


RestoreIT®
Server Edition
Version 7
User’s Guide

Copyright Notice
Copyright© 2005 FarStone Technology, Inc.
All Rights Reserved.
No part of this publication may be copied, transmitted,
stored in a retrieval system, or translated into any
language in any form or by any means without the
expressed written permission of FarStone Technology, Inc.
FarStone grants you the right to use one copy of the
enclosed software program ("SOFTWARE") on a single
computer. If the SOFTWARE is installed on a network, or
more than one user can run the SOFTWARE at the same
time, you must purchase an additional license for each
additional user or computer.
Trademarks
• RestoreIT Server® and RestoreIT Server® Server are
registered trademarks of FarStone Technology, Inc.
• Microsoft®, Windows® and MS-DOS® are registered
trademarks of Microsoft Corporation.
• Pentium is a registered trademark of Intel Corporation.
• Other product names mentioned in this manual may be
trademarks or registered trademarks of their respective
companies and are hereby acknowledged.
Printed in the United States of America.
FarStone Technology, Inc.
Corporate and North American Headquarters
15 Hammond Dr., Suite 304
Irvine, CA 92618
Phone: (949) 458-3666
- 2 -

Fax: (949) 458-3633
Asia-Pacific Offices
10F-1B, No. 207, DunHua North Rd., Taipei, 105, Taiwan
Phone: 886-2-2546-9898
Fax: 886-2-2546-3838
Technical Support:
For technical support, please contact us at:
http://www.farstone.com/home/ensite/support/support.shtml
Or use our online support system and FAQ at
www.farstone.com
Copyright © 2000-2005, FarStone Technology, Inc. All rights
reserved.
.
- 3 -

Contents
CHAPTER 1 INTRODUCTION..................................................- 7 -
1-1 INTRODUCTION TO RESTOREIT SERVER ...................................- 7 -
1-2 FEATURES.....................................................................................- 7 -
CHAPTER 2 INSTALLATION.................................................. - 11 -
2-1 SYSTEM REQUIREMENTS ...........................................................- 11 -
2-2 PRE-INSTALLATION CHECK.......................................................- 11 -
2-3 INSTALLING RESTOREIT SERVER.............................................- 12 -
2-4 MULTIBOOTING WINDOWS.......................................................- 16 -
CHAPTER 3 RESTOREIT SERVER........................................ - 18 -
MANAGER IN WINDOWS........................................................ - 18 -
3-1 LAUNCHING RESTOREIT SERVER IN WINDOWS .....................- 18 -
3-2 USING RESTOREIT SERVER QUICK START .............................- 19 -
3-2.1 Quick Backup...............................................................- 20 -
3-2.2 Quick Restore..............................................................- 21 -
3-2.3 File-level Restore....................................................... - 21 -
3-3 SYSTEM RESTORE......................................................................- 23 -
3-3.1 Restoring to an Incremental Backup Point.......- 23 -
3-3.2 Restoring from a Complete Backup Point......... - 24 -
3-4 SYSTEM BACKUP........................................................................- 25 -
3-4.2 Creating an Incremental Backup Point.............. - 25 -
3-4.2 Creating a Complete Backup Point...................... - 27 -
3-5 MANAGING BACKUP POINTS.....................................................- 28 -
3-5.1 Introduction to Various Backup Points...............- 29 -
3-5.2 Viewing Backup Point Properties.......................... - 30 -
3-5.3 Deleting a Backup Point.......................................... - 31 -
3-5.4 Locking and Unlocking a Complete Backup Point.-
32 -
3-5.5 Renaming a Backup Point.......................................- 33 -
3-5.6 Exporting an Internal Complete Backup Point as

an External Backup Point....................................................- 33 -
3-6 FILE-LEVEL BACKUP AND RESTORE..........................................- 34 -
3-6.1 How to Restore a Specific File............................... - 34 -
3-6.2 How to back up Specific Files or Folders...........- 34 -
3-7 ADVANCED FUNCTIONS OF RESTOREIT SERVER .................... - 35 -
3-7.2 Creating and Using a Rescue Disc....................... - 35 -
Functions of RestoreIT Rescue Disc .......................................- 36 -
Creating a RestoreIT Rescue Disc...........................................- 36 -
How to Use Your RestoreIT Rescue Disc...............................- 37 -
3-8 RESTOREIT SERVER SETTINGS................................................- 38 -
General Settings ............................................................................- 38 -
RestoreIT Server Scheduler ......................................................- 40 -
File Backup Settings.....................................................................- 44 -
3-9 UPDATING YOUR PRODUCT.......................................................- 47 -
3-10 GETTING ASSISTANCE.............................................................- 47 -
3-11 EXITING THE RESTOREIT SERVER MANAGER.......................- 48 -
CHAPTER 4 RESTOREIT SERVER MANAGER IN PRE-OS
MODE ..................................................................................................- 50 -
4-1 LAUNCHING THE RESTOREIT SERVER PRE-OS MANAGER ....- 50 -
4-2 QUICKLY RESTORE YOUR SYSTEM IN PRE-OS MODE ............- 50 -
4-3 RESTOREIT SERVER MANAGER IN PRE-OS MODE ................- 51 -
Incremental Backup Points................................................. - 51 -
Complete Backup Points...................................................... - 53 -
RestoreIT Server Settings .................................................. - 53 -
Uninstalling RestoreIT Server............................................- 55 -
Exiting RestoreIT Server..................................................... - 55 -
CHAPTER 5 REMOVING RESTOREIT SERVER..............- 57 -
5-1 REMOVING RESTOREIT SERVER ..............................................- 57 -
CHAPTER 6 FAQ ............................................................................ - 60 -
CHAPTER 7 SOFTWARE LICENSE AGREEMENT...........- 81 -
- 5 -

Chapter 1
Introduction

Chapter 1
Introduction
Instantly recover from system crashes, virus attacks or
accidental data deletion.
1-1 Introduction to RestoreIT Server
RestoreIT Server is an innovative real-time system
restoration utility. Once installed, RestoreIT Server
continually monitors and keeps a complete record of all
activities on the hard drive. RestoreIT Server lets you
recover lost data after a system crash, virus attack, faulty
software installation, accidental file deletion or
unintentional formatting of the hard drive. In merely a
few minutes, if not seconds, all of the contents of your
hard drive can be restored back to a point in time when
your computer was functioning properly. RestoreIT Server
is different from general-purpose backup software.
RestoreIT Server uses a unique real-time incremental
backup technology, taking up only 5 to 10 percent of the
hard drive space. RestoreIT Server can be set to
automatically back up your computer hourly, daily, or at
each system startup.
1-2 Features
• File-level Restore
RestoreIT Server allows you to back up and restore
previous versions of a specific file after it has been

deleted, changed or overwritten, without having to
restore the entire system to an earlier period of time.
• 100% protection
RestoreIT Server allows you to instantly recover from
accidental disk formatting, file deletion, virus attacks or
system crash. RestoreIT Server offers complete system
protection, 24 hours a day, 365 days a year.
• Kills Viruses, Rescues Files
Feel free to download files and open e-mail attachments
without having to worry about virus attacks. Infected or
damaged files can be rescued in seconds.
• Only a Fraction of Disk Space Used
RestoreIT Server uses a unique real-time incremental
backup technology, taking up only 5 to 10 percent of the
hard drive space.
• Password Protection
Using RestoreIT Server, you can lock your system at the
DOS level. No unauthorized person can use your
computer.
• Personalized and Secure Complete Backup Point
RestoreIT Server allows you to name a Backup Point and
lock it to prevent accidental removal.
• Complete Backup Point
RestoreIT Server stores a permanent copy of your hard
drive, so even after years of use, you can restore your
system back to the day you first installed RestoreIT
Server.
- 8 -

• Easy to Use
A clear and friendly Graphical User Interface (GUI)
makes RestoreIT Server easy to use. Even a novice can
easily restore a computer back to working order without
having to call technical support.
• Intelligent Data Integrity Checking
RestoreIT Server checks the integrity of the data in the
latest Incremental Backup Point and marks it as
mbiguous” if any inconsistencies are found.
“a
• Unlimited Backup Points
RestoreIT Server can set up numerous Incremental
Backup Points, limited only by the hard drive space
available.
- 9 -

Chapter 2
Installation
- 10 -

Chapter 2
Installation
2-1 System Requirements
To use RestoreIT Server, your computer must have one of
the following Windows operating systems:
Windows 2000 Professional Workstation with
Service Pack 4 or higher
Windows XP Professional
Windows XP Home Edition
Windows XP Media Center Edition
Windows 2000 Server
Windows 2000 Advanced Server
Windows 2000 Data Center
Windows Small Business Server 2003
Windows Server 2003
Windows Server 2003 Data Center
Windows Server 2003 Web Edition
Your computer must also meet the following minimum
system requirements.
Intel Pentium processor at 133 MHz
256 MB of RAM
20 MB for the program and 5 to 10% of the total
hard drive space (at least 400 MB) for backup
activities
Internet Explorer 4 or higher
CD/DVD recorder (optional)
2-2 Pre-Installation Check

Before installing RestoreIT Server, please do the following:
1.Disable any antivirus programs during the installation,
including protection at the BIOS level.
2.Close all other applications before installing.
3.Have the RestoreIT Server serial number handy (located
in the software package).
4. Log on with the administrator or an authorized user
account.
5. For optimal performance you should also do the
following:
Uninstall any previous version of RestoreIT Server, if
it is installed.
Uninstall Norton SystemWorks or Norton Utilities if
either is installed. You can reinstall this software after
RestoreIT Server has been installed successfully.
Uninstall other data backup/protection software, such
as Goback, Recovery Genius, TrueImage, Acronis Disk
Editor, PC Angel, etc.
Run Windows Checkdisk to check for hard drive
errors and ensure disk integrity.
Run Windows Disk Defragmenter to combine the free
space on your hard drive and repair fragmented files.
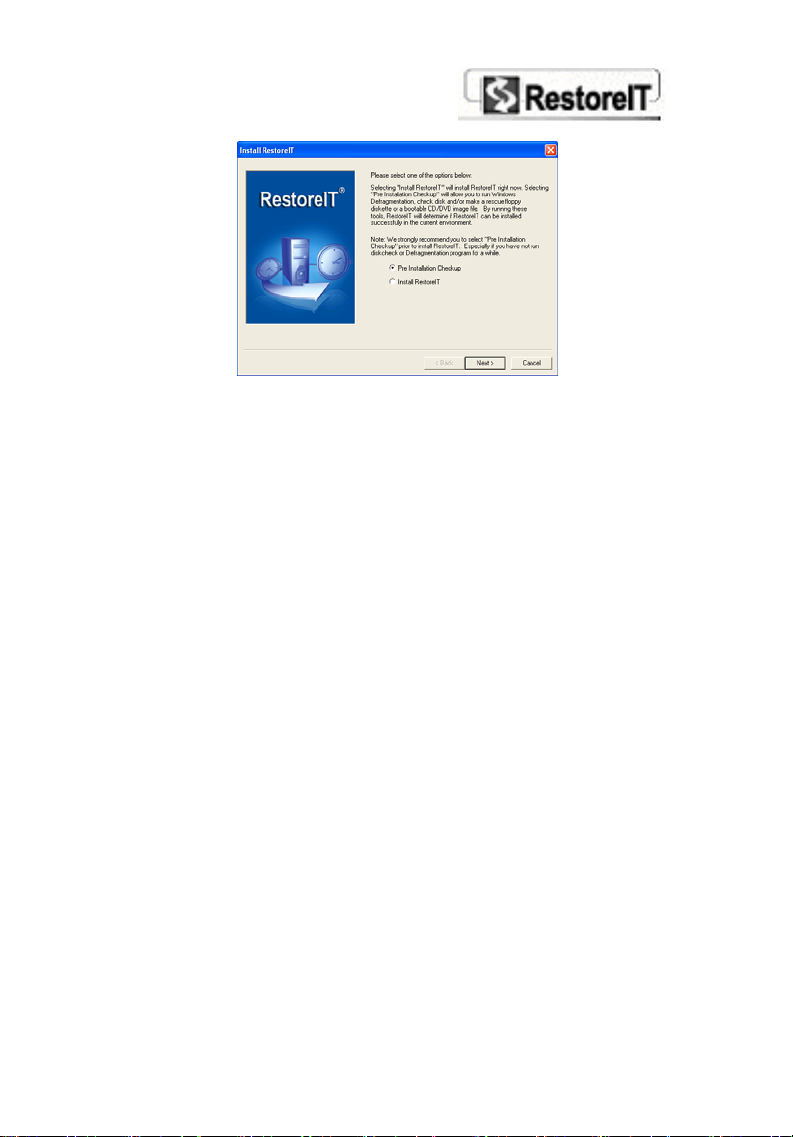
2-3 Installing RestoreIT Server
1. Insert the RestoreIT Server CD-ROM disc. The Setup
program should start automatically. If it does not, run
the SETUP.EXE file directly from the CD.
2. Select Pre Installation Checkup and click Next. If
you have performed the Pre Installation Checkup
manually, please select Install RestoreIT Server and
skip to step 6.
3. Click on any of the following options to ensure a
successful RestoreIT Server installation of RestoreIT
Server:
Check all volumes for errors
Runs the Windows Check Disk command to check
for errors on all partitions of your hard drive
(requires system restart).
Defragment files on the volumes
Launches Windows Disk Defragmenter, to
defragment files and folders on your local volumes
and increase system performance. This also will
help ensure RestoreIT Server is installed
successfully.
Create a rescue disc
In cases where RestoreIT Server cannot start
properly, you can use a RestoreIT Rescue Disc to
boot and restore your system.
Create a rescue CD/DVD image file
In cases where RestoreIT Server cannot start
properly, you can use a rescue CD/DVD to boot
and restore the system. This function will create
an image of a rescue CD/DVD and store it on your
hard drive. You can use any burning software to
make this image into a rescue bootable CD/DVD.

Note: Some operations may require you to restart
your computer. After restarting, you will need to
launch the RestoreIT Server Setup program.
4. Click Next to continue. RestoreIT Server will check
your hard drive structure and generate a report to you
regarding the availability of your system.
5. Click OK to continue the installation.
6. When the RestoreIT Server install screen appears,
select Continue to go to the next step.
7. When the License Agreement screen appears, select I
Accept to continue.
8. Enter your serial number. Select Continue to proceed.
Note: If you do not enter a serial number, RestoreIT
Server will install a trial version that has limitations on
time and functions on your computer.
9. Select an install type, Typical Install (Recommend)
or Customized Install., and then select Continue to
start installation.
Note: Typical Install will apply default settings in the
following steps to install RestoreIT Server on your
computer. We recommend that normal users choose
Typical Install. Customized Install allows manual
settings and is for advanced users.
RestoreIT Server will be installed in the path displayed.
You can choose anther location to install RestoreIT
Server, or leave it as default.
10. Click Continue and RestoreIT Server will be
automatically installed to the destination folder.
Note: Typical Install will skip the next step.
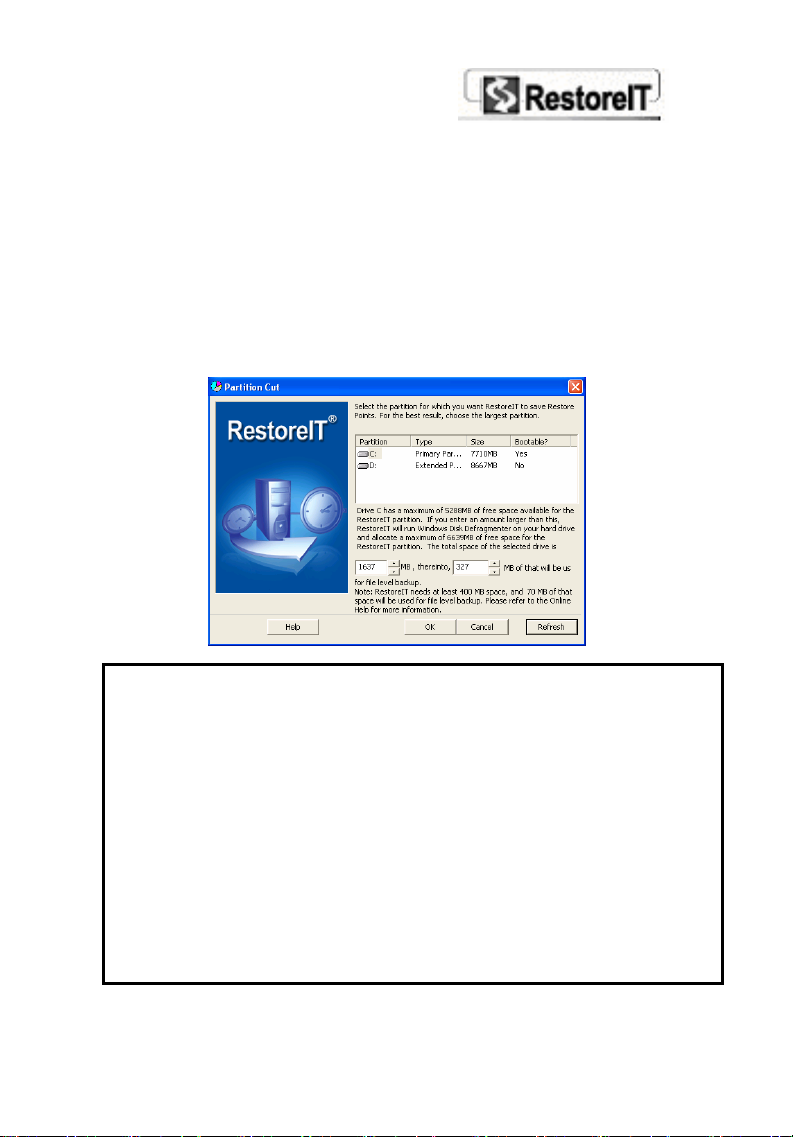
11. Select the partition where RestoreIT Server can create
an internal RestoreIT Server Partition to save the
backup data. For the best results, choose the extended
partition. The installation program will check the
partition size to determine if there is enough space,
and give a recommended size for the RestoreIT Server
Partition (at least 400 MB is required). You can also
manually assign the size for both the RestoreIT Server
partition and the file backup space.
Note:
1. The internal RestoreIT Server Partition is used to
store the Pre-OS Mode program, Incremental Backup
Points, Complete Backup Points and File Backup
Records. Except for the Complete Backup Point, the total
space needed by the other files is at least 400 MB.
2. The RestoreIT Server Partition can only be created on
your primary/bootable hard drive, if multiple hard drives
are present. The RestoreIT Server Partition cannot be
resized after it is created. For better performance, we
recommend that you allocate 10% of your total hard drive
space for the RestoreIT Server Partition. If a Complete
Backup Point is to be stored in the RestoreIT Server

Partition, you must add the space needed for the Complete
Backup Point when assigning the RestoreIT Server
Partition size.
12. Click OK and you will be prompted to restart your
computer. Please eject the RestoreIT Rescue Disc and
select Restart to complete the installation. RestoreIT
Server will reboot the computer and initialize your
initial Backup Point. After the system restarts,
RestoreIT Server will begin an initialization procedure.
Note: If the installation program detects multiple
installations of Windows, you will receive a message
stating RestoreIT Server has detected multiple
Operating Systems. To ensure full protection, please
install RestoreIT Server on each installed Operating
System. For further assistance, please contact
FarStone technical support.
2-4 Multibooting Windows
RestoreIT Server supports multibooting for
Windows2000/XP.
To ensure full protection for your computer, we
recommend that you install RestoreIT Server on each
installed Operating System. The installation process is the
same as described in 2-8. The only difference is in step 9.
The installation program will prompt A previous
RestoreIT Server exists. Should I use it? Click Yes to
continue installation. Clicfk No to cancel the installation
process.
Note: RestoreIT Server does not support System
Commander.

Chapter 3
The RestoreIT
Server
Manager
in Windows
Chapter 3
RestoreIT Server
Manager in
Windows
3-1 Launching RestoreIT Server in Windows
To launch RestoreIT Server in Windows, Select Start on the
Windows taskbar, then All ProgramsÆ RestoreIT
ServerÆ RestoreIT Server. You can also double-click
the RestoreIT Server icon
click the RestoreIT Server icon in the system tray by your
clock.
The figure below shows the RestoreIT Server main interface
within Windows.
on the desktop or double-
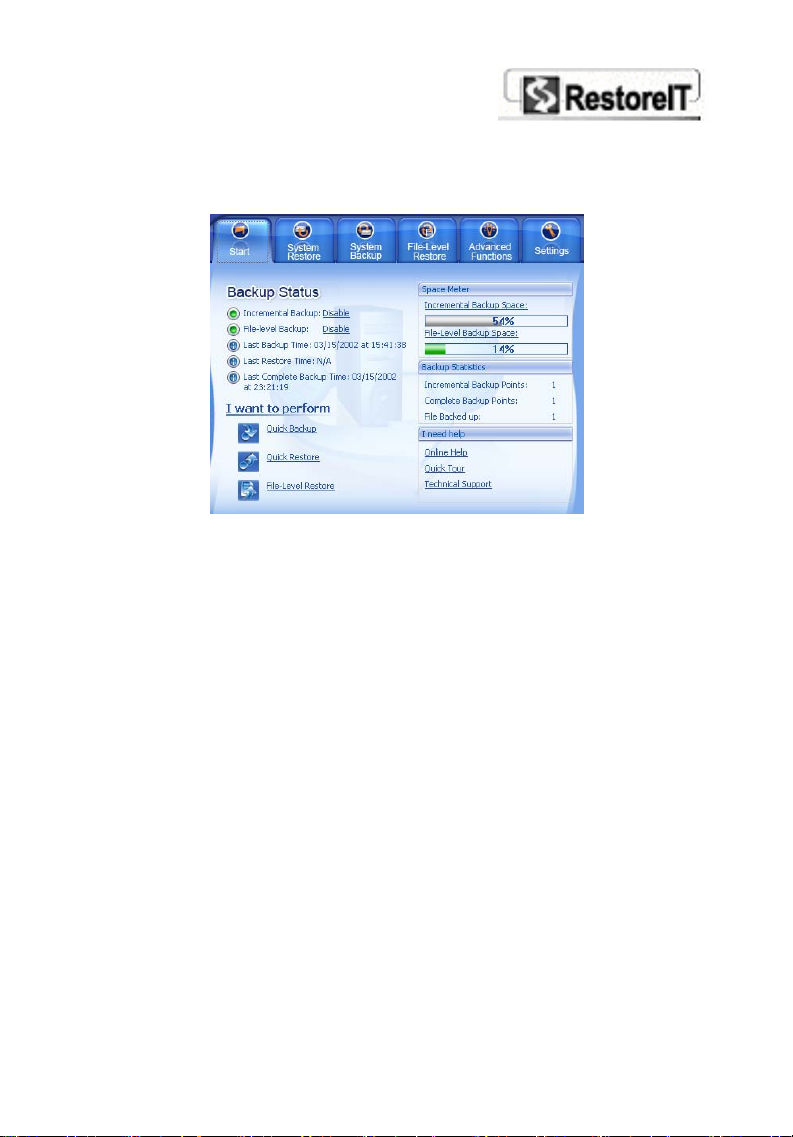
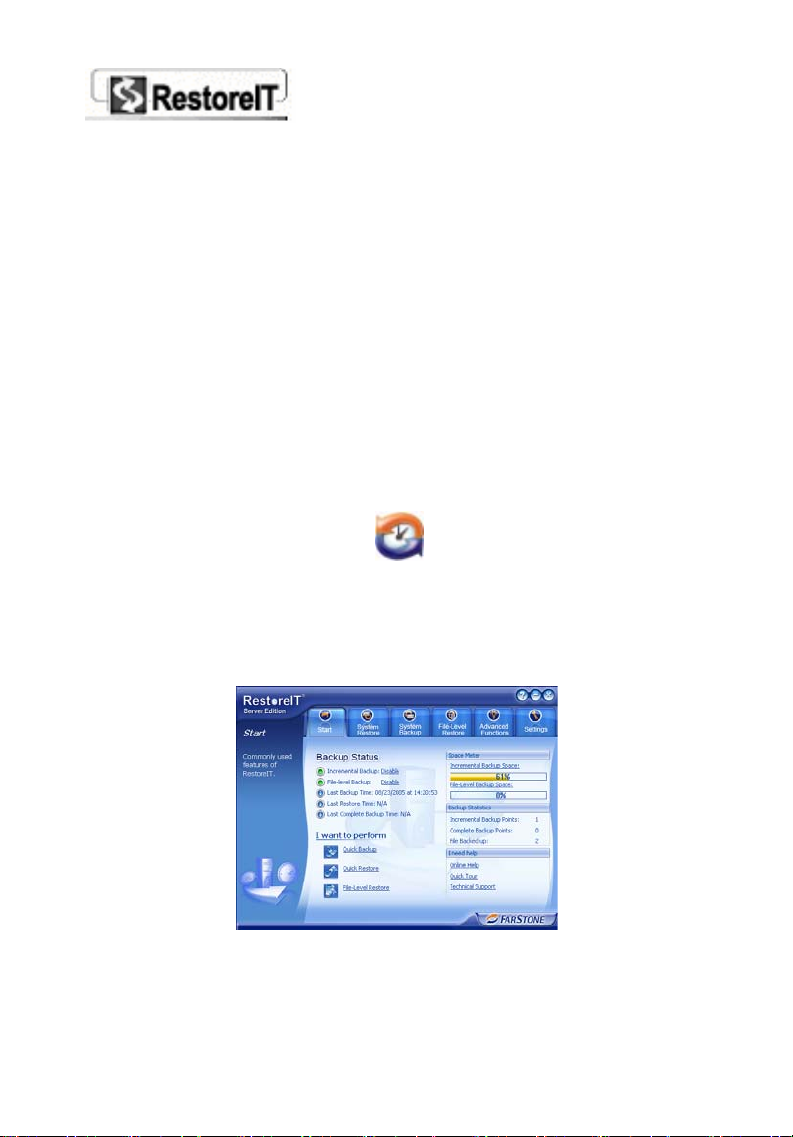
3-2 RestoreIT Server Start
After launching the program, you will see the RestoreIT
Server Quick Start page.
From the Backup Status, you can see if the Incremental
Bakcup and File-Level Backup are enabled and quickly
change their status. Click the enable/disable link to change
their status. You can also view the time when you create
the latest backup point and/or perform a restoration.
From the Space Meter, you can view space usage of the
RestoreIT Server partition.
From the Backup Statistics, you can view the number of
Incremental Backup Points, Complete Backup Points and
File-Level backups.
If you have any questions on using RestoreIT Pro, you can
view User Guide or an online flash demo (Online Demo)
from the I Need Help section. Or you can contact our
technician by clicking Online Support.
From the I want to perform … section, RestoreIT Server
allows you to use some frequently used functions like Quick
Backup, Quick Restore and File-Level Restore.
3-2.1 Performing a Quick Task
From the I want to perform … section, pick a quick task
to perform. The following chapters are detailed descriptions
on how to perform quick takes.
Quick Back
The Quick Backup option is used for creating a new
Incremental Backup Point
Backup Point, please refer to section 3-5.1 Introduction to
Various Backup Points) to back up your hard drive and
protect your data.
To perform a Quick Backup
1. Select the Quick Start page and click the Quick
Backup button in I want to perform … section
to create a new Incremental Backup Point.
RestoreIT Server will lock the hard drive during this
process. If any program is currently writing to or
reading from the hard drive, RestoreIT Server will stop
creating the Quick Backup Point. If your computer
locks up during this time, restart it manually and try
again.
Note: RestoreIT Server does not create new Backup
Points if it is unable to lock your hard drive.
Close ALL applications when you create a new
Backup Point.
2. Select Finish when the Incremental Backup Point has
been successfully created.
(for a definition of Incremental
Quick Restore
Choosing this option, you can quickly restore your
computer to the state it was in when the most recent
Incremental Backup Point was created.
To perform a Quick Restore
1. Select the Quick Start page and click the Quick
Restore button
The restoration dialog box will appear and ask you to
choose whether to restore Only C Drive or the Entire
hard drive.
2. Click Next after you have made your selection.
RestoreIT Server will restart your computer and your
hard drive will revert back to the most recent Backup
Point.
3. When the system has restarted, the restoration
process will start.
in I want to perform… section.
File-level Restore
This function allows you to quickly retrieve previous
versions of deleted, changed or overwritten files, without
doing an entire restore operation.

To restore a specific file
1. Select the Start page and click the File-level Restore
button
in I want to perform… section.
2. The File Restore window will open with three main
display areas. In the left pane, you can expand file
folders to locate which file you want to retrieve. The
top right pane displays available files located in the
selected directory. Click a file to see all backed up
versions; this is displayed in the bottom right pane.
Here you can select a version and click Restore, or
click Open to preview the file.
Note: RestoreIT Server will automatically create
a Backup for a specified file each time the file is
modified, deleted or overwritten. By default, all
files in the My Documents folder, and all files
with *.doc *.txt *.cpp *.ppt *.xls *.pdf
*.rtf extensions are backed up automatically.
To specify which file or folder to back up, go to
User Settings Æ File Backup Æ Files and
Folders, or use the File-level Backup Wizard
on the Backup page, to add a file or folder to the
list.
3-3 System Restore
3-3.1 Restoring to an Incremental Backup Point
Incremental Backup Point
create unlimited backups of your system. Incremental
Backup Points are stored in the RestoreIT Server partition
and you can easily roll back your system to any previous
state by restoring to an Incremental Backup Point.
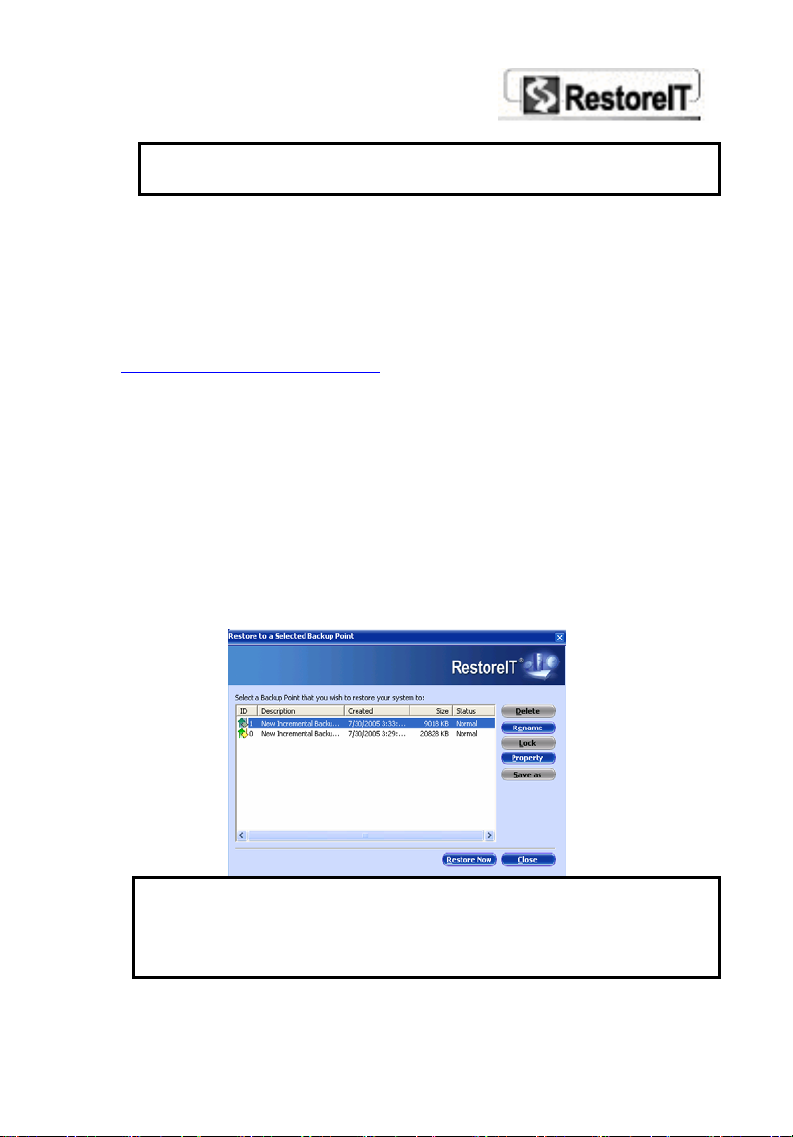
To restore an Incremental Backup Point
1. Select System Restore on the main interface, and
then Restore to any previous Backup Point.
2. Choose the Incremental Backup Point that you would
like to restore and click Restore Now.
s are small in size and you can
Note:
If you choose to restore the most recent Incremental
Backup Point, this is equal to performing a Quick
Restore.

To perform a Quick Restore you can also do any of the
flowing:
• Select Quick Start and then Quick Restore.
• Select System Restore and then Quick Restore
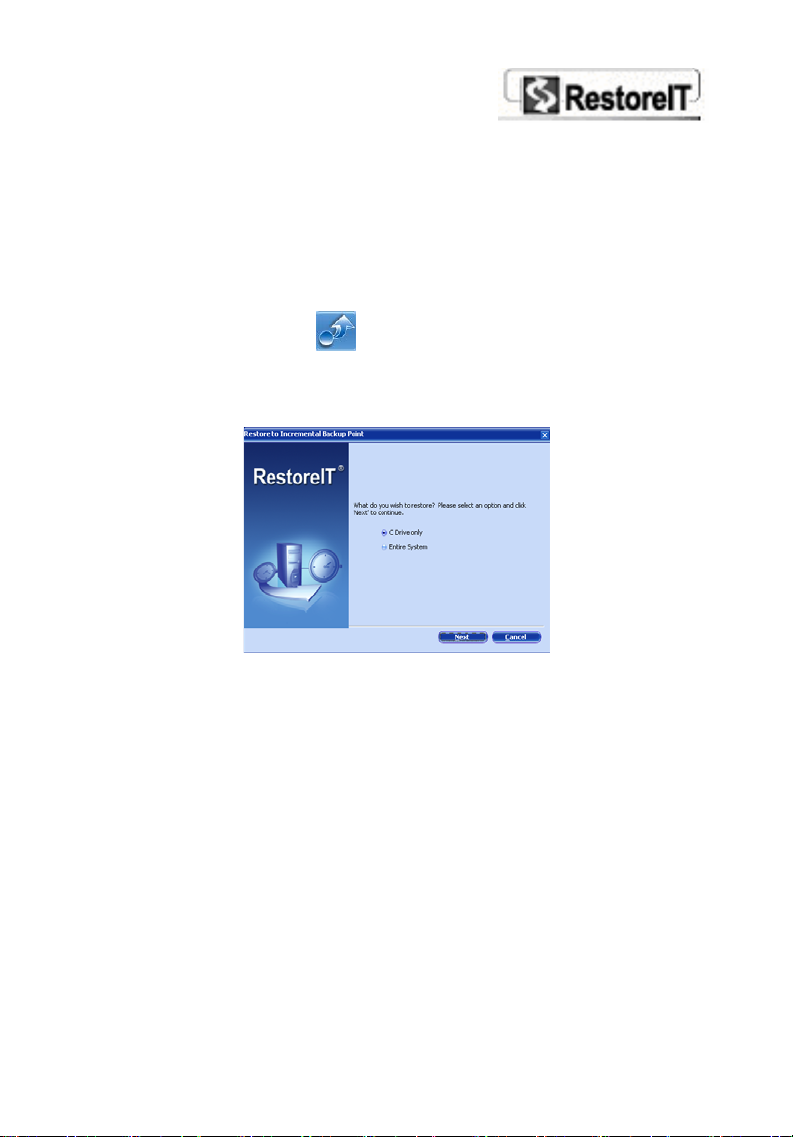
3. Choose to restore the Entire hard drive or Only C:
drive and then press Next. A dialog box will appear to
show information on the selected Backup Point. Select
Next after you have made sure this is the correct
Backup Point to be restored. RestoreIT Server will
restart your computer and your hard drive will revert
back to the selected Backup Point.
4. After the system has restarted, the restoration process
will start.
Note: 1. Choosing to execute an Incremental Backup
Point will clear all existing Incremental Backup
Points that were created after that point.
2. After restoring Only C: drive, all existing
Incremental Backup Points that were created
before that point, can only be used to restore the
primary drive.
3. RestoreIT Server does not recommend
restoring an Ambiguous Backup Point. It will
warn users twice during the restoring process.
3-3.2 Restoring from a Complete Backup Point
A Complete Backup Point
is a full backup of all data on the
selected drive. Restoring a complete backup will roll your
entire system back to the state when the backup point is
created, and all data on your system will be restored as
well.

To restore your system from a Complete Backup
Point
1. Select System Restore from the main interface and
then Restore to a Complete Backup Point. Detailed
information of all the Complete Backup Points are
listed in the window below. This list helps you
recognize the backup point you want to restore from
and find the path when you create it. Click Restart to
restart your computer and enter RestoreIT Server PreOS Mode.
2. In Pre-OS Mode, select the image file of the Complete
Backup Point to be restored. You can either select an
Internal Complete Backup Point from the RestoreIT
Server partition, an External Complete Backup
Point from a valid path (Select the first image if there
are several image files for one Backup Point.)
3. Click Next. Select the source partition if you would like
to restore only a partition in the Complete Backup
Point. (a Complete Backup Point may contain the data
of more than one partition);
4. Select the destination hard drive and the destination
partition, and then click Next. To restore a single
partition, select only the partition you would like to
restore.
5. After reviewing your selections, click Next to confirm
your settings and reboot the computer.
6. When the computer restarts, the restoration process
will start.
3-4 System Backup
3-4.2 Creating an Incremental Backup Point
With RestoreIT Server, you can create an Incremental
Backup Point at any time. All Incremental Backup Points
reside in the protected, hidden RestoreIT Server partition
and the number of Incremental Backup Points is limited
only by the space of the RestoreIT Server partition.
To create a New Incremental Backup Point
1. Either of the following methods will launch the Create
a New Backup Point window
• Select the Quick Start page and then Quick
Backup;
• Select the System Backup page and then
Incremental Backup;
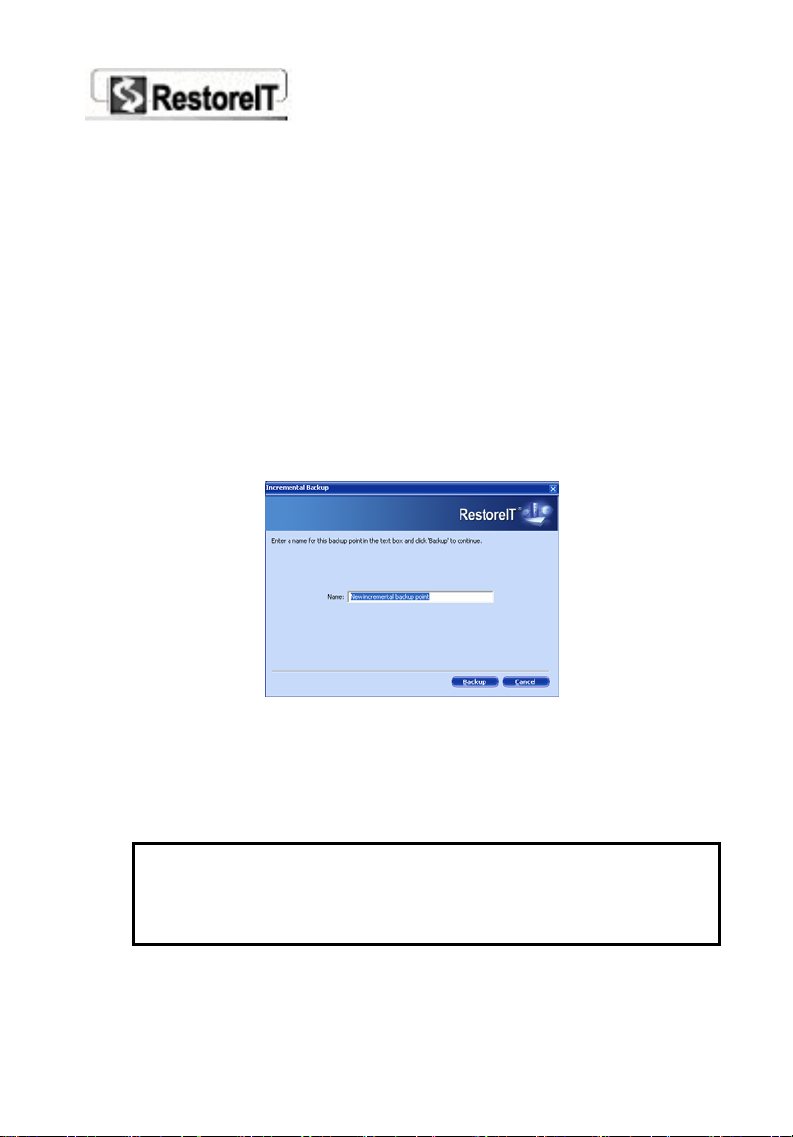
2. Enter a name for the Backup point. You can choose to
leave the default name. Click Next to start creating
the Incremental Backup Point.
3. RestoreIT Server will lock the hard drive. If any
program is currently accessing the hard drive,
RestoreIT Server will stop creating the Backup Point. If
your computer locks up during this period, restart the
system manually and try again.
Note: RestoreIT Server does not create new Backup
Points if it is unable to lock your hard drive.
Close ALL applications when you create a new
Backup Point.

4. Select Finish when the Incremental Backup Point has
been successfully created.
3-4.2 Creating a Complete Backup Point
A Complete Backup Point is a full backup of all data on the
selected drive(s). You can choose to create a Complete
Backup Point in the RestoreIT Server partition (Internal
Complete Backup Point) or to create the Complete Backup
Point in other places, such as on the local disk, on a
network place, to a movable storage media like a USB disk
or burn it directly to a CD/DVD (External Complete Backup
Point). Both Internal Complete Backup Points and
External Complete Backup Points are created in the
RestoreIT Server Pre-OS Mode.
To create a Complete Backup Point
1. Select System Backup from the menu interface, and
then Complete Backup.
2. A screen will appear to prompt you to restart your
computer and create the Complete Backup Point in
Pre-OS Mode. Close any open programs or files and
click OK to restart computer and continue creating the
backup point.
3. In Pre-OS Mode, select the Source hard drive in the
upper pane, and then select the Source Partition(s)
you want to back up in the lower pane. Click Next to
continue.
Note: Normally, there is only one hard drive installed
on a computer and you can skip to selecting the
partition(s).
4. Select a location and enter the name of the image file
and any comments. Click Next to continue.

Here you can choose to store the backup file in the
RestoreIT Server partition as an Internal Complete
Backup Point or, you can save it as an External
Complete Backup Point which is stored outside of
the RestoreIT Server partition and stored on the hard
drive, a network place, a removable storage media,
such as USB hard drive or a CD/DVD.
Note: If the Backup Points are stored on several discs,
use the first disc to start the restoration process. You
will be prompted to insert the next disc when it is
needed.
5. After reviewing your selections, click Next to confirm
your settings and begin backing up the selected
partition(s) to a Complete Backup Point.
Note: RestoreIT Server will divide the Complete
Backup Point into several volumes and let you save
these images in different locations if:
1. The selected target location does not have enough
space to contain the image; or
2. The size of the Complete Backup Point is more than
2 GB. (If backing up to a NTFS partition, you do not
have this limitation.) or
3. You are saving the image to a network share.
6. After the Complete Backup Point is successfully
created, click OK to restart your computer.
3-5 Managing Backup Points
With multiple backup points created and stored on your
system, RestoreIT Server allows you to view properties,
delete, rename and lock/unlock your restore points. You

can also export a Complete Backup Point from the
RestoreIT Server partition.
3-5.1 Introduction to Various Backup Points
To provide a complete protection of your system, and a
flexible way to restore your data, RestoreIT Server offers
three different types of backup points – Incremental
Backup Point, Internal and External Complete Backup
Points.
1.Incremental Backup Point is an image file created
with our incremental backup technology. It is small in
size and unlimited in number. It is stored in the
hidden protected RestoreIT Server partition. (The
number of Incremental Backup Points is limited only
by the amount of available hard drive space.)

Backup Point as an Ambiguous Incremental
Backup Point. Inconsistencies can occur if data
is changed while RestoreIT Server is not
monitoring the hard drive drive. We do not
recommend restoring from an Ambiguous
Incremental Backup Point.
2.Internal Complete Backup Point is an image file
created by performing a complete backup of all data
on the selected drives or the whole hard drive. The
Internal Complete Backup Point is stored in the hidden
RestoreIT Server partition and can be exported out of
the partition as an External Complete Backup Point at
any time. (Only one Internal Complete Backup Point
can reside in the RestoreIT Server partition at a time.)
External Complete Backup Point is also an image file
created by performing a complete backup. It is the same as
an Internal Complete Backup Point. The difference is that an
External Complete Backup Point can be saved any place
outside of the RestoreIT Server partition, on the local hard
drive, a network location, a removable storage media such as
USB hard drive or burn it directly to a CD/DVD.
3-5.2 Viewing Backup Point Properties
This section shows the information and settings of a
Backup Point. This will help you recognize and manage
your Backup Points.
To view a Backup Point’s properties
1. Select System Restore from the main interface and
then Restore to any previous Backup Point.

2. Single-click a backup point to highlight the selected
item and then click Property from the buttons on
the right, to launch the Backup Point Property dialog
box. (shown below)
3-5.3 Deleting a Backup Point
To Delete an Ambiguous or Complete Backup Point
1. Select System Restore from the main interface and
then click Restore to any previous Backup Point.
2. Highlight the desired Backup Point(s) and select
Delete.
Note: 1. Only ambiguous Incremental Backup
Points and Complete Backup Points that are

stored inside the RestoreIT Server partition can
be deleted.
2. If you choose to delete a Complete Backup
Point that has been locked, RestoreIT Server will
prompt the message, “Please unlock it first and
then delete it.”
3. After you click OK, another dialog box will launch to
warn you that preceding Backup Points will be cleared.
Click Yes to continue.
4. Another confirmation dialog box will launch to list all
the Backup Points to be deleted. Click Next to
continue.
Note: 1. Choosing to delete an Ambiguous
Incremental Backup Point will clear all
Incremental Backup Points created before that
one.
2. Choosing to delete a Complete Backup Point
will clear all Backup Points in the RestoreIT
Server partition. Please make sure it is your
intention to delete these items before taking this
action!
5. Select Next to restart the PC and finish the operation.
3-5.4 Locking and Unlocking a Complete Backup Point
Only the Internal Complete Backup Point can be locked
and unlocked. The Incremental Backup Points and
External Complete Backup Points do not have this function.
The default setting of the Complete Backup Point is locked.

To unlock a Complete Backup Point
1. Select System Restore from the main interface and
then Restore to any previous Backup Point.
2. Highlight the Complete Backup Point from the Backup
Point list and click the Unlock Button, located on the
right side of the window.
After you unlock the Complete Backup Point, repeat the
process to lock it again. This will protect the Backup Point
from being deleted.
3-5.5 Renaming a Backup Point
After you have created an Incremental Backup Point, you
can modify its name so that you can easily recognize the
backup point for future use.
To rename a Backup Point
1. Select System Restore from the main interface and
then Restore to any previous Backup Point.
2. Highlight the Backup Point and click the Rename
button, located on the right side of the window. Enter
the new name (Up to 255 characters) and click OK to
finish.
3-5.6 Exporting an Internal Complete Backup Point as
an External Backup Point
The RestoreIT Server partition can store only one
Complete Backup Point at a time. But RestoreIT Server
allows you to export the Internal Complete Backup Point
and save the backup point as an External Complete
Backup Point
To export an Internal Complete Backup Point

1. Select System Restore from the main interface and
then click Restore to any previous Backup Point.
2. Highlight a Complete Backup Point and click the Save
as button on the right side of the window.
3. Select the path to store the Complete Backup file and
click OK.
3-6 File-level Backup and Restore
3-6.1 How to Restore a Specific File
This function allows you to retrieve previous versions of a
specific file after it was deleted, changed or overwritten,
without doing an entire restore operation.
To restore a specific file
1. Select the File-level Restore page and then File-
level Restore.
2. The File Restore window will open. Please refer back to
Chapter 3.2.3 File-level Restore
instructions on how to operate in this window.
Note: You can also right-click a specific file in Window
Explorer and select File-Level Recovery to open the
File Restore window.
for detailed
3-6.2 How to back up Specific Files or Folders
The File-level Backup Wizard guides you through setting
up the file level backup protection.
To add files or folders to File-level Backup using the
Wizard

1. Select the File-Level Restore page and then click
File-Level Backup Wizard.
2. The File-Level Backup Wizard will launch. Select Add a
file or Add a folder and click Next.
3. Follow the on-screen instructions to add files or folders.
Click Finish to exit the wizard.
Note: You can also specify files or folders to protect in
the File-level Backup by selecting the User Settings
page from the main interface, From this page click
Settings and the Settings window will open. Click File
Backup from the menu on the left and then click the
Add Files button on the right side of the window. The
File-level Backup window will open, click the Add button
on the right side of this window and proceed to select
the files to be backed up. Please refer to Chapter 3-8.3
File-level Backup Settings for related instructions.
3-7 Advanced Functions of RestoreIT Server
The Advanced Functions page of the RestoreIT Server
main interface allows you to create a Rescue Disc which is
useful in case your system crashes and RestoreIT Server
cannot start properly.
3-7.2 Creating and Using a Rescue Disc

A rescue disc is a bootable disc that can be used to boot
and restore your system in cases where RestoreIT Server
cannot start properly. The RestoreIT Rescue Disc
(VBTOOLS.EXE) runs in Pre-OS Mode and is able to boot a
computer when the system crashes. We strongly
recommend that you make a Rescue Disc during the
RestoreIT Server installation process.
Functions of RestoreIT Rescue Disc
• Creates a backup of the hard drive MBR (Master Boot
Record), DPT (Disk Partition Table), EPT (extended
partition table) prior to the RestoreIT Server
installation.
• Recover a MBR
• To cancel creating (or restoring) an
Incremental/Complete Backup Point.
• Remove RestoreIT Server.
• Collect necessary information for technical support
Creating a RestoreIT Rescue Disc
Note: RestoreIT Server only creates a disc image and
you need to use Nero (or other burning software) to
burn the image to a CD/DVD disc. The burned disc is a
RestoreIT Rescue Disc.
To create a Rescue Disc
1. Select Advanced Functions from the RestoreIT
Server main interface, and then click Rescue Disc.
2. Click Browse to select a location to save the disc
image file.
3. Click Create and a disc image file with the extension
of “.ima” will be created in the selected path.

4. Launch a 3
rd
party burning utility such as Nero to
create a bootable rescue disc for the image.
How to Use Your RestoreIT Rescue Disc
Insert the RestoreIT Rescue Disc into the CD/DVD drive
and reboot your PC, the RestoreIT Server Disk Tools will
automatically run. There are four selections you can
choose, which may be selected by using the
Arrow/Down or Tab keys. Use the Enter key to confirm
your selection.
1. Back up the MBR (Master Boot Record), DPT (Disk
Partition Table) and EPT (Extended Partition Table)
to file:
Click here to copy the current hard drive MBR (Master
Boot Record) as a local backup file.
2. Restore the MBR, DPT and EPT from file:
Click here to replace the current hard drive MBR with a
previous created MBR.
3. Cancel creating or restoring a Backup Point:
In case you ever need to cancel the restoration or the
creation process, click here to abort the operation.
4. Uninstall RestoreIT Server
Click here to uninstall RestoreIT Server

5. Collect information for technical support
If a problem occurs (e.g. you cannot start your system)
while using RestoreIT Server, you can collect necessary
disk information using the RestoreIT Rescue Disc, which
can help FarStone technicians resolve the issue quickly
3-8 RestoreIT Server Settings
RestoreIT Server settings allow you to modify general
settings, backup/restore schedules and file level backup
settings.
To modify RestoreIT Server settings
Select User Settings from the main interface and then
click Settings on this page. The settings dialog box will be
displayed (as shown below).
There are three major categories in this dialog box,
General, Scheduler and File Backup.
General Settings

The General tab in the Settings screen provides an
overview of the RestoreIT Server partition and some
general settings of the program.
• Disable Incremental Backup
Check this box to stop creating any new Incremental
Backup Points. This function will override the settings
in the backup scheduler.
The pie table provides you with statistics on the used
and available space for the RestoreIT Server partition.
• Disable File-level Backup
Check this box to disable the File-Level Backup
function.
• Show RestoreIT ServerT Logo at startup
Check this box to display RestoreIT Server logo each
time the program starts.
• Prompting when the free space is low
If this option is enabled, the Prompt me when the
free space is less than option will display a warning
message when the free space in the RestoreIT Server
Partition is less than the specified percentage of the
total space size.
• Prompt me if there is a new version available

If this option is enabled, RestoreIT Server will check
whether there is a new version of RestoreIT Server
available on the FarStone website. If a new version
is found, you can download the setup program and
upgrade your RestoreIT Server.
• Display icon in system tray when I log on
Windows
If this option is enabled, the RestoreIT Server icon will
automatically display on the Taskbar Notification area
at each system startup.
• Password Required to access RestoreIT Server
Check this box to enable password protection for the
program. Set a password for RestoreIT Server to
protect your program settings from being modified by
unauthorized uses
To set/change the password, click Set Password,
and then enter your current password (by default
there is no password set). Enter the new desired
password (maximum of eight characters) and re-enter
it to confirm your password.
After the password is applied, RestoreIT Server will
ask for a password upon starting the application. If
you enter a wrong password five times RestoreIT
Server will shut down automatically (you can try again
by restarting the application). Please memorize your
password and keep it confidential.
RestoreIT Server Scheduler
RestoreIT Server provides flexible and easy-to-use
schedule settings. Select the Scheduler on the Settings
screen. There are two options for this category.

¾ Backup Scheduler
This option allows you to configure a schedule for creating
your Incremental Backup Points.
Creating a Backup Point Automatically
Check the Create Incremental Backup Point
Automatically box to enable this function.
• Create a new Backup when the system starts up:
Using this option, your PC will create a Backup Point
automatically every time the system starts up.
Create one new Backup Point every
(number)
between 1 and 30 days.
After selecting this option, your PC will create a
Backup Point every (number)
have set. These days are not accumulated. For
example, if the setting is for every two days and
your PC does not start up within six days, when
you start up, RestoreIT Server will create only
one Backup Point automatically.
Create a new Backup Point only at system
startup.
Using this option, RestoreIT Server will create a
Backup Point every time you boot up.
of day(s). Choose an amount
of day(s) that you

• Create Backup Points while the system is
running: Using this option, RestoreIT Server allows
you to create Backup Points while you are using your
computer. You can set RestoreIT Server to create a
Backup Point every 1 to 720 hours.
Note: During the RestoreIT Server Backup Point
creation process, any program reading from or
writing to your hard drive may affect the
creation of the Backup Point. At anytime if
there are any possible conflicts, RestoreIT
Server will stop creating the Backup Point and
will not affect normal operations.
¾ Restore Scheduler
This option allows you to set a restore schedule and
enables you to restore your system at a pre-set schedule.
Here are the detailed descriptions of these settings.
Restoring to a Backup Point Automatically
If you would like to let RestoreIT Server restore to a
specified Backup Point automatically, check the Restore
Automatically check box to enable this function and at
the same time, specify the backup point to restore and the
restore mode.
The number in the box indicates the ID number of an
Incremental Backup Point in the Backup Point list. (Please

refer to chapter 3-5 Managing Backup Points for more
information).
• Restore at system startup: Your computer will
revert to a specified Backup Point automatically every
time the system reboots. You can schedule RestoreIT
Server to:
Restore system every (number)
Choose an amount between 1 and 30 days.
After selecting this option, your PC will revert to
the specified Backup Point every (number)
day(s) that you have set. However, if for example,
you schedule RestoreIT Server to restore the
system every two days but you do not start your
PC for six days, when you start your system,
RestoreIT Server will create only one Backup Point,
and will restore your computer back to the
specified Backup Point.
Restore system at every startup.
Using this option, RestoreIT Server will
automatically restore your computer to the
specified Backup Point every time you reboot your
system.
of day(s).
of

• Restore while the system is running: Your system
will restore to a specified Backup Point automatically
for a pre-set number of hours (between 1 to 720
hours)
File Backup Settings
The File level backup function protects specified files by
creating a backup each time the specified files are
modified, deleted or overwritten and allowing you to
restore the old version at any time.
The file backup settings provide you with a convenient
way to configure your file level backup settings. You can
configure which files/folders or what types of file need to
be protected, and configure other settings such as number
of backup copies and the space limitation etc.
¾ Files and Folders
This page allows you to specify the general file types
(extensions), folders or specific file that RestoreIT Server
needs to automatically back up.

All files and folder protected by RestoreIT Server are listed
in the box on this page. By default, all files on the hard
drive with “.doc”, “.txt”, “.xls”, “.ppt”, “.pdf”, and “.rtf”
extensions, and all type of files in My Documents are
included.
Adding Files to be protected
Click Add Files: to start adding any specific file(s).
Click Add and select the file(s) you wish to add from your
hard drive to the protected file list.
Click Delete to exclude any file from the list and
RestoreIT Server will stop protecting this file or file type
(extension).
Adding Folders to be protected
Click Add Directory to start adding a folder to the
protected list.
Click Add and select the folder from your hard drive.

You can choose to back up all files or only the specified file
types (files with certain extensions). If the types you
want to backup are not on the list, you can manually add
a file type by clicking Add and type the file extension to
be included.
Check the Include sub-folders box if you want to back
up the files in sub-folders.
Excluding Files or Folders from the Backup List
Select a file or folder and click the Delete button to
exclude it from the Backup File List.
¾ Other
Here you can set other file level backup settings.
• Copies: You can choose to back up a specified number
of copies (between 1 to 50 copies), or unlimited
numbers of copies until the file backup space is used
up. (RestoreIT Server will prompt you to delete

unneeded backup versions if the file backup space is
used up.)
• Space limitation: You can specify a size limit
(between 1MB to 200MB). RestoreIT Server will not
back up a file if its size exceeds the limit. You can also
set RestoreIT Server to prompt you if the backup
space is less than your pre-set percentage, You can
specify a percentage between 5 and 30 percent.
• Other: Select this option to display the back up
progress when performing a File-level back up.
3-9 Updating Your Product
When using RestoreIT Server to protect your computer,
you should visit FarStone’s website (www.farstone.com
periodically to check if there are any new updates
available and update your copy of RestoreIT Server.
Select the User Settings page then Live Update; you
will be guided to the corresponding page on FarStone
website where you can check for new updates.
3-10 Getting assistance
RestoreIT Server provides you with Online Help and a
Flash tutorial to help you get familiarized with RestoreIT
Server.
¾ View RestoreIT Server Tutorial
Click on the Help button and then select Product Tour to
view the Flash tutorial on using RestoreIT Server.
)

¾ View RestoreIT Server Online Help
Click on the Help button and then select Help from the
dropdown menu.
3-11 Exiting the RestoreIT Server Manager
When you finish setting up RestoreIT Server, click the
close button on the upper right corner of the program
interface or choose Exit from the right-click menu of the
task bar icon to close the RestoreIT Server Manager.
RestoreIT Server will continue to run in the background.

Chapter 4
RestoreIT
Server
Manager
in Pre-OS
Mode

Chapter 4
RestoreIT Server
Manager in Pre-OS
Mode
4-1 Launching the RestoreIT Server Pre-OS Manager
To launch the RestoreIT Server Pre-OS Manager, press the
space bar after system POST (Power-On-Self-Test), but
before Windows begins to load.
Enter your password (if specified) and press Enter to
access the main screen of RestoreIT Server. (If no
password has been set, the password box will not be
shown.)
4-2 Quickly Restore Your System in Pre-OS Mode

After RestoreIT Server has been launched, you will see
the following screen.
Click Quick Restore to restore your computer to the
most recent Incremental Backup Point.
Please refer to chapter 3-2.2 Quick Restore
instructions on performing a Quick Restore.
for detailed
4-3 RestoreIT Server Manager in Pre-OS Mode
After booting to RestoreIT Server Pre-OS, click the
Advanced button to enter the Pre-OS RestoreIT Server
Manager as shown below.
Incremental Backup Points

Click on Incremental Backup Points to display a list of
all Incremental Backup Points. The first available Backup
Point will be the one most recently created.
Use your mouse to select the Incremental Backup Point,
and then choose whether to restore the entire hard drive
or the C: drive only. Click OK to start the RestoreIT
Server restoration process. A complete restore can take
from 20 seconds up to 10 minutes, depending on the
number of files affected. Once the system has restarted,
your PC will be restored to the chosen Backup Point. All
file modifications and additions made after the Backup
Point date will be cleared and any files removed or
damaged on your system that existed prior to the creation
of the Backup Point will be restored.
If you want to delete an Incremental Backup Point, use
your mouse to select a Backup Point to delete; then click
the Delete this Backup Point radio button and click OK
to delete this Backup point.

Note: Deleting an Incremental Backup
Point will clear all Incremental Backup Points
created before that one.
Complete Backup Points
From the Pre-OS RestoreIT Server Manager, click on
Complete Backup Points. Next, click Browse to select
the Complete Backup Point from your hard drive, CD/DVD
drive or network storage location. You can view the
description in the box below to make sure it is the one you
want to restore. Click Next to start the restoration
process. Refer back to chapter 3-3.2 Restoring from a
Complete Backup Point for more information on how to
complete the restoration process.
RestoreIT Server Settings
Click Settings to open the RestoreIT Server-Settings
window. It provides several options to manage your
backup strategy.

Password:
To enable password upon system startup, check the
Check password required to access RestoreIT Server
box.
Click Change Password to manage your password
setting.
Security:
In the Security settings, you can enable or disable the
automatic creation of Backup Points. Pre-OS Mode will
create a Backup Point every (number)
of day(s) that are
specified. These days are not accumulated. For example,
if the setting is for every two days and your PC does not

start up within six days, when you start up RestoreIT
Server will create only one Backup Point automatically.
You can also enable/disable RestoreIT Server Incremental
Backup and Complete Backup functions easily, by unchecking or checking the appropriate check box.
Network:
Click Configure to manually setup your network settings
if you cannot access the network when you back up to or
restore from a network place. You can set your network
adaptor, the IP address of your compute and the LAN
settings here.
Uninstalling RestoreIT Server
This option allows you to completely remove RestoreIT
Server from your system. All disk space held by RestoreIT
Server will be released.
Exiting RestoreIT Server
This option allows you to exit from the Pre-OS RestoreIT
Server Manager.

Chapter 5
Removing
RestoreIT
Server

Chapter 5
Removing RestoreIT
Server
5-1 Removing RestoreIT Server
1. If the RestoreIT Server Manager is opened in Windows,
we suggest you close it before running Uninstall
RestoreIT Server.
2. Select Start on the Windows taskbar, then All
Programs Æ RestoreIT Server Æ Uninstall
RestoreIT Server.
3. Confirm that you would like to remove RestoreIT
Server.
4. Once you enter your password, you will be able to
remove RestoreIT Server completely. (If you have
never set the password, the password dialog box will
not be shown.)
5. RestoreIT Server will be removed completely when
your computer restarts.
You can also safely remove RestoreIT Server using one of
the following three methods:
1. Remove RestoreIT Server using the Add/Remove
Programs option in the Windows Control Panel.
2. Remove RestoreIT Server in the Pre-OS Mode
environment.
3. Use the RestoreIT Rescue Disc to remove RestoreIT
Server. (Refer to the next Section RestoreIT Rescue
Disc for more details)

Note: If you have more than one Windows operating
system and you installed RestoreIT Server in each
one, removing RestoreIT Server will result in the
removal of RestoreIT Server in all operating
systems.
- 58 -

Chapter 6
FAQ
- 59 -

Chapter 6
FAQ
1. Do I need to do anything before installing
RestoreIT Pro?
A: We strongly recommend that you run the Windows
Checkdisk program to check for hard drive errors before
installing RestoreIT Pro. The Checkdisk utility can be started
by running Chkdsk.exe from a command prompt or by using
the RestoreIT Pro, Pre-Installation Checklist. Note: Running
Checkdisk from either location will require a system reboot
for the operation to be completed.
2. After I installed RestoreIT Pro and restarted the
computer, my system crashed. How can I install
RestoreIT Pro without it crashing my system?
A: You may have assigned all the free space in your C drive
for the RestoreIT Pro partition. If all of the free disk space
on C: is assigned as the RestoreIT Pro partition, the
system on partition C: would not be accessible. Therefore
the system cannot be loaded. You should reserve at least
- 60 -

200 MB of free space in partition C: to avoid this type of
error.
3. I installed RestoreIT Pro on a Compaq PC and then
restarted the computer but the following error
message comes up: “You have installed vb twice,
please uninstall and review FarStone’s FAQs.”
How can I fix this?
A: Some computers such as Compaq and HP come with
system backup/restore software already pre-installed.
These programs may cause conflicts with RestoreIT Pro
and prevent it from being installed on these computers.
We recommend that you remove all other system
backup/restore software first before trying to install
RestoreIT Pro again.
4. I would like to get help from FarStone technical
support. What kind of information should I give the
technician?
A: In order to assist you better, please send us the following
files: Dpssetup.log, PartitionCut.log, Autosetup.log,
Vbptask.log and Diskdata.log. These files reside on the
same directory as the RestoreIT Pro program.
- 61 -

5. Can RestoreIT Pro fix the system after my hard
drive has been mistakenly formatted or
repartitioned?
A: RestoreIT Pro can fix the system only if it was installed
prior to the mistaken formatting or repartitioning.
6. Can I use disk tools such as F-disk, PartitionMagic
and Norton Speed Disk after RestoreIT Pro is
installed on my computer?
A: No. While RestoreIT Pro is compatible with this software,
certain functions within these utilities may cause
RestoreIT Pro to stop functioning or at worst, cause
RestoreIT Pro to be uninstalled.
7. What should I do if I see error message “0xe23”
while installing RestoreIT Pro?
A: This error occurs in versions of RestoreIT Pro prior to
3.02. To solve this issue, please complete the
following steps:
a. Install RestoreIT Pro version 3.03 or later on your
computer;
b. Enter the BIOS setup and detect the hard drive
information. Select LBA mode for your hard drive.
c. Run Checkdisk (chkdsk.exe /f) to scan all partitions
on your computer.
- 62 -

8. What should I do if I see error message “0xe2f”
while installing RestoreIT Pro?
A: Please contact our technical support staff to obtain a tool
to repair the logic error in your hard drive.
9. There are two hard drives on my computer. Why
can’t I choose to create the RestoreIT Pro partition
on the second hard drive?
A: If there are multiple hard drives on your computer,
RestoreIT Pro can only recognize the primary drive and
protects the data in it. But you can create a Complete
Backup Point for the secondary drive. Please refer to
section 3-4.2 “Creating a Complete Backup Point” for
more information.
10. Multiple operating systems, including Linux, are
installed on my computer. Can RestoreIT Pro
protect all three systems?
A: RestoreIT Pro is designed for Windows users only.
RestoreIT Pro can protect multiple Windows operating
systems but it cannot protect a Linux system. In fact,
RestoreIT Pro cannot even be installed if a Linux operating
system is present.
- 63 -

11. Does RestoreIT Pro work in Windows Safe Mode?
If so, are there any limitations when using
RestoreIT Pro in Safe Mode?
A: Yes. RestoreIT Pro will work in Windows Safe Mode.
12. Why do I get error message “8112” when I try to
create a Complete Backup Point?
A: The amount of partition space allocated for RestoreIT Pro
is not big enough to contain the Complete Backup Point
you tried to create. You can resolve this problem by
reinstalling RestoreIT Pro and allotting more disk space for
your RestoreIT Pro partition.
13. I formatted my hard drive in Pre-OS Mode by using
a startup floppy disk. Can I recover lost data using
RestoreIT Pro?
A: If you start your computer using a startup floppy disk and
you format the hard drive in Pre-OS Mode, you will only
be able to restore the system using the Complete Backup
Point. However, if you use a startup floppy disk to boot
your system from the “Boot from A:” option in Pre-OS
Mode and reformat your hard drive, then you will be able
to restore your system from Incremental Backup Points
as well.
- 64 -

14. Can I use Norton Ghost to copy a hard drive on
which RestoreIT Pro is installed?
A: Yes. RestoreIT Pro version 3.01 or later is compatible
with all versions of Ghost except Ghost 2003. If you are
using Ghost 2003, in order to copy the hard drive
properly you need to modify the Ghost Properties by
typing in “parameter –ib” behind the Target command.
15. While I was uninstalling RestoreIT Pro, a disk
information error appeared. What should I do?
A: This message appears under the following circumstances:
a. If you assigned an unformatted partition for
RestoreIT Pro while installing the program, RestoreIT
Pro will ask you whether or not you wish to revert the
RestoreIT Pro partition back to free space when you
remove the RestoreIT Pro program. Just click “OK.”
b. The RestoreIT Pro uninstall program detected that the
RestoreIT Pro partition structure has been changed (e.g.
re-partitioning the disk using F-disk). It may cause a
partition information error if the program removes the
RestoreIT Pro partition from your computer. If you do
not want to change the disk partition, please restore
your system and then launch the uninstall program
again.
- 65 -

16. Does RestoreIT Pro support multi-boot systems?
A: Yes. Please refer to section 2-4 “Multibooting Windows”
17. RestoreIT Pro displays a message saying that there
is not enough space to create a RestoreIT Pro
partition but I know that I have plenty of free disk
space for this. What should I do to resolve this
problem?
A: Please use the following methods to solve the problem:
During installation, select a partition in the partition tool
window. Then enter the partition size you want to create
for RestoreIT Pro and click “OK” to restart the computer.
Before entering Windows, the tool will run the disk
defragmenter and create a partition for RestoreIT Pro.
RestoreIT Pro will continue installing after Windows is
booted.
In order for RestoreIT Pro to defragment your system,
please do the following:
1. Do not restart the system while defragmenting.
2. The partition tool supports FAT32 and NTFS only. It
cannot defragment FAT16 or other partitions.
3. Confirm the partition information listed by the
partition tool.
- 66 -

4. Windows may scan the system after the disk
defragmentation.
18. I started creating a Complete Backup Point in Pre-
OS Mode but I found that the size of the Complete
Backup Point is too big and it is taking too much
time to create. Can I stop creating the Complete
Backup Point and create it later?
A: Yes. If you want to stop creating the Complete Backup
Point in Pre-OS Mode, just press “Esc” on the keyboard
and select “Yes” from the popup window to confirm the
cancellation.
19. What should I do if the antivirus software (e.g.
Norton Antivirus) gives me a virus warning
continuously when I am installing RestoreIT Pro?
A: When you are installing RestoreIT Pro on your system, the
setup program will write data onto your hard drive.
Some antivirus software will regard this process as a
virus attack and prompt you with a warning. We
strongly recommend you disable real-time protection
before installing RestoreIT Pro. Then enable it again
after the setup process is complete.
20. Can I use an “ambiguous” Backup Point to restore
my system?
- 67 -

A: RestoreIT Pro checks Backup Points for integrity after they
are created. If the Backup Point is damaged or invalid
for restoration, it will be marked as an “ambiguous”
Backup Point. You should not restore to those Backup
Points.
21. Why do I see a “0xe2” error when trying to install
RestoreIT Pro on a system with four operating
systems?
A: A maximum of four operating system entries can reside on
a computer. If all four entries are filled, then RestoreIT
Pro cannot be installed.
22. Is the process of creating a Complete Backup Point
necessary?
A: You can choose to have Incremental Backup Point
protection only. However, we recommend that you create
a Complete Backup Point on which you can always rely.
23. If, for example, I restore my system to yesterday,
all files changed or created today will be lost. Is
there any way to restore to yesterday without
losing today’s saved files?
A: Yes. You should store all of your saved documents in a
different partition. When you restore, only restore your
- 68 -

system partition. This way your newer files will not be
lost when you restore your system.
24. I have already created a RestoreIT Pro Rescue Disc.
Is the RestoreIT Pro Rescue Disc still effective if I
reinstall RestoreIT Pro on my computer?
A: Yes. The RestoreIT Pro RestoreIT Pro Rescue Disc can be
used on any computer on which RestoreIT Pro is
installed.
25. Can RestoreIT Pro really protect my PC from being
destroyed by a virus?
A: Yes. When a virus attacks your PC, common system files,
applications, MS Word documents or VB SCRIPT will be
infected. Using RestoreIT Pro to revert your system back
to the day before the virus infection, all files on your hard
drive will be free of viruses. Therefore all infected files
will have been cleaned.
26. Does RestoreIT Pro provide support for Windows
advanced power management?
A: Yes. RestoreIT Pro supports all Windows advanced power
management features (Standby, Sleep, Hibernate).
27. Why did my computer system crash while RestoreIT
Pro was loading the hard drive driver?
- 69 -

A: This problem will only occur on a computer whose hard
drive does not support UDMA3. Please disable UDMA in
CMOS setup.
28. When I was creating a Complete Backup Point, it
tells me “The size of the Complete Backup Point is
more than 2GB. Do you want to create another
Backup Point to contain the rest of the data?”
A: The size of a Complete Backup Point cannot exceed 2GB
when it is created on a FAT32 partition. If there is more
than 2GB data to be backed up to the Complete Backup
Point, another backup file will be created to contain the
rest of the data. Note: only the first volume (the first
Backup Point) should be selected when using such points
to restore your computer.
29. When I tried to restore from a Complete Backup
Point stored outside the RestoreIT Pro partition, I
received an error message saying “The Backup
Point you selected does not include the header data
of the partition. The selected Backup Point cannot
be used”. Why can’t I use this Backup Point?
A: Only the first volume in the series of the Complete Backup
Point has the ability to start the restoration process
because it contains the initial data of the source
partition/disk. Also refer to questions 28 and 33.
30. Sometimes, when RestoreIT Pro is burning a
Complete Backup Point onto a blank CD, the
progress bar is not moving and the keyboard locks
up. Why?
- 70 -

A: Before creating the Complete Backup Point, RestoreIT Pro
requires a period of time to initialize the data. At this
time, the progress bar might not be moving. However,
the program is still running in the background.
RestoreIT Pro will also lock your keyboard when you are
writing the image to a CD so that the keyboard is
unusable.
31. I used a Recovery CD to restore a partition and got
an error message saying “The information in the
target partition has been altered. Auto-recovery is
aborted.” What can I do?
A: The Recovery CD restores the partition from which it was
created. If the source partition no longer exists or its size
was reduced, the partition cannot be restored from the
Recovery CD.
32. If the source partition is a bootable partition (e.g.
C:\) but the target partition is not, can the target
partition be used to boot the system after
restoration?
A: Yes. Please do the following:
1. Modify your boot.ini file.
a. If you are in DOS, enter the boot partition (C:\)
and type “edit boot.ini” to modify this file.
b. If you are in Windows, the file boot.ini might
be hidden. Select Show hidden files and
folders from ToolsÆFolder Options menu to
show boot.ini, then open it.
2. Add the following to boot.ini:
multi(0)disk(0)rdisk(X)partition(Y)\Folder="
Description "
- 71 -

X: is HDD number, generally defined as 0 – 3.
Number 0 is the primary master, 1 is the primary
slave, 2 is the secondary primary and 3 is the
secondary slave;
Y: is partition ID, generally defined as 0-25, 0 is for
the first partition.
Folder: is the location where the boot files are stored.
If your system is Windows 2000, it should be
defined as WINNT. If it is Windows XP, it
should be Windows.
Description is the comments for the options in the splash
screen at system startup.
33. When I try to revert to a Complete Backup Point
stored in the RestoreIT Pro partition, it displays a
message "The partition structure of the current
hard drive does not match the partition structure in
the Complete Backup Point. Reverting to this
Backup Point will renew the partition structure. If
there are NTFS partitions on your hard drive, the
restoration may result in data loss or system boot
failure. Do you want to proceed?"
A: RestoreIT Pro will verify data consistency in the Backup
Point and the disk partition to be restored before
reverting to a Backup Point. If you resized the partition
that is protected by the Backup Point, and enlarged the
size of the NTFS partition that is not protected by the
Backup Point, the restoration may result in data loss or
system boot failure.
34. Why aren’t all the files on my hard drive listed in
the File Restore window?
- 72 -

A: Users should specify file types and folders for RestoreIT
Pro to back up. Only the specified files will be backed up
and listed in the File Restore window. Please refer to
section 3-1.4 File-level Restore
35. I specified a file type to be backed up. Why didn’t
RestoreIT Pro create a backup version after I
overwrote a file of this type?
A: Different applications have different ways to save a file.
We cannot exclude the possibility that some types of files
cannot be protected by RestoreIT Pro when they are saved
by certain applications. If you encountered this kind of
problem, please send a list of the file type(s) and the
application(s) using this file type(s) to a FarStone
technical support representative.
http://www.farstone.com/home/ensite/support/support.shtml
36. Can I restore a file that was in a formatted partition?
A: No. But you can first restore the partition using an
Incremental Backup Point or a Complete Backup Point
created before that partition was formatted.
37. When I right-click a renamed file in Windows
Explorer, why can’t I find previous versions of this
file that existed before it was renamed?
A: If a file is renamed, RestoreIT Pro will treat it as if it’s a
new file. If you need to access versions of the file from
before it was renamed, open the File Restore window from
the RestoreIT Pro main interface to find it by the pervious
name.
for more information.
- 73 -

38. Will RestoreIT Pro back up a file that is infected by
a virus?
A: Yes. RestoreIT Pro will create a backup version as long as
a file is modified, overwritten or deleted, whether or not
the file is infected. But if the file is intact when the backup
version is created, you can use this backup to restore the
file once it is infected.
39. After uninstalling RestoreIT Pro I tried to access
the partition that was allocated for creating the
RestoreIT Pro partition and RestoreIT Pro prompted
me to format the partition and indicated that all the
data in that partition will be lost. What should I do?
A: This message is due to a possible error in the file system
of that partition. Please run the Windows Check Disk tool
by right-clicking on the partition in Windows and selecting
Properties-> Tools -> Error-checking.
40. I had a USB hard drive on my computer. But
RestoreIT Pro cannot recognize it when I try to
create a complete backup point. How can I solve it?
A: Please try the following methods:
(1) If you plugged in the USB hard drive after launching
RestoreIT Pro, please restart you computer and try again.
(2) Set USB Mode as Hi-Speed in BIOS or enable USB
1.1
(3) Remove RestoreIT Pro and install the latest version
of RestoreIT Pro.
41. I had a large storage capacity hard drive (>137G)
on my computer. Why was RestoreIT Pro
automatically uninstalled after I had finished
installing it and rebooted the system?
- 74 -

A: This may because your BOIS does not support the large
storage capacity hard drive. Contact the manufacture of
your computer to upgrade the BIOS.
42. I used a recovery CD/DVD to restore a partition
and got an error message saying “The information in
Destination Partition has been altered. Auto-recover is
aborted.” What can I do?
A: The recovery CD restores the partition from which it was
created. If the source partition no longer exists or its size
was reduced, the partition cannot be restored from the
recovery CD.
43. When I restored a partition from an image file, it
prompted me “There is not enough space on the
Destination Partition.” But I’m sure the free space on
the Destination Partition is larger than the used space
in the Source Partition, why?
A: If the data on the end of the Source Partition cannot be
moved, RestoreIT Pro will prompt you with this notice.
Even if the free space on Destination Partition is larger
than used space in the Source Partition. The same error
may occur in Partition/Disk Clone.
44. If the source partition is a bootable partition (e.g.
C:\) but the target partition is not, can the target
partition be used to boot the system after restoration?
A: Yes. Please do the following:
1. Modify your boot.ini file.
a. If you are in DOS, enter the boot partition (C:\)
and type “edit boot.ini” to modify this file.
b. If you are in Windows, the file boot.ini might
be hidden. Select Show hidden files and
folder from tools->folder options from the
menu bar to show boot.ini, then open it (the
- 75 -

default path to the boot.ini file is C:\boot.ini).
2. Add the following to boot.ini:
multi(0)disk(0)rdisk(X)partition(Y)\Folder="
Description "
X: is the HDD (hard drive) number, generally defined
as 0 – 3. Number 0 is the primary master, 1 is the
primary slave, 2 is the secondary primary and 3 is
the secondary slave;
Y: is the partition ID, generally defined as 0-25, 0 is
for the first partition.
Folder: is the place storing the boot file (this is not
the boot.ini file). If your system is Windows
NT/2000, it should be defined as WINNT. If
your system is Windows XP, it should be
Windows.
Description is for adding comments for the options
listed on the splash screen at system startup.
45. I have connected a USB hard drive or a USB
CD/DVD recorder to the system, why is it not
recognized by RestoreIT Pro or will not work with
RestoreIT Pro?
A: If you cannot see the USB device in RestoreIT Pro, there
are two possible reasons:
(1) RestoreIT Pro does not support plug-and-play. If the
USB device is plugged in after you launch RestoreIT
Pro, you will not see the device. In this case, you can
connect the USB device before launching RestoreIT
Pro
(2) The settings of the USB Controller on the
motherboards BIOS may also influence the use of
RestoreIT Pro. Please try the following two methods to
resolve this issue:
●disable the USB 2.0 Controller;
●set USB to “Hi Speed” in the BIOS USB settings.
- 76 -

46. I created an image for Drive C: on two CD-R discs.
Why can the disc not be used to mount a temporary
partition?
A: Mounting a partition requires all the backup data of the
drive. If you use one of two discs, it cannot provide the
complete information. To solve this problem, you can
first copy the image files from the two discs to the hard
drive and then use it to mount a temporary partition.
This problem cannot be overcome by using multiple CD
drives.
47. When I try to create a Recovery CD/DVD, it failed
and prompted an error message “Move Data Error”.
Why?
A: This error may occur if the quality of the recordable
CD/DVD media is not good, or the disc is incompatible
with the recorder. To solve this problem, please replace
the media with a higher quality disc or upgrade your
CD/DVD recorder.
48. How can I create an image to a shared folder on a
local network location?
A: First you must make sure the local network setting are
correctly configured and you have the appropriate
permissions to access the shared folder you want to
backup to. In the Select Image Location box, click
Browse to select the location through Windows My
Network Places interface, or directly enter the full path
and the file name into the Path field. The path should be a
full network path including the name of the image file. A
sample network path would look like this:
\\192.168.0.111\ShareDir\Image.sco
.
- 77 -

49. Is there any limitation when I restore from an
image over the network?
A: RestoreIT Pro can restore an image file sized below 2GB
when restoring from a network location. When backing
up an image to a network locatoin, RestoreIT Pro can
automatically split the file into several volumes with a
maximum size of 2GB each. You can select the first
volume of the image to be restored. But, if you share an
image stored in an NTFS partition that is over 2GB, you
cannot restore from it on another computer over the
network; this file must be copied back to the local
computer to perform a successful restore.
50.Why can Windows XP/2000 not boot and a blue
screen error occur after I disk cloning or
restoring from an image. How can I resolve this
issue?
A: You can check “Erase disk signature” when performing
Disk Clone or Restore Drives. This option can help avoid
such error.
Note: If you operating system is installed on an inactive
partition (on drive D: for example), checking this option
may change its disk signature (to C: for example) after
cloning or restoring. This will cause some OS settings,
services or some programs unusable, or some partition
may lose its drive letter. You can re-allocate a drive
letter for such partitions in Disk Management (Computer
Management\Disk Management\Right-click a
partition\Change Drive Letter and Path). For an active
partition or a partition where your operating system is
installed, you should modify registry
(\HKEY_LOCAL_MACHINE\SYSTEM\MountedDevice1)
and then restart computer to reallocate the drive letter.
- 78 -

If this error still occurs with this option checked, please
try this method: running “sysprep” tool before you
perform Disk Clone or Restore Drives task, then restart
the system with RestoreIT Pro2.1 Bootable Disc and
perform your task.
You can get the “sysprep” tool by extracting sysprep.exe
from SUPPORT\TOOLS\DEPLOY.CAB on the install disc.
On how to use this tool, please refer to deploy.chm (for
Windows XP users)/deptool.chm (for Windows 2k users)
located in the same directory.
- 79 -

Chapter 7
Software
License
Agreement
- 80 -

Chapter 7
Software License
Agreement
FARSTONE TECHNOLOGIES INC. (FARSTONE) END USER
LICENSE AGREEMENT FOR SECUREPC, HEREAFTER
REFERRED TO AS THE "SOFTWARE"
PLEASE READ CAREFULLY: THE USE OF THIS "SOFTWARE"
IS SUBJECT TO THE "SOFTWARE" LICENSE TERMS OF
FARSTONE AND OTHER LICENSORS WHOSE SOFTWARE
MAY BE BUNDLED WITH THIS PRODUCT.
BY YOUR USE OF THE "SOFTWARE" INCLUDED WITH THIS
PRODUCT YOU AGREE TO THE LICENSE TERMS REQUIRED
BY THE LICENSOR OF THE "SOFTWARE", AS SET FORTH
BELOW. IF YOU DO NOT AGREE TO THE LICENSE TERMS
APPLICABLE TO THE "SOFTWARE", YOU MAY RETURN THE
ENTIRE UNUSED PRODUCT FOR A FULL REFUND.
In return for acquiring a license to use the farstone
"software", which may include software from third party
licensors, trial versions or copies of the "software" and
patches made available by farstone, and the related
documentation, you agree to the following terms and
conditions:
A. Single User License: This Agreement grants you, the
Licensee, a License to:
(a) use the "Software" on a single computer system or
network, and only by a single user at a time. If you wish to

use the "Software" for more users, you will need an
additional License for each user.
(b) make one copy of the "Software" in machine-readable
form solely for back-up purposes, provided you reproduce
FarStone's copyright proprietary legends. Notwithstanding
the foregoing, the "Software" may be used on the home,
laptop or other secondary computer of the principal user of
the "Software", and an additional copy of the "Software"
may be made to support such use. As used in this License,
the "Software" is "in use" when it is either loaded into RAM
or installed on a hard drive or other permanent memory
device. The "Software" may be "in use" on only one
computer at any given time. (Different License terms and
fees are applicable for networked or multiple user
applications.) As a specific condition of this License, you
agree to use the "Software" in compliance with all
applicable laws, including copyright laws, and that you will
not copy, transmit, perform or distribute any audio or
other content using the "Software" without obtaining all
necessary Licenses or permissions from the owner of the
content.
B. Multiple User License: This Agreement grants you,
the Licensee, a License to:
Make one copy of the "Software" in machine-readable form
solely for back-up purposes, provided you reproduce
FarStone's copyright proprietary legends.
You must acquire and dedicate a License for each separate
computer on which any part or portion of the "Software" is
installed or run As used in this License, the "Software" or
any part or portion of the "Software" is "in use" when it is
either loaded into RAM or installed on a hard drive or other
permanent memory device including any networked or
shared environment where either direct or indirect
- 82 -

connections are made through software or hardware which
pools or aggregates connections.
As a specific condition of this License, you agree to use the
"Software" in compliance with all applicable laws, including
copyright laws, and that you will not copy, transmit,
perform or distribute any audio or other content using the
"Software" without obtaining all necessary Licenses or
permissions from the owner of the content.
C. Restrictions: You may not distribute copies of the
"Software" to others or electronically transfer the
"Software" from one computer to another over a network.
You may not post or otherwise make available the
"Software", or any portion thereof, in any form, on the
Internet. You may not use the "Software" in a computer
service business, including in time-sharing applications.
The "Software" contains trade secrets and, in order to
protect them, you may not decompile, reverse engineer,
disassemble, or otherwise reduce the "Software" to a
human-perceivable form. YOU MAY NOT MODIFY, ADAPT,
TRANSLATE, RENT, LEASE, LOAN, RESELL FOR PROFIT,
DISTRIBUTE, NETWORK OR CREATE DERIVATIVE WORKS
BASED UPON THE "SOFTWARE" OR ANY PART THEREOF.
D. Ownership: As Licensee, you own the media upon
which the "Software" is recorded or fixed, but FarStone
and its Licensors retain title and ownership of the
"Software" recorded on the original media and all
subsequent copies of the "Software", regardless of the
form or media in which or on which the original and other
copies may exist. This License does not grant, convey or
in any way transfer ownership of the "Software".
E. Separation of Components: The "Software" is
licensed as a single product. Its component parts may not
- 83 -

be separated for use on more than one computer, not
withstanding reference to Section B of this License
agreement where Multiple user Licenses have been
purchased.
F. Confidentiality: You agree to maintain the "Software"
in confidence and that you will not disclose the "Software"
to any third party without the express written consent of
FarStone. You further agree to take all reasonable
precautions to preclude access of unauthorized persons to
the "Software".
G. Terms: This License shall continue for as long as you use
the "Software". However, it will terminate if you fail to
comply with any of its terms and conditions. You may
terminate the License at any time by destroying the
"Software" (including the related documentation) together
with all copies or modifications in any form. FarStone will
have the right to terminate our License immediately if you
fail to comply with any term or condition of this Agreement.
Upon any termination, including termination by you, you
must destroy the "Software" (including the related
documentation), together with all copies or modifications in
any form. The Limitations, Warranties and Liability set out
below shall continue in force even after any termination
H. Transfer: You may transfer the "Software" License to
someone else, only if you assign all of your rights under this
License, cease all use of the "Software", erase or destroy any
copy (including the hard drive copy) made in support of your
use of the "Software", and the other person agrees to the
terms of this License.
If the "Software" is an upgrade from other "Software",
whether from us or another supplier, you may use or transfer
- 84 -

the "Software" only in conjunction with the upgraded
"Software", unless you destroy it. If the "Software" is an
upgrade from FarStone, you may only use that upgraded
"Software" in accordance with this License.
I. Special Terms Applicable to Databases. Where a
database is included with the "Software", you acknowledge
that it is licensed only in connection with the use of the
"Software" to perform disk creation, and that the database
and all data derived there from must be maintained in
confidence in accordance with the provisions of Section E of
this document. This License does not grant you any rights to
distribute or disclose such a database or data contained
therein.
J. Limited Warranty: FarStone and its Licensor warrant
only that the media upon which the "Software" is furnished
will be free from defects in material or workmanship under
normal use and service for a period of thirty (30) days from
the date of delivery to you. FARSTONE AND ITS LICENSORS
DO NOT AND CANNOT WARRANT THE PERFORMANCE OR
RESULTS YOU MAY OBTAIN BY USING THE "SOFTWARE" OR
DOCUMENTATION. THE FOREGOING STATES THE SOLE AND
EXCLUSIVE REMEDIES FARSTONE AND ITS LICENSORS WILL
PROVIDE FOR BREACH OF WARRANTY. EXCEPT FOR THE
FOREGOING LIMITED WARRANTY, FARSTONE AND ITS
LICENSORS MAKE NO WARRANTIES, EXPRESSED OR
IMPLIED, INCLUDING, BUT NOT LIMITED, AS TO NONINFRINGEMENT OF THIRD PARTY RIGHTS,
MERCHANTABILITY OR FITNESS FOR A PARTICULAR
PURPOSE. Some states do not allow the exclusion of implied
warranties or limitations on how long an implied warranty
may last, so the above limitations may not apply to you.
This warranty gives you specific legal rights and you may
also have other rights, which vary from state to state.
- 85 -

The entire liability of FarStone and its Licensors, and your
exclusive remedy for a breach of this warranty, shall be: (a)
the replacement of any media not meeting the above limited
warranty which is returned to FarStone; or (b) if FarStone or
its distributor is unable to deliver replacement media which is
free from defects in materials or workmanship, you may
terminate this Agreement by returning the "Software" and
your money will be refunded.
K. Limitation of Liability: IN NO EVENT WILL FARSTONE
OR ITS LICENSORS BE LIABLE TO YOU FOR ANY INCIDENTAL,
CONSEQUENTIAL OR INDIRECT DAMAGES, INCLUDING ANY
LOST PROFITS, LOST SAVINGS, OR LOSS OF DATA, EVEN IF
FARSTONE OR A LICENSOR HAS BEEN ADVISED OF THE
POSSIBILITY OF SUCH DAMAGES, OR FOR ANY CLAIM BY
ANY OTHER PARTY. Some states do not allow the exclusion
or limitation of special, incidental, or consequential damages,
so the above limitation or exclusion may not apply to you.
L. Bundling: In no case may the "SOFTWARE" be bundled
with hardware or other software without written permission
from FarStone.
M. Export: You acknowledge that the laws and regulations of
the United States and/or other countries may restrict the
export and re-export of the "Software". You agree that you
will not export or re-export the "Software" or documentation
in any form in violation of applicable law in the United States
and/or foreign law.
N. General: You acknowledge that you have read this
Agreement, understand it, and that by using the "Software"
you agree to be bound by its terms and conditions. You
further agree that it is the complete and exclusive statement
of the agreement between FarStone and you, and supersedes
- 86 -

any proposal or prior agreement, oral or written, and any
other communication between FarStone and you relating to
the subject matter of this Agreement. No additional or any
different terms will be enforceable against FarStone unless
FarStone gives its express consent, including an express
waiver of the terms of this Agreement, in writing signed by
an officer of FarStone. You assume full responsibility for the
use of the "Software" and agree to use the "Software" legally
and responsibly.
Should any provision of this Agreement be declared
unenforceable in any jurisdiction, then such provision shall be
deemed severable from this Agreement and shall not affect
the remainder hereof. FarStone reserves all rights in the
“Software” not specifically granted in this Agreement.
Should you have any questions concerning this Agreement,
you may contact FarStone by writing to:
FarStone Technology, Inc.
Legal Department
15 Hammond Dr., Suite 304
Irvine, CA 92618
Phone: (949) 458-3666
- 87 -
 Loading...