


GameDrive®
Version 10
For Windows 2000/XP/Server
2003
User’s Guide

Copyright Notice
No part of this publication may be copied, transmitted,
stored in a retrieval system, or translated into any language
in any form or by any means without the express written
permission of FarStone Technology, Inc.
FarStone grants you the right to use one copy of the
enclosed software program ("SOFTWARE") on a single
computer. If the SOFTWARE is installed on a network, or
more than one user can run the SOFTWARE at the same time,
you must purchase an additional license for each additional
user or computer.
Trademarks
FarStone™ and GameDrive® are trademarks of FarStone
Technology, Inc. R apid Cache® is a registered tr ademark o f
FarStone Technology, Inc. Microsoft®, Windows® and
MS-DOS® are registered trademarks of Microsoft
Corporation. Other product names mentioned in this User’s
Guide may be trademarks or registered trademarks of their
respective companies.
FarStone Technology, Inc.
U.S. Headquarters:
15 Hammond Dr., Suite 304
Irvine, CA 92618
Phone: (949) 458-3666
Asia-Pacific Offices
10F-1B, No. 207, DunHua North Rd., Taipei, 105, Taiwan
Phone: 886-2-2546-9898
Fax: 886-2-2546-3838
Technical Support:
Please contact your retailer or use our online support system
2

at www.farstone.com. For your convenience, you will find
answers to frequently asked questions on our website at
www.farstone.com
http://www.farstone.com/home/ensite/support/support.shtml
. Follow the links to the support section:
Copyright© 2002-2005 FarStone Technology, Inc. All rights
reserved.
RapidCache
®
Copyright© 1993-2005 FarStone Technology,
Inc.
License Agreement
FARSTONE TECHNOLOGIES INC. (FARSTONE) END USER LICENSE
AGREEMENT FOR GAMEDRIVE, HEREAFTER REFERRED TO AS THE
"SOFTWARE"
PLEASE READ CAREFULLY: THE USE OF THIS "SOFTWARE" IS SUBJECT TO
THE "SOFTWARE" LICENSE TERMS OF FARSTONE AND OTHER LICENSORS
WHOSE SOFTWARE MAY BE BUNDLED WITH THIS PRODUCT.
BY YOUR USE OF THE "SOFTWARE" INCLUDED WITH THIS PRODUCT YOU
AGREE TO THE LICENSE TERMS REQUIRED BY THE LICENSOR OF THE
"SOFTWARE", AS SET FORTH BELOW. IF YOU DO NOT AGREE TO THE
LICENSE TERMS APPLICABLE TO THE "SOFTWARE", YOU MAY RETURN THE
ENTIRE UNUSED PRODUCT FOR A FULL REFUND.
LICENSE AND WARRANTY:
The software that accompanies this license (the "Software") is the property
of FARSTONE or its licensors and is protected by copyright law. While
FARSTONE continues to own the Software, you will have certain rights to
use the Software after your acceptance of this l icense. Except as may be
modified by a license addendum which accompanies this license, your rights
and obligations with respect to the use of this Software are as
follows:
A. Single User License:
(a) Use the "Software" on a single computer system or network and only by
a single user at a time. If you wish to use the "Software" for more users, you
3

will need an additional License for each user.
(b) Make one copy of the "Software" in machine-readable form solely for
back-up purposes, provided you reproduce FarStone's copyright proprietary
legends. Notwithstanding the foregoing, the "Software" may be used on the
home, laptop or other secondary computer of the principal user of the
"Software", and an additional copy of the "Software" may be made to
support such use. As used in this License, the "Software" is "in use" when it
is either loaded into RAM or installed on a hard disk or other permanent
memory device. The "Software" may be "in use" on only one computer at
any given time. (Different License terms and fees are applicable for
networked or multiple user applicatio ns.) As a specific condition of this
License, you agree to use the "Software" in compliance with all applicable
laws, including copyright laws, and that you will not copy, transmit, perform
or distribute any audio or other content using the "Software" without
obtaining all necessary Licenses or permissions from the owner of the
content.
B. Multiple User License:
Make one copy of the "Software" in machine-readable form solely for
back-up purposes, provided you reproduce FarStone's copyright proprietary
legends.
You must acquire and dedicate a License for each separate computer on
which any part or portion of the "Software" is installed or run As used in this
License, the "Software" or any part or portion of the "Software" is "in use"
when it is either loaded into RAM or installed on a hard disk or other
permanent memory device including any networked or shared environment
where either direct or indirect connections are made t hrough software or
hardware which pools or aggregates connections.
As a specific condition of this License, you agree to use the "Software" in
compliance with all applicable laws, inc lud ing co pyr ight laws, an d tha t you
will not copy, transmit, perform or distribute any audio or other content
using the "Software" without obtaining all necessary Licenses or
permissions from the owner of the content.
C. Restrictions: You may not distribute copies of the "Software" to others
or electronically transfer the "Software" from one computer to another over
a network. You may not post or otherwise make available the "Software",
or any portion thereof, in any form, on the Internet. You may not use the
4

"Software" in a computer service business, including in time-sharing
applications. The "Software" contains trade secrets and, in order to protect
them, you may not decompil e, reverse en gineer, disassemble, or otherwise
reduce the "Software" to a human-perceivable form. YOU MAY NOT MODIFY ,
ADAPT , TRANSLA TE, RENT , LEASE, LOAN, RESELL FOR PROFIT , DISTRIBUTE,
NETWORK OR CREATE DERIVA TIVE WORKS BASED UPON THE "SOFTWARE"
OR ANY PART THEREOF.
D. Limited Warranty:
FarStone warrants that the media on which the Software is distributed will
be free from defects for a period of thirty (30) days from the date of delivery
of the Software to you. Your sole remedy in the event of a breach of this
warranty will be that FarStone will, at its option, replace any defective
media returned to FarStone within the warranty period or refund the money
you paid for the Software. FarStone does not warrant that the Software will
meet your requirements or that operation of the Software will be
uninterrupted or that the Software will be error-free.
THE ABOVE WARRANTY IS EXCLUSIVE AND IN LIEU OF ALL OTHER
WARRANTIES, WHETHER EXPRESS OR IMPLIED, INCLUDING THE IMPLIED
WARRANTIES OF MERCHANTABILITY, FITNESS FOR A PARTICULAR
PURPOSE AND NONINFRINGEMENT. THIS WARRANTY GIVES YOU SPECIFIC
LEGAL RIGHTS. YOU MAY HAVE OTHER RIGHTS, WHICH VARY FROM STATE
TO STATE.
E. Limitation of Liability: IN NO EVENT WILL FARSTONE OR ITS
LICENSORS BE LIABLE TO YOU FOR ANY INCIDENTAL, CONSEQUENTIAL OR
INDIRECT DAMAGES, INCLUDING ANY LOST PROFITS, LOST SAVINGS, OR
LOSS OF DATA, EVEN IF FARSTONE OR A LICENSOR HAS BEEN ADVISED OF
THE POSSIBILITY OF SUCH DAMAGES, OR FOR ANY CLAIM BY ANY OTHER
PARTY. Some states do not allow the exclusion or limitation of special,
incidental, or consequential damages, so the above l imitation or exclu sion
may not apply to you.
F. General: You acknowledge that you have read this Agreement,
understand it, and that by using the "Software" you agree to be bound by its
terms and conditions. You further agree that it is the complete and exclusive
statement of the agreement between FarStone and you, and supersedes
any proposal or prior agreement, oral or written, and any other
5

communication between FarStone and you relating to the subject matter of
this Agreement. No additional or any different terms will be enforceable
against FarStone unless FarStone gives its express consent, including an
express waiver of the terms of this Agreement, in writing s igned by an
officer of FarStone. You assume full responsibility for the use of the
"Software" and agree to use the "Software" legally and responsibly.
Should any provision of this Agreement be declared unenforceable in any
jurisdiction, and then such provision sha ll be deemed severable from this
Agreement and shall not affect the remainder hereof. FarStone reserves all
rights in the “Software” not specifically granted in this Agreemen t.
Should you have any questions concerning this Agreement, you may
contact FarStone by writing to:
FarStone Technology, Inc.
Legal Department
15 Hammond Dr. Suite 304
Irvine, CA 92618
6

Contents
Chapter 1 Introduction ....................................... 9
1.1 What is GameDrive®? 9
1.2 Features and Benefits 10
Chapter 2 Installation....................................... 12
2.1 System Requirements 12
2.2 Installing GameDrive®™ 12
2.3 Uninstalling GameDrive® 13
Chapter 3 Starting GameDrive®........................ 14
3.1 Launching GameDrive® 14
3.1.2 The GameDrive® Manager 14
3.1.2 Frequently Used Buttons 16
3.2 The GameDrive® Start Menu 17
Chapter 4 Building Virtual CDs (VCDs).............. 19
4.1 Building VCDs fr om the CD Drive 19
4.2 Building VCDs from Mixed Mode CDs 21
4.3 Converting between ISO 9660 Images and VCDs
23
Chapter 5 Getting Around in GameDrive®......... 25
5.1 Adding VCD files to Run on Your GameDrive®
25
5.1.1 Adding VCD Files from the Hard Drive 25
5.1.1 Adding VCD Files from the Internet 26
5.2 Using Cabinets to Organiz e VCDs 27
5.3 Inserting a VCD 27
5.4 Ejecting a VCD 27
5.5 VCD Properties 28
7

5.5.1 Opening the VCD Properties window 28
5.5.2 Changing the VCD Description 28
5.5.3 Changing the Auto-run command 28
5.5.4 Changing the Default Virtual Drive 28
5.5.5 Using Hot-Keys to run VCDs 28
5.6 Adding Additional Virtual Drives 29
5.7 Changing a Drive Letter 29
5.8 Deleting VCD icons or VCD files 29
5.9 Searching VCDs 30
5.10 Extracting files from the VCD 30
5.11 Extracting Audio Tracks 30
5.12 GameDrive® Manager Settings 31
5.13 Running VCDs Using Command Line Syntax 31
5.14 Live Update 32
5.15 Enter a new serial number 33
5.16 Rapid Cache 34
8
Chapter 1
Introduction
Chapter 1 Introduction
1.1 What is GameDrive®?
GameDrive® is an innovative software program that
emulates the computer’s physical CD/DVD-ROM drive,
enabling you to run PC games directly from your hard drive
without the use of the physical CD/DVD drive or the actual
disc.
9

1.2 Features and Benefits
Improved copy protection support ability
GameDrive® is compatible with StarForce V1/V2/V3 (new),
SecuRom *New V5 (new), DVD SecuROM *New (new),
SafeDisc1, SafeDisc2, SecuROM, LaserLock, CD Cops and
more.
Add VCDs from the Internet
With GameDrive®, you can add a VCD (*.VCD) that is
shared on the Internet or a LAN into the GameDrive®.
VCD Cabinet
Instead of adding VCDs all in one place, the new added
Cabinet function allows you to sort your VC Ds and put them
into different “cabinets” in the GameDrive® Manager.
Export Audio Tracks
Extract audio tracks from an existing audi o CD , either a real
CD or a virtual CD, and store them as an audio file (*.WAV)
or a MP3 file on the hard disk.
#1 in CD/DVD-ROM game compatibility:
GameDrive® supports the newest and most popular games
available today including copy-protected titles.
Run Multiple CDs/DVDs Simultaneously:
GameDrive® allows you to run multiple CD/DVDs at the
same time.
Optimized CD/DVD performance:
Discs are played at hard drive speed (equivalent to a 200x
CD/DVD drive). GameDrive® also comes with advanced
caching technology that can reduce CD/DVD access times b y
up to 75%.
Fully integrated with Windows:
10

GameDrive®'s XP-style interface is completely
integrated with Windows Explorer and the Windows
Device Manager.
Enable/disable CD auto-run, change CD drive let ters, or
set your own hot-keys to run your CDs.
Easy Management
GameDrive® converts the contents of the entire CD into a
single VCD file on the hard drive. Disk and file management
are greatly simplified.
Ideal for Notebook and Laptop PCs
GameDrive® extends the battery life of your notebook and
eliminates the need to carry CDs/DVDs when you trav el .
11

Chapter 2
Installation
Chapter 2 Installation
2.1 System Requirements
• Windows 2000/XP/Server 2003
• CD/DVD drive
• 25 MB of hard disk space
• 128MB RAM or better
• Intel Pentium (or compatible) 233 MHz processor or
better
Note: A virtual CD drive does not take any appreciable
amount of hard drive space. However, 19 KB of RAM
is reserved for each virtual drive when a VCD is
inserted.
2.2 Installing GameDrive®
Insert the GamelDrive CD-ROM disc. The setup program
should start automatically. If the auto-run function does not
work, run the setup.exe file directly. Also, if you are
installing from a network or a hard drive, double-click
12

setup.exe to launch the Windows Installer program.
Follow the instructions step by step to the end of the
installation process.
2.3 Uninstalling GameDrive®
To uninstall th e GameDrive® program, select Start in the
Windows taskbar, and then select either
Programs/GameDrive®/Uninstall GameDrive® or
Start/Settings/Control Panel and double-click on the
Add/Remove Programs icon to open the Add/Remove
Programs screen. Select GameDrive®, and then select
Add/Remove. Either method will launch the GameDrive®
Uninstall Wizard. Follow the instructions step by step to the
end of the uninstall process.
The uninstall program will remove all files created by
GameDrive®, except the VCD files (files with the “VCD”
extension). These VCD files can be deleted by using
Windows Explorer.
13

Chapter 3
Starting
GameDrive®
Chapter 3 Starting GameDrive®
3.1 Launching GameDrive®
After installation, you can launch GameDrive® directly
without restarting the computer.
Double-click the shortcut icon
launch GameDrive® manager.
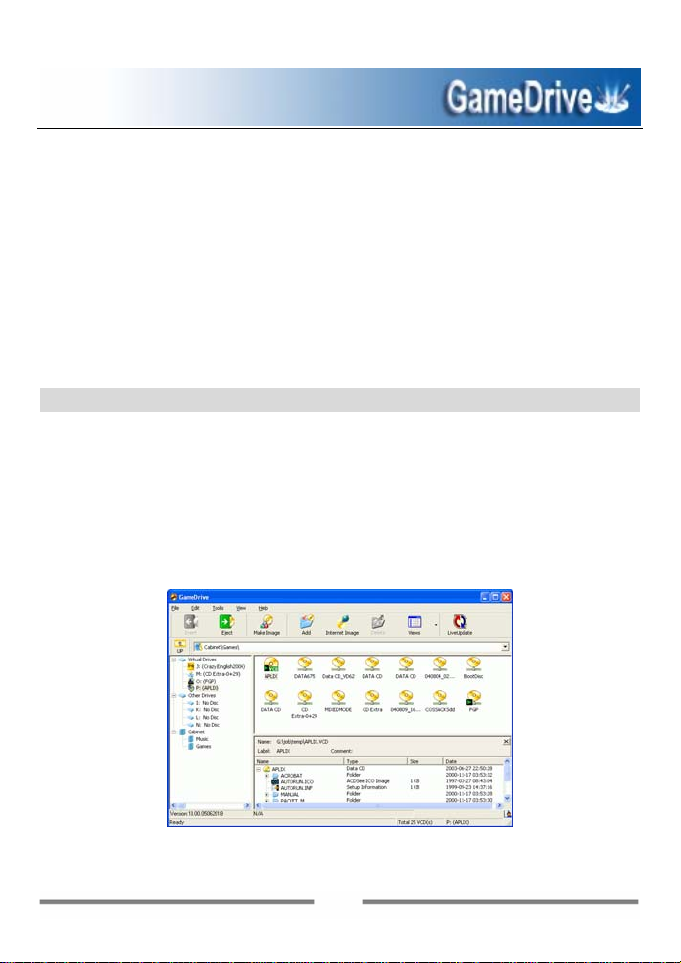
3.1.2 The GameDrive®
The figure above shows GameDrive® emulating three
CD-ROM/DVD-ROM drives – drive H, R and T . The left column
Manager
14
on the desktop to

lists each virtual drive and drive letter with the description of
the VCD that is currently loaded. The upper right pane
displays all VCDs and cabinets available.
The address bar in the middle enables you to select a cabinet
quickly . Click the drop button to select a cabinet. Click the UP
button to go to the up level cabinet.
You can create a shortcut for a VCD on the desktop by
right-clicking the VCD and then selecting shortcut from the
popup menu.
Note: Select one VCD at a time. Only one shortcut can be
created at a time.
Yo u can enable the auto-run func tion for the selected virtual
drives, or for all (virtual) drives.
Right-click on a virtual drive and select Auto-Run to enable
the auto-run function for it. The cu rrent user will need to log
off and log back on to the computer for changes to take
affect.
Right-click “Virtual Drives” (the heading) and select
Auto-run (All Virtual Drives) to enable the auto-run
function for all virtual drives. The current user w ill need to
log off and log back on to the computer for changes to take
affect.
Right-click “Virtual Drives” (the heading) and select
Auto-run (All Drives) to enable the auto-run function for
all drives, including the physical drive. The current user will
need to log off and log back on to the computer for cha nges
to take affect.
15

Select a VCD added in the GameDrive® Manager and you
can view the content of it in the pane below. Right-click a file
or several selected files in the content pane and you will see
three options:
¾ Open: Open the selected file.
¾ Export: Export the selected file and store it on the hard
disk. With this function, you can:
Export any file in a multi-session VCD and store it on
the hard disk. (Note: Some files in a multi-session
cannot be seen or accessed through Windows
Explorer.)
Export audio tracks from a Mixed-Mode CD or
CD-Extra such as *.wav files, and store them on the
hard disk.
¾ Properties: View the properties of the selected file.
3.1.2 Frequently Used Buttons
Insert
Inserts a VCD into a virtual drive.
Double-clicking on the VCD icon in
GameDrive®™ Manager has the same effect.
Eject
Ejects a VCD from a virtual drive.
16

Make Image
Converts the contents of a CD into a VCD file.
CD-ROMs, Mixed Mode CDs, Photo CDs, Video
CDs, DVD-ROMs (Data Mode) and Unprotected
DVD Videos.
Add Internet Image
Adds a VCD file shared on the Internet or LAN
to the GameDrive® Manager.
Add VCD
Adds a VCD file to the GameDrive®
Manager.
Delete VCD
Removes a VCD from the GameDrive®
Manager.
3.2 The GameDrive® Start Menu
After launching GameDrive®, a GameDrive® icon will be
displayed in the
Note: The GameDrive® icon will not be displayed if you
have disabled the VD Task function. To disable
GameDrive® Task, go to View Æ Options Æ
Miscellaneous Settings and clear the “Run VD Task while
launching GameDrive® Manger” box.
Windows system tray near the clock.
17

Double-click the icon to launch the GameDrive®
Manager.
Right-click
the icon to open the GameDrive® Start
Menu.
The Start Menu provides a quick entry to the most commonly
used functions of GameDrive®.
18

Chapter 4
Building a Virtual
CD (VCD)
Chapter 4 Building Virtual CDs (VCDs)
4.1 Building VCDs from the CD Drive
To use GameDrive®, first create an image of a CD on your
hard drive. This image is known as a Virtual CD or VCD. Y ou
can build a VCD from almost all types of Game CD.
T o begin building a VCD, using one of the following methods:
1. Select Make Image
2. Select File from the menu bar and select Make Image.
3. Right-click the GameDrive® icon in the system tray and
select Make Image.
4. Use the shortcut key Ctrl+B.
5. Open Windows Explorer and right-click the inserted
physical drive and select Make Image /GameDrive®.
on the toolbar.
19

Follow the steps below:
Step 1 Select the physical CD drive and then select Next.
Step 2 GameDrive® will verify that the selected hard drive
has enough free space to store the new VCD. Use the file
browser button
to select a location in which to save the
new VCD file and give the new fil e a name. (If no new name
is entered, the new VCD will use the na me of the folder in
which it is to be stored as the VCD file name.)
Step 3 Select the CD read method and use data
compression if desired. The default read method
“Intelligent Extraction” is successful for most CD formats.
In most cases, you can use Intelligent Extraction to
build your Game VCDs. However, due to the nature of
encryption, some of the Game CDs require that they be built
using the Other Protected CD Type. If you know which
protection is on the CD, you can choose to build with that
protection by using Other Protected CD type.
Using data compression will save hard disk space but will
also require a longer VCD build time.
20

Step 4 Enter a description of the new VCD in the descri ption
box.
Step 5 (optional) If the CD does not have an auto-run file,
then you can specify a program to run when the VCD is
inserted. You can use the file browse button
to locate
the executable program.
Step 6 (optional) If you want to eject the CD from the CD
drive when the build operation is complete, check ‘Eject the
VCD on completion of the Build process. Then select
Next to continue.
Step 7 (optional) Y ou can set a password for V CD fil es. The
password will be required if you attempt to insert the VCD or
view the content of the VCD.
Step 8 GameDrive® will then display the attributes of the
VCD about to be created. Select Next to begin the build, or
click Back to edit your settings.
Step 9 With the VCD successfully built, select Finish to
close the VCD Build window.
4.2 Building VCDs from Mixed Mode CDs
If you are making an Image from a Mixed Mode or a CD Extr a,
follow the steps below:
Step 1 Select the physical CD drive and then select Next.
Step 2 Check that selected hard drive has sufficient ‘Free
Space’ to store the new VCD, then use the File Browser to
select a location to save the VCD and give the new VCD file a
name. If no new name is entered then the new VCD will use
the name of the folder in which it is to be stored, as the VCD
file name.
21

Step 3 Select the CD read method and the CD record
method.
In most cases, you can use Intelligent Extraction to
build your Game VCDs. However, due to the nature of
encryption, some of the Game CDs require that they be built
using the Other Protected CD Type. If you know which
protection is on the CD, you can choose to build with that
protection by using Other Protected CD type.
Using data compression will save hard disk space but will
require a longer VCD build time.
Select Record Data Tracks to include only the data tracks
of the mixed mode CD in the VCD.
Select Record Audio Tracks to include only the audio
tracks of the mixed mode CD in the VCD.
Select both Record Data Tracks and Record Audio
Tracks to include both the Audio and Data Tracks in the
VCD.
Step 4 If you have selected Record Audio Tracks,
selecting the Next button will open the Select T racks window.
(If selecting Record Data Tracks only, the Build VCD
manager will go directly to Step 4.)
Select the audio tracks to be included in the VCD by checking
the appropriate boxes in the Tracks list.
Select the Preview track play button
track. Select Volume
volume level.
to listen to the
to set the Preview track’ s
22

Step 5 T o complete the building process, please refer to step
4 to step 9 in section 4.1.
4.3 Converting between ISO 9660 Images and VCDs
You can convert an ISO 9660 image file (*.ISO file) into a
VCD file (*.VCD file) and vice versa.
To convert files, follow the steps below:
Step 1: Select File Æ Convert, or press Ctrl+G to open
the Convert File window.
Step 2: Select the file browser button to open the Windows
file browser and locate the ISO or VCD file.
Step 3: Select the desired ISO file, and then select Open to
continue.
Step 4: Select Convert to start the conversion.
23

Note: Audio, DVD and compressed VCD files cannot be
converted into ISO files.
24

Chapter 5
Getting Around in
GameDrive®
Chapter 5 Getting Around in GameDrive®
5.1 Adding VCD files to Run on Your GameDrive®
T o use an existing VCD file on your hard drive, on the Internet
or on another computer in a network, you must first add a
VCD icon to the GameDrive® Manager window.
5.1.1 Adding VCD Files from the Hard Drive
To use a VCD f ile that is on your hard drive or on another
computer in a network, use any of these methods:
Method 1: Drag and drop the VCD file from Windows
Explorer into GameDrive® Manager.
Method 2: Select File from GameDrive® Manager, and then
select Add to open the Add VCD browser. Use the file
browser to select and add VCD files.
Method 3: Right-click in the right pane of the GameDrive®
Manager and select ADD to open the Add VCD window.
25

Method 5: Click the Add button to open the Add VCD
window.
Method 6: Use the Search window (See Section 5.9) to
locate and add GameDrive® type files.
5.1.1 Adding VCD Files from the Internet
To use a VCD file that is on the Internet, first you must
confirm the IP address (or website name) and name of the
image file. Also make sure it is a shared file. Use any of these
methods to add Internet images:
Method 1: Select File from GameDrive® Manager, and then
select Add Internet Image to open the Add Internet Image
dialog box. Type in the IP address and file name to add the
VCD file.
Method 2: Click the Internet Image button
open the Add Internet Image dialog box.
26
to

5.2 Using Cabinets to Organize VCDs
A cabinet, which is similar to a folder in Windows Explorer , is
used to store multiple VCDs. You can sort your VCDs into
different categories and put them into different cabinets in
the GameDrive® Manager. Using cabinets to organize your
various VCDs, you can save time locating a specific VCD from
so many VCDs all in one manager.
To add a new cabinet, right-click on any cabinet icon in the
left pane of the GameDrive® Manager and select New
Cabinet.
To add VCDs to an existing cabinet, simply drag and drop
VCDs from the GameDrive® Manager (the root cabinet). Y ou
can also add a VCD directly into a cabinet by using any of the
methods described in section 5.1 Adding VCD Files to Run on
Your Virtual Drives.
To delete a cabinet, right-click the desired cabinet, and then
select Delete or click the Delete button
.
5.3 Inserting a VCD
Click on a VCD to select it, and then click Insert
5.4 Ejecting a VCD
Click on an inserted VCD to select it, and then select Eject
.
27
.

5.5 VCD Properties
The VCD Properties window shows VCD attributes such as its
storage
window you can
auto-run command, set its
hot-key to insert the VCD.
location, file size and CD ty pe. From the Properties
also edit the VCD description, add an
default virtual drive or assign a
5.5.1 Opening the VCD Properties window
T o open the VCD Properties window, right-click on a VCD icon
select Properties.
and
5.5.2 Changing the VCD Description
Open the VCD Properties window and select the General tab.
Enter the new
description into the Description box.
5.5.3 Changing the Auto-run command
Open the VCD Properties window and select the Setting tab.
Use the browse button to select the location of the progr am.
5.5.4 Changing the Default Virtual Drive
Open the VCD Properties window and select the Setting tab.
Select the Default Drive drop box and select a new default
drive.
5.5.5 Using Hot-Keys to run VCDs
Open the VCD Properties window and select the Setting tab.
Tab down to the hot-keys box and press a key (for example,
pressing “C” will create Ctrl +Alt + C as the new hot-key).
Press Ctrl, then Alt, then the character key to insert the
VCD.
28

5.6 Adding Additional Virtual Drives
To change the nu mber of virtual drives in your system (the
maximum is 23), select View on the menu bar then Drivers
or select the Drives
button to open the Drives dialog.
Select OK to finish adding additional virtual drives. The
system will prompt you to restart your computer.
Note: The number of virtual drives
is not the same on all
computers. The symbols indicate the number of usable
drives. If new devices such as another physical CD-ROM
drive are to be installed, you will have to leave a drive letter
free so the system can accommodate the new drive.
5.7 Changing a Drive Letter
You can change the drive letter for any drive on your system,
including the physical drive. Right-click the desired virtual
drive and select Edit Drive to change the drive letter.
5.8 Deleting VCD icons or VCD files
Step 1: Click on the VCD you want to remove from the
GameDrive® Manager and then select File on the menu bar
and Delete VCD, or press Delete on the keyboard.
Step 2: Select OK to remove only the VCD icon from the
GameDrive® Manager. To remove both the VCD icon and
its corresponding VCD file from the hard disk, check the
Delete both the VCD icon and the VCD file box, and then
select OK.
29

5.9 Searching VCDs
Select File and Search or use CTRL+F to open the Search
VCD dialog box and then select Search to start searching.
Select a certain file or multiple files (by holding CTRL) and
select Add to add them into the GameDrive® Manager
window
5.10 Extracting files from the VCD
Users may obtain files from the VCDs even without inserting
them into the virtual drive. Click on a VCD icon in the
GameDrive® tray and all of its contents will be displayed in
the bottom-right frame. Then right-click on a selected file
and select Extract from the drop menu.
5.11 Extracting Audio Tracks
GameDrive® allows you to extract audio tracks from an
audio CD, or from the audio track of a Mixed-Mode CD or a
CD Extra, either a real CD or a virtual CD, and store them as
an audio file (*.WAV) or a MP3 file on the hard disk.
Use any of these methods to open the Extract Audio screen.
Click the Drive drop button and select a virtual drive with
the desired VCD inserted, or select the physical drive with an
existing disc inserted.
You can pre view a track. To preview a track, select one track
by title, and click the Play button.
Note: Clicking this button
controls are similar to any audio player.
will eject the disc. The other
Before extracting a track, you can set wave format for the
MP3 file by clicking Select Wave Format button.
30

After you have set the wave format for each track to be
exported, click Extract and choose a location to save the
file.
5.12 GameDrive® Manager Settings
From the File menu in GameDrive® Manager, select Options
to open the settings Option window. Here you can set on
toolbar buttons, animation on/off, build size, device, etc.
5.13 Running VCDs Using Command Line Syntax
Using the command line syntax for GameDrive® is a
powerful way of automating repetitious tasks.
Each command starts with the term "GDrive." A virtual driv e
can be referenced by its drive letter (e.g. E:, F:, G:) or a
number corresponding to the position of the virtual drive.
For example, if drives E, F and G are virtual drives, then drive
F can be referred to as “2:”. Once a virtual drive is
referenced, you can then issue a command to tell
GameDrive® what to do next.
Available commands are:
1. Gdrive <drive letter:> <VCDfilename> /I [@cmd] [/M]
[/NA] =>
2. Gdrive <drive letter:> /E [/M] => Eject VCD
If successful, returns 0, otherwise 1.
3. GDrive /drive: Returns the number of virtual drives
available
Note: Commands shown in square brackets [ ] are
optional.
4. /I Insert a VCD
5. /E Eject a VCD
6. [/M] Show message
Insert VCD
31

7. [@<path><filename>] Run a program on the VCD.
To use this, you must include the full path showin g the
location of the program to be run and the name of the
executable file.
5.14 Live Update
If your computer is connected to the Internet and the
Automatic Live Update is enabled, your GameDrive®
program will automatically update itself whenever a newer
version is available.
You can also manually update your GameDrive® software
and play more encrypted CD/DVD-ROM titles.
T o run Liv e Update and get the latest files from the F arStone
website, please follow these instructions:
Step 1 Click the LiveUpdate button
from the
GameDrive® toolbar to launch the GameDrive® LiveUpdate
program.
z If you have not registered your personal information
with FarStone, follow the process below:
Step 2 Select the Register now button and click Next to
continue.
Step 3 Enter the required register information in the
Register window and click Next. A prompt window will
display to notify you registered successfully. Click Next to
continue.
Note: FarStone will send you an E-mail containing your
Registration ID, which will be needed the next time you run
LiveUpdate manually. Be sure to enter a correct E-mail
32

address and remember it. If you forget your Registration ID ,
we can resend it to you upon request.
z If you have registered before, follow the process below:
Step 2 Select I have registered before and click Next to
continue.
Step 3 Enter your Registration ID that was sent to your
mailbox when you first registered your information with
FarStone. Click Next to continue.
Note: If cannot find the Registered ID, you can enter your
E-mail and click the Retrieve ID button. We will
immediately resend your Registered ID to you. BE SURE THE
E-MAIL ADDRESS ENTERED HERE IS THE SAME ONE YOU
PROVIDED WHEN YOU REGISTERED THE FIRST TIME.
Otherwise, we cannot identify your information nor help you
find your Registration ID.
Step 4 Live Update will automatically search for new
components for GameDrive®. Once it collects all of the
updates, click Next to download and install them.
Step 5 After all of the components are installed on your
computer, click Finish to close LiveUpdate.
5.15 Enter a new serial number
Generally speaking, it is illegal to install GameDrive® with
the same serial number on more than one computer in a
network (for more information, please refer to the License
Agreement). However, you can use either of the following
methods to enter a new serial number (which can be
purchased from FarStone) and enable GameDrive® to be
run on more than one computer simultaneously.
33

Right-click the GameDrive® icon from the system tray and
select Enter new serial number from the popup menu.
5.16 Rapid Cache
Rapid Cache® is a unique CD caching utility program that
uses an incremental caching algorithm found only in
VirtualDrive.
Select FileÆRapid Cache to launch the Rapid Cache
Manager:
You can view detailed information on a (virtual) disc drive on
the CD Drive information tab, or a (virtual) disc inserted in a
drive on the CD-ROM Properties tab.
34
 Loading...