

Page 1
Page 2

Copyright Notice
No part of this publication may be copied, transmitted, stored in a retrieval system or
translated into any language in any form or by any means without the expressed written
permission of FarStone Technology, Inc.
FarStone gr ants you the right to use one copy of the enclosed softw are program (“SOFTWARE”)
on a single computer . If the SOFTWARE is installed on a network, or more than one user can run
the SOFTWARE at the same time, you must purchase an additional license for each additional
user or computer.
Trademark
FarStone® is a trademark of FarStone Technology, Inc. Microsoft, Windows® and MS-DOS® are
registered trademarks of Microsoft Corporation. Other product names mentioned in this User’ s
Guide may be trademarks or registered trademarks of their respective companies.
FarStone Technology, Inc.
U.S. Headquarters:
6 Morgan, Suite 160
Irvine, CA 92618
Phone: (949) 458-3666
Fax: (949) 458-3633
www.farstone.com
Asia-Pacific Offices
10F-1B, No. 207, DunHua North Rd., Taipei, 105, Taiwan
Phone: 886-2-2546-9898
Fax: 886-2-2546-3838
www.farstone.com.tw
Technical Support
Answers to frequently asked questions are posted on our website at
www.farstone.com/support/faqs
Support at www.farstone.com/support
. For other support issues, please contact FarStone Technical
.
Copyright
©
2000-2008 FarStone Technology, Inc. All rights reserved.
Page 3

Software License Agreement
FARSTONE TECHNOLOGY, INC. (FARSTONE) END USER LICENSE AGREEMENT FOR
DRIVECLONE NETWORK, HEREAFTER REFERRED TO AS THE “SOFTWARE”
PLEASE READ CAREFULLY: THE USE OF THIS “SOFTWARE” IS SUBJECT TO THE “SOFTWARE”
LICENSE TERMS OF FAR STONE AND O THER LICENSORS WHO’S SOFTWARE MAY BE BUNDLED
WITH THIS PRODUCT.
BY YOUR USE OF THE “SOFTWARE” INCLUDED WITH THIS PRODUCT YOU AGREE TO THE
LICENSE TERMS REQUIRED BY THE LICENSOR OF TH E “SOFTWARE” , AS SET FOR TH BELOW . IF
YOU DO NOT AGREE TO THE LICENSE TERMS APPLICABLE TO THE “SOFTWARE”, YOU MAY
RETURN THE ENTIRE UNUSED PRODUCT FOR A FULL REFUND.
LICENSE AND WARRANTY:
The software that accompanies this license (the “Software”) is the property of FARSTO NE or its
licensors and is protected by copyright law. While FARSTONE continues to own the Software,
you will have certain rights to use the Software after your acceptance of this license. Except as
may be modified by a license addendum which accompanies this license, your rights and
obligations with respect to the use of this Software are as follows:
A. Single User License:
(a) Use the “Software” on a single computer system or network, and only by a single user
at a time. If you wish to use the “Software” for more users, you will need an additional
License for each user.
(b) Make one copy of the “Software” in machine-readable form solely for back-up purposes
provided you reproduce FarStone’s copyright proprietary legends. Notwithstanding the
foregoing, the “Software” may be used on the home, laptop or other secondary computer
of the principal user of the “Software”, and an additional copy of the “Software” may be
made to support such use. As used in this License, the “Software” is “in use” when it is
either loaded into RAM or installed on a hard disk or other permanent memory device. The
“Software” may be “in use” on only one computer at any given time. (Different License
terms and fees are applicable for networked or multiple user applications.) As a specific
condition of this License, you agree to use the “Software” in compliance with all applicable
laws, including copyright laws, and that you will not copy, transmit, perform or distribute
any audio or other content using the “Software” without obtaining all necessary Licenses or
permissions from the owner of the content.
Page 4

B. Multiple User License:
Make one copy of the “Software” in machine-readable form solely for back-up purposes,
provided you reproduce FarStone’s copyright proprietary legends.
You must acquire and dedicate a License for each separate computer on which any part or
portion of the “Software” is installed or run As used in this License, the “Software” or any part
or portion of the “Software” is “in use” when it is either loaded into RAM or installed on a hard
disk or other permanent memory device including any networke d or shared environment where
either direct or indirect connections are made through software or hardware which pools or
aggregates connections.
As a specific condition of this License, you agree to use the “Software” in compliance with all
applicable laws, including copyright laws, and that you will not copy, transmit, perform or
distribute any audio or other content using the “Software” without obtaining all necessary
Licenses or permissions from the owner of the content.
C. Restrictions:
You may not distribute copies of the “Software” to others or electronically transfer the
“Software” from one computer to another over a network. Y ou may not post or otherwise make
available the “Software”, or any portion thereof, in any form, on the Internet. You may not use
the “Software” in a computer service business, including in time-sharing applications. The
“Software” contains trade secrets and, in order to protect them, you may not decompile,
reverse engineer, disassemble, or otherwise reduce the “Software” to a human-perceivable
form. YOU MAY NOT MODIFY, ADAPT, TRANSLATE, RENT, LEASE, LOAN, RESELL FOR PROFIT,
DISTRIBUTE, NETWORK OR CREATE DERIVATIVE WORKS BASED UPON THE “SOFTWARE” OR
ANY PART TH EREOF.
D. Limited Warranty:
FarStone warrants that the media on which the Software is distributed will be free from defects
for a period of thirty (30) days from the date of delivery of the Software to you. Your sole
remedy in the event of a breach of this warranty will be that FarStone will, at its option, replace
any defective media returned to F arStone within the warr anty period or refund the money you
paid for the Software. FarStone does not warrant that the Software will meet your
requirements or that operation of the Software will be uninterrupted or that the Software will
be error-free.
THE ABOVE WARRANTY IS EXCLUSIVE AND IN LIEU OF ALL OTHER WARRANTIES, WHETHER
EXPRESS OR IMPLIED, INCLUDING THE IMPLIED WARRANTIES OF MERCHANTABILITY,
FITNESS FOR A PAR TICULAR PURPOSE AND NONINFRINGEMENT. THIS WARRANTY GIVES YOU
SPECIFIC LEGAL RIGHTS. YOU MAY HAVE OTHER RIGHTS, WHICH VARY FROM STATE TO
STATE.
E. Limitation of Liability:
Page 5

IN NO EVENT WILL FARSTONE OR ITS LICENSORS BE LIABLE TO YOU FOR ANY INCIDENTAL,
CONSEQUENTIAL OR INDIRECT DAMAGES, INCLUDING ANY LOST PROFITS, LOST SAVINGS,
OR LOSS OF DATA, EVEN IF FARSTONE OR A LICENSOR HAS BEEN ADVISED OF THE
POSSIBILITY OF SUCH DAMAGES, OR FOR ANY CLAIM BY ANY OTHER PARTY. Some states do
not allow the exclusion or limitation of special, inciden tal, or consequential damages, so the
above limitation or exclusion may not apply to you.
F. General:
You acknowledge that you have read this Agreement, understand it, and that by using the
“Software” you agree to be bound by its terms and conditions. You further agree that it is the
complete and exclusive statement of the agreement between FarStone and you, and
supersedes any proposal or prior agreement, oral or written, and any other communication
between FarStone and you relating to the subject matter of this Agreement. No additional or
any different terms will be enforceable against FarStone unless FarStone gives its express
consent, including an express waiver of the terms of this Agreement, in writing sign ed by an
officer of FarStone. Y ou assume full responsibility for the use of the “Software” and agree to use
the “Software” legally and responsibly.
Should any provision of this Agreement be declared unenforceable in any jurisdiction, and then
such provision shall be deemed severable from this Agreement and shall not affect the
remainder hereof. F arStone reserves all rights in the “Software” not specifically granted in this
Agreement.
Should you have any questions concerning this Agreement, you may contact FarStone by
writing to:
FarStone Technology, Inc.
Legal Department
6 Morgan, Suite 160
Irvine, CA 92618
Page 6

Contents
Chapter 1: Introduction............................................................................... 9
1.1 Product Overview .......................................................................................................9
1.2 Software Structure .....................................................................................................9
1.3 Powerful Backup Features.......................................................................................... 10
1.4 Other Features and Benefits....................................................................................... 11
Chapter 2: Installing and Uninstalling DriveClone Network....................... 12
2.1 System Requirements ...............................................................................................12
2.2 Installing DriveClone Network.....................................................................................12
2.2.1 Installing the Network Manager..................................................................13
2.2.2 Installing the Remote Manager...................................................................15
2.2.3 Installing the Client...................................................................................15
2.3 Uninstalling DriveClone Network .................................................................................17
Chapter 3: DriveClone Specific Terminology.............................................. 18
3.1 File Backup.............................................................................................................. 18
3.2 System Snapshot ..................................................................................................... 18
3.3 Hard Drive Imaging .................................................................................................. 18
3.4 Full and Incremental Backups..................................................................................... 18
3.5 DriveClone Universal Restore...................................................................................... 19
3.6 DriveClone Secure Area............................................................................................. 19
3.7 Startup Recovery Manager......................................................................................... 19
3.8 PXE and Network Recover Manager............................................................................. 19
3.9 VSS and Database Support ........................................................................................ 19
3.9.1 VSS Concepts ..........................................................................................20
3.9.2 VSS Limitations........................................................................................21
Chapter 4: The Remote Manager ............................................................... 22
4.1 The Remote Manager Main Console .............................................................................22
Page 7

4.1.1 Connect to a Network Manager...................................................................22
4.1.2 Install Components...................................................................................22
4.2 Tools Tab................................................................................................................. 25
4.2.1 Create a Bootable Rescue Disk ...................................................................25
4.2.2 Preview Backup Image..............................................................................26
4.2.3 Check Image Integrity...............................................................................26
4.2.4 Export PXE Image.....................................................................................27
Chapter 5: The Network Manager.............................................................. 28
5.1 The Network Manager Main Console............................................................................ 28
5.1.1 Quick Start..............................................................................................28
5.1.2 Client List................................................................................................29
5.1.3 Group Jobs..............................................................................................32
5.1.4 View Logs................................................................................................33
5.2 Backing up Client Computers...................................................................................... 33
5.2.1 Create a System Snapshot.........................................................................34
5.2.2 Create Complete Backups for Client Computers.............................................35
5.2.3 File Backup..............................................................................................38
5.3 Restoring Client Computers........................................................................................ 40
5.3.1 Return to a System Snapshot.....................................................................41
5.3.2 Restore a Client Computer.........................................................................42
5.3.3 Restore My Computer (Universal Restore)....................................................43
5.3.4 Restore Files............................................................................................44
5.4 Tools Tab................................................................................................................. 45
5.4.1 Create a Bootable Rescue Disk ...................................................................46
5.4.2 Preview Backup Image..............................................................................47
5.4.3 Check Image Integrity...............................................................................47
5.4.4 Export PXE Image.....................................................................................47
Chapter 6: The Client................................................................................. 49
6.1 Enter the DriveClone Network Client Pre-OS Manager ....................................................50
6.1.1 Boot from Bootable Rescue Disk .................................................................51
6.1.2 Boot from PXE Server................................................................................51
6.1.3 Install Driver in Pre-OS .............................................................................54
6.2 DriveClone Network Client Manager in Pre-OS Mode ...................................................... 55
6.2.1 Restore My Computer in Pre-OS..................................................................56
Page 8

6.2.2 Perform Universal Restore in Pre-OS ...........................................................57
6.2.3 Image Integrity Check...............................................................................57
6.2.4 Return to a System Snapshot in Pre-OS.......................................................58
6.2.5 Uninstall..................................................................................................58
Chapter 7: Glossary................................................................................... 59
Chapter 8: Appendix.................................................................................. 60
8.1 Frequently Asked Questions....................................................................................... 60
Page 9

Chapter 1: Introduction
1.1 Product Overview
DriveClone Network is a powerful, all-in-one, centrally managed data backup an d hard disk
imaging application that creates ongoing “snapshots” and hard drive images of all systems on
a local area network. DriveClone Network allow s a network administrator to remotely deploy
DriveClone Network Manager and DriveClone Network Client Module; remotely back up
selected files, folders, Windows applications settings, even the entire disks and partitions to an
external location for a single client, one group or domain; remotely restore client module from
any existing image file; or even remotely monitor the whole progress by viewing the real time
status. Unwanted downloads and installations are quickly removed from your client computers.
Deleted system and application files are restored with a f ew mouse clicks.
The Pre-OS manager allows the administrator to restore the client system even if the operating
system does not run.
System Snapshot, the unique technology developed by FarStone, captures the system status
within several seconds and stores the created “snapshots” in the Secure Area. (Secure Area is
a hidden protected space which is created from the free space on the local hard drive.)
With a newly added function, Universal Restore, user does not need to restore the image back
to the original hardware.
1.2 Software Structure
The software includes three components, Network Manager, Remote Manager, and Client
Module
Page 10
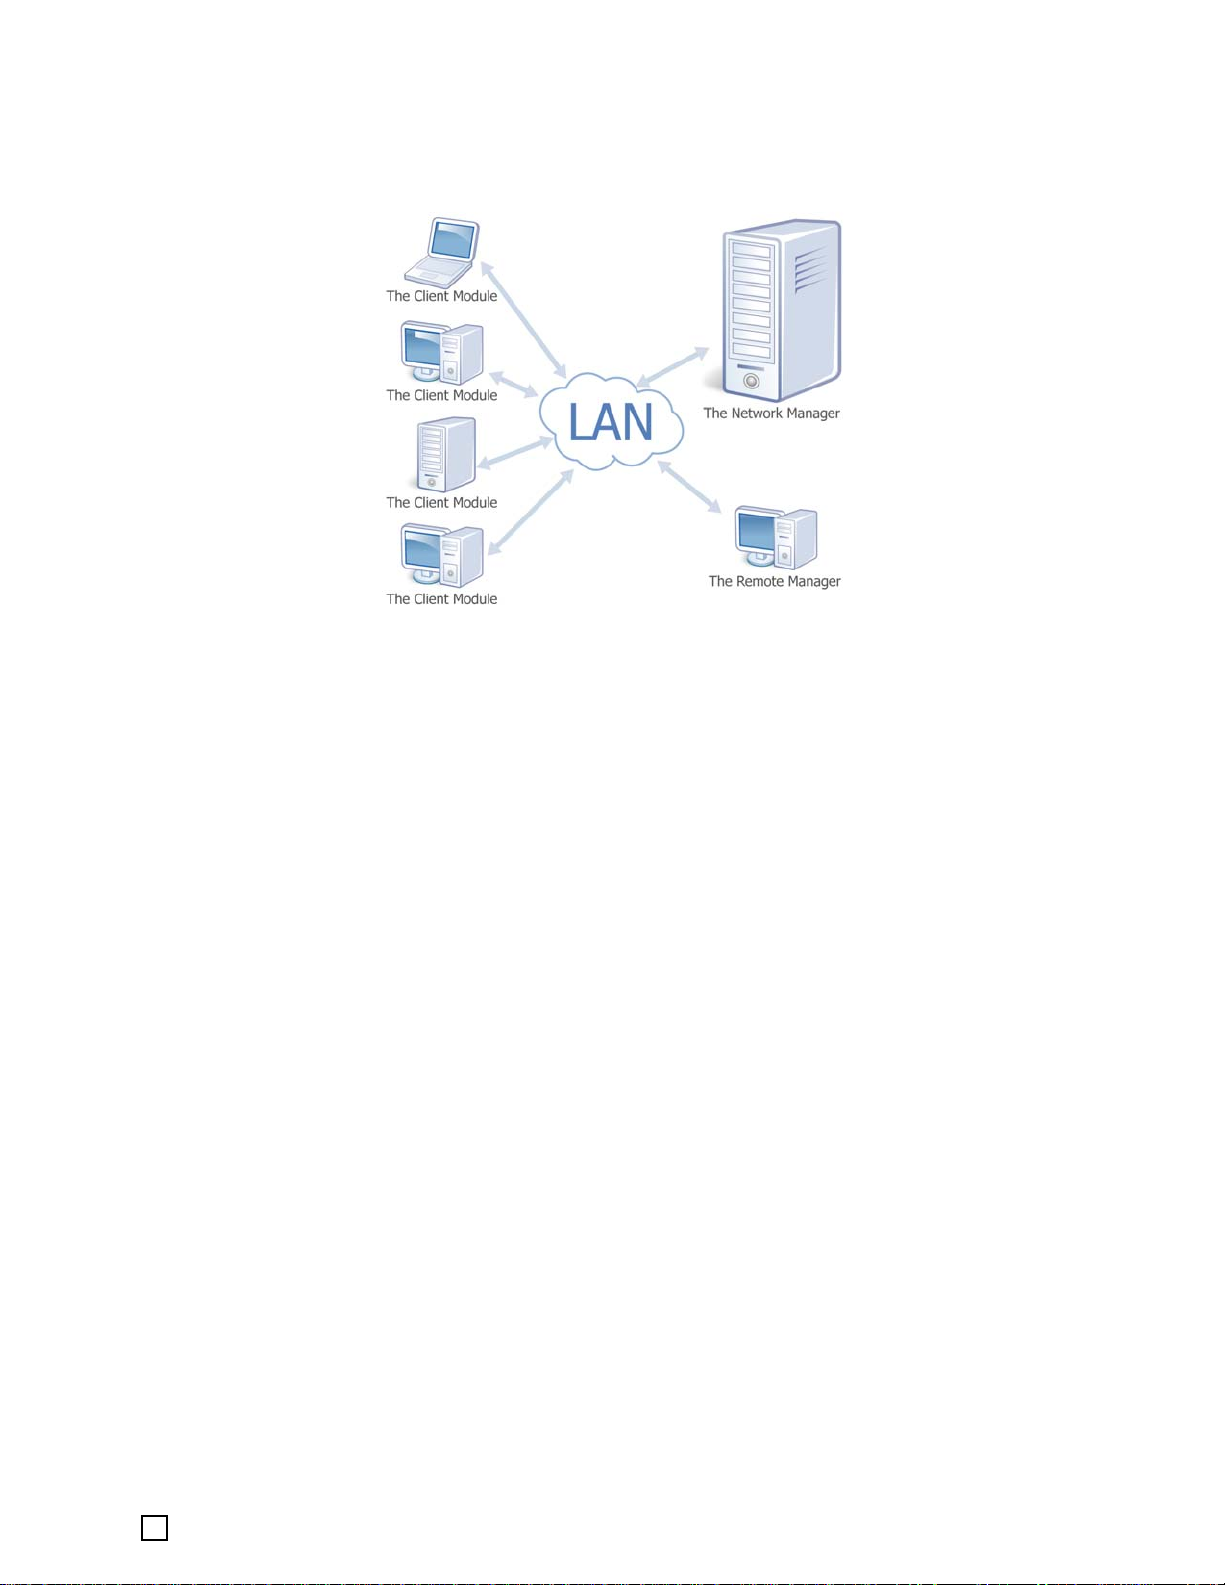
The Network Manager – The interface (GUI) for managing all of the clients on the network.
The Remote Manager – Software that enables remote management of network backup and
recovery.
The Client Module– An agent installed on the client systems to allow remote management via
the Network Manager,which includes a Secure Area for System Snapshots, and provides a local
Pre-OS recovery interface.
The DriveClone Network Manager will automatically detect the type of operating system
installed on the clients and track your available DriveClone Network PC Client and DriveClone
Network Server Client licenses. DriveClone Network will alert you when you are out of available
licenses.
• DriveClone Network Server Client: Installed on server operating systems, such as
Windows 2000 Server or Windows Server 2003 and various editions of each.
• DriveClone Network PC Client: Installed on workstation operating systems, such as
Windows 2000 Professional, Windows XP or Windows Vista.
1.3 Powerful Backup Features
DriveClone Network’s suite of backup features includes:
• Hard Drive Imaging: Backs up and restores a system with a complete copy of all files,
installed software, partition information, and system settings
• Incremental Backup: Manually or automatically updates save disk images without
ever leaving Windows. Incremental backup points log only the changes that have
occurred since the last Complete Backup.
• System Snapshots: Backs up an entire computer system automatically to the Secure
Area. The system snapshots also provide a fast method to recover from
software-related data disasters
Page 11

• File Backup: Manually or automatically backs up selected file/folder, file extension,
etc.
• Universal Restore: Restores a complete system image of a particular configuration
to a different hardware configuration system or a Virtual Machine.
1.4 Other Features and Benefits
• Microsoft Volume Shadow Copy Service (VSS) Support (for Windows Server
2003 and higher): Easily backup VSS compatible databases (Exchange, Or acle, SQL
Server) without taking databases offline and ensuring data consistency.
• Preboot Execution Environment (PXE) Support: Boot and recover any system
from PXE server without a need of the Bootable Rescue Disk.
• Complete External Backup: Store a complete system image on a USB hard drive, or
on a network share.
• Easy Disk Image Updates: Incremental Backup lets you quickly update your saved
disk image without ever leaving Windows.
• Flexible Backup: Back up your client’s hard drive to another local hard drive, network
drive, or a USB device.
• Rapid, Controlled Recovery: Rebuild system via Complete Restore or System
Snapshot in minutes, not hours or days.
• Partition Support: Supports FAT,FAT32, NTFS and other unknown partitions.
• Hardware Support: Supports IDE, EIDE, SATA, and SCSI hard drives and hardware
RAID 0/1.
• 100% protection: Restore an operating system damaged by corrupt software,
human error, a virus attack, or a software bug.
• Quick and Safe Try: Y ou have choice to return to original state in seconds as long as
a System Snapshot is created before the new application is installed.
• Unlimited System Snapshots: The number of system snapshots you can create is
limited only by the hard drive space you allocated for DriveClone N etwork Client’s
Secure Area.
Page 12

Chapter 2: Installing and
Uninstalling DriveClone
Network
2.1 System Requirements
Desktop or notebook computer running
• Windows® 2000 Professional (SP4)
• Windows® XP (32-bit & x64)
• Windows® Vista (32-bit & 64-bit)
Server computer running
• Windows® 2000 Server or Advanced Server (SP4)
• Windows® Server 2003 Standard or Enterprise or Data Center (32-bit & x64)SP2
• Windows® Server 2003 R2 SP2
Network Manager
• Intel® Pentium processor at 133 MHz or faster
• 256 MB of RAM (1 GB of RAM or more is recommended if your system is Vista)
• 550 MB or more disk space
• Internet Explorer® 6.0 or higher
Client Module
• Intel® Pentium processor at 133 MHz or faster
• 256 MB of RAM (1 GB of RAM or more is recommended if your system is Vista)
• 1450 MB or more disk space
Remote Manager
• Intel® Pentium processor at 133 MHz or faster
• 256 MB of RAM (1 GB of RAM or more is recommended if your system is Vista)
• 550 MB or more disk space
• Internet Explorer® 6.0 or higher
Optional
• USB 2.0 Device
• CD/DVD ROM
2.2 Installing DriveClone Network
DriveClone Network needs to be installed from an administrator account.
Page 13
If you purchased a CD:
Insert the CD into your CD-ROM drive. The setup program should start automatically. If it
doesn’t, browse the CD and double-click on Autorun.exe. Follow the prompts displayed to
finish your installation.
If you purchased an electronic download:
Save the executable file to your hard drive. Double-click on the file to launch the DriveClone
Network installer. Follow the prompts displayed to finish your installation.
Tip
Be sure to install the DriveClone Network components according to the
order shown in above figure: Please install DriveClone Network Manager
first, then DriveClone Network Remote Manager . DriveClone Network Client
Module should be installed as the last step.
2.2.1 Installing the Network Manager
1. Select Install/Remove DriveClone Network Manager, and then click Run.
2. Select the language preference of the application, and click Next.
3. Carefully read the software license agreement. If you accept the terms of the agreement,
select I accept the terms in the license agreement, and click Next.
Page 14
4. Enter your personal information and serial number.
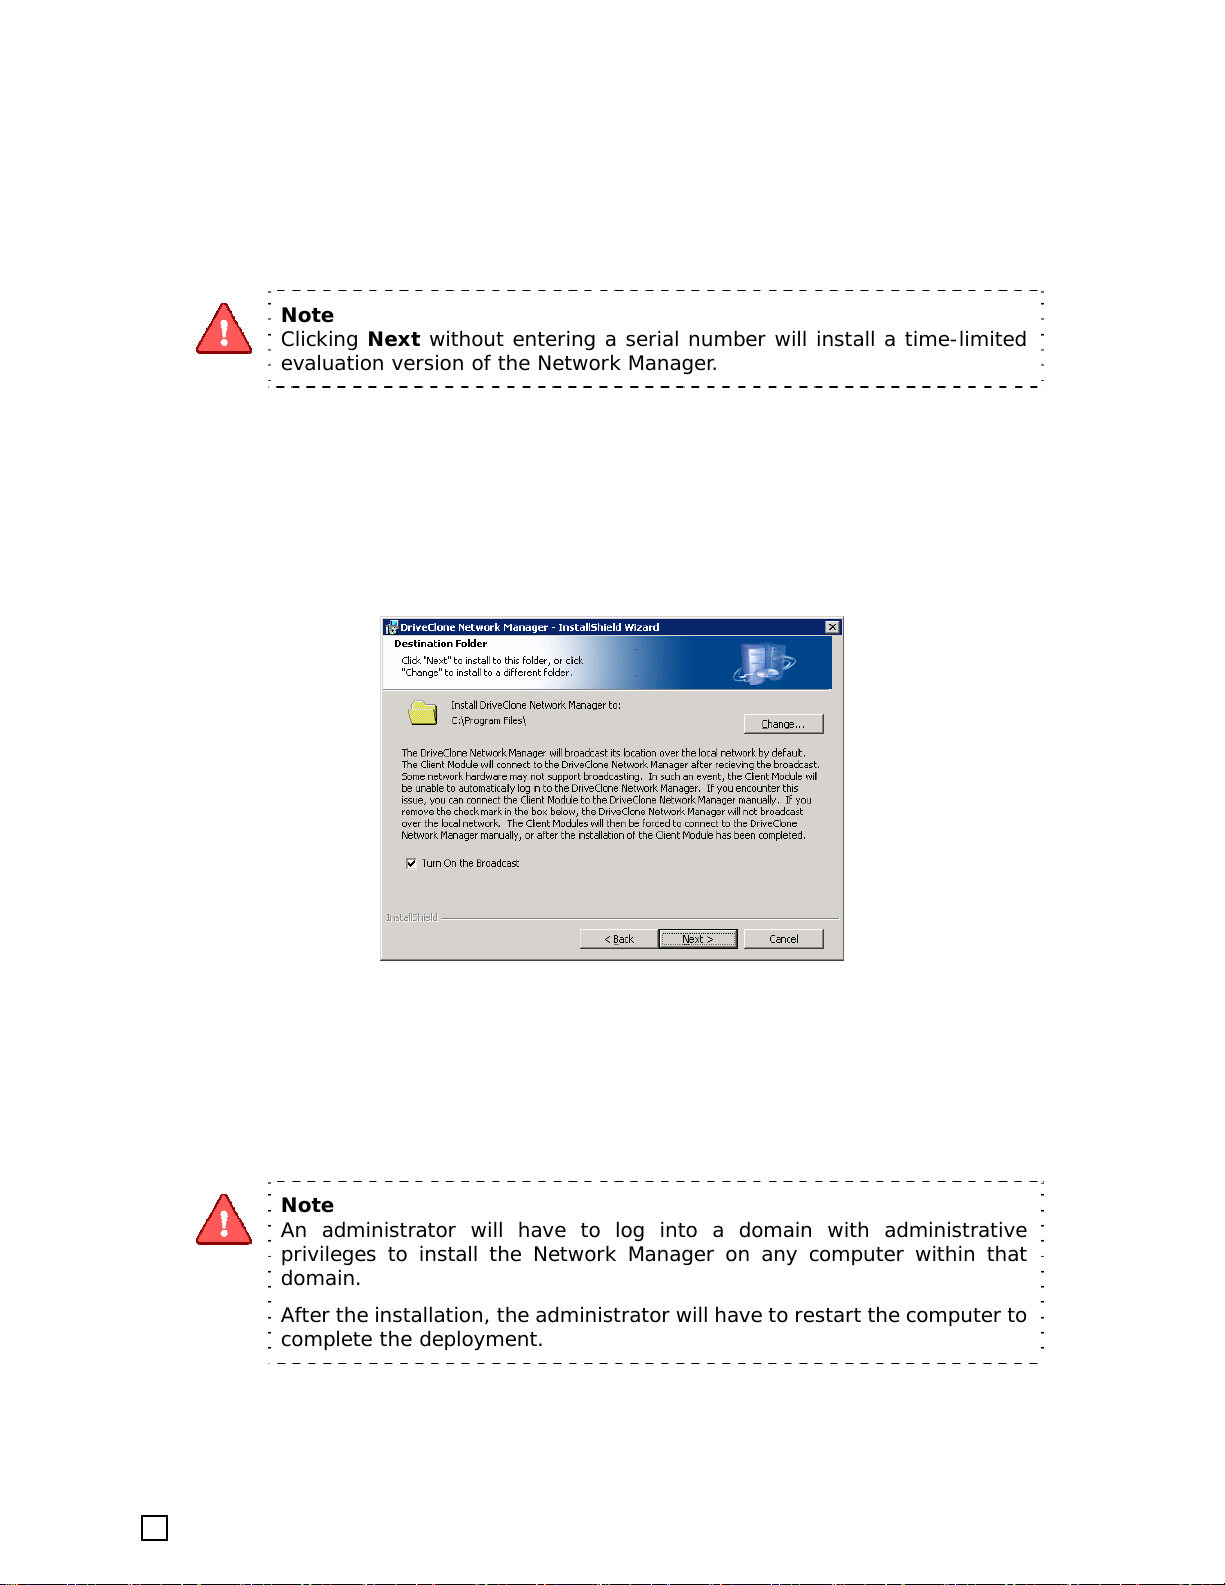
Note
Clicking Next without entering a serial number will install a time-limited
evaluation version of the Network Manager.
5. Select the Turn On the Broadcast checkbox to broadcast the server location on to the
network to allow the clients to connect with the server automatically.
6. Click Next to install to the default folder, or Change to select another location for your
installation.
7. Click Install to launch the installation process.
8. Click Finish, and then restart your computer to complete the installation.
Note
An administrator will have to log into a domain with administrative
privileges to install the Network Manager on any computer within that
domain.
After the installation, the administrator will hav e to restart the computer to
complete the deployment.
Page 15
2.2.2 Installing the Remote Manager
1. Select Install/Remove DriveClone Network Remote Manager, and then click Run.
2. Select the language preference of the application, and click Next.
3. Carefully read the software license agreement. If you accept the terms of the agreement,
select I accept the terms in the license agreement, and click Next.
4. Click Next to install to the default folder, or Change to select another location.
5. Click Install to launch the installation process.
6. Click Finish, and then restart your computer to complete the installation.
Note
Be sure to install the DriveClone Network Remote Manager and the Network
Manager on different computers.
An administrator will need to log into the domain with administrative
privileges to install the Remote Manager on any computer within that
domain. After the installation, the remote manager computer will n eed to
restart to complete the deployment.
2.2.3 Installing the Client
1. Select Install/Remove DriveClone Network Client Module, and then click Run.
2. Select the language preference of the application, and click Next.
3. Carefully read the software license agreement. If you accept the terms of the agreement,
select I accept the terms in the license agreement, and click Next.
4. Enter the Network Manager IP address, and click Next. If the Broadcast function on the
Network Manager is enabled, you do not need to enter an IP address.
Page 16
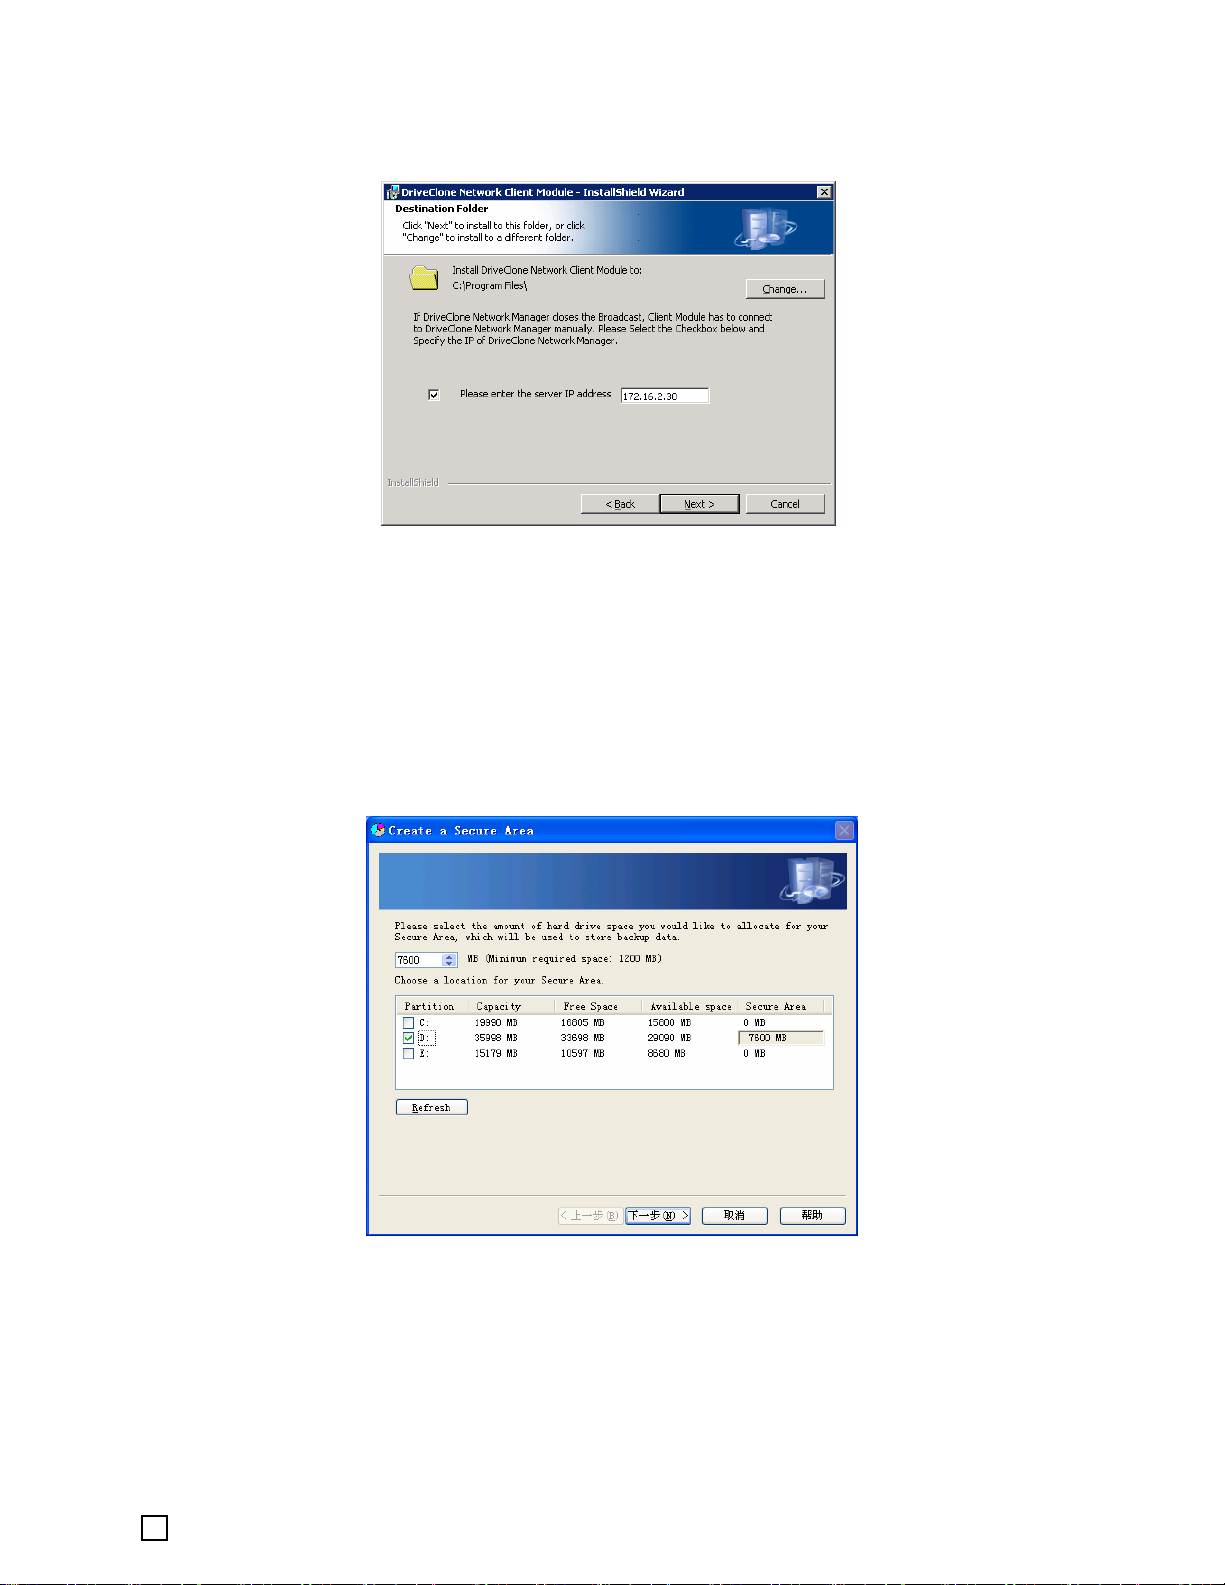
5. Click Next to install to the default folder, or Change to select another location.
6. Click Install to launch the installation process.
7. Specify a size for the DriveClone Network Secure Area (1200 MB or more) to store local
backup data.
DriveClone Network will provide a recommend size for the Secure Area on each selected
partition. For best performance, choose to create the Secure Area from one of the
non-operating system partition. Y ou can modify the size of the Secure Area so that it can hol d
more or less data then the space recommended by the application.
Page 17
Tip
DriveClone Network allocates 200MB for Pseudo Drive (refers to Section 7
for definition) from your Secure Area automatically.
8. Click Finish to complete the installation. The computer will now restart and create an i nitial
System Snapshot.
2.3 Uninstalling DriveClone Network
1. From the Windows Start menu, select Start Æ Settings Æ Control Panel.
2. Double-click Add/Remove Programs, and select Change or Remove Programs.
3. Select the DriveClone Network Manager , the Remote Manager, or the Client Module, and click
Remove to begin uninstalling the associated component.
Tip
Uninstalling DriveClone Network Remote Manager will not remove all of the
backup jobs you created.
If the Client Module is running a Complete Backup, System Snapshot, or
File Backup, the uninstall program will terminate.
Page 18

Chapter 3: DriveClone Specific
Terminology
3.1 File Backup
DriveClone Network Client File Backup monitors files changes. When a change is detected,
DriveClone Network Client will record it and back it up according to your schedule. File backups
can be stored locally or externally.
3.2 System Snapshot
System Snapshot and Hard Drive Imaging are both sector level backup functionalities. System
Snapshot stores only the changed data sectors into the DriveClone Network Client Secure Area.
The amount of storage capacity required for each snapshot is substantially less than the enti re
amount of data on the hard drive. As a result, snapshots offer a significant savings of hard drive
space and an increased restoration speed when compared with hard drive imaging or complete
disk cloning methods.
3.3 Hard Drive Imaging
Hard Drive Imaging can be used for bare-metal, disaster recovery when hard drive failure is
encountered.
3.4 Full and Incremental Backups
A full and incremental backup solution aim to make storing several copies of the source data
more feasible. To accomplish this, a complete backup is taken initially and then increment a l
backups can be scheduled or run manually (Inc remental backup only stores the files or sectors
that have changed since the previous full or incremental backup). Restoring a system to a
certain point in time requires locating the complete backup and all the incremental backups
taken between that complete backup and the particular point in time to which the system is to
be restored to.
Page 19

3.5 DriveClone Universal Restore
With DriveClone Universal Restore, there is no need to reinstall the operating system,
applications, configuration files, individual files, and folders into the new system with different
hardware configuration, or to a virtual machine. With Universal Restore, you can now restore
your system on a similar or a different (than original) hardware configuration within a few
mouse- clicks.
3.6 DriveClone Secure Area
DriveClone’s Secure Area is a virtual partition which is created from the free space on the hard
drive. This location is hidden, protected, and accessible only by DriveClone.
3.7 Startup Recovery Manager
The Startup Recovery Manager (called DriveClone Pre-OS) is stored in DriveClone’s Secure
Area. The DriveClone Pre-OS starts DriveClone on a local computer prior to Window s being
loaded. With this capability, even if Windows won't start for some reason, you can run
DriveClone and restore damaged partitions. As opposed to when booting from DriveClone’s
Bootable Rescue Disk or from a PXE server, you will not need separate media or a network
connection to launch DriveClone.
3.8 PXE and Network Recovery Manager
PXE stands for Preboot Execution Environment. It is an open industry standard developed by a
number of participating software and hardware vendors. Initially designed by Intel, with input
from 3Com, HP, Dell, Compaq, and Phoenix Technologies, PXE works with a network interface
card (NIC) as a boot device for a client PC. When the operating system on a client PC cannot be
accessed after a system crash, the System Administrator can use DriveClone’s Pre-OS mode
(from the Client PC) to restore the system to a working state by using the PXE restore feature.
To do this, your Server PC and Client PC must have network cards that support PXE Boot. You
will also have to configure a DHCP Server and a TFTP Server to support the function of PXE
restore feature.
For more detail on how to configure the PXE Server, please refers to Section 6.1.2.2 for more
detail
3.9 VSS and Database Support
The large volume and dynamic nature of the data stored on the server platform make an
Page 20
accurate and reliable backup difficult to perform. DriveClone Network Client introduces VSS
support to solve the problems mentioned above.
VSS (Volume Shadow Copy Service, also referred to as Volume Snapshot Service) is a storage
technology introduced on the Windows 2003 Server operating system. VSS allows manual or
automatic backup copies or snapshots of a file or folder at a specific point in time. It is useful
for creating backups or to access and recover copies of files that have been locked by
applications for editing. VSS is also included in Windows Vista.
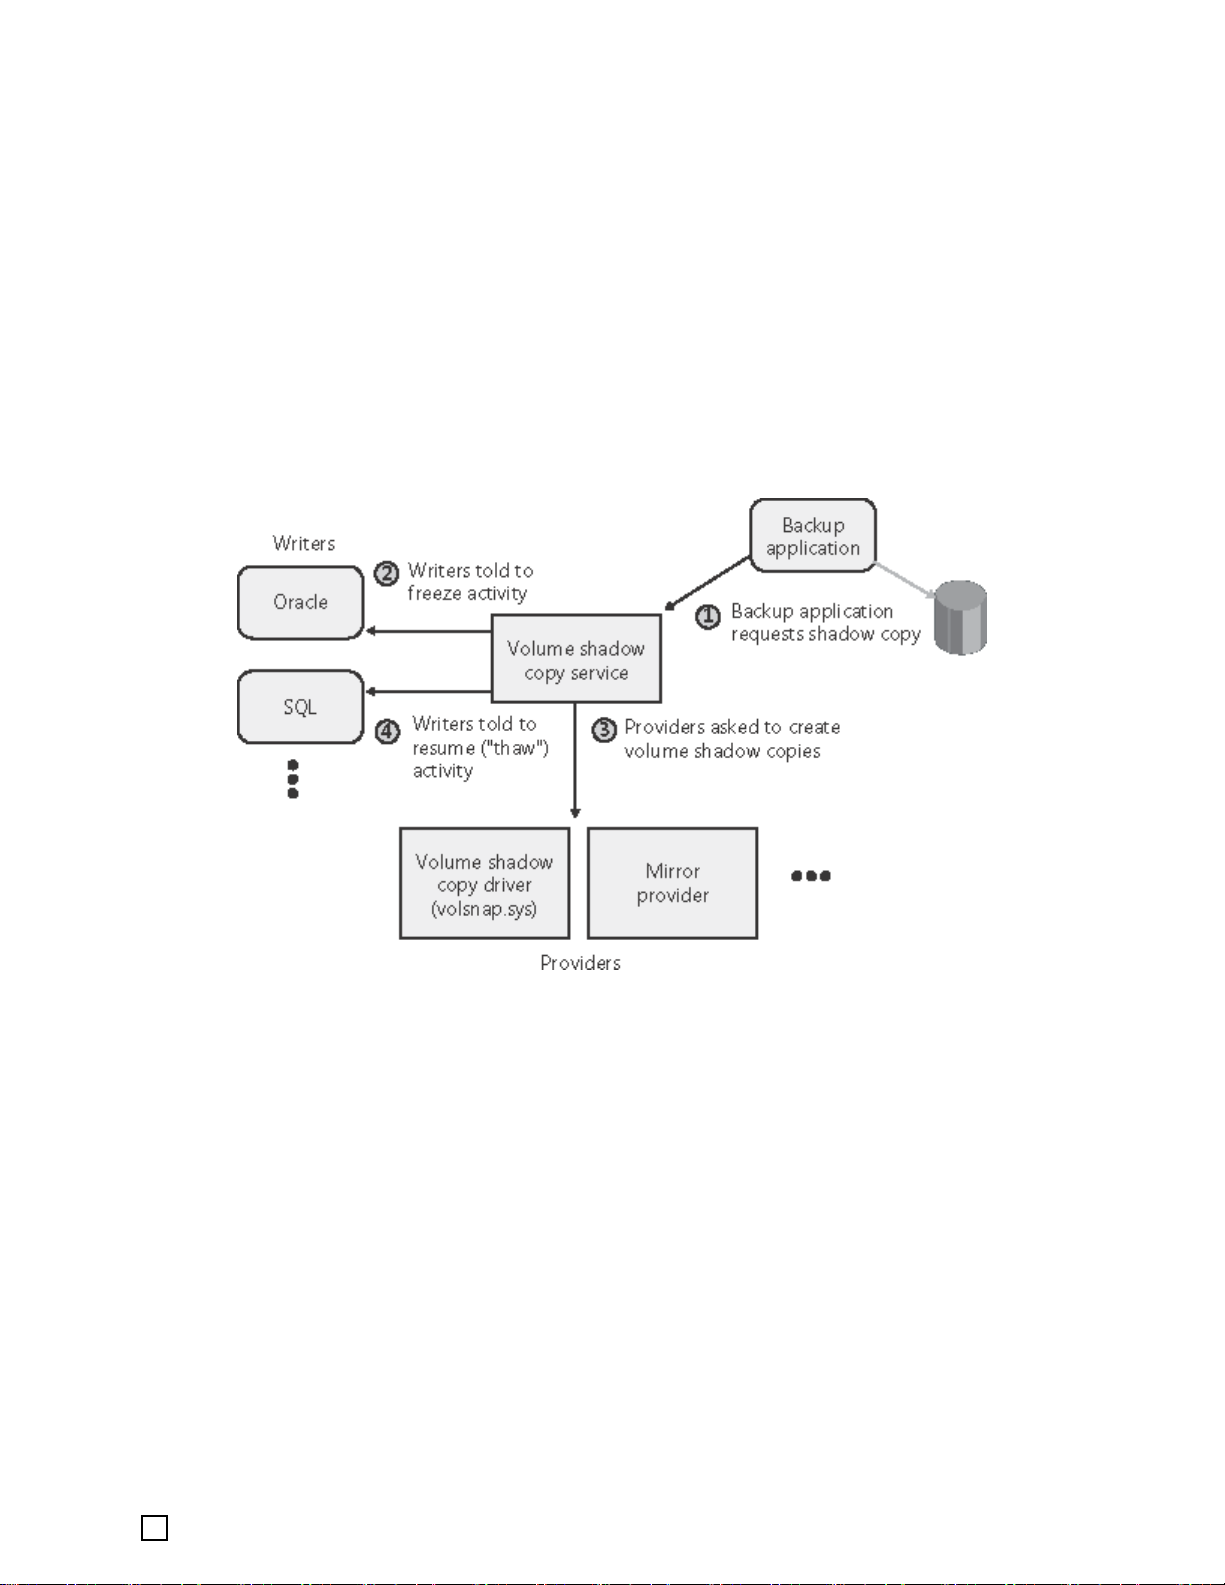
3.9.1 VSS Concepts
As shown in the above figure, VSS consists of four parts:
1. Requestor - its main task is to initiate the creation of the shadow copy.
2. Writer - its main task is to ensure the consistency of the data. If utilit ies keep writing
data to the hard disk during the creation of a shadow copy, the data will be inconsistent.
VSS can ensure the consistency of data by controlling the Application Writer Module. It can
then achieve a higher efficiency and increased data integrity when creating the shadow
copy. Usually, the writer may be a different service module in the operating system, like
COM+, DHCP Service, Active Directory Service, etc. A database is a common writer type.
3. Provider - its main task is to create the shadow copy. Provider receives the command
from the writer and starts to create the shadow copy. Different providers are required for
different hardware and software configuration.
4. Core module of Volume Shadow Copy Service - its main task is to organize different
modules to work together. The core module also provides the method to create the V olume
Shadow Copy.
Page 21

3.9.2 VSS Limitations
VSS has several significant limitations:
1. Only VSS compliant applications can benefit from VSS framework.
2. VSS is a local solution working within a single host. Remote applications aren’t controlled
by VSS.
3. VSS currently works to its full capacity on Windows 2003 Server only.
4. There must be a NTFS partition in the system.
Page 22

Chapter 4: The Remote Manager
T o launch the Remote M anager , double-click the DriveClone Network Remote Manager icon
on your desktop, or select Start Æ All Programs Æ DriveClone Network Remote Manager
Æ DriveClone Network Remote Manager.
4.1 The Remote Manager Main Console
4.1.1 Connect to a Network Manager
1. Select Connect to a Network Manager.
2. Enter the computer name, the user name, and the password for the remote computer,
and then Click OK.
3. Your system will then be connected to a Network Manager.
4.1.2 Install Components
DriveClone Network provides three installation methods; Remote, E-mail, and Local
Page 23

Installation.
4.1.2.1 Remote Installation
Tip
The remote installation tool cannot deploy DriveClone Network components in Windows Vista or XP
Home Edition. These operating systems require local or E-mail Installation.
Before starting a remote installation, you must:
1. Install Remote Manager on your local computer prior to the remote installation.
2. Confirm that the firewall on the target computer allows File and Printer Sharing.
3. Make sure the share name ADMIN$ is accessible on the target computer . The registry ke y value
under:
HKEY_LOCAL_MACHINE\SYSTEM\CurrentControlSet\Services\lanmanserver\AutoShareServer
on the target computer should be set to 1.
4. Configure the “Network Access: Sharing and security model for local accounts” in the Local
Security Policy on the target computer to "Classic - Local users authenticate as themselves".
1. Start Remote Manager, and select Install Components.
2. Select Remote Installation.
3. Select the component you want to install, and click Next.
4. Enter the computer name, the user name, the password and the domain for the
remote computer.
5. Specify an installation path for the component.
a. If installing the Client Module, you can enter the IP address of DriveClone
Network Manager.
b. If installing the Network Manager , y ou can turn on the broadcast option to make
the Client(s) connecting automatically. If the broadcast is not enabled, the
remote client system will need to enter the IP address of the Network Manager
to connect to it.
6. Select the option at the bottom to restart remote computer automatically. If you
de-select this option, the remote client system will need to restart manually to
complete the installation.
7. Confirm all the configuration information, and click Next.
8. The software will now start to install. When the installation is completed, click Finish
Page 24

to exit.
4.1.2.2 E-mail Installation
If the Remote Installation function is not available, you can email Client Module installer to
selected client system(s).
1. Select E-mail Installation after clicking Installation Components in the main
interface. If you have configured your Email account, please skip to step 3.
Note
If there are no mail software installed on the client system or if the mail
software is never configured, you can not install via Email.
2. Configure your E-mail account as follows:
a. Go to the Tools menu in the Outlook Express, and click on Accounts.
b. Click Add and select Mail.
c. Enter your name as you want it to appear on your emails, and click Next.
d. Put in your email address, which consists of a user you set up in webmail and
@yourdomain.xyz, and then click Next.
e. Set the server type as POP3.
f. Enter the name of the incoming and outgoing mail servers, and click Next.
g. Enter your email address for the Account Name. Enter the password you set for
this account.
h. Click Next, and then click Finish.
i. Select the account you just created, and then click on Properties.
j. Select the Servers tab,
k. Under Outgoing Mail Server, check the box next to My server requires
authentication and
3. Enter the client account you want to send this mail.
4. Click Send.
click OK.
Page 25

4.2 Tools Tab
4.2.1 Create a Bootable Rescue Disk
Create a bootable disk to recover from a system crash or hard drive failure
1. Insert a blank Disc or USB device.
2. Click on the Tools tab, and then select Bootable Rescue Disk.
3. Select the CD/DVD drive or the USB device you’ll be using to create your Bootable
Rescue Disk and click Next.
Tip
If there are some data on the inserted device, you will be asked whether
you wish to erase the disc. If you want to continue, click Erase. Click
Change to insert another blank CD/DVD, or Cancel to stop the creating
process.
Page 26

4. Click Finish to complete the process.
4.2.2 Preview Backup Image
Preview the content of the specified partition of a complete backup image
1. Click on the Tools tab, and then select Preview Backup Image.
Note
If you have mounted an image before, you will be prompted to dismount
the previous image. Click Continue to dismount the previous image, or
Cancel to exit this process.
2. Enter the storage path of the image you want to preview and click Goto to select the
image, or select the storage path of the image you want to preview and click Next.
3. Select a complete backup point or an incremental backup point, and click Next.
4. Select the partition you want to preview, and click Mount to load the image into the
system.
5. You can now browse and copy data on the preview drive in Windows® Explorer.
If you do not want to preview the image anymore, select Tools menu and click Unmount
Image to close the preview partition.
4.2.3 Check Image Integrity
Use this function to check if a complete backup image file is valid and can be used for
restoration.
Click on the Tools tab, and select Check Image Integrity.
1. Enter the storage path of the imag e you want to check, and click Goto to select the image.
You can also select the storage path of the image you want to check and click Next.
2. Select to validate either the Complete or Incremental Backup point, and click Next to
continue.
3. After validating the backup point, click Finish to complete the Image Integrity Check.
Page 27

4.2.4 Export PXE Image
Export the PXE image to restore system without using the Bootable Rescue Disk. (For more
information about PXE, please refer to 3.8
1. Click on the Tools tab, and select Export PXE Image.
2. Enter the destination path you want to save the exported image and click Goto, or select
the destination path locally or remotely and click Next.
3. Click Finish to return the main console, or click the storage path to view the PXE Image.
)
Page 28

Chapter 5: The Network
Manager
T o launch the Network Manager, double-click the DriveClone Network Manager icon on your
desktop, or select Start Æ All Programs Æ DriveClone Network Manager Æ DriveClone
Network Manager.
5.1 The Network Manager Main Console
5.1.1 Quick Start
Install Components – Select an option to install DriveClone Network components.
1. Remote Installation- Remotely installs DriveClone Network components. (Please
refer to 4.1.2.1 for more detail)
Page 29

Setting
Tip
Yo u can only deploy the Client Mod ule remotely from the Network Manager.
The Remote Installation function is not available if your operating system is
Windows Vista or XP Home Edition. For those operating systems, please use
the E-mail Installation or Local Installation method.
2. E-mail Installation- If the Remote Installation function is not available, you can
email the Client Module installer to selected clien t system. (Refer to 4.1.2.2
3. Local Installation- The administrator or the Client performs local installation
manually. (Refer to 2.2.3
)
)
– configures system options.
• Default Backup Location
1. Click Browse to change the default backup location.
2. Select a computer from the list.
3. If required, enter a valid user name and password, and then click OK.
4. Select an existing folder or create a new subfolder by typing the new folder name,
and then click Create New folder.
5. Click OK to accept the new setting.
• Log Size - specify the maximum size of the log file.
• Deactivate Clients - remove inactive clients from the client list according to your
setting.
• Global Account Authentication - enter an administrator account as the default
authentication account.
• Broadcast – enable/disable the Broadcast funct ion ality
5.1.2 Client List
Each Client is represented by an icon showing its Conn ection and Authorizat ion status, along
with its operating system type and a status display of the System Snapshot feature.
Connection Status
• Ready - the client is online and the Remote Manager can manage this client.
• Inaccessible - the client is online, but the Remote Manager cannot control the client.
• Off-line - the client is not currently connected to the Network Manager.
Page 30

Authorization Status indicates whether the client has been authorized (licensed) or not.
OS Type shows the current operating system as DriveClone Network Server Client or
DriveClone Network PC Client.
Snapshot Status
• Enabled - System Snapshot is turned on.
• Disabled - System Snapshot is turned off.
• N/A - System Snapshot was erased during a system restoration and it is not available
unless you enable System Snapshot manually.
•
Selected Clients or Groups can be controlled or configured in the Client List
window:
• Authentication – Right-click on a client and select Authentication. Enter the user
name and password of the client. If the computer is in a domain, th e client must be
authenticated under an administrator account.
• Authorize/Unauthorized License – Right-click on a client and select Authorize
License or Unauthorized License to manage the license to DriveClone Network Server
Client or DriveClone Network PC Client (each will requ ire a different type of license).
• Enable/Disable System Snapshot – Right-click on a client and select Enable System
Snapshot or Disable System Snapshot to change the S ystem Snapshot status for the
selected client.
• Jobs – Right-click on a client and select Job List to view existing Snapshot, Complete
Backup, and File Backup jobs.
• Snapshot - Set the frequency for the automatic creation of System Sna pshots, or
intervals for automatic restoration.
a. Create a Snapshot every n hour(s) - Create a Snapshot every 1 to 24 hours.
Tip
If the system is set to create a snapshot every hour, DriveClone Network
will take the first snapshot an hour after the creation of the most recent
system snapshot.
b. Create a Snapshot at system startup - Create a new System Snapshot
automatically every time the computer boots up.
c. Restore computer at every startup - Check this box if you want DriveClone
Network to restore to the most recent System Snapshot every time you start
your computer. You have the option of restoring just the C: drive or the entire
Page 31

hard drive. If you restore just the C: drive, all Snapshots created before the
restore point used will be available for C: drive restoration only.
i. If you opt to restore a computer at every startup, you can also select a time
to automatically restart the computer. The client computer will be restarted
and restored at those set times as well as at system startup.
ii. To set the time for rebooting a client computer, select Restore Entire
Hard Drive or System Partition to the latest System Snapshot at
every system startup.
• Back Up Computers – There are four functions you can perform on the back up
computer job.
a. Detail - View detailed information about the backup jobs you’ve created,
including the description, source, destination, and scheduled settings.
b. Edit Schedule - Schedule incremental updates for the backup job you’ve
created; change other scheduled settings.
c. Back Up Now - Create an Incremental Backup immediately.
d. Delete - Delete the selected job.
Scheduling Complete Backups
1.Complete backups and incremental updates can be created according to
pre-set schedule.
2. If the system is busy , DriveClone Network will not be able to perform the
scheduled backup job, and will automatically try again later.
• File Backup – After a File Backup is created, you’ll see the following options:
a. Detail - View detailed information about a backup job you’ve created, including
the job name, job location, and settings.
b. Edit Schedule – Change scheduled settings for the backup job you’ve created.
c. Add Files - Add file to your File Backup list.
d. Back Up Now - Run the selected incremental File Backup job immediately.
e. Delete - Delete the selected job.
Page 32

Scheduling File Backups
1. If your system is busy, DriveClone Network will not able to initiate the
backup process. DriveClone Network will attempt to perform the backup
after 5 minutes.
2. The following files are not backed up:
a. Files in the Recycle Bin
b. Files in the System Volume Information directory,
pagefile.sys, and the _$temp directory
c. Hiberfil.sys
d. Files with “.rit” and “.tmp” extensions
e. Microsoft Office temporary files
f. Files in DriveClone Network’s installation folder
g. Files in the Backup Destination directory of the backup job
currently running
h. Files in the Temp directory
• Properties – Right-click on a client and select Properties to view client details like the
computer name, workgroup, IP address, and connection status.
5.1.3 Group Jobs
Back Up Computers
After a Complete Backup is created, you can perform following functions by clicking Group Job,
and selecting Back Up Computers.
Detail - View detailed information about the backup jobs you’ve created, including Job
Name, Source, Storage Path, Schedule, Description and the Clients involved.
Resend Job – Resend accidentally deleted jobs back to Client computers.
Delete - Delete the selected job.
Status - View the Job Status here which includes the detailed information of the Job and the
general information of the client operating system.
Page 33

File Backup
After a File Backup Job is created, you can perform the following functions by clicking Group
Job, and selecting File Backup.
Detail – View detailed information about the backup jobs you’ve created, including Job
Name, Destination, and Schedule.
Resend Job – Resend accidentally deleted jobs to the Clients
Delete - Delete the selected job.
Status - View the Job Status here which includes the detailed information of the Job and the
general information of the client operating system.
5.1.4 View Logs
This feature displays all of the DriveClone Network events, including warnings, errors, and
operations.
The red mark on the log indicates the entry is related to the Network Manager console. The
other color on the log indicates the log entry is related to DriveClone Clients. You can
double-click any event log to view its detail.
Save - Export the logs and save the event record as a text file.
Delete - Delete the selected events.
Delete All - Delete all events.
Refresh –Refresh the current list.
5.2 Backing up Client Computers
DriveClone Network backs up partitions or an entire hard drive as an image file, which can be
used to restore a system. The image file can be saved on a local hard drive or network share.
It supports file systems like FAT16, FAT32, and NTFS, and data compression of up to 60%.
After clicking Back Up in the left of the main console, DriveClone Netw ork will display the
following window.
Page 34

1. Create a System Snapshot: Allow quick system recovery from most data disasters.
2. Back Up Computer(s): Save a complete disk image to an external location.
3. File Backup: Back up selected personal files.
5.2.1 Create a System Snapshot
1. Launch the Network Manager.
2. Select Back Up, and click Create a System Snapshot.
3. Enter a name for the System Snapshot job, and click Next.
4. Select a workgroup, domain, or an individual computer you want to back u p, and click Next.
Tip
The client has to be ready(Connection Status) prior to the operation.
If you select a computer, workgroup, or domain that has already been
scheduled for System Snapshots, you’ll be prompted that the new
operation will overwrite the original schedule for that client. You’ll need to
initialize the System Snapshot manually in the Client List if you continue.
Page 35

5. After you set the schedule, click Next.
a. If you select Start Now, DriveClone will initiate the process after clicking Next
twice.
b. If you set a schedule, specify the frequency for creating or r estoring to a System
Snapshot automatically.
• Create a System Snapshot once every X hour(s) - Create a Snapshot
every 1-24 hours.
Scheduling a System Snapshot
If the system is set to create a snapshot every hour, DriveClone Network
will take the first snapshot an hour after the creation of the most recent
System Snapshot.
• Create a new System Snapshot whenever I start my computer –
Create a new System Snapshot automatically every time the system starts.
• Automatic Restore Setting – Select Restore the Entire Hard Drive or
restore the System Partition to the latest System Snapshot at every
startup to schedule automatic restore of a Client computer.
• Reboot client computer at N Hour(s) N Minute(s) –Specify the time to
reboot the Client system.
Tip
Reboot client computer at N Hour(s) N Minute(s) is available only if
you select Restore to the latest System Snapshot at every startup.
6. Confirm all the settings, and then click Next to launch the backup process or click
Previous to modify any setting.
7. Click Finish to complete the process.
5.2.2 Create Complete Backups for Client Computers
Creating a Complete Backup
Page 36

1. Launch the Network Manager.
2. Select Back Up, and click Back Up Computer(s).
3. Select Create a New Complete Backup.
4. Enter a name for your new Complete Backup and click Next.
5. Select one or more computers from the list.
Tip
If you select more than one computer, the backup progress bar will not be
displayed. You can click View St at us to monitor the backup progress.
The client has to be ready(Connection Status) prior to the operation.
6. Select the System Partition or the Entire Hard Drive you want to back up. If you want to
enable Universal Restore, please select Specify Partition(s) to Back Up (This option is
only available if only one computer is selected for backup.), and then click Next.
Tip
U
niversal Restore option is available only if your bootable system
partition is located in a primary partition on the primary hard drive.
7. Store the backup file on a network share or locally on the client.
Store in a network share
a. Select Store in a network share.
b. Select a computer from the displayed list.
c. Enter a user name and password for the selected computer.
d. Click OK and select a shared folder.
Store locally on the client computer
a. Select Store locally on the client computer.
b. E nter a storage path for your file backup and click Next.
Page 37

8. Specify the settings for your backup job.
a. Daily - Repeats the backup at a set time of the day.
b. Weekly - Repeats the backup at a set time(s) every week.
c. Monthly - Repeats the backup at a set time(s) every month.
d. One time only – Runs the backup at a scheduled time.
e. Start Now – Performs the backup manually immediately.
Tip
If you don’t want the client(s) to miss the backup job, please select the
option at the bottom of the interface.
f. Advance (Optional):
• Select a compression mode of None, Low, or High. Compressed images
will save disk space, but will take more time to create and restore.
• Select Enable Password Protection to protect your image files. Once the
password is set, you’ll need to enter your password each time you access that
image file.
• Select the file size for a single volume of the split image. If you select
“automatic, ” DriveClone Network will automatically split the image according
to the file system of the destination partition.
• Select Check the data integrity of the Image file when backup is
complete to verify the backup file’s integrity once the job is completed.
• Add a description to the backu p file in the Image File Description box.
• Set the backup priority to Low, Normal, or High.
• Choose a network connection speed for the backup.
9. Review your information and settings. Click Next to launch the backup process. A
backup progress bar will display if only one computer is selected for back. Otherwise, click
View Status to monitor the backup progress.
10. Click Finish to return to the main console.
Creating an Incremental Backup
1. Launch the DriveClone Network Manager.
Page 38

2. Select Back Up and click Back up Computer(s).
3. Select Incremental Backup and click Next.
4. Select an existing job from the Job List.
5. Review your information and settings, and click Next to l aunch the incremental backup. A
backup progress bar will display if only one computer is selected for back up. Otherwise,
click View Status to monitor the backup progress.
6. Click Finish to return to the main console
5.2.3 File Backup
Creating a New File Backup job
1. Launch the Network Manager, and click Back Up.
2. Click File Backup.
3. Select New File Backup to create a new job.
4. Enter a name for your new job.
5. Select one or more computers from the domain or workgroup.
Tip
6. Select the files you want to back up, and set the maximum number of backup versions (file
revisions) you want to store.
A backup progress bar will display if only one computer is selected for back.
Otherwise, click View Status to monitor the backup progress.
The client has to be ready(Connection Status) prior to the operation.
Page 39

7. Click Next.
a. Click Delete Type to remove file types you don’t want to back up.
b. Click Add New Type to add new file type in to the back up list. You will
need to enter a file type extension and a description.
c. Click Add Group to create a new file type group. Y ou will need to enter a
group name.
8. Select a location to store the backup file, su ch as a shared folder or locally on the Client
system.
Store in a network share
a. Select Store in a network share.
b. Select a computer from the list.
Page 40

c. Enter a valid user name and password to access the selected computer.
d. Click OK and select a shared folder f or storing the File Backup.
Store locally on the client computer
a. Select Store locally on the client computer.
b. Enter a path for your File Backup, and click Next.
9. Specify the settings for your backup job.
a. Daily - Repeats the backup at a set time of the day.
b. Weekly - Repeats the backup at a set time(s) every week.
c. Monthly - Repeats the backup at a set time(s) every month.
d. One time only – Runs the backup at a scheduled time.
e. Start Now - Performs the backup manually.
f. Advanced- Select a backup priority and set the network connection speed.
10. Review your information and settings, and click Next. For best results, close all the files you
want to back up prior to launch your backup job. A progress bar will display if only one
computer is selected for back. Otherwise, click View Status to monitor the backup
progress.
11. Click Finish to return to the main console.
Updating a File Backup Job
1. Launch the DriveClone Network Manager.
2. Select Back Up, and click File Backup.
3. Select Incremental File Backup, and click Next.
4. Select an existing job from the Job List.
5. Review your information and settings, and click Next to launch the incremental backup . A
backup progress bar will display if only one computer is selected for back. Otherwise, click
View Status to monitor the backup progress.
6. Click Finish to return to the main console
5.3 Restoring Client Computers
DriveClone Network can restore your system from an existing image file of partition(s) or of an
Page 41

entire hard drive. The image file can be stored on a local hard drive or a network share.
After clicking Restore tab in the left of the main console, DriveClone Network will display the
following window.
1. Return to a System Snapshot: Restore your primary hard drive or the system partition
of your primary hard drive from a system snapshot
2. Restore Files: Recover personal files.
3. Restore a Computer: Restore all your system configuration and data from a complete
back up point.
4. Universal Restore: Restore a system from a special image file, which supports Universal
Restore. (More information about Universal Restore can be found in the Backing up Client
Computers section of this manual.)
5.3.1 Return to a System Snapshot
1. Start the Network Manager and click Restore.
2. Click Return to a System Sn apshot.
3. Select the computer you want to restore and click Next.
Page 42

Tip
The client has to be ready(Connection Status ) prior to creating t he system
snapshot.
4. Select a date from the calendar and the System Snapshot you want to restore from. Click
Next to continue.
5. Select to restore the entire hard drive or just the C: drive. Click OK to initiate the restore
process.
Note
If you restore just the C: drive, DriveClone Network will restore the files on
the C: drive partition only. After the restoration, all Snapshots created
before the selected Snapshot will able to restore the C: drive only.
6. A pop-up window will prompt you to restart the client system to complete the restoration
process. Click OK to continue, or click Cancel to exit.
7. Click Finish to return to the main console.
5.3.2 Restore a Client Computer
To restore a partition or the entire hard drive on a client computer
1. Launch DriveClone Network.
2. Select Restore, and click Restore a Computer.
3. From the list, select the computer you want to restore and click Next.
Tip
The client has to be ready(Connection Status ) prior to creating t he system
snapshot.
Page 43

4. Select a backup image from the list, or click here to select an image file stored on a network
share. Click Next to continue.
5. Select a Complete Backup point or any Incremental Backup point to restore from, and click
Next.
6. Select to restore a single partition or the entire hard drive, and click Next.
7. Select a destination partition or a destination hard drive to be restored from the image file,
and click Next. If you choose to restore a single partition, skip to step 9.
8. To restore the entire hard disk, please select a restore option.
a. Modify the destination partition size.
b. Restore according to the original size of the source hard drive.
If you selected option a, double click the partition to be resized from the list. If you selected
option b, skip to step 10.
9. Modify the size of the destination partition, and click Next to continue.
Tip
An image file may contain backup data of more than one partition. Y ou have
the option of selecting and restoring only a single partition at a time.
10. Click Next to begin the restoration process.
11. Click Finish to complete the process.
5.3.3 Restore My Computer (Universal Restore)
Follow the steps below to restore a system partition or active partition to a different computer:
Note
There must be enough free disk space on the destination partition to hold
the data that will be restored from the image file.
1. Launch DriveClone Network Manager
Page 44

2. Select Restore from the options on the left side of the window, and click Restore My
Computer (Universal Restore).
3. From the list, select the computer you want to restore, and click Next.
4. Select a complete backup image from the dropdown list, or click Click here to locate a
complete backup image and click Next to continue.
Tip
Only images that support Universal Restore will be displayed. More
information about Universal Restore can be found in the Back up My
Computer section of this manual.
If you select an image file stored on the network, you may be prompted to
provide a user name and password to access the network share. Contact
your network administrator if you need assistance accessing network
resources.
5. Select the backup point for your Universal Restore, and then click Next to proceed.
6. When the dialog box appears,
restore process, or Cancel to exit.
7. Click Finish to return to the main console. Y ou can open View Logs to view the detail of the
restoration process.
After entering Pre-OS main console, the client needs to do the following:
1. Select the destination hard drive. It is strongly recommended to select Only restore
system partition if you don’t want the to restore the entire hard drive.
2. View the partition structure of the destination hard drive as if the restoration is completed.
Click Next to continue.
3. Confirm the settings of the restore. Click Previous to modify , Start to conti nue, or Cancel
to exit.
4. Click OK to return to Pre-OS main console, or click Restart to reboot to windows.
DriveClone Network can restore from a network location. To use this feature, you should first
configure your network settings. (Refer to Network Settings
click OK to restart the client system into Pre-OS to begi n the
for details.)
5.3.4 Restore Files
1. Launch DriveClone Network, and click Restore.
2. Click Restore Files.
Page 45

3. From the list displayed, select a computer to restore and click Next.
Tip
4. Select an image file from the list, or click click here to select an image file stored on a
network share. Click Next to continue.
The client has to be ready(Connection Status ) prior to creating t he system
snapshot.
You can select only one computer at a time in step 3.
5. Select Files from the most recent backup or Files from a previous ba ckup and click
Next. If you select Files from a previous backup, please select the backup point you w ant
to restore from the list.
6. Select the file(s) you want to restore from.
7. Select a location to save the restored files:
a. If New Desktop Folder is selected, the restored files will be saved in a new
folder on the client’s desktop, with the folder hierarchy preserved exactly as it
was backed up.
b. If Original Locati on is selected, the restored files will be saved to their original
folder and will overwrite existing files in that folder with the same name. It is
recommended that you back up the folder prior to restoration. If sever al versions
of a file are selected, they will be restored to the same location with the version
number added to the file name.
c. If Network Share is selected, click Select Share to browse a folder on the
network. The restored files will be kept in their original folder h ierarchy.
8. Click Next to begin the restore process.
9. Click Finish to return the main console.
5.4 Tools Tab
Page 46

5.4.1 Create a Bootable Rescue Disk
Create a bootable disk to recover from a system crash or hard drive failure from the Pre-OS
Mode.
1. Insert a blank Disc or USB device and Launch the DriveClone Network.
2. Click on the Tools tab, and then select Bootable Rescue Disk.
3. Select the CD/DVD drive or the USB device you’ll be using to create your Bootable Rescue
Disk and click Next.
Tip
If there are some data on the inserted device, you will be prompted to erase
the disc. If you want to continue, click Erase. Otherwise, click Change to
insert another blank CD/DVD, or Cancel to stop the process.
4. Click Finish to complete the process.
Page 47

5.4.2 Preview Backup Image
1. Launch the DriveClone Network.
2. Click on the Tools tab, and then select Preview Backup Image.
Note
If you have mounted an image before, you will be prompted to dismount
the previous image. Click Continue to dismount the previous image, or
Cancel to exit this process.
3. Enter the storage path of the image you want to preview, and click Goto to select the image.
Or select the storage path of the image you want to preview, and click Next.
4. Select a complete backup point or an incremental backup point, and click Next.
5. Select the partition you want to preview, and click Mount to begin previewing the image.
6. You can now browse and copy data on the preview drive in Windows Explorer.
If you do not want to preview the image anymore, select Tools menu and click Unmount
Image to close the preview partition.
5.4.3 Check Image Integrity
Use this function to check if a complete backup image file is valid and can be used for
restoration.
1. Click on the Tools tab, and select Check Image Integrity.
2. Enter the storage path of the image you want to preview, and click Goto to select the image.
Or select the storage path of the image you want to preview, and click Next.
3. Select to validate either the Complete or Incremental Backup point and click Next to
continue.
4. After validating the backup point, click Finish to complete the Image Integrity Check.
5.4.4 Export PXE Image
Export the PXE image to restore system without using the Bootable Rescue Disk. (For more
information about PXE, please refer to 3.8
)
Page 48

1. Click on the Tools tab, and select Export PXE Image.
2. Enter the destination path you want to save the exported image and click Goto, or select the
destination path locally or remotely and click Next.
3. Click on Finish to complete the process.
Page 49

Chapter 6: The Client
View/Change DriveClone Network Manager IP Address: If the Client computer fails to
connect to the Network Manager automatically, right-click on the DriveClone Network system
tray icon
Address. Enter the new IP address for the Network Manager and click Save.
and select View Æ Change DriveClone Netw ork Manager IP
Tip
If you select the checkbox at the bottom in the above picture before you
save the IP address, the client will stop using the broadcasts from the
Network Manager.
If the checkbox remains unchecked, the client will use the broadcast
information to locate the Network Manager.
Page 50

Create a Secure Area: If a Complete Backup restored partitions containing the Client’s
DriveClone Network Secure Area, the original Secure Area would be damaged. You will be
prompted to create a new Secure Area when you restart the system.
Restart Prompt: Client computers must be restarted to complete the restore process. Before
the Client computer is restarted, a pop-up window will inform the user of the Client computer
of the time remaining before the computer is restarted. This will allow the user time to close
programs, save data and avoid data loss.
6.1 Enter the DriveClone Network Client
Pre-OS Manager
To launch the DriveClone Network Client Pre-OS Manager, press the space bar after system
POST (Power-On-Self-Test), but before Windows
Tip
If you did not installed System Snapshot module, the Return to a System
Snapshot and Uninstall features in Pre-OS mode will be disabled.
®
begins to load.
Page 51

6.1.1 Boot from Bootable Rescue Disk
1. Insert the Bootable Rescue Disk and restart your computer, and then enter BIOS to set the
CD/DVD ROM as the first boot device.
2. Enter your serial number and click OK to continue.
Tip
To use this function, you have to enter your serial number.
3. After entering DriveClone Network Client Pre-OS main console, you can then modify your
network settings, return to a system snapshot, check image integrity, restore drives and
uninstall DriveClone Network Clien t.
6.1.2 Boot from PXE Server
You have to configure TFTP Server and DHCP Server prior to booting from PXE Server.
6.1.2.1 System Requirement for PXE
• Intel 486 (or compatible) processor or higher
• VBE2.0 Display Card or higher
• 256 MB of RAM or higher
6.1.2.2 Configuration of PXE Restore
When the operating system on a client PC cannot be accessed after a system crash, the
System Administrator can use DriveClone Network Client’s Pre-OS mode (from the Client
PC) to restore the system to a working status by u sing PXE Restore.
To do this, your Server PC and Client PC must have the network card which supports PXE
Boot. You will also have to configure a DHCP Server and a TFTP Server to support the
function of PXE Restore.
6.1.2.3 Configuration of TFTP Server
Please follow the steps below to configure a TFTP Server.
1. Set the IP address of your server (example: 192.168.0.1). For best results, start the IP
address with xxx.xxx.xxx.1.
Page 52

2. Create a Root directory for the TFTP Server. For instance, set the C:\pxe_boot to be the
Root directory (Y o u can create the directory in any location on the TFTP Server and the
directory can be named with any name). Then, copy all the files of Bootstrap directory
from DriveClone Network Client’s installation directory to your root directory.
3. Set the configuration file to match the client PC. Create a new directory named with
pxelinux.cfg in C:\pxe_boot. Then, create a text file in pxelinux.cfg directory. The name
of this text file must be named with the MAC Address of the client PC. For instance, if the
MAC Address is 00-14-2a-3a-c9-9c, the filename must be 01-00-14-2a-3a-c9-9c. There
cannot be an extension of the file name.
4. The content of the text file is shown below:
DEFAULT install
PROMPT 1
LABEL install
KERNEL spc_kern
APPEND initrd=spc_root rw root=/dev/ram0 vga=788 ramdisk_size=102400 APPT=0
console=/dev/null
5. Select a tsize option for the TFTP Server.
6.1.2.4 Configuration of DHCP Server
1. Set the Boot File as pxelinux.0.
2. Configure the Boot Server with the same IP address of your TFTP Server.
3. Create a new port for DHCP Serv er (The port ca n be named wi th an y name). T hen, set
the IP Address to be the IP Address of the TFTP Server, such as 192.168.0.1.
6.1.2.5 Configuration of Client PC
Enter BIOS and set the boot mode as LAN Boot.
1. Turn on the DHCP and TFTP Servers. Restart the client PC so that it can enter the
Pre-OS mode of PXE.
2. In Pre-OS, specify your network settings and restore your computer.
Network Settings
DriveClone Network Client can back up to, or restore from a network location. To use this
feature, you should first configure your network settings.
Page 53

To configure your network settings, click Network Settings in Pre-OS.
There are two tabs in the Network Settings window:
¾ General:
You can set up your network adaptor, IP address, Subnet mask and Default gateway
from here.
If you have more than one network adaptor on your system, select the adaptor to be
used from the dropdown menu.
IP Settings:
• Obtain an IP address automatically: If your network supports DHCP (Dynamic
Host Configuration Protocol), this option will obtain an IP address automatically
from a DHCP server or a Point-to-Point Protocol (PPP) dial-up network access
server. DriveClone Network Client uses DHCP is set as the default option.
• IP address: Choose this option to manually specify an IP address for your network.
This option can be used when automatically obtaining an IP address fails or when
there is an IP address conflict.
¾ Advanced:
Page 54

If your computer is on a Local Area Network (LAN), you can configure the LAN settings
to back up images to or restore from a network location.
DNS settings:
• Obtaining DNS server address automatically: DNS (Domain Name System) is an
internet service that translates domain names into IP addresses. It is a system for
name resolution, suitable for network computers with fixed IP addresses.
DriveClone Network Server uses DHCP is set as the default option.
• Use the following DNS server addresses: Manually specify the DNS server
addresses if needed.
WINS: Specify an IP address for a WINS server. Windows Internet Naming Service
(WINS) is a system that determines the IP address associated with a particular network
computer. It supports network client and server computers running Windows and can
provide name resolution for other computers with special arrangements. It uses a
distributed database that is automatically updated with the names of computers
currently available and the IP address assigned to each one.
6.1.3 Install Driver in Pre-OS
1. During launching the DriveCl one Server Pre-OS Manager, press the space bar after system
POST (Power-On-Self-Test), but before Windows
2. When the following screen appears, press F6 to continue.
®
begins to load.
Page 55

3. Insert a Driver Disc and then press Enter to begin loading dri ver. After that, DriveClone will
enter Pre-OS to install third party driver. You can also press F3 to skip the driver installation
and load into Pre-OS directly.
If DriveClone cannot detect the compatible and available driver, yo u can install third party
driver manually. But the driver may not work properly.
Tip
DriveClone is fully compatible with Redhat Enterprise Linux 5.
6.2 DriveClone Network Client Manager in
Pre-OS Mode
After you enter the DriveClone Network Client Manager, you will see the following window.
Page 56

6.2.1 Restore My Computer in Pre-OS
You can select a complete backup point stored on CD/DVD, local hard drive or local area
network to restore your computer.
1. Click Restore My Computer icon on Pre-OS Main Console.
2. Click Browse to select the complete image file you want to restore from and click OK.
3. Click Next to continue.
4. Select a backup point from the list, and select Next to continue.
5. Click Next to continue without selecting Perform Universal Restore.
6. Select the destination partition or hard disk to restore.
a. To restore a single partition, click Next.
b. To restore the entire disk, select or deselect Restore by the Original Size
checkbox. If you want to resize the destination partition, please deselect Restore
by the Original Size checkbox and then double-click a partition in the list to resize
it. Click Next to continue the restoration process.
7. Confirm the settings of the restore and Click Previous to modify, Start to continue, or
Cancel to exit.
8. Click OK to return to the Pre-OS main console, or Restart to reboot to windows.
Page 57

DriveClone Network can restore from a network location. To use this feature, you should first
configure your network settings. (Refer to Network Settings
for details.)
6.2.2 Perform Universal Restore in Pre-OS
With Universal Restore, you can restore your system to a different hardware or a virtual
machine.
1. Click Restore My Computer icon on Pre-OS Main Console.
2. Click Browse to select the complete image file you want to restore from. Click OK to
continue.
3. Click Next to continue.
4. Select a backup point from the list, and select Next to continue.
5. Select to Perform Universal Restore.
6. Click Next to continue.
Tip
Universal Restore optoin has to be enabled during the creation of the
backup to allow the image to perform Universal Restore.
7. Select the destination hard drive. It is strongly recommended to select Only restore
system partition if you don’t want to restore the entire hard drive.
8. View the desired partition structure of the destination hard drive, and click Next to continue.
9. Confirm the settings, and Click Previous to modify, Start to continue, or Cancel to exit.
10. Click OK to return to the Pre-OS main console, or Restart to reboot to windows.
DriveClone Network can restore from a network location. To use this feature, you should first
configure your network settings. (Refer to Network Settings
for details.)
6.2.3 Image Integrity Check
In this section, you can check if the backup data in your Complete backup image file is valid.
1. Click Image Integrity Check icon on Pre-OS Main Console.
Page 58

2. Click Browse to select the image file you want to check, and click OK.
3. Click Next to continue.
4. Confirm the information of the selected image, and click Next to begin checking process.
5. After the checking process is complete, click OK to return to the Pre-OS main console, or
click Restart to reboot to Windows.
DriveClone Network Client can also check the image file stored on a network location. To use
this feature, you should first configure your network settings. Refer to Network Settings
details.
for
6.2.4 Return to a System Snapshot in Pre-OS
1. Click on Return to a System Snapshot icon in the Pre-OS Main Console to display a list of
System Snapshots. The first System Snapshot listed will be the most recently created
snapshot.
2. Select a System Snapshot, and the n choose whether to restore the entire hard drive or the
C: drive only, and then click OK.
3. Please read the prompt message carefully, and then click OK to launch the DriveClone
Network Client restoration process. Click Cancel to exit.
4. Click Close to complete the restoration process, or click Return to Main Console to return
the main interface in Pre-OS.
A complete restore can take from 20 seconds up to 10 minutes, depending on the number of
files affected. Once the system has restarted, your SYSTEM will be r estored from th e chosen
System Snapshot. All file modifications and additions made after System Snapshot date will be
removed.
6.2.5 Uninstall
Click Uninstall, and then OK to uninstall DriveClone Network Client. After your computer
restarts, all disk space held by DriveClone Network Client will be released. You can also click
button to restart your computer or click button to turn off your computer.
Page 59

Chapter 7: Glossary
• DriveClone Network Image
A DriveClone Network image is a file containing a complete copy of a computer’ s hard drive
or partitions on that hard drive. With this image, you can transfer the contents of a hard
drive to a portable medium such as a recordable CD/DVD, USB drive, or to another hard
drive, for later restoration when needed.
• Secure Area
The Secure Area is a Virtual Partition on the primary hard drive. It uses dispersed free hard
drive space to create a logically continuous storage area. This area is hidden in Windows
and protected and accessible only by DriveClone Network.
• System Snapshot
System Snapshots are incremental points-in-time of a computer system’s state at a given
moment. DriveClone Network monitors all sector-level changes from the last Snapshot and
writes any changes to a new Snapshot. This backup usually takes only seconds to complete.
Snapshots offer the quickest way to restore a damaged Windows system to a working
state.
• System Partition
The system partition refers to the disk volume that contains the hardware-specific files that
are needed to launch Windows (for example: Ntldr, Boot.ini, and Ntdetect.com). On
dynamic disks, this is known as the system volume.
• Boot Partition
The boot partition refers to the disk volume that cont ains the Win dows operating system
files (by default, in the WINDOWS folder) and its support files (by default in the
WINDOWS\System32 folder). The boot partition can, but is not required, to be the same
partition as the system partition. There will be one (and only on e) system partition, but
there will be one boot partition for each operating system in a multi-boot system. On
dynamic disks, this is known as the boot volume.
• Universal Restore
Universal Restore allows you to restore your system partition and active partitions to
different hardware configurations or virtual machines, such as a replaced motherboard or
hard drive controller.
• Pseudo Drive
Pseudo Drive is a virtual space created in the Secure Area. DriveClone Server utilizes this
space to reduce the backup data of System Snapshot and increase backup efficiency.
Page 60

Chapter 8: Appendix
8.1 Frequently Asked Questions
Q. How long does it take DriveClone Network to back up or restore a system?
A: This depends on the amount of data on your system. However, DriveClone Network’s
technology minimizes the time it takes to perform a backup.
Q. I started DriveClone Network in Windows immediately after installation
completed, but a message says that I have to restart my computer in order to run
it. Why?
A: You have to restart your computer after installing DriveClone Network, in order for all
configuration changes to take effect.
Q. When I restored a partition from an image file, DriveClone Network prompted me
that “There is not enough space on the Destination Partition.” But I’m sure the
free space on the Destination Partition is larger than the used space in the Sou rce
Partition. Why am I getting this prompt?
A: If data at the end of the source partition cannot be moved, DriveClone Network will prompt
you with this notice.
Q. I installed DriveClone Network on my computer with two operating systems:
Windows 2000 and XP. I removed DriveClone Network from Windows 2000. Why
is the program unusable on Windows XP?
A: Uninstalling DriveClone Network from one operating system will result in the remove of the
application from other operating systems as well.
Q. Why can’t I find all of the created jobs in my Jobs List?
A: There are two possible causes:
1. The core files of your system partition were lost or re-initialized after you restored the
system partition.
The partition that you backed up has since been resized.
2.
In both scenarios, the backup files containing old partiti on information are no longer v alid
and were therefore removed automatically from the Jobs List.
Q. Do I need to do anything before installing the Client component?
A: We recommend running Windows CheckDisk to scan for hard drive errors. CheckDisk can
be started by running Chkdsk.exe from the command prompt or by using the Client Module
Pre-Installation Checklist.
Page 61

Q. Bad Sectors have already been detected on a h ard drive. How does this affect my
backup and restore options?
A: DriveClon e will try to copy all used sectors when performing a Complete or Incremental
backup. You may be prompted to skip a bad sector or a job could fail due to bad sectors.
Therefore, it’s recommended to run Windows Check Disk command to detect and repair
hard drive errors, or use utilities provided by your hard drive manufacturer, when
attempting to resolve this type of problem.
Q. After I installed DriveClone Network and restarted my computer, my system
crashed. How can I install DriveClone Network so that it doesn’t crash my system
again?
A: You may have assigned all of the free space on your C: drive to the Secure Area. If all of free
disk space on C: is assigned for the Secure Area, the operating system will fail. Y ou should
reserve at least 200 MB of free space on your C: drive to avoid this problem. F or best results,
if your primary hard drive is partitioned with multiple drive lett ers or there is sufficient,
unallocated free space available, do not specify Secure Area space from the C: drive.
Q. I installed the Client component on a Compaq PC. When I restart the computer,
the following error message appeared: “You have installed vb twice. Please
uninstall and review FarStone’s FAQs.” How can I fix this?
A: Some computers come with system backup/restore software already pre-installed. These
programs may cause conflicts with DriveClone Network and interfere with inst allation. We
recommend that you remove all other system backup/restore software before attempting
to install DriveClone Network.
Q. I’d like to get help from FarStone technical support. What kind of information
should I give the technician?
A: Please send us the following files: Dpssetup.log, PartitionCut.log, Autosetup.log,
Vbptask.log and Diskdata.log. These files are located in the same folder as the DriveClone
Network application.
Q. Can DriveClone Network fix my system after my hard drive has been accidentall y
formatted or repartitioned?
A: Yes — if DriveClone Network was installed prior to the incident.
Q. Can I use disk tools such as F-disk, PartitionMagic and Norton Speed Disk after
installing DriveClone Network on my computer?
A: Currently there are no known resource conflicts with those utilities
Q. I’ve installed three operating systems on my computer, including Linux. Can
DriveClone Network protect all three systems?
A: DriveClone Network protects multiple Windows operating systems, but not non-Windows
systems.
Q. Does DriveClone Network work in Windows Safe Mode?
Page 62

A: DriveClone Network does not work in Windows Safe Mode.
Q. What should I do if my antivirus software constantly prompts a virus warning
when I’m installing DriveClone Network?
A: During installation, DriveClone Network’s setup program writes data onto your hard drive.
Some antivirus programs see this as an attack. W e recommend that y ou disable real-time
protection before installing DriveClone Network. You can enable your antivirus software
again after installation is completed.
Q. Why do I see a “0xe2” error when I try to install DriveClone Network on a
computer with four operating systems?
A: A maximum of four operating system entries can reside on a single computer. If all four
entries are filled, DriveClone Network cannot be installed.
Q. Can DriveClone Network protect my PC from a destructive virus?
A: While DriveClone Network cannot prevent the actual virus attack, it can restore your
computer to a point before the attack occurred, recovering your files and effectively
removing the virus.
Q. Why did my computer crash when DriveClone Network was loading the hard drive
driver?
A: This problem will occur if the computer hard drive does not support UDMA3. Please disable
UDMA in CMOS setup to resolve this and try again.
Q. I had a large hard drive (equal to, or greater than 137GB) on m y computer. Wh y
was DriveClone Network automatically uninstalled when I restarted my system?
A: Your BIOS may not support a large capacity hard drive. Try contacting your computer
manufacturer to upgrade the BIOS.
Q. I’ve installed DriveClone Network on Windows 2003 Server. Why can’t I back up
data through VSS?
A: VSS requires an NTFS partition in the system. Please check to see if your computer has an
NTFS partition and that all other VSS requirements are met.
Q. I’m trying to back up data to a computer on the network. Why can’t I access the
network share after I have entered a valid user name and password?
A: Follow these steps to reconfigure the Local Security Settings of the remote computer:
Configuration
1. Select Start Æ Control Panel Æ Administrative Tools Æ Local Security Policy.
2. Locate Security Settings Æ Local Policies Æ Security Options from the directory in
the left window.
3. Double click on Network access: sharing and security model for local accounts.
Page 63

4. Select Classic - local users authenticate as themselves, and click Apply.
Q. Why am I not able to authenticate in my client list?
A: Check your account. If your computer is in a domain, you’ll have to log into the domain and
try again.
Q. Why does it take more time to install DriveC lone Netwo rk on my compute r than
on other systems?
A: If there are too many dispersed/fragmented files in your system partition s, DriveClone
Network will defragment them to free up contin uous space for the application’ s kernel file.
This may take several minutes. Moreover, when you install System Snapshot on a FAT32
partition, DriveClone Network will divide the Secure Area, which takes a much longer time
than an installation on NTFS partitions.
Q. Why couldn’t I run the Network Manager following installation?
A: Two or more Netw ork Managers may have been installed on the same LAN. DriveClone
Network will allow only one Network Manager to operate at any given time.
Q. Why couldn’t I find the backup file I wanted after I ran a backup for several
computers?
A: Backup for different systems varies according to network times and the size of the backup.
You may have to wait for the entire backup job to finish before you can locate the file in
question.
Q. Why can’t I find certain image files within a Complete Backup stored on my hard
drive?
A: If the image file has been stored in a compressed NTFS partition, it can be restored in
Windows or in Pre-OS. However, if the image file has been stored in a partit ion yet to be
compressed, it can not be recognized in Pre-OS.
Q. How can a Client connect to DriveClone Network automatically?
A: Enable the broadcast functionality on the Network Manager allows client to connect
automatically. If this doesn’ t work, you may have to turn off the broadcast feature and
connect from the Client manually.
Tip
When the Client connects automatically (via broadcast mode), the Network
Manager can use a dynamic IP address. When Client connects manually,
the Network Manager should reside on a static IP address.
Q. How can a Client PC be restored following a data disaster?
Page 64

A: There are three ways to boot the Client:
1. Press the space bar upon boot up to enter Pre-OS.
2. Use a start-up disc to enter Pre-OS.
3. Configure PXE and remotely boot the Client to Pre-OS.
Upon entering Pre-OS:
1. Select a System Snapshot to restore from.
2. Connect to the network or other locally attached storage and select a Complete or
Incremental Backup Image to restore from.
Q. When do I have to manually initialize the Secure Area of a Client PC?
A: If a restoration results in changes to the partitions that hold the hidden files, the Secure
Area will have to be initialized. When the Client computer restarts, a prompt to initialize the
Secure Area will appear.
Q. How can I back up and restore without having a DHCP Server on the network?
A: If the DHCP service is not running on your network, you’ll have to manually enter a static
IP address to access the network in Pre-OS.
Q. Is there anything I should be aware of when I back up and restore domain
servers?
A: Backing up domain servers may destroy the Active Directory . If this happens, you’ll have to
recreate the Active Directory.
Q. What happens if a Client PC misses a scheduled backup?
A: If a Client PC is turned off at the time of a scheduled backup, DriveClone Network will start
to back up at the next scheduled time.
Q. Does the DriveClone Network Client conflict with any other applications?
A: Please close the following applications when launch DriveClone Network Client: Norton
GoBack, Kaspersky Anti-Virus, R e coveryGenius, U timaco SafeGuard, Acronis OS Selector,
SafeguardV4.2, OSL2000
Q. Why do I have to authenticate (license) DriveClone Network on a Client PC after
I restored it from a System Snapshot?
A: When you restore from a System Snapshot, all data from the backup point you select is
recovered, including your old authentication status. If that authentication status shows the
Client as unlicensed, you’ll have to re-enter the serial number.
Q. Which partition types does DriveClone Network recognize?
Page 65

A: NTFS and FAT, FAT32.
Q: Occasionally, I was not able to enter DriveClone Network Pre-OS environment by
pressing space bar when restarting my computer with Vista operating system.
A: Because a few motherboards with Intel 945 chips have intermittent incompatibility issue
with DriveClone Network. Please try to restart the system again.
Q: What do I do if DriveClone Network Client does not respond to the
backup command given from DriveClone Network Manager?
A: Please restart the client computer . After the client is restarted, within DriveClone Network
Manager, under “Group Job” tab, select “Job Resend” function to resend the backup
request.
Q: Why didn’t DriveClone Network call my Outlook when I click Email Installation?
A: The configuration setting of the Internet Explorer may be incorrect. Launch your Internet
Explorer, select
manually. We recommend using either Microsoft Office Outlook or Outlook Express.
ToolsÆInternet OptionsÆProgramsÆE-mail, and modify E-mail setting
Q: Why is my backup image is larger than the matched source partition or hard
disk?
A: The source partition or hard disk may be too fragment. Please Defragment it and then back
up again.
 Loading...