

Page 1
STATEMENT
OF POLICY
It is the policy of Farm Star
to improve its products
where it is possible and practical
to do so. Farm Star
reserves the right to make
changes or improvements in
design and construction at any
time, without incurring the obligation to make these changes on
previously manufactured units.
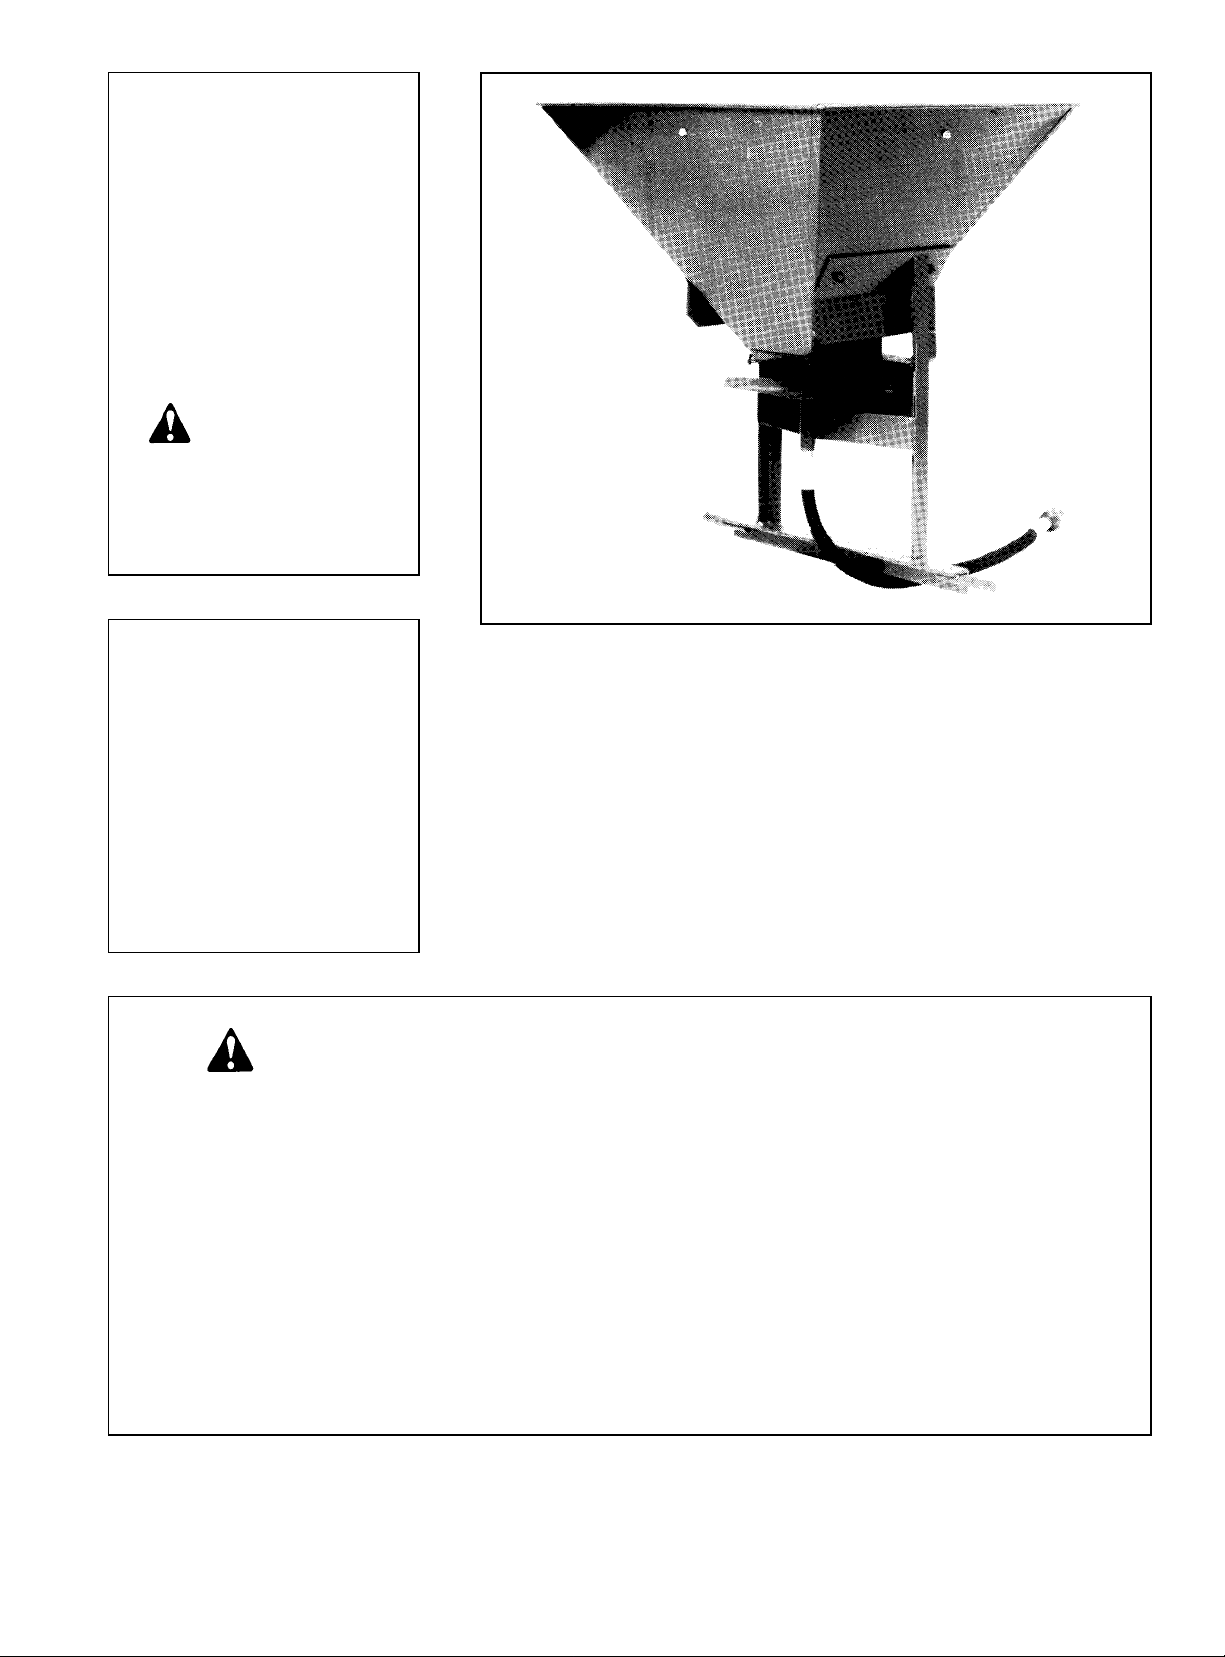
Broadcast Seeder/Spreader
3-PT. MOUNTED
PTO DRIVE
Safety Instructions Assembly & Mounting
Tractor Preparation Maintenance
Operating Instructions Repair Parts
ATTENTION! SAFETY RULES
1.Read instruction manual and make sure all operators are knowledgeable on
correct operation of equipment and familiar with the Safety Rules of Operation.
2.Never allow riders on equipment.
3. When operating on rough or uneven terrain, use extreme caution and a safe
operating speed.
4.When spreading seed or fertilizer, always use safety goggles.
5.Never operate equipment when anyone is within 50 feet of seeder/spreader.
OWNER’S
MANUAL
MODEL NO.’s
US-33
US-63
CAUTION
For Safe Operation
Read Rules And
Instructions Carefully
Before operating equipment – If you have any questions regarding the proper assembly or
operation, contact your dealer or representative.
Page 2

1
T o the Owner/Operator/Dealer
All implements with moving parts are potentially hazardous. There is no substitute for a cautious, safe-minded operator who recognizes the potential hazards and follows reasonable safety practices. The manufacturer has designed this
implement to be used with all its safety equipment properly attached to minimize the chance of accidents.
BEFORE YOU START!!
Read the safety messages on the implement and shown in your manual.
Observe the rules of safety and common sense!
THIS SAFETY ALERT SYMBOL IDENTIFIES IMPORTANT
SAFETY WARNING MESSAGES. CAREFULL YREAD EACH
WARNING MESSAGE THAT FOLLOWS. FAILURE TO
UNDERSTAND AND OBEY A SAFETY WARNING, OR
RECOGNIZE A SAFETY HAZARD, COULD RESULT IN AN
INJURY OR DEATH TO YOU OR OTHERS AROUND YOU.
THE OPERATOR IS ULTIMATELY RESPONSIBLE FOR THE
SAFETY OF HIMSELF, AS WELL AS OTHERS, IN THE
OPERATING AREA OF THE TRACTOR AND EQUIPMENT.
UNDERSTAND SIGNAL WORDS
Note the use of the signal words DANGER, WARNING
and CAUTION with the safety messages. The
appropriate signal word for each has been selected
using the following guidelines:
DANGER: Indicates an imminently hazardous situation
that, if not avoided, will result in death or serious injury.
This signal word is to be limited to the most extreme
situations typically for machine components which, for
functional purposes, cannot be guarded.
WARNING: Indicates a potentially hazardous situation that, if not avoided, could result in death
or serious injury, and includes hazards that are
exposed when guards are removed. It may also
be used to alert against unsafe practices.
CAUTION: Indicates a potentially hazardous situation that, if not avoided, may result in minor or
moderate injury. It may also be used to alert
against unsafe practices.
THIS SYMBOL MEANS
– A TTENTION!
– BECOME ALERT!
– YOUR SAFETY IS INVOLVED!
IMPORTANT SAFETY INFORMATION!
Working with unfamiliar equipment can lead to careless injuries. Read this manual, and the manual for your tractor,
before assembly or operating, to acquaint yourself with the machine. It is the equipment owner’s responsibility, if this
equipment is used by any person other than yourself, is loaned or rented, to make certain that the operator, prior to
operating:
1. Reads and understands the operator’s manuals.
2. Is instructed in safe and proper use.
The use of this equipment is subject to certain hazards which cannot be protected against by mechanical
means or product design. All operators of this equipment must read and understand this entire manual, paying
particular attention to safety and operating instructions, prior to using. If there is something in this manual you
do not understand, ask your supervisor, or your dealer, to explain it to you.
Most accidents occur because of neglect or carelessness. Keep all helpers and bystanders fifty feet (50’) from
operating equipment. Only properly trained people should operate this tractor and attached implement. It is
recommended the tractor be equipped with a Roll-Over Protection System (ROPS) and a seat belt that is used.
Always stop the tractor, set brake, shut off the tractor engine, remove the tractor key, and lower implement to
the ground before dismounting tractor. Never leave equipment unattended with the tractor running.
Page 3
2
All equipment is potentially hazardous. There is no substitute for a cautious, safe-minded operator who
recognizes potential hazards and follows reasonable safety practices.
When the use of hand tools is required to perform any part of assembly, installation, adjustment, maintaining,
repairing, removal, or moving the implement, be sure the tools used are designed and recommended by the
tool manufacturer for that specific task.
Personal protection equipment including safety glasses, safety shoes, and gloves are recommended during
assembly, installation, operation, adjustment, maintaining, repairing, removal, or moving of the spreader.
Always use two people to handle heavy, unwieldy components during assembly, installation, removal, or
moving of the implement.
Never place any part of your body where it would be in danger if movement should occur during assembly,
installation, operation, maintaining, repairing, removal, or moving the implement.
Never place yourself between the tractor and implement while implement is in operation.
Do not work under a raised implement unless it is securely blocked or held in position. Do not depend on the
tractor hydraulic system to hold the implement in place.
A heavy load can cause instability of the tractor. Use extreme care during travel. Slow down on turns and
watch out for bumps. The tractor may need front counter-weights to counter-balance the weight of the
implement. An unstable tractor could steer badly and possibly tip over, causing injury or death.
Never use alcoholic beverages or drugs which can hinder alertness or coordination while operating equipment.
Consult your doctor about operating tractor and implement while taking prescription medications.
Do not allow others to ride on the tractor with an operator. Riders are subject to injury such as being struck by
foreign objects or being thrown off. Riders obstruct the operator’s view resulting in unsafe operation. Never
allow anyone to ride on the implement!
Before you operate any implement, check over all pins, bolts and connections to be sure all are securely in
place. Replace any damaged or worn parts immediately.
Do not allow anyone who is not familiar with the safety rules and operation instructions to use this equipment.
Never allow children to operate or be around equipment.
Do not exceed lift capacity of the tractor hitch.
Keep alert and watch the front as well as the rear when working with the attached implements.
SAFETY INFORMATION (continued)R E PAIR PA RT S
Page 4

3
When maneuvering close to buildings or passing through narrow areas, be sure to allow sufficient clearance
for the implement.
Do not operate close to ditches or creeks. Slow down when operating over rough ground.
Always be sure the implement is in the proper raised position when in transport.
Never operate broadcast spreader if anyone is within 50 ft. of tractor and spreader.
Never use your hand or fingers to clear a jam of material in the feed gate. Use a clean stick or rod.
When spreading any material, always use safety goggles or safety glasses with side shields.
When spreading, always be aware of the wind direction and that it may carry the material further than normal
spread width.
Use care when working on slopes.
Never place any part of your body in the hopper while the PTO is engaged. The rotating agitator can cause
serious injury.
Avoid excessive speed during operation. Use lower gear to slow forward travel.
NEVER operate any PTO driven implement unless tractor PTO guard is in place and PTO driveline shielding
is in place.
Always shut off tractor and shift to “Park” or set brakes when leaving tractor. Always lower implement to
ground. Remove key when leaving tractor unattended.
Before operating equipment: if you have any questions regarding the proper assembly or operation, contact
your dealer or representative.
Safety is a primary concern in the design and
manufacture of our products. Unfortunately, our
efforts to provide safe equipment can be wiped out
by a single careless act of an operator.
In addition to the design and configuration of equipment, hazard control and accident prevention are
dependent upon the awareness, concern, prudence
and proper training of personnel involved in the
operation, transport, maintenance and storage of
equipment.
It has been said, “The best safety device is an
informed, careful operator.” We ask you to be that
kind of an operator.
ALWAYS OBEY ALL
SAFETY RULES!
ALWAYS BE CAREFUL!
SAFETY INFORMATION (continued) OPERATIONAL SPREADING CHART
Page 5

4
TRACTOR PREPA R ATION
The 3-pt. mounted broadcast seeder/spreader models
with a flexible shaft PTO drive will fit most Category I and
some larger Category 0 tractors. Larger Category II tractors may also be used if the 3-pt. hitch lift arms will narrow to 26 inches. Bushings will be needed to fit the
Category I (7/8” dia.) lift pins.
NOTE: Some Category 0 tractors have very short lift
arms or 5/8” diameter (Cat. 0) lift arm ball ends. These
tractors are not usually suitable. Using the seeder on a
tractor with very short lift arms will cause the flexible PTO
shaft to operate with sharp radius bends and will have
flexible shaft failure.
Check the tractor’s 3-pt. hitch. The hitch hydraulic system should be able to hold the lift arms at a set height. If
the hydraulic system leaks and allows the lift arms to
drop, then use stay straps to lock the hitch into position.
Refer to your tractor operator’s manual or dealer for any
adjustments necessary to put the 3-pt. hydraulic lift system in good working order. (I&T shop manuals will list
most specifications and adjustment instructions – available from most farm equipment dealers.)
NOTE: Tractor must have a 13/8” dia. PTO shaft. Use of
PTO extensions is not recommended as they could
cause the flexible PTO shaft to operate with sharp radius
bends and will have rapid failure.
Be sure tires and rims are in good condition. Inflate tires
to the proper recommended air pressure.
Check the tractor’s hydraulic system. Refer to your
tractor operator’s manual or dealer for any adjustments
necessary to put the hydraulic system in good working
order. (I&Tshop manuals will list most specifications and
adjustment instructions – available from most farm
equipment dealers.)
Check the shield over the PTO stub shaft. Make sure it
is in good condition and bolted securely to the tractor.
Purchase a new shield if old shield is damaged or
missing. (You may have to use a tractor salvage yard for
replacement parts on older tractors.)
It is recommended that a ROPS (Roll-Over Protection
Structure) be installed on all tractors. Contact your local
dealer for ROPS for your tractor.
PACKING
Seeders and extension hoppers are usually shipped in
individual cartons. Sometimes the extension sides are in
the main seeder carton if ordered together.
ASSEMBLY & MOUNTING
US-33
The scale plate and lever assembly is folded and bolted
to the seeder frame to prevent shipping damage. Unbolt
this assembly and unfold the lever and control rod. Bolt
the scale plate and control rod assembly on the front of
the main frame, using the 1/4” – 20 x 1/2” bolts provided.
Swing the upper half of the lever up into position (as
shown in parts drawing). Replace the bolts and tighten
securely.
Place the end of the control rod through the hole in the
end of the seed gate control plate (middle plate) and
secure with the 3/32” x 1/2” cotter pin provided.
The openings in the hopper bottom (seed gate) are regulated by the control rod and the scale plate lever. Put
the seed gate middle plate into the closed position.
Loosen the control rod adjustment bolt (this bolt connects the lever to the control rod and screws into an
adjustment button). The adjustment button should now
be able to slide on the control rod.
NOTE: If the paint on the control rod does not allow the
button to slide on the control rod, it may be necessary to
sand some of the paint off with emery paper.
With the seed gate (middle plate) in the closed position,
place the scale plate lever in the closed position.
Retighten the adjustment bolt so that the adjustment button is tight on the control rod.
Move the lever and check to see that the seed gate
(middle plate) is moving with the lever.
Place the lever at the desired setting on the scale plate
and locate the stop bolt so that each time the lever is
pulled to the open position it will be at the same position.
Tighten the stop bolt.
Mount the seeder on your tractor by sliding the lift arm
ball sockets over the seeder pull pins and secure with
Be sure your tractor is in good condition and
properly equipped with counterweights. Read all the
safety precautions and make sure all tractor
operators are familiar with the safety rules of tractor
operation.
CAUTION!
ALWAYS OBEY ALL SAFETY RULES!
ALWAYS BE CAREFUL!
INSTRUCTIONS
Page 6

ASSEMBLY & MOUNTING (continued)
linchpins (not furnished). Attach the center link (not furnished) to the center link bracket on the seeder, using a
center link pin (not furnished) and secure it with a suitable linchpin. Adjust the center link so that the seeder fan
is parallel to the ground.
Slip the adapter (on the tractor end of flexible shaft) on
the tractor PTO stub shaft and tighten setscrew. Tie
flexible shaft to seeder frame to keep it from flopping.
US-63
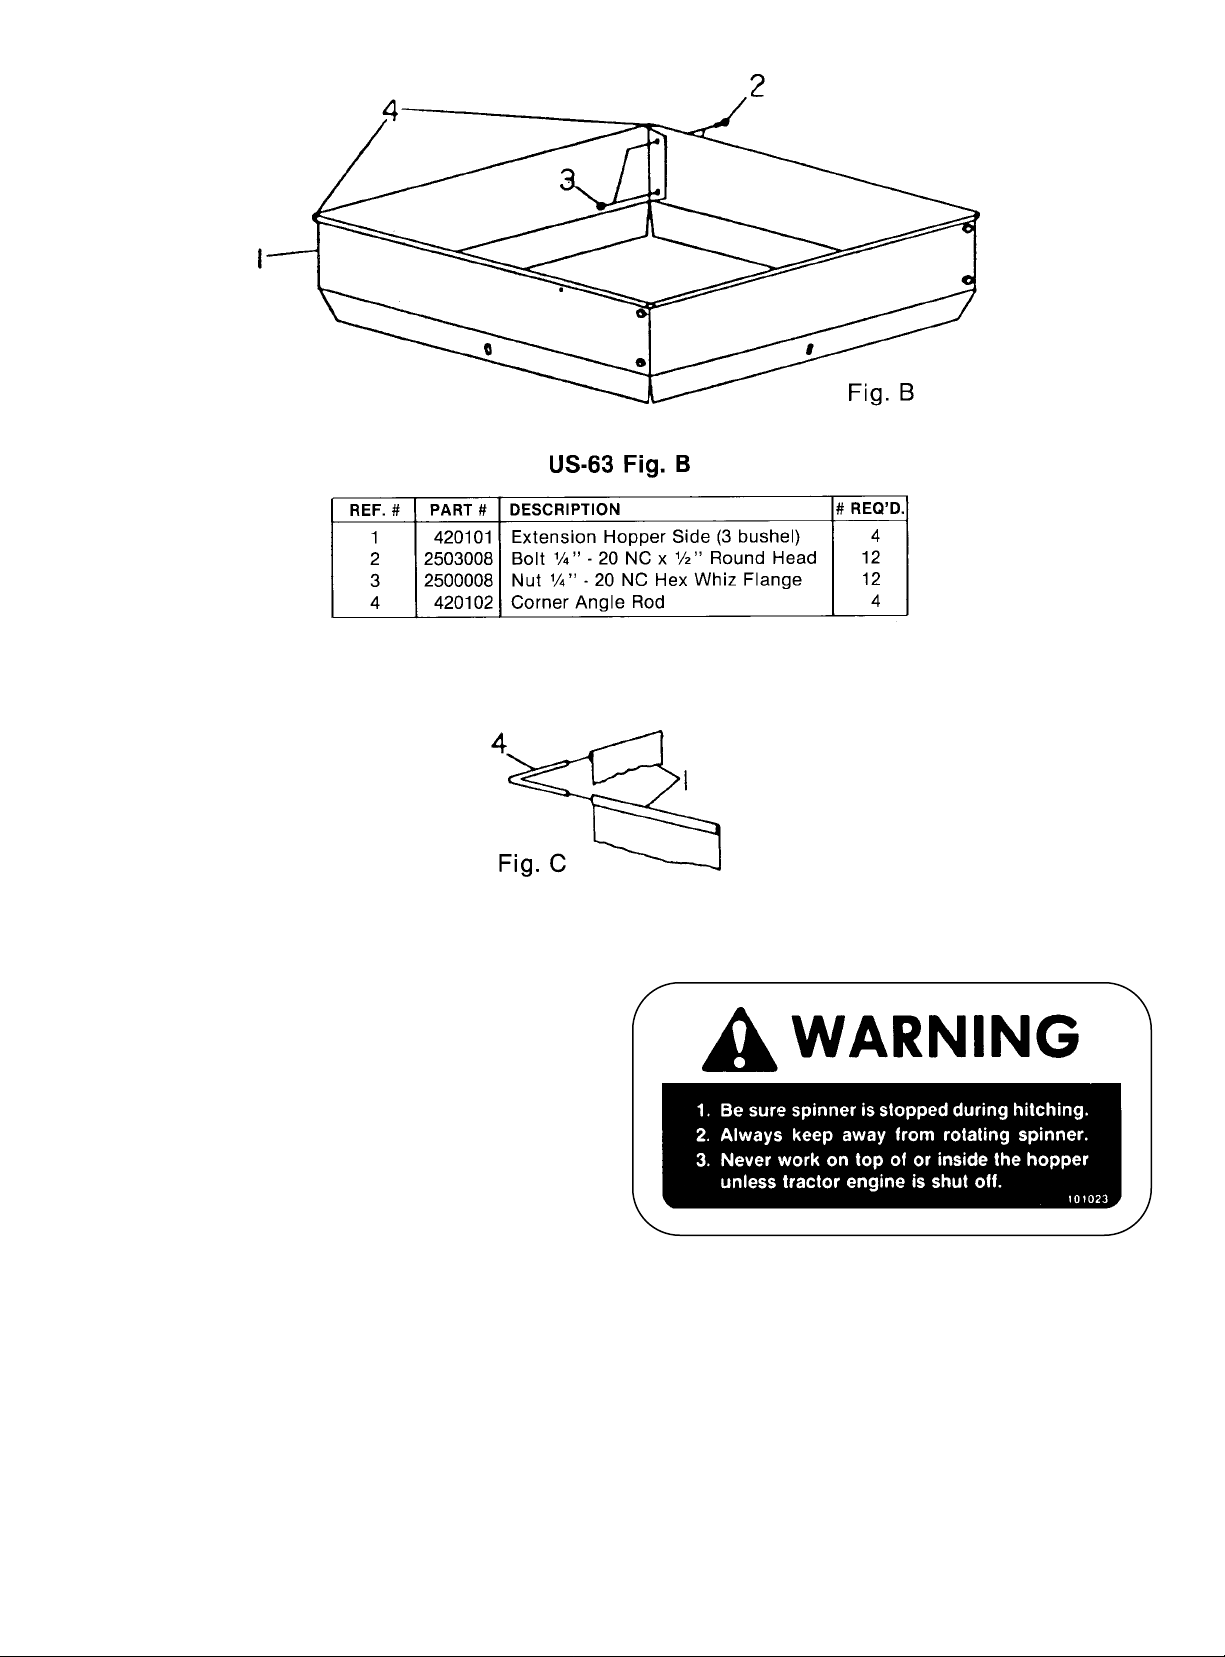
(Assemble as directed in US-33, including the following.) Position the hopper extension sides as show in
figure “B”. As you position each side, insert the corner
angle rod in each pocket as shown in figure “C”. After
these are all placed, then insert all the bolts and tighten
them securely . Take out all of the cap plugs in the seeder
hopper.
NOTE: If there is a possibility of using the seeder as a 3
bushel, then these cap plugs should be kept for future
use.) Position the extension hopper in the seeder hopper
and bolt it in place.
INSTRUCTIONS (continued) INSTRUCTIONS (continued)
Read manual before operating.
CAUTION!
SAFETY PREPA R ATION
• Know your controls and how to stop tractor, engine,
and PTO quickly in an emergency. READ THIS
MANUAL AND THE ONE PROVIDED WITH YOUR
TRACTOR.
• To avoid accident or injury, do not allow anyone to
operate this equipment without proper instructions.
PREPARATION
There is a grease zerk on the shaft housing just below
the spreader fan. Use a good quality grease and give this
lubrication point a few shots of grease before using the
seeder/spreader.
NOTE: Use of Stabilizer Bars
Install stabilizer bars, adjustable sway chains, or
sway blocks on your tractor lift arms to keep the
spreader from swinging side to side.
O PE R ATION
1. Raise the seeder/spreader up so the spreader fan is
30-34 inches above the ground. This will give you the
best spreading performance. It is also best if the
seeder/spreader is tilted slightly forward so that the
spreader fan throws slightly upward. (Use the top link
to make this adjustment.)
2. Check the register of the control lever with the seed
gate (material gate). With the seed gate closed, the
control lever indicator should so indicate. If it does not,
you can adjust the adjustment button on the control
rod.
3. DO NOT FILL HOPPER (especially with fertilizer) and
transport over long distances, as it may result in packing, causing poor or erratic discharge.
4. FOR BEST RESULTS use pelletized fertilizer, as it
has little tendency to lump and cause little or no dust.
5. Be sure to sift or break up lumps found in some types
of granular fertilizer before filling hopper.
6. Do not use on windy days, especially when spreading
fine grass seed.
7. Be extremely careful if you are spreading herbicides,
as there is the possibility of wind drift or overthrow into
area that serious crop/shrub damage could occur.
Follow precautions on package.
8. The spreader will not work with rock salt. It will
spread granular calcium chloride if dry and freeflowing.
Any person who operates this equipment must be
instructed in and be capable of the safe operation of
the tractor, implement and all controls.
• Do not allow children to operate this machine.
• Always wear relatively tight and belted clothing to
avoid entanglement in moving parts. Wear sturdy,
rough-soled work shoes and protective equipment for
eyes, hands, and hearing. Never operate tractor in
bare feet, sandals, or sneakers.
• Operate only in daylight or good artificial light.
• Ensure implement is properly mounted, adjusted and
in good operating condition.
• Ensure that all safety shielding and safety signs are
properly installed and in good condition.
5
Page 7

O P E R ATION (continued)
2. Check rate chart for suggested setting for material
type to be spread.
3. Width of spread depends upon the tractor PTO speed
and the weight of the material. The heavier the material, the wider the spread. The table shows width of
spread at 540 rpm, so the width will vary according to
the speed of your PTO.
For accurate spreading, calibrate your tractor to
operate at the desired speed. Acalibrated speedometer is the best and most accurate. If your tractor does
not have a speedometer or its accuracy is questionable, then you may calibrate in the following manner:
Set out two markers 88 feed apart. Select proper gear
and adjust throttle speed to give the following travel
time as shown between the markers.
NOTE: You cannot adjust the throttle very much, as
you need to maintain 540 rpm PTO speed. (A plus or
minus 20 rpm could be tolerated.)
1 MPH will travel 88 feet in 60 seconds
4 MPH will travel 88 feet in 15 seconds
6 MPH will travel 88 feet in 11.2 seconds
8 MPH will travel 88 feet in 7.5 seconds
After selecting gear and throttle setting to give
desired speed, mark the throttle position in some
convenient manner. Check PT O speed to make sure it
is near 540 rpm.
4. You are now ready to make a trial turn to assure accurate results. Close the hopper and put in a pre-determined amount of the material to be spread. Spread
this and check the results. Make final adjustments to
obtain desired results.
SPREADING INSTRUCTIONS
1. The opening in the hopper bottom is regulated by the
control lever. The size of the opening is determined by
the calibrated scale. Place the control lever at the
desired setting and adjust the stop bolt.
MAINTENANCE
1. The hopper should be washed after use, especially
after use with corrosive material such as fertilizer or
ice melting compounds. When dry, oil thoroughly –
move speed gate several times to allow oil to cover
plate completely.
2. Flexible shafts will give long service with proper care.
Shafts should never be kinked and if they flop should
be tied down. A larger shear pin should not be used.
To do so voids your warranty . To remove flexshaft from
seeder, the outer case has a RH thread and the inner
core a LH thread. Hold fan firmly and turn PTO
adapter clockwise to unscrew inner core. When core
feels free, turn outer case counter-clockwise until case
9. When broadcasting fertilizer, always start vehicle in
motion before opening feed gate. (Do not allow
vehicle to sit stationary with feed gate open.) If fertilizer is accidentally deposited too heavily in a small
area, soak down thoroughly with garden hose or sprinkler to prevent burning.
CAUTION!
KEEP ALL PERSONS AWAY FROM THE ROTATING
SPREADERS FAN AND THE PTO SHAFT! NEVER
OPERATE WHEN ANYONE IS WITHIN 50 FEET OF
SEEDER/SPREADER.
A heavy load can cause instability in driving a tractor. Make sure the front of the tractor is properly
counter-balanced with weights. Always drive slowly
– especially around turns. An unstable tractor could
steer badly and possibly tip over, causing injury or
death.
W ARNING!
Do not attempt to use your fingers to clear a jam.
Accidental closing of the feed gate could shear a
finger off, or leaving the PTO engaged could rotate
the agitator, which could pinch or amputate a finger.
Be sure that the tractor engine is shut off and the
PTO clutch is disengaged before doing any adjustment or repair.
NOTE: Do not start and stop PTO with hopper full.
Agitator should be kept running (whenever there is
material in hopper) to avoid “shock starts” on shaft.
NOTE: Use stabilizer bars, adjustable sway chains,
or sway blocks on your tractor lift arms to keep the
spreader from swinging side to side.
CAUTION!
6
Page 8

INSTRUCTIONS (continued)
STORING SAFELY
• Never store equipment with fuel in the tank inside a
building where fumes may reach an open flame or
spark. Allow engine to cool before storing in an
enclosure.
• Do not run engine indoors - exhaust gases contain
carbon monoxide, an odorless and deadly poison.
• Sand areas where paint is chipped or worn and
repaint to prevent rust. Lubricate all pivot locations on
hitch kit to prevent moisture damage during storage.
W ARNING!
▲ Keep clear of rotating parts; stay on tractor seat
until all motion has stopped.
▲ Be sure tractor engine is off and key is removed
before making any adjustments.
▲ Do not get under machine to make measurements
or adjustments without securely blocking implement first.
OBEY ALL
SAFETY
W ARNINGS!
MAINTENANCE (continued)
and core can be removed. To remove core from case,
take off PTO adapter by removing the spiral roll pin
and remove core from opposite end.
3. Grease shaft housing (under spreader fan) before
each use.
4. Always store seeder/spreader in a clean, dry place.
5. Before using, check to make sure all nuts and bolts
are tight.
6. Paint any bare metal or rusty spots for longer life.
HELPFUL TROUBLE-SHOOTING
TIPS
1. Not feeding even –
A. Seed gate opening may be set too close for the
material being spread. To overcome, set the opening larger and driver faster to obtain same spread
rate.
B. Check material for foreign matter.
C. Check agitator cotter pin for shear.
3. Roll pins shearing between PTO adapter and
flexible PTO driveshaft –
A. Operator is starting PTO when hopper is full of
material. PTO should be kept in gear to avoid
“shock starts” on shaft. Use control lever to start
and stop material flow – NOT PTO!
B. Flexible shaft is being operated with excessive
tight radius bends or is kinked.
C. Material being spread has large lumps or foreign
material jamming agitator.
D. Flexible shaft needs lubrication.
E. Roll pin hole is worn in PTO adapter or flexible
shaft end.
2. Poor spread –
A. Too much speed (over 560 PTO rpm) can cause
uneven spread.
B. PTO speed too slow (PTO rpm under 520 rpm) will
result in a narrow spread.
C. Bent fan blades.
D. Cotter pin sheared or missing on fan hub.
E. Too windy for material being spread.
F. Agitator problems – check tips above, under “Not
feeding even.”
G. Operator not spacing spread runs properly for cor-
rect overlap.
For best results, cover area twice over at one-half
recommended material usage rate, the second
time over to run halfway between first spreading
width or in a criss-cross pattern. This method
allows the most complete and even coverage, as
well as to give operator a chance to adjust gate
setting to compensate for too thin or too heavy a
covering the first time over.
H. Seeder/spreader should run level or tilted slightly
forward. Make sure lift arms on tractor are
adjusted so one side is not lower than the other.
7
Page 9
8
U Keep children away from danger all day, every day.
U Equip tractors with roll-over protection (ROPS) and keep
all machinery guards in place.
U Please work, drive, play, and live each day with care and
concern for your safety and that of your family and fellow
citizens.
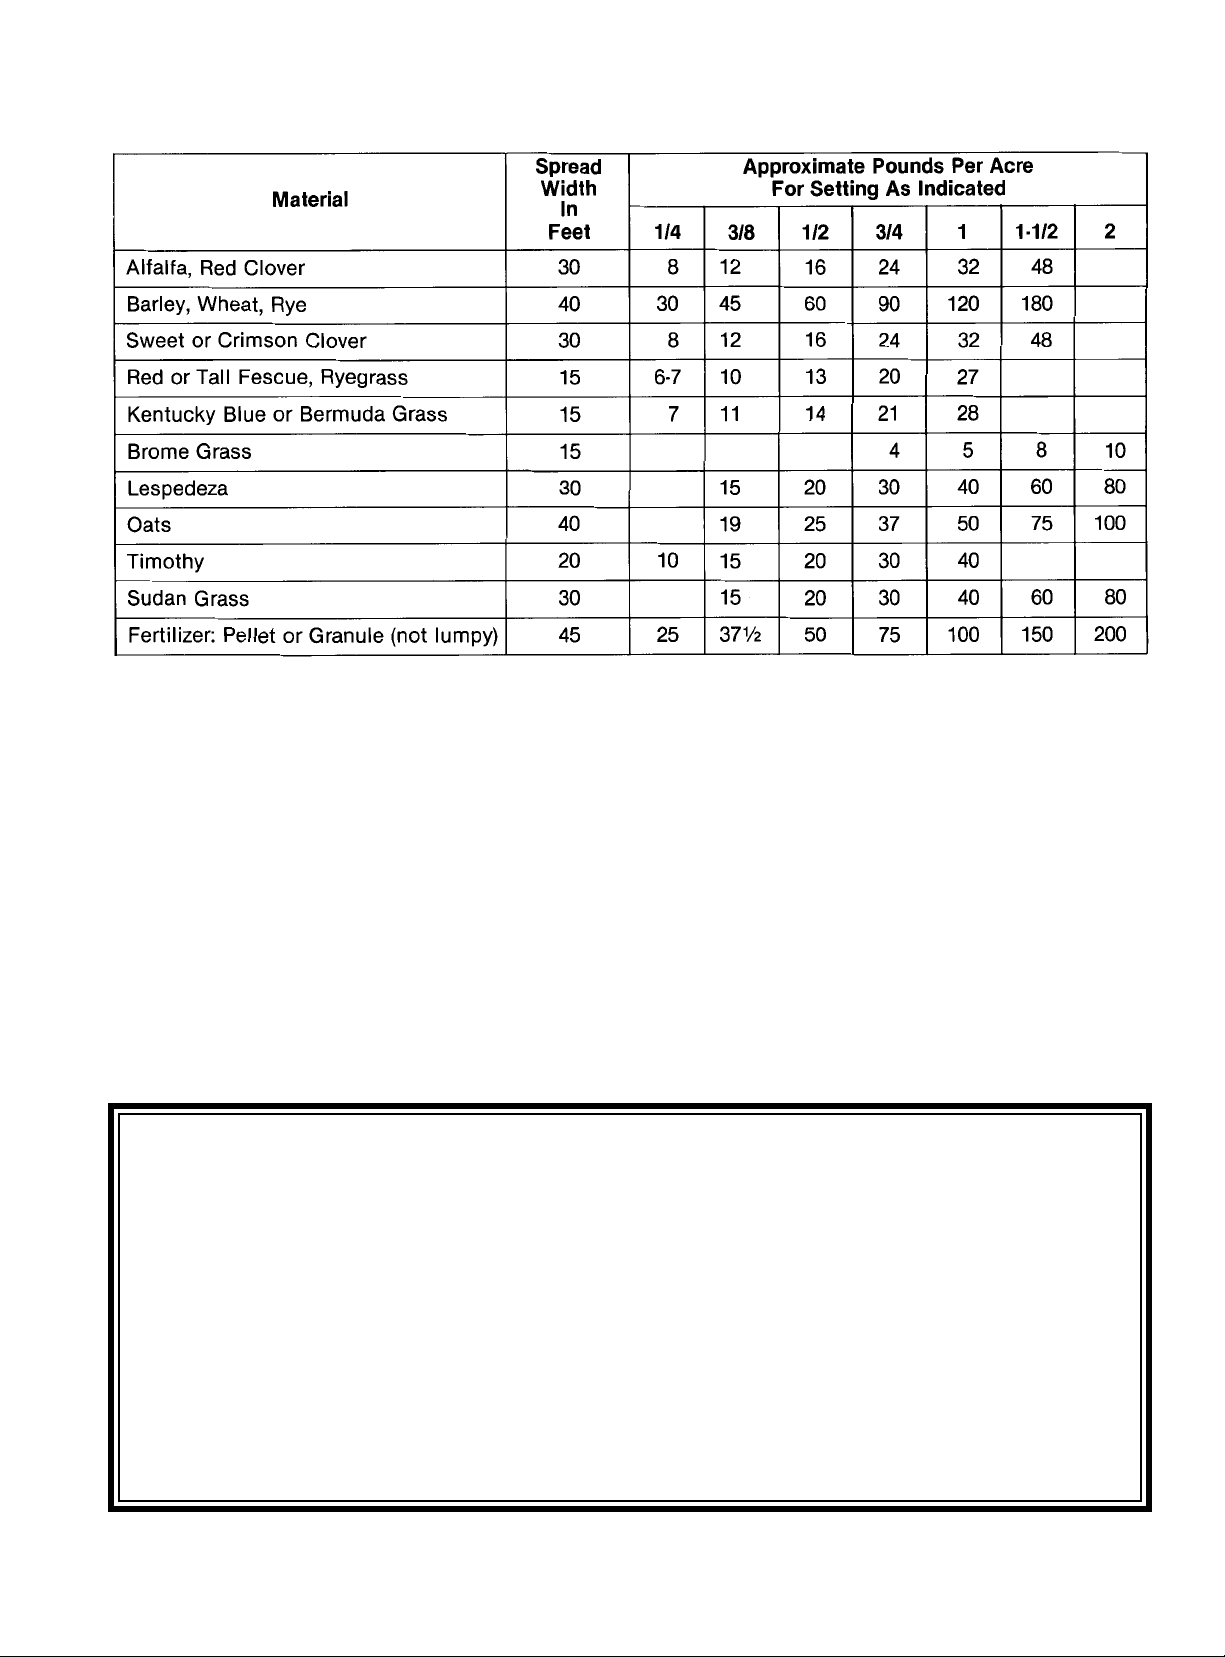
(Calibrated at 4 MPH ground speed and 540 RPM PTO speed)
The spread width indicated on this chart is possible if spinner is operated 30 inches above the ground.
NOTE:
Spread Chart settings are approximate – always make trial run to check actual application rate.
The amount of seed or fertilizer broadcast depends on the size of the hopper opening and the speed of the tractor. The
table shown is an approximate guide based on a tractor speed of 4 MPH, so adjust for different speeds.
Page 10
9
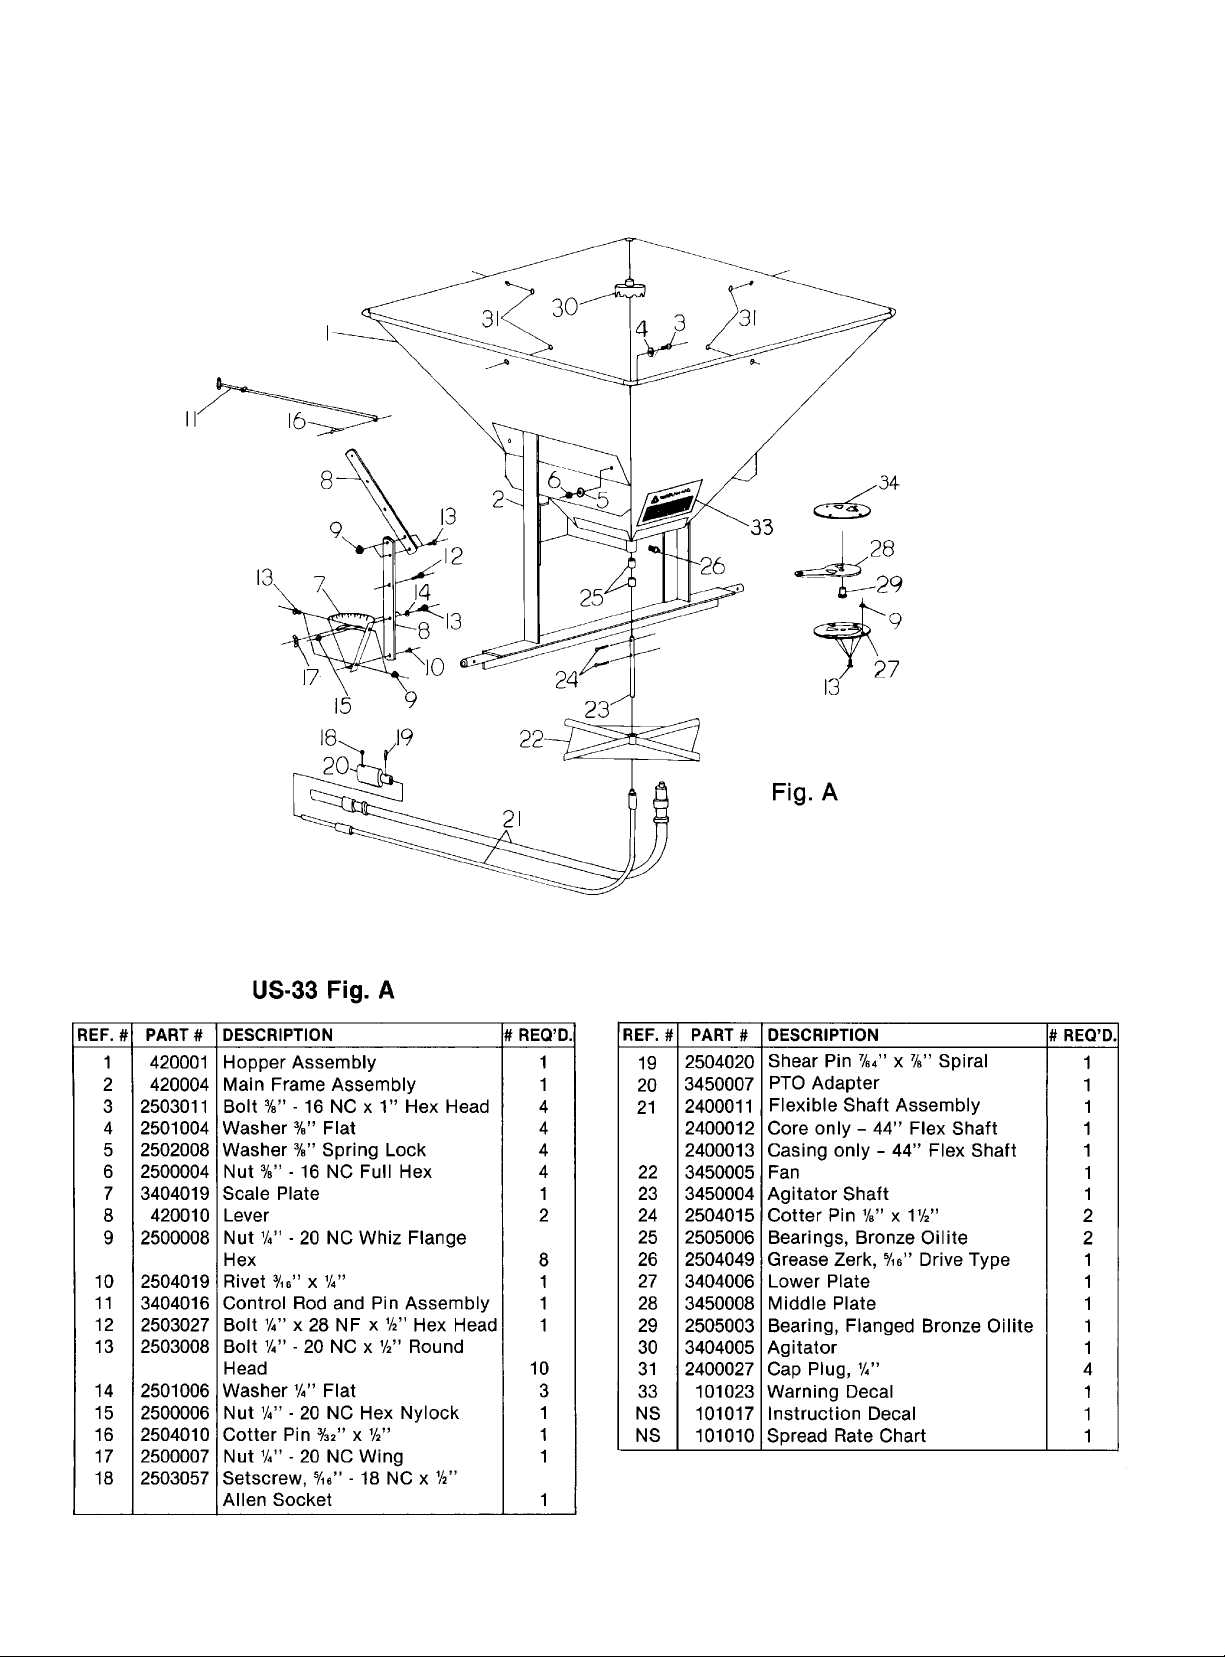
3-PT. BROADCAST SEEDER/SPREADER
Page 11
OBEY ALL
SAFETY WARNINGS
10
Replace Safety Decals
If Damaged Or Missing
Page 12
SAFETY PRECAUTIONS
MOST ACCIDENTS OCCUR BECAUSE OF NEGLECT OR CARELESSNESS.
AVOID NEEDLESS ACCIDENTS BY FOLLOWING ALL OF THE SAFETY PRECAUTIONS LISTED BELOW.
• Machinery should be operated only by those who
are responsible and are authorized to do so.
• Stop the engine, lower all equipment, lock the
brakes, and remove the ignition key before dismounting from the tractor.
• Never stand between tractor and implement while
tractor is being backed to hitch.
• Loose fitting clothing should not be worn, to avoid
catching on various parts.
• Detach implement in area where children normally
do not play.
• When performing adjustments or maintenance on
an implement, first lower it to the ground or block it
securely at a workable height.
• Only a qualified operator should be permitted on
tractor when in operation; no riders allowed.
• Make certain everyone is in the clear before starting
tractor or raising or lowering equipment.
• Operate the tractor and implement only while
seated in the driver’s seat.
• Reduce speed when transporting mounted
implements to avoid bouncing and momentary loss
of steering control.
• A heavy load can cause instability of the tractor.
Use extreme care during road travel. Slow down on
turns and watch out for bumps. Tractor may need
front counter-weights to counter-balance the weight
of the implement.
• Reduce speed on hillsides or curves so there is no
danger of tipping.
• Avoid driving too close to the edge of ditches or
creeks.
• Do not transport implement on public roads without
reflectors and slow moving vehicle emblem in
daylight and with approved warning lights at night
and other periods of poor visibility.
• Due to the width of some implements, use extra
caution on highways, farm roads, and when
approaching gates.
• Always be sure the implement is in the proper
position for transport.
• Keep alert and watch the front as well as the rear
when working with the implement.
OWNER’S
MANUAL
MODEL NO.’s
US-33
US-63
WHEN ORDERING
REPAIR PARTS, ALWAYS
GIVE THE FOLLOWING
INFORMATION:
1. PART NUMBER
2. PART DESCRIPTION
3. MODEL NUMBER
4. NAME OF ITEM
MARCH 1998
FS-SS003-OG
FARM STAR LIMITED WARRANTY
Farm Star warrants its implements, parts and accessories to be free from defects
in materials and workmanship for a period of six (6) months from date of purchase.
Upon written approval, Farm Star will repair or exchange without charge any part,
which
upon examination by Farm Star or its authorized agent, shall disclose to be
defective.
This does not apply to (1) parts that have worn out in normal use, (2) parts broken
because of improper assembly or operation by the customer, (3) parts accidentally
damaged, (4) failure of parts traceable to improper care, (5) parts failing through use
of implement for purposes other than those for which it was designed.
The obligations assumed by Farm Star and the limitations expressed herein are in
lieu of all other warranties expressed or implied.
FARM STAR
P.O. BOX 100 LITCHFIELD, IL 62056-0100 (217) 324-5973
MAKE EVERY DAY
A HOLIDAY FROM ACCIDENTS
Please work, drive, play and live each day with care
and concern for your safety and that of your family
and fellow citizens.
3-Pt. Broadcast Seeder/Spreader
 Loading...