

Page 1
OWNER’S
MANUAL
MODEL NO.
FOD-15
CAUTION
For Safe Operation
Read Rules And
Instructions Carefully
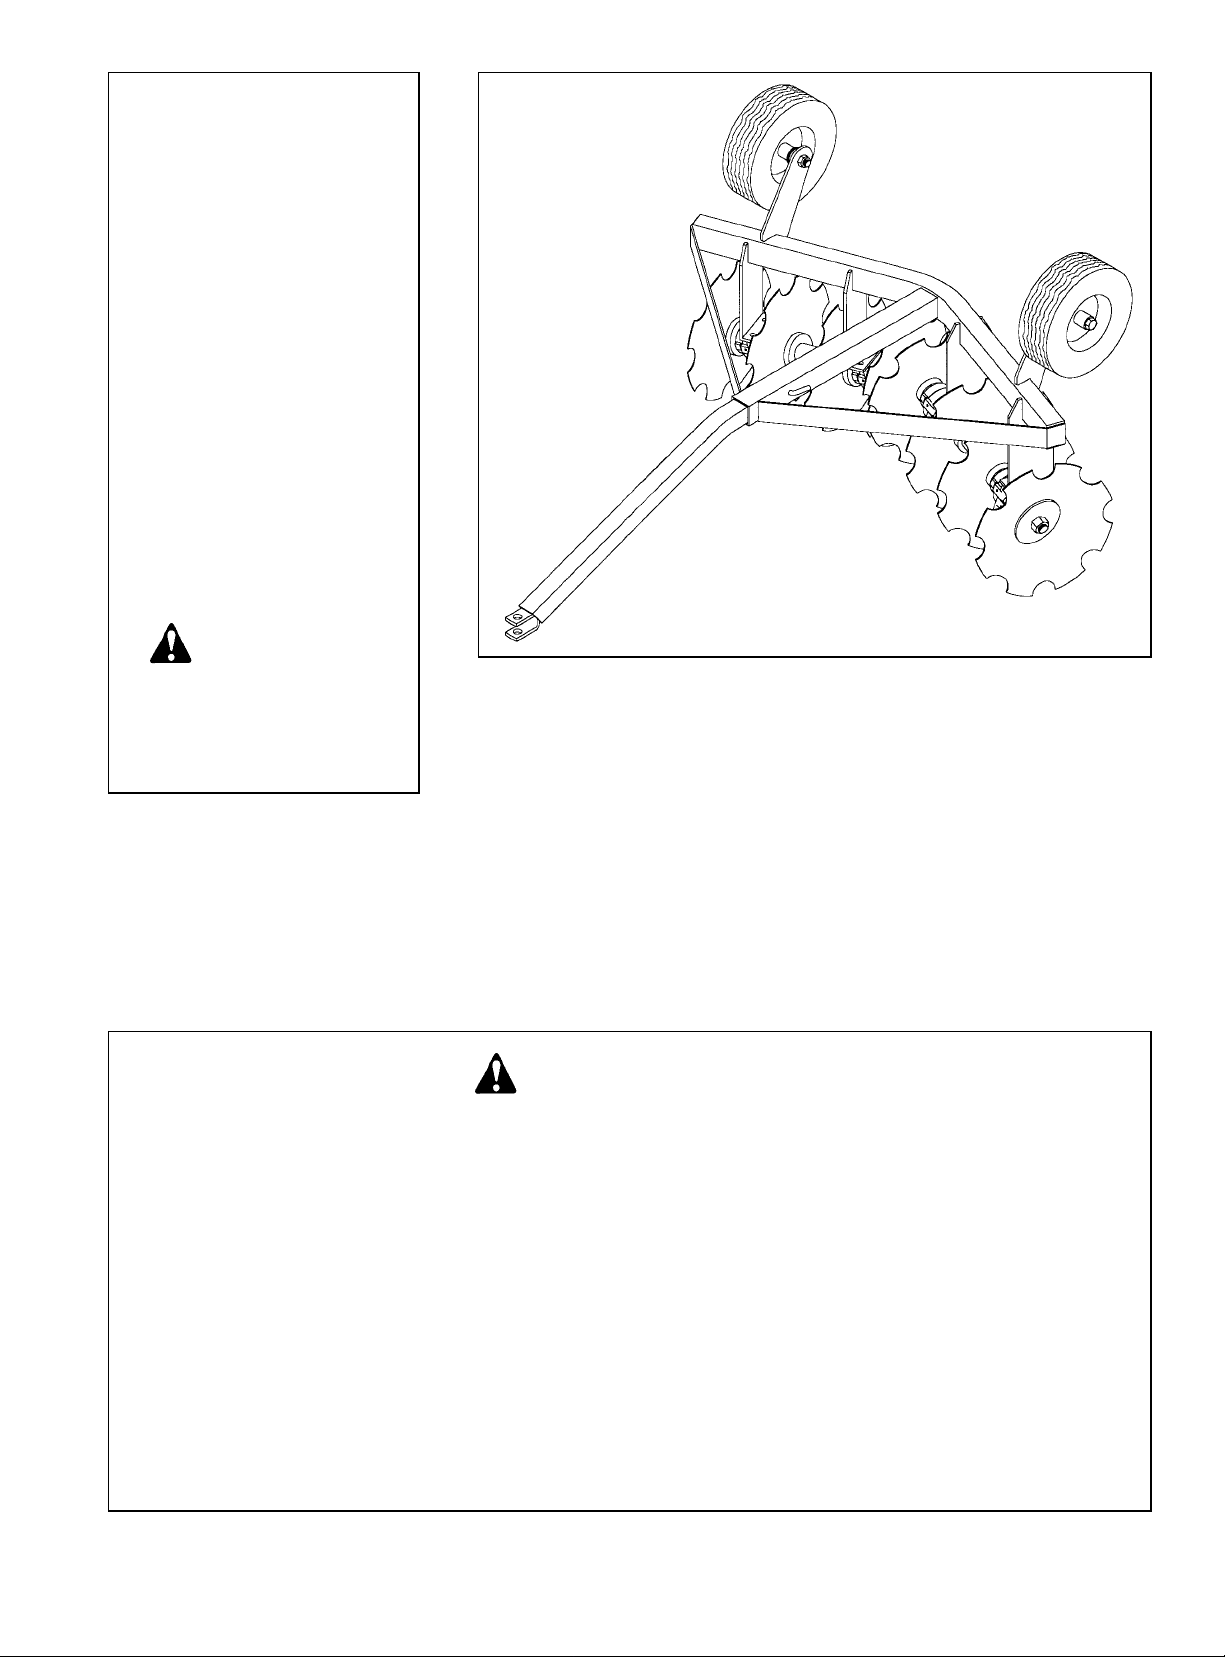
FLIP-OVER
SINGLE GANG DISC
Safety Instructions Assembly & Mounting
Tractor Preparation Maintenance
Operating Instructions Repair Parts
SINO LEEINGLES, PIDA AYUDA A
AIGUIEN QUE SI LO LEA PARA QUE
LE TRADUZCA LAS MEDIDAS DE
SEGURIDAD.
CAUTION
THE FOLLOWING SAFETY PRECAUTIONS SHOULD BE THOROUGHLY UNDERSTOOD
BEFORE ATTEMPTING TO BEGIN ASSEMBLING THIS MACHINE
1. Select an area for assembly that is clean and free of any
debris which might cause persons working on the
assembly to trip.
2. Do not lift heavy parts or assemblies. Use crane, jack,
tackle, fork trucks or other mechanical devices.
3. Preview the assembly instructions in your operator’s
manual before proceeding further.
4. If the assembly instructions call for parts or assemblies to
be blocked up, use only blocking material that is in good
condition and is capable of handling the weight of the
assembly to be blocked. Also insure that the blocking
material is on a clean, dry surface.
5. Never put hands, or any part of body, under blocked up
assemblies if at all possible.
6. After completing assembly, thoroughly inspect the
machine to be sure that all nuts, bolts, hydraulic fittings
or any other fastened assemblies have been thoroughly
tightened.
7. Before operating the machine, thoroughly read the
operation section of your operator’s manual.
8. Before operating, read the maintenance section of your
operator’s manual to be sure that any parts requiring
lubrication, such as gearboxes, are full, to avoid any
possible damage.
9. Before operating equipment – If you have any
questions regarding the proper assembly or
operation, contact your dealer or representative.
Page 2

1
TABLE OF CONTENTS
WARRANTY . . . . . . . . . . . . . . . . . . . . . . . . . . . . . . . . . . . . . 2
SAFETY INFORMATION . . . . . . . . . . . . . . . . . . . . . . . . . . . 3
SAFETY SIGNS . . . . . . . . . . . . . . . . . . . . . . . . . . . . . . . . . . 8
PREPARATION INSTRUCTIONS . . . . . . . . . . . . . . . . . . . . . 9
OPERATING INSTRUCTIONS . . . . . . . . . . . . . . . . . . . . . . . 11
OWNER SERVICE & LUBRICATION . . . . . . . . . . . . . . . . . . 12
PARTS LISTS . . . . . . . . . . . . . . . . . . . . . . . . . . . . . . . . . . . . 13
SINO LEEINGLES, PIDA AYUDA A
AIGUIEN QUE SI LO LEA PARA QUE
LE TRADUZCA LAS MEDIDAS DE
SEGURIDAD.
STATEMENT
OF POLICY
It is the policy of Farm Star to
improve its products where it is
possible and practical to do so.
Farm Star reserves the right to
make changes or improvements
in design and construction at
any time, without incurring the
obligation to make these
changes on previously manufactured units.
TO THE OWNER:
Read this manual before using your Flip-Over Single Gang Disc. This manual is provided to give you the
necessary operating and maintenance instructions for keeping your Single Gang Disc in top operating condition.
Please read this manual thoroughly. Understand what each control is for and how to use it. Observe all safety
signs on the machine and noted throughout the manual for safe operation of implement. Keep this manual handy
for ready reference.
Like all mechanical products, it will require cleaning and upkeep. Lubricate the Disc as specified.
Use only genuine Farm Star service parts. Substitute parts will void the warranty and may not meet standards
required for safe and satisfactory operation. Record the model and serial number of your Disc here:
Model:________________________________________ Serial Number:_______________________________
RETAIL CUSTOMER’S RESPONSIBILITY
It is the Retail Customer and/or Operator’s responsibility to read the Operator’s Manual, to operate,
lubricate, maintain, and store the product in accordance with all instructions and safety procedures.
Failure of the operator to read the Operator’s Manual is a misuse of this equipment.
It is the Retail Customer and/or Operator’s responsibility to inspect the product and to have any part(s)
repaired or replaced when continued operation would cause damage or excessive wear to other parts or
cause a safety hazard.
It is the Retail Customer’s responsibility to deliver the product to the authorized Farm Star Dealer, from
whom he purchased it, for service or replacement of defective parts which are covered by warranty.
Repairs to be submitted for warranty consideration must be made within forty-five (45) days of failure.
It is the Retail Customer’s responsibility for any cost incurred by the Dealer for traveling to or hauling
of the product for the purpose of performing a warranty obligation or inspection.
Page 3

2
LIMITED WARRANTY
✯ ✯ ✯ ✯ ✯ ✯ ✯ ✯ ✯ ✯ ✯ ✯ ✯ ✯ ✯ ✯ ✯ ✯ ✯ ✯ ✯ ✯ ✯ ✯ ✯ ✯ ✯
Farm Star warrants to the original purchaser of any new Disc Harrow Model FOD-15, that the equipment be
free from defects in material and workmanship for a period of six (6) months for non-commercial, state, and
municipalities. Use sixty (60) days for commercial use from date of retail sale.
Replacement or repair parts installed in the equipment covered by this warranty are warranted for sixty (60)
days from the date of purchase of such part or to the expiration of the applicable new equipment warranty
period, whichever occurs later.
Such parts shall be provided at no cost to the user during regular working hours. Farm Star reserves the right
to inspect any equipment or parts which are claimed to have been defective in material or workmanship.
DISCLAIMER OF IMPLIED WARRANTIES & CONSEQUENTIAL DAMAGES
Farm Star’s obligation under this warranty, to the extent allowed by law, is in lieu of all warranties, implied or
expressed, including implied warranties of merchantability and fitness for a particular purpose and any liability
for incidental and consequential damages with respect to the sale or use of the items warranted. Such
incidental and consequential damages shall include but not be limited to: transportation charges other than
normal freight charges; cost of installation other than cost approved by Farm Star; duty; taxes; charges for
normal service or adjustments; loss of crops or any other loss of income; rental of substitute equipment,
expenses due to loss, damage, detention or delay in the delivery of equipment or parts resulting from acts
beyond the control of the manufacturer.
THIS WARRANTY SHALL NOT APPLY:
1. To vendor items which carry their own warranties, such as hydraulic cylinders, tires, and tubes.
2. If the unit has been subjected to misapplication, abuse, misuse, negligence, fire or other accident.
3. If parts not made or supplied by Farm Star have been used in connection with the unit, if, in sole judgement of Farm Star such use affects its performance, stability, or reliability.
4. If the unit has been altered or repaired outside of an authorized dealership in a manner which, in the sole
judgement of Farm Star affects its performance, stability or reliability.
5. To normal maintenance service and normal replacement items such as gearbox lubricant, hydraulic fluid,
worn blades, or to normal deterioration of such things as belts and exterior finish, due to use or exposure.
6. To expendable or wear items such as teeth, chains, sprockets, belts, springs and other items that in the
company’s sole judgement is a wear item.
NO EMPLOYEE OR REPRESENTATIVE OF FARM STAR IS AUTHORIZED TO CHANGE THIS
WARRANTY IN ANY WAY OR GRANT ANY OTHER WARRANTY UNLESS SUCH CHANGE IS MADE IN
WRITING AND SIGNED BYFARM STAR’S SERVICE MANAGER, POST OFFICE BOX 100, LITCHFIELD,
ILLINOIS 62056-0100.
✯ ✯ ✯ ✯ ✯ ✯ ✯ ✯ ✯ ✯ ✯ ✯ ✯ ✯ ✯ ✯ ✯ ✯ ✯ ✯ ✯ ✯ ✯ ✯ ✯ ✯ ✯
Page 4

3
T o the Owner/Operator/Dealer
All implements with moving parts are potentially hazardous. There is no substitute for a cautious, safe-minded operator who recognizes the potential hazards and follows reasonable safety practices. The manufacturer has designed this
implement to be used with all its safety equipment properly attached to minimize the chance of accidents.
BEFORE YOU START!!
Read the safety messages on the implement and shown in your manual.
Observe the rules of safety and common sense!
THIS SAFETY ALERT SYMBOL IDENTIFIES IMPORTANT
SAFETY W ARNING MESSAGES. CAREFULLY READ EACH
WARNING MESSAGE THAT FOLLOWS. FAILURE TO
UNDERSTAND AND OBEY A SAFETY WARNING, OR
RECOGNIZE A SAFETY HAZARD, COULD RESULT IN AN
INJURY OR DEATH TO YOU OR OTHERS AROUND YOU.
THE OPERATOR IS ULTIMATELY RESPONSIBLE FOR THE
SAFETY OF HIMSELF, AS WELL AS OTHERS, IN THE
OPERATING AREA OF THE TRACTOR AND ATTACHED
EQUIPMENT.
IMPORTANT SAFETY INFORMATION!
Working with unfamiliar equipment can lead to careless injuries. Read this manual, and the manual for your tractor,
before assembly or operating, to acquaint yourself with the machines. It is the implement owner’s responsibility, if this
machine is used by any person other than yourself, is loaned or rented, to make certain that the operator, prior to
operating:
1. Reads and understands the operator’s manuals.
2. Is instructed in safe and proper use.
The use of this equipment is subject to certain hazards which cannot be protected against by mechanical
means or product design. All operators of this equipment must read and understand this entire manual, paying
particular attention to safety and operating instructions, prior to using. If there is something in this manual you
do not understand, ask your supervisor, or your dealer, to explain it to you.
THIS SYMBOL MEANS
– A TTENTION!
– BECOME ALERT!
– YOUR SAFETY IS INVOLVED!
UNDERSTAND SIGNAL WORDS
Note the use of the signal words DANGER, WARNING
and CAUTION with the safety messages. The
appropriate signal word for each has been selected
using the following guidelines:
DANGER: Indicates an imminently hazardous situation
that, if not avoided, will result in death or serious injury.
This signal word is to be limited to the most extreme
situations typically for machine components which, for
functional purposes, cannot be guarded.
If you have questions not answered in this manual or require additional copies or the manual is damaged, please
contact your dealer or the manufacturer directly.
WARNING: Indicates a potentially hazardous situation that, if not avoided, could result in death
or serious injury, and includes hazards that are
exposed when guards are removed. It may also
be used to alert against unsafe practices.
CAUTION: Indicates a potentially hazardous situation that, if not avoided, may result in minor or
moderate injury. It may also be used to alert
against unsafe practices.
Page 5

4
SAFETY INSTRUCTIONS (continued)
Safety of the operator is one of the main concerns in designing and developing a new piece of equipment.
Designers and manufacturers build in as many safety features as possible. However, every year many
accidents occur which could have been avoided by a few seconds of thought and a more careful approach to
handling equipment. You, the operator, can avoid many accidents by observing the following precautions in
this section. To avoid personal injury, study the following precautions and insist those working with you, or for
you, follow them.
To prevent injury or death, use a tractor equipped with a Roll-Over Protective System (ROPS). Do not paint
over, remove or deface any safety signs or warning signs on your equipment. Observe all safety signs and
practice the instruction on them.
Never exceed the limits of a piece of machinery. If its ability to do a job, or to do so safely, is in question -
DON’T TRY IT.
Do not modify the equipment in any way. Unauthorized modification may impair the function and/or safety and
could affect the life of the equipment.
In addition to the design and configuration of this implement, including Safety Signs and Safety Equipment,
hazard control and accident prevention are dependent upon the awareness, concern, prudence, and proper
training of personnel involved in the operation, transport, maintenance, and storage of the machine. Refer also
to Safety Messages and Operation Instructions in each of the appropriate sections of the Tractor and
Implement Manuals. Pay close attention to the Safety Signs affixed to the Tractor and the Implement.
Review the safety instructions with all users annually.
This equipment is dangerous to children and persons unfamiliar with its operation. The operator should be a
responsible adult familiar with farm machinery and trained in this equipment’s operations. Do not allow per-
sons to operate or assemble this unit until they have read this manual and have developed a thorough
understanding of the safety precautions and of how it works.
EQUIPMENT SAFETY GUIDELINES
Keep safety signs clean and legible at all times.
Replace safety signs that are missing or have become illegible.
Replaced parts that displayed a safety sign should also display the current sign.
Safety signs are available from your Distributor or Dealer Parts Department or the factory.
SAFETY SIGNS
Page 6

5
SAFETY INFORMATION (continued)
All equipment is potentially hazardous. There is no substitute for a cautious, safe-minded operator who
recognizes potential hazards and follows reasonable safety practices.
When the use of hand tools is required to perform any part of assembly, installation, adjustment, maintaining,
repairing of the implement, be sure the tools used are designed and recommended by the tool manufacturer
for that specific task.
Personal protection equipment including safety glasses, safety shoes, and gloves are recommended during
assembly, installation, operation, adjustment, maintaining, repairing of the implement.
Always use two people to handle heavy, unwieldy components during assembly or installation of the
implement.
Never place any part of your body where it would be in danger if movement should occur during assembly,
installation, operation, maintaining, repairing of the implement.
Never place yourself between the tractor or ATV and implement while implement is in operation.
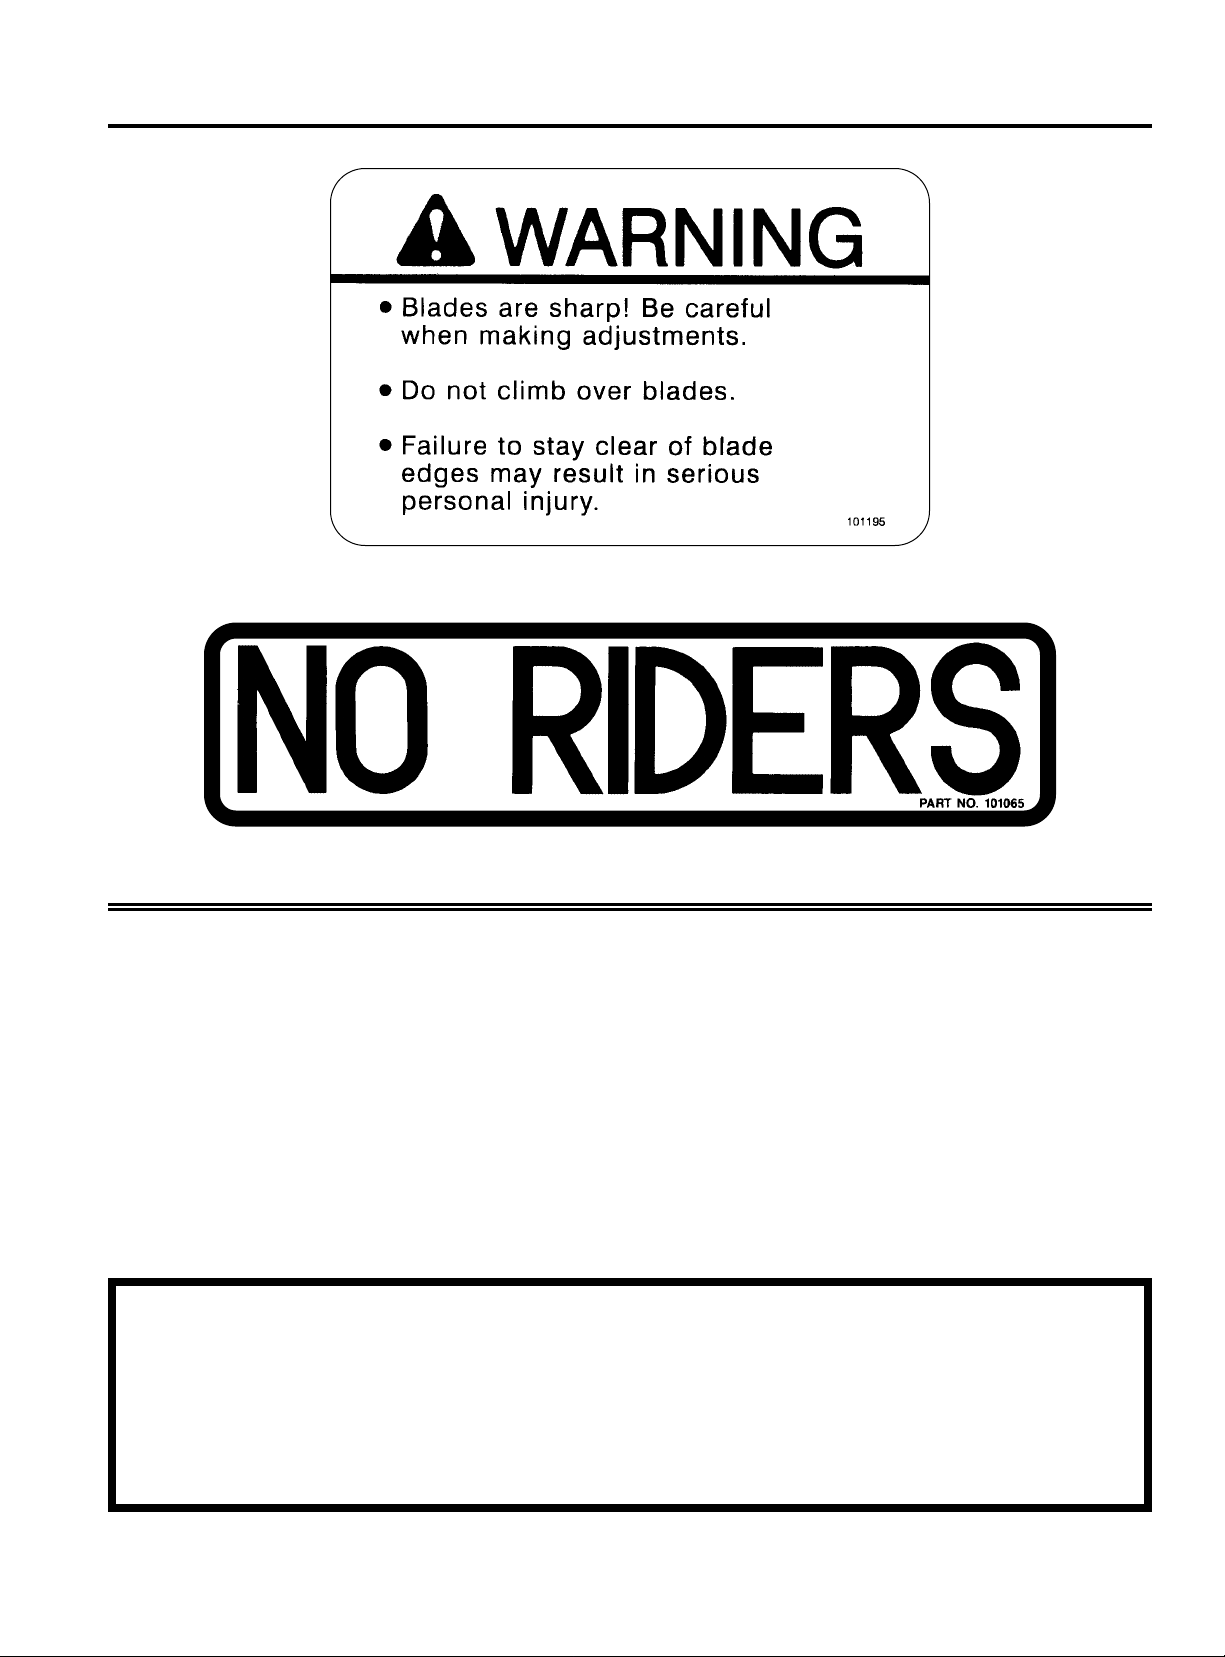
Disc blades are sharp! Do not allow discs to roll over or fall on any part of the body. Do not allow wrenches to
slip when working near disc blades. Do not climb over machine above disc blades. Failure to stay clear of disc
blade edges can result in serious personal injury.
Never use alcoholic beverages or drugs which can hinder alertness or coordination while operating this
equipment. Consult your doctor about operating this machine while taking prescription medications.
Do not allow others to ride on the tractor or ATV with an operator. Riders are subject to injury such as being
struck by foreign objects or being thrown off. Riders obstruct the operator’s view resulting in unsafe operation.
Never allow anyone to ride on the implement!
Before you operate the equipment, check over all pins, bolts and connections to be sure all are securely in
place. Replace any damaged or worn parts immediately.
Do not allow anyone who is not familiar with the safety rules and operation instructions to use this equipment.
Never allow children to operate or be around equipment.
Know your controls and how to stop tractor, engine, and implement quickly in an emergency. Read this manual
and the one provided with your tractor.
Keep alert and watch the front as well as the rear when working with equipment.
Do not operate close to ditches or creeks. Slow down when operating over rough ground.
Page 7

6
SAFETY INFORMATION (continued)
When maneuvering close to buildings or passing through narrow areas, be sure to allow sufficient clearance
for the implement and tractor or ATV.
When removing, or adjusting equipment, be sure that your feet are never under the implement.
Be careful to avoid catching the implement on stumps or other immovable objects.
Use extra care when working on slopes.
Avoid excessive speed during operation.
Make implement adjustments only when the implement is attached to the tractor.
Always ease the tractor or ATV into the load.
Watch for and avoid hidden obstructions, i.e., buried pipes, rocks, concrete piers, uneven concrete slabs,
stumps, etc., when operating equipment.
Never operate tractor and implement under trees with low hanging limbs. Operators can be knocked off the
tractor and then run over by the implement.
Always be sure the implement is in the proper position for transport.
Reduce speed when transporting mounted implements to avoid bouncing and momentary loss of steering
control.
Be a safe and courteous driver. Always yield to oncoming traffic in all situations, including narrow bridges, intersections, etc.
Do not exceed 10 mph (16 kph). Reduce speed on rough roads and surfaces.
Page 8

7
SAFETY INSTRUCTIONS (continued)
Following operation, or when unhooking, stop the tractor or ATV, set the brakes, shut off the engine and
remove the ignition keys.
Store the unit in an area away from human activity. Do not park equipment where it will be exposed to livestock for long periods of time. Damage and livestock injury could result.
Do not permit children to play on or around the stored unit.
Make sure all parked machines are on a hard, level surface and engage all safety devices.
If blocking is used, make sure it is solid and secure before leaving area.
Never replace hex bolts with less than grade five bolts unless otherwise specified, i.e. shear bolts. Refer to
bolt torque chart for head identification marking.
Where replacement parts are necessary for periodic maintenance and servicing, genuine factory replacement
parts must be used to restore your equipment to original specifications. The manufacturer will not claim
responsibility for use of unapproved parts and/or accessories and other damages as a result of their use.
If equipment has been altered in any way from original design, the manufacturer does not accept any liability
for injury or warranty.
Never work under equipment unless it is blocked securely.
Keep all persons away from operator control area while performing adjustments, service, or maintenance.
Turn curves or go up or down hills only at a low speed and at a gradual steering angle. Make certain that at
least 20% of the tractor’s weight is on the front wheels to maintain safe steerage. Slow down on rough or
uneven surfaces, and loose gravel.
Pick up all rocks and other debris before operation. Enter new areas carefully. Never assume an area is clear.
Always Check!
Take all possible precautions when leaving unit unattended: Disengage PTO, set parking brake, stop engine
and remove key from ignition. Park in level area.
Be certain the tractor or ATV is in neutral or park position before starting engine.
Page 9
8
SAFETY SIGNS
OBEY ALL
SAFETY WARNINGS!!
U Keep children away from danger all day, every day.
U Please work, drive, play, and live each day with care and
concern for your safety and that of your family and fellow
citizens.
Page 10

9
TRACTOR/ATV REQUIREMENTS
AND PREPA R ATION
The model FOD-15 single gang disc is designed for 16
hp or larger garden tractors and ATV’s with an engine
size of 250 cc or more.
The disc is easy to pull and maneuver. It can be turned
in tight areas.
The disc is easily flipped over so it can be transported
over lawns or driveways without tearing up the surface.
NOTE: The transport wheels are for use behind the
tractor or ATV only. They are NOT designed for road use.
The large 16” diameter notched disc blades will pull
easier than smaller diameter blades, yet will cut trash
and penetrate the soil better.
PACKAGING
The model FOD-15 disc is normally shipped on a single
pallet. The two gangs will be pre-assembled. The main
frame will have the wheels installed with the tongue
assemble strapped to it. The gang bearings and hardware will be in a box along with the operator’s manual.
ASSEMBLY
Preview the assembly instructions and the exploded
views of the disc in your operator’s manual and become
familiar as to how the parts or assemblies go together.
Have good blocking material available.
Select an area for assembly that is clean and free from
debris.
Do not attempt to lift heavy parts or assemblies. Use a
hoist, crane, forklift, or similar safe mechanical device, or
another person.
Stand to the side and cut the shipping bands using a
pair of sheet metal shears. Remove the parts from the
pallet. Open the box containing the gang bearings, hardware and operator’s manual. Lay the main frame on its
back so the bearing hangers are up. Match up the four
sets of gang bearings.
NOTE: The two bearing cap halves only fit together
properly one way . If mated incorrectly, there will be a gap
between the two halves.
Lay a bearing half on each of two bearing hangers on
one side of the unit. With the help of another person, set
one of the gangs on the two bearing cap halves. Place
the mating bearing caps on the gang units, install the 1/
2
x 5 carriage bolts, and flange lock nuts. Leave the lock
nuts loose so the bearings can be adjusted. Assemble
the opposite side in the same manner. Slide the two
gangs toward the center with about 1/4inch between the
two center blades. Snug the bearing lock nuts. Rotate
the gangs and align the bearings by tapping them gently
until the gangs rotate easily. Tighten the bearing bolts.
Grease the bearings until grease appears at the ends of
the bearings.
NOTE: These are cast bearings and require frequent,
liberal greasing to keep dirt flushed from the bearings.
Check the lubrication section of this manual.
Insert the tongue for either transport or discing and
install the retaining pin.
CAUTION!
Be sure your tractor or ATV is in good condition.
Read all the safety precautions and make sure all
operators are familiar with the safety rules of
operation.
DANGER!
Disc blades are extremely sharp. Exercise extreme
care when working on or near disc blades. Do not
allow discs to roll over or fall on any bodily part. Do
not allow wrenches to slip when working near disc
blades and never push wrenches towards disc
blades. Do not climb over machine above disc
blades. Failure to stay clear of disc blade edges can
result in serious personal injury.
INSTRUCTIONS
Page 11
10
FLIPPING THE DISC FROM
TRANSPORT TO DISCING
POSITION AND VISE VERSA
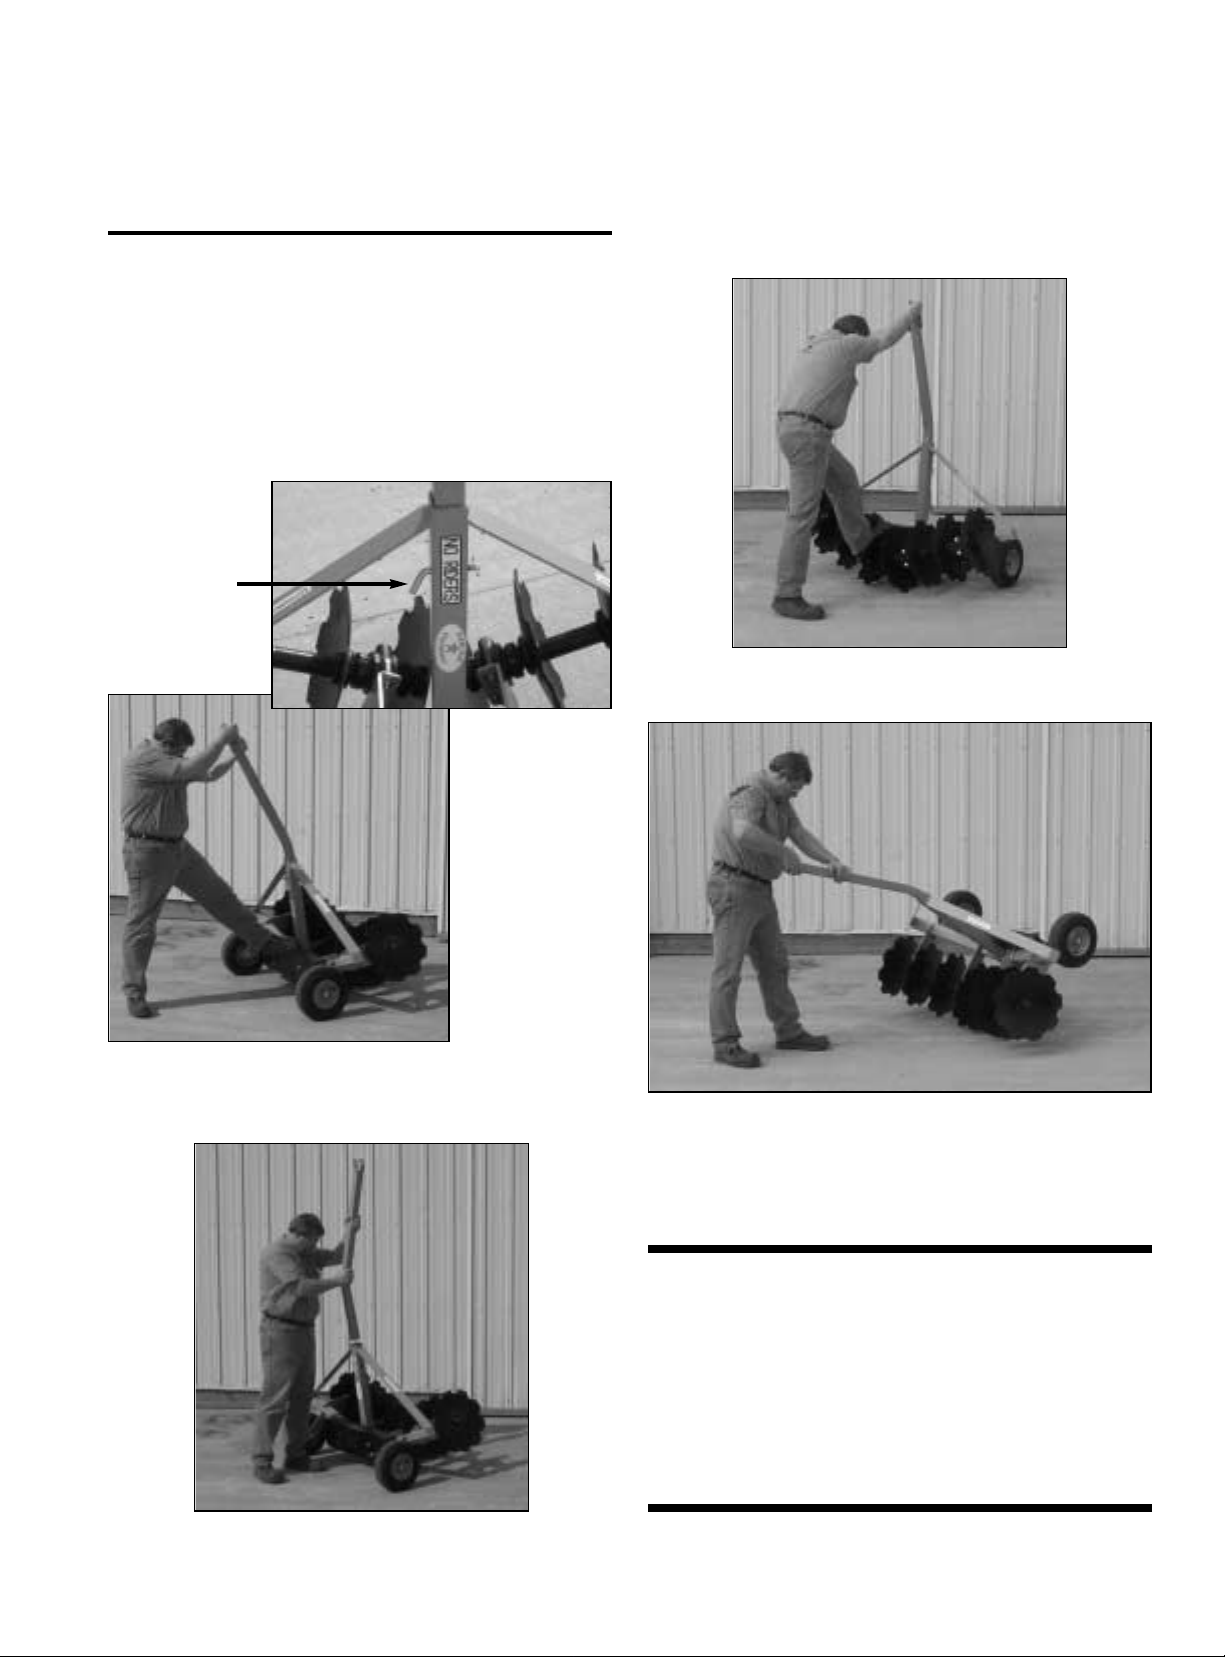
Unhook the disc from the tractor drawbar and pull the
tractor forward out of the way. Lift the disc tongue while
placing one foot near the center of the unit to prevent it
from rolling forward and allow it to come to rest in the
vertical position. Remove the tongue retaining pin and
reverse the tongue. Reinstall the retaining pin.
(See Fig. A& B)
Place one foot on the inner axle bearing and pull the
tongue downward into the discing position.
(See Fig. C & D)
INSTRUCTIONS (continued)
FIG. A
FIG. B
FIG. C
FIG. D
ALWAYS
OBEY ALL
SAFETY
W ARNINGS!!
Retaining Pin
Page 12

11
OPERATION
The safe operation of the implement is the responsibility of the operator. The operator should be familiar
with the implement, tractor (or ATV) and all safety
practices before starting operation. Review and follow
all the safety rules in this manual and those of the
tractor or ATV.
Due to the sharp rotating blades, a responsible adult
only (not a child) should do all the discing and transporting operations.
Inspect the area to be disced for stumps, stones,
branches, or other foreign objects that could cause
damage to the pulling vehicle or the disc. If objects
cannot be cleared from the area (like stumps) then
mark them clearly so the operator can avoid them.
The large 16” diameter notched disc blades will cut
trash and penetrate the soil for good ground preparation. In sod or tough soil conditions, several
passes may be necessary to work the soil to a satisfactory condition.
The disc can be operated at up to 5 mph. Under
most conditions, 3 to 4 mph is a better operating
speed. Operating too fast will not allow the blades to
penetrate and greatly increase the chance of damage
to the disc.
Successive passes should be made with the outer
blade approximately 7 inches from the previous pass to
match the blade spacing and to prevent ridging. In
most cases, multiple passes will be required to achieve
the desired soil preparation. It is recommended to
straddle previous passes or work the second time over
at an angle to avoid ridging and to mix the soil.
Never allow anyone to play near the unit and always
store the unit in a safe secure place, preferable in a
locked storage shed or fenced area. Never allow
anyone to climb or ride on the unit for any reason.
An optional weight kit is available for increasing disc
penetration.
OPERATING INSTRUCTIONS
Pass diagonally through sharp dips and avoid sharp
drops to prevent “hanging up” tractor and disc.
Practice will improve your skills in maneuvering rough
terrain.
UNEVEN TERRAIN –
W ARNING!
Do not operate on steep slopes.
Do not stop, start or change directions suddenly
on slopes.
Use extreme care and reduce ground speed on
slopes and rough terrain.
Watch or hidden hazards on the terrain during
operation.
CAUTION!
When maneuvering close to buildings or passing
through narrow areas, be sure to allow sufficient
clearance for the implement and tractor or ATV.
CAUTION!
Keep alert and watch the front as well as the rear
when working with equipment.
Do not operate close to ditches or creeks.
Slow down when operating over rough ground.
Avoid excessive speeds!
SAFETY . . .
YOU CAN LIVE WITH IT!
Page 13
12
OWNER SERVICE
The information in this section is written for operators who possess basic mechanical skills. For your
protection, read and follow all safety information in
this manual.
OBEY ALL
SAFETY WARNINGS!!
LUBRICATION INFORMATION
Use a lithium grease of NO. 2 consistency with a
MOLY (molybdenum disulfide) additive for all
locations. Be sure to clean fittings thoroughly before
attaching grease gun.
MAINTENANCE
Periodically check all bolts to make sure they are
tight.
Replace any worn or damaged parts immediately.
STORAGE
At the end of the working season or when the disc
will not be used for a long period, it is good practice
to clean off any dirt or grease that may have accumulated on the disc and any of the moving parts.
Store the unit in a shed or under a tarpaulin to protect it from the weather. The disc blades and tires
should rest on boards, or some other object, to keep
them out of the soil.
Inspect the disc for loose, damaged or worn parts
and adjust or replace if needed.
Repaint parts where paint is worn or scratched to
prevent rust. Replace any safety signs if damaged or
missing.
Store disc in a clean, dry place away from human
activity or livestock.
The model FOD-15 disc uses greasable cast iron
bearings for long trouble free operation. Each bearing
half has a grease zerk fitting, one to the front of the
disc gang and one to the rear. It is important that both
halves of each bearing set be greased daily during
use to keep dirt flushed out.
These bearings cannot be damaged from over lubri-
cation.
NOTE: Cast iron bearings have a slightly rough finish.
Initially these rough spots will be ground off and a
smooth bearing surface will result. It is recommended
that when first using the disc, that the bearings be
greased several times during use to flush out grease
that has some of the ground particles. After this, once
a day lubrication is sufficient.
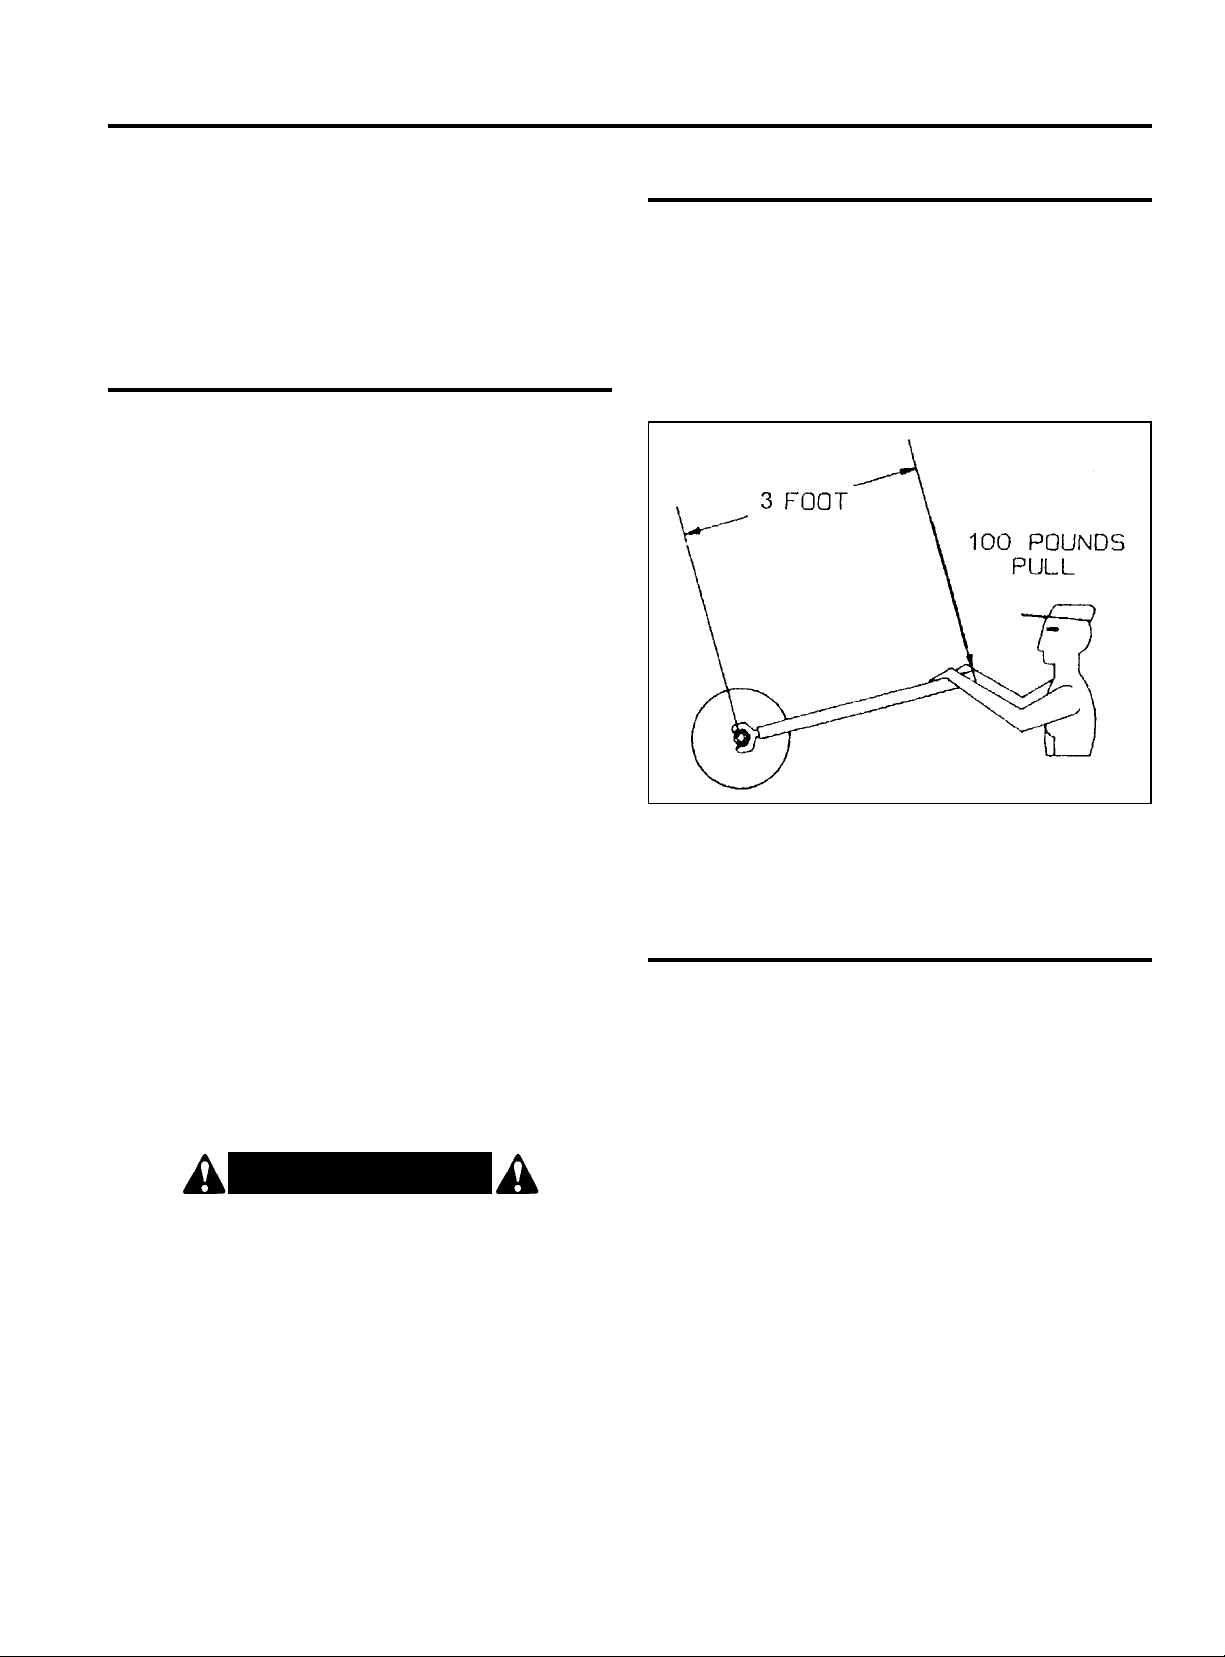
NOTE: TIGHTEN ALL 1” BLADE AXLE NUTS TO
300 FOOT-POUNDS OF TORQUE.
W ARNING!
Always stop the tractor or ATV, set brake, shut
off engine, and remove key before attempting to
service. Never leave equipment unattended with
engine running.
FIG. E Example of 300 foot-pounds of torque.
Page 14
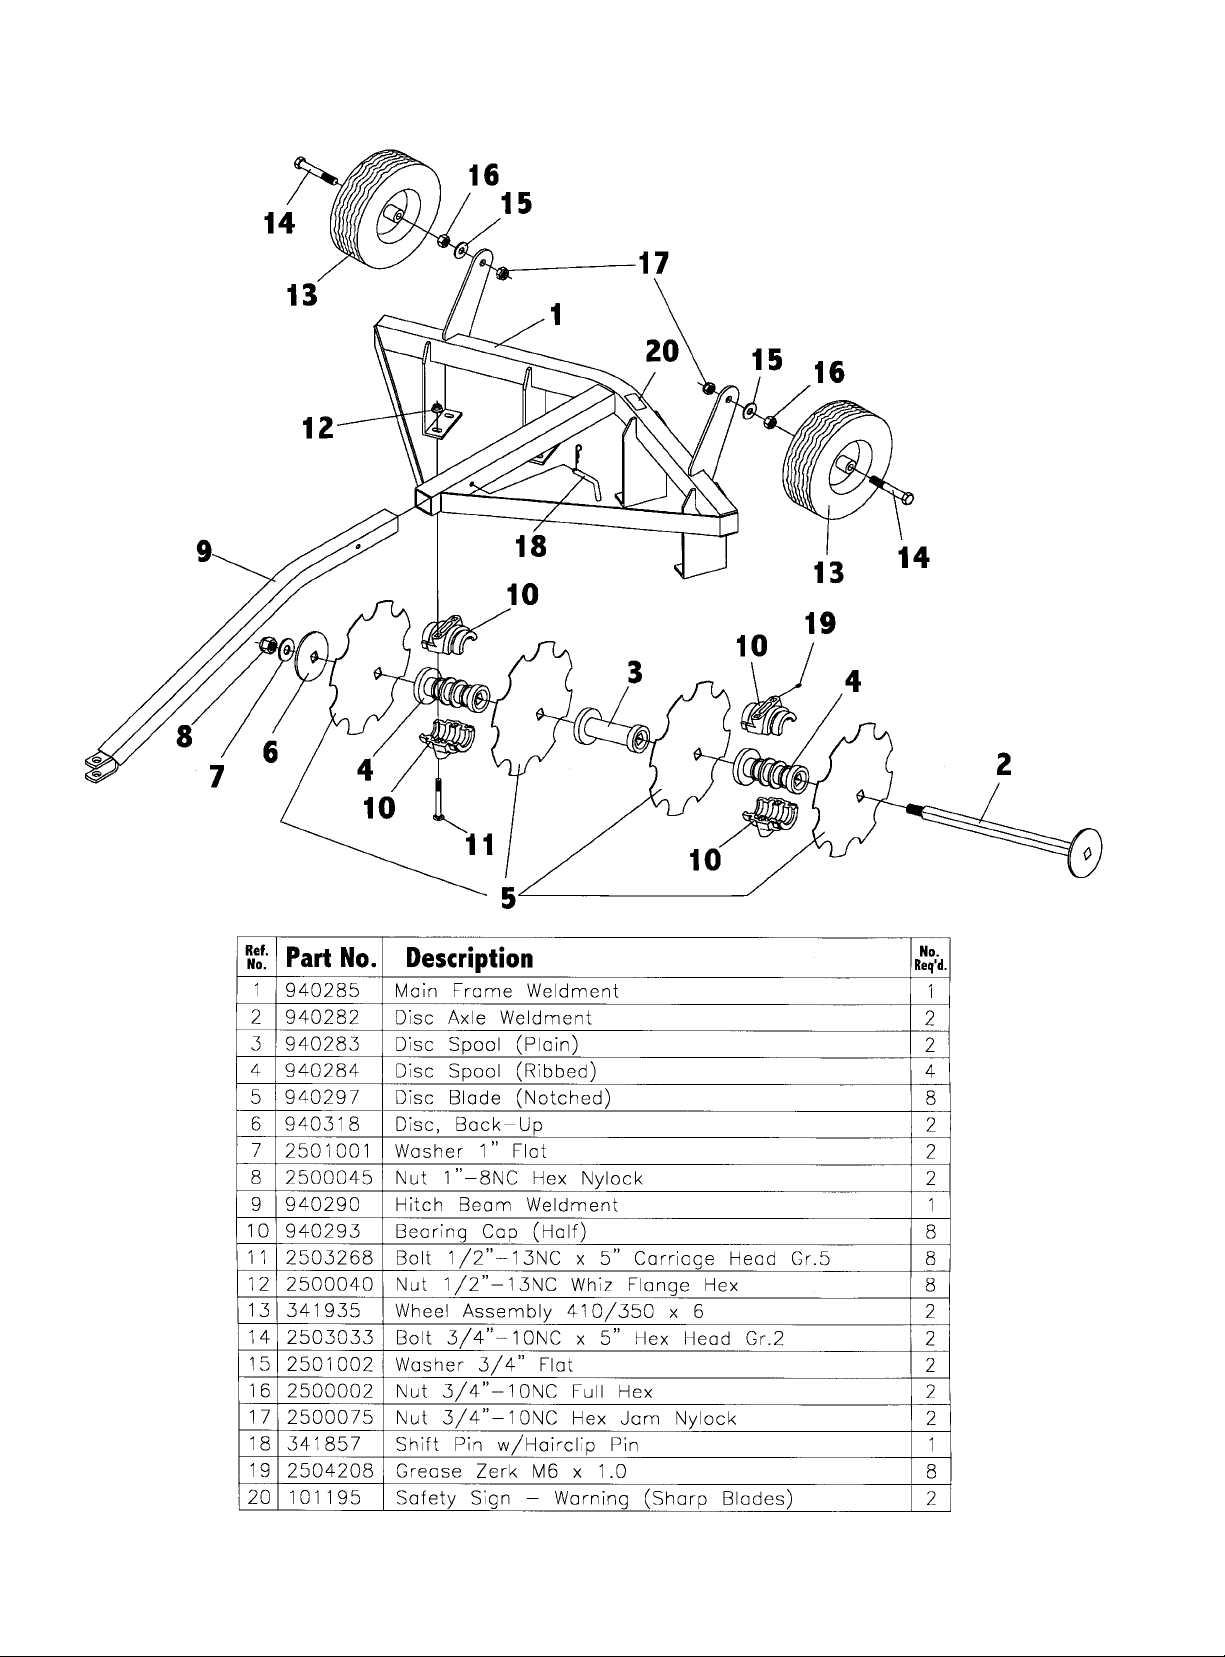
13
FOD-15 PA RTS LIST
Page 15
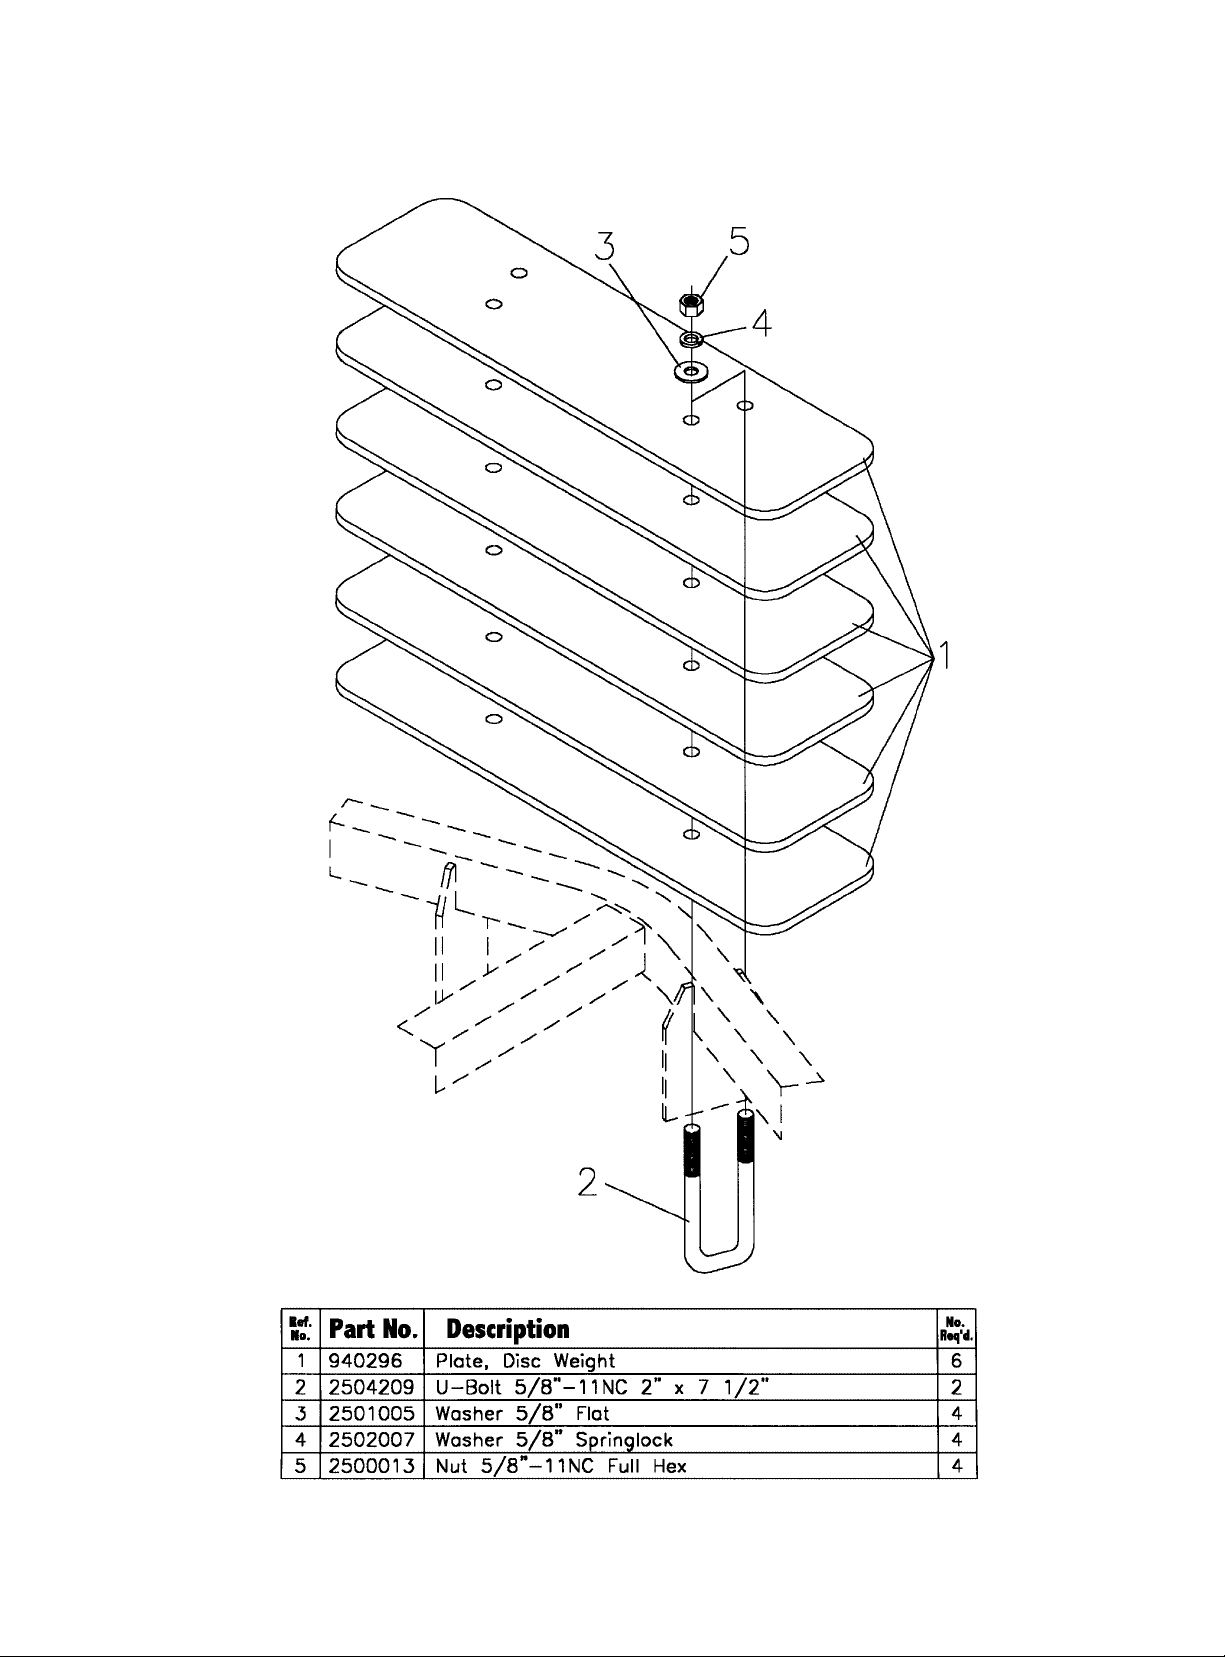
14
OPTIONAL WEIGHT KIT
PA RTS LIST
Page 16

OWNER’S
MANUAL
MODEL NO.
FOD-15
WHEN ORDERING
REPAIR PARTS,
ALWAYS GIVE
THE FOLLOWING
INFORMATION:
1. PART NUMBER
2. PART DESCRIPTION
3. MODEL NUMBER
4. NAME OF ITEM
APRIL 2000
FS-LE006-OG
FARM STA R
P.O. BOX 100 LITCHFIELD, IL 62056-0100 (217) 324-5973
MAKE EVERY DAY
A HOLIDAY
FROM ACCIDENTS!
FLIP-OVER
SINGLE GANG DISC
Keep children away from danger all day,
every day . . .
Please work, drive, play and live each day
with care and concern for your safety and
that of your family and fellow citizens.
SAFETY PRECAUTIONS
MOST ACCIDENTS OCCUR BECAUSE OF NEGLECT OR CARELESSNESS.
AVOID NEEDLESS ACCIDENTS BY FOLLOWING ALL OF THE SAFETY PRECAUTIONS LISTED BELOW.
• Machinery should be operated only by those who are
responsible and are authorized to do so.
• Stop the engine, lower all equipment, lock the brakes,
and remove the ignition key before dismounting from the
tractor.
• Never stand between tractor and implement while tractor
is being backed to hitch.
• Loose fitting clothing should not be worn, to avoid catch-
ing on various parts.
• Detach implement in area where children normally do not
play.
• When performing adjustments or maintenance on an
implement, first lower it to the ground or block it securely
at a workable height.
• Only a qualified operator should be permitted on tractor
when in operation; no riders allowed.
• Make certain everyone is in the clear before starting
tractor or raising or lowering equipment.
• Operate the tractor and implement only while seated in
the driver’s seat.
• Reduce speed when transporting mounted implements to
avoid bouncing and momentary loss of steering control.
• A heavy load can cause instability of the tractor. Use
extreme care during road travel. Slow down on turns and
watch out for bumps. Tractor may need front counterweights to counter-balance the weight of the implement.
• Reduce speed on hillsides or curves so there is no
danger of tipping.
• Avoid driving too close to the edge of ditches or creeks.
• Do not transport implement on public roads without
reflectors and slow moving vehicle emblem in daylight
and with approved warning lights at night and other
periods of poor visibility.
• Due to the width of some implements, use extra caution
on highways, farm roads, and when approaching gates.
• Always be sure the implement is in the proper position for
transport.
• Keep alert and watch the front as well as the rear when
working with the implement.
 Loading...