

Page 1
OWNER’S
MANUAL
MODEL NO.
580
CAUTION
For Safe Operation
Read Rules And
Instructions Carefully
SINO LEEINGLES, PIDAAYUDA
A AIGUIEN QUE SI LO LEA
PARA QUE LE TRADUZCA LAS
MEDIDAS DE SEGURIDAD.
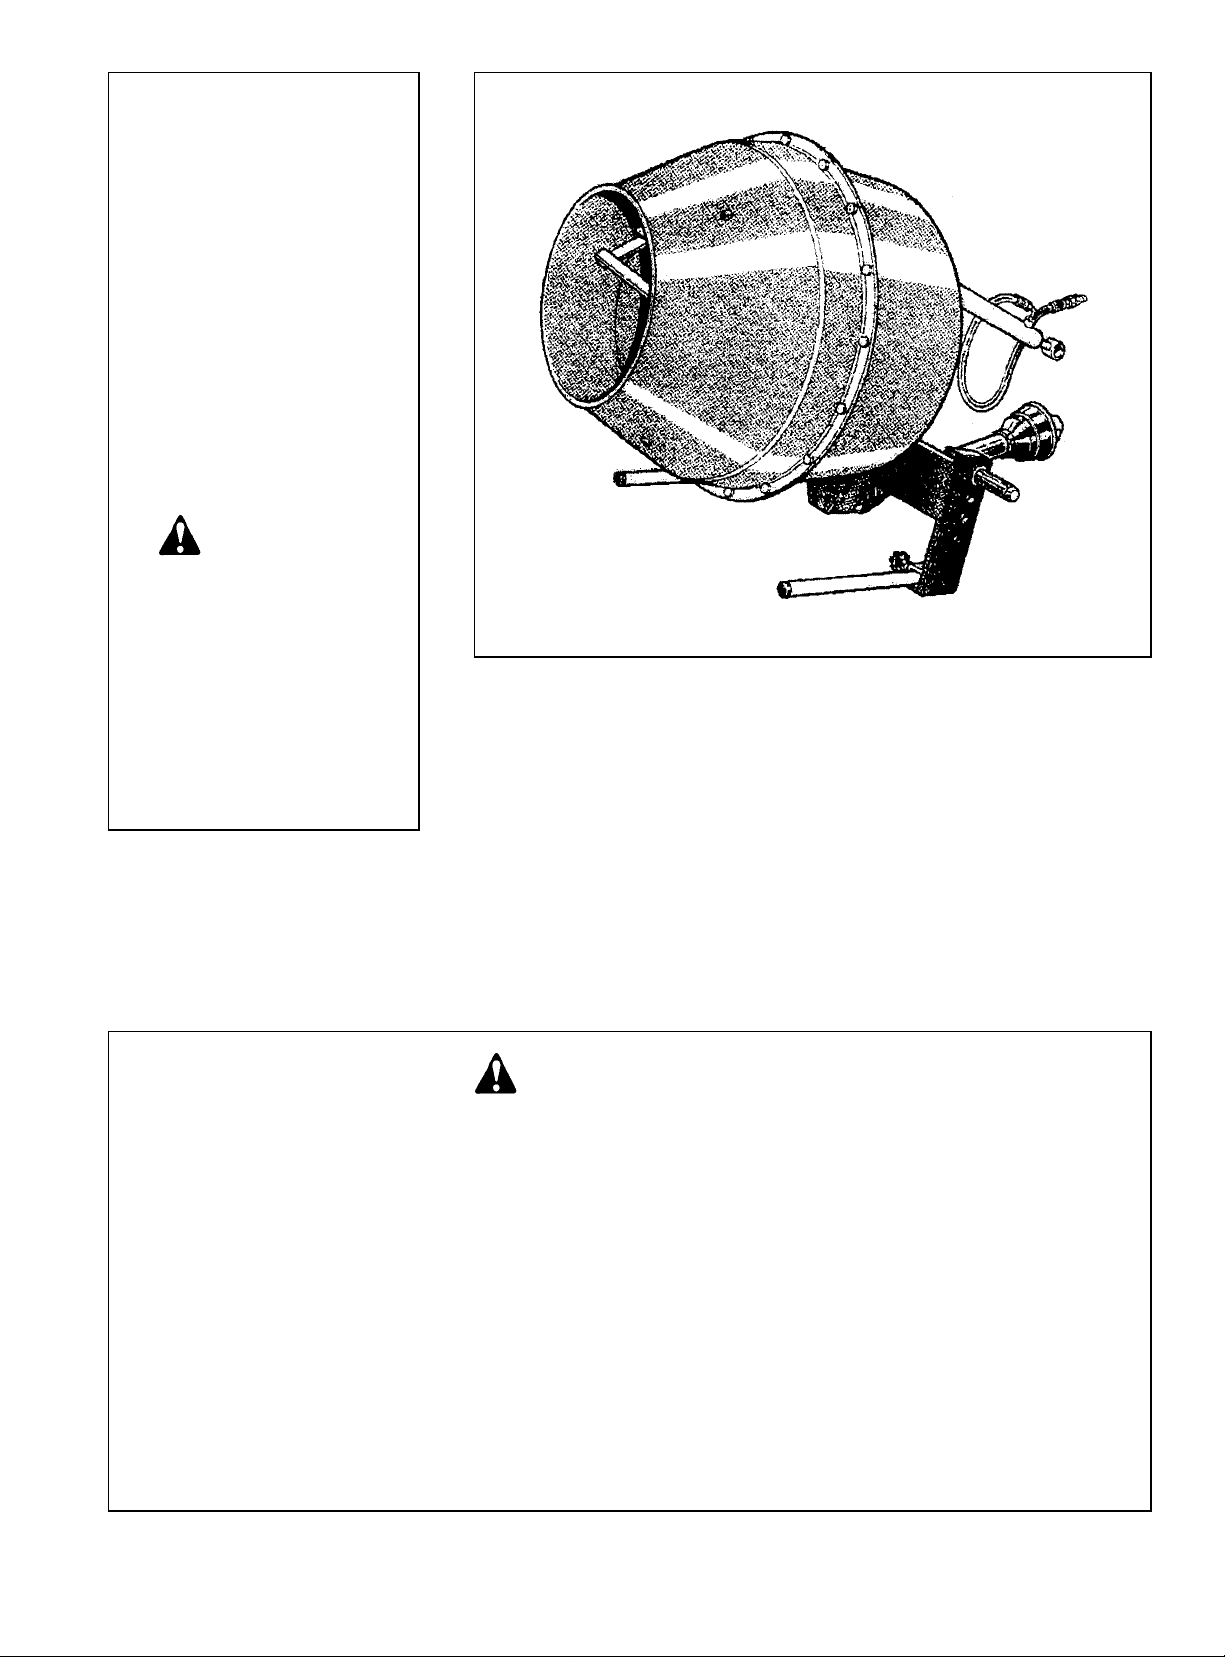
3 PT. MIXER
Safety Instructions Assembly & Mounting
Tractor Preparation Maintenance
Operating Instructions Repair Parts
CAUTION
THE FOLLOWING SAFETY PRECAUTIONS SHOULD BE THOROUGHLY UNDERSTOOD
BEFORE ATTEMPTING TO BEGIN ASSEMBLING THIS MACHINE
1. Select an area for assembly that is clean and free of any
debris which might cause persons working on the
assembly to trip.
2. Do not lift heavy parts or assemblies. Use crane, jack,
tackle, fork trucks or other mechanical devices.
3. Preview the assembly instructions in your operator’s
manual before proceeding further.
4. If the assembly instructions call for parts or assemblies to
be blocked up, use only blocking material that is in good
condition and is capable of handling the weight of the
assembly to be blocked. Also insure that the blocking
material is on a clean, dry surface.
5. Never put hands, or any part of body, under blocked up
assemblies if at all possible.
6. After completing assembly, thoroughly inspect the
machine to be sure that all nuts, bolts, hydraulic fittings
or any other fastened assemblies have been thoroughly
tightened.
7. Before operating the machine, thoroughly read the
operation section of your operator’s manual.
8. Before operating, read the maintenance section of your
operator’s manual to be sure that any parts requiring
lubrication, such as gearboxes, are full, to avoid any
possible damage.
9. Before operating equipment – If you have any
questions regarding the proper assembly or
operation, contact your dealer or representative.
Page 2

1
TABLE OF CONTENTS
WARRANTY . . . . . . . . . . . . . . . . . . . . . . . . . . . . . . . . . . . . . 2
SAFETY INFORMATION . . . . . . . . . . . . . . . . . . . . . . . . . . . 3
SAFETY SIGNS . . . . . . . . . . . . . . . . . . . . . . . . . . . . . . . . . . 13
PREPARATION INSTRUCTIONS . . . . . . . . . . . . . . . . . . . . . 14
OPERATING INSTRUCTIONS . . . . . . . . . . . . . . . . . . . . . . . 18
TROUBLE-SHOOTING . . . . . . . . . . . . . . . . . . . . . . . . . . . . . 20
PARTS LISTS . . . . . . . . . . . . . . . . . . . . . . . . . . . . . . . . . . . . 21
TO THE OWNER:
Read this manual before using your 3 pt. Mixer. This manual is provided to give you the necessary operating
and maintenance instructions for keeping your 3 pt. Mixer in top operating condition. Please read this manual
thoroughly. Understand what each control is for and how to use it. Observe all safety signs on the machine and
noted throughout the manual for safe operation of implement. Keep this manual handy for ready reference.
Like all mechanical products, it will require cleaning and upkeep. Lubricate the Mixer as specified.
Use only genuine Farm Star service parts. Substitute parts will void the warranty and may not meet stan-
dards required for safe and satisfactory operation. Record the model and serial number of your Mixer here:
Model:________________________________________ Serial Number:_______________________________
RETAIL CUSTOMER’S RESPONSIBILITY
It is the Retail Customer and/or Operator’s responsibility to read the Operator’s Manual, to operate, lubricate, maintain, and store the product in accordance with all instructions and safety procedures. Failure
of the operator to read the Operator’s Manual is a misuse of this equipment.
It is the Retail Customer and/or Operator’s responsibility to inspect the product and to have any part(s)
repaired or replaced when continued operation would cause damage or excessive wear to other parts or
cause a safety hazard.
It is the Retail Customer’s responsibility to deliver the product to the authorized Farm Star Dealer, from
whom he purchased it, for service or replacement of defective parts which are covered by warranty.
Repairs to be submitted for warranty consideration must be made within forty-five (45) days of failure.
It is the Retail Customer’s responsibility for any cost incurred by the Dealer for traveling to or hauling
of the product for the purpose of performing a warranty obligation or inspection.
SINO LEEINGLES, PIDA AYUDA A
AIGUIEN QUE SI LO LEA PARA QUE
LE TRADUZCA LAS MEDIDAS DE
SEGURIDAD.
STATEMENT
OF POLICY
It is the policy of Farm Star
to improve its products
where it is possible and practical
to do so. Farm Star
reserves the right to make
changes or improvements in
design and construction at any
time, without incurring the obligation to make these changes on
previously manufactured units.
Page 3

2
LIMITED WARRANTY
✯ ✯ ✯ ✯ ✯ ✯ ✯ ✯ ✯ ✯ ✯ ✯ ✯ ✯ ✯ ✯ ✯ ✯ ✯ ✯ ✯ ✯ ✯ ✯ ✯ ✯ ✯
Farm Star warrants to the original purchaser of any new 3 pt. Mixer Model 580, that the equipment be free
from defects in material and workmanship for a period of six (6) months for non-commercial, state, and
municipalities. Use sixty (60) days for commercial use from date of retail sale.
Replacement or repair parts installed in the equipment covered by this warranty are warranted for ninety (90)
days from the date of purchase of such part or to the expiration of the applicable new equipment warranty
period, whichever occurs later.
Such parts shall be provided at no cost to the user during regular working hours. Farm Star reserves the right
to inspect any equipment or parts which are claimed to have been defective in material or workmanship.
DISCLAIMER OF IMPLIED WARRANTIES & CONSEQUENTIAL DAMAGES
Farm Star’s obligation under this warranty, to the extent allowed by law, is in lieu of all warranties, implied or
expressed, including implied warranties of merchantability and fitness for a particular purpose and any liability
for incidental and consequential damages with respect to the sale or use of the items warranted. Such
incidental and consequential damages shall include but not be limited to: transportation charges other than
normal freight charges; cost of installation other than cost approved by Farm Star; duty; taxes; charges for
normal service or adjustments; loss of crops or any other loss of income; rental of substitute equipment,
expenses due to loss, damage, detention or delay in the delivery of equipment or parts resulting from acts
beyond the control of Farm Star.
THIS WARRANTY SHALL NOT APPLY:
1. To vendor items which carry their own warranties, such as hydraulic cylinders, tires, and tubes.
2. If the unit has been subjected to misapplication, abuse, misuse, negligence, fire or other accident.
3. If parts not made or supplied by Farm Star have been used in connection with the unit, if, in sole judgement of Farm Star such use affects its performance, stability, or reliability.
4. If the unit has been altered or repaired outside of an authorized Farm Star dealership in a manner which,
in the sole judgement of Farm Star affects its performance, stability or reliability.
5. To normal maintenance service and normal replacement items such as gearbox lubricant, hydraulic fluid,
worn blades, or to normal deterioration of such things as belts and exterior finish, due to use or exposure.
6. To expendable or wear items such as teeth, chains, sprockets, belts, springs and other items that in the
company’s sole judgement is a wear item.
NO EMPLOYEE OR REPRESENTATIVE OF FARM STAR IS AUTHORIZED TO CHANGE THIS
WARRANTY IN ANY WAY OR GRANT ANY OTHER WARRANTY UNLESS SUCH CHANGE IS MADE IN
WRITING AND SIGNED BY FARM STAR’S SERVICE MANAGER, POST OFFICE BOX 100, LITCHFIELD,
ILLINOIS 62056-0100.
✯ ✯ ✯ ✯ ✯ ✯ ✯ ✯ ✯ ✯ ✯ ✯ ✯ ✯ ✯ ✯ ✯ ✯ ✯ ✯ ✯ ✯ ✯ ✯ ✯ ✯ ✯
Page 4

3
T o the Owner/Operator/Dealer
All implements with moving parts are potentially hazardous. There is no substitute for a cautious, safe-minded operator who recognizes the potential hazards and follows reasonable safety practices. The manufacturer has designed this
implement to be used with all its safety equipment properly attached to minimize the chance of accidents.
BEFORE YOU START!!
Read the safety messages on the implement and shown in your manual.
Observe the rules of safety and common sense!
THIS SAFETY ALERT SYMBOL IDENTIFIES IMPORTANT
SAFETY WARNING MESSAGES. CAREFULLY READ EACH
WARNING MESSAGE THAT FOLLOWS. FAILURE TO
UNDERSTAND AND OBEY A SAFETY WARNING, OR
RECOGNIZE A SAFETY HAZARD, COULD RESULT IN AN
INJURY OR DEATH TO YOU OR OTHERS AROUND YOU.
THE OPERATOR IS ULTIMATELY RESPONSIBLE FOR THE
SAFETY OF HIMSELF, AS WELL AS OTHERS, IN THE
OPERATING AREA OF THE TRACTOR AND ATTACHED
EQUIPMENT.
IMPORTANT SAFETY INFORMATION!
Working with unfamiliar equipment can lead to careless injuries. Read this manual, and the manual for your tractor,
before assembly or operating, to acquaint yourself with the machines. It is the implement owner’s responsibility, if this
machine is used by any person other than yourself, is loaned or rented, to make certain that the operator, prior to
operating:
1. Reads and understands the operator’s manuals.
2. Is instructed in safe and proper use.
The use of this equipment is subject to certain hazards which cannot be protected against by mechanical
means or product design. All operators of this equipment must read and understand this entire manual, paying
particular attention to safety and operating instructions, prior to using. If there is something in this manual you
do not understand, ask your supervisor, or your dealer, to explain it to you.
THIS SYMBOL MEANS
– A TTENTION!
– BECOME ALERT!
– YOUR SAFETY IS INVOLVED!
UNDERSTAND SIGNAL WORDS
Note the use of the signal words DANGER, WARNING
and CAUTION with the safety messages. The
appropriate signal word for each has been selected
using the following guidelines:
DANGER: Indicates an imminently hazardous situation
that, if not avoided, will result in death or serious injury.
This signal word is to be limited to the most extreme
situations typically for machine components which, for
functional purposes, cannot be guarded.
If you have questions not answered in this manual or require additional copies or the manual is damaged, please
contact your dealer or the manufacturer directly.
WARNING: Indicates a potentially hazardous situation that, if not avoided, could result in death
or serious injury, and includes hazards that are
exposed when guards are removed. It may also
be used to alert against unsafe practices.
CAUTION: Indicates a potentially hazardous situation that, if not avoided, may result in minor or
moderate injury. It may also be used to alert
against unsafe practices.
Page 5

4
SAFETY INSTRUCTIONS (continued)
Safety of the operator is one of the main concerns in designing and developing a new piece of equipment.
Designers and manufacturers build in as many safety features as possible. However, every year many
accidents occur which could have been avoided by a few seconds of thought and a more careful approach to
handling equipment. You, the operator, can avoid many accidents by observing the following precautions in
this section. To avoid personal injury, study the following precautions and insist those working with you, or for
you, follow them.
In order to provide a better view, certain photographs or illustrations in this manual may show an assembly
with a safety shield removed. However, equipment should never be operated in this condition. Keep all shields
in place. If shield removal becomes necessary for repairs, replace the shield prior to use.
To prevent injury or death, use a tractor equipped with a Roll-Over Protective System (ROPS). Do not paint
over, remove or deface any safety signs or warning signs on your equipment. Observe all safety signs and
practice the instruction on them.
Never exceed the limits of a piece of machinery. If its ability to do a job, or to do so safely, is in question -
DON’T TRY IT.
Do not modify the equipment in any way. Unauthorized modification may impair the function and/or safety and
could affect the life of the equipment.
In addition to the design and configuration of this implement, including Safety Signs and Safety Equipment,
hazard control and accident prevention are dependent upon the awareness, concern, prudence, and proper
training of personnel involved in the operation, transport, maintenance, and storage of the machine. Refer also
to Safety Messages and Operation Instructions in each of the appropriate sections of the Tractor and
Implement Manuals. Pay close attention to the Safety Signs affixed to the Tractor and the Implement.
Replace any CAUTION, WARNING, DANGER or instruction safety sign that is not readable or is missing.
Location of such safety signs is indicated in this booklet.
Never use alcoholic beverages or drugs which can hinder alertness or coordination while operating this
equipment. Consult your doctor about operating this machine while taking prescription medications.
Review the safety instructions with all users annually.
This equipment is dangerous to children and persons unfamiliar with its operation. The operator should be a
responsible adult familiar with farm machinery and trained in this equipment’s operations. Do not allow per-
sons to operate or assemble this unit until they have read this manual and have developed a thorough
understanding of the safety precautions and of how it works.
EQUIPMENT SAFETY GUIDELINES
Page 6

5
SAFETY INSTRUCTIONS (continued)
Keep safety signs clean and legible at all times.
Replace safety signs that are missing or have become illegible.
Replaced parts that displayed a safety sign should also display the current sign.
Safety signs are available from your Distributor or Dealer Parts Department or the factory.
Be sure that the installation area is clean and dry.
Be sure temperature is above 50˚F (10˚C).
Decide on the exact position before you remove the backing paper.
Remove the smallest portion of the split backing paper.
Align the sign over the specified area and carefully press the small portion with the exposed sticky backing in
place.
Slowly peel back the remaining paper and carefully smooth the remaining portion of the sign in place.
Small air pockets can be pierced with a pin and smoothed out using the piece of sign backing paper.
Failure to follow proper procedures when mounting a tire on a wheel or rim can produce an explosion which
may result in serious injury or death.
Do not attempt to mount a tire unless you have the proper equipment and experience to do the job.
Inflating or servicing tires can be dangerous. Whenever possible, trained personnel should be called to service
and/or mount tires.
Always order and install tires and wheels with appropriate capacity to meet or exceed the anticipated weight
to be placed on the equipment.
How to Install Safety Signs:
SAFETY SIGNS
TIRE SAFETY
Page 7

6
SAFETY INSTRUCTIONS (continued)
Safety is a primary concern in the design and manufacture of our products. Unfortunately , our efforts to provide
safe equipment can be wiped out by a single careless act of an operator.
Know your controls and how to stop tractor, engine, and mixer quickly in an emergency. Read this manual and
the one provided with your tractor.
In addition to the design and configuration of equipment, hazard control and accident prevention are
dependent upon the awareness, concern, prudence and proper training of personnel involved in the operation,
transport, maintenance and storage of equipment.
It has been said, “The best safety device is an informed, careful operator.” We ask you to be that kind of an
operator. It is the operator’s responsibility to read and understand ALL Safety and Operating instructions in the
manual and to follow these. Accidents can be avoided.
Train all new personnel and review instructions frequently with existing workers. A person who has not read
and understood all operating and safety instructions is not qualified to operate the machine. An untrained operator exposes himself and bystanders to possible serious injury or death.
Working with unfamiliar equipment can lead to careless injuries. Read this manual, and the manual for your
tractor, before assembly or operating, to acquaint yourself with the machines. It is the 3 pt. mixer owner’s
responsibility, if this machine is used by any person other than yourself, is loaned or rented, to make certain
that the operator, prior to operating:
1. Reads and understands the operator’s manuals.
2. Is instructed in safe and proper use.
SAFETY TRAINING
Do not allow children to operate this machine.
Page 8

7
SAFETY INSTRUCTIONS (continued)
Never operate the tractor and implement until you have read and completely understand this manual, the
Tractor Operator’s Manual, and each of the Safety Messages found on the safety signs on the tractor and
implement.
Operate only in daylight or good artificial light.
Ensure implement is properly mounted, adjusted and in good operating condition.
Make sure driveline spring-activated locking pin or balls operate freely and are seated firmly in tractor PTO
stub shaft groove.
Ensure that all safety shielding and safety signs are properly installed and in good condition.
Check that the PTO driveline does not contact the swinging drawbar of the tractor. The swinging drawbar may
have to be removed on some tractors. Damage to the driveline could make it unsafe to operate.
Personal protection equipment including hard hat, safety glasses, safety shoes, and gloves are recommended
during assembly , installation, operation, adjustment, maintaining, repairing, removal, or moving the implement.
Do not allow long hair, loose fitting clothing or jewelry to be around moving parts.
Operate the implement only with a tractor equipped with an approved Roll-Over Protective System (ROPS).
Always wear your seat belt on tractors equipped with a ROPS. Serious injury or even death could result from
falling off the tractor ---particularly during a turnover when the operator could be pinned under the ROPS or
the tractor.
PROLONGED EXPOSURE TO LOUD NOISE MAY CAUSE PERMANENT HEARING LOSS!
Tractors with or without Implement attached can often be noisy enough to cause permanent, partial hearing
loss. We recommend that you wear hearing protection on a full-time basis if the noise in the Operator’s position exceeds 80db. Noise over 85db on a long-term basis can cause severe hearing loss. Noise over 90db
adjacent to the Operator over a long-term basis may cause permanent, total hearing loss. NOTE: Hearing loss
from loud noise (from tractors, chain saws, radios, and other such sources close to the ear) is cumulative over
a lifetime without hope of natural recovery.
PREPARATION
Page 9

8
Always stop the tractor, set brake, shut off the tractor engine, remove the ignition key, and lower implement to
the ground before dismounting tractor. Never leave equipment unattended with the tractor running.
Never place hands or body on mixer with tractor engine running or before you are sure all motion has stopped.
Stay clear of all moving parts.
Do not reach or place yourself under equipment until it is blocked securely.
Take all possible precautions when leaving unit unattended: Disengage PTO, set parking brake, stop engine
and remove key from ignition. Park in level area.
SAFETY INSTRUCTIONS (continued)
3 Pt. Mixer operating power is supplied from tractor PTO. Refer to your tractor manual for PTO engagement
and disengagement instructions. Always operate the PTO in the 540 rpm range. Know how to stop tractor and
mixer quickly in case of an emergency.
Never engage PTO drive with the mixer in the dump position. Engaging PTO with mixer in dump position can
cause damage to the PTO driveline. This damage could cause the driveline to come apart causing possible
injury or death.
Mixer should be lifted off the ground before engaging PTO and be sure that no one is near the machine. When
engaging PTO, the RPM should always be low.
When raising mixer with the 3 point hitch, check that the PTO driveline does not go into sharp angles (more
than 15˚).
Be certain the tractor is in neutral or park position before starting engine.
Do not leave the tractor or the implement unattended with the engine running.
The use of this equipment is subject to certain hazards which cannot be protected against by mechanical
means or product design. All operators of this equipment must read and understand this entire manual, paying
particular attention to safety and operating instructions, prior to using. If there is something in this manual you
do not understand, ask your supervisor, or your dealer, to explain it to you.
Most accidents occur because of neglect or carelessness. Keep all helpers and bystanders at least twenty (20)
feet from an operating mixer. Only properly trained people should operate this machine.
Check the tractor master shield over the PTO stub shaft. Make sure it is in good condition and fastened
securely to the tractor. Purchase a new shield if old shield is damaged or missing. (You may have to use a
tractor salvage yard for replacement parts on older tractors.)
STARTING AND STOPPING SAFETY
OPERATIONAL SAFETY
Page 10

9
SAFETY INSTRUCTIONS (continued)
Never place hands or hand held tools (shovel) into the mixer drum while it is turning. It could catch on the mixer
paddles and whip around, possibly injuring the operator.
Use extreme care and maintain minimum ground speed when transporting on hillside, over rough ground and
when operating close to ditches or fences. Be careful when turning sharp corners.
Inspect the entire machine periodically as indicated in the Maintenance Section of this manual. Look for loose
fasteners, worn or broken parts, and worn PTO driveline joints and/or shields. Make sure all pins have cotter
pins and washers. Serious injury may occur from not maintaining this machine in good working order.
Avoid sudden starts and stops while traveling up or downhill.
Always drive down slopes; never across the face. Avoid operation on steep slopes. Slow down on sharp turns
and slopes to prevent tipping and/or loss of control. Avoid slopes when surface is wet, slippery grass or soil.
Never attempt to check or adjust chain tension while implement is operating. Always stop it before this
operation.
OPERATIONAL SAFETY (continued)
Do not allow riders on the implement or tractor at any time. There is no safe place for any riders.
Disengage power takeoff (PTO) and place transmission into neutral before attempting to start engine.
Install and secure all guards and shields before starting or operating.
Keep hands, feet, hair, and clothing away from moving parts.
This mixer is designed for use only on tractors with 540 RPM power takeoff.
Afull mixer will put a heavy load on the rear of your tractor. Be sure front of tractor is properly counterbalanced
with weights.
Page 11

10
SAFETY INSTRUCTIONS (continued)
Comply with state and local laws governing highway safety and movement of farm machinery on public roads.
The use of flashing amber lights is acceptable in most localities. However, some localities prohibit their use.
Local laws should be checked for all highway lighting and marking requirements.
When driving the tractor and equipment on the road or highway under 20 mph (32 kph) at night or during the
day, use flashing amber warning lights and a slow moving vehicle (SMV) identification emblem.
Always be sure the implement is in the proper raised position for transport.
Reduce speed when transporting mounted implements to avoid bouncing and momentary loss of steering
control.
Plan your route to avoid heavy traffic.
Always install transport locks, pins or brackets before transporting.
Do not drink and drive!
Watch for traffic when operating near or crossing roadways.
Turn curves or go up or down hills only at a low speed and at a gradual steering angle. Make certain that at
least 20% of the tractor’s weight is on the front wheels to maintain safe steerage. Slow down on rough or
uneven surfaces, and loose gravel.
Use extreme care and maintain minimum ground speed when transporting on hillside, over rough ground and
when operating close to ditches or fences. Be careful when turning sharp corners.
Never allow riders on either tractor or implement. Falling off can kill.
Be a safe and courteous driver. Always yield to oncoming traffic in all situations, including narrow bridges, intersections, etc.
Do not exceed 20 mph (32 kph). Reduce speed on rough roads and surfaces.
Always disengage PTO before driving the tractor to transport the implement from one place to another.
TRANSPORT SAFETY
Page 12

11
SAFETY INSTRUCTIONS (continued)
Good maintenance is your responsibility. Poor maintenance is an invitation to trouble.
Follow good shop practices.
- Keep service area clean and dry.
- Be sure electrical outlets and tools are properly grounded.
- Use adequate light for the job at hand.
Make sure there is plenty of ventilation. Never operate the engine of the towing vehicle in a closed building.
The exhaust fumes may cause asphyxiation.
Before working on this machine, drive to a level area, disengage the PTO, lower implement (or if working
underneath, raise and block securely), shut off the engine, set the brakes, and remove the ignition keys.
Be certain all moving parts on attachments have come to a complete stop before attempting to perform
maintenance.
Never work under equipment unless it is blocked securely. Never depend on hydraulic system to keep implement in raised position.
Always use personal protection devices such as eye, hand and hearing protectors, when performing any
service or maintenance.
Keep all persons away from operator control area while performing adjustments, service, or maintenance.
Periodically tighten all bolts, nuts and screws and check that all cotter pins are properly installed to ensure unit
is in a safe condition.
When completing a maintenance or service function, make sure all safety shields and devices are installed
before placing unit in service.
Openings in the skin and minor cuts are susceptible to infection from hydraulic fluid. If injured by escaping
hydraulic fluid, see a doctor at once. Gangrene and death can result. Without immediate medical treatment,
serious infection and reactions can occur.
MAINTENANCE SAFETY
Page 13

12
SAFETY INSTRUCTIONS (continued)
After servicing, be sure all tools, parts and service equipment are removed.
Check to ensure all safety signs are installed and in good condition. (See safety sign section for location
drawing.)
Never replace hex bolts with less than grade five bolts unless otherwise specified, i.e. shear bolts. Refer to
bolt torque chart for head identification marking.
Where replacement parts are necessary for periodic maintenance and servicing, genuine factory replacement
parts must be used to restore your equipment to original specifications. The manufacturer will not claim
responsibility for use of unapproved parts and/or accessories and other damages as a result of their use.
If equipment has been altered in any way from original design, the manufacturer does not accept any liability
for injury or warranty.
A fire extinguisher and first aid kit should be kept readily accessible while performing maintenance on this
equipment.
Following operation, or when unhooking, stop the tractor, set the brakes, disengage the PTO, shut off the
engine and remove the ignition keys.
Store the unit in an area away from human activity.
Do not park equipment where it will be exposed to livestock for long periods of time. Damage and livestock
injury could result.
Do not permit children to play on or around the stored unit.
Make sure all parked machines are on a hard, level surface and engage all safety devices.
If blocking is used, make sure it is solid and secure before leaving area.
MAINTENANCE SAFETY (continued)
STORAGE SAFETY
Page 14

13
REMEMBER: If Safety Signs have been damaged, removed, become illegible or parts replaced without Signs, new
Safety Signs must be applied. New Safety Signs are available from your authorized distributor or factory.
WARNING
540 RPM SPEED
RANGE ONLY
HIGHER PTO SPEEDS CAN CAUSE
PERSONAL INJURY AND
EQUIPMENT FAILURE
101101
SAFETY SIGNS
WARNING
Page 15
14
TRACTOR REQUIREMENTS
AND PREPA R ATION
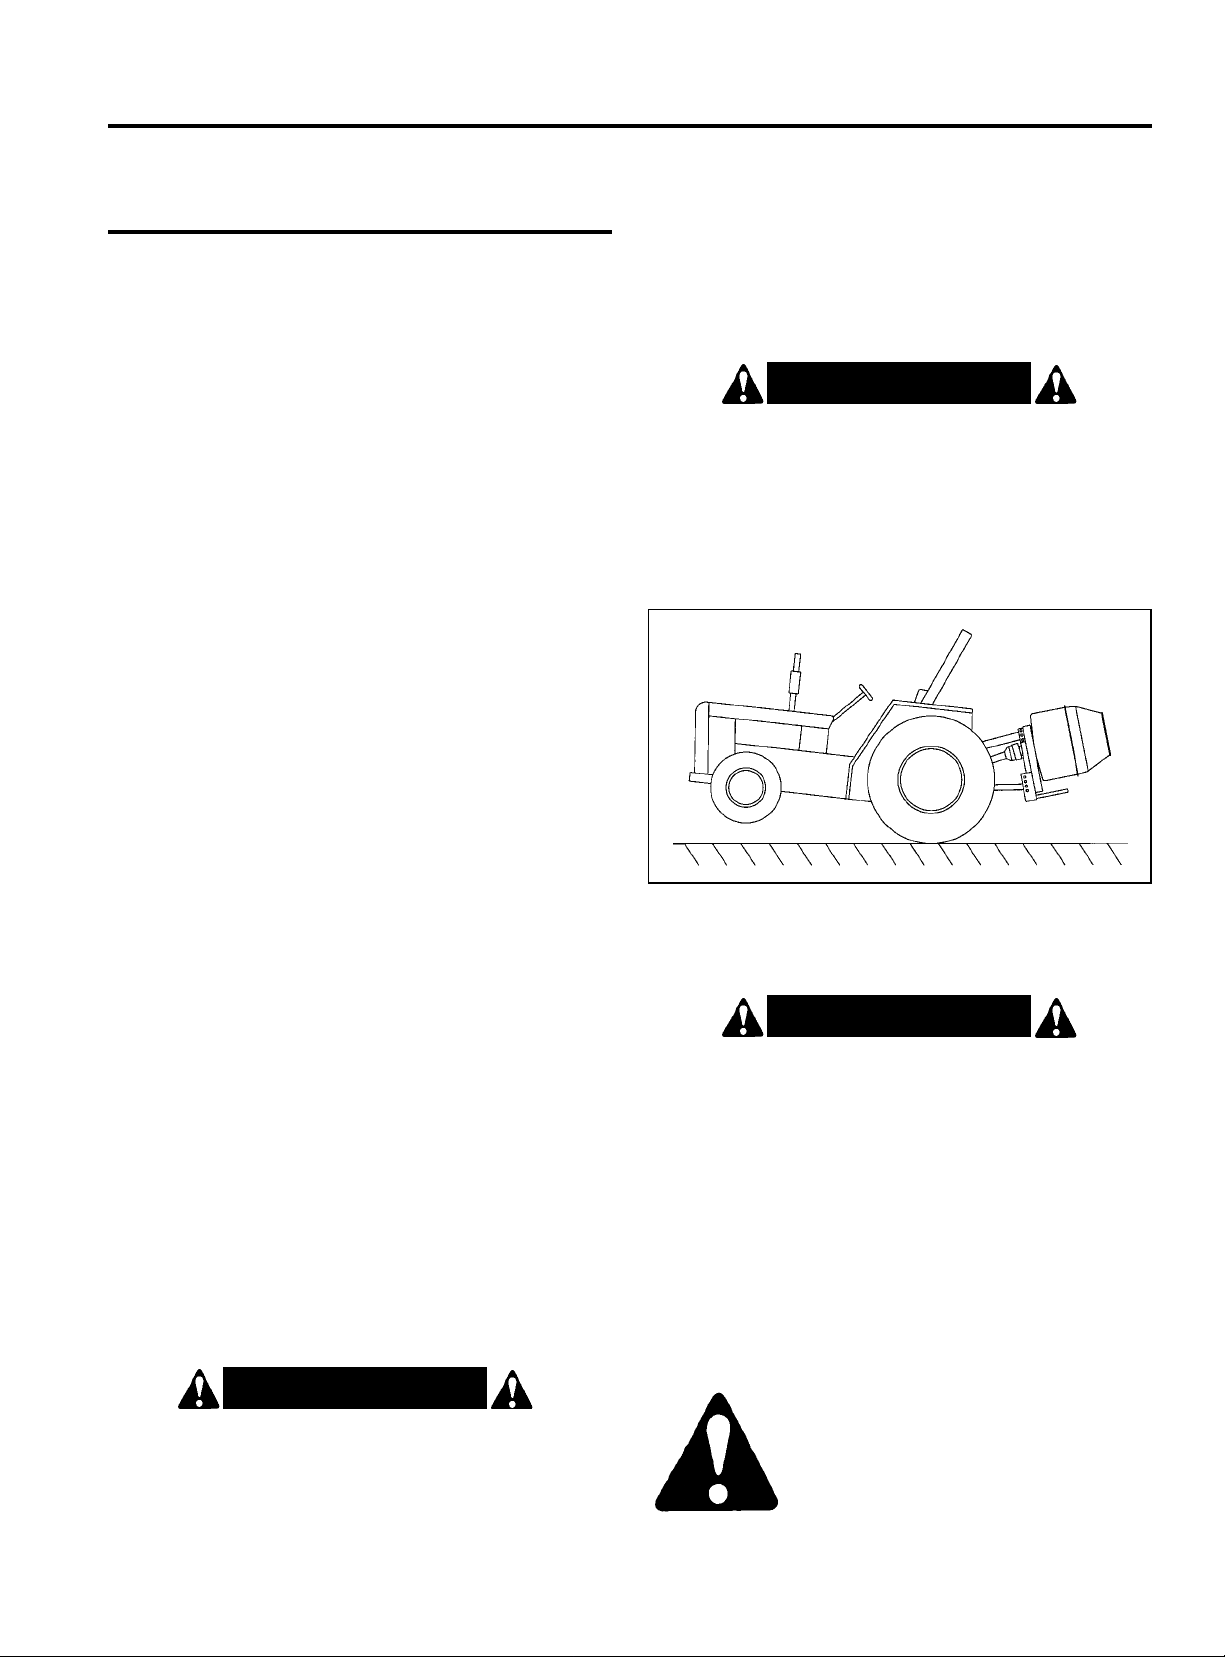
The model 580 mixer requires a tractor with a Category
I hitch and to be of sufficient size to handle a loaded
mixer drum. Five cubic feet of concrete weighs 685 lbs.
and the 580 mixer weighs 215 lbs. for a total weight of
900 lbs. Always be sure your tractor is properly counterbalanced for a safe operation.
Asmaller size tractor (20-25 hp) equipped with front end
weights or equipped with a front end loader can usually
handle the mixer easily.
NOTE: Small low-profile tractors will generally not work
with the 580 mixer as they are so low they cannot dump
the mixer into forms of any height.
The tractor must have one hydraulic power remote to
power the dump cylinder.
The tractor must be equipped with a 540 rpm PTO
(power takeoff) in good working condition.
It is recommended that only tractors with wide front
axles be used with the mixer. Tricycle front wheel
arrangements are inherently unstable and tractor
roll-over accidents are more likely to occur.
The tractor also needs lift arm stabilizer bars or sway
blocks to control side movement of the mixer.
Check the tractor’s 3-pt. hydraulic lift system. Refer to
your tractor operator’s manual or dealer for any adjustments necessary to put the hydraulic system in good
working order. (I&T shop manuals will list most specifications and adjustment instructions - available from most
farm equipment dealers.)
Be sure tires and rims are in good condition. Inflate
tires to the proper recommended air pressure.
Check the tractor master shield over the PTO stub
shaft. Make sure it is in good condition and fastened
securely to the tractor. Purchase a new shield if old
shield is damaged or missing. (You may have to use a
tractor salvage yard for replacement parts on older
tractors.)
It is recommended that a ROPS (Roll-Over Protection
Structure) and a seat belt be installed on all tractors.
Contact your local dealer for a ROPS for your tractor.
CAUTION!
Be sure your tractor is in good condition. Read all
the safety precautions and make sure all tractor
operators are familiar with the safety rules of
operation.
Figure 1. Tractor Stability
W ARNING!
When using 3 pt. hitch equipment, a minimum 20%
of tractor and equipment weight must be on tractor
front wheels. Without this weight, tractor could tip
up, causing possible loss of control and possible
personal injury or death. The weight may be attained
with a front end loader, front wheel weights, ballast
in tires or front tractor weights. When attaining a
minimum 20% of tractor and equipment weight on
the front wheels, you must not exceed the ROPS
weight certification. Weigh the tractor and equipment. DO NOT GUESS OR ESTIMATE!
W ARNING!
A heavy load can cause instability in driving a tractor.
Make sure the front of the tractor is properly counterbalanced with weights. Always drive slowly - especially
around turns. An unstable tractor could steer badly and
possibly tip over, causing injury or death.
INSTRUCTIONS
The operator is responsible for the safe operation of this
mixer. The operator must be properly trained. Operators
should be familiar with the mixer and tractor and all
safety practices before starting operation. Read the
safety rules and safety signs on pages 3-13.
SAFETY . . .
YOU CAN LIVE WITH IT!
Page 16
15
ASSEMBLY
This unit is shipped almost completely assembled.
Carefully follow instructions for final assembly.
Before attempting assembly check the following items.
Having all the needed parts and equipment readily at
hand will speed up your assembly task and will make the
job as safe as possible.
•
Check for fasteners and pins that were shipped with the
mixer. All hardware coming from the factory has been
installed in the location where it will be used. If a part or
fastener is temporarily removed for assembly reasons,
remember where it goes. Keep the parts separated.
• Have a minimum of 2 people at hand during assembly .
Refer to the Safety Precautions and Warnings on the
front cover and in the Safety Section of this manual prior
to working on the machine.
The pull pins must be installed on the outside of the
mixer frame.
Attach the mixer to the lower lift arms of the tractor. Use
two (2) 7/16” lynch pins (not furnished) to lock the pull pins
to the lift arms. NOTE! Be sure to always use stabiliz-
er bars to prevent side sway on the mixer. Failure to
use stabilizer bars on the 3 pt. hitch could cause breakage of the hydraulic toplink cylinder or the PTO driveline.
Install the special, toplink hydraulic cylinder to the
tractor, using the pin furnished with the tractor. The
hydraulic cylinder is a single acting cylinder.
Attach the hose to the rod end of the toplink cylinder.
Use a good quality thread sealant. DO NOT USE
TEFLON TAPE. The port of the hydraulic toplink cylinder
are 1/4” pipe thread.
The tractor end of the hose will connect to a 1/2” - 14
NPT standard hydraulic quick coupler tip.
NOTE: The rod end of the hydraulic cylinder connects to
the tractor toplink brackets and the cylinder body
connects to the adjustable links as shown in the parts
view.
NOTE: The hydraulic toplink cylinder is single acting, it
may require adjustment on your tractor valve to operate
(check tractor owner’s manual).
Use caution when trial dumping the mixer. Allowing the
mixer to dump too far may bind the rod end of the
hydraulic cylinder and bend the rod.
If it appears this will happen, move the hydraulic cylinder to a higher hole position and/or move the lower lift
pins to a lower hole position. It is suggested that you start
with the center hole positions and work from there.
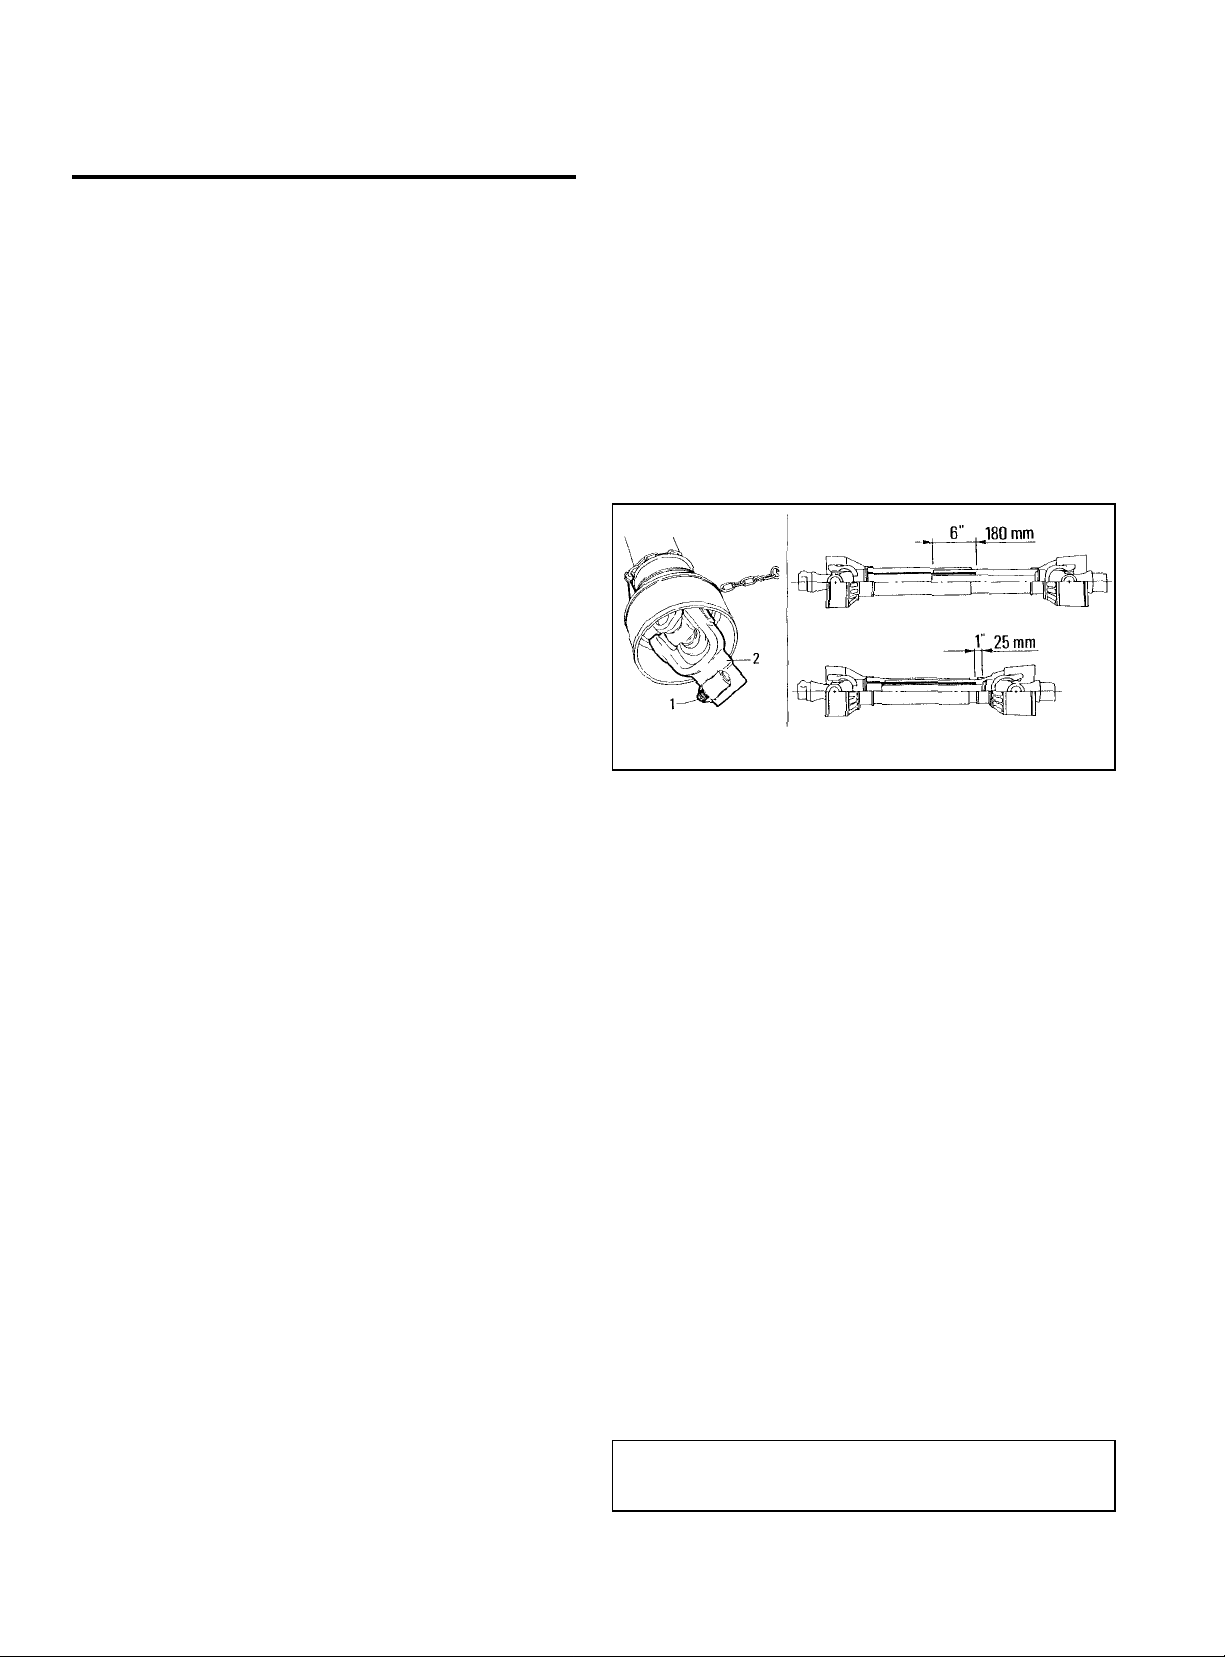
The minimum coupling length (overlap) must be no less
than 180 mm (6 inches) in each work position.
Driveline travel must still be about 25 mm (1 inch) in the
maximum coupling (overlap) position. See Figure 2.
PTO INSTALLATION
In some cases it will be necessary to shorten the PTO
assembly to match your particular tractor. The following
procedure should be used:
– Check that the driveline is the correct length Figure 2.
Figure 2
INSTRUCTIONS (continued)
Always couple the two end yokes of the driveline and
check that they are locked in place.
To achieve this condition, completely insert the latch pin
(Ref. #1, Figure 2) into the groove in the PTO shaft on
the tractor. Install the bolt through the yoke and input
shaft on the mixer.
An unlocked shaft would slip out of position, causing
notable mechanical damage and serious injury to anyone
near.
If the driveline is too long, it should be shortened in the
following way:
– Set the machine PTO input shaft at a minimum dis-
tance from the tractor PTO stub shaft; then set the
tractor brakes and switch the engine off.
– Separate the two halves of the driveline. Install the
female part into the tractor PTO and the male part on
the machine PTO, checking that the position is correct
by means of the latch pin.
OBEY ALL SAFETY WARNINGS!
Page 17
16
ASSEMBLY (continued)
INSTRUCTIONS (continued)
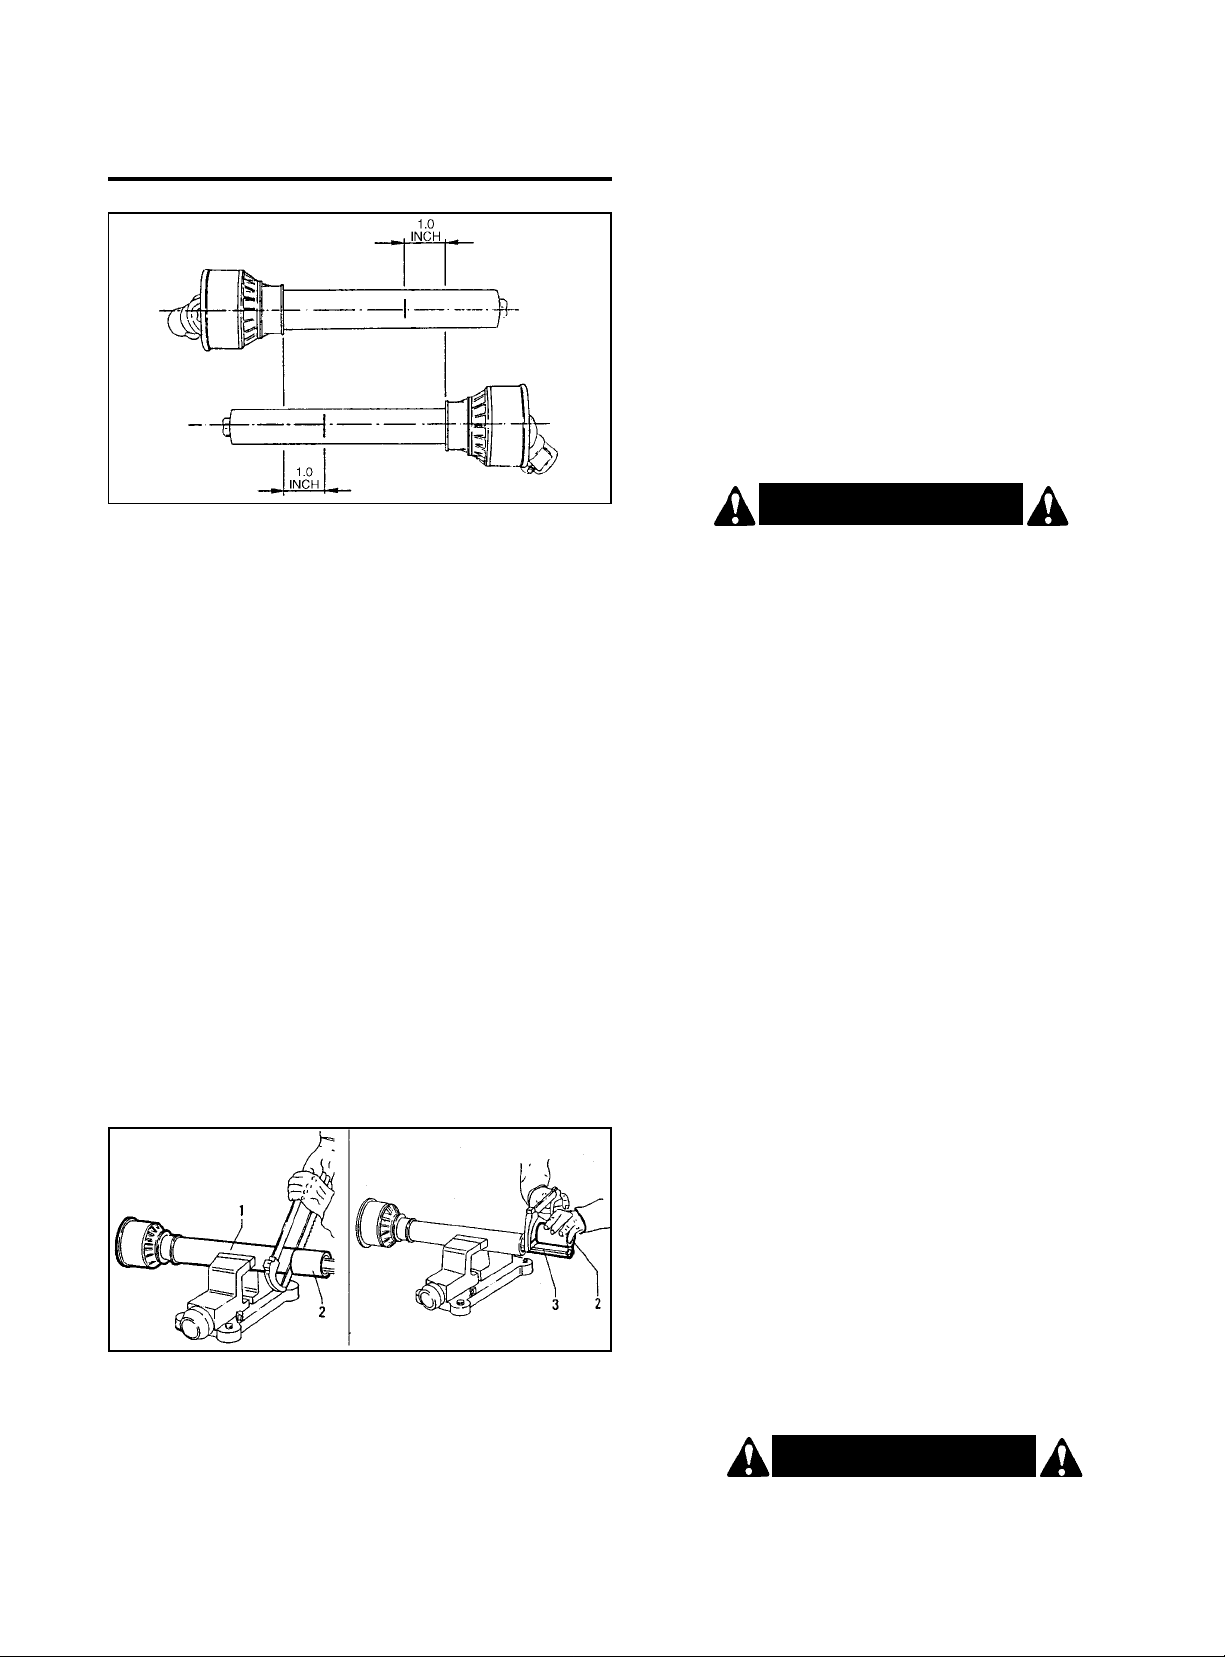
1. Place the two halves of the driveline together, keeping
them parallel (see Figure 3). Using a felt-tip pen,
matchmark the place where the two halves must be
shortened, measuring 1.0 inch from the beginning of
each half, as shown in Figure 3.
Double check before making any cuts. Cut PTO
drivelines cannot be returned.
Figure 3
2. Raise and lower the mixer to determine position with
greatest distance between the PTO shaft and mixer
input shaft. Shut tractor off, leaving mixer in position
of greatest distance between shafts. SECURELY
BLOCK MIXER IN POSITION.
Figure 4
3. Hold driveline sections parallel to each other and
check for minimum 6” (15cm) overlap. If driveline
has been marked for cutting, overlap will be the
distance between the two marks. If driveline has less
than minimum overlap, do not use. Contact
authorized dealer.
4. If driveline must be cut to a shorter length, clamp
driveline in a well padded vise to prevent damage to
the shield. Cut off shield where marked. Using cut-off
section of shield as a guide, cut shaft the same
amount. (Figure 4.)
5. Repeat the procedure to the other driveline half.
Remove all burrs and cuttings.
6. Apply multi-purpose grease to inside of outer (female)
driveline section. Assemble driveline and install on
tractor and mixer. Pull on each driveline section to be
sure yokes lock into place. Make certain driveline
shielding is in place and in good condition.
W ARNING!
When attaching PTO yoke to tractor PTO shaft, it is
important that spring-activated locking pin or balls
operate freely and are seated in groove on PTO shaft.
A loose shaft could slip off and result in personal
injury or damage to equipment.
7. Carefully raise and lower the mixer and check to be
sure the PTO assembly does not jam. If it does, cut
equal amounts from each half of the PTO assembly.
If the PTO driveline assembly contacts the swinging
drawbar, damage will occur to the driveshaft shield and
possibly the driveshaft itself. (NOT covered under
warranty.)
8. Check the swinging drawbar of the tractor and make
sure the PTO driveline assembly will not contact. The
swinging drawbar can be moved forward on some
tractors or it can be removed.
NOTE: This type of damage is NOT covered under
warranty, as it is totally under the control and the
responsibility of the operator.
CAUTION!
READ MANUAL BEFORE OPERATING!
Page 18

17
INSTRUCTIONS (continued)
OBEY ALL
SAFETY WARNINGS!
REPLACE
SAFETY SIGNS
IF DAMAGED
OR MISSING!
U Equip tractors with roll-over
protection (ROPS) and keep
all machinery guards in
place.
U Keep children away from
danger all day, every day . . .
U Please work, drive, play and
live each day with care and
concern for your safety and
that of your family and
fellow citizens.
CAUTION!
Do not operate the PTO at other than the rated 540
RPM. Excessive speeds can cause breakage and
potential injury.
SAFETY TRAINING
• Know your controls and how to stop tractor, engine,
and PTO quickly in an emergency. READ THIS
MANUAL AND THE ONE PROVIDED WITH YOUR
TRACTOR.
• To avoid accident or injury, do not allow anyone to
operate this equipment without proper instructions.
Any person who operates this equipment must be
instructed in and be capable of the safe operation of
the tractor, implement and all controls.
• Do not allow children to operate this machine.
NOTE: NEVER LOAD MIXER WITH THE DRUM NOT
TURNING. STARTING A LOADED DRUM COULD
DAMAGE THE DRIVE CHAIN OR SPROCKETS.
A heavy load can cause instability in driving a
tractor. Make sure the front of the tractor is properly
counterbalanced with weights. Always drive slowly
– especially around turns. An unstable tractor could
steer badly and possibly tip over, causing injury or
death.
W ARNING!
Page 19
18
OPERATING INSTRUCTIONS
PRE-OPERATION CHECKLIST
(OWNER/OPERATOR RESPONSIBILITY)
____ Review and follow safety rules and safety signs on
pages 3 through 13.
____ Check that mixer is properly and securely attached
to tractor.
____ Make sure driveline spring-activated locking pin or
locking balls operate freely and are seated firmly in
tractor PTO spline groove.
____ Lubricate all grease fitting locations. Make sure
PTO shaft slip joint is lubricated.
____ Check that all hardware is properly installed.
____ Check that all shields and guards are properly
installed and in good condition.
____ Place tractor PTO and transmission in neutral
before starting engine.
____ Set tractor PTO gear select lever for 540 rpm
operation.
____ Check that no one enters the area of machine
operation. Always work at a safe distance from
people, pets, and livestock.
____ Know your controls and how to stop tractor, engine
and PTO quickly in an emergency. READ THIS
MANUALAND THE ONE PROVIDED WITH YOUR
TRACTOR.
____ To avoid accident or injury, do not allow anyone to
operate this equipment without proper instructions.
Any person who operates this equipment must be
instructed in and be capable of the safe operation
of the tractor, implement and all controls.
____ Check that PTO driveline shields are securely
locked and clear the swinging drawbar.
O PE R ATION
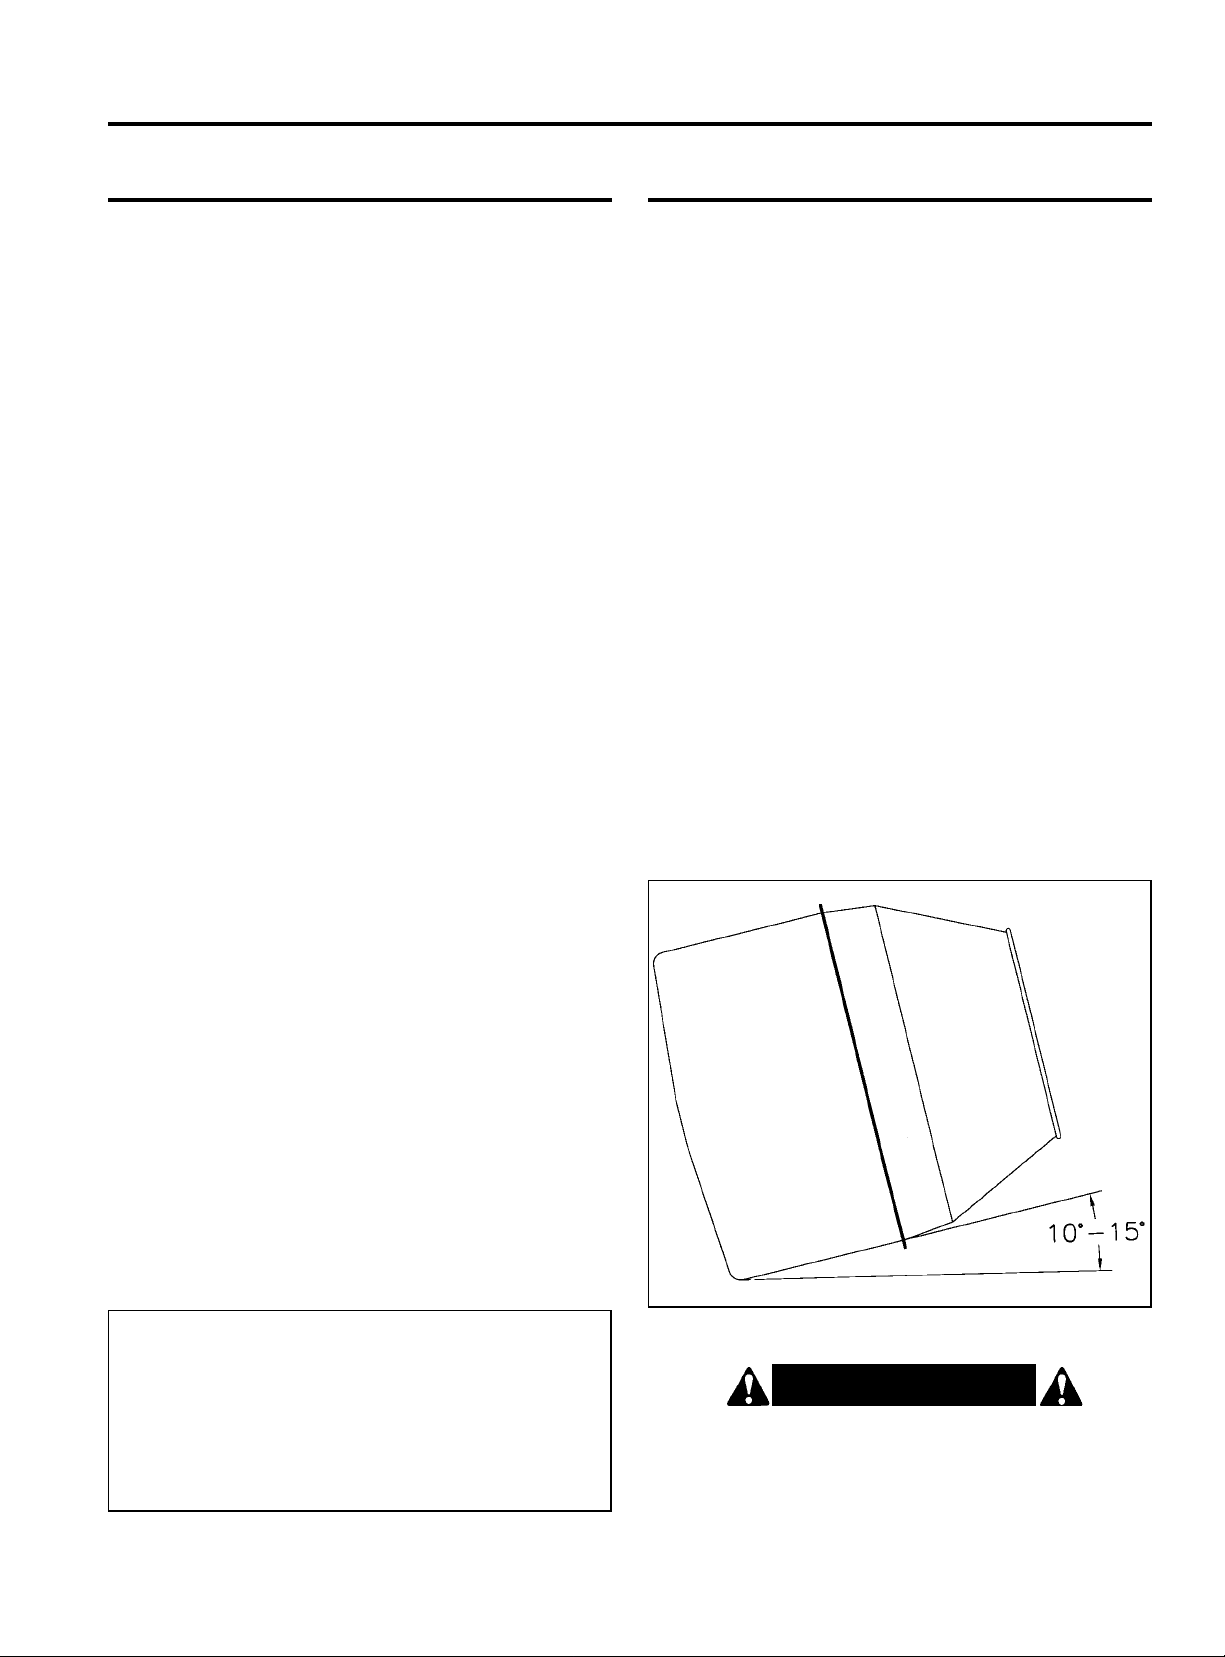
For best mixing, the drum should be inclined upward
10˚ to 15˚ (see Fig. 5). Add some water before cement,
sand or aggregate is put in drum.
NOTE: ONL YLOAD MIXER WHILE DRUM IS TURNING.
The amount of water used per sack of cement is the key
to quality concrete. Use 5, 6 or 7 gallons of water per
sack of cement with dry sand and dry aggregate depending on the strength of concrete required. The less water
you use the stronger the concrete will be and we suggest
that you deduct approximately 1 gallon if the material is
wet and approximately 11/2gallons if very wet.
We suggest mixing a trial batch to determine exact
proportions you will want to use. If too wet, add more
sand and aggregate. If too stiff, reduce the amount of
sand and aggregate in the next batch, but never add
more water to a batch once you have established the
correct proportions to use.
After concrete is poured, it is screeded or struck off with
a straight edge like a 2 x 4 and should then be floated to
smooth it. Further troweling or finishing should be
delayed until the water sheen has disappeared from the
surface. The concrete should be cured at least five days.
To prevent evaporation of mixing water, cover with burlap
or straw and keep damp or cover with a vapor sealing
material to seal in the water and prevent evaporation.
Safety is a primary concern in the design and
manufacture of our products. Unfortunately , our ef forts
to provide safe equipment can be wiped out by a
single careless act of an operator.
It has been said, “The best safety device is an
informed, careful operator”. We ask you to be that
kind of an operator.
W ARNING!
Never place hands or hand held tools (shovel) into
the mixer drum while it is turning. It could catch on
the mixer paddles and whip around, possibly injuring the operator.
Figure 5
Page 20
19
OPERATING INSTRUCTIONS (continued)
DUMPING
MAINTENANCE
If work is required while the mixer is attached to the
tractor, the mixer must be blocked securely. NEVER trust
the tractors’ hydraulic system.
After mixing concrete, or any material that clings to the
side of the drum, be sure to clean thoroughly when finished. In mixing concrete, if there are lapses between
batches, it is a good idea to add some water and rinse so
that the concrete will not set in the drum.
Thoroughly clean the grease zerks before servicing.
Dirt mixed with lubricant will rapidly wear parts and
destroy bearings.
Check the drive chain and if necessary, adjust with the
tightener.
Carefully check and replace any worn or damaged
parts.
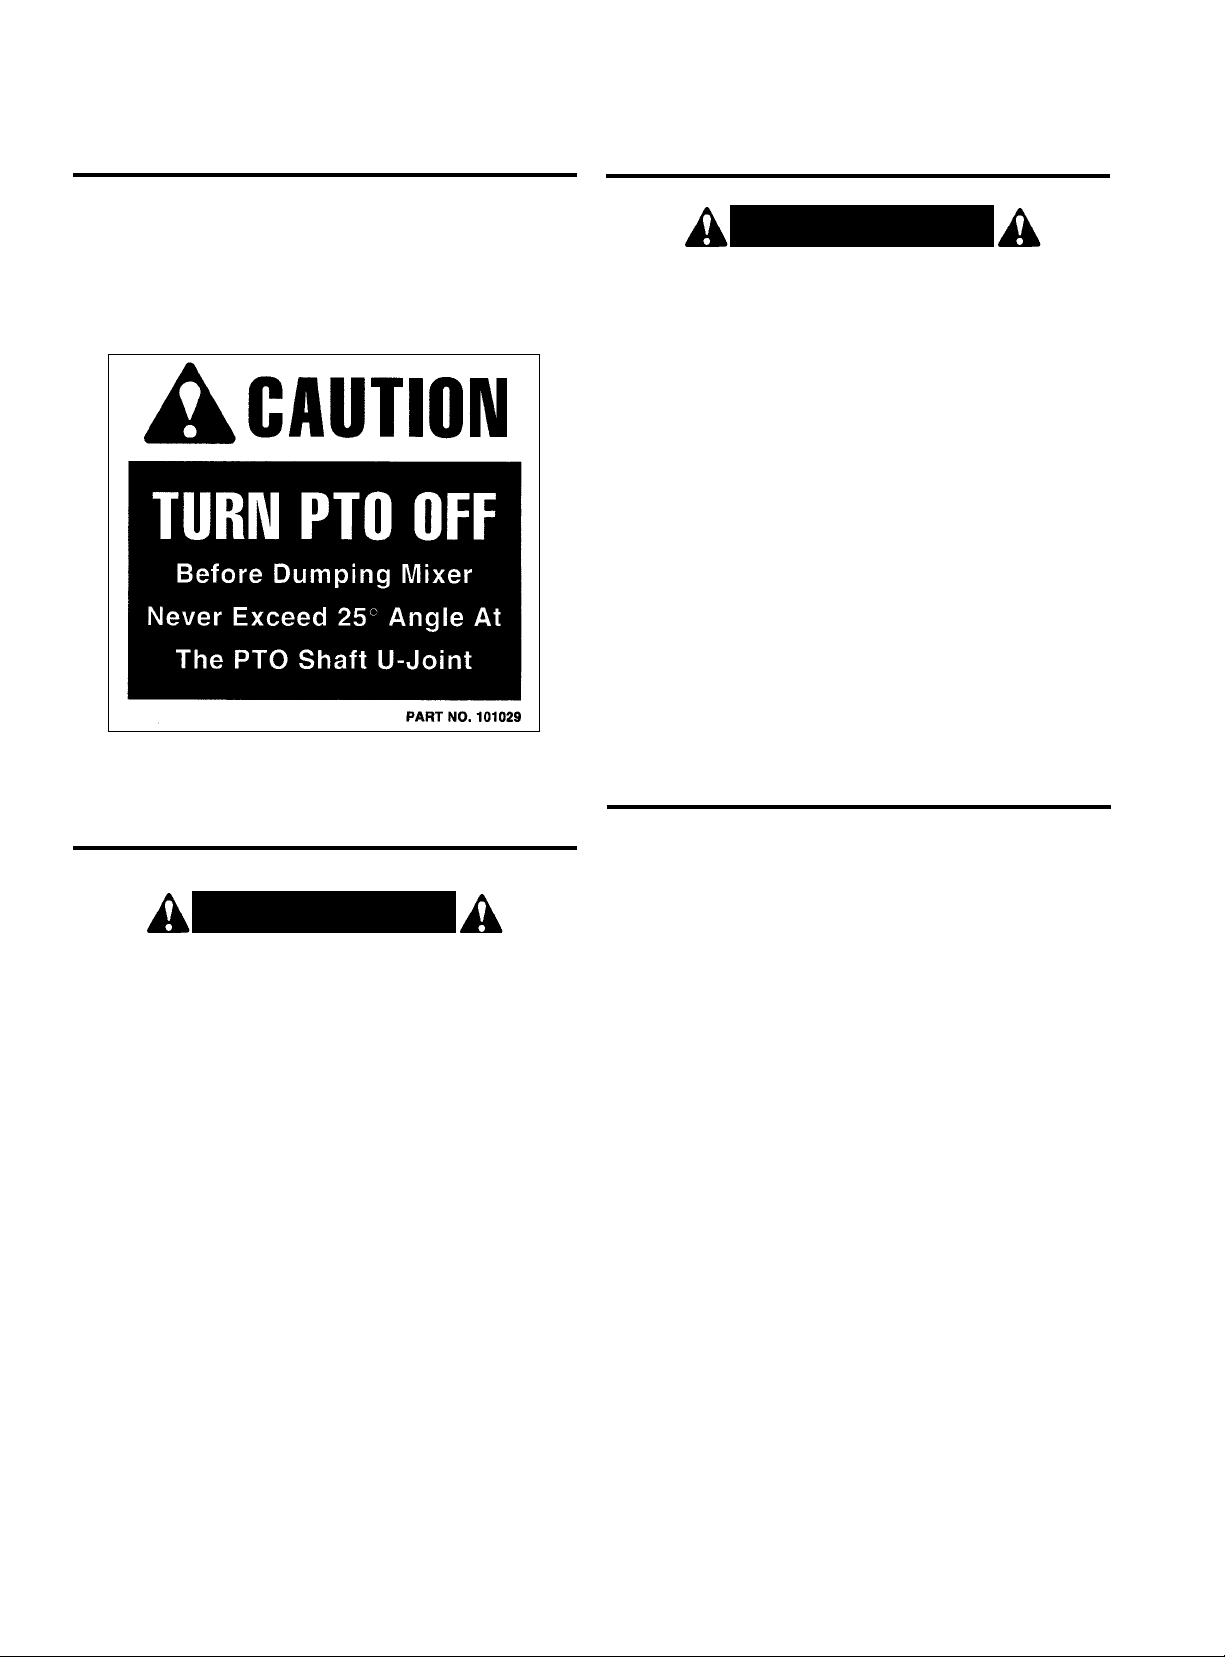
Disengage the PTO before dumping. Never attempt to
dump the mixer with the mixer running – PTO
damage will result. Always dump the mixer slowly to
avoid splashing the mixture. Be careful not to let the
mixer dump too far and bind the hydraulic cylinder. Use
a shovel to remove the last of the mixture.
W ARNING!
Before servicing the machine, disengage the PTO,
engage the parking brake or place the transmission
in “Park,” shut off the tractor and remove the key.
Keep clear of rotating parts; stay on tractor seat
until all motion has stopped.
Do not get under machine to make adjustments
without securely blocking implement first.
TRANSPORTING
• Be sure to reduce tractor ground speed when turning;
and, leave enough clearance so the mixer does not
contact obstacles such as buildings, trees or fences.
• Select a safe ground travel speed when transporting
from one area to another. When traveling on
roadways, transport in such a way that faster moving
vehicles may pass you safely.
• When traveling over rough or hilly terrain, slow down
and use extra care.
• Read all the safety warnings in the front of the manual.
CAUTION!
When traveling on public roads, whether at night or
during the day, use accessory light and devices for
adequate warnings to operators of other vehicles.
Comply with all federal, state and local laws.
STORAGE
• At the end of the working season or when the mixer
will not be used for a long period, it is good practice to
clean off any dirt or grease that may have accumulated on any of the moving parts.
• Store mixer in a dry location. If mixer must be stored
outside, place drum so that the mouth of the drum is
down to prevent water from accumulating in the drum.
• Make sure the hydraulic toplink cylinder has the rod
end fully retracted into the cylinder body and that the
breather hole on the cylinder body is positioned where
water cannot enter. (It is recommended that the
hydraulic toplink cylinder be stored inside.)
• Inspect the mixer for loose, damaged or worn parts
and adjust or replace if needed.
• Lubricate as noted.
• Collapse driveshaft as far as possible and store it to
prevent ground contact. Place blocks under mixer
skids.
• Sand areas where paint is chipped or worn and
repaint to prevent rust.
• Always store in a safe place away from children or
livestock.
Page 21

20
TROUBLE-SHOOTING
PROBLEM: MIXER DUMPS AND WON’T COME
BACK TO LOAD POSITION
POSSIBLE SOLUTIONS:
❖ Hydraulic hose from cylinder not connected to tractor
hydraulic remote outlet.
❖ Hydraulic toplink cylinder on mixer is single acting and
is incompatible with tractor remote outlet valve –
check manual and tractor dealer to see if different
valve is available.
❖ Low oil in tractor reservoir – add oil.
❖ Front of tractor is headed downhill and oil level in
reservoir is low – add oil.
PROBLEM: MIXER WILL NOT DUMP
POSSIBLE SOLUTIONS:
❖ Hydraulic toplink not connected properly to tractor
hydraulic outlet.
❖ Tractor hydraulic valve not working properly – check
tractor manual.
❖ Low oil level in tractor hydraulic reservoir – check oil
level.
❖ See – Mixer Not Tilting Enough Section and Mixer
Dumps And Won’t Come Back Section.
PROBLEM: DRIVE CHAIN BREAKS
POSSIBLE SOLUTIONS:
❖ Loading mixer while drum is stationary and then trying
to start a loaded drum to turn – always load into a
turning mixer.
❖ Using a tractor without live PTO and having to
stop/start mixer drum when shifting tractor gears. Use
another tractor or mix less material for less load.
❖ Too much load for mixer – reduce amount of material.
❖ Drive chain not properly tightened.
❖ Drive chain is rusted and has been setting outside –
replace chain and lubricate regularly.
❖ Tractor engine RPM too high when engaging PTO –
always slow engine RPM when engaging or
disengaging PTO.
PROBLEM: MIXER SHAKES EXCESSIVELY
POSSIBLE SOLUTIONS:
❖ Stabilizer straps not attached to tractor 3 pt. hitch lift
arms – install stabilizer.
❖ Mix too dry and has formed a clump – add water.
❖ Material has large chunks – break up material before
putting in mixer drum.
❖ Tractor engine idle too slow – increase engine RPM
slightly.
❖ PTO driveline is operating at a severe angle – raise or
lower 3 pt. hitch so driveline is operating with minimum angle.
PROBLEM: MIXER WILL NOT TILT ENOUGH WHEN
DUMPING
POSSIBLE SOLUTIONS:
❖ Geometry of pull pin location and toplink is not correct
– change location of toplink connection to mixer and
location of pull pins.
❖ Low profile tractor being used – use different tractor.
❖ Tractor front end is positioned downhill at dumping
site – dump mix on level ground into wheelbarrow and
transport to actual dump site.
Page 22
21
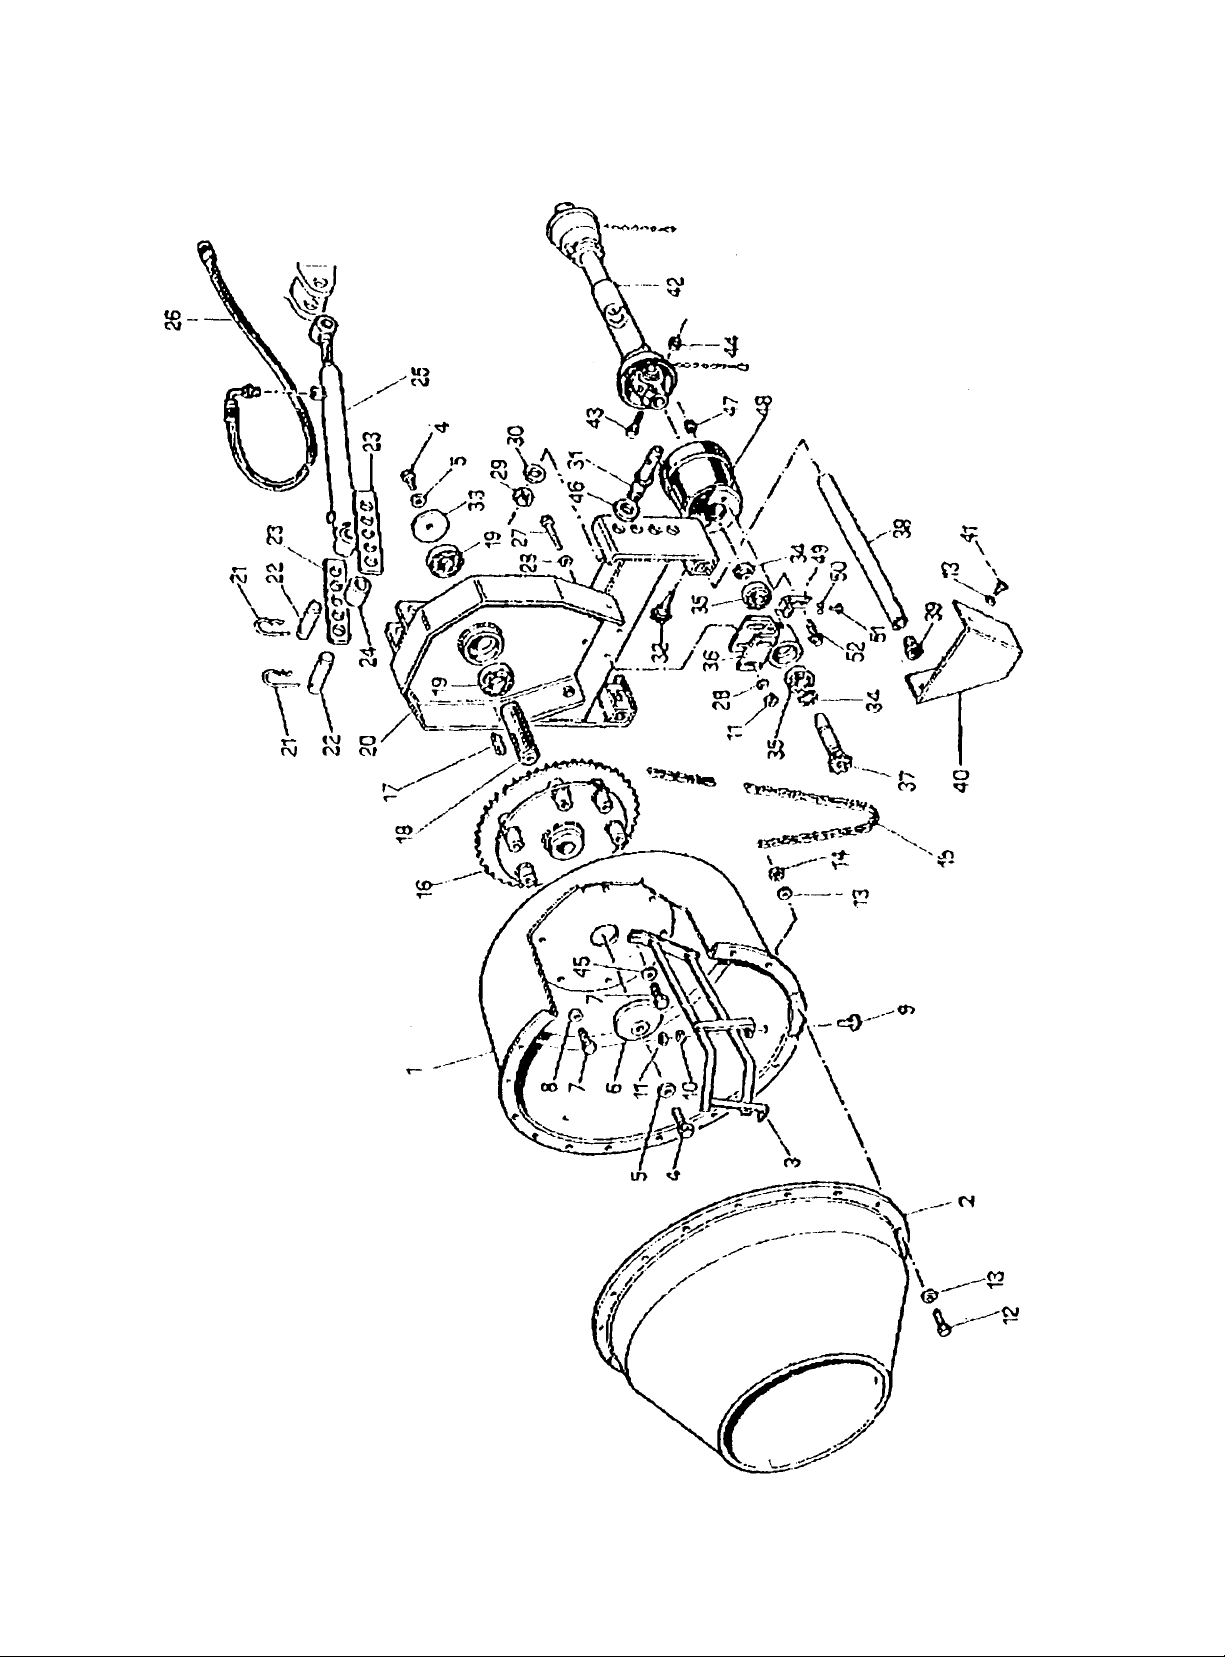
MODEL 580 MIXER PA RTS VIEW
Page 23
22
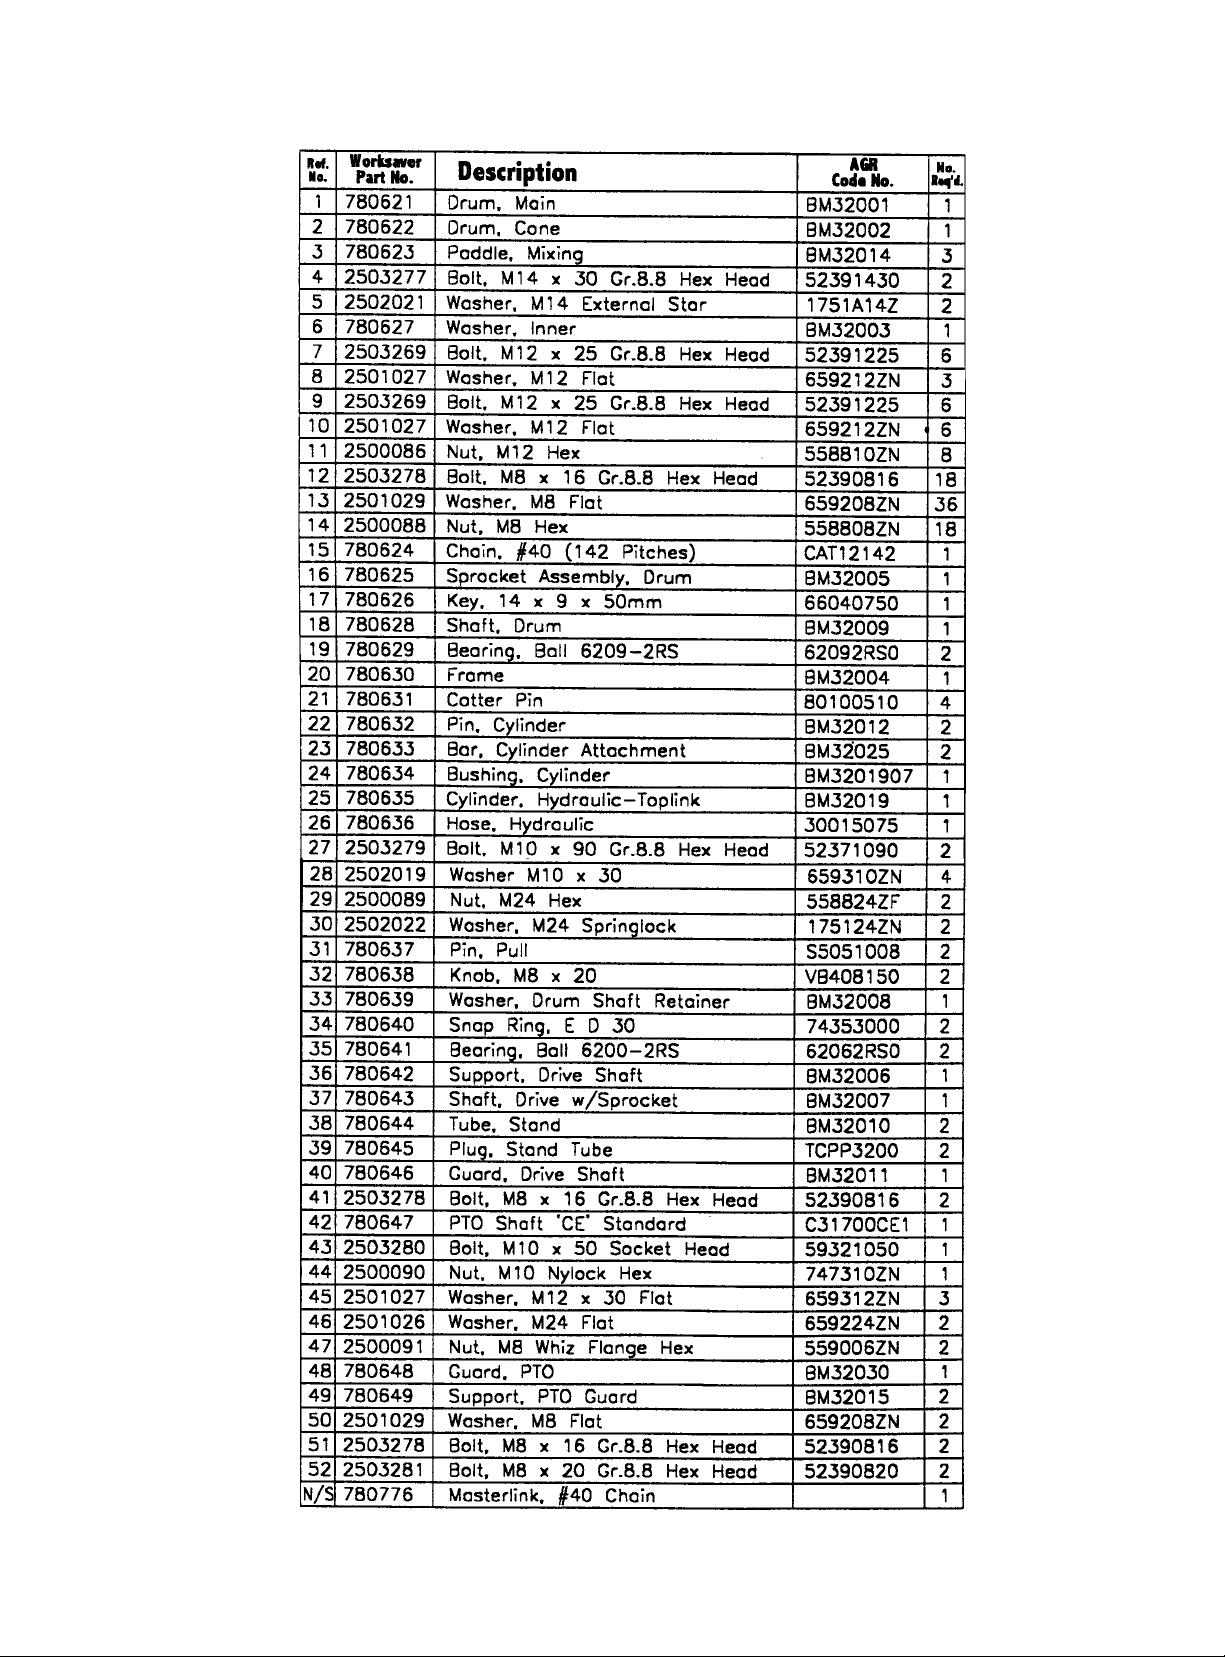
MODEL 580 MIXER PA RTS LIST
Page 24

OWNER’S
MANUAL
MODEL NO.
580
APRIL 2000
FS-TA009-OG
FARM STAR
P.O. BOX 100 LITCHFIELD, IL 62056-0100 (217) 324-5973
WEB: http:// www.farmstar.com E-MAIL: [email protected]
MAKE EVERY DAY
A HOLIDAY
FROM ACCIDENTS!
3 PT. MIXER
WHEN ORDERING REPAIR PARTS,
ALWAYS GIVE THE
FOLLOWING INFORMATION:
1. PART NUMBER
2. PART DESCRIPTION
3. MODEL NUMBER
4. NAME OF ITEM
SAFETY PRECAUTIONS
MOST ACCIDENTS OCCUR BECAUSE OF NEGLECT OR CARELESSNESS.
AVOID NEEDLESS ACCIDENTS BY FOLLOWING ALL OF THE SAFETY PRECAUTIONS LISTED BELOW.
• Machinery should be operated only by those who are
responsible and are authorized to do so.
• Stop the engine, lower all equipment, lock the brakes,
and remove the ignition key before dismounting from the
tractor.
• Never stand between tractor and implement while tractor
is being backed to hitch.
• Loose fitting clothing should not be worn, to avoid catch-
ing on various parts.
• Detach implement in area where children normally do not
play.
• When performing adjustments or maintenance on an
implement, first lower it to the ground or block it securely
at a workable height.
• Only a qualified operator should be permitted on tractor
when in operation; no riders allowed.
• Make certain everyone is in the clear before starting
tractor or raising or lowering equipment.
• Operate the tractor and implement only while seated in
the driver’s seat.
• Reduce speed when transporting mounted implements to
avoid bouncing and momentary loss of steering control.
• A heavy load can cause instability of the tractor. Use
extreme care during road travel. Slow down on turns and
watch out for bumps. Tractor may need front counterweights to counter-balance the weight of the implement.
• Reduce speed on hillsides or curves so there is no
danger of tipping.
• Avoid driving too close to the edge of ditches or creeks.
• Do not transport implement on public roads without
reflectors and slow moving vehicle emblem in daylight
and with approved warning lights at night and other
periods of poor visibility.
• Due to the width of some implements, use extra caution
on highways, farm roads, and when approaching gates.
• Always be sure the implement is in the proper position for
transport.
• Keep alert and watch the front as well as the rear when
working with the implement.
 Loading...