

Farberware SELECT FSM126E Use & Care Instructions Manual

SELECT SERIES
USE & CARE INSTRUCTIONS
16-SPEED STAND MIXER FSM126E
FARBERWARE
®

2
1. To protect against electrical shock, do not put the Motor
Housing or Stand Mixer Base in water or other liquids.
2. DO NOT allow children to use this appliance. Use Stand
Mixer with care when children are present.
3. Unplug from outlet when not in use, before putting on or taking off parts, and before cleaning.
4. Avoid contacting moving parts. Keep hands, hair, clothing, as
well as utensils out of Mixing Bowl and away from Beaters during
operation to reduce the risk of severe injury to persons or damage
to the Mixer.
5. Do not operate any appliance with a damaged cord or plug, or
after the appliance malfunctions or has been dropped or damaged in any manner. Return appliance to the nearest
authorized service center for examination, repair or electrical
or mechanical adjustment.
6. Do not use outdoors.
7. The use of attachments not recommended or sold by the manufacturer may cause fire, electric shock, or injury.
8. Do not let the cord hang over the edge of table or counter or
touch hot surfaces, including the stove.
9. Do not use appliance for other than its intended use.
10. Do not leave appliance unattended while operating.
11. Remove Beaters and Cookie Dough Hooks from Mixer after use
and before cleaning.
12. Be sure Stand Mixer is assembled completely and properly
before using.
13. Turn unit "OFF" by pressing ON/OFF Button and unplug from
wall outlet when finished using. Do not remove accessories
until the motor comes to a complete stop.
When using electrical appliances, especially when children are
present, basic safety precautions should always be followed,
including the following:
READ ALL INSTRUCTIONS BEFORE USING.
IMPORTANT SAFEGUARDS
SAVE THESE INSTRUCTIONS
FOR HOUSEHOLD USE ONLY
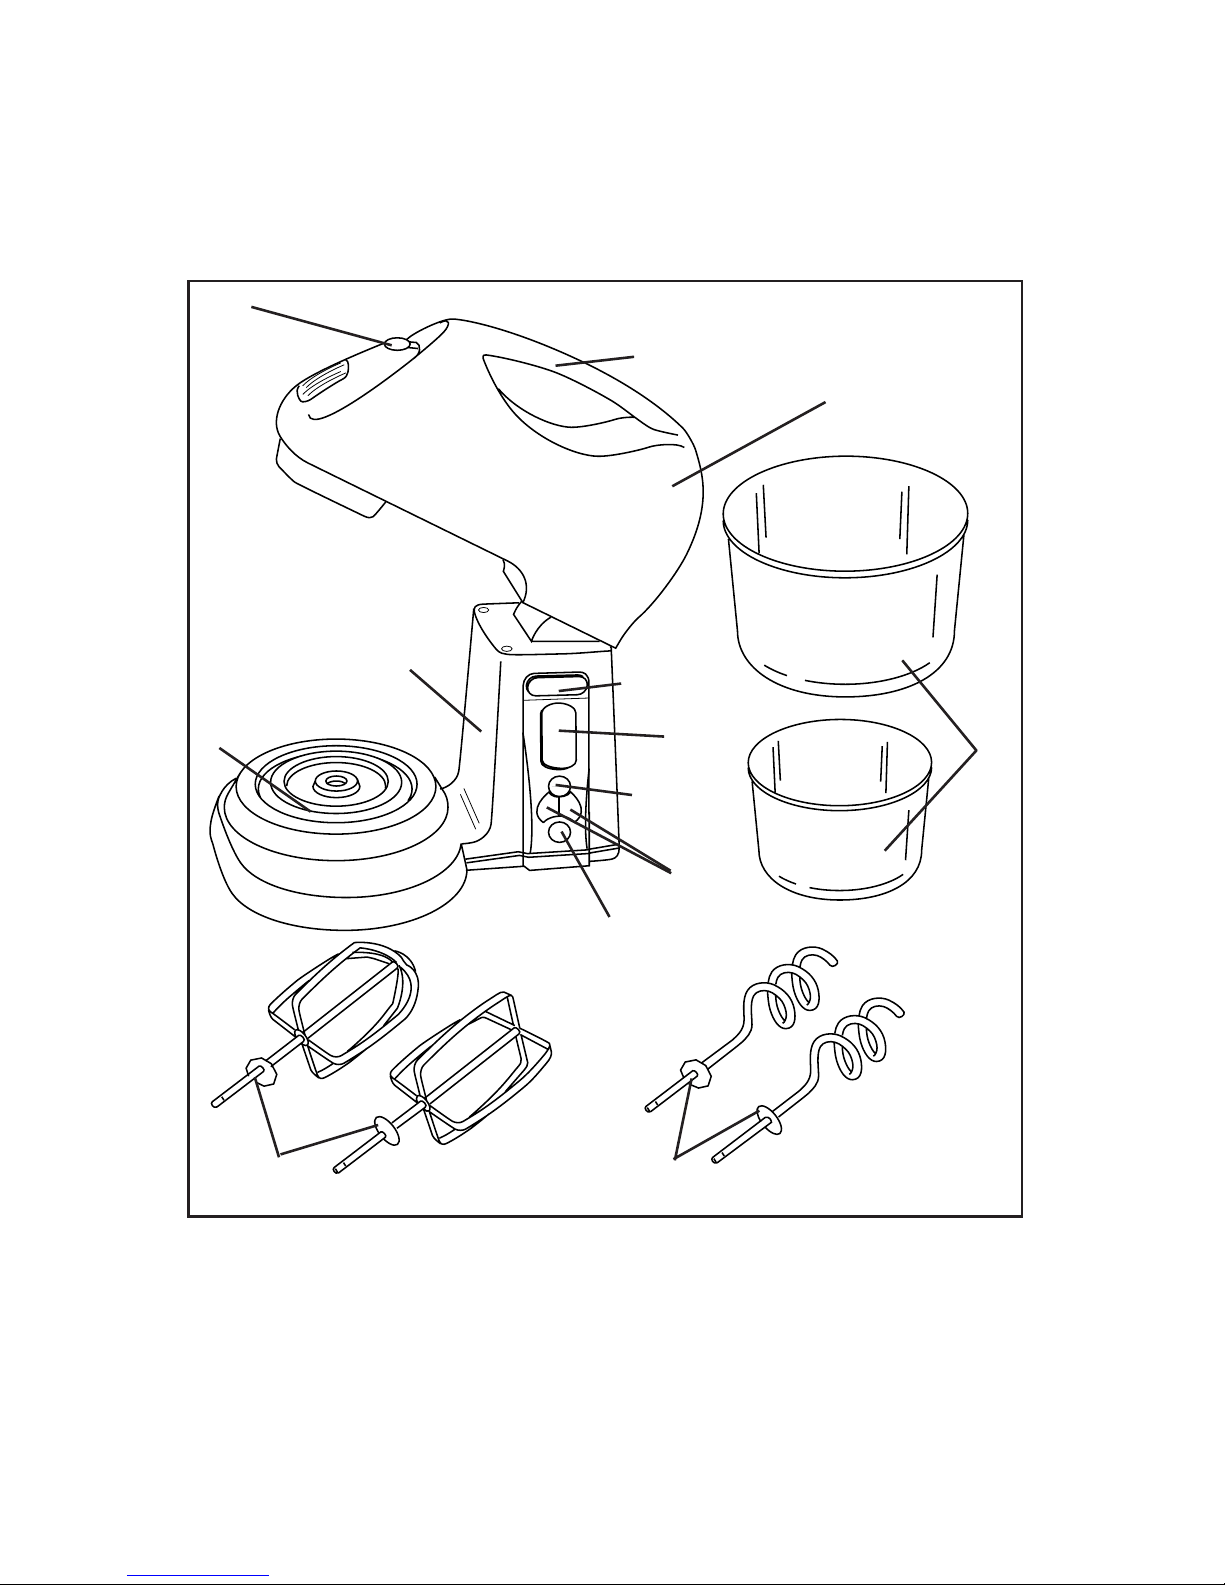
GETTING TO KNOW YOUR
FARBERWARE® FSM126E
16-SPEED STAND MIXER
Release
Start
Stop
—
+
On/Off
16
SPEED
MIXER
3
A. Ejector Button
B. Handle
C. Motor Housing
D. Head Release Button
E. Mixer Stand
F. LED Display
G. START/STOP Button
H. Speed Control Buttons
I. ON/OFF Button
J. Turntable
K. Mixing Bowls
L. Beaters
M. Cookie Dough Hooks
A
C
D
E
G
H
K
B
L
F
I
J
M

4
This appliance is for HOUSEHOLD USE ONLY and may be plugged
into any 120V AC electrical outlet. Do not use any other type of
outlet.
POLARIZED PLUG
This appliance has a polarized plug (one blade is wider than the
other). To reduce the risk of electric shock, this plug is intended to
fit into a polarized outlet only one way. If the plug does not fit fully
into the outlet, reverse the plug. If it still does not fit, contact a
qualified electrician. Do not attempt to modify the plug in any
way.
SHORT CORD
The Stand Mixer's retractable power cord is short to reduce your
risk of becoming entangled in or tripping over a long cord. You can
obtain a longer power-supply cord or extension cord, but be careful when using the Stand Mixer when it is equipped with extra
cord length.
If a longer power-supply cord or extension cord is used, (1) the
marked electrical rating of the extension cord should be at least as
great as the electrical rating of the appliance, and (2) the longer
cord should be arranged so that it will not drape over the counter
top or table top where it can be pulled on by children or tripped
over unintentionally.
BEFORE USING YOUR 16-SPEED STAND
MIXER
1. Carefully unpack Mixer.
2. Wash Beaters, Cookie Dough Hooks, and Mixing Bowls with
warm, soapy water. Rinse well and dry thoroughly.
CAUTION: To protect against electric shock, never immerse the
Motor Housing or Base in water or any other liquid.
CAUTION: Use this product with the proper AC voltage rating
only. Be sure to unplug the power cord when Stand Mixer is not in
use.
INSTRUCTIONS FOR USE
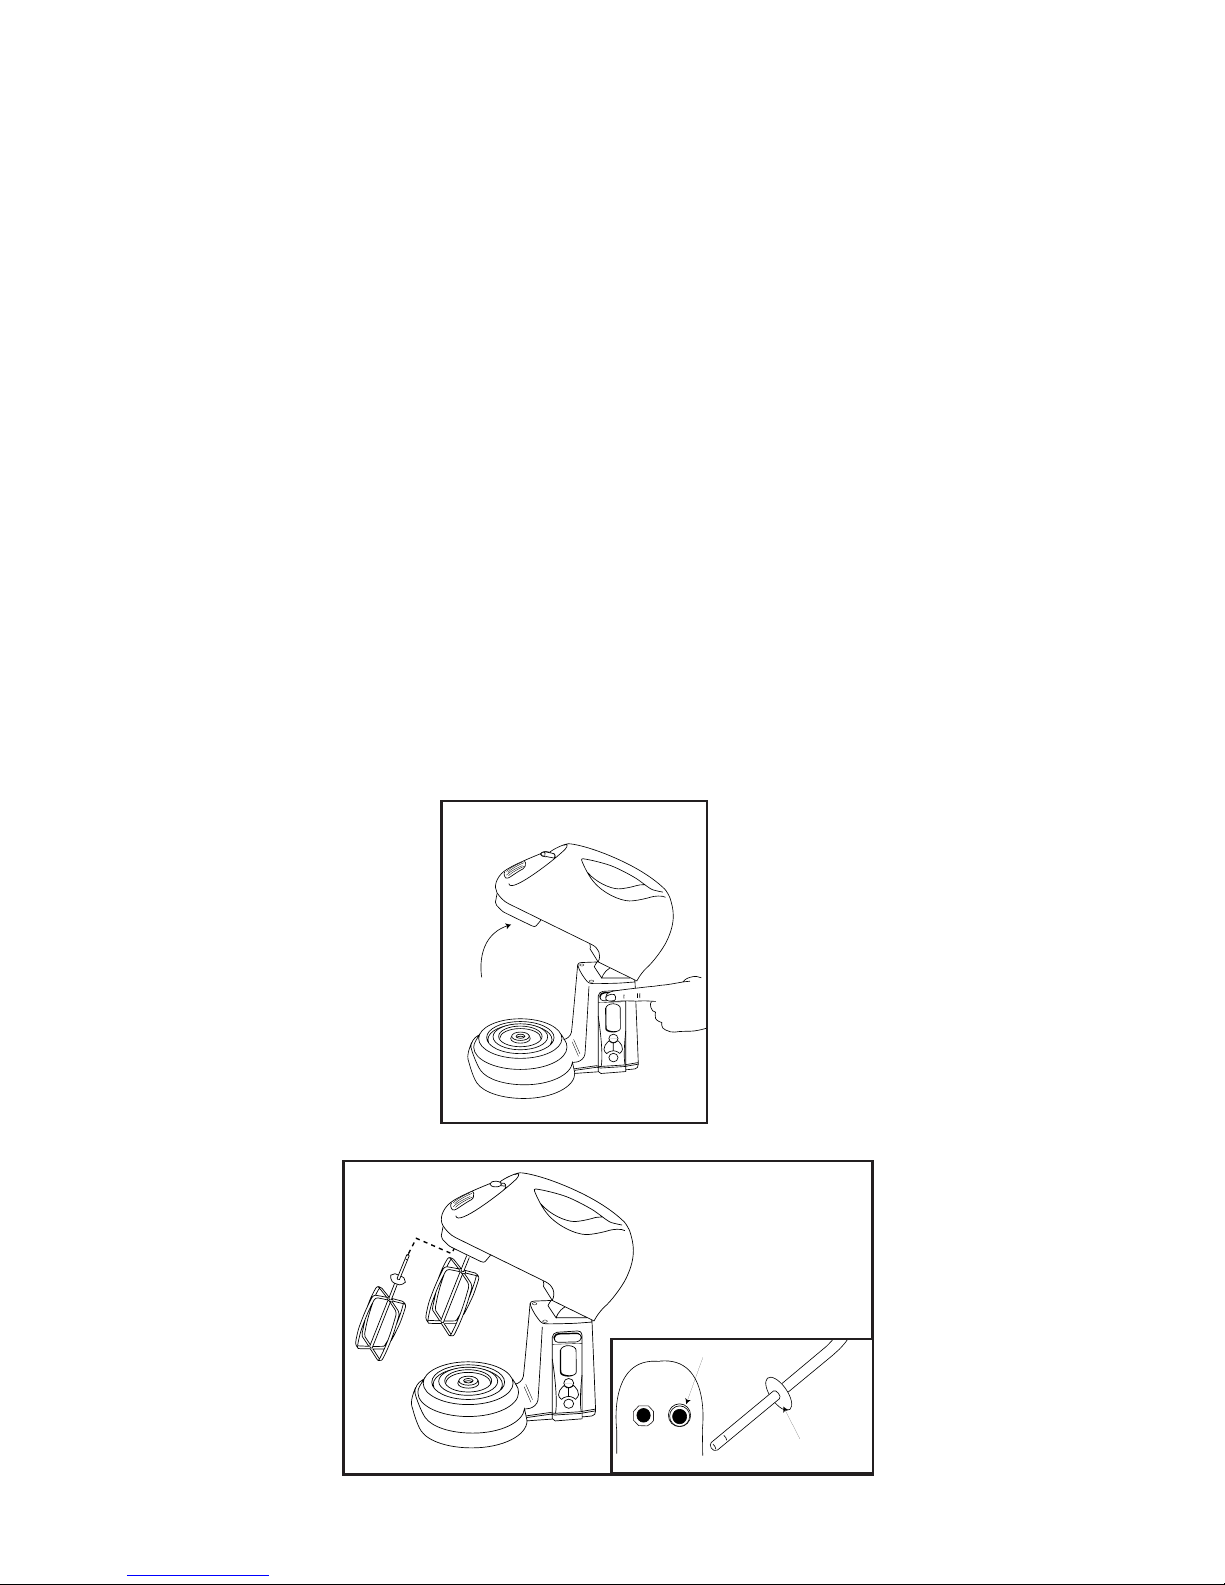
INSERTING BEATERS/COOKIE DOUGH
HOOKS
CAUTION: Use either both Beaters or both Cookie Dough Hooks. Do
not attempt to use a Cookie Dough Hook with a Beater. This could
damage the Mixer.
1. Place Stand Mixer on a dry, level surface.
2. Press Head Release Button while pivoting Mixer head upwards.
See Figure 1. DO NOT attempt to pivot Mixer head without first
pressing Head Release Button. This could damage the Mixer.
NOTE: Beaters and Cookie Dough Hooks have two types of stem
disks: round and hexagonal.
3. Insert Beater or Cookie Dough Hook stems, one at a time, into
holes on underside of Motor Housing. See Figure 2. Insert
Beater or Cookie Dough Hook with round stem disk into round
hole; hexagonal stem disk into hexagonal hole. See Figure 2
inset drawing. Push in firmly and twist slightly to lock each
Beater or Cookie Dough Hook into place.
5
Release
Start
Stop
—
+
On/Off
16
SPEED
MIXER
Figure 2
ROUND
STEM DISK
ROUND HOLE
R
Start
Stop
—
+
On/Off
16
SPEED
MIXER
Figure 1
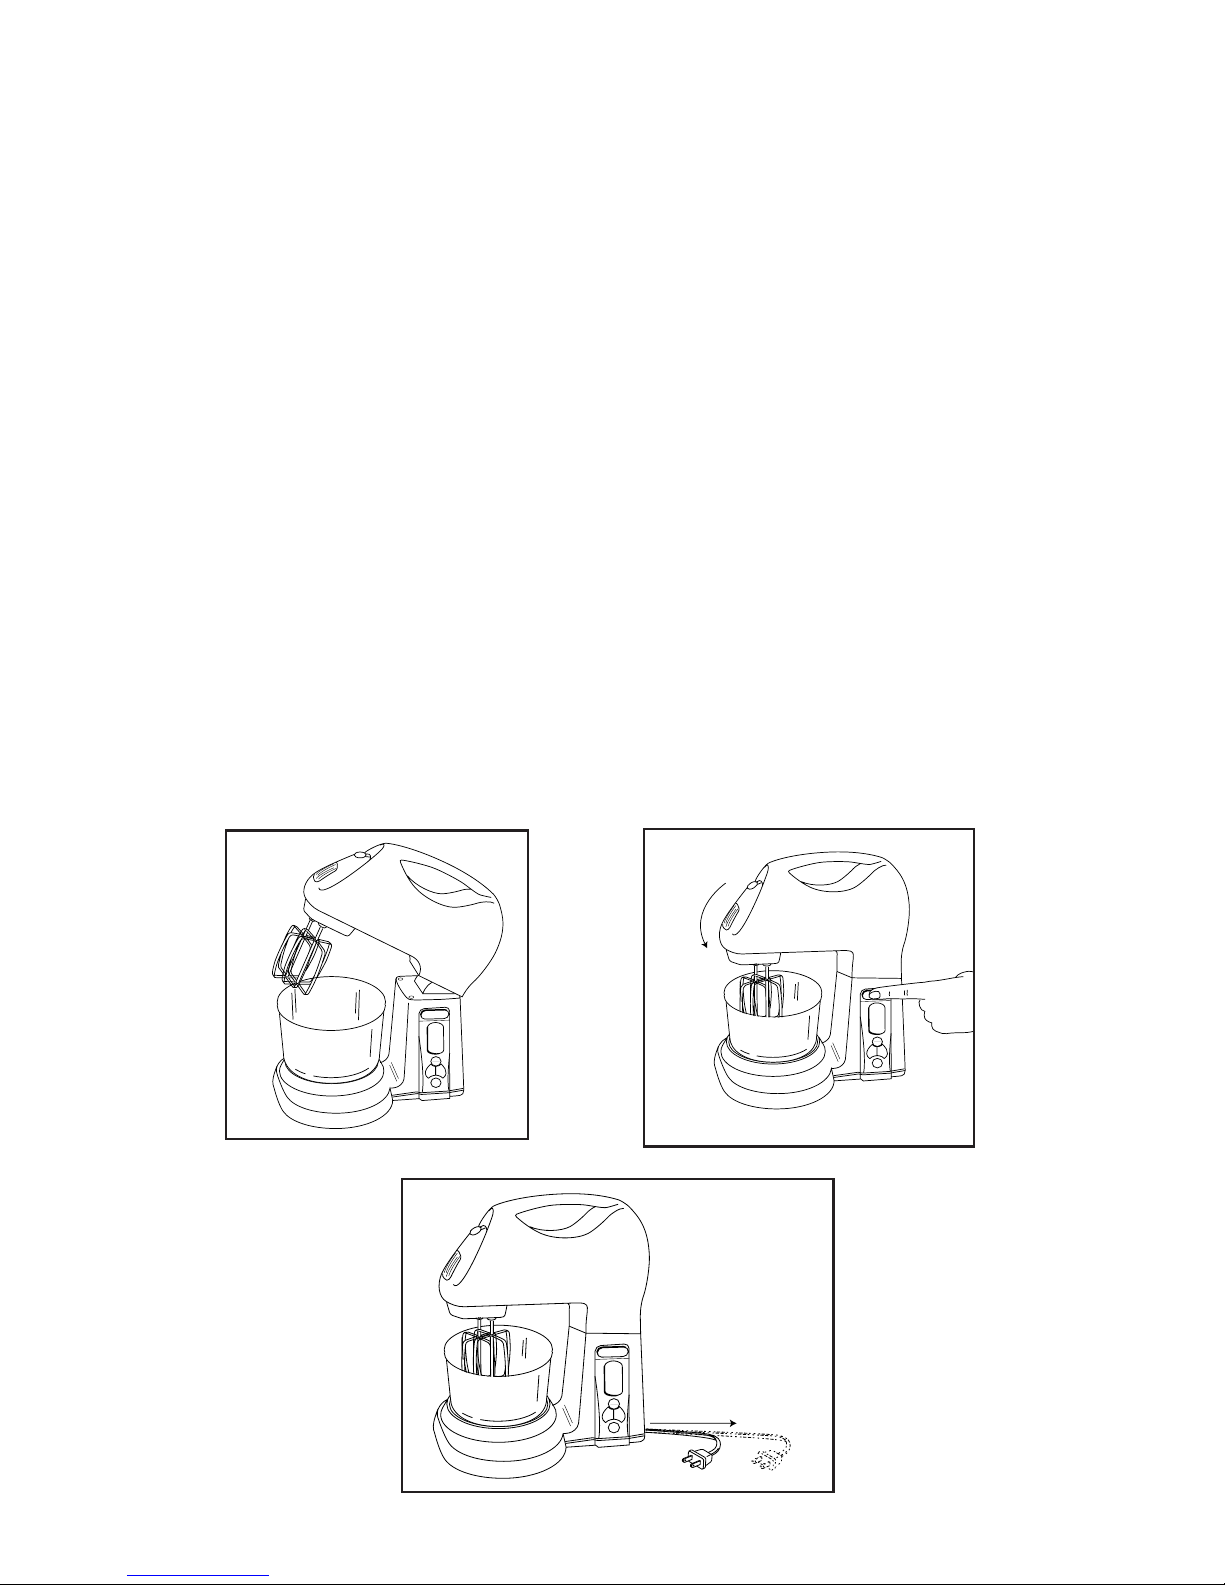
1. Place desired ingredients into large or small Mixing Bowl.
NOTE: Maximum capacity of the large Mixing Bowl is 4 quarts; the
small Mixing Bowl is 1 1/2 quarts. Do not fill bowl more than half full
with ingredients.
2. Lift Turntable up off of base. Note small and large mixing bowl
location as marked in Base. Replace Turntable at desired location.
3. Place filled Mixing Bowl (large or small) onto Turntable. See Figure
3. Be sure to align rim on underside of bowl with corresponding
rim on Turntable. When Bowl is placed properly, it will spin freely
on Turntable.
4. With Beaters or Cookie Dough Hooks properly in place, press
Head Release Button while pivoting Mixer head downward until
it rests firmly in place. See Figure 4.
5. Gently pull plug and power cord out from rear of unit. See Figure 5.
Pull power cord to desired length only. DO NOT allow any extra
cord length than necessary. Plug power cord into a standard 120V
AC household electrical outlet.
6
R
Start
Stop
—
+
On/Off
16
SPEED
MIXER
Figure 4
Release
Start
Stop
—
+
On/Off
16
SPEED
MIXER
Figure 5
MIXING
Release
Start
Stop
—
+
On/Off
16
SPEED
MIXER
Figure 3
7
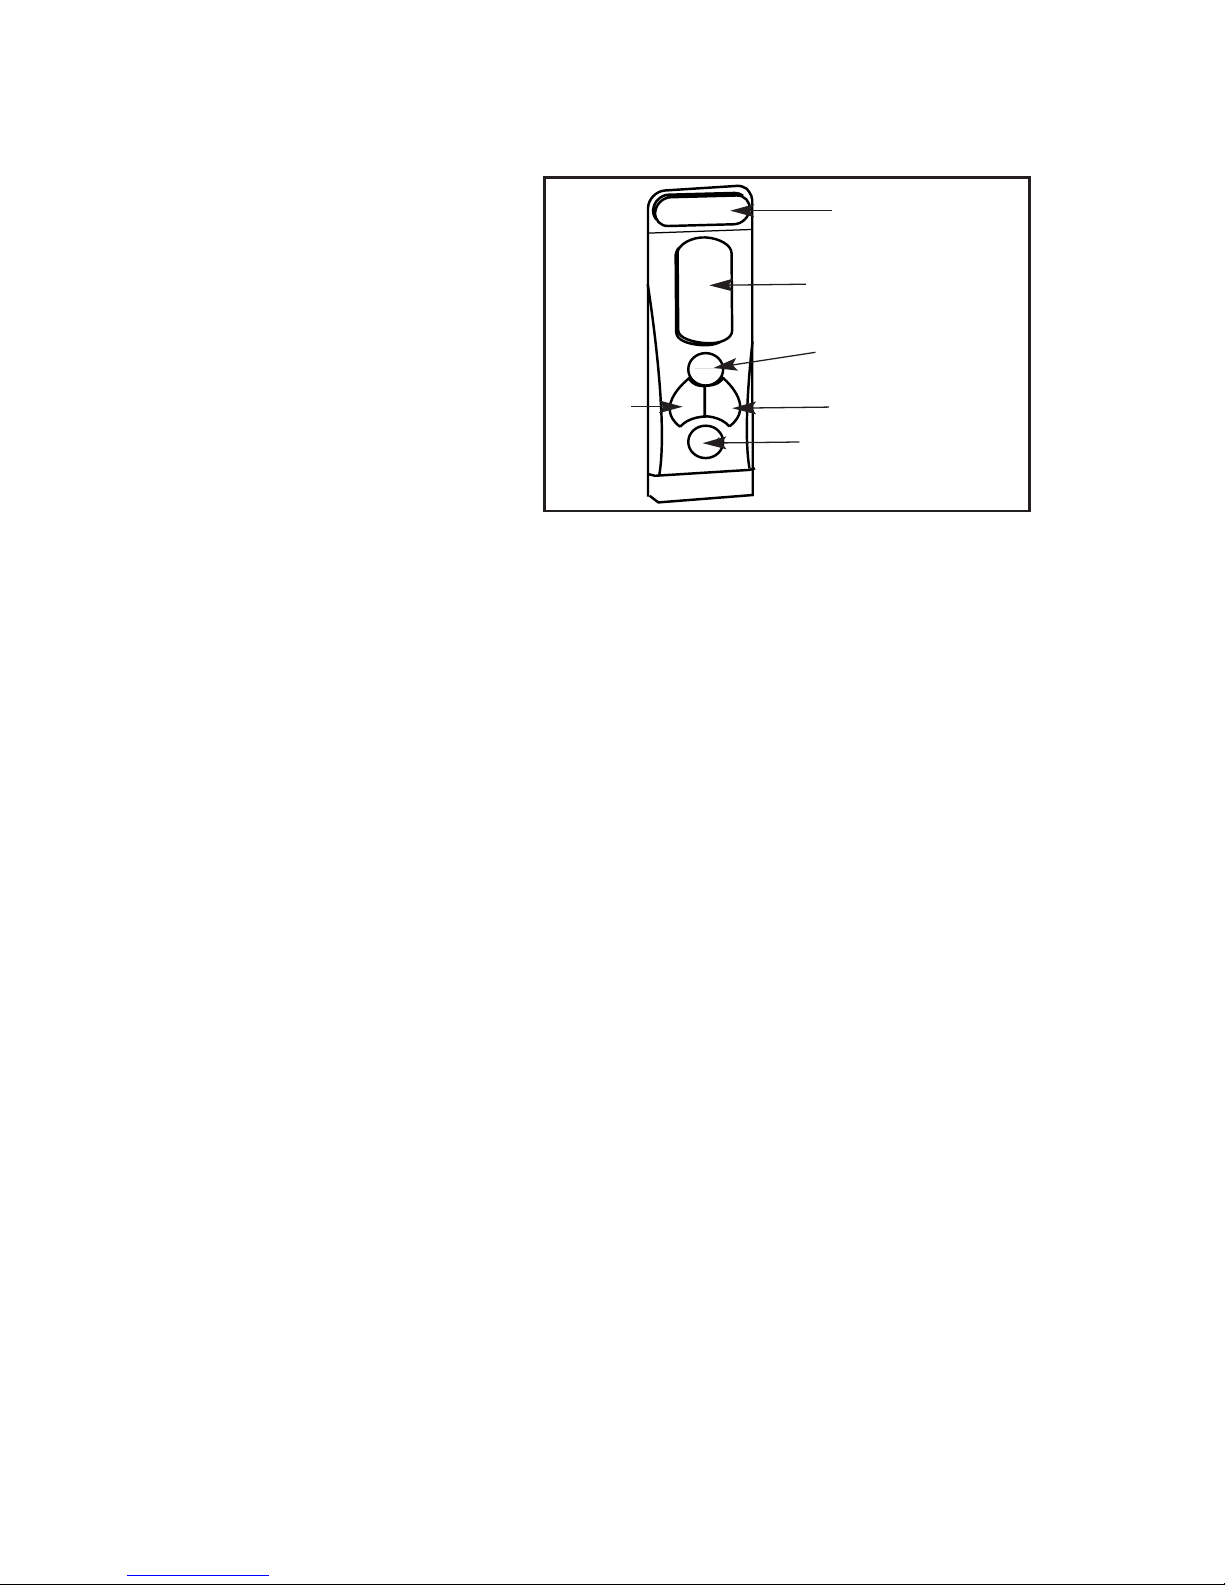
5. Press ON/OFF Button
once. The number "1"
will flash green in the
LED Display. This indicates the Mixer is turned
on and in standby mode.
If the LED does not light,
the Mixer is not in
standby mode. Press
ON/OFF Button a
second time to re-set
the Mixer.
6. Press either of the Speed Control Buttons to increase ("+" Up Button)
or decrease ("-" Down Button) the mixing speed. See
"Recommended Speed Guide" on page 10 for detailed information.
Press Speed Control Button once to change speed by one setting.
Hold Speed Control Button down to increase or decrease speed
rapidly.
Always start mixing with a slow speed setting. Then, adjust
speed setting higher to match consistency of the ingredients.
7. Press START/STOP Button once to begin mixing. The LED will stop
flashing and show the speed setting in a constant green.
Upon start-up, the Mixer motor starts slowly and gently increases
its speed to the selected speed setting. This prevents ingredients
from splattering.
Additional ingredients can be added slowly to the Mixing Bowl during operation.
8. Press either speed setting button to increase speed setting ("+"Up
Button) or decrease speed setting ("-" Down Button) as desired.
9. Press START/STOP Button once to stop mixing. The Mixer will
stop mixing and stay in standby mode (speed setting will flash).
Use a rubber or plastic spatula to scrape sides and bottom of
Mixing Bowl, as desired. Press START/STOP Button once to continue mixing until ingredients reach the desired consistency.
CAUTION: DO NOT scrape sides or bottom of Mixing Bowl
while Mixer is in operation.
MIXING (CONT.)
Release
Start
Stop
—
+
On/Off
16
SPEED
MIXER
Head Release
Button
LED Display
Start/Stop
Button
Up ButtonDown
Button
Power ON/OFF
Button
MIXING (CONT.)
10.Once all ingredients have reached the desired consistency, press
START/STOP Button to stop mixing. The green LED will flash to
indicate the Mixer is in standby mode.
11. Press ON/OFF Button to turn off power to Mixer.
12.Remove plug from electrical outlet. Gently tug the cord to fully
retract the cord into the Mixer Base.
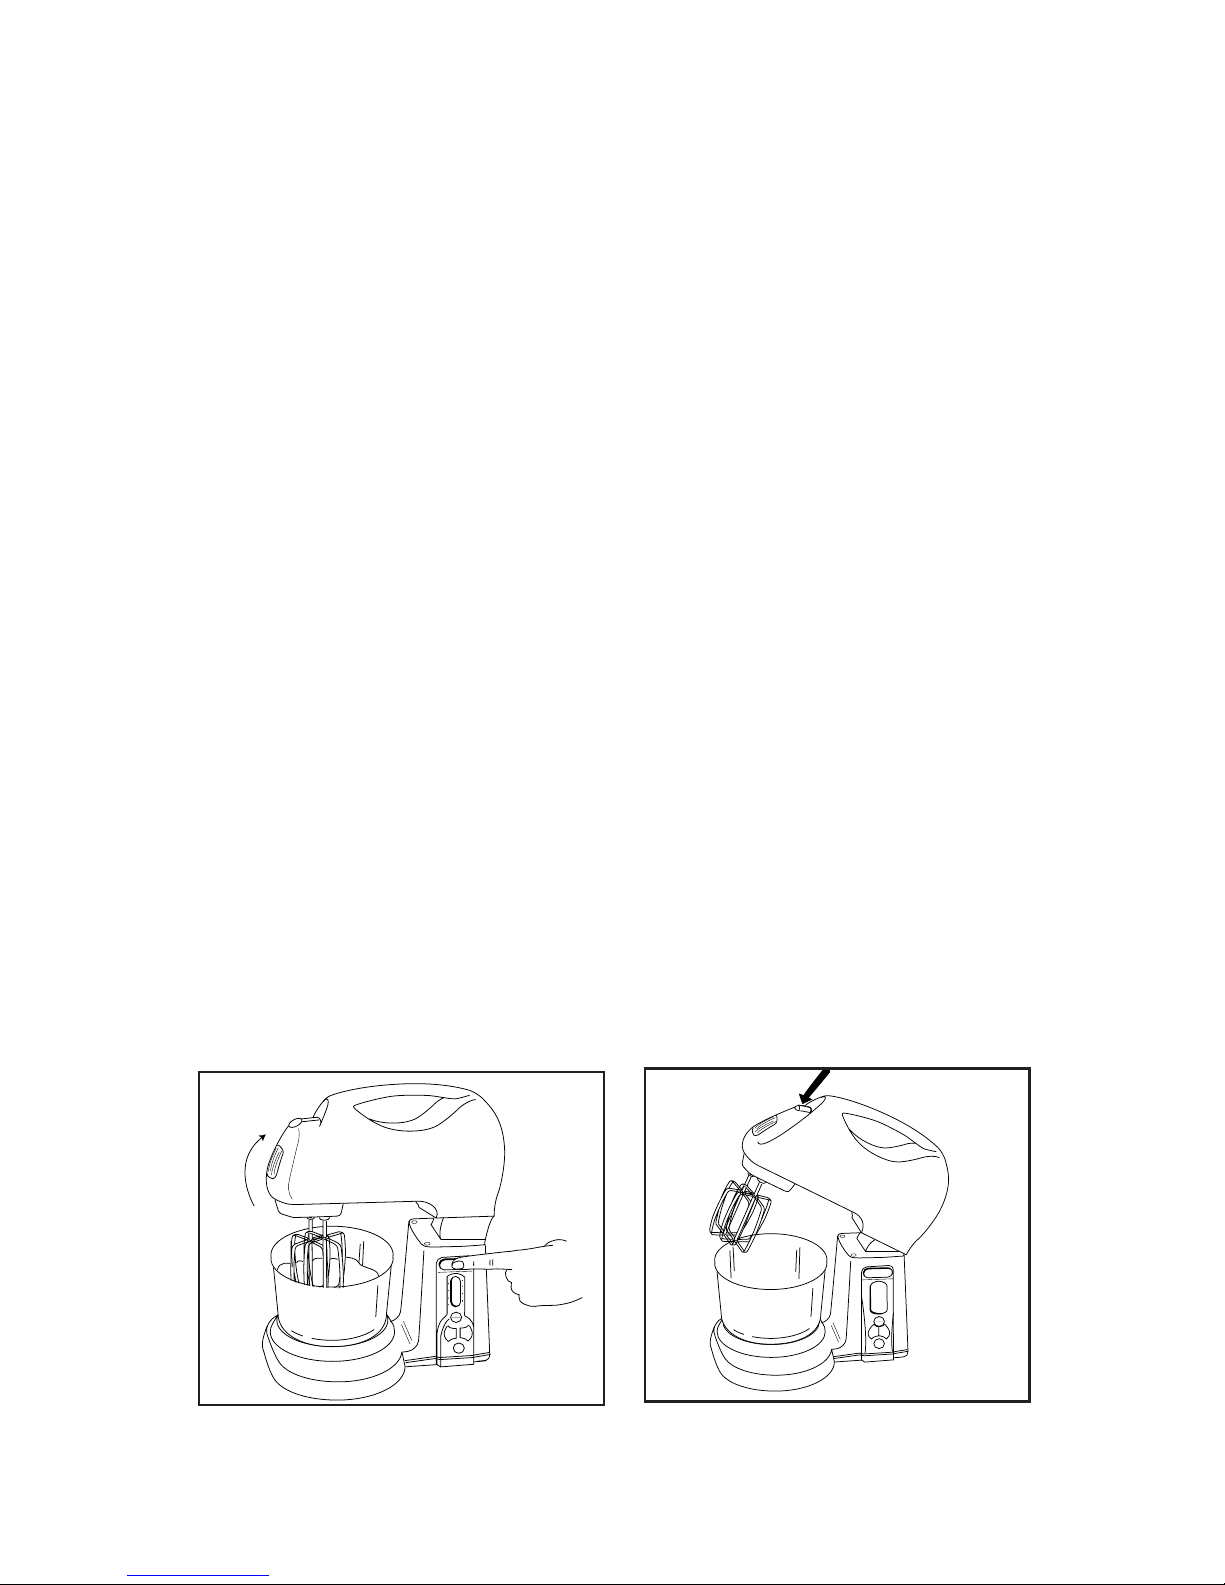
13. Press the Head Release Button and carefully raise the Mixer head.
See Figure 6.
14.Press down the Ejector Button while grasping the Beaters or Cookie
Dough Hooks to release them from the Mixer. See Figure 7.
15.Gently scrape excess batter from Beaters and Cookie Dough
Hooks with a rubber or plastic spatula. Do not strike Beaters or
Cookie Dough Hooks against Mixing Bowl to remove excess batter. This could damage the Mixer parts.
16.Carefully remove Mixing Bowl from Turntable. Pour batter from
Mixing Bowl into another container. Use only a rubber or plastic
spatula to remove batter from Mixing Bowl.
Release
Start
Stop
—
+
On/Off
16
SPEED
MIXER
Figure 7
8
START
STOP
ON/OFF
TILT RELEASE
4
8
12
16
2
6
10
14
LOW HIGH
Figure 6

IMPORTANT HINTS AND
INSTRUCTIONS
• During first use of your Mixer, you may notice an odor from the
motor. This is normal and will cease with continued operation.
• Never fill Mixing Bowl more than 1/2 full—the mixing action will
cause the ingredients to rise in the bowl. Mix large recipes in
several batches.
• Do not attempt to knead more than 8 ounces of heavy dough or
batter (heavy cookie dough or candy batter) at one time.
• A self-protection circuit automatically switches the Mixer to standby mode during overload. Reduce the amount of batter or adjust
the speed setting higher, to a more suitable setting, and press the
START/STOP Button to begin again.
• Always retract cord into Mixer Base when operation is completed
and when storing Mixer.
• To prevent the possibility of severe personal injury and/or damage
to the Mixer, keep hands and utensils out of Mixing Bowl during
operation.
• Always be sure ON/OFF Button is off and Mixer is unplugged
before inserting or removing Beaters or Cookie Dough Hooks.
9
 Loading...