

Fanvil X5 User Manual

<文档标题>
Fanvil Technology Co., Ltd
HQ Add: Level 3, Block A, Gaoxinqi Building, Anhua Industrial Park, Qianjin 1 Road, 35th District, Bao'An, Shenzhen, 518101 P.R. China
Tel: +86-755-2640-2199 Fax: +86-755-2640-2618 Email: sales@fanvil.com support@fanvil.com Beijing Tel:+86-10-5753-6809
Suzhou Tel: +86-512-6592-0605 SEA Tel: +60-3-512-21997
Document Version: 1.0
Software Version: 1.2.275
Release Date: 2015/1/25
User Manual
X5

<文档标题>
Fanvil Technology Co., Ltd
HQ Add: Level 3, Block A, Gaoxinqi Building, Anhua Industrial Park, Qianjin 1 Road, 35th District, Bao'An, Shenzhen, 518101 P.R. China
Tel: +86-755-2640-2199 Fax: +86-755-2640-2618 Email: sales@fanvil.com support@fanvil.com Beijing Tel:+86-10-5753-6809
Suzhou Tel: +86-512-6592-0605 SEA Tel: +60-3-512-21997
Table of Content
Figures ............................................................................................................................................................ 5
Tables ............................................................................................................................................................. 8
1 Safety Instruction ................................................................................................................................ 9
2 Overview ............................................................................................................................................ 10
3 Installation ......................................................................................................................................... 11
3.1 Use PoE or external Power Adapter ......................................................................................... 11
3.2 Desktop and Wall-mount Installation ....................................................................................... 12
4 Introduction to the Phone User Interface ....................................................................................... 14
4.1 Keypad ...................................................................................................................................... 14
4.2 Using Handset / Hands-free Speaker / Headphone ................................................................... 15
4.3 Screen User Interface ................................................................................................................ 16
4.4 Web Portal ................................................................................................................................ 17
5 Setting Up .......................................................................................................................................... 19
5.1 Network Configuration ............................................................................................................. 19
5.2 Line Configurations .................................................................................................................. 20
6 Using the Phone ................................................................................................................................. 25
6.1 Making Phone Calls .................................................................................................................. 25
6.1.1 Make / Receive Second Call ..................................................................................................... 29
6.1.2 Join / Split Two Calls (3-way Local Conference) ..................................................................... 30
6.1.3 Call Transfer ............................................................................................................................. 30
6.2 Using Phonebook ...................................................................................................................... 31
6.2.1 Add / Edit / Delete Contact ....................................................................................................... 32
6.2.2 Add / Edit / Delete Group ......................................................................................................... 33
6.2.3 Browse and Add / Remove Contacts in Group ......................................................................... 33
6.3 Using Cloud Phonebook ........................................................................................................... 34
6.3.1 Open Cloud Phonebook ............................................................................................................ 35
6.4 Call Logs ................................................................................................................................... 36
6.5 Voice Message .......................................................................................................................... 37
6.6 Do-Not-Disturb ......................................................................................................................... 38
6.7 Auto-Answering ....................................................................................................................... 40
6.8 Call Forward ............................................................................................................................. 41

<文档标题>
Fanvil Technology Co., Ltd
HQ Add: Level 3, Block A, Gaoxinqi Building, Anhua Industrial Park, Qianjin 1 Road, 35th District, Bao'An, Shenzhen, 518101 P.R. China
Tel: +86-755-2640-2199 Fax: +86-755-2640-2618 Email: sales@fanvil.com support@fanvil.com Beijing Tel:+86-10-5753-6809
Suzhou Tel: +86-512-6592-0605 SEA Tel: +60-3-512-21997
6.9 DSS LCD Configuration ........................................................................................................... 43
7 Phone Settings ................................................................................................................................... 45
7.1 Adjust Audio Volume ............................................................................................................... 45
7.2 Set Ring Tone Volume and Type.............................................................................................. 45
7.3 Adjust LCD Contrast ................................................................................................................ 45
7.4 Set Device Time/Date ............................................................................................................... 46
7.5 Reboot the Device ..................................................................................................................... 47
7.6 Reset to Factory Default ........................................................................................................... 47
8 Web Portal ......................................................................................................................................... 48
8.1 Web Portal Authentication ........................................................................................................ 48
8.2 Web Call ................................................................................................................................... 48
8.3 SYSTEM / Information ............................................................................................................ 49
8.4 SYSTEM / Account .................................................................................................................. 49
8.5 SYSTEM / Configurations ........................................................................................................ 50
8.6 SYSTEM / Upgrade .................................................................................................................. 50
8.7 SYSTEM / Auto Provision ....................................................................................................... 50
8.8 SYSTEM / Tools ...................................................................................................................... 50
8.9 NETWORK / Basic .................................................................................................................. 50
8.10 NETWORK / Advanced ........................................................................................................... 50
8.11 NETWORK / VPN ................................................................................................................... 51
8.12 LINES / SIP .............................................................................................................................. 51
8.13 LINES / Dial Peer ..................................................................................................................... 56
8.14 LINES / Dial Plan ..................................................................................................................... 59
8.15 LINES / Global Settings ........................................................................................................... 60
8.16 PHONE / Features .................................................................................................................... 60
8.17 PHONE / Audio ........................................................................................................................ 64
8.18 PHONE / MCAST .................................................................................................................... 65
8.19 PHONE / Time/Date ................................................................................................................. 66
8.20 PHONE / Advanced .................................................................................................................. 67
8.21 PHONEBOOK / Contacts ......................................................................................................... 67
8.22 PHONEBOOK / Cloud Phonebook .......................................................................................... 68
8.23 PHONEBOOK / Blacklist ........................................................................................................ 69
8.24 PHONEBOOK / Advanced ...................................................................................................... 69
8.25 CALL LOGS ............................................................................................................................ 69

<文档标题>
Fanvil Technology Co., Ltd
HQ Add: Level 3, Block A, Gaoxinqi Building, Anhua Industrial Park, Qianjin 1 Road, 35th District, Bao'An, Shenzhen, 518101 P.R. China
Tel: +86-755-2640-2199 Fax: +86-755-2640-2618 Email: sales@fanvil.com support@fanvil.com Beijing Tel:+86-10-5753-6809
Suzhou Tel: +86-512-6592-0605 SEA Tel: +60-3-512-21997
8.26 FUNCTION KEY / Function Key ............................................................................................ 70
8.27 FUNCTION KEY / Softkey ..................................................................................................... 71
9 Advanced Features ............................................................................................................................ 72
9.1 VPN .......................................................................................................................................... 72
9.1.1 L2TP ......................................................................................................................................... 72
9.1.2 OpenVPN .................................................................................................................................. 73
10 Trouble Shooting ............................................................................................................................... 74
10.1 Get Device System Information ............................................................................................... 74
10.2 Upgrade to the latest software .................................................................................................. 74
10.3 Reboot Device .......................................................................................................................... 75
10.4 Reset Device to Factory Default ............................................................................................... 75
10.5 Network Packets Capture .......................................................................................................... 75
10.6 Entering Post Mode and Recover System Image ...................................................................... 75
10.7 Common Trouble Cases............................................................................................................ 77
Appendix I - Icon Illustration..................................................................................................................... 79
Appendix II – Text Input from Keypad .................................................................................................... 80
Appendix III – LED Definition .................................................................................................................. 82

<文档标题>
Fanvil Technology Co., Ltd
HQ Add: Level 3, Block A, Gaoxinqi Building, Anhua Industrial Park, Qianjin 1 Road, 35th District, Bao'An, Shenzhen, 518101 P.R. China
Tel: +86-755-2640-2199 Fax: +86-755-2640-2618 Email: sales@fanvil.com support@fanvil.com Beijing Tel:+86-10-5753-6809
Suzhou Tel: +86-512-6592-0605 SEA Tel: +60-3-512-21997
Figures
Figure 1 - Desktop Installation ....................................................................................................... 12
Figure 2 - Change handset hook to wall-mount mode ............................................................... 12
Figure 3 - Wall-mount Installation .................................................................................................. 13
Figure 4 - Connecting to the Device ............................................................................................. 13
Figure 5 - Keypad ............................................................................................................................ 14
Figure 6 - Screen Layout / Default Standby Screen ................................................................... 16
Figure 7 - Vertical Scroll Bar .......................................................................................................... 17
Figure 8 - Check the Device’s IP Address ................................................................................... 17
Figure 9 - Web Portal Login Page ................................................................................................. 18
Figure 10 - Configure SIP Proxy Server Address ....................................................................... 20
Figure 11 - Configure SIP Proxy Server Port............................................................................... 20
Figure 12 - Configure SIP Username ........................................................................................... 21
Figure 13 - Configure Authentication Name ................................................................................ 21
Figure 14 - Configure SIP Authentication Password .................................................................. 21
Figure 15 - Configure Display Name ............................................................................................ 21
Figure 16 - Enable / Disable Outbound Proxy ............................................................................. 22
Figure 17 - Enable / Disable Sip Line ........................................................................................... 22
Figure 18 - Configure Advanced Line Options ............................................................................ 22
Figure 19 - Configure SIP Realm/Domain ................................................................................... 22
Figure 20 –Configure Unregistered Dial ....................................................................................... 22
Figure 21 - Enable / Disable Anonymous..................................................................................... 23
Figure 22 - Configure DTMF Mode ............................................................................................... 23
Figure 23 - Enable / Disable STUN .............................................................................................. 23
Figure 24 - Configure Local Port ................................................................................................... 23
Figure 25 - Configure Ring Type ................................................................................................... 23
Figure 26 - Configure MWI Number .............................................................................................. 23
Figure 27 - Configure Pickup Number .......................................................................................... 23
Figure 28 - Configure Park Number .............................................................................................. 23
Figure 29 - Configure Join Call Number....................................................................................... 24
Figure 30 - Enable / Disable Missed Call ..................................................................................... 24
Figure 31 - Enable / Disable Feature Sync .................................................................................. 24
Figure 32 - Enable / Disable SCA ................................................................................................. 24

<文档标题>
Fanvil Technology Co., Ltd
HQ Add: Level 3, Block A, Gaoxinqi Building, Anhua Industrial Park, Qianjin 1 Road, 35th District, Bao'An, Shenzhen, 518101 P.R. China
Tel: +86-755-2640-2199 Fax: +86-755-2640-2618 Email: sales@fanvil.com support@fanvil.com Beijing Tel:+86-10-5753-6809
Suzhou Tel: +86-512-6592-0605 SEA Tel: +60-3-512-21997
Figure 33 - Default Line .................................................................................................................. 25
Figure 34 - Dialing a Number before Audio Channel Opened .................................................. 26
Figure 35 - Dial a Number after Audio Channel Opened ........................................................... 26
Figure 36 - Calling Remote Party .................................................................................................. 27
Figure 37 - Incoming Call Screen .................................................................................................. 27
Figure 38 - Talking Mode Screen .................................................................................................. 28
Figure 39 - Call Holding Screen .................................................................................................... 28
Figure 40 - Dual Calls ..................................................................................................................... 29
Figure 41 - Conference Call ........................................................................................................... 30
Figure 42 - Phonebook screen ...................................................................................................... 31
Figure 43 - Phonebook is Empty ................................................................................................... 32
Figure 44 - Browsing Phonebook .................................................................................................. 32
Figure 45 - Add New Contact ......................................................................................................... 33
Figure 46 - Group List ..................................................................................................................... 33
Figure 47 - Browsing Contacts in a Group ................................................................................... 34
Figure 48 - Select (Add/Remove) Contacts in a Group ............................................................. 34
Figure 49 - Cloud Phonebook List ................................................................................................ 35
Figure 50 - Downloading Cloud Phonebook ................................................................................ 35
Figure 51 - Browsing Contacts in Cloud Phonebook ................................................................. 36
Figure 52 - Call Logs ....................................................................................................................... 36
Figure 53 - Filter Call Log Type ..................................................................................................... 37
Figure 54 - New Voice Message Notification ............................................................................... 37
Figure 55 - Voice Message Screen ............................................................................................... 38
Figure 56 - Configure the Voice Message Number .................................................................... 38
Figure 57 - DND Enabled on All Lines .......................................................................................... 39
Figure 58 - Configure DND on Line .............................................................................................. 39
Figure 59 - DND Enabled on Line1 ............................................................................................... 40
Figure 60 - Configure Auto-answering on Line1 ......................................................................... 40
Figure 61 - Auto-answering Enabled on Line1 ............................................................................ 41
Figure 62 - Select Line for Call Forward Configuration .............................................................. 42
Figure 63 - Select Call Forward Type ........................................................................................... 42
Figure 64 - Activate Call Forward and configure Call Forward Number .................................. 42
Figure 65 - Set Delay Time for Call Forward on No Answer ..................................................... 42
Figure 66 – DSS LCD Page Configuration Screen .................................................................... 43
Figure 67 – DSS LCD Screen Configuration ............................................................................... 44

<文档标题>
Fanvil Technology Co., Ltd
HQ Add: Level 3, Block A, Gaoxinqi Building, Anhua Industrial Park, Qianjin 1 Road, 35th District, Bao'An, Shenzhen, 518101 P.R. China
Tel: +86-755-2640-2199 Fax: +86-755-2640-2618 Email: sales@fanvil.com support@fanvil.com Beijing Tel:+86-10-5753-6809
Suzhou Tel: +86-512-6592-0605 SEA Tel: +60-3-512-21997
Figure 68 - Web Call Controls ....................................................................................................... 48
Figure 69 - Web Call, Entering Number and Select Line ........................................................... 49
Figure 70 - Global Substitution Configuration ............................................................................. 57
Figure 71 - Local Substitution Configuration ............................................................................... 57
Figure 72 - Add Prefixes Configuration ........................................................................................ 58
Figure 73 - Add Suffixes Configuration ......................................................................................... 58
Figure 74 – Deletion Configuration ............................................................................................... 59
Figure 75 – Softkey Configuration ................................................................................................. 71

<文档标题>
Fanvil Technology Co., Ltd
HQ Add: Level 3, Block A, Gaoxinqi Building, Anhua Industrial Park, Qianjin 1 Road, 35th District, Bao'An, Shenzhen, 518101 P.R. China
Tel: +86-755-2640-2199 Fax: +86-755-2640-2618 Email: sales@fanvil.com support@fanvil.com Beijing Tel:+86-10-5753-6809
Suzhou Tel: +86-512-6592-0605 SEA Tel: +60-3-512-21997
Tables
Table 1 - Time Settings Parameters .............................................................................................. 46
Table 2 - Line Configuration on Web ............................................................................................ 51
Table 3 - Global Settings for Lines on Web ................................................................................. 60
Table 4 - Common Phone Feature Settings on Web .................................................................. 61
Table 5 - Audio Settings on Web ................................................................................................... 64
Table 6 - MCAST Parameters on Web ......................................................................................... 66
Table 7 - Time/Date Setting Parameters on Web ....................................................................... 66
Table 8 – DSS Key Setting Parameters on Web ........................................................................ 70
Table 9 - Trouble Cases .................................................................................................................. 77
Table 10 - Keypad Icons ................................................................................................................. 79
Table 11 - Status Prompt and Notification Icons ......................................................................... 79
Table 12 - Look-up Table of Characters ....................................................................................... 80
Table 13 - DSS KEY LED State ..................................................................................................... 82
Table 14 - ENB LED State .............................................................................................................. 82

<文档标题>
Fanvil Technology Co., Ltd
HQ Add: Level 3, Block A, Gaoxinqi Building, Anhua Industrial Park, Qianjin 1 Road, 35th District, Bao'An, Shenzhen, 518101 P.R. China
Tel: +86-755-2640-2199 Fax: +86-755-2640-2618 Email: sales@fanvil.com support@fanvil.com Beijing Tel:+86-10-5753-6809
Suzhou Tel: +86-512-6592-0605 SEA Tel: +60-3-512-21997
1 Safety Instruction
Please read the following safety notices before installing or using this unit. They are crucial for the
safe and reliable operation of the device.
Please use the external power supply that is included in the package. Other power supply may
cause damage to the phone, affect the behavior or induce noise.
Before using the external power supply in the package, please check the home power voltage.
Inaccurate power voltage may cause fire and damage.
Please do not damage the power cord. If power cord or plug is impaired, do not use it, it may
cause fire or electric shock.
Do not drop, knock or shake the phone. Rough handling can break internal circuit boards.
This phone is design for indoor use. Do not install the device in places where there is direct
sunlight. Also do not put the device on carpets or cushions. It may cause fire or breakdown.
Avoid exposure the phone to high temperature or below 0℃ or high humidity.
Avoid wetting the unit with any liquid.
Do not attempt to open it. Non-expert handling of the device could damage it. Consult your
authorized dealer for help, or else it may cause fire, electric shock and breakdown.
Do not use harsh chemicals, cleaning solvents, or strong detergents to clean it. Wipe it with a
soft cloth that has been slightly dampened in a mild soap and water solution.
When lightning, do not touch power plug, it may cause an electric shock.
Do not install this phone in an ill-ventilated place. You are in a situation that could cause bodily
injury. Before you work on any equipment, be aware of the hazards involved with electrical
circuitry and be familiar with standard practices for preventing accidents.

<文档标题>
Fanvil Technology Co., Ltd
HQ Add: Level 3, Block A, Gaoxinqi Building, Anhua Industrial Park, Qianjin 1 Road, 35th District, Bao'An, Shenzhen, 518101 P.R. China
Tel: +86-755-2640-2199 Fax: +86-755-2640-2618 Email: sales@fanvil.com support@fanvil.com Beijing Tel:+86-10-5753-6809
Suzhou Tel: +86-512-6592-0605 SEA Tel: +60-3-512-21997
2 Overview
The new Fanvil X5 IP Phone is a high-end enterprise desktop phone which comes with an intelligent
DSS Key-mapping LCD to increase enterprise users’ productivity at a cost-effective price.
The DSS Key-mapping LCD is designed with intelligence to support dynamic usage to substitute
expansion modules. There are 8 DSS keys corresponded to the LCD display to provide dynamic
Line/DSS/BLF functions up to five pages at virtualized total 40 DSS keys. User may
configure/customize each DSS key in each page. Every DSS key has a LED indication in green, red,
and yellow colors to reflect the key state. There is also one DSS event notification button to notify
user whenever there is an event in other page(s). A page shortcut button is also designed to allow
user to quickly switch between pages. X5 is the most economic choice for SMB office and enterprise
supervisors.
Evolved from Fanvil’s C62/C66 enterprise IP phones, X5 pushes its high-end cost-effective
enterprise IP phone to another level. X5 inherits all enterprise features from Fanvil’s C-Series
enterprise phones, such as HD voice in handset, headset, and full-duplex speakerphone modes,
PoE, Fast/Gigabit Ethernet, QoS, secure transmission, auto-provisioning, and more.
X5 is a great office productivity appliance for enterprise users. The old DSS key label is inconvenient
and not environmental friendly. X5’s intelligent DSS Key-mapping LCD provides users the flexibility
to change DSS key definition and display through easy configuration. Meanwhile, with its intelligent
design of the DSS key/LCD, it can be multiplied as expansion modules to save space and cost. X5
will provide the best user experience to advance enterprise users.”
In order to help some users who are interested to read every detail of the product, this user manual
is provided as a user’s reference guide. Still, the document might not be up to date with the newly
release software, so please kindly download updated user manual from Fanvil website, or contact
with Fanvil support if you have any question using X5.

<文档标题>
Fanvil Technology Co., Ltd
HQ Add: Level 3, Block A, Gaoxinqi Building, Anhua Industrial Park, Qianjin 1 Road, 35th District, Bao'An, Shenzhen, 518101 P.R. China
Tel: +86-755-2640-2199 Fax: +86-755-2640-2618 Email: sales@fanvil.com support@fanvil.com Beijing Tel:+86-10-5753-6809
Suzhou Tel: +86-512-6592-0605 SEA Tel: +60-3-512-21997
3 Installation
3.1 Use PoE or external Power Adapter
X5, called as ‘the device’ hereafter, supports two power supply modes, power supply from external
power adapter or 802.3af Class 2 Power over Ethernet (PoE) complied switch (PoE support also
applies to X5G).
PoE power supply saves the space and cost of providing the device additional power outlet. With a
PoE switch, the device can be powered through a single Ethernet cable which is also used for data
transmission. By attaching UPS system to PoE switch, the device can keep working at power outage
just like traditional PSTN telephone which is powered by the telephone line.
For users who do not have PoE equipment, the traditional power adaptor should be used. If the
device is connected to a PoE switch and power adapter at the same time, the power adapter will be
used in priority and will switch to PoE power supply at power failure on the power adapter.
Please use the power adapter supplied by Fanvil and the PoE switch met the specifications to
ensure the device worked properly.
<文档标题>
Fanvil Technology Co., Ltd
HQ Add: Level 3, Block A, Gaoxinqi Building, Anhua Industrial Park, Qianjin 1 Road, 35th District, Bao'An, Shenzhen, 518101 P.R. China
Tel: +86-755-2640-2199 Fax: +86-755-2640-2618 Email: sales@fanvil.com support@fanvil.com Beijing Tel:+86-10-5753-6809
Suzhou Tel: +86-512-6592-0605 SEA Tel: +60-3-512-21997
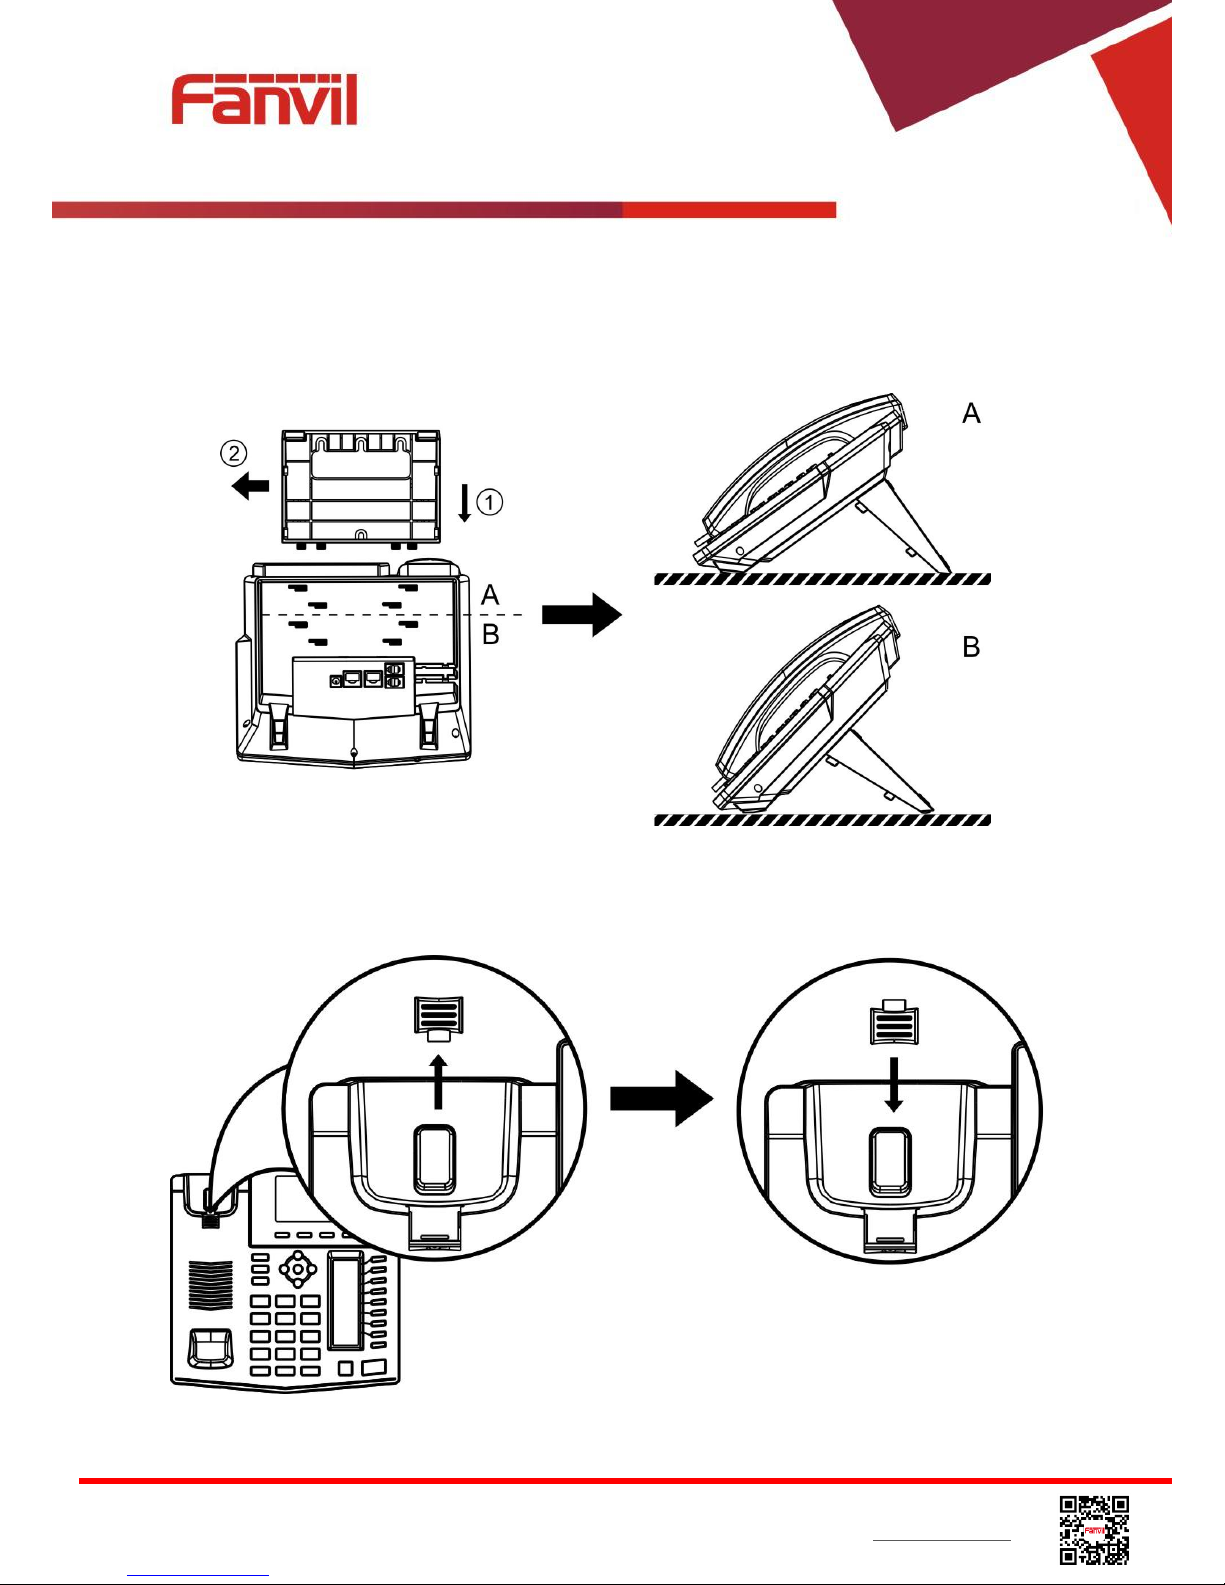
3.2 Desktop and Wall-mount Installation
The device supports two installation mode, desktop and wall-mount. To set up the phone to be used
on desktop, please follow the instructions in below picture to install the device.
Figure 1 - Desktop Installation
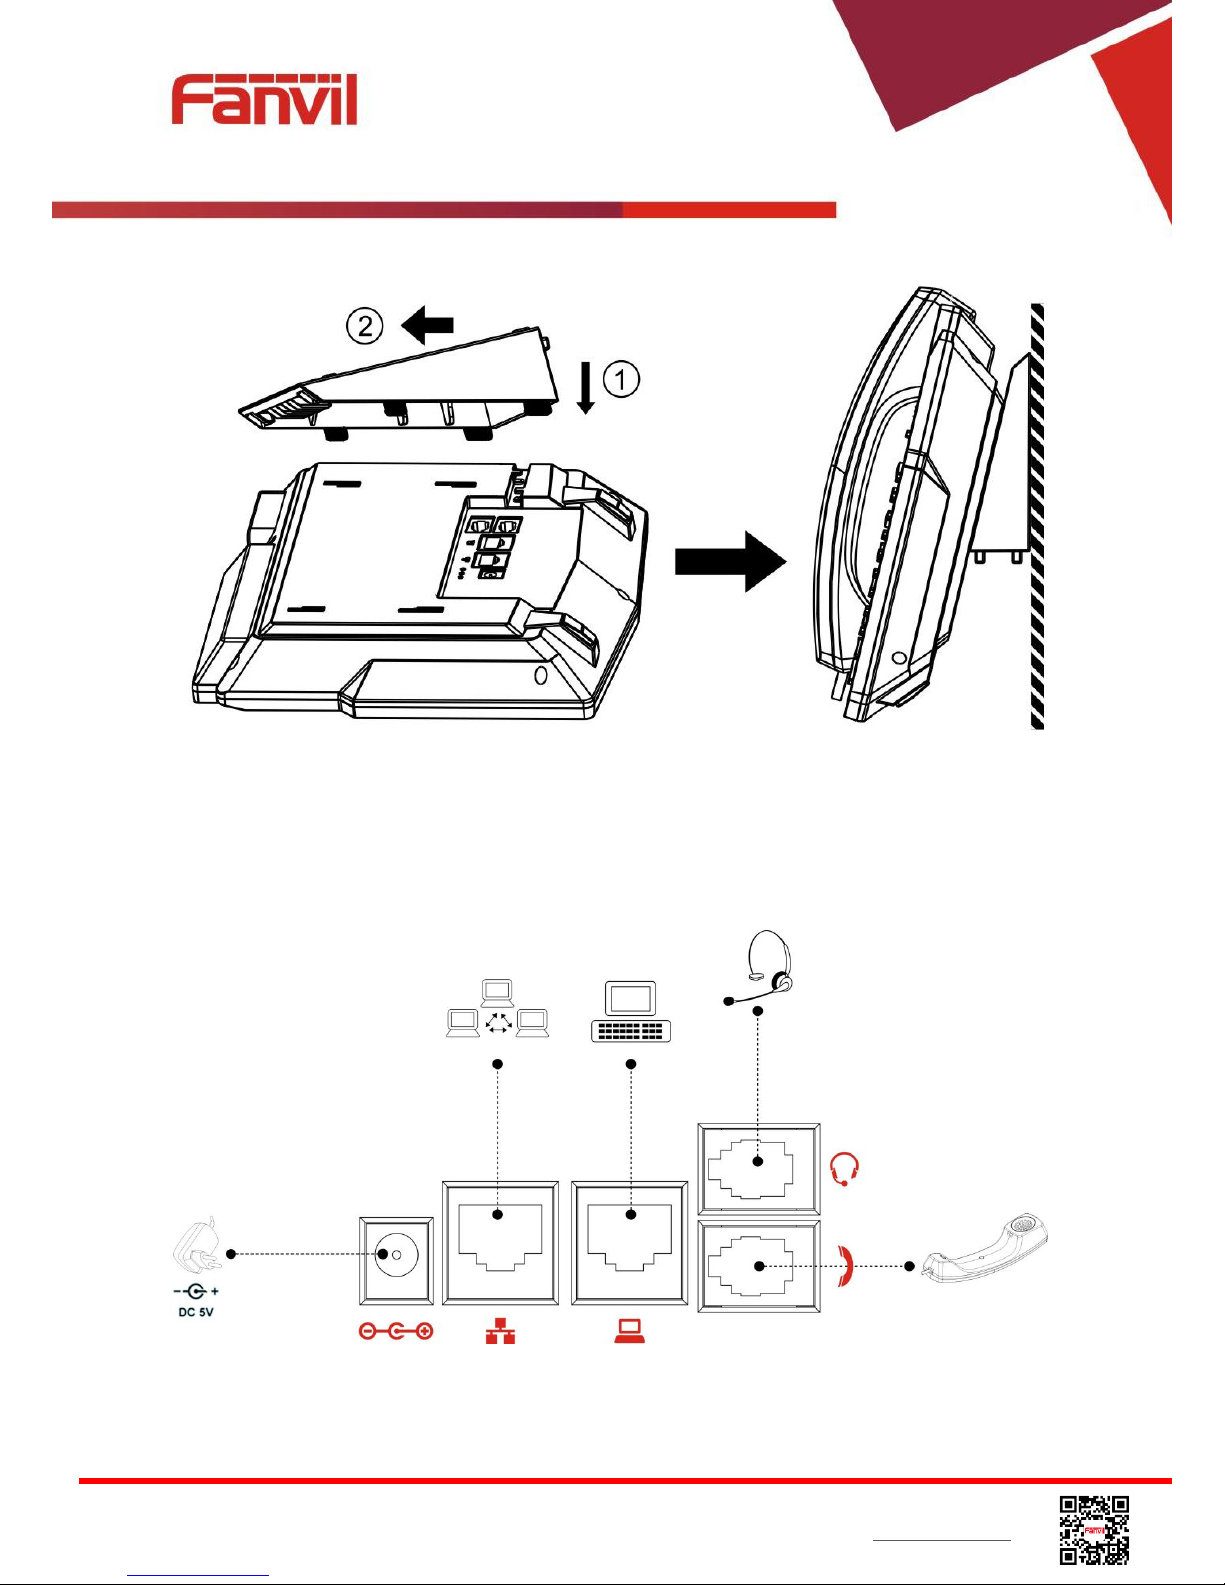
To mount the device on the wall, please follow the instructions in below picture.
Figure 2 - Change handset hook to wall-mount mode
<文档标题>
Fanvil Technology Co., Ltd
HQ Add: Level 3, Block A, Gaoxinqi Building, Anhua Industrial Park, Qianjin 1 Road, 35th District, Bao'An, Shenzhen, 518101 P.R. China
Tel: +86-755-2640-2199 Fax: +86-755-2640-2618 Email: sales@fanvil.com support@fanvil.com Beijing Tel:+86-10-5753-6809
Suzhou Tel: +86-512-6592-0605 SEA Tel: +60-3-512-21997
Figure 3 - Wall-mount Installation
Please connect power adapter, network, PC, handset, and headphone to the corresponding ports as
described in below picture.
Figure 4 - Connecting to the Device
NOTICE! Power adapter is optional for both X5 and X5G model
<文档标题>
Fanvil Technology Co., Ltd
HQ Add: Level 3, Block A, Gaoxinqi Building, Anhua Industrial Park, Qianjin 1 Road, 35th District, Bao'An, Shenzhen, 518101 P.R. China
Tel: +86-755-2640-2199 Fax: +86-755-2640-2618 Email: sales@fanvil.com support@fanvil.com Beijing Tel:+86-10-5753-6809
Suzhou Tel: +86-512-6592-0605 SEA Tel: +60-3-512-21997
4 Introduction to the Phone User Interface
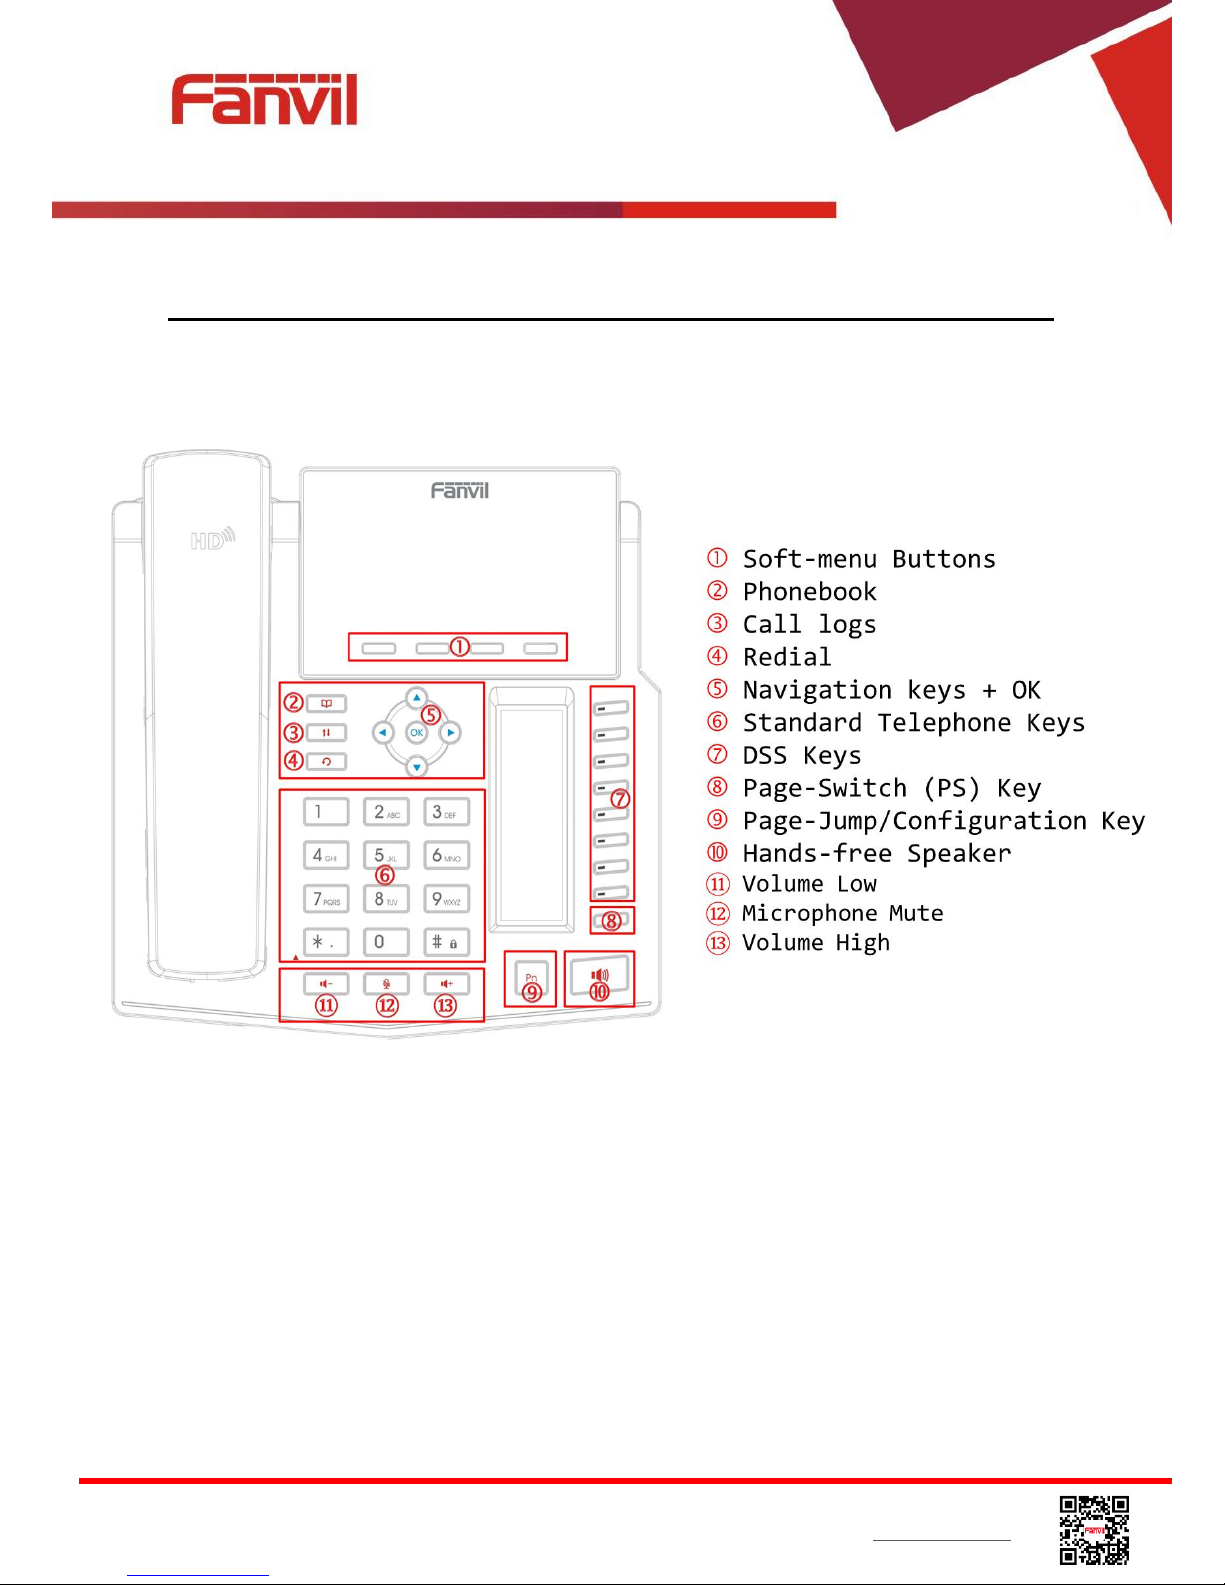
4.1 Keypad
Figure 5 - Keypad
The above picture shows the keypad layout of the device. Each key provides its own specific
function. User should refer to the illustration in this section about the usage of each key and the
description in this document about each function.
Some keys support long-pressing function. User can press and hold the key for 1.5 seconds to
trigger the long-pressed function.

<文档标题>
Fanvil Technology Co., Ltd
HQ Add: Level 3, Block A, Gaoxinqi Building, Anhua Industrial Park, Qianjin 1 Road, 35th District, Bao'An, Shenzhen, 518101 P.R. China
Tel: +86-755-2640-2199 Fax: +86-755-2640-2618 Email: sales@fanvil.com support@fanvil.com Beijing Tel:+86-10-5753-6809
Suzhou Tel: +86-512-6592-0605 SEA Tel: +60-3-512-21997
Soft-menu Buttons – These four buttons provide different functions corresponding to the
soft-menu displayed on the screen.
Standard Telephone Keys – The 12 standard telephone keys provide the same function as
standard telephones, but further to the standard function, some keys also provide special
function by long-pressing the key,
Key # - Long-pressed to lock the phone. (Default PIN is 123)
Key Pn - Long-pressed to open DSS LCD page configuration.
Navigation Keys – User can press up/down navigator keys to change line focus in talking
screen or move cursor in a screen with list items; in some configuration or text editor screen,
user can press left/right navigator keys to switch option or move cursor to the left / right.
Redial – By pressing ‘Redial’ button, user can redial the last dialed number.
Call logs – By pressing ‘Call logs’ button, user open call logs as a shortcut.
Phonebook – By pressing ‘Phonebook’ button, user open phonebook as a shortcut.
Hands-free Speaker – By pressing this button once, user can turn on the audio channel of
hands-free speaker
Page–Switch – By pressing this button once, user can switch DSS LCD page one by one.
Pn / Page-Jump – By pressing this button with a number which ranges from 1 - 5, user can
switch specific DSS LCD page.
Volume Low – In standby, ringing, ring configuration screen, user can press this button to lower
the ringtone volume; in talking and audio volume adjustment screen, user can press this button
to lower the audio volume.
Microphone Mute – User can mute the microphone with this button during talking mode.
Volume High – In standby, ringing, ring configuration screen, user can press this button to
increase the ringtone volume; in talking and audio volume adjustment screen, user can press
this button to increase the audio volume.
4.2 Using Handset / Hands-free Speaker / Headphone
Using Handset
To talk over handset, user should lift the handset off the device and dial the number, or dial the
number first, then lift the handset and the number will be dialed. User can switch audio channel to
handset by lifting the handset when audio channel is opened in speaker or headphone.
Using Hands-free Speaker
<文档标题>
Fanvil Technology Co., Ltd
HQ Add: Level 3, Block A, Gaoxinqi Building, Anhua Industrial Park, Qianjin 1 Road, 35th District, Bao'An, Shenzhen, 518101 P.R. China
Tel: +86-755-2640-2199 Fax: +86-755-2640-2618 Email: sales@fanvil.com support@fanvil.com Beijing Tel:+86-10-5753-6809
Suzhou Tel: +86-512-6592-0605 SEA Tel: +60-3-512-21997
To talk over hands-free speaker, user should press the hands-free button then dial the number, or
dial the number first then press the hands-free button. User can switch audio channel to the speaker
from handset by pressing the hands-free button when audio channel is opened in handset.
Using Headphone
To use headphone, by default, user should headset button which is defined by DSS key to turn on
the headphone. Same as handset and hands-free speaker, user can dial the number before or after
headphone turned on.
Using Line Keys(Defined by DSS Key)
User can use line key to make or answer a call on specific line. If handset has been lifted, the audio
channel will be opened in handset, otherwise, the audio channel will be opened in hands-free
speaker or headphone.
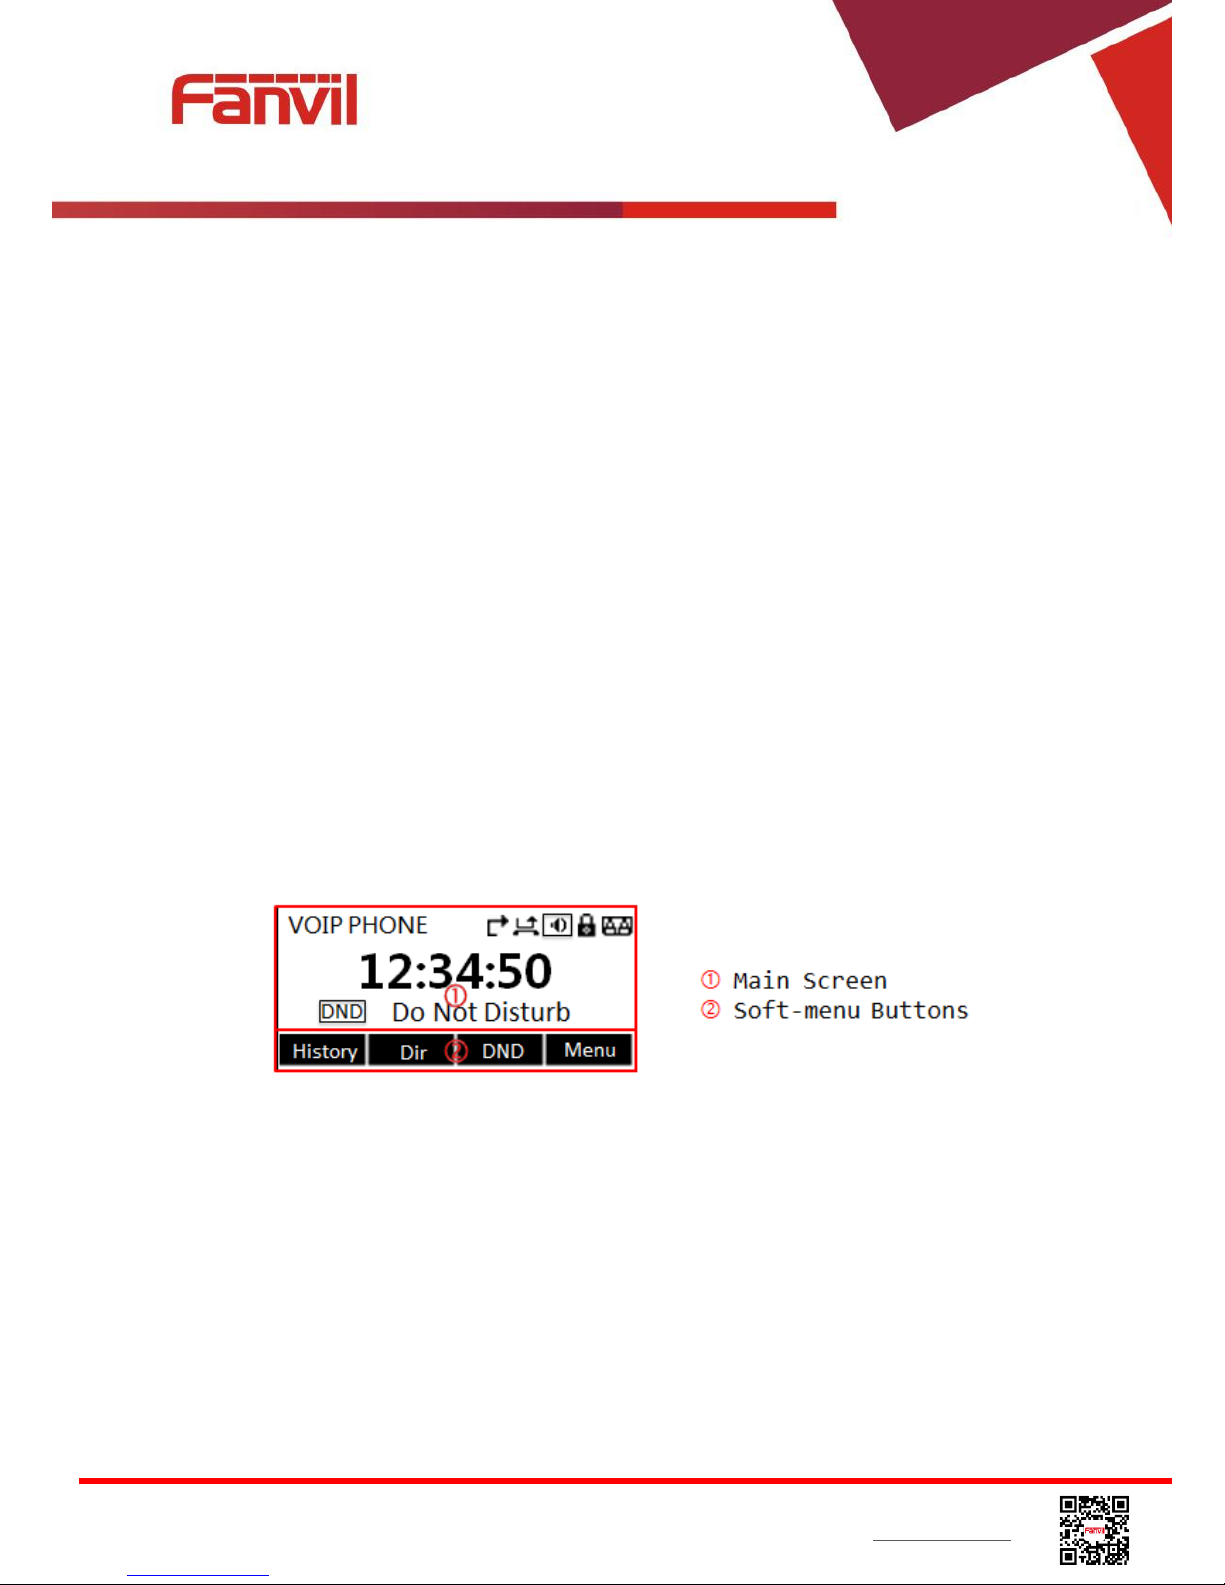
4.3 Screen User Interface
Figure 6 - Screen Layout / Default Standby Screen
The screen user interface is mostly presented in the above layout except some prompt messages.
The upper area is the main screen to display the device’s status and information or data for viewing
or editing. The lower area is the software menu (soft-menu) buttons which will change against user’s
action or device’s status.
The above picture shows the default standby screen which is also the root of the soft-menu. The
default standby screen shows the greeting words and effective feature indications like voice
message, missed call, auto-answering, do-not-disturb, call forward, lock state, and the network
<文档标题>
Fanvil Technology Co., Ltd
HQ Add: Level 3, Block A, Gaoxinqi Building, Anhua Industrial Park, Qianjin 1 Road, 35th District, Bao'An, Shenzhen, 518101 P.R. China
Tel: +86-755-2640-2199 Fax: +86-755-2640-2618 Email: sales@fanvil.com support@fanvil.com Beijing Tel:+86-10-5753-6809
Suzhou Tel: +86-512-6592-0605 SEA Tel: +60-3-512-21997
connectivity. User can get back to the default standby screen mostly by lifting and putting by the
handset.
The icon illustration is described in Appendix I - Icon Illustration.
In some screens, there are more items or long text to be displayed which could not fit into the screen.
They will be arranged in a list or multiple lines with a scroll bar. If user sees a scroll bar, user can use
up/down navigator buttons to scroll the list. By long-pressed the navigator keys, user can scroll the
list or items in a faster speed.
Figure 7 - Vertical Scroll Bar
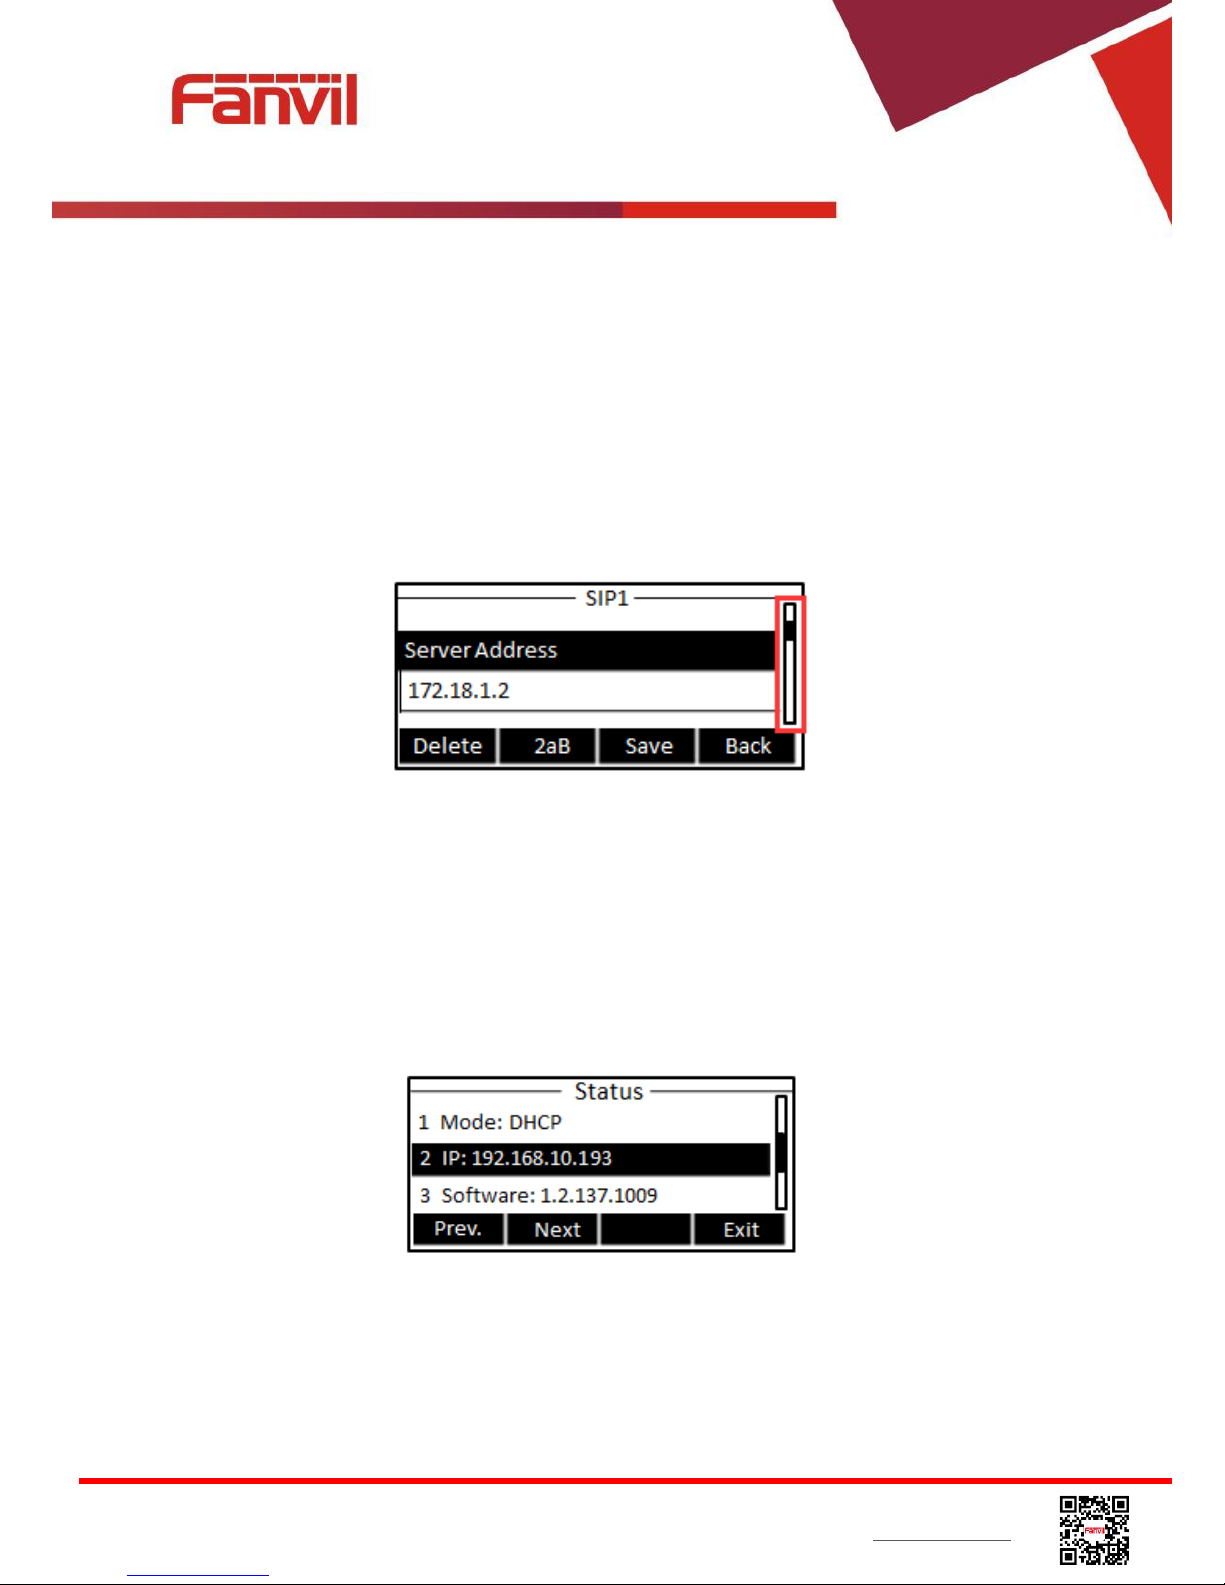
4.4 Web Portal
User can also use the device’s web portal to manage or operate the device. User should open the
device’s web portal page by entering the device’s IP address in a browser. To get the device IP
address, user could press the soft-menu button [Menus] -> [Status] or by pressing [Down] navigator
key.
Figure 8 - Check the Device’s IP Address
<文档标题>
Fanvil Technology Co., Ltd
HQ Add: Level 3, Block A, Gaoxinqi Building, Anhua Industrial Park, Qianjin 1 Road, 35th District, Bao'An, Shenzhen, 518101 P.R. China
Tel: +86-755-2640-2199 Fax: +86-755-2640-2618 Email: sales@fanvil.com support@fanvil.com Beijing Tel:+86-10-5753-6809
Suzhou Tel: +86-512-6592-0605 SEA Tel: +60-3-512-21997
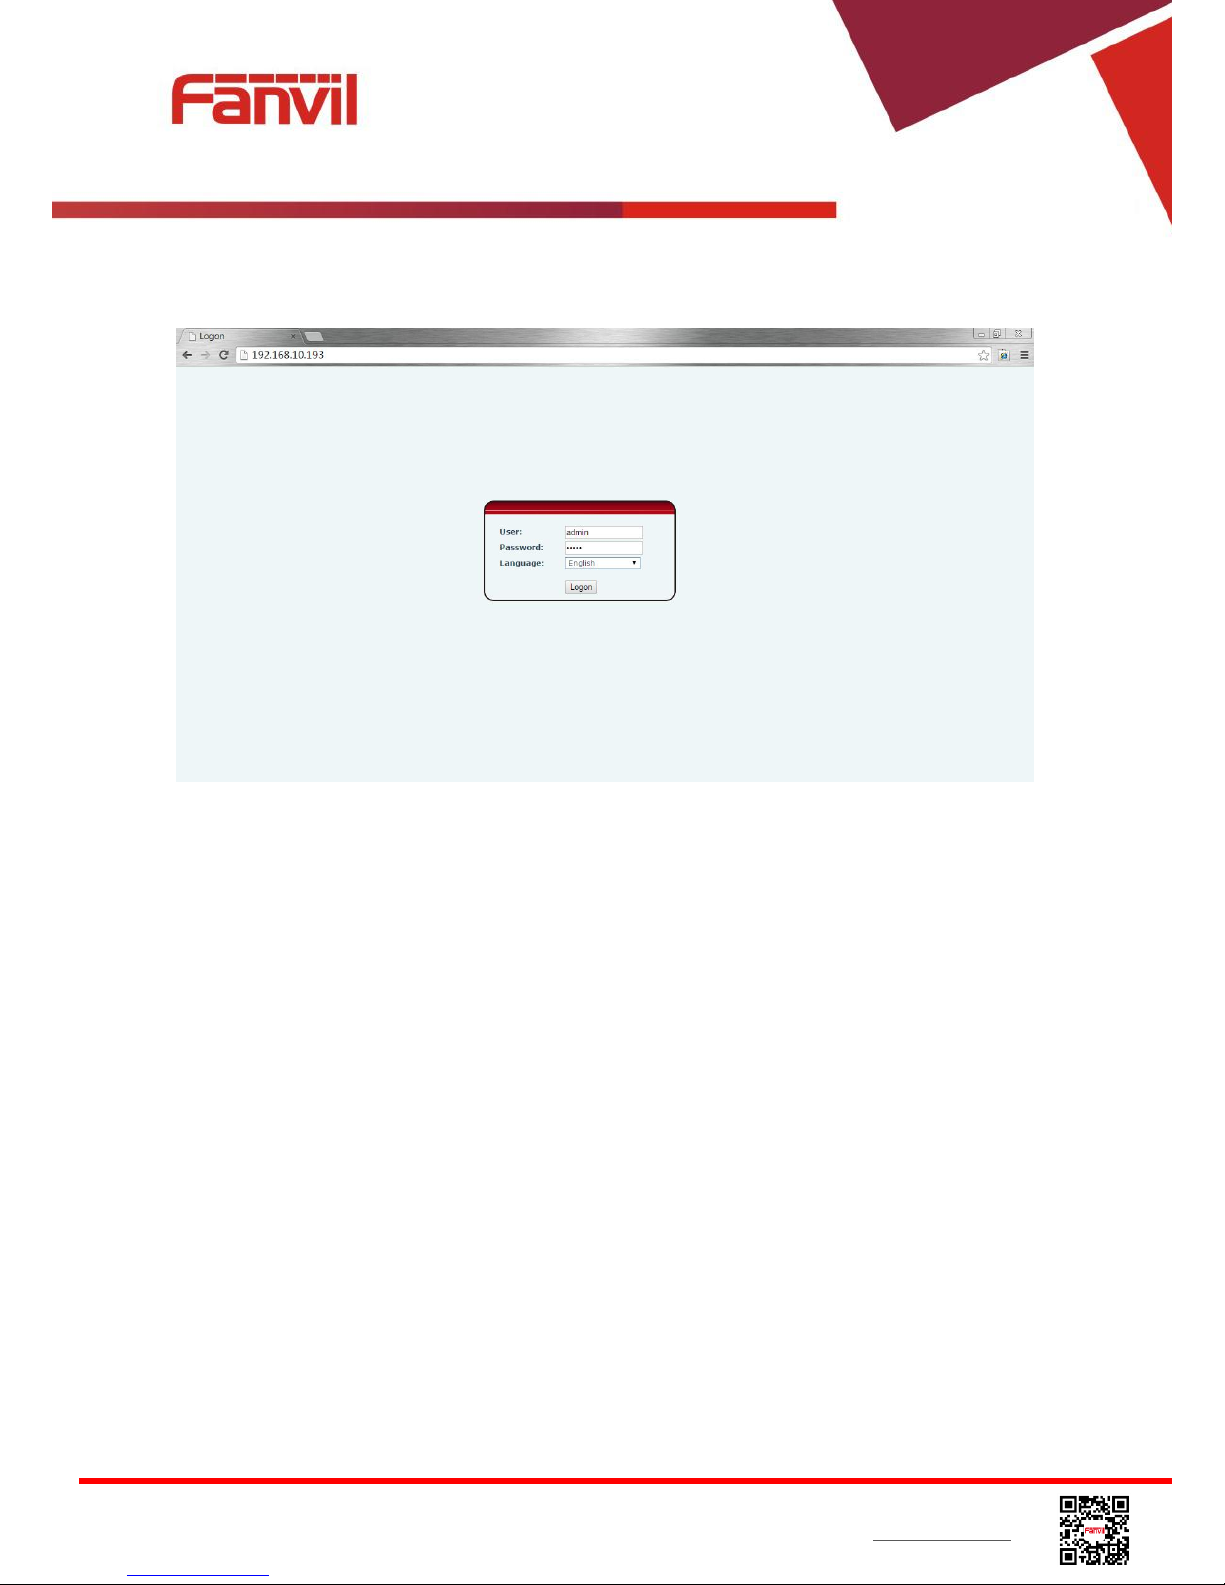
The first screen of the device’s web portal is the login page.
Figure 9 - Web Portal Login Page
User must enter the username and password to log in to the web portal. The default username and
password are both ‘admin’. For the detail of web portal operations, please refer to 8 Web Portal.

<文档标题>
Fanvil Technology Co., Ltd
HQ Add: Level 3, Block A, Gaoxinqi Building, Anhua Industrial Park, Qianjin 1 Road, 35th District, Bao'An, Shenzhen, 518101 P.R. China
Tel: +86-755-2640-2199 Fax: +86-755-2640-2618 Email: sales@fanvil.com support@fanvil.com Beijing Tel:+86-10-5753-6809
Suzhou Tel: +86-512-6592-0605 SEA Tel: +60-3-512-21997
5 Setting Up
In order to get the device ready for making and receiving phone calls, the device must be configured
with correct network configurations and at least one of the lines must be configured with an IP
telephony service.
5.1 Network Configuration
The device relies on IP network connection to provide service. Unlike traditional phone system
based on a circuit switched wire technology, IP devices are connected to each other over the
network and exchange data in packet basis based on the devices’ IP address.
To enable the device, the network parameters must be configured properly first. To configure
network parameters, user should open the network configuration screen through soft-menu [Menu]
-> [Settings] -> [Advanced Settings] -> [Network] -> [Network Settings] from standby screen.
NOTICE! If user saw a ‘WAN Disconnected’ icon flashing in the middle of screen, it
means the network cable was not correctly connected to the device’s network port. Please
check the cable is connected correctly to the device and to the network switch, router, or
modem.
There are three common IP configuration modes.
Dynamic Host Configuration Protocol (DHCP) – This is the automatic configuration mode by
getting network configurations from a DHCP server. Users need not to configure any
parameters manually. All configuration parameters will be getting from DHCP server and
applied to the device. This is recommended for most users.
Static IP Configuration – This option allows user to configure each IP parameters manually,
including IP Address, Subnet Mask, Default Gateway, and DNS servers. This is usually used in
an office environment or by power users.
PPPoE – This option is often used by users who connect the device to a broadband modem or
router. To establish a PPPoE connection, user should configure username and password
provided by the service provider.
The device is default configured in DHCP mode.
<文档标题>
Fanvil Technology Co., Ltd
HQ Add: Level 3, Block A, Gaoxinqi Building, Anhua Industrial Park, Qianjin 1 Road, 35th District, Bao'An, Shenzhen, 518101 P.R. China
Tel: +86-755-2640-2199 Fax: +86-755-2640-2618 Email: sales@fanvil.com support@fanvil.com Beijing Tel:+86-10-5753-6809
Suzhou Tel: +86-512-6592-0605 SEA Tel: +60-3-512-21997
5.2 Line Configurations
A line must be configured properly to be able to provide telephony service. The line configuration is
like a virtualized SIM card. Just like a SIM card on a mobile phone, it stores the service provider and
the account information used for registration and authentication. When the device is applied with the
configuration, it will register the device to the service provider with the server’s address and user’s
authentication as stored in the configurations.
To configure a line manually, user may open the line configuration screen through soft-menu button
[Menu] -> [Settings] -> [Advanced Settings] -> [Accounts] -> [SIP1] / [SIP2] / [SIP3] / [SIP4] / [SIP5] /
[SIP6] -> [Basic Settings] from the standby screen.
NOTICE! User must enter correct PIN code to be able to advanced settings to edit line
configuration. (The default PIN is 123)
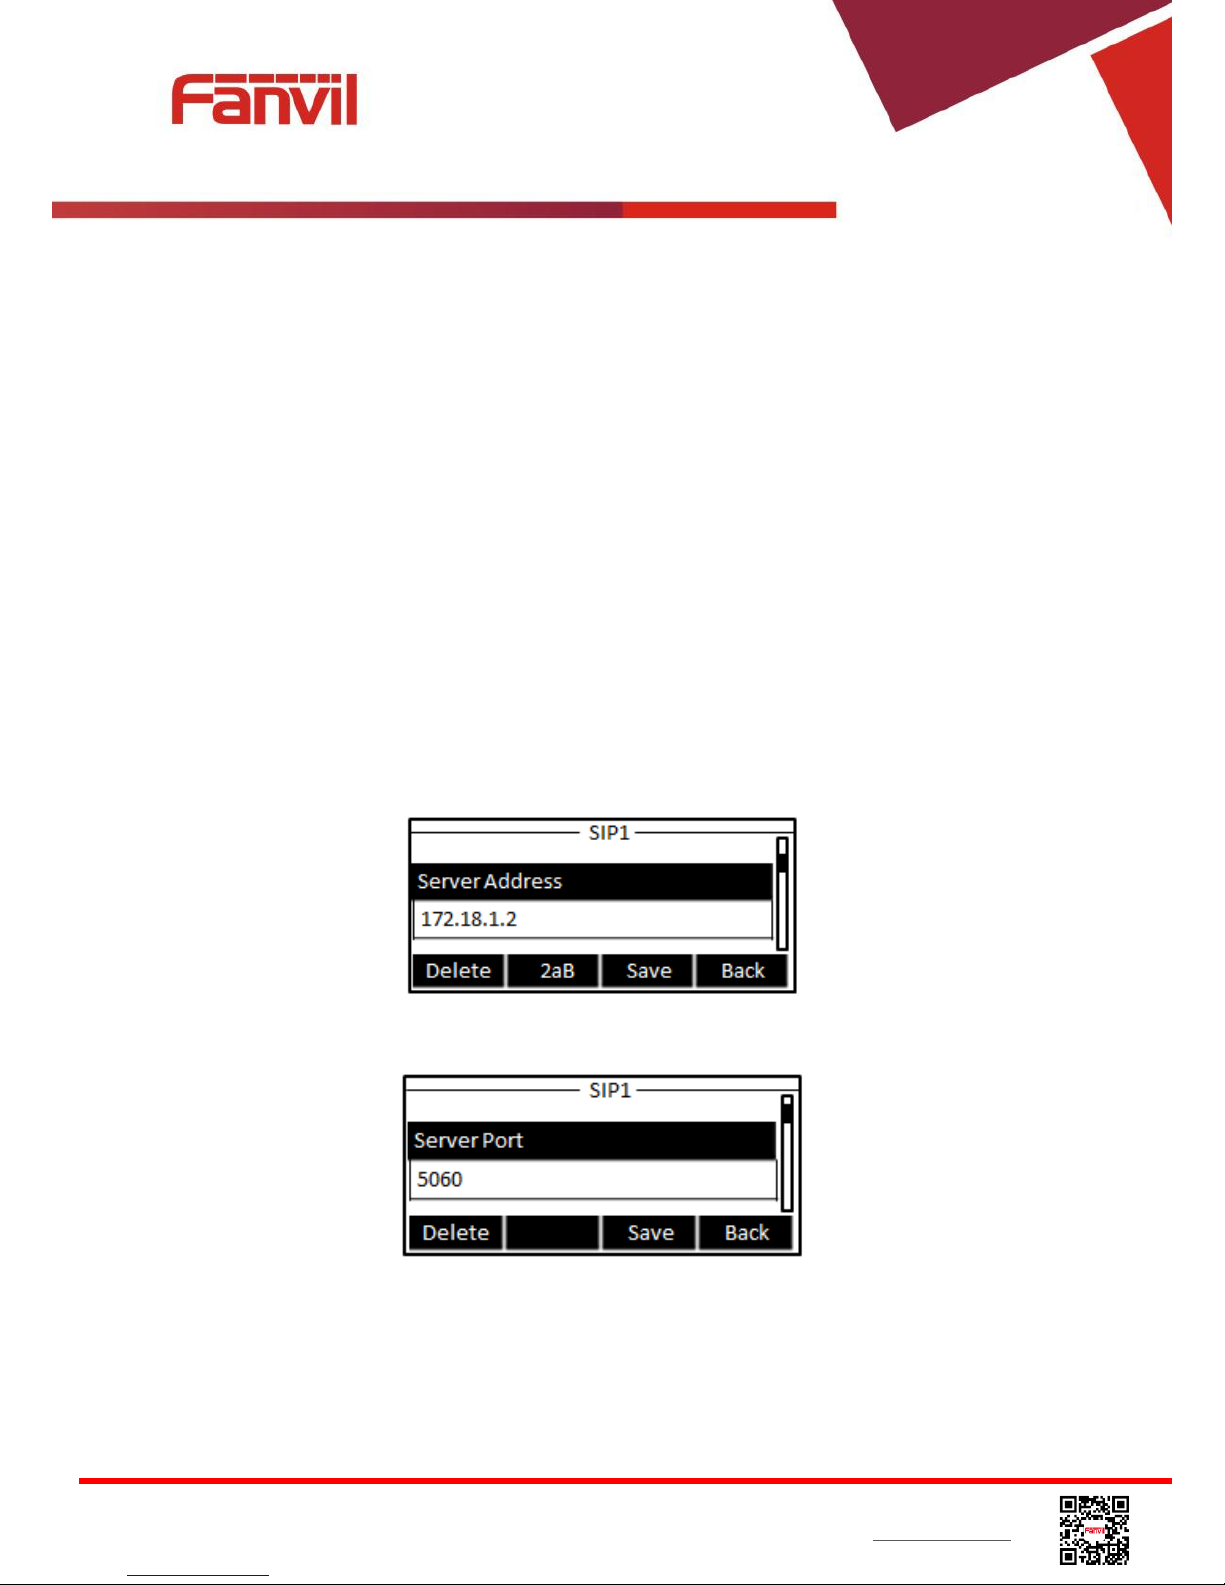
The parameters and screens are listed in below pictures.
Figure 10 - Configure SIP Proxy Server Address
Figure 11 - Configure SIP Proxy Server Port
<文档标题>
Fanvil Technology Co., Ltd
HQ Add: Level 3, Block A, Gaoxinqi Building, Anhua Industrial Park, Qianjin 1 Road, 35th District, Bao'An, Shenzhen, 518101 P.R. China
Tel: +86-755-2640-2199 Fax: +86-755-2640-2618 Email: sales@fanvil.com support@fanvil.com Beijing Tel:+86-10-5753-6809
Suzhou Tel: +86-512-6592-0605 SEA Tel: +60-3-512-21997
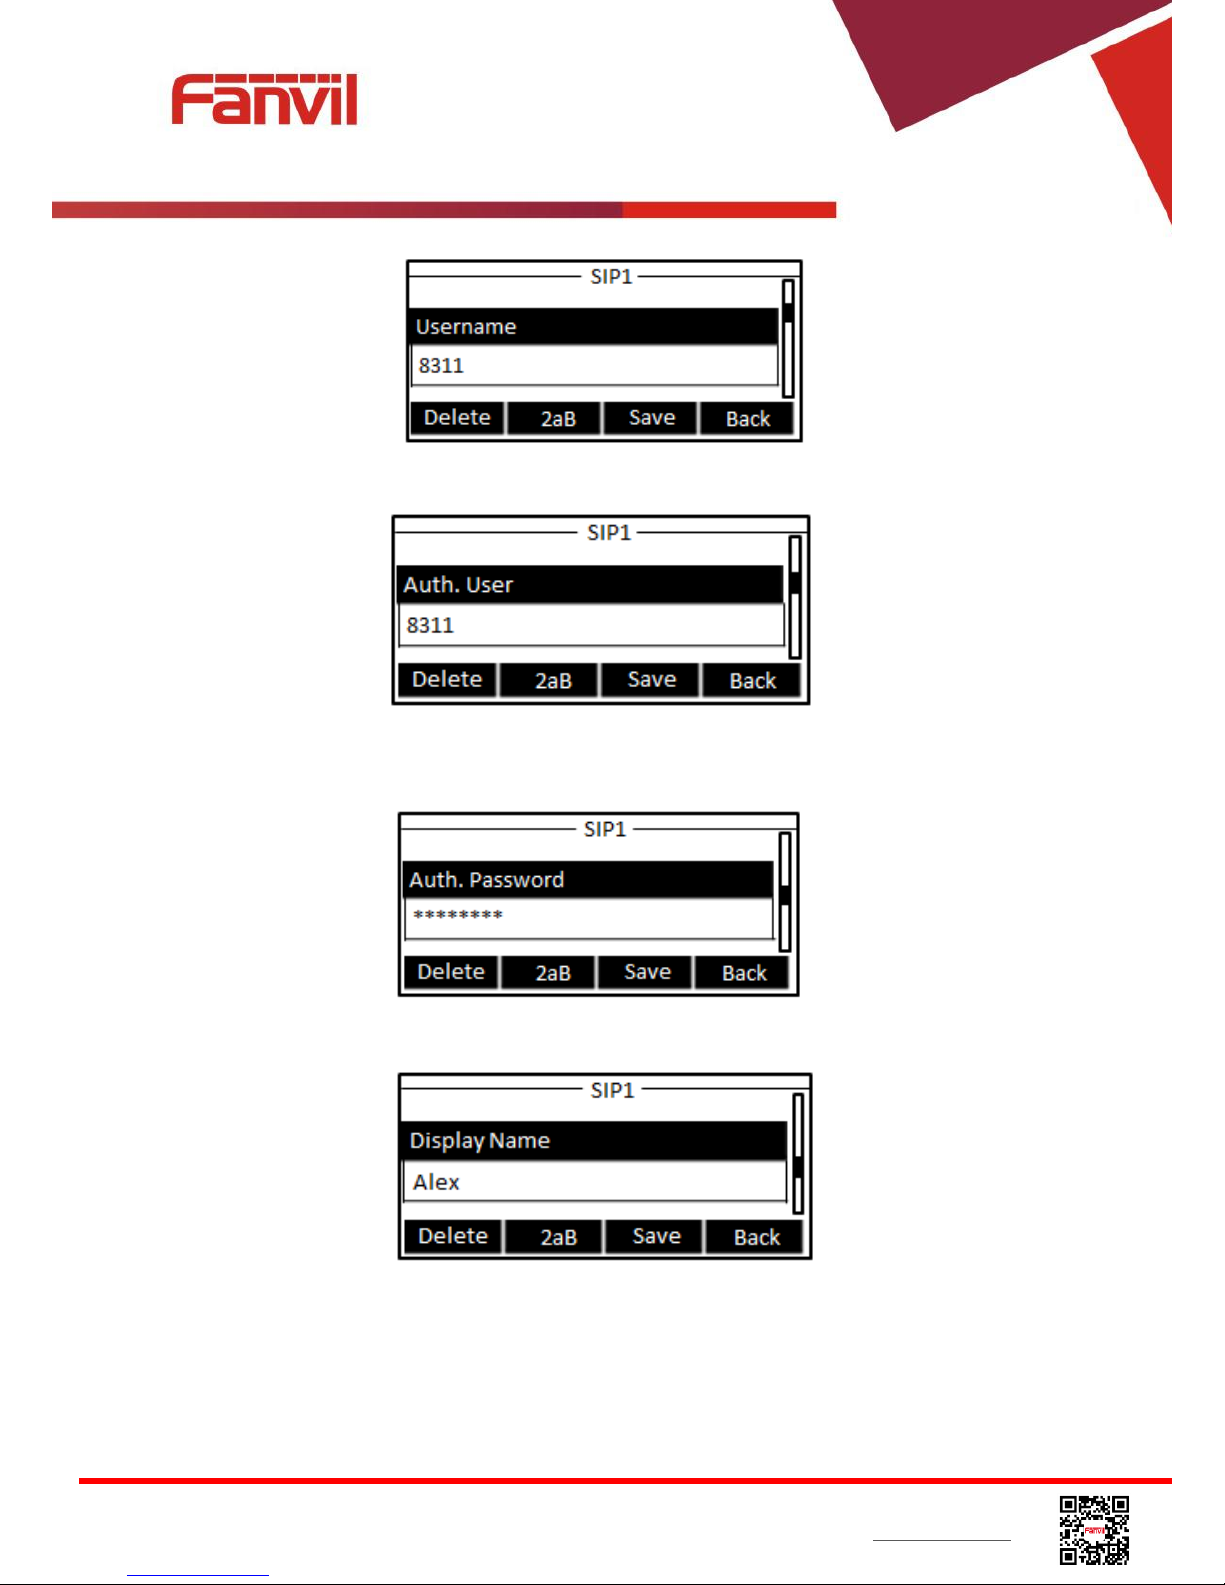
Figure 12 - Configure SIP Username
Figure 13 - Configure Authentication Name
Figure 14 - Configure SIP Authentication Password
Figure 15 - Configure Display Name
<文档标题>
Fanvil Technology Co., Ltd
HQ Add: Level 3, Block A, Gaoxinqi Building, Anhua Industrial Park, Qianjin 1 Road, 35th District, Bao'An, Shenzhen, 518101 P.R. China
Tel: +86-755-2640-2199 Fax: +86-755-2640-2618 Email: sales@fanvil.com support@fanvil.com Beijing Tel:+86-10-5753-6809
Suzhou Tel: +86-512-6592-0605 SEA Tel: +60-3-512-21997
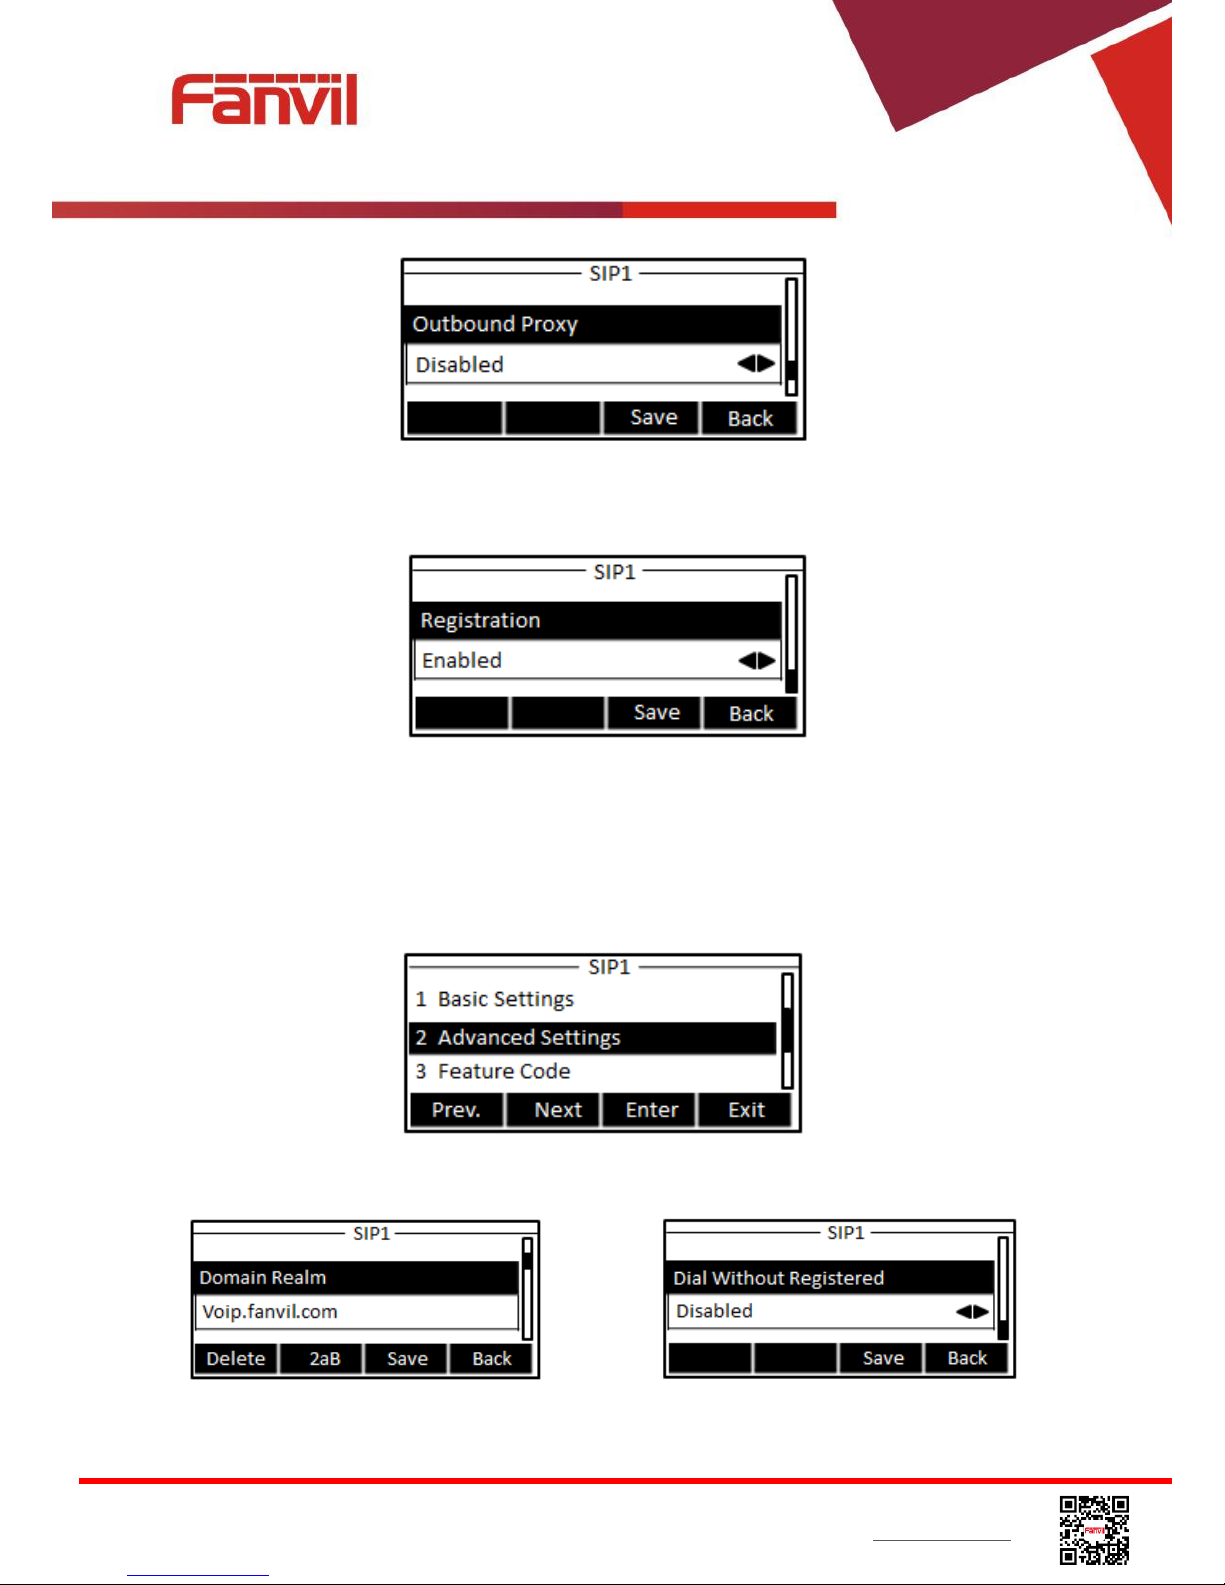
Figure 16 - Enable / Disable Outbound Proxy
Figure 17 - Enable / Disable Sip Line
Save the adjustment by pressing [OK] or [Save] when done.
For users who want to configure more options, user should use web management portal to modify or
Advanced Settings in accounts on the individual line to configure those options.
Figure 18 - Configure Advanced Line Options
Figure 19 - Configure SIP Realm/Domain
Figure 20 –Configure Unregistered Dial
<文档标题>
Fanvil Technology Co., Ltd
HQ Add: Level 3, Block A, Gaoxinqi Building, Anhua Industrial Park, Qianjin 1 Road, 35th District, Bao'An, Shenzhen, 518101 P.R. China
Tel: +86-755-2640-2199 Fax: +86-755-2640-2618 Email: sales@fanvil.com support@fanvil.com Beijing Tel:+86-10-5753-6809
Suzhou Tel: +86-512-6592-0605 SEA Tel: +60-3-512-21997
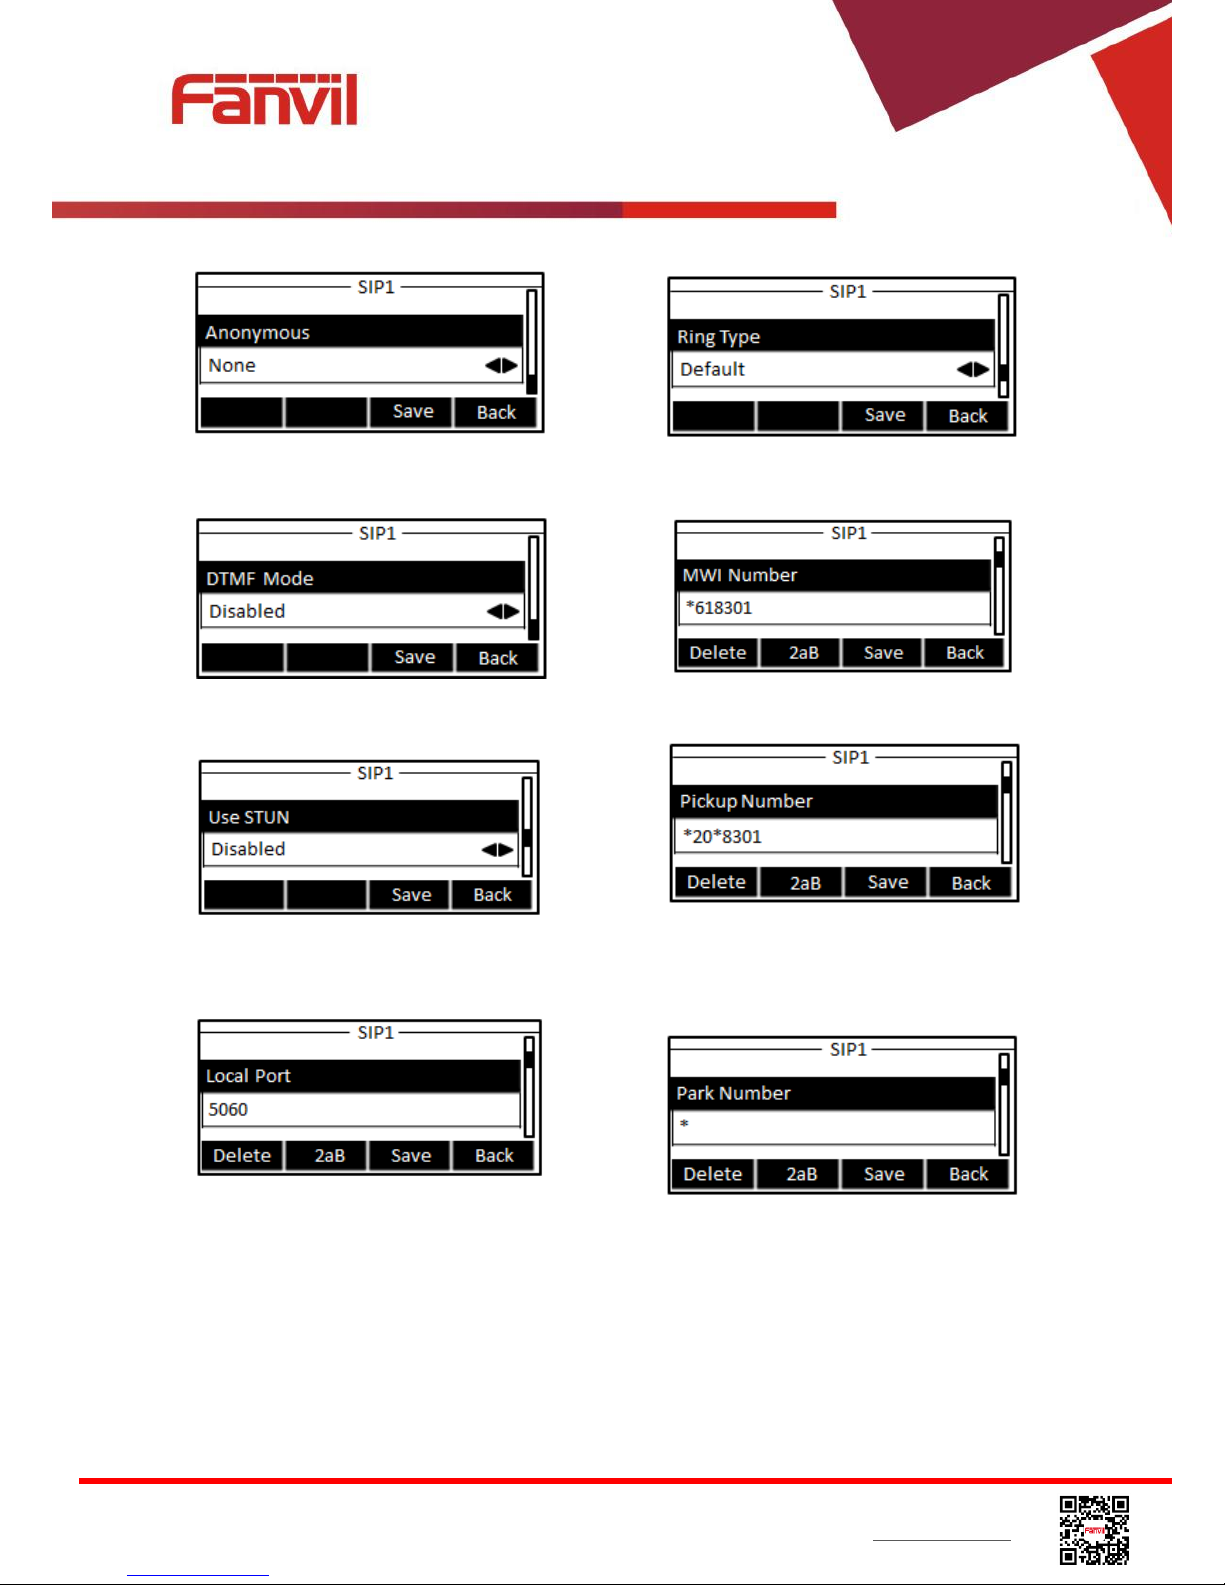
Figure 21 - Enable / Disable Anonymous
Figure 22 - Configure DTMF Mode
Figure 23 - Enable / Disable STUN
Figure 24 - Configure Local Port
Figure 25 - Configure Ring Type
Figure 26 - Configure MWI Number
Figure 27 - Configure Pickup Number
Figure 28 - Configure Park Number
<文档标题>
Fanvil Technology Co., Ltd
HQ Add: Level 3, Block A, Gaoxinqi Building, Anhua Industrial Park, Qianjin 1 Road, 35th District, Bao'An, Shenzhen, 518101 P.R. China
Tel: +86-755-2640-2199 Fax: +86-755-2640-2618 Email: sales@fanvil.com support@fanvil.com Beijing Tel:+86-10-5753-6809
Suzhou Tel: +86-512-6592-0605 SEA Tel: +60-3-512-21997
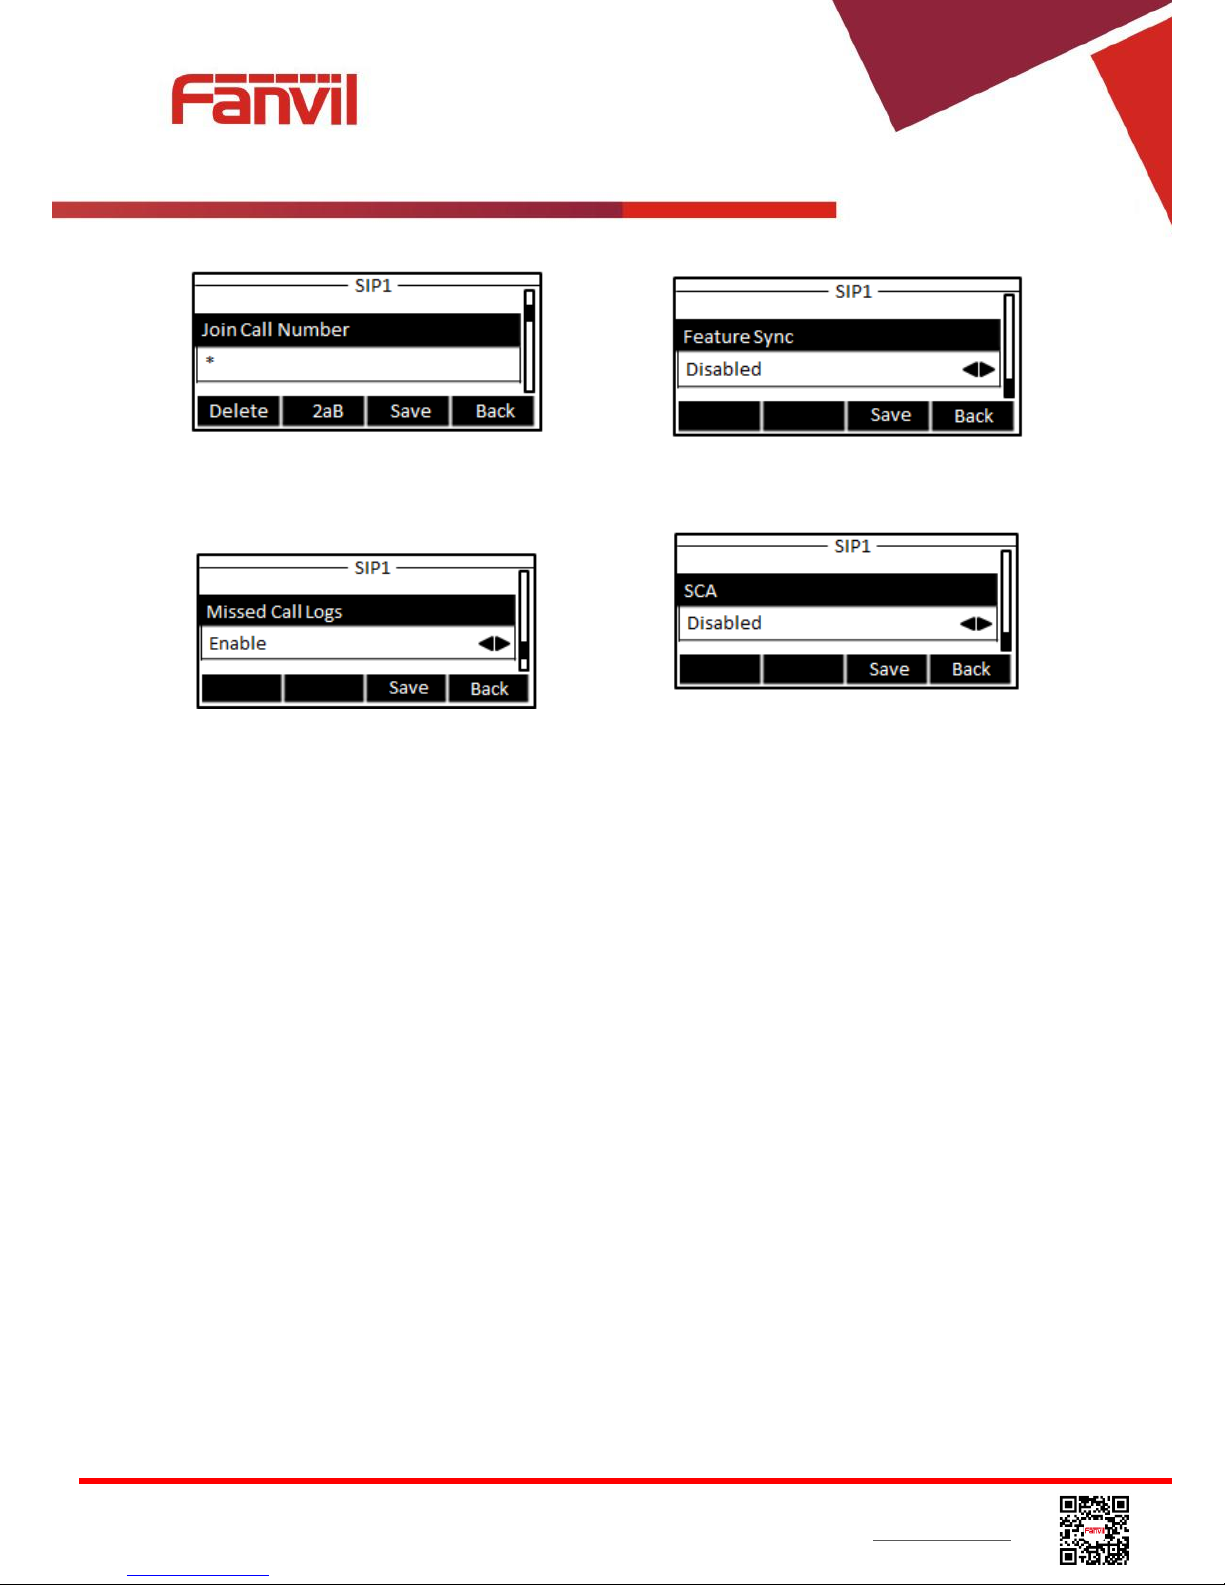
Figure 29 - Configure Join Call Number
Figure 30 - Enable / Disable Missed Call
Figure 31 - Enable / Disable Feature Sync
Figure 32 - Enable / Disable SCA
NOTICE! On the device, user can only configure whether STUN / Outbound Proxy is enabled,
to change the STUN / Outbound Proxy server address, user must edit in the device web
portal. (Refer to 8.15 LINES / Global Settings and 8.12 LINES / SIP )

<文档标题>
Fanvil Technology Co., Ltd
HQ Add: Level 3, Block A, Gaoxinqi Building, Anhua Industrial Park, Qianjin 1 Road, 35th District, Bao'An, Shenzhen, 518101 P.R. China
Tel: +86-755-2640-2199 Fax: +86-755-2640-2618 Email: sales@fanvil.com support@fanvil.com Beijing Tel:+86-10-5753-6809
Suzhou Tel: +86-512-6592-0605 SEA Tel: +60-3-512-21997
6 Using the Phone
6.1 Making Phone Calls
Default Line
The device provides six line services. If both lines are configured, user can make or receive phone
calls on either line. If default line is configured by user, there will be a default line to be used for
making outgoing call which is indicated on the top left corner. To change the default line, user can
press left/right navigator buttons to switch between two lines. Enable or disable default line, user can
press [menu] - > [Features] -> [Default Line] or configure from Web Interface (Web / PHONE /
Features / Common Settings).
Figure 33 - Default Line
Dialing Methods
User can dial a number by,
Entering the number directly
Selecting a phone number from phonebook contacts (Refer to 6.2 Using Phonebook)
Selecting a phone number from cloud phonebook contacts (Refer to 6.3 Using Cloud
Phonebook)
Selecting a phone number from call logs (Refer to 6.4 Call Logs)
Redialing the last dialed number
Dialing Number then Opening Audio
To make a phone call, user can firstly dial a number by one of the above methods. When the dialed
number is completed, user can press [Dial] button on the soft-menu, or press hand-free button to
turn on the speaker or headphone, or lift the handset to call out with the current line, or user can
press line key(Configured by DSS Keys) to call out with specified line.
 Loading...