

Page 1
`
SIP Video Intercom i18S
USER
MANUAL
V1.0
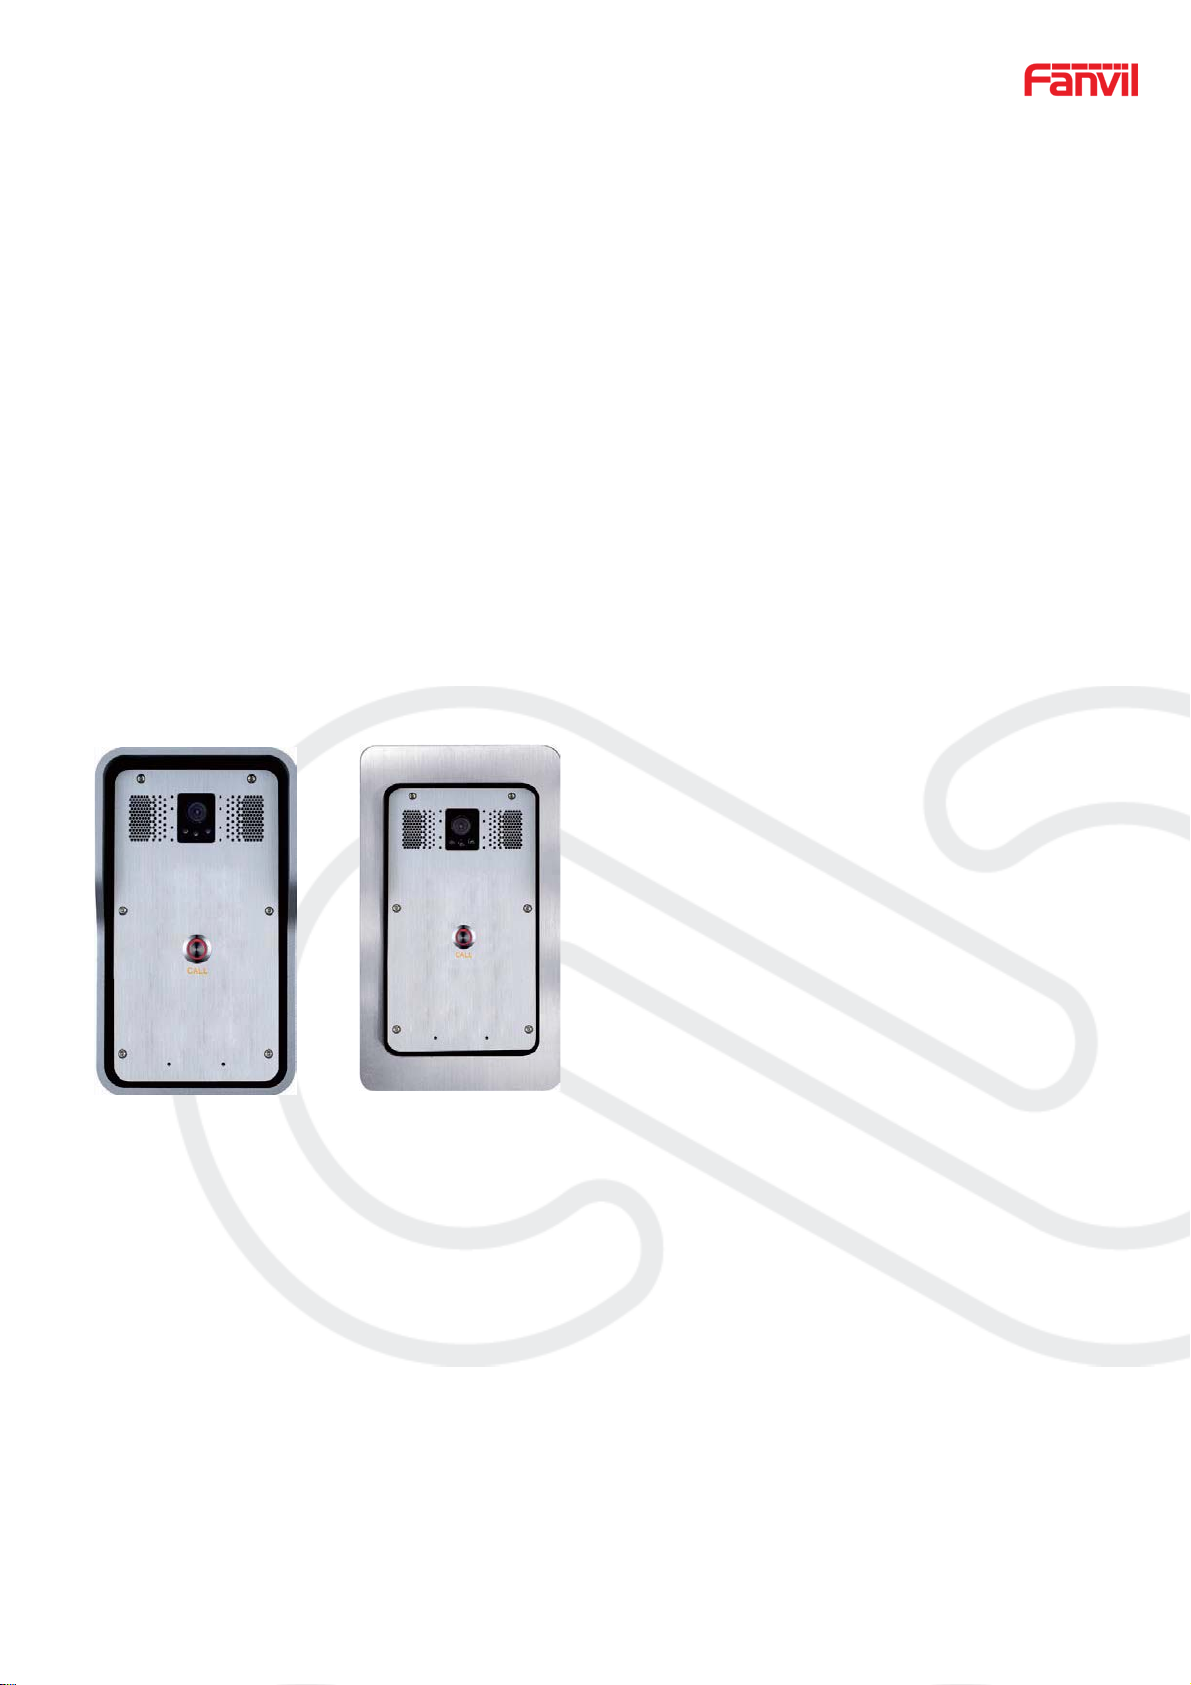
Wall mounting Flush mounting
www.fanvil.com
ZZZIDQYLOFRP
Page 2

`
Document
VER
Firmware
VER
Explanation Time
V1.0 2.1.1.3390 Initial issue 20180208
V1.1 2.1.1.3445 Change some description 20180514
ZZZIDQYLOFRP
Page 3

`
Safety Notices
1. Please use the specified power adapter. If you need to use the power adapter provided by
other manufacturers under special circumstances, please make sure that the voltage and
current provided is in accordance with the requirements of this product, meanwhile, please
use the safety certificated products, otherwise may cause fire or get an electric shock.
2. When using this product, please do not damage the power cord either by forcefully twist it,
stretch pull, banding or put it u nder heav y pressure or b etween i tem s, other wi se it may ca us e
damage to the power cord, lead to fire or get an electric shock.
3. Before using, please confirm that the temperature and environment is humidity suitable for
the product to work. (Move the product from air conditioning room to natural temperature,
which may cause this product surface or internal components produce condense water
vapor, please open power use it after waiting for this product is natural drying).
4. Please do not let non-technical staff to remove or repair. Improper repair may cause electric
shock, fire, malfunction, etc. It will lead to injury accident or cause damage to your product.
5. Do not use fingers, pins, wire, other metal objects or foreign body into the vents and gaps. It
may cause current through the metal or foreign body, which may even cause electric shock
or injury accident. If any foreign body or objection falls into the product please stop using.
6. Please do not discard the packing bags or store in places where children could reach, if
children trap his head with it, may cause nose and mouth blocked, and even lead to
suffocation.
7. Please use this product with normal usage and operating, in bad posture for a long time to
use this product may affect your health.
8. Please read the above safe ty notices before installing or using this phone. They are crucial
for the safe and reliable operation of the device.
ZZZIDQYLOFRP
Page 4

`
Table of Content
A. Product introduction..........................................................................................................................................6
1. Appearance of the product.......................................................................................................................6
2. Description .................................................................................................................................................6
B. Start Using...........................................................................................................................................................7
1. Confirm the connection ............................................................................................................................7
1) Power port.............................................................................................................................................7
2) Power, Security functions Input, Security functions Output port...................................................7
3) Wiring instructions...............................................................................................................................7
2. Quick Setting..............................................................................................................................................8
C. Basic operation...................................................................................................................................................8
1. Answer a call..............................................................................................................................................8
2. Call...............................................................................................................................................................9
3. End Call.......................................................................................................................................................9
D. Page settings ......................................................................................................................................................9
1. Browser configuration ..............................................................................................................................9
2. Password Configuration ...........................................................................................................................9
3. Configuration via WEB............................................................................................................................10
(1) System................................................................................................................................................10
a) Information ....................................................................................................................................10
b) Account..........................................................................................................................................11
c) Configurations ...............................................................................................................................12
d) Upgrade.........................................................................................................................................12
e) Auto Provision ...............................................................................................................................13
f) FDMS .............................................................................................................................................13
g)Tools...............................................................................................................................................16
(2) network...............................................................................................................................................17
a) Basic..............................................................................................................................................17
b) VPN...............................................................................................................................................19
(3) Line .....................................................................................................................................................20
a) SIP.................................................................................................................................................20
b) Basic Settings................................................................................................................................25
(4) Intercom settings ..............................................................................................................................26
a) Features ........................................................................................................................................26
b) Audio .............................................................................................................................................27
c) Video..............................................................................................................................................29
d) MCAST..........................................................................................................................................32
e) Action URL ....................................................................................................................................35
ZZZIDQYLOFRP
4/43
Page 5

`
f) Time/Date.......................................................................................................................................36
(5) Security settings ...............................................................................................................................37
(6) Function Key......................................................................................................................................39
E. Appendix............................................................................................................................................................41
1. Technical parameters ..........................................................................................................................41
2. Basic functions.....................................................................................................................................42
3. Schematic diagram ..............................................................................................................................42
4. The broadcast terminal configuration notice....................................................................................43
ZZZIDQYLOFRP
5/43
Page 6
`
A.Product introduction
i18S Voice Access is a digital network door phone. Its core part adopts mature VoIP
solution (Broadcom chip), which can perform stably and reliably, it is hands-free, adopting
digital full-duplex mode. The voice is loud and clear. It has a series of advantages, such as
generous appearance, comfortable keypad and low power consumption, etc. i31S is easy
to install. It is solid and durable.
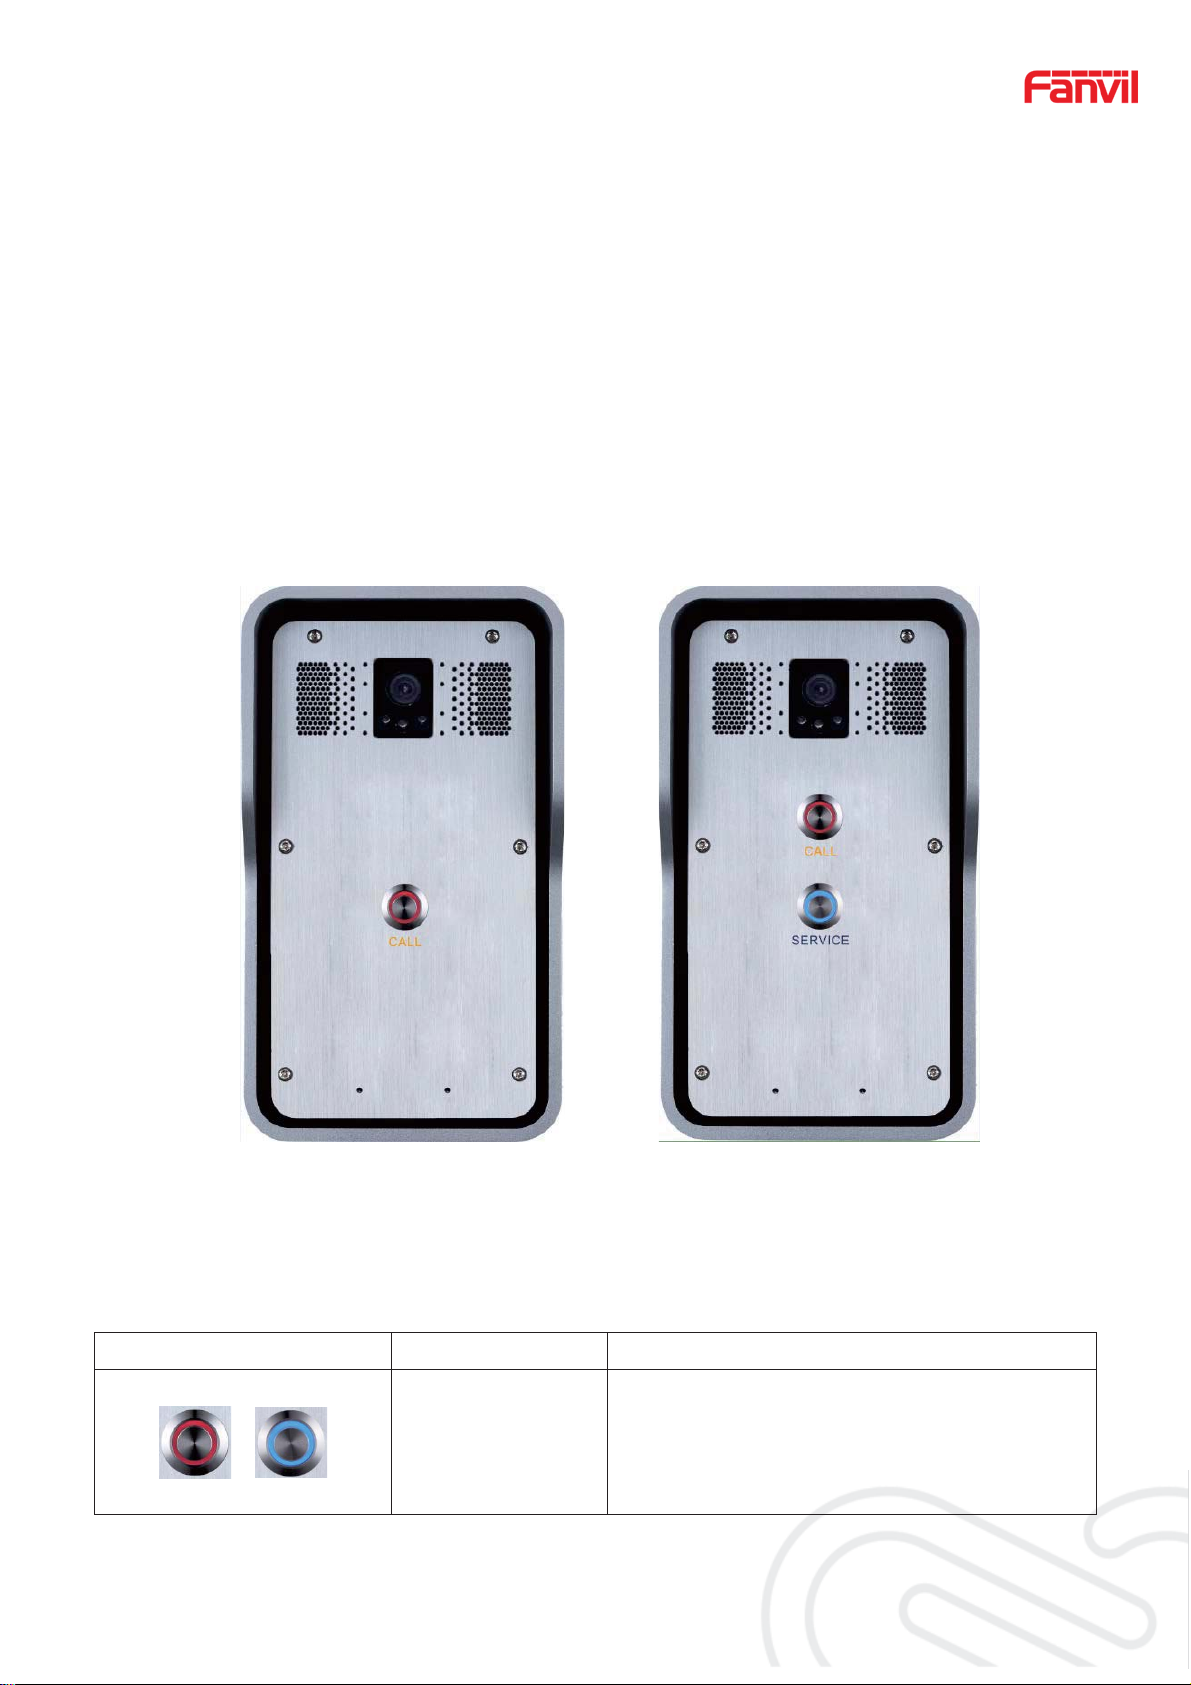
1. Appearance of the product
6
Single button Dual button
2. Description
Picture Description Function
ZZZIDQYLOFRP
Network error: Blink with 2s
Network running: Off
DSS Key LED
Registration failed: Blink with 6s
Registration succeeded: On
6/43
Page 7
`
B.Start Using
Before you start to use the equipment, please make the following installation:
1. Confirm the connection
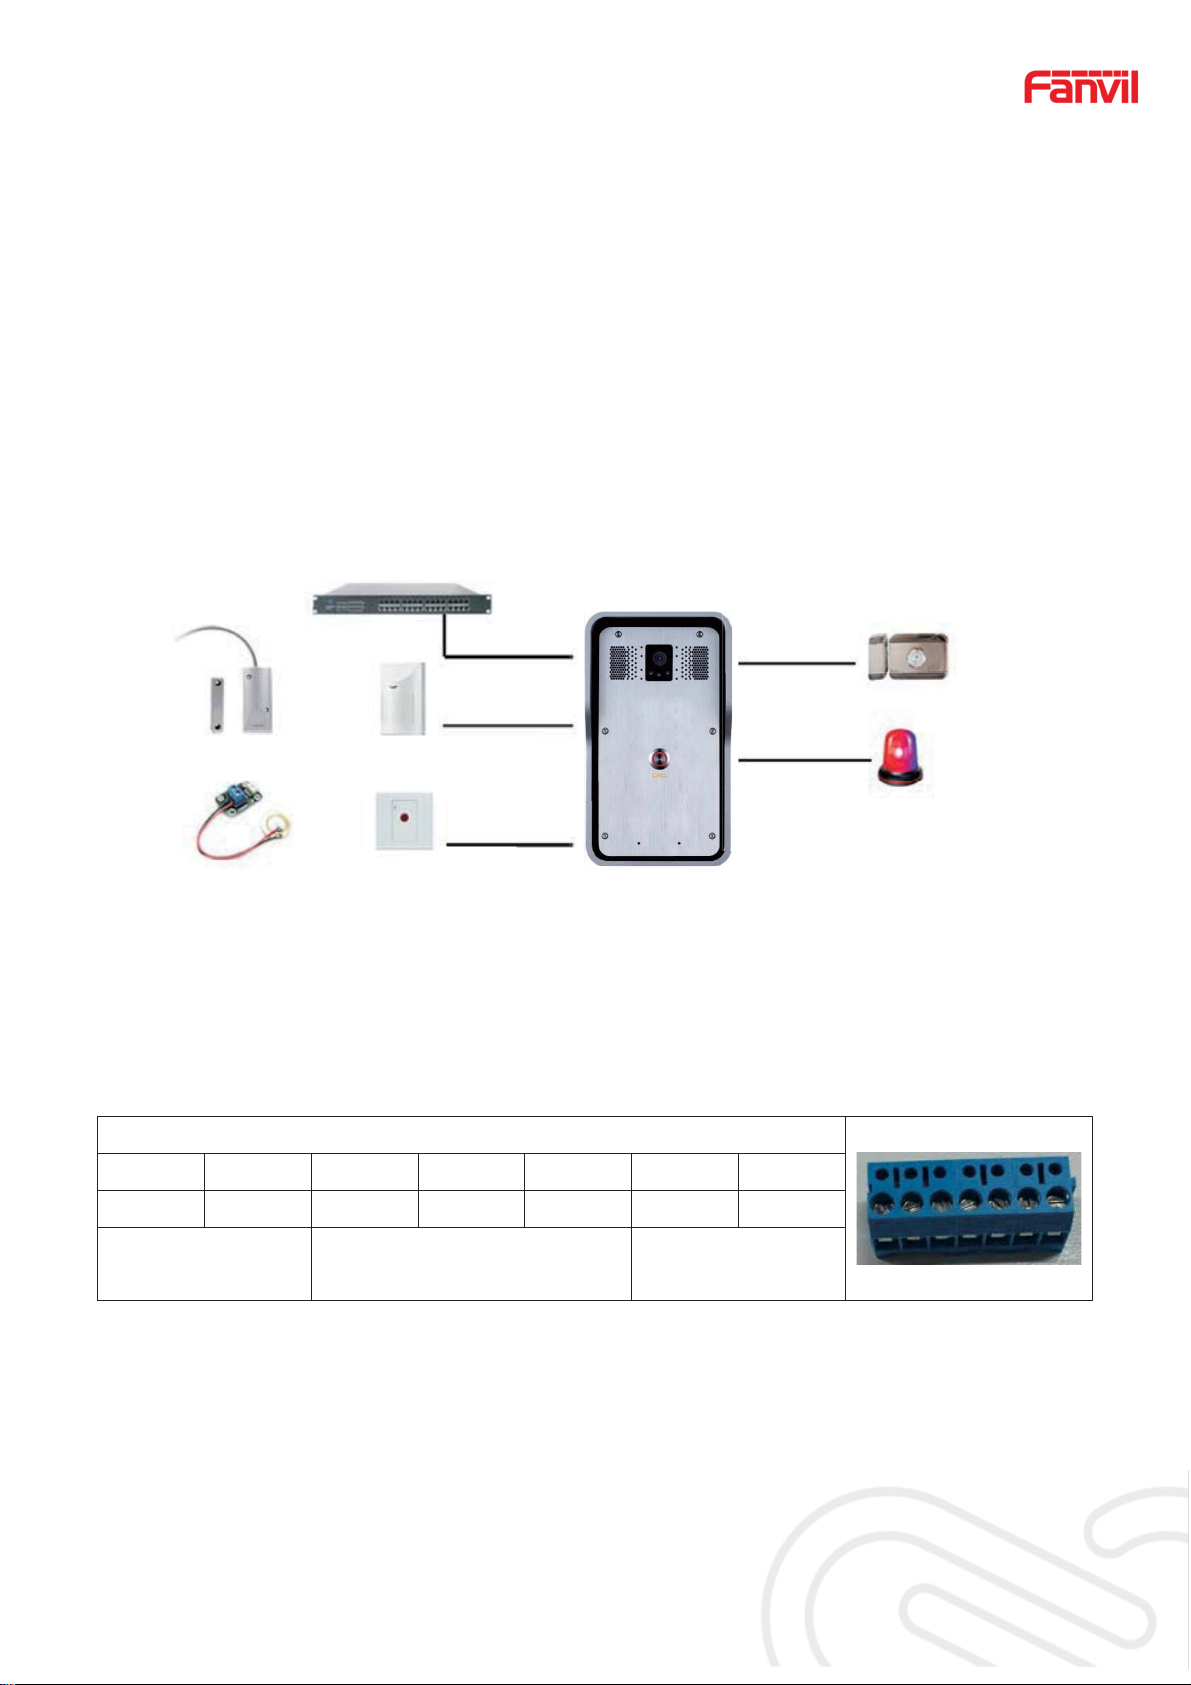
Please confirm the power cord, network cable, electric lock control line connected and the
boot-up is normal. (Check the network state of light)
Power port
7
Switch
or
Door magnetic switch
Vibration sensor
Power, Security functions Input, Security functions Output port
Infrared sensor
or
Emergency key
WAN port
Input port
Input port
Output port
or
Output port
Electric lock
Alarm light
Power supply ways: 12v/DC or PoE.
CN7
1234567
+12V VSS NC COM NO S_IN S_OUT
12V 1A/DC
Security functions Output
Wiring instructions
z NO: Normally Open Contact.
z COM: Common Contact.
z NC: Normally Close Contact.
ZZZIDQYLOFRP
port
Security functions
Input port
7/43
Page 8
`
2. Quick Setting
The product provides completed functions and parameter settings. To understand all
meaning of parameters well, it is better for users to have knowledge of network and SIP
protocol. In order to let users, enjoy the high-quality voice service and low-cost advantage
immediately, here we list some basic but compulsory setting options in this section. Users
can use it without understanding such complicated knowledge of SIP protocols.
In prior to this step , pl e ase make sure your broadband Internet onlin e can work normally
and complete the connection of the network hardware. The product default factory setting of
network mode is STATIC IP. Before the entering of Web setting, pls connec the PC to the
same LAN network with i18S or set the network segment of PC's Static IP address in the
same segment of i18S.
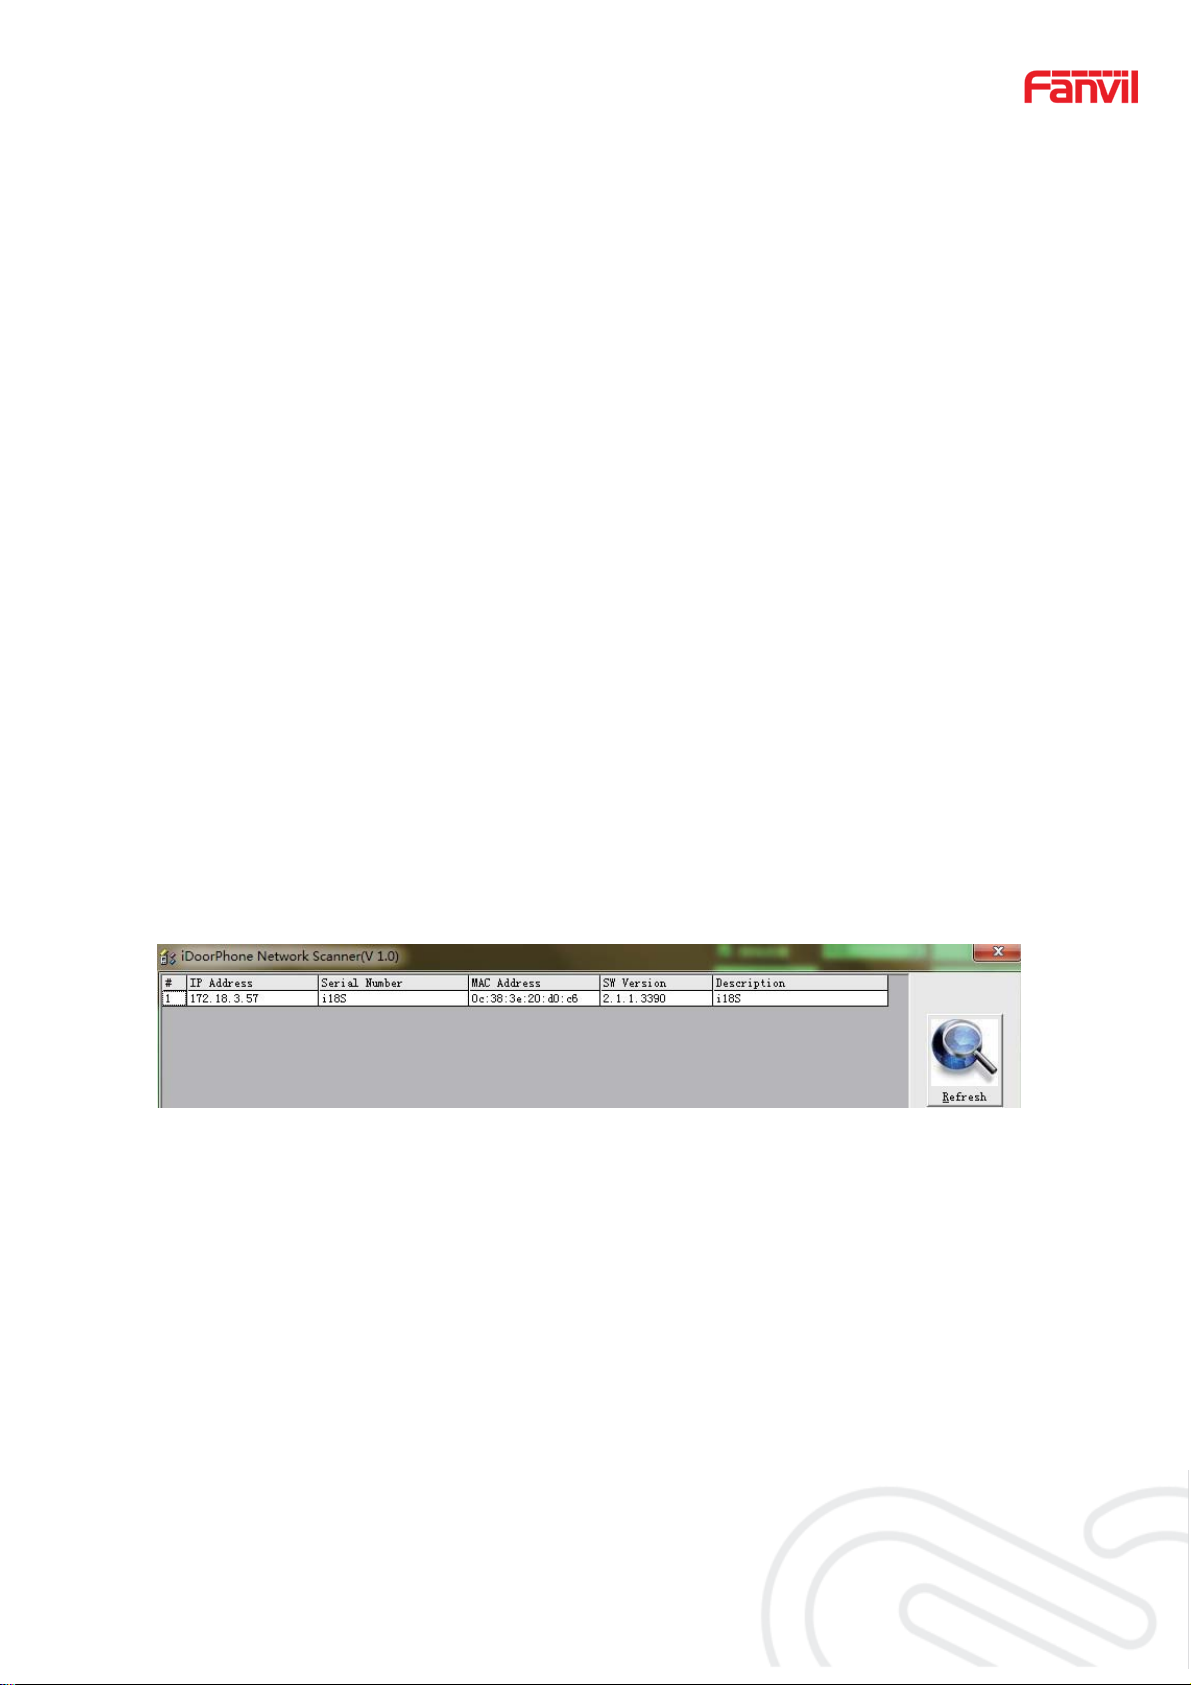
¾ The default IP address is static IP address: 192.168.1.128. User can also use the
software"iDoorPhoneNetworkScanner.exe" to find the IP address of the device.
8
(download address http://download.fanvil.com/tool/iDoorPhoneNetworkScanner.exe)
¾ Note: Waiting for 30s to run the device when it is power on.
¾ Login to the WEB to configure the device
¾ Configure the service account, user name, server registered address and other parameters
on the web page of SIP.
¾ Set DSS key in the Webpage (Intercom -> function key).
¾ Set function parameters in the Webpage (Safeguarding).
C.Basic operation
1. Answer a call
By default, the incoming call will be answered automatically without any ringing. User MAY
want to hear ring before answer the incoming call. This could be configured under EGS
setting -> Features -> Basic Settings -> Auto Answer timeout. This parameter is the ringing
time. Auto answered could be disabled under EGS setting -> Features -> Basic settings ->
Enable auto Answer.
ZZZIDQYLOFRP
8/43
Page 9
`
2. Call
Configure shortcut key as hot key then setup a number. The configured number will be
called when user press the shortcut key.
3. End Call
Enable the DSS key to hang up the call.
D.Page settings
1. Browser configuration
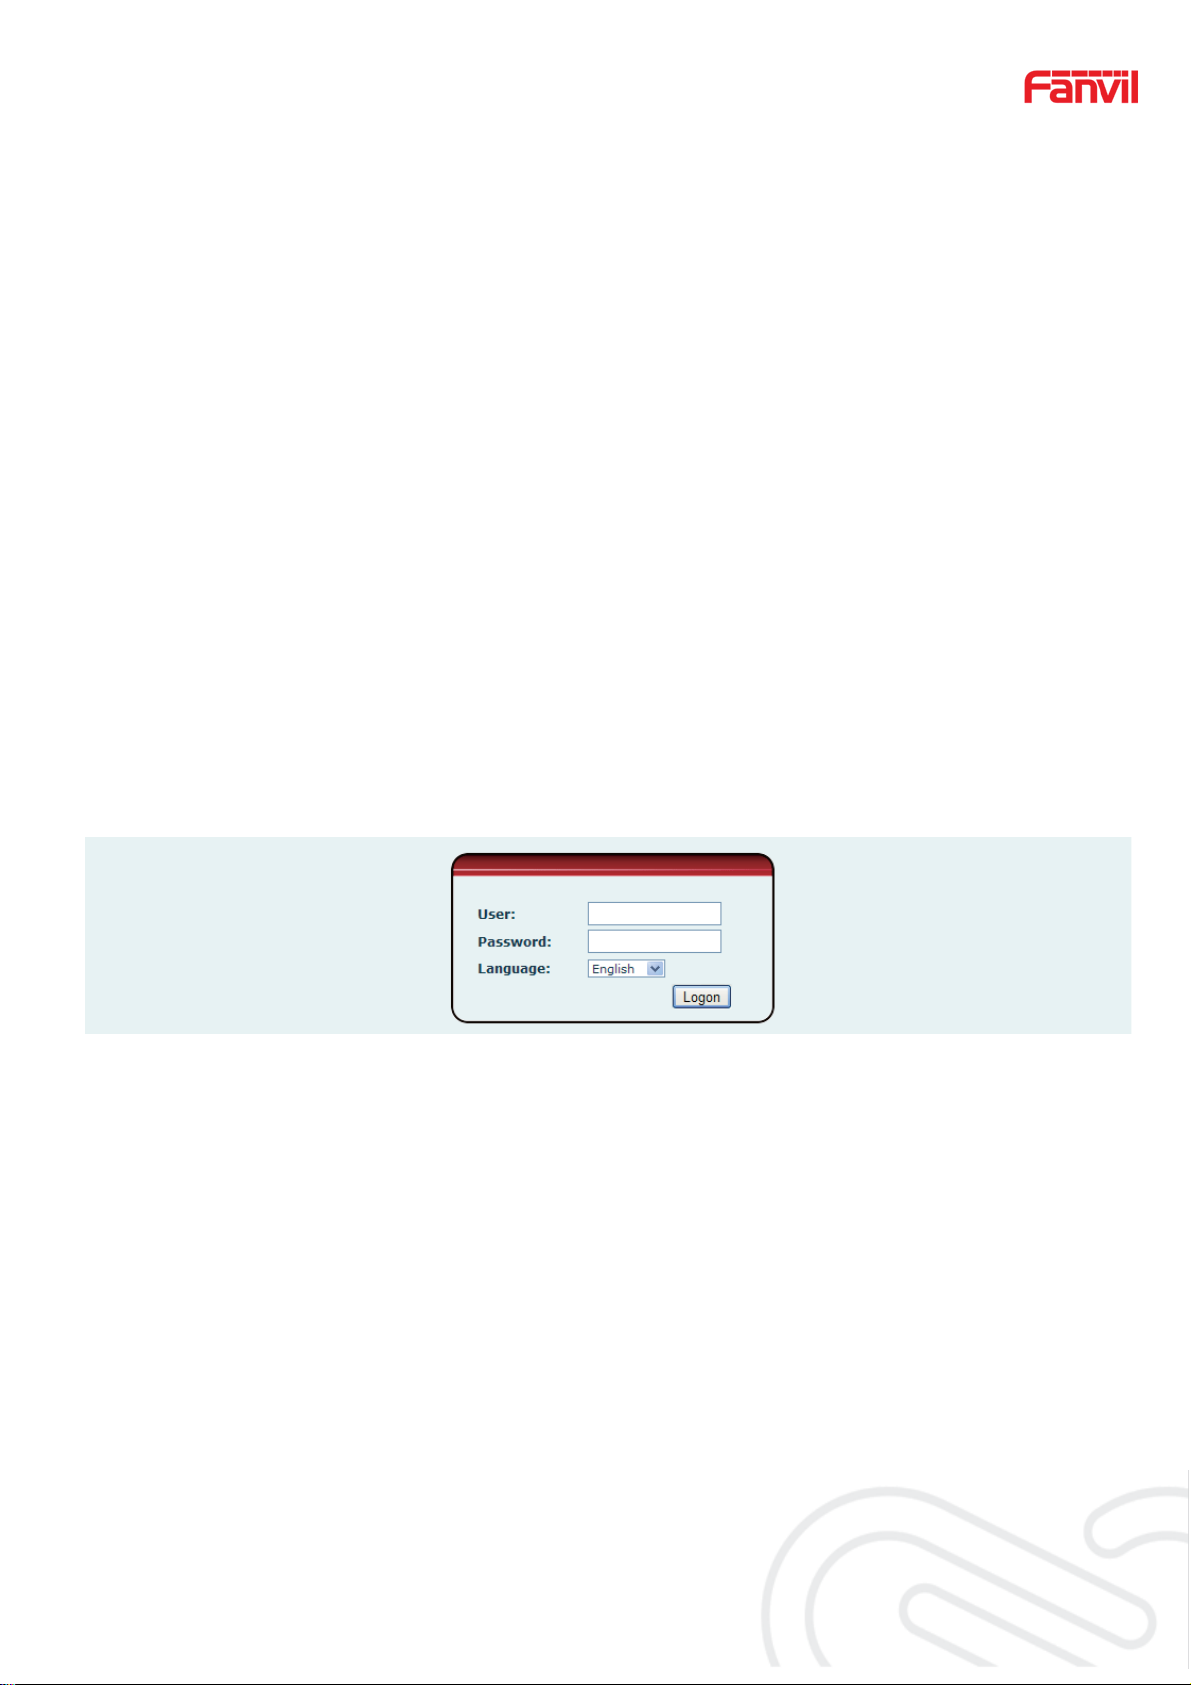
When the device and your computer are successfully connected to the network, enter
the IP address of the device on the browser as http://xxx.xxx.xxx.xxx/, Then you can see the
login interface of the web pa ge management.
9
Input the user name and password. Then click the [logon] button to enter the settings
screen.
After configuring the equipment, remember to click SAVE under the Mainte nance tab. If
this is not done, the equipment will lose the modifications when it has been rebooted.
2. Password Configuration
There are two levels of access: root level and general level. A user with root level
access can browse and set all configuration parameters. While a user with general level can
set all configuration parameters except server parameters for SIP
z Default user with general level:
Username: guest
Password: guest
ZZZIDQYLOFRP
9/43
Page 10
`
z Default user with root level:
Username: admin
Password: admin
3. Configuration via WEB
(1)System
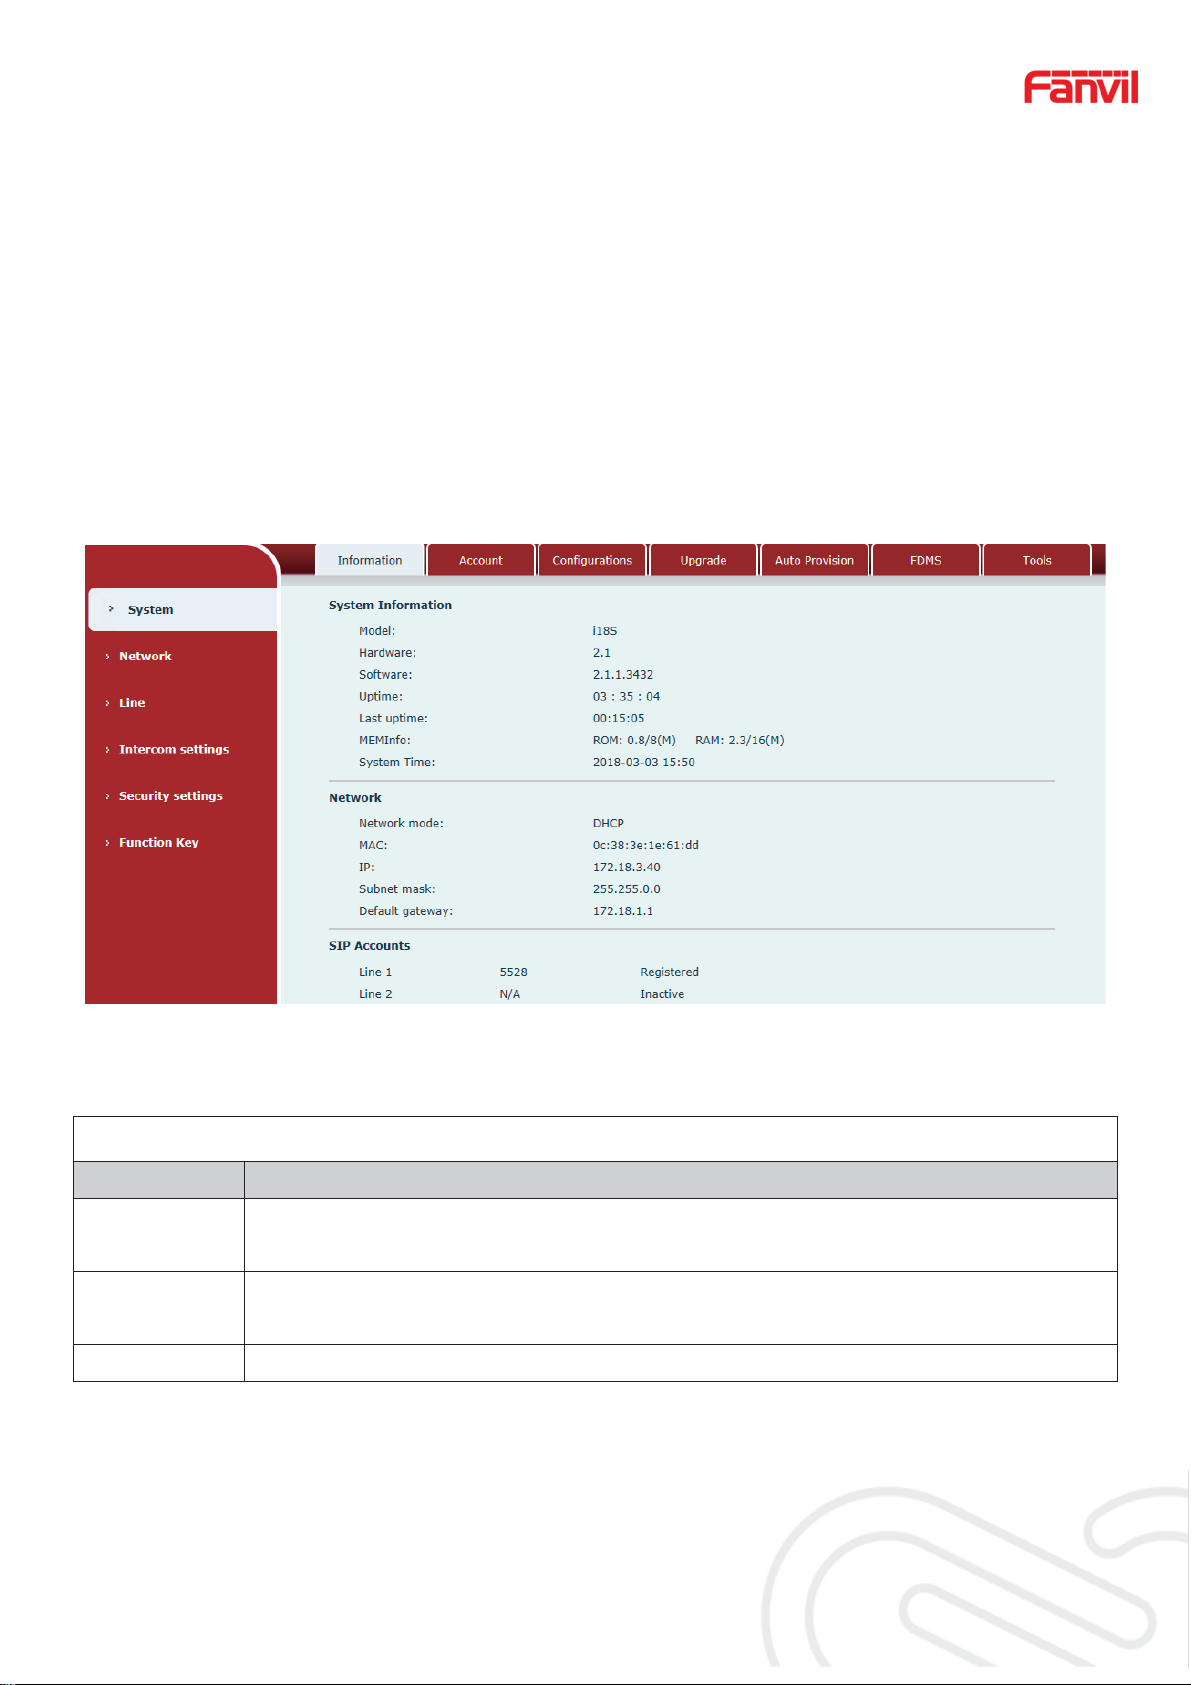
a) Information
10
Information
Field Name Explanation
System
Information
Network
SIP Accounts Shows the phone numbers and registration status for the 2 SIP LINES.
ZZZIDQYLOFRP
Display equipment model, hardware version, software version, uptime, Last
uptime and MEMinfo.
Shows the configuration information for WAN port, including connection mode of
WAN port (Static, DHCP, PPPoE), MAC address, IP address of WAN port.
10 / 43
Page 11

`
b) Account
On this page, user can add or remove users depending on their needs and can modify
existing user permission.
11
Account
Field Name Explanation
Change Web Authentication Password
You Can modify the login password to the account
Add New User
You can add new user
User Accounts
Show the existing user information
ZZZIDQYLOFRP
11 / 43
Page 12
`
c) Configurations
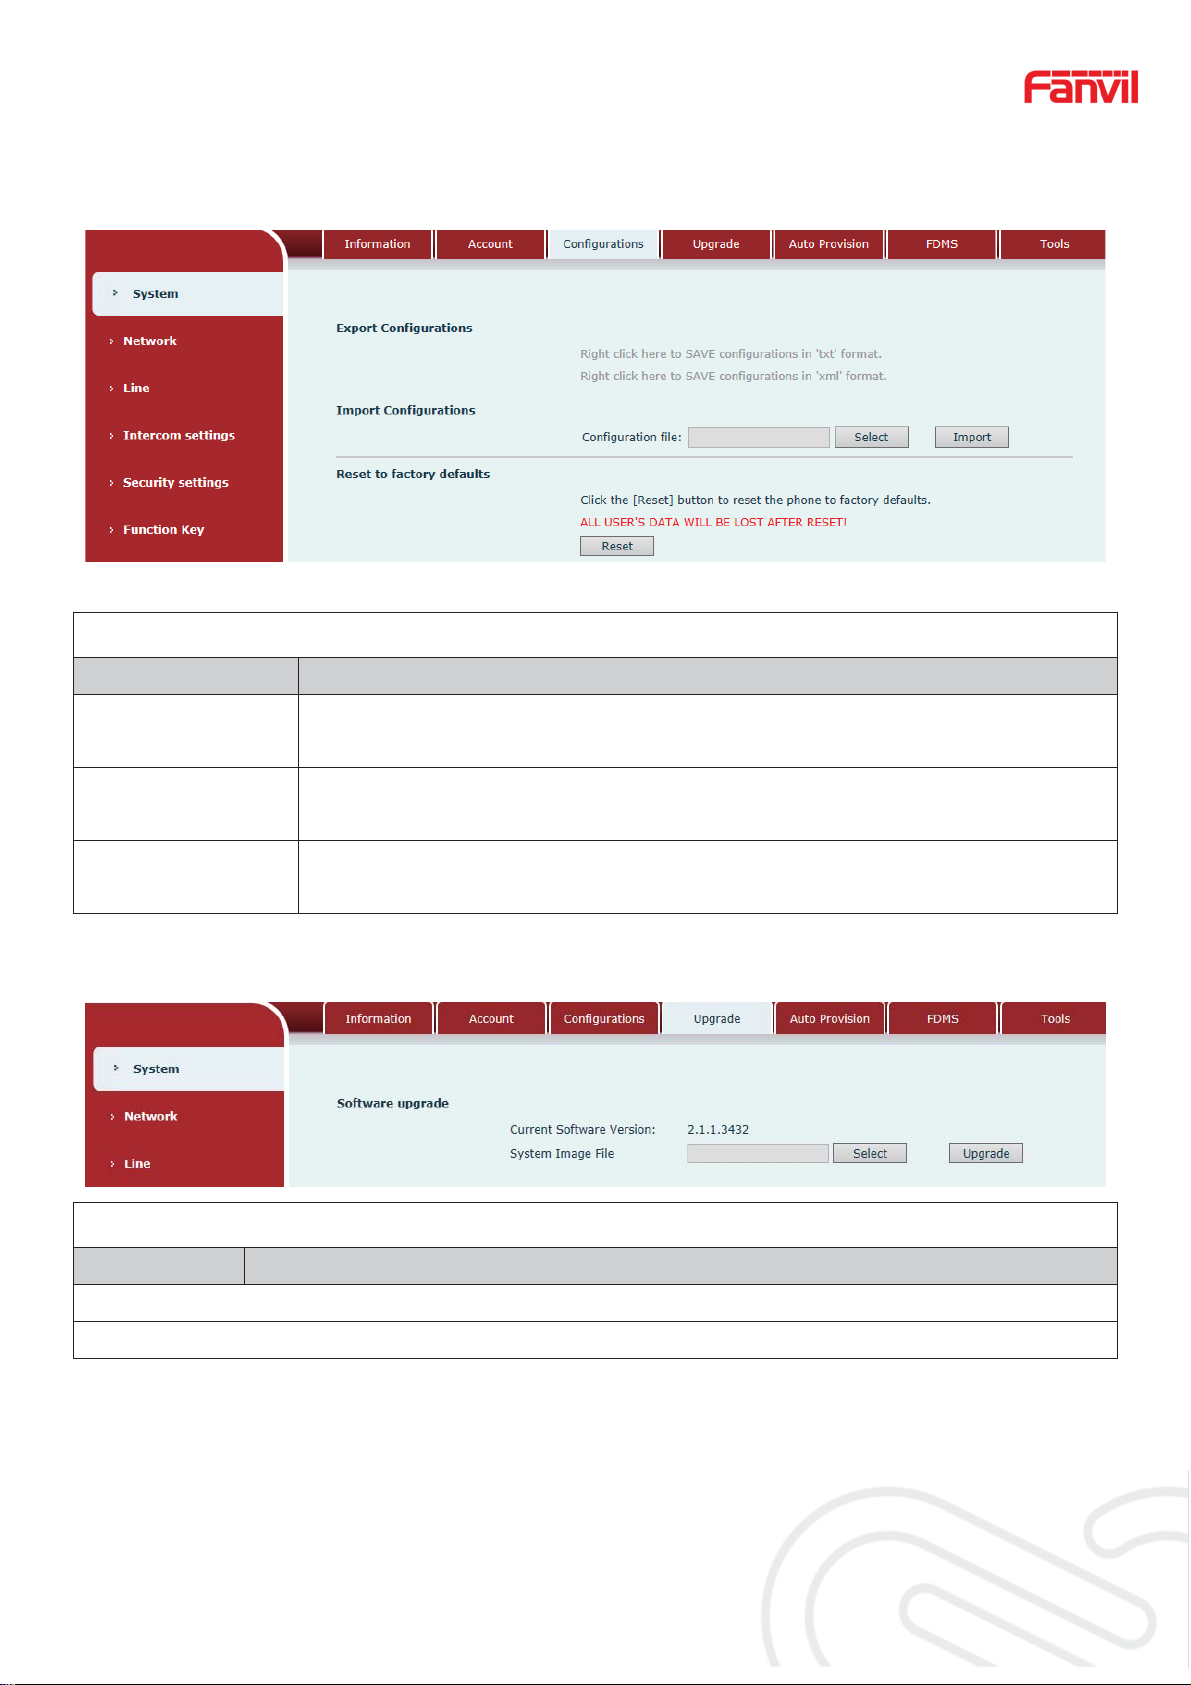
Configurations
12
Field Name Explanation
Export
Configurations
Save the equipment conf iguration to a txt or xml file. Please Right click on
the choice and then choose “Save Link As.”
Import
Browse to the config file, and press Update to load it to the equipment.
Configurations
Reset to facto ry
defaults
This will reset factory default settings and remove all configuration
information.
d) Upgrade
Upgrade
Field Name Explanation
Software upgrade
Browse to the firmware, and press Update to load it to the equipment.
ZZZIDQYLOFRP
12 / 43
Page 13
`
e) Auto Provision
13
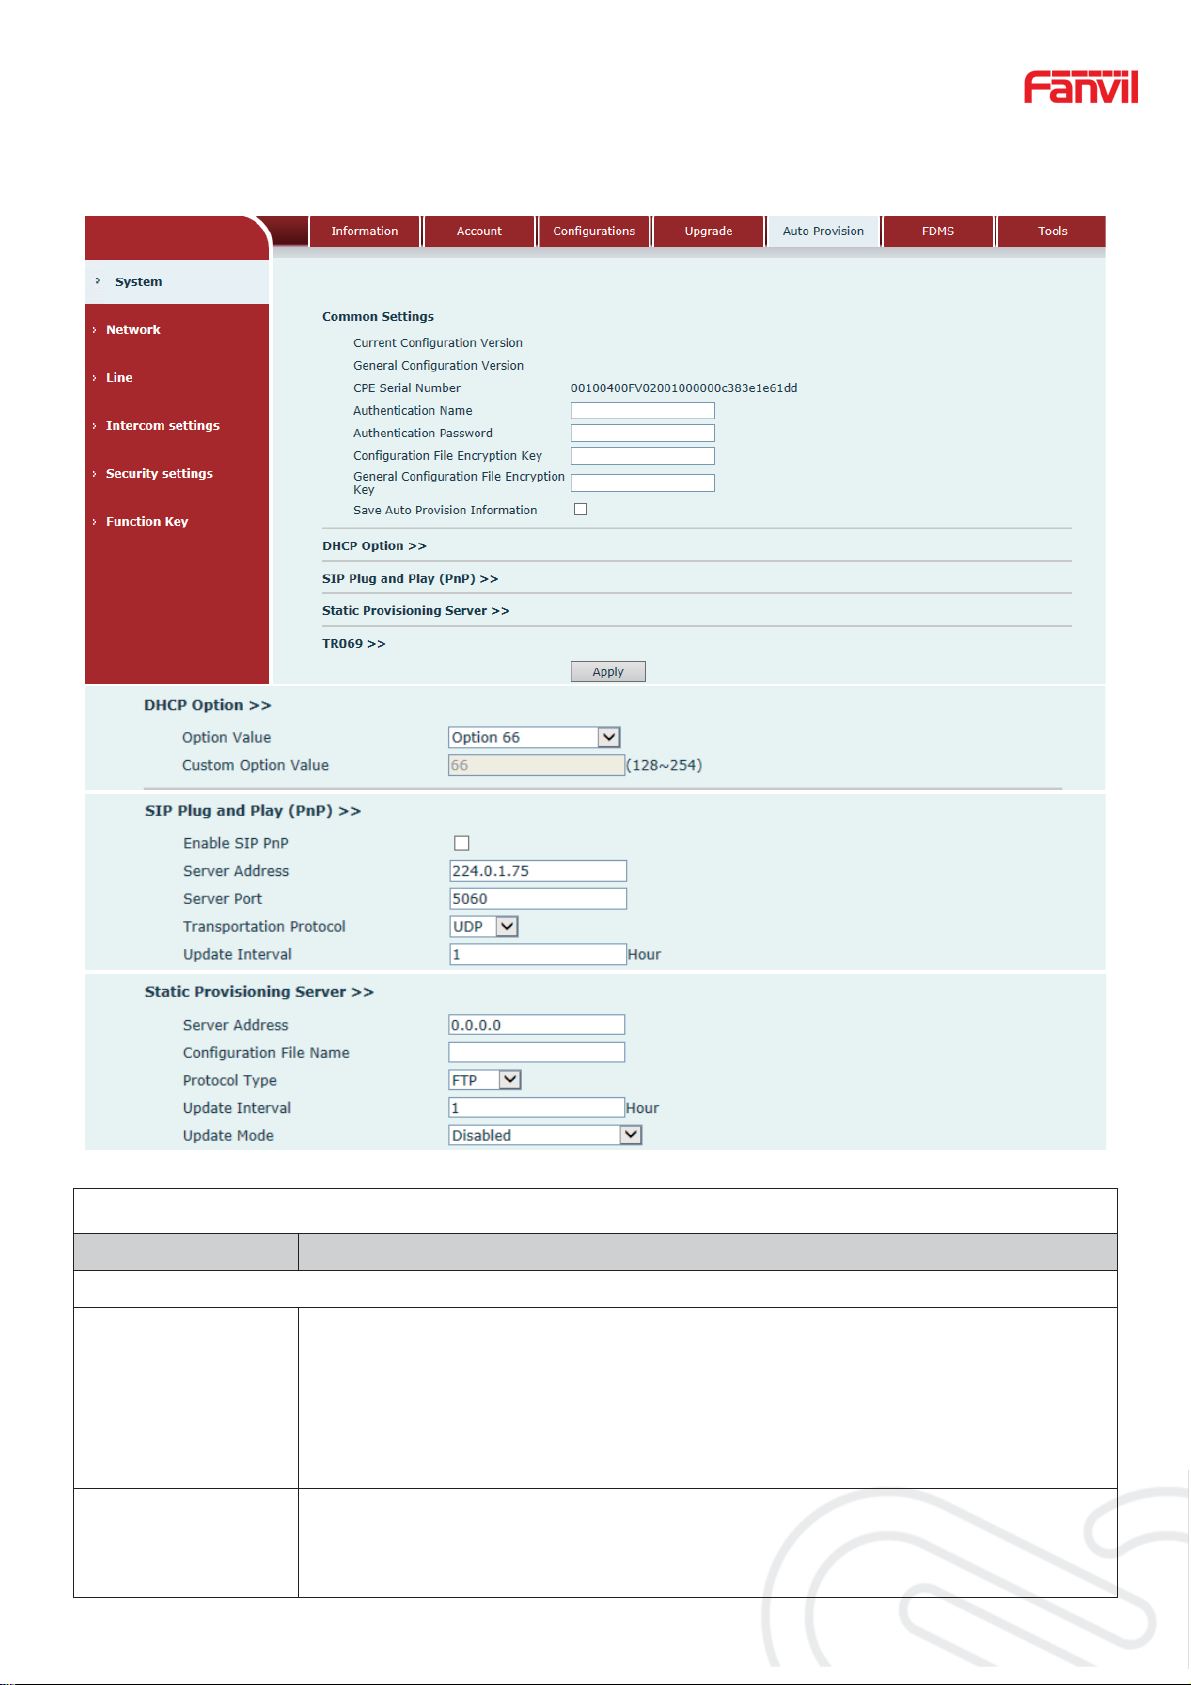
Auto Provision
Field Name Explanation
Common Settings
Show the current config file’s version. If the version of configuration
Current
Configuration
Version
General
Configuration
Version
ZZZIDQYLOFRP
downloaded is higher than this, the configuration will be upgraded. If the
endpoints confirm the configuration by the Digest method, the
configuration will not be upgraded unless it differs from the current
configuration
Show the common config file’s version. If the configuration downloaded
and this configuration is the same, the auto provision will stop. If the
endpoints confirm the configuration by the Digest method, the
13 / 43
Page 14

`
14
configuration will not be upgraded unless it differs from the current
configuration.
CPE Serial
Number
Authentication
Name
Authentication
Password
Configuration File
Encryption Key
General
Configuration File
Encryption Key
Save Auto
Provision
Information
DHCP Option
Option Value
Serial number of the equipment
Username for configuration server. Used for FTP/HTTP/HTTPS. If this is
blank the phone will use anonymous
Password for configuration server. Used for FTP/HTTP/HTTPS.
Encryption key for the configuration file
Encryption key for common configuration file
Save the auto provision username and password in the phone until the
server url changes
The equipment supports configuration from Option 43, Option 66, or a
Custom DHCP option. It may also be disabled.
Custom Option
Custom option number. Must be from 128 to 254.
Value
SIP Plug and Play (PnP)
If this is enabled, the equipment will send SIP SUBSCRIBE messages to a
multicast address when it boots up. Any SIP server understand that
Enable SIP PnP
message will reply with a SIP NOTIFY message containing the Auto
Provisioning Server URL where the phones can request their configuration.
Server Address PnP Server Address
Server Port PnP Server Port
Transportation
PnP Transfer protocol – UDP or TCP
Protocol
Update Interval Interval time for querying PnP server. Default is 1 hour.
Static Provisioning Server
Set FTP/TFTP/HTTP server IP address for auto update. The address can
Server Address
be an IP address or Domain name with subdirectory.
Configuration File
Specify configuration file nam e. The equipment will use its MAC ID as the
Name
config file name if this is blank.
Protocol Type Specify the Protocol type FTP, TFTP or HTTP.
Update Interval Specify the update interval time. Default is 1 hour.
1. Disable – no update
Update Mode
2. Update after reboot – update only after reboot.
ZZZIDQYLOFRP
14 / 43
Page 15

`
3. Update at time interval – update at periodic update interval
TR069
Enable TR069 Enable/Disable TR069 configuratio n
ACS Server Type Select Common or CTC ACS Server Type.
ACS Server URL ACS Server URL.
ACS User User name for ACS.
ACS Password ACS Password.
TR069 Auto Login Enable/Disable TR069 Auto Login.
15
INFORM Sending
Period
f) FDMS
Time between transmissions of “Inform” is 3600 seconds.
FDMS Settings
Enable FDMS Enable/Disable FDMS configuration
The time to send si p Subscri be in formatio n to the FDM S ser ver on a reg ular
FDMS Interval
basis. Unit is in second.
Doorphone Info Settings
Community Name The name of the community where the device is installed
Building Number The name of the building where the equipment is installed
Room Number The name of the room where the equipment is installed
ZZZIDQYLOFRP
15 / 43
Page 16
`
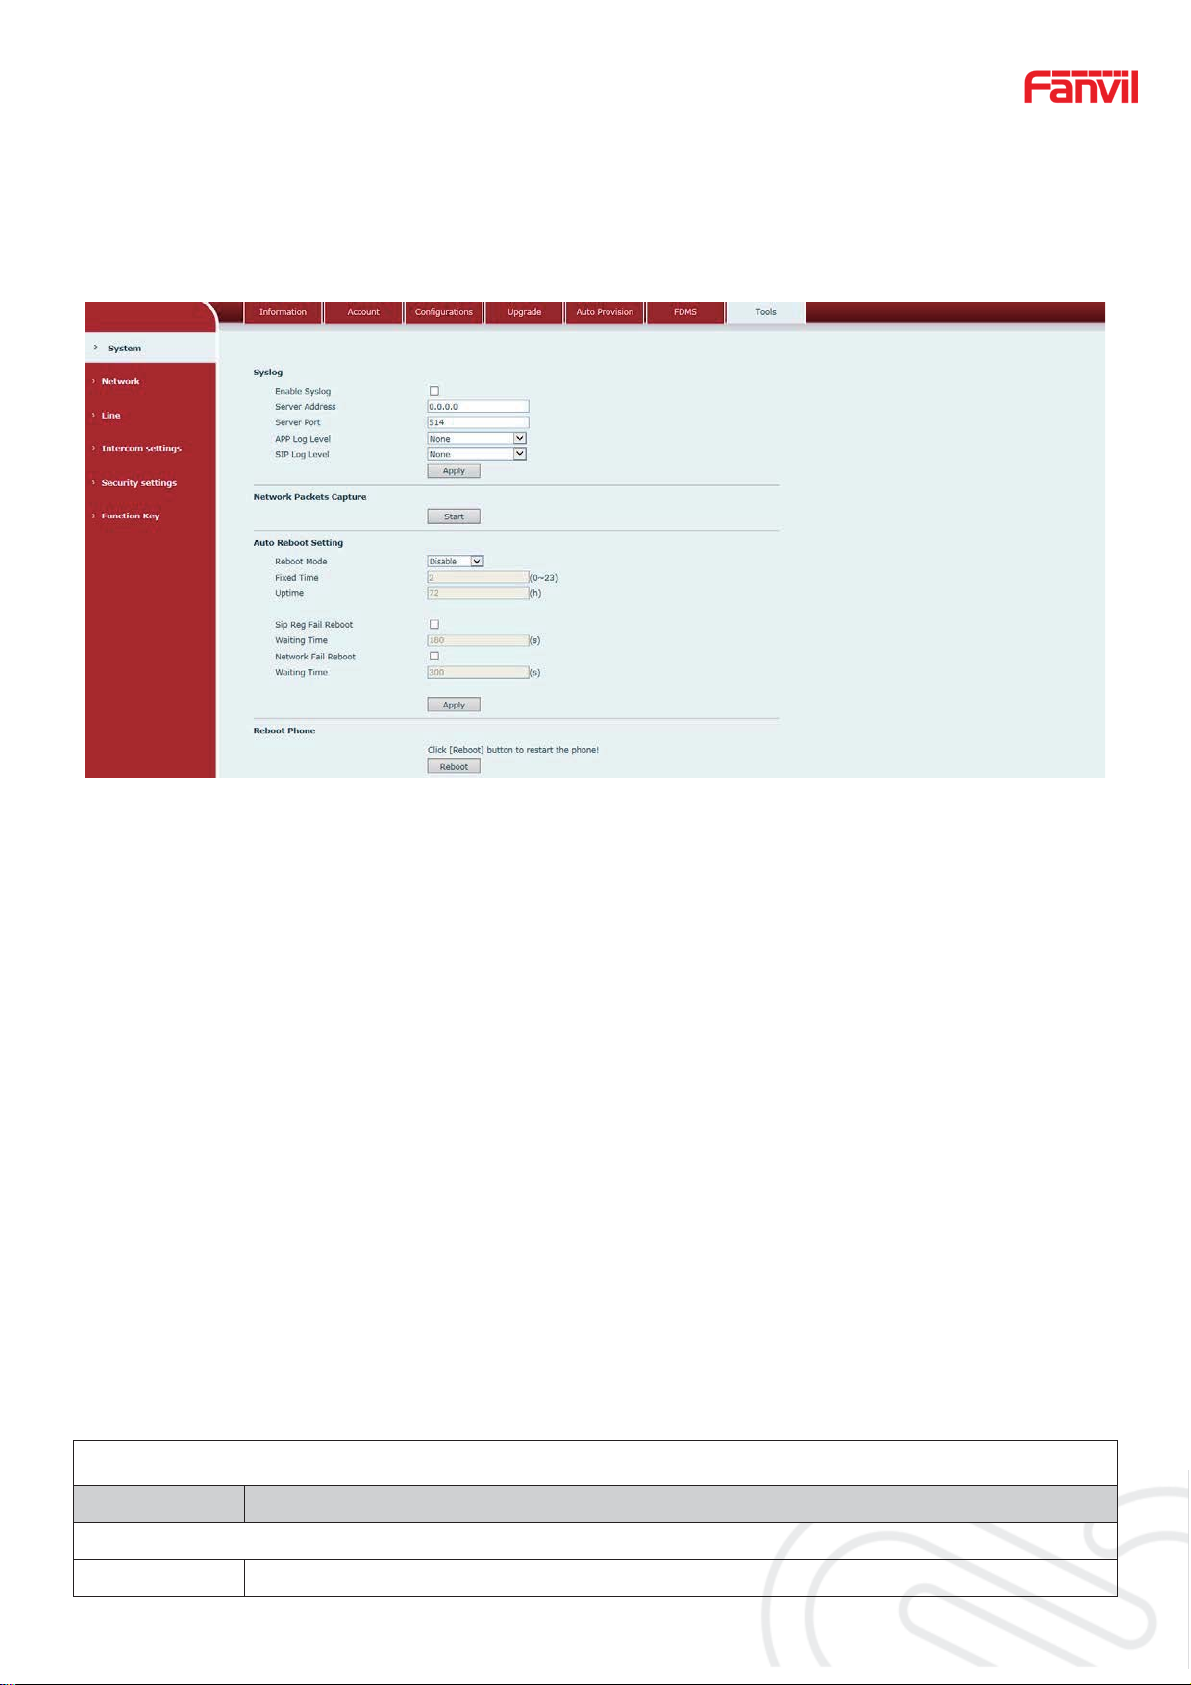
g) T ools
16
Syslog provide a client/server mechanism for the log messages which is recorded by the
system. The Syslog serv er receiv es the mess ag es from clients andclassifies them based on
priority and type. Then these messages will be written into a log by rules which the
administrator has configured.
There are 8 levels of debug information.
Level 0: emergency; System is unusable. This is the highest debug info level.
Level 1: alert; Action must be taken immediately.
Level 2: critical; System is probably working incorrectly.
Level 3: error; System may work incorrectly.
Level 4: warning; System may work correctly but needs attention.
Level 5: notice; It is the normal but significant condition.
Level 6: Informational; It is the normal daily messages.
Level 7: debug; Debug messages normally used by system designer. This level can only
be displayed via telnet.
Tools
Field Name Explanation
Syslog
Enable Enable or disable system log.
ZZZIDQYLOFRP
16 / 43
Page 17
`
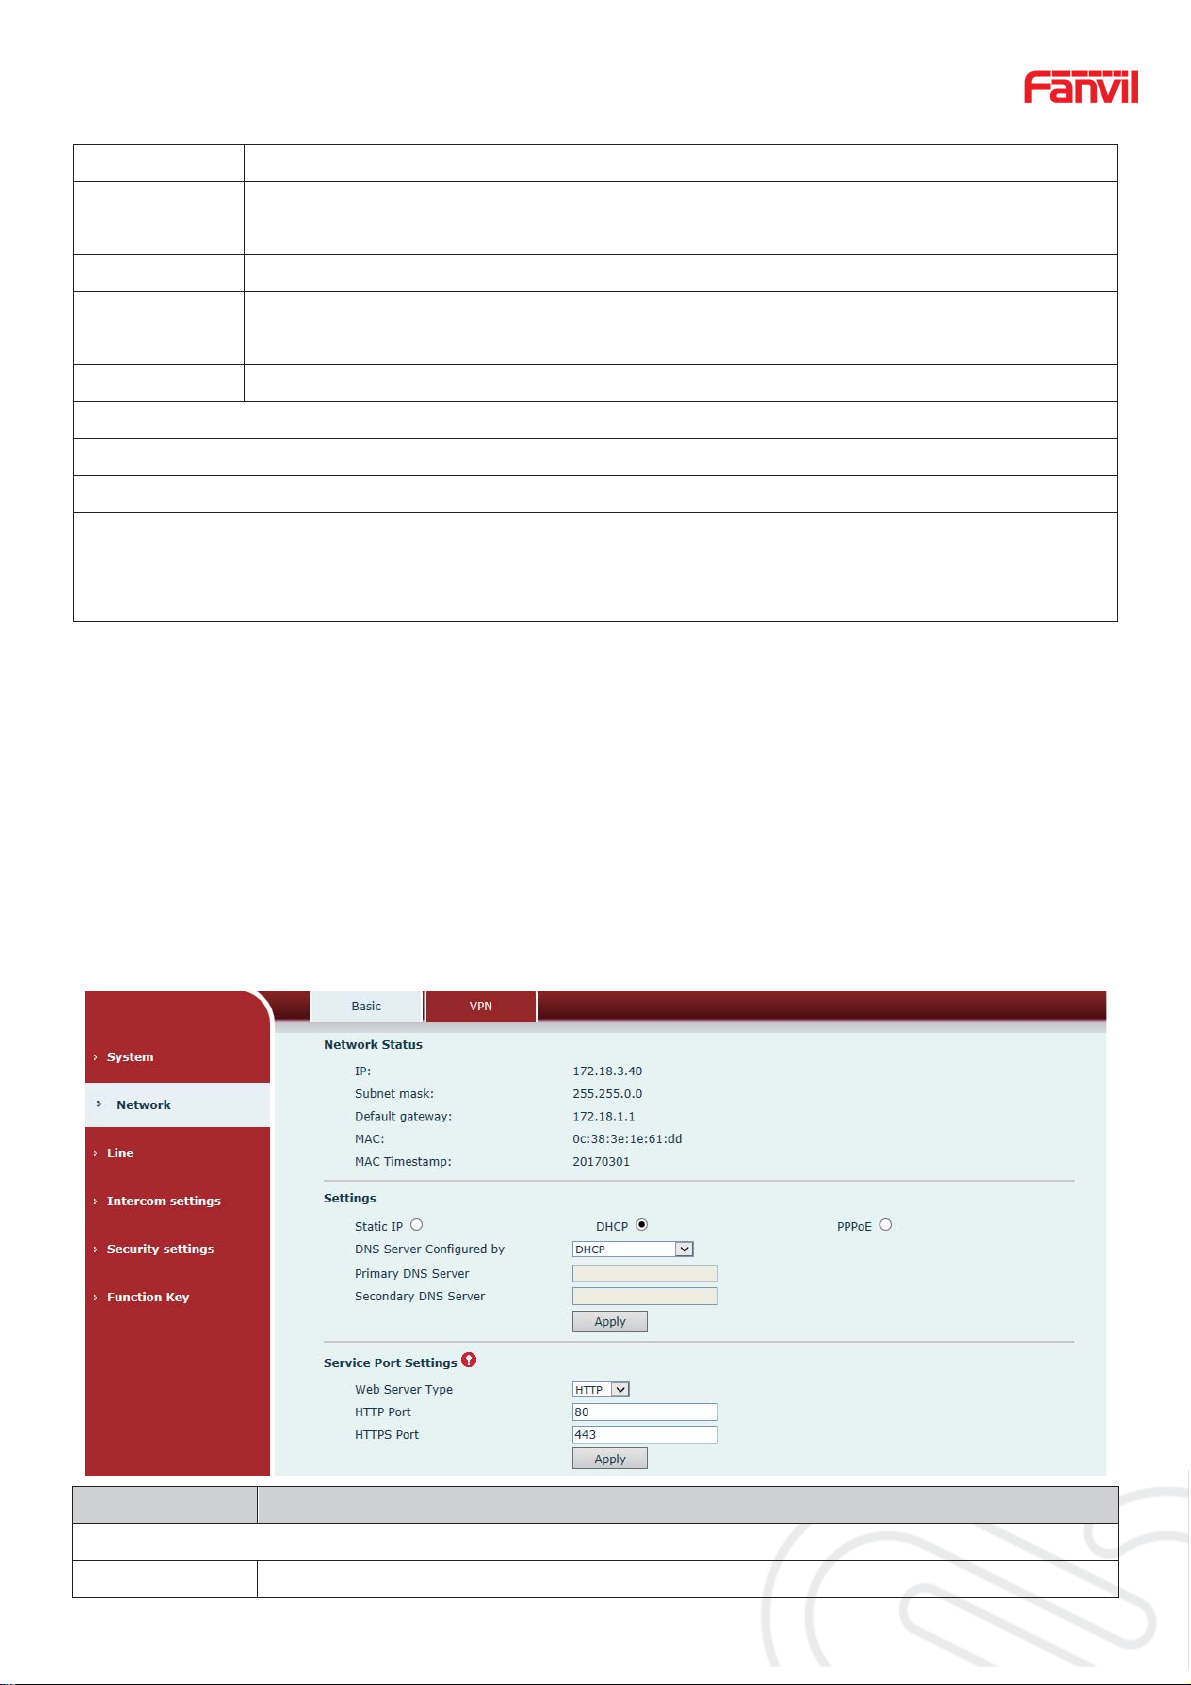
Syslog
17
Server
System log server IP address.
Address
Server Port System log server port.
APP Log
Set the level of APP log.
Level
SIP Log Level Set the level of SIP log.
Network Packets Capture
Capture a packet stream from the equipment. This is normally used to troubleshoot problems.
Reboot Phone
Some configu r ation modifications require a reboot to become effective. Clicking the Reboot
button will lead to reboot immediately.
Note: Be sure to save the configuration before rebooting.
(2)network
a) Basic
Field Name Explanation
Network Status
IP The current IP address of the equipment
ZZZIDQYLOFRP
17 / 43
Page 18

`
Subnet mask The current Subnet Mask
18
Default
The current Gateway IP address
gateway
MAC The MAC address of the equipment
MAC
Get the MAC address of time.
Timestamp
Settings
Select the appropriate network mode. The equipment supports three network modes:
Network parameters must be entered manually and will not change. All
Static IP
parameters are provided by the ISP.
DHCP Network parameters are provided automatically by a DHCP server.
Account and Password must be input manually. These are provided by your
PPPoE
ISP.
If Static IP is chosen, the screen below will appear. Enter values provided by the ISP.
DNS Server
Select the Configured mode of the DNS Server.
Configured by
Primary DNS
Server
Enter the server address of the Primary DNS.
Secondary
DNS Server
Enter the server address of the Seco ndary DNS .
Click the APPLY button after entering the new settings. The equipment will save the new settings
and apply them. If a new IP address was entered for the equipment, it must be used to login to
the phone after clicking the APPLY button.
Service Port Settings
Web Server
Specify Web Server Type – HTTP or HTTPS
Type
Port for web browser access. Default value is 80. Change this from the default
to enhance security. Setting this port to 0 will disable HTTP access.
HTTP Port
Example: The IP address is 192.168.1.70 and the port value is 8090, The
accessing address is http://192.168.1.70:8090.
Port for HTTPS access. An https authentication certification must be
HTTPS Port
downloaded into the equipment before using https.
Default value is 443. Change this from the default to enhance security.
Note:
1) Any changes made on this page require a reboot to become active.
2) It is suggested that the make the values bigger than 1024 if users change the port to HTTPS.
Values less than 1024 are reserved.
ZZZIDQYLOFRP
18 / 43
Page 19

`
3) If the HTTP port is set to 0, HTTP service will be disabled.
b) VPN
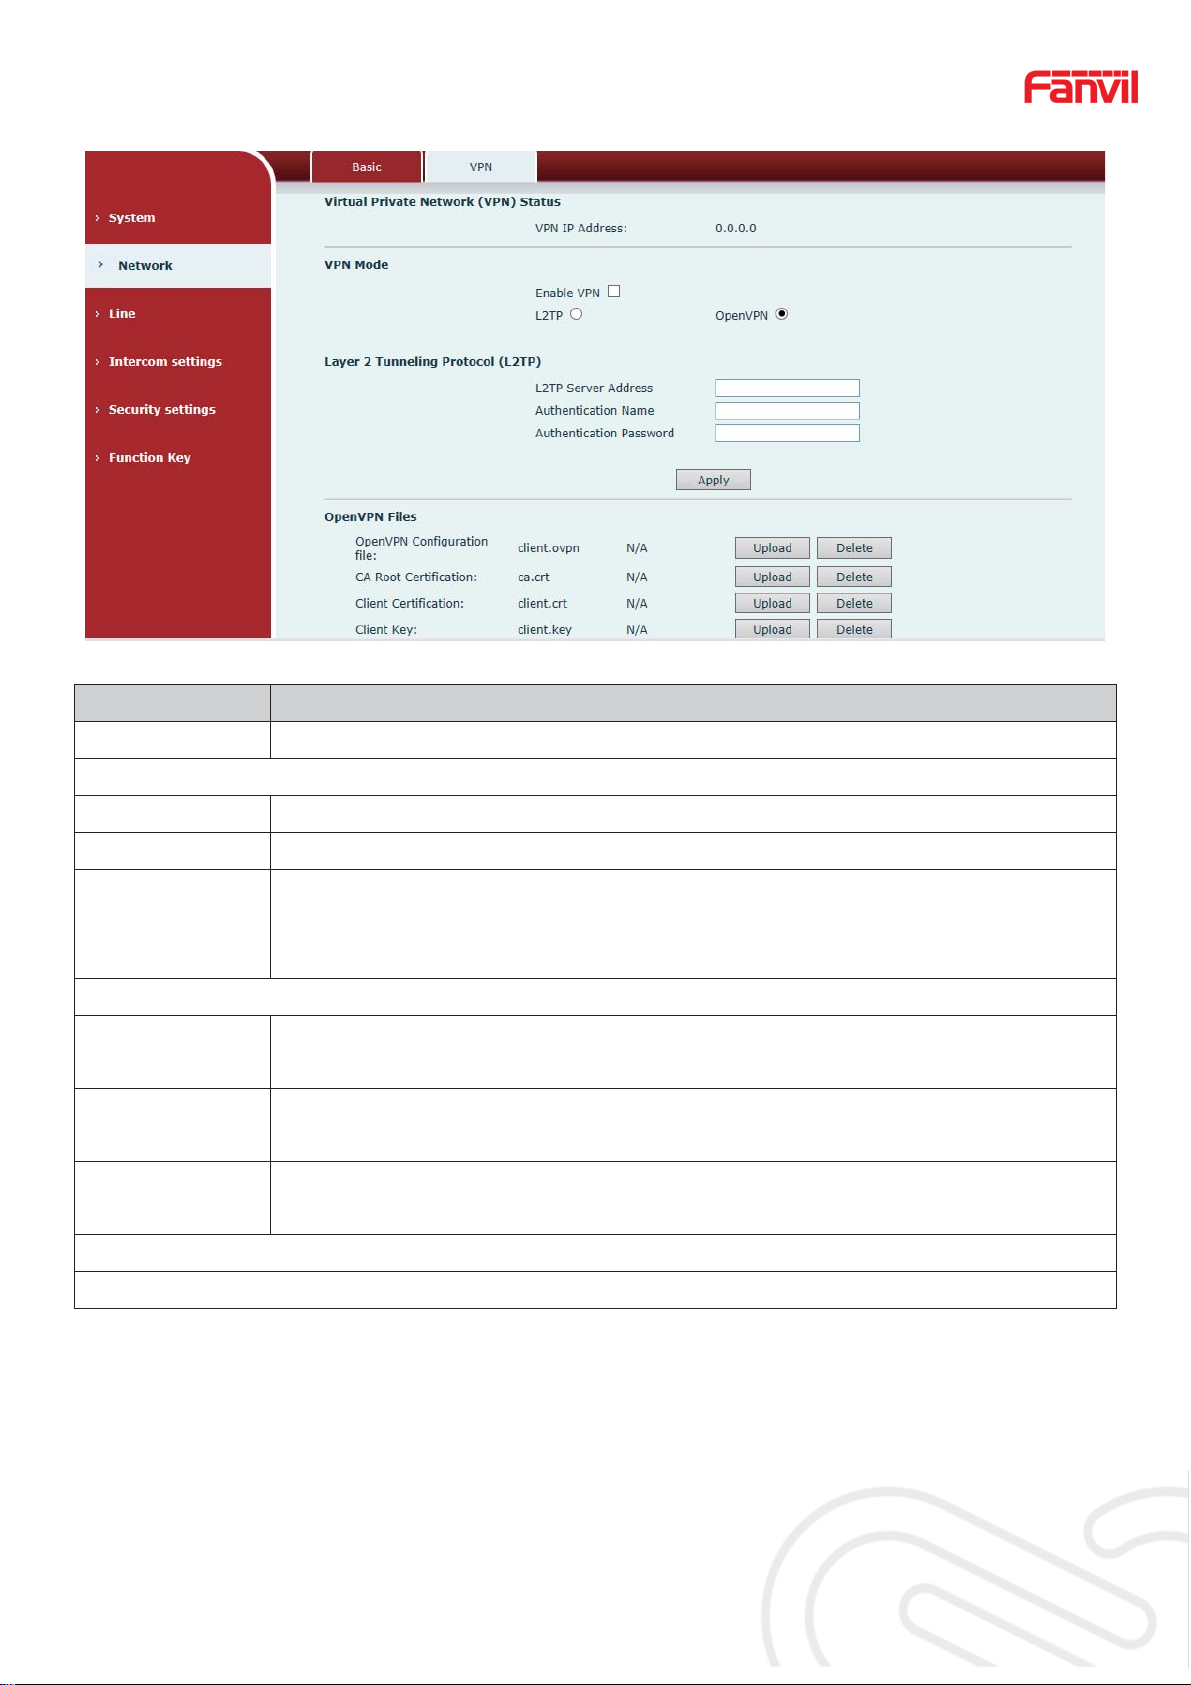
The device supports re mote co nnec tion v ia VPN . It s upports b oth La y er 2 Tunneling Protocol
(L2TP) and Open VPN protocol. This allows users securely connect from public network to
local network remotely.
19
ZZZIDQYLOFRP
19 / 43
Page 20
`
20
Field Name Explanation
VPN IP Address Shows the current VPN IP address.
VPN Mode
Enable VPN Enable/Disable VPN.
L2TP Select Layer 2 Tunneling Protocol
Select OpenVPN Protocol. (Only one protocol may be activated. After the
OpenVPN
selection is made, the configuration should be saved and the phone be
rebooted.)
Layer 2 Tunneling Protocol (L2TP)
L2TP Server
Set VPN L2TP Server IP address.
Address
Authentication
Set User Name access to VPN L2TP Server.
Name
Authentication
Set Password access to VPN L2TP Server.
Password
Open VPN Files
Upload or delete Open VPN Certification Files
(3)Line
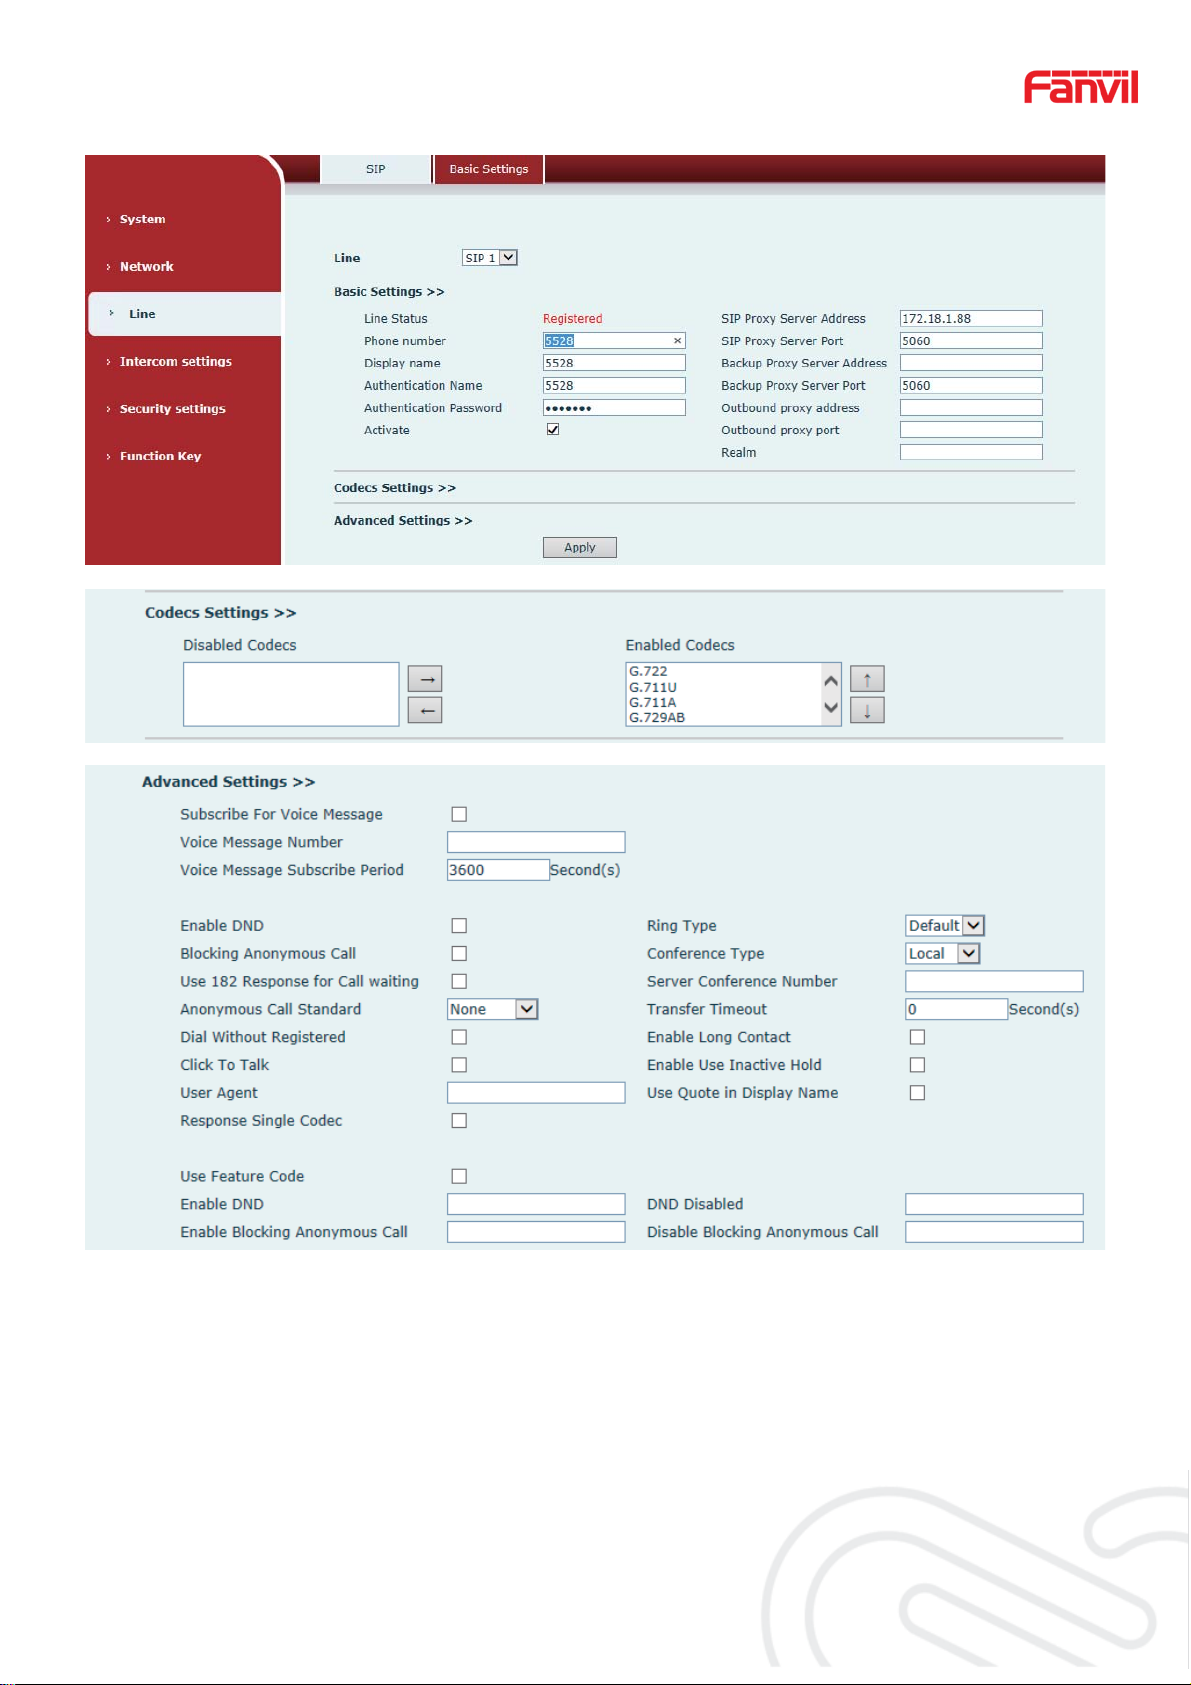
a) SIP
Configure a SIP server on this page.
ZZZIDQYLOFRP
20 / 43
Page 21
`
21
ZZZIDQYLOFRP
21 / 43
Page 22

`
SIP
22
Field Name Explanation
Basic Settings (Choose the SIP line to configured)
Display the current line status at page loading. To get the up to date line
status, user has to refresh the pag e manually. There are a few status her e:
1) Inactive, indicates that this line is not activated yet, user can activate
the line by selecting the option “activate”.
2) Timeout, indicates the SIP registration status timeout. It means that
there’s no response from SIP server. User may need to check the network
or SIP server IP address and port.
Line Status
3) Registered, indicates the SIP account is registered to SIP server
successfully, is able to send or receive calls.
4) 403 forbidden, indicates the SIP error code 403, means SIP server
rejected the SIP registration because the username and password are
incorrect. User will need to check the username and password, they must
be matched with the username and password which w er e pr ov i ded by SIP
server.
5) Other SIP error code, check SIP protocol standard, or contact support.
Username
Enter the username of the service account, assigned by IPPBX
administrator, or provided by ISP provider.
Display name Enter the display name to be sent in a call request.
Enter the authentication name of the service account, which is assigned
Authentication Name
by IPPBX administrator, or provided by ISP provider.
Authentication
Password
Enter the authentication password of the service account, which is
assigned by IPPBX administrator, or provided by ISP provider.
Activate Whether the service of the line should be activated
ZZZIDQYLOFRP
22 / 43
Page 23

`
23
SIP Proxy Server
Enter the IP or FQDN address of the SIP proxy server
Address
SIP Proxy Server Port Enter the SIP proxy server port, default is 5060
Outbound proxy
address
Enter the IP or FQDN address of outbound proxy server provided by the
service provider
Outbound proxy port Enter the outbound proxy port, default is 5060
Realm Enter the SIP domain if requested by the service provider
Codecs Settings
Set the priority and availability of the codecs by adding or remove them from the list.
Advanced Settings
Enable the device to subscribe a voice message waiting notification, if
Subscribe For Voice
enabled, the devi ce will receive notification from the server i f ther e i s voice
Message
message waiting on the server
Voice Message
Set the number for retrieving voice message
Number
Voice Message
Set the interval of voice message notification subscription
Subscribe Period
Enable DND
Enable Do-not-disturb, any incoming call to this line will be rejected
automatically
Blocking Anonymous
Reject any incoming call without presenting caller ID
Call
Use 182 Response for
Set the device to use 182 response code at call waiting response
Call waiting
Anonymous Call
Set the standard to be used for anonymous
Standard
Dial Without
Set call out by proxy without registration
Registered
Click To Talk Set Click To T alk
User Agent Set the user agent, the default is Model with Software Version.
Response Single
Codec
If setting enabled, the device will use single codec in response to an
incoming call request
Ring Type Set the ring tone type for the line
Set the type of call confer ence, Loc al= set up call con ference by the dev ice
Conference Type
itself, maximum supports two remote parties, Server=set u p call
conference by dialing to a conference room on the server
Server Conference
Number
Set the conference room number when conference type is set to be
Server
Transfer Timeout Set the timeout of call transfer process
Enable Long Contact Allow more parameters in contact field per RFC 3840
Use Quote in Display Whether to add quote in display name
ZZZIDQYLOFRP
23 / 43
Page 24

`
Name
24
When this setting is e nabled, the features in this section will not be
Use Feature Code
handled by the device itself but by the server instead. In order to control
the enabling of the features, the device will send feature code to the
server by dialing the number specified in each feature code field.
Specific Server Type Set the line to collaborate with specific server type
Registration
Set the SIP expiration interval
Expiration
Use VPN Set the line to use VPN restrict route
Use STUN Set the line to use STUN for NAT traversal
Convert URI Convert not digit and alphabet characters to %hh hex code
DTMF Type Set the DTMF type to be used for the line
DTMF SIP INFO
Set the SIP INFO mode to send ‘*’ and ‘#’ or ‘10’ and ‘11’
Mode
Transportation
Set the line to use TCP or UDP for SIP transmission
Protocol
Local Port Set the Local Port
SIP Version Set the SIP version
Caller ID Header Set the Caller ID Header
Enables the use of strict routing. When the phone receives packets from
Enable Strict Proxy
the server, it will use the source IP address, not the address in via field.
Enable user=phone Sets user=phone in SIP messages.
Enable SCA Enable/Disable SCA (Shared Call Appearance)
Enable BLF List Enable/Disable BLF List
Set the line to use DNS SRV which will resolve the FQDN in proxy server
Enable DNS SRV
into a service list
Set the line to use dummy UDP or SIP OPTION packet to keep NAT
Keep Alive Type
pinhole opened
Keep Alive Interval Set the keep alive packet transmitting interval
Set the line to enable call ending by session timer refreshment. The call
Enable Session Timer
session will be ended if there is not new session timer event update
received after the timeout period
Session T i meout Set the session timer timeout period
Enable rport Set the line to add rport in SIP headers
Enable PRACK Set the line to support PRACK SIP message
Set the line to use DNS SRV which will resolve the FQDN in proxy server
Enable DNS SRV
into a service list
Auto Change Port Enable/Disable Auto Change Port
Keep Authentication Keep the authentication parameters from previous authentication
ZZZIDQYLOFRP
24 / 43
Page 25

`
25
Auto TCP
Using TCP protocol to gua rantee usability of transport for SIP messages
above 1500 bytes
Enable Feature Sync Feature Sycn with server
Enable GRUU Support Globally Routable User-Agent URI (GRUU)
RTP Encryption Enable RTP encryption such that RTP transmission will be encrypted
RTP Encryption Key Set the pass phrase for RTP encryption
b) Basic Settings
STUN -Simple Traversal of UDP through NAT -A STUN server allows a phone in a private
network to know its public IP and port as well as the type of NAT being used. The equipment
can then use this information to register itself to a SIP server so that it can make and receive
calls while in a private network.
Basic Settings
ZZZIDQYLOFRP
25 / 43
Page 26
`
Field Name Explanation
SIP Settings
Local SIP Port Set the local SIP port used to send/receive SIP messages.
26
Registration Failure
Set the retry interval of SIP REGISTRATION when registration failed.
Retry Interval
Enable Strict UA
Enable or disable Strict UA Match
Match
DHCP Server would respond an OPTION message to the request from
DHCP client. To working with the terminal device, Access device and DHCP
policy server would be able to implement the zero configuration and auto
Enable DHCP
provisioning. OPTION 120 is one o f the OPTI ONS in w hich the devi ce could
Option 120
obtain the SIP server address from the ACK response sent back by the
DHCP server. Then the SIP Agent of terminal device starts register with the
SIP server address.
Strict Branch The value determined whether it’s exactly matched the Branch
STUN Settings
Server Address STUN Server IP address
Server Port STUN Server Port – Default is 3478.
STUN blinding period – STUN packets are sent at this interval to keep the
Binding Period
NAT mapping active.
SIP Waiting Time Waiting time for SIP. This will vary depending on the network.
TLS Certification File
Upload or delete the TLS certification file used for encrypted SIP transmission.
Note: the SIP STUN is used to achieve the SIP penetration of NAT, and the realization of a
service, when the equipment configuration of the STUN server IP and port (usually the default is
3478), and select the Use Stun SIP server, the use of NAT equipment to achieve penetration.
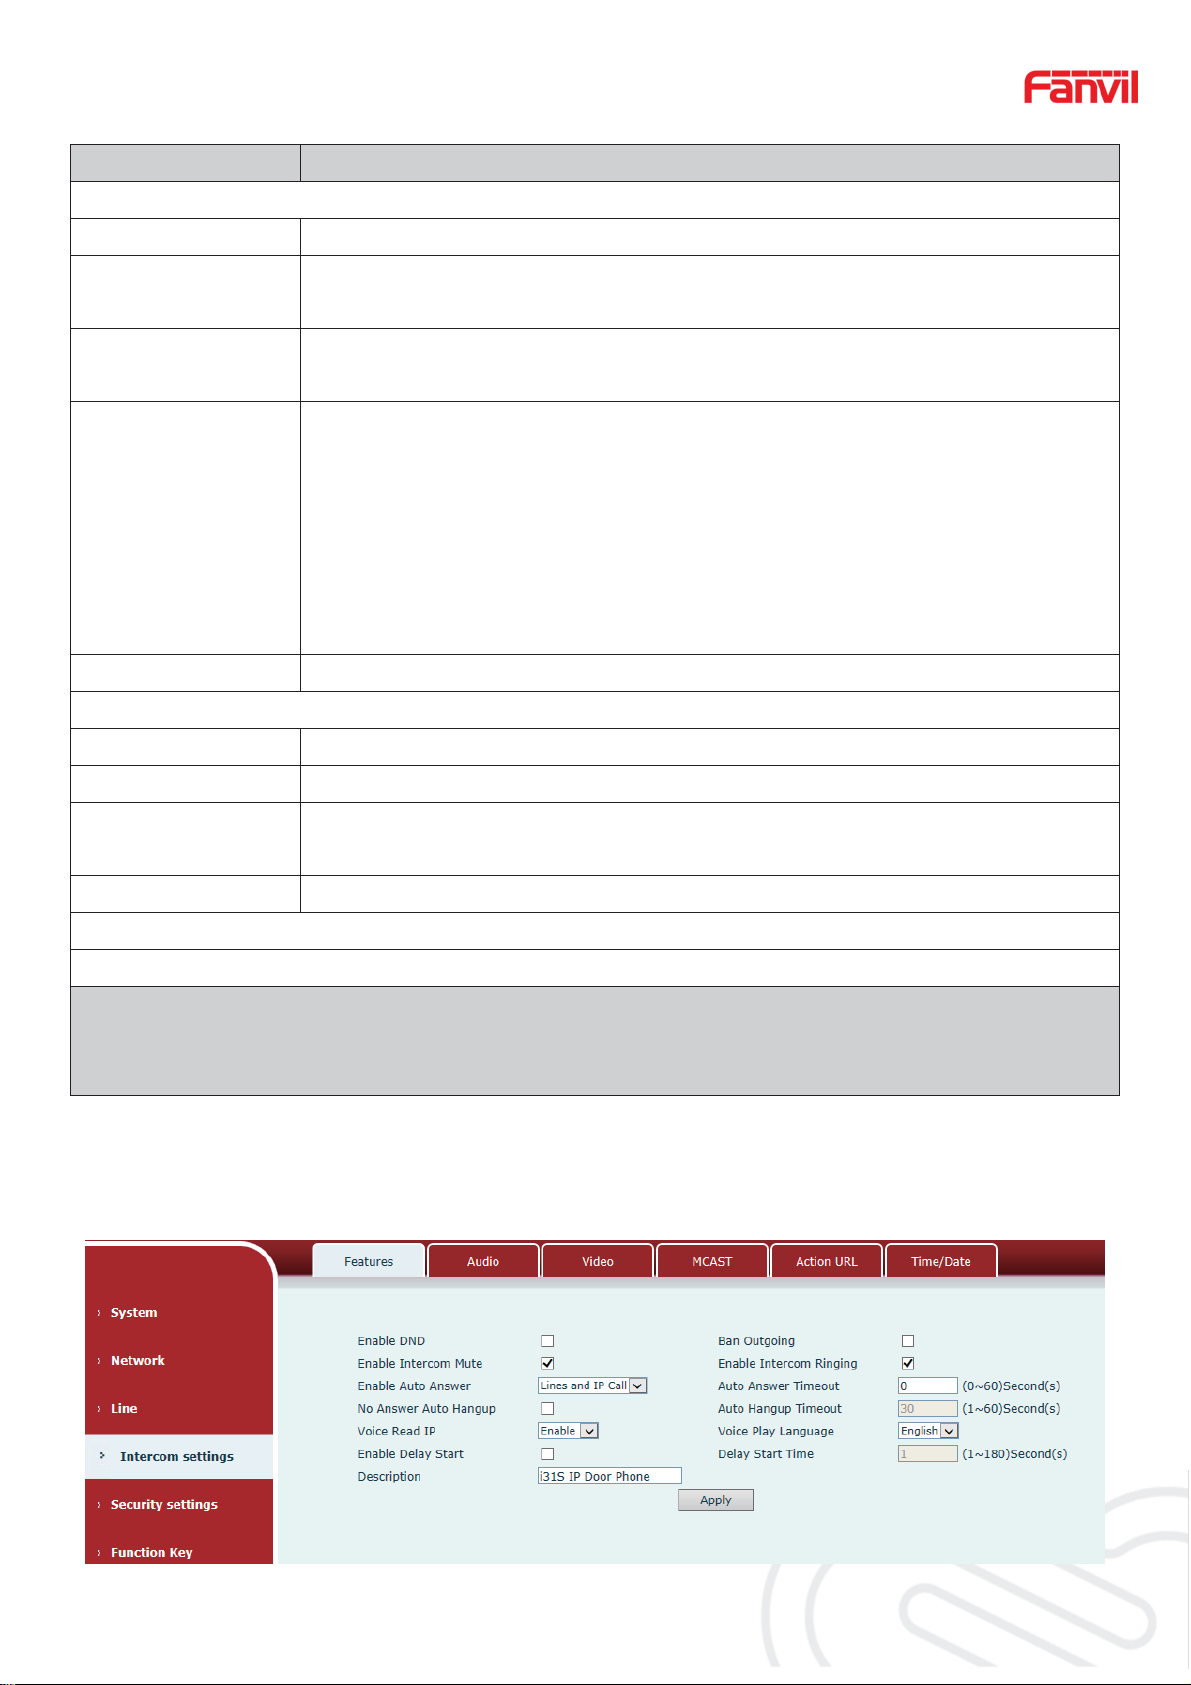
(4)Intercom settings
a) Features
ZZZIDQYLOFRP
26 / 43
Page 27

`
Features
Field Name Explanation
Basic Settings
27
Enable DND
DND might be disabled phone for all SIP lines, or line for SIP individually.
But the outgoing calls will not be affected
Ban Outgoing If enabled, no outgoing calls can be made.
Enable Intercom
If enabled, mutes incoming calls during an intercom call.
Mute
Enable Intercom
If enabled, plays intercom ring tone to alert to an intercom call.
Ringing
Enable Auto Answer Enable Auto Answer function
Auto Answer Timeout Set Auto Answer Timeout
No Answer Auto
Enable automatically hang up when no answer
Hangup
Auto Hangup
Configuration in a set time, automatically hang up when no answer
Timeout
Voice Read IP Enable or disable voice broadcast IP address
Voice Play Language Set language of the voice prompt
Enable Delay Start Enable or disable the start delay
Delay Start Time Set start delay time
Device description displayed on IP sca nni ng toolsoftware. Initial Value is
Description
“i18S”.
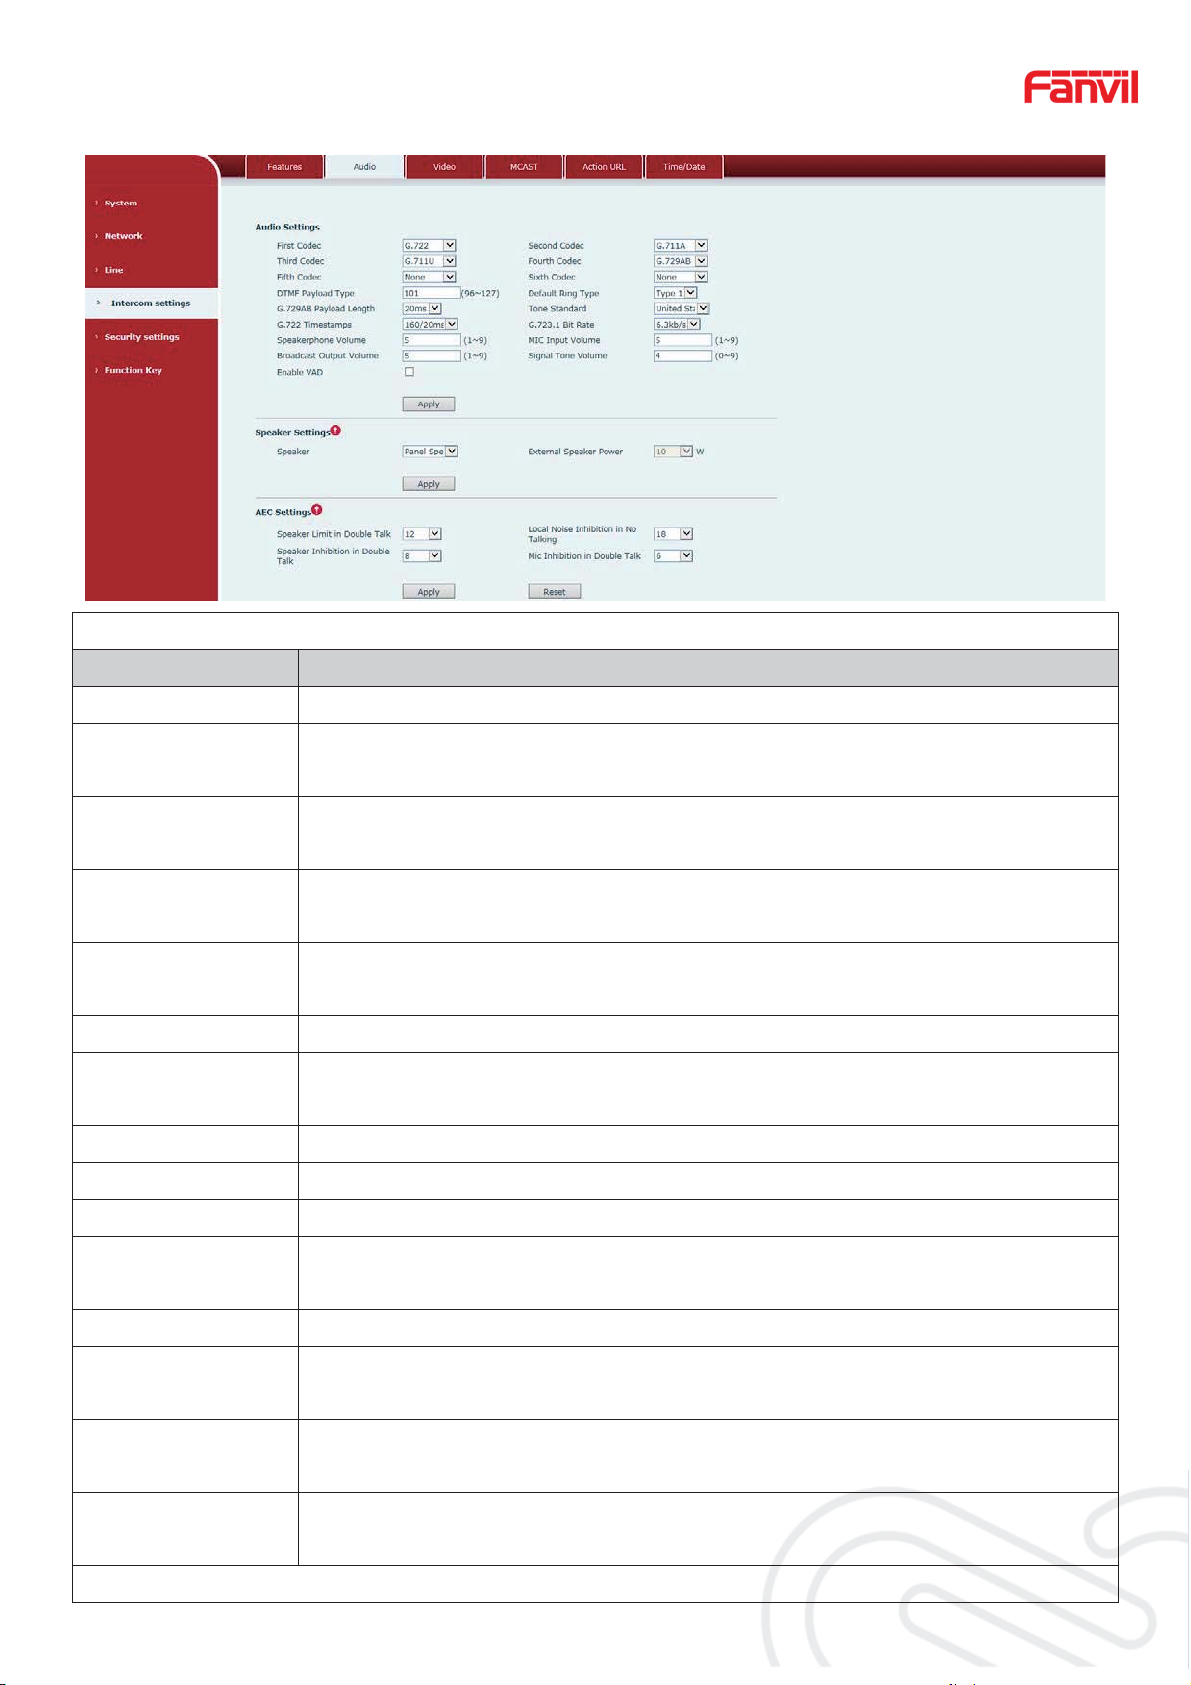
b) Audio
This page configures audio parameters such as voice codec, speak volume, mic volume
and ringer volume.
ZZZIDQYLOFRP
27 / 43
Page 28
`
Audio Setting
28
Field Name Explanation
First Codec The first codec choice: G.711A/u, G.722ˈG.723.1, G.729ABˈG.726-32
The second codec choice: G.7 11A/u, G.72 2ˈG.723.1, G.729ABˈG.726-32,
Second Codec
None
The third codec choice: G.711A/u, G.722ˈG.723.1, G.729ABˈG.726-32,
Third Codec
None
The forth codec choice: G.711A/u, G.722ˈG.723.1, G.729ABˈG.726-32,
Fourth Codec
None
DTMF Payload
The RTP Payload type that indicates DTMF. Default is 101
Type
Default Ring Type Ring Sound – There are 9 standard types and 3 User types.
G.729AB Payload
G.729AB Payload Length –Adjusts from 10 – 60 ms.
Length
Tone Standard Configure tone standard area.
G.722 Timestamps Choices are 160/20ms or 320/20ms.
G.723.1 Bit Rate Choices are 5.3kb/s or 6.3kb/s.
Speakerphone
Set the speaker calls the volume level.
Volume
MIC Input Volume Set the MIC calls the volume level.
Broadcast Output
Set the broadcast the output volume level.
Volume
Signal Tone
Set the audio signal the output volume level.
Volume
Enable or disable Voice Activity Detection (VAD). If VAD is enabled, G729
Enable VAD
Payload length cannot be set greater than 20 ms.
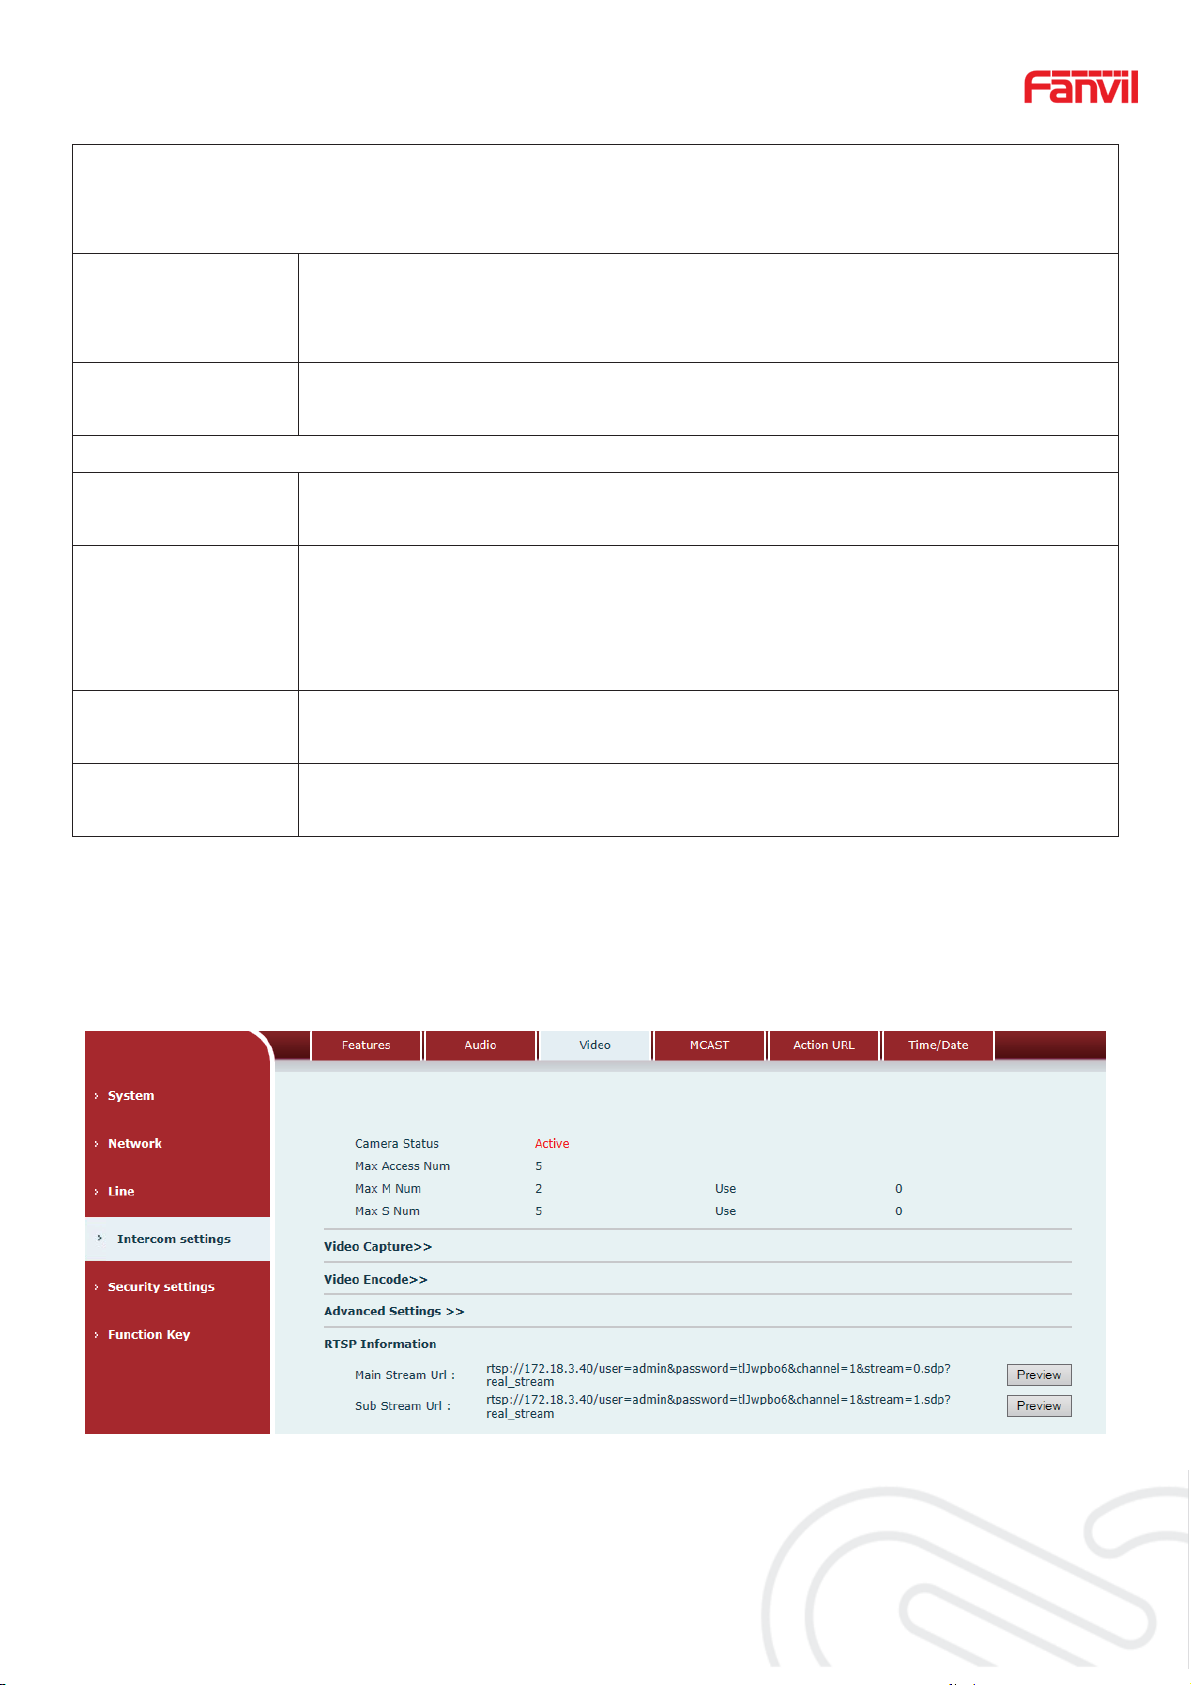
Speaker Settings
ZZZIDQYLOFRP
28 / 43
Page 29
`
29
These settings are only for the devices which support multiple ou tput power. Be aware of that,
the selected output power must be less than the real output power of the external speak,
otherwise the external speak might be damaged.
The embedded speaker can be set t o use st at ic output power mode, and the ext ernal
Speaker
External Speaker
Power
AEC Settings
Speaker Limit in
Double Talk
Local Noise
Inhibition in No
Talking
Speaker Inhibition in
Double T alk
Mic Inhibition in
Double Talk
speak can be set as 10W, 20W, 30 W output power. NOTE: this device support
embedded speaker
Set the external speaker power, it must be lower than the real power of the external
speaker, otherwise the external speaker might be damaged.
Limit maximum volume of the speaker while it’s in the two-way
conversation, the bigger the value, the loader the volume allowed.
While there’s no talking on the conversation, the background noise will be inhibit ed,
this value determined how much it’s inhibit ed. The higher the value, the more
background noise will b e inhibited. It’s not recommended to set it too big, because
there will be more background nois e w hile talking in the conversation.
Set the speaker inhibition while it’s in the two-way conversation, the higher of the
inhibition value, the s ma ll er of the volume.
Set the MIC inhibition w hil e it’ s in t h e two- way conv ersation, t he hig her o f the inhi biti on
value, the smaller of the v olume.
c) Video
This page allows you to set the video capture and video encode.
ZZZIDQYLOFRP
29 / 43
Page 30

`
30
Video
Field Name Explanation
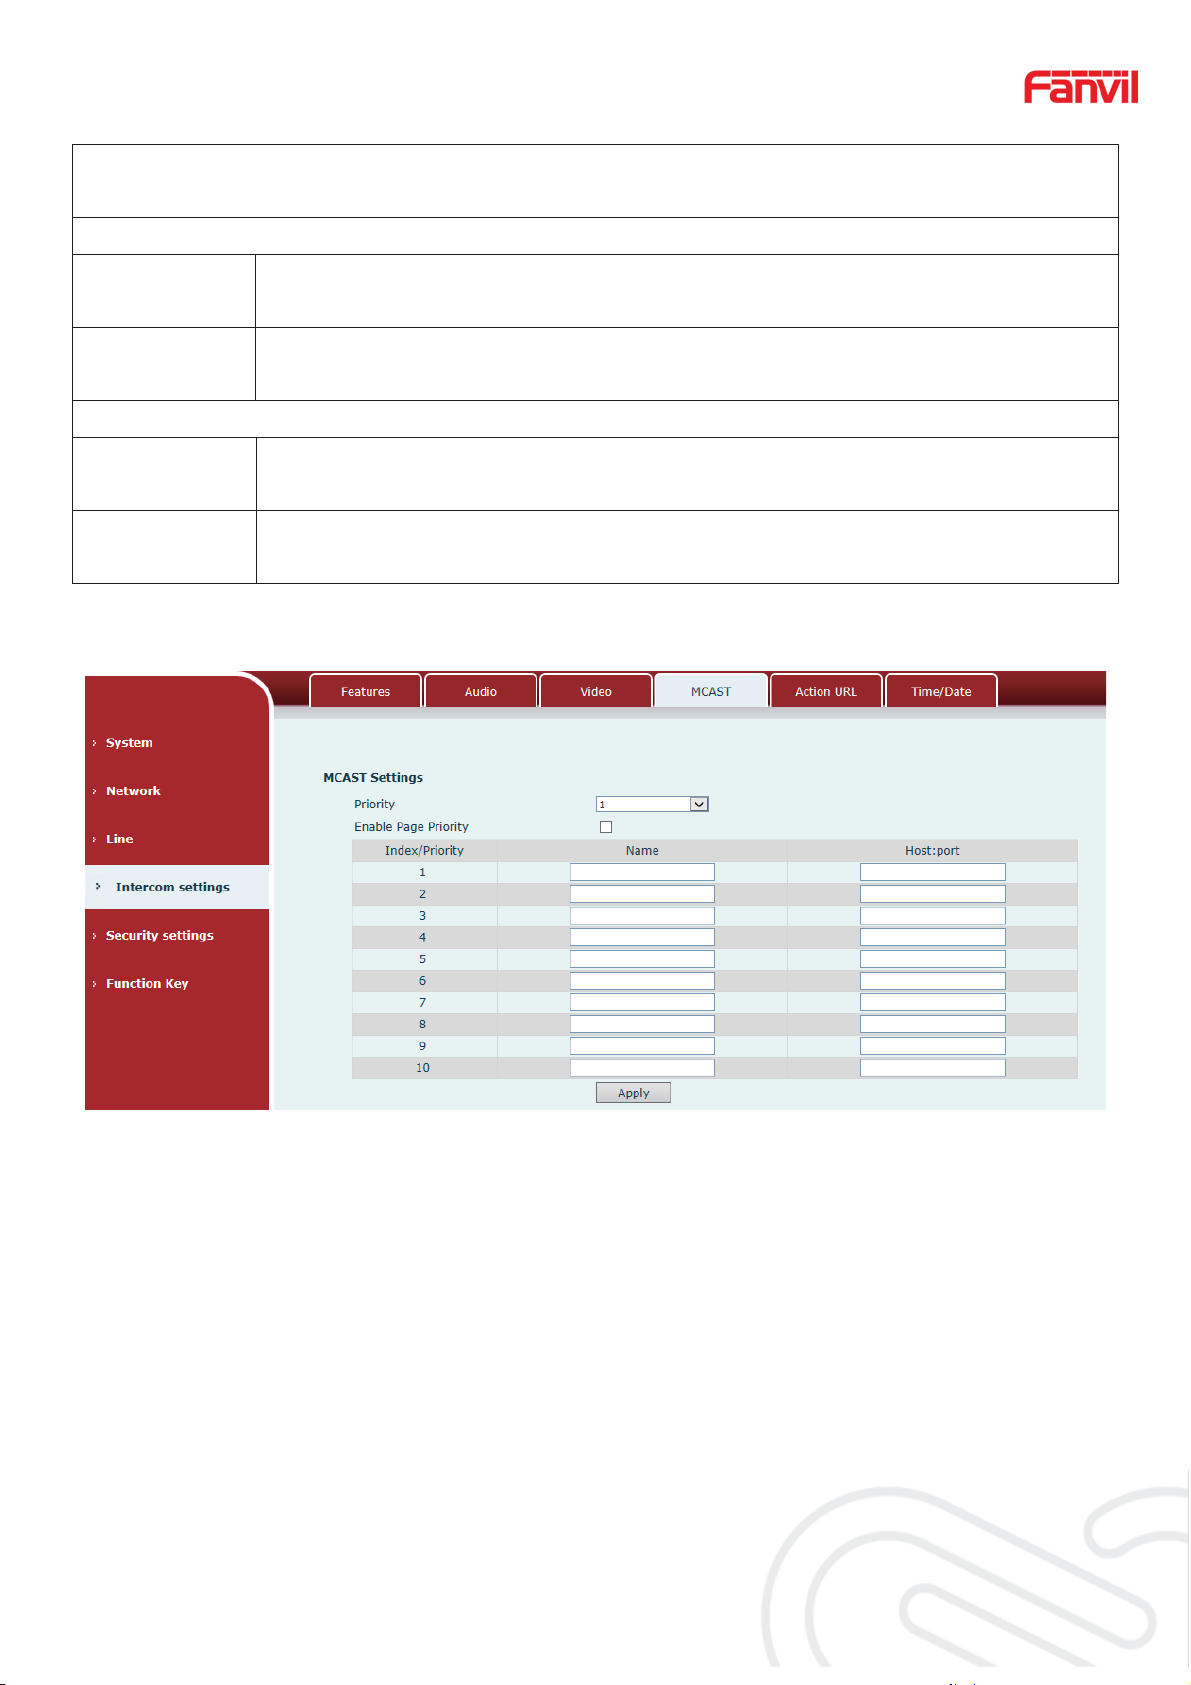
Camera Status˖Display the relevant information of the camera, including maximum access,
maximum stream, maximum sub stream, and the status.
Video Capture
Auto: IRCUT switches according to the actual ambient light level of the cam era
IRCUT Mode
Synchronization: The switching of the IRCUT is determined by the actual
brightness of the IR lamp.
ZZZIDQYLOFRP
30 / 43
Page 31

`
31
Automatic: automatically switches according to the DNC Threshold and the
brightness of the actual environment where the camera is located
Day/Night
Mode
Day Mode: The camera's video screen is always colored, if there is IR-cut will
be synchronized to switch.
Night Mode: the camera's video screen is always black and white, if there is
IR-cut will be synchronized switch.
Automatic: Automatically adjusts according to the actual environment in which
the camera is located.
White Balance
Outdoor: installed in the outdoor preferred.
Indoor: installed in the room preferred.
Horizon Flip The video is flipped horizontally
Enable the option. In a fluorescent environment can eliminate the video
Anti Flicker
horizontal scroll
Vertical Flip The video is flipped horizontally
IR Swap IR-cut filter switch
DNC
Threshold
In the Day / Night mode Auto option, the color switching black and white
threshold is set
Backlight
In front of a very strong background light can see people or objects clearly
Compensation
AutoFill
Sensitivity
In the environment changes in light and shade, the higher the sensitivity the
faster the video changes
wide Dynamic Set wide dynamic
Wide Dynamic
Change the brightness of the background image, the higher the brighter.
Upper Limit
Fill Light Enable or disable Fill Light
Video Encode
Encode
Only H.264 encoding format is supported
Format
Main stream: support 720P
Resolution
Sub-stream: you can select CIF (352 * 288), D1 (720 * 576)
The larger the value is, the more coherent the video would be got; not
Frame Rate
recommend adjusted.
CBR: If the code rate (bandwidth) is insufficient, it is preferre d.
Bitrate Control
VBR: Image quality is preferred, not recommended.
Quality Video quality adjustment, the better the quality needs to transfer faster
Bit rate It is proportional to video file size, not recommend adjusted.
I Frame
Interval
The greater the value is, the worse the video quality would be, otherwise the
better video quality would be; not recommend adjusted.
Activate When you s elected it, the stream is enabled, otherwise disab led
Encode Static config
ZZZIDQYLOFRP
31 / 43
Page 32
`
32
Select the video codec type, it’s recommended to use “Base Line” to stay the same as the video
output or stream receiver.
Advanced Settings
Video
Select the transport type of the video stream
Direction
H.264 Payload
Set the payload type of H.264
Type
RTSP Information
Main Stream
Access the main address of RTSP
Url
Sub Stream
Access the child address of RTSP
Url
d) MCAST
It is easy and convenient to use multicast function to send notice to each member of the
multicast via setting the multicast key on the device and sending multicast RTP stream to
pre-configured multicast address. By configuring monitoring multicast address on the device,
monitor and play the RTP stream which sent by the multicast address.
MCAST Settings
Equipment can be set up to monitor up to 10 different multicast address, used to receive
the multicast RTP stream sent by the multicast address.
Here are the ways to change equipment receiving multicast RTP stream processing mode
in the Web interface: set the ordinary priority and enable page priority.
z Priority:
In the drop-down box to choose priority of ordinary calls the priority, if the priority of the
ZZZIDQYLOFRP
32 / 43
Page 33

`
33
incoming flows of multicast RTP, lower precedence than the current common calls, device will
automatically ignore the group RTP stream. If the priority of the incoming flow of multicast RTP
is higher than the current common calls priority, device will automatically receive the group RTP
stream, and keep the current common calls in state. You can also choose to disable in the
receiving threshold drop-down box, the device will automatically ignore all local network
multicast RTP streams.
z The options are as follows:
1-10: To definite the priority of the common calls, 1 is the top level while 10 is the lowest
Disable: ignore all incoming multicast RTP stream
Enable the page priority:
Page priority determines the device how to deal with the new receiving multicast RTP
stream when it is in multicast session currently. When Page priority switch is enabled, the
device will automatically ignore th e low priority multicast RTP stream but receive top-level
priority multicast RTP stream and keep the current multicast session in state; If it is not
enabled, the device will automatically ignore all receiving multicast RTP streams.
z Web Settings:
The multicast SS priority is higher than that of EE, which is the highest priority.
Note: when pressing the multicast key for multicast session, both multicast sender and
receiver will beep.
ZZZIDQYLOFRP
33 / 43
Page 34
`
Listener configuration
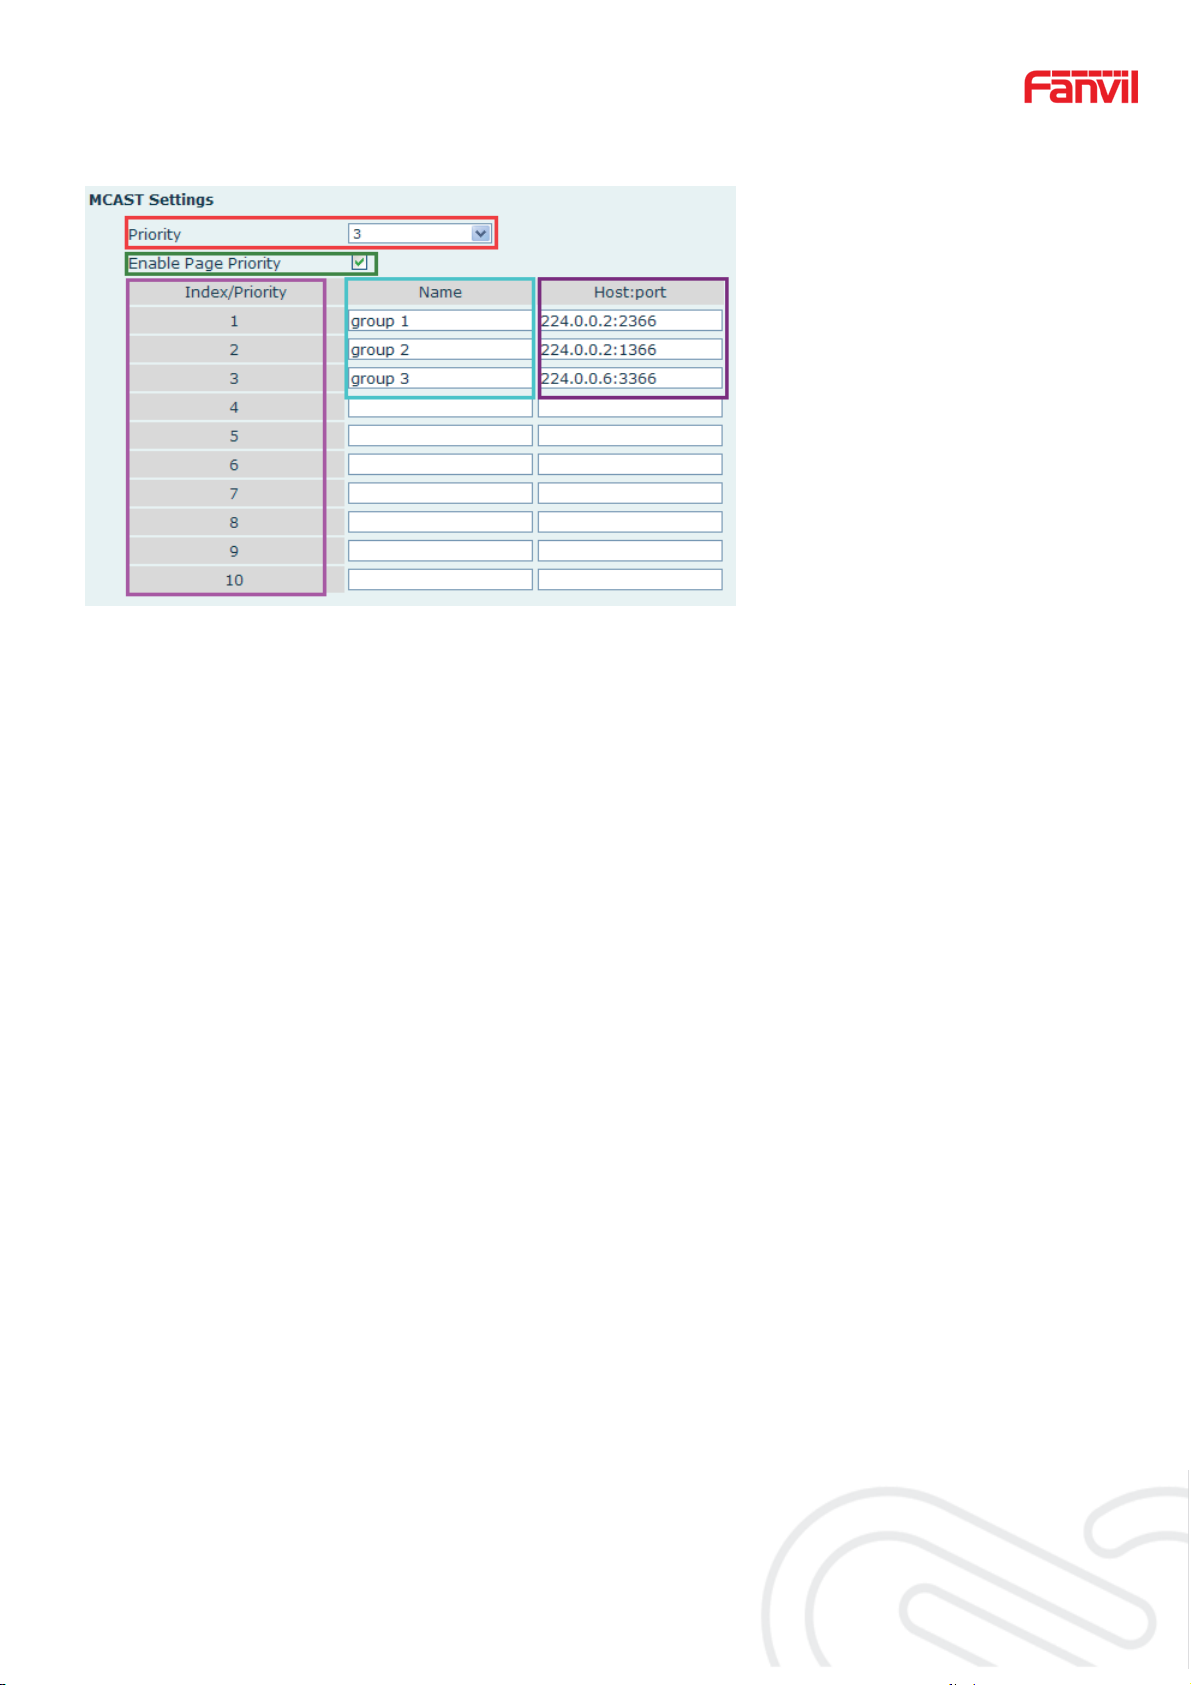
z Blue part (name)
34
"Group 1","Group 2" and "Group 3" are the names of the moni toring multicast which you set.
The group name will be displayed on the screen when you answer the multicast. If you have not
set, the screen will display the IP: port directly.
z Purple part (host: port)
It is a set of addresses and ports to listen, separated by a colon.
z Pink part (index / priority)
Multicast is a sign of listening, but also the monitoring multicast priority. The smaller number
refers to higher priority.
z Red part (priority)
It is the general call, non-multicast call priority. The smaller number refers to higher priority.
The followings will explain how to use this option:
The purpose of setting monitoring multicast "Group 1" or "Group 2" or "Group 3" is able to
launch a multicast call.
All equi pme nt has one or more common non-multicast communications.
When you set the Priority for the disabl e, an y level of mult icast will not answer. Multicast call
is rejected.
When you set the Priority to a value, only higher than the priority of multicast can get access.
If you set the Priority i s 3, g r oup 2 and group 3 for priority level equal to 3 or l ess tha n 3 were
rejected, 1 priority is 2 higher than ordinary call priority. Device can answer the multicast
message and hold the other call at the same time
z Green part (Enable Page priority)
User can set whether to open more priority to be is the priority of multicast, Multicast is the
pink part number. Explain how to use:
The purpose of setting monitoring multicast "group 1" or "3"is to set up listening "group of 1"
or "3" as multicast address multicast call.
All equipment has been a path or multi-path to multicast phone, such as listening to
ZZZIDQYLOFRP
34 / 43
Page 35
`
35
"multicast information group 2".
If multic ast i s a n ew "group of 1 ", the n the c all w ill come in. Beca use "the priority group 1" is 2,
higher than the current call "priority group 2" 3
If multicast is a new "group of 3", "1" will listen to the equipment and maintain the "group of 2”.
Because "the priority group 3" is 4, lower than the current call "priority group 2" 3,
Multicast service
z Send: When configu red d one, ou r key will pr ess sh ell o n the correspo nding e quipm ent. The
equipment will turn into the talking interface directly. The premise is to ensure no current
multicast call and 3-way of the case. T hen the multicast can be established.
z Monitor: It is the IP port and priority configuration monitoring device. When the call is
initiated and incoming multicast, it will turn into the Talking interface equipment directly.
e) Action URL
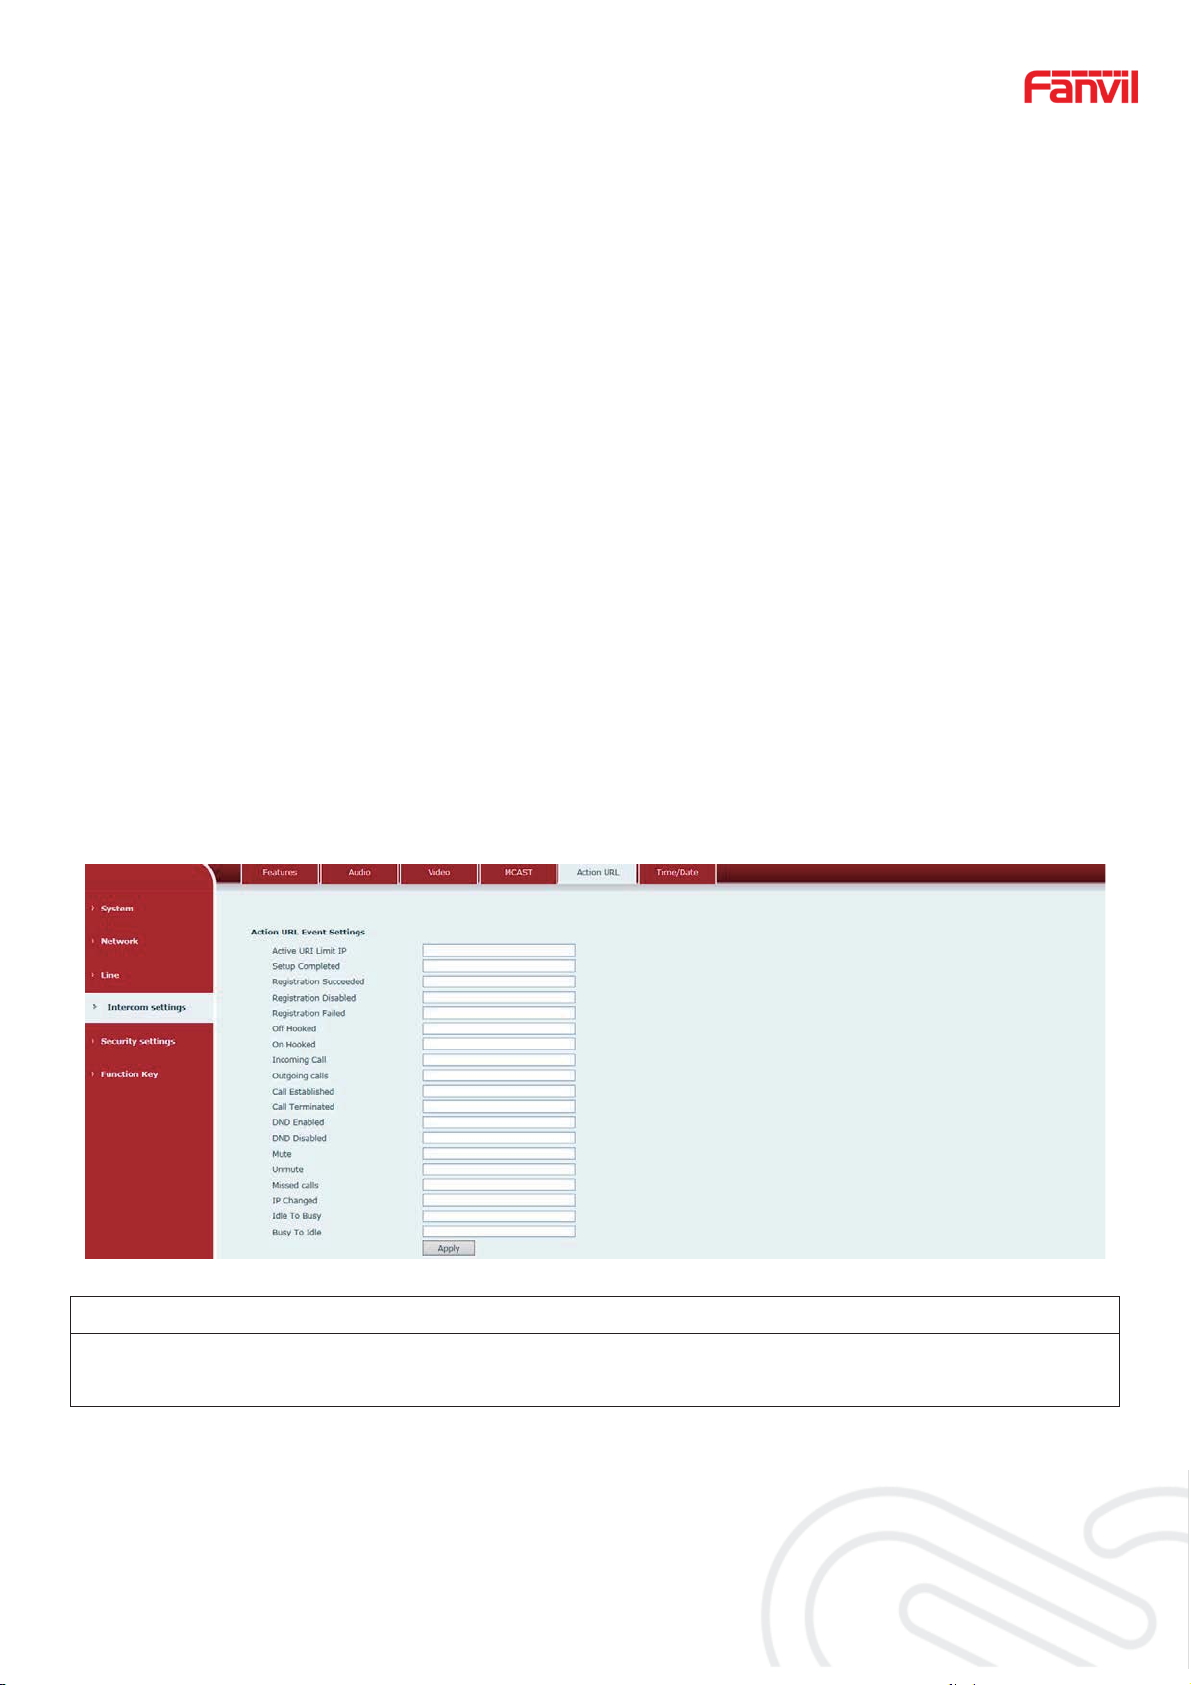
Action URL Settings
URL for various actions is performed by the phone. These actions are recorded and sent as xml
files to the server. Sample format is http://InternalServer /FileName.xml
ZZZIDQYLOFRP
35 / 43
Page 36

`
f) Time/Date
Time/Date
36
Field Name Explanation
Network Time Server Settings
Time Synchronized
via SNTP
Enable time-sync through SNTP protocol
Time Synchronized
via DHCP
Enable time-sync through DHCP protocol
Primary T i me Serv er
Secondary T ime
Server
Time zone
Resync Period
Set primary time server address
Set secondary time server address, when primary server is not reachable, the device
will try to connect to secondary t ime server to get time synchronization.
Select the time zone
Time of re-synchronization with time server
Date Format
Date Format
Select the time/date dis play format
Daylight Saving Time Settings
Location
Select the user's time zone specific area
Select automatic DST according to the preset rules of DST, or the manually input
DST Set Type
rules
Manual Time Settings
The time set by hand, need to disable SNTP service first.
ZZZIDQYLOFRP
36 / 43
Page 37
`
(5)Security settings
37
Security settings
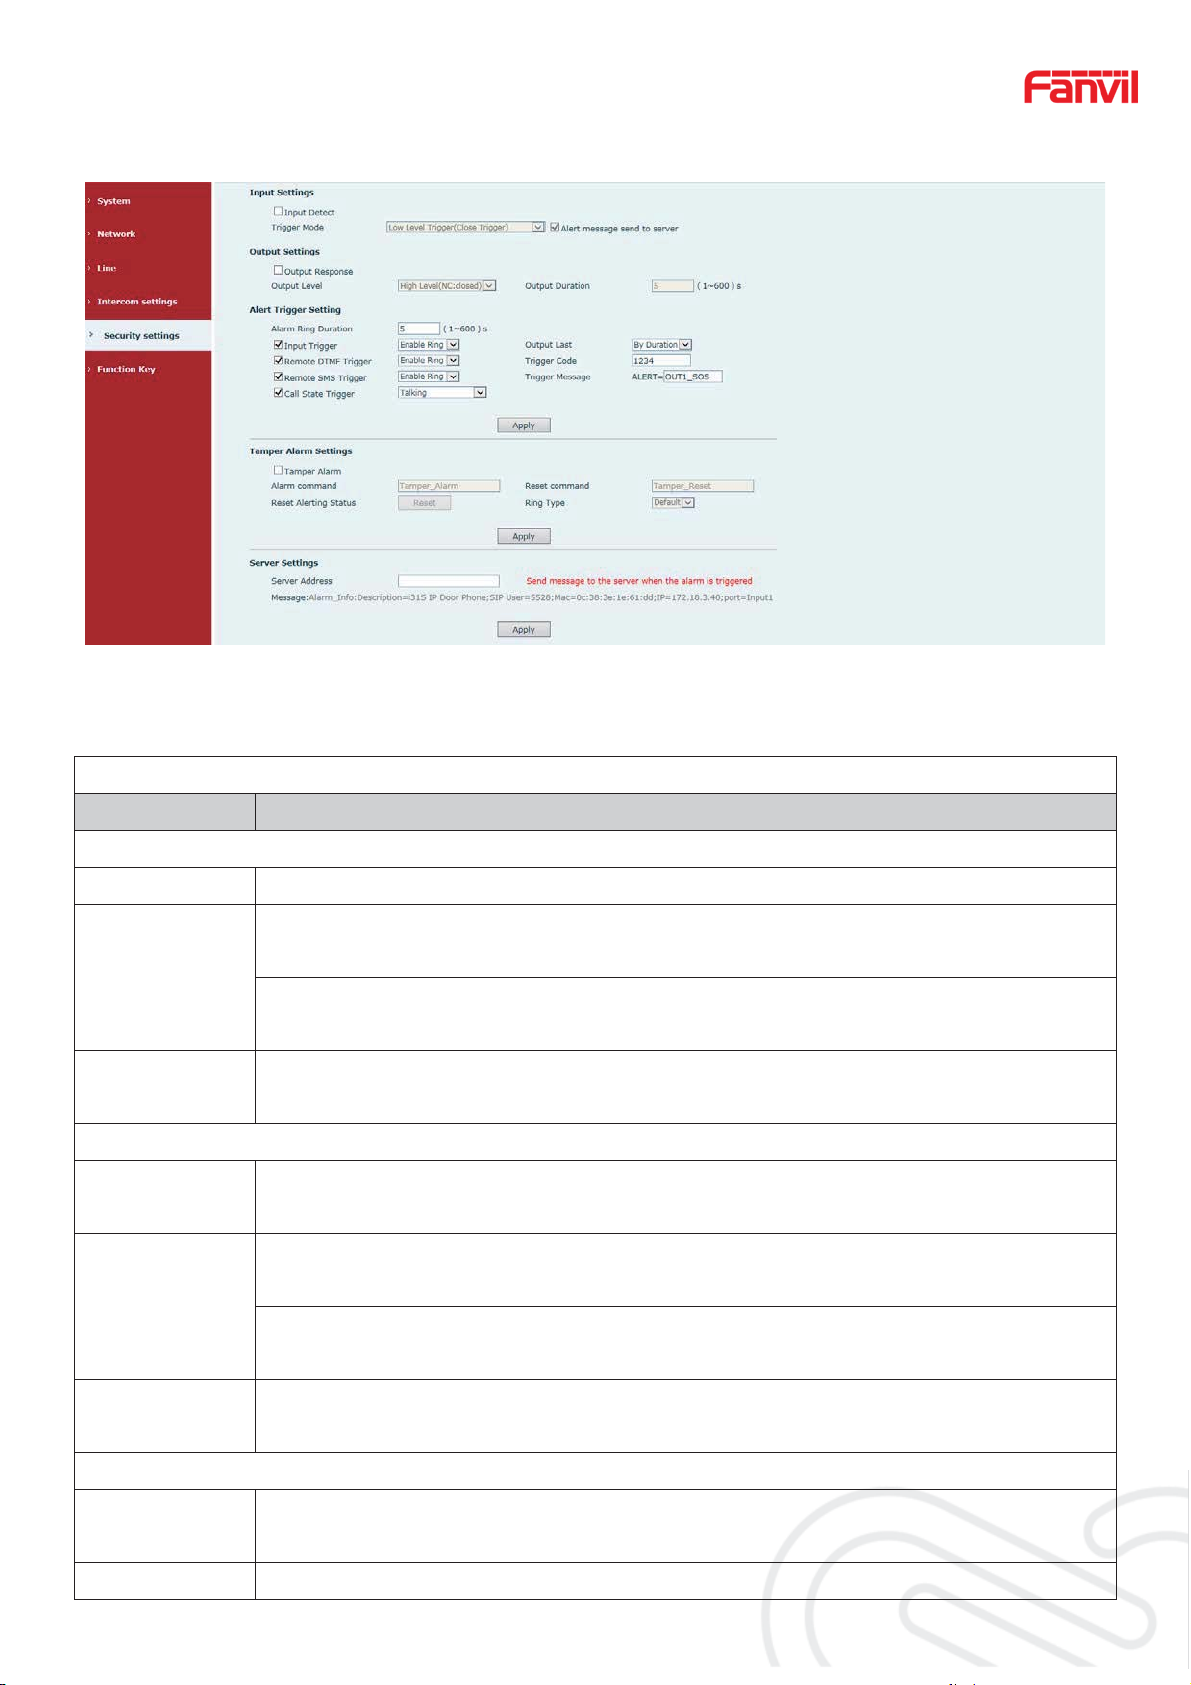
Field Name Explanation
Input settings
Input Detect Enable input detection
Low Level Trigger(Close Trigger),Double short circuit detection port(If it is
single port, is the low level)Detection to trigger when closed
Trigger Mode
High Level Trigger(Disconnect Trigger),Double short circuit detection port(If it is
single port, is the high level)Detection to trigger when disconnect.
Alert message
send to server
When meet the input port to trigger condition, to the server sends the alarm
information correspondence.
Output Settings
Output
Enable output port detection
Response
Low Level(NO: always on )When meet the trigger condition, trigger the NO port
disconnected.
Output Level
High Level(NC: always off )When meet the trigger condition, trigger the NC
port close.
Output
Define the output Duration change of output port.˄1~600S˅
Duration
Alert Trigger Setting
Alarm Ring
Define the output Duration change of output port.˄1~600S˅
Duration
Input Trigger When the input port meet to trigger condition, the output port will be triggered
ZZZIDQYLOFRP
37 / 43
Page 38

`
38
By Duration˖
Received the terminal equipment to send the DTMF password, if correct, which
triggers the corresponding output port (The Port level time change, By < Outpu t
Remote DTMF
Duration> control)
By Calling State˖
Trigger
During the call, receive the terminal equipment to send the DTMF password, if
correct, which triggers the corresponding output port (The Port level time
change, by call state control, after the end of the call, port to return the default
state)
Remote SMS
Trigger
In the remote device or server to send instructions to ALERT=[instructions], if
correct, which trigge rs the corresponding output port
The port output continuous time synchronization and trigger state changes,
Call State
Trigger
including the trigger conditions: 1, call; 2, call and singing; 3, singing; three
models. (for example: the call trigger ou tput port, will be in conversation state
continued to output the corresponding lev el )
T amper A larm Settings
Tamper Alarm When the selection is enabled, the tamper detec tion enabled
Alarm
command
When dete cted someone tampering the equipment, will be sent alarm to the
corresponding server
Reset
command
Reset Alerting
Status
Server Settings
Server
Address
When the equipment receives the command of reset from se rver, the
equipment will stop alarm
Directly stop the alarm from equipment i n the We bpage
Configure remote response server address (including remote response server
address and tamper alarm server address)
ZZZIDQYLOFRP
38 / 43
Page 39
`
(6)Function Key
39
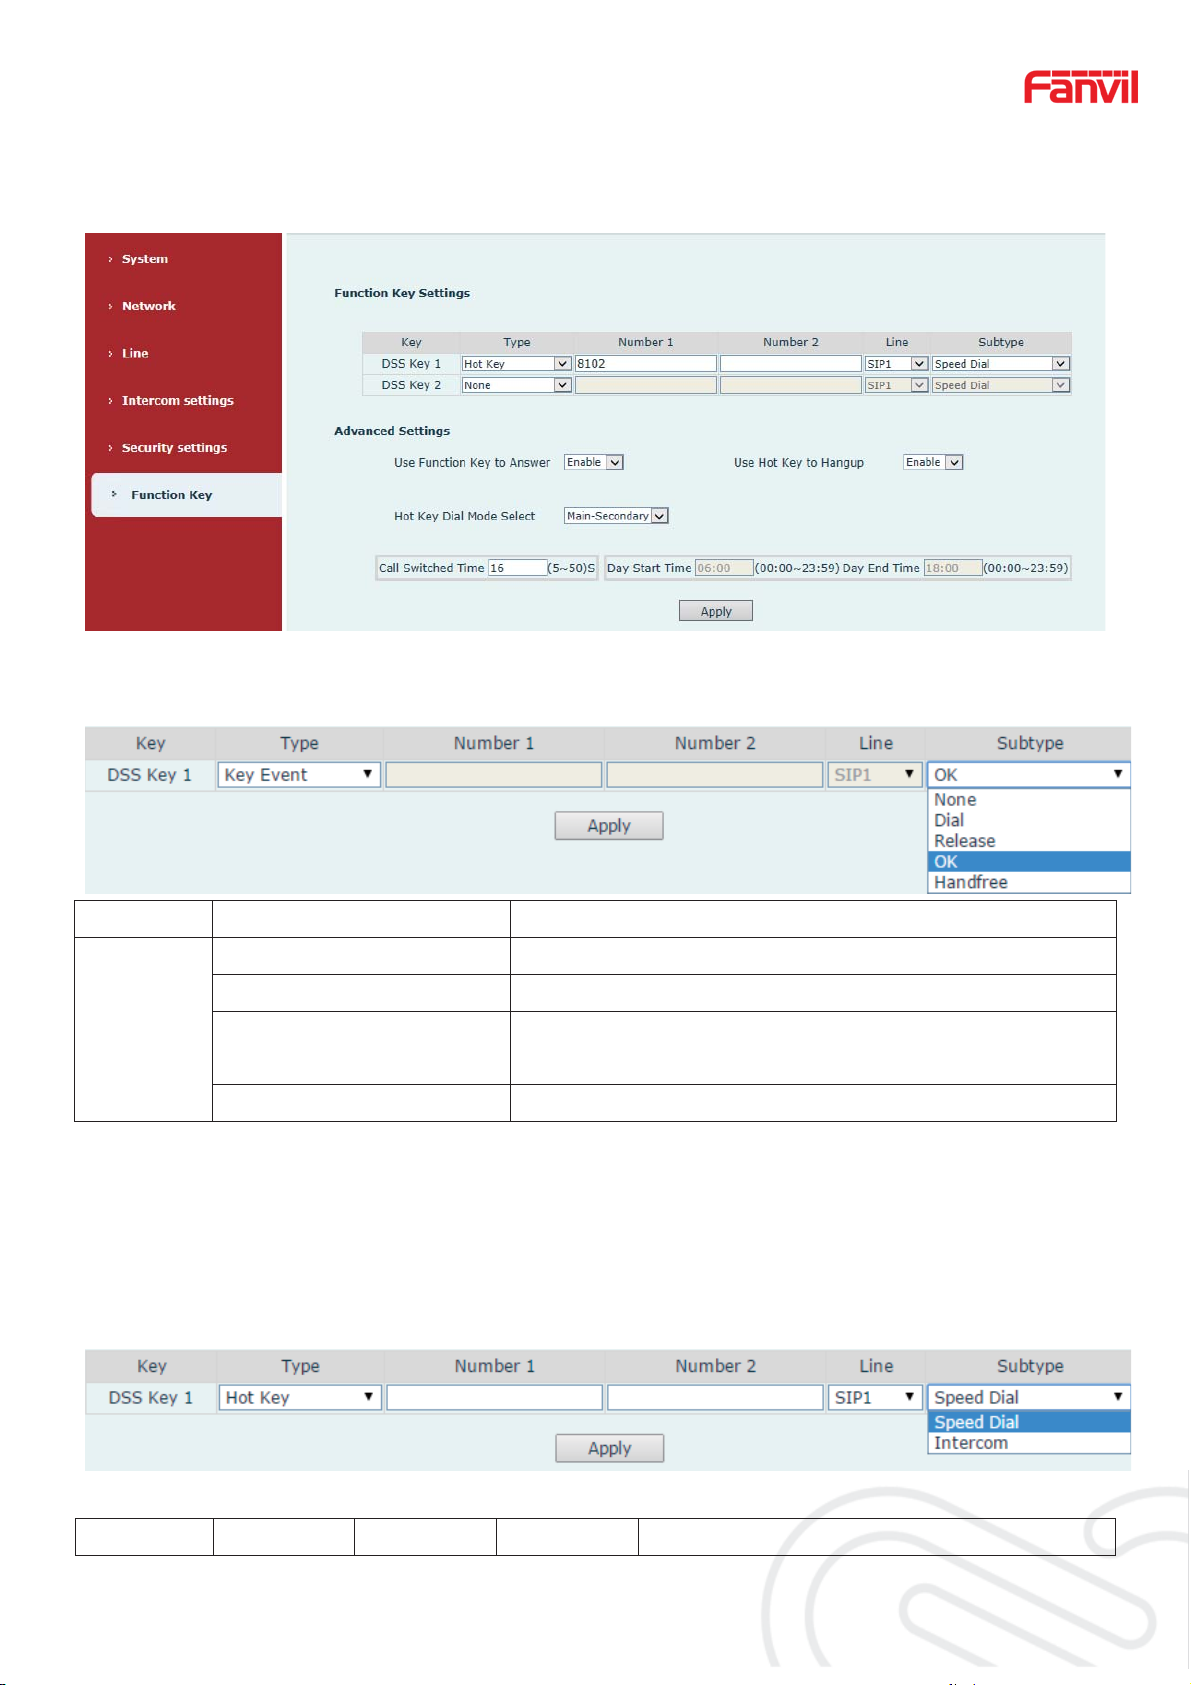
¾ Key Event
You might set up the key type with the Key Event.
Type Subtype Usage
None No responding
Dial Dialing function
Key Event
Release Delete password input, cancel dialing input and end
call
OK Identification key
¾ Hot Key
You might enter the phone number in the input box. When you press the shortcut key,
equipment would dial preset telephone number. This button can also be used to set the IP
address: you can press the shortcut key to make a IP call directly.
Type Number Line Subtype Usage
ZZZIDQYLOFRP
39 / 43
Page 40

`
40
Using Speed Dial mode together with
Fill the
called
The SIP
Speed Dial
whether this call is allowed to be hung up
, can define
account
Hot Key
party’s SIP
by re-pressing the speed dial key.
correspond
account or
In Intercom mode, if the caller’s IP phone
ing lines
IP address
Intercom
supports Intercom feature, the device can
automatically answer the Intercom calls
¾ Multicast
Multicast function is to del i v er voice streams to configured multicast address; al l equipment
monitored the multicast address can receive and play it.
The DSS Key multicast web configuration for calling party is as follow:
Type Number Subtype Usage
G.711A
Narrowband speech coding (4Khz)
Narrowband speech coding (4Khz)G.726-32
Multicast
Set the host IP address
and port number; they
must be separated by a
colon
G.711U
G.722 Wideband speech coding (7Khz)
G.723.1
G.729AB
operation mechanism
You can define the DSS Key configuratio n with multicast address, port and used codec. Th e
device can configure v ia WEB to monitor t he multic ast address and port. When the devi ce makes
a multicast, all devices monitoring the address can receive the multicast data.
calling configuration
If the device is in calls, or it is three-way conference, or in initiated multicast communication, the
device would not be able to launch a new multicast call.
ZZZIDQYLOFRP
40 / 43
Page 41

`
E.Appendix
1. Technical parameters
41
Communication protocol
Main chipset
DSS key materials
Key
DSS Key
Audio amplifier
Volume control
Full duplex
speakerphone
Speech
DTMF TYPE
flow
wideband speech
code
Narrowband
speech code
Security linkage
Port
WAN
SIP 2.0(RFC-3261)
Broadcom
Stainless steel
1 or 2
3W
Adjustable
Support (AEC)
In-band, Out-of-band(RFC 2833), SIP INFO
G.722
G711A/u, G.723.1, G.729AB, ILBC, AMR
1 embedded short circuit input interface
1 embedded short circuit output interface
10/100BASE-TX s Auto-MDIX, RJ-45
Camera
Power supply mode
Cables
Shell Material
Working temperature
Working humidity
Storage temperature
Installation way
Dimension
1/3 "color CMOS, wide angle
12V / 1A DC or PoE
CAT5 or better
Cast aluminium panel, Cast aluminium back shell
-40°C to 70°C
10% - 90%
-40°C to 70°C
Wall-mounting or Flush-mounting
Wall-mounting: 223*13 0*74 m m
Flush-mounting: 270*1 50*6 1m m
ZZZIDQYLOFRP
41 / 43
Page 42
`
2. Basic functions
z 2 SIP Lines
z PoE Enabled
z Full-duplex speakerphone (HF)
z Intelligent DSS Keys (S peed Dial/intercom etc.)
z Wall-mounting / Flush-mounting
z Special integrated noise reduction module
z Dual microphone Omnidirectional voice pickup
z 1 embedded short circuit input interface
z 1 embedded short circuit output interface. Support 4 controlled events: remote DTMF;
remote server’s commands; interact with short circuit input; talking status
z Anti-tamper switch
z Record voice and video during calls (Optional)
z All in ONE: Radio and intercom, intellige nt security function
42
z Industrial standard certifications: IP65ˈIK10ˈCE/FCC
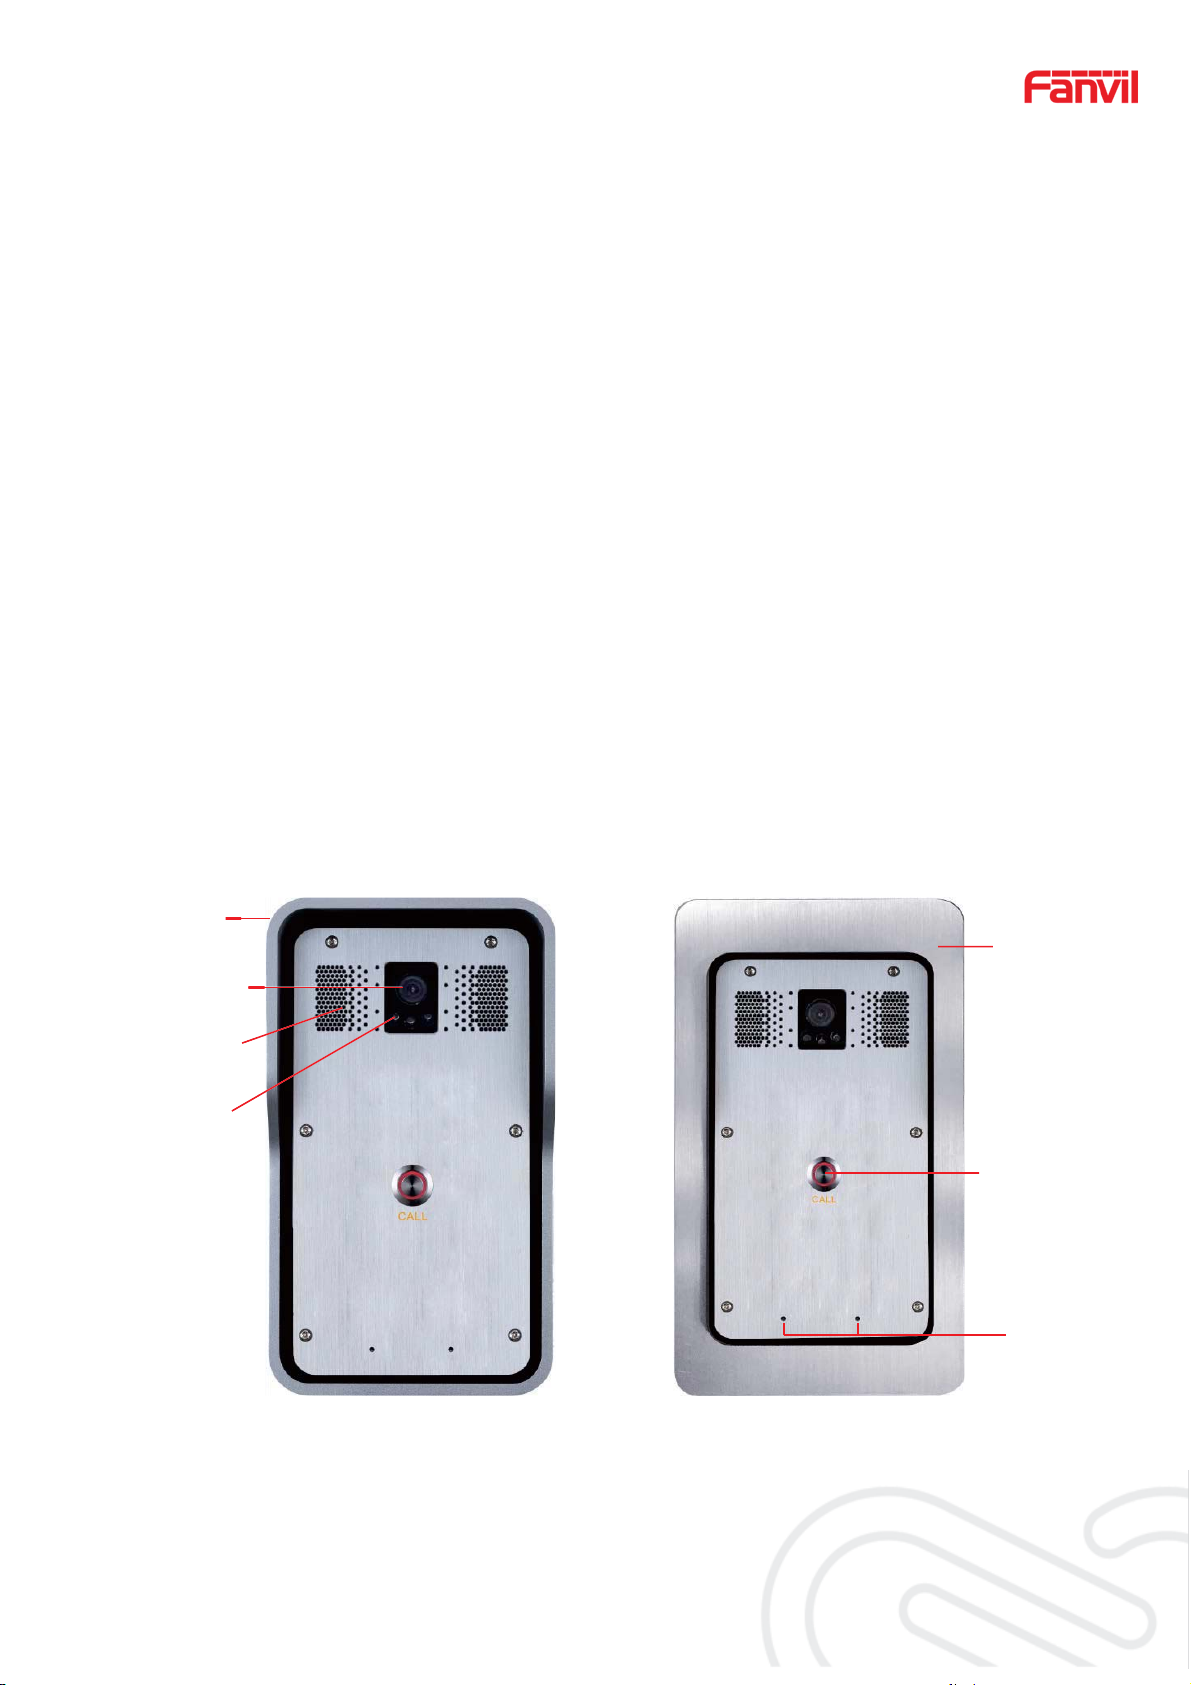
3. Schematic diagram
Rain cover
Camera
Speaker
IR LED
Decor frame
DSS Key
ZZZIDQYLOFRP
MIC
42 / 43
Page 43

`
4. The broadcast terminal configu ration no tice
How to avoid an incoherency sound when the broadcast playing?
When the terminal used as broadcast, the speaker is loud. If do not set mute for
microphone, the AEC (echo cancellation) of equipment will be activated, which leads the sound
incoherence. In order to avoid such circumstance, when the equipment turn to use as a radio
should be set as intercom mode. Then activate the intercom mute, so as to ensure the
broadcast quality.
43
How to improve broadcasting t one quality?
In order to obtain better broadcast quality, recommend the use of the HD (G.722) mode for broadcast.
Voice bandwidth will be by the narrow width (G.711) of 4 KHz, which is extended to broadband (G.722)7
KHz. When combine d w it h t he active speaker, the effect will be better.
ZZZIDQYLOFRP
43 / 43
 Loading...