


<文档标题>
1
H2S User Guide
<文档标题>
2
Document VER
Firmware VER
Explanation
Time
V1.0
2.0.2.2817
Initial issue
20170616
V1.1
20190715

<文档标题>
3
Table of Content
1 The Appearance of Product
1.1 Keypad instruction
1.2 Wall mount setup
2 Telephone Setting
2.1 Getting IP address
2.2 Checking IP address
2.3 How to enter web setting interface
2.4 Network setting
2.5 SIP setting
2.6 LED indicator state
3 Basic Operation
3.1 Making a call
3.2 Answering a call
3.3 Holding a call
3.4 Redialing
4 Advanced Operation
..................................................................................................................................
.....................................................................................................................................
....................................................................................................................................
.....................................................................................................................................
.......................................................................................................................
.........................................................................................................................
.......................................................................................................................
...................................................................................................................
............................................................................................................................
......................................................................................................................
...............................................................................................................................
.........................................................................................................................
..............................................................................................................................
...........................................................................................................................
................................................................................................................
...........................................................................................
4
4
6
7
7
7
7
7
8
9
10
10
10
10
10
11
4.1 Call transfer
4.2 Messages waiting
5 FAQ
..........................................................................................................................................................
................................................................................................................................
......................................................................................................................
11
11
12
<文档标题>
4
1 The Appearance of Product
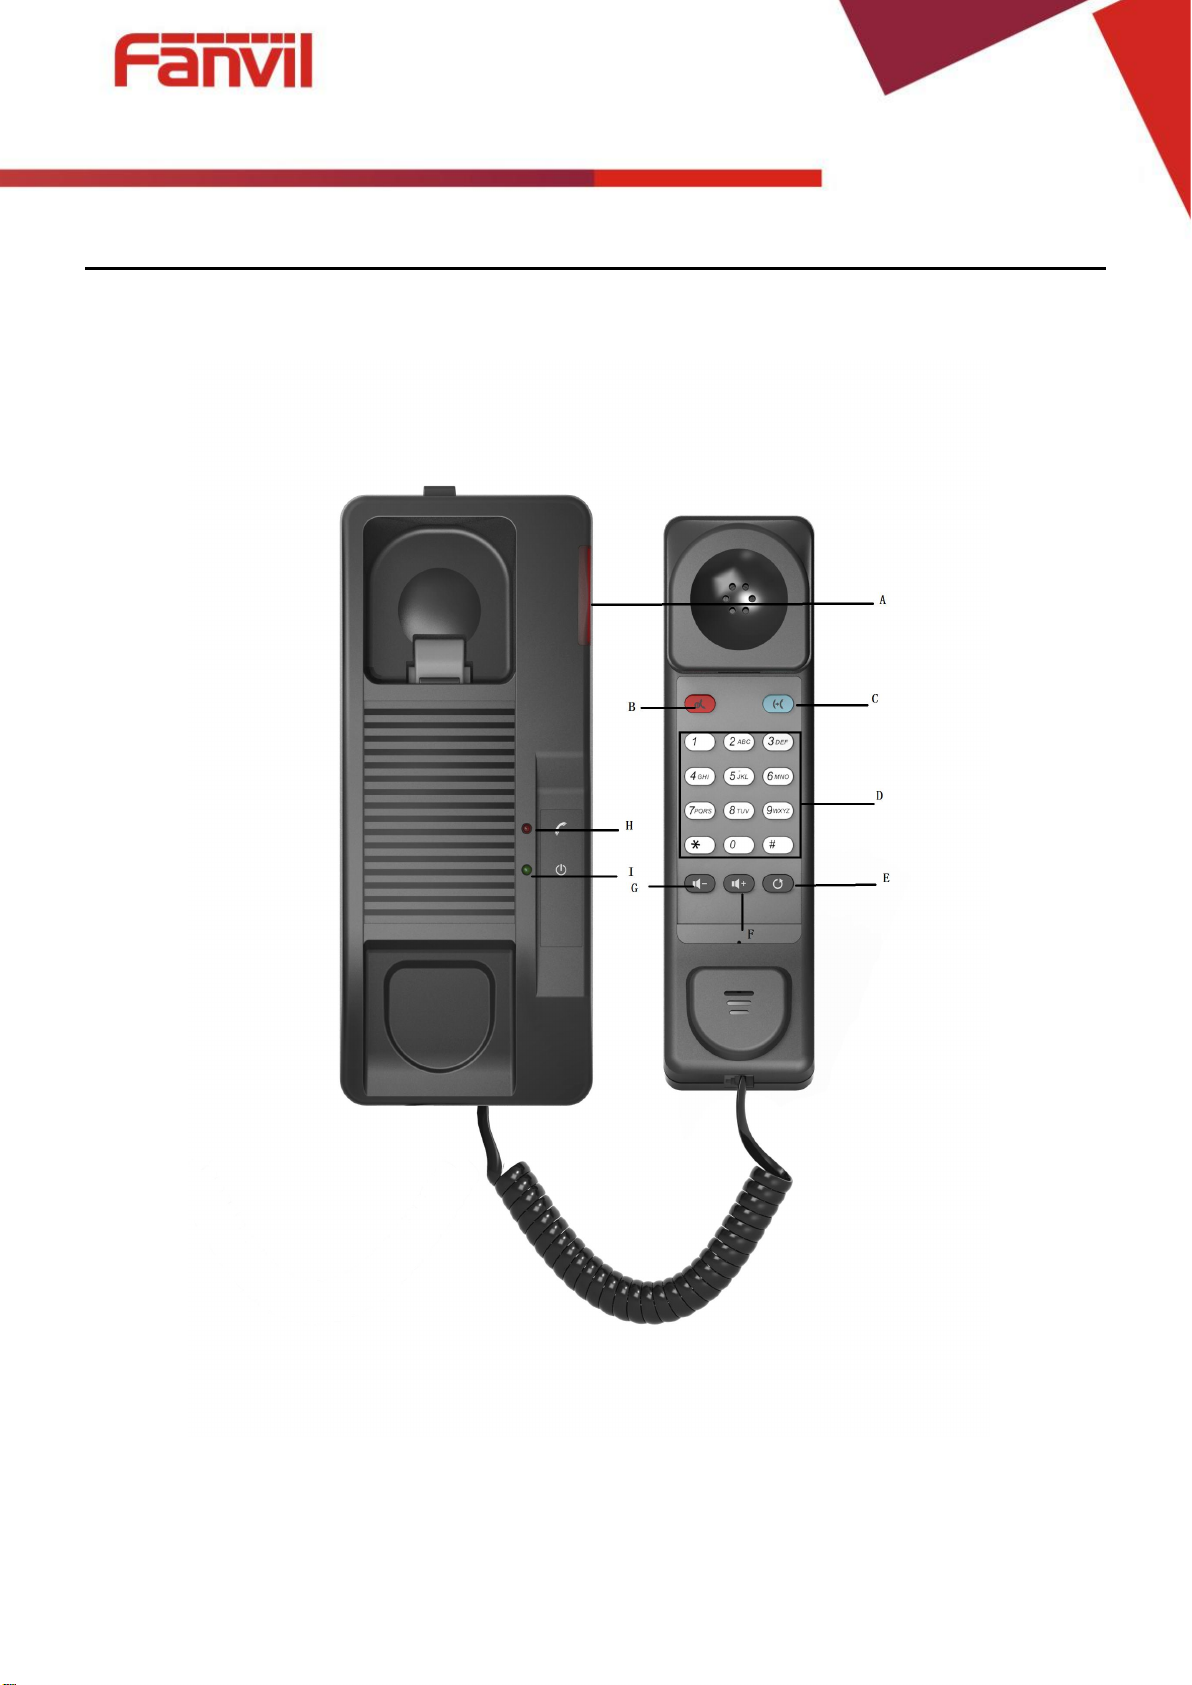
1.1 Keypad instruction
A: Telephone LED Indicator
The light flashes when the telephone rings for incoming calls. When the telephone system
supports Messages Waiting Indication (MWI) function and there are some voice messages,
the light will also flash.

<文档标题>
5
B: Hold Button
Places a call on hold status.
C: Transfer Button
Transfer a call to another number
D: Dialpad
Dial the number.
E: Redial
Dial the last number you dialed.
F: Volume plus
Press this button to increase the volume
G: Volume down
Press this button to reduce the volume
H: Handset LED Indicator
I: Power LED Indicator
J: Cable trough

<文档标题>
6
K: Wan Port
10.7cm
Screw
Screw
Wall
Embedded junction box
8.5cm*8.5cm
5.8cm
13.2cm
L: Headset Port
Connect the headset cord.
M: Handset Wire trough
N: Wall Mount Hole
O: Power Port (When use do not the power supply, please will the PVC stick in this position, prevent dirt or debris.)
P: PVC
1.2 Wall mount setup
Fix the device on the wall.
1. Screw the embedded junction box on the wall
2. Connect the cable from embedded junction box to the telephone.
3. Hitch the telephone on the screw.
Please refer the dimension when you want to screw the embedded junction box on the wall.

<文档标题>
7
2 Telephone Setting
2.1 Getting IP address
DHCP is the default network setting, and telephone will get the IP address from DHCP
server(Router) after the cable connected.
2.2 Checking IP address
Pick up the handset and long press the “#” key, then you can hear the IP address voice
information.
2.3 How to enter web setting interface
Set the telephone through web interface.
1. Connect the telephone and PC in the same LAN.
2. Run the IE in the PC, and input the telephone IP in address bar.
3. Input the user name and password, both of them are “admin”.
4. Click “Logon” button to enter into the web setting interface.
2.4 Network setting
Enter into the web setting interface, select Network->Basic, there are three mode of network.
1. Static IP
2. DHCP
Get IP address from DHCP server automatically.
3. PPPoE
PPPoE server, Username, Password

<文档标题>
8
You should choose correct network mode according to your network environment.
2.5 SIP setting
Enter into the web setting interface, select Line->SIP, and fill in the items below.
1. Server address
2. Account name
3. Phone number
4. Password
Click the “Apply” button to save the config, you can dial out after the register status is
“Registered” with red color.

<文档标题>
9
2.6 LED indicator state
Incoming call
The telephone LED indicator will flash at 0.5s on, 0.5s off.
MWI
The telephone LED indicator will flash at 0.5s on, 2s off.
Picking up the handset.
All buttons backlight will keep on.
Connecting power.
The power indicator will keep on.

<文档标题>
10
3 Basic Operation
3.1 Making a call
using dial pad
1. Off-hook
2. Dial the number on the dial pad , end with # as default.
3. On-hook, end a call.
:
3.2 Answering a call
When your telephone rings and the telephone LED indicator will flashes.
1. Pick up the handset and start to talk.
2. Hang up, end a call.
3.3 Holding a call
1. While on a call, press the Hold key, the call will be held.
2. To retrieve a held call, you can press the Hold key again.
3.4 Redialing
Press the Redial key to dial the last number you dialed.
1. Pick up handset.
2. Press “Redial” key to dial the last number you dialed.

<文档标题>
11
4 Advanced Operation
4.1 Call transfer
Blind transfer
During a call, you want to transfer the call to another one without talking with the one you
transfer to.
1. Press “Transfer” key, you can get the second dial tone , and the first call is held
automatically.
2. Dial the number which you want to transfer to, and then press“#” or “Transfer” button.
3. When the third party answers the incoming call you will hear the busy tone, the call have
been transferred successfully.
Attended transfer
During a call, you want to transfer the call to another one after talking with the one you transfer
to.
1. Press “Transfer” key, get the second dial tone, and the first call is held automatically.
2. Dial the number you want to transfer to, press“Redial”key, the second call connected.
3. Press “Transfer” key again, you will hear the busy tone, the call have been transferred
successfully.
4.2 Messages waiting
When the telephone LED indicator flashes and there is no incoming call, you need to dial
the feature access code for message retrieving. Once the messages have been retrieved, the
light flashing will stop.

<文档标题>
12
5 FAQ
1. Line LIGHT indicator flashes, can’t make a call.
Please check the SIP register status, and make sure the register information is correct.
2. Can’t hear the voice each other
Please contact your administrator to confirm whether there is firewall in the network.
3. Can’t get IP address
Please contact your administrator to make sure the network setting is correct.
4. Can’t visit the web setting interface
Please make sure all of connections are correct.
1) Check the IP address you input in PC.
2) Make sure the PC and telephone in the same LAN
3) Do factory reset and try again.
 Loading...