

Fanvil G100S User Manual

[䭞ޕ᮷ᆇ]
G100S VoIP
Gateway User Manual

[䭞ޕ᮷ᆇ]
Document VER Firmware VER Explanation Time
V1.0 rc2.1.1136 Initial issue 20160808
V1.1 1.4.1505
Alter the router mode to LAN Port
Fixed the functional parameters
Add the shortcut keys note
20170908

[䭞ޕ᮷ᆇ]
Table of Content
1 Safety Instruction........................................................................................................................5
2 About Device...............................................................................................................................6
2.1 Product description..............................................................................................................6
2.2 Device Appearance...............................................................................................................6
2.2.1 Interface and Buttons Description ................................................................................6
2.2.2 Indicator Lights Description ..........................................................................................7
3 Getting Started ............................................................................................................................8
3.1 Connecting the Power and the Network .............................................................................8
3.1.1 Connecting the Network.................................................................................................8
3.1.2 Connecting the Power....................................................................................................8
4 Basic Phone Operation...............................................................................................................9
4.1 Call Transfer..........................................................................................................................9
4.2 Call Hold................................................................................................................................9
4.3 Shortcut key........................................................................................................................10
5 Web Configuration....................................................................................................................11
5.1 Ways to Configure .............................................................................................................. 11
5.2 Password Configuration ....................................................................................................11
5.3 Browser Configuration.......................................................................................................11
5.4 WEB Pages Function Explanation.....................................................................................12
5.4.1 Status.............................................................................................................................12
5.4.1.1 Overview..................................................................................................................12
5.4.1.2 Routes .....................................................................................................................14
5.4.1.3 System Log.............................................................................................................14
5.4.2 System...........................................................................................................................15
5.4.2.1 System.....................................................................................................................15
5.4.2.1.1 General Settings...............................................................................................15
5.4.2.1.2 Logging.............................................................................................................15
5.4.2.1.3 Language...........................................................................................................16
5.4.2.2 Administration ........................................................................................................16
5.4.2.3 Time Synchronization ............................................................................................17
5.4.2.4 Backup/Flash Firmware.........................................................................................17
5.4.2.5 Auto Provision........................................................................................................18

[䭞ޕ᮷ᆇ]
5.4.2.6 Reboot.....................................................................................................................20
5.4.2.7 Auto-Reboot............................................................................................................20
5.4.3 Network..........................................................................................................................21
5.4.3.1 WAN.........................................................................................................................21
5.4.3.2 LAN..........................................................................................................................22
5.4.3.3 Static Routes...........................................................................................................23
5.4.3.4 Diagnostics.............................................................................................................23
5.4.3.4.1 Diagnostics.......................................................................................................23
5.4.3.4.2 Network Packets Capture ................................................................................25
5.4.3.5 Check-WAN .............................................................................................................25
5.4.3.6 QoS..........................................................................................................................26
5.4.4 VoIP................................................................................................................................27
5.4.4.1 Line1 & Line2..........................................................................................................27
5.4.4.2 Common..................................................................................................................32
5.4.4.3 Dial Peer..................................................................................................................33
5.4.4.4 Debug ......................................................................................................................33
5.4.5 Phone.............................................................................................................................34
5.4.5.1 Audio.................................................................................................................. ......34
5.4.5.2 Call Feature.............................................................................................................35
5.4.5.3 Dial rules .................................................................................................................37
5.4.5.3.1 Dial Rules..........................................................................................................38
5.4.5.3.2 Digital Rule Table..............................................................................................38
5.4.6 Logout............................................................................................................................39
6 Trouble Shooting ......................................................................................................................40
6.1 Reboot Device.....................................................................................................................40
6.2 Reset Device to Factory Default........................................................................................40
6.3 Network Packets Capture...................................................................................................40
6.4 Common Problems.............................................................................................................41

[䭞ޕ᮷ᆇ]
5/41
Safety Instruction
Please use the external power supply that is included in the package. O t her power supply may cause damage to
the device, affect the be havior.
z Before using the external power supply in the package, please ch eck the home power voltage. Inaccura t e
power voltage may cause fire and damage.
z Please do not damage the power cord. If power cord or plug is impaired, do not use it, it may cause fire or
electric shock.
z Do not drop, knock or shake the phone. Rough handling can break internal circuit boards.
z This
device is design for indoor use. Do not install the device in places where there is direct sunlight. Also
do not put the device on carpets or cushions. It may cause fire or bre akdown.
z Avoid exposure the
device to high temperature or below 0䉝 or high hu midity.
z Avoid wetting the unit with any liquid.
z Do not attempt to open it. Non-expert handling of the device could da ma ge it. Consult your authorized
dealer for help, or else it may cause fire, electric shock and breakdown.
z Do not use harsh che mica ls, clean in g solv ent s, or strong detergents to clean it . Wipe it with a soft cloth that
has been slightly dampened in a mild soap and water solution.
z When lightning, do not touch power plug, it may cause an electric shock.
z Do not install this device in an ill-vent ilated place. You are in a situation that could cause bodily injury.
Before you work on any equipment, be aware of the hazards involved with electrical circuitry and be
familiar with standard prac t ices for preventing accidents.

[䭞ޕ᮷ᆇ]
6/41
About Device
Product description
G100S is a new VoIP gateway, its core part is a proven solution for VOIP, and so the
performance is stable and reliable. Compact appearance, intelligent software and simple interface,
making IP gateway no longer limited to enterprise applications, but also for ordinary home users.
Device Appearance
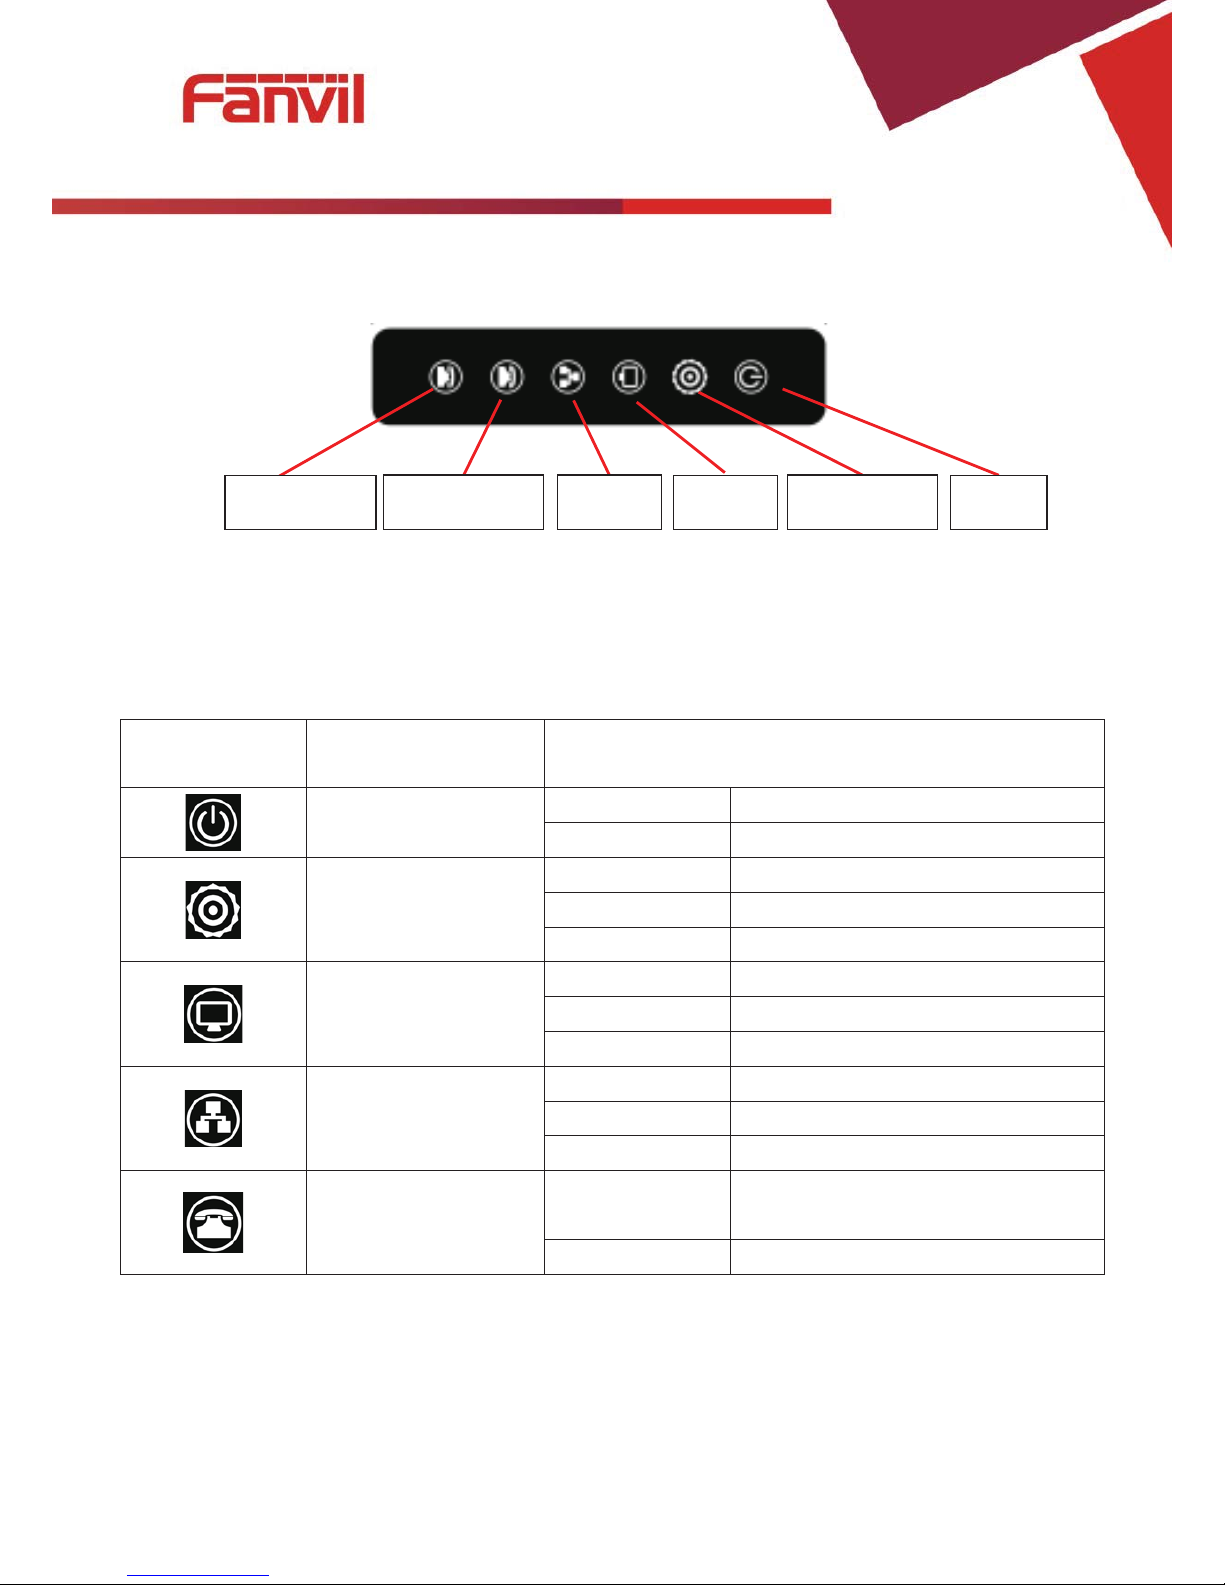
Interface and Buttons Description
Description Function
RST
Restore Default button. When the device is working properly, if you press this
button with a sharp object (such as a pencil) until the CPU fast twinkling (about
5 seconds).Restore function will take effect after you release it.
POWER PORT
Connecting to a power source.
LAN PORT
Connecting to a computer or a PBX and so on.
WAN PORT
Connecting to the network.
FXS 1
Connecting to the analog phone.
FXS 2
N/A
[䭞ޕ᮷ᆇ]
7/41
Indicator Lights Description
After you insert the 12V DC power adapter to this device, power light starts to work, analog
phone light comes on, then off! Registered light twinkles for a moment, WAN light and LAN light
will be twinkling and then enter standby mode, when you pick up the analog phone, the analog
phone light will keep on, when you hang up, the light off!
Indicator
lights
Description Function
Power Light
off Power is invalid.
on Power supply is normal.
SIP Registered
Light
off SIP is not registered.
twinkle SIP registration is failed.
on SIP registration is successful.
LAN Light
off LAN port is not connected.
twinkle LAN port is transmitting data.
on LAN port connection is normal.
WAN Light
off WAN port is not connected.
Twinkle WAN port is transmitting data.
on WAN port connection is normal.
Analog Phone Light
off
Phone is in standby or not
connected.
on Phone is being off hook.
Analog phone WAN
LAN
Registered
PowerOff
[䭞ޕ᮷ᆇ]
8/41
Getting Started
Before you start using the device, please make the following installation:
Connecting the Power and the Network
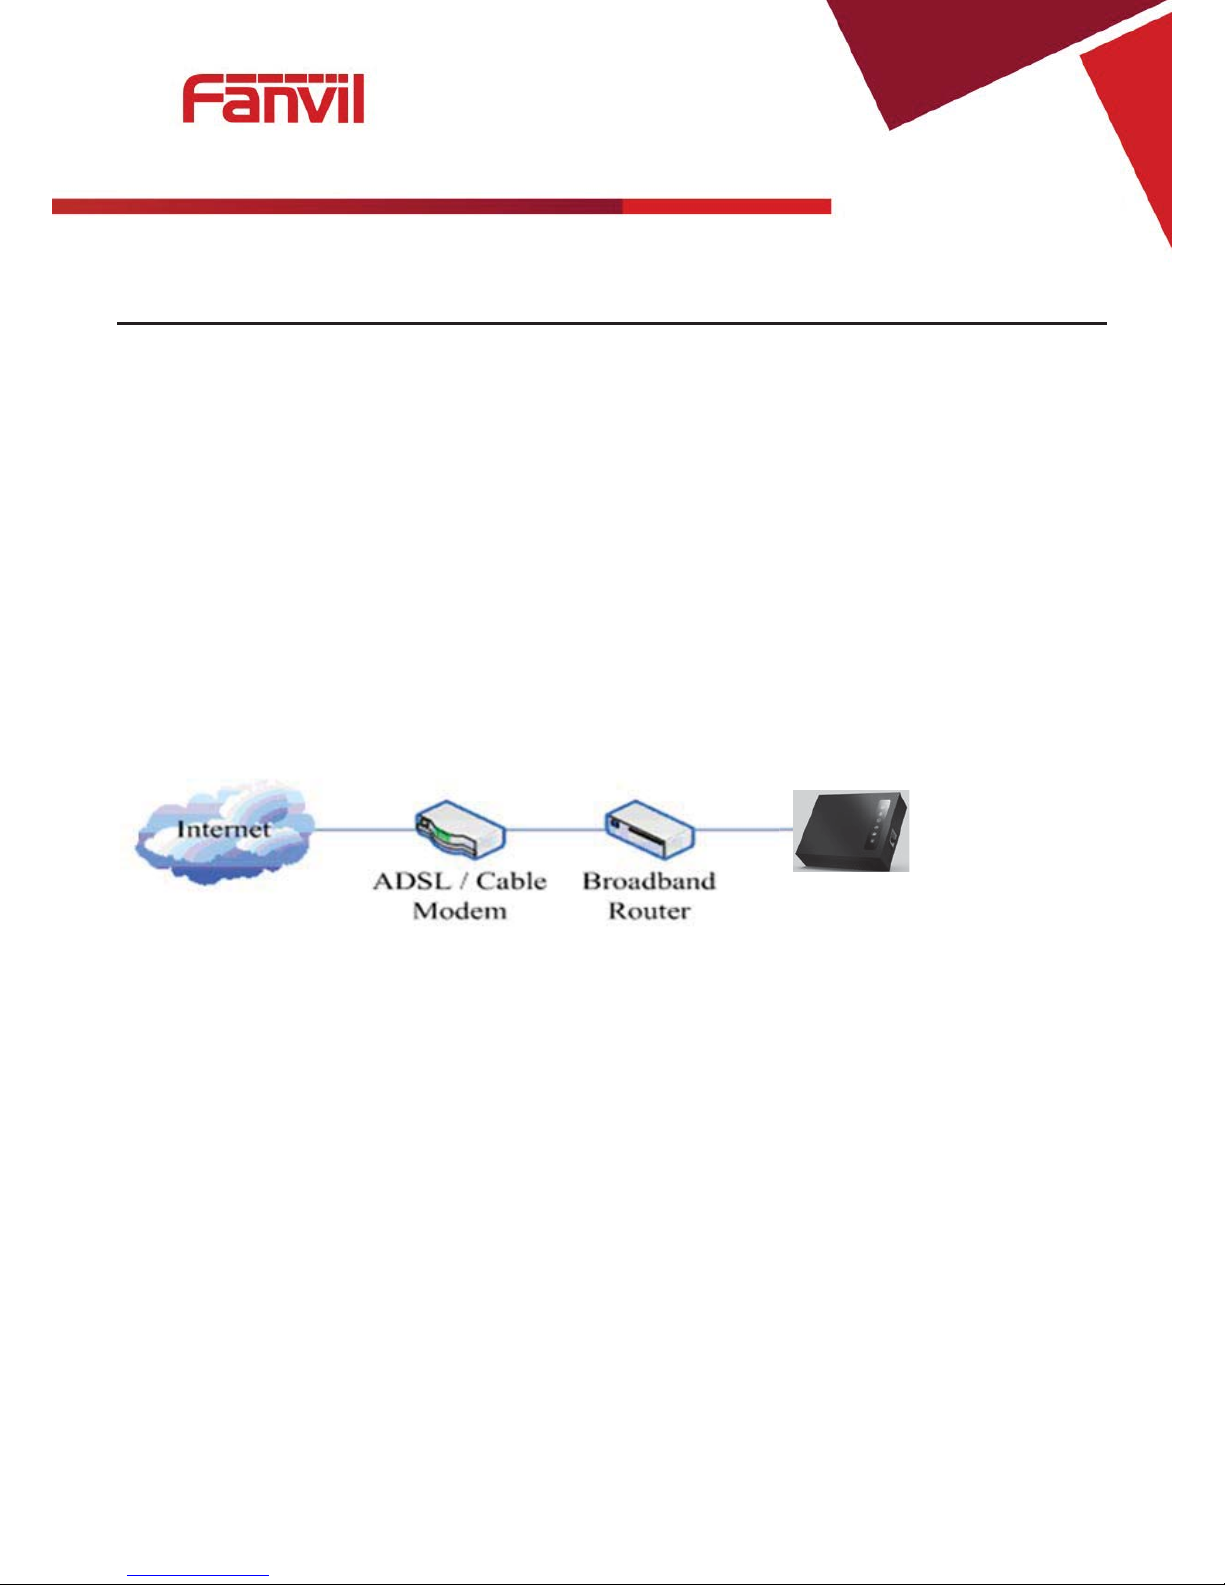
Connecting the Network
Before this step, please make sure your environment can satisfy the requirement of broadband
network access.
Please connect one end of the network cable to t he dev i ce's WAN port and the other en d c onnect
to your broadband ro ut er 's LAN por t. Now you have completed the netw or k har dware connection.
In most of the cases, you need to set your device's network as the DHCP mode. (The default
mode of the device is DHCP)
Connecting the Power
Before proceeding with this step, please make sure your power connector and electrical outlet
for the agreement, at the same time, the voltage and current are also conform to what the device
need.
a) Put the DC port connect to the power port that on the back of the device.
b) Put the AC adapter plug connect to an electrical outlet, the device starts to boot.
c) At this point, all of your indicator lights (except the power light) will twinkle together. After the
boot is completed, the indicator lights will be on according to your current configuration. (If
your lights is unnormal, we need to further configure your network online mode)
d) If the device has landed on the server, you can start a call right now.
G100S

[䭞ޕ᮷ᆇ]
9/41
Basic Phone Operation
Call Transfer
a. Blind Transfer:
During a conversation, you press FLASH (Flash) button, enter * and the number you want to
transfer, then press [#] key to confirm, you can transfer the current call to the third party. (In order
to use the feature, you must enable the gateway Call Waiting function and Call Transfer function)
b. Attended Transfer:
During a conversation, you press FLASH (Flash) button, enter the number you want to
transfer ,wait until tel ephon e conn ected, hang up dir ectly , you ca n tr ans fer success. (In ord er to use
the feature, you must enable the gateway Call Waiting function and Call Transfer function)
Notes:
Call Transfer function is implemented under certain condition: there is one way of the two
calls is in idle state.
The call between Gateway (transfer side) and phone A is established, then the gateway and
the phone C start another call, now you hang up the phone A, the gateway still can initiate a
transfer.
Only your network phone traffic service providers support the (RFC3515), can this function
work properly
Call Hold
a. Call Hold and Set Aside
During a conversation, y ou can press FL A SH but ton , then ent er the number t o dia l and t he [#] key to con fir m.
You can keep your current call and build the third party at the same time. If you press the FLAS H (flash) button
again, you can switch bac k. Y ou can only talk with one side while other parties cannot he ar your conversation or
talk with you. During aconversation, if you press the [*] but ton, t he device w ill e nter the t hree-p arty call mode. ( To
use this feature, you must enab le the Ca ll Waiting fu nction of the g ateway . To achiev e the three-w ay calling mode,
you must enable the Gate way Three Way Call function)
b. Call Hold and Accept Call Waiting
During a normal conversation, if there is third-party dial-in, the handset will be heard beep ~
beep ~ tips, you can use FLASH (flash) button to accept the call waiting. If you press this button

[䭞ޕ᮷ᆇ]
10 / 41
again, you can switch back. You can only talk with one side while other parties cannot hear your
conversation or talk with you. (To use this feature, you must enable the Call Waiting function of
the gateway)
Shortcut key
The device can call the corresponding shortcut key through the RJ11 connected analog
telephone to realize the related operation.
After the network related operation has been modified, it will need to be restarted before it
becomes effective.
z #****: Reboot
z #*100: Switch to static IP mode
z #*101: Switch to DHCP mode
z #*102: Switch to PPPOE mode
z #*103: Switch to bridge mode
z #*104: Off to bridge mode
z #*111: Query IP of WAN port
z #*222: Read phone number
z #*50: Set IP of WAN port
z #*51: Set Gateway of WAN port
z #*52: Set DNS of WAN port
z #*53: Set Subnet Mask of WAN port
z #*90: Cancel the to call transfer
z #*91: Call transfer of busy
z #*92: Call transfer of unconditional
z #*93: Call transfer of no answer

[䭞ޕ᮷ᆇ]
11 / 41
Web Configuration
Ways to Configure
Device offers two different config ure w ays to different users:
z Use web browser: the computer users wh o are fa miliar with the operation of computers. (Recommended
use)
z Use the telnet tool: command line u sers.
Password Configuration
The setting of the device’ s browser and command-line can be divided int o t wo login modes: user mode and
supervisor mode, under the manager mode, y ou can v iew and edit all of the op tions; w hile the <A uto Provision>
option cannot be viewed under the user mode.
When a tip: ‘Please enter y our passw ord’ appeared on the device, you enter differe nt information will into
different modes:
z User mode:
Username: admin
Password: admin
z Manager mode:
Username: root
Password: admin
Browser Configuration
When the device and co mputer are c onnect ed to the netw or k success fully , y ou enter the dev ic e WAN port I P
address in the browser (gateway IP address can be get by dialing * 111 #) http://xxx.xxx.xxx.xxx / to see the web
management interface login page (as shown below). Enter username and pas sword , click <Login> button ,you
will enter the setting pages .
[䭞ޕ᮷ᆇ]
12 / 41
If you have not save your settings, the set t ings will be restored to the previous state unchang ed when you
boot phone next time .In order to save your settings, please click the <Save> button that belongs to
configuration settings in the System , after this process ,your device configuration will ta ke e f fect immediately
without reboot again.
Note: LAN port IP address (192.168.10.1).
WEB Pages Function Explanation
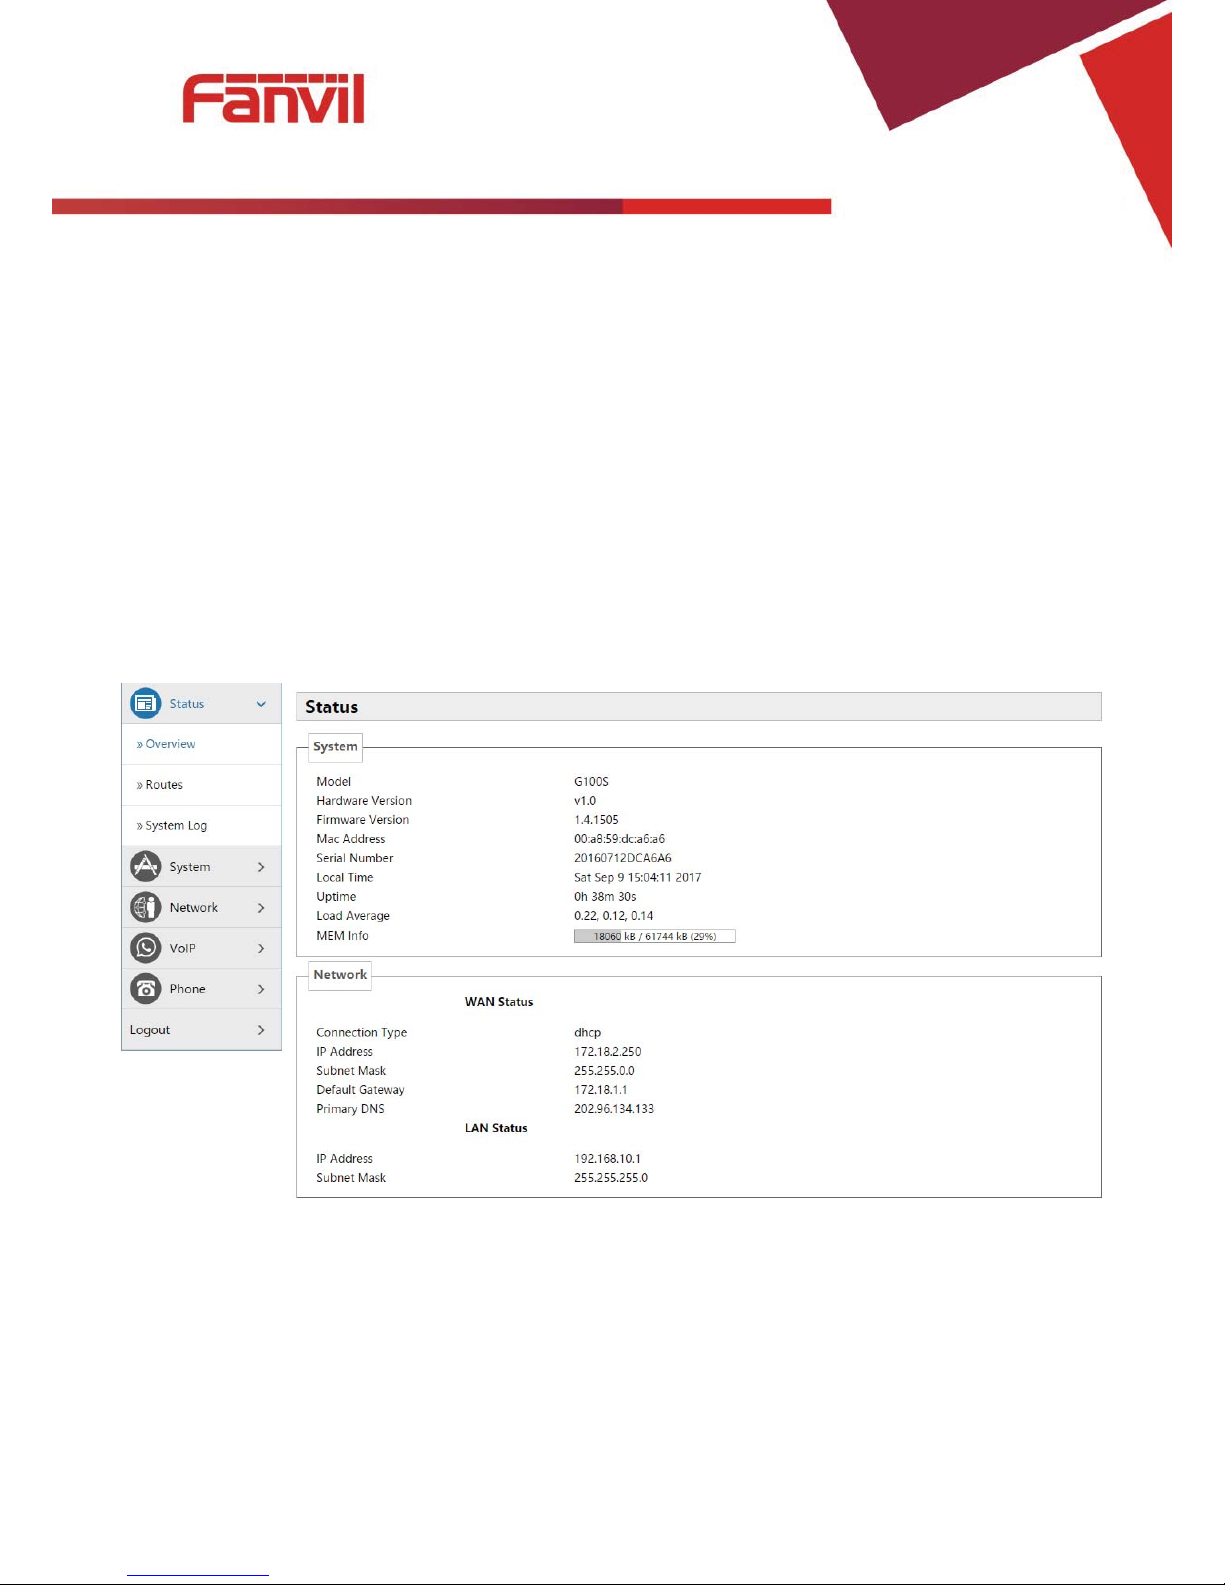
Status
Overview
[䭞ޕ᮷ᆇ]
13 / 41
Name Explanation
System
Model Displays device model.
Hardware Version Displays device hardware version.
Firmware Version Displays device software firmware version number.
MAC Address Displays the current MAC address.
Serial Name Displays device serial number.
Local Time Displays the current system time
Uptime Displays device runtime
Load Average Displays the current average load value
MEM Info Displays the current memory status
Network (WAN Status)
Connection Type Displays the current networking way.
IP Address Displays the current IP address.
Subnet Mask Displays the current subnet mask.
Default Gateway Displays the default gateway.
Primary DNS Displays the primary DNS.
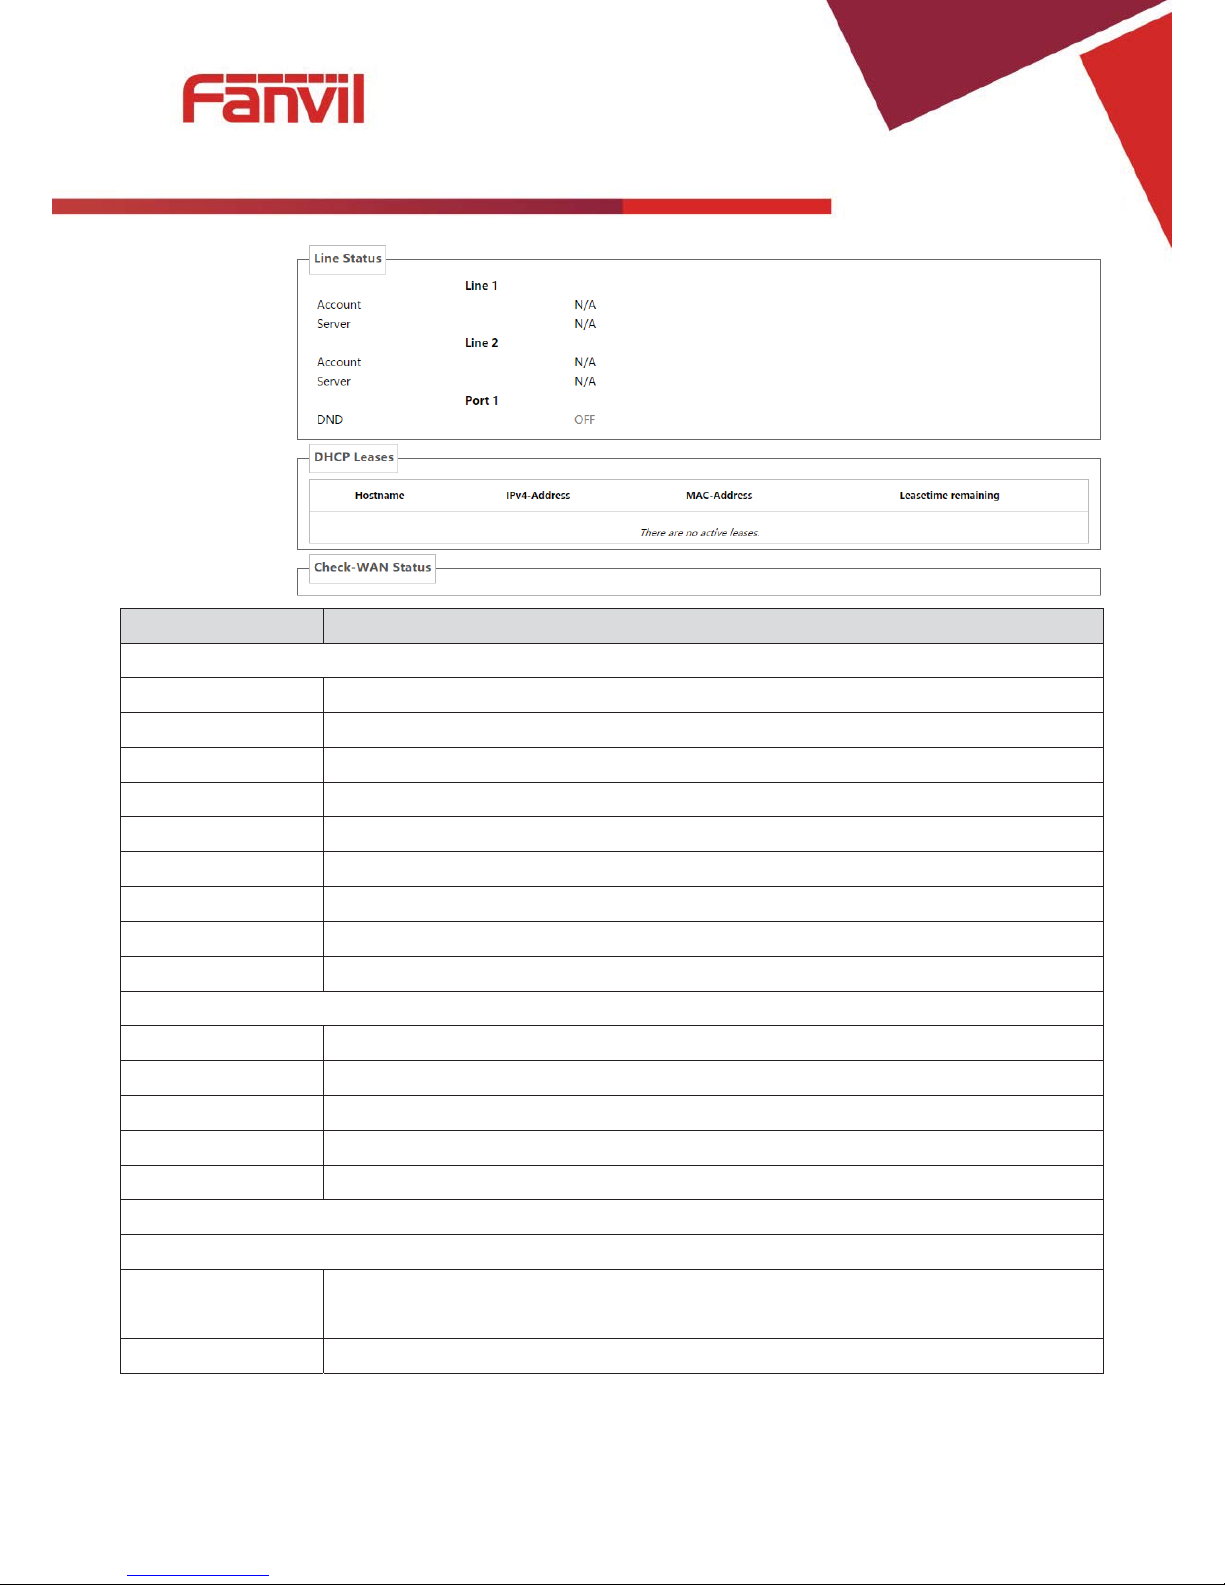
Line status
Displays the current SIP line 1-2 registries number, server and status.
DND
Open this option, any dial-in call will be blocke d, the caller will be prompted
that the device cannot be used, but you can establish a call with the device.
DHCP Leases
Displays host information that has been assigned IP parameters by DHCP
 Loading...