

Fanvil F52 User Manual

Fanvil Technology Co., Ltd
HQ Add: Level 3, Block A, Gaoxinqi Building, Anhua Industrial Park, Qianjin 1 Road, 35th District, Bao'An, Shenzhen, 518101 P.R. China
Tel: +86-755-2640-2199 Fax: +86-755-2640-2618 Email: fanvil@fanvil.com www.fanvil.com Beijing Tel:+86-10-5753-6809
Suzhou T el : +86-512-6592-0605 SEA Tel: +60-3-203-50737
F52 VoIP Phone User Manual
Corporate Headquarters
Fanvil Technology Co., Ltd
Address: Level 3, Block A, Gaoxinqi Building, Anhua Industrial Park, Qianjin 1 Road, 35th District,
Bao'An, Shenzhen, 518101 P.R. China
Web Site: www. Fanvil.com
Tel: +86 755 26402199
Fax: +86 755 26402618

Fanvil Technology Co., Ltd
HQ Add: Level 3, Block A, Gaoxinqi Building, Anhua Industrial Park, Qianjin 1 Road, 35th District, Bao'An, Shenzhen, 518101 P.R. Chin a
Tel: +86-755-2640-2199 Fax: +86-755-2640-2618 Email: fanvil@fanvil.com www.fanvil.com Beijing Tel:+86-10-5753-6809
Suzhou T el : +86-512-6592-0605 SEA Tel: +60-3-203-50737
- 2 -
Safety Notices
Please read the following safety notices before installing or using this phone. They are crucial for the safe
and reliable operation of the device.
Please use the external power supply that is included in the package. Other power supplies may cause
damage to the device, affect the behavior or induce noise.
Before using the external power supply, please be sure it is for use with your power voltage. Incorrect
power voltage may cause fire and damage.
Please do not damage the power cord. If the power cord or plug is damaged, do not use it. This may
cause fire or electric shock.
The power plug should be accessible at all times because this is the only way to remove power from the
device.
Handle the phone carefully. Do not drop it or shake it. Rough handling can cause internal damage.
Do not install the device in direct sunlight. Also do not put the device on carpets or cushions, or other
poorly ventilated locations. This may cause fire or overheating.
Avoid exposure to temperatures above 40℃, below 0℃ or high humidity. Avoid wetting the unit with
any liquid.
Do not use harsh chemicals, cleaning solvents, or strong detergents to clean the device. If cleaning is
necessary use a soft cloth that has been slightly dampened in a mild soap and water solution.
Do not touch the power cord or network cable during a thunderstorm. There is a slight risk of
electrical shock.
Do not attempt to open the device. Consult your authorized dealer for repair.

Fanvil Technology Co., Ltd
HQ Add: Level 3, Block A, Gaoxinqi Building, Anhua Industrial Park, Qianjin 1 Road, 35th District, Bao'An, Shenzhen, 518101 P.R. Chin a
Tel: +86-755-2640-2199 Fax: +86-755-2640-2618 Email: fanvil@fanvil.com www.fanvil.com Beijing Tel:+86-10-5753-6809
Suzhou T el : +86-512-6592-0605 SEA Tel: +60-3-203-50737
- 3 -
Table of Contents
1 INTRODUCING F52 VOIP PHONE .......................................................................... - 8 -
1.1 THANK YOU ..................................................................................................................... - 8 -
1.2 BOX CONTENTS ............................................................................................................... - 8 -
1.3 KEYPAD ........................................................................................................................... - 8 -
1.4 INPUT/OUTPUT PORTS...................................................................................................... - 9 -
1.5 ICON INTRODUCTION ......................................................................................................- 10 -
1.6 LED INTRODUCTION ......................................................................................................- 10 -
1.6.1 Power Indication LED (Power Light Enabled) ............................................................. - 10 -
1.6.2 Power Indication LED (Power Light Disabled) ............................................................ - 11 -
2 INITIAL CONNECTION AND SETTING .............................................................. - 11 -
2.1 CONNECTING THE PHONE ................................................................................................ - 11 -
2.2 NETWORK SETTINGS.......................................................................................................- 12 -
2.2.1 PPPoE Mode ................................................................................................................. - 12 -
2.2.2 Static IP Mode ............................................................................................................... - 13 -
2.2.3 DHCP Mode.................................................................................................................. - 14 -
3 BASIC FUNCTIONS .................................................................................................. - 15 -
3.1 MAKING A CALL ..............................................................................................................- 15 -
3.1.1 Call Device ................................................................................................................... - 15 -
3.1.2 Call Methods ................................................................................................................. - 15 -
3.2 ANSWERING A CALL ........................................................................................................- 15 -
3.3 DO NOT DISTURB (DND) ...............................................................................................- 15 -
3.4 CALL FORWAR D ..............................................................................................................- 15 -
3.5 CALL HOLD ....................................................................................................................- 16 -
3.6 CALL WAITING................................................................................................................- 16 -
3.7 CALL TRANSFER..............................................................................................................- 16 -
3.7.1 Blind Transfer ............................................................................................................... - 16 -
3.7.2 Attended Transfer ......................................................................................................... - 17 -
3.7.3 Semi-Attended Transfer ................................................................................................ - 17 -
3.8 3-WAY CONFERENCE CALL ..............................................................................................- 17 -
3.9 MULTIPLE-WAY CALL ......................................................................................................- 17 -
4 ADVANCED FUNCTION S ........................................................................................ - 17 -
4.1 CALL PICKUP ..................................................................................................................- 17 -
4.2 JOIN CALL .......................................................................................................................- 18 -

Fanvil Technology Co., Ltd
HQ Add: Level 3, Block A, Gaoxinqi Building, Anhua Industrial Park, Qianjin 1 Road, 35th District, Bao'An, Shenzhen, 518101 P.R. Chin a
Tel: +86-755-2640-2199 Fax: +86-755-2640-2618 Email: fanvil@fanvil.com www.fanvil.com Beijing Tel:+86-10-5753-6809
Suzhou T el : +86-512-6592-0605 SEA Tel: +60-3-203-50737
- 4 -
4.3 REDIAL / UNREDIAL ........................................................................................................- 18 -
4.4 CLICK TO DIAL ................................................................................................................- 18 -
4.5 CALL BACK .....................................................................................................................- 19 -
4.6 AUTO ANSWER ................................................................................................................- 19 -
4.7 HOTLINE/WARMLINE ......................................................................................................- 19 -
4.8 SPEED DIAL .....................................................................................................................- 19 -
4.9 APPLICATION ..................................................................................................................- 19 -
4.9.1 SMS .............................................................................................................................. - 19 -
4.9.2 Memo ............................................................................................................................ - 19 -
4.9.3 Voice Mail ..................................................................................................................... - 20 -
4.9.4 Ping ............................................................................................................................... - 20 -
5 OTHER FUNCTIONS ............................................................................................... - 20 -
5.1 CALL FORWAR D ..............................................................................................................- 20 -
5.2 AUTO ANSWER ...............................................................................................................- 20 -
5.3 AUTO HANDDOWN .........................................................................................................- 21 -
5.4 CALL WAITING................................................................................................................- 21 -
5.5 DND ...............................................................................................................................- 21 -
5.6 BAN ANONYMOUS ..........................................................................................................- 21 -
5.7 BAN OUTGOING ..............................................................................................................- 21 -
5.8 HOTLINE .........................................................................................................................- 22 -
5.9 DIAL PLAN ......................................................................................................................- 22 -
5.10 DIAL PEER ......................................................................................................................- 22 -
5.11 INTERCOM ......................................................................................................................- 22 -
5.12 AUTO REDIAL .................................................................................................................- 22 -
5.13 CALL COMPLETION .........................................................................................................- 23 -
5.14 POWER LIGHT .................................................................................................................- 23 -
5.15 HIDE DTMF ...................................................................................................................- 23 -
5.16 PASSWORD DIAL .............................................................................................................- 23 -
5.17 PRE DIAL ........................................................................................................................- 24 -
5.18 CALL LOGS .....................................................................................................................- 24 -
5.19 DEFAULT LINE ................................................................................................................- 24 -
5.20 AUTO SWITCH LINE ........................................................................................................- 24 -
6 BASIC SETTING ....................................................................................................... - 24 -
6.1 KEYBOARD .....................................................................................................................- 24 -
6.2 SCREEN SETTINGS ..........................................................................................................- 25 -
6.3 RING SETTINGS ...............................................................................................................- 25 -

Fanvil Technology Co., Ltd
HQ Add: Level 3, Block A, Gaoxinqi Building, Anhua Industrial Park, Qianjin 1 Road, 35th District, Bao'An, Shenzhen, 518101 P.R. Chin a
Tel: +86-755-2640-2199 Fax: +86-755-2640-2618 Email: fanvil@fanvil.com www.fanvil.com Beijing Tel:+86-10-5753-6809
Suzhou T el : +86-512-6592-0605 SEA Tel: +60-3-203-50737
- 5 -
6.3.1 Ring Volume ................................................................................................................. - 25 -
6.3.2 Ring T y pe ...................................................................................................................... - 25 -
6.4 VOICE VOLUME ..............................................................................................................- 25 -
6.5 TIME & DATE ..................................................................................................................- 26 -
6.6 GREETING WORDS ..........................................................................................................- 26 -
6.7 LANGUAGE .....................................................................................................................- 26 -
7 ADVANCED SETTINGS ........................................................................................... - 27 -
7.1 ACCOUNTS......................................................................................................................- 27 -
7.1.1 Basic Settings ................................................................................................................ - 27 -
7.1.2 Advanced Settings ........................................................................................................ - 27 -
7.1.3 Service Code ................................................................................................................. - 27 -
7.2 NETWORK .......................................................................................................................- 28 -
7.3 SECURITY .......................................................................................................................- 28 -
7.4 MAINTENANCE ...............................................................................................................- 28 -
7.5 FACTORY RESET ..............................................................................................................- 28 -
8 WEB CONFIGURATION .......................................................................................... - 29 -
8.1 INTRODUCTION OF CONFIGURATION ................................................................................- 29 -
8.1.1 Configuration Methods ................................................................................................. - 29 -
8.1.2 Password Configuration ................................................................................................ - 29 -
8.2 SETTING VIA WEB BROWSER ...........................................................................................- 29 -
8.3 CONFIGURA TION VIA WEB .............................................................................................- 31 -
8.3.1 BASIC........................................................................................................................... - 31 -
8.3.1.1 Status ............................................................................................................................. - 31 -
8.3.1.2 Wizard ........................................................................................................................... - 32 -
8.3.1.2.1 Static IP ......................................................................................................................... - 33 -
8.3.1.2.2 DHCP ............................................................................................................................ - 33 -
8.3.1.2.3 PPPoE ........................................................................................................................... - 33 -
8.3.1.2.4 Quick SIP Settings ........................................................................................................ - 34 -
8.3.1.3 Call Log ........................................................................................................................ - 35 -
8.3.1.4 Language....................................................................................................................... - 36 -
8.3.2 Network ........................................................................................................................ - 37 -
8.3.2.1 WAN Config ................................................................................................................. - 37 -
8.3.2.1.1 Static IP ......................................................................................................................... - 39 -
8.3.2.1.2 DHCP ............................................................................................................................ - 39 -
8.3.2.1.3 PPPoE ........................................................................................................................... - 39 -
8.3.2.2 LAN Config .................................................................................................................. - 40 -

Fanvil Technology Co., Ltd
HQ Add: Level 3, Block A, Gaoxinqi Building, Anhua Industrial Park, Qianjin 1 Road, 35th District, Bao'An, Shenzhen, 518101 P.R. Chin a
Tel: +86-755-2640-2199 Fax: +86-755-2640-2618 Email: fanvil@fanvil.com www.fanvil.com Beijing Tel:+86-10-5753-6809
Suzhou T el : +86-512-6592-0605 SEA Tel: +60-3-203-50737
- 6 -
8.3.2.3 Qos & VLAN Config .................................................................................................... - 41 -
8.3.2.4 Service Port ................................................................................................................... - 44 -
8.3.2.5 DHCP SERVICE........................................................................................................... - 45 -
8.3.2.6 TIME&DATE ............................................................................................................... - 46 -
8.3.3 VOIP ............................................................................................................................. - 48 -
8.3.3.1 SIP Configuration ......................................................................................................... - 48 -
8.3.3.2 IAX2 ............................................................................................................................. - 54 -
8.3.3.3 STUN Config ................................................................................................................ - 55 -
8.3.3.4 DIAL PEER .................................................................................................................. - 57 -
8.3.4 Phone ............................................................................................................................ - 60 -
8.3.4.1 AUDIO ......................................................................................................................... - 60 -
8.3.4.2 FEATURE ..................................................................................................................... - 62 -
8.3.4.3 DIAL PLAN.................................................................................................................. - 66 -
8.3.4.4 CONTACT .................................................................................................................... - 67 -
8.3.4.5 REMOTE CONTACT .................................................................................................. - 69 -
8.3.4.6 WEB DIAL ................................................................................................................... - 71 -
8.3.4.7 Multicast ....................................................................................................................... - 71 -
8.3.5 Function Key ................................................................................................................ - 73 -
8.3.5.1 Softkeys ........................................................................................................................ - 73 -
8.3.6 Maintenance .................................................................................................................. - 73 -
8.3.6.1 Auto Provision .............................................................................................................. - 73 -
8.3.6.2 Syslog ........................................................................................................................... - 77 -
8.3.6.3 Config Setting ............................................................................................................... - 79 -
8.3.6.4 Update ........................................................................................................................... - 80 -
8.3.6.5 Access ........................................................................................................................... - 82 -
8.3.6.6 Reboot ........................................................................................................................... - 83 -
8.3.7 Security ......................................................................................................................... - 84 -
8.3.7.1 WEB FILTER ............................................................................................................... - 84 -
8.3.7.2 Firewall ......................................................................................................................... - 85 -
8.3.7.3 Network Address Translation (NAT) ............................................................................ - 86 -
8.3.7.4 VPN .............................................................................................................................. - 89 -
8.3.7.5 Security ......................................................................................................................... - 90 -
8.3.8 Logout ........................................................................................................................... - 91 -
9 APPENDIX .................................................................................................................. - 91 -
9.1 SPECIFICATION ................................................................................................................- 91 -
9.1.1 Hardware....................................................................................................................... - 91 -
9.1.2 Voice Features ............................................................................................................... - 92 -

Fanvil Technology Co., Ltd
HQ Add: Level 3, Block A, Gaoxinqi Building, Anhua Industrial Park, Qianjin 1 Road, 35th District, Bao'An, Shenzhen, 518101 P.R. Chin a
Tel: +86-755-2640-2199 Fax: +86-755-2640-2618 Email: fanvil@fanvil.com www.fanvil.com Beijing Tel:+86-10-5753-6809
Suzhou T el : +86-512-6592-0605 SEA Tel: +60-3-203-50737
- 7 -
9.1.3 Network Features .......................................................................................................... - 94 -
9.1.4 Maintenance and management ...................................................................................... - 95 -
9.2 DIGIT-CHARACTER MAP TABLE .......................................................................................- 96 -

Fanvil Technology Co., Ltd
HQ Add: Level 3, Block A, Gaoxinqi Building, Anhua Industrial Park, Qianjin 1 Road, 35th District, Bao'An, Shenzhen, 518101 P.R. Chin a
Tel: +86-755-2640-2199 Fax: +86-755-2640-2618 Email: fanvil@fanvil.com www.fanvil.com Beijing Tel:+86-10-5753-6809
Suzhou T el : +86-512-6592-0605 SEA Tel: +60-3-203-50737
- 8 -
1 Introducing F52 VoIP Phone
1.1 Thank you
Thank you for purchasing the F52 Voice Over Internet Protocol (VoIP) telephone. The F52 is a fully
featured telephone that provides voice communication over the data network. This phone has all the features
of a traditional telephone and all gives access to many data service features. This guide will help you easily
use the various features and services available on your phone.
1.2 Box Contents
The following items should be packed with your telephone. Please contact your dealer if any of them are
missing.
• Telephone (Main body) with display and keypad
• Handset
• Handset cord
• Power supply
• Ethernet cable
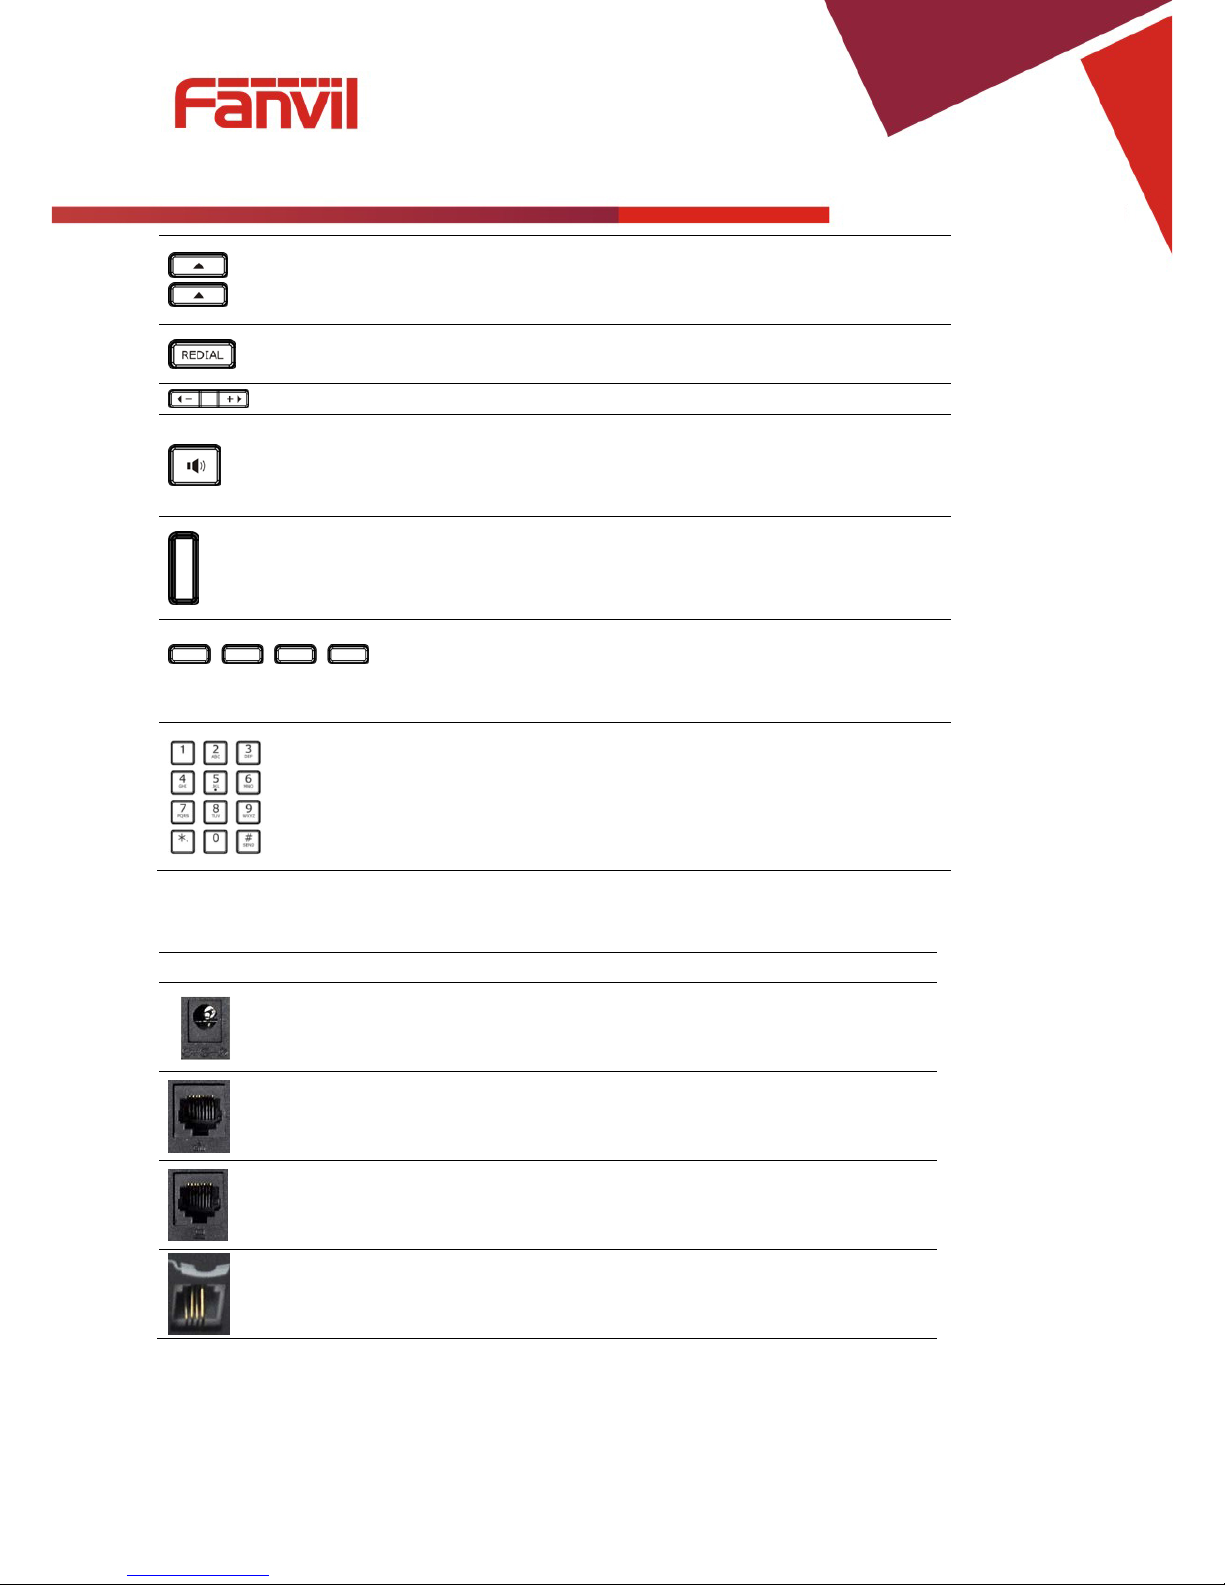
1.3 Keypad
Key
Key name
Function Description
Fanvil Technology Co., Ltd
HQ Add: Level 3, Block A, Gaoxinqi Building, Anhua Industrial Park, Qianjin 1 Road, 35th District, Bao'An, Shenzhen, 518101 P.R. Chin a
Tel: +86-755-2640-2199 Fax: +86-755-2640-2618 Email: fanvil@fanvil.com www.fanvil.com Beijing Tel:+86-10-5753-6809
Suzhou T el : +86-512-6592-0605 SEA Tel: +60-3-203-50737
- 9 -
Navigation
These keys are used in many areas of phone operation.
Depending on the application they will have different
functions.
Redial
When off hook, this will dial the last called number.
In stand-by mode, it will check the Outgoing Call.
Volume -/+
Adjust the volume by pressing these two keys.
Speaker Activate speakerphone mode.
Indicator
light
This light blinks to indicate a missed call.
Soft
key 1/2/3/4
Various functions depending on the phone mode.
Description will be shown in LCD.
Keyboard Dial phone numbers
1.4 Input/Output Ports
Port
Port name
Description
Power switch Input: 5V AC, 1A
WAN 10/100M Connect it to Network
LAN 10/100M Connect it to PC
Handset Port type: RJ-9 connector

Fanvil Technology Co., Ltd
HQ Add: Level 3, Block A, Gaoxinqi Building, Anhua Industrial Park, Qianjin 1 Road, 35th District, Bao'An, Shenzhen, 518101 P.R. Chin a
Tel: +86-755-2640-2199 Fax: +86-755-2640-2618 Email: fanvil@fanvil.com www.fanvil.com Beijing Tel:+86-10-5753-6809
Suzhou T el : +86-512-6592-0605 SEA Tel: +60-3-203-50737
- 10 -
1.5 Icon Introduction
Icon
Description
Call out
Call in
Call hold
Auto answer
Contact
DND(Do not Disturb)
In hand free mode
In handset mode
SMS
Missed call
Call forward
1.6 LED Introduction
1.6.1 Power Indication LED (Power Light Enabled)
LED Status
Description
Steady red
Power on.
Blinking red
There is an incoming call.
Off Power off.
Fanvil Technology Co., Ltd
HQ Add: Level 3, Block A, Gaoxinqi Building, Anhua Industrial Park, Qianjin 1 Road, 35th District, Bao'An, Shenzhen, 518101 P.R. Chin a
Tel: +86-755-2640-2199 Fax: +86-755-2640-2618 Email: fanvil@fanvil.com www.fanvil.com Beijing Tel:+86-10-5753-6809
Suzhou T el : +86-512-6592-0605 SEA Tel: +60-3-203-50737
- 11 -
1.6.2 Power Indication LED (Power Light Disabled)
LED Status Description
Blinking red There is an incoming call
2 Initial Connection and Setting
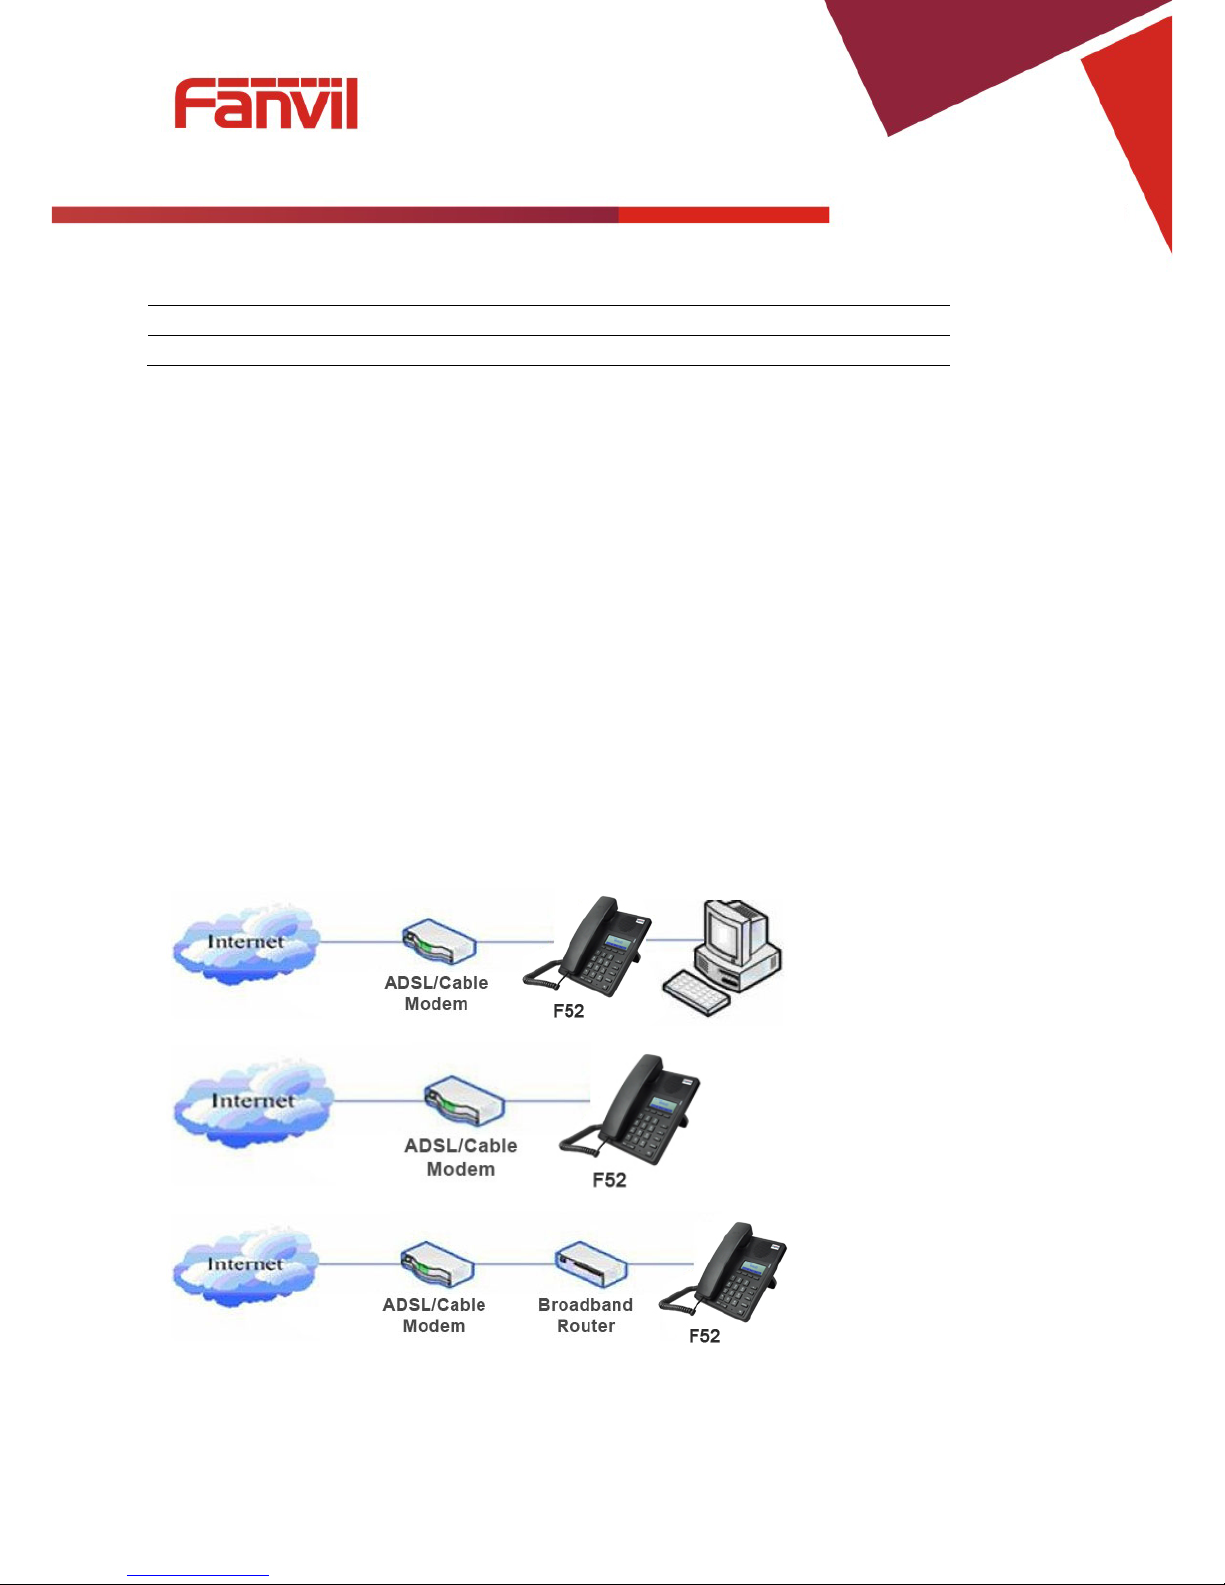
2.1 Connecting the phone
1. Connect to the network. Use the Ethernet cable in the package to connect the WAN port on the back of
your phone to an Ethernet port. The following 3 figures show connection options.
a. Shared network connection—This method requires at least one available Etherne t port. Connect the
WAN port on the back of your phone to the Ethernet port. Since the phone has a built-in router, it can
be connected directly to the network.
b. Direct network connection—Use this method if you have a single Ethernet port which is already in use.
Disconnect the Ethernet cable from the Ethernet port and attach it to the WAN port on the back of the
phone. Then use the Ethernet cable in the package to connect the LAN port on the back of the phone to
the other device. The IP Phone now shares a network connection.
c. Access by router connection—Connect one end of the network cable to the F52’s WAN port the other
end is connected to your broadband router’s LAN port, so that the completion of the network hardware
connections. In most cases, you must configure your network settings to DHCP mode.

Fanvil Technology Co., Ltd
HQ Add: Level 3, Block A, Gaoxinqi Building, Anhua Industrial Park, Qianjin 1 Road, 35th District, Bao'An, Shenzhen, 518101 P.R. Chin a
Tel: +86-755-2640-2199 Fax: +86-755-2640-2618 Email: fanvil@fanvil.com www.fanvil.com Beijing Tel:+86-10-5753-6809
Suzhou T el : +86-512-6592-0605 SEA Tel: +60-3-203-50737
- 12 -
2. Connect the handset to the handset jack using the handset cable in the package.
3. Connect the power supply to the DC port on the back of the phone. Connect the power supply to a
standard power outlet. Note that the power supply will not be needed if your network provides
Power over Ethernet (PoE).
4. The phone’s LCD screen displays “INITIALIZING”. Later, a ready screen displays the date, time
and current network mode.
If your LCD screen displays different information from the above, more information may need to be entered.
Please refer to the next section. If your phone registers into your IP telephony Server, it is ready to use. If
not, continue to read for more configuration information.
2.2 Network Settings
DHCP is supported by default. This allows the phone to receive an IP address and other network-related
settings (Netmask, IP gateway, DNS server) from the DHCP server. If no DHCP server is available, the
network connection settings must be changed. Follow the instructions below to change to either PPPoE or
static IP.
2.2.1 PPPoE Mode
1. Press the Menu softkey.
2. Scroll down to “3 Settings.”
3. Press Enter.
4. Scroll down to “2 Advanced Settings.”
5. Press Enter.
6. The LCD will display “Enter Password”.
7. Input the password (default value is 123).
8. Press Eenter.
9. Scroll down to “2 Network.”
10. Press Enter.
11. Press Enter to select WAN Settings.
12. Scroll down to “4 PPPoE Settings.”
13. Press Enter.
14. Use the keypad to enter the User Name.
15. Press Save.
16. Press Down key.
17. Use the keypad to enter the Password.

Fanvil Technology Co., Ltd
HQ Add: Level 3, Block A, Gaoxinqi Building, Anhua Industrial Park, Qianjin 1 Road, 35th District, Bao'An, Shenzhen, 518101 P.R. Chin a
Tel: +86-755-2640-2199 Fax: +86-755-2640-2618 Email: fanvil@fanvil.com www.fanvil.com Beijing Tel:+86-10-5753-6809
Suzhou T el : +86-512-6592-0605 SEA Tel: +60-3-203-50737
- 13 -
18. Press Save.
19. Press Down key.
20. Use vol-/vol+ key to enable PPPoE.
21. Press Save.
22. Press Back to return to the WAN Settings screen.
23. Press up/down key to scroll to “1 Connection Mode.”
24. Press Enter.
25. Use vol-/vol+ to select “PPPoE.”
26. Press Save.
27. Press Back times to return to idle screen.
28. Disconnect and reconnect the power supply so the phone will reboot and apply the new settings.
2.2.2 Static IP Mode
1. Press the Menu softkey.
1. Scroll down to “3 Settings.”
2. Press Enter.
3. Scroll down to “2 Advanced Settings.”
4. Press Enter.
5. The LCD will display “Enter Password”.
6. Input the password (default value is 123).
7. Press ENTER.
8. Scroll down to “2 Network.”
9. Press Enter.
10. Press Enter to select WAN Settings.
11. Scroll down to “2 Static IP Settings.”
12. Press Enter.
13. Use the keypad to enter the IP Address.
14. Press Save softkey.
15. Press Down key.
16. Use the keypad to enter the Subnet Mask.
17. Press Save softkey.
18. Press Down key.
19. Use the keypad to enter the Gateway Ad dress.
20. Press Save softkey.
21. Press Down key.
22. Use the keypad to enter the DNS 1 Address.
23. Press Save softkey.

Fanvil Technology Co., Ltd
HQ Add: Level 3, Block A, Gaoxinqi Building, Anhua Industrial Park, Qianjin 1 Road, 35th District, Bao'An, Shenzhen, 518101 P.R. Chin a
Tel: +86-755-2640-2199 Fax: +86-755-2640-2618 Email: fanvil@fanvil.com www.fanvil.com Beijing Tel:+86-10-5753-6809
Suzhou T el : +86-512-6592-0605 SEA Tel: +60-3-203-50737
- 14 -
24. Press Down key.
25. Use the keypad to enter the DNS 2 Address if desired.
26. Press Save softkey.
27. Press Back softkey.
28. Press up/down key to scroll to “1 Connection Mode.”
29. Press Enter.
30. Use vol-/vol+ to select “Static IP.”
31. Press Save softkey.
32. Press Back or Exit 6 times to return to idle screen.
33. Disconnect and reconnect the power supply so the phone will reboot and apply the new settings.
2.2.3 DHCP Mode
1. Press the Menu softkey.
2. Scroll down to “3 Settings.”
3. Press Enter.
4. Scroll down to “2 Advanced Settings.”
5. Press Enter.
6. The LCD will display “Enter Password”.
7. Input the password (default value is 123).
8. Press Enter.
9. Scroll down to “2 Network.”
10. Press Enter.
11. Press Enter to select WAN Settings.
12. Scroll down to “3 DHCP Settings.”
13. Press Enter.
14. Use vol-/vol+ to enable or disable DHCP DNS.
15. Press Save softkey.
16. Press Down key.
17. Use vol-/vol+ to enable or disable DHCP Time.
18. Press Save softkey.
19. Press Back softkey.
20. Press up/down key to scroll to “1 Connection Mode.”
21. Press Enter.
22. Use vol-/vol+ to select “DHCP.”
23. Press Save softkey.
24. Press Back or Exit 6 times to return to idle screen.
25. Disconnect and reconnect the power supply so the phone will reboot and apply the new settings.

Fanvil Technology Co., Ltd
HQ Add: Level 3, Block A, Gaoxinqi Building, Anhua Industrial Park, Qianjin 1 Road, 35th District, Bao'An, Shenzhen, 518101 P.R. Chin a
Tel: +86-755-2640-2199 Fax: +86-755-2640-2618 Email: fanvil@fanvil.com www.fanvil.com Beijing Tel:+86-10-5753-6809
Suzhou T el : +86-512-6592-0605 SEA Tel: +60-3-203-50737
- 15 -
3 Basic Functions
3.1 Making a call
3.1.1 Call Device
Calls can be made using two different devices:
1. Handset - Pick up the handset. The
icon will be shown on the LCD screen.
34. Speakerphone - Press the Speaker button. The
icon will be shown on the LCD screen.
The number may also be dialed first. Then the method of speaking can be chosen.
3.1.2 Call Methods
Use one of the following methods to place a call.
1. Dial the desired number using the keypad.
2. Press the REDIAL button to redial the last number called.
3. Press the Dial softkey to make the call if necessary.
3.2 Answering a call
If the phone is idle, lift the handset, press the Speaker button or Answer softkey to answer Using the speaker
phone to answer.
If the phone is in use, press the Answer softkey.
During the conversation, you can alternate between Handset and Speaker phone by pressing the
corresponding buttons or picking up the handset.
3.3 Do Not Disturb (DND)
Press the DND softkey then use vol-/vol+ to select Phone,Line,Disabled to active or disabled DND Mode.
If you select Phone ,New incoming calls will be rejected and the display will show:
icon.
If you select Line,you should press Down key then select Line1 or Line2 to Enable ,after new incoming calls
will be rejected and the display will show:
icon.
If you select Disabled,Incoming calls will be ring and stored in the Call History.
3.4 Call Forward
This feature allows forwarding an incoming call to another phone number. The display shows icon.

Fanvil Technology Co., Ltd
HQ Add: Level 3, Block A, Gaoxinqi Building, Anhua Industrial Park, Qianjin 1 Road, 35th District, Bao'An, Shenzhen, 518101 P.R. Chin a
Tel: +86-755-2640-2199 Fax: +86-755-2640-2618 Email: fanvil@fanvil.com www.fanvil.com Beijing Tel:+86-10-5753-6809
Suzhou T el : +86-512-6592-0605 SEA Tel: +60-3-203-50737
- 16 -
The following call forwarding events can be configured:
Off: Call forwarding is deactivated by default.
Always: Incoming calls are immediately forwarded.
Busy: Incoming calls are immediately forwarded when the phone is busy.
No Answer: Incoming calls are forwarded when the phone is not answered after a specific
period.
To configure Call Forward via Phone interface:
1. Press Menu ->Features->Enter>Call Forward->Enter.
2. Select the line to be forwarded.
3. Use vol-/vol+ to select Disabled, Always, Busy, or No Answer.
4. After choosing a mode (except Disabled), press Down key and then enter the phone number for
forwarding.
5. Press Save to save the changes.
3.5 Call Hold
1. Press the Hold softkey to put the active call on hold.
35. If there is only one call on hold, press the Hold softkey to retrieve the call.
36. If there is more than one call on hold, press the Up/Down key to highlight the call, then press the
Resume button to retrieve the call.
3.6 Call Waiting
1. Press Menu ->Features->Enter->Call Waiting->Enter.
37. Use the navigation keys to activate or deactivate call waiting.
38. Press Save to save the changes.
3.7 Call transfer
3.7.1 Blind Transfer
During a conversation, press the XFER key, dial the number to which the call is to be transferred followed by
"#" and then hang up.

Fanvil Technology Co., Ltd
HQ Add: Level 3, Block A, Gaoxinqi Building, Anhua Industrial Park, Qianjin 1 Road, 35th District, Bao'An, Shenzhen, 518101 P.R. Chin a
Tel: +86-755-2640-2199 Fax: +86-755-2640-2618 Email: fanvil@fanvil.com www.fanvil.com Beijing Tel:+86-10-5753-6809
Suzhou T el : +86-512-6592-0605 SEA Tel: +60-3-203-50737
- 17 -
3.7.2 Attended Transfer
During a conversation, press the XFER key, dial the number to which the call is to be transferred followed by
"#" and press Send. After the third party answers, press XFER to complete the transfer.
NOTE: Call waiting and call transf er must be enabled.
NOTE: The SIP server must support RFC3515.
3.7.3 Semi-Attended Transfer
During a conversation, press the XFER key, dial the number to which the call is to be transferred. Then
press the Send softkey. When the third party phone begins to ring, press XFER to complete the transfer.
NOTE: Call waiting and call transfer must be enabled.
3.8 3-way conference call
1. Press the Conf softkey during an active call.
39. The first call will be placed on hold and dial tone will be heard.
40. Dial the number to be added to the conference.
41. Press Dial.
42. When the call is answered, press Conf to add the caller to the conference.
43. To release the conf er ence, pres s Split.
3.9 Multiple-way call
To add a fifth party to four active calls
1. Press Conf softkey or XFER softkey
2. Press OK
3. Enter the number
4. Press Dial and wait for the other party to answer.
5. Use the arrow keys to select a call.
4 Advanced Functions
4.1 Call pickup
This allows a third party to answer a call by dialing a code. For example: A calls B, but there is no answer.
C can go off hook, dial a code plus B’s number, and pick up the call.
Fanvil Technology Co., Ltd
HQ Add: Level 3, Block A, Gaoxinqi Building, Anhua Industrial Park, Qianjin 1 Road, 35th District, Bao'An, Shenzhen, 518101 P.R. Chin a
Tel: +86-755-2640-2199 Fax: +86-755-2640-2618 Email: fanvil@fanvil.com www.fanvil.com Beijing Tel:+86-10-5753-6809
Suzhou T el : +86-512-6592-0605 SEA Tel: +60-3-203-50737
- 18 -
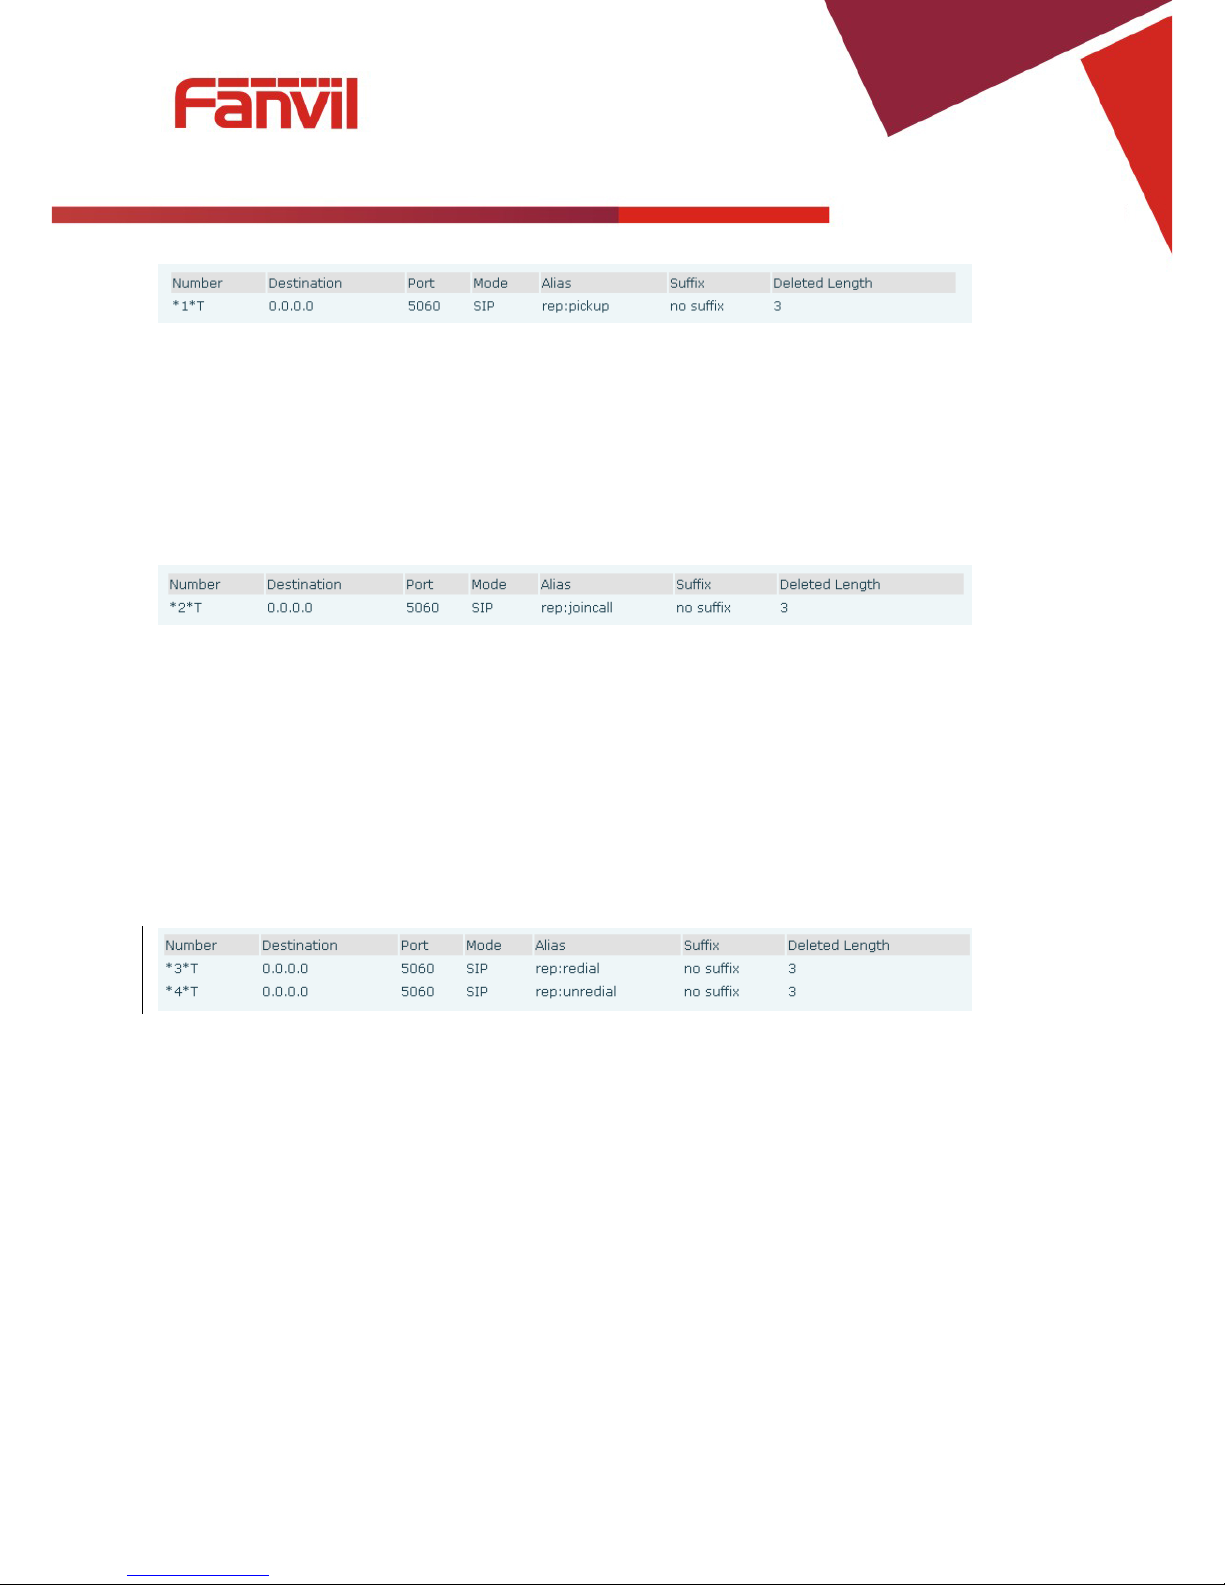
The following chart shows how to configure this in the dial peer screen.
*1* is the code. After saving the above configuration, C can dial *1* plus B’s phone number to pick up A’s
call. The prefix can be set to anything the user desires that does not interfere with other dialing rules.
4.2 Join call
This allows a third party to join an existing call. For example: If B and C are on a call, A can join by
dialing a code plus the number for B or C. This assumes that B or C also support Join Call.
The following chart shows how to configure this in the dial peer screen.
*2* is the code. After saving the above configuration, A can dial *2* plus the number for B or C to join B
and C’s call. The prefix can be set to anything the user desires that does not interfere with other dialing rules.
4.3 Redial / Unredial
If B is on a call when A calls, A will get busy tone. If A wants to connect to B as soon as B is available, he
can use the redial function. To use this feature, A dials a prefix and then B’s number.
When the redial function is activated, A will check B’s calling status every 60 seconds. When B is available,
A’s phone will ring. When A goes off hook, the phone will call B automatically. If A does not want to call
B, the redial function can be cancelled by dialing a prefix plus B’s number.
*3* is the redial prefix code. A can dial *3* plus B’s phone number to activate the redial function.
*4* is the unredial prefix code. A can dial *4* to cancel the redial function.
The user can select any prefix as long as it does not interfere with dialing rules.
4.4 Click to dial
If User A browses to User B’s phone number or SIP address in the contact page and clicks it, User A’s phone
will ring. After he goes off hook, the phone will call User B.
Note:This feature requires that the software on PC or PBX support click to dial.

Fanvil Technology Co., Ltd
HQ Add: Level 3, Block A, Gaoxinqi Building, Anhua Industrial Park, Qianjin 1 Road, 35th District, Bao'An, Shenzhen, 518101 P.R. Chin a
Tel: +86-755-2640-2199 Fax: +86-755-2640-2618 Email: fanvil@fanvil.com www.fanvil.com Beijing Tel:+86-10-5753-6809
Suzhou T el : +86-512-6592-0605 SEA Tel: +60-3-203-50737
- 19 -
4.5 Call back
This function will redial the last received call.
4.6 Auto answer
If this feature is activated, the phone will answer incoming calls after a programmable delay.
4.7 Hotline/Warmline
This feature will cause the phone to place a call to a programmed number whenever it goes off-hook. A
different hotline number can be set for each SIP line.
4.8 Speed dial
This feature will allow you make speed dial easily. If you set up speed dial with name and tel numbers for
1~9, and then you can dial n# to make the corresponding speed dial number directly.
4.9 Application
4.9.1 SMS
1. Press + ->Applications->Enter->SMS->Enter.
2. Use the navigation keys to highlight the options. Messages can be read in the Inbox/Outbox.
3. Press Reply to reply to a message. Use the 2aB softkey to change the Input Method. After entering
the reply, press OK, use the navigation keys to select the line from which you want to send, then press
Send.
4. To write a new message, press New. Use the 2aB softkey to change the Input Method. After entering
the reply, press OK, use the navigation keys to select the line from which you want to send, and press
Send.
5. To delete a message, press Del. You have three options to choose: Yes, All, No.
4.9.2 Memo
Memos can be recorded in the phone as reminders.
Press Menu->Application->Memo->Enter->Add.
Options for Mode, Date, Time, and Ring Tone can then be configured. The reminder text can also be
entered. When the configuration is com plete d, press Save.

Fanvil Technology Co., Ltd
HQ Add: Level 3, Block A, Gaoxinqi Building, Anhua Industrial Park, Qianjin 1 Road, 35th District, Bao'An, Shenzhen, 518101 P.R. Chin a
Tel: +86-755-2640-2199 Fax: +86-755-2640-2618 Email: fanvil@fanvil.com www.fanvil.com Beijing Tel:+86-10-5753-6809
Suzhou T el : +86-512-6592-0605 SEA Tel: +60-3-203-50737
- 20 -
4.9.3 Voice Mail
1. Press Menu->Application->Voice Mail->Enter.
2. Use the navigation keys to highlight the line for which you want to set voicemail.
3. Press Edit
4. Use the navigation keys to enable voicemail.
5. Input the number. Press 2aB softkey if necessary to change the input method.
6. Press Save to save the change.
7. To hear a new voicemail, press the Voicemail softkey. Then press Dial. It may then be necessary to
enter a password.
4.9.4 Ping
1. Press Menu->Application->Ping->Enter.
2. Enter the IP Address to be pinged.
3. Press Start
4. Display will show “Ping IP Address”
5. After approximately 5 seconds, the display will show “OK” if the ping is successful or “Failed” is the
ping is unsuccessful.
5 Other Functions
5.1 Call Forward
If this feature is enabled, the phone will forward to another phone.
6. Press Menu ->Features-> Enter->Auto Answer-> Enter.
7. Use Up/Down key to select line.
8. Use vol-/vol+ to Enable.
9. Use Up/Down key to access number setting.
5.2 Auto Answer
If this feature is enabled, the phone will answer a ringing line after a specified time.
1. Press Menu ->Features-> Enter->Auto Answer-> Enter.
2. Use Up/Down key to select line.
3. Use vol-/vol+ to Enable.
4. Use Up/Down key to access time setting.

Fanvil Technology Co., Ltd
HQ Add: Level 3, Block A, Gaoxinqi Building, Anhua Industrial Park, Qianjin 1 Road, 35th District, Bao'An, Shenzhen, 518101 P.R. Chin a
Tel: +86-755-2640-2199 Fax: +86-755-2640-2618 Email: fanvil@fanvil.com www.fanvil.com Beijing Tel:+86-10-5753-6809
Suzhou T el : +86-512-6592-0605 SEA Tel: +60-3-203-50737
- 21 -
5. Use keypad to enter time in seconds.
5.3 Auto Handdown
This is the time after a call ends before the phone returns to the idle state.
1. Press Menu ->Features-> Enter->Auto Handdown-> Enter.
2. Use vol-/vol+ to Enable.
3. Use Up/Down key to access time setting.
4. Use keypad to enter time in minutes.
5.4 Call Waiting
If you turn off call waiting,when there is a second way you can not call all the way incoming.
1. Press Menu ->Features-> Enter->Call Waiting-> Enter.
2. Use vol-/vol+ to Enable.
3. Use Up/Down key to access tone setting.
5.5 DND
If this function is enabled the new incoming calls will be rejected.
1. Press Menu ->Features-> Enter->DND-> Enter.
2. Use vol-/vol+ to Enable.
3. Use Up/Down key to access line setting.
4. Use vol-/vol+ to Enable.
5.6 Ban Anonymous
If this function is enabled, the phone will block calls with no Caller ID information.
1. Press Menu ->Features-> Enter->Ban Anonymous Call-> Enter.
2. Choose the SIP Account from which to Ban Anonymous Call.
3. Press OK
4. Use vol-/vol+ to Enable.
5.7 Ban Outgoing
If this function is enabled, the phone cannot make outgoing calls.
Press Menu ->Features-> Ban Outgoing-> Enter.

Fanvil Technology Co., Ltd
HQ Add: Level 3, Block A, Gaoxinqi Building, Anhua Industrial Park, Qianjin 1 Road, 35th District, Bao'An, Shenzhen, 518101 P.R. Chin a
Tel: +86-755-2640-2199 Fax: +86-755-2640-2618 Email: fanvil@fanvil.com www.fanvil.com Beijing Tel:+86-10-5753-6809
Suzhou T el : +86-512-6592-0605 SEA Tel: +60-3-203-50737
- 22 -
5.8 Hotline
If you turn on automatically as you set the number of call setup time.
1. Press Menu ->Features-> Enter->Hotline-> Enter.
2. Use Up/Down key to select line.
3. Use vol-/vol+ to Enable.
4. Use Up/Down key to access time setting.
5. Use Up/Down key to access number setting.
5.9 Dial Plan
1. Press Menu ->Features-> Enter->Dial Plan-> Enter.
2. The following items in the dial plan can be enabled or disabled: Press # to Send, Timeout to Send,
Timeout, Fixed Length Number, Press # to Do BXFER, BXFER On Onhook, AXFER On Onhook.
Note: It is recommended that Dial Plan be configured from the web interface.
5.10 Dial Peer
1. Press Menu ->Features-> Enter->Dial Peer-> Enter.
2. Select Add to enter the Edit interface, and input information.
Note: It is recommended that Dial Peer be configured from the web interface. Refer to Section 8.3.3.4.
5.11 Intercom
Enables/Disables Intercom calls
Press Menu ->Features-> Enter->Intercom-> Enter.
5.12 Auto Redial
If Auto Redial is enabled, the phone will continue to retry a busy call. The user sets the retry interval and
the number of times to redial. The user is also given the option to activate this feature on each busy call.
1. Press Menu ->Features-> Enter->Auto Redial-> Enter.
2. Use vol-/vol+ to Enable.
3. Use Up/Down key to select Interval and Times.
4. Press Save.

Fanvil Technology Co., Ltd
HQ Add: Level 3, Block A, Gaoxinqi Building, Anhua Industrial Park, Qianjin 1 Road, 35th District, Bao'An, Shenzhen, 518101 P.R. Chin a
Tel: +86-755-2640-2199 Fax: +86-755-2640-2618 Email: fanvil@fanvil.com www.fanvil.com Beijing Tel:+86-10-5753-6809
Suzhou T el : +86-512-6592-0605 SEA Tel: +60-3-203-50737
- 23 -
5.13 Call completion
This is similar to Auto Redial except that it detects the state of the called number before making a new call
attempt.
1. Press Menu ->Features-> Enter->Call Completion-> Enter.
2. Use vol-/vol+ to Enable.
3. Press Save.
5.14 Power Light
This feature enables the power light at the bottom of the phone.
Press Menu ->Features-> Enter->Power LED-> Enter.
5.15 Hide DTMF
This feature sets how DTMF digits are displayed after a call is in progress. For example, dial a PIN code to
access banking information.
1. Press Menu ->Features-> Enter->Hide DTMF-> Enter.
2. Use vol-/vol+ to select one of the following 4 choices.
a) Disabled – All the digits will be shown on the LCD.
b) All – None of the digits will be shown on the LCD. The “*” will be shown.
c) Delay – The last digit entered will be shown for a short time and then replaced by “*.”
d) Last Show – The last digit entered will be shown. Previous digits are replaced by “*.”
5.16 Password Dial
This feature controls the display of dialed digits. When enabled, a password and length can be set.
Example: A call is placed to 6625551212. Password is set to 662 and length is set to 3. Display will show
662***1212.
1. Press Menu ->Features-> Enter->Passwd Dial-> Enter.
2. Use vol-/vol+ to enable the feature.
3. Use Up/Down key to move to Prefix.
4. Use keypad to enter prefix.
5. Use Up/Down key to move to Length.
6. Use keypad to enter Length.
7. Use BACK or EXIT to return to idle screen.

Fanvil Technology Co., Ltd
HQ Add: Level 3, Block A, Gaoxinqi Building, Anhua Industrial Park, Qianjin 1 Road, 35th District, Bao'An, Shenzhen, 518101 P.R. Chin a
Tel: +86-755-2640-2199 Fax: +86-755-2640-2618 Email: fanvil@fanvil.com www.fanvil.com Beijing Tel:+86-10-5753-6809
Suzhou T el : +86-512-6592-0605 SEA Tel: +60-3-203-50737
- 24 -
5.17 Pre Dial
If this feature is enabled, digits dialed on-hook will be transmitted when the phone goes off-hook
Press Menu ->Features-> Pre Dial-> Enter.
5.18 Call Logs
If this feature is disabled,you will not see the call logs.
1. Press Menu ->Features-> Enter->Call Logs-> Enter.
2. Use vol-/vol+ to enable.
5.19 Default Line
If this feature is disabled, The handset displays Greeting Words.
1. Press Menu ->Features-> Enter->Call Logs-> Enter.
2. Use vol-/vol+ to enable.
5.20 Auto Switch Line
If this feature is enabled,then the opportunity to use the first available line call path.
1. Press Menu ->Features-> Enter->Auto Switch Line-> Enter.
2. Use vol-/vol+ to enable.
6 Basic Setting
6.1 Keyboard
1. Press Menu ->Settings-> Enter->Basic Settings-> Enter->Keyboard->Enter.
2. There are four sets of keys which can be configured.
a) DSS Keys – Keys on the right side of the phone beside the Speakerphone button or Line Keys.
b) Programmable Keys – Arrow keys and OK key
c) Desktop Long Pressed – Action to take when Programmable Key is pressed and held.
d) Soft Key – Keys under the display
3. Use Up/Down key and Enter to select the key.
4. Use vol-/vol+to select the function.
5. Press OK to save.
6. Use BACK or EXIT to return to idle screen.

Fanvil Technology Co., Ltd
HQ Add: Level 3, Block A, Gaoxinqi Building, Anhua Industrial Park, Qianjin 1 Road, 35th District, Bao'An, Shenzhen, 518101 P.R. Chin a
Tel: +86-755-2640-2199 Fax: +86-755-2640-2618 Email: fanvil@fanvil.com www.fanvil.com Beijing Tel:+86-10-5753-6809
Suzhou T el : +86-512-6592-0605 SEA Tel: +60-3-203-50737
- 25 -
6.2 Screen Settings
1. Press Menu ->Settings-> Enter->Basic Setting s-> Enter->Screen Settings->Enter.
2. The following items can be set.
a) Contrast – Set the contrast of the LCD.
b) Contrast Calibration – Set the level of contrast that the curr ent contra st sett ing prov ides.
c) Backlight – Enable or disable LCD backlight.
3. Press OK to save.
4. Use BACK or EXIT to return to idle screen.
6.3 Ring Settings
6.3.1 Ring Volume
1. Press Menu ->Settings-> Enter->Basic Setti ng s-> Enter->Ring Settings->Enter->Ring Volume->Enter.
2. Use vol-/vol+ to select the desired ring volume from the 9 choices. The phone will ring at the selected
volume shortly after it is selected.
3. Press Save.
4. Use BACK or EXIT to return to idle screen.
6.3.2 Ring Type
1. Press Menu ->Settings-> Enter->Basic Setti ng s-> Enter->Ring Settings->Enter->Ring Type->Enter.
2. Use vol-/vol+ to select the desired ring type. There are 9 standard types and 3 user types. The user
type can be configured from the web interface. The phone will ring at the selected type shortly after it
is selected.
3. Press Save.
4. Use BACK or EXIT to return to idle scr een.
6.4 Voice Volume
1. Press Menu ->Settings-> Enter->Basic Setti ng-> Enter->Voice Volume ->Enter.
2. Use vol-/vol+ to select the desired voice volume from the 9 choices.
3. Press Save.
4. Use BACK or EXIT to return to idle screen.

Fanvil Technology Co., Ltd
HQ Add: Level 3, Block A, Gaoxinqi Building, Anhua Industrial Park, Qianjin 1 Road, 35th District, Bao'An, Shenzhen, 518101 P.R. Chin a
Tel: +86-755-2640-2199 Fax: +86-755-2640-2618 Email: fanvil@fanvil.com www.fanvil.com Beijing Tel:+86-10-5753-6809
Suzhou T el : +86-512-6592-0605 SEA Tel: +60-3-203-50737
- 26 -
6.5 Time & Date
1. Press Menu ->Settings->Enter->Basic Settings-> Enter->Time & Date->Enter.
2. Use vol-/vol+ to choose Auto or Manual. If Auto is chosen, the phone will get date and time
information from a time server. The IP address of this server may need to be entered. If Manual is
chosen, the date and time must be entered.
3. Use Up/Down key to move to the following items. Use vol-/vol+ to make selection.
a) SNTP Server – Time Server IP address – This is the only item that must be configured if auto is
chosen.
b) Time Zone – This is shown as an of fs et from GMT .
c) Format – Date Display format.
d) Type – Character used as delimiter in date display.
e) 12 Hour Clock – If disabled, clock is 24 hour.
f) Daylight Saving T im e
4. Press Save.
5. Use BACK or EXIT to return to idle screen.
6.6 Greeting Words
This feature shows the words displayed in the upper left of the LCD. Default is VOIP PHONE.
1. Press Menu ->Settings-> Enter->Basic Setti ng s-> Enter->Greeting Word->Enter.
2. Enter the message using the keypad. It may be necessary to change the input mode using the soft keys.
Use DELETE to remove characters and 0 for space. Maximum message length is 12 characters.
3. Press Save.
4. Use BACK or EXIT to return to idle screen.
6.7 Language
1. Press Menu ->Settings-> Enter->Basic Setti ng s-> Enter->Language Set ->Enter.
2. Use vol-/vol+ to choose English or Chinese.
3. Press Save.
4. Use BACK or EXIT to return to idle screen.

Fanvil Technology Co., Ltd
HQ Add: Level 3, Block A, Gaoxinqi Building, Anhua Industrial Park, Qianjin 1 Road, 35th District, Bao'An, Shenzhen, 518101 P.R. Chin a
Tel: +86-755-2640-2199 Fax: +86-755-2640-2618 Email: fanvil@fanvil.com www.fanvil.com Beijing Tel:+86-10-5753-6809
Suzhou T el : +86-512-6592-0605 SEA Tel: +60-3-203-50737
- 27 -
7 Advanced Settings
7.1 Accounts
This allows configuration of SIP account parameters. After selecting one of the three available accounts,
the following items may be configured.
7.1.1 Basic Settings
1. Display Name – Name send in Caller ID
2. Outbound Proxy - SIP Outbound Proxy IP Address
3. Registration – Enable or disable registration for this account.
4. Server Address – SIP Server IP Address
5. Server Port – SIP Port – Default 5060
6. SIP User – SIP User name
7. Auth User – User name for authentication
8. Auth Password – Password for authentication
7.1.2 Advanced Settings
1. Domain Realm – SIP Domain
2. Dial W itho ut Regis te red – Enable or disable dialing with no SIP registration
3. Anonymous – Privacy Support. Choose RFC3323, RFC3325 or None
4. DTMF Mode – Choose RFC2833, SIP_Info, In-band, or Auto
5. Use STUN – Enable or disable use of STUN Server. If enabled, the IP address of the STUN server
must be entered.
6. Local Port – Local SIP Port – Default 5060
7. Ring Type – Select ring type for this account. See Section 6.3.2.
8. MWI Number – Number for Message Waiting
9. Pickup Number – Code for call pickup
10. Park Number – Code for call park
11. Join Call Number – Code to join a call
12. Missed Call Logs – Enable or disable
7.1.3 Service Code
Sets the codes to be dialed to an IP PBX to enable or disable the following functions.

Fanvil Technology Co., Ltd
HQ Add: Level 3, Block A, Gaoxinqi Building, Anhua Industrial Park, Qianjin 1 Road, 35th District, Bao'An, Shenzhen, 518101 P.R. Chin a
Tel: +86-755-2640-2199 Fax: +86-755-2640-2618 Email: fanvil@fanvil.com www.fanvil.com Beijing Tel:+86-10-5753-6809
Suzhou T el : +86-512-6592-0605 SEA Tel: +60-3-203-50737
- 28 -
1. Mode – Selects whether or not all these codes are active.
2. DND
3. Always CFW – Always Call Forward
4. Busy CFW - Call Forward Busy
5. No Answer CFW - Call Forward No Answer
6. Anonymous
7.2 Network
Enter Network settings as discussed in Section 2.2.
7.3 Security
1. Menu Password – Password to enter configuration menu.
2. Keyboard Password – If this feature is enabled, this password must be entered whenever the keypad is
used.
3. Keyboard Status – Enable or disable key lock as described above.
7.4 Maintenance
See Section 8.3.6 for a detailed explanation of each option. It is recommended that these features be
accessed through the web interface.
4. Auto Provision – Select DHCP Option, Plug and Play, or Phone Flash for autoprovision.
5. TR069 – Enable or disable configuration via TR069.
6. Backup – Select Config, Phonebook or none for backup. File name must be entered.
7. Upgrade – Select Image, MMI Set, BMF, Ring, Config, or Phonebook for upgrade. File name must be
entered.
7.5 Factory Reset
Choose Yes to return the phone to factory default settings.

Fanvil Technology Co., Ltd
HQ Add: Level 3, Block A, Gaoxinqi Building, Anhua Industrial Park, Qianjin 1 Road, 35th District, Bao'An, Shenzhen, 518101 P.R. Chin a
Tel: +86-755-2640-2199 Fax: +86-755-2640-2618 Email: fanvil@fanvil.com www.fanvil.com Beijing Tel:+86-10-5753-6809
Suzhou T el : +86-512-6592-0605 SEA Tel: +60-3-203-50737
- 29 -
8 Web Configuration
8.1 Introduction of configuration
8.1.1 Configuration Methods
There are three methods which can be used to configure this phone:
1. Phone keypad – As discussed in previous sections
2. Web browser - Recommended way
3. Telnet with CLI command
8.1.2 Password Configuration
There are two levels of access: root level and general level. A user with root level access can browse and
set all configuration parameters, while a user with general level can set all config urat ion par ameters except
server parameters for SIP or IAX2.
• Default user with general level:
Username: guest
Password: guest
• Default user with root level:
Username: admin
Password: admin
The default password for the phone screen menu is 123.
8.2 Setting via web browser
Enter the phone’s IP address into the address bar of the web browser. This assumes that the pc and the phone
are on the same subnet. Note: Internet Explorer, Firefox, Chrome, or Safari are supported browsers.
If the IP address is not known, it can be displayed on the phone’s LCD by pressing the Menu->Status.
After entering the IP address, the following screen is displayed.
 Loading...