

Page 1
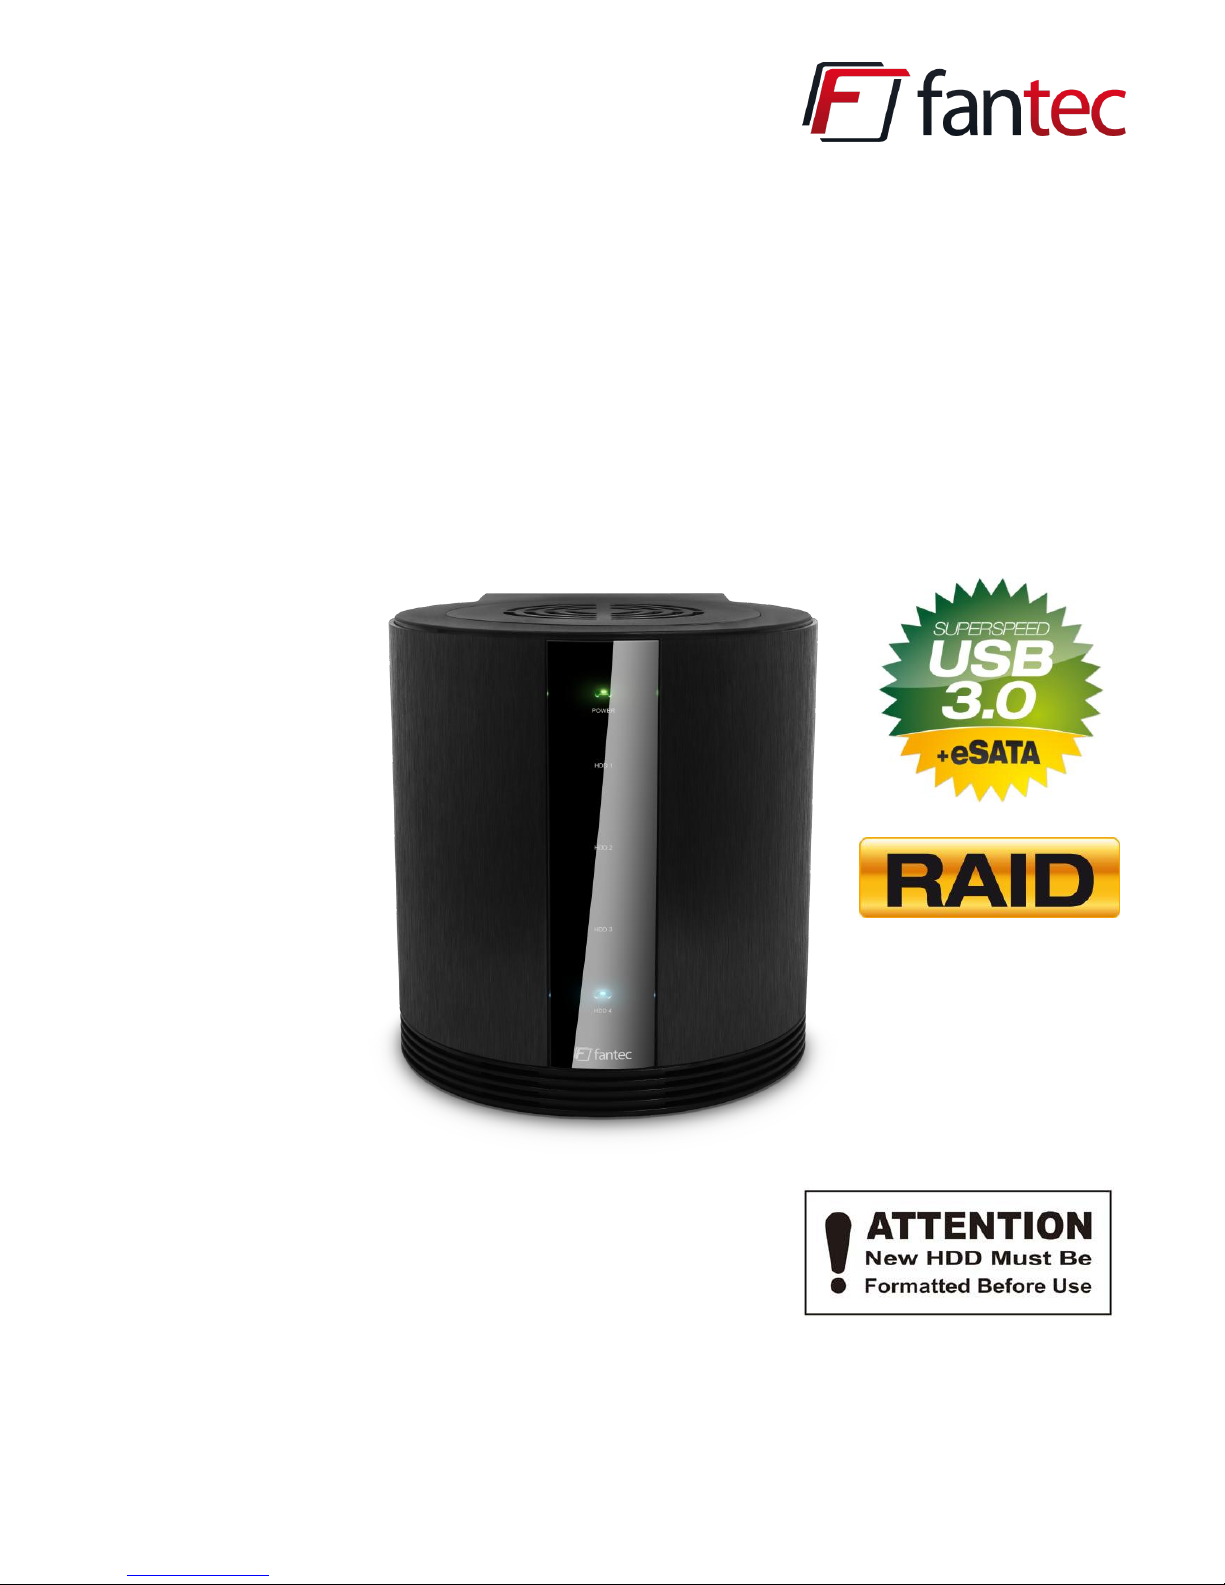
Fantec SQ-35RU3e
4 x 3.5" SATA, HDD, RAID, USB3.0, eSATA
User Manual
Important:
All data is deleted when changing the RAID mode.
Backup the HDD(s) before changing the RAID mode.
Page 2

Fantec SQ-35RU3e User Manual
1. Package Contents
- 1 x user manual
- 1x 4 bay hard drive enclosure
- 4x HDD bays
- 8 x screws
- 1 x USB 3.0 cable
- 1 x eSATA cable
- 1 x power adaptor
2. Notes
- eSATA and USB 3.0 connector (downwards compatible with USB2.0 and USB1.1)
- Auto energy saving function when PC is switched off
- 25% less power consumption with Green Power Design
- 33% less HDD temperature with 80mm fan and intelligent ventilation design
- Up to 5Gbps transmission speed per USB3.0 connection
- SATA-II interface: supports HDDs with SATA I, II, III
- 4 HDDs, Plug&Play, hot swap
- Supports HDD capacity up to 4TB in GPT format, Windows 7/Vista
- Windows XP (MBR) supports HDD/Raid drives up to 2TB (4x500GB)!
Please note:
1. Read this user manual carefully before installing and using the product.
2. This product works in temperatures between 0
o
C and 40oC and in relative humidity
between 0% and 80%. Ensure a well ventilated working environment.
3. Do not block the ventilation openings to allow heat dissipation.
4. Do not place any liquids or chemicals on the device.
5. The power adaptor works with 12V, 5.4A, input 100V~240V. Do not connect any other
power supply to avoid damaging the device.
6. Do not cover the power adaptor and ensure sufficient ventilation.
7. The HDD must be properly attached in the HDD insert before being inserted in the
housing.
1
Page 3
Fantec SQ-35RU3e User Manual
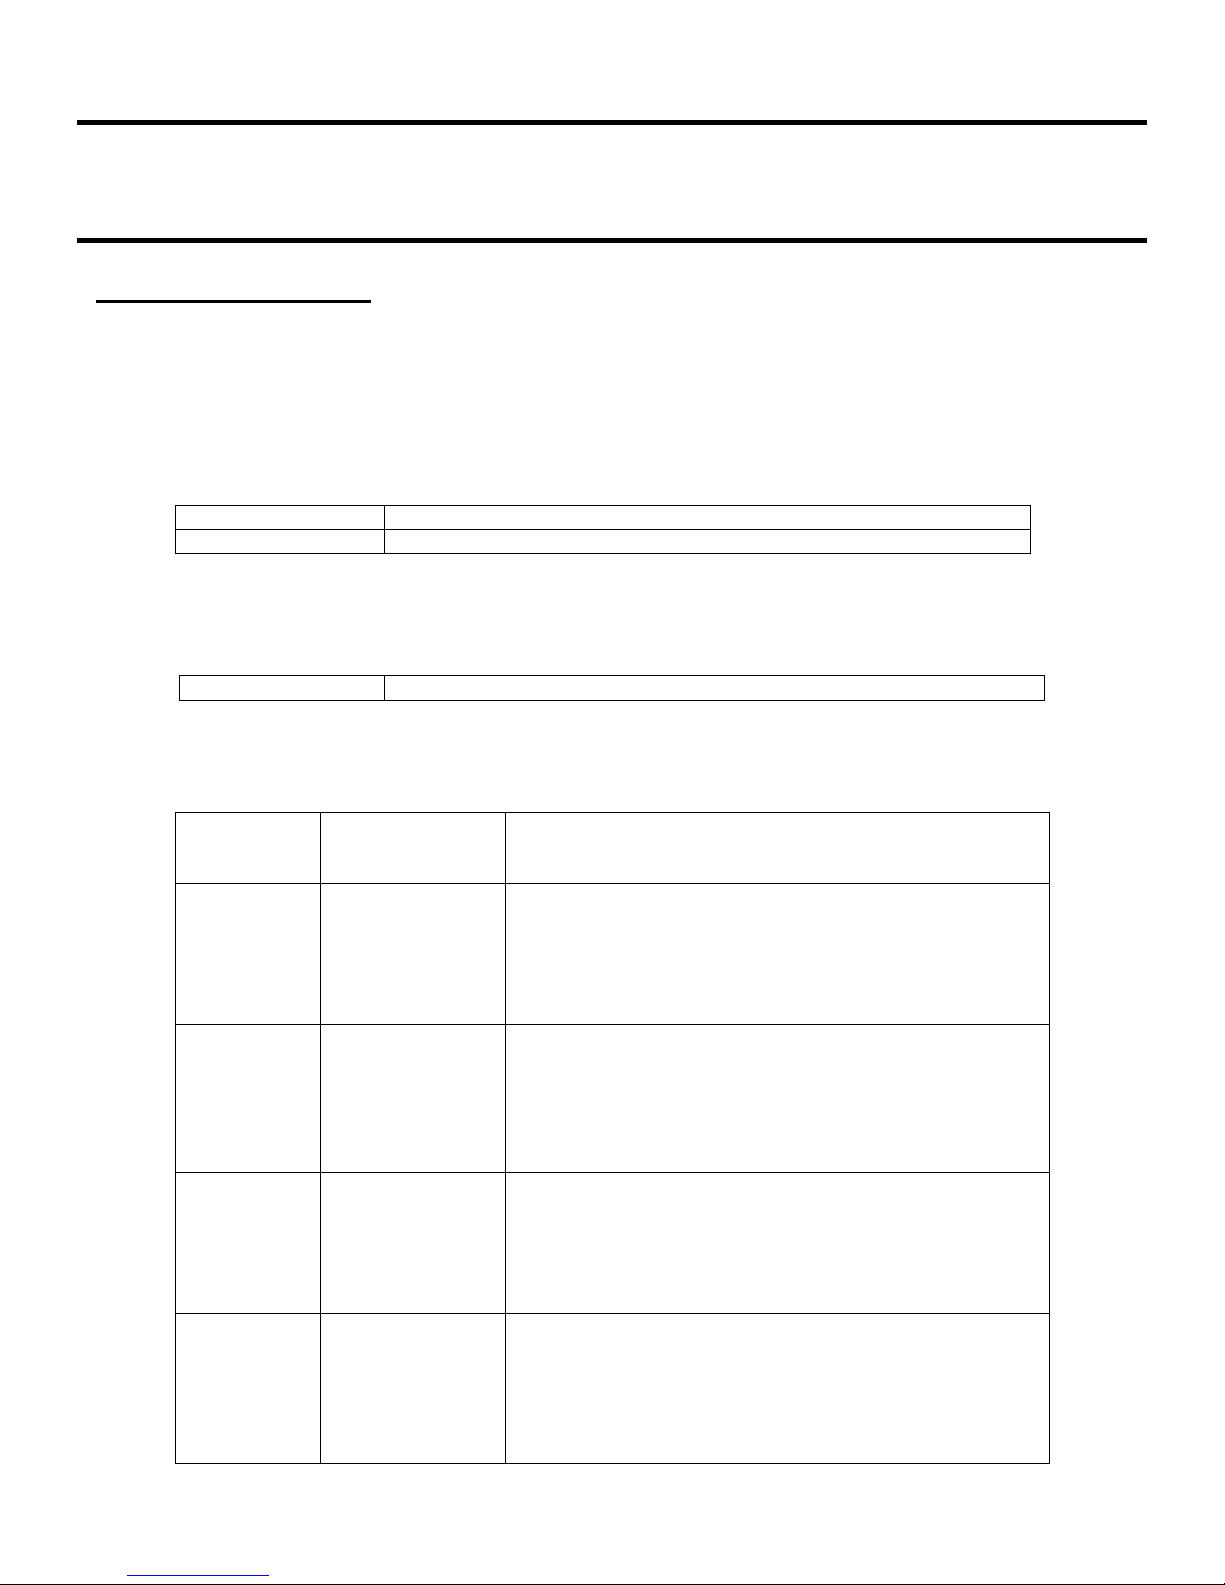
USB 3.0
Connect USB3.0 cable to computer
eSATA
Connect eSATA cable to computer
Controller
Use the controller to set the fan speed
Power LED
Green
LIGHTS UP: switched on
OFF: switched off
HDD 1
Blue
LIGHTS UP: HDD connected
FLASHES: access (read/write)
FLASHES CONTINUOUSLY (3Hz): HDD fault
OFF: HDD not installed/removed/sleep mode
HDD 2
Blue
LIGHTS UP: HDD connected
FLASHES: access (read/write)
FLASHES CONTINUOUSLY (3Hz): HDD fault
OFF: HDD not installed/removed/sleep mode
HDD 3
Blue
LIGHTS UP: HDD connected
FLASHES: access (read/write)
FLASHES CONTINUOUSLY (3Hz): HDD fault
OFF: HDD not installed/removed/sleep mode
HDD 4
Blue
LIGHTS UP: HDD connected
FLASHES: access (read/write)
FLASHES CONTINUOUSLY (3Hz): HDD fault
OFF: HDD not installed/removed/sleep mode
3. About the device
Hardware overview
DC input
Connector for supplied power adaptor
- 12VDC, 100-240VAC, 50-60Hz
PC connection
Note: In case of concurrent connection of eSATA and USB3.0 the PC detects eSATA.
Fan speed control
LED indicators:
2
Page 4
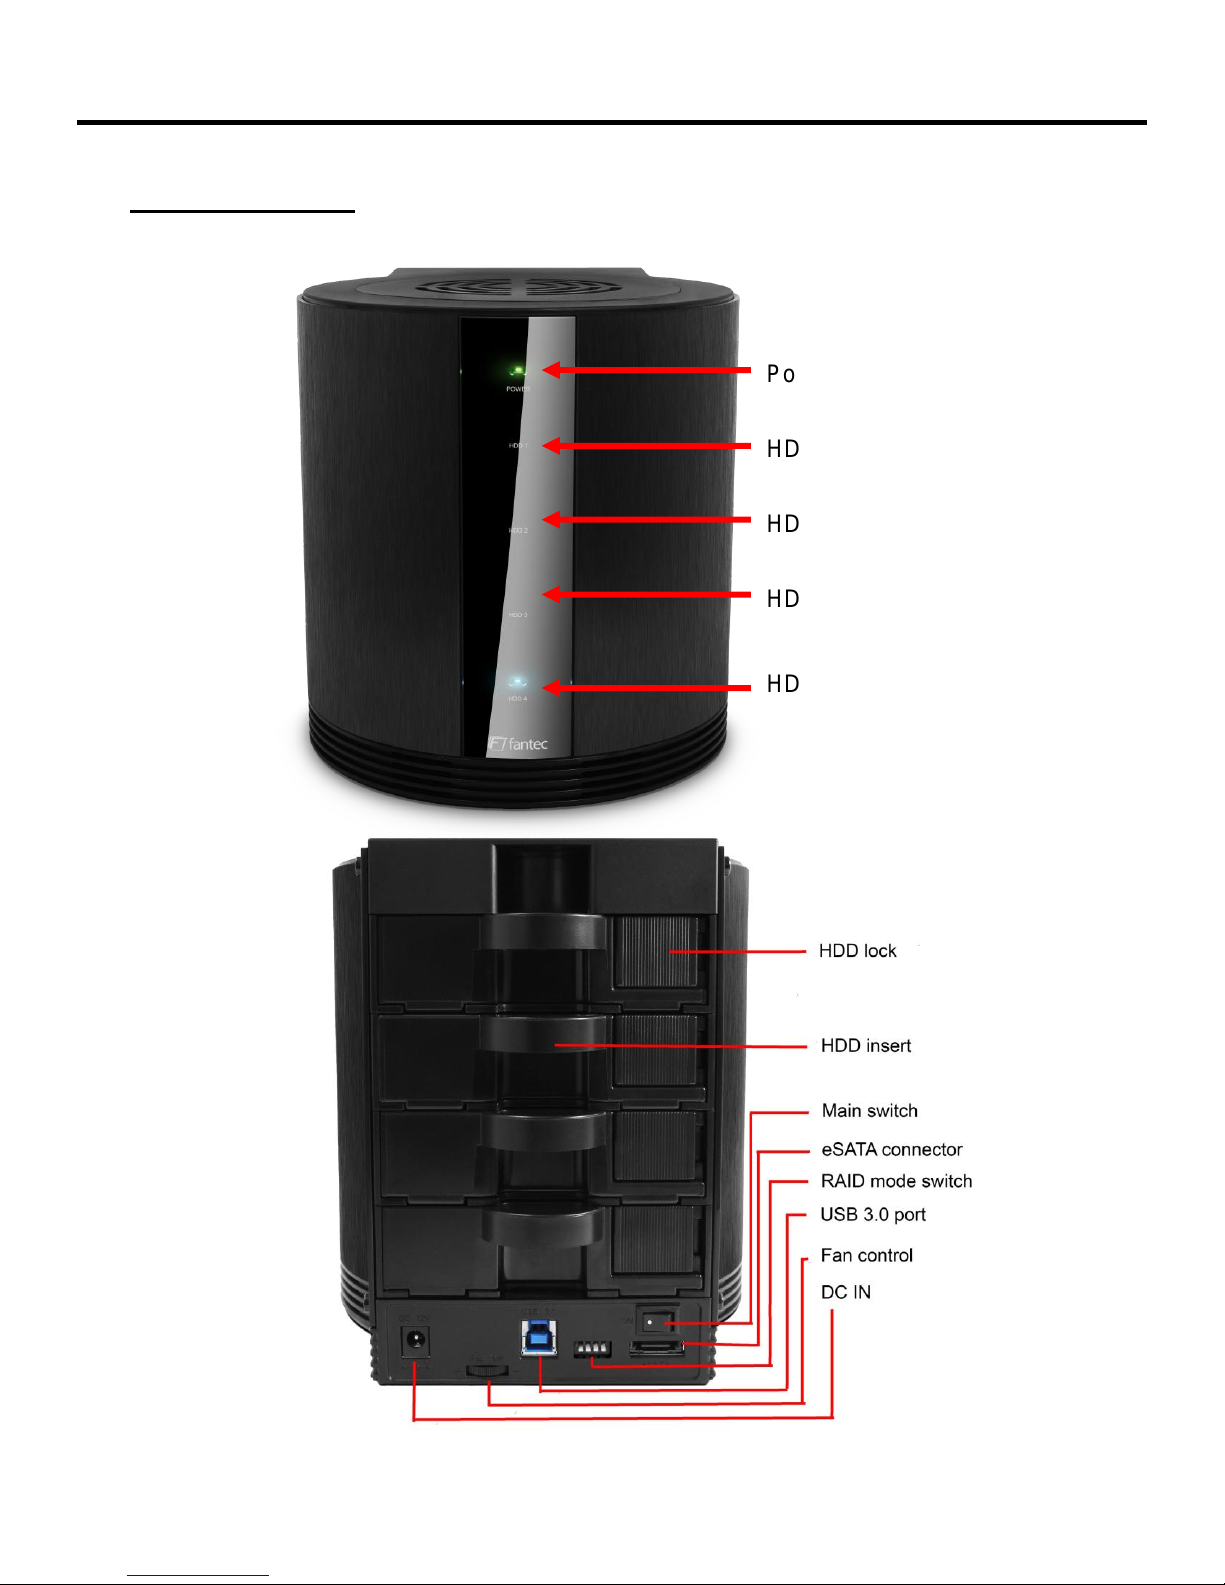
Power LED
HDD1 LED
HDD2 LED
HDD3 LED
HDD4 LED
Front / Rear view
Fantec SQ-35RU3e User Manual
3
Page 5
Fantec SQ-35RU3e User Manual
4. Hardware installation instructions
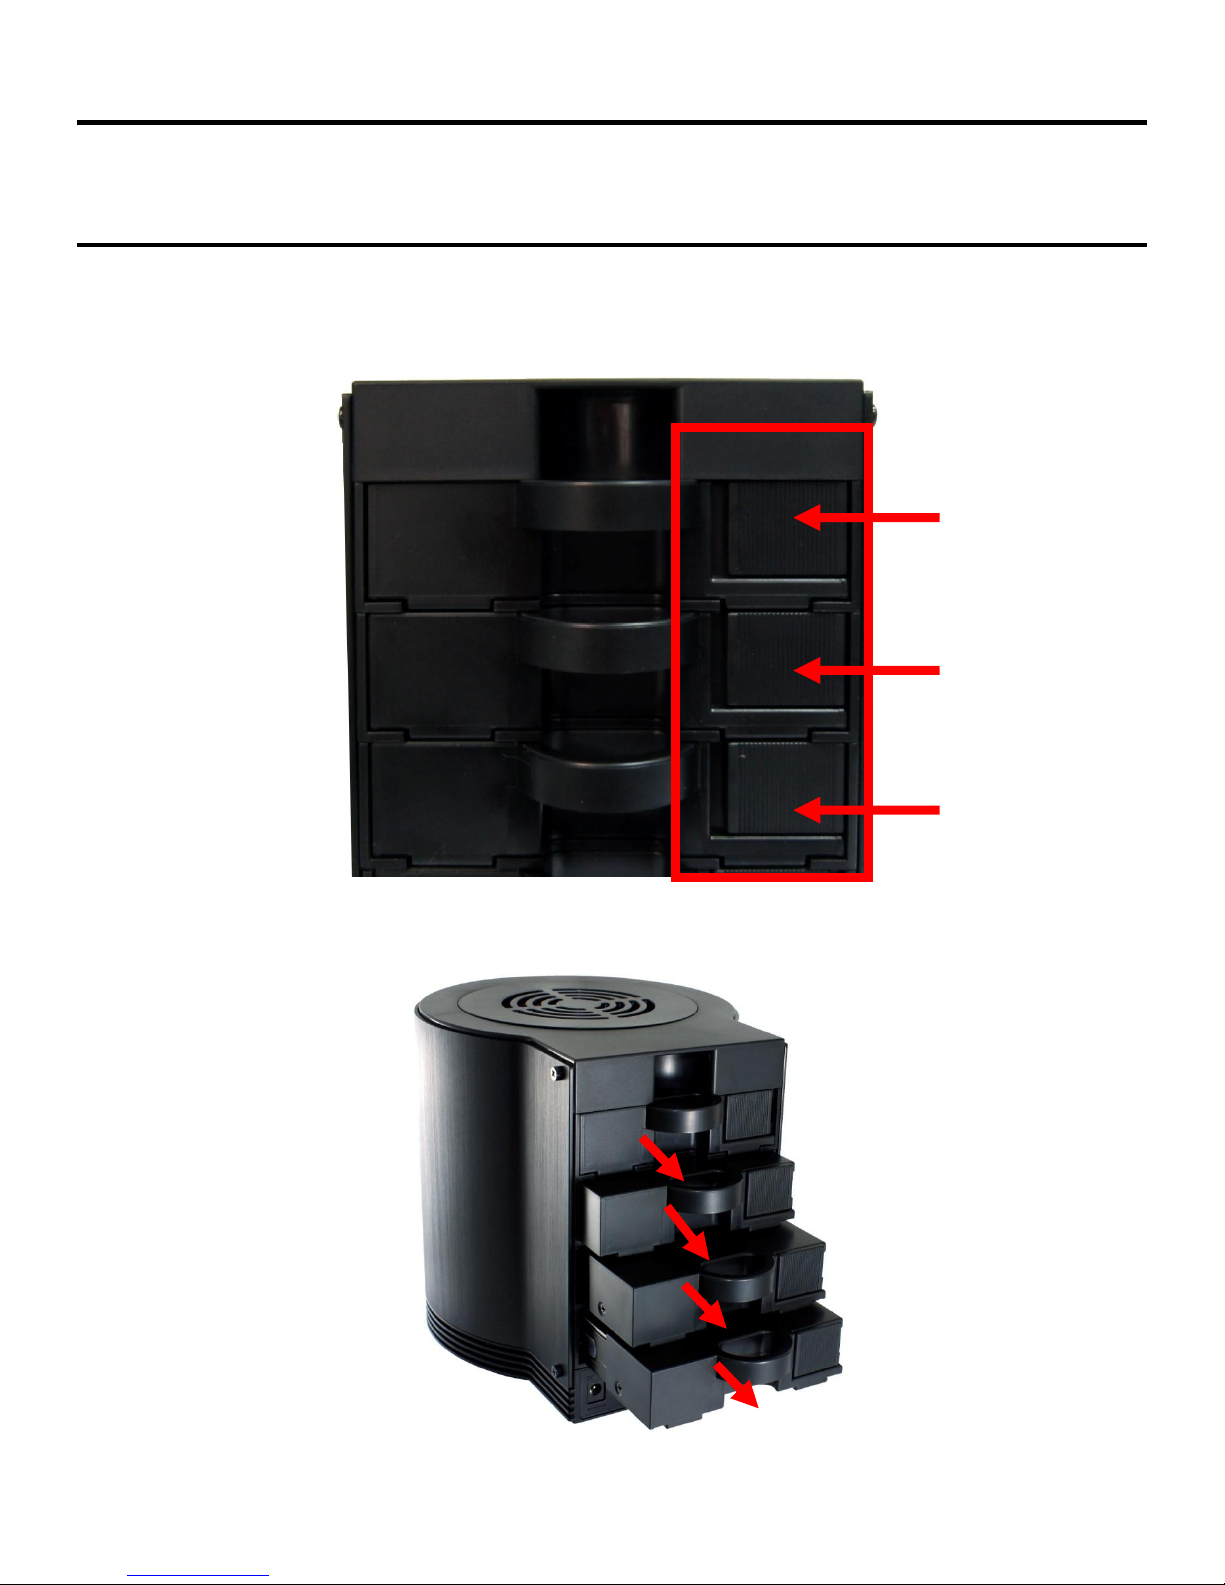
Step1: Push the Locker switch to the left side to unlock the HDD tray.
Step2: Take out the HDD trays.
4
Page 6
Fantec SQ-35RU3e User Manual
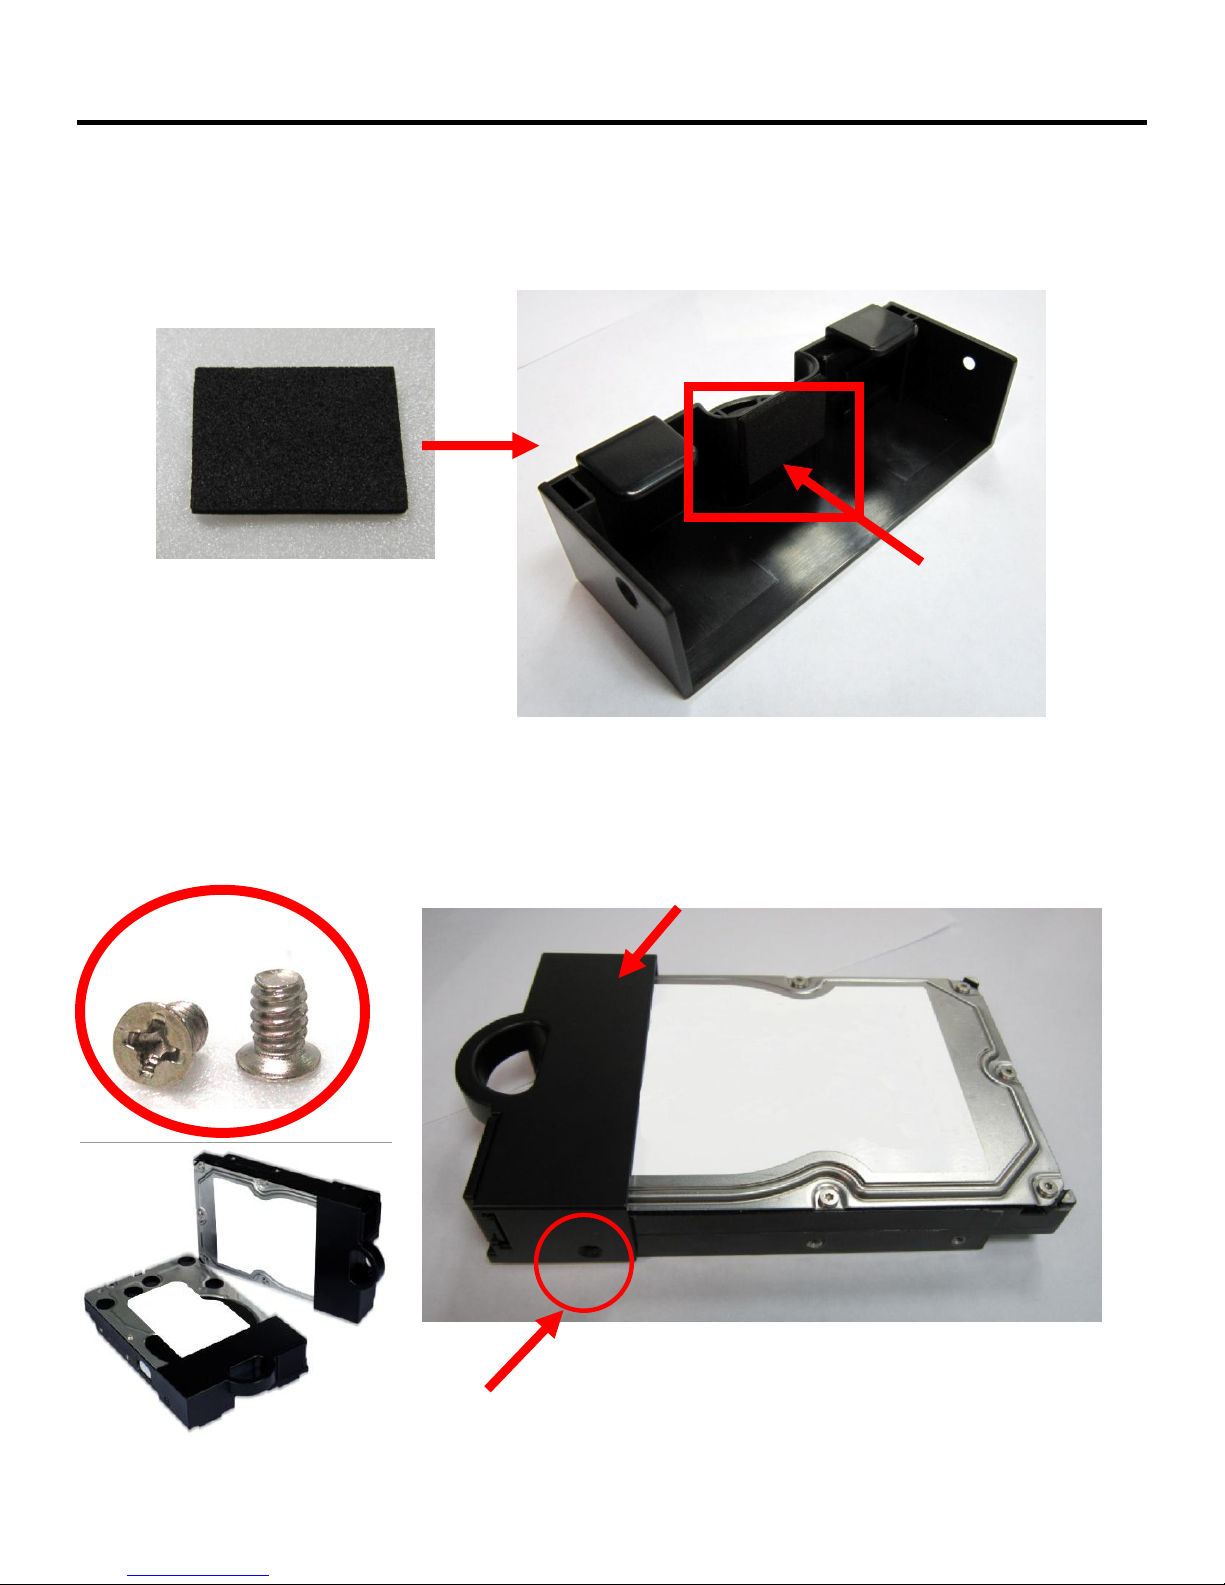
Step3: Gluing the rubber pad to the middle at inner side of HDD tray if your HDD is a little
shorter.
Step4: Install the HDD into the tray and insert one screw on each side. Make sure screws are
firmly tightened, holding the tray and HDD together.
5
Page 7
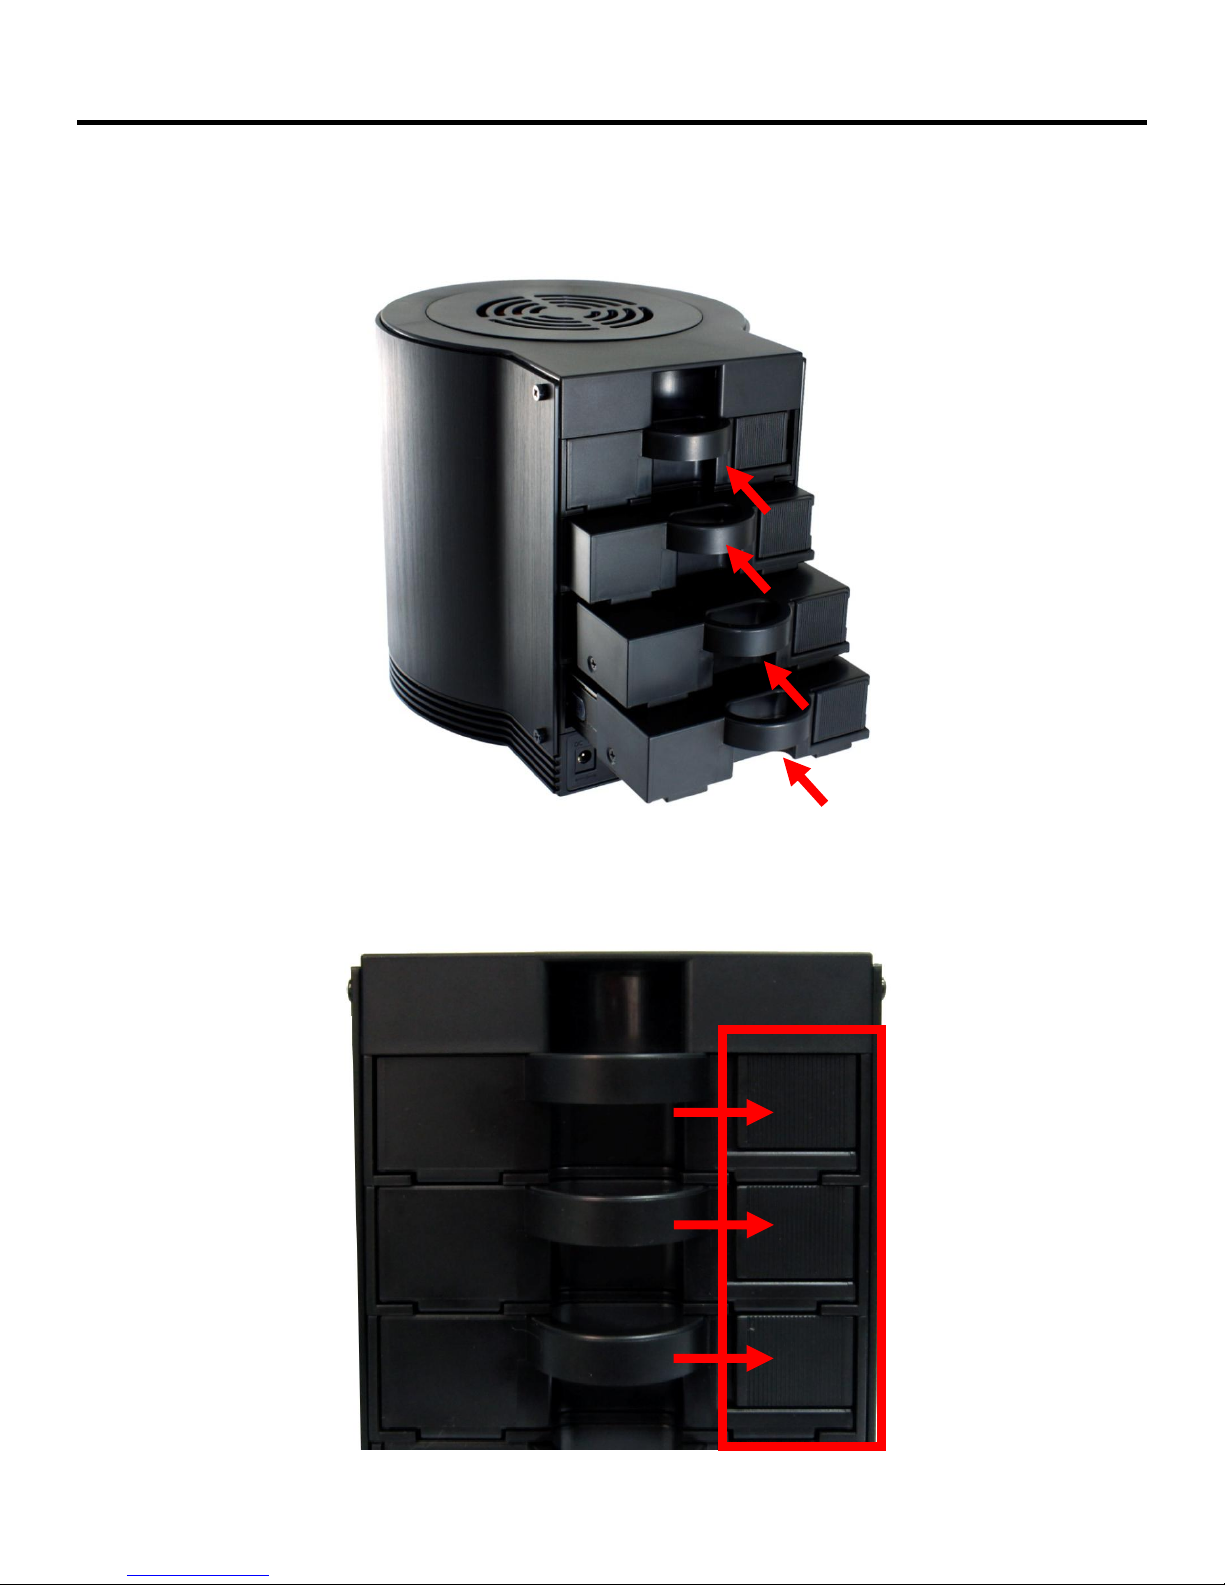
Step5: Slide HDD trays into the case.
Fantec SQ-35RU3e User Manual
Step6: Push the switch to the right side to lock the HDD tray.
6
Page 8
Fantec SQ-35RU3e User Manual
RAID mode settings
5. RAID settings
With FANTEC SQ-35RU3e you can set the Raid versions described below. The SQ-35RU3e creates
from 4 physical drives one virtual drive. This is managed by the Raid housing. The virtual drive is
displayed as a “volume” on a Windows computer. Thanks to the virtual drive you can create a Raid
with the FANTEC SQ-35RU3e even with different HDD models. The HDDs may have both different
capacities and use different speeds.
7
Page 9
Fantec SQ-35RU3e User Manual
Important: Backup the HDD(s) before changing the RAID setting.
1. Switch on the device.
2. Ensure that the desired number of HDDs is installed and that the respective HDD LEDs light up.
3. Connect the device via USB or eSATA cable to the PC.
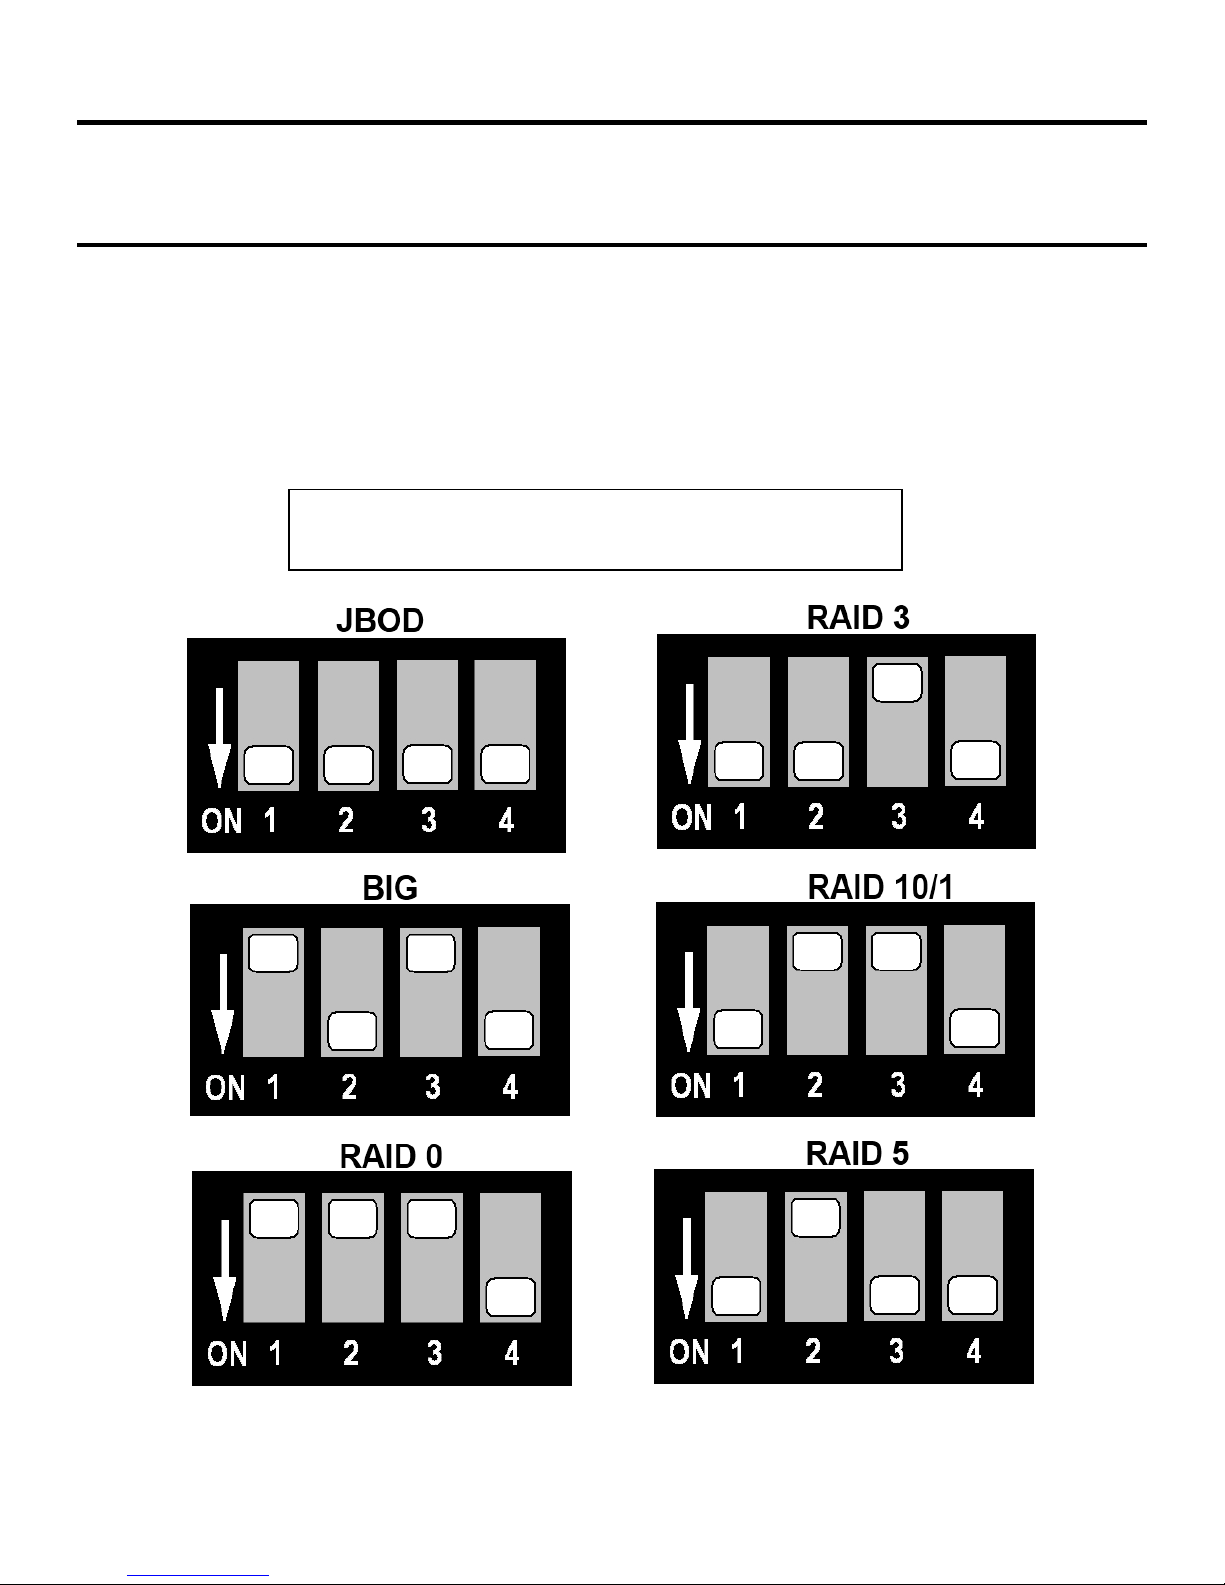
4. Select the Raid mode by setting the “RAID switch” on the rear of the device.
5. Press and hold “RAID Reset” for 3~5 seconds to reset the HDD mode and to set the new mode.
6. Format the HDDs.
Note: Below you will find a detailed instruction for HDD formatting.
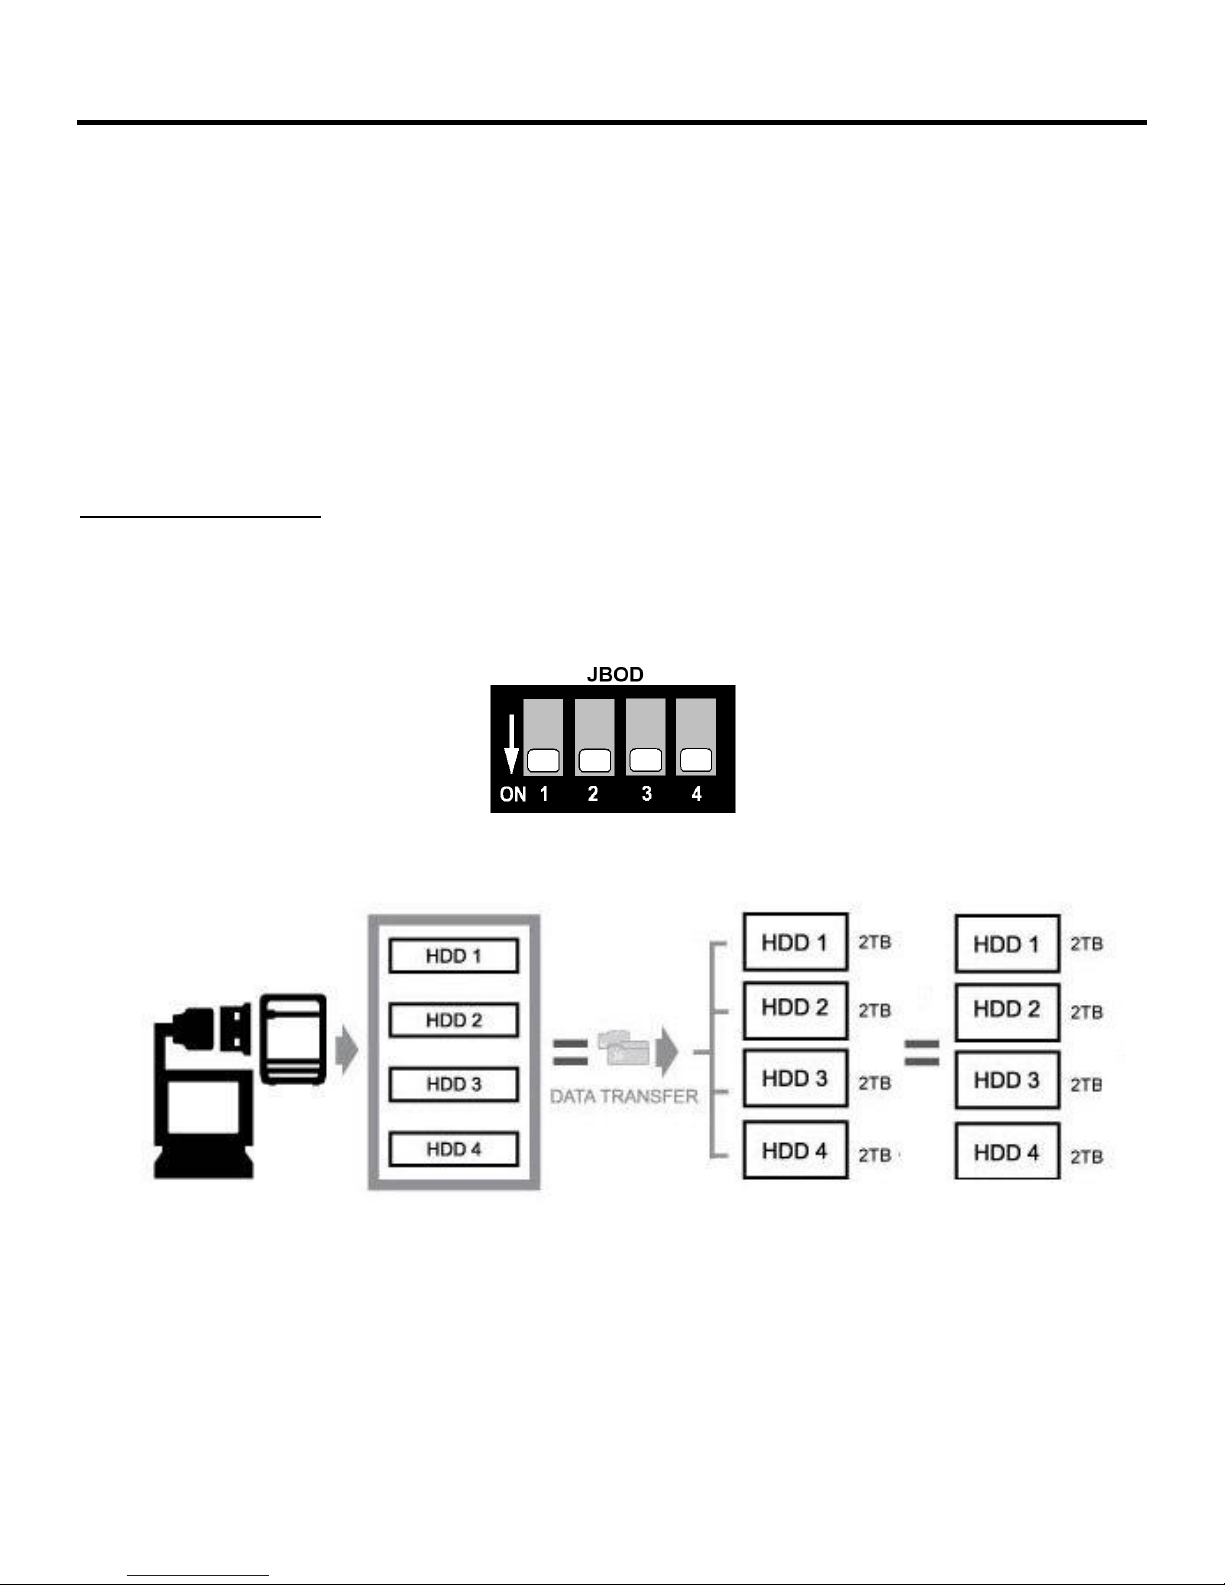
JBOD MODE (single):
JBOD mode displays each drive individually.
After connecting the device via USB or eSATA all drives are displayed.
8
Page 10
Fantec SQ-35RU3e User Manual
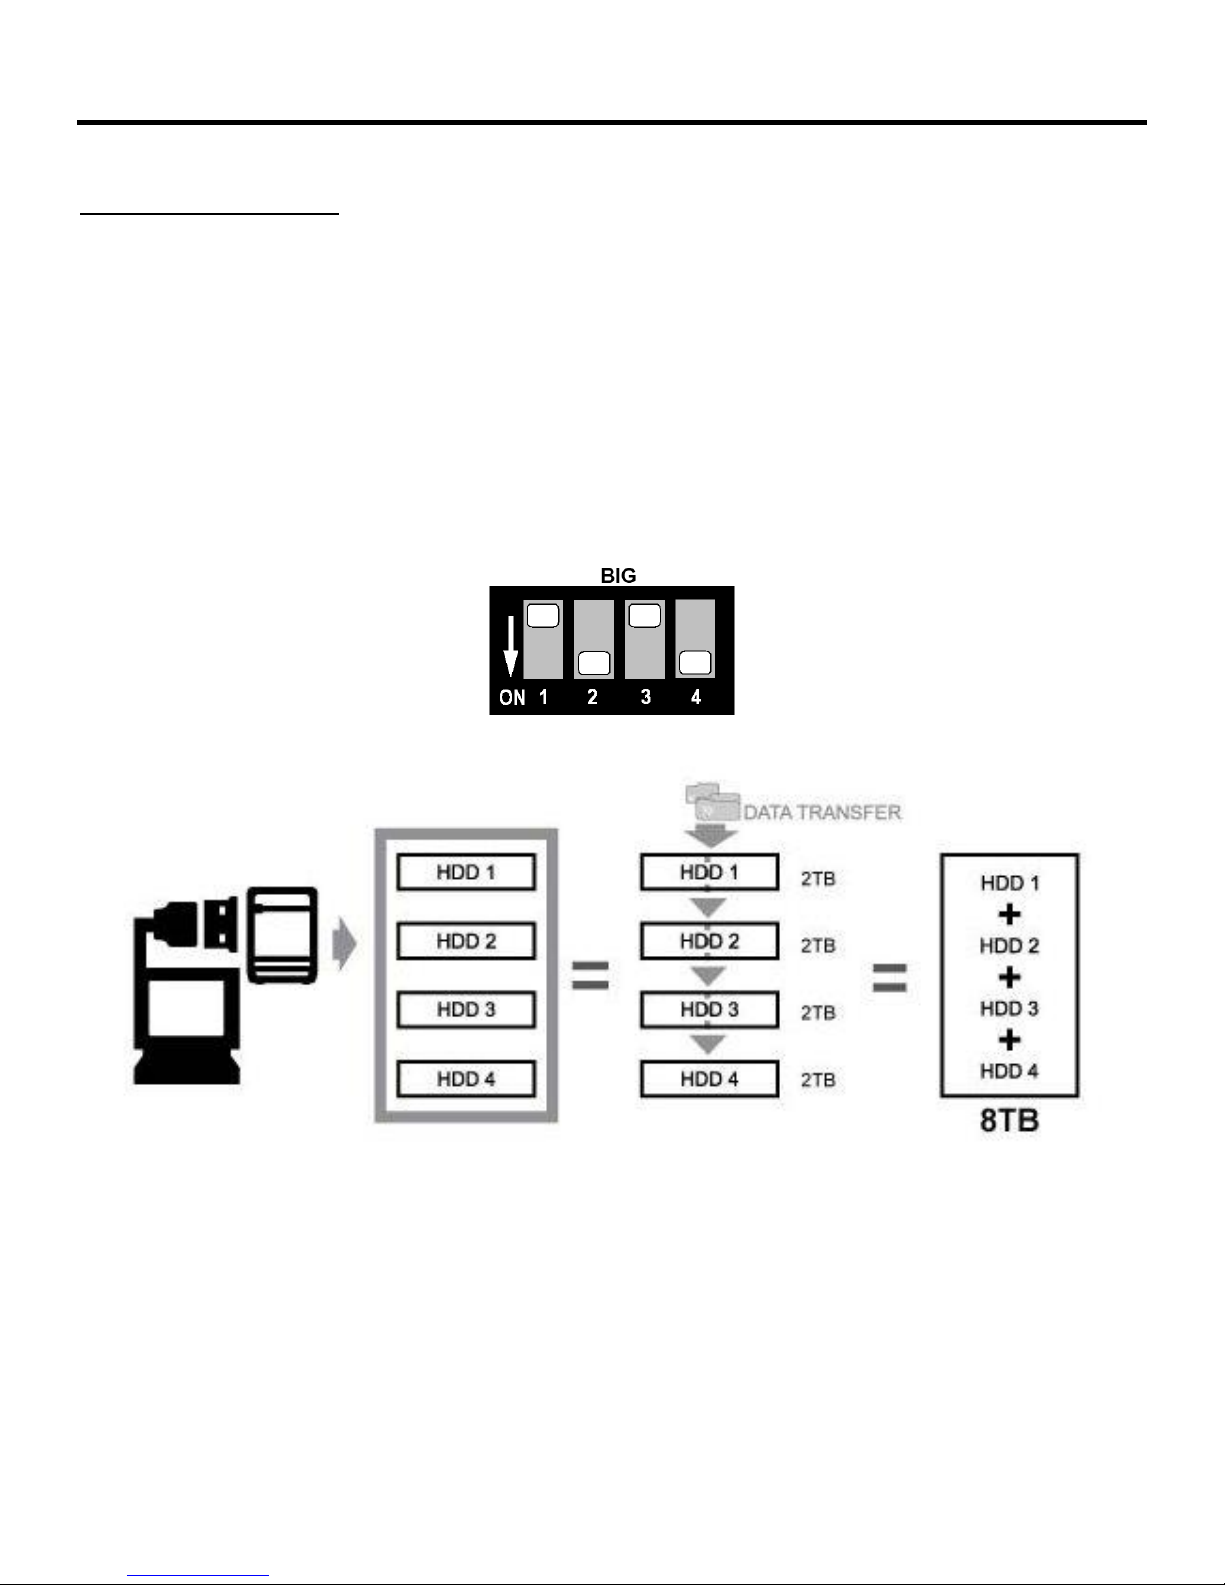
BIG MODE (spanning):
BIG mode combines individual HDDs to a large drive and therefore seamlessly enlarges the
HDD capacity limitations as they apply for separately connected HDDs. With the BIG mode
you get maximum storage capacity without replacing existing HDDs with expensive new and
larger ones.
Note: It is not possible to subsequently add further data media or to remove individual drives
from Big, in both cases Raid would be inconsistent and your data are lost!
9
Page 11
Fantec SQ-35RU3e User Manual
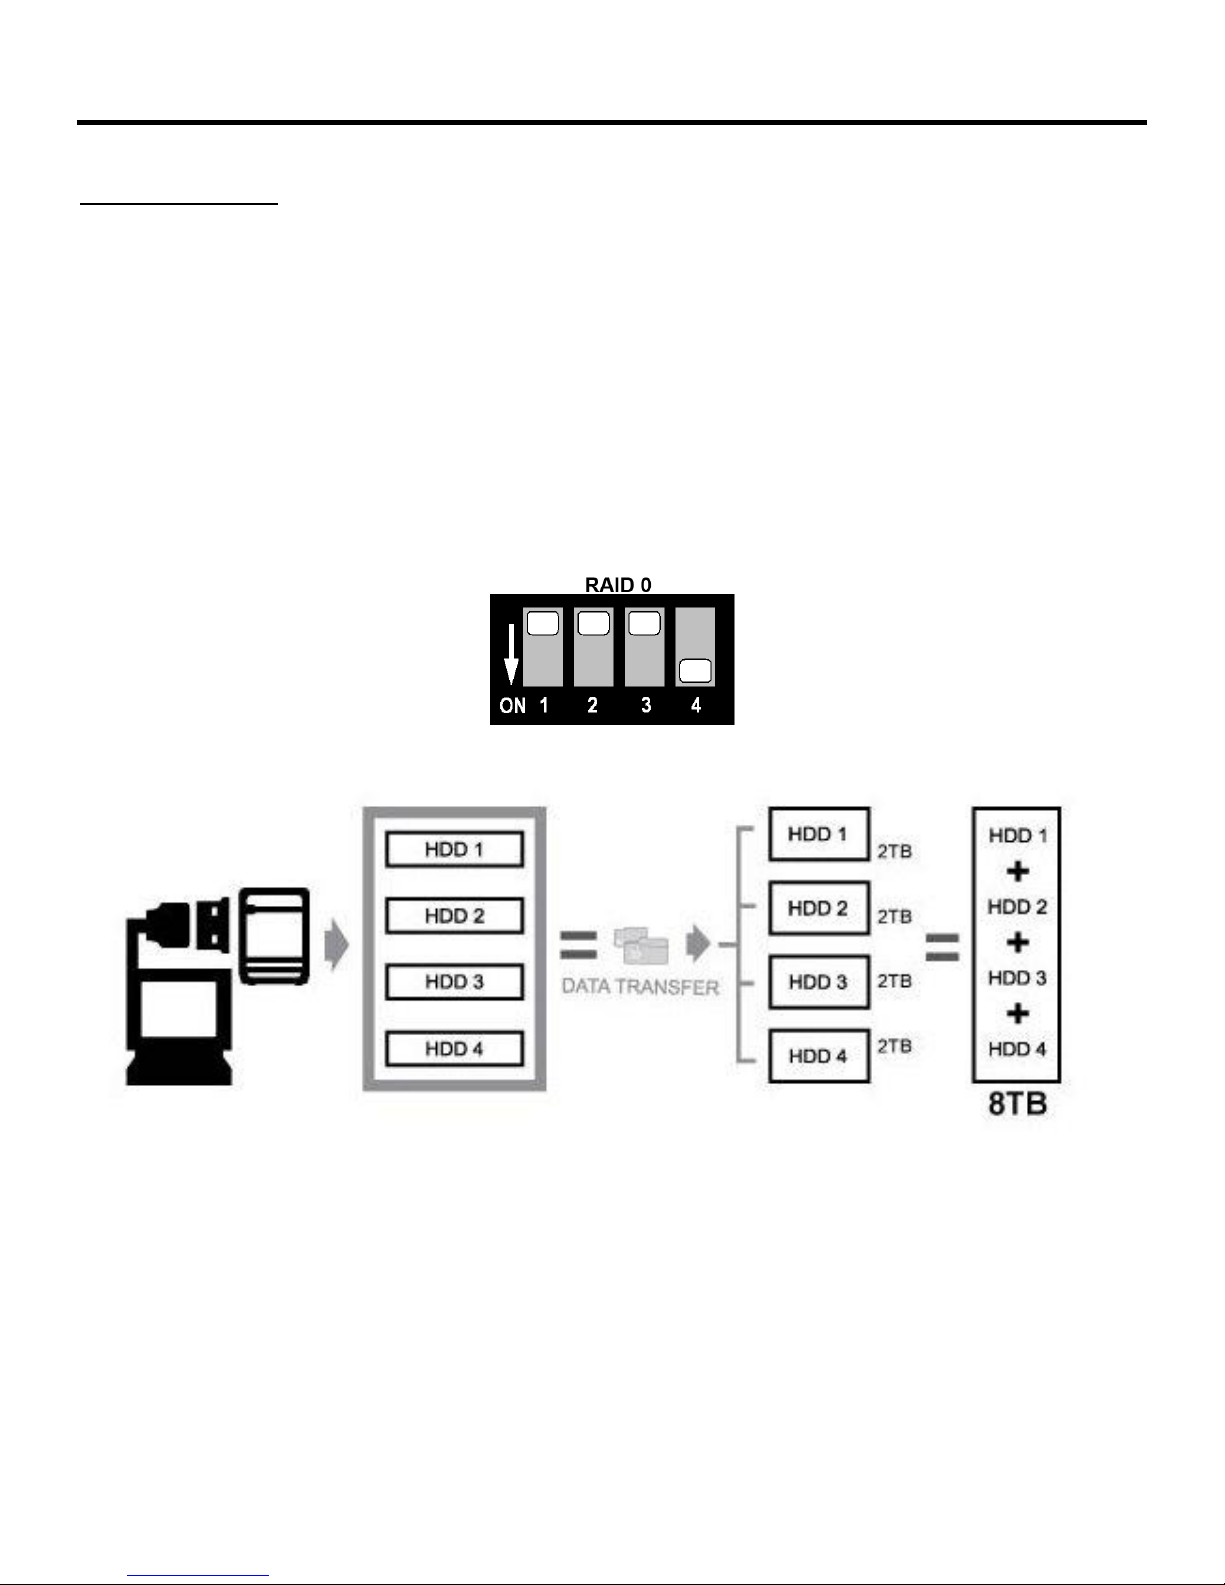
RAID 0 (striping):
RAID0 mode accesses all HDDs at the same time.
This function is also called striping. In this mode the best data transfer rate is achieved, since
parallel writing on all HDDs.
Individual data blocks are distributed simultaneously across the HDDs, which increases
performance. However, data redundancy is sacrificed in this mode for increase of
performance.
Note: RAID0 mode is very unsafe; if one HDD fails all data is lost!
10
Page 12

Fantec SQ-35RU3e User Manual
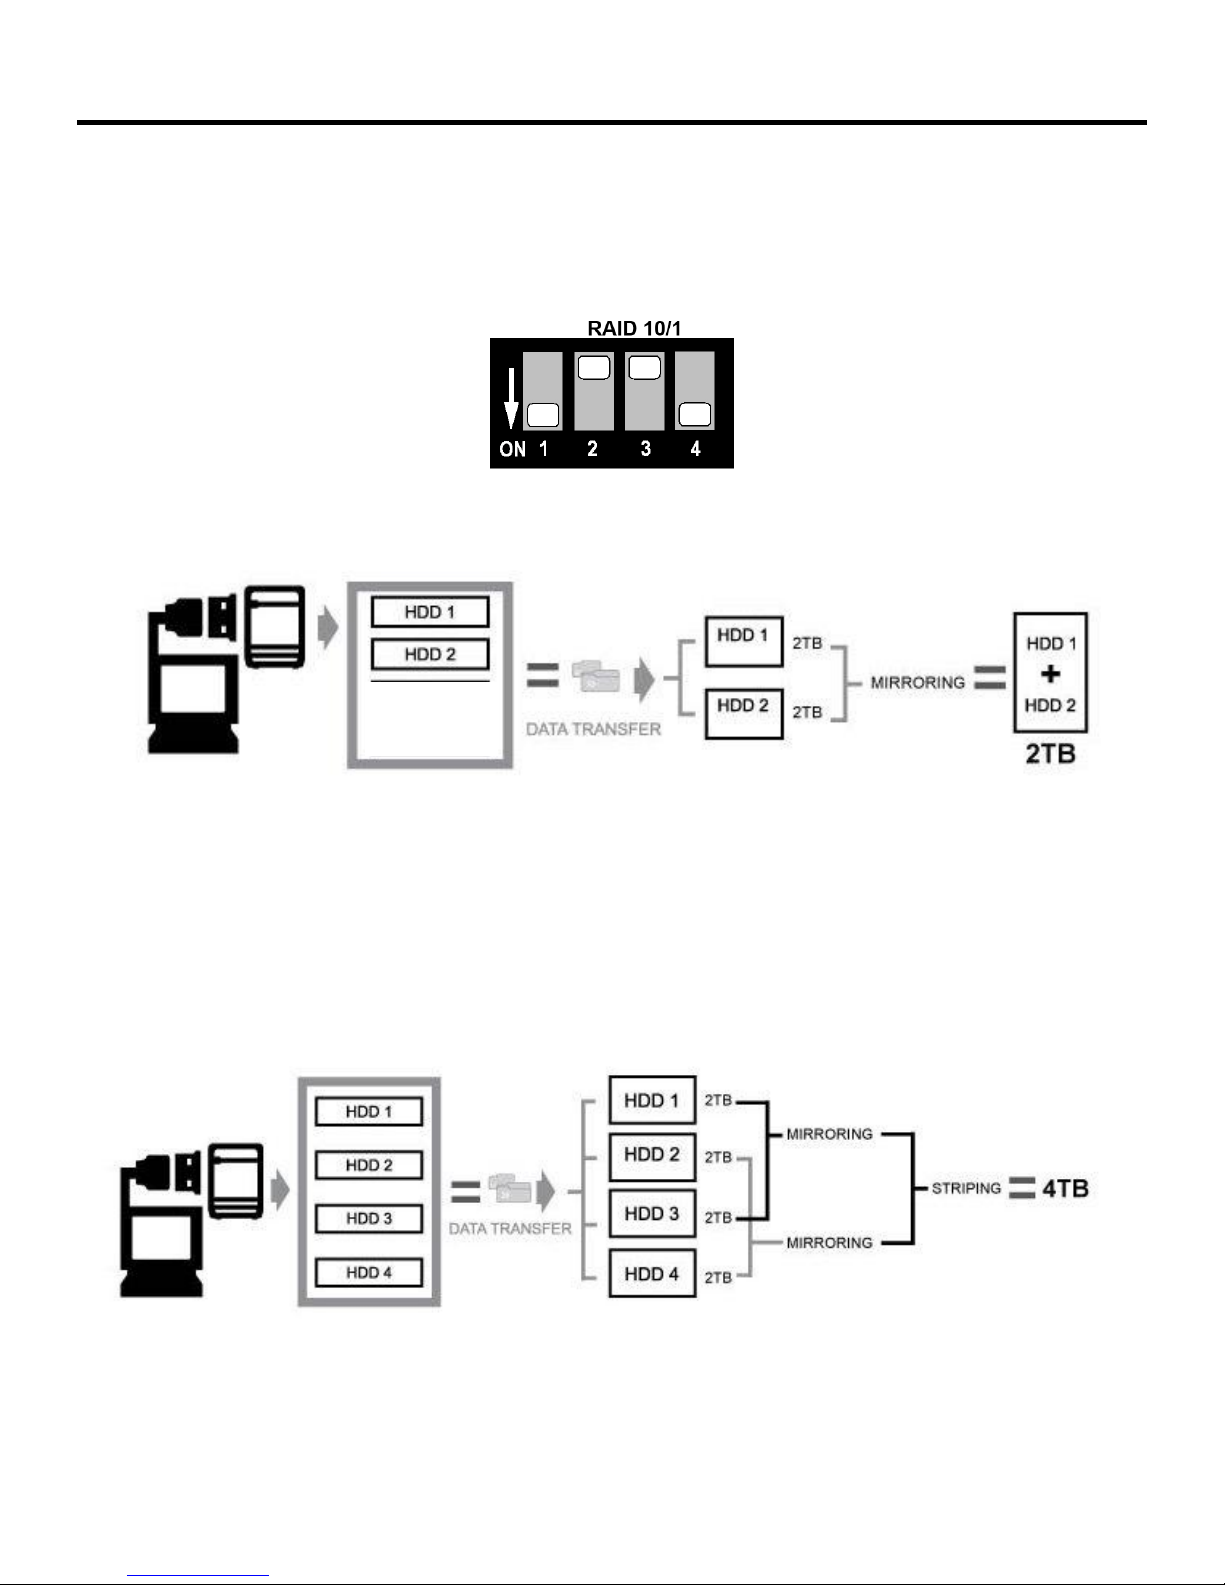
RAID 10/1 (mirroring):
If only two HDDs are present in slots 1 and 2, or 3 and 4 during setting RAID10 mode, then the
device creates one RAID1 from both HDDs.
RAID1 mode automatically creates a copy of all data and prevents data loss due to defect of a single
HDD.
Every data transfer is affected on both drives, which makes RAID1 mode the safest for critical data,
which under no circumstances are to be lost.
The actual useable storage capacity is half of the capacity of both HDDs combined (for identical
HDDs) or the capacity of the smaller HDD (for different HDDs).
If one HDD fails the functioning HDD is still useable, but the data are in a critical state until the
defective HDD is replaced.
After inserting the new HDD automatically a backup of all data on the sound HDD is affected and
redundancy is restored. During restoration the HDD is still useable, but the risk of complete data loss
is increased, since data redundancy is not yet completed.
Generally HDD access from PC during restoration is prioritized. However, this access increases the
restoration time and limits performance up to the time when restoration is completed.
11
Page 13
Fantec SQ-35RU3e User Manual
As can be seen in the illustration, a virtual drive is created from HDDs 1 and 2, which corresponds to
the storage capacity of the smaller HDD.
As soon as all four HDDs are inserted the device creates RAID10.
This is a combination of RAID 0 striping and RAID 1 mirroring.
HDDs 1 and 2 create a RAID 0 combination and are mirrored to HDDs 3 and 4.
12
Page 14
Fantec SQ-35RU3e User Manual
XOR PARITY
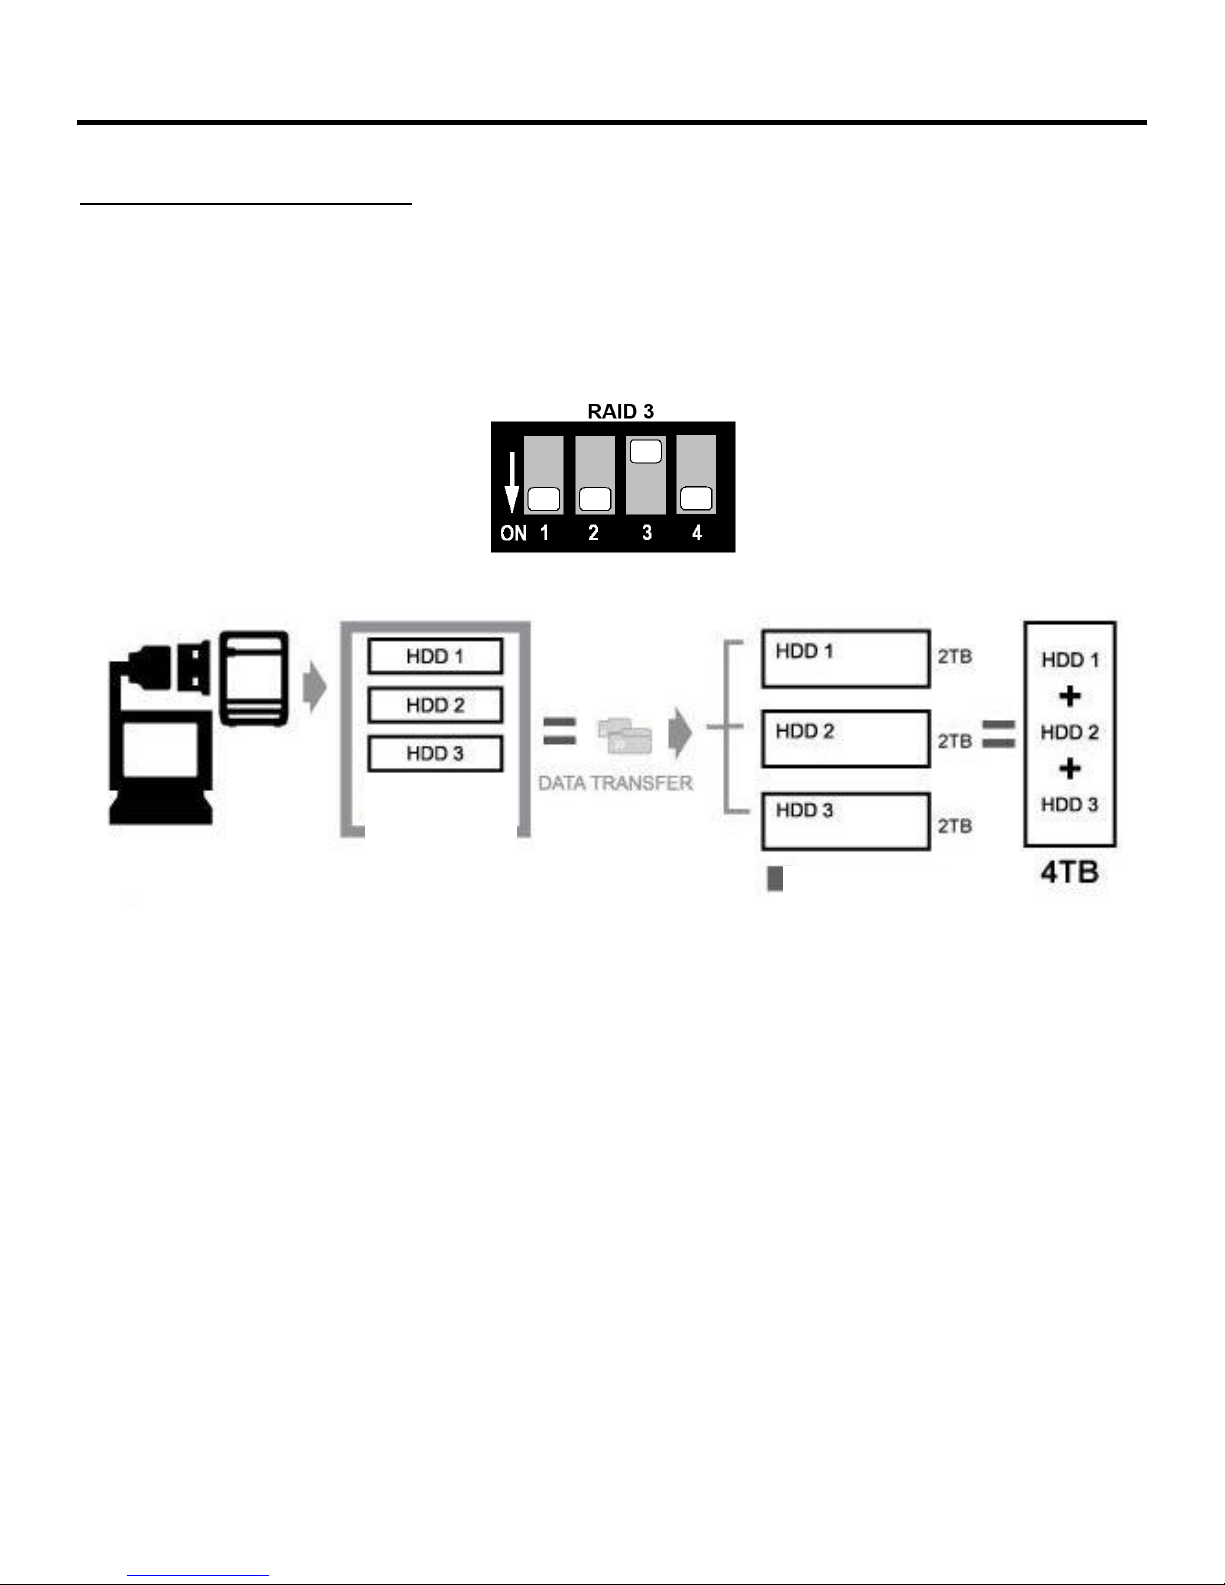
RAID 3 (striping with parity):
This mechanism allows data segmentation in individual bytes, which are written in turn on the
existing HDDs. A check byte is created and saved on the “Parity Disk”. With an algorithm (XOR
conjunction) it is possible to restore the missing data after disk failure with the check sum. Writing is
significantly slower than reading.
13
Page 15
Fantec SQ-35RU3e User Manual
XOR PARITY
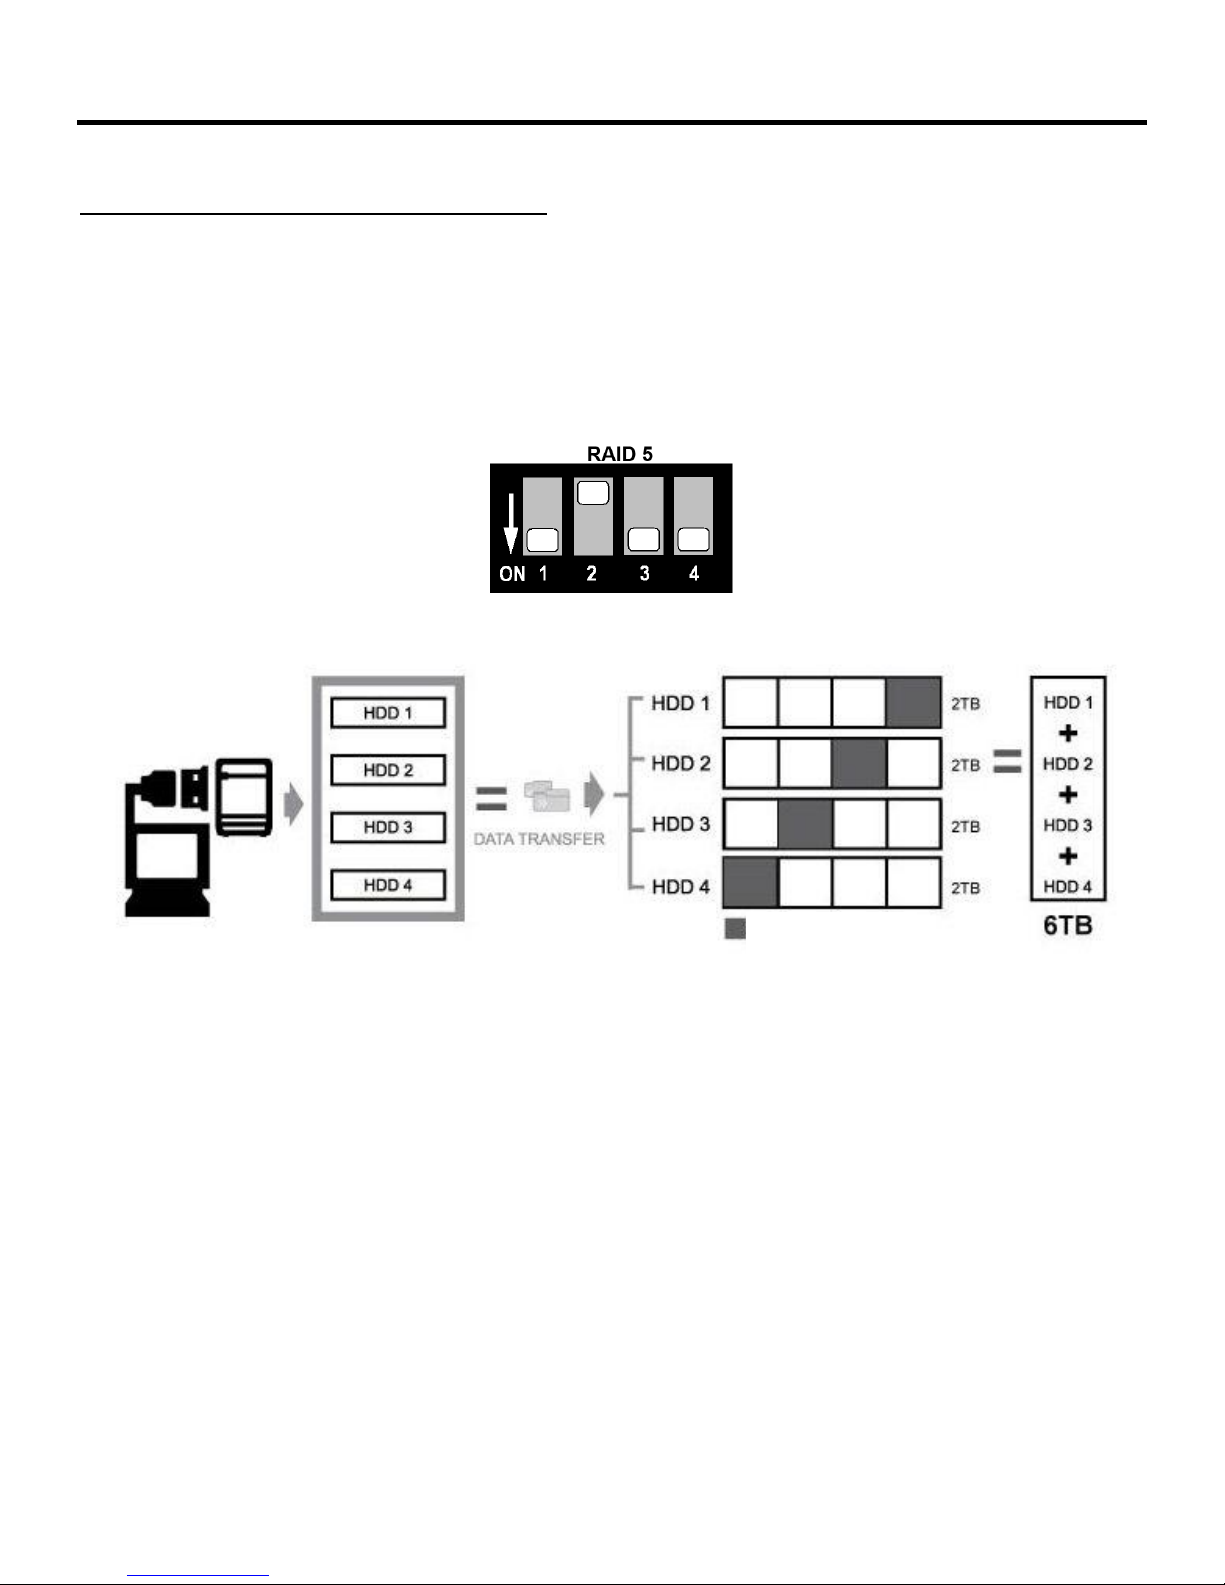
RAID 5 (striping with distributed parity):
For RAID 5 the drives work independently and the parity blocks are stored across all HDDs. In case of
failure of one HDD data can be restored via XOR conjunction of the remaining blocks with the parity
block. Advantage is faster, distributed reading access, but writing is slower than for an individual
HDD, since writing is always combined with updating parity.
14
Page 16
6. HDD formatting instruction
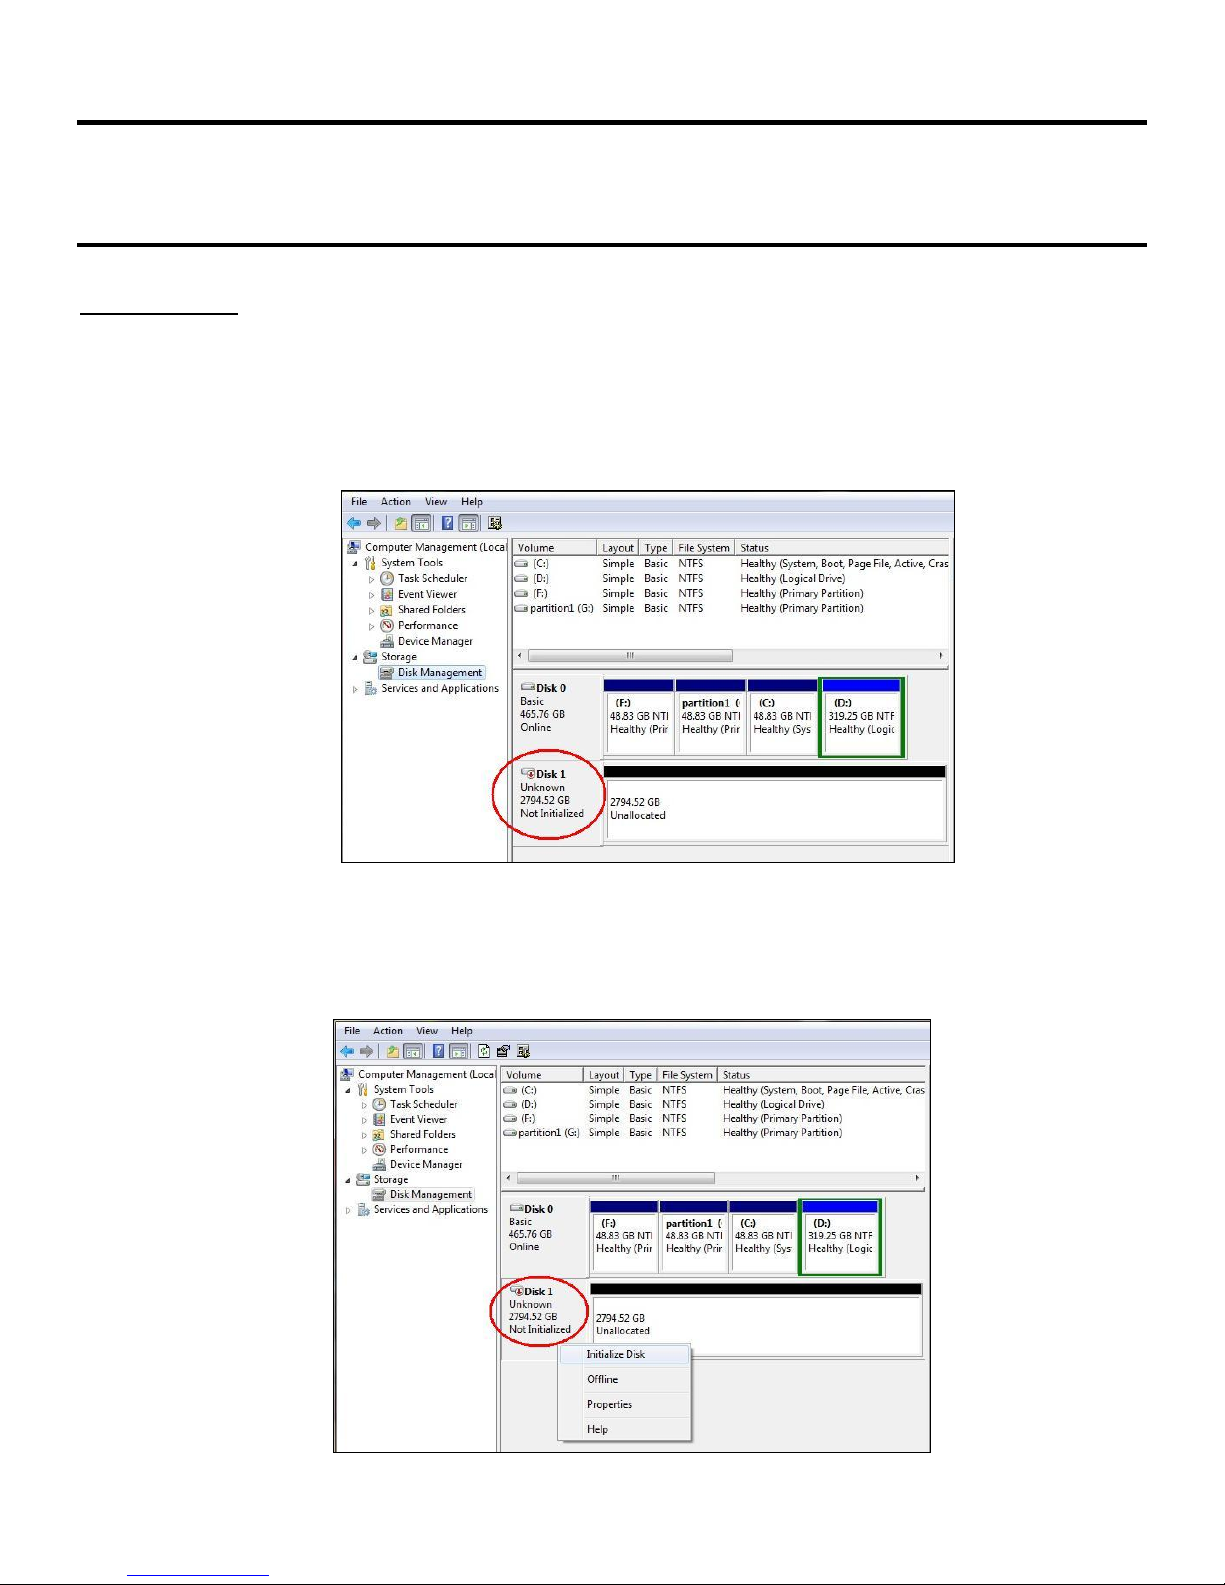
Initialize disk
If the HDD is new you have to initialization the device. View the box to the left of the
“Unallocated” box.You most likely would see the “Not Initialized” message displayed.
The Hard Disk Drive must be set to “Online” before partitioning and formatting the
Hard Disk Drive.
Fantec SQ-35RU3e User Manual
1. Right-click the “Not Initialized” area, a disk’s initialization menu will appear as below.
Select “Initialize Disk” and follow the steps of the HDD Formatting Guide wizard to
complete disk initialization.
15
Page 17
Fantec SQ-35RU3e User Manual
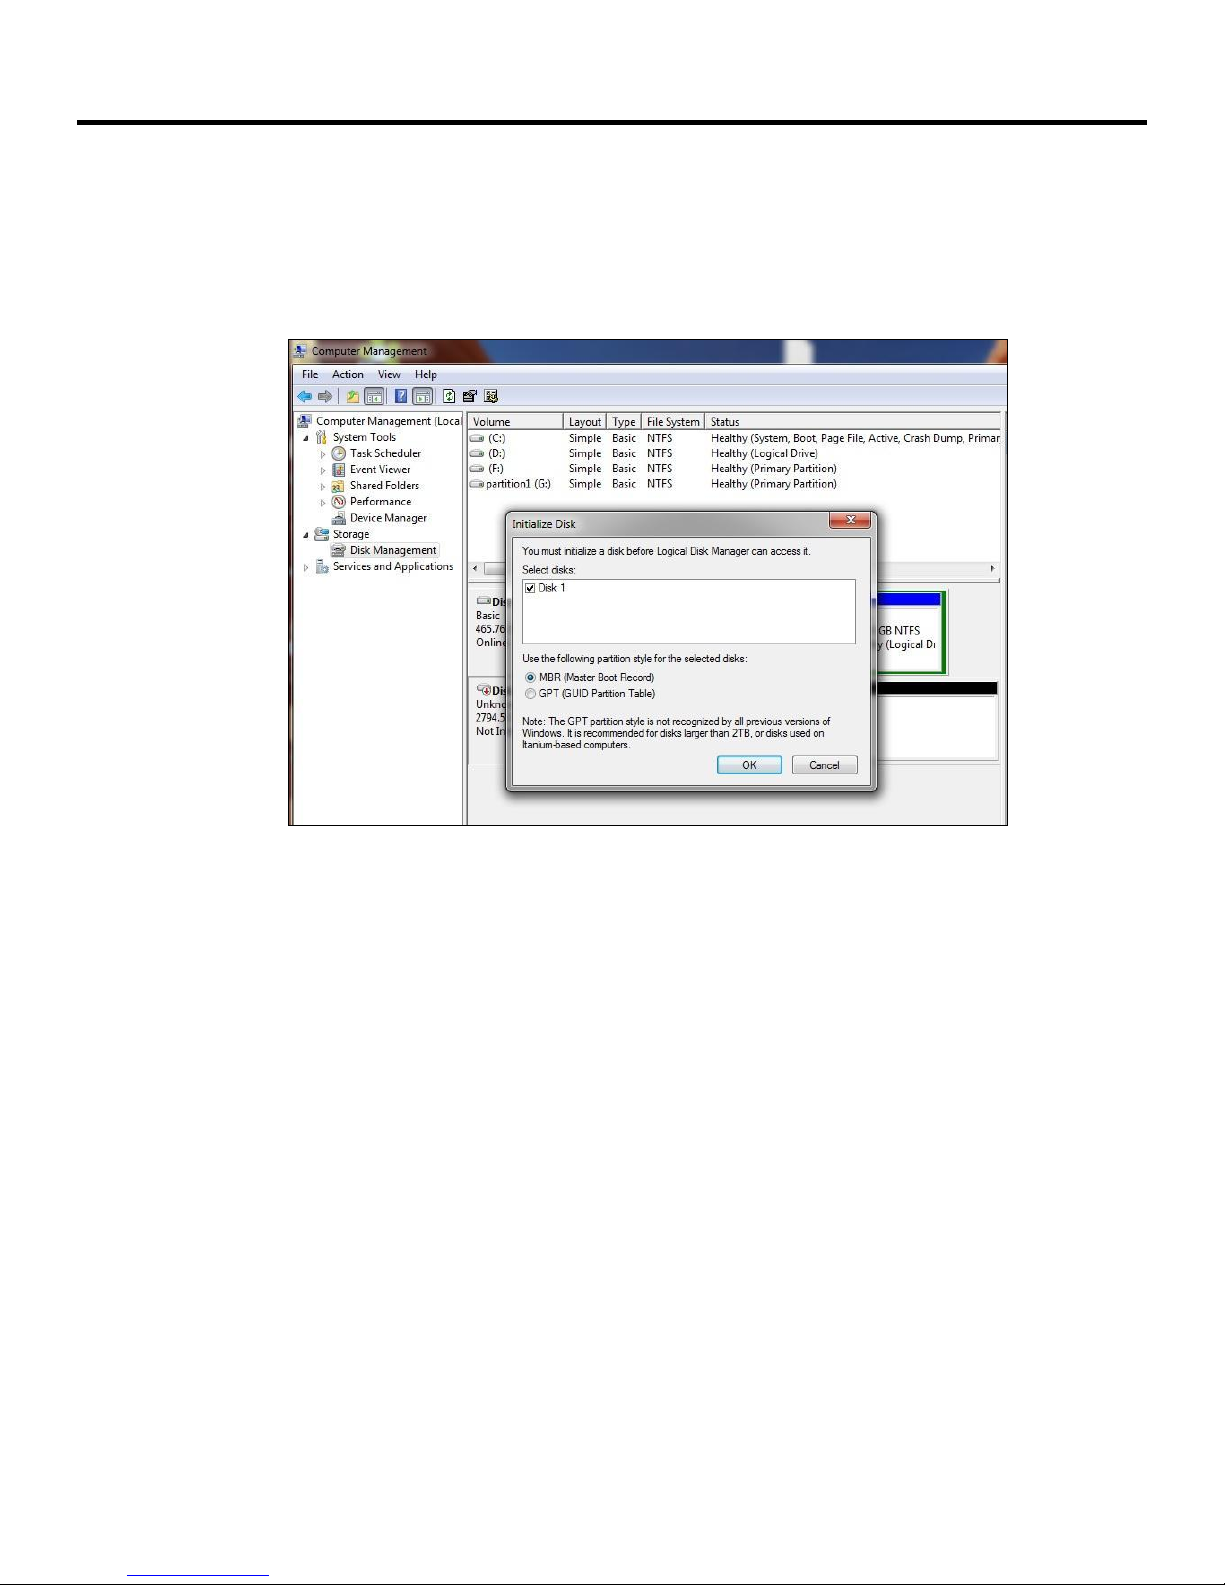
Note: Windows Vista and 7 will ask what kind of disk type you want to make, “MBR” or
“GPT”. Please Activate MBR if the total volume is less than 2TB. If the total volume is
more than 2TB please activate GPT.
16
Page 18
Format disk
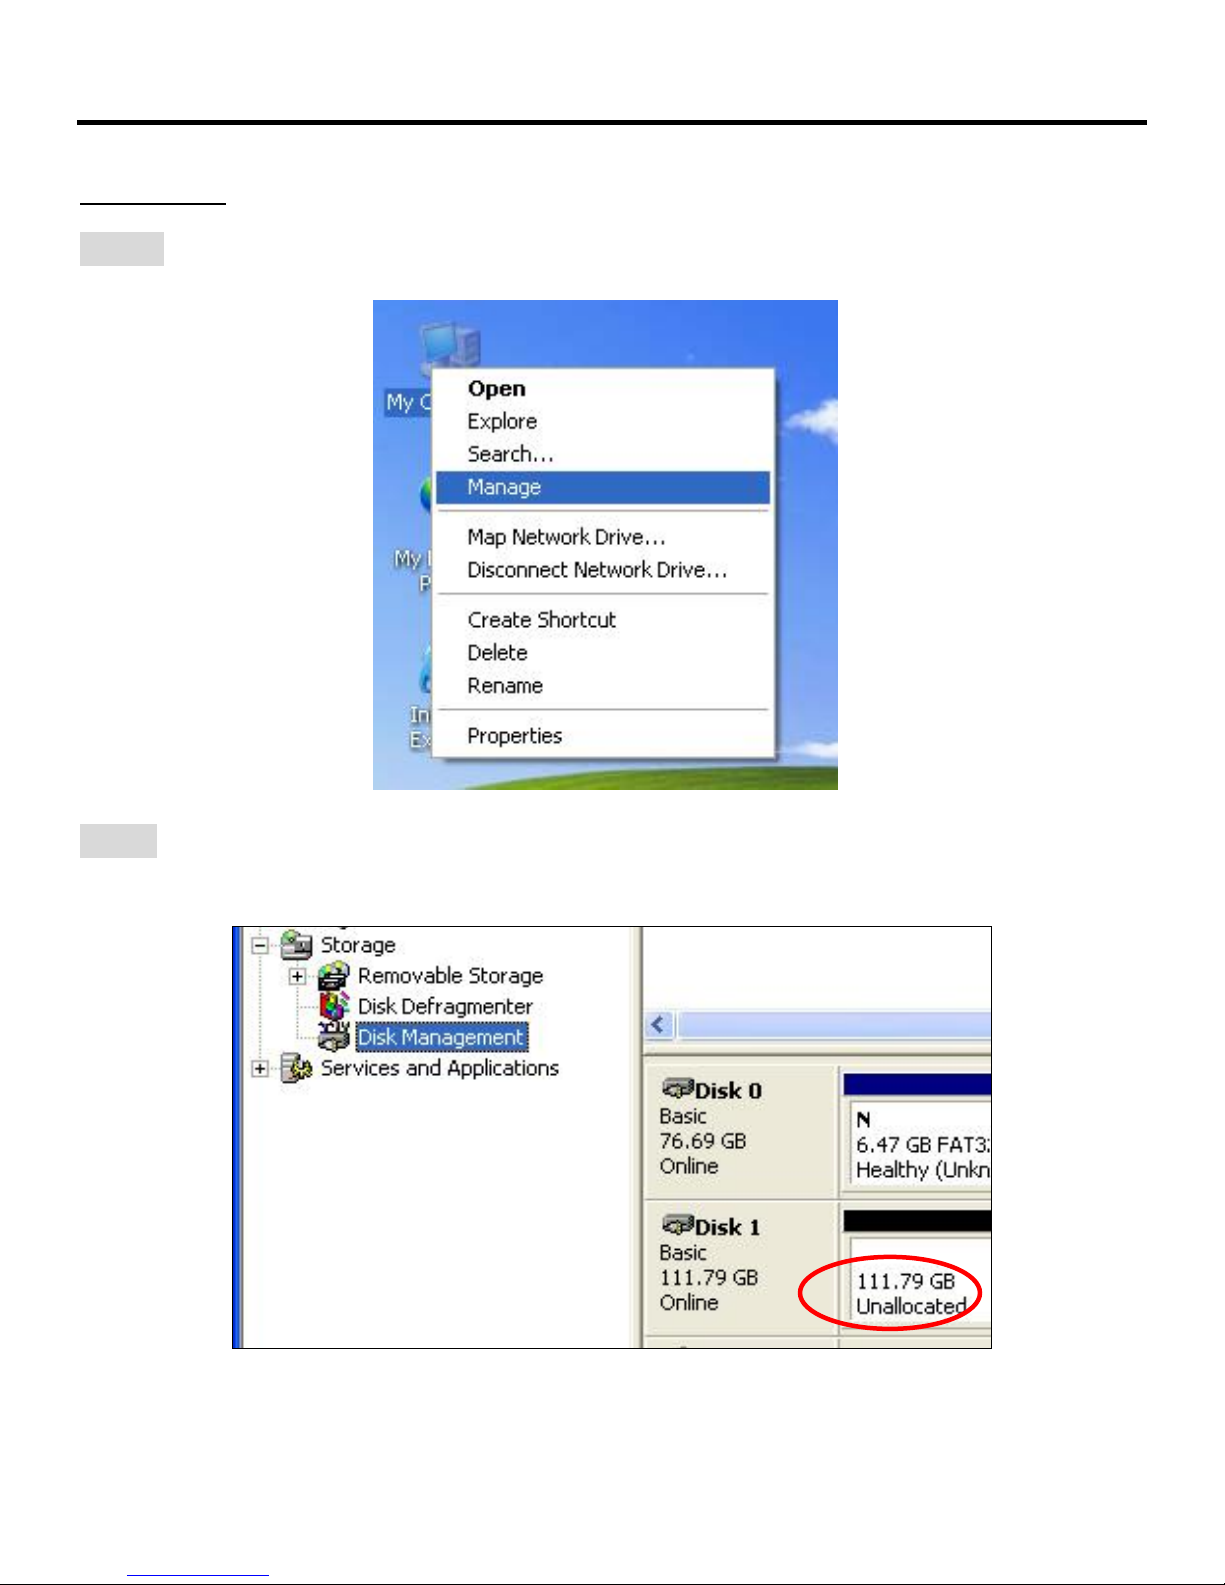
STEP 1: Right-click on “My Computer” and select “Manage”.
Fantec SQ-35RU3e User Manual
STEP2: Select “Disk Management” and you will see your External HDD showed
“Unallocated”.
17
Page 19
Fantec SQ-35RU3e User Manual
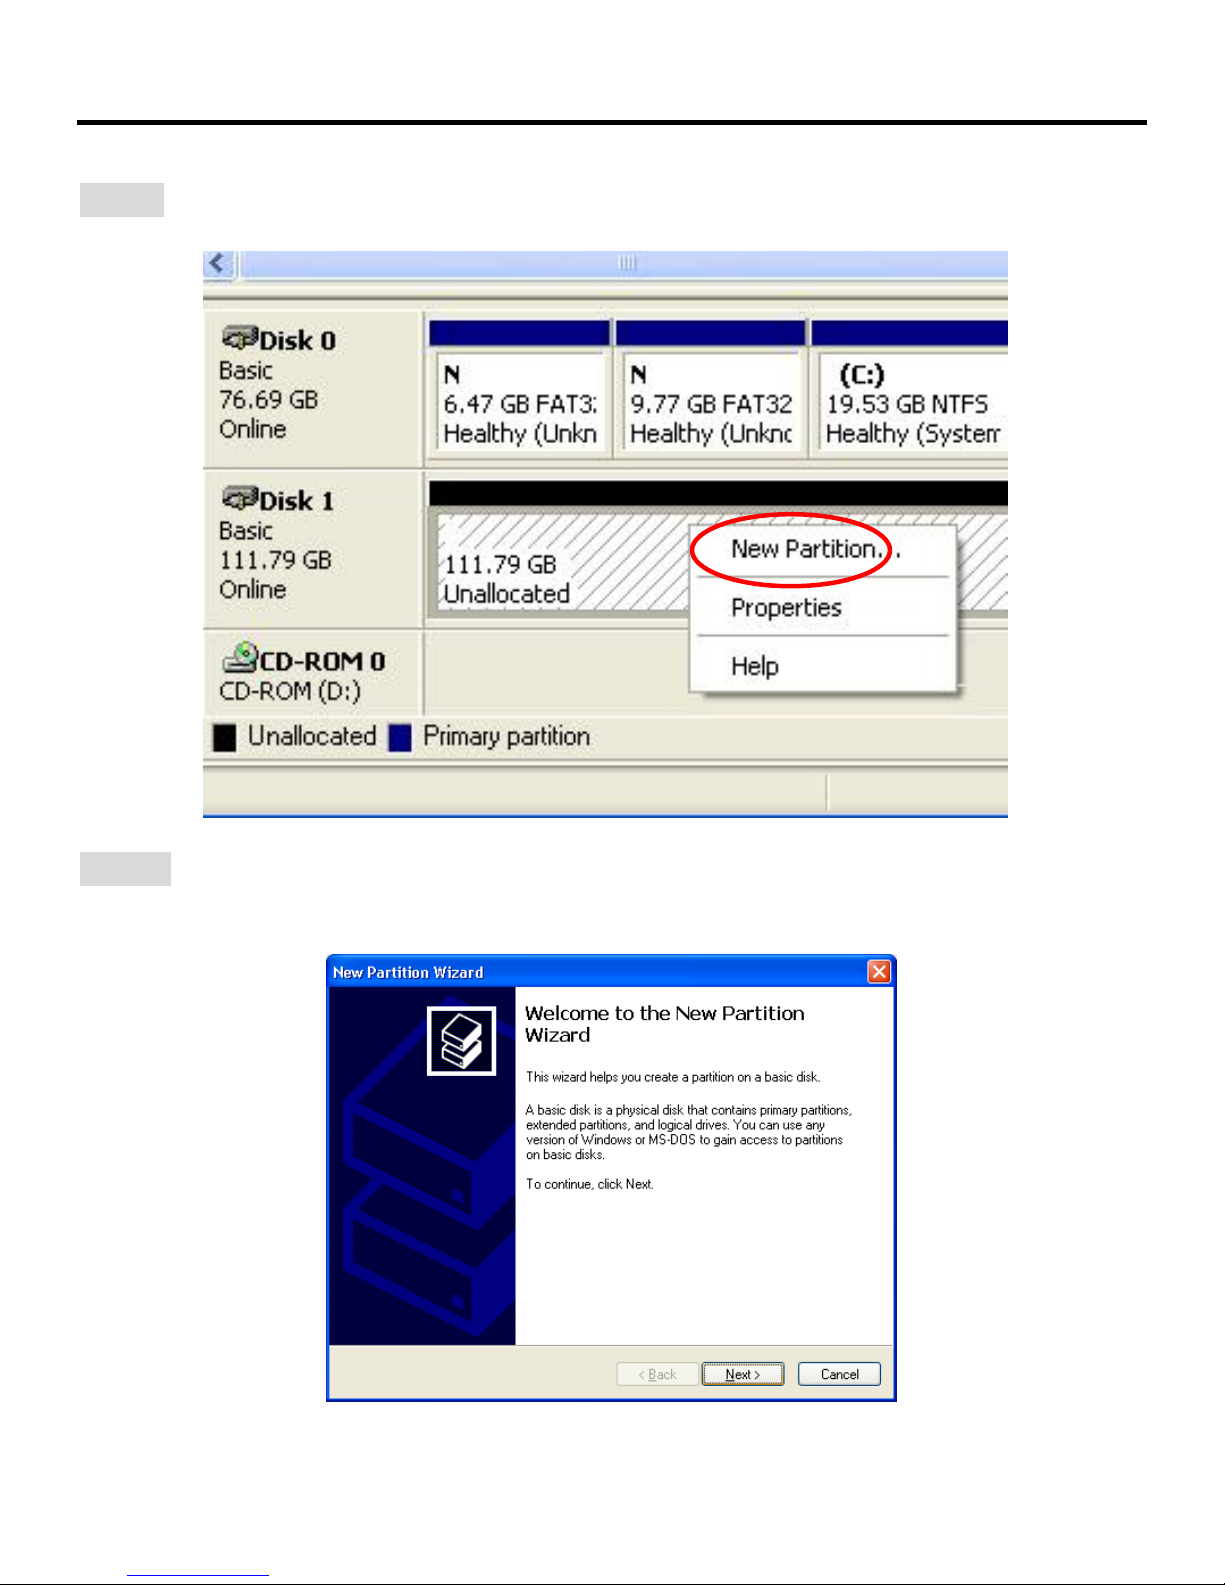
STEP 3: Right-click on “Unallocated” and select “New Partition”.
STEP 4: The “New Partition Wizard” is displayed. Follow the instructions to complete
installation.
18
Page 20
Fantec SQ-35RU3e User Manual
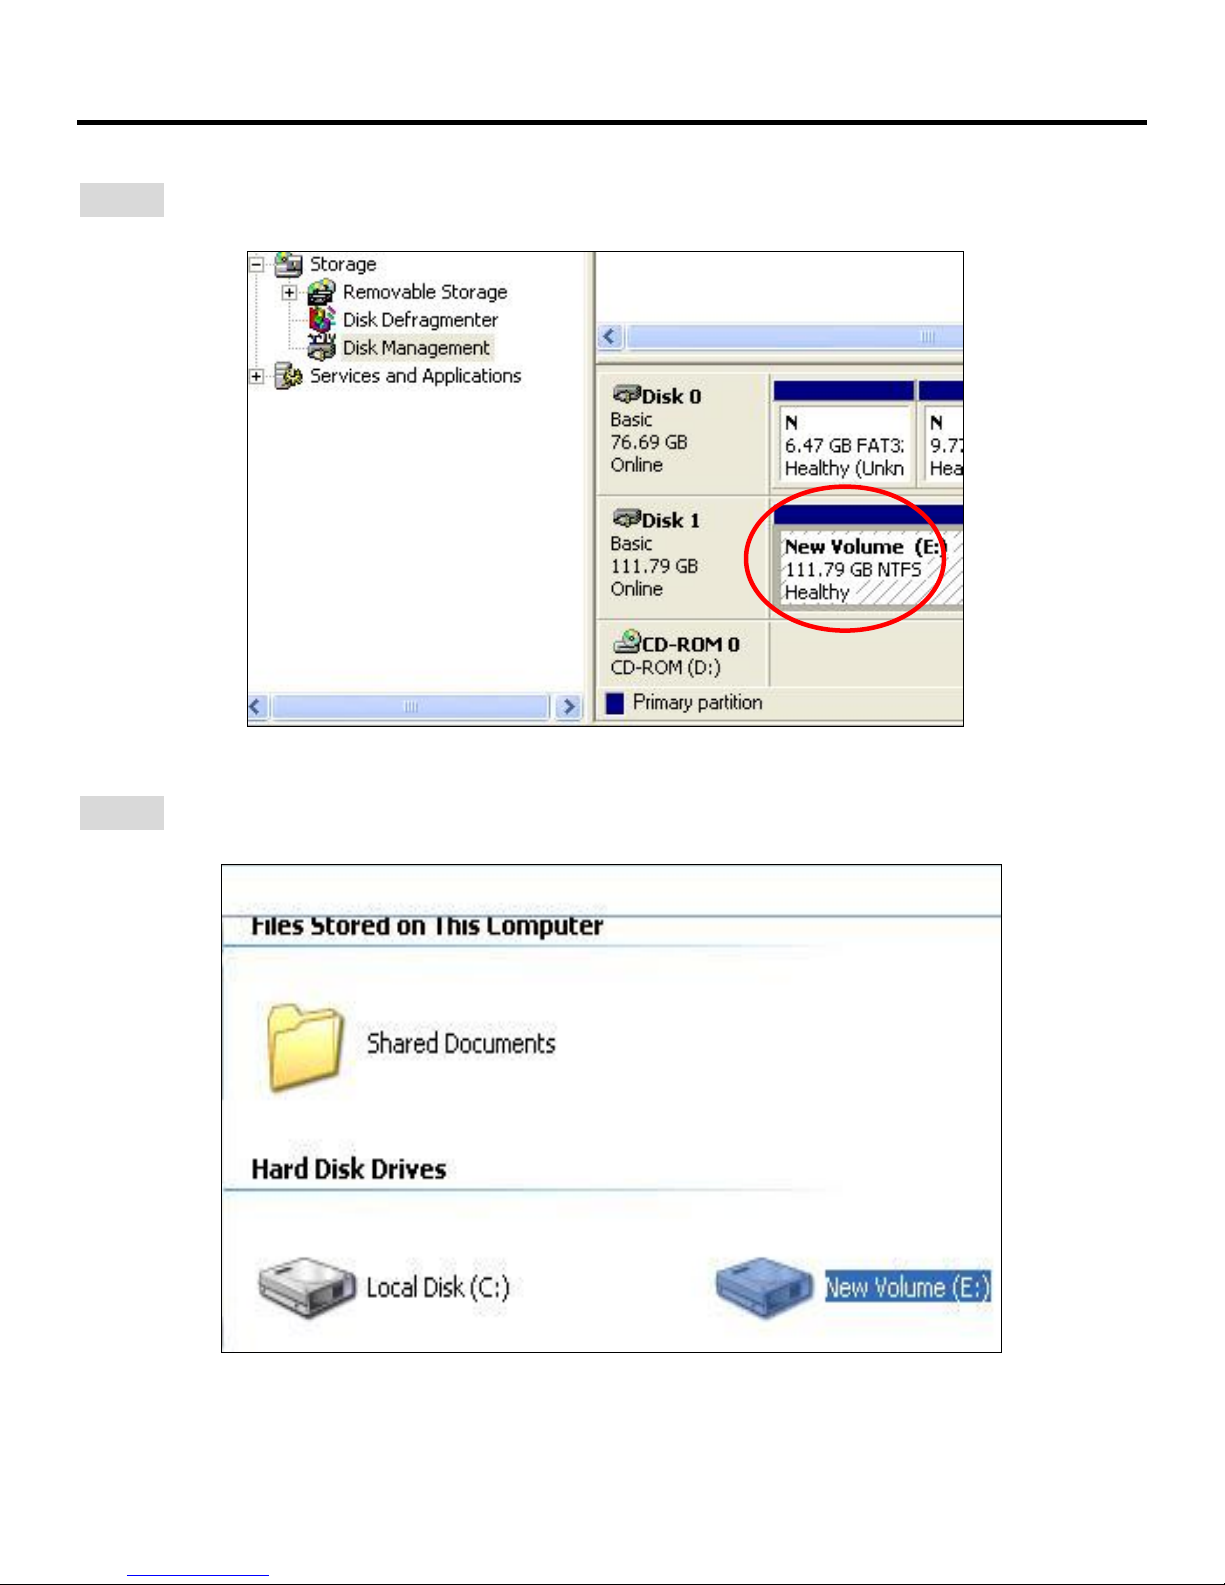
STEP 5: When partitioning is completed, the external HDD will be recognized as a “New
Volume”.
STEP 6: Double-click “My Computer”. You will see the new volume appears on your PC.
19
 Loading...