

Page 1

DB-R35DUS
User Manual
English
Page 2
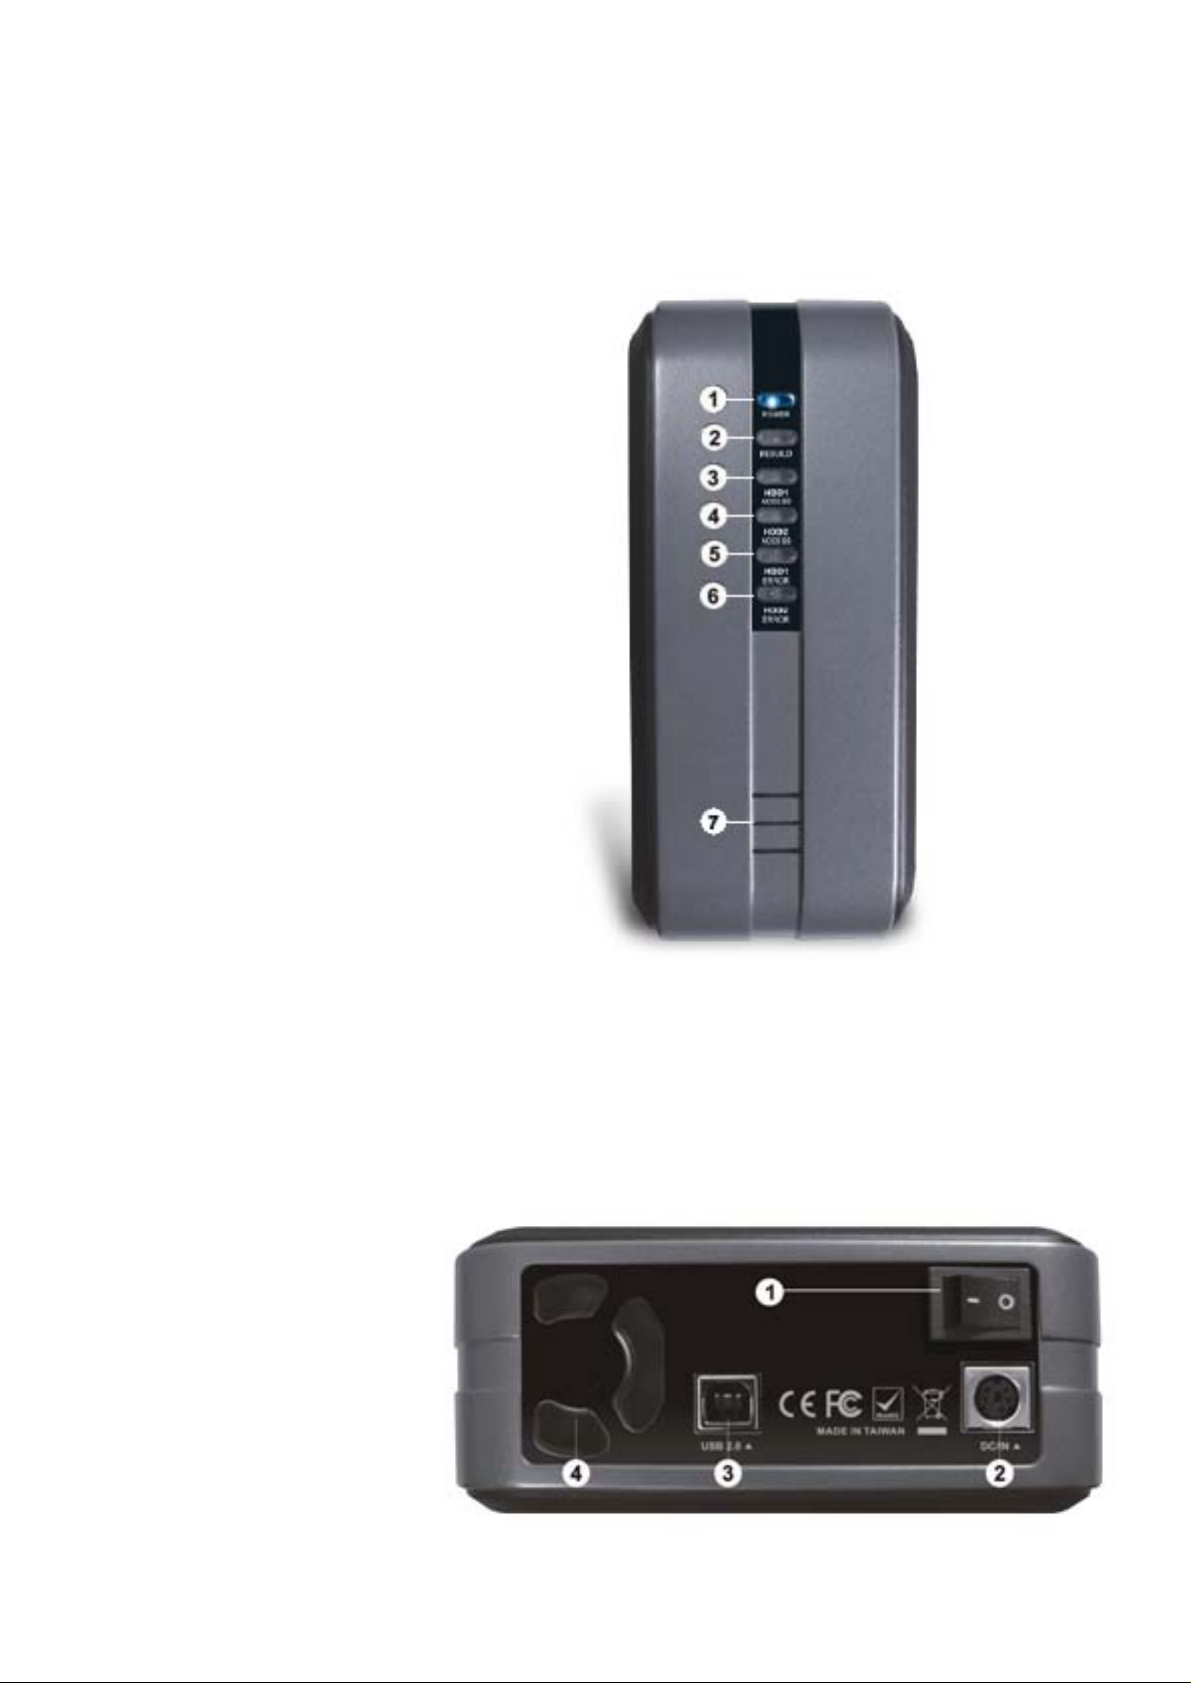
Detail View:
Front View:
1. Power indicator
2. Rebuild indicator
3. HDD1 Access Indicator
4. HDD2 Access Indicator
5. HDD1 Error Indicator
6. HDD2 Error Indicator
7. Ventilation
USB 2.0
Rare View:
1. Power switch
2. Power receptacle
3. USB 2.0 port
4. Fan for ventilation
Page 3
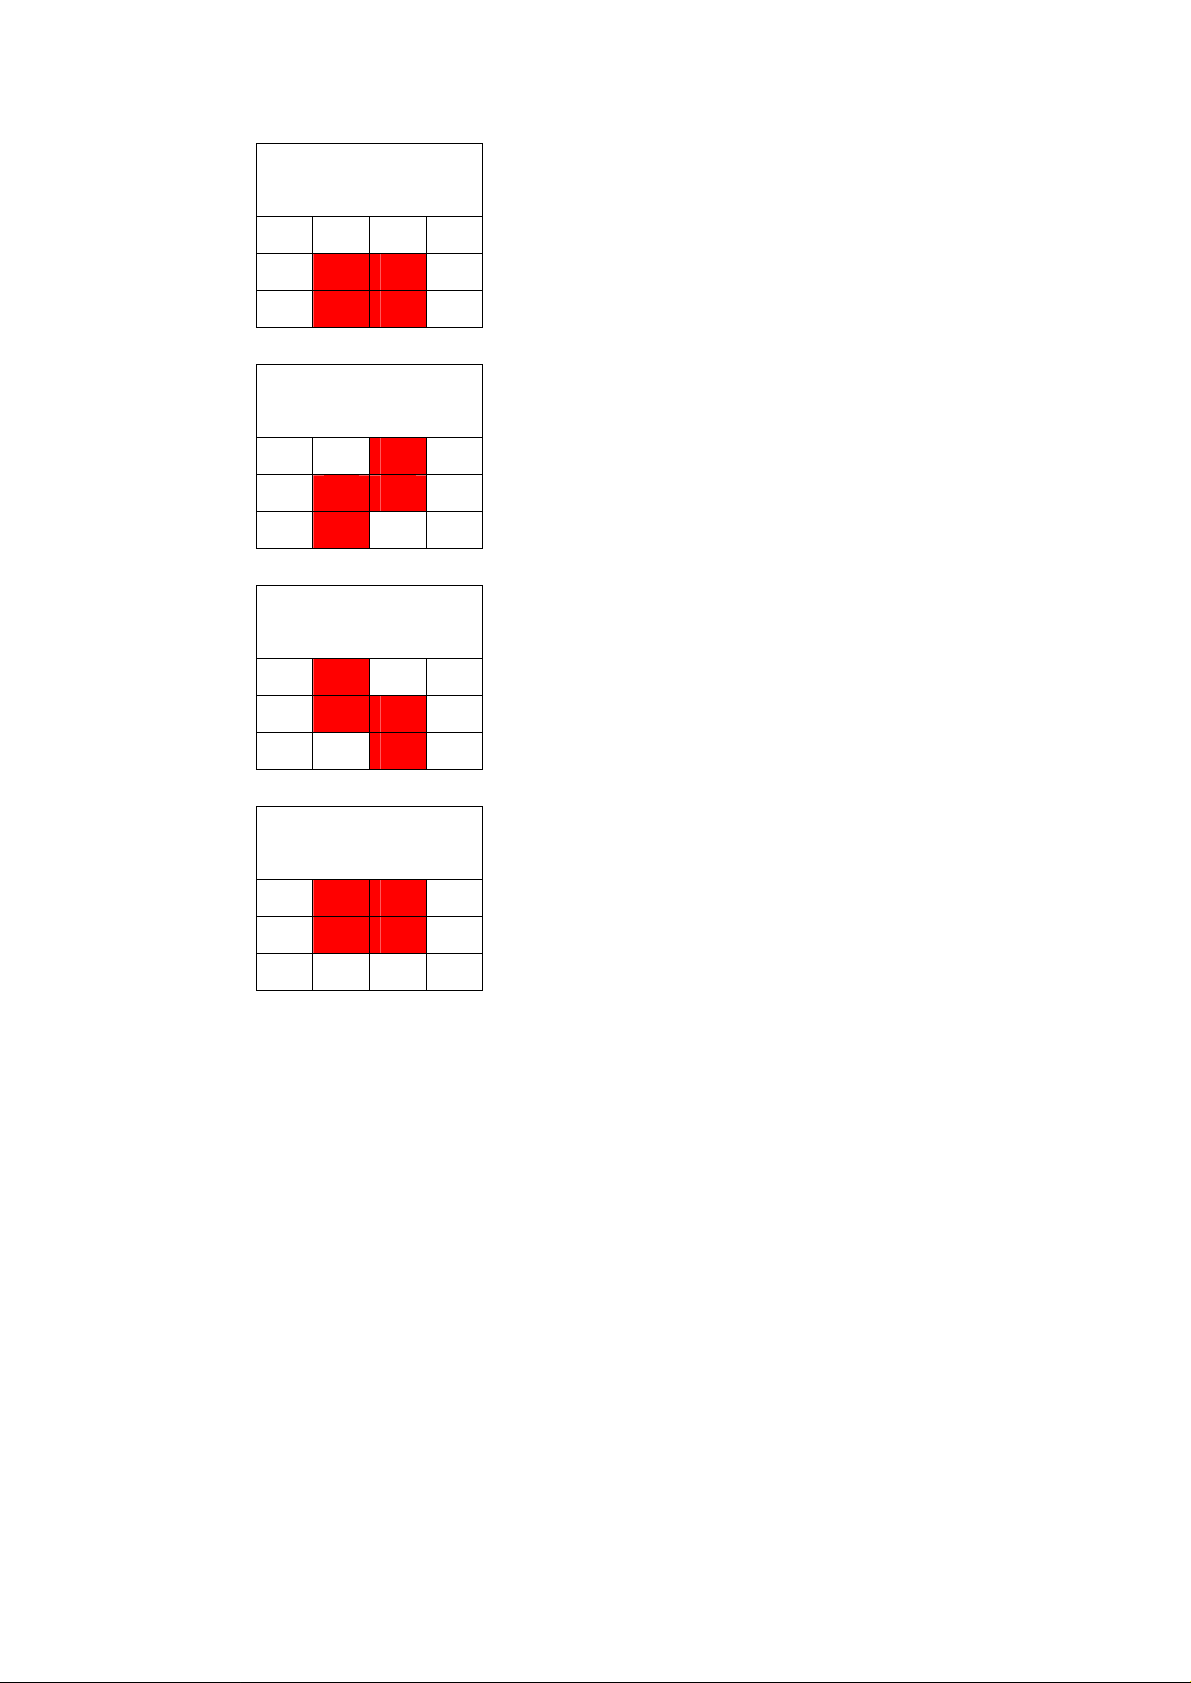
RAID Jumper Setting:
None RAID
(Single Mode)
1 4
2 5
3 6
RAID0
Spanning
1 4
2 5
3 6
RAID0
Stripping
1 4
2 5
3 6
RAID1
Mirroring
1 4
2 5
3 6
1. When both HDD insert at the same time under RAID mode all data will be
formatted.
2. For the first time usage, please install one main source HDD and power “on”
DB-R35DUS. Wait until “error” indicator on the second HDD lights on, system had
set first HDD to Main HDD then power “off” DB-R35DUS. Please install second
HDD and power “on” again. System will automatically “rebuild” data to second
target HDD. (If both HDDs are new with no data, then both HDDs can install at the
same time.)
3. Both HDDs have to be the same brand and model number when using “RAID
function”.
4. When changing usage mode (Single Mode, RAID0 Mode or RAID1 Mode) will
require re-format the HDDs. Make sure back-up all data before doing so.
Page 4

System Requirements
PC Requirements
• Minimum Intel Pentium III CPU 500MHz, 128MB RAM
• USB 1.1 equipped PC; Win2000, WinXP, Vista
• USB 2.0 equipped PC; Win2000, WinXP, Vista
Mac Requirements
• Minimum Apple G3 processor (G4 for 1394b), 128MB RAM
• USB 1.1 equipped Mac; Mac OS 9.2, 10.1.5 or above
• USB 2.0 equipped Mac; Mac OS 10.2 or above
Package Contents
• RAID enclosure X 1
• External Power Adapt er; Input 100-240V, Output +12V/2A, +5V/2A X 1
• Power Cord X 1
• Interface Cables:
USB2.0 X 1
• Screw Driver X 1
• Accessories pouch (screws) X 1
Page 5

Hard Drive Assembly:
1. To remove the cover of
DB-R35DUS:
Please unscrew and
remove the screws on the
bottom of unit. Only one
side (top) of screws needs
to remove. Top side is the
side where power switch is.
Insert the screw-driver into
the bolt and push upward
to release the top cover.
2. Unfasten the screws on
HDD holder case and pull
backward to release the
HDD holder case.
Since using RAID1 (Mirror Mode) if install improperly, the HDD which already
contain DATA will be formatted. To prevent Data lost please follow step 3-1 for
installing under RAID 1 (Mirror Mode)
Installing Single or RAID0 Mode:
3. Insert both HDD1 and HDD2 into
both bays of HDD holder and secure
them with screws.
Page 6

4. Insert back the HDD holder back to DB-R35DUS
with both HDDs attached.
5. Push forward the HDD holder to secure the
connection and fasten the screws on the holder.
6. Recover the top plate of DB-R35DUS and fasten
the screws prior remove.
Now installation is complete, please attach power core and connect DB-R35DUS
with USB cable to computers. DB-R35DUS is ready to use.
Page 7

Installing RAID1 M ode:
Installing this method, if first HDD already contain data.
Note: Tw o HDD must be identical in brand, size and model number.
3-1. Insert first HDD which contain data.
And fasten with screws.
3-2. Insert back the HDD holder back to DB-R35DUS
with first HDDs attached. Make sure the
connection of HDD holder and DB-R35DUS is
intact.
At this point, please connect DB-R35DUS to power source and turn on the unit. (no
need to connect to computer.) DB-R35DUS will automatically build a RIB table to
First HDD. This way is for DB-R35DUS to recognize the source HDD. After the RIB
table is written on to HDD, the error light indicator of second HDD will light. Power off
and remove the HDD holder to install the second HDD.
Page 8

3-3. Please insert second HDD and
secure it with screws.
3-4. Push forward the HDD holder to secure the
connection and fasten the screws on the holder.
3-5. Recover the top plate of DB-R35DUS and fasten
the screws prior remove.
Now installation is complete, please attach power core. After turn on the unit,
DB-R35DUS will perform “REBUILT” function. This copies an identical data from
HDD1 to HDD2. Rebuilt can be done off-line. Af ter Rebuilt indicator LED goes off and
DB-R35DUS is ready to use. Rebuilding data might take several hours depend on
the capacities of HDDs.
Page 9

System Setup:
Connection to your computer:
Few cautions before using RAID enclosure
1. Do not cover or block the ventilation holes on the enclosure.
2. Check for visible damage on unit, accessories and cables before tuning on the
power.
3. Do not expose the enclosure to water and humid conditions.
Setting Mode:
None-RAID: (Single Mode) Computer will show up as two independent drives. This
function can be use if only one HDD is installed. Or, two different brands or capacities
of HDDs are installed.
RAID0 - Sp anning: Tw o HDDs will show up as one large single drive. Spanning is an
array (not RAID) that is written sequentially across two drives.
Page 10

RAID0 - Stripping: T wo HDDs will show up as one large single drive but speed
performance will boost up. The two HDDs will write Data in “column” effect. This form
of array splits each piece of Data across both HDDs in segments. Data are store
between first HDD and second HDD. While the HDD is stripe in writing, the next head
of next HDD is move to next track to write. The Data is writing without any form of
data-checking. Once one HDD is damage and all Data can be lost.
RAID1 – Mirroring: Using this mode will require 2 identical HDDs; meaning they
must be the same capacity, brand and model number. Under RAID1, it will create an
extra copy (or mirror) set of data to second drive. The backup data are more
important for safe keeping and the available data only show up in one large single
drive. This is useful when first HDD fail and it can be replaced by second set of
identical data instantly.
Page 11

The LED panel in the front indicates accessing of HDD1, HDD2 and also when
rebuilding the data. Error LED lights up when HDD1 or HDD2 fail, rebuilding
incorrectly and HDD not present..
For installation of the DB-R35DUS, please refer to Hard Drive Assembly.
Note: For each time changing the “Mode” of DB-R35DUS, Please use RIB-Cleaner
program in our CD-ROM to clean the RIB table of the HDD.
Installation:
PC:
Before connecting to the PC please refer to our Hard Drive Assembly procedures for
RAID set-up.
If HDD is pre-installed by our vendor, user can plug directly to PC and start using the
unit. If wish to change the setting please refer to Hard Drive Assembly for correctly
way of setting.
1. Turn on PC and start Windows.
2. Connect (USB or 1394) DB-R35DUS and turn on the power.
3. Windows will search and install drive automatically.
4. Open “My Computer” and “external hard drive” will appear.
Remove the “external hard drive” from PC.
For safe removal of external hard drive, this is to prevent any data lost. Please
always follow the correct removal procedure.
1. Click the icon for external hardware in task bar.
2. Choose the hard drive wish to remove and confirm it.
Page 12

Macintosh:
Before connecting to the Macintosh please refer to our Hard Drive Assembly
procedures for RAID set-up.
If HDD is pre-installed by our vendor, user can plug directly to Macintosh and start
using the unit. If wish to change the setting please refer to Hard Drive Assembly for
correctly way of setting.
1. Turn on Macintosh and start Mac OS.
2. Connect (USB or 1394) DB-R35DUS and turn on the power.
3. Mac OS will search and install drive automatically.
4. External drive will appear on Desk top.
Remove the “external hard drive” from Macintosh..
1. Drag the external hard drive to trash bin.
2. Turn off the power.
Note: If user wishes to use DB-R35DUS on both Windows and Mac OS system, we
recommend that HDD to be formatted at FAT32. Also, please do the formatting under
Windows OS. If formatting is done by Mac OS, Windows might not recognize the
drive.
Our recommendation of file systems to be formatted on HDD:
1. Win2000, Win XP, Vista à NTFS
2. Mac OS X à HFS+ (Mac OS Extended)
3. Both Windows and Mac OS à FAT32
 Loading...