

Page 1

Nano 12082007
1
Using the Fiber Optic
Cable
with the Nano Flash
Thank you for purchasing a Fantasea Line Nano Slave Flash. We
hope the following instructions will assist you in assembling a
Fiber Optic Cable to work with your Nano Flash and that you will
have many excellent underwater images using the Fantasea Line
Nano Flash.
The Nano Flash is capable of synchronizing with the camera's internal flash
without a fiber optic cable in most diving conditions. It has a slave sensor that
triggers the Nano Flash to fire along with the camera's internal flash, as long
as the Nano Flash and the camera are positioned on the same axis.
The fiber optic cable, however, ensures the best synchronization between the
camera's internal flash and the Nano Flash in all angles and in various diving
conditions.
Step 1 - Preparing the Fiber Optic Cable
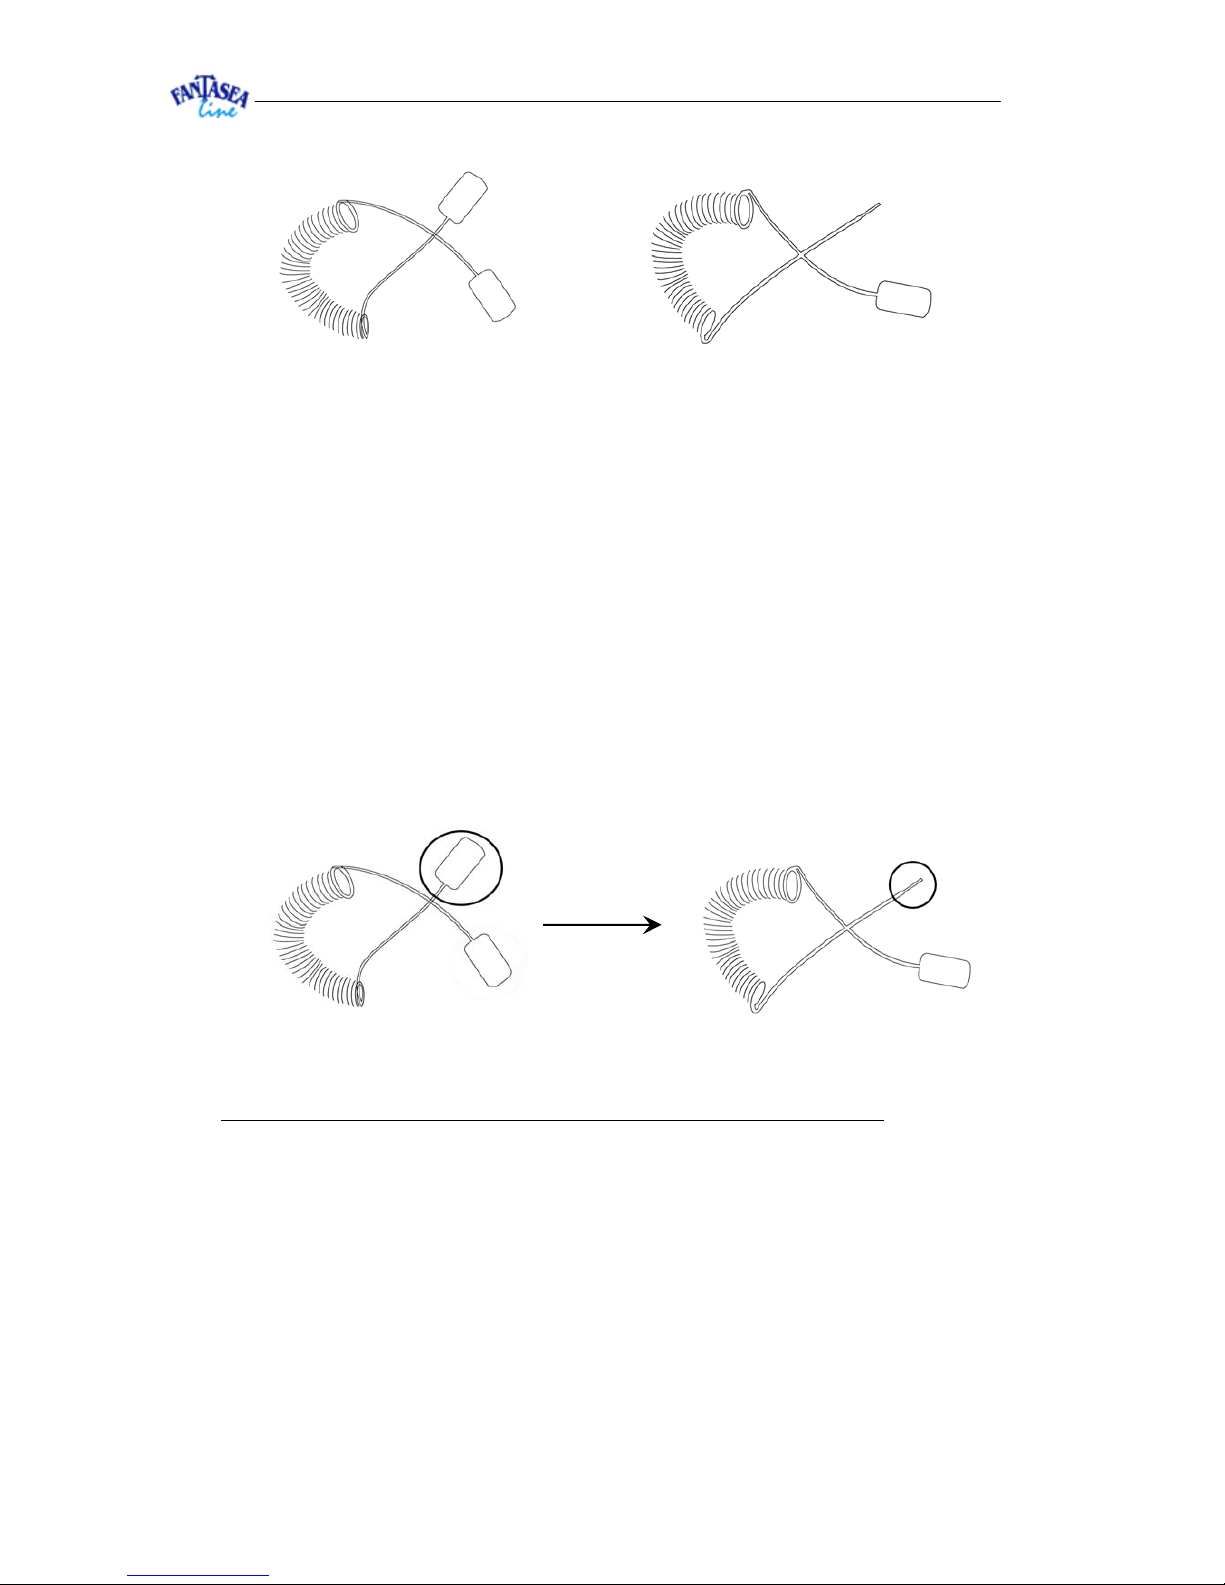
The fiber optic cable consists of two ends: One is attached to a white plastic
fitting (flat white plastic at the end of the cable with Allen screw inside), and
the other is loose or attached to an additional plastic component. If your fiber
optic cable consists of plastic fittings on both ends (image #1), please follow
this first step. However, if your fiber optic cable features a plastic fitting only
on one end (image #2), please continue to Step 2.
Page 2
Nano 12082007
2
a) Remove the plastic fitting from one end of the cable, so the other stays
attached to a white plastic fitting. This can be done by using the Allen
key you have received with your fiber optic cable kit, meant for
loosening the screw that keeps the fiber optic cable's end attached to
the fitting (image a). Store the removed plastic fitting in a safe place for
possible future use.
b) You end up with a fiber optic cable exposed on one end and attached to
a white plastic fitting on the other (image b).
Step 2 - Attaching the Fiber Optic Cable to the Nano Flash
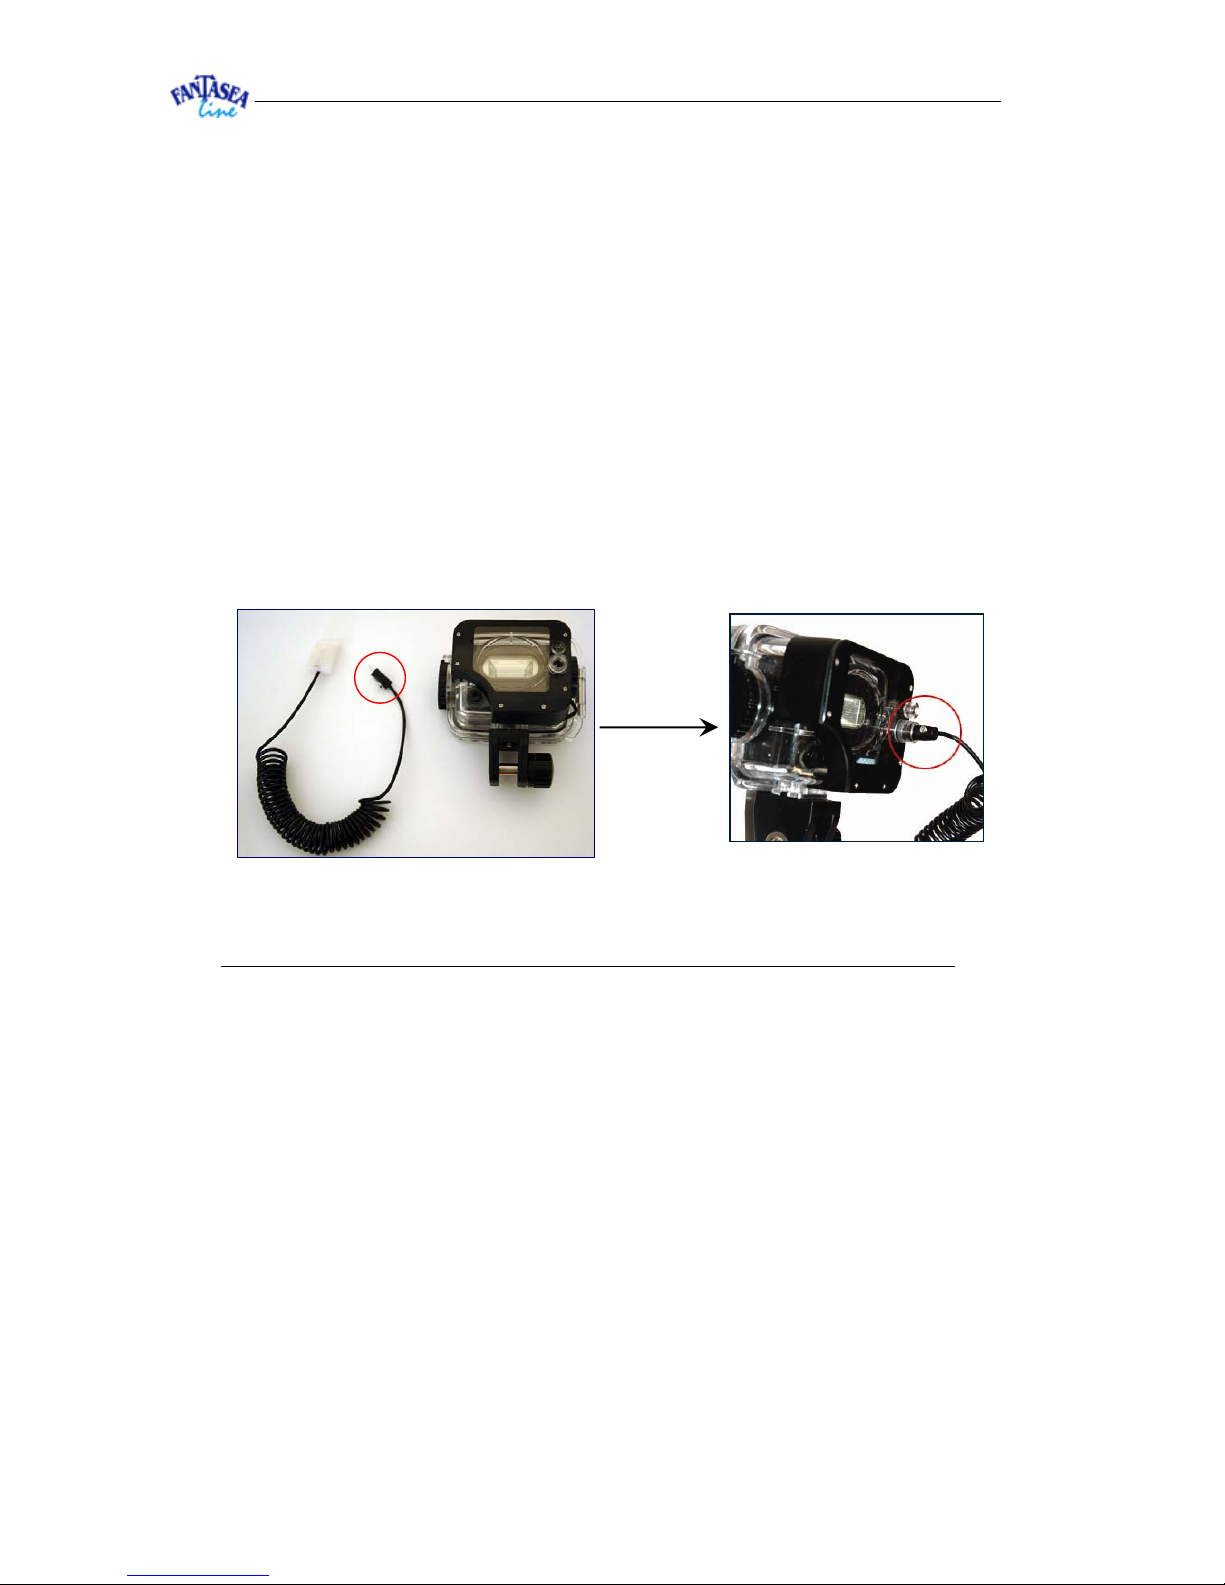
a) Insert the exposed end of the fiber optic cable (the end without the
fitting) into the small hole of the adaptor unit until the fiber optic cable
emerges slightly (3mm/0.2 inch) out the other side (image c).
b) Use the tool you have received with your fiber optic cable kit in order to
tighten the screw on the adaptor. Tighten it enough to stabilize the fiber
#1
#2
a
b
Page 3
Nano 12082007
3
optic cable inside the adaptor, but don't tighten it too strongly.
Tightening the screw too much might damage the fiber optic
cable.
c) Install the black and clear plastic diffuser cover on the Nano Flash
Housing, if it isn't already assembled.
d) Carefully but firmly insert the black adaptor inside the lower right
grommet (the one with the wider hole) of the black diffuser cover, so
that the adaptor's screw doesn't get in its way. Insert it all the way to
the end, and do not force once you encounter any resistance (image d).
Step 3 – Attaching the Fiber Optic Cable to the Camera Housing
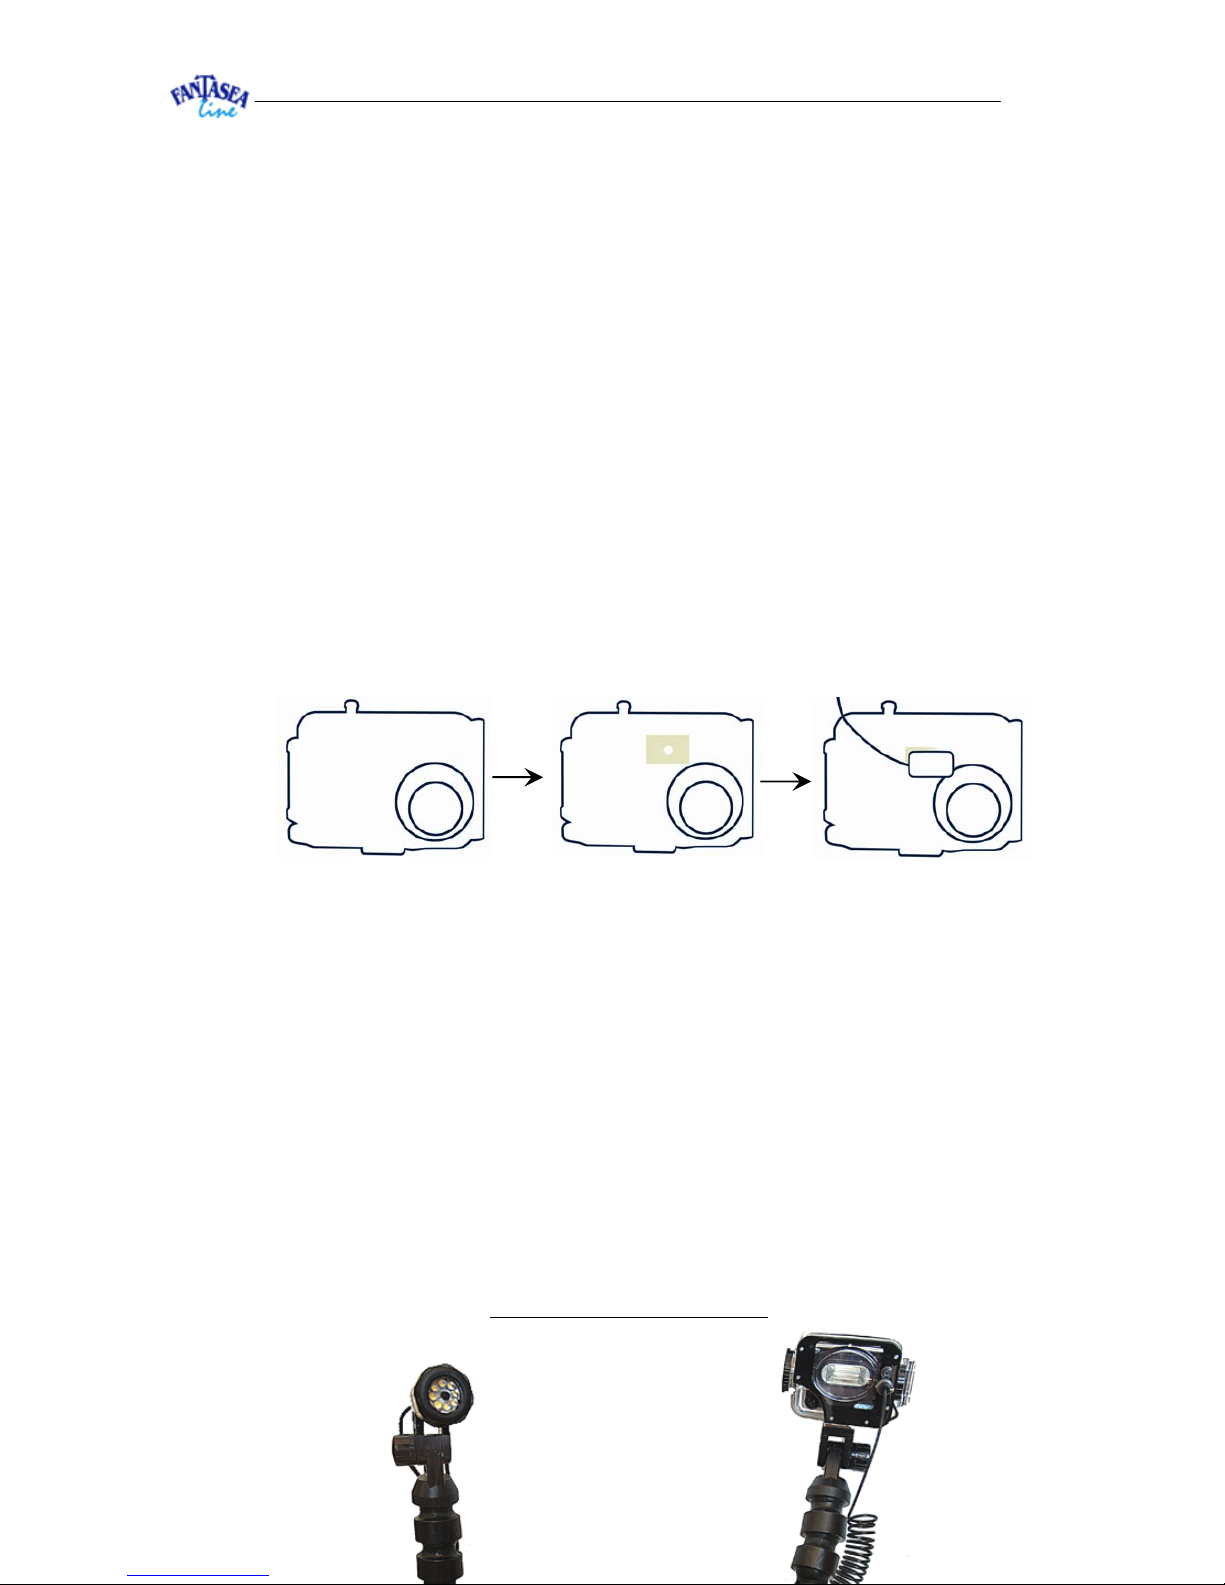
a) The other end of the fiber optic cable attaches to the outside of the
camera housing - opposite the camera's internal flash - by using both
sides of the Velcro strip included in the kit. The white plastic fitting
normally comes with the Velcro tape attached and therefore you are
only required to apply the other side of the Velcro strip on the housing
to receive it (images e to g). If your housing features a built-in flash
diffuser, the Velcro strip should be attached beneath it, directly to the
housing. If possible, place the Velcro strip between the built-in flash
diffuser and the housing. If the camera housing's built in diffuser
assembly does not provide enough space for the Velcro strip or the
d
c
Page 4
Nano 12082007
4
white plastic Fiber Optic terminal to be attached between it and the
housing, then the housings diffuser can be disassembled in order to
position the Fiber Optic terminal in its postiion. Please note that it’s
mostly recommended to totally block out the internal flash of the
camera when using the fiber optic cable (see Step 3b), and therefore
removing the built-in flash diffuser will have no affect on lighting.
b) It is preferable to totally block out the internal flash of the camera after
attaching the camera side of the cable by putting black electrical tape
over the fiber optic connector attached to the housing case. This
effectively achieves two things: it diminishes the effects of backscatter,
as well as avoiding any shadowing effect while using wide angle or
macro accessory lenses.
c) Follow the instructions on your Nano Flash manual in order to
synchronize your camera with the Nano Flash. Please note that
different digital cameras have different Pre-Flash and Flash
characteristics, which are compatible with different Nano Flash modes.
For example, Nikon Coolpix Cameras make use of a 2 pre-flash
program, so the acceptable setting to synchronize the slave would be 2.
It is always a good idea to test the synchronization when photographing
opposite a mirror.
The Nano Lighting System
e
f g
Page 5

Nano 12082007
5
You can also find this instructions manual in our Customer Support Section
on the website- http://www.fantasea.com/technical.asp
For further information please contact us at [email protected]
Note:
In some cases, after using the fiber optic cable frequently or for a long period,
you might encounter a decrease in performance. You can easily solve this
problem by cutting 1 cm/0.3 inch off the fiber optic cable's ends, using a sharp
tool and performing a very straight angled cut. This way you remove any worn
ends, and expose a new portion of the cable.
 Loading...