

Page 1
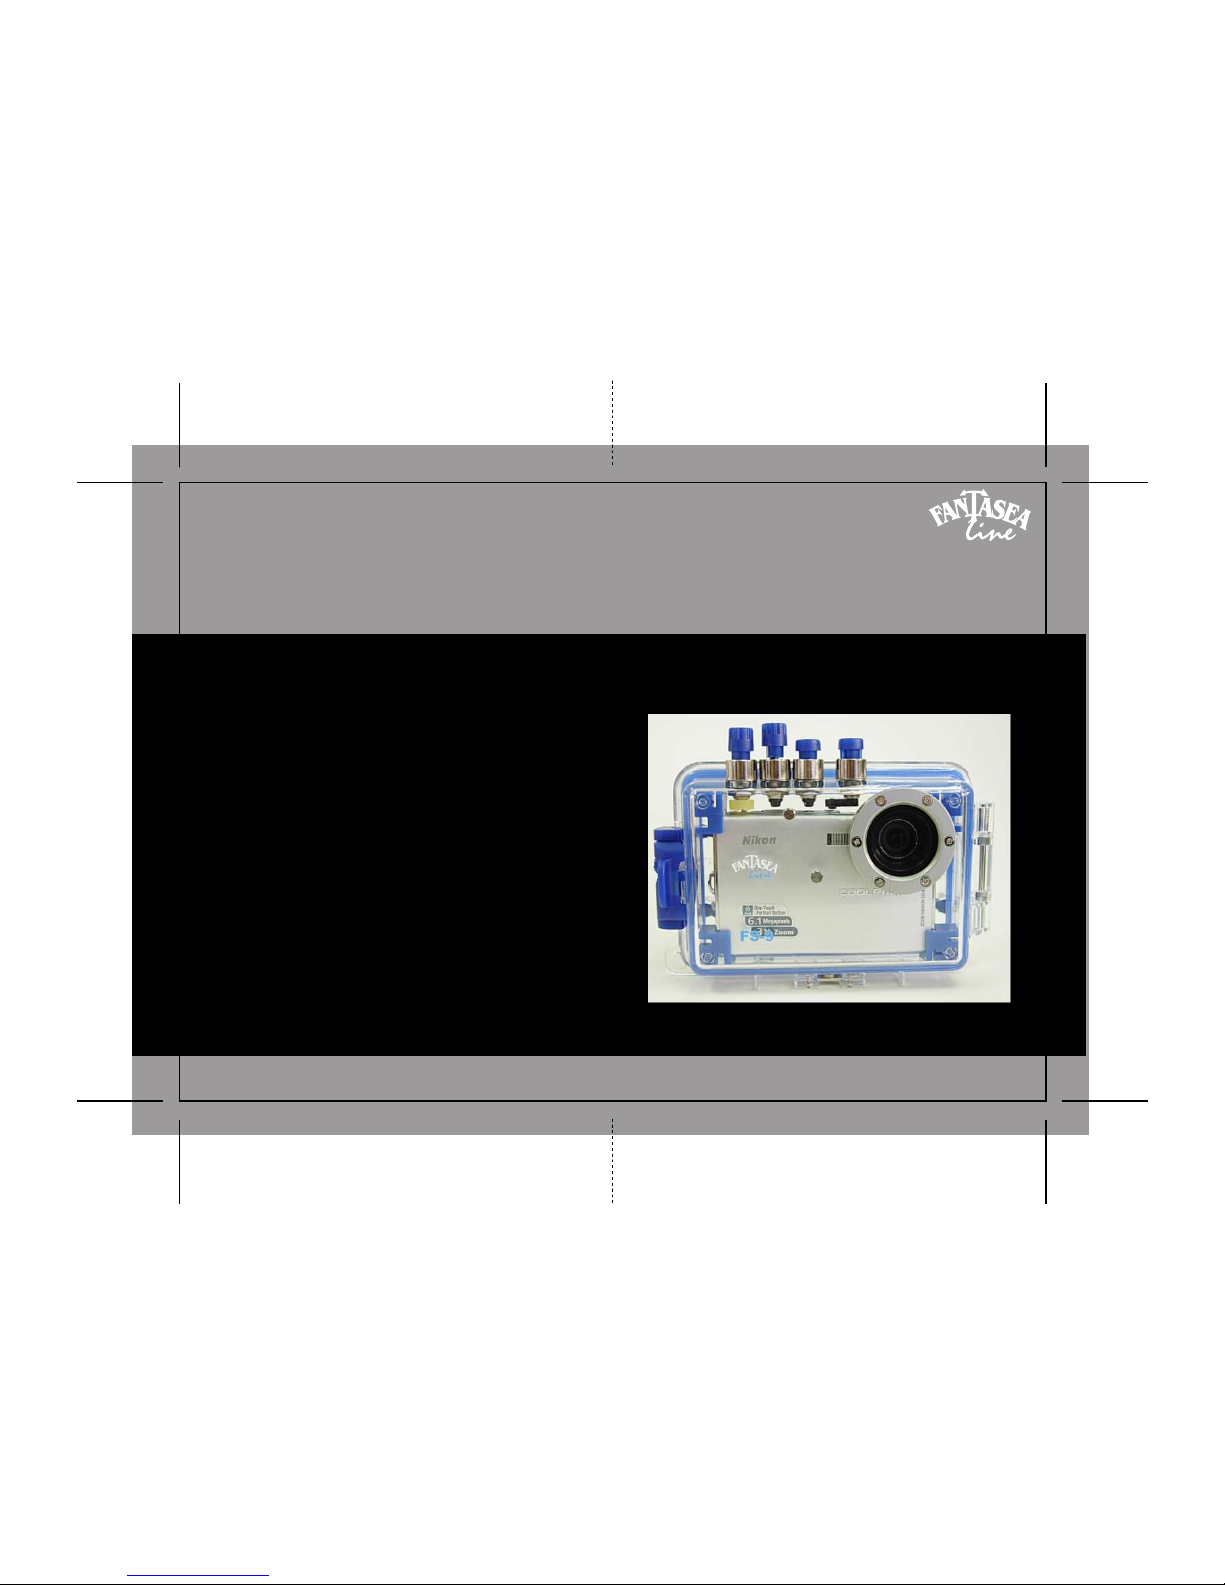
For Nikon Coolpix S9
Digital Camera
FS-9
FS-9
OPERATORS MANUAL
Page 2
pg.13
1
TABLE OF CONTENTS
Manual for the FS-9
Care & Maintenance: ............................
pg.15
Using the flash: .....................................
pg.12
Accessory slave flashs: ................................................
Lens accessories: ........................................................
Fantasea coolpix accessory systems and sets: ...............
pg.12
pg.13
Battery life: ............................................
pg.11
Using the fantasea FS-9 housing.....................
pg.8
Opening the Housing: ..................................................
Inserting Camera: ............................................................
Checking the gasket: ...................................................
Closing the housing: ....................................................
pg.8
pg.8
pg.9
pg.10
General information: ..............................
pg.2
The Fantasea FS-9 housing: ........................................
Fantasea FS-9 Uses: ....................................................
General Camera description: ........................................
Nikon Coolpix S9 feature highlights: .............................
pg.2
pg.2
pg.7
pg.7
Table of contents.....................................
pg.1
Exposure Modes:
(Pre-set before camera insertion)
......
Zoom control: ..............................................................
Macro focus: ...............................................................
Quick review: ..............................................................
Camera standby mode: ..............................................
pg.14
pg.14
pg.14
pg.14
pg.14
Shooting Techniques: ............................
pg.14
Viewing the subject: ...............................
pg.10
Taking the picture: .......................................................
Choosing image files: ..................................................
pg.11
pg.11
Flood insurance: ...................................
pg.17
2
General Information:
Fantasea FS-9 Uses:
The Fantasea FS-9 housings is designed as an underwater/outdoor
camera housing. It has a working depth of 130 feet/40 meters.
Underwater photographers can dive or snorkel and capture all
the excitement of this fascinating world, while outdoor
photographers also have the option of capturing the action of
such activities as white water and paddle sports, sailing and
boating, surfing, fishing and hunting, backpacking and camping,
and for family activities around the swimming pool or at the
beach. The Fantasea FS-9 will protect those Coolpix cameras
from water, sand, dust, and other damaging elements.
The Fantasea FS-9 housing:
Fantasea has designed a special housing for the Nikon Coolpix
S9 digital camera. The housings, dedicated to Nikon S9, insures
the most compact design for easy handling and accurate access
to camera functions through the critical placement of push-button
controls.
The FS-9 housings provide a built in Flash Diffuser and an antiglare hood over the LCD screen.
Control Features include:
This housing is ideal for outdoor and underwater photographers
who enjoy the camera's automatic exposure features for capturing
fast action pictures easily and creatively.
Zoom
Macro
Exposure
Video/Still
Delete
Review
Menu
Mode
Page 3
3
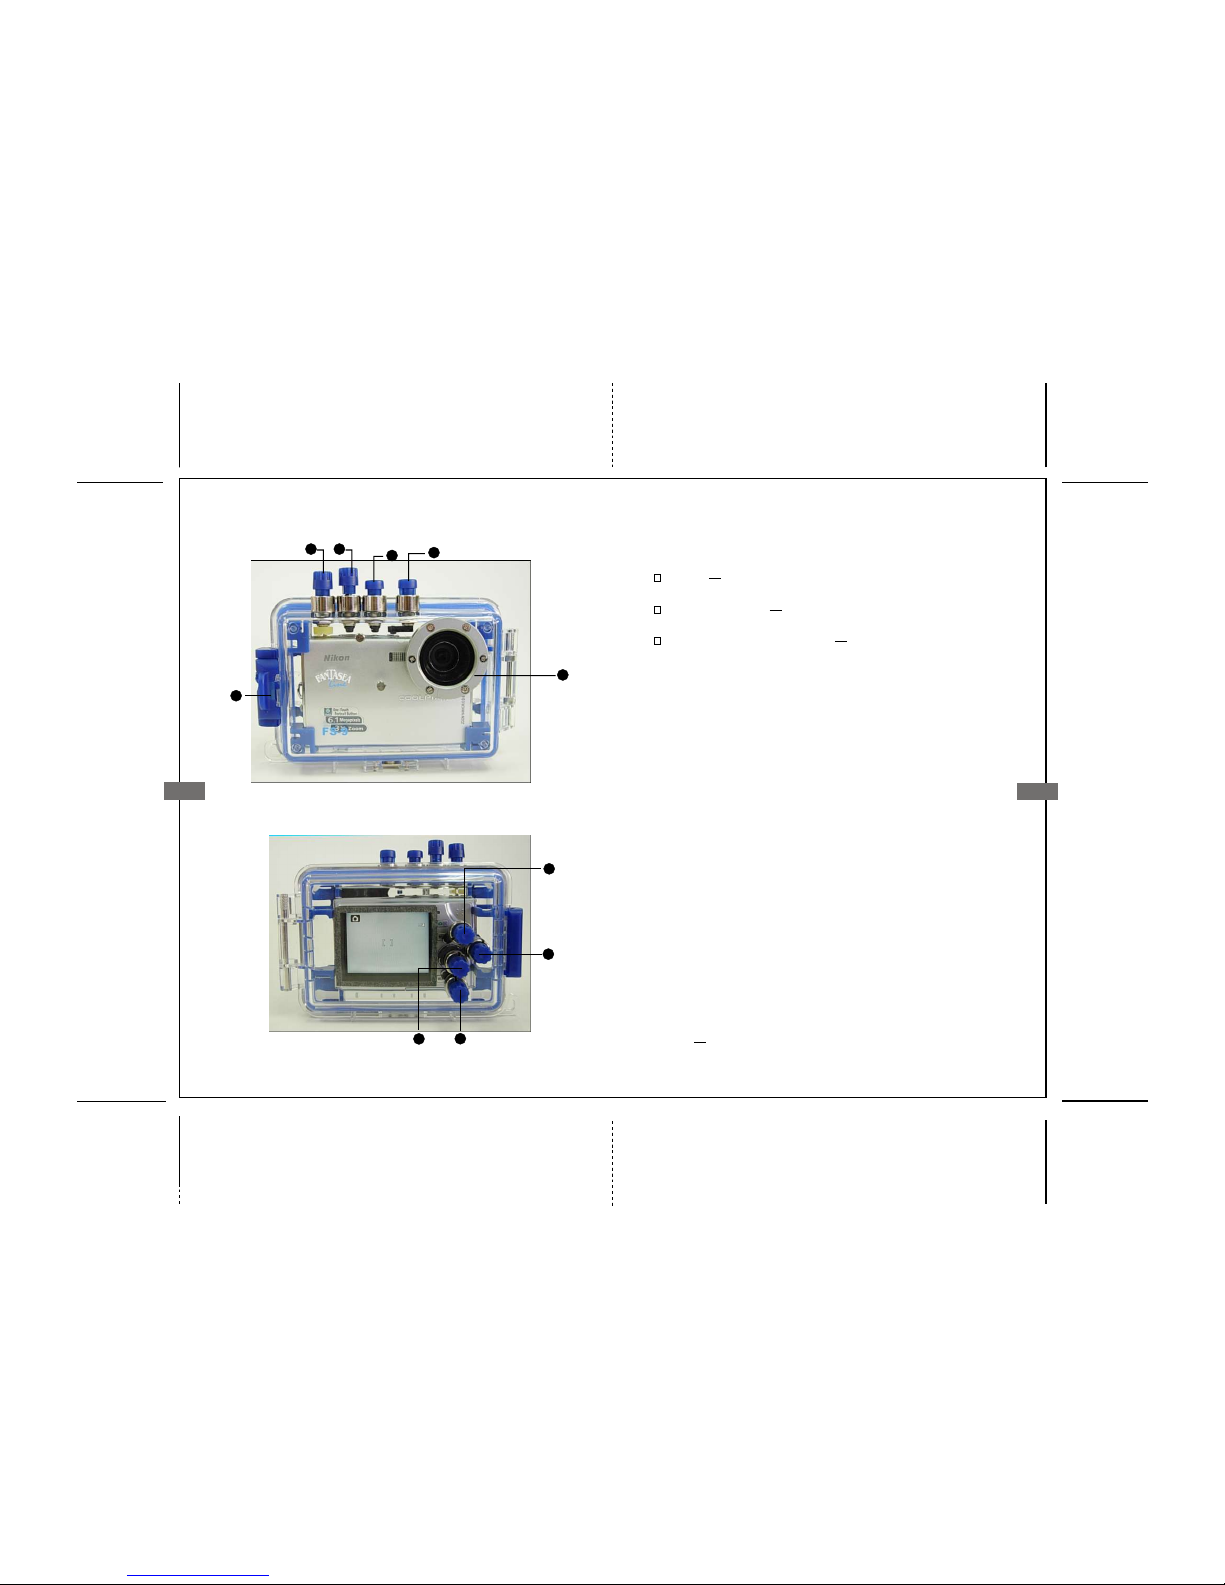
Top and front buttons
6
2
5
1
3
Back Side of Housing Buttons
7
10
98
4
1: One Touch Portrait/ D-Lighting:
For portrait shots when this button is pressed in shooting mode
the following features are available:
2: Power Switch:
When this button is pressed during full-frame or thumbnail
playback a copy of current picture is created with enhanced
brightness and contrast.
Enhanced Contrast: D-Lighting:
To turn the camera on, press the power switch. The power -on
lamp will light and the monitor will turn on.
To turn the camera off, press the power switch and wait for
the power-on lamp to turn off.
3: Shutter Release button:
This is a two stage shutter-release button. First lightly press
the shutter-release button halfway, stopping when you feel
minimal resistance. Once the camera has focused, press the
shutter-release button the rest of the way down to release the
shutter and take the picture.
Portrait background details are softened; the subject stands
out more clearly.
Face-priority AF camera detects and focuses on faces
automatically.
Advanced red eye reduction reduces red eye caused by
the flash.
4: Zoom Control/playback zoom and thumbnail playback
[swivel button]
The zoom control is used to frame subjects in the monitor.
Select W to zoom out, increasing the area visible in the frame.
Select T to zoom up to 3x so that the subject fills a larger
area of the frame. Pressing T for about 2 seconds at 3x zoom
will trigger the digital zoom, allowing subject to be magnified
up to 4x more. Note that unlike the optical zoom, the digital
zoom will not increase the amount of detail visible in the
picture they are simply enlarged producing a slightly grainy
image.
4
Page 4
5
7: Mode/Shooting/Playback button:
9: Menu/Delete button:
Pressing the W button in full-frame playback displays pictures
in contact sheets whereas pressing the T button can be used
to zoom in on pictures during full-frame playback.
Swivels between Shooting/Playback and Mode function.
Pressing this button during shooting or playback displays a
mode selection menu either Shooting Mode or Playback
Mode menus appear.
To view pictures full-frame in monitor [full-frame playback],
press this button [if camera is off, pressing the button for about
a second will turn the camera on in playback mode].
Swivel function button for the following dual functions:
Delete
To delete the current displayed picture in the monitor, press
the Delete button. Two options appear: No or Yes. Highlight
wanted option and press the OK center button [#10].
Additionally, pressing the Delete button in full-frame or
thumbnail playback displays the same dialog requesting
confirmation for deletion. Follow the directions as stated above
to delete.
6
8: Rotary Multi Selector:
The rotary multi selector is used to navigate the camera menus.
Rotate in any direction to highlight items and press the center
OK [#10] button to confirm selection. To cancel and return
to the previous menu, press the rotary multi selector to the
left. Highlighted options are found when pressing this rotary
dial left, right or up and down.
5: Buckle to secure housing:
Refer to the section "Using the Fantasea FS-9 Housing" on
how to open and close the camera housing.
6: Lens Port:
Refer to the section "Inserting Camera" for useful information.
Menu
To display the Shooting menu, select the shooting mode [button
#7] and press the Menu button. For Playback menu, the
playback mode must be selected and press the Menu button.
To display the Set Up menu, select setup from the shooting,
playback, scene, movie etc menus
Note!
Before making a selection from the Rotary Selector
button, be sure the flange of the OK button is moved
away from the Multi Selector field.
Once you have made your selection on the Rotary
Selector, swing the flange around of the OK button
directly over the 'confirm' area in the center of the
Rotary Selector and press down on the OK button to
validate your selection.
10: Center OK button:
This button authorizes the selections made when the Delete,
Menu and Rotary Multi selector buttons are used. Must be
swiveled into place when pressing OK and see that it does
not interfere with the action of the Rotary Multi Selector
button.
Note!
It is strongly recommended that you familiarize yourself
with all the controls topside before using these controls
while diving.
Page 5
7
Nikon COOLPIX S9 Feature Highlights
Ingenious "right-angled" design that allows it to operate
throughout its entire focal range without ever protruding from
the camera's slim body
The Coolpix S9 is a small, slim and stylish with Nikon's distinctive
"wave-surface" design and an all-metal body. that contains a 6.1
megapixel sensor.
At the heart of the COOLPIX S9 is a large 2.5-inch CCD screen
with 170 degree viewing angle. It also features a 3x Zoom-Nikkor
ED lens with a 38-114mm range (35mm equivalent) and an
aperture range of f/3.5 to f/4.3 which gives users broad
compositional freedom to shoot anything from broad scenery to
confined portraits.
The COOLPIX S9 insures great-looking results in challenging
conditions with a handy One-touch portrait button that provides
direct access to three unique in-camera Nikon image innovations:
Face Priority AF*, which automatically detects and achieves
sharp focus on people's faces wherever they are in the frame; InCamera Red-Eye Fix, which automatically overcomes the redeye effect sometimes caused by flash; and Nikon's D-Lighting,
which rescues underexposed images or shots with too much back
light.
General Camera Description:
8
Using the Fantasea FS-9 housing:
Opening The Housing:
Inserting Camera:
Since the Fantasea's FS-9 was specifically designed for the
Coolpix S9 digital camera, insertion is a simple matter of placing
the camera in the housing.
Make sure the camera lens is centered in the rounded port area
and that the lens does not distort the round black rubber seat.
The housing is designed to have the camera fit in place perfectly,
but if you are not careful, it is possible to put it in at an improper
angle and hence it will be impossible to get a good seal or easy
closure of the housing.
1.
Pulling the latch toward the rear of the housing will unclip the
latching buckle and allow it to swing free--for opening.
3.
Pinch the Latch Buckle Release Tab with one hand. While
pinching the tab, pull the latch open. The latch is hinged on
the front half of the clamshell.
2.
2.
After camera insertion, be sure that the extended camera lens
does not catch or bend the black rubber seat on the inside of the
lens port. It is vital that the lens does not disturb this rubber seat.
Observe that the locking mechanism has a single spring tab.
1.
Notes:
It is recommended to make some camera settings
prior to inserting into the housing. Please refer to
the Coolpix owner's manual for menu options and
personal preferences to choose from.
1.
Take a few test shots: it is recommended to turn
the camera "on" and program to "Flash Always"
mode before inserting into housing and then take
test shots to make sure all systems are working.
2.
Auto mode [4 modes] with Scene Assist for better picture
composition with 15 Scene modes that can produce greatlooking shots in a wide range of common conditions
Date Counter which visually counts down the days to a special
occasion, as well as a Time zone function for setting home
town and new city time zones so images can be sorted easily
after traveling
In common with all members of the COOLPIX family, the
S9 comes complete with Nikon’s unique PictureProject
software
Stop-motion movie function which makes it easy for users to
create their very own stop-motion animated films by taking
a shot of the models they wish to animate, move the models,
then shoot again
Page 6
9
Checking the Gasket:
Info:
Gasket
Underwater photographers will probably want to set the flash
mode to the flash always setting to insure they always have a
flash with every exposure. It is also wise to set the focus mode
to allow the lens to focus in the macro range for capturing great
images of the tiny and exotic subjects that you can find underwater.
Prior to each closure of the housing the gasket seal should be visually
inspected. If there is any debris present, including dirt, sand, dust,
hair, grease or other matter, it must be cleaned to insure a proper
watertight seal.
Cleaning the gasket is a simple matter of wiping it with a damp, soft
cloth to remove the foreign matter. Be careful the cloth you use does
not leave any of its own material behind as this can also affect the
effectiveness of the gasket. It is not necessary to remove the gasket
for cleaning unless visual inspection determines that there is foreign
matter underneath the gasket as well. If this occurs, be sure the
surface of the housing is also clean and wiped free of any debris.
Since the gasket on the Fantasea FS-9 are face-toface/compression sealed, and is not subject to friction
as it is closed, there is no need to lubricate it. Grease
or any other form of lubrication does not help seal
the housing. It only reduces friction, which is
commonly present if the housing has an O-ring seal.
Lubricating the gasket before use could cause it to
slip out of its groove, and not form a proper seal:
therefore no silicon or other lubricants should be used.
The gasket should also be checked visually for any
cracks or perforations. If any part of the gasket shows
signs of wear or damage, it is imperative that it be
changed before going into the water.
If the gasket is removed from the channel groove it
sits in, be sure to get it completely back into place so
it is properly seated. Starting at one corner, pr ess the
gasket with your finger and feel it seat into its channel
groove. Then continue this procedure continuously
in one direction, round its perimeter, until the entire
gasket has been pressed flat into place. Go over it a
second time to be sure it is properly in place. Then
you are ready to clean it, give it a final visual
inspection, and close the housing.
10
Closing the Housing:
2.
Never force the housing closed; if it does not close easily,
please check to make sure that the camera is well seated and
that the lens is sitting properly in the port area and not distorting
the rubber seat.
It is most important to check to make sure the rectangular rubber
gasket [blue or black] is seated correctly in its niche [not raised
at any point and sitting in its groove] and that there is no sand, dirt
or any other foreign object on its surface. Do not use any lubricant
whatsoever on this gasket especially silicon grease which will
distort it. Make sure that the black wrist lanyard is not jammed
into the housing during the closing procedure.
3.
Bring the two halves of the housing together with one hand
[squeezing your thumb on one side and your other fingers on the
other until the two halves touch and hold securely in that position.
With the other hand, attach the flange to the body of the camera
and gently lower the rounded latch until it snaps into place.
1.
The S9 camera does not have the standard eyepiece but underwater
photographers and outdoor photographers will appreciate the
large LCD viewing monitor for composing photographs. The
LCD monitor will allow you to see your subject in sharp focus
and framed properly. Hold the camera housing in your outstretched
arm at a position that is both comfortable and also allows you to
easily see the LCD monitor, for best compositional options.
Viewing the Subject:
4.
Always take the first dive without your camera in the housing
just to make sure there is no leakage from damage to the
housing. During the dive especially at the beginning of
descent take special care to look at the housing to make sure
no bubbles are escaping from it and that no water is entering.
Generally, if there is a problem with the seal, you will discover
it in the first seconds of the dive.
Page 7

11
Choosing Image Files:
There are several image file options to choose from that offer
different resolution and file sizes. This determination must be
made prior to camera insertion from Menu options. Please refer
to the Coolpix instruction manual for details on setting these
preferences.
Taking the Picture:
Once you have composed your scene or subject in the LCD
monitor, depress the shutter release button to take the picture. A
half depress will activate the live viewing ability of the LCD and
allow the camera to focus, once in focus and ready to shoot a
green light will appear on the LCD monitor and the camera is
ready to take the picture. Press down the shutter all the way to
complete image capture. You may notice a pre-flash and slight
delay in the shutter release. This is to allow the camera to make
its final focus and exposure calculations before taking the picture.
With a little practice, you will become used to this and taking
pictures of moving subjects will become easier and natural.
Battery life:
The Lithium-ion battery that comes with the Coolpix is very
efficient and lasts for more than enough time for a typical photo
dive. However, there are certain things that users can control to
help with battery life. The most important is to set the camera to
turn the LCD off after a short time, during periods of non-use.
It can then be automatically turned back on if you depress the
shutter release control half way. Please refer to the Coolpix
instruction manual for details on how to make this adjustment
setting. It is always wise to have backup batteries in case you do
run out of power. The supplied battery can be recharged many
times and offer an economical and environmentally friendly
power source.
12
Using The Flash:
Accessory Slave flash:
If you should use the Coolpix built-in flash as the master, you
can trigger a second slave flash to provide more artificial light
when needed. To do this, you must use an accessory flash that
has a slave feature built in. The flash from the Coolpix must be
aimed or bounced toward the accessory flash's slave sensor, or
other fiber optic sensor. This will trigger the slave to fire in sync
with the master flash.
The Coolpix has a built-in flash, which will illuminate nearby
underwater subjects. For subjects that are farther away, an accessory
slave flash is recommended. (see below). A built-in flash dif fuser
is supplied which will help achieve a wider and softer light source
thereby providing more coverage and less likelihood of backscatter
(the unattractive snowstorm affect of the flash reflecting off the
suspended particles in the water). Further reduction of backscatter
can be achieved by using an accessory off-camera slave flash.
This will be discussed in more detail.
The need for artificial light to maximize color reproduction is
necessary in nearly all pictures. Therefore it is strongly
recommended that you set the flash mode to Flash Always. This
will insure the flash fires on every exposure regardless of the
ambient light conditions. (Please refer to the camera's instruction
manual for more details).
Outdoor photographers do not have this same concern. There is
no backscatter to be concerned with, and due to the ability of the
flash to travel farther and more effectively in air as compared to
in water, there is normally not a need for an accessory flash to
provide proper illumination for most subjects.
When using an accessory slave flash with fiber optic cable, it is
recommended to black out the internal camera flash. The internal
flash is located near the camera lens and can contribute to
backscatter by illuminating floating particles close to the lens port.
If the sensor of the fiber optic cable is attached to the outside of
the housing directly above the internal flash and taped over with
black tape–it will block out the light from the internal flash but
transmit the light pulse to the external slave flash.
Page 8
13
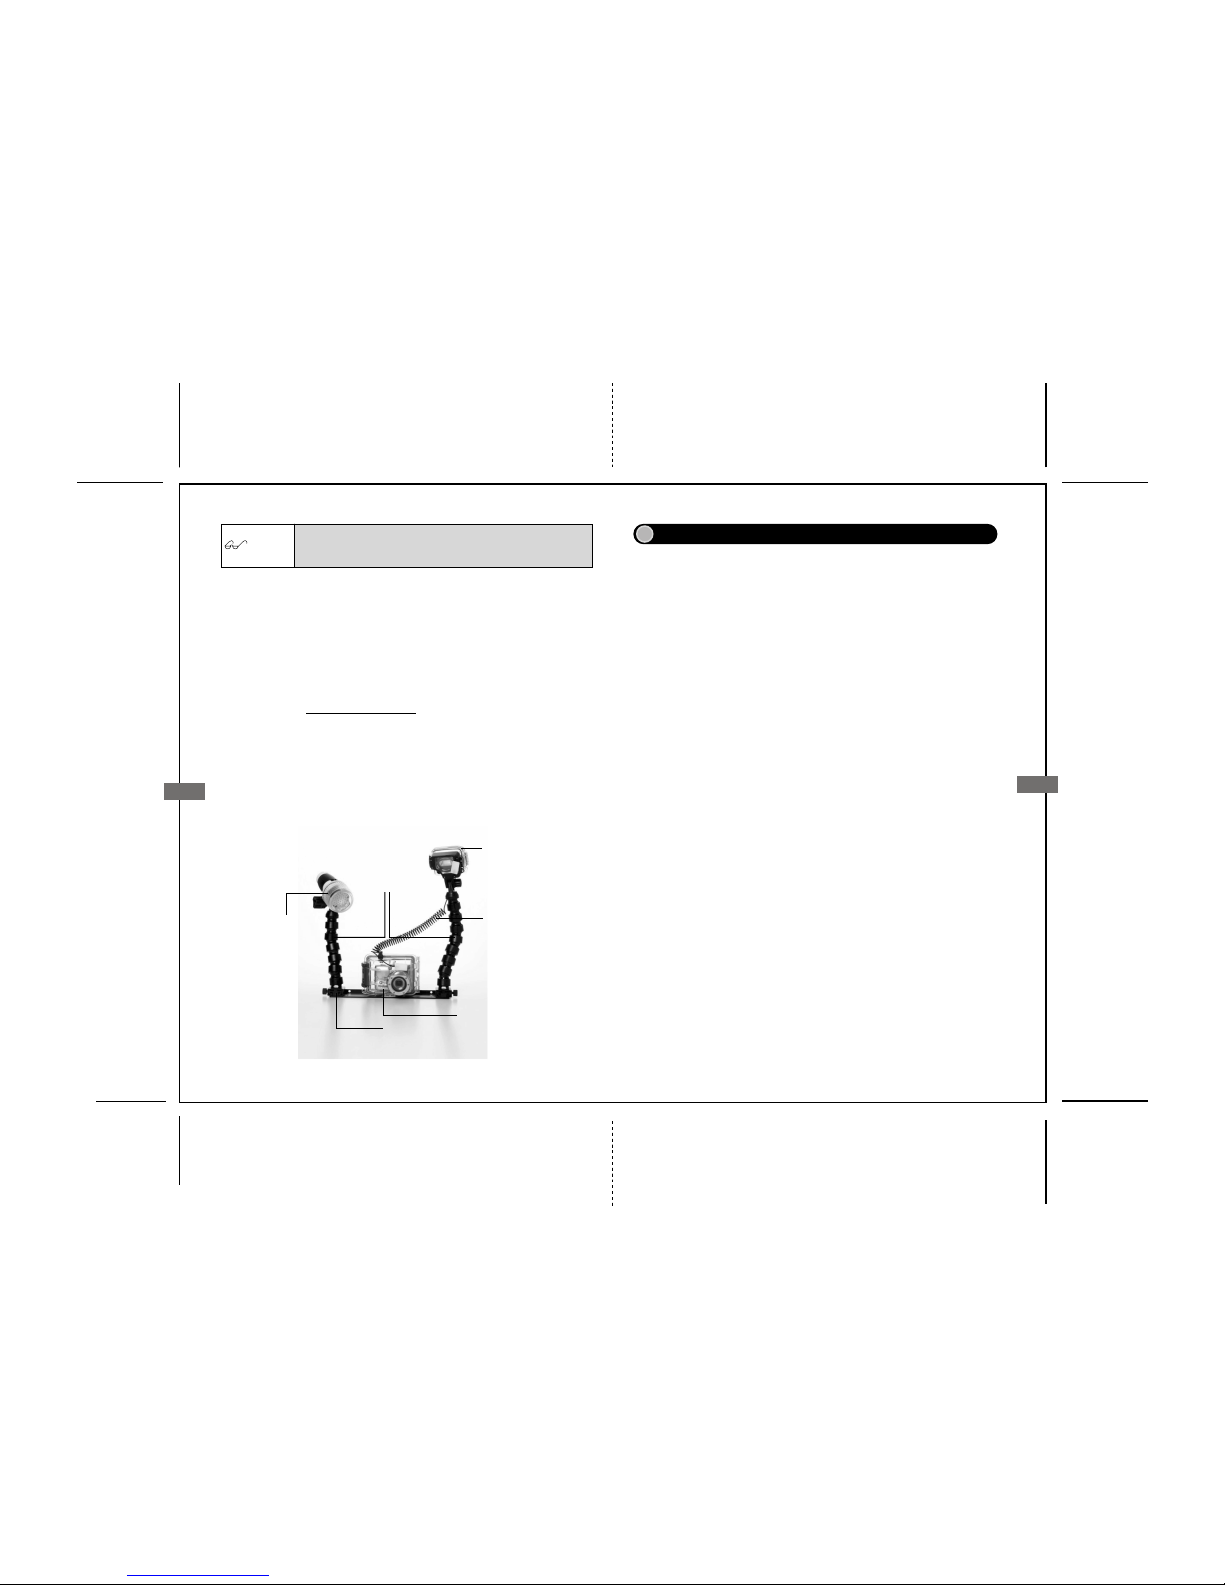
Coolpix Nano Flash
Coolpix Housing
LED 44 focus light
Fiber Optic Cable
Double Slot Tray
Coolpix Accessory System
2 Flex Arms
Lens Accessories:
The Fantasea FS-9 is designed to work with some of the wideangle and macro adapters that are currently on the market. Fantasea
Line offers a macro/wide angle converter lens adapter for this
purpose. The converter lens can be used with one of its two
elements for super macro images, or with both of its elements
for great wide angle images. Red Filters which go over the lens
port or on the converter lens itself are also available. For more
information on these items, see your local photo dealer or visit
our website at www.fantasea.com
Fantasea Coolpix Accessory Systems and Sets:
Fantasea Offers a variety of Coolpix (and other housings) sets
made up of quality accessory products which serve to enhance
and improve your underwater images. Products like external flash
systems, flexible arms, trays, filters, wide angle and macro lenses,
fiber optic cables and more. Below you can see one sample
system. For more information please refer to our website or to
the Fantasea Dealer where you purchased your housing.
Be sure to use a slave flash that has the ability to
ignore the built-in pre-flash in digital cameras,
and synchronizes with the shutter release.
Note!
14
Shooting Techniques:
There are several exposure modes for photographers to choose
from, depending on the situation. Underwater it is recommended
that you shoot in the Auto mode on the camera in which ambient
light and artificial light will be automatically controlled by the
camera according to the lighting conditions. You can also select
different light meters to use, based on the situation and your
personal preferences. Additionally , you can choose the Auto White
Balance setting for color temperature control, or experiment with
some of the other modes to see which will work best underwater.
These settings do not have to be made ahead of any dive, as they
can be accessed through the housing controls while underwater.
Please reference the Coolpix instruction manual for details on
how to set these camera options, and under what conditions the
different choices would be used.
Exposure Modes: (Pre-set before camera insertion)
Zoom in for telephoto photos and larger subject size. Zoom out
for wide-angle scenes. It is generally not recommended to use
the zoom underwater as it is preferable to get physically closer
to your subject. The digital zoom has no value at all.
Zoom Control:
For capturing the tiny and exotic subjects that require close focus.
Macro focus is possible when the lens is in the wide-angle position.
Macro Focus:
Immediate review of most recent image is available that will
confirm that you captured the shot you want. However, if you
want to scroll through your images, or delete images from the
memory card, this should be done when you are topside and the
camera is out of the housing.
Quick Review:
Camera Standby Mode:
You can access the camera's menu to choose how long a period
of inactivity before the camera goes into standby mode. Options
are 30 seconds, one minute, five minutes, and 30 minutes. This
Page 9

The Fantasea FS-9 housing requires only a minimum amount of
care for reliable performance. The following are tips that will
enable you to get the best results.
Always rinse your housing with a strong stream of fresh water
and if possible soak your housing in fresh water tub or rinse
tank for about 20 minutes after every dive in order to dissolve
the salt water crystals from around the controls and openings
of the housing. Manipulate each of the movable controls to
assist the removal of salt particles from these tight areas.
1.
Care & Maintenance:
Allow the housing to dry thoroughly before packing away for
the day or for the trip home. You may use a soft towel or cloth
to dry the housing. Be sure there is no grease or other debris
on the towel.
2.
Visually check the condition of the gasket before every dive.
If it is dirty, clean it with fresh water and dry it with a soft
cloth as described above. If it is damaged in any way, such
as cut or perforated, replace it immediately.
3.
15
16
Do not use grease or any other type of lubricant on the gasket
when closing the housing. It does not increase the ability of
the gasket to make a proper seal.
4.
Be careful not to get greasy fingerprints or dirt on the lens
port. This will affect the image quality. W ipe any dirt or grease
off with fresh water and a soft cloth.
5.
Travel with the housing protected in a padded case. It is best
to remove the camera from inside the housing when traveling
and provide it with its own protective case, or compartment.
7.
Never dive with the Fantasea FS-9 housing to a depth greater
than 130 ft/40 meters.
8.
It is recommended that you select the shortest time option on
the menu, for placing the camera into standby during periods
of inactivity. This will conserve battery power and reduce the
heat given off by the LCD screen, which can contribute to
condensation inside the housing and fogging.
10.
It is strongly recommended to take the first dive without the
camera inside the housing. You should check that the water
tight seal has not been affected during transport and long
periods of storage.
11.
9.
It is recommended to have annual maintenance of all Fantasea
housings. This includes visual inspection and possible changing
of all seals / gaskets / o-rings. It is recommended to use an
authorized Fantasea Service Center for this purpose. Please
contact Fantasea Line by email: [email protected] or
visit the Fantasea Customer Service section at the end of this
manual or on the Fantasea web site www.fantasea.com.
It is likewise recommended to visually monitor the housing
during every descent, especially for the first 10 meters/33 ft.
If water is observed entering the housing or bubbles escaping
from it, the housing should be rotated to a port down position
and held that way as you return to the surface immediately
and get out of the water.
12.
6.
Do not drop the housing on hard surfaces. It is not a shock
absorber, and could crack, affecting its watertight integrity.
It could also cause damage to the camera inside.
When you want to resume shooting, pressing any button will reactivate the camera. However, if after the camera goes into standby ,
a further period of three minutes goes by without any activity,
the camera will turn off [deep sleep mode]. You can turn it back
on by pressing and holding the triangular icon button-Review/Restore [Playback] for about five seconds. The W elcome
to Nikon Coolpix screen will appear then it will display last image
taken. One additional press of the Review button will then return
the camera to active shooting mode.
feature allows you to conserve battery power by placing the LCD
monitor on standby [sleep mode]. It is recommended that this
option is set for 30 seconds for the following reasons: to conserve
battery power and longer periods of time will cause a warming
of the LCD screen. This will cause heating of housing and this
can produce condensation and fogging of the lens port. If this
occurs and the condensation appears on the lens port then it will
have a negative impact on the quality of the images taken.
Page 10

17
Flood Insurance:
Every Fantasea housing includes a one-year flood insurance policy.
Supplied by the Divers Equipment Protection Program (DEPP),
this insurance policy acts as additional protection to the warranty
and is good for one year. If your Fantasea housing experiences
water leakage in this period of time you will be compensated for
the loss of the camera. Only a small shipping charge will apply. All
insurance policies should be activated at the time of purchase. All
owners must complete the on-line product registration form by
going to www.fantasea.com and go to the Customer Support tab
and choose Product Registration; you will be taken to this page-http://www.fantasea.com/product_registration.asp where you can
complete the form and register your housing purchase. Failure to
register the product within 30 days of purchase will result in a
shorter period of insurance coverage for your housing and may in
the end cancel the flood insurance coverage all together. Also, you
must keep the original sales receipt of your purchase, which must
be submitted in the event of a claim: include it in the box . To make
a claim go to the same page and click the banner link:
For DEPP flood insurance claims please submit
your claim to http://www.fantasea.com/claims.asp
 Loading...