

Fanimation FP7958**-220, THE URBANJET Owner's Manual
The Urbanjet
Oscillating Desk Fan
™
Model No. FP7958**-220
OWNER’S MANUAL
READ AND SAVE THESE INSTRUCTIONS
Net Weight: 2.3 kg

Important Safety Instructions
WARNING: To avoid fire, shock and serious personal injury, follow these instructions.
1. Read your owner’s manual and safety information before installing your new fan. Review the accompanying assembly diagrams.
2. Before servicing or cleaning unit, unplug unit from power outlet.
3. Ensure that the fan is switched off from the supply mains before removing the grille.
4. Do not insert anything into the fan grille while the fan is operating.
5. If the supply cord is damaged, it must be replaced by the manufacturer or its service agent or a similarly qualified person in order to
avoid a hazard.
6. This appliance is not intended for use by persons (including children) with reduced physical, sensory or mental capabilities, or lack of
experience and knowledge unless they have been given supervision or instructions concerning use of the appliance by a person
responsible for their safety.
Additional Safety Instructions
WARNING: This product is designed to use only those parts supplied with this product and/or accessories designated specifically for
use with this product. Using parts and/or accessories not designated for use with this product could result in personal injury or property
damage.
ARNING: To reduce the risk of personal injury. Do not insert foreign objects in between rotating fan blades.
W
WARNING: Do not touch the fan and plug if your hands are wet.
WARNING: Do not unplug the fan by holding the power cord. Unplug the fan by holding the plug.
WARNING: Do not use the fan if the power cord or the plug is damaged, or if the power socket is loose.
WARNING: Do not use the fan near any of the following: gas stove, any fire source, unusually humid or high temperature, oil soot with
a lot of metal powder, obstacles affecting oscillating or outdoor.
WARNING: Do not insert hands or fingers into the fan grille, or the movable parts.
WARNING: Do not use the fan with any solid-state speed control device to reduce the risk of fire or electric shook.
WARNING: Place the fan on a smooth and level surface.
WARNING: Those who are not qualified electricians should not dissemble, repair or rebuild the fan.
Table of Contents
Electrical and Structural Requirements . . . . . . . . . . . . . . . . . . . . . . . . . . . . . . . . . . . . . . 3
How to Set Up Your Desk Fan. . . . . . . . . . . . . . . . . . . . . . . . . . . . . . . . . . . . . . . . . . . . . . . 3
Maintenance. . . . . . . . . . . . . . . . . . . . . . . . . . . . . . . . . . . . . . . . . . . . . . . . . . . . . . . . . . . . . 4
Trouble Shooting . . . . . . . . . . . . . . . . . . . . . . . . . . . . . . . . . . . . . . . . . . . . . . . . . . . . . . . . . 4
Service Parts . . . . . . . . . . . . . . . . . . . . . . . . . . . . . . . . . . . . . . . . . . . . . . . . . . . . . . . . . . . . 5
Electrical and Structural Requirements
ELECTRICAL REQUIREMENTS
Table fan requires a grounded electrical supply line of
220-240 volts AC, 50/60 Hz circuit. 1.6 m power cord
included. Indoor, dry location use only.
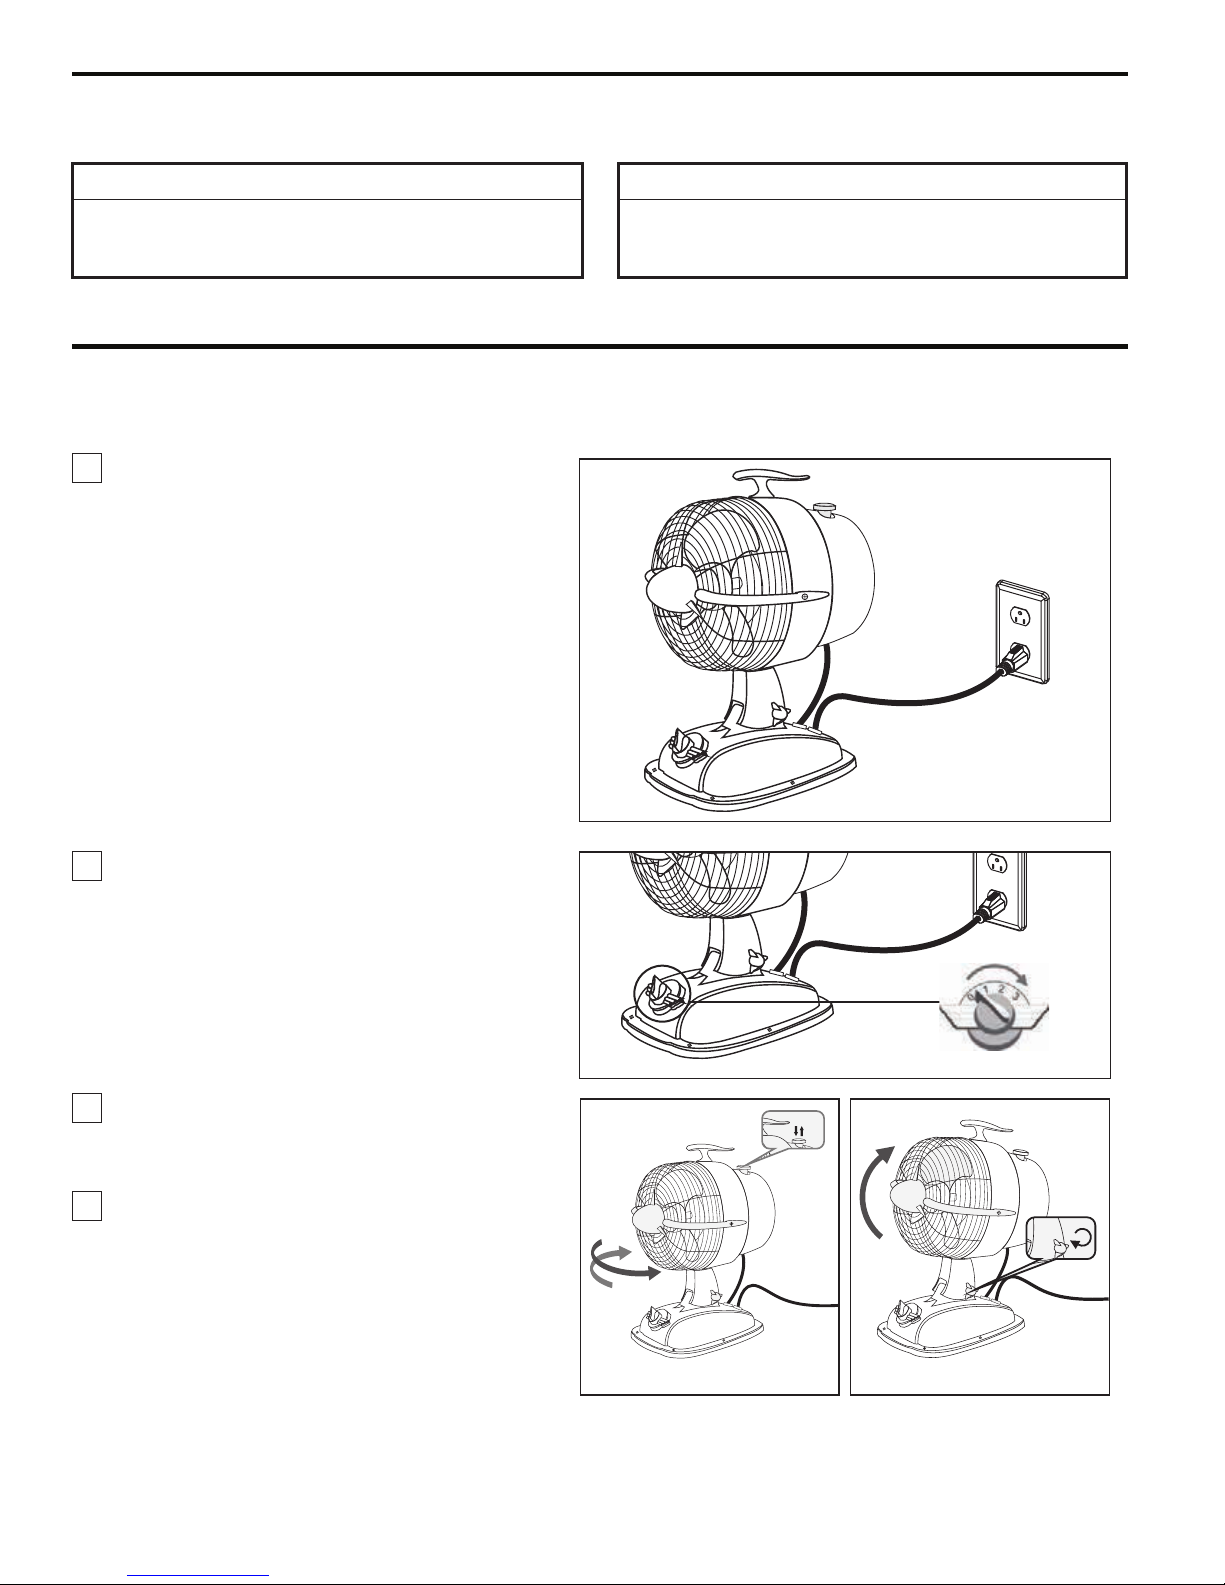
How to Set Up Your Desk Fan
1. Carefully remove the fan from carton and
dispose of packaging. Plug cord directly into
a suitable wall socket and turn on the power
supply. (Figure 1)
▲
WARNING
To avoid fire or shock, follow instructions carefully.
Any electrical work not described in these instructions
should only be completed by a licensed electrician.
2. Select the desired airflow, located on fan base
by rotating switch clockwise. (Figure 2)
The switch speeds are as follows:
0 = OFF
1 = Low
2 = Med
3 = High
3. Pull up on the oscillating knob for non-oscillating
operation. Push down on the oscillating knob for
oscillating operation. (Figure 3)
Turn the tilt angle adjusting knob on the fan’s
4.
neck anti-clockwise to loosen and hold the fan
head to adjust up and down to the desired tilt
angle. Turn the tilt angle adjusting knob
clockwise to tighten the fan head once your
fan is at the desired tilt angle. (Figure 4)
Figure 1
Figure 2
Figure 3 Figure 4
3
 Loading...