

Page 1
WFR8515 DC WIFI Receiver
SPECIFICATION and INSTRUCTION SHEET
ELECTRICAL SPECS: 120 Volts, 60 Hertz, Fan 0.6 amp
FAN MODEL USED: Use on Triaire Custom MAD8515 DC motor fan only. The WiFi receiver needs to conjunct
with TR205D or TW206D control to learn the optional blade size load before fan operation
with fanSync WiFi APP. See catalog or our website, www.FANIMATION.com for TR205D or
TW206D wall remote information.
NOTE: If fan or supply wires are different colors than indicated, have this unit installed by a qualified electrician.
WARNING
To avoid possible electrical shock, be sure electricity is
you are not sure if the outlet box is grounded, contact a
licensed electrician for advise, as it must be grounded for
safe operation.
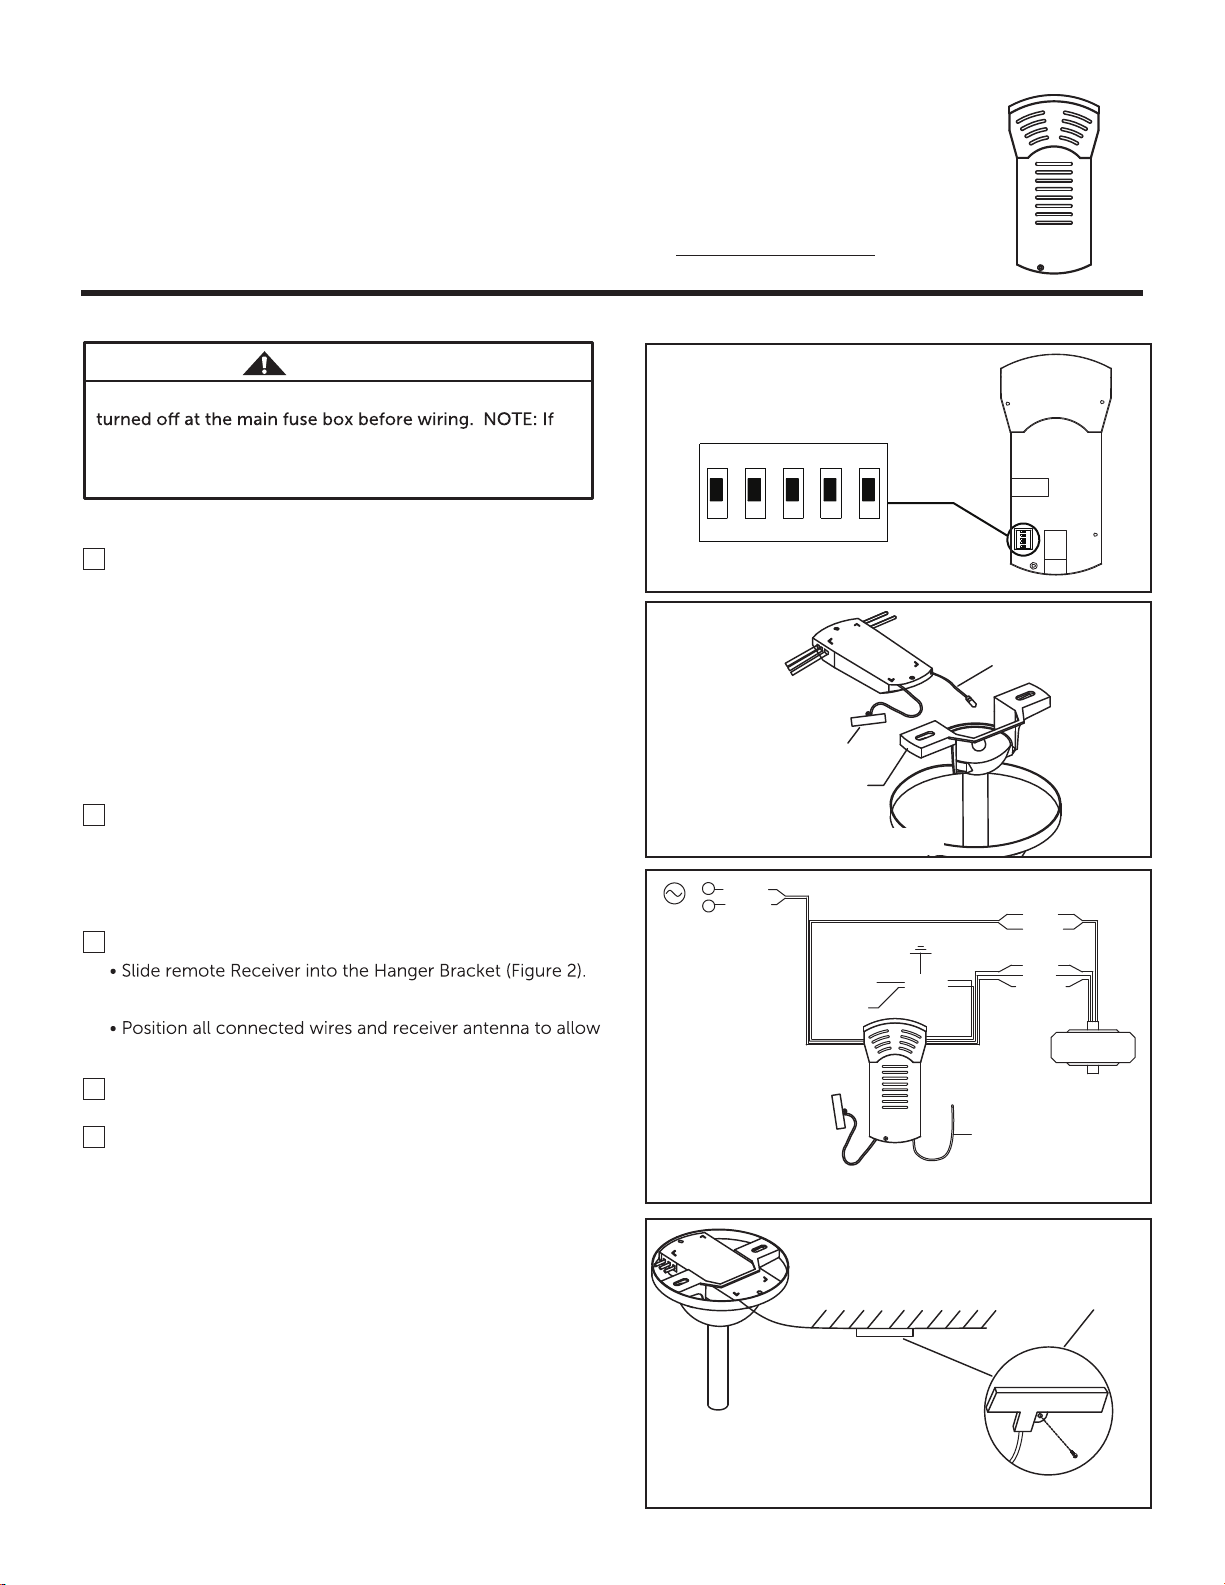
Dip Switch
ON
INSTALLATION INSTRUCTIONS:
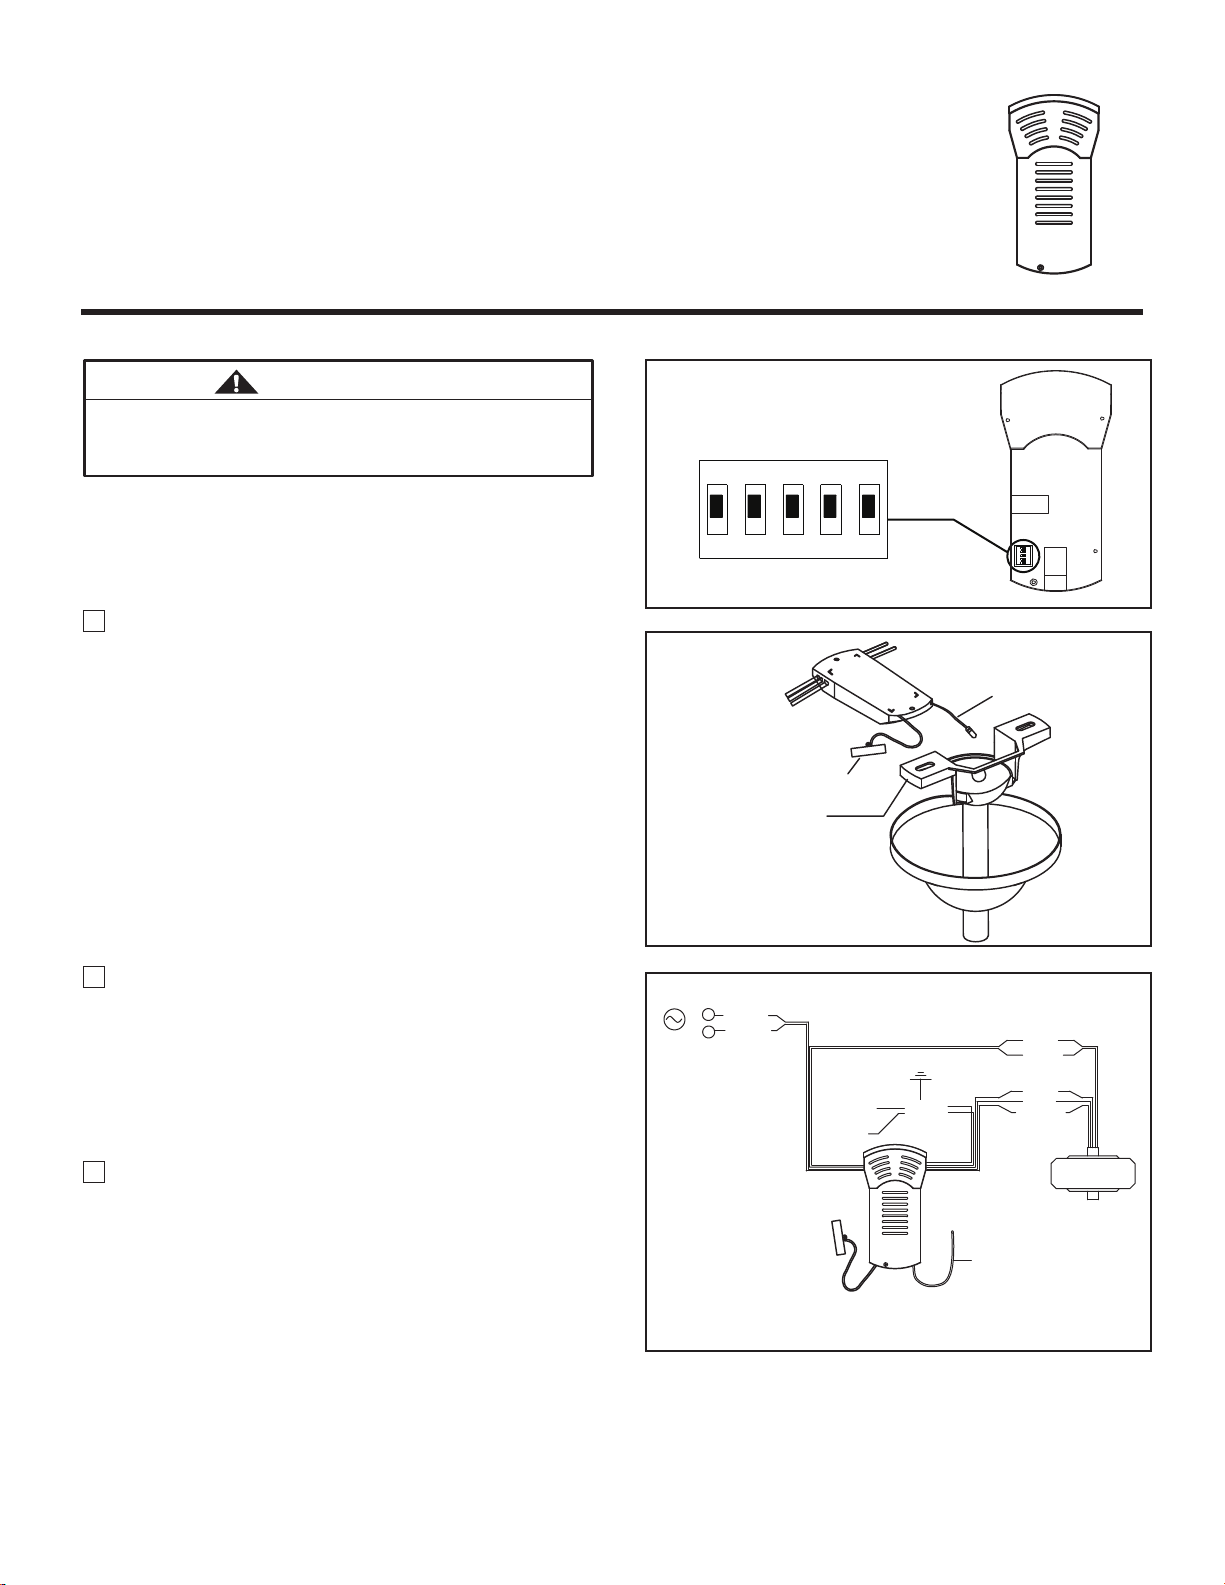
1. Dip Switch Set Up
NOTE: The remote unit has 32 different code
combinations. To prevent possible interference from or
to other remote units, simply change the combination
code in the remote and receiver.
NOTE: Factory setting is all up. Do not use this position.
• To set the code on receiver unit, slide dip switches
to the same positions as set on the remote, when using
with the TR205D remote or TW206D wall remote.
(Figure 1)
2. The breaker and wall switch that controls the power to the
fan must be in the off position. Please make sure that the
wall switch that controls the power to the fan and ligth kit
if installed, is a true on off toggle or rocker switch. It cannot
have a dimming function on of any kind.
3. Install Receiver in the Hanger Bracket:
• Connect wires using connectors as shown in Figure 3..
installation of ceiling canopy.
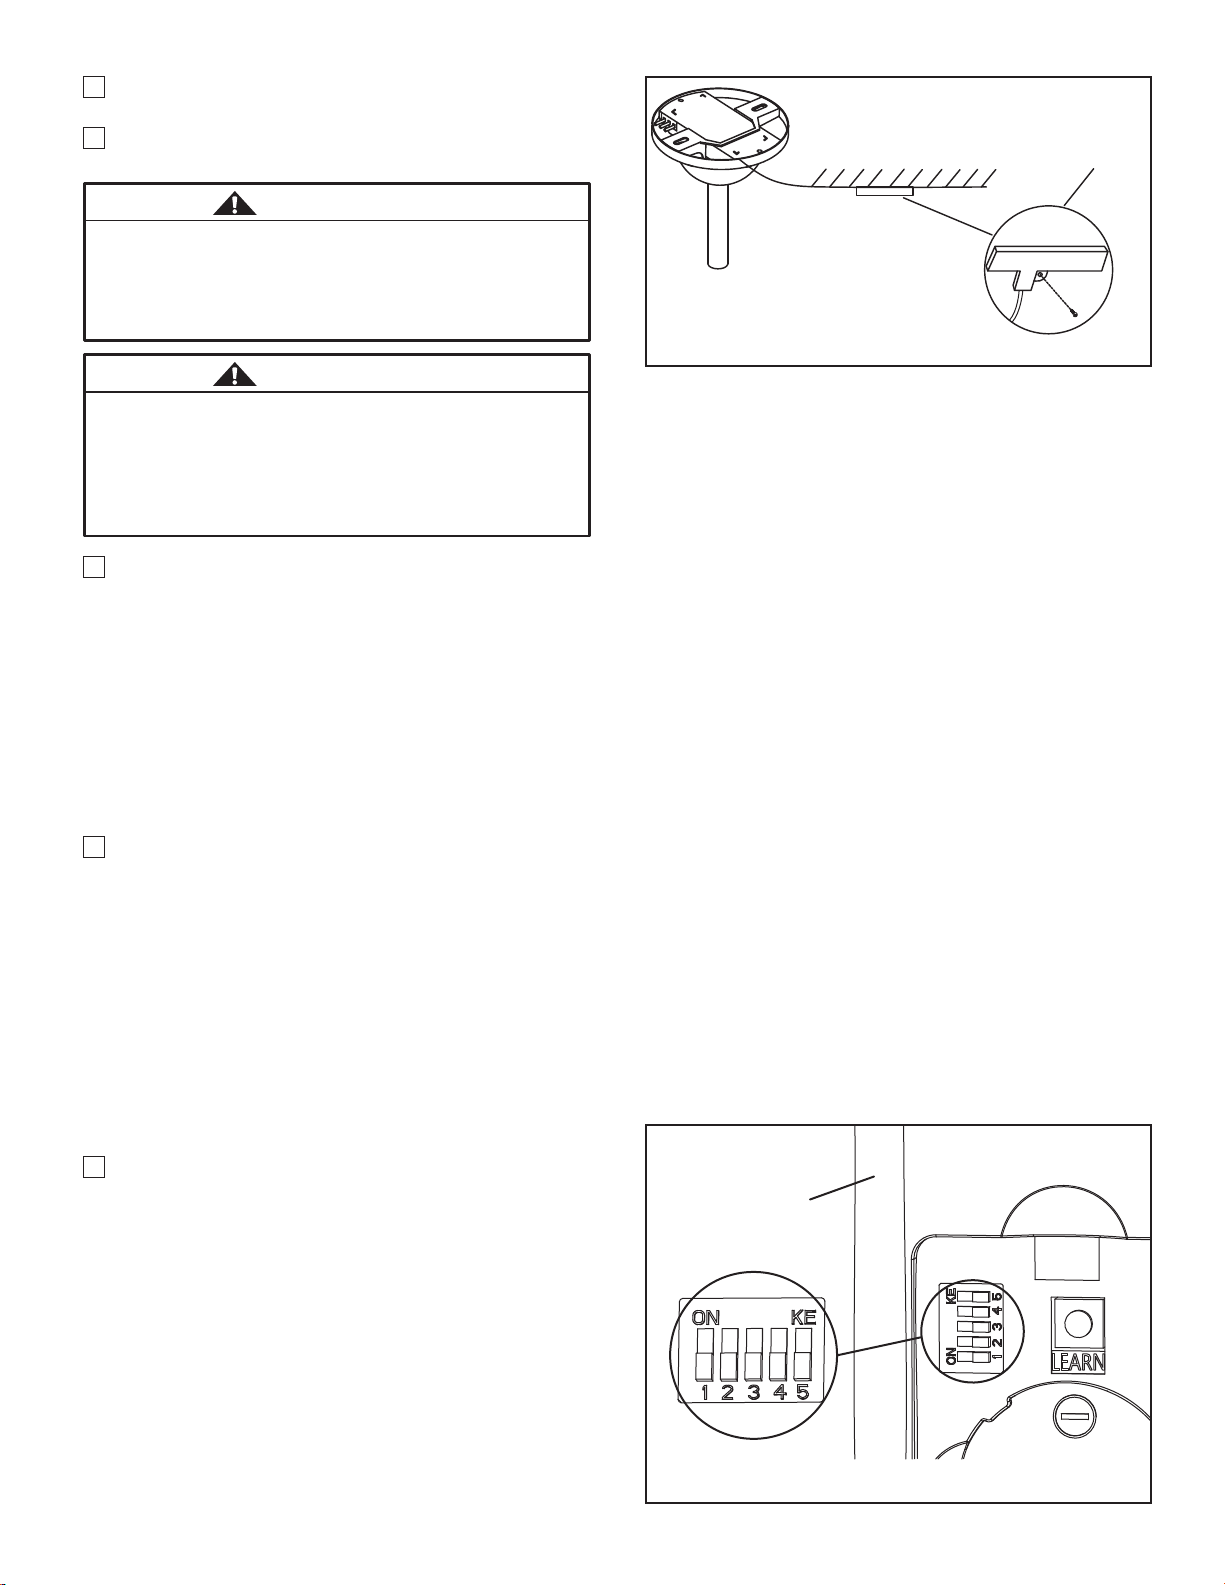
4. The receiver has a wifi antenna that can be used if you
experience range issues. (Figure 4)
5. Restore electrical power at the breaker and wall switch.
AC
POWER
1 2 3 4 5
WIFI Antenna
Hanger Bracket
L
BLACK
WHITE
N
HANGER
BRACKET
HANGER
BALL
Figure 1
Figure 2
GROUND
YELLOW
/ GREEN
ANTENNA
(Leave connected
and do not cut)
BLUE
BLACK
/ WHITE
RED
GRAY
YELLOW
BLACK
ANTENNA
DC MOTOR
WARNING:
To avoid possible fire or shock, make sure that the
electrical wires are completely inside the outlet box and not
pinched between the wall plate and the wall.
WARNING: Check to see that all connections are tight, including
ground, and that no bare wire is visible at the wire connectors,
except for the ground wire. Do not operate fan unless blades are
in place. Noise and fan damage could result.
1
Figure 3
After Installation
Ceiling
Figure 4 (Optional)
mount to ceiling using
WIFI Antenna
wood screw
WIFI antenna
Page 2
6. If you have multiple fans and want to program all
fans to one handheld control. Slide the Dip Switch with
the same position in ALL receiver to ONE handheld to
set up the code for each fans and follow Step 1 of the
remote control speed set up process. Each fan needs
to be no more than 30 feet from the handheld control
that you would like to program. Please note the wall
switch that controls the power to your fan(s) should be
in the off position until you are ready to program your
handheld remote(s).
7. If you have multiple fans and want to program each
fan to separate handheld controls. Slide the Dip Switch
with the same position in both receiver and handheld to
set up the code for each fans and follow Step 1 of the
remote control speed set up process below for each
fans. Repeat these steps for each fan that you would
like to program to a separate handheld remote. Please
note that the wall switch that controls the power to your
fan(s) should be in the off position until you are ready to
program your handheld remote(s).
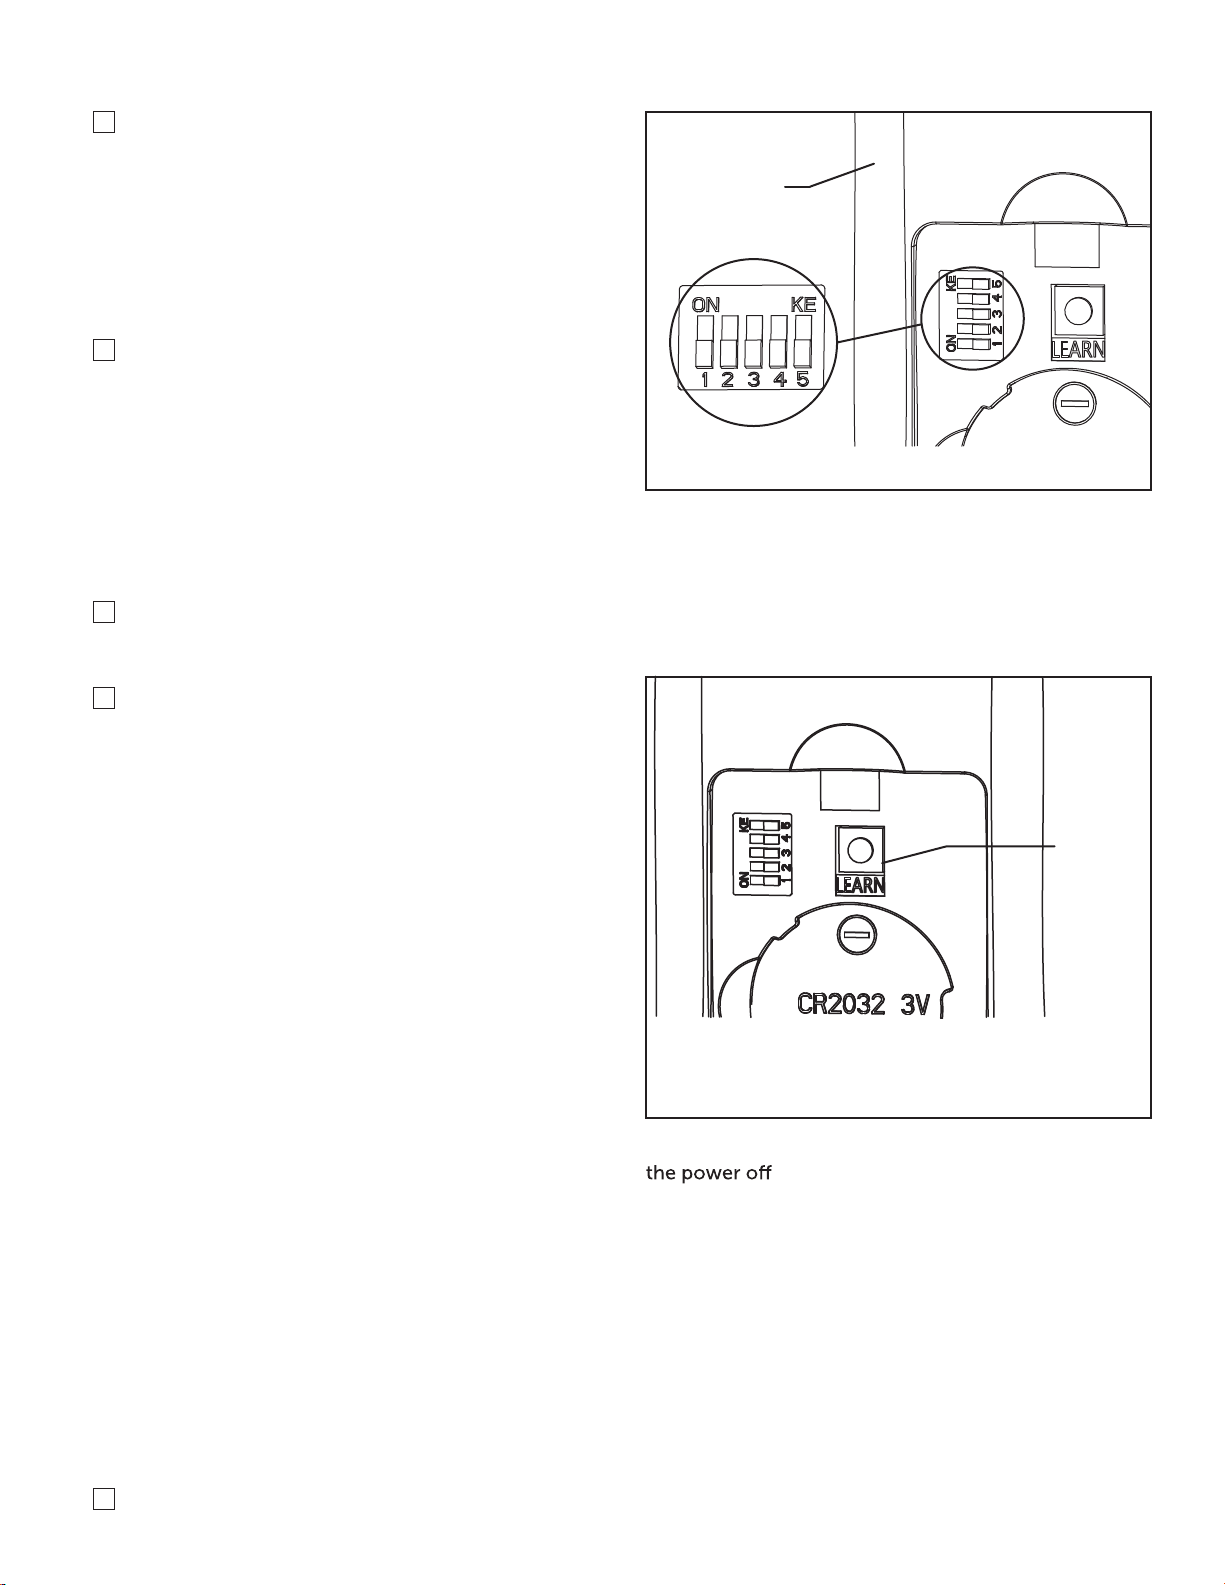
Remote Control Dip Switch Set Up
8. To set the remote code with a small screwdriver or
ball point pen (neither included), slide dip switches
firmly up or down to same as receiver unit. (Figure 5)
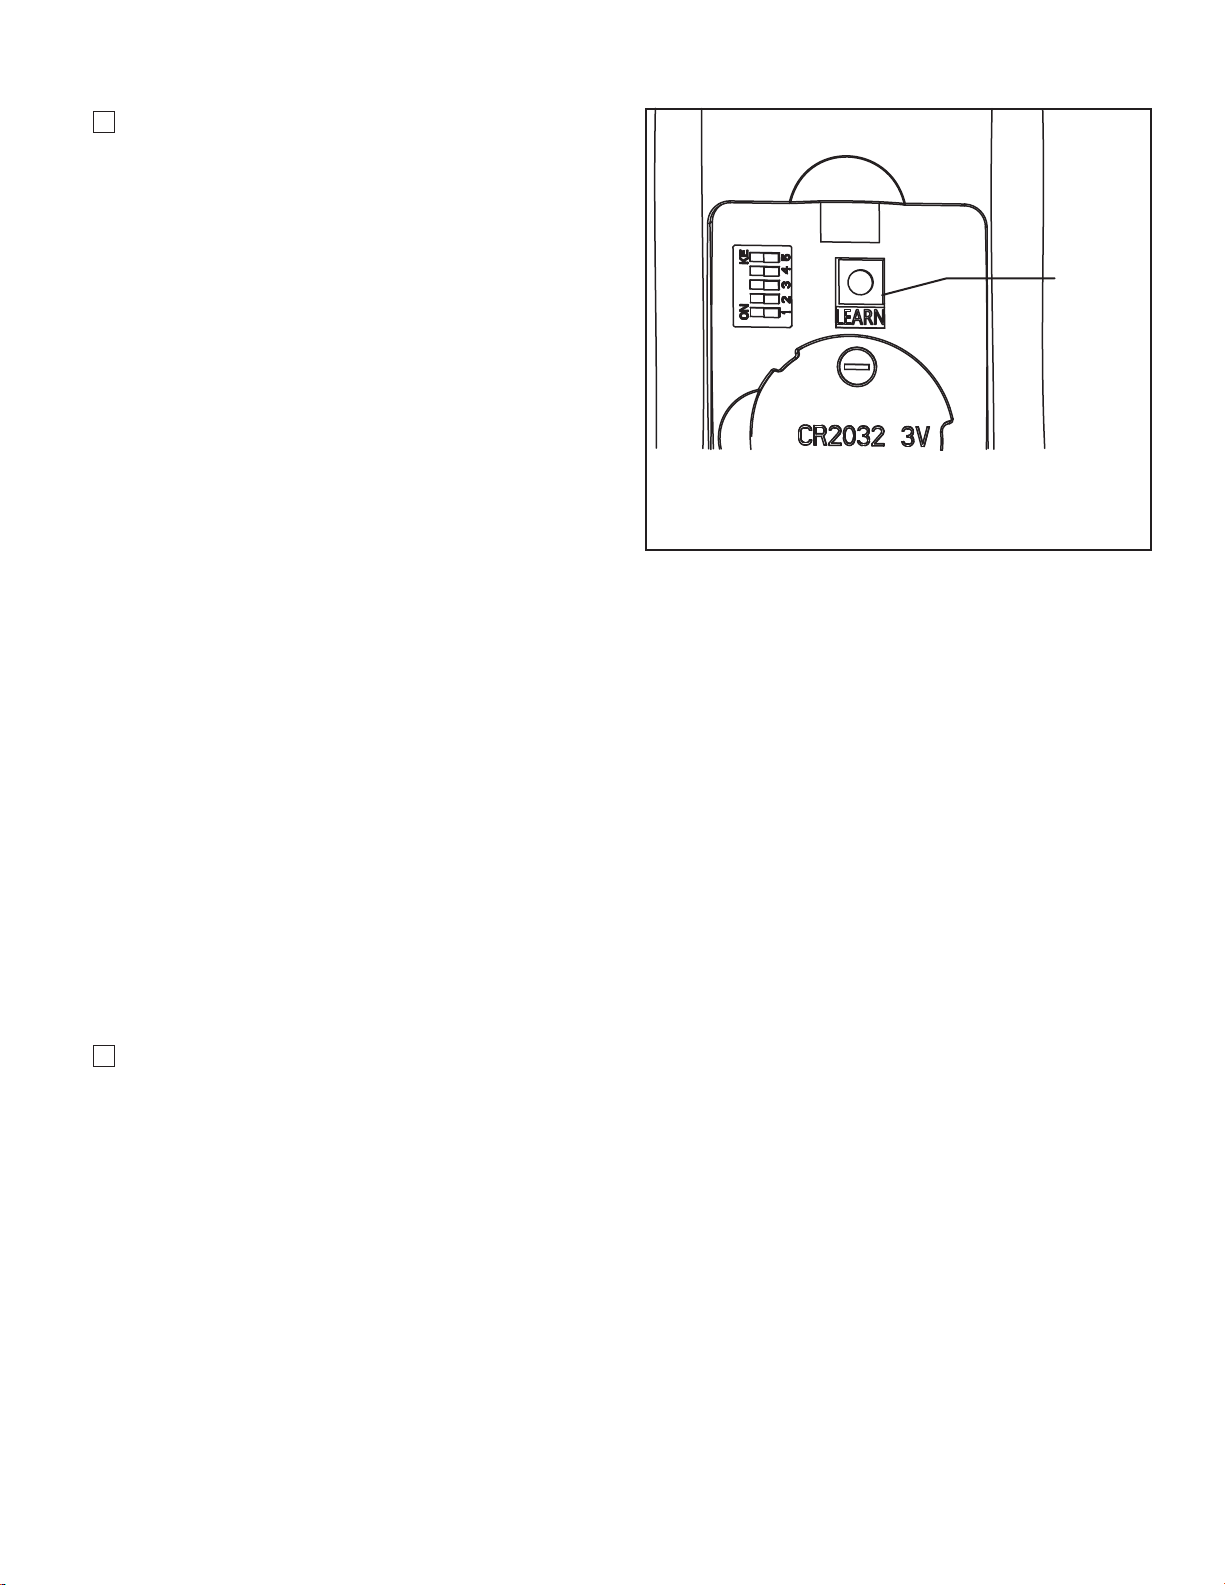
9. Remote Control Speed (RPM) Setting Process :
(Figure 6)
1)
After installing and wiring the unit, restore power to
your fan by ensuring that the breaker and wall switch
that controls the power supply is moved to the on
position, press and hold the “LEARN” button inside of the
battery compartment of the handheld remote control for
1-3 seconds.
2) You must press the “LEARN” button within 30 seconds
of restoring power to the fan.
3) When restoring power to your fan at the wall switch
and breaker, DO NOT press any button(s) on the
handheld remote control before pressing the “LEARN”
button, otherwise the fan will fail the learn procedure.
4) If you press any button(s) on the handheld remote
control before pressing the “LEARN” button, please turn
the wall switch that controls the power to the fan to the
off position then on again, and start the process
beginning with Step 1 above.
5) When you press the "LEARN" button, the fan will make
one musical sound and light blink once if with light and
start to run beginning the control set up process.
6) DO NOT press any button(s) after pressing the LEARN
button while the fan is programming or it will fail to
program.
7) The fan will run in forward direction for approximately
3 minutes.
8) When the fan stops running after approximately 3
minutes, the fan will make two musical sounds and light
blink twice if with light that means that the handheld
remote control and speed set up process is complete.
9) The fan is now ready for normal use.
10. Follow the app set up instructions on the following pages.
Remote
Dip Switch
Figure 5
NOTE: The remote unit has 32 different code
combinations. To prevent possible interference from
or to other remote units, simply change the
combination code in the remote and receiver.
NOTE: Factory setting is all up. Do not use this
position.
LEARN
Figure 6
NOTE: If you want to change the blades: turn
→ change the blades→ turn the
power on → perform the control setting process.
2
Page 3
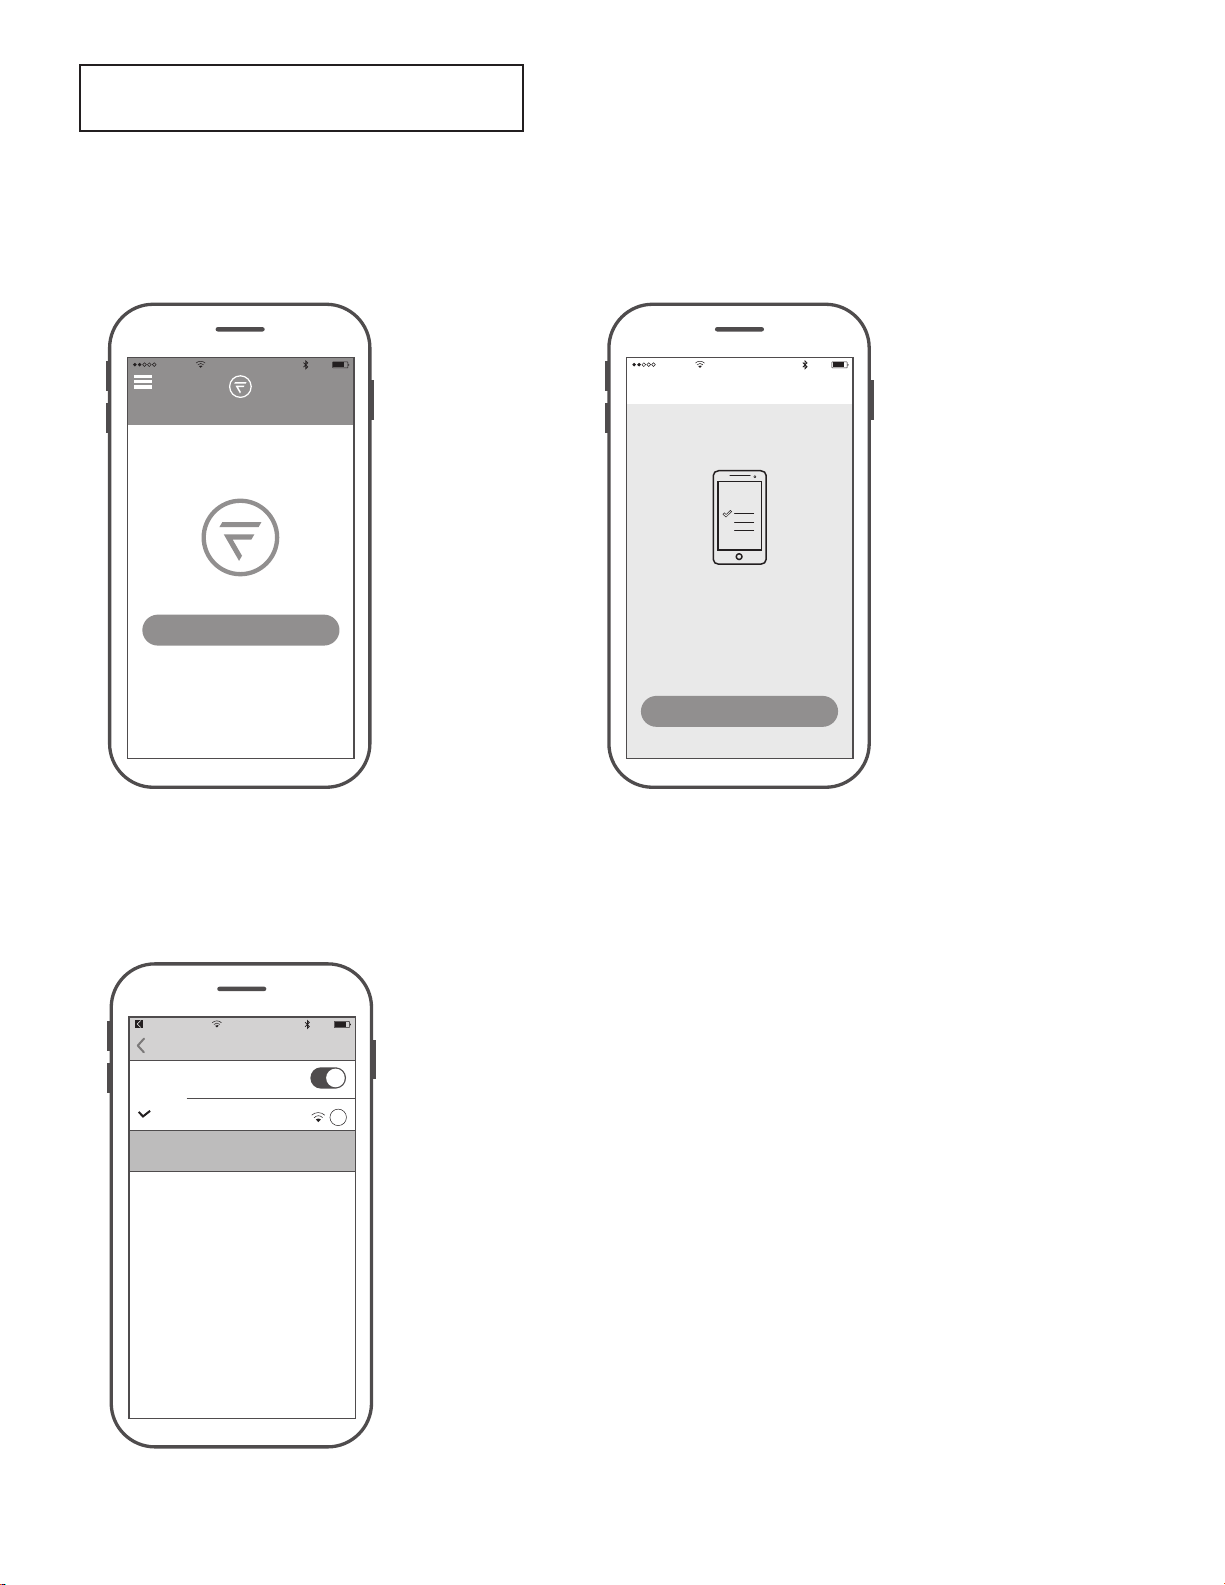
fanSync WiFi APP Setup
1. Visit the Apple APP Store or the Google Play Store to download the free fanSync WiFi APP.
2. Create your Fanimation fanSync account.
3. At this stage, your ceiling fan Wi‐Fi receiver should be installed and within range of your Wi‐Fi router.
4. With the APP open, select "add device".
10:37 AM
Add Fainmation..
80%
All
10:37 AM
80%
Home
Connect To Your Dvice
WI-FI
Your dashboard is empty
Add a Fanimation Ceiling Fans
To begin you must first connect your phone
to the Fanimation Ceiling Fans you are
setting up. Your Fanimation Ceiling Fans will
broadcast a temporary Wi-Fi hotspot that
Once you’ve completed this step come back
looks like
“Fanimation_xxxxxx”.
Go to Settings
NOTE: The device default Wi‐Fi SSID : Fanimation_XXXXXX (ex: Fanimation_402AD4).
5. Select the Fanimation_XXXXXX device.
fanSync W...
Settings
Wi-FI
Fanimation_402AD4
Unsecured Network
CHOOSE A NETWORK
10:38 AM
Wi-Fi
80%
i
3
Page 4
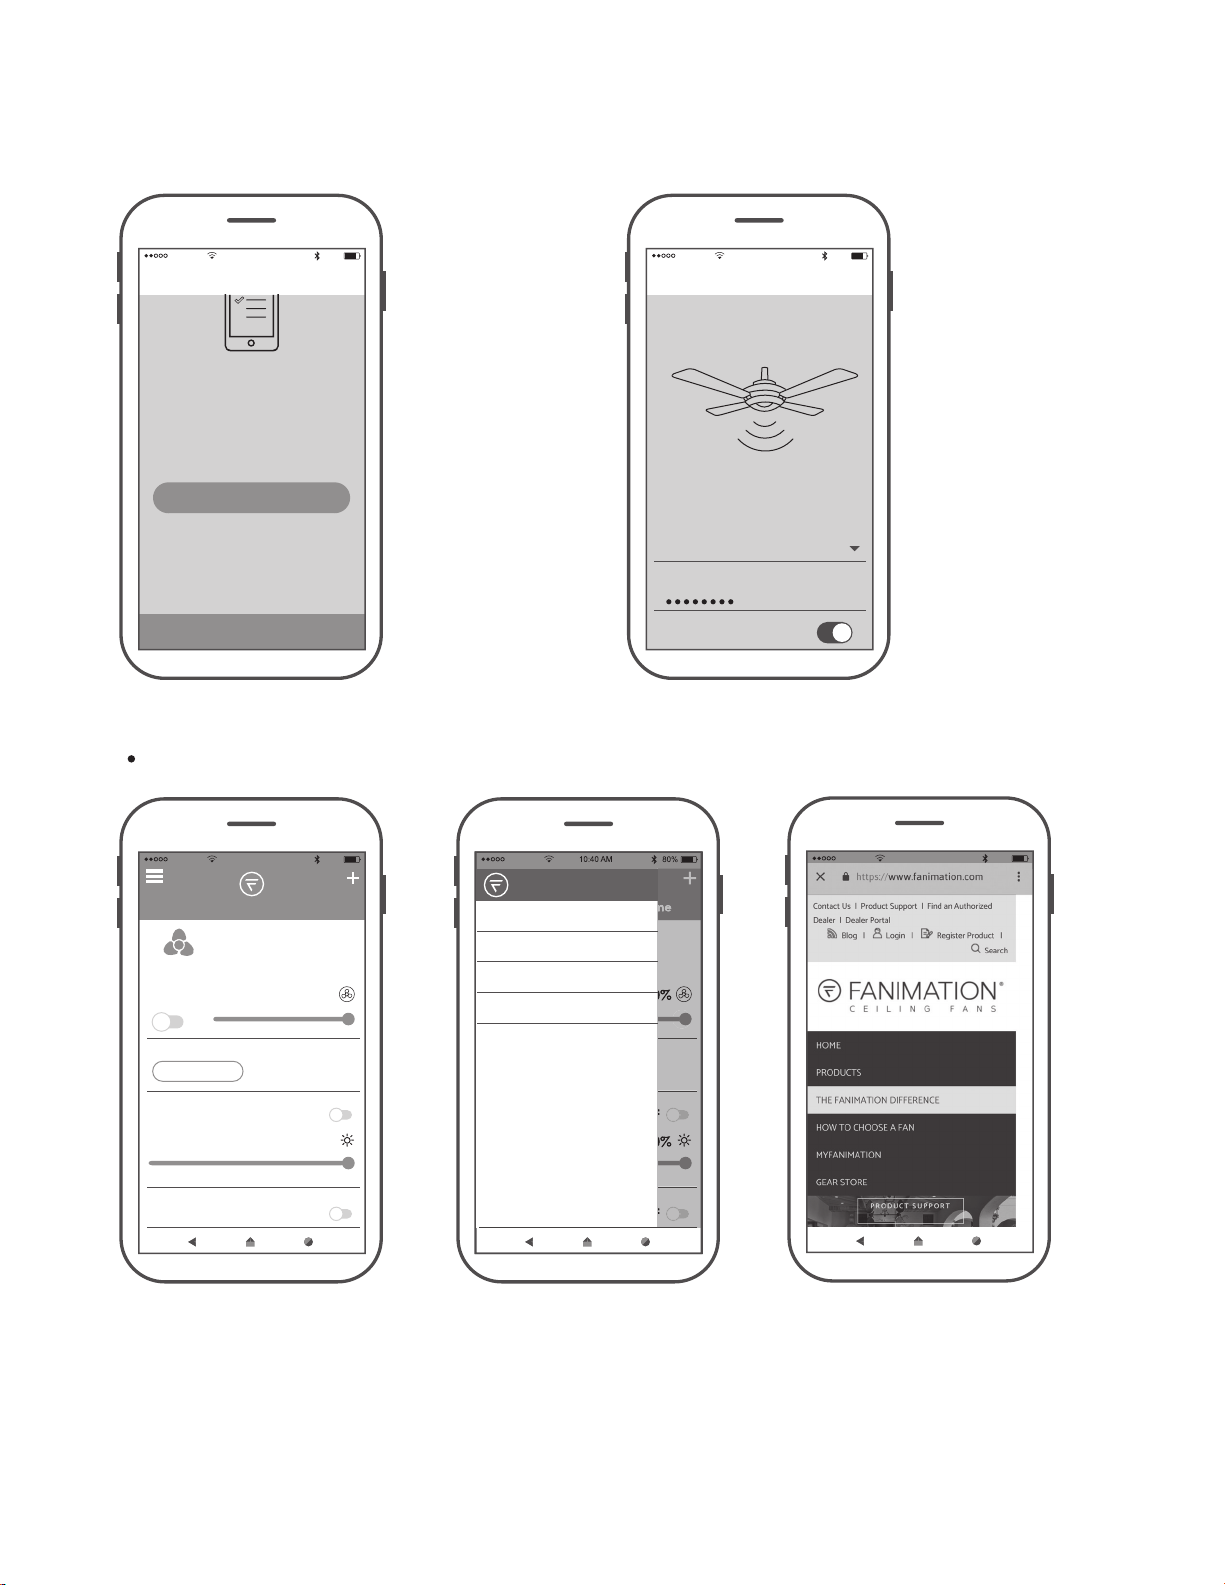
6. Press " CONTINUE". 7. Select your WiFi router and enter the WiFi password to connect
your fanSync WiFi receiver. It will takes 1-2 minutes to connect.
8. After your WiFi receiver is connected, you can now name your
ceiling fan in the APP and customize your settings.
10:39 AM
80%
Add Fainmation..
To begin you must first connect your phone
to the Fanimation Ceiling Fans you are
setting up. Your Fanimation Ceiling Fans will
broadcast a temporary Wi-Fi hotspot that
Once you’ve completed this step, come back
to the fanSync Wifi app to continue the
looks like
“Fanimation_xxxxxx”.
Go to Settings
setup.
CONTINUE
fanSync WiFi APP Overview
10:40 AM
Add Fainmation..
Set Up Wi-Fi Network
Enter your network settings below to
connect your device online.
SSID
XXXXX
PASSWORD
Remember my SSID and pa...
80%
10:40 AM
All
Home
Lounge
OFF 100%
BREEZE MODE
NORMAL
LIGHT
HOME AWAY
FRESH AIR
OFF
100%
OFF
80%
10:42 AM
80%
HOME
MY GROUP
SETTINGS
SUPPORT
4
Page 5
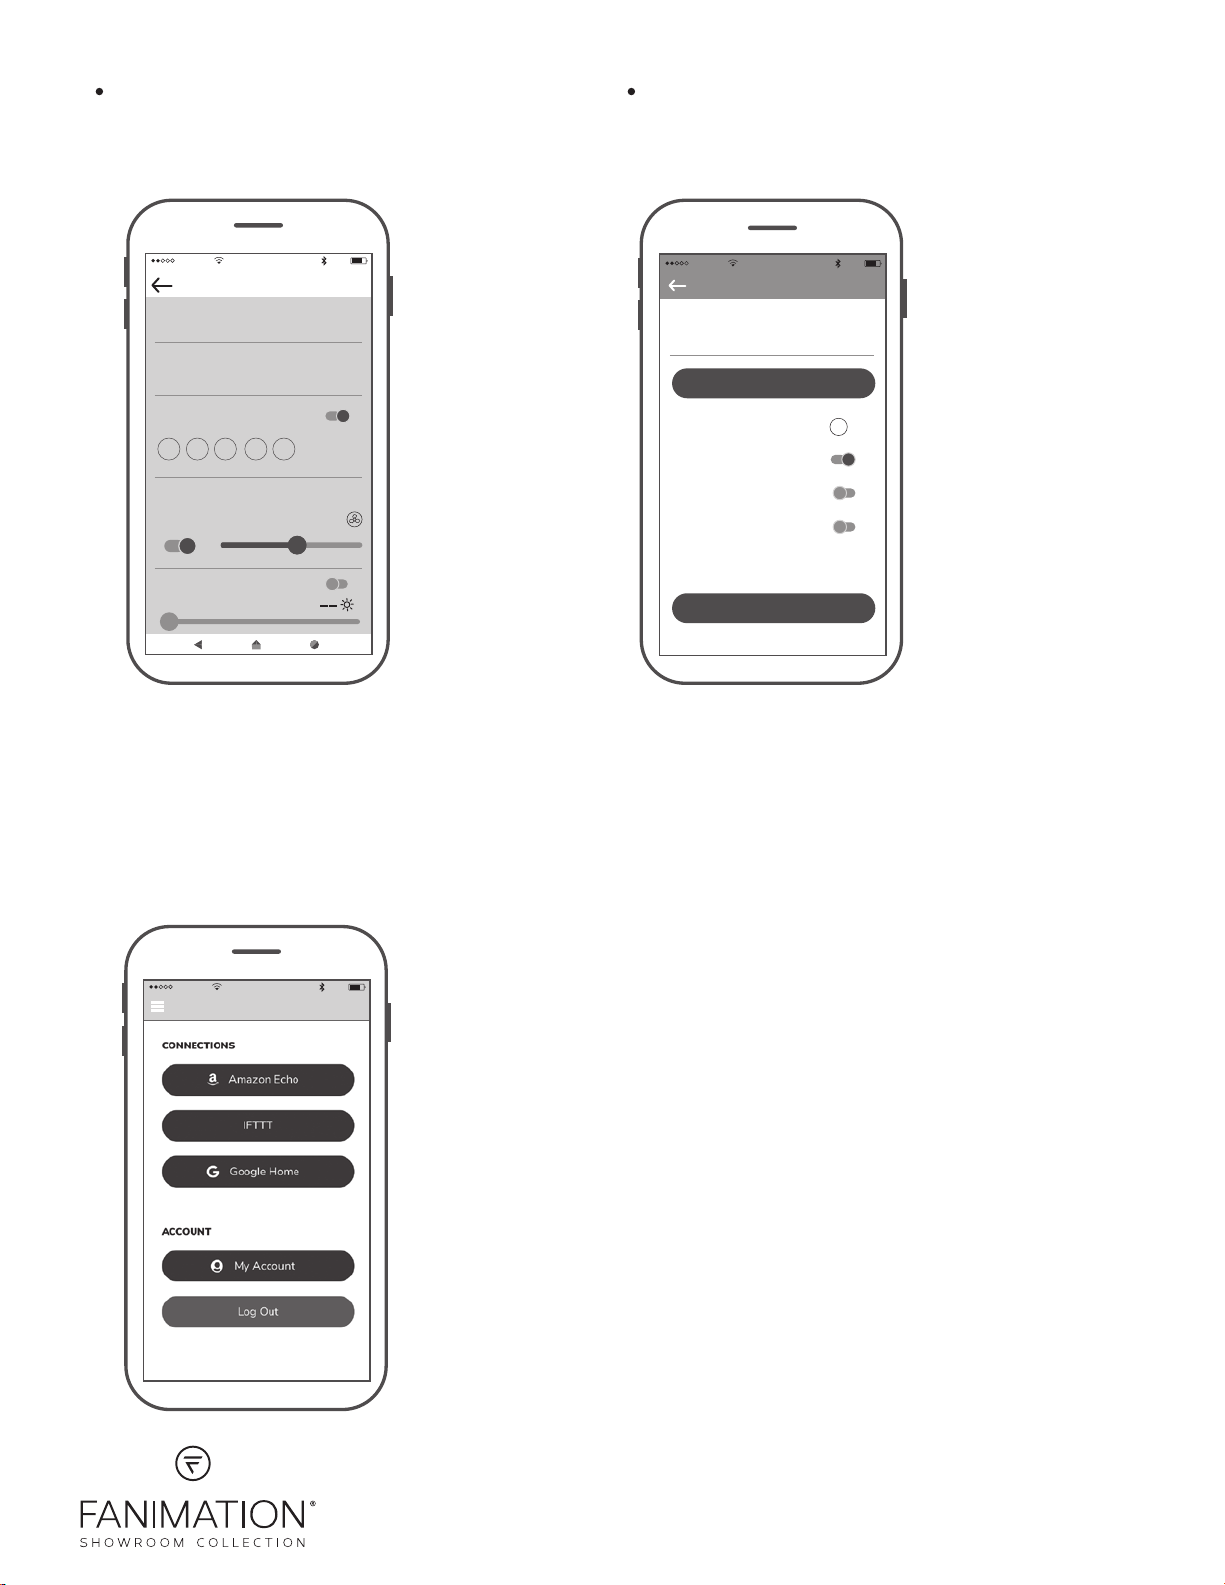
Set up Real Time Schedule
Share Device
After one smart device is connected to a fan, that in order
for other APP users to control the fan that you must share
the device with other users.
10:43 AM
Edit Schedule
SCHEDULE NAME
Work Days
START TIME END TIME
8:00 PM 5:00 PM
REPEAT
M T W TH F SA SU
Settings
ON
ON
OFFLIGHT
51 %
80%
Settings
10:45 AM
80%
DEVICE NAME
Lounge
Save
EXTRA DEVICE CONTROLS !
HIDE FAN DIRECTION
HIDE LIGHT POWER
HIDE LIGHT DIMMER
FAMILY SHARING
SHARE DEVICE
• Link with Amazon Echo, Google Home and IFTTT
Select the device you want to connect and follow the instructions in the set up procedure.
Amazon Alexa Help: https://www.amazon.com/gp/help/customer/display.html?nodeId=201749240
In order to connect with NEST, ECOBEE, Samsung Smart things, wink, etc. that you must
connect via IFTTT.
IFTTT Help: https://help.ifttt.com/hc/en-us/articles/115010325748-What-is-IFTTTGoogle Help:https://support.google.com/googlehome/answer/7073578?hl=en
10:46 AM
Settings
80%
10983 Bennett Parkway
Zionsville, IN 46077
(888) 567-2055 • FAX (866) 482-5215
Outside U.S. call (317) 733-4113
WWW.FANIMATION.COM
Copyright 2019 Fanimation
2019/05 V.01
Page 6
Receptor WIFI de WFR8515 DC
SPECIFICATION and INSTRUCTION SHEET
Especificaciones eléctricas: 120 voltios, 60 Hz., Ventilador de 0.6 amp.
Modelos de ventilador usado: Utilizado solo en ventilador de motor CC Triaire Custom MAD8515.
El receptor Wifi necesita al controlador TR205D o TW206D para aprender la
carga de tamaño de pala opcional antes de utilizar el ventilador con la App fanSync Wifi.
Consulte el catálogo o nuestra página web, www.FANIMATION.com para obtener información
sobre el mando a distancia TR205D o TW206D.
ADVERTENCIA
Para evitar posibles descargas eléctricas, asegúrese de que
la electricidad esté desconectada en la caja de fusibles
principal antes de realizar la instalación eléctrica.
NOTA: Si no está seguro de si la caja de distribución
eléctrica tiene conexión a tierra, pida asesoramiento a un
electricista autorizado, ya que la conexión a tierra es
fundamental para un funcionamiento seguro.
INSTRUCCIONES DE INSTALACIÓN:
Configuración del interruptor Dip
1.
NOTA: El mando a distancia incluido en este ventilador
tiene 32 combinaciones diferentes de códigos. Para
evitar posibles interferencias desde o hacia otros
mandos a distancia, modifique el código de combinación
de su transmisor y receptor.
NOTA: Los ajustes de fábricas vienen con todos los
interruptores hacia arriba. No utilice esta posición.
• Para configurar el código en la unidad del receptor,
deslice los interruptores dip en las mismas posiciones
que en el mando a distancia, cuando lo use con el
mando a distancia TR205D o el mando a distancia en
pared TW206D. (Figura 1)
Interruptores
ON
1 2 3 4 5
Figura 1
Antena WIFI
Soporte
de suspensión
Figura 2
ANTENA
(Dejar conectado y no
cortar)
2. El interruptor de pared y el interruptor que controla la fuente
de alimentación hacia el ventilador deben estar en la
posición de apagado. Asegúrese de que el interruptor de
pared que controla la fuente de alimentación hacia el
ventilador y el kit de iluminación si estuviese instalado, esté
de verdad en un conmutador de encendido/apagado o en
un interruptor basculante. No tiene una función de
atenuación de ningún tipo.
3. Instale el receptor en el soporte colgante:
• Deslice el receptor del mando a distancia en el soporte
colgante: (Figura 2)
• Conecte los cables según se indica: (Figura 3)
• Coloque todos los cables conectados y la antena del
receptor para permitir la instalación en la carcasa del
techo.
6
L
Negro
N
Blanco
ALIMENTACIÓN
DE CA
Abrazadera
para colgar
Bola para
colgar
Figura 3
Puesta a tierra
Amarillo
/ Verde
ANTENA
NEGRO
Azul
Negro/
Blanco
Rojo
Gris
Amarillo
DC de MOTOR
Page 7
4. El receptor tiene una antena Wifi que puede utilizarse si
sufre problemas de rango. (Figura 4)
5. Restaure la fuente de alimentación en el conmutador y en
el interruptor de pared.
ADVERTENCIA
Para evitar un posible incendio o descarga eléctrica,
asegúrese de que los cables eléctricos estén
completamente dentro de la caja de conexiones y no
estén siendo pisados entre la placa de la pared y la
propia pared.
ADVERTENCIA
Verifique que todas las conexiones estén bien ajustadas,
incluida la conexión a tierra, y que no haya ningún cable
desnudo visible en los conectores de cables, a excepción
del cable de conexión a tierra. No haga funcionar el
ventilador hasta que las aspas estén colocadas. Podrían
producirse ruidos y daños en el ventilador.
6. Si tiene varios ventiladores y desea programarlos todos
en un único mando a distancia, Deslice el interruptor DIP a
la misma posición en TODOS los receptores a UN dispositivo móvil para configurar el código de cada ventilador y
siga el Paso 1 del proceso de configuración de la velocidad del mando a distancia. Paso 1 del proceso de configuración del mando a distancia. Cada ventilador necesita
estar a menos de 30 pies de distancia del mando al que
desea programarlo. Tenga en cuenta que el interruptor de
pared que controla la fuente de alimentación de su(s)
ventilador(es) debería estar en la posición Apagado hasta
que esté listo para programar su(s) mando(s) a distancia.
Después de la instalación
Techo
Figura 4 (Opcional)
Instale la antena WIFI
en el techo usando
un tornillo para madera
Antena WIFI
7. Si tiene múltiples ventiladores y desea programar cada
uno con mandos a distancia diferentes,Deslice el interrup-tor DIP a la misma posición tanto en el receptor como
en el dispositivo móvil para configurar el código de cada
ventilador y siga el Paso 1 del siguiente proceso de
configuración de la velocidad del mando a distancia.
Repite estos pasos para cada uno de los ventiladores que
desea programar a un mando a distancia diferente. Tenga
en cuenta que el interruptor de pared que controla el
encendido de su(s) ventilador(es) debería estar en la
posición apagado hasta que esté preparado para
programar su(s) mando(s) a distancia.
Configuración del interruptor Dip
8. Para configurar el código del mando a distancia,
Mueva los interruptores de código hasta colocar elcódigo
de selección en la posición arriba o abajo.Con un
destornillador pequeño o con una lapicera (no se incluye)
deslice firmemente hacia arriba o hacia abajo. (Figrua 5)
NOTA: Los ajustes de fábricas vienen con todos los
interruptores hacia arriba. No utilice esta posición.
NOTA: El mando a distancia incluido en este ventilador
tiene 32 combinaciones diferentes de códigos. Para evitar
posibles interferencias desde o hacia otros mandos a
distancia, modifique el código de combinación de su
transmisor y receptor.
Mando a Distancia
Interruptores
Figura 5
7
Page 8
9. Configuración del mando a distancia y proceso de
configuración de la velocidad (RPM): (Figura 6)
1) Tras la instalación y el cableado de la unidad, vuelva a
suministrar electricidad a su ventilador asegurándose de
que el disyuntor y el interruptor de pared que controlan la
fuente de alimentación estén en la posición de encendido.
Pulse y mantenga pulsado el botón “SET” del interior del
compartimento de las pilas del mando a distancia durante
1-3 segundos.
2) Debe pulse el botón “SET” en menos de 30 segundos
después de haber suministrado la electricidad al
ventilador.
3) Cuando haya restaurado la electricidad a su ventilador a
través del disyuntor y del interruptor de pared, NO pulse
ningún botón en el mando a distancia hasta que haya
pulsado el botón “SET”, ya que de lo contrario el ventilador
perderá el proceso de aprendizaje.
4) Si pulse algún botón en el mando a distancia antes de
pulsar el botón “SET”, coloque de nuevo el interruptor de
la pared que controla el encendido del ventilador en la
posición de apagado, e inicie el proceso desde el Paso 1.
5) Cuando pulse el botón “SET”, el ventilador emitirá un
sonido musical y la luz parpadeará un veces y comenzará
a funcionar. Se inicia el proceso de configuración del
mando a distancia.
6) NO pulse ningún botón después de pulsar el botón SET
mientras el ventilador se está programando o causará que
no se realice bien la programación.
7) El ventilador girará en adelante direcciones durante
aproximadamente 3 minutos.
8) Cuando el ventilador deje de funcionar tras 3 minutos,
el ventilador emitirá dos sonidos musicales y la luz
parpadeará dos veces que indican que el proceso de
configuración de la velocidad y del mando a distancia ha
sido completado.
9) El ventilador ya está preparado para su uso normal.
NOTA: Si desea cambiar las palas: apague proceso de
establecimiento de.
LEARN
Figura 6
NOTA: Si desea cambiar las palas: apague
el dispositivo → cambie las palas → repetir el
proceso de establecimiento de.
10. Siga las instrucciones de configuración de la App en
las siguientes páginas.
8
Page 9
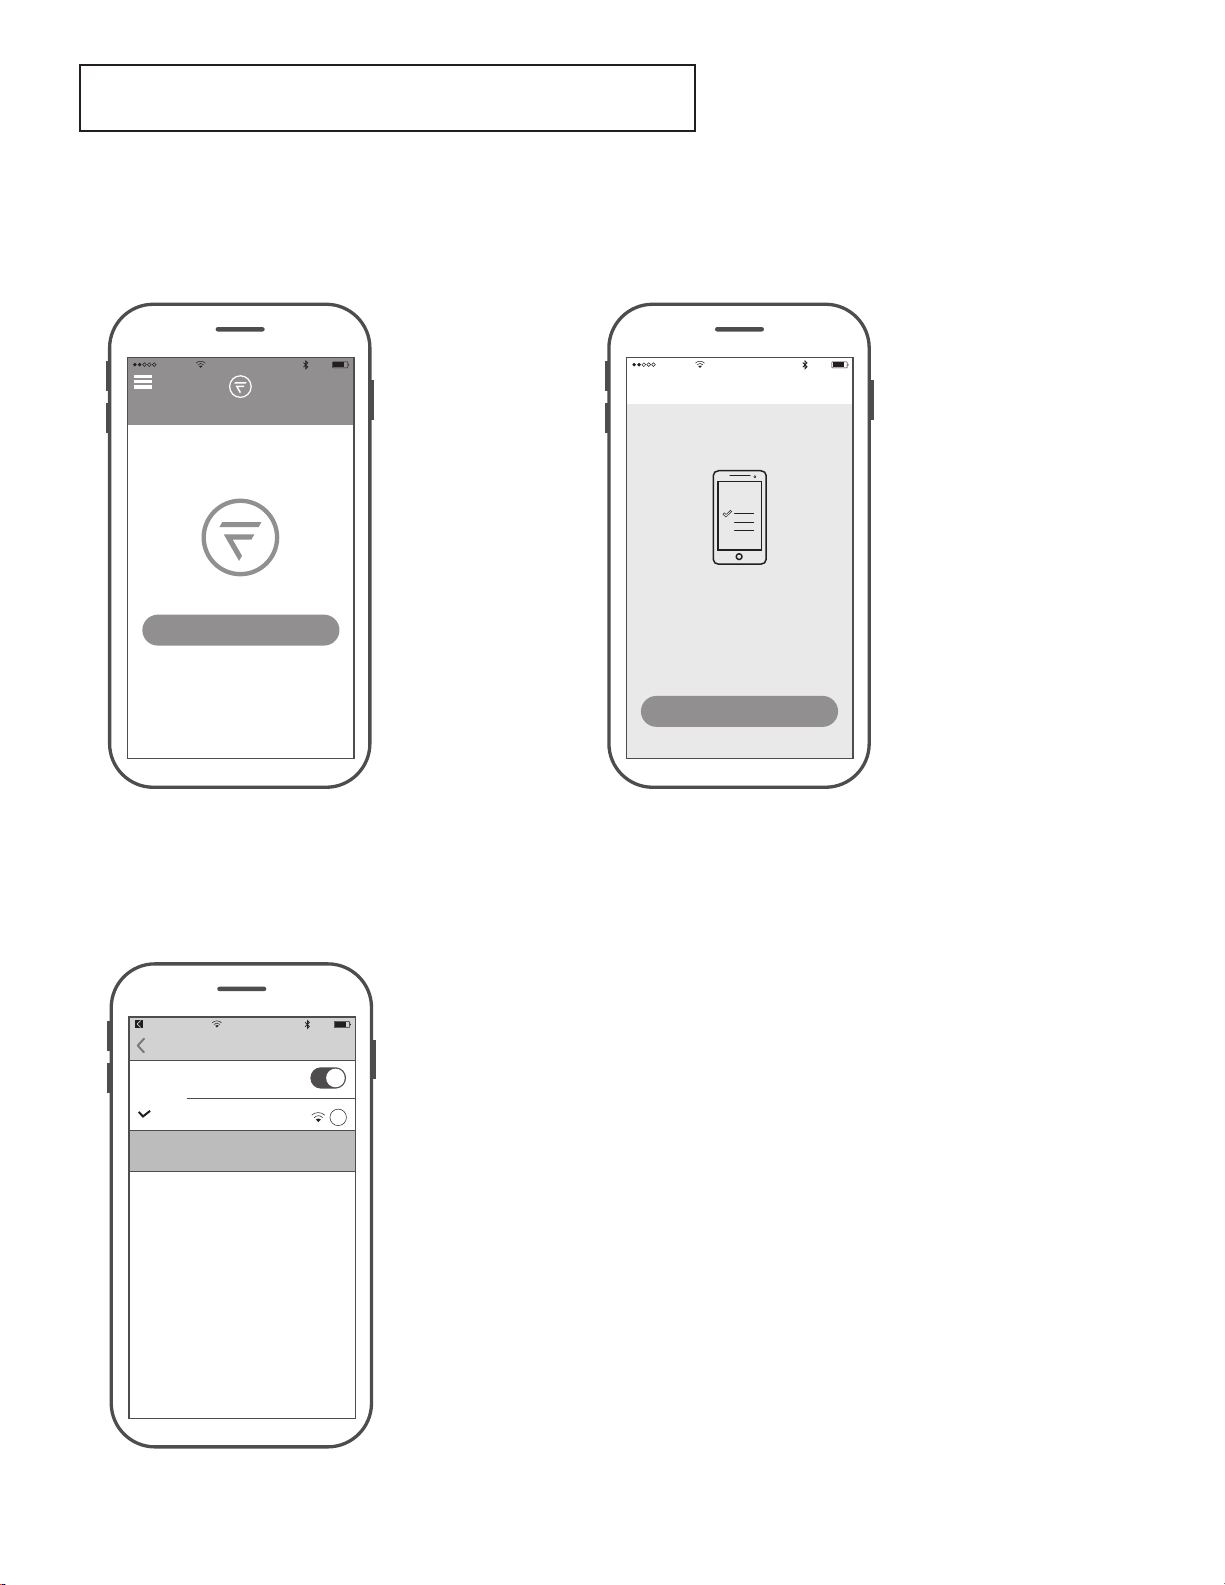
Instalación de la App fanSync Wifi
1. Visite el App Store de Apple o el Play Store de Google para descargarse la App gratuita fanSinc Wifi.
2. Cree su cuenta Fanimation fanSync.
3. En este paso, el receptor Wifi de su ventilador de techo debe estar instalado y dentro del rango de su router Wifi.
4. Con la App abierta, seleccione “añadir dispositivo”.
10:37 AM
All
Your dashboard is empty
Add a Fanimation Ceiling Fans
80%
Home
NOTA: El SSID Wifi predeterminada del dispositivo es: Fanimation_XXXXXX (ej.: Fanimation_402AD4).
5. Seleccione el dispositivo Fanimation_XXXXXX.
10:37 AM
Add Fainmation..
80%
Connect To Your Dvice
WI-FI
To begin you must first connect your phone
to the Fanimation Ceiling Fans you are
setting up. Your Fanimation Ceiling Fans will
broadcast a temporary Wi-Fi hotspot that
Once you’ve completed this step come back
looks like
“Fanimation_xxxxxx”.
Go to Settings
fanSync W...
Settings
Wi-FI
Fanimation_402AD4
Unsecured Network
CHOOSE A NETWORK
10:38 AM
Wi-Fi
80%
i
9
Page 10
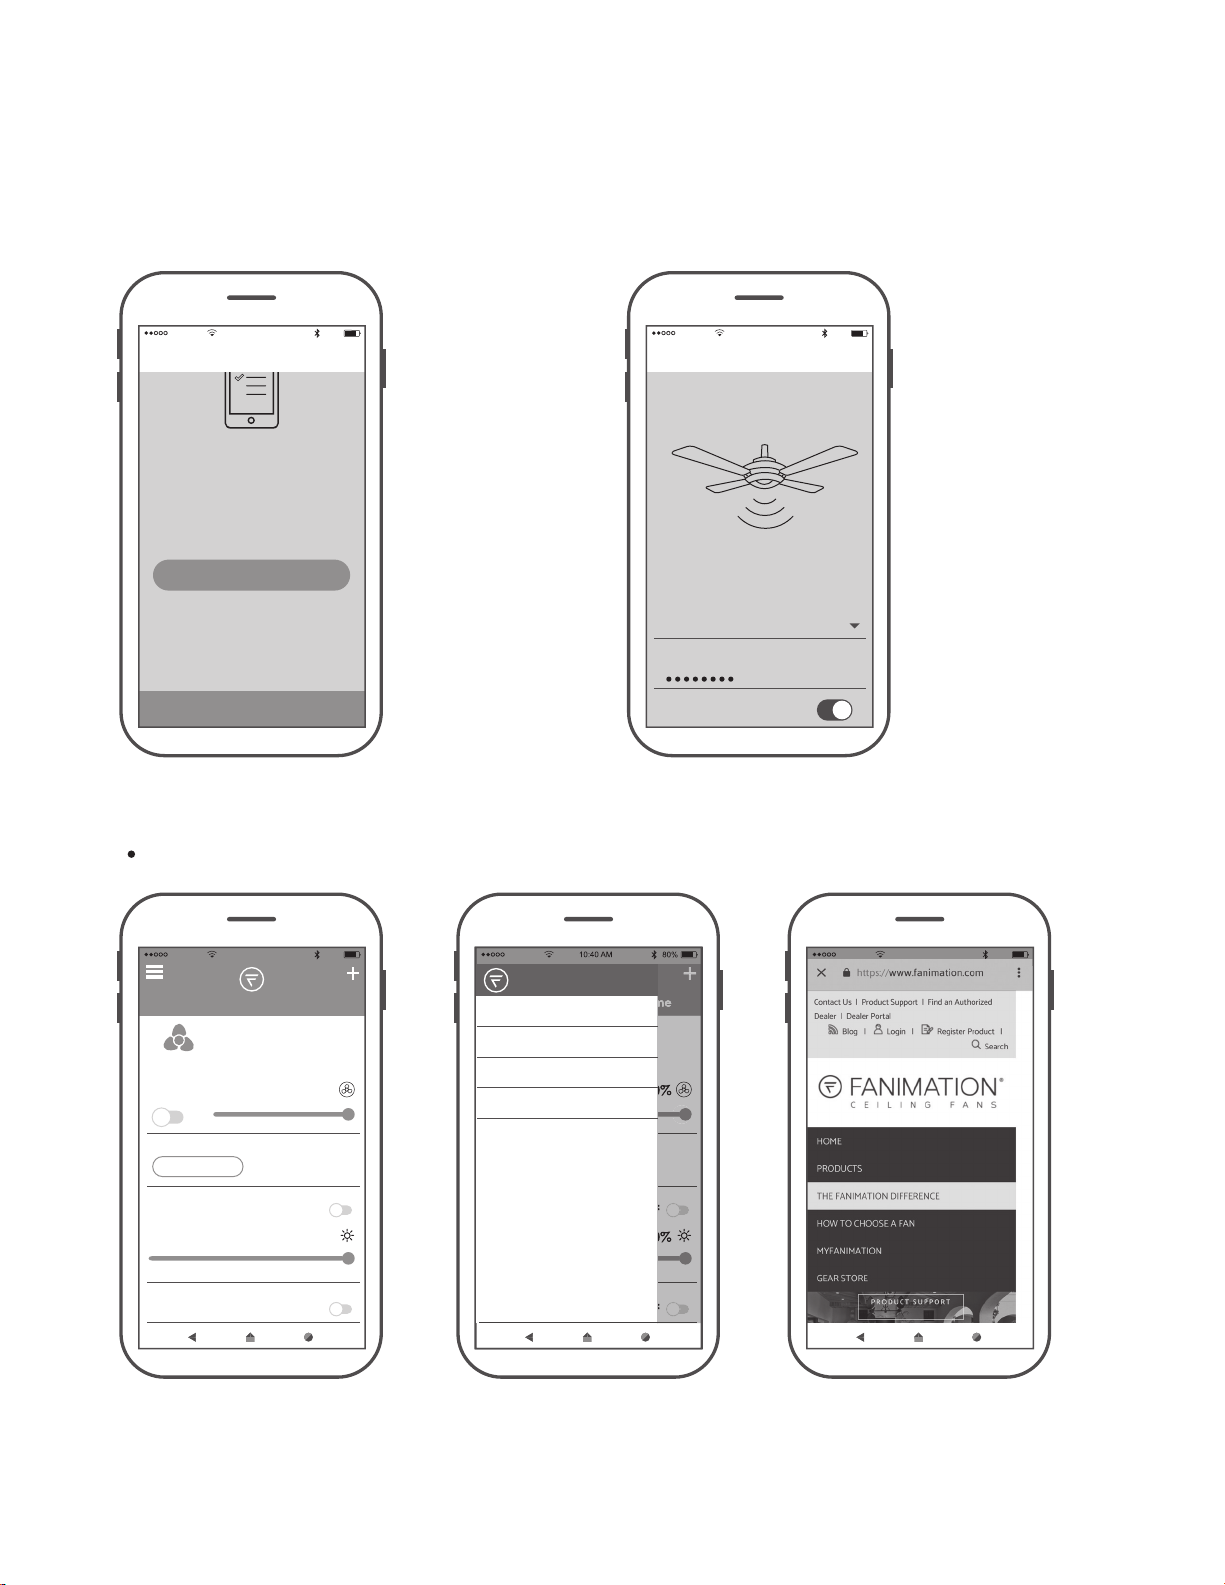
6. Pulse “CONTINUAR”. 7. Seleccione su router Wifi e introduzca la contraseña Wifi para
conectarse a su receptor Wifi fanSync. Tardará 1 - 2 minutos en
conectarse.
8. Una vez que su receptor Wifi se haya conectado, ahora puede
nombrar su ventilador de techo en la App y personalizar sus
ajustes.
10:39 AM
80%
Add Fainmation..
To begin you must first connect your phone
to the Fanimation Ceiling Fans you are
setting up. Your Fanimation Ceiling Fans will
broadcast a temporary Wi-Fi hotspot that
Once you’ve completed this step, come back
to the fanSync Wifi app to continue the
looks like
“Fanimation_xxxxxx”.
Go to Settings
setup.
CONTINUE
Vista general de la App fanSync Wifi
10:40 AM
Add Fainmation..
Set Up Wi-Fi Network
Enter your network settings below to
connect your device online.
SSID
XXXXX
PASSWORD
Remember my SSID and pa...
80%
10:40 AM
All
Home
Lounge
OFF 100%
BREEZE MODE
NORMAL
LIGHT
HOME AWAY
FRESH AIR
OFF
100%
OFF
80%
HOME
MY GROUP
SETTINGS
SUPPORT
10:42 AM
80%
10
Page 11
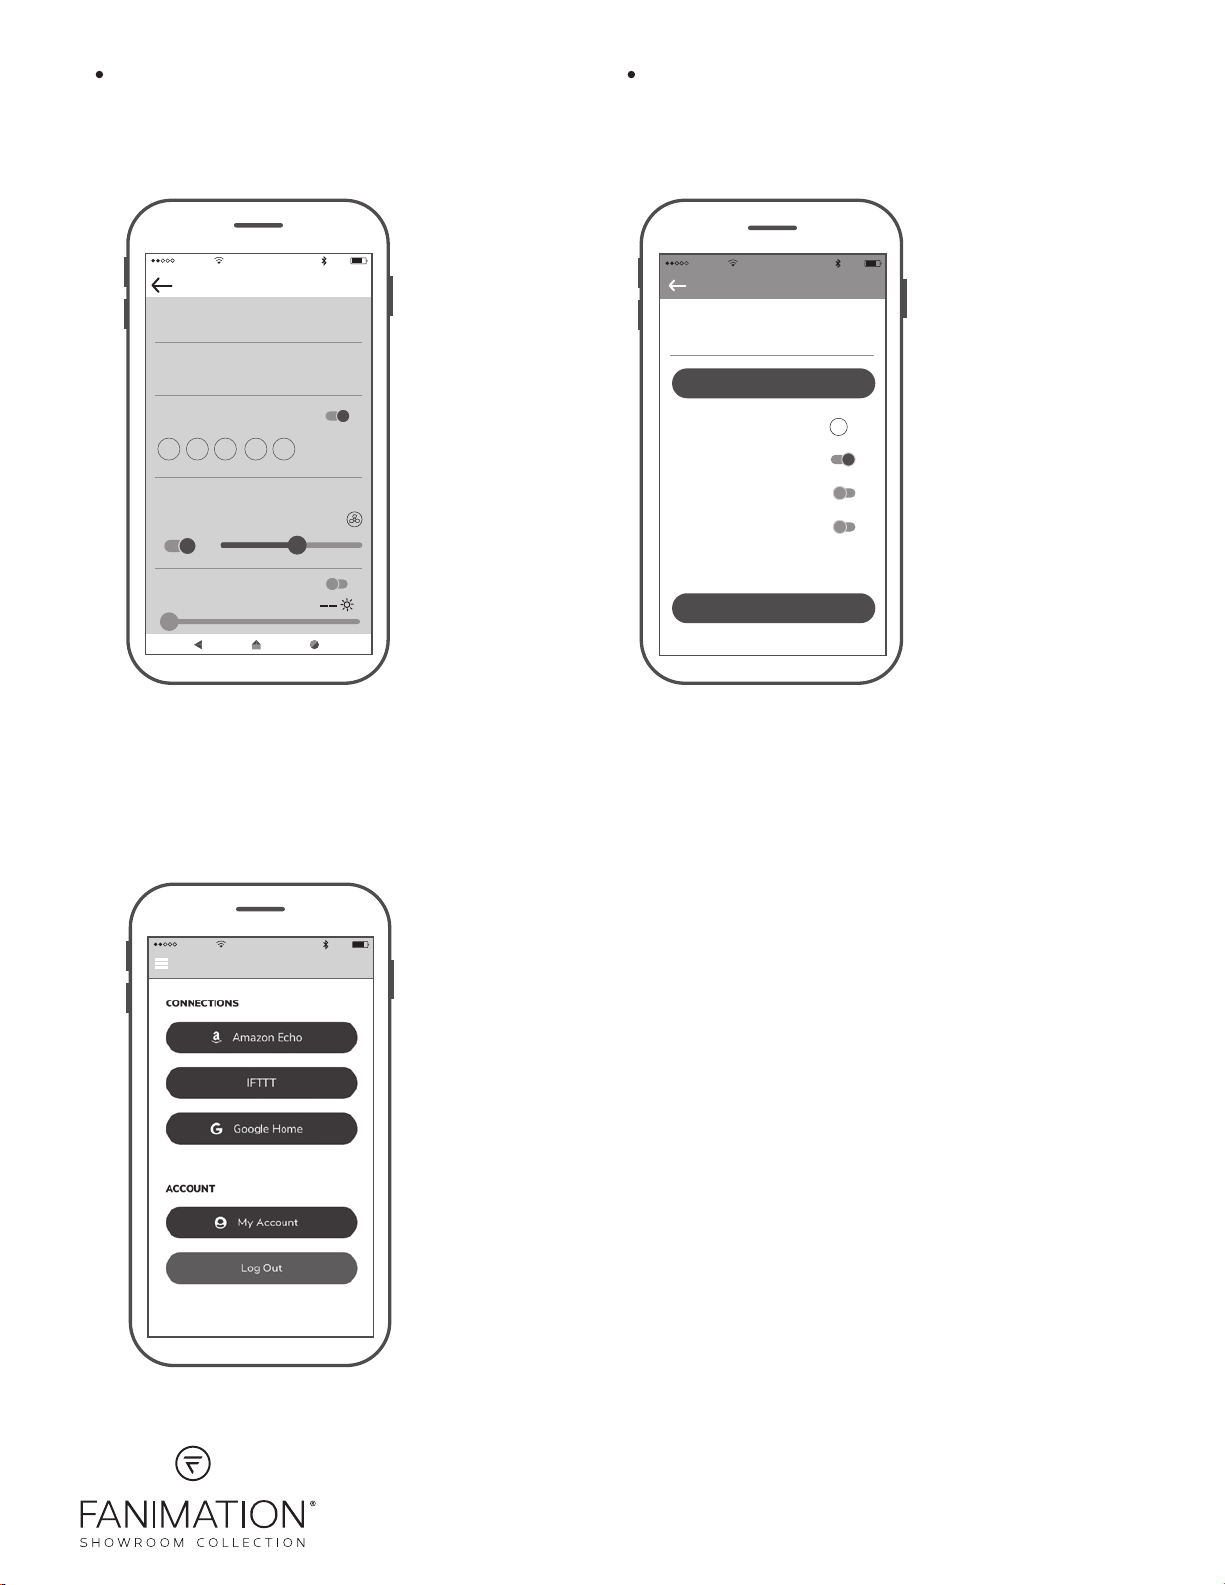
Configuración de programación en
tiempo real
Compartir dispositivo
Una vez que un dispositivo inteligente es conectado al
ventilador, debe compartir el dispositivo con otros usuarios
para que otros usuarios de la App puedan controlar el
ventilador.
10:43 AM
Edit Schedule
SCHEDULE NAME
Work Days
START TIME END TIME
8:00 PM 5:00 PM
REPEAT
M T W TH F SA SU
Settings
ON
ON
OFFLIGHT
51 %
80%
Settings
10:45 AM
80%
DEVICE NAME
Lounge
Save
EXTRA DEVICE CONTROLS !
HIDE FAN DIRECTION
HIDE LIGHT POWER
HIDE LIGHT DIMMER
FAMILY SHARING
SHARE DEVICE
• Enlace con Amazon Echo, Google Home y IFTTT
Seleccione el dispositivo que desee conectar y siga las instrucciones en el procedimiento de configuración.
Ayuda para Amazon Alexa: https://www.amazon.com/gp/help/customer/display.html?nodeId=201749240 Para
conectarse a NEST, ECOBEE, Samsung Smart things, wink, etc. debe conectarse a través de IFTTT.
Ayuda para IFTTT: https://help.ifttt.com/hc/en-us/articles/115010325748-What-is-IFTTTAyuda de Google: https://support.google.com/googlehome/answer/7073578?hl=en
10:46 AM
Settings
80%
10983 Bennett Parkway
Zionsville, IN 46077
Llame Sin Cargo al (888) 567-2055
Desde fuera de los EE.UU. llame al (317) 733-4113
FAX (866) 482-5215
Visite nuestro sitio Web en www.fanimation.com
Copyright 2019 Fanimation
2019/05 V.01
 Loading...