

Page 1
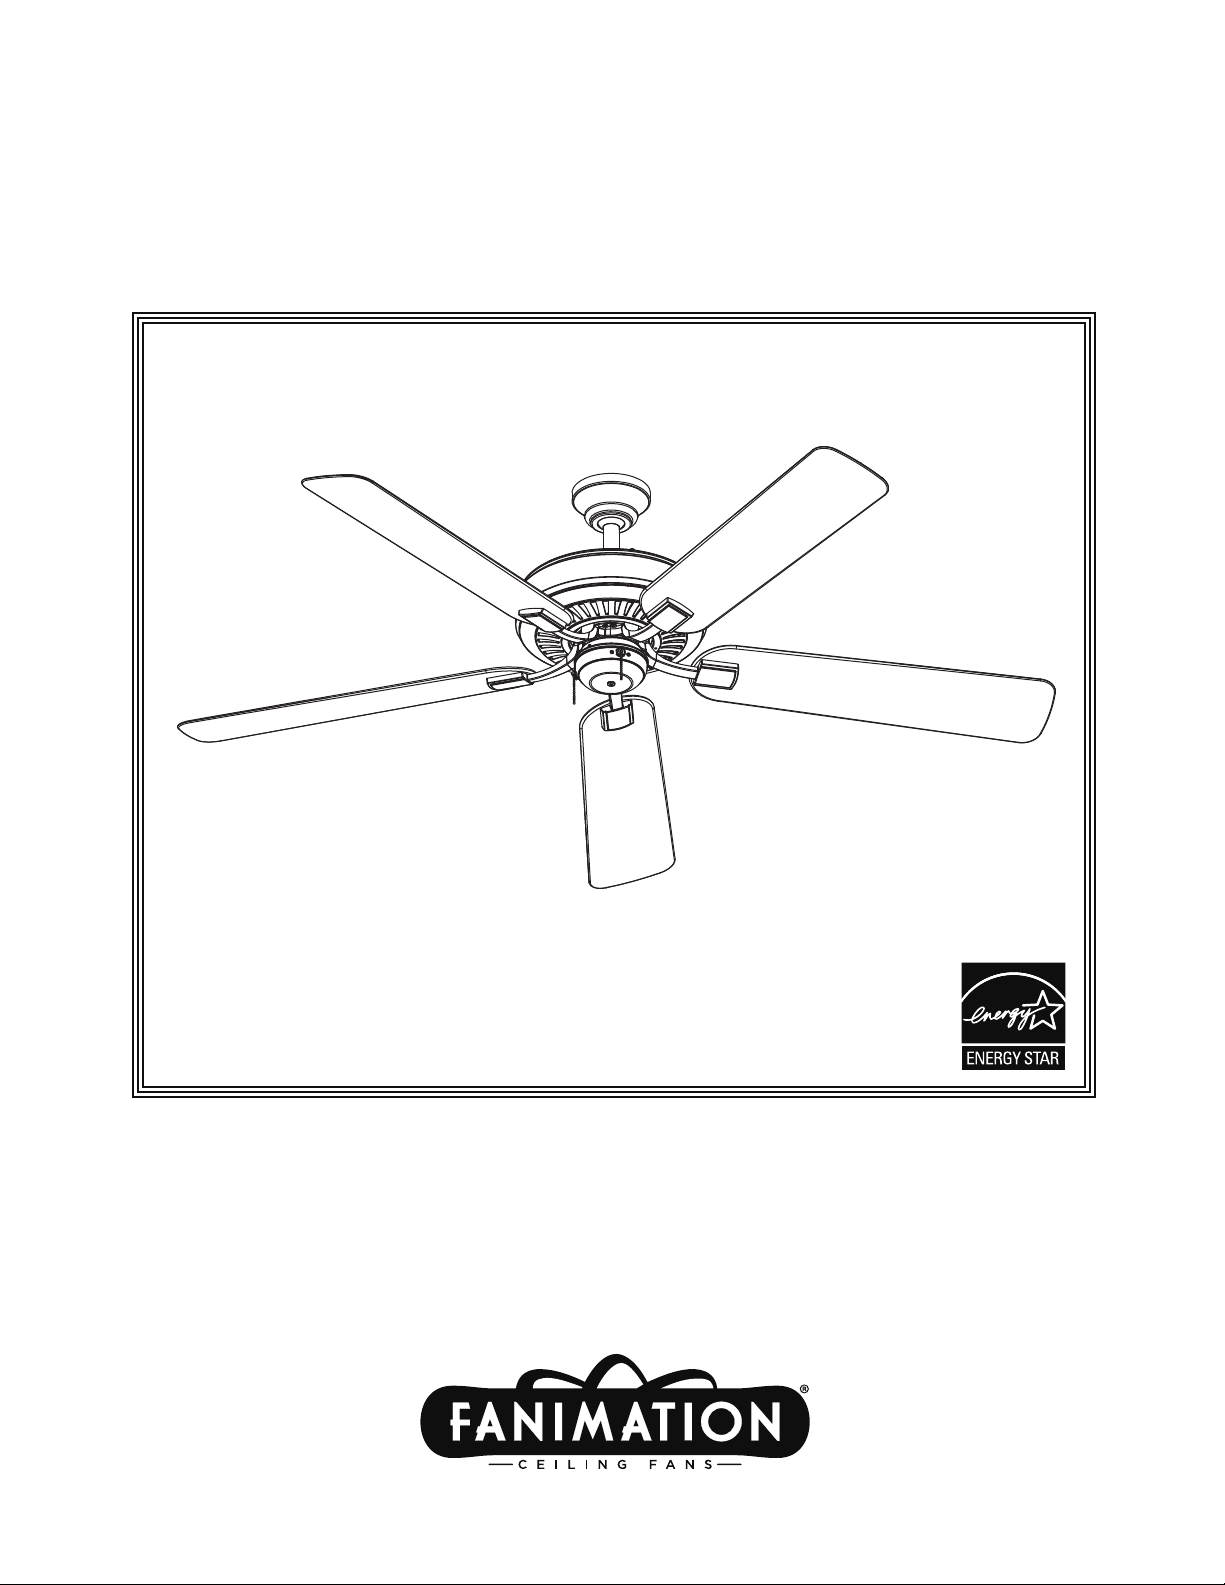
The Edgewood
Wet Location Ceiling Fan
™
Net Weight 13.72 kg (30.2 lbs)
Model No. TF971**
OWNER’S MANUAL
READ AND SAVE THESE INSTRUCTIONS
Page 2
Important Safety Instructions
WARNING: To avoid fire, shock and serious personal injury, follow these instructions.
1. Read your owner’s manual and safety information before installing your new fan. Review the accompanying assembly diagrams.
2. Before servicing or cleaning unit, switch power off at service panel and lock service panel disconnecting means to prevent power
from being switched on accidentally. When the service disconnecting means cannot be locked, securely fasten a warning device, such
as a tag, to the service panel.
3. Be careful of the fan and blades when cleaning, painting, or working near the fan. Always turn off the power to the ceiling fan before
servicing.
4. Do not insert anything into the fan blades while the fan is operating.
5. Do not operate reversing switch until fan blades have come to a complete stop.
Additional Safety Instructions
1. To avoid possible shock, be sure electricity is turned off at the fuse box before wiring, and do not operate fan without blades.
2. All wiring and installation procedures must satisfy National Electrical Codes (ANSI/ NFPA 70-1999) and Local Codes. The ceiling fan
must be grounded as a precaution against possible electrical shock. Electrical installation should be made or approved by a licensed
electrician.
3. The fan base must be securely mounted and capable of reliably supporting at least 50 lbs. Consult a qualified electrician if in doubt.
4. The fan must be mounted with the fan blades at least 7 feet from the floor to prevent accidental contact with the fan blades.
5. Follow the recommended instructions for the proper method of wiring your ceiling fan. If you do not have adequate electrical
knowledge or experience, have your fan installed by licensed electrician.
WARNING: TO REDUCE THE RISK OF SHOCK, DO NOT USE THIS FAN WITH ANY SOLID-STATE SPEED CONTROL DEVICE.
WARNING: This product is designed to use only those parts supplied with this product and/or accessories designated specifically for
use with this product. Using parts and/or accessories not designated for use with this product could result in personal injury or property
damage.
WARNING: To reduce the risk of personal injury, do not bend the blade bracket (flange or blade holder) when installing the brackets,
balancing the blades, or cleaning the fan. Do not insert foreign objects in between rotating fan blades.
LIMITED LIFETIME WARRANTY
Extends to the original purchaser of a Fanimation Fan
1. LIMITED LIFETIME MOTOR WARRANTY - If any part of your fan motor fails, due to a defect in materials or workmanship during
the lifetime of the original purchaser, Fanimation will provide the replacement part free of charge, when the defective fan is returned
to our national service center. Proof of purchase is required. Customer shall be responsible for all costs incurred in the removal or
reinstallation and shipping of the product for repairs or replacement.
2. ONE YEAR MOTOR LABOR WARRANTY - If your fan motor fails at any time within one year from the original purchase, due to
defects in materials or workmanship, labor to repair the motor will be provided free of charge at our national service center. Purchaser
will be responsible for labor charges after this one-year period. Customer shall be responsible for all costs incurred in the removal or
reinstallation and shipping of the product for repairs or replacement.
3. If any other part of your fan fails at any time within one year after original purchase, due to a defect in materials or workmanship, we
will repair, or replace, at our option, the defective part free of charge for parts and labor performed at our national service center.
4. Because of varying climate conditions, this warranty does not cover changes in the finish, including rusting, pitting, corroding,
tarnishing, or peeling.
5. This warranty is void and does not apply to damage from improper installation, neglect, accident, misuse, exposure to extremes of
heat or humidity, or as a result of any modification to the original product.
6. All costs of removal and reinstallation of the fan are the sole responsibility of the owner of the fan and not the store that sold the fan
or Fanimation.
7. Fanimation reserves the right to modify or discontinue any product at any time and may substitute any part under this warranty.
8. Under no circumstances may a fan be returned without prior authorization from Fanimation. The receipt of purchase must accompany authorized returns and must be sent freight prepaid to Fanimation. The fan to be returned must be properly packed to avoid
damage in transit; Fanimation will not be responsible for any damage resulting from improper packaging.
9. It is understood that any repair or replacement is the exclusive remedy available from Fanimation. There is no other expressed or
implied warranty. Fanimation hereby disclaims any and all implied warranties, including, but not limited to those of merchantability and
fitness for a particular purpose to the extent permitted by law. Some states do not allow limitations on implied warranties. Fanimation
will not be liable for incidental, consequential, or special damages arising out of or in conjunction with product use or performance,
except as may otherwise be accorded by law. This warranty gives you special legal rights and you may also have other rights that vary
from state to state.
10. A certain amount of wobble is normal and should not be considered a problem or a defect.
Table of Contents
Unpacking Instructions. . . . . . . . . . . . . . . . . . . . . . . . . . . . . . . . . . . . . . . . . . . . . . . . . . . . . . . . . . . . . . . . . . . . . . . . . . . . .3
4. . . . . . . . . . . . . . . . . . . . . . . . . . . . . . . . . . . . . . . . . . . . . . . . . . . . . . . . . . . . . . . . . .snaF gnilieC fo esU tneic iffE ygrenE
Electrical and Structural Requirements . . . . . . . . . . . . . . . . . . . . . . . . . . . . . . . . . . . . . . . . . . . . . . . . . . . . . . . . . . . . . . .4
How to Assemble Your Ceiling Fan . . . . . . . . . . . . . . . . . . . . . . . . . . . . . . . . . . . . . . . . . . . . . . . . . . . . . . . . . . . . . . . . . . .5
How to Hang Your Ceiling Fan . . . . . . . . . . . . . . . . . . . . . . . . . . . . . . . . . . . . . . . . . . . . . . . . . . . . . . . . . . . . . . . . . . . . . . .7
How to Wire Your Ceiling Fan. . . . . . . . . . . . . . . . . . . . . . . . . . . . . . . . . . . . . . . . . . . . . . . . . . . . . . . . . . . . . . . . . . . . . . . .8
Installing the Canopy Housing. . . . . . . . . . . . . . . . . . . . . . . . . . . . . . . . . . . . . . . . . . . . . . . . . . . . . . . . . . . . . . . . . . . . . . .8
Assembling and Mounting the Fan Blades. . . . . . . . . . . . . . . . . . . . . . . . . . . . . . . . . . . . . . . . . . . . . . . . . . . . . . . . . . . . .9
Installing the Switch Cup Assembly . . . . . . . . . . . . . . . . . . . . . . . . . . . . . . . . . . . . . . . . . . . . . . . . . . . . . . . . . . . . . . . . . .9
Operating Instructions - Pull Chain. . . . . . . . . . . . . . . . . . . . . . . . . . . . . . . . . . . . . . . . . . . . . . . . . . . . . . . . . . . . . . . . . . 10
Maintenance. . . . . . . . . . . . . . . . . . . . . . . . . . . . . . . . . . . . . . . . . . . . . . . . . . . . . . . . . . . . . . . . . . . . . . . . . . . . . . . . . . . . . 10
Blade Cleaning. . . . . . . . . . . . . . . . . . . . . . . . . . . . . . . . . . . . . . . . . . . . . . . . . . . . . . . . . . . . . . . . . . . . . . . . . . . . . . . . . . . 10
Parts List . . . . . . . . . . . . . . . . . . . . . . . . . . . . . . . . . . . . . . . . . . . . . . . . . . . . . . . . . . . . . . . . . . . . . . . . . . . . . . . . . . . . . . .11
Exploded-View Illustration . . . . . . . . . . . . . . . . . . . . . . . . . . . . . . . . . . . . . . . . . . . . . . . . . . . . . . . . . . . . . . .
Trouble Shooting. . . . . . . . . . . . . . . . . . . . . . . . . . . . . . . . . . . . . . . . . . . . . . . . . . . . . . . . . . . . . . . . . . . . . . . . . . . . . . . . .13
. . . . . . . . . .12
Page 3
This manual is designed to make it as easy as possible for you
to assemble, install, operate, and maintain your ceiling fan
Tools Needed for Assembly Materials
• One Phillips head screwdriver
• One stepladder
• One ¼” blade screwdriver
• One wire stripper
• Four wire connectors
(supplied)
Wiring outlet box and box connectors must be of type
required by local code. The minimum wire would be a 3conductor (2-wire with ground) of the following size:
Wire Size A.W.G.Installed Wire Length
▲
WARNING
Before assembling your ceiling fan, refer to section on
proper method of wiring your fan (page 4). If you feel you
do not have enough wiring knowledge or experience,
have your fan installed by a licensed electrician.
Up to 50 ft.
50 - 100 ft.
NOTE: Place the parts from the loose parts bags in a small
container to keep them from being lost. If any parts are missing,
contact your local retailer.
14
12
Unpacking Instructions
For your convenience, check-off each step. As each step is completed, place a check mark. This will ensure that all
steps have been completed and will be helpful in finding your place should you be interrupted.
▲
WARNING
Do not install or use fan if any part is damaged or
missing. This product is designed to use only those
parts supplied with this product and/or any accessories
designated specifically for use with this product by
Fanimation. Substitution of parts or accessories not
designated for use with this product by Fanimation could
result in personal injury or property damage. Contact
your retail store for missing or damaged parts.
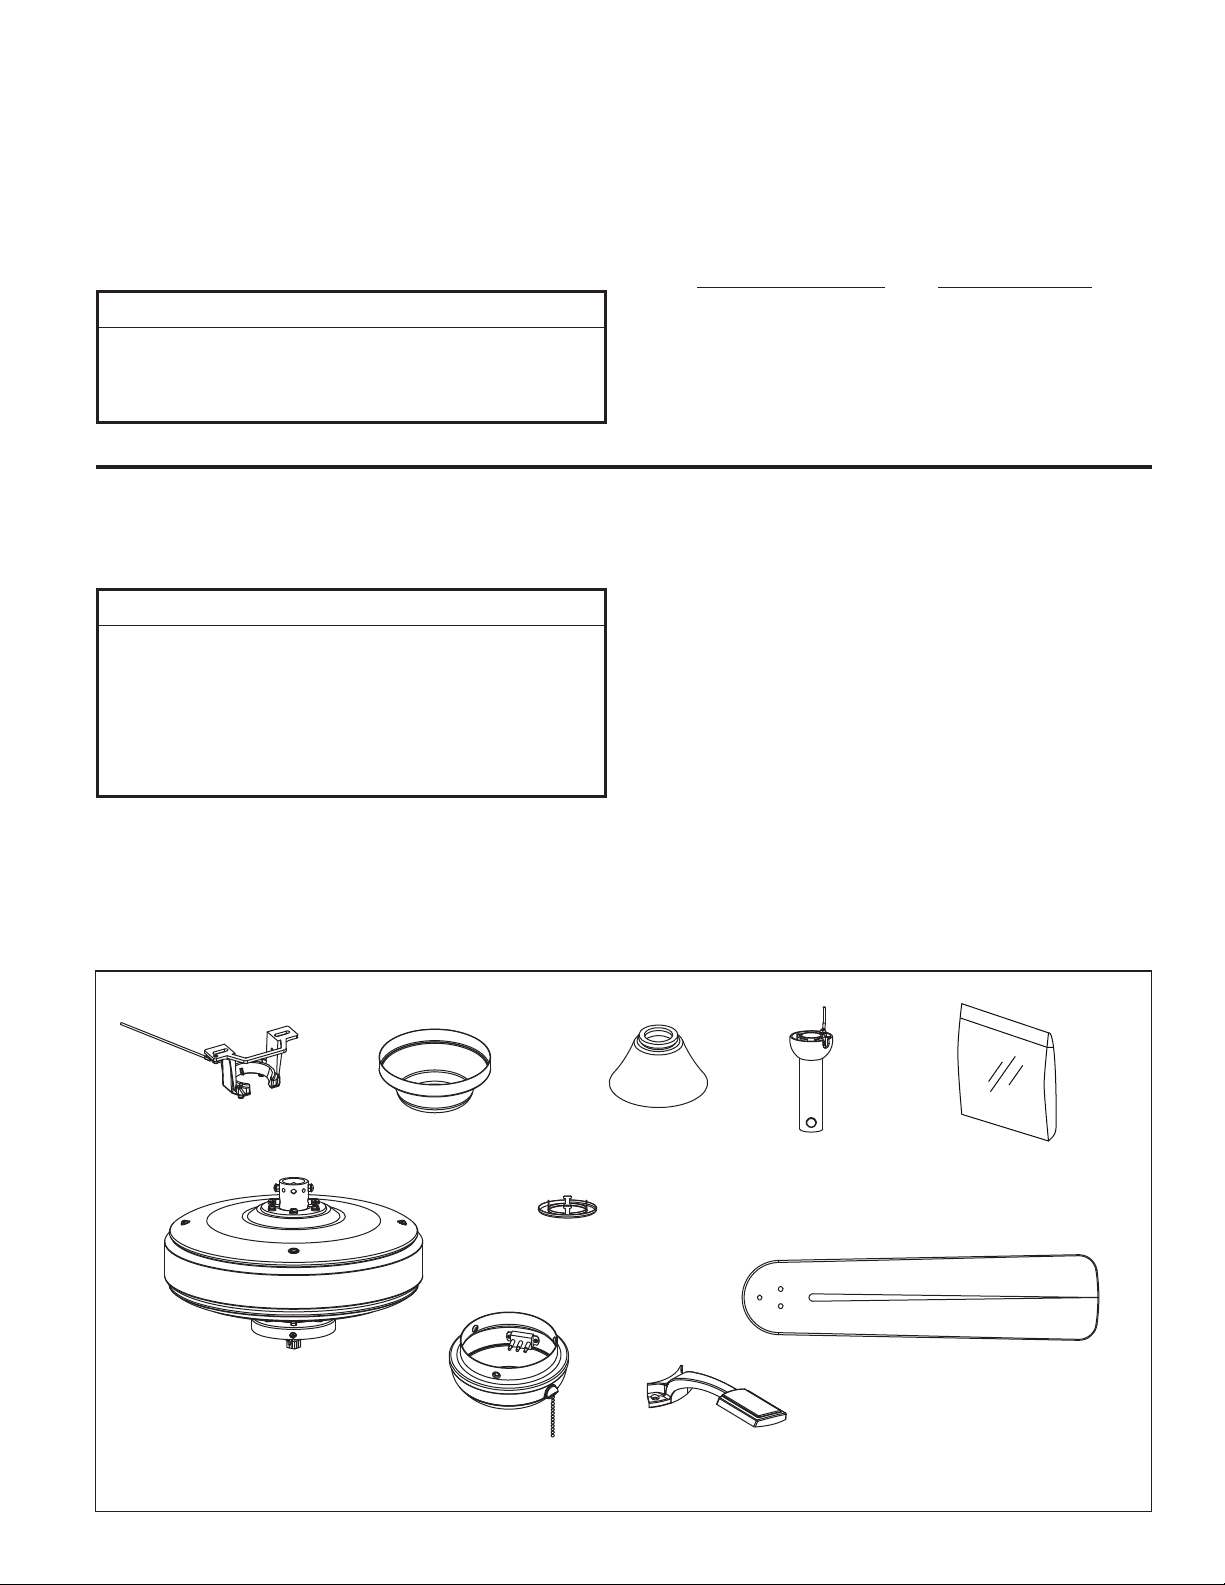
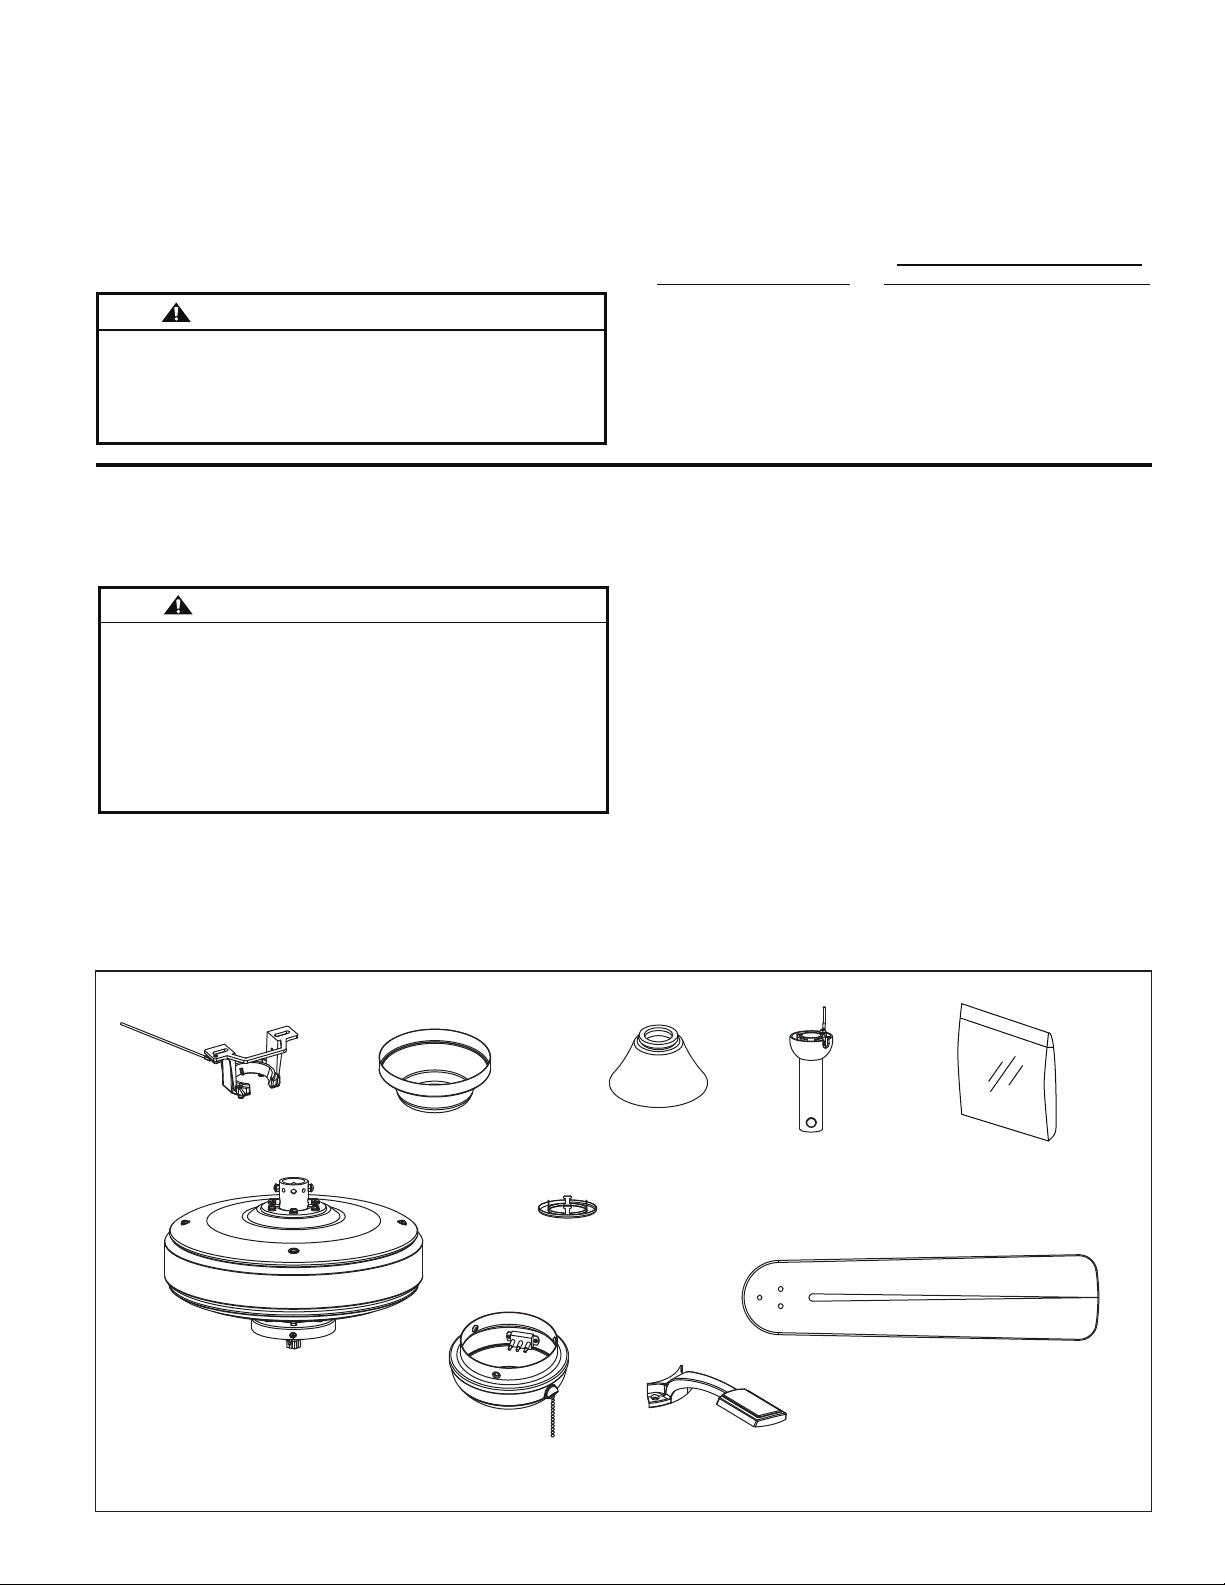
1. Check to see that you have received the following
parts:
NOTE: If you are uncertain of part description, refer to
exploded view illustration. (Figure 1, page 11)
• Fan Motor Assembly
• Hanger Bracket Assembly
• Downrod/Hanger Ball
Assembly
• Switch Cup Assembly
• Ceiling Canopy
• Motor Coupling Cover Assembly
• Canopy Screw Cover Assembly
• Blade Holder
• Blade Set
Set
• Hardware bag:
– Eleven ¼”-20 x 15mm
(blade holder to fan motor hub)
screws with lockwashers
– Sixteen
to blade holder) washer-head
screws with fiber washers
– Four wire connectors
– Chain Coupler
– Chain Fob
– Balance Kit
– Two #8-32 x 19 mm junction
box screws
– Two Flat Washer Ø10 x Ø5 x 0.8
mm, stainless steel
3
/16-24 x 7.5mm (blade
Hanger Bracket
Assembly
Fan Motor
Assembly
Ceiling Canopy
Switch Cup Assembly
Motor Coupling
Cover Assembly
Canopy Screw
Cover Assembly
3
Blade Holder Set
Downrod/
Hanger Ball
Assembly
Hardware Bag
Blade Set
Page 4
Energy Effi cient Use of Ceiling Fans
Ceiling fan performance and energy savings rely
heavily on the proper installation and use of the ceiling
fan. Here are a few tips to ensure efficient product
performance.
Choosing the Appropriate Mounting Location
Ceiling fans should be installed, or mounted, in the middle
of the room and at least 7 feet above the floor and 18
inches from the walls. If ceiling height allows, install the fan
8 - 9 feet above the floor for optimal airflow. Consult your
Fanimation Retailer for optional mounting accessories.
Turn Off When Not in the Room
Ceiling fans cool people, not rooms. If the room is
unoccupied, turn off the ceiling fan to save energy.
Electrical and Structural Requirements
Your new ceiling fan will require a grounded electrical
supply line of 120 volts AC, 60 Hz, 15 amp circuit. The
outlet box must be securely anchored and capable of
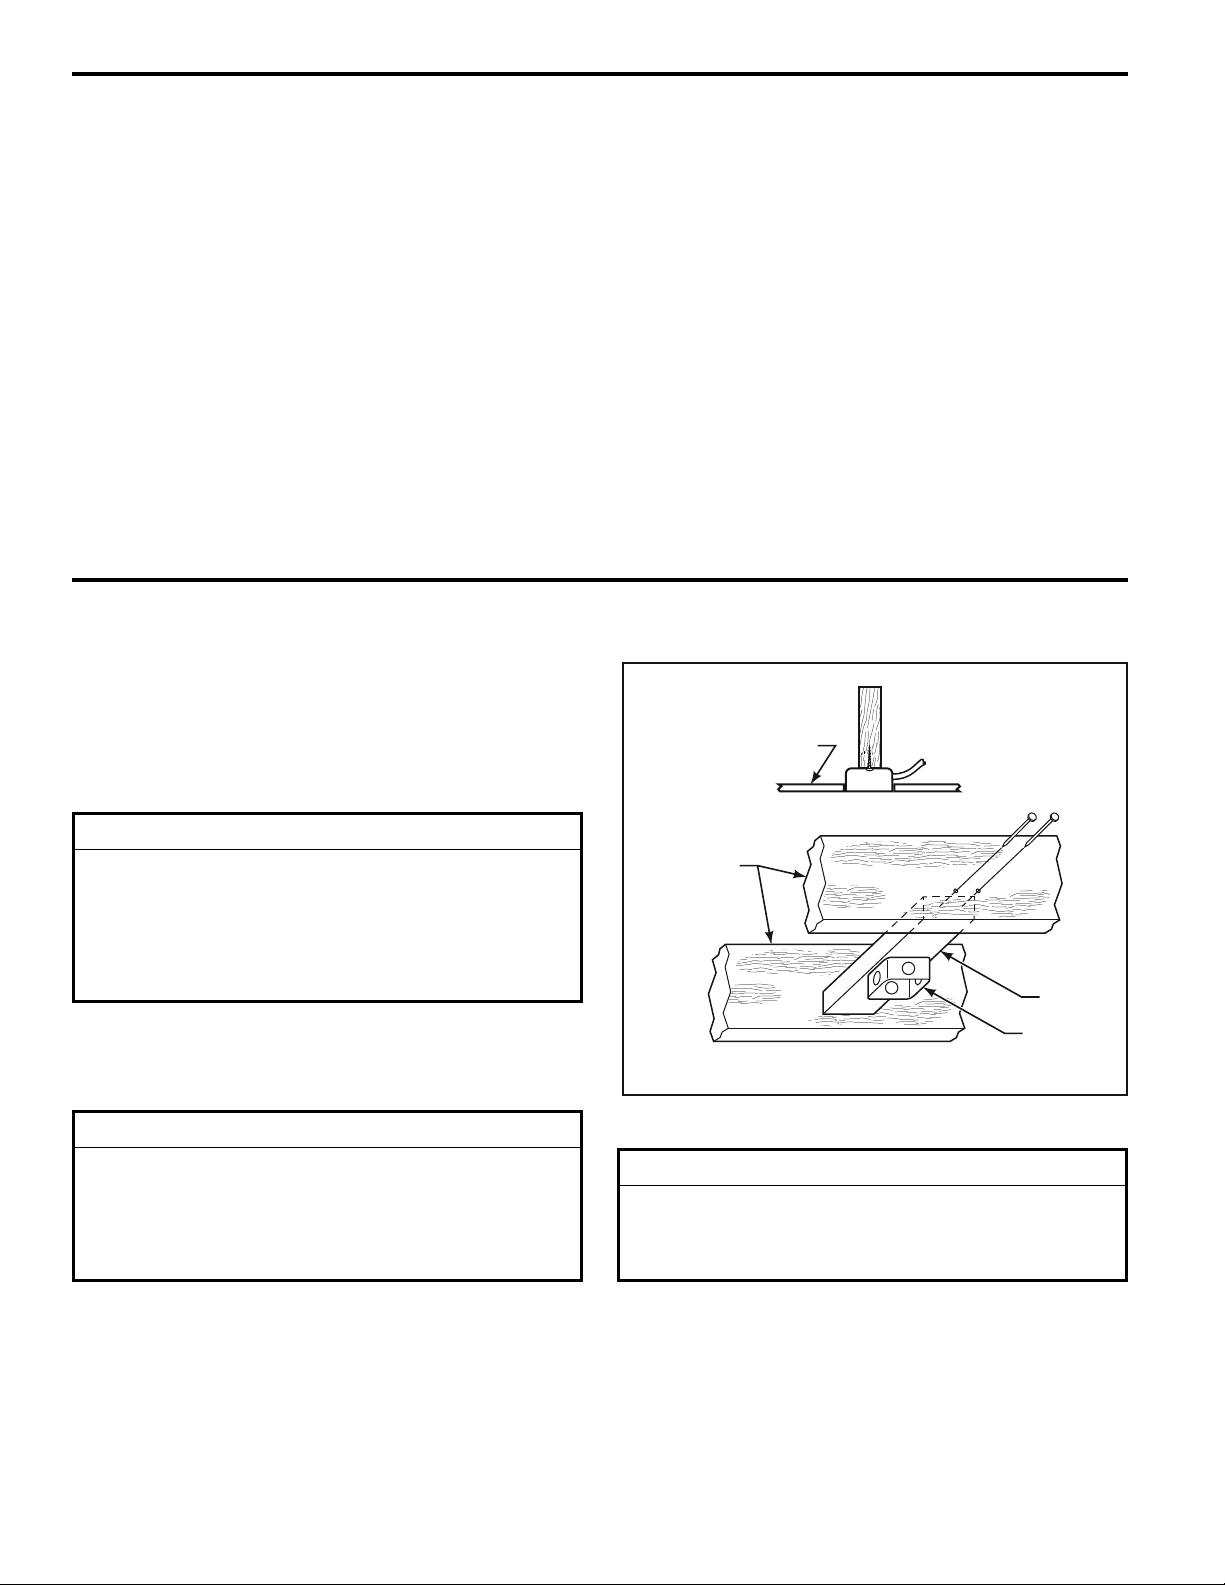
withstanding a load of at least 50 lbs. Figure 1 depicts
different structural configurations that may be used for
mounting the outlet box.
Using the Ceiling Fan Year Round
Summer Season: Use the ceiling fan in the counter-
clockwise direction. The airflow produced by the ceiling
fan creates a wind-chill effect, making you “feel” cooler.
Select a fan speed that provides a comfortable breeze,
lower speeds consume less energy.
Winter Season: Reverse the motor and operate the ceiling
fan at low speed in the clockwise direction. This produces
a gentle updraft, which forces warm air near the ceiling
down into the occupied space.Remember to adjust your
thermostat when using your ceiling fan - additional energy
and dollar savings could be realized with this simple step!
Ceiling
▲
WARNING
To reduce the risk of fire, electrical shock, or personal
injury, mount fan to outlet box marked acceptable
for fan support of 22.7 kg (50 lbs) or less. Use screws
supplied with outlet box. Most outlet boxes commonly
used for support of light fixtures are not acceptable for
fan support and may need to be replaced. Consult a
qualified electrician if in doubt.
If your fan is to replace an existing light fixture, turn
electricity off at the main fuse box at this time and remove
the existing light fixture.
▲
WARNING
Turning off wall switch is not sufficent. To avoid
possible electrical shock, be sure electricity is turned
off at the main fuse box before wiring. All wiring must
be in accordance with National and Local codes and the
ceiling fan must be properly grounded as a precaution
against possible electrical shock.
Ceiling
Joists
2˝ x 4˝
Outlet
Box
Figure 1
▲
WARNING
To avoid fire or shock, follow all wiring instructions
carefully. Any electrical work not described in these
instructions should be done or approved by a licensed
electrician.
4
Page 5
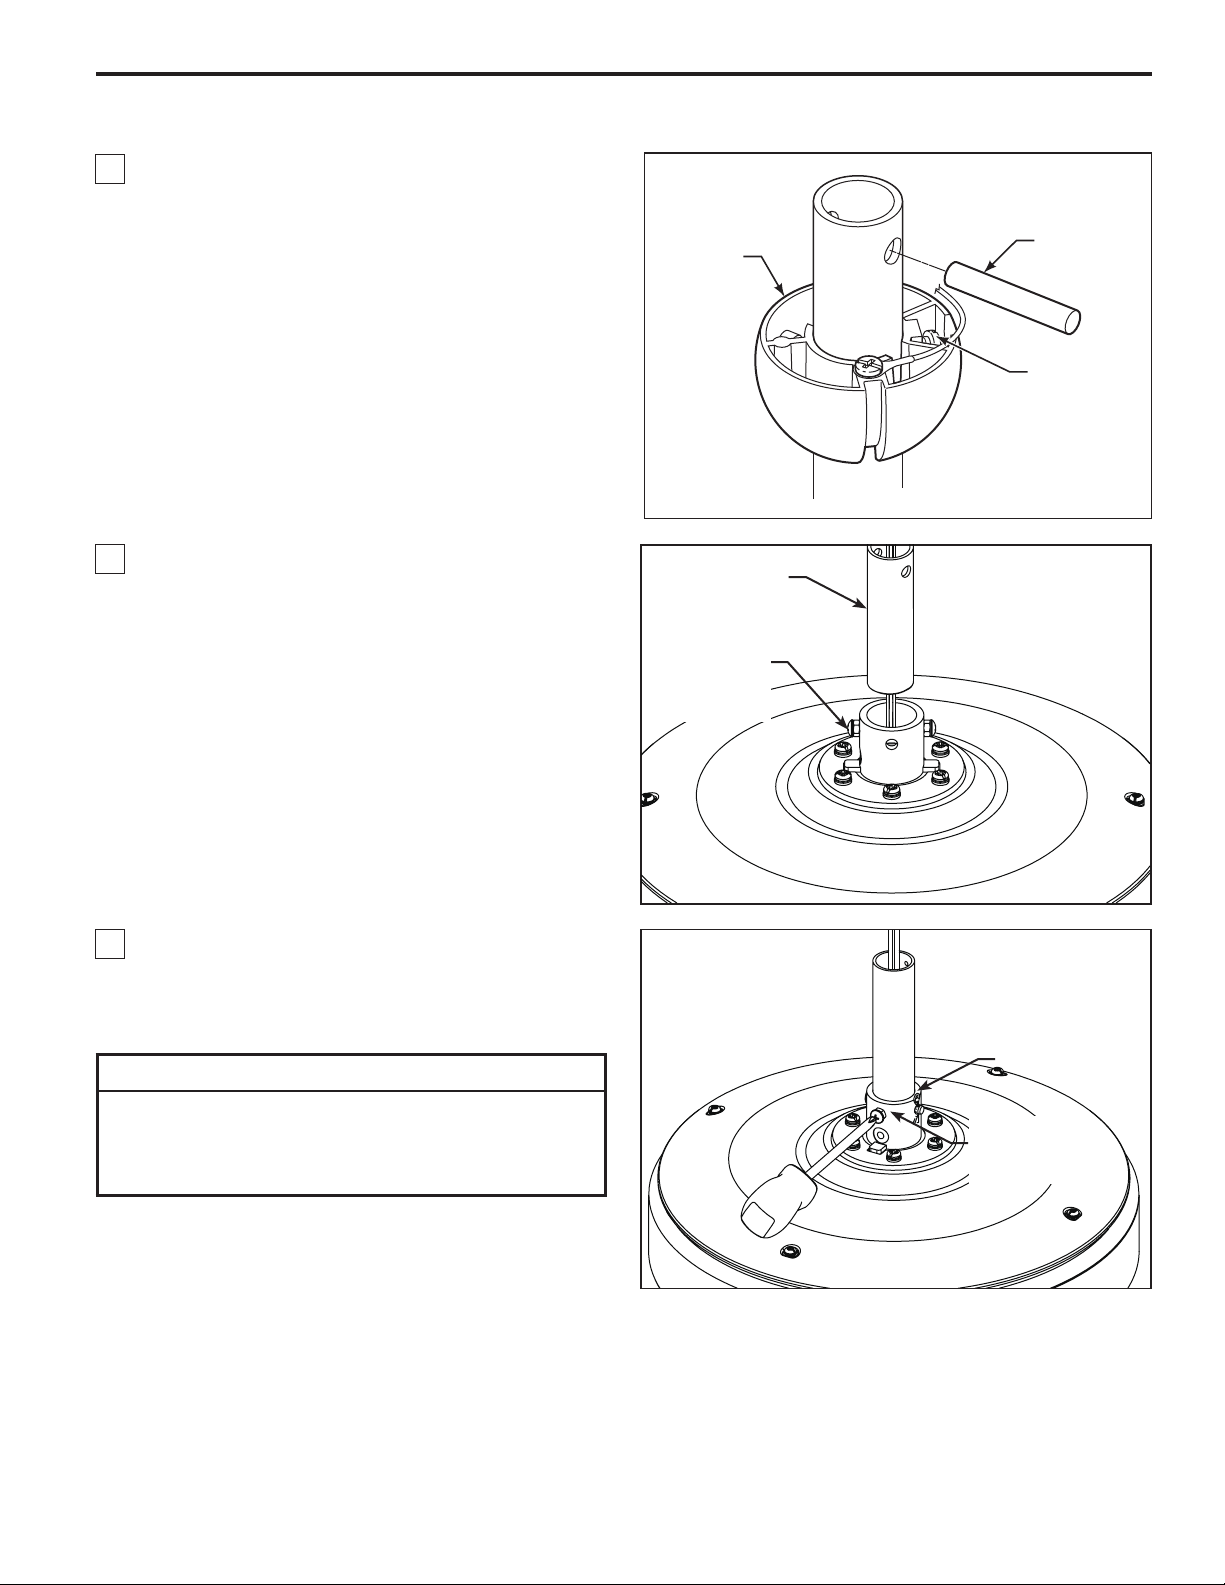
How to Assemble Your Ceiling Fan
1. Prior to assembly, set aside and save the hardware
bags packed in the packing. Remove the hanger ball
by loosening the setscrew in the hanger ball until the
ball falls freely down the downrod. Remove the pin
from the downrod, then remove the danger ball.
Retain the pin and hanger ball for reinstallation in
Step5. (Figure1)
2. The fan comes with blue, black, and white 80”
wires.
Separate and untwist the three wires. Route
the wires the wires through the downrod.
NOTE: You will be using either the 4½”
downrod supplied with your fan or an optional downrod
purchased separately.
Loosen the two setscrews in the downrod support.
Install downrod into coupler. Align the clevis pin
holes in the downrod with the holes in the downrod
support. (Figure 2)
Hanger
Ball
Downrod/
Hanger Ball
Assembly
Clevis Screw
w/Rubber
Washers (2),
Locknut
Pin
Setscrew
Figure 1
3. Install the clevis pin, hairpin clip and tighten set
screws. The clevis pin and hair pin clip must be
properly installed to prevent the set screws from
working loose. (Figure 3)
▲
WARNING
It is critical that the clevis screw in the downrod support is
properly installed and the setscrews and nuts are securely
tightened. Failure to verify that the clevis screw, nuts, hairpin
clip and setscrews are properly installed could result in the fan
falling.
Figure 2
Hairpin
Clip
Set Screw
w/Hex Nut
Rubber
Washer (2ea)
Figure 3
5
Page 6
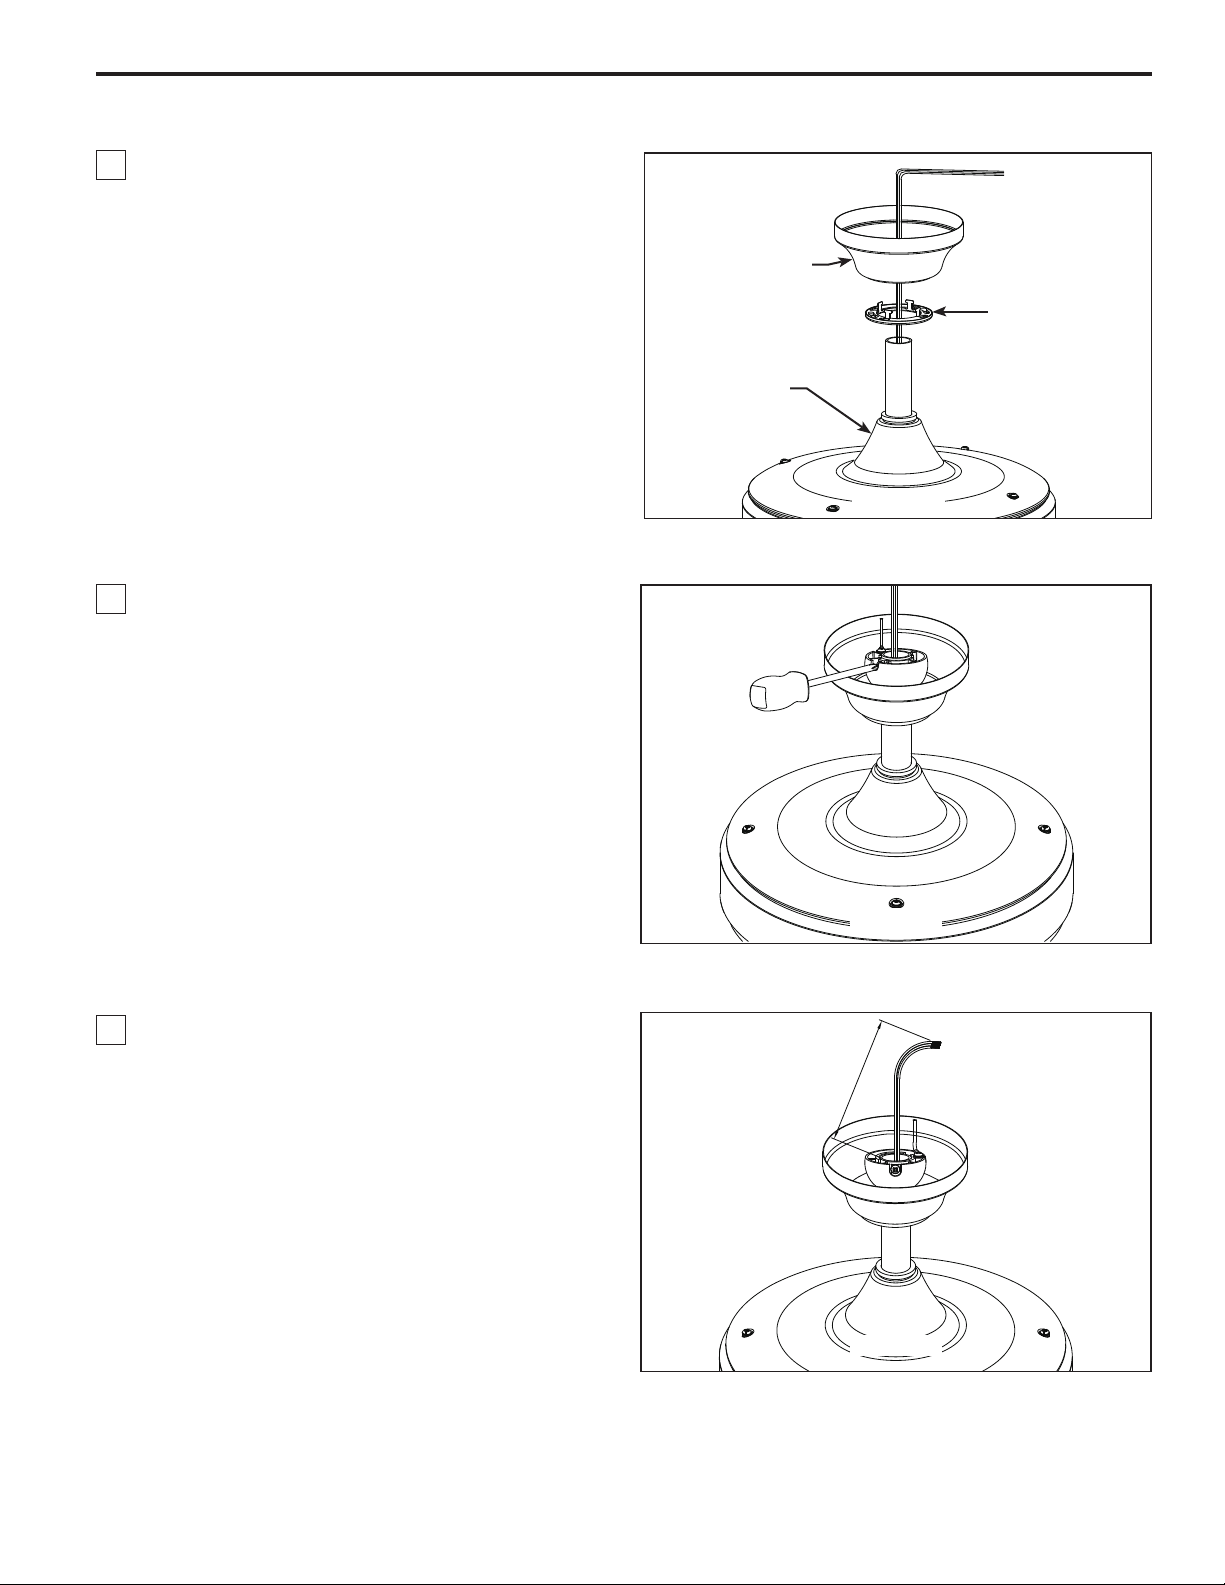
How to Assemble Your Ceiling Fan (continued)
4. Route wires through motor coupling cover,
canopy screw cover and ceiling canopy. (Figure 4)
5. Reinstall the hanger ball on the downrod as
follows. Route the three 80 in. Wire through the
hanger ball. Position the pin through the two holes
in the downrod and align the hanger ball so the
pin is captured in the groove in the top of the
hanger ball. Pull the hanger ball up tight against
the pin. Securely tighten the set screw in the
hanger ball. A loose set screw could create fan
wobble. (Figure 5)
Ceiling
Canopy
Motor
Coupling
Cover
Canopy Screw
Cover
Figure 4
6. 9 ot 6 yletamixorppa eriw dael ssecxe ffo tuC
inches above top of the top of the downrod. Strip
insulation off
1/2 inch from the end of each lead
wire. (Figure 6)
NOTE:
where necessary, before installation.
All set screws must be checked, and retightened
Figure 5
6 to 9 in.
Figure 6
6
Page 7
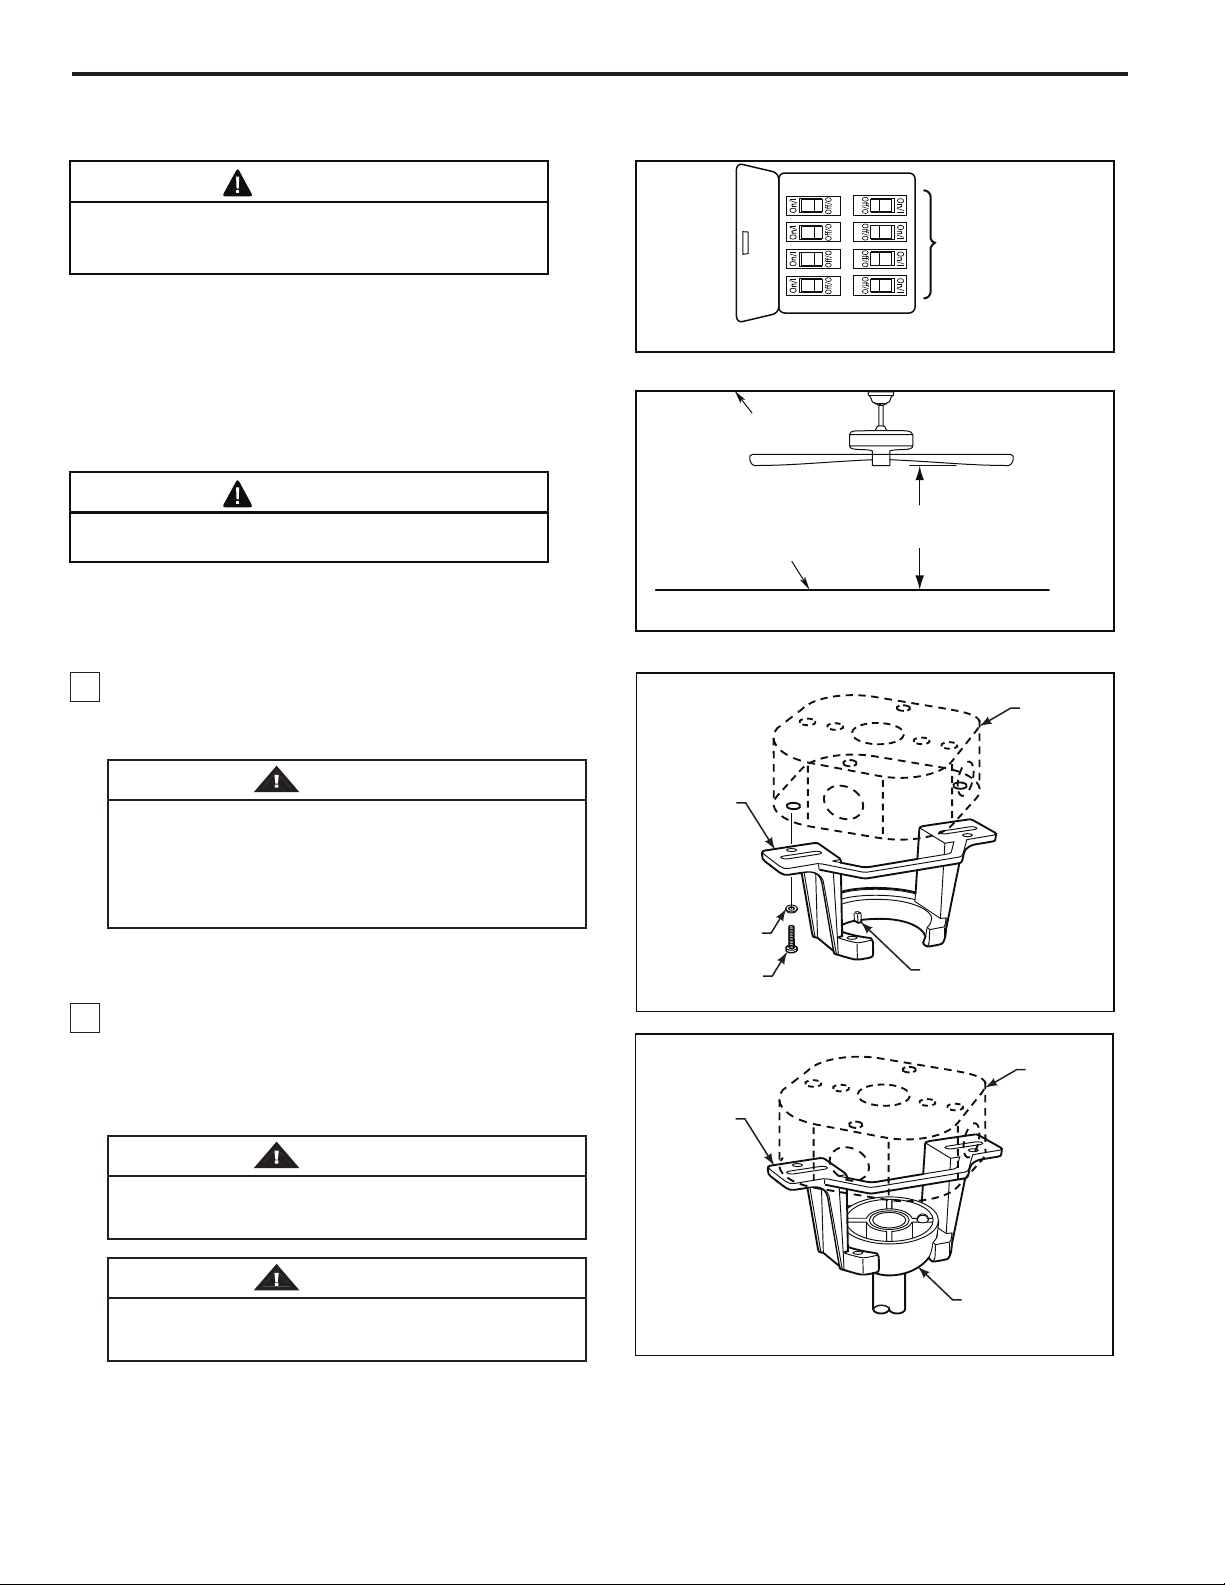
How to Hang Your Ceiling Fan
WARNING
To avoid possible fire or shock, be sure electricity is
turned off at the main fuse box before hanging.
(Figure 7)
MAIN FUSE BOX
Figure 7
NOTE: If you are not sure if the outlet box is grounded,
contact a licensed electrician for advise, as it must be
grounded for safe operation.
WARNING
The fan must be hung with at least 7’ of clearance
from floor to blades. (Figure 8)
1. Securely attach the hanger bracket to the outlet
box using the outlet box screws and washers supplied
withe the fan. (Figure 9)
WARNING
The outlet box must be securely anchored. Hanger
bracket must seat firmly against outlet box. If the outlet
box is recessed, remove wall board until bracket
contacts box. If bracket and /or outlet box are not
securely attached, the fan could wobble or fall.
2. Carefully lift the fan and seat the downrod/hanger
ball assembly on the hanger bracket that was just
attached to the outlet box. Be sure the groove in the
ball is lined up with tab on the hanger bracket.
(Figure 10)
WARNING
Hanger
Bracket
Flat Washer
Screw (2)
Supplied with Fan
Hanger
Bracket
CEILING
FLOOR
Figure 8
Figure 9
NO LESS
THAN
7 FEET
Tab
Outlet Box
Outlet Box
Failure to seat tab in groove could cause damage to
electrical wires and possible shock or fire hazard.
WARNING
To avoid possible shock, do not pinch wires between
the hanger ball assembly and the hanger bracket.
Downrod/Hanger
Figure 10
ylbmessA llaB
7
Page 8
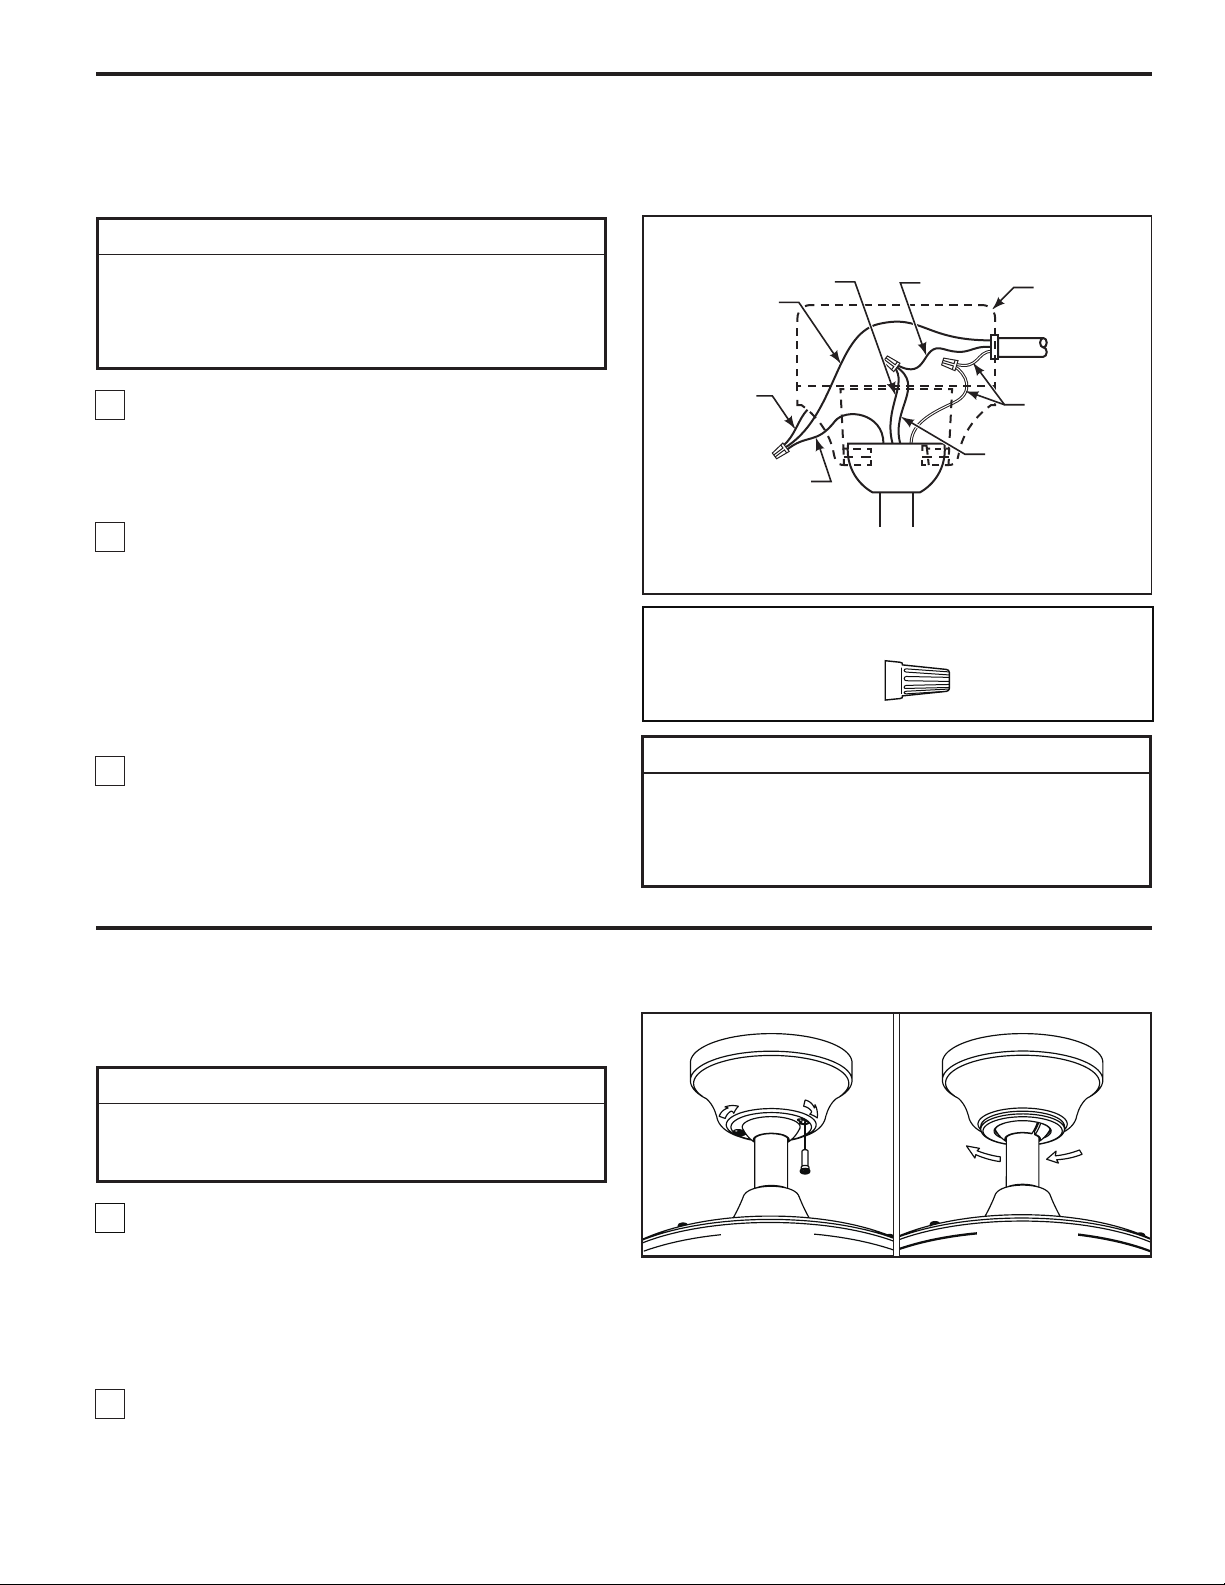
How to Wire Your Ceiling Fan
If you feel that you do not have enough electrical wiring knowledge or experience, have your fan installed by a
licensed electrician.
▲
WARNING
To avoid possible electrical shock, be sure electricity is
turned off at the main fuse box before wiring.
NOTE: If you are not sure if the outlet box is grounded,
contact a licensed electrician for advice, as it must be
grounded for safe operation.
Green Wire
(Ground)
Black
Fan Wire
Black
Listed
Outlet Box
Household
Supply
1. Connect the green grounding lead from the hanger
ball andthe green grounding lead from the hanger
bracket to the supply grounding conductor (this may
be a bare wire or wire with gree colored insulation).
Securely connect wires with wire connectors supplied.
2. Securely connect the white fan motor wire the white
supply (neutral) wire using wire connector supplied.
Securely connect the black fan morot wire and blue
wire tho the black supply wire using wire connector
supplied (Figure 11). After connections have been
made, turn leads upward and carefully push leads into
the outlet box, withe the white and green leads on one
side of the outlet box ane the black and blue leads on
the other side ofh the outlet box.
3. Proceed to the next step of “Installing the
Canopy Housing“.
Installing the Canopy Housing
Green Wire
(Ground) from
Hanger Bracket
Green Wire
(Ground) from
Hanger Bowl
Figure 11
HARDWARE USED:
CONNECTORS
▲
WARNING
Check to see that all connections are tight, including
ground, and that no bare wire is visible at the wire
connectors, except for the ground wire. Do not operate
fan until the blades are in place. Noise and motor
damage could result.
White
Blue
x 3WIRE
NOTE: This step is applicable after the necessary wiring
is completed.
▲
WARNING
To avoid possible fire or shock, make sure that the
electrical wires are completely inside the canopy housing
and not pinched between the housing and the ceiling.
1. Remove one of the two shoulder screws in the
hanger bracket. Loosen the second shoulder screw
without fully removing it. Assemble canopy by
rotating key slot in canopy over shoulder screw in
hanger bracket. Tighten shoulder screw. Fully
assemble and tighten second shoulder screw that
was previously removed. (Figure 12a)
2. Securely attach and tighten the canopy screw cover
over the shoulder screws in the hanger bracket utilizing
the keyslot twist-lock feature. (Figrue 12b)
Figure 12a
Figure 12b
8
Page 9
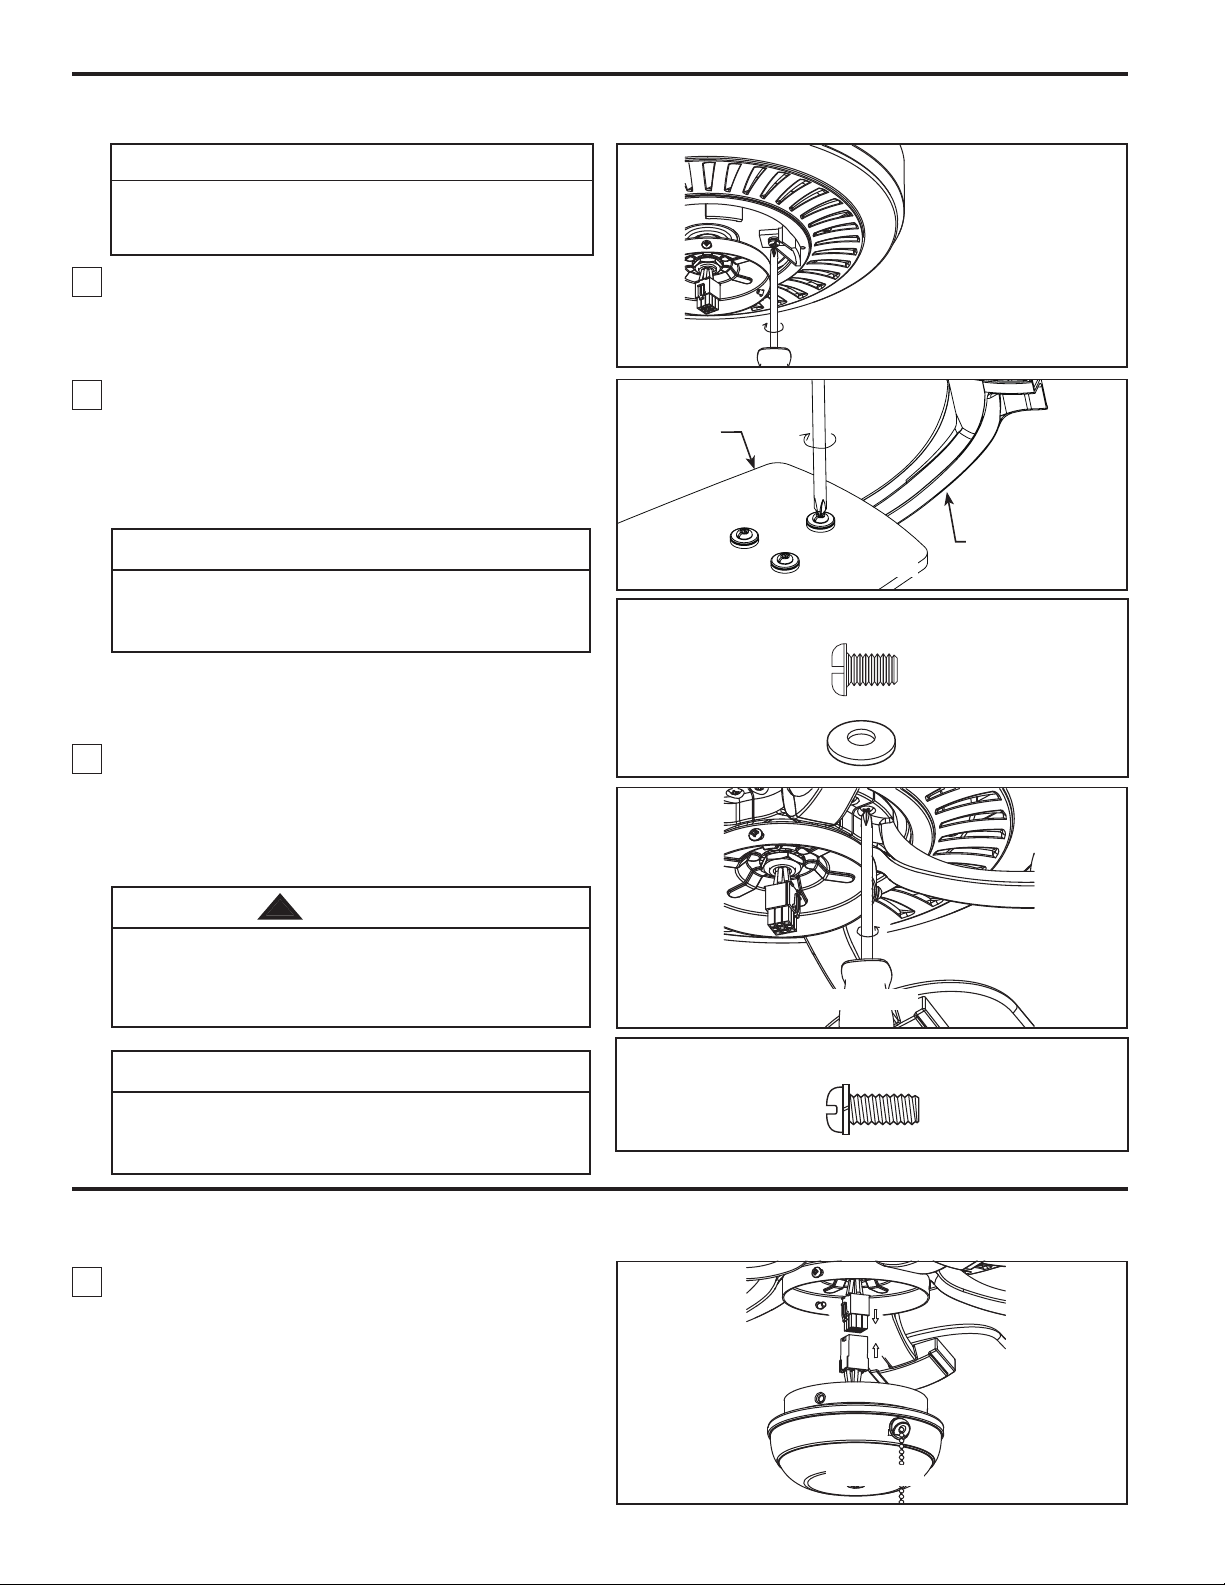
Assembling and Mounting the Fan Blades
Assembling and Mounting the Fan Blades
INSTALLATION NOTE
Do not connect fan blades until the fan is
completely installed. Installing the fan with blades
assembled may result in damage to the fan blades.
1. Remove and discard the (rubber) motor “stops” by
removing the five screws. (Figure 13)
2. Position the blade over the blade holder with
threaded posts showing. Make sure the bottom edge
of the blade is fully seated against the blade arm.
With a phillips screwdriver, tighten 3/16-24 x 7.5 mm
phillips head screws and flat washers to secure the
blade to the blade arm. (Figure 14)
CAUTION
Do not connect fan blades until the fan is completely
installed. Installing the fan with blades assembled
may result in damage to the fan blades.
Figure 13Figure 13
Blade
Blade Holder Arm
Figure 14
HARDWARE USED:
3. Secure the blade holders to the motor support
using the 1/4-20 x 15 mm screws throught the holes
located on the side of the motor support. (Figure 15)
NOTE:
Periodically check blade holder hardware and
resecure if necessary.
!
WARNING
To reduce the risk of personal injury, do not bend the
blade holders when installing, balancing the blades
or cleaning the fan. Do not insert foreign objects in
between the rotating blades.
CAUTION
To reduce the risk of electric shock, disconnect the
electrical supply circuit to the fan before installing
light kit.
Installing the Switch Cup Assembly
3/16-24 x 7.5mm
PHILLIPS HEAD
SCREWS
FLAT WASHER
Figure 15
HARDWARE USED:
1/4-20 x 15mm
SCREWS
x 15
x 15
x 10
1. Securely attach the 9-pin switch cup connector to
wiring harness socket within Switch Cup Assembly.
(Figure 16)
Figure 16
9
Page 10
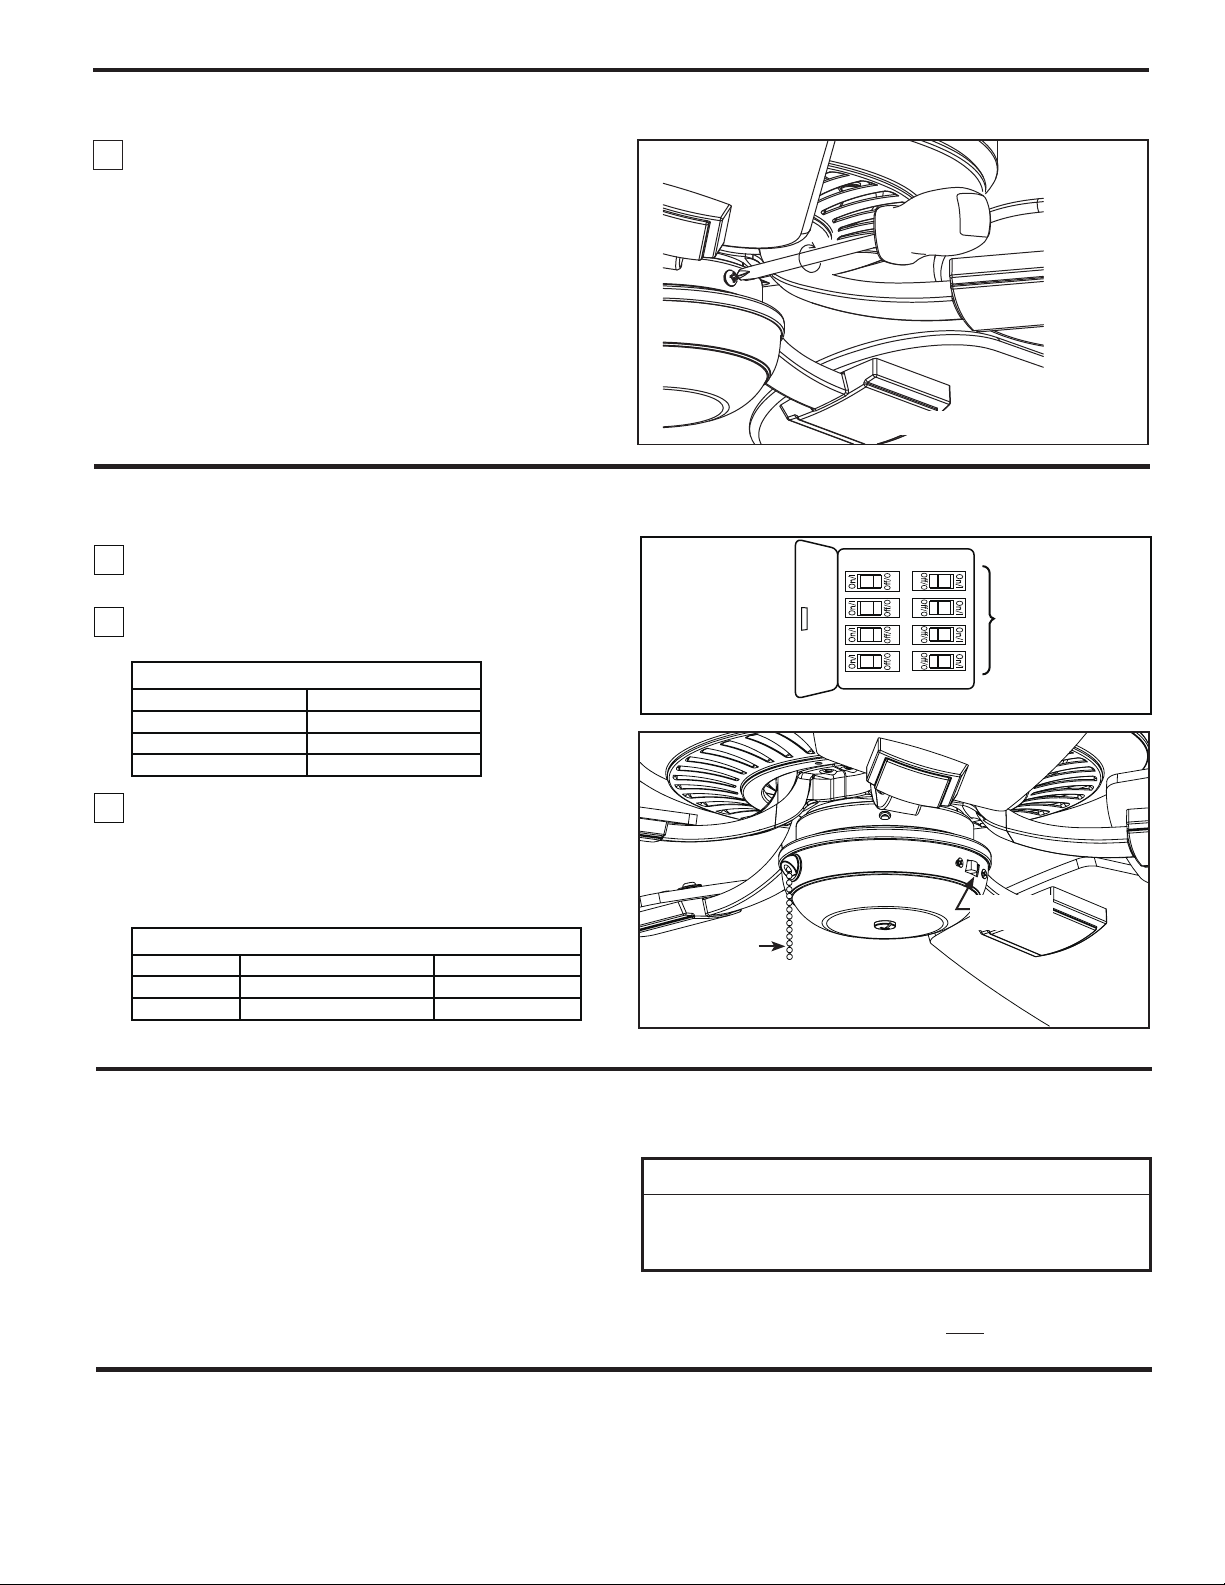
Installing the Switch Cup Assembly (continued)
2. Assemble the Switch Cup Assembly onto the
Housing Adapter with three screws. (Figure 17)
Operating Instructions-Pull Chain
1. Restore electrical power to the outlet box by turning
the electricity on at the main fuse box. (Figure 18)
Figure 17
2. Check the operation of the fan by gently pulling on
the fan speed pull chain.
Pull Chain Operating Sequence
1st Pull High
nd
2
Pull Medium
rd
3
Pull Low
th
4
Pull Off
3. If airflow is desired in the opposite direction, turn the
fan off and wait for the blades to stop turning. Then
slide the reverse switch to the opposite position and
turn fan on again. Your fan model is equipped with a
4-position, 3-speed, pull chain switch. (Figure 19)
Reverse Switch Information
Season Rotation Direction Switch Position
Summer Counter-Clockwise Left
Winter Clockwise Right
Maintenance
Periodic cleaning of your new ceiling fan is the only
maintenance that is needed.
When cleaning, use only a soft brush or lint free cloth to
avoid scratching the finish.
Abrasive cleaning agents are not required and should be
avoided to prevent damage to finish.
MAIN FUSE BOX
Figure 18
Reversing
Switch
Speed Control
Pull Chain
Figure 19
CAUTION
Do not use solvents when cleaning your ceiling fan. It
could damage the motor or the blades and create the
possibility of electrical shock.
RECOMENDED: Periodically check that the blade holders to motor hub screws are secure and tight.
Blade Cleaning
Periodic light dusting of the blades is recommended.
A feather duster will work best.
Avoid using water, cleansers, or harsh rags, which can
warp and ruin the blades.
10
Page 11

Parts List
Model #TF971**
Ref.# Description Part #
1 Hanger Bracket Assembly APGAC110RBL
2 Downrod/Hanger Ball Assembly ADRAC1-45**
3 Ceiling Canopy P70055**
APPAC1101**
APPAC1404**
AMA0971**
AP071001**
AP097101**
AP097104**
HDWTF971**
10
Canopy Screw Cover Assembly4
Motor Coupling Cover Assembly5
Fan Motor Assembly6
Blade Holders Set7
8
9
Blade Set
Switch Cup Assembly
Hardware Bag Containing:
Balance Kit (BALKT)
Wire Connectors (4)
Chain Coupler
Chain Fob
#8–32 x 19mm Junction Box Screws, Stainless Steel (2)
Flat Washer Ø10 x Ø5 x 0.8 mm, Stainless Steel (2)
Blade Mounting Hardware Bag Containing:
3/16”–24 x 7.5 mm Phillips Head Screws with Flat
Washers (16 pcs)
Blade Holder Mounting Hardware Bag Containing:
¼”–20 x 15 mm Phillips Screws with Lockwashers
(11 pcs)
Refer to fan model number located on down rod support
Before discarding packaging materials, be certain all parts have been removed
How To Order Parts
When ordering repair parts, always
give the following information:
• Part Number
• Part Description
• Fan Model Number
Contact your retail store for repair parts.
11
Page 12
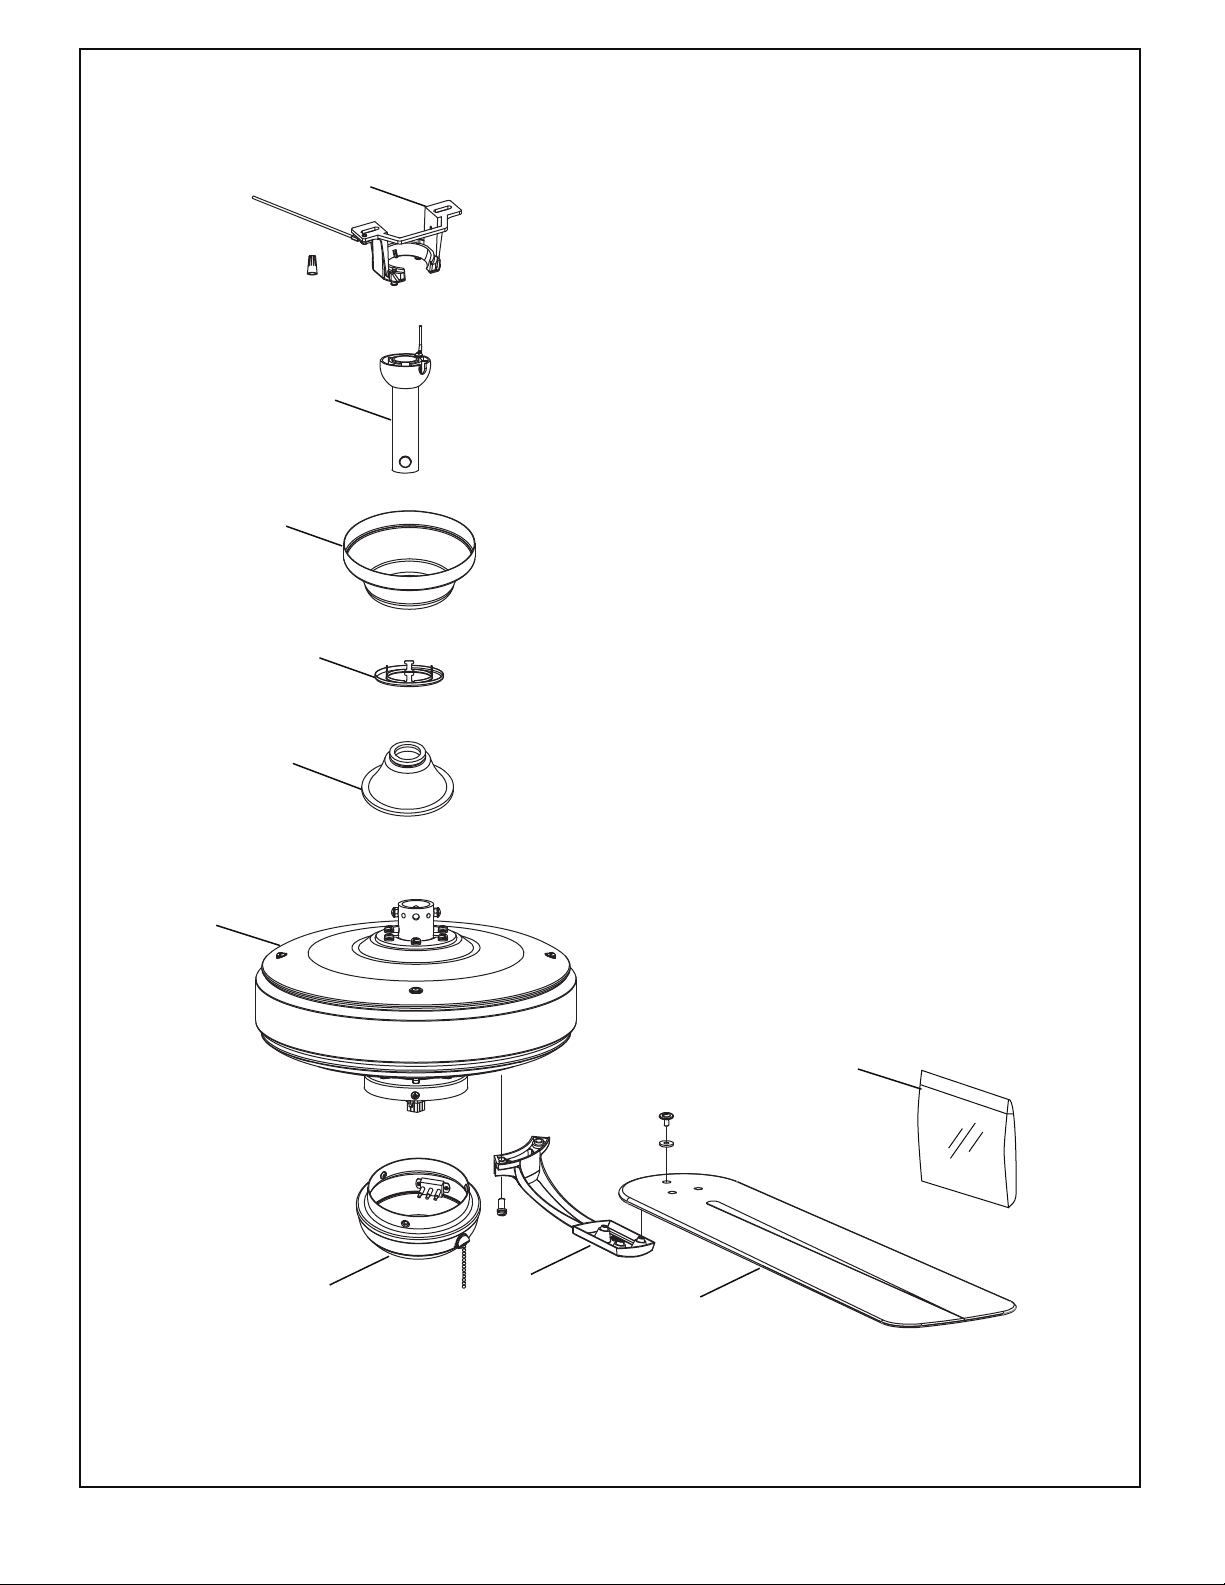
TF971** Wet Location Fan
Exploded-View
1
2
3
4
5
6
10
9
7
8
NOTE: y.rav yam noitarug ifnoc strap lautca sti ro elacs ot ton si nwohs noitartsulli ehT
Figure 1
12
Page 13

For your own safety turn off power at fuse box or circuit breaker before trouble shooting your fan.
Trouble Probable Cause Suggested Remedy
1. FAN WILL NOT START
Trouble Shooting
▲
WARNING
1. Fuse or circuit breaker blown.
2. Loose power line connections to the fan, or loose
switch wire connections in the switch housing.
3. Reversing switch in neutral position.
1. Check main and branch circuit fuses or circuit
breakers.
2. Check line wire connections to fan and switch wire
connections in the switch housings.
CAUTION: Make sure main power is turned off !
3. Make sure reversing switch position is all the way to
one side.
2. FAN SOUNDS NOISY
3. FAN WOBBLES
EXCESSIVELY
1. Blades not attached to fan.
2. Loose screws in motor housing.
3. Screws securing fan blade holders to motor hub are
loose.
4. Wire connectors inside housing rattling.
5. Motor noise caused by solid state variable speed
control.
6. Screws holding blades to blade holders are loose.
1. Setscrew and nut in downrod support is loose.
2. Setscrew in downrod/hanger ball assembly is loose.
3. Screws securing fan blade holders to motor hub are
loose.
4. Blade holders not seated properly.
5. Hanger bracket and/or ceiling outlet box is not
securely fastened.
6. Fan blades out of balance.
1. Attach blades to fan before operating.
2. Check to make sure all screws in motor housing are
snug (not over-tight).
3. Check to make sure the screws which attach the fan
blade holders to the motor hub are tight.
4. Check to make sure wire connectors in switch
housing are not rattling against each other or against
the interior wall of the switch housing.
CAUTION: Make sure main power is turned off !
5. Some fan motors are sensitive to signals from
solid-state variable speed controls. Solid-state controls
are not recommended, choose an alternative control
method.
6. Tighten screws securely.
1. Tighten both setscrews and nuts securely in downrod
support.
2. Tighten the setscrew in the downrod/hanger ball
assembly.
3. Check to be sure screws which attach the fan blade
holders to the motor hub are tight.
4. Check to be sure the fan blade holders seat firmly
and uniformly to the surface of the motor housing. If
holders are seated incorrectly, loosen the screws and
retighten.
5. Tighten the hanger bracket screws to the outlet box,
and secure outlet box.
6. Interchanging position of fan blades can redistribute
the weight and result in a smoother operation. For
example, exchange blades in positions 1 and 3 or 1 and
4. If this does not improve wobble, exchange 2 and 4 or
2 and 5.
4. NOT ENOUGH AIR
MOVEMENT
1. If possible, consider using a longer downrod. For
example, use a 12” downrod instead of the 6” downrod
that comes with your fan.
2. Consider using a narrow blade instead of the wide
oval. Narrow blades are available in the palm leaf and
woven bamboo series.
13
Page 14

10983 Bennett Parkway
Zionsville, IN 46077
(888) 567-2055
FAX (866) 482-5215
Outside U.S. call (317) 733-4113
Copyright 2013 Fanimation 2013 07 V.01/
Visit Our Website @ www.fanimation.com
Page 15

The Edgewood
Ventilador de techo para ubicaciones húmedas
™
Peso neto 13.72 kg (30.2 lbs)
Modelo N.º TF791**
MANUAL DEL PROPIETARIO
LEA Y GUARDE ESTAS INSTRUCCIONES
Page 16

Instrucciones de seguridad importantes
ADVERTENCIA: Siga estas instrucciones para prevenir incendios, descargas eléctricas y lesiones personales graves.
Lea el manual del propietario y la información de seguridad antes de instalar su nuevo ventilador. Observe los diagramas de 1.
ensamblaje adjuntos.
Antes de llevar a cabo el mantenimiento o la limpieza de la unidad, desconecte la electricidad en el panel de servicio y bloquee los 2.
medios de desconexión del mismo para evitar que se active accidentalmente. Si no se pueden bloquear los medios de desconexión
del servicio, coloque un dispositivo de advertencia, como una etiqueta, en el panel de servicio.
Tenga cuidado con la estructura y las aspas del ventilador cuando limpie, pinte o trabaje cerca del mismo. Desconecte siempre la 3.
electricidad del ventilador de techo antes de llevar a cabo el mantenimiento.
No coloque nada en las aspas del ventilador cuando éste se encuentra en funcionamiento.4.
No accione el conmutador inversor hasta que las aspas del ventilador se hayan detenido por completo.5.
Instrucciones de seguridad adicionales
Para evitar posibles descargas eléctricas, asegúrese de que la electricidad esté desconectada en la caja de fusibles antes de realizar 1.
la instalación eléctrica, y no haga funcionar el ventilador sin las aspas.
Todos los procedimientos de conexión eléctrica e instalación deben cumplir con los Códigos eléctricos nacionales (ANSI/NFPA 2.
70-1999) y Códigos locales. El ventilador de techo debe estar conectado a tierra a fin de prevenir posibles descargas eléctricas. La
instalación eléctrica debe ser llevada a cabo o aprobada por un electricista autorizado.
Se debe fijar bien la base del ventilador; ésta debe ser capaz de soportar sin problemas al menos 15,9 kg (35 lb). Consulte la página 3.
18 del manual del propietario para ver los requisitos de soporte. Si tiene dudas, consulte a un electricista calificado.
Las aspas del ventilador deben instalarse por lo menos a 2 m (7 pies) del suelo, a fin de evitar un contacto accidental con las mismas.4.
Siga las recomendaciones sobre el método correcto de instalación eléctrica de su ventilador de techo. Si no posee la experiencia o 5.
los conocimientos eléctricos adecuados, contrate a un electricista autorizado para instalar el ventilador.
ADVERTENCIA: PARA REDUCIR EL RIESGO DE DESCARGAS ELÉCTRICAS, ESTE VENTILADOR SE DEBE INSTALAR CON UN
CONTROL/INTERRUPTOR DE PARED AISLADO.
ADVERTENCIA: Este producto está diseñado para ser usado sólo con las piezas suministradas o los accesorios indicados
específicamente para el mismo. Si utiliza piezas o accesorios que no están indicados para su uso con este producto, podría
sufrir lesiones personales o dañar el ventilador. ADVERTENCIA: Este producto está diseñado para ser usado sólo con las piezas
suministradas o los accesorios indicados específicamente para el mismo. Si utiliza piezas o accesorios que no están indicados para su
uso con este producto, podría sufrir lesiones personales o dañar el ventilador.
ADVERTENCIA: Para reducir el riesgo de lesiones personales, no doble los soportes de las aspas (borde o soporte de aspas) al instalar
los soportes, balancear las aspas o limpiar el ventilador. No coloque objetos extraños entre las aspas del ventilador en funcionamiento.
GARANTÍA LIMITADA DE POR VIDA
Se extiende al comprador original de un ventilador Fanimation
GARANTÍA LIMITADA DE POR VIDA DEL MOTOR - Si se produjera una falla en alguna de las partes del motor de su ventilador debido 1.
a un defecto en los materiales o en la fabricación durante el tiempo de vida del comprador original, Fanimation proporcionará la pieza de
repuesto sin cargo una vez que el ventilador defectuoso sea devuelto a nuestro centro de servicios nacional. Se requiere comprobante de
venta. El cliente se hará responsable de todos los gastos de remoción o reinstalación y envío del producto para reparaciones o sustitución.
GARANTÍA DE MANO DE OBRA DEL MOTOR POR UN AÑO - Si el motor de su ventilador fallara antes de cumplirse un año a partir del 2.
momento de su compra original debido a defectos en los materiales o en la fabricación, se le efectuará la reparación del mismo sin cargo
en nuestro centro de servicios nacional. El comprador se hará responsable de los gastos de mano de obra luego del período de un año.
El cliente se hará responsable de todos los gastos de remoción o reinstalación y envío del producto para reparaciones o sustitución.
Si otra pieza del ventilador fallara dentro del período de un año a partir de la fecha de compra original debido a un defecto en los 3.
materiales o en la fabricación, repararemos o sustituiremos, según creamos conveniente, la pieza defectuosa sin cargo alguno en
nuestro centro de servicios nacional.
Debido a las diversas condiciones climáticas, esta garantía no cubre cambios en la terminación, incluidos oxidación, corrosión, 4.
falta de brillo o peladuras.
Esta garantía es nula y no se aplica a daños por instalación incorrecta, negligencia, accidentes, uso indebido, exposición al calor o 5.
a la humedad en exceso, o como resultado de cualquier modificación realizada al producto original.
Todos los gastos de remoción y reinstalación del ventilador son responsabilidad exclusiva del propietario, y no de la tienda que 6.
vendió el ventilador ni de Fanimation.
Fanimation se reserva el derecho de modificar o discontinuar un producto en cualquier momento, o sustituir cualquier pieza según 7.
lo establecido por esta garantía.
En ningún caso se podrá devolver un ventilador sin previa autorización por parte de Fanimation. Las devoluciones autorizadas 8.
deberán ir acompañadas del recibo de venta y deberán enviarse a Fanimation, previo pago del flete. El ventilador que se devuelva
deberá estar embalado en forma adecuada a fin de evitar daños durante el transporte. Fanimation no se hará responsable de los
daños que resulten del embalaje incorrecto del producto.
Se entiende que las reparaciones y las sustituciones son el único recurso disponible de Fanimation. No existe ninguna otra 9.
garantía expresa o implícita. Por la presente, Fanimation niega todas las garantías implícitas, que incluyen, entre otras, la
comerciabilidad y la aptitud para determinado fin hasta donde la ley lo permita. Algunos estados no permiten limitaciones sobre las
garantías implícitas. Fanimation no se hará responsable por daños accidentales, resultantes o especiales derivados del uso o el
rendimiento del producto o en conjunción con éste, excepto en los casos en los que la ley así lo disponga. Esta garantía le otorga
derechos legales especiales y es posible que también goce de otros derechos que pueden variar según el estado.
Es normal que se produzca un cierto movimiento oscilante y esto no debe considerarse un problema o defecto.10.
Tabla de contenidos
Instrucciones para el desempaque........................ . . . . .17 Instalación de la caja del interruptor ...................... . . . . .23
......... . . .
. .18
Requisitos eléctricos y estructurales...................... . . . . .18
Cómo ensamblar el ventilador de techo ................... . . . . .19
Cómo colgar el ventilador de techo . . . . . . . . . . . . . . . . . . . . . . . . . . . .21
Cómo realizar la instalación eléctrica del ventilador de techo . . . . . . 22
Instalación de la cubierta del capuchón . . . . . . . . . . . . . . . . . . . . . . . . 22
Ensamblaje y montaje de las aspas del ventilador........... . . . . .23
Instrucciones de funcionamiento - Cadena de encendido/apagado . .24Uso eficiente de la energía en ventiladores de techo
Mantenimiento
........................................ . . . . .24
Limpieza de las aspas .................................. . . . . .24
Lista de piezas ........................................ . . . . .25
Ilustración del despiece................................. . . . . .26
Solución de problemas ................................. . . . . .27
Page 17
Este manual está diseñado para facilitar al máximo el ensamblaje, la
instalación, el funcionamiento y el mantenimiento de su ventilador de techo.
Herramientas necesarias
para el ensamblaje
• Destornillador Phillips
• Escalera de tijera
• Destornillador de ¼˝
• Pelacables
• Tres conectores de
cables (incluidos)
ADVERTENCIA
Antes de ensamblar el ventilador de techo, consulte la
sección sobre el método correcto de instalación eléctrica del
ventilador (página 18). Si siente que no posee la experiencia
o los conocimientos eléctricos necesarios, contrate a un
electricista autorizado para instalar el ventilador.
La caja de distribución eléctrica y los conectores de la caja deben ser del tipo
requerido por el código local. El cable más pequeño debe ser un cable de tres
conductores (de dos conductores con conexión a tierra) del siguiente tamaño:
longitud del cable instalado
hasta 15,2 m (50 pies)
de 15,2 a 30,5 m (50 a 100 pies)
NOTA: coloque las piezas de las bolsas de piezas individuales en un
contenedor pequeño para evitar que se extravíen. Si faltan piezas, póngase en contacto con su proveedor local.
Materiales
tamaño del cable según el A.W.G.
(Calibre de Alambre Estadounidense)
14
12
Instrucciones para el desempaque
Para su comodidad, marque cada uno de los pasos. A medida que completa cada paso, coloque una marca de verificación.
Con esto se asegurará de completar todos los pasos y podrá saber desde dónde retomar si fuera interrumpido.
ADVERTENCIA
No instale ni utilice el ventilador si falta alguna pieza
o si hay piezas dañadas. Este producto está diseñado
para ser usado sólo con las piezas suministradas o los
accesorios indicados por Fanimation específicamente
para el mismo. La sustitución de piezas o accesorios no
designados por Fanimation para usar con este producto
podría ocasionar lesiones personales o daños en el
ventilador. Póngase en contacto con su tienda si faltan
piezas o hay piezas dañadas.
1. Verifique que haya recibido las siguientes piezas:
NOTA: Si no está seguro de la descripción de una pieza,
consulte la ilustración del despiece. (Figura 1, página 25)
Unidad del soporte de
suspensión
Capuchón de techo
• Unidad del motor del ventilador
• Unidad del soporte de
suspensión
• Unidad del barral/de la
semiesfera
• Caja del interruptor
• Capuchón de techo
• Cubierta de unión del motor
• Cubierta para el tornillo del
capuchón
• Juego de soporte de Aspas
• Juego de aspas
Cubierta de unión
del motor
Unidad del barral/de la
semiesfera
• Bolsa de accesorios:
– Tornillos de ¼" –20 x 15
mm con arandelas de seguridad
(soporte de aspas a buje del motor)
– Dieciséis tornillos con cabeza de
arandela de 3/16-24 x 7,5 mm y
arandelas de fibra (aspa a soporte
de aspas)
– Cuatro conectores de cables
– Acoplador de cadena
– Cadena
– Kit de balanceo
– Dos tornillos para cajas de
conexiones de 8-32x19mm
– Arandela plana de Ø10 x Ø5 x 0.8
mm, acero inoxidable
Bolsa de accesorios
Unidad del motor
del ventilador
Cubierta para el tornillo del
capuchón
Caja del interruptor
Juego de aspas
Juego de soporte de Aspas
17
Page 18

Uso eficiente de la energía en ventiladores de techo
El nivel de rendimiento y ahorro de energía de los
ventiladoresdetechodependendesucorrectainstalación
yuso.Acontinuaciónlepresentamosalgunassugerencias
para asegurar un rendimiento eficientedel producto.
Selección del lugar de montaje adecuado
Los ventiladores de techo se deben instalar en el centro
de la habitación, a 2 m (7 pies) de altura del piso como
mínimo y 0,5 m (18 pulgadas) de las paredes. Si la altura
del techo lo permite, instale el ventilador a 2,5 m (8-9
pies) por encima del suelo para un flujo de aire óptimo.
Consulte en su tienda minorista de Fanimation para
obtener accesorios de montaje opcionales.
Apague el ventilador cuando no se encuentre en la
habitación
Los ventiladores son para refrescar a la gente, no a
las habitaciones. Si la habitación está vacía, apague el
ventilador de techo para ahorrar energía.
Requisitos eléctricos y estructurales
Su nuevo ventilador de techo requiere una línea de
suministro eléctrico con conexión a tierra de 120 voltios de
CA, 60 Hz, circuito de 15 amperios. La caja de distribución
eléctrica debe estar bien asegurada y debe ser capaz de
soportar una carga de, al menos, 22,7 kg (50 lb). La Figura 1
muestra diversas configuraciones estructurales que podrían
utilizarse para montar la caja de distribución eléctrica.
Uso del ventilador de techo todo el año
En verano:Useel ventiladordetechoen sentido contrarioa
lasagujasdel reloj. El flujo deaire queproduce el ventilador
crearáunefectofríodelairequelorefrescarámás.Seleccione
una velocidad quele proporcione una brisa confortable. Las
velocidades másbajas consumen menosenergía.
Eninvierno: Invierta elmotoryhaga funcionarelventilador
de techo a velocidad baja y en el sentido de las agujas
del reloj. Esto produce una suave corriente ascendente,
que obliga al aire cálido que se acumula cerca del techo a
bajar al espacio ocupado. No olvide ajustar el termostato
cuando utilice el ventilador de techo. Con este sencillo
paso puede ahorrar energía adicional y dinero.
Techo
ADVERTENCIA
Para reducir el riesgo de incendios, descargas eléctricas o
lesiones personales, fije el ventilador a la caja de distribución
eléctrica marcada como aceptable para un peso de 22,7
kg (50 lb) o menos. Utilice los tornillos suministrados con
la caja de distribución eléctrica. La mayoría de las cajas
de distribución eléctricas que comúnmente se utilizan
como soporte de lámparas no sirven como soporte de
ventiladores y es posible que deban reemplazarse. Consulte
a un electricista calificado si tiene dudas.
Si el ventilador reemplazará a una lámpara existente,
desconecte la electricidad de la caja de fusibles principal
y retire la lámpara.
ADVERTENCIA
Apagar el interruptor de pared no es suficiente. Para
evitar posibles descargas eléctricas, asegúrese de que
la electricidad esté desconectada en la caja de fusibles
principal antes de realizar la instalación eléctrica. Toda
instalación eléctrica debe cumplir con los códigos
nacionales y locales y el ventilador de techo debe tener
la conexión a tierra adecuada como forma de precaución
ante posibles descargas eléctricas.
Vigas del
techo
2˝ x 4˝
Caja de
distribución
eléctrica
Figura 1
ADVERTENCIA
A fin de evitar incendios o descargas eléctricas, siga con
cuidado todas las instrucciones de instalación eléctrica.
Cualquier trabajo eléctrico que no se describa en estas
instrucciones deberá ser realizado o aprobado por un
electricista autorizado.
18
Page 19
Cómo ensamblar el ventilador de techo
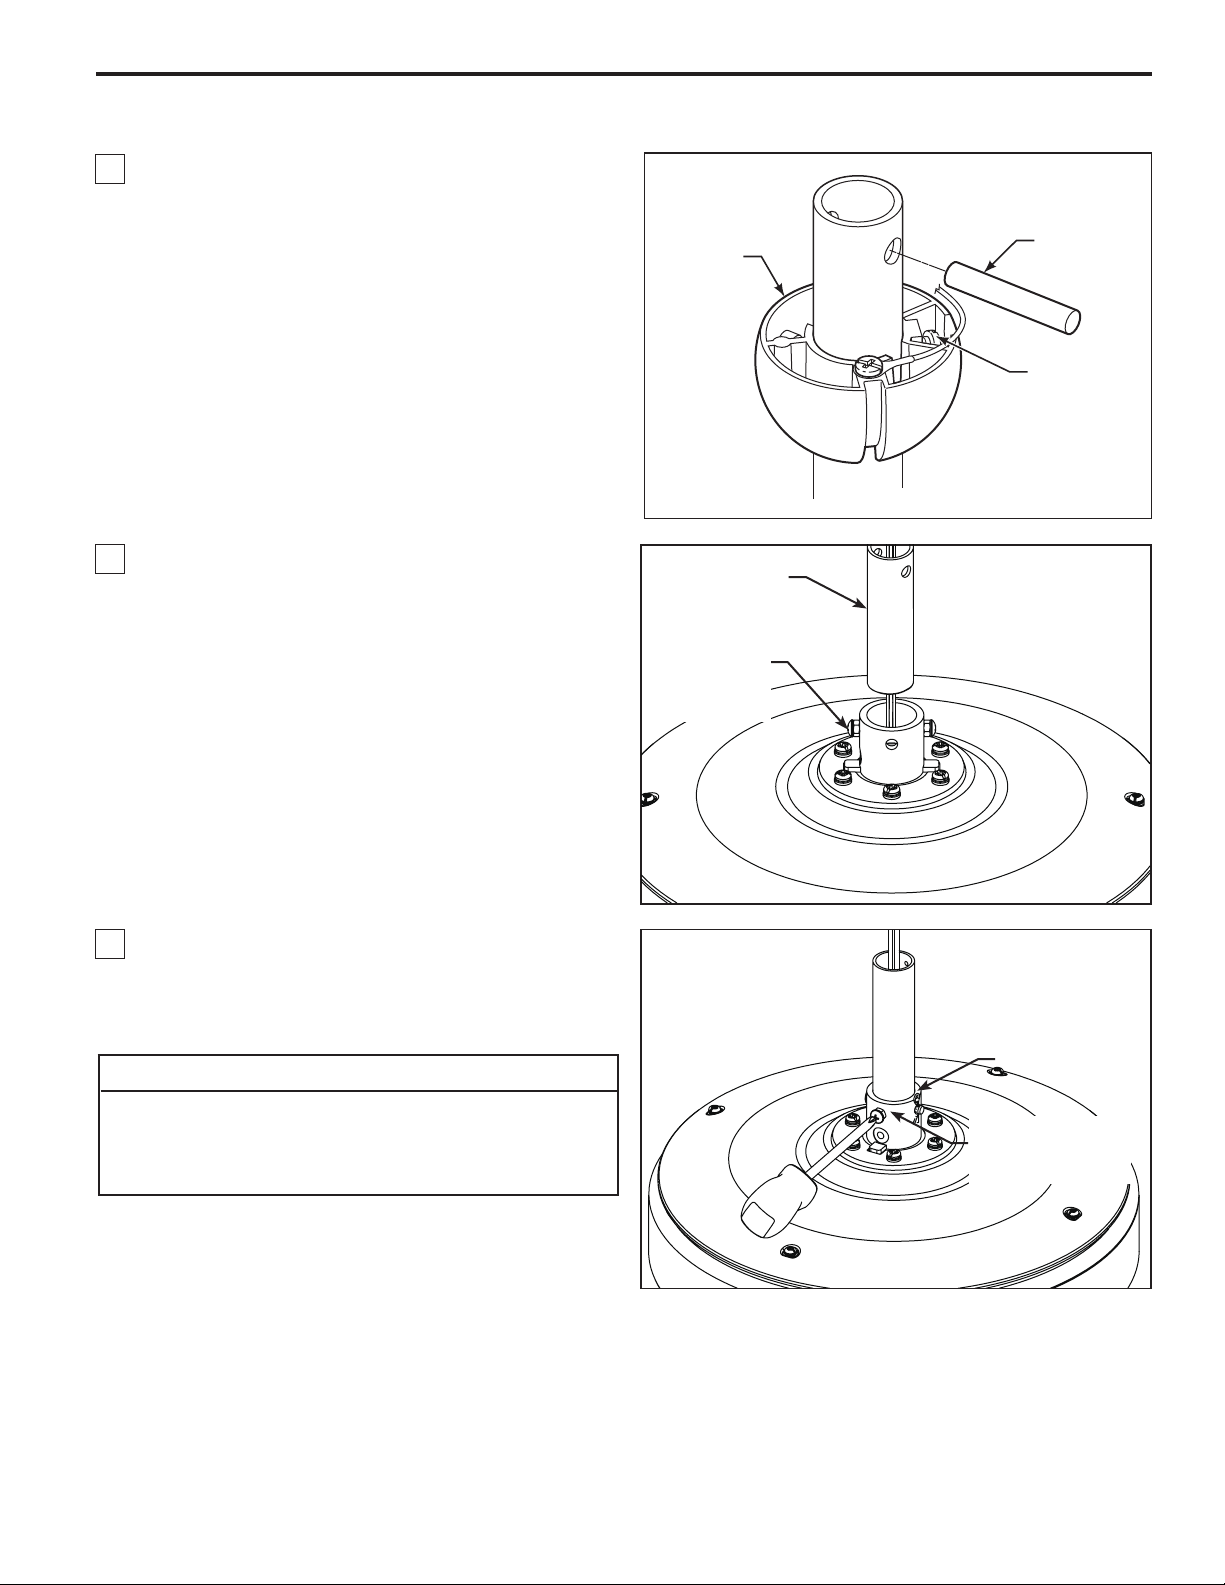
1. Antes de realizar el ensamblaje, separe y guarde las
bolsas de accesorios en el empaque. Afloje el tornillo
de fijación de la semiesfera para lograr que ésta pueda
desplazarse libremente por el barral. Retire el pasador
del barral y luego extraiga la semiesfera. Conserve el
pasador y la semiesfera para su reinstalación en el
Paso 5 (Figura 1).
Bola para
colgar
Pasador
Tornillo
de fijación
Figura1
2. El ventilador viene con cables de 80˝ de color azul,
negro y blanco. Separe y desenrosque los tres cables.
Pase los cables a través del barral.
NOTA: Podrá utilizar el barral de 11,43 cm (4½”) que
viene con el ventilador o un barral opcional comprado
por separado.
Afloje los dos tornillos de fijación del soporte del barral
Instale el barral en el acoplador. Alinee los orificios del
pasador en el barral con los orificios del soporte del
mismo. (Figura 2)
3. Instale el pasador y el pasador de horquilla, y apriete
los tornillos de fijación. El pasador y el pasador de
horquilla deben estar instalados correctamente para
evitar que los tornillos de fijación se aflojen. (Figura 3)
▲
ADVERTENCIA
Es de suma importancia que el tornillo Clevis en el soporte del
barral esté colocado correctamente y que los tornillos de fijación
y las tuercas estén bien ajustados. Si el tornillo Clevis, las
tuercas, el pasador de horquilla y los tornillos de fijación no
están correctamente colocados, el ventilador podría caerse.
Unidad del
barral/de la
semiesfera
Horquilla de tornillo
con arandelas de
goma (2), Tuerca
Figura 2
Pasador
de horquilla
Tornillo de fijación
con tuerca hexagonal
y arandela de goma
(2 cada uno)
19
Figura 3
Page 20
Cómo ensamblar el ventilador de techo (cont.)
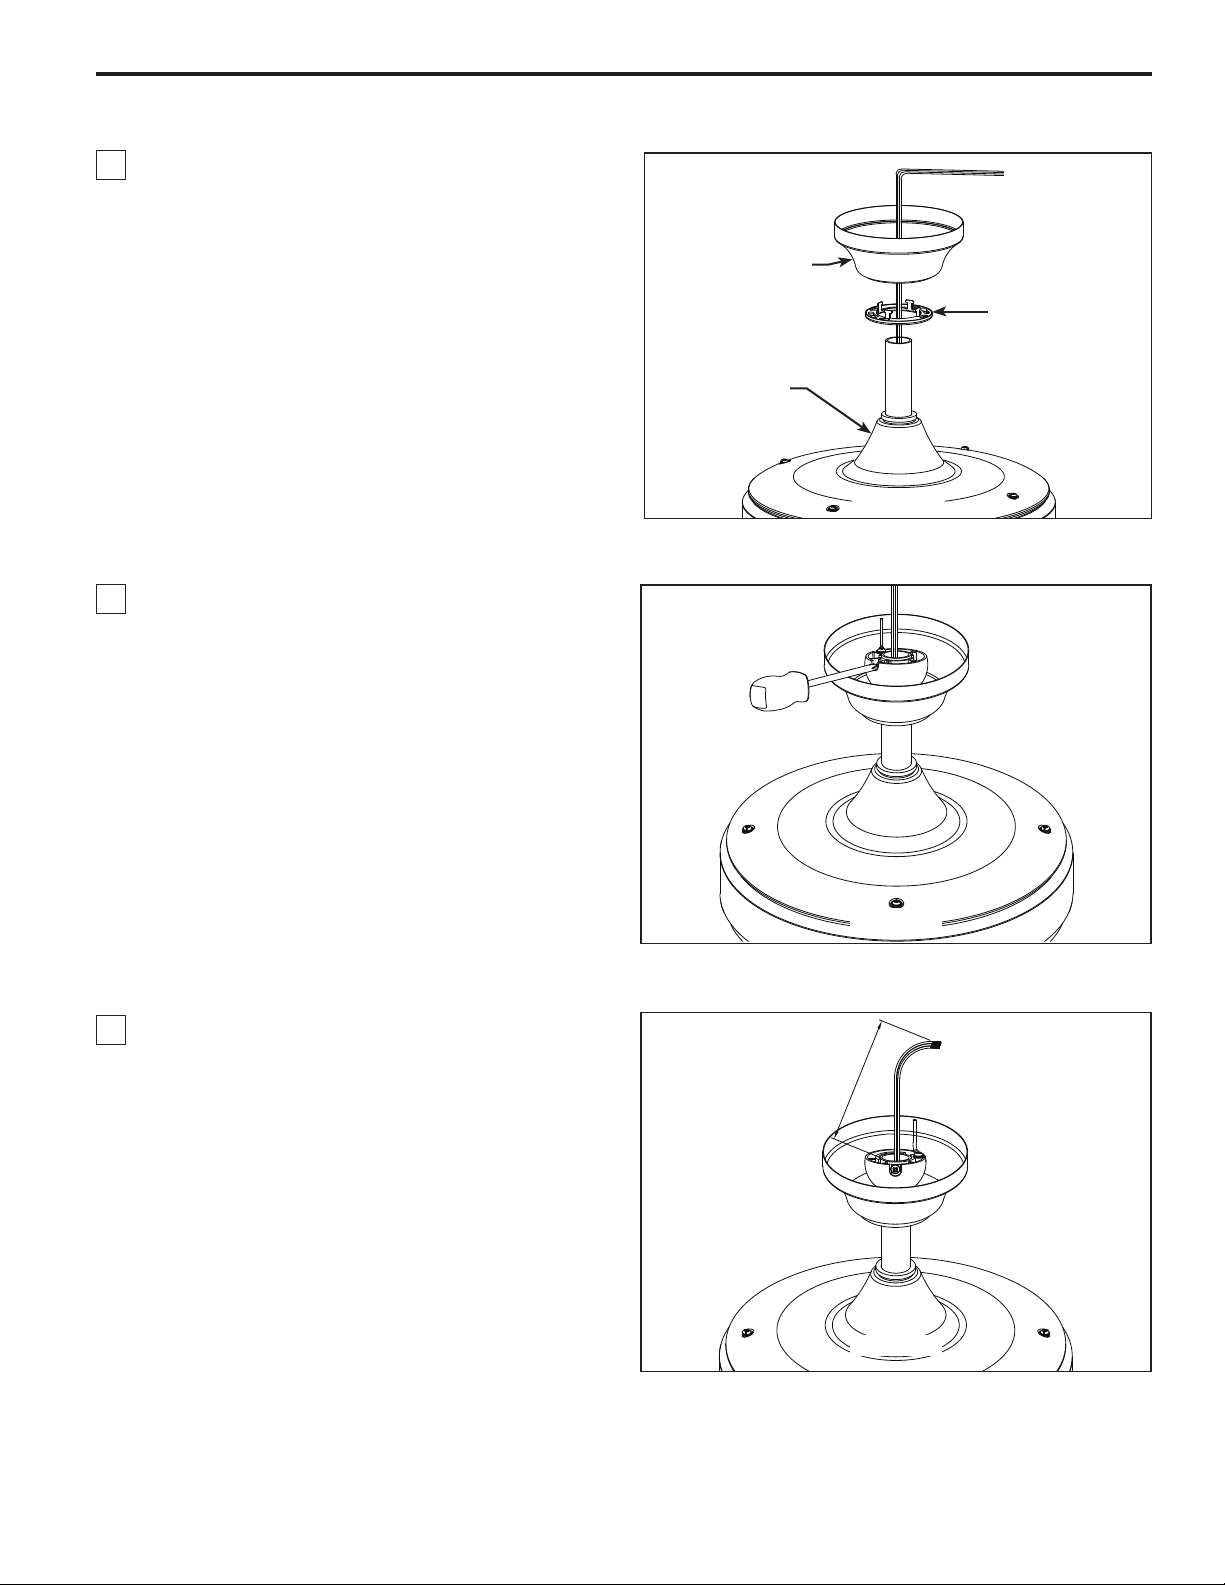
4. Pase los cables a través de la cubierta de unión del
motor, la cubierta para el tornillo y el capuchón.
(Figura 4)
5. Vuelva a colocar la semiesfera en el barral como
se indica a continuación. Pase los tres cables de
2.03 m (80˝) a través de la semiesfera. Pase el pasador
a través de los dos orificios en el barral y alinee la
semiesfera de modo que el pasador quede atrapado
en la ranura de la parte superior de la misma. Empuje
la semiesfera hacia arriba, bien ajustada contra el
pasador. Ajuste firmemente el tornillo de fijación en la
semiesfera. Si el tornillo de fijación está flojo, podría
provocar oscilación del ventilador. (Figura 5)
Capuchón de techo
la cubierta del
tornillo de la base
Cubierta de
unión del motor
Figura 4
6. Corte el exceso de cable aproximadamente de 15
a 23 cm (6 a 9 pulgadas) por encima de la parte
superior del barral. Pele 1,2 cm (½˝) del aislamiento
en cada extremo del cable. (Figura 6)
NOTA:
volver a ajustarlos cuando sea necesario antes de realizar
la instalación.
Se deben revisar todos los tornillos de fijación y
Figura 5
22,86 cm
15,24 cm a
Figura 6
20
Page 21
Cómo colgar el ventilador de techo
Tornillo (2)
(
Incluido con
ADVERTENCIA
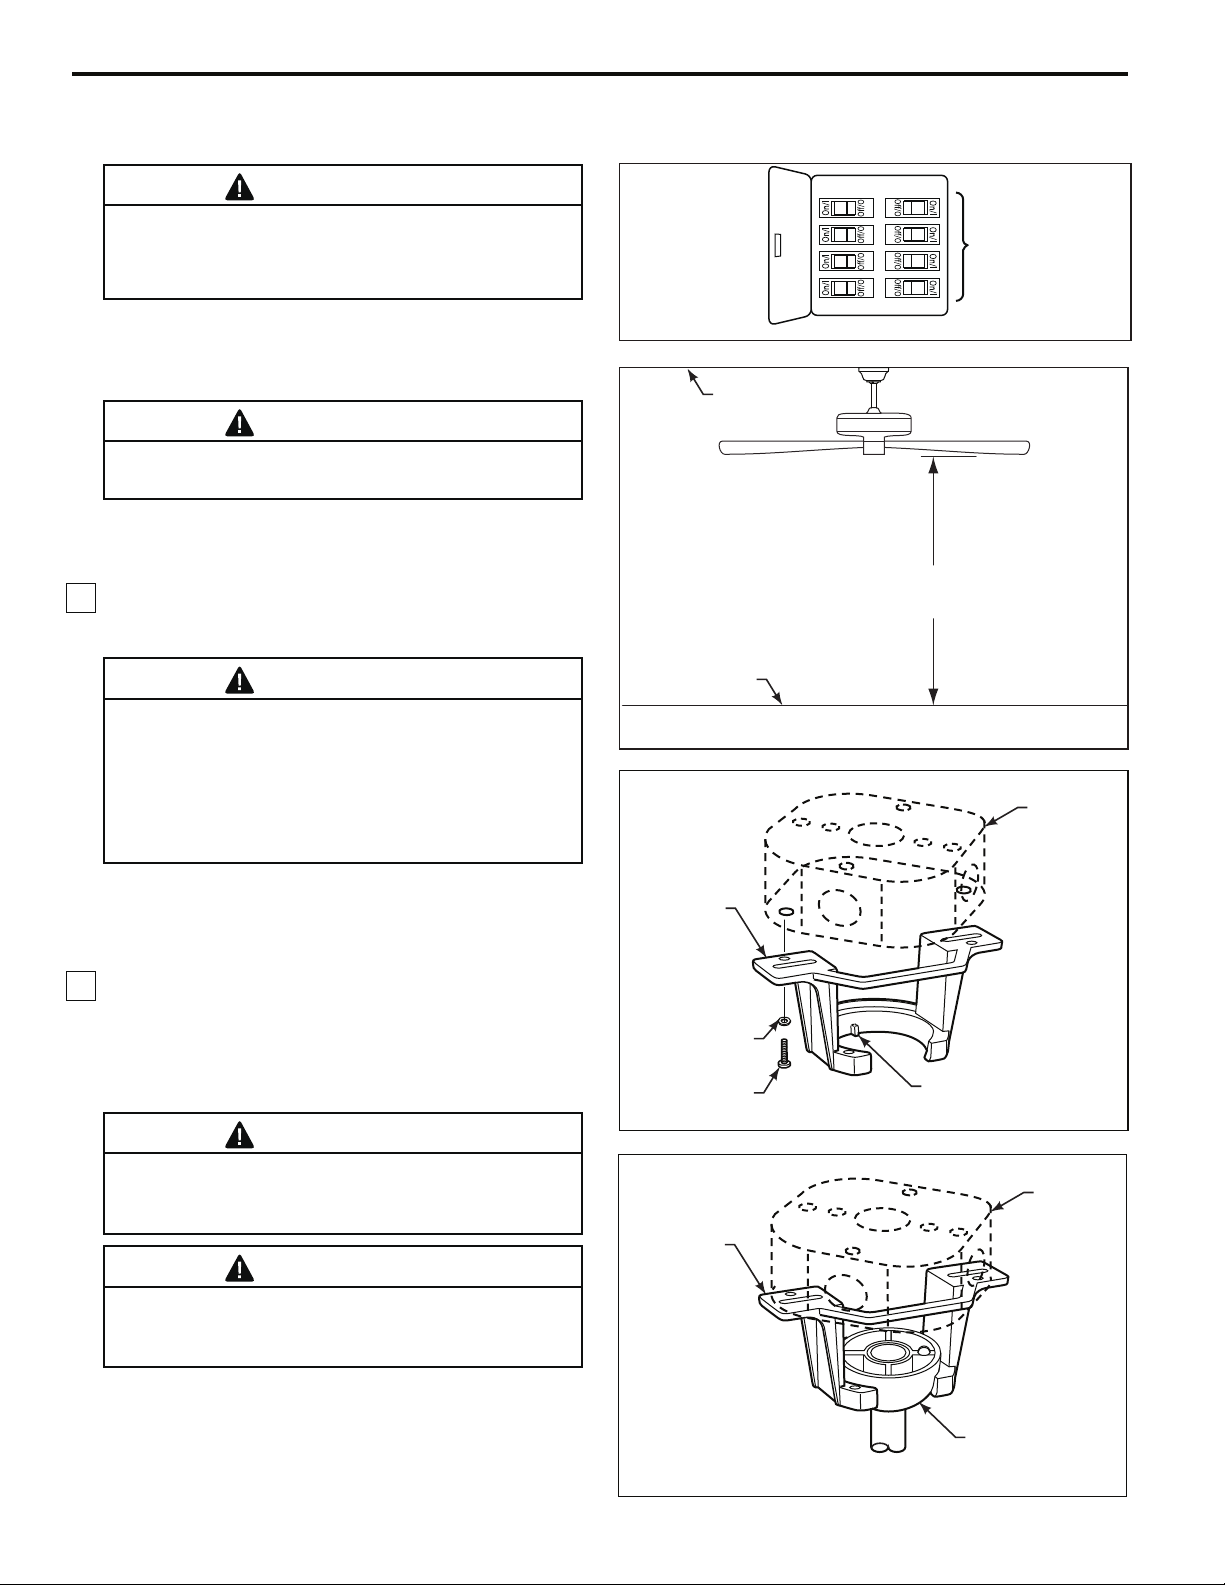
Para evitar una posible descarga eléctrica, asegúrese
de cortar la alimentación eléctrica de la caja de
fusibles principal antes de colgar el ventilador.
(Figura 7)
PRINCIPAL CAJA DE
FUSIBLES
NOTA: Si no está seguro de si la caja de salida tiene
conexión a tierra, pida consejo a un electricista
certificado, ya que debe tener conexión a tierra para
un funcionamiento seguro.
ADVERTENCIA
Debe colgar el ventilador a una distancia mínima de
2,13 m desde las aspas hasta el piso. (Figura. 8)
1. Fije bien la abrazadera para colgar a la caja de
salida con los tornillos y las arandelas provistas con la
ventilador. (Figura. 9)
ADVERTENCIA
La caja de salida debe estar bien asegurada. La
abrazadera para colgar debe estar bien asentada
contra la caja de salida. Si la caja de salida está
empotrada, retire el panel hasta que la abrazadera
haga contacto con la caja. Si la abrazadera y/o la caja
de salida no están
podría tambalearse o caerse.
bien aseguradas, el ventilador
Figura 7
EI Techo
No
menos de
2,13 m
EI Piso
Figura 8
Caja de
salida
2. Levante cuidadosamente el ventilador y coloque el
ensamble de la bola para colgar/varilla en la abrazadera
para colgar que acaba de fijar a la caja de salida.
Asegúrese de que la ranura de la bola esté alineada
con la lengüeta de la abrazadera para colgar.
(Figura. 10)
ADVERTENCIA
Si no coloca la lengüeta en la ranura, podrían
dañarse los cables eléctricos y podrían ocurrir
incendios o descargas eléctricas.
ADVERTENCIA
Para evitar una posible descarga eléctrica, no apriete
los cables entre el ensamble de la bola para colgar
y la abrazadera para colgar.
Abrazadera
para colgar
Arandela Plana
ventilador)
Abrazadera
para colgar
Lengüeta
Figura 9
Caja de
salida
Ensamble de la bola
para colgar/varilla
Figura 10
21
Page 22
Cómo realizar la instalación eléctrica del ventilador de techo
Si siente que no posee la experiencia o los conocimientos eléctricos necesarios, contrate a un electricista
autorizado para instalar el ventilador.
▲ADVERTENCIA
Para evitar posibles descargas eléctricas, asegúrese
de que la electricidad esté desconectada de la caja de
fusibles principal antes de realizar la instalación. NOTA:
si no está seguro si la caja de distribución eléctrica tiene
conexión a tierra, pida asesoramiento a un electricista
autorizado, ya que la conexión a tierra es importante
para un funcionamiento seguro.
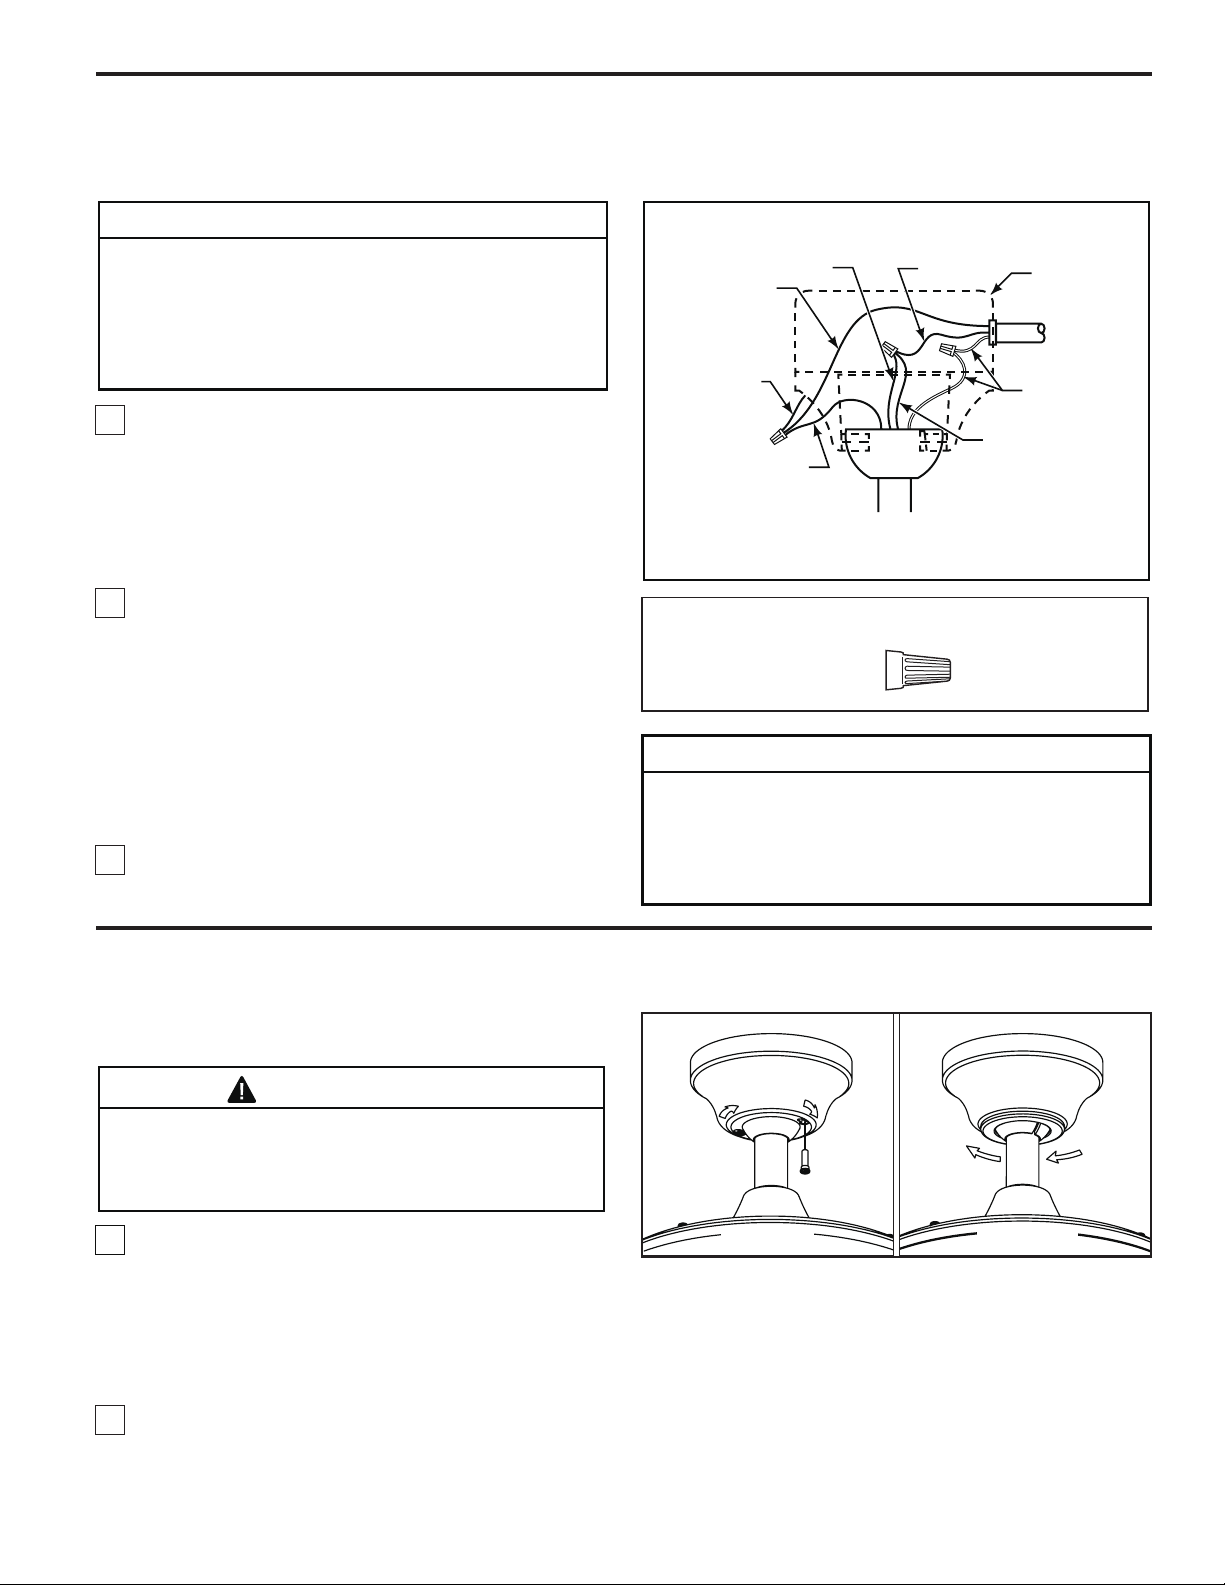
1. Conecte el cable de conexión a tierra verde
de la semiesfera y el cable de conexión a tierra
verde del
conexión a tierra (el mismo puede ser un cable
desnudo o un cable con aislamiento de color verde)
Conecte los cables con los conectores de cables
suministrados.
2. Conecte el cable blanco del motor del ventilador
al cable de suministro blanco (neutro) con el
conector de cables suministrado. Conecte el cable
de suministro negro con el conector de cables
suministrado (Figura 11). Luego de realizar las
conexiones, doble los cables hacia arriba e insértelo
insértelos con cuidado en la caja de distribución
eléctrica, con los cables blanco y verde a un lado
de la caja y los cables negro y azul al otro lado.
3. Continúe con el siguiente paso de "Instalación de
la Vivienda Canopy".
soporte de suspensión al conductor con
negro del motor del ventilador y el cable azul al cable
Cable verde
(conexión a
tierra)
Cable verde
(conexión
a tierra) del
soporte de
suspensión
Cable verde
(conexión a
tierra) de la
semiesfera
Cable del
ventilador
negro
Negro
Caja de
distribución
eléctrica
indicada
Suministro
doméstico
Blanco
Azul
Figura 11
Aditamentos utilizados
Conectores
de cable
x 3
▲ADVERTENCIA
Verifique que todas las conexiones estén bien ajustadas,
incluida la conexión a tierra, y que no haya ningún cable
desnudo visible en los conectores de cables, a excepción
del cable de conexión a tierra. No haga funcionar el
ventilador hasta que las aspas estén colocadas. Podrían
producirse ruidos y daños en el motor.
Instalación de la cubierta del capuchón
NOTA: Este paso se debe realizar luego de completar la
instalación eléctrica necesaria.
ADVERTENCIA
Para evitar posibles incendios o descargas eléctricas,
asegúrese de que los cables eléctricos se encuentren
completamente adentro de la cubierta del capuchón y
de que no estén aprisionados entre la cubierta y el techo.
1 Retire uno de los dos tornillos de reborde de la
.
abrazadera para colgar. Afloje el segundo tornillo de
reborde sin retirarlo del todo. Ensamble la base girando
el chavetero de la base sobre el tornillo de reborde de
la abrazadera para colgar. Ajuste el tornillo de reborde.
Ensamble por completo el segundo tornillo de reborde
que antes había retirado y ajústelo. (Figura 12a)
2. Coloque y ajuste firmemente la cubierta para el tornillo
de la base sobre los tornillos de reborde de la abrazadera
para colgar mediante el mecanismo de seguro por giro del
chavetero. (Figura. 12b)
22
Figure 12a
Figure 12b
Page 23

Ensamblaje y montaje de las aspas del ventilador
NOTA DE INSTALACIÓN
No conecte las aspas hasta que el ventilador esté
totalmente instalado. Instalar el ventilador con las
aspas colocadas podría ocasionar daños en las
mismas.
1. Retire y deseche los topes (de goma) del motor
extrayendo los cinco tornillos. (Figura 13)
2. Coloque las aspas sobre sus soportes con los postes
roscados que se muestran. Asegúrese de que el borde
inferior del aspa esté completamente asentado sobre el
brazo del aspa. Con un destornillador Phillips, ajuste los
tornillos con cabeza de arandela de 3/16-24 x 7,5 mm
junto con las phillips de plano para asegurar las aspas
a los brazos del aspa. (Figura. 14)
PRECAUCIÓN
No conecte las aspas hasta que el ventilador esté
totalmente instalado. Instalar el ventilador con las
aspas colocadas podría ocasionar daños en las
mismas.
3. Fije los soportes de aspas al soporte del motor
mediante los tornillos de 1/4-20 x 15 mm a través de
los orificios ubicados al costado del soporte del motor.
(Figura 15)
NOTA:
soportes de las aspas y vuelva a ajustarlas si fuese
necesario.
Revise periódicamente las piezas de los
Aspas
Aditamentos utilizados:
Tornillos con cabeza
de phillips
(3/16-24 x 7.5)
Arandelas
de plano
Figura 13
Soporte de aspas
Figura 14
x 15
x 15
!
ADVERTENCIA
Para reducir el riesgo de lesiones personales, no
doble los soportes de aspas al instalarlos, balancear
las aspas o limpiar el ventilador. No coloque objetos
extraños entre las aspas del ventilador en
funcionamiento.
PRECAUCIÓN
A fin de reducir el riesgo descargas eléctricas,
desconecte el circuito de suministro eléctrico al
ventilador antes de instalar el kit de iluminación.
Instalación de la caja del interruptor
1. Ajuste firmemente la caja del interruptor de 9
pasadores al enchufe del mazo de cables dentro de la
caja del interruptor. (Figura 16)
Figura 15
Aditamentos utilizados:
Tornillos
¼ -20 x 15
Figura 16
x 10
23
Page 24
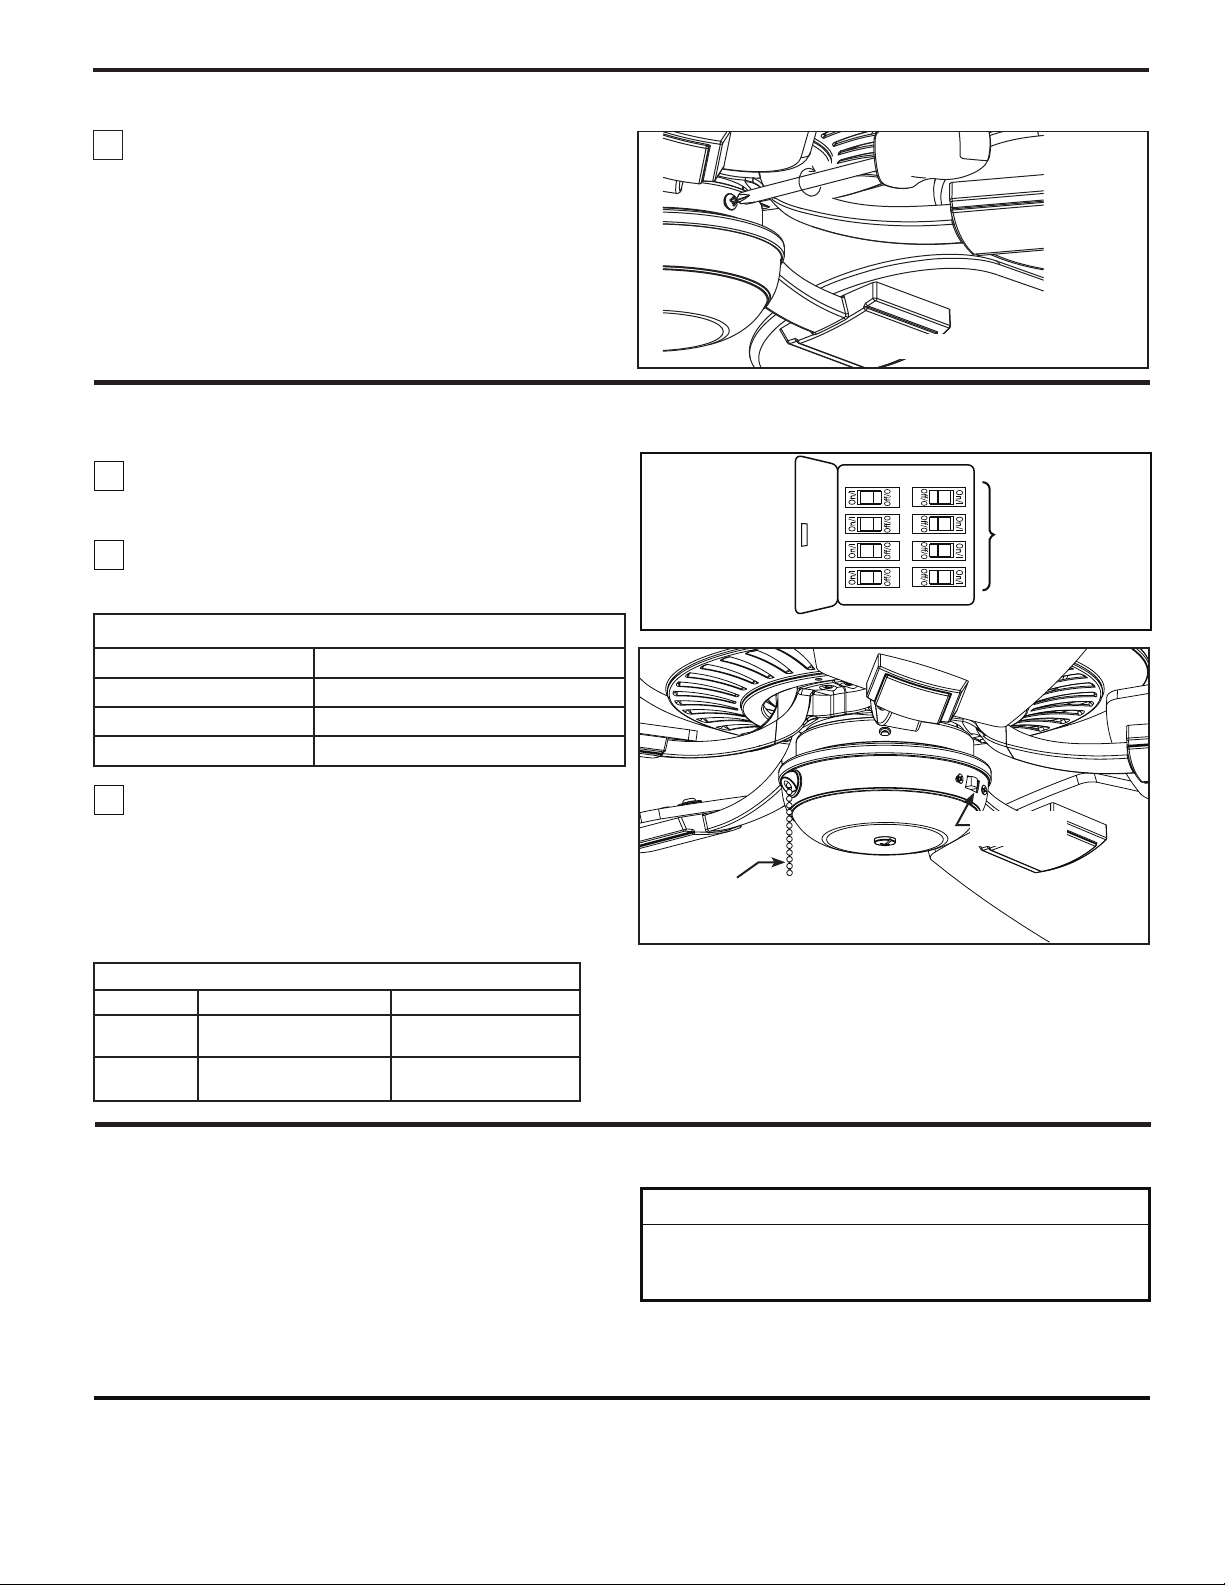
Instalación de la caja del interruptor (cont.)
2. Ensamble la caja del interruptor al adaptador de la
caja con tres tornillos. (Figura17)
Figura 17
Instrucciones de funcionamiento - Cadena de encendido/apagado
1. Vuelva a conectar la corriente eléctrica en la caja de
distribución eléctrica mediante la conexión de la
electricidad en la caja de fusibles principal. (Figura 18)
2. Verifique el funcionamiento del ventilador tirando
levemente de la cadena de encendido/apagado para el
control de la velocidad.
Secuencia de funcionamiento de la cadena del tirador
1.ª tirada
2.ª tirada
3.ª tirada
4.ª tirada
Alta
Media
Baja
Apagado
Figura 18
PRINCIPAL CAJA DE
FUSIBLES
3. Si desea que el flujo de aire se desplace en la
dirección opuesta, apague el ventilador y espere a que
las aspas se detengan. Luego deslice el conmutador
Conmutador
inversor
inversor a la posición contraria y vuelva a encender el
ventilador. Su modelo de ventilador está equipado con
un interruptor de cadena de 4 posiciones y 3
Cadena de encendido/apagado
para el control de la velocidad
Figura 19
velocidades. (Figura 19)
Información sobre el interruptor de reversa
Temporada
Verano
Invierno
Dirección de rotación
En dirección contraria
a las manecillas del reloj
En dirección de las
manecillasdel reloj
Posición del interruptor
Derecha
Izquierda
Mantenimiento
El único mantenimiento necesario para el ventilador de
techo es una limpieza periódica.
Al llevar a cabo la limpieza, use sólo un cepillo suave o un
paño sin pelusas, para evitar rayar el acabado.
No se requieren agentes abrasivos de limpieza; los mismos
No utilice solventes para limpiar el ventilador de techo.
Podrían dañar el motor o las aspas y ocasionar posibles
descargas eléctricas.
deben evitarse para prevenir daños en el acabado.
SE RECOMIENDA: verificar periódicamente que los tornillos que sujetan los soportes de aspas al buje del motor estén
bien ajustados.
PRECAUCIÓN
Limpieza de las aspas
Se recomienda limpiar el polvo de las aspas periódicamente.
Lo mejor es utilizar un plumero.
Evite usar agua, productos de limpieza o trapos ásperos,
que pueden combar o dañar las aspas.
24
Page 25
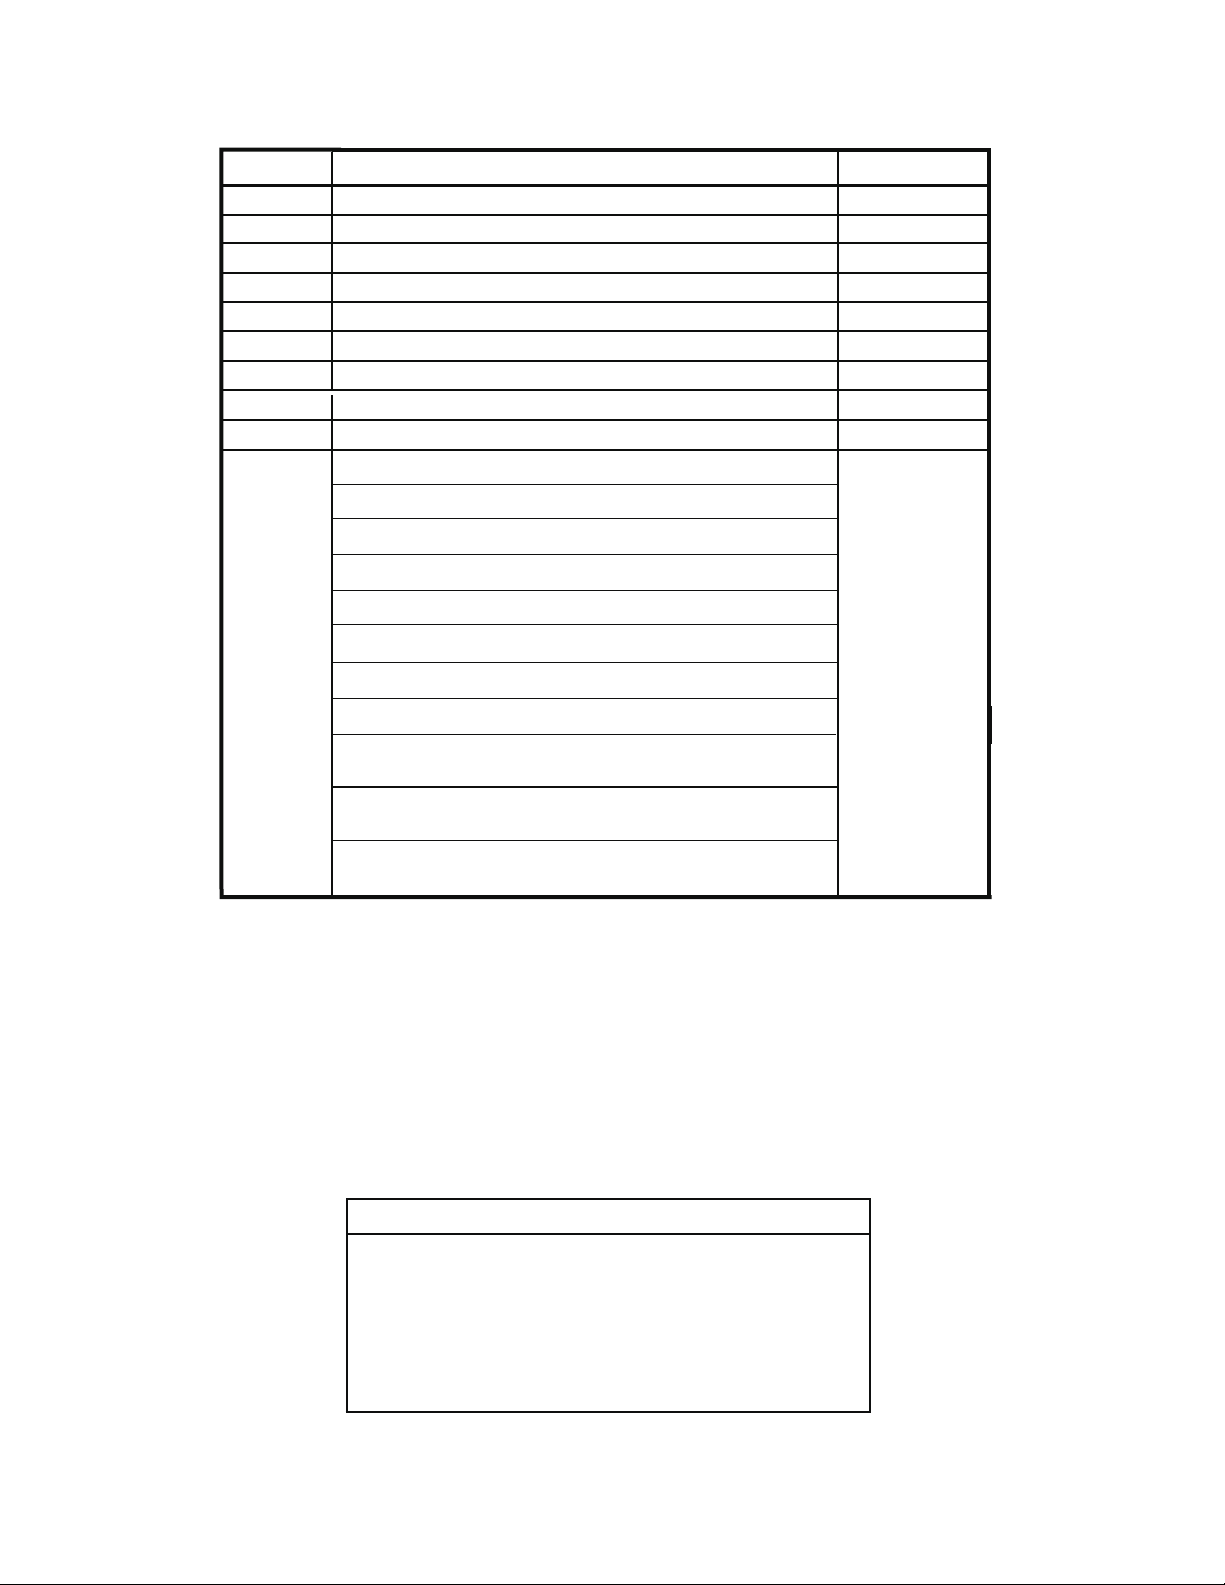
Lista de piezas
Modelos N.° TF971**
N.° de Ref. Descripción Pieza N.º
1
2
3
4
5
6
7
8
9
Unidad del soporte de suspensión
Unidad del barral/de la semiesfera
Capuchón de techo
Cubierta para el tornillo del capuchón
Cubierta de unión del motor
Unidad del motor del ventilador
Caja del interruptor
Juego de soporte de Aspas
Caja del interruptor
Bolsa de accesorios que contiene:
APGAC110RBL
ADRAC1-45**
P70055**
APPAC1101**
APPAC1404**
AMA0971**
AP071001**
AP097101**
AP097104**
Kit de balanceo
conectores de cables (4)
Acoplador de cadena
10
Inserte los CÓDIGOS DE ACABADO (consulte el número de modelo del ventilador que se encuentra en el
Cadena
#8–32 x 19mm Junction Box Screws, Stainless Steel (2)
Arandela plana de Ø10 x Ø5 x 0.8 mm, acero inoxidable (2)
Bolsa de accesorios para el montaje de as as que contiene:
arandelas de flano (16 piezas)
Bolsa de accesorios para el montaje de lo
aspas que contiene:
Tornillos Phillips de ¼" –20 x 15 mm c
seguridad (11 piezas)
(BALKT)
p
2
4 x 7,5 mm y
-61/3 ed spillihp ed azebac noc sollinrot
s soportes de
on arandelas de
HDWTF971**
soporte de barral)
Antes de desechar los materiales de embalaje, asegúrese de haber extraído todas las piezas
Cómo hacer un pedido de piezas
Al hacer un pedido de piezas de repuesto,
proporcione siempre la siguiente información:
• Número de pieza
• Descripción de la pieza
• Número de modelo del ventilador
Póngase en contacto con su tienda para obtener
las piezas de repuesto.
25
Page 26

Ventilador de techo para ubicaciones húmedas TF971**
Despiece
1
2
3
4
5
6
10
9
7
8
Figura 1
NOTA: la ilustración que se muestra no está hecha a escala y su configuración real puede variar.
26
Page 27

Solución de problemas
▲ADVERTENCIA
Para su propia seguridad, desconecte la electricidad de la caja de fusibles o disyuntor antes de
Problema Causa posible Solución sugerida
1. EL VENTILADOR NO
ARRANCA
1. El fusible o el disyuntor están fundidos.
2. Las conexiones eléctricas del ventilador o del
interruptor en la caja del interruptor están flojas.
3. El conmutador inversor se encuentra en posición
neutra.
solucionar problemas en su ventilador.
1. Controle los fusibles del circuito principal y derivado
o los disyuntores.
2. Controle las conexiones eléctricas del ventilador y
del interruptor en las cajas de los interruptores.
PRECAUCIÓN: ¡Asegúrese de que el suministro
principal de electricidad esté desconectado!
3. Asegúrese de que el conmutador inversor esté
completamente a un lado.
2. EL VENTILADOR HACE
RUIDO
3. EL VENTILADOR OSCILA
EN EXCESO
1. Las aspas no están sujetas al ventilador
2. Hay tornillos flojos en la caja del motor.
3. Los tornillos que aseguran los soportes de las aspas
al buje del motor están flojos.
4. Los conectores de cables dentro de la caja hacen
ruido.
5. Ruido del motor provocado por el control de
velocidad de estado sólido variable.
6. Los tornillos que sujetan las aspas a los soportes de
aspas están flojos.
7. El tornillo del soporte de la cubierta inferior está flojo.
1. El tornillo de fijación y la tuerca del soporte de barral
están flojos.
2. El tornillo de fijación en la unidad del barral/de la
semiesfera está flojo.
3. Los tornillos que aseguran los soportes de las aspas
al buje del motor están flojos.
4. Los soportes de aspas no están colocados
correctamente.
5. El soporte de suspensión o la caja de distribución
eléctrica del techo no están bien asegurados.
6. Las aspas del ventilador están desbalanceadas.
1. Ajuste las aspas al ventilador antes de ponerlo en
funcionamiento.
2. Asegúrese de que todos los tornillos de la caja del
motor estén bien ajustados (pero no en exceso).
3. Asegúrese de que los tornillos que fijan los soportes de
aspas al buje del motor del ventilador estén bien ajustados.
4. Asegúrese de que los conectores de cables en la caja
del interruptor no produzcan ruido al rozar unos con otros
o al rozar la pared interior de la caja del interruptor.
PRECAUCIÓN: ¡Asegúrese de que el suministro
principal de electricidad esté desconectado!
5. Algunos motores de ventilador son sensibles a
las señales de los controles de ve
sólido variables. Los controles de estado sólido no son
recomendables. Escoja un método de control alternativo.
6. Ajuste bien los tornillos.
7. Asegure bien los tornillos de fijación.
1. Ajuste bien los dos tornillos de fijación y las tuercas
en el soporte de barral.
2. Ajuste el tornillo de fijación en la unidad del barral/de
la semiesfera.
3. Asegúrese de que los tornillos que fijan los soportes de
aspas al buje del motor del ventilador estén bien ajustados.
4. Asegúrese de que los soportes de las aspas del
ventilador estén colocados firmemente y de manera
uniforme en relación con la superficie de la caja del
motor. Si los soportes están mal colocados, afloje los
tornillos y vuelva a ajustarlos.
5. Ajuste los tornillos del soporte de suspensión de la
caja de distribución eléctrica y asegúrela.
6. Al intercambiar la posición de las aspas, puede
redistribuir el peso y hacer que el ventilador funcione
más suavemente. Por ejem
las posiciones 1 y 3, o 1 y 4. Si esto no mejora el nivel de
oscilación, intercambie la 2 por la 4, o la 2 por la 5.
locidad de estado
plo, intercambie las aspas en
4. NO HAY SUFICIENTE
MOVIMIENTO DE AIRE
1. Si es posible, considere el uso de un barral más largo.
Por ejemplo, use un barral de 30,5 cm (12”) en lugar del
barral de 15 cm (6”) que viene con el ventilador.
2. Considere utilizar aspas más angostas en lugar de
aspas ovaladas y anchas. Las aspas más angostas están
disponibles en las series de hoja de palma y bambú tejido.
27
Page 28

10983 Bennett Parkway
Zionsville, IN 46077
Llame Sin Cargo al (888) 567-2055
FAX (866) 482-5215
Desde fuera de los EE.UU. llame al (317) 733-4113
Copyright 2013 Fanimation 2013/07 V.01
Visite nuestro sitio Web en www.fanimation.com
 Loading...