

Page 1

Bud-e FRIDGE – USER GUIDE
1.
Page 2
NOTES BEFORE INSTALLATION
1. Allow unit to rest upright in the correct
position for 1 hour before unboxing.
3. Position unit in a well ventilated area and
ensure you allow a minimum of 2 inches
clear area around the unit.
4. Do not rest any objects on the top
or sides of the unit
5. The fridge requires a 110V US type
power outlet.
6. After turning the fridge on allow it to reach
pre-programmed temperature (0°C/32°F)
(3 LEDs on) over a 12 hour period.
UNBOXING YOUR Bud-e FRIDGE
7. After this initial period (minimum 12 hours)
the fridge setting can be changed to achieve
below zero temperatures by illuminating all 5
LEDS’s (-1.5°C/-3.0°C) or (29°F/26°F)
8. To ensure the unit can reach below zero
temperatures efciently, please load with
cold beer as opposed to room temperature
product where possible.
9. It is normal for the sides of the fridge to be
warm at times during operation.
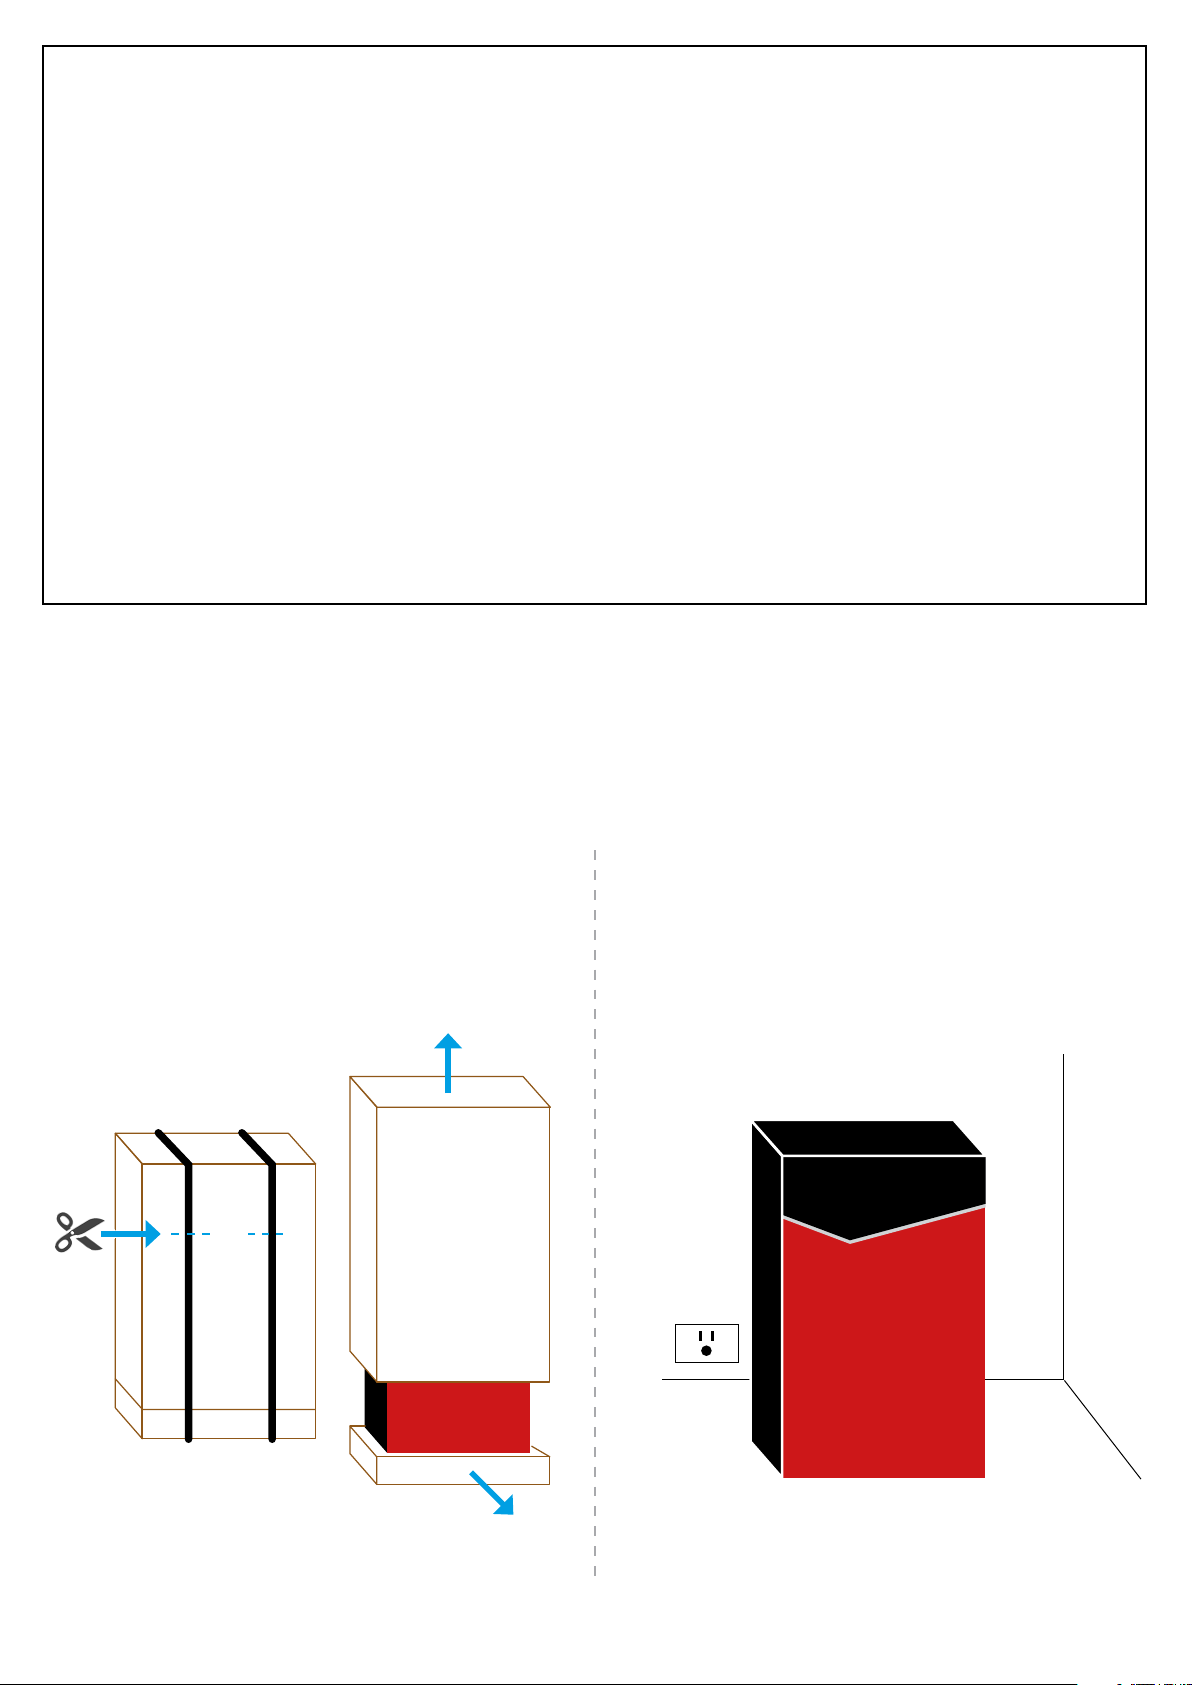
Move packaged unit to approximate position of installation and allow unit to rest upright
in the correct position for 1 hour before unboxing.
Cut the straps and slide the
1. 2.
complete cardboard outer upward
and off the fridge. Remove the
fridge from the packaging base.
Cut
Place the fridge in position
on a level surface near a
110V power outlet.
Remove any plastic coverings
from the fridge
2.
Page 3
UNBOXING YOUR Bud-e FRIDGE
3.
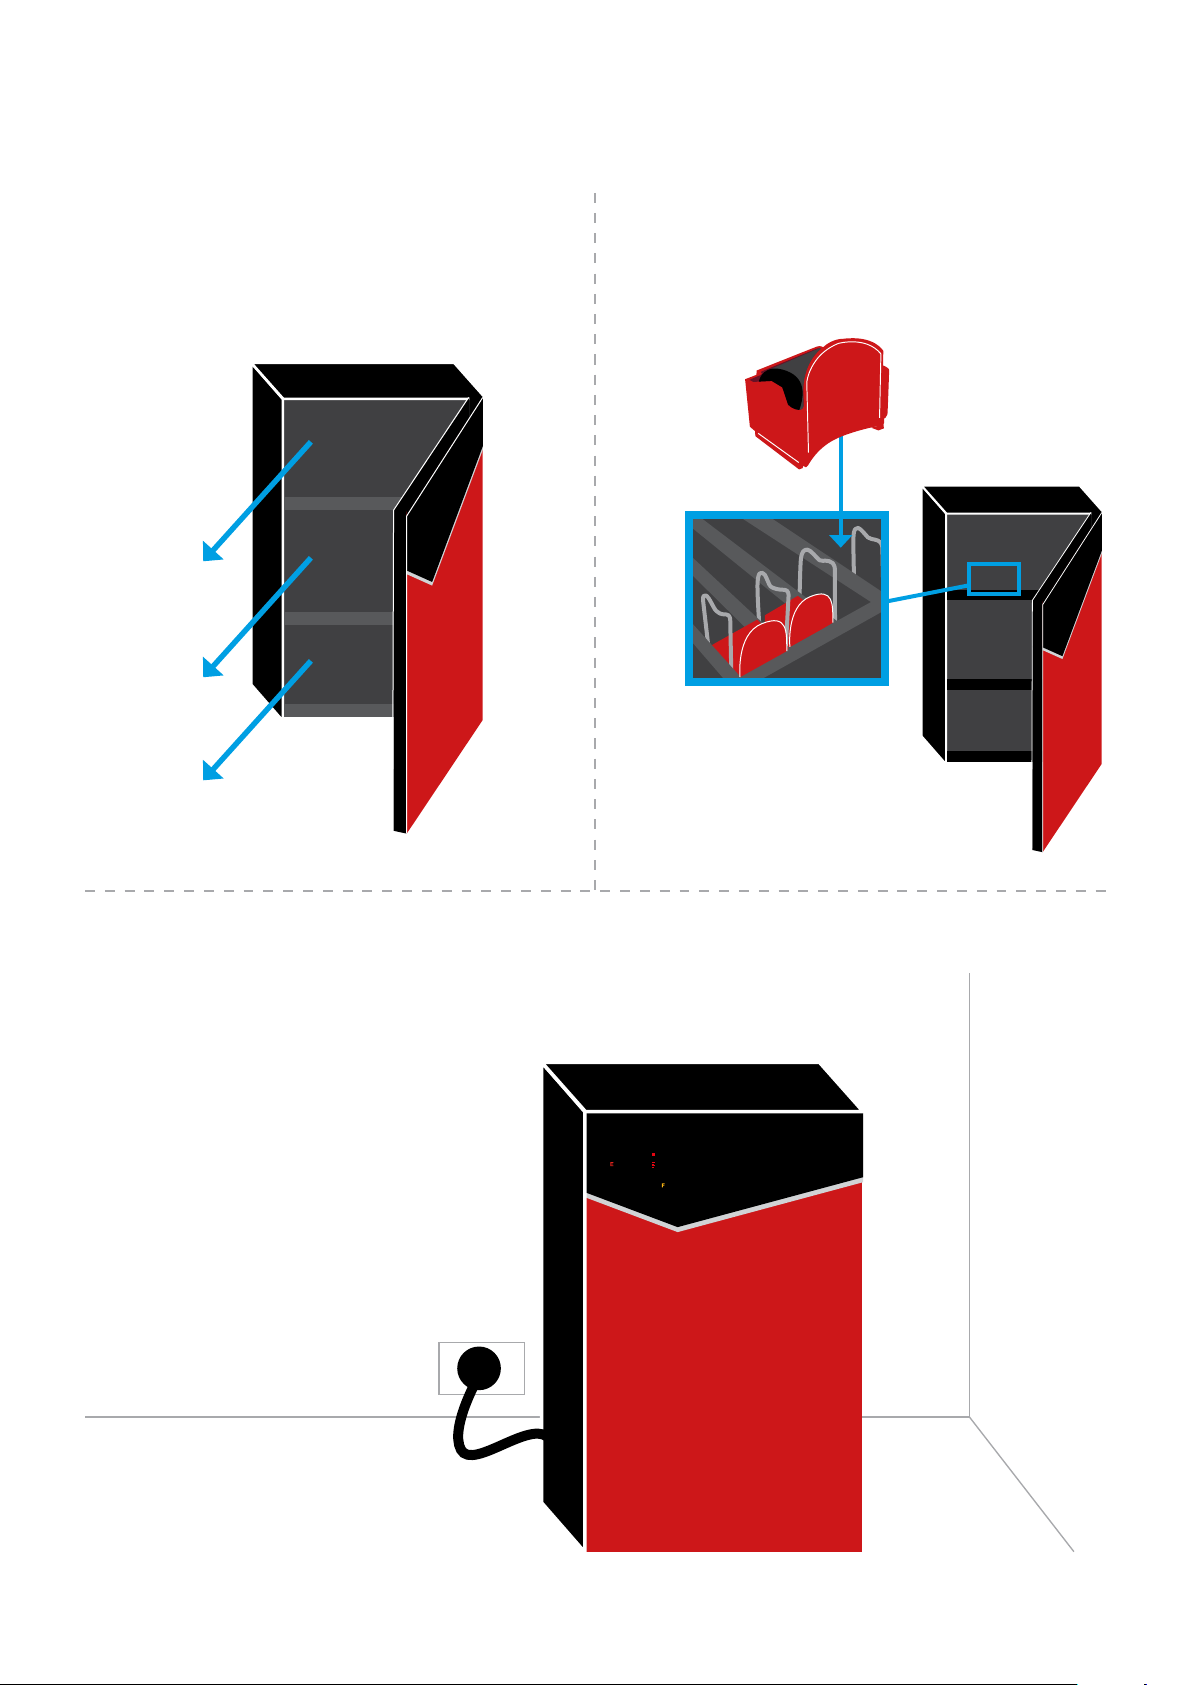
Open fridge door and remove
all internal packaging and tape.
Remove
packaging
Remove
tape
Remove
packaging
Insert one ‘colour roller’ per
4.
channel ensuring silver magnetic
feet are facing down as shown.
Shelf channels
x 18
5.
Plug the fridge into a
110V power outlet.
32
3.
Page 4
Bud-e FRIDGE TEMPERATURE SETTINGS
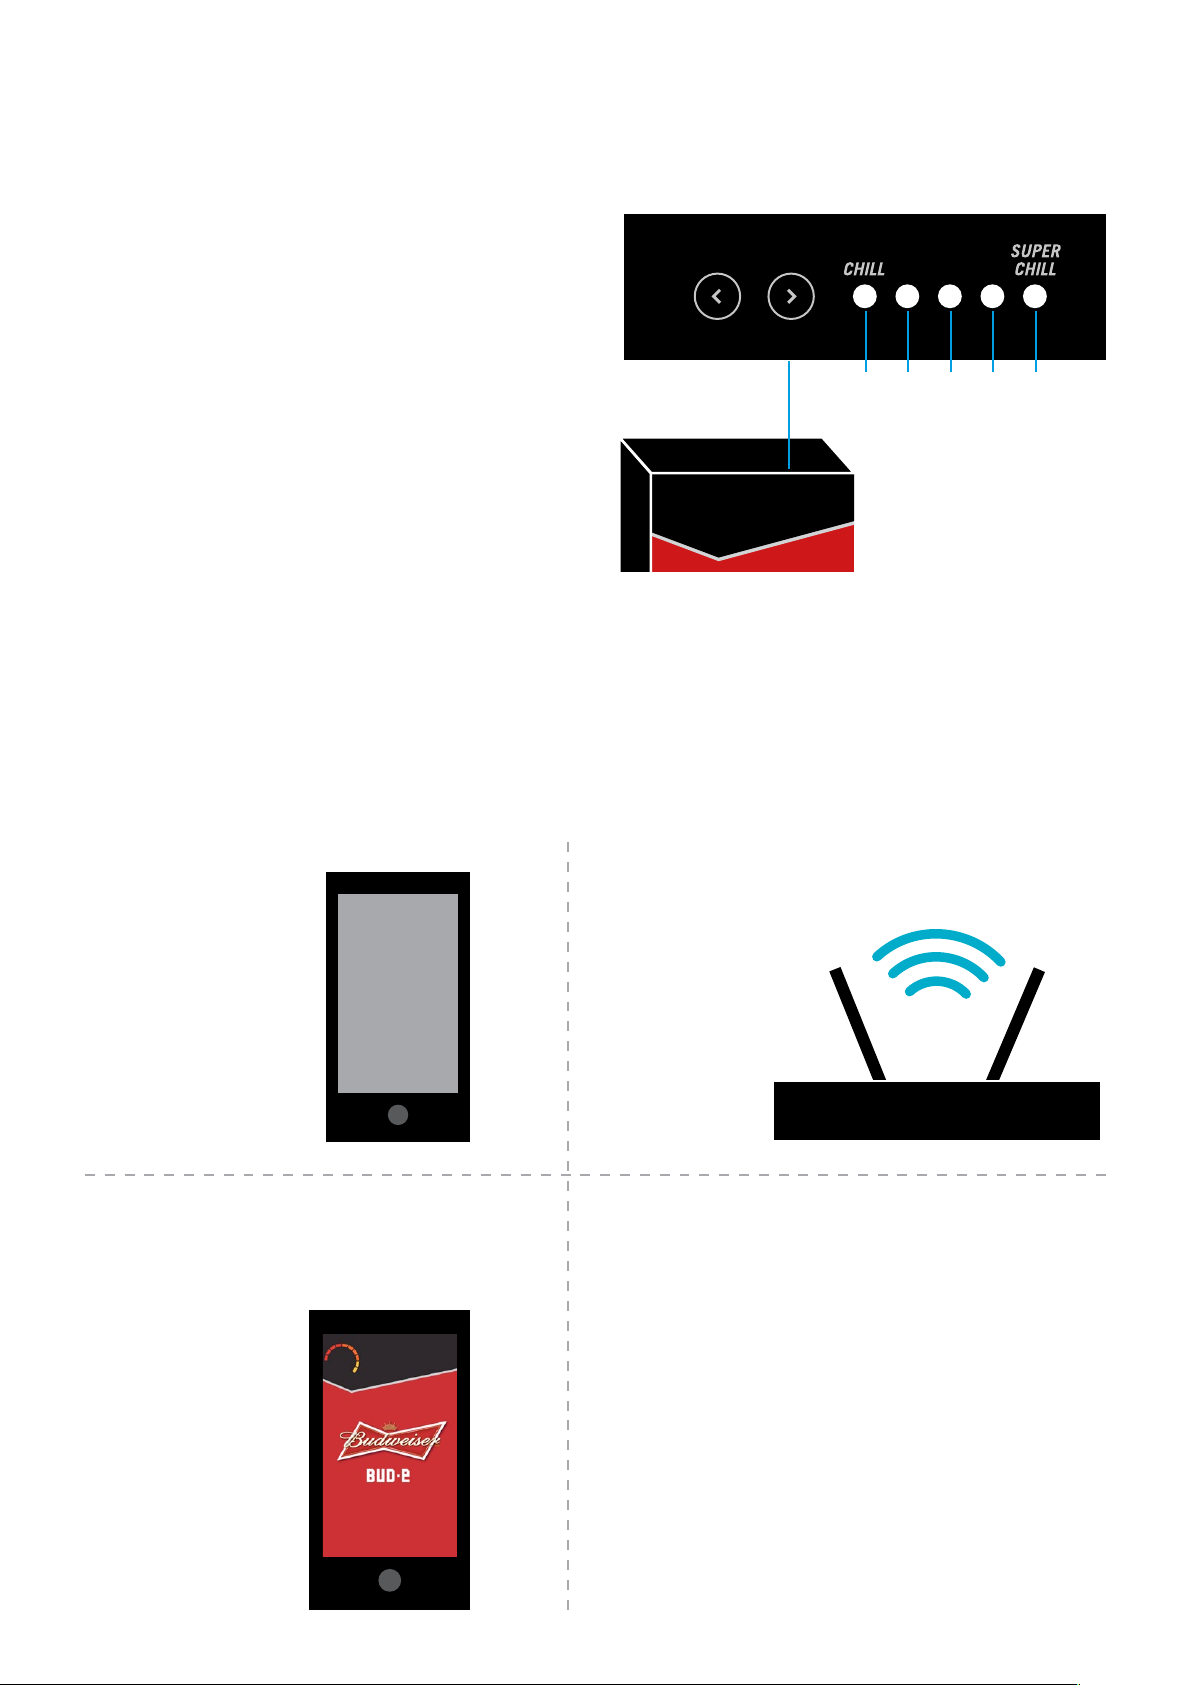
The fridge has 5 temperature settings*:
1 LED on = 5°C = 41°F
2 LEDs on = 2°C = 35°F
3 LEDs on = 0°C (default) = 32°F
4 LEDs on = -1.5°C = 29°F
5 LEDs on = -3.0°C = 27°F
*Please note these are approximate temperature settings
only. Actual temperature may differ depending on stock
and environment.
CONNECTING Bud-e TO WI-FI
Before connecting to Wi-Fi you will need
An iOS or
1. 2.
Android
mobile
device
2 3 4 51
Temperature settings
are located on top of
the fridge door.
Wi-Fi router - 802.11b/g/n with
broadband internet connection.
3.
Download the Bud-e APP and follow
on screen prompts to connect
Wi-Fi
Warning
• This product will not connect to any Wi-Fi networks
requiring secondary authentication.
• Make sure your phone is connected to the Wi-Fi
network you wish to connect your fridge to.
• For best ‘blinkup’ results turn your iPhone screen
to maximum brightness.
• For best ‘blinkup’ results do not place fridge
in direct sunlight or where there may be bright
or ashing lights.
4.
Page 5
Bud-e WI-FI STATUS LED (top panel)
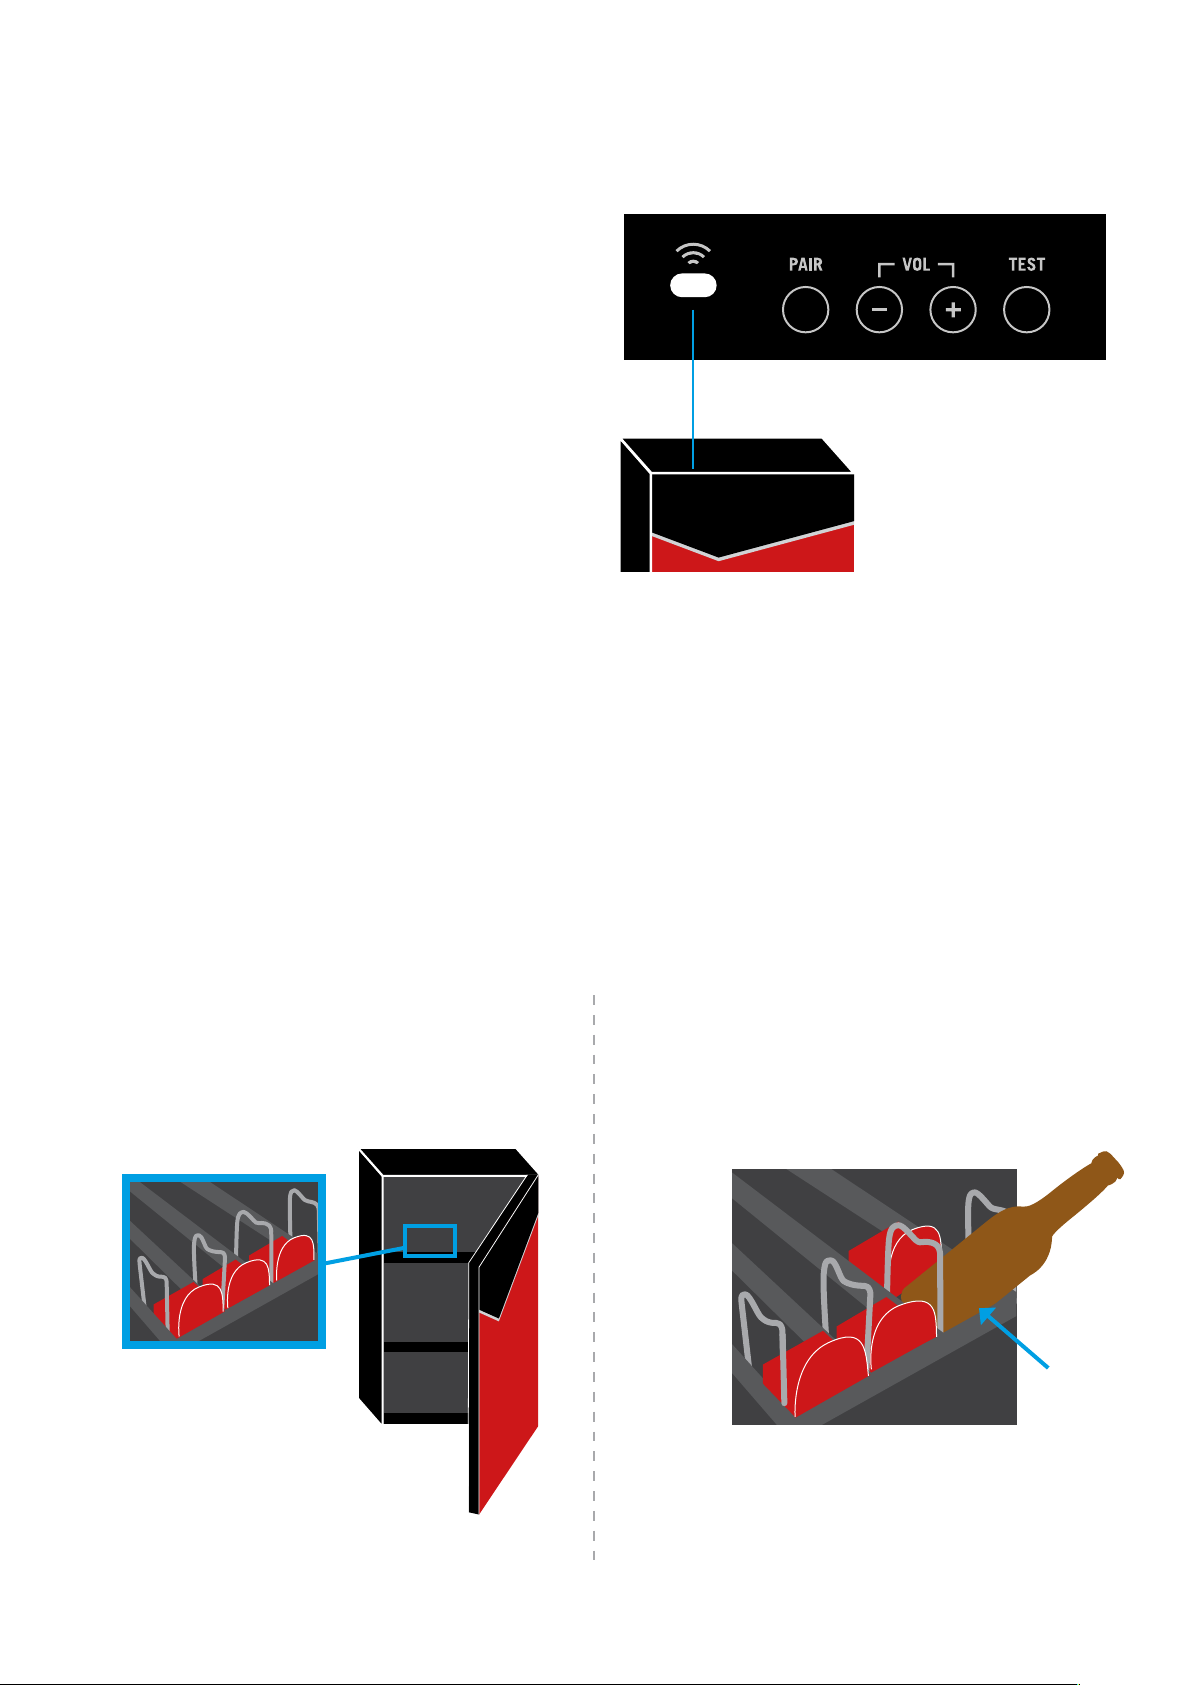
Wi-Fi LED status
Flashing red = not connected
Flashing green = connected successfully
Solid green = updating rmware
(do not unplug fridge during this process)
Flashing amber = has not received any
Wi-Fi settings
Off = normal operation
(the unit is still connected to Wi-Fi)
Note: If the unit loses its Wi-Fi connection the
Wi-Fi icon on the display will also ash red.
Wi-Fi status LED is
located on top of the
fridge door.
LOADING AND UNLOADING STOCK INTO Bud-e FRIDGE
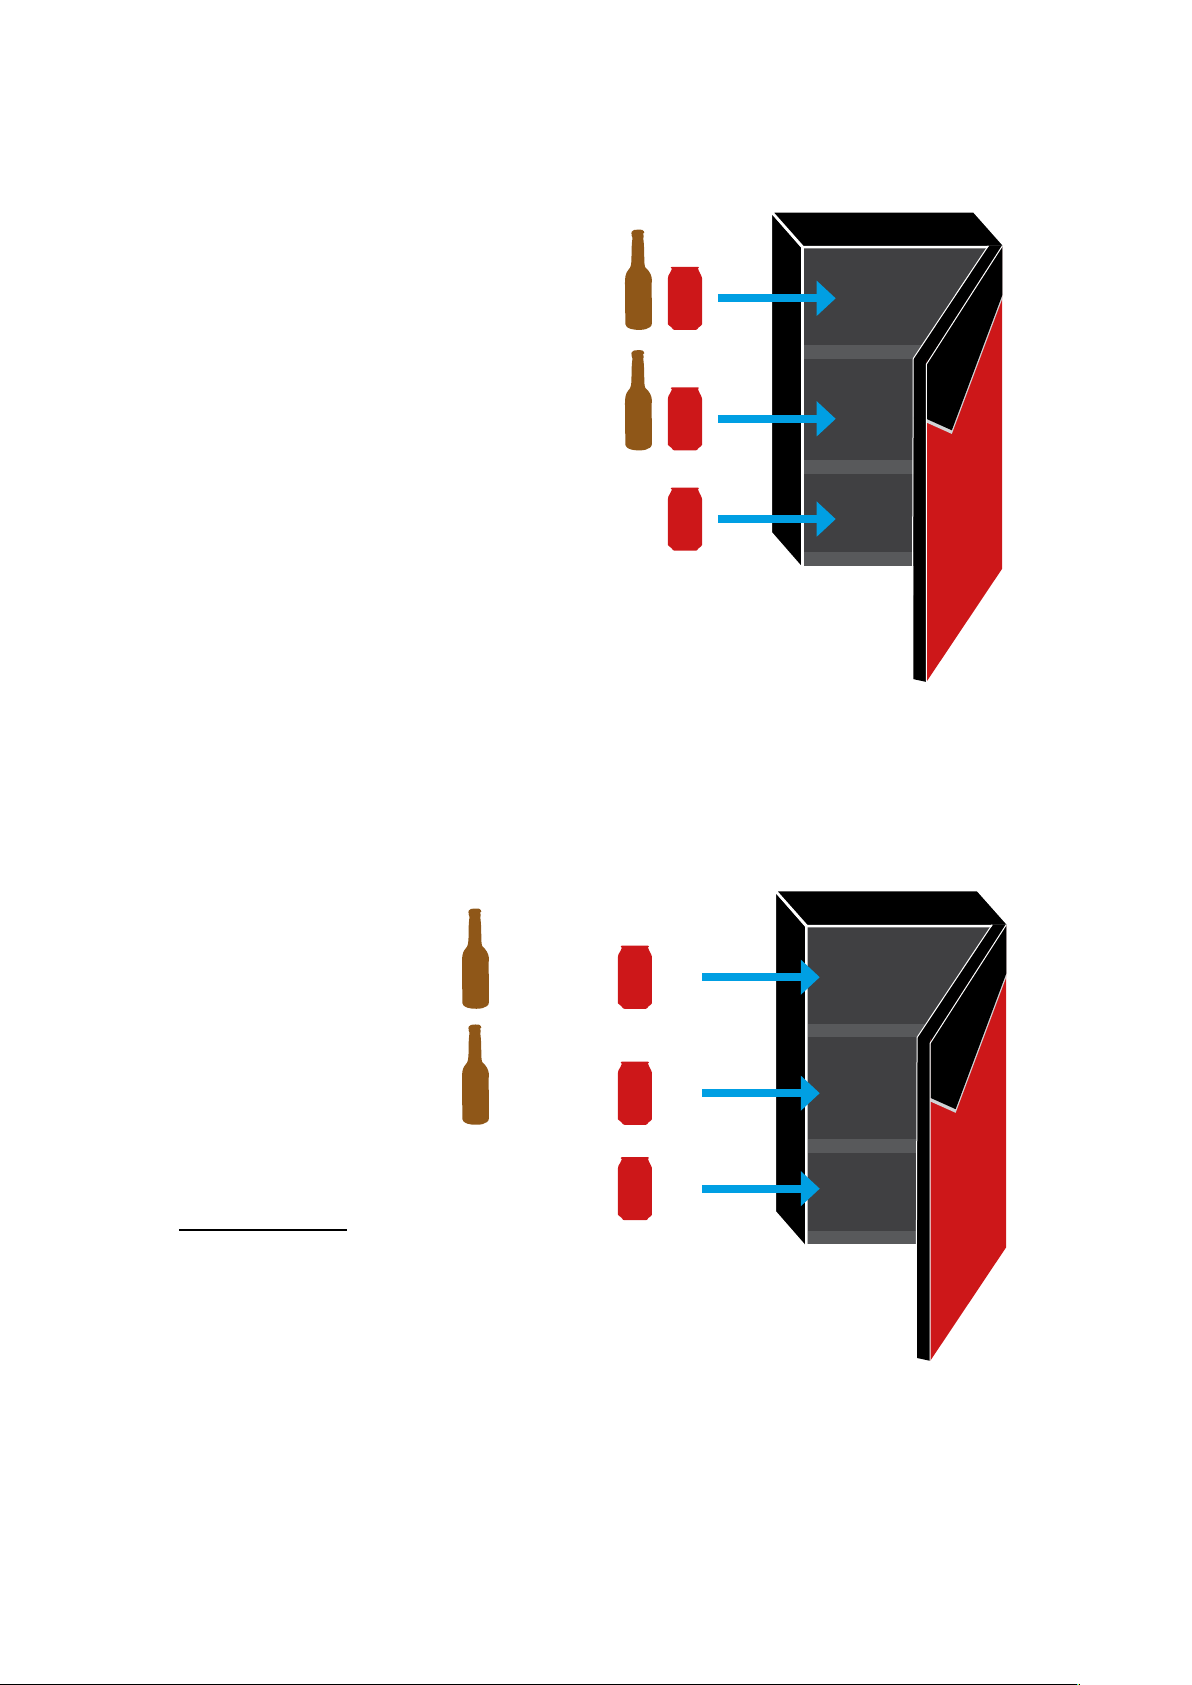
Please note the top two shelves of this fridge are designed for US type 12oz bottles, 12oz cans,
or 16oz cans only. Please note, the bottom shelf is for 12oz cans only.
Make sure there is a ‘colour roller’
1. 2.
in each channel.
Shelf channels
Push base of bottle or can in direction
shown making sure it pushes the colour
roller further back into the shelf channel.
5.
Page 6
3.
LOADING AND UNLOADING STOCK INTO Bud-e FRIDGE
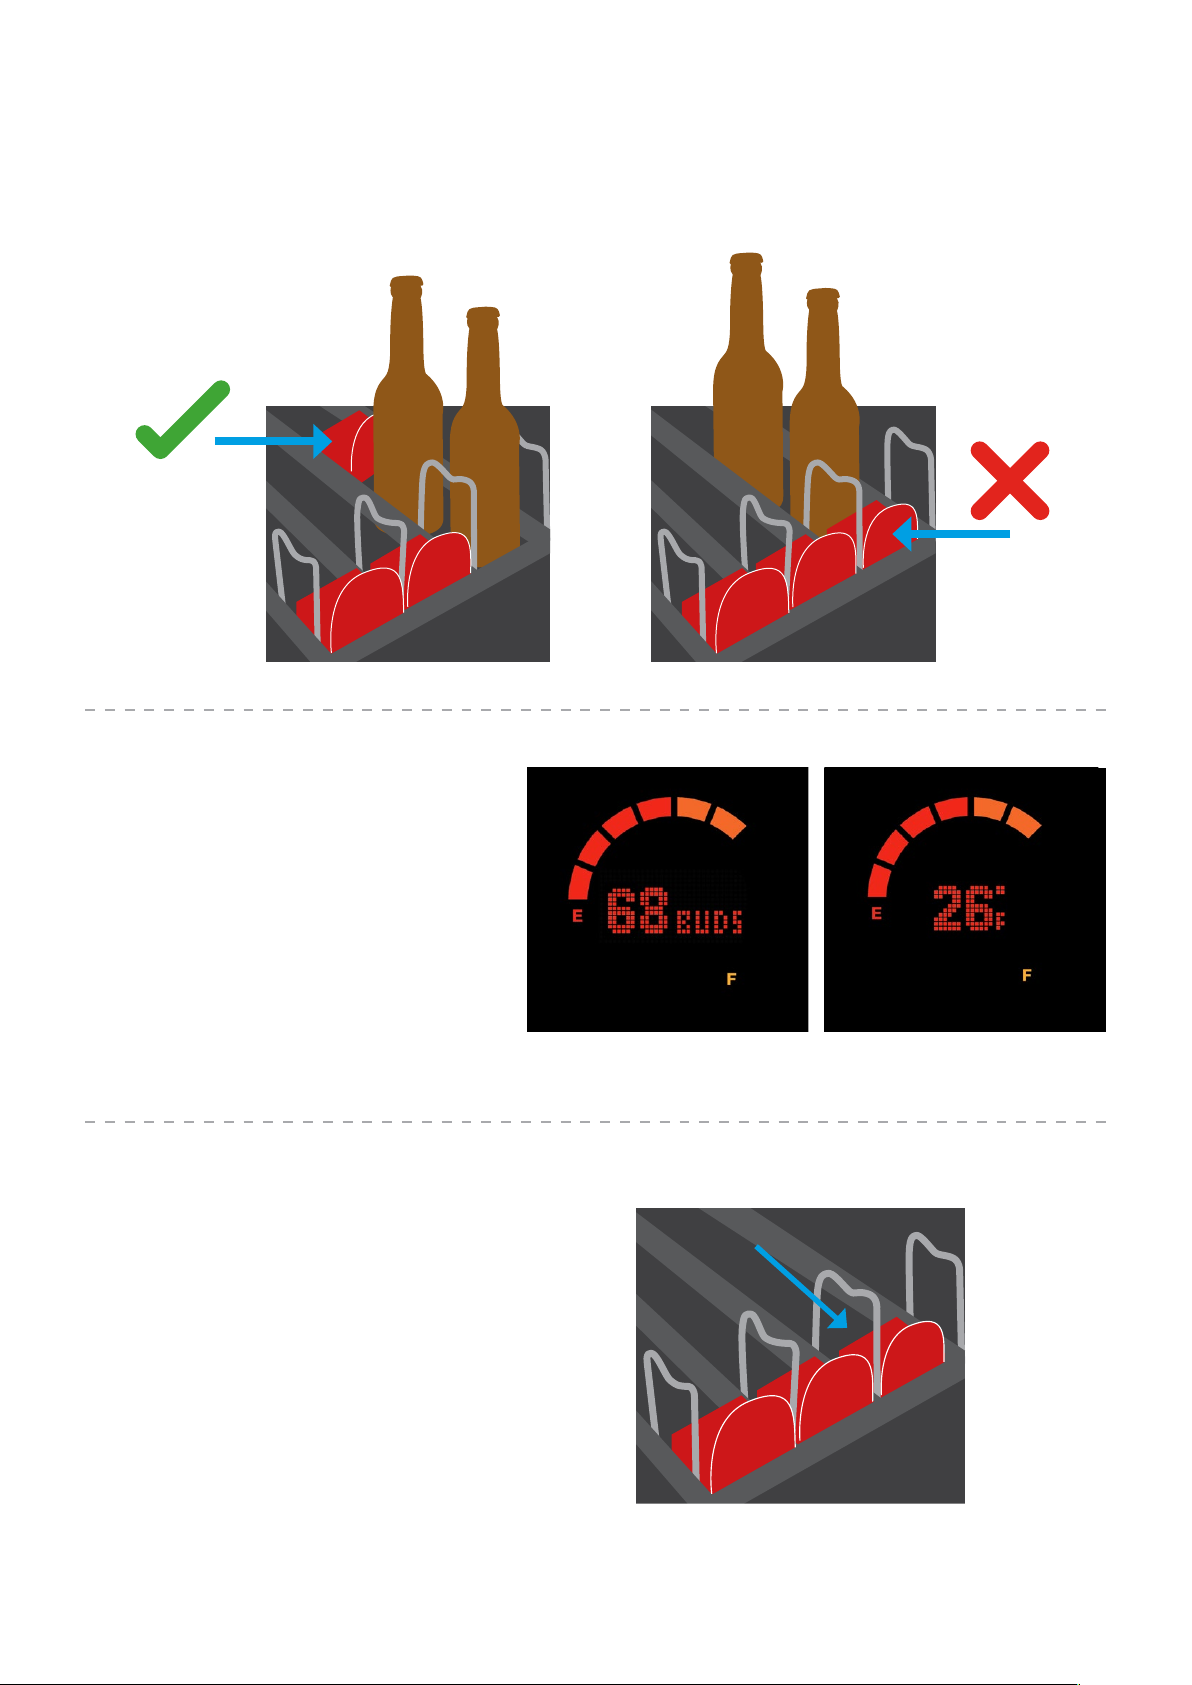
Make sure roller is directly behind bottle or can for accurate stock counting.
4.
5.
On closing the fridge door the
stock levels will be displayed
on the door for 5 seconds and
then display the current fridge
internal temperature.
Stock count Temperature
The colour rollers measure the
stock level. When removing
beer make sure the colour roller
slides as far towards the door
as possible.
6.
Page 7
Bud-e FRIDGE STOCK CAPACITY
Please note: The bottom shelf of
the Bud-e fridge will hold cans only
Cans only
The total capacity of the Bud-e fridge is 78 vessels. This will be made up of either all
cans or cans and bottles. Total bottle capacity is 60 bottles
x 30
x 30
x 18
Total 78
Cans only
or
or
7.
Page 8
Bud-e APP - Wi-Fi CONNECTION
Let’s go
Facebook
Name
Password
Bud-e
Set up my
Bud-e
What’s a
Bud-e?
Bud-e
Activate Bud-e via
Signing up means you agree to our Terms and Conditions
Facebook not for you?
Facebook
We never post to your wall
Let’s go
Bud-e
Facebook
Name
Password
Next
Press the ‘PAIR’ button on top
of the fridge door.
Step 3 of 6
Bud-e
HELP
Animation
Bud-e
Let me in
Bud-e
Territory
MM / DD / YYYY
Old enough to share a Bud?
You must be of legal drinking
age to access Bud-e
Set up my
Bud-e
What’s a
Bud-e?
Bud-e
Activate Bud-e via
Signing up means you agree to our Terms and Conditions
Facebook not for you?
Facebook
We never post to your wall
1Loading screen 2 3A 4A
Let’s go
Bud-e
Twitter
Name
Password
Let’s go
Bud-e
Google +
Name
Password
Let’s go
Name
Email
Phone
Create Bud-e account
User has the option to see what the Bud-e fridge
is all about. This is a crucial area to grab possible
sales from people who have just downloaded the
app because it’s a Budweiser app and not
because they have a fridge. See screen 21
Sign in through Facebook
is our preferred option
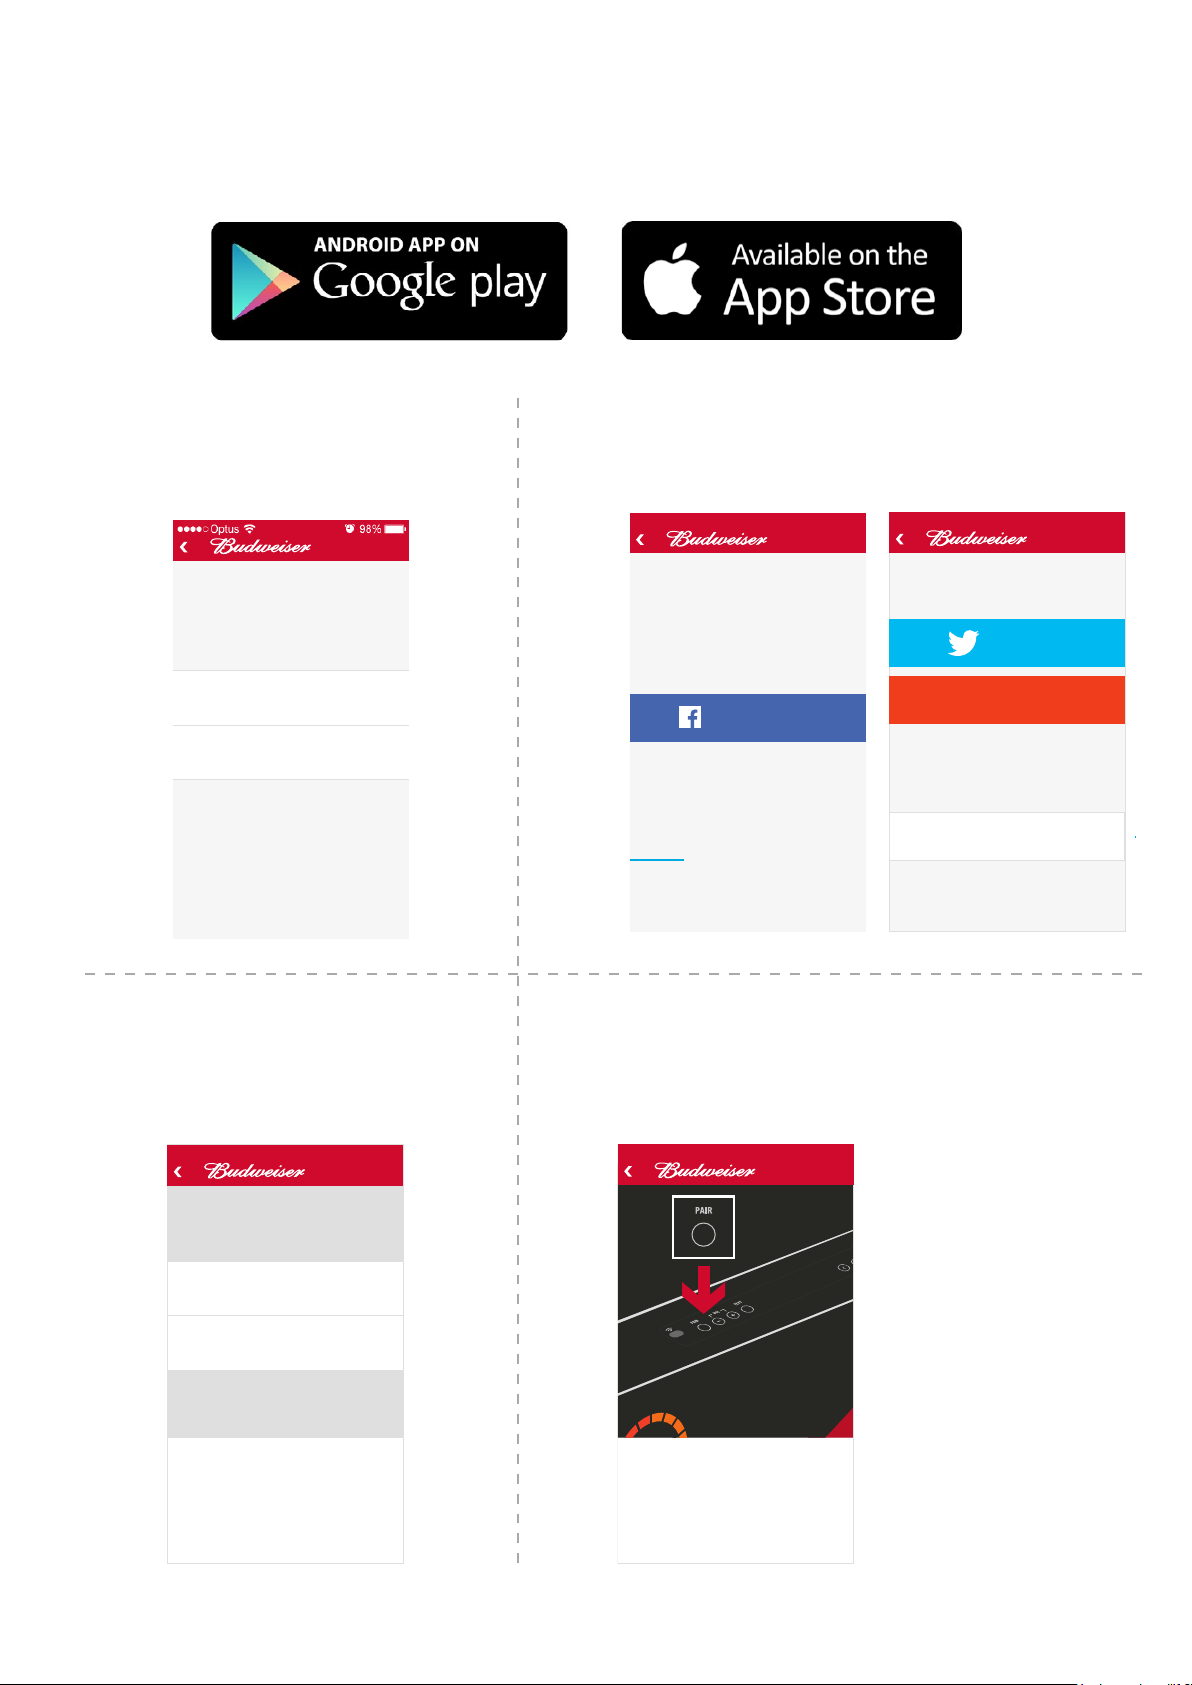
Download the Bud-e APP and follow on screen prompts to connect
1.
Enter territory and date of birth
to access the APP. User must
be of legal drinking age.
Bud-e
Old enough to share a Bud?
You must be of legal drinking
age to access Bud-e
Territory
MM / DD / YYYY
Let me in
2.
Activate account via a social
network, or create an account
using your email.
Bud-e
Activate Bud-e via
Facebook
We never post to your wall
Facebook not for you?
Signing up means you agree to our Terms and Conditions
Bud-e
Activate Bud-e via
Twitter
Google +
We never post to your wall
Or create a Bud-e account
Activate with Email Address
Signing up means you agree to our Terms and Conditions
HELP
3.
Enter the Wi-Fi network name.
Enter password if required. The
fridge will access the internet
via this Wi-Fi.
Network Name (required)
Password (if required)
Bud-e
Wi-Fi
HELP
Step 2 of 6
Your Bud-e fridge will connect
to the internet through this Wi-Fi.
Next
Press the pair button on top of the fridge door.
4.
This will wake the Wi-Fi sensor for connection.
Bud-e
Step 3 of 6
Press the ‘PAIR’ button on top
of the fridge door.
Next
HELP
8.
Page 9
Bud-e APP - Wi-Fi CONNECTION (CONTINUED)
Next
Press the ‘PAIR’ button on top
of the fridge door.
Step 3 of 6
Bud-e
HELP
and more of a guided interaction.
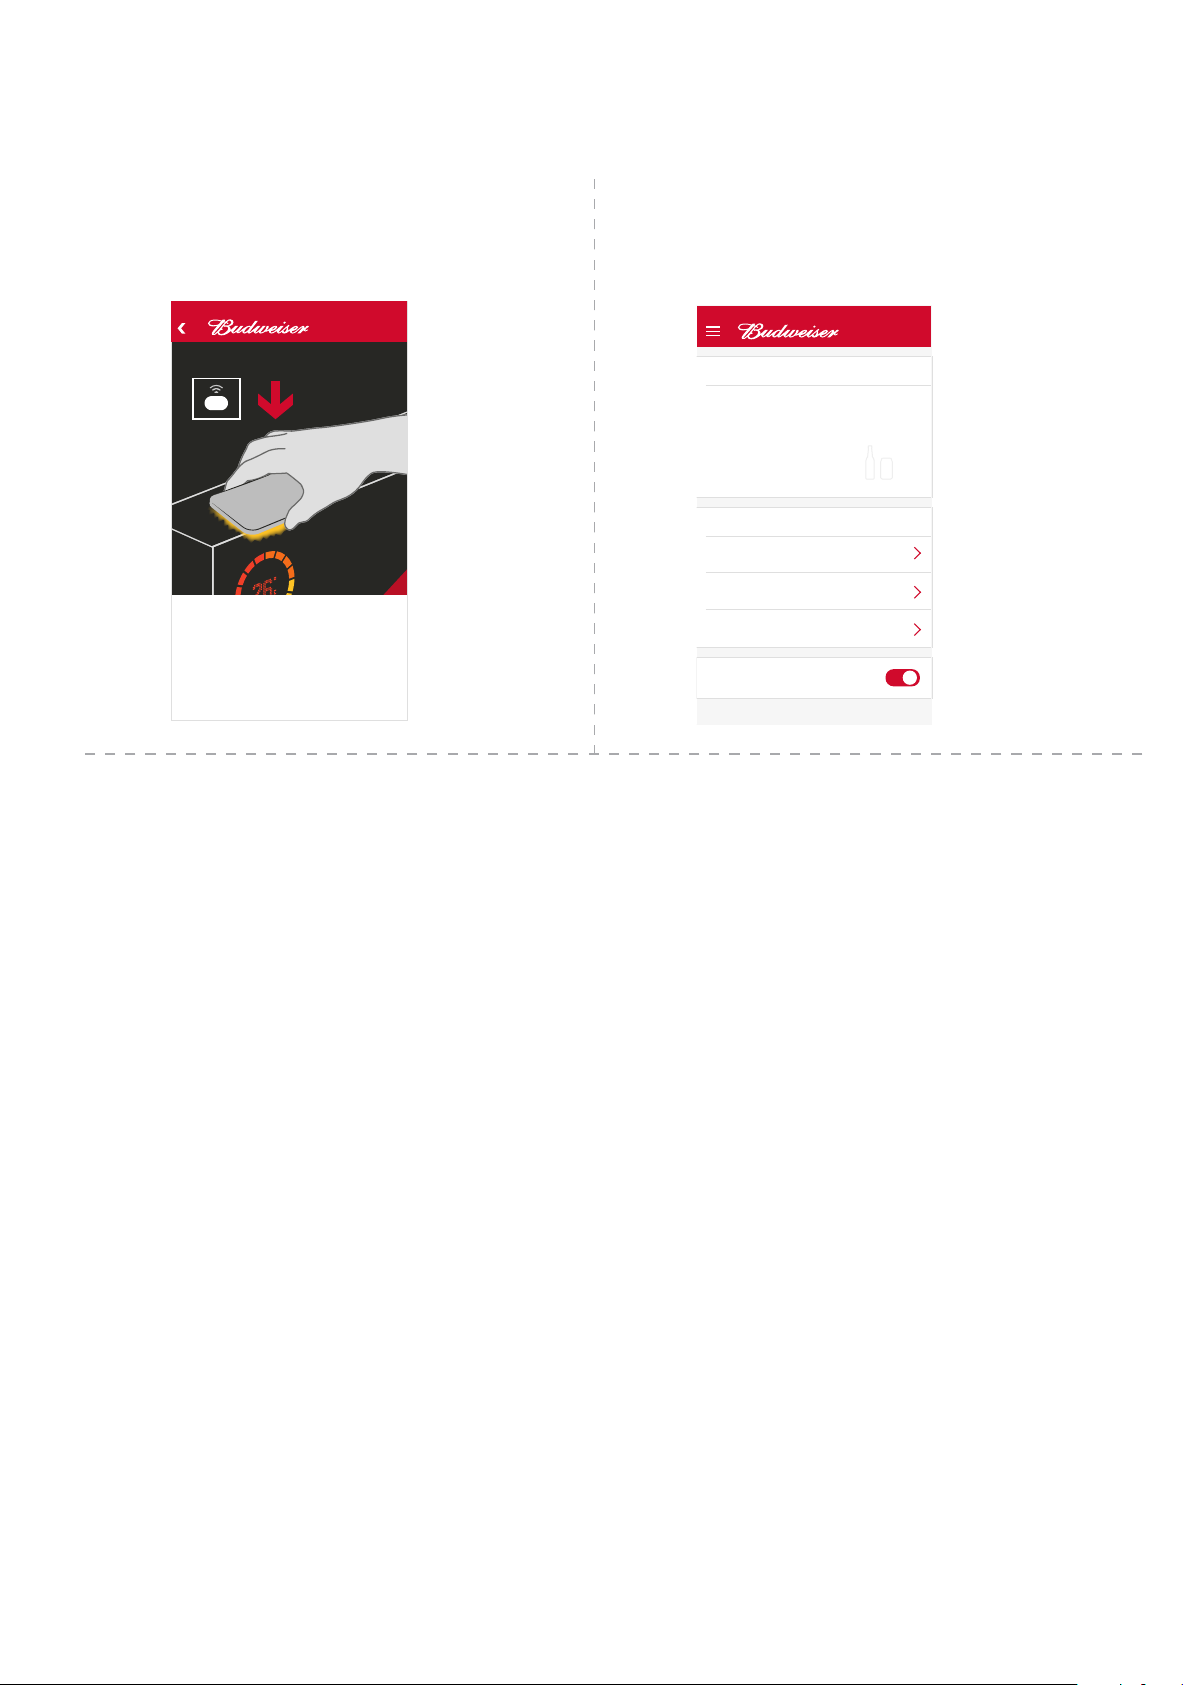
When countdown starts, hold the screen
5. 6.
of your device at against the Wi-Fi
sensor until the screen stops ashing.
Wi-Fi sensor
Step 6 of 6
Go
Name, the Wi-Fi sensor is on top
of the door. Hold phone screen at
against the sensor while ashing.
Bud-e
HELP
Once connected, the app will display
real time stock count and temperature
of the fridge.
Bud-e
Stock level - Full
Order
72
Upcoming events
Jets Vs Steelers (NFL)
Montréal Vs Winnipeg (NHL)
Interpol (Brooklyn Bowl)
Temp
26
10 Nov
11 Nov
12 Nov
°
9.
Page 10
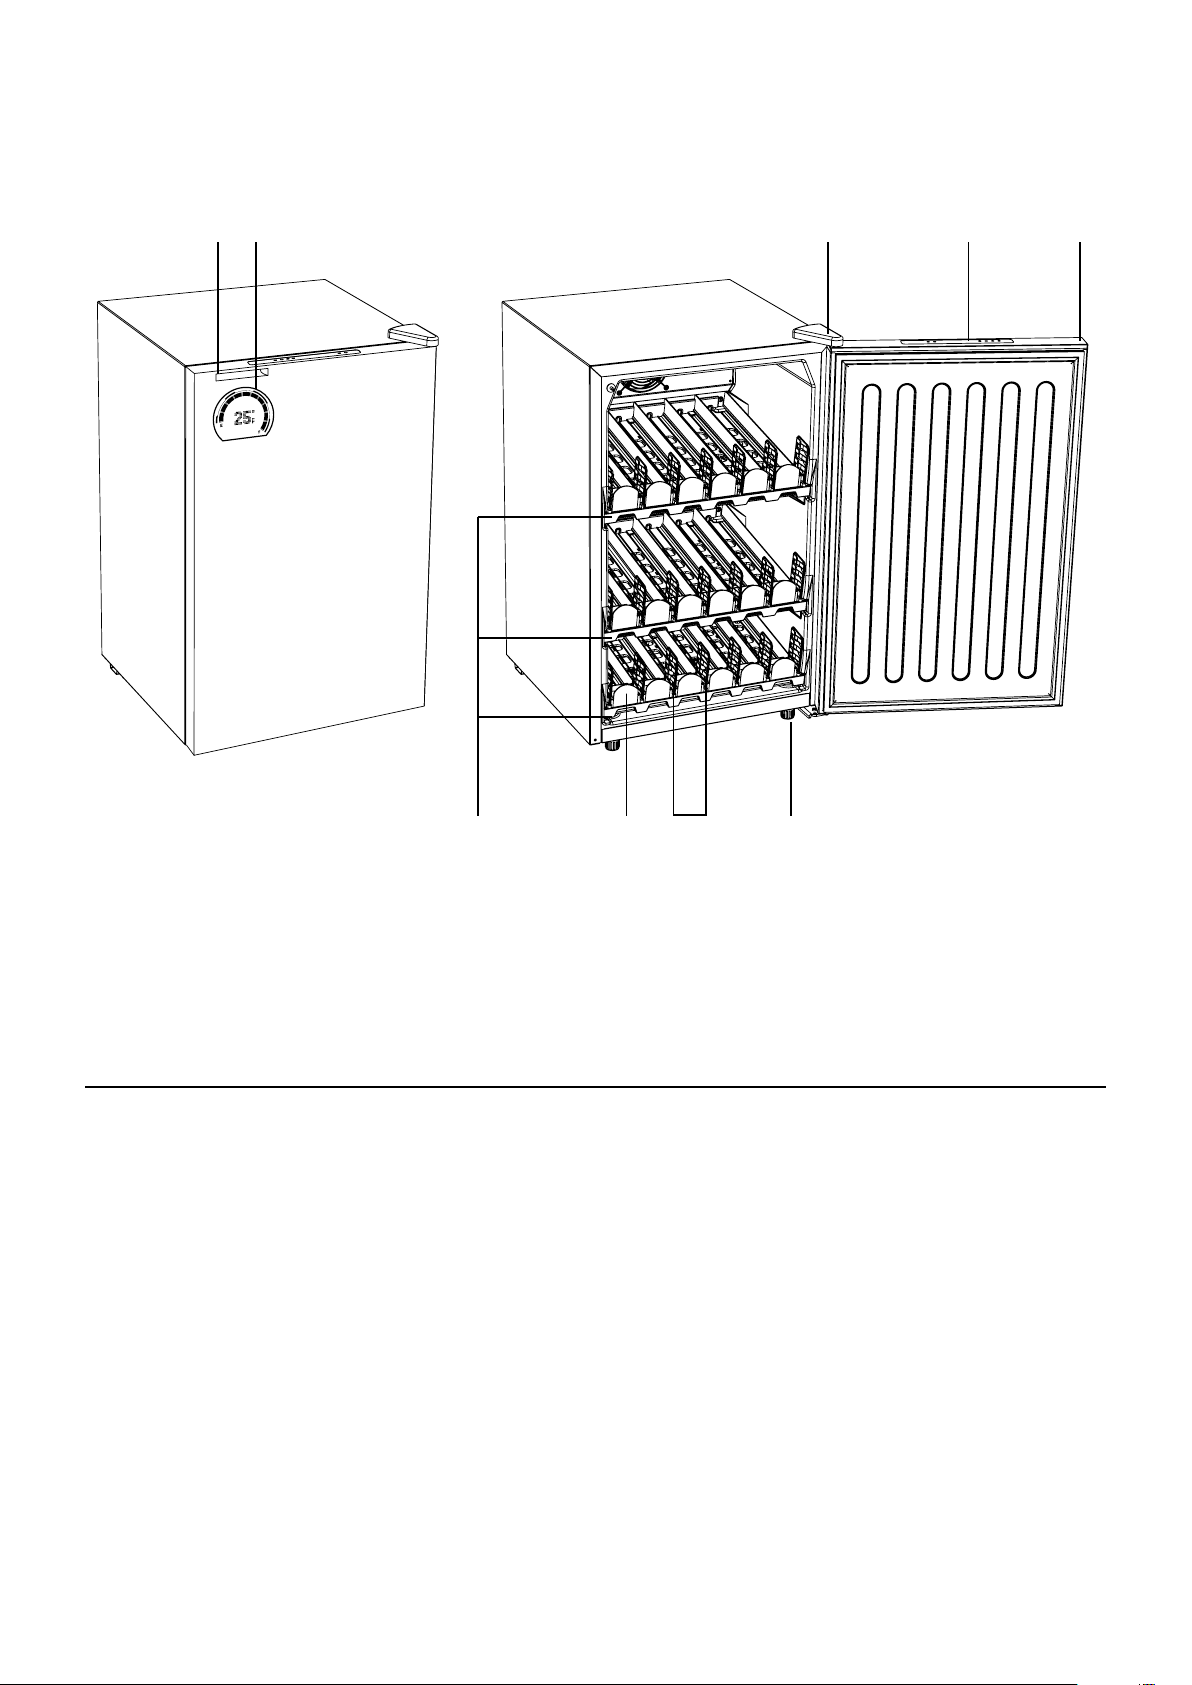
Bud-e FRIDGE - OvERvIEW
4. 5.3.2.1.
7.6. 9.8.
1. Speaker
2. Display
3. Door hinge
Bud-e sounds/alerts
Bud-e has a set number of sounds that will alert you to different events.
A. Adding stock
B. Pressing the pair button
C. Pressing any function button
on the control panel
4. Control panel
5. Door
6. Shelves (x3)
7. Shelf roller (x18)
8. Shelf gates (x21)
9. Front feet
(x2 adjustable)
D. End of cold countdown
E. Door open
F. Full fridge
G. Power on
10.
Page 11
Page 12
Page 13
Page 14
Page 15
 Loading...