

Page 1

Page 2
2
Page 3

Manual Porsche 911 Turbo S Wheel (PWTS)
Thanks for choosing the Porsche 911 S Turbo Wheel.
Before using this product read this manual for important safety and health information.
Keep all manuals for future reference.
For FAQs and further information please visit www.FANATEC.com/support.
3
Page 4

INDEX
1. General 05
2. Content of package 08
3. Compatability 08
4. Description of buttons and accessories
4.1 Buttons 09
4.2 Pedals 13
4.3 Shifters 14
4.4 RF Dongle 14
4.5 Cables 15
5. Installation
5.1 Installation of shifters 16
5.2 Table Installation 17
5.3 Simulatior installation 19
5.4 Installation of pedals 19
5.5 Connection of Xbox 360 Headset 20
5.6 Electrical Connection 21
6. „Getting started“
6.1 Select Platform mode
Xbox 360 22
PC 23
PS3 23
6.2 Tuning 24
6.3 Calibration
Shifter 26
Wheel Center 27
6.4 Binding with optional RF dongle 28
7. Summary: Modes and button combinations 29
8. Cleaning the wheel 29
9. Troubleshooting 29
10. Technical Support / FAQ 31
11. Manufacturer 31
12. Trademarks 31
13. Warranty 31
4
Page 5
WARNING
Before using this product, read this manual for
important safety and health information. Keep
all manuals for future reference. For replacement
manuals, go to
www.FANATEC.com/support.
1. General
WARNING: Photosensitive Seizures
A very small percentage of people may experience a
seizure when exposed to certain visual images, including
ashing lights or patterns that may appear in video
games. Even people who have no history of seizures or
epilepsy may have an undiagnosed condition that can
cause these „photosensitive epileptic seizures” while
watching video games.
These seizures may have a variety of symptoms, including
light-headedness, altered vision, eye or face twitching,
jerking or shaking of arms or legs, disorientation,
confusion, or momentary loss of awareness. Seizures
may also cause loss of consciousness or convulsions
that can lead to injury from falling down or striking
nearby objects.
Immediately stop playing and consult a doctor if you
experience any of these symptoms. Parents should
watch for or ask their children about the above
symptoms – children and teenagers are more likely
than adults to experience these seizures. The risk of
photosensitive epileptic seizures may be reduced by
taking the following precautions:
Sit farther from the TV screen.
•
Use a smaller TV screen.
•
Play in a well-lit room.
•
Do not play when you are drowsy or fatigued.
•
If you or any of your relatives have a history of seizures
or epilepsy, consult a doctor before playing.
WARNING: Musculoskeletal disorders
Use of game controllers, keyboards, mice, or other
electronic input devices may be linked to serious injuries
or disorders.
When playing video games, as with many activities,
you may experience occasional discomfort in your
hands, arms, shoulders, neck, or other parts of your
body. However, if you experience symptoms such as
persistent or recurring discomfort, pain, throbbing,
aching, tingling, numbness, burning sensation, or
stiffness, DO NOT IGNORE THESE WARNING
SIGNS. PROMPTLY SEE A QUALIFIED HEALTH
PROFESSIONAL, even if symptoms occur when you are
5
Page 6
not playing a video game. Symptoms such as these can
be associated with painful and sometimes permanently
disabling injuries or disorders of the nerves, muscles,
tendons, blood vessels, and other parts of the body.
These musculoskeletal disorders (MSDs) include carpal
tunnel syndrome, tendonitis, tenosynovitis, vibration
syndromes, and other conditions.
While researchers are not yet able to answer many
questions about MSDs, there is general agreement
that many factors may be linked to their occurrence,
including medical and physical conditions, stress and
how one copes with it, overall health, and how a person
positions and uses their body during work and other
activities (including playing a video game). Some studies
suggest that the amount of time a person performs an
activity may also be a factor.
If you have questions about how your own lifestyle,
activities, or medical or physical condition may be
related to MSDs, see a quali ed health professional.
Attention!
The device must not be exposed to rain or humidity
•
in order to avoid risk of re and the danger of
electric shock.
Operating temperature: 0°C – 40°C.
•
The maximum operation time of the wheel with
•
continuous Force feedback activity is 1 hour. Let
the wheel cool down for a few minutes before you
continue.
Long playing may cause health risks. Take a break
•
of 5 minutes every 20 minutes, and do not play for
more than 2 hours per day.
We strongly advise you to not drive a vehicle
•
immediately after using a video game.
Utilisation of the vibration and Force Feedback
•
function may cause damage to your health.
In case of interferences with other wireless 2.4 GHz
•
devices, the interfering devices must be removed
or switched off.
Not intended for children under the age of 3
•
years.
Contains small pieces. Danger of swallowing!
•
Do not open the casing of the device.
•
The device only contains components that cannot
•
be repaired by the user and opening will void the
warranty.
WARNING: Electrical Safety
As with many other electrical devices, failure to take
the following precautions can result in serious injury or
death from electric shock or re or damage to the racing
wheel.
6
Page 7

If you use AC power, select an appropriate power
source:
Use only the power supply and AC power cord that
•
came with your racing wheel or that you received
from an authorized repair center.
Do not use non-standard power sources, such as
•
generators or inverters, even if the voltage and
frequency appear acceptable. Only use AC power
provided by a standard wall outlet.
To avoid damaging the AC power cord:
•
Protect the cord from being pinched or sharply
•
bent, particularly where it connects to the
power outlet and the racing wheel.
Do not jerk, knot, sharply bend, or otherwise
•
abuse the power cord.
Do not expose the power cord to sources of
•
heat.
When disconnecting the power cord or power
•
supply, pull on the plug
If the power cord becomes damaged in any
•
-
do not pull on the cord.
way, stop using it immediately and contact
Fanatec Customer Support for a replacement.
Unplug your racing wheel’s power cord during
•
storms or when unused for long periods of
time.
7
Page 8

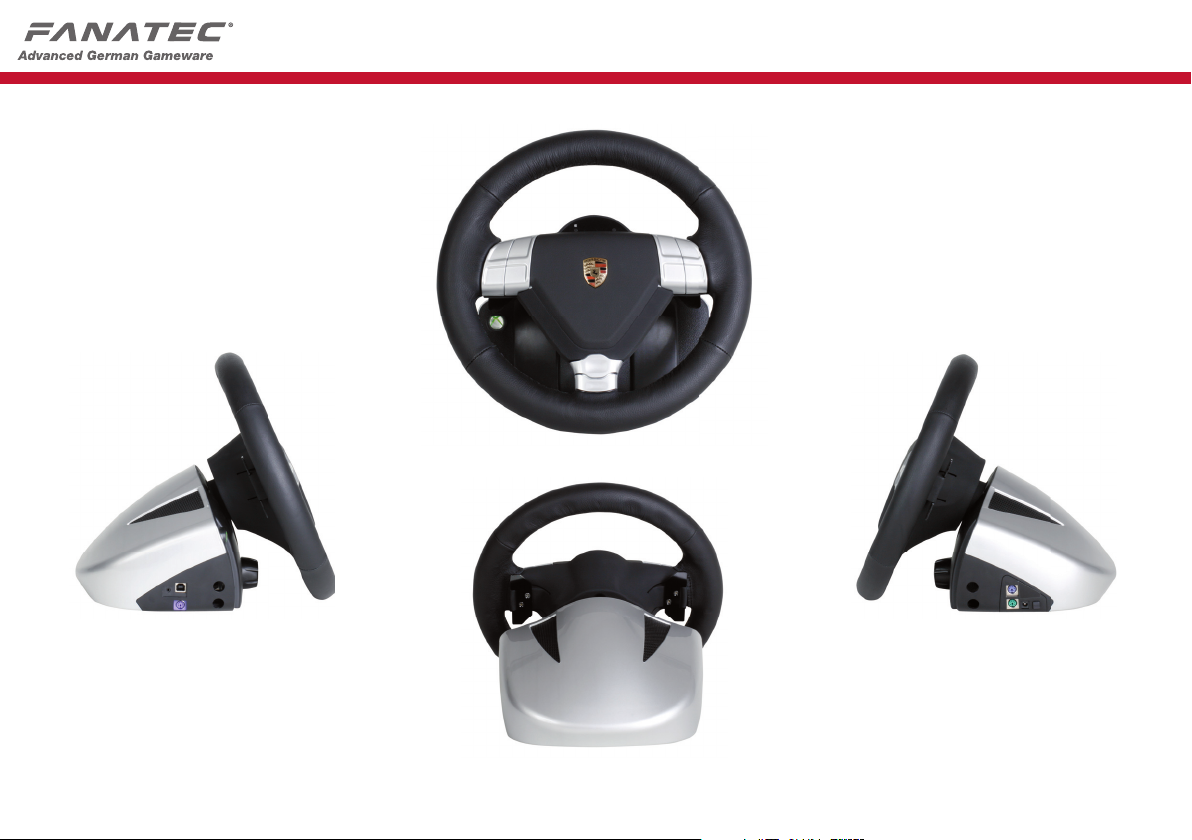
2. Content of package
Steering wheel
•
USB Cable
•
110V-220V Power supply for wheel
•
UK Adapter (EU Version only)
•
Quickguide manual
•
Optional
2 steel bars (410 mm each)
•
6-speed gear stick with reverse (7GS)
•
Sequential gear stick (2GS)
•
Gear stick connection cable
•
Standard Pedals
•
Steel Plate for pedals
•
Screw driver and screws for steel plate
•
Cable for the pedals
•
RF Dongle for Playstation 3 and PC
•
Adapter for G25 pedals and Microsoft Wireless
•
Xbox 360 wheel pedals
3. Compatability
Microsoft Xbox 360
The PWTS can be used with all games which support
(Force Feedback) racing wheels. Only new games (eg.
Forza Motorsport 3) will use extended features like 900°
mode, clutch, 7GS shifter etc.
PC
Minimum requirement:
Windows XP (SP2)
•
Windows Vista (32-Bit/64-Bit)
•
Windows 7 (32-Bit/64-Bit)
•
20 MB of Harddisk space
•
Free USB 1.1 or higher port
•
Direct X9.0 or higher
•
The game must support Direct X Force Feedback functionality.
Playstation 3
Only racing games which support the Porsche wheel will
use the full functionality of the wheel.
To ensure increased compatibility you can switch to
Playstation 3 mode which makes the Porsche wheel
compatible to games which only support other Force
Feedback wheels. Please note that we cannot guarantee
the full functionality for features like the 900° rotation, the
clutch or the 6-speed gear stick in this mode.
8
Page 9
X
Y
A
B
LSB
RSB
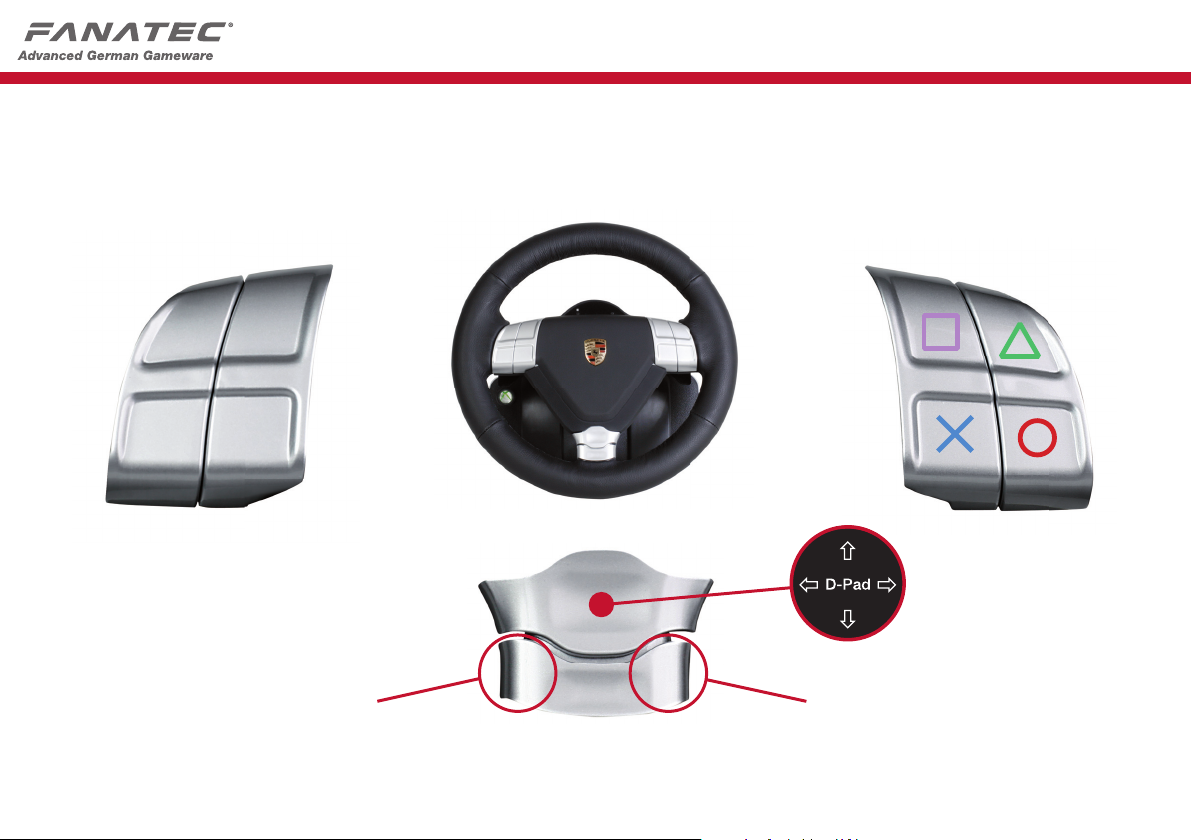
4. Description of buttons and accessories
4.1 Buttons
Buttons on wheel (Xbox 360 mode)
RSB
LSB
Back Button Start Button
X
A
Y
B
IMPORTANT: This button naming will be used to explain all button combinations!
9
Page 10
L2
R2
R3
L3
4.1 Buttons
Buttons on wheel (Playstation 3 mode)
R2
L2
L3
R3
Select Button Start Button
10
Page 11

4.1 Buttons
Tuning ButtonXbox 360 Guide Button
11
Page 12

4.1 Buttons
Shifter Paddles
Connect Button
Right: Xbox 360 Right Bumper
PS3 R1
Left: Xbox 360 Left Bumper
PS3 L1
12
Page 13

4.2 Pedals
Steel plate for pedals
Clutch
Brake
Throttle
Screws Screwdriver
13
Page 14

4.3 Shifters
4.4 RF Dongle
6-speed gear stick plus reverse PS/2 Slot
Sequential PS/2 Slot
two LEDs
Button on backside
white LED indication of boot mode for programming
the dongle
red LED connection with wheel established
14
Page 15

4.5 Cables
Power supply (DE)
UK adapter (EU version only)
Connection base to pedals
Connection base to gear stick
Power supply (US)
USB cable
110V-220V Power supply for wheel
15
Page 16

5. Installation
5.1 Installation of shifters
Make sure that the tube xation screws are lose.
1.
Use a coin and not a screwdriver.
Insert the metal tubes into the base from the left or
2.
right side. The tube has to be fully inserted until it
comes out of the base on the other side.
To build up some counterforce use a at underground
3.
and place the wheel vertical on the tubes. Then push
the wheel down with soft pressure.
Tighten the tube xation screws with a coin.
4.
16
Choose either the sequential or the 6-speed gear
5.
stick and attach it to the tubes.
Page 17

Put the wheel on the side to build up some
6.
counterforce and press the gear stick on the tubes
from above until you see the metal tubes coming
out on the other side of the gear stick channels.
Connect the gear stick connection cable with the
7.
base and the gear stick.
++
Please note that you can mount the shifter on both sides
but only one gear stick can be active at the same time.
5.2 Table installation
Open the table clamp xation screw.
1.
17
Page 18

Pull out the table clamp a little bit (5 cm).
2.
Mount the wheel to the table and then push in the
3.
table clamp as much as possible. Please note that
the quick release clamps must be unfastened.
Tighten the table clamp screw.
4.
Fasten the quick release clamps.
5.
Please note that if the shape of the edge of your table
does not allow the xation with the table clamp you could
use some books to x it.
18
Page 19

5.3 Simulator installation
If you prefer a permanent installation on a table or
simulator you can x the wheel with 4 screws to any at
surface.
Please use the drilling template to drill the holes.
The length of the screws depends on your table so we
did not include any screws but you can use standard
metric screws with a diameter of 6 mm.
IMPORTANT:
Please only tighten the screws very gently to avoid
damaging the wheel.
5.4 Installation of pedals
In combination with the PWTS you can use the Porsche
Wheel Standard Pedals, the ClubSport Pedals, the G25
pedals (optional adapter) or the Microsoft Wireless Xbox
360 wheel pedals (optional adapter).
Connect the pedals with the PS/2 cable to the green
socket on the right side of the wheel.
19
Page 20

If you use the ClubSport Pedals you can also connect
them directly to the PC as a separate USB controller.
IMPORTANT:
Use only one connection cable for the ClubSport
pedals and use the USB cable only for PC.
5.5 Connection of Xbox 360 Headset
Turn down the volume by rotating the volume control all
the way to the left. Insert the 2.5 mm headset connector
into the female connector on the Left side of your
PWTS.
Put on your headset and adjust the microphone.
20
Page 21

5.6 Electrical connection (Wheel power supply)
Please plug-in the power supply to the right side of the
base.
Power supply
Power switch
21
Page 22

6. Getting started
After pressing the power switch it automatically self
calibrates with a full rotation to the right side and back
to the center. Please keep your hands off the wheel
during calibration and do not press any pedals. The
wheel display shows “- - - “ and waits in Standby Mode.
Now you can select on of the three separate platform
modes which ensure best functionality on Xbox 360, PC
and Playstation 3.
Please note that if you use the wheel for the rst time
you might need to bind the RF dongle to the wheel or
calibrate the shifter (7GS). Please see instructions below
how to do this.
6.1 Select platform mode
Xbox 360 Mode
The Porsche Wheel Turbo S communicates wireless with
the Xbox 360 and does not need any cable or dongle.
1. Power on both devices.
2. After self calibration press and hold Xbox 360 Guide
Button for one second or press and hold Start
Button for one second.
3. The Wheel button illumination shows Xbox 360
symbols. Xbox 360 and PWTS are connected.
If you use the wheel for the fi rst time, the PWTS must
be connected to the Xbox 360 like any other wireless
controller.
Connect Button
on Xbox 360
Xbox 360
Guide Button
Connect Button on wheel
1.) Press Connect Button on your console
ring of light starts blinking
2.) Press and hold Connect Button on wheel about one
second
ring of light on wheel stops blinking and shows the
same illuminated segment
3.) PWTS and console are connected
22
Page 23

PC Mode
1. Installation of drivers
For PC use, you need to install the driver before you
plug in the RF dongle or the USB cable.
The driver requires less than 10 MB of space on
your hard disk and is compatible to Windows XP
(SP2) and Windows Vista (32-Bit/64-Bit) as well as
Windows 7 (32-Bit/64-Bit).
Please check
www.FANATEC.com/support for the
latest updates on the driver.
2. Connect the USB cable to a free USB slot of your
PC and to the connector on the left side of the
wheel. Alternatively you can plug in the (optional)
RF dongle to your PC. In case the wheel does not
connect to the RF dongle you might need to bind
it. Please see section 6.4 of this manual for further
information.
3. Power on the wheel.
4. After self calibration press the Back Button and hold
it for one second. There will be no wheel button
illumination.
5. PC and PWTS are connected.
Driver
To open the driver dialog you have to go to the control
panel, double click „Game Controllers“ and choose the
properties of „Porsche Wheel“.
In this window you can change several settings of the
wheel and test if all buttons are working ne.
PS3 Mode
1. Connect the USB cable to a free USB slot of your
Playstation and to the connector on the left side of
the wheel. Alternatively you can plug in the (optional)
RF dongle to your PlayStation 3. In case the wheel
does not connect to the RF dongle you might need
to bind it. Please see section 6.4 of this manual for
further information. Power on the wheel and your
PlayStation 3.
2. After the self calibration enter the PC mode by
pressing Back Button for one second. There will be
no wheel button illumination.
3. Press Connect Button + Back Button simultaneously.
Wheel button illumination shows PlayStation
symbols
4. Playstation 3 and PWTS are connected.
IMPORTANT: Please note that on some Playstation 3
games it is required to use the SIXAXIS controller for
Navigation in the games menu.
After starting a game, the wheel could return to PC
mode – press the button combination Connect-Button +
Back-Button again to re-enter PS3 mode (see side 24).
23
Page 24

Connect Button
+
Back Button
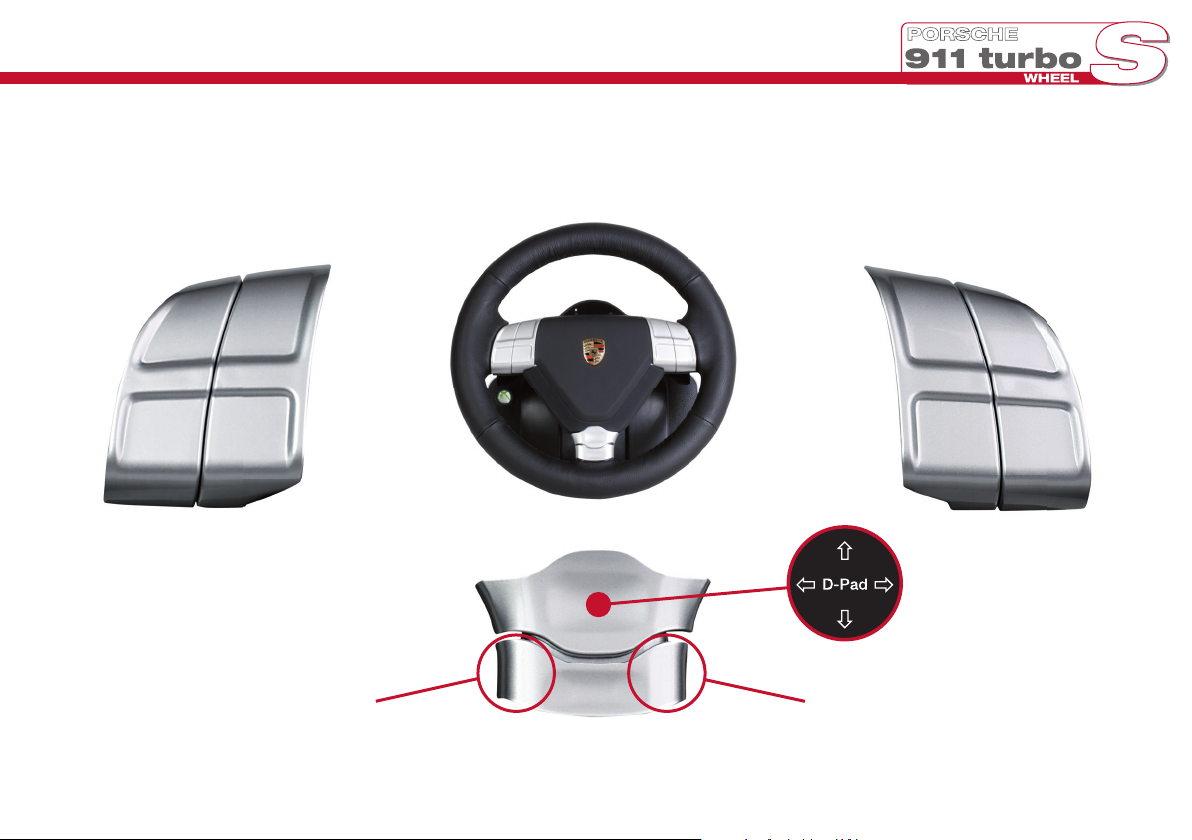
6.2 Tuning
With the TUNING feature you can ne tune the wheel
settings independent from the game or platform even
during gameplay directly on the wheel. You can adjust
the strength of the Force Feedback and vibration motors
as well as setting the best sensitivity for your favourite
game. Additionally you can enable the Drift Mode, the
ABS vibration feature and permanently save 5 settings in
the memory of the wheel.
D-Pad
To navigate in the menu
24
Page 25

To navigate in the menu:
1.
Press the Tuning Button.
The currently active set-up will
appear, indicated by S_1 to S_5.
You can save up to ve set-ups in
the controller.
Select set-up: and
2.
Select function: and
3.
Change setting of the respective
4.
function: and
Leave tuning mode: Press „TUNING“
5.
The settings will remain.
Sensitivity
The value shows the wheel rotation which is
needed for a full rotation in the game. The
available values depend on the used platform:
Xbox 360
210/270/540/900
Please set the value according to the game
to ensure best game play.
NOTE: Games will only detect the wheel as
a 900° rotation wheel if 900 is selected.
PS3
210 / 360 / 540 / OFF (default)
If the setting is „OFF“ the sensitivity of the
wheel will be controlled by the Game In case
you are not able to choose the sensitivity
in a Playstation 3 game, you can force the
wheel to a certain sensitivity.
PC
210 / 360 / 540 / OFF (default)
If the setting is „OFF” the sensitivity will be
controlled by the driver (recommended).
Force Feedback
0 / 33 / 66 / 100
Adjust the percentage of the total Force
Feedback strength.
Shock Vibration
0 / 33 / 66 / 100
In the wheel rim are two additional vibration
motors which can be controlled by the game
if a game supports it. By default the vibration
motors are synchronized with the gas pedal
to let you feel the vibration of the motor.
You can adjust the percentage of the
vibration strength you want.
25
Page 26

ABS Vibration
0-100
This feature simulates ABS vibration by
activating the vibration motors in the wheel
and on the brake pedal of the ClubSport
Pedals (optional). You can set a value of
brake power from 0-100% that is needed to
start the vibration.
Drift Mode
OFF / 1 / 2 / 3
Enable the unique drift mode feature which
makes the wheel easier and faster to turn.
Reset all TUNING settings to factory standards:
To reset all settings in the tuning menu to
default press the Tuning Button for about 10
seconds.
6.3 Calibration
Shifter
If the 6-speed gear stick (7GS) is not working
properly it might require new calibration.
Please go through the following steps:
` Power on the wheel
` Choose any platform mode (Xbox 360/
PS3/PC)
Make sure your 7GS shifter is connected
to the wheel.
` Press „Start Button“ + „TUNING button“
at the same time
The LED display will show G_n
` Bring the 7GS into neutral position
` Press the „Start Button“
The display will now change to G_r
` Enter reverse gear
` Press the „Start Button“
The display will now change to G_1
` Bring the 7GS into 1
st
gear
` Press the „Start Button“
The display will now change to G_2
` Bring the 7GS into 2nd gear
` Press the „Start Button“
The display will now change to G_3
` Bring the 7GS into 3rd gear
` Press the „Start Button“
26
Page 27

The display will now change to G_4
` Bring the 7GS into 4th gear
` Press the „Start Button“
The display will now change to G_5
` Bring the 7GS into 5
` Press the „Start Button“
The display will now change to G_6
` Bring the 7GS into 6th gear
` Press the „Start Button“
`
Press the „Tuning Button” to exit the menu
Calibration is completed
Wheel Center Calibration
In some cases a new calibration of the wheel
center could be necessary.
th
gear
LSB + RSB Button
+
Xbox 360 Guide Button
Bring the wheel into PC mode and turn it to its center
position.
Press and hold LSB Button and RSB Button at the
same time.
Press Xbox 360 Guide Button.
Release all three buttons.
27
Page 28

6.4 Binding with (optional) RF dongle
After a rmware update of the wheel or dongle, if the RF
dongle was purchased separately or if you exchange a
component it might be required to bind the wheel to the
RF dongle.
` Connect RF Dongle to PC or PS3
Power on PWTS and activate PC mode
(press Back Button one second).
Press the Binding Button on the dongle –
red LED starts blinking.
Press Start Button and right D-Pad
button simultaneously.
Red LED stops blinking and lights constantly -
RF Dongle and PWTS are connected.
Binding Button
(backside)
right D-Pad Button
+
Start Button
The red LED on the RF dongle indicates if the wheel is
coupled correctly.
The effective reach between wheel and RF dongle is 4
meters.
28
Page 29

7. Summary: Modes and button combinations
Choose platform mode
Power on the wheel and wait until self calibration has
nished. Display shows “- - - “.
Xbox 360: Press and hold Xbox 360 Guide Button
for one second.
PC: Press and hold Back Button for one second.
PS3: Start PC mode. Press Back Button and
Connect button simultaneously.
Calibrate wheel center
Start PC mode and then press and hold RSB and LSB
simultaneously (see side 27). Then Press Xbox 360 Guide
Button and release the buttons.
Reset all Tuning Menu setting
Press and hold Tuning Button for ten seconds.
Start 7GS Shifter Calibration
Press Start Button and Tuning Button simultaneously.
8. Cleaning the racing wheel
Clean only with a dry or slightly damp cloth. Using
cleaning solutions may damage your racing wheel.
9. Troubleshooting
The Porsche 911 Turbo S Wheel must not be opened
or modi ed. Endor® AG expressly prohibits analysis
and utilisation of the electronics, hardware, software and
rmware contained in the controller.
In case dif culties occur in connection with utilisation of
the Porsche 911 Turbo S Wheel, please use the following
guide for elimination of errors.
On the website
further details and contact data.
Malfunctions on Playstation 3
` Game does not recognize the Porsche wheel:
Please switch the wheel to compatibility mode.
` Wheel switches to PC mode after starting a game:
Please enter PS3 mode again.
` Saving the game is not possible:
Please use the SIXAXIS controller to save the game
and navigate in the system menu.
Malfunctions on Xbox 360
Forza Motorsport 3 does not detect the 900° wheel
rotation: Make sure you start the Xbox 360 with the on/off
button on the console and not by pressing the Xbox 360
Guide Button on the wheel. Make sure you select 900 for
www.FANATEC.com/support you will nd
29
Page 30

the SEN (Sensitivity) in the Tuning menu.
Clutch or 6-speed gear shift is not working at all
Please make sure that your game supports this
•
feature.
Please check if you have chosen the right settings
•
in the options menu of the game.
Please make sure that the gear stick cable is
•
connected properly.
Please make sure that the gear stick is calibrated.
•
If you bought the shifters separately you will have
to calibrate the 7GS shifter before you can use it.
Please test the functionality on the PC if possible.
•
In GranTurismo 5: Prologue you need to press the
•
triangle button in the game in order to activate the
clutch.
Wheel is not working properly
Please check if the game is supporting the wheel
•
and if you selected the right settings in the options
menu of the game.
Make sure the latest version of the Porsche wheel
•
driver is installed (PC only)
Please make sure that the power cable is connected
•
properly. After the power switch is pressed the
wheel should automatically self calibrate
Please check if there is a connection between the
•
RF dongle and the wheel. The LEDs on the dongle
must shine permanently. In case it does not, try to
renew the binding (further info in the section 6.4).
In general we highly recommend installing a
•
separate and dedicated PCI USB controller card
only for the PWTS in order to avoid con icts
with other USB devices and to get maximum
performance of your wheel.
If the wheel is connected by cable and the dongle
•
is plugged to the same or another device, the
wheel will use the cable connection.
Some older PC games don’t support enough
•
buttons to make use of all features of the wheel
Some racing games are not optimized for racing
•
wheels. Even if they can be played with the PWTS
they could work better with a gamepad or a
keyboard.
Force Feedback strength gets weaker
Under certain circumstances like it can happen that the
Force feedback Motor of the wheel might be in danger to
overheat. The built in temperature sensor will automatically
reduce the power of the Force Feedback effects until the
normal operating temperature is reached.
Problems with USB headset
Some PC with AMD processor have problems with Force
feedback wheels. In such a case please install a USB 2.0
30
Page 31

PCI card and use it for the Porsche wheel.
Problems with driver
Please make sure to download the latest version of the
driver at
www.FANATEC.com/support.
10. Technical Support / FAQ
www.FANATEC.com/support
11. Manufacturer
ENDOR® AG
Seligenthalerstraße 16 A
84034 Landshut
Niederbayern / Germany
Fanatec is a brand of Endor® AG
www.FANATEC.com
12. Trademarks
„Porsche“ and „911“ are registered trademarks of Dr. Inc.
h.c. F. Porsche Aktiengesellschaft.
Manufactured under licence of Porsche Lizenz- und
Handelsgesellschaft mbH.
„PlayStation 2“, „PlayStation 3“ are trademarks of Sony
ComputerEntertainment Inc.
„Fanatec“ and „Endor“ are registered trademarks of
Endor® AG/Germany.
„Microsoft“, „Xbox 360“, „Xbox Live“ and „Xbox“ are either
registered trademarks or trademarks of Microsoft Corp. in
the United States and/or other countries.
13. Warranty
Please check the FAQ database at www.FANATEC.
com whether your problem can be already solved there.
Normally, the warranty period is two years. However, this
may differ depending on the respective state.
1) Endor® AG grants for the hardware product – as
extension of shorter national warranty regulations,
if applicable –a two-year warranty for material and
manufacturing defects. The warranty does not include
defects that are due to commercial use of the product
and/or normal wear and tear and/or damaging by third
parties and/or improper utilisation or treatment and/or
utilization of the product contrary + to the operating and
maintenance instructions and/or not intended installation
and/or non-compliance with the local safety standards
and/or the results of an intervention by a third party or
a not authorised opening of the device including any
measures for modi cation, adjustment and/or adaptation
measures (also in case of professional execution).
Warranty applies as of the date of purchase when the
31
Page 32

nal customer purchased the product, and is exclusively
limited to the rights as of 2), as far as this does not limit
any further legal warranty claims on the basis of various
national laws. Warranty is subject to return of the defective
product with carriage paid, within the warranty period,
including the original receipt that must include date of
purchase as well as the company stamp/company print
of the rst dealer.
2) The warranty covers – at the choice of Endor® AG
– either gratuitous repair or replacement of the device
or components of the device. With defects that are not
covered by the warranty and/or that are excluded from
warranty (see above), possibilities for repair are to be
requested with the local customer service or the local
dealer.
As far as permitted by law, any further liability - with the
exception of intent and gross negligence – is excluded
for any indirect or direct damages and consequential
damages, regardless of whatsoever basis of claim.
This applies in particular to damages with other property,
damages to persons, data losses as well as nancial
losses like loss of pro t as well as transport damages in
connection with returns to Endor® AG.
As far as liability limitations are not legally allowed or
effective in certain states or certain regions, the limitations
are to be effective to such extent that exclusions of liability
can be agreed upon in accordance with the respective
national laws or jurisdiction.
32
Page 33

33
 Loading...