


Electronic
Keyboard
2
1
2
1
Owner’s Manual

INFORMATION FOR YOUR SAFETY!
THE FCC REGULATION WARNING (for USA)
This equipment has been tested and found to comply with
the limits for a Class B digital device, pursuant to Part 15 of
the FCC Rules.
These limits are designed to provide reasonable protection
against harmful interference in a residential installation. This
equipment generates, uses, and can radiate radio frequency
energy and, if not installed and used in accordance with the
instructions, may cause harmful interference to radio
communications. However, there is no guarantee that
interference will not occur in a particular installation.
If this equipment does cause harmful interference to radio or
television reception, which can be determined by turning the
equipment off and on, the user is encouraged to try to
correct the interference by one or more of the following
measures:
Reorient or relocate the receiving antenna.
Increase the separation between the equipment and
receiver.
Connect the equipment into an outlet on a circuit
different from that to which the receiver is connected.
Consult the dealer or an experienced radio/TV technician
for help.
Unauthorized changes or modification to this system can
void the user's authority to operate this equipment.
PRECAUTIONS
PLEASE READ CAREFULLY BEFORE PROCEEDING
Please keep this manual in a safe place for future reference.
Power Supply
Please connect the designated AC adaptor to an AC outlet
of the correct voltage.
Do not connect it to an AC outlet of voltage other than that
for which your instrument is intended.
Unplug the AC power adaptor when not using the
instrument, or during electrical storms.
Connections
Before connecting the instrument to other devices, turn off
the power to all units. This will help prevent malfunction and
/ or damage to other devices.
Location
Do not expose the instrument to the following conditions to
avoid deformation, discoloration, or more serious damage:
Direct sunlight
Extreme temperature or humidity
Excessive dusty or dirty location
Strong vibrations or shocks
Close to magnetic fields
CAUTION
The normal function of the product may be disturbed by
Strong Electro Magnetic Interference. If so, simply reset
the product to resume normal operation by following the
owner's manual. In case the function could not resume,
please use the product in other location.
Regarding the display
instrument
This display is a precision device created
using extremely high technology, and careful attention
has been paid to its product quality. Although you may
notice some of the issues listed below, please be aware
that these are due to the characteristics of LCD displays,
and are not malfunctions.
• There may be pixels in the display that are always dark
(unlit) or always bright (lit).
• Depending on the displayed content, the brightness of
the display may appear uneven.
• Depending on the displayed content, horizontal stripes
of shading may be visible.
• Depending on the displayed content, flickering or moire
patterns may be visible.
Interference with other electrical devices
Radios and televisions placed nearby may experience
reception interference. Operate this unit at a suitable
distance from radios and televisions.
Cleaning
Clean only with a soft, dry cloth.
Do not use paint thinners, solvents, cleaning fluids, or
chemical-impregnated wiping cloths.
Handling
Do not apply excessive force to the switches or controls.
Do not let paper, metallic, or other objects into the
instrument. If this happens, unplug the AC adaptor from the
wall outlet. Then have the instrument inspected by qualified
service personnel.
Disconnect all cables before moving the instrument.
2

Introduction
Panel & Display Description
Front Panel..........................................................6
Rear Panel..........................................................7
Main Display........................................................8
Setup
Power Supply......................................................9
Setting a Music Stand.........................................9
Connecting a Footswitch.....................................9
Connecting a Volume Pedal................................9
Connections
Connecting a pair of Headphones.....................10
Connecting an Audio Equipment.......................10
Connecting an MP3/CD Player.........................10
Connecting a Computer.....................................11
Connecting external MIDI devices.....................11
Contents
Quick Start
Basic Operations
Selection Operation...........................................12
Soft Keyboard Operation...................................12
Setting Operation..............................................13
Playing the Demos.......................................14
Playing Voices..............................................15
Playing with a Style......................................16
Playing Songs...............................................17
Recording Your Performance to MIDI......18
Recording Your Performance as Audio...19
Using a USB Storage Device.....................20
3

Voice
Playing Various Voices......................................21
Keyboard Parts
Playing a single Voice (Right1)................................21
Playing Two or Three Voices Simultaneously (R 1, 2, 3)21
Playing Different Voices with the Left and Right Hands.22
....................................................21
Setting the touch sensitivity of the keyboard.....22
Changing Pitch..................................................23
Master Tuning.....................................................23
Transpose..........................................................23
Octave..............................................................24
Scale Tune.........................................................24
Adjusting the Volume of Voices.........................26
Adding Effects to Voices....................................26
Arpeggiator.........................................................27
Harmony............................................................30
Chopper.............................................................30
Global Effect......................................................31
Reverb and Chorus..............................................31
EQ....................................................................32
Editing Voice.....................................................32
Editable Parameters.............................................33
Saving the Edited Voice.........................................34
Saving, Deleting or Renaming the User Voice.............34
Style
Selecting Various Styles....................................35
Playing Only the Rhythm Tracks of a Style.......35
Playing All Tracks of a Style..............................35
Adjusting the Volume Balance..........................36
Muting the tracks of a style...............................37
Split Point Settings............................................37
Selecting a Chord Fingering Type.....................38
Chord Basics......................................................38
Single Finger......................................................39
Multi Finger........................................................39
Chord Dictionary..................................................39
Operations for Style Playback...........................40
Style Variations....................................................40
The Function Description of Control Buttons...............40
Adjusting the Tempo..........................................41
Using the Metronome.......................................41
One Touch Setting.............................................42
Saving, Deleting or Renaming the User Style...42
Contents
Advanced Use
Playing the Keyboard and Recording Your
Performance as a New Style.............................47
Editing Each Note of Style................................48
Setting the Notes Transfer Rules for Chord
Changes............................................................50
Setting O.T.S. of Style (One Touch Settings)....52
Song
Playing Various Songs......................................53
Operations for Song Playback..........................53
Adjusting the Volume of the Song.....................54
Displaying Music Notation (Score)....................55
Song Recording
MIDI Recording.................................................57
Quick Recording
..................................................57
Multi Track Recording...........................................58
Editing the Recorded MIDI Song..............................59
Audio Recording................................................60
Saving, Deleting or Renaming the User Song..60
Global Setting
Keyboard...........................................................61
Style & Song.....................................................61
Controllers.........................................................62
Knob.................................................................62
Multi Pad............................................................63
Pedal................................................................64
Effect.................................................................65
MIDI I/O.............................................................65
Utility..................................................................65
Performance Memory
Selecting a Performance Bank..........................67
Recalling a Performance Memory Settings.......67
Freezing the Specific Item.................................68
Registering the Performance Memory Settings.68
Saving, Deleting or Renaming the User
Performance......................................................69
USB Device
File Operations in the File Selection Display.....70
Creating a New Folder......................................71
Formatting the USB Device...............................71
Style Recording
Editing Basic Parameters..................................43
Further Editing a Style.......................................46
4
MIDI
What’s MIDI?.....................................................72
Midi Terminals...................................................72

Appendices
Contents
Troubleshooting
Specification..................................................73
Appendices
Voice List...........................................................74
Style List............................................................80
Song List...........................................................82
Demo List..........................................................82
Chord List..........................................................83
MIDI Implementation List..................................84
............................................73
Introduction
Quick Start
Advanced Use
Appendices
5

1
2
1
2
Panel & Display Description
Front Panel
1
2
1. POWER ON/OFF BUTTON
Turn the power on or off.
2. MASTER VOLUME SLIDER
Adjust the master volume.
3. SELECT BUTTON
Select the four effect combinations
of GROUP KNOBS sequentially.
4. GROUP KNOBS
Effect1: Adjust volume, pan of the
current part(R1/R2/R3/L).
Effect2: Adjust attack time, release
time of the current part
(R1/R2/R3/L).
Effect3: Adjust the filter cutoff
frequency, the amount of
resonance applied at the
filter cutoff frequency of the
current part(R1/R2/R3/L).
Effect4: The knob effect can be
assigned separately. See
“Controller”.
5. EFFECT ON/OFF BUTTON
Turn the special effect such as
arpeggio, harmony, or chopper on
or off.
6. RECORD SONG BUTTON
Enter the RECORD SONG interface.
You’ll record your performace in SMF
format.
7. RECORD AUDIO BUTTON
Enter the audio recording is in ready
state. You’ll record your performace in
WAV format.
345
6
8 9 10 11 12 13
14 15
16
17
20 21 22 23 24
8. SCORE BUTTON
Show the staff of the current song
(SMF).
9. SONG SELECT BUTTON
Enter the SONG SELECT interface.
10. STYLE SELECT BUTTON
Enter the STYLE SELECT interface.
11. USB DEVICE BUTTON
Enter the USB DEVICE interface.
12. GLOBAL SETTING BUTTON
Enter the GLOBAL SETTING
interface.
13. MIXER BUTTON
Enter the MIXER interface.
14. A.B.C. BUTTON
Turn the A.B.C. MODE on or off.
15. AUTO FILL IN BUTTON
Turn the AUTO FILL IN on or off.
16. O.T.S. LINK BUTTON
Turn the O.T.S. LINK on or off. If it
is turned on, the One Touch Settings
can be changed when you select
different style.
17. FADE IN/OUT BUTTON
Turn the FADE IN or OUT on or off.
18. TEMPO +, TEMPO – BUTTONS
Adjust the current tempo.
7
27
18
19
25
19. METRO. BUTTON
Turn the Metronome on or off.
SONG CONTROL
20. PLAY/STOP BUTTON
Start playing the song or stop
the song playback.
21. PAUSE BUTTON
Pause the song playback.
22. RW BUTTON
Rewind the song.
23. FF BUTTON
Fast forward the song.
STYLE CONTROL
20. START/STOP BUTTON
Start or stop playing the style.
21. SYNC. START BUTTON
Turn the SYNC. START on or
off.
22. SYNC. STOP BUTTON
Turn the SYNC. STOP on or off.
23. INTRO 1 BUTTON
Play the intro 1.
24. INTRO 2 BUTTON
Play the intro 2.
25. MAIN A, B, C, D BUTTONS
Play the main part.
26. ENDING 1, 2 BUTTONS
Play the ending.
26
6

29
Panel & Display Description
28
30
36
37
32
31
38
34 35
33
39
27. MULTI PAD BUTTONS
Add spice to your performance
with special dynamic phrases
by pressing them.
28. VOICE BUTTONS
Enter the VOICE SELECT
interface. You’ll select a voice
category.
29. DATA DIAL
Change the value of current
selection.
30. PART ON/OFF BUTTONS
Turn LEFT, RIGHT1, RIGHT2,
RIGHT3 on or off individually.
31. EXIT BUTTON
Exit the current interface and
return to the previous display.
32. +, - BUTTONS
Increase and decrease the
value by 1.
33. SUSTAIN BUTTON
Turn the sustain effect on or
off.
34. TRANSPOSE+, TRANSPOSE-
BUTTONS
Adjust the TRANSPOSE value.
35. OCTAVE+, OCTAVE BUTTONS
Adjust the OCTAVE value.
40
37. FREEZE BUTTON
Turn the FREEZE function on or
off.
38. STORE BUTTON
Save the panel setups to one of the
performance memories.
39. M1-M6 BUTTONS
PERFORMANCE MEMROY:
Recall the panel setups from one of
the performance memories.
O.T.S (M1-M4):
Call up all the settings (voice,
effect, etc) that match the current
style.
40. O.T.S. BUTTON
Switch to the O.T.S. function.
41. MODULATION BUTTON
Apply a vibrato effect.
42. PITCH BEND
Bend note up and down.
43. PHONES
Connect the headphones to the
keyboard.
44. USB PORT
Connect the USB storage device.
41
42
Rear Panel
2
1
1. USB JACK
Connect to a computer.
2. MIDI IN/OUT/THRU JACKS
Connect other products equipped
with a MIDI interface.
3. SUSTAIN JACK
Connect a sustain pedal.
4. VOLUME JACK
Connect a volume pedal.
5. AUX. OUT JACK
Connect to your amplifier/audio.
6. AUX. IN JACK
Connect any external audio source,
such as an MP3 or CD player.
7. DC 12V
Connect DC 12V power adaptor.
(Optional)
4
3
6
5
7
36. BANK BUTTON
Select a performance memory
bank.
43
44
7

Panel & Display Description
Main Display
6
1
4
A
C
B
5
1. Voice
Display voice name and octave data of each part.
(Right1, Right2, Right3, Left)
How to select the voice for each part?
For example:
1. Pressing anywhere in the R1 display area makes the
R1 part selected.
2. Pressing again will call up the Voice Selection display.
Now, you can select the voice for R1.
2. Style&Song
Display the currently selected style name, for example
“8Beat Ballad”. Pressing this name will call up the Style
Selection.
Pressing song tab will display the currently selected song
name, for example “Brahms Waltz”. Pressing this name
will call up the Song Selection display.
2
3
4. Chord
Display the chord name and related information.
A. Chord Name
B. Chord Mode
C. Split
5. Shortcut to setup pages
Pressing “Split Point” will call up the Split Setting quickly.
Pressing “Effect” will call up the Effect Setting quickly.
Pressing “Controllers” will call up the Controllers display
quickly.
6. Others
The amount of transposition in semitone units.
Current tempo.
Current playback position.
Current time signature.
3. Performance
Display the currently selected performance name.
Pressing this name will call up the Performance
Selection display.
8
Setup
This section contains information about setting up your instrument and preparing to play. Please go through this section carefully
before turning the power on.
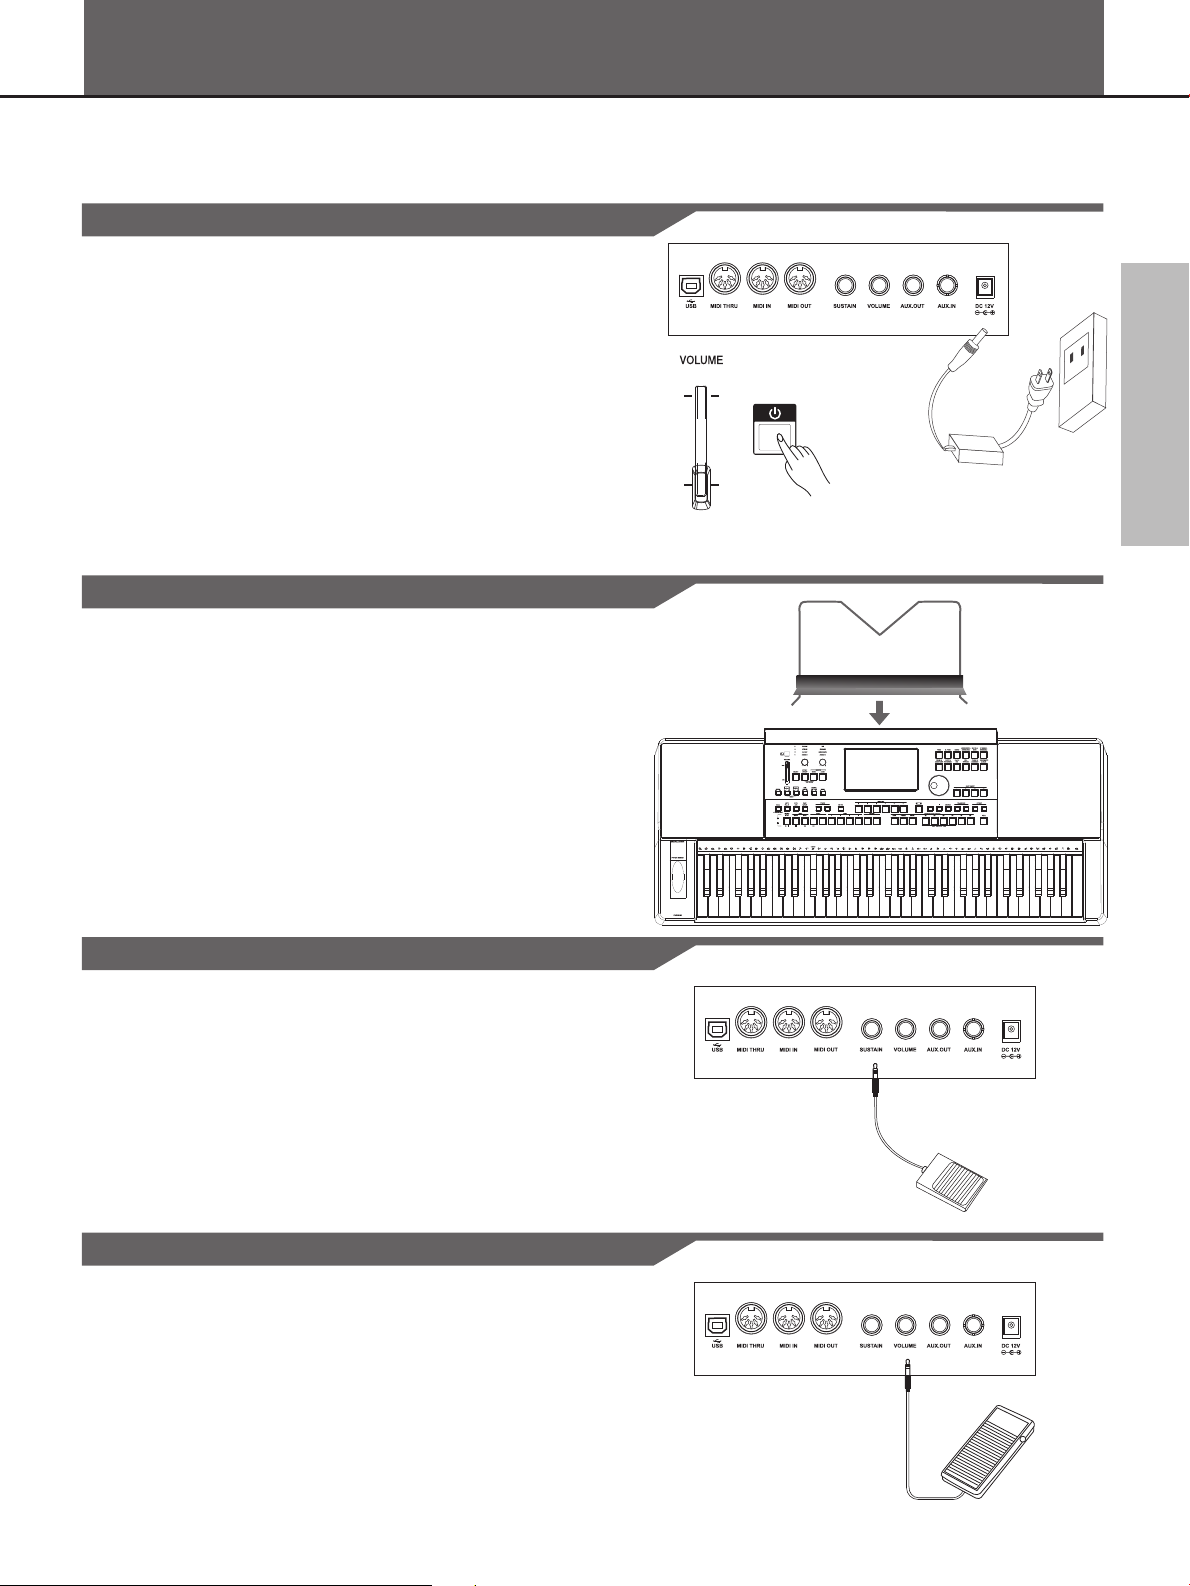
Power Supply
1. Move the MASTER VOLUME slider downwards to set the minimum
volume level.
2. Connect the AC/DC adaptor to the power supply jack.
3. Plug the AC/DC adaptor into an AC outlet.
4. Turn the power ON. The LCD on the panel will light up.
Note:
When the keyboard is not in use or in the time of thunderstorm, please
disconnect the power for safety purpose.
Setting a Music Stand
The instrument is supplied with a music stand that can be attached to
the instrument by inserting it into the slot at the rear of the panel.
Connecting a Footswitch
The sustain function lets you produce a natural sustain as you play by
pressing a footswitch. Plug an optional footswitch into this jack and use
it to switch sustain on or off.
2
1
2
1
Connecting a Volume Pedal
An optional volume control can be plugged into the volume jack for
adjusting the volume of sound.
9

Connections
Connecting a pair of Headphones
When an optional pair of stereo headphones is connected with the
headphones jack, the sound from speakers will switch off automatically
resulting in only the sound from headphone to be heard for private
practice or late-night playing.
Note:
Do not listen with the headphones at high volume for long periods of
time. Doing so may cause hearing loss.
Connecting an Audio Equipment
Connect the rear-panel AUX.OUT jack to amplified speakers, amplifiers
or domestic hi-fi units for external amplification.
2
1
2
1
Note:
To avoid damaging the speakers, please ensure that the volume has
been set to the minimum level before connecting the power and other
devices.
Connecting an MP3/CD Player
Connect the audio output of an MP3/CD player or other audio source
to the stereo AUX. IN jack on the rear panel.
The input signal is mixed with the instrument signal, allowing you to
play along.
10

Connecting a Computer
You can simply connect the computer with USB cable via the USB
connector.
You can use a commercially available MIDI interface to connect the
keyboard to the computer via the MIDI connectors.
Note:
The default MIDI I/O device is USB, So please first set this device as
MIDI, and then connect to the computer. (The setting operation see
Global Setting-MIDI IN/OUT.)
After the driver is installed and initialization is finished, you can choose
USB MIDI Keyboard in the device menu of the software to transfer
MIDI data.
Note:
Do not select USB MIDI Keyboard in both of input and output settings
together, otherwise the sound overlaps.
Connections
Connecting external MIDI devices
You can use standard MIDI cables to connect external MIDI devices.
MIDI IN: Receive MIDI message from an external MIDI device.
MIDI OUT: Transmits MIDI message generated by the instrument.
MIDI THRU: Simply relays the MIDI message received at MIDI IN.
Note:
To avoid damages, please be sure to turn off the power switches
before you disconnect the related devices from the keyboard.
The default MIDI I/O device is USB, So please first set this device as
MIDI, and then connect to the external MIDI device. (The setting
operation see Global Setting-MIDI IN/OUT.)
MIDI OUT MIDI IN
2
1
2
1
MIDI OUTMIDI IN
11

Basic Operations
Selection Operation
There are some selection interfaces: voice selection, style selection,
song selection, performance selection, etc.
How to select the file in these selection interfaces?
For example:
1. Location of data
Preset: Location where pre-programmed (preset) data is stored.
User: Location where recorded or edited data is saved.
USB: Location where data on USB storage device is saved.
2. Category of data
The files are divided into categories according to their types. The
categorization will be selected by pressing this categorization name
on LCD. For example: The voice file (Grand Piano) is in the Piano
categorization. Pressing “Piano” will select the Piano
categorization.
3. Flip and File Browsing
If there are too many files in one category, the files will be on
paging show. You can select your desired page by pressing the
cursor button on LCD.
4. File Selecting
Select the desired file by pressing the file name on the current page.
1
4
Previous Page
3
Page Num
Current Page
Next Page
22
Using the Soft Keyboard
When you name or rename a file or a folder, you should call up soft
keyboard display.
1. Deleting characters:
Press the delete button.
2. Moving the cursor:
Press the right or left cursor button.
3. Entering capital characters:
Press the CAPS button, the capital characters will be displayed.
4. Entering space:
Press the space button.
5. Entering numbers or marks:
Press the numbers button, the numbers and marks will be
displayed.
Enter the number or mark by pressing its button.
Press the OK button to actually enter the new name and return to
the previous display.
Press the CANCEL button to cancel operations and return to the
previous display.
3
5
4
1
2
12

Setting Operation
There are three types on parameter setting.
1. ON/OFF as in the picture: )
Press this “ON” button to switch the keyboard touch response
ON or OFF.
(
On
Basic Operations
2. LIST (as in the picture: Curve )
Press this “Normal” button, all available parameters would be
listed.
You can choose any one of 3 ways below:
1. Press your desired parameter on LCD to select it.
2. Use the DATA DIAL to select your desired parameter.
3. Press the [+] or [-] button to select your desired parameter.
The selected parameter will be highlighted.
Normal
3. DATA (as in the picture: Flat velocity )
Press this “100” button to display a pop-up box.
You can choose any one of 3 ways below:
1. Press the “+” or “-” button to adjust the data.
2. Use the DATA DIAL to adjust the data.
100
3. Press the [+] or [-] button to adjust the data.
13

Playing the Demos
The instrument features 2 wonderful demos. Please refer to DEMO
LIST.
Press the [SONG SELECT] and [STYLE SELECT] buttons
simultaneously to start playing the demo.
Select your desired demo
Press the Demo name on LCD or use the DATA DIAL, the [+] or the
[-] button to select your desired demo.
Pause the demo
Press the [PAUSE] button to pause the demo playing or continue
playing the demo.
Stop the demo
Press the [PLAY/STOP] button to stop the demo playback.
Adjust the tempo of the demo playback
Press the [TEMPO+] or [TEMPO-] button to adjust the tempo of the
playback demo.
Exit the demo
Press the [EXIT] button to stop the demo playback and return to the
main display.
14

Playing Voices
The instrument features exceptionally realistic 672 voices(Including 256 GM2 instrument voices and 15 drum kits), including
piano, guitar, strings, brass and many more. Please refer to Voice List.
Turn the R1 PART on
Press the PART ON/OFF [RIGHT 1] button to turn the R1 part on.
You can play different voices simultaneously or play different voices
with the left and right hands. First, turn on the corresponding part.
Select a Voice for R1 PART
There are 2 methods to select the voice category.
1.
Press one of the VOICE buttons to select a voice category and call
up the Voice Selection display.
Press the R1 display area on Main Display to call up the Voice
Selection display. Press one of the voice categories NAME on the
Voice Selection display.
2. Press the cursor button on LCD to select your desired voice page.
3. Press the voice NAME to select the desired voice on the current
page display.
You can also select the user voice, details see Voice.
Play the Voice Demo
Press the “Voice Demo” on the Voice Selection display to start the
demo for the selected voice. Press the “Voice Demo”again to stop it.
Note:
If there isn't voice demo for the selected voice, “Voice Demo” will not
be displayed.
Play the keyboard and listen to the selected voice.
15

Playing with a Style
The instrument features 240 styles in a variety of different musical genres. Try selecting some of the different styles
(Refer to Style List) and play with the auto accompaniment.
Select a style
There are 2 methods to call up the Style Selection display.
1.
Press the [STYLE SELECT] button.
Press STYLE Name on the Main Display.
2. Press one of the style categories NAME on the Style Selection
display to select the style category.
3. Press the cursor button on LCD to select your desired style page.
4. Press the style NAME to select the desired style on the current
page display.
You can also select the user style, details see Style.
Start a style
1. Press the [A.B.C.] button, the specified left-hand section of the
keyboard becomes the “Auto Accompaniment” section, and chords
played in this section are automatically detected and used as a
basis for fully automatic accompaniment with the selected style.
2. Press the [SYNC START] button to set Auto Accompaniment to
standby—letting you simultaneously start the accompaniment as
soon as you start playing.
3. As soon as you play a chord with your left hand, the
accompaniment starts.
4. Press the [START/STOP] button to stop the accompaniment.
16
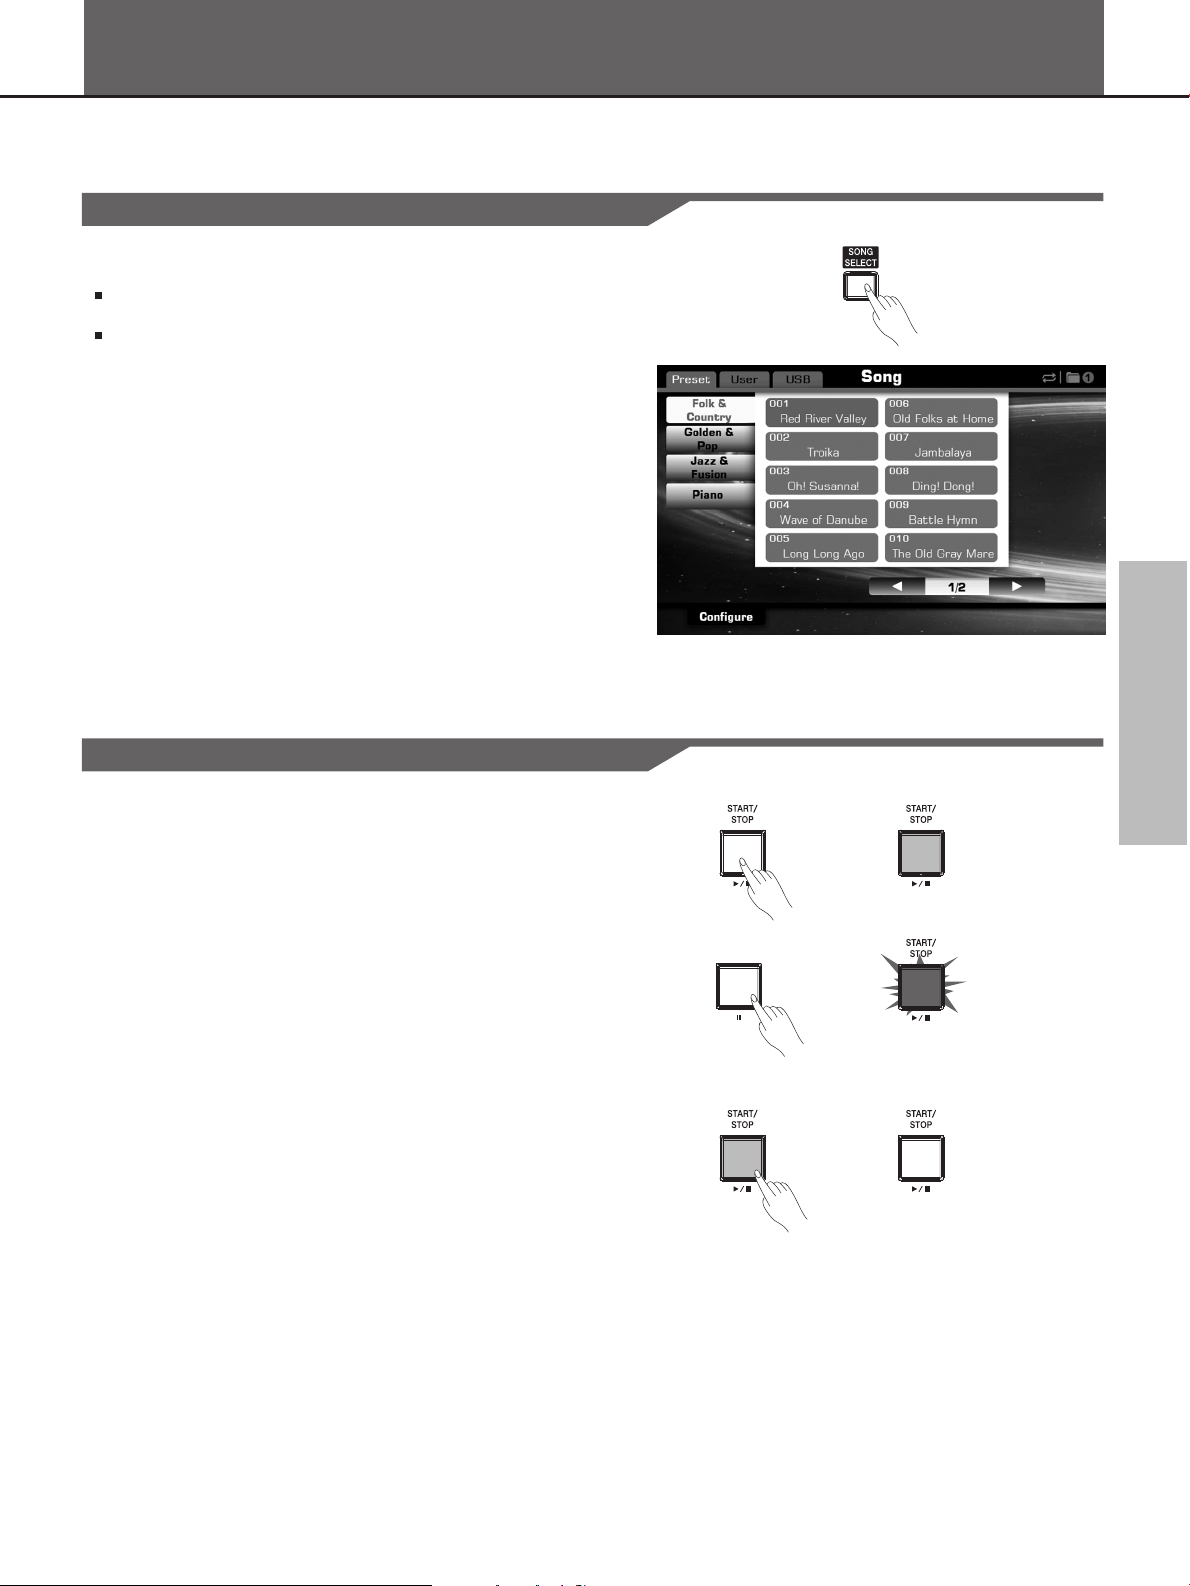
The instrument features 90 songs.
Select a Song
There are 2 methods to call up the Song Selection display.
1.
Press the [SONG SELECT] button.
Press Song Name on the Main Display.
2. Press the song NAME to select the desired song on the current
page display.
You can also select the user song, details see Song.
Playing Songs
Playback a Song
Press the [PLAY/STOP] button to start playback the selected song.
1.
The LED of [PLAY/STOP] will light up.
2. Press the [PAUSE] button to pause the playing song, Press the
[PAUSE] button again to continue it.
3. Press the [PLAY/STOP] button to stop the playing song.
17

Record Your Performance to MIDI
1. Press the [RECORD SONG] and [EFFECT ON/OFF] buttons
simultaneously to call up the Recording Display. A blank song
(“New Song”) is called up for recording. The LED of [RECORD
SONG] is flashing that means it is in the recording standby mode.
2. Press the [PLAY/STOP] button or play the keyboard to start
recording. The LED of [RECORD SONG] will light up.
3. Press the “STOP” button on the Recording Display or press the
[RECORD SONG] button to stop recording and call up soft
keyboard display. The LED of [RECORD SONG] will be turned off.
4. Enter the new name and press “OK” to save the new user song.
5. Press the [PLAY/STOP] button to playback the recorded user song.
If you want to record R1, R2, R3, L simultaneously or record melody
and accompaniment simultaneously, you may refer to
MIDI RECORDING for details.
18

Recording Your Performance as Audio
You can record your performance as CD quality audio file to a USB
device.
1. Please connect your USB storage device drive to the keyboard.
2.
Press the [RECORD AUDIO] button to start recording your
performance. The LED of [RECORD AUDIO] will light up.
3. Press the [RECORD AUDIO] button again to stop recording your
performance and call up soft keyboard display. The LED of
[RECORD AUDIO] will be turned off.
3. Enter the name and press “OK” to save the audio file you just
recorded.
4. Press the [PLAY/STOP] button to play the recorded audio song.
For details see Audio Recording.
19

Using a USB Storage Device
By connecting a USB storage device to your instrument, you can save
data you’ve created to the connected device, as well as read data from
the connected device.
Compatible USB device
Recommended Brand: KINGSTON, SANDISK, SONY, LEXAR,
TRANSCEND
Format: FAT 16/32
Capacity: 1G,2G,4G,8G,16G,32G
Using the USB device
1. Connect the USB storage device to the USB port.
2. Press the [USB DEVICE] button to display the folders and files
under the root directory of USB device.
Press the USB tab on each selection display (such as voice, style,
song, performance), enter the relevant folder directly, and save,
rename or delete the user files from USB device.
Note
If you save your files to your USB storage device in file
displays (like VOICE Selection or Song Selection), the files would be
saved into folder “PianoUser” in the root directory of your USB storage
device.
selection
20

Voice
The instrument has a huge selection of various musical instrument voices which you can play. Try out the different voices
referring to the voice list in the appendix.
Playing Various Voices
The instrument allows you to play several different voices together in a
layer, or play one voice with your left hand while you play a different
voice (or even three layered voices!) with your right.
Keyboard Parts
Voices can be assigned independently to each keyboard part: Right 1,
Right 2, Right3, and Left. You can combine these parts by using the
PART ON/OFF buttons to create a rich, ensemble sound.
Playing a single Voice (Right 1)
You can play a single voice over the entire keyboard range.
1. Press the PART ON/OFF [RIGHT 1] button to turn the R1 part on.
Use the other PART ON/OFF buttons to turn R2 part, R3 part, L part
off.
2. Select a voice for R1.
Press one of the VOICE buttons to call up the Voice selection
display for the R1 part.
If you want to select the user voice, press the “User” to select the
USER display or press the “USB” to select the USB display.
Press the cursor button on LCD to select your desired voice page.
Press the voice NAME to select the desired voice on the current
page display.
Right 1 Part
3. Play the keyboard and listen to the voice.
Playing Two or Three Voices Simultaneously (Right 1, 2, 3)
You can simulate a melody duet or trio.
1. Turn on all the keyboard parts you need by using the PART
ON/OFF buttons on the panel.
2. Open the voice selection screen by voice buttons, choose a
keyboard part in the top left corner of the screen to select its voice.
You can select voices for different parts by doing so.
3. Play the keyboard and listen to the performance.
Right 1 Part
Right 2 Part
Right 3 Part
21

Voice
Playing Different Voices with the Left and Right Hands
You can combine these four parts to create a rich, ensemble sound.
1. Make sure one or more right hand parts are turned on.
2. Press the PART ON/OFF [LEFT] button to turn it on.
3. Select a voice for LEFT.
Press one of the VOICE buttons to call up the voice selection display
for the Left part.
Press the cursor button on LCD to select your desired voice page.
Press the voice NAME to select the desired voice on the current
page display.
4. Set split point.
The point on the keyboard that separates L and R1/R2/R3 is called
the “split point”. The split point is set to F#3 at the factory setting,
however you can set this to any key you wish.
Pressing “SPLIT POINT” on main display or pressing “Split” on voice
selection display will call up the Split Setting display.
Press Left area and make the left split point selected. Use the DATA
DIAL, the [+] or the [-] button or press the key directly to set your
desired split point.
Left Part
Right 1 Part
Right 2 Part
Right 3 Part
5. Play the keyboard with your hands.
Setting the touch sensitivity of the keyboard
Pressing “SPLIT POINT” on main display or pressing “Split” on voice
selection display will call up the Touch Sensitivity Setting display.
1. Press this “ON/OFF” button to switch the keyboard touch response
ON (orange font display) or OFF (gray font display).
2. Press this “Normal” button to call up a pop-up box showing the other
velocity curves.
Use the DATA DIAL, the [+] or the [-] button to select the other curve.
Play the keyboard and select your desired curve.
3. Press this “100” button to call up a pop-up box showing the
adjustable range of parameters.
Use the DATA DIAL, the [+] or the [-] button to adjust the data.
If the keyboard touch response is OFF, this parameter will be at
work.
Voice L
Split Point
Voice R
Selecting Keyboard Latch
Press All Off button to call up a pop-up box showing the other
“ ”
selections. Including All Off , Left and All On . Turn the latch function
on, the layer voice will continue playing after you remove your hand
from the keyboard.
“ ” “ ” “ ”
22

Changing Pitch
Pressing the [GLOBAL SETTING] button will call up the Global Setting
display quickly.
Pressing “Keyboard” on the Global Setting display will call up the Tune
Setting display.
Master Tuning
The Master Tuning function sets the overall pitch of the instrument.
1. Press the Master Tune “440.0Hz” button on the Tune Setting display
to call up a pop-up box showing the adjustable range of parameter.
Voice
2. Press the “+” or “-“ button or use the DATA DIAL, the [+] or the [-]
button to adjust the data, you can set the parameter from 415.4Hz
to 466.2Hz.
3. Press the [+] button and the [-] button simultaneously to set the
default value 440.0Hz.
Transpose
This function allows the overall pitch of the instrument to be transposed
up or down by a maximum of one octave in semitone increments.
Method1:
1. Press the Transpose “0” button on the Tune Setting display
to call up a pop-up box showing the adjustable range of
parameter.
2. Press the “+” or “-“ button or use the DATA DIAL, the [+] or
the [-] button to adjust the data.
Method2:
1. Press the [TRANSPOSE +] button or the [TRANSPOSE-]
button to set the value, the range of parameter is from 12~+12.
2. Press the [TRANSPOSE +] button and the [TRANSPOSE-]
button simultaneously to set the default value 0.
23

Voice
Octave
Shifts the pitch of the specified voice or track up or down by octaves.
A setting of “0” produces normal pitch.
You can adjust the range of the pitch change in octaves for each
keyboard part (R1, R2, R3, L).
Method1:
1. Press the R1 “0” button on the Tune Setting display to call
up a pop-up box showing the adjustable range of octave.
2. Press the “+” or “-“ button or use the DATA DIAL, the [+] or
the [-] button to adjust the data.
Method2:
1. Select a keyboard part in the main screen by pressing the
corresponding area.
2. Press the [OCTAVE +] button or the [OCTAVE -] button to
set the relative octave, ranging from -1~+1.
3. Press the [OCTAVE +] button and the [OCTAVE -] button
simultaneously to set the default octave 0.
Scale Tune
Scale tune allows each individual note of the octave to be tuned over
range from -50 to +50 cents in 1-cent increments (1 cent = 1/100th of a
semitone). This makes it possible to produce subtle tuning variations,
or tune the instrument to totally different scales (e.g. classic or Arabic
scales).
Turn on Scale Tune
Press the button on the Scale Tune Setting display to turn on or off
this function.
When Scale Tune is ON, the box and the button will be changed
from gray to orange.
24

Select Preset Scale Types
1. Press the Recall “Pure Major” on the Scale Tune Setting display to
call up a pop-up box showing the scale types.
2. Press the scale name on pop-up box or use the DATA DIAL, the [+]
or the [-] button to select your desired scale type.
Pure Major & Pure Minor
These tunings preserve the pure mathematical intervals of each scale,
especially for triad chords (root, third, fifth). You can hear this best in
actual vocal harmonies – such as choirs and a cappella singing.
Pythagorean
This scale was devised by the famous Greek philosopher and is
created from a series of perfect fifths, which are collapsed into a single
octave. The 3rd in this tuning are slightly unstable, but the 4th and 5th
are beautiful and suitable for some leads.
Meantone
This scale was created as an improvement on the Pythagorean scale,
by making the major third interval more “in tune.” It was especially
popular from the 16th century to the 18th century. Handel, among
others, used this scale.
Werckmeister
The main feature of this scale is that each key has its own unique
character. The scale was used extensively during the time of Bach and
Beethoven, and even now it is often used when performing period
music on the harpsichord.
Voice
Arabic
Use these tunings when playing Arabic music.
Tune the individual note
1. Press the C “0” button on the Scale Tune Setting display to select
the note to be tuned and call up a pop-up box showing the
adjustable range of tune.
2. Press the “+” or “-“ button or use the DATA DIAL, the [+] or the [-]
button to adjust the data.
Save to User Scale
1. Press the Save to “…” button on the Scale Tune Setting display to
call up a pop-up box as picture.
2. Press the dot in front of user scale name to select the user scale.
There are 3 user scales: User 1, User 2, User 3.
3. Press “OK” to confirm saving to the selected user scale.
25
Voice
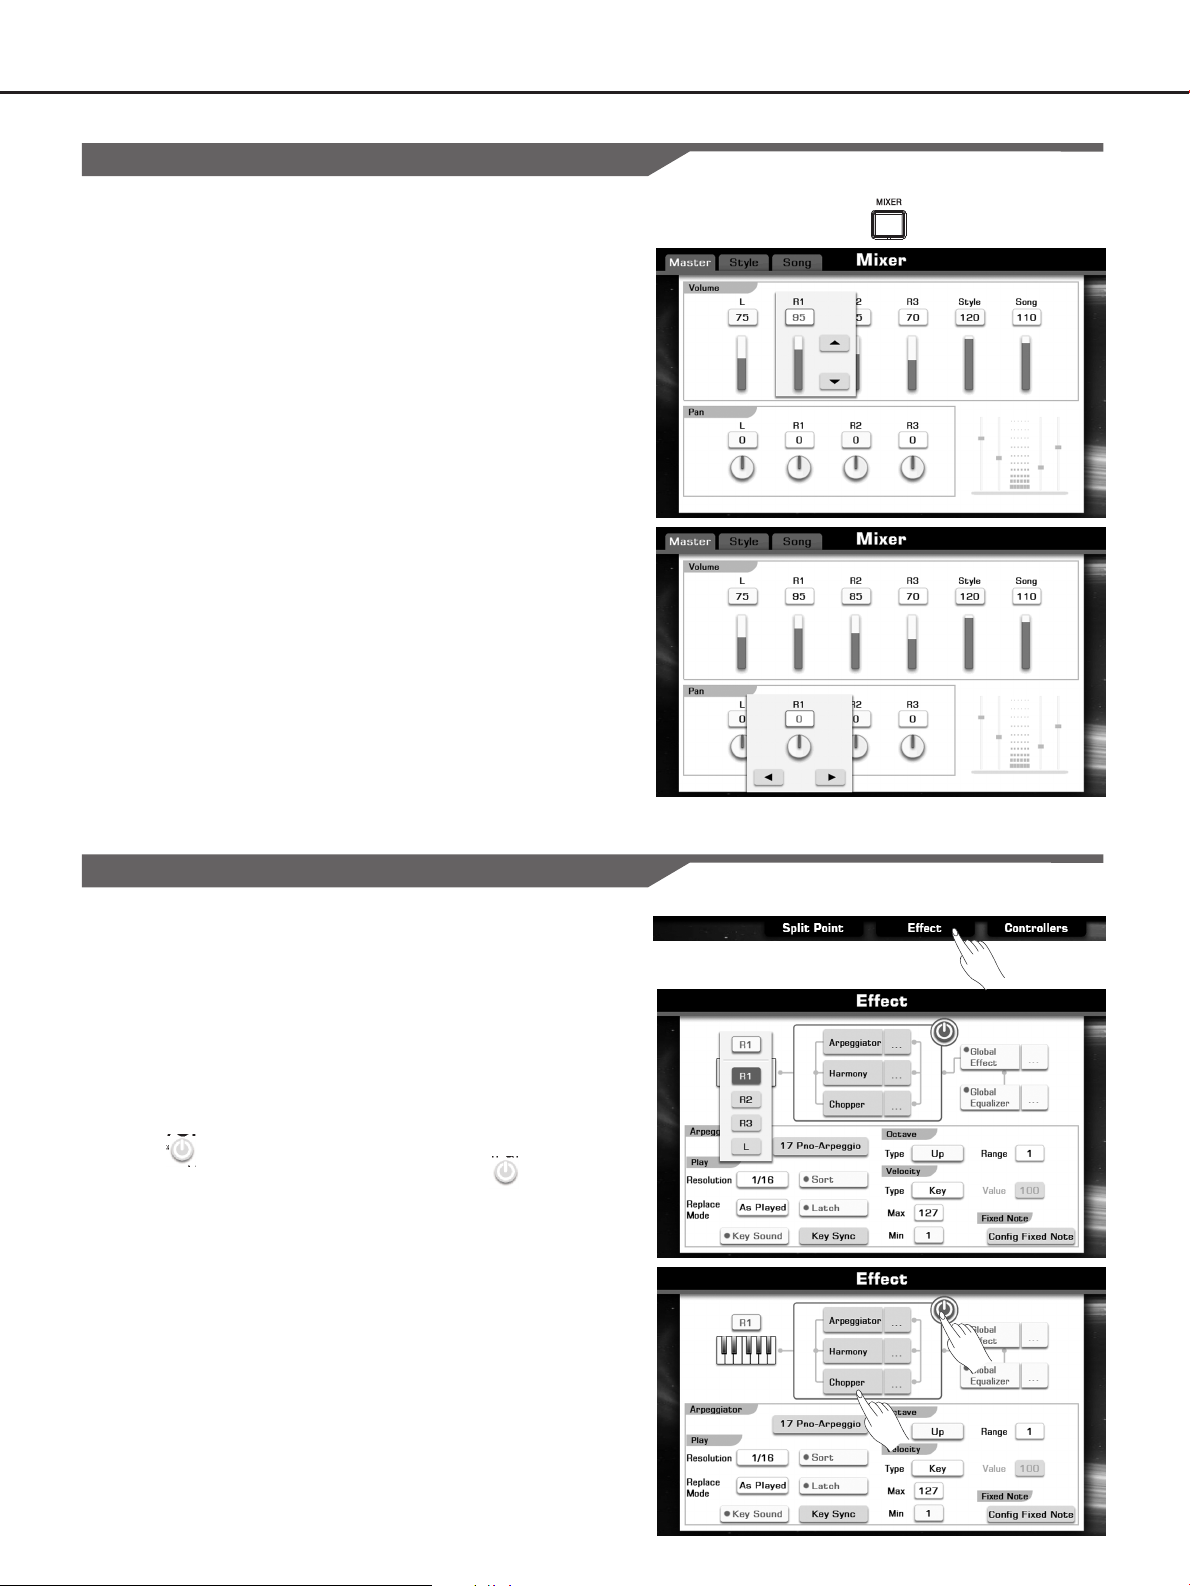
Adjusting the Volume of Voices
In the mixer interface, you can adjust the levels and stereo position
(pan) of each voice.
1. Press the [MIXER] button to call up the Mixer display.
2. Press “Master” to call up the relevant setting display.
3. Press R1 “95” button in the volume box to call up a pop-up box
showing the adjustable range of volume.
4. Press the “+” or “-“ button or use the DATA DIAL, the [+] or the [-]
button to adjust the data.
5. Press R1 “0” button in the pan box to call up a pop-up box showing
the adjustable range of pan.
6. Press the “+” or “-“ button or use the DATA DIAL, the [+] or the [-]
button to adjust the data.
If you want to adjust the volume of other parts (R2, R3, L, Style, Song)
or the pan of other parts (R2, R3, L), just press the relevant button and
operate according to the above steps.
Adding Effects to Voices
There are three effects: Arpeggiator, Harmony, Chopper. You can apply
various effects to your voice.
Pressing “EFFECT” on main display or pressing “Effect” on voice
selection display will call up the Effect display.
Select the desired part
Press the “R1” button to call up a pop-up box as shown to the right.
Press the relevant button (R1,R2,R3,L) to select your desired part for
which you want to add effects.
Turn On/Off Effects
Press the “ ” button on Effect display to turn on/off all effects you’ve
set them on. When effects are ON, the box and the button will be
changed from gray to orange.
Press this “Arpeggiator” button to switch the arpeggiator effect ON or
OFF.
Press this “Harmony” button to switch the harmony effect ON OFF.
Press this “Chopper” button to switch the chopper effect ON OFF.
or
or
26

Arpeggiator
The arpeggiator is a function that automatically generates arpeggios
(playing the notes of the chord individually, with a constant tempo).
You can make settings for the arpeggiator used in the voice. There are
more than 120 internal Arp patterns you can select. You can also select
your original Arp patterns that are made by GrandSuit software on PC
and saved to USB Storage Device.
Press the “Arpeggiator ...” button on the Effect display to call up the
Arpeggiator Setting display.
Arpeggiator parameters:
1. Pattern
Press the Arp pattern name (Ex.17 Pno-rpeggio) to call up the Arp
Pattern Selection display.
Press the Arp Pattern name to select your desired Arp Pattern.
Press the [EXIT] button to exit to the Effect display.
Voice
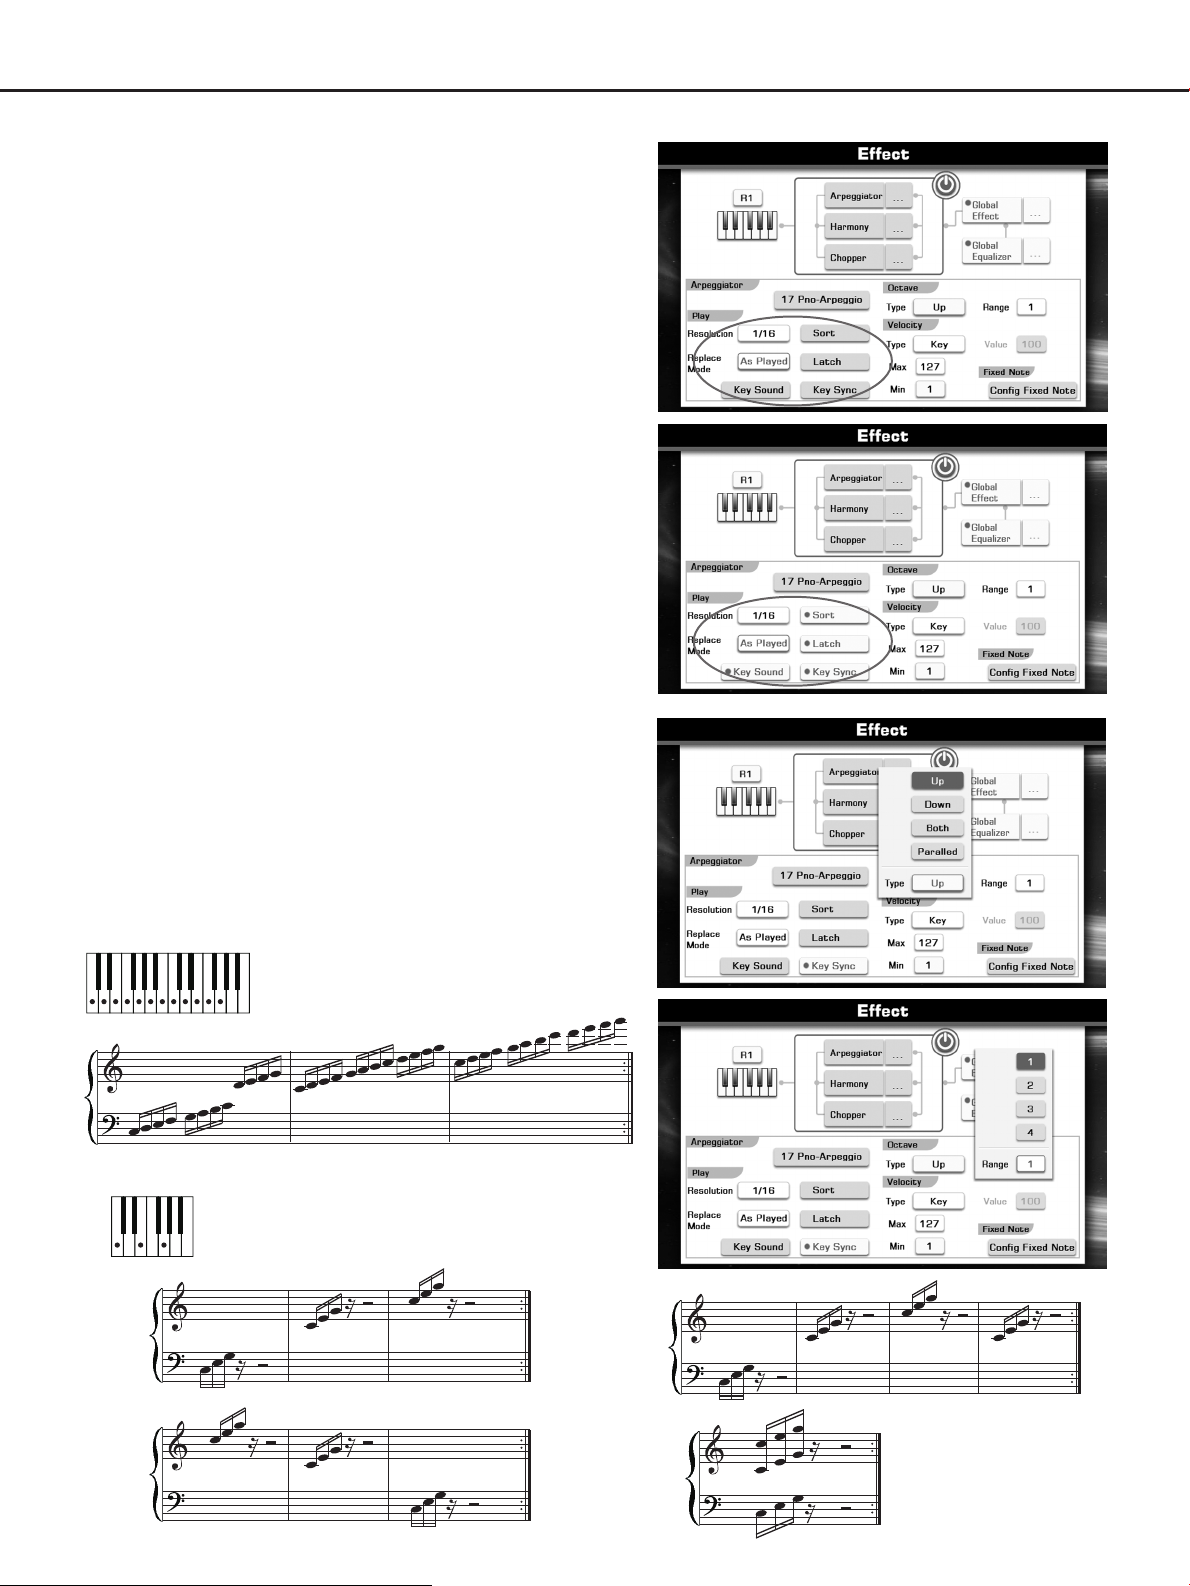
2. Resolution
Specify the timing resolution of the arpeggio. The notes of the
arpeggio will be played ate the interval you specify: 1/16^3,1/16,
1/8^3, 1/8, 1/4^3, 1/4.
Press the “Resolution 1/16” button to call up a pop-up box showing
the timing resolutions of the arpeggio.
Press the resolution button or use the DATA DIAL, the [+] or the [-]
button to select the resolution.
3. Sort
This specifies the order in which the notes you press will be
arpeggiated.
Press the “Sort” button to switch this function ON or OFF.
ON: Notes will be arpeggiated in the order of their pitch, regardless
of the order in which you pressed them.
OFF: Notes will be arpeggiated in the order in which you pressed
them.
4. Replace Mode
Press the “As Played” button to call up a pop-up box showing the
replace modes.
Example 1:
Preset Arp Pattern: 01 Up Down; Sort:On; Resolution:1/16
C4
C4
Fill Played Running Up
Up & Down
As Played
Random
27
Voice
5. Latch
Press the “LATCH” button to switch this function ON or OFF.
ON: The arpeggio will continue playing after you remove your
hand from the keyboard.
OFF: The arpeggio will stop when you remove your hand from the
keyboard.
6. Key Sound
Press the “KEY SOUND” button to switch this function ON OFF.
ON: The notes you played will be sounded, in addition to being
sounded as part of the arpeggio.
OFF: Only the arpeggiated notes will be heard.
7. Key Sync
Press the “KEY SYNC” button to switch this function ON OFF.
ON: The arpeggio pattern will start playing once a note is played
on the keyboard.
OFF: The arpeggio pattern will always play according to the tempo.
or
or
8. Octave
Press the “Range 1” button to call up a pop-up box showing the
numbers of octaves in which the arpeggio will be played.
Press the “Type UP” button to call up a pop-up box showing the
arpeggio playing type in the octave ranges.
Example1:
Preset Arp Pattern: 01 Up Down; Sort: On; Resolution: 1/16;
Replace Mode: As played; Key Sound: On; Octave Range: 3
C3
C3
28
Up
Down
Both
Paralled
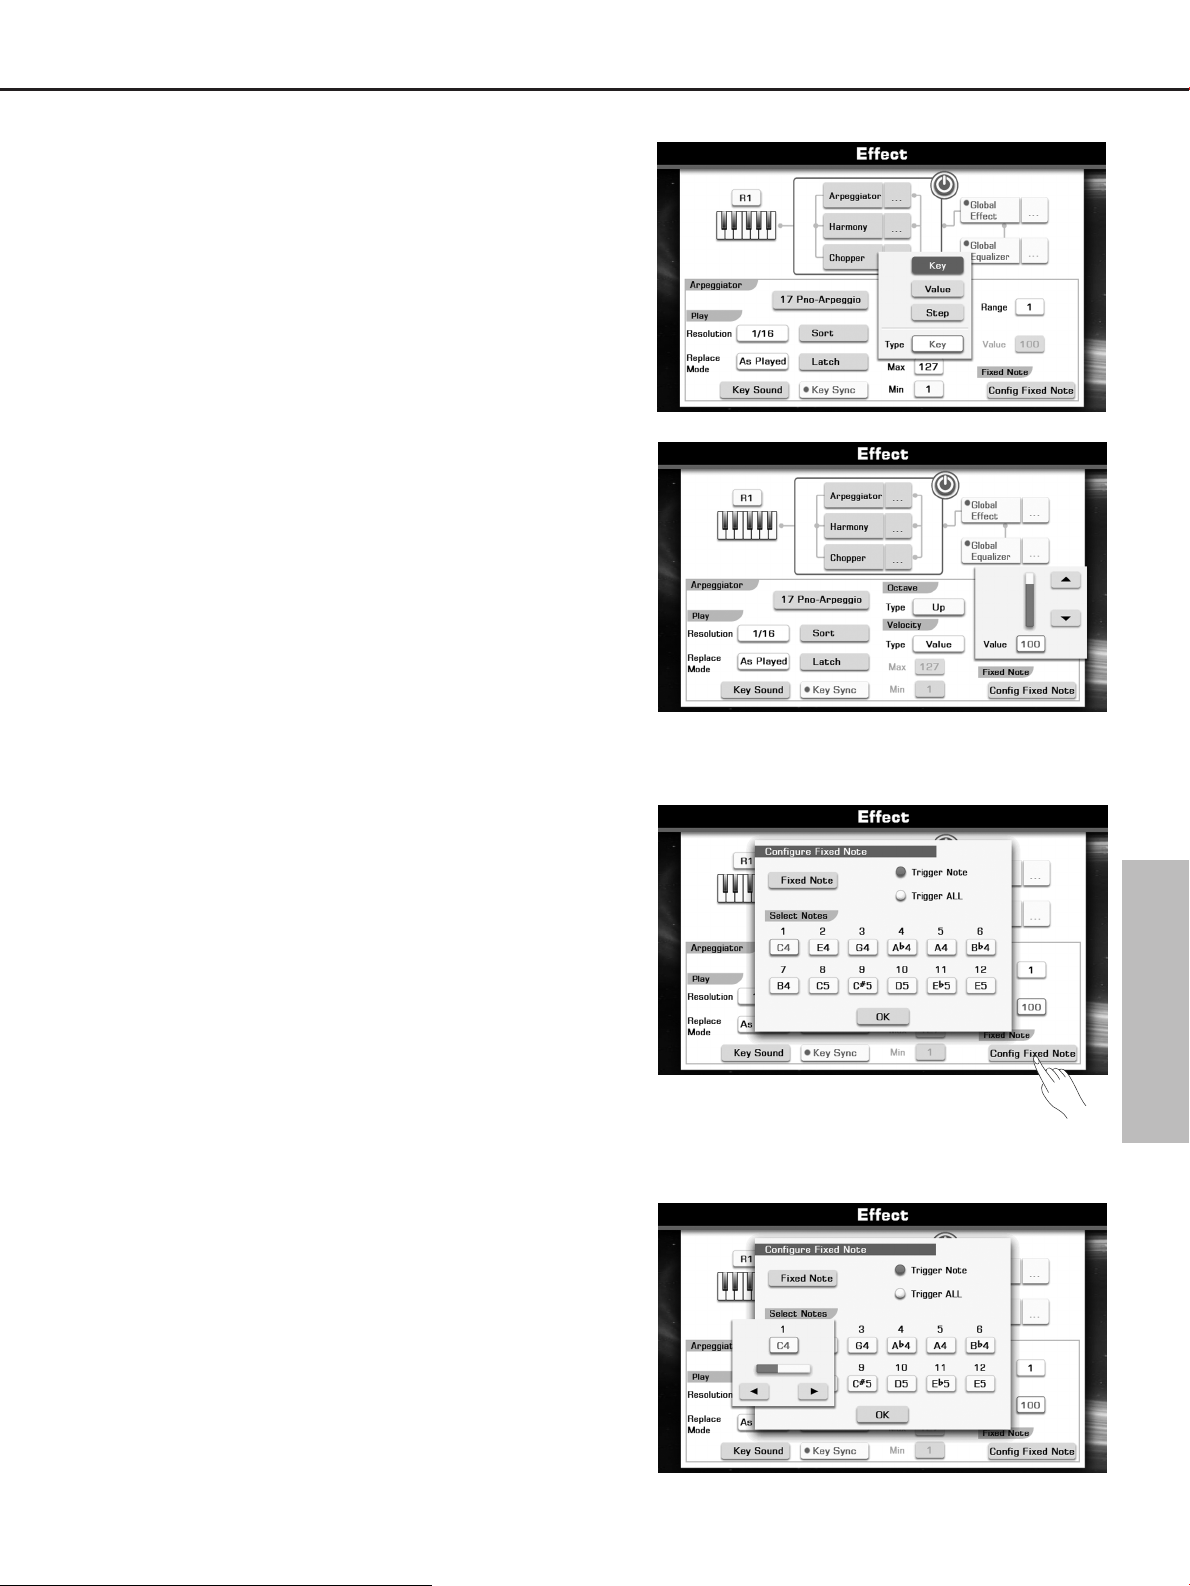
9. Velocity
Specifies the velocity of the notes in the arpeggio.
Press the Type “Key” button to call up a pop-up box showing the
velocity types.
Key: Each note will sound with the velocity value at which it was
actually played. You can also set the range of the velocity.
“Min”and “Max”. If the velocity value is not in the range of the
specified velocity, the arpeggio pattern will not play.
Value: Each note will sound with the specified velocity values.
Step:Each note will sound with the velocity specified for each step.
Voice
10. Fixed Note
With this Fixed Note setting, the arpeggio pattern will always play
the specified pitches regardless of the note numbers received from
the keyboard.
Press the “Configure Fixed Note” button to call up the Fixed Note
Setting display.
Press this “Fixed Note” button to switch the function ON or OFF.
You can also select the different mode to trigger the arpeggio
pattern.
Trigger Note: Play the first specified pitch if you play one key on
the keyboard.
Trigger All: Play all 12 specified pitches if you play one key on the
keyboard.
Specifying the Note: Press this “C4” button to display a pop-up
box.
Note:
Please set the replace mode as “As Played”.
29

Voice
Harmony
If you turn the harmony on, it automatically adds harmony parts to the
notes you play with your right hand—immediately giving you a more full
and professional sound.
In this example, harmony notes in the scale of C major (the chord
played in the left hand) are automatically added to the notes played in
the Chord section right-hand range of the keyboard.
Press the “ ” button on the Effect display to call up the
Harmony Setting display.
There are nine harmony types: Duet, Trio Octave 1+5 Country Duet
Block 4 Close 1 4 Close 2 4 Open. Octave or 1+5 effect is always
added by playing a melody with your right hand. The others effect is
added by playing chords with your left hand and melodies with your
right hand.
Ratio: 20% 40% 80% 100%.
You can adjust the volume level of harmony parts.
Touch Limit: 0-127
You can set the minimum of the response velocity. If you
play a melody with your right hand at a velocity less than
the setting value, the Harmony part will not be added to
the notes.
Harmony...
, , , ,
, , ,
, , ,
Split Point
Chord section
Chopper
If you turn the chopper on, it automatically adds chopping effect to the
notes you hold down. Since the Chopper effect is added by detecting
pressed keys. If you release the key, it automatically turns the chopper
effect off.
Press the “ ” button on the Effect display to call up the
Chopper Setting display.
There are two play modes: Use Pattern or Real-Time.
Mode 1: Use Pattern
There are 25 user patterns you can select. Press the Pattern
“001” on the Chopper Setting display to call up a pop-up box
showing the the available patterns for selection.
Mode 2: Real Time
There are 2 parameters you can change.
Interval: 1/1, 1/2, 1/4, 1/8, 1/16
Pull-up Time: 5-100
Press the Interval “1/16” on the Chopper Setting display to call up a
pop-up box showing the available interval values for selection.
Chopper...
30

Global Effect
Reverb and Chorus
Reverb: You can create a reverb effect that makes you sound like you
are playing in places like a concert hall, or live in a club.
Chorus: You can add a chorus effect that makes your playing sound as
though multiple parts were being played together at the same
time.
You can select the reverb type and adjust the master reverb level and
the channel reverb level.
You can also select chorus type and adjust the master chorus level and
the channel chorus level.
Turn On/Off Global Effect and Adjust the Parameter
1. Press the “EFFECT” button on main display to call up the Effect
display.
2. Press the “Global Effect” button on the Effect display to turn on
Global Effect. This applies the reverb and chorus effects to the
entire sound of the instrument.
Voice
3. Press the “ ” button on the Effect display to call up the
Global Effect Setting display.
Global Effect...
4. Press the Type relevant button (ex. “Hall”) to call up a pop-up box
showing the reverb types.
5. Press the relevant type button or use the DATA DIAL, the [+] or the
[-] button to select the reverb type.
6. Press the Master Level relevant button (ex. “64”) to call up a pop-up
box showing the adjustable range of reverb master level.
7. Press the “+” or “-” button or use the DATA DIAL, the [+] or the [-]
button to adjust the data.
8. Press the channel level relevant button (ex. R1 send “50”) to call up
a pop-up box showing the adjustable range of reverb channel level.
9. Press the “+” or “-” button or use the DATA DIAL, the [+] or the [-]
button to adjust the data.
If you want to adjust the parameter of chorus, just press the relevant
button and operate according to the above steps.
31

Voice
EQ
The instrument possesses a four-band digital equalizer function.
Frequency Bands (4 bands)
Low
Low-Mid
High-Mid
High
You can adjust the FREQ (center frequency) of every band and adjust
the gain (amplitude change) in each of the four frequency bands within
a range of -12 to 0 to +12 decibels [dB].
Turn On/Off Global EQ and Adjust the Parameter
1. Press the “EFFECT” button on main display to call up the Effect
display.
2. Press the button on the Effect display to turn on
Global EQ.
This applies the equalizer effect to the entire sound of the
instrument.
3. Press the “ ” button on the Effect display to call up
the EQ Setting display.
“Global Equalizer”
Global Equalizer...
4. Press the relevant button (ex. Freq. low “400Hz”) to call up a pop-up
box showing the adjustable range of frequency.
5. Press the “+” or “-” button or use the DATA DIAL, the [+] or the [-]
button to adjust the data.
6. Press the relevant button (ex. Gain low “6dB”) to call up a pop-up
box showing the adjustable range of gain.
7. Press the “+” or “-” button or use the DATA DIAL, the [+] or the [-]
button to adjust the data.
Editing Voice
You can create your own voice by editing some parameters of the
existing voices and save it as a user voice to the USER display for
future recall.
1. Select the desired voice for editing.
2. Press the “EDIT” on the Voice Selection display to call up the Voice
Editing display.
3. Press the “Common” or “Envelope” on the Voice Editing display to
call up the relevant editing display.
4. Press the relevant button to select the item (parameter) to be
edited.
5. Use the DATA DIAL, [+] or [-] button to adjust the data.
32

Editable Parameters
Common
Default Volume
MONO/POLY
Portamento Time
Left Octave
Right Octave
Modulation Depth
Effect
Adjusts the volume of the current edited
voice.
Determines whether the edited voice is
played monophonically or polyphonically.
Portamento is a function that creates a
smooth transition in pitch from the first
note played on the keyboard to the next.
Shifts the octave range of the edited voice
up or down in octaves. When the edited
voice is used as the LEFT part, this
parameter is available.
Shifts the octave range of the edited voice
up or down in octaves. When the edited
voice is used as any of the RIGHT 1-3
parts, this parameter is available.
Determines the intensity of the Vibrato
effect. Higher settings result in a more
pronounced Vibrato.
Voice
0-127
0-3
-1,0,1
-1,0,1
1-4
Arpeggiator
Reverb Level
Chorus Level
Envelope
Attack
Decay
Release
Vibrato
Rate
Depth
Delay
Including the current arpeggiator setting or
not.
Adjust the reverb level of the edited voice.
Adjust the chorus level of the edited voice.
Determines how quickly the sound reaches its
maximum level after the key is played. The lower
the value, the quicker the attack.
Determines how quickly the sound reaches its
sustain level (a slightly lower level than
maximum). The lower the value, the quicker the
decay.
Determines how quickly the sound decays to
silence after the key is released. The lower the
value, the quicker the decay.
Determines the speed of the vibrato effect.
Determines the intensity of the vibrato effect.
Determines the amount of time that elapses
between the playing of a key and the start of the
Vibrato effect.
0-127
0-127
0-127
0-127
0-127
0-127
0-127
0-127
Level
ATTACK DECAY RELEASE
Sustain Level
Time
Key on Key off
Pitch
DELAY
RATE
DEPTH
Time
33

Voice
Saving the Edited Voice
Press the “COMPARE” on the editing display to compare the sound of
the edited voice with the original voice.
If you are satisfied with your edited voice, please press the “SAVE” on
the editing display to call up soft keyboard display.
Name the edited voice and press “OK” to save it as a user voice on the
USER Voice selection display.
Saving, Deleting or Renaming the User Voice
1. Press“USER” or “USB” tab on Voice Selection display to call up the
relevant display for user voices.
2. Select your desired user voice by pressing the relevant name of
user voice.
3. Press the “Menu” button to display the relevant buttons on the
current display.
4. Press “SAVE TO USER” to call up soft keyboard display, enter the
new name and press “OK” to save as a new user voice to the
internal memory.
5. Press “SAVE TO USB” to call up soft keyboard display, enter the
new name and press “OK” to save as a new user voice to the USB
device memory.
6. Press “DELETE” to display the pop-up box, press “OK” to delete the
current user voice.
7. Press “RENAME” to call up soft keyboard display, enter the new
name and press “OK” to rename the current user voice.
Note:
If the new name you entered is same as the name of exited user voice,
a pop-up box will appear.
Please press “OK” and rename the file again.
34

Style
The instrument has a huge selection of various musical genre styles which you can play. Try out the different styles referring to
the style list in the appendix.
Selecting Various Styles
Press the [STYLE SELECT] button or press STYLE NAME on the Main
Display to call up the Style Selection display.
Press one of the style categories NAME on the Style Selection display
to select the style category.
Press the cursor button on LCD to select your desired style page.
Press the style NAME to select the desired style on the current page
display.
Note:
If you want to select the user style, press the “User” tab to display the
available user styles or press the "USB" tab to display the user styles
on your USB device.
Playing Only the Rhythm Tracks of a Style
Rhythm is one of the most important parts of a Style. Try to play the
melody along with just the rhythm. You can sound different rhythms for
each Style. Keep in mind, however, that not all Styles contain rhythm
channels. (Piano category)
1. Select your desired style.
2. Press the [A.B.C] button to turn auto accompaniment off.
3. Press the [START/STOP] button to play back the rhythm channels.
4. Press the [START/STOP] button to stop the rhythm.
Note:
You can also start the rhythm simply by playing a key if SYNC START
is enabled.
Playing All Tracks of a Style
The auto accompaniment feature puts a full backing band at your
fingertips. To use it, all you have to do is play the chords with your left
hand as you perform and the selected accompaniment style matching
your music will automatically play along, instantly following the chords
you play. With auto accompaniment, even a solo performer can enjoy
playing with the backing of entire band or orchestra.
Track Name
Percussion
Drum
Bass
Chord 1
Chord 2
Chord 3
Phrase 1
Phrase 2
35

Style
1. Select your desired style.
2. Press the [A.B.C] button to turn auto accompaniment on.
3. Press the [SYNC START] button to turn SYNC START on.
4. Play a chord with your left hand to start the auto accompaniment.
5. Press the [START/STOP] button or press any of the [ENDING]
button to stop the auto accompaniment.
Note:
You can also stop the auto accompaniment simply by releasing the
chord keys if SYNC STOP is enabled.
Default Split Point #F3
Adjusting the Volume Balance
Press the [MIXER] button to call up the Mixer Display.
Adjusting the Volume Balance between the style and
the keyboard
1. Press “Master” tab to call up the relevant setting display.
2. Press Style “120” button in the volume box to call up a pop-up box
showing the adjustable range of volume.
3. Press the “+” or “-” button or use the DATA DIAL, the [+] or the [-]
button to adjust the data.
4. Adjust the keyboard volume by pressing the relevant button and
operating according to the above steps.
5. Press the [EXIT] button to exit the Mixer Display.
Note:
If you turn on the Chord velocity control, the style volume changes in
response to your playing strength in the chord section of the keyboard.
Details see Global Setting-Style & Song.
Adjusting the Volume Balance for style
1. Press “Style” tab to call up the relevant setting display.
2. Press Drum “127” button in the volume box to call up a pop-up box
showing the adjustable range of volume.
3. Press the “+” or “-” button or use the DATA DIAL, the [+] or the [-]
button to adjust the data.
4. Adjust the volume of other tracks by pressing the relevant button
and
operating according to the above steps.
5. Press the [EXIT] button to exit the Mixer Display.
36

Muting the tracks of a style
1. Press the [MIXER] button to call up the Mixer Display.
2. Press “Style” tab to call up the relevant style setting display.
3. Press the “S” button to set the channel to SOLO (orange font
display). You listen to only one instrument of this track. Press the
“S” button again to cancel SOLO (gray font display).
4. Press the “M” button to mute the channel (orange font display).
You can listen to the playback of the style except this track. Press
the “M” button again to cancel MUTE (gray font display).
5. Press the [EXIT] button to exit the Mixer Display.
Style
Split Point Settings
There are two Split Points that separate the different sections of the
keyboard: the Chord section, the LEFT part section and the RIGHT 1
and 2 sections. The two Split Point settings (below) are specified as
note names.
Split Point (Chord)—separates the Chord section for Style playback
from the section(s) for playing Voices (RIGHT 1, 2,3 and LEFT).
Split Point (Left)—separates the two sections for playing Voices, LEFT
and RIGHT 1- 3.
1. Pressing “SPLIT POINT” on main display or pressing “Split” on
voice selection display will call up the Split Setting display.
2. Set the Split Point (Chord) and the Split Point (Left) to the same
note
Press “Chord + Left” to turn it on.
Use the DATA DIAL, the [+] or the [-] button or press the key directly
to set your desired split point.
3. Set the Split Point (Chord) and the Split Point (Left) to different
notes.
Press “Chord + Left” to turn it off.
Press Chord Note Name and make the chord split point selected.
Use the DATA DIAL, the [+] or the [-] button or press the key directly
to set your desired chord split point.
Press Left Note Name and make the left split point selected. Use
the DATA DIAL, the [+] or the [-] button or press the key directly to
set your desired left split point.
Split Point (C+L)
Chord & Left
Split Point (Chord)
Voice R1, R2, R3,
Split Point (L)
Note:
Split Point(Left) cannot be set lower than Split Point(Chord), and Split
Point(Chord) cannot be set higher than Split Point(Left).
Chord Left
Voice R1, R2, R3,
37

Style
Selecting a Chord Fingering Type
Style playback can be controlled by the chords you play in the chord
section of the keyboard. There are two types of fingering.
Holding down [A.B.C] button will call up the Chord Setting display.
Press the Fingering type name to select your desired Chord Fingering
type.
Press “Full Range” to turn it on (orange font display). Detect chords in
the entire key range. Chords are detected in a way similar to Multi
Finger, even if you split the notes between your left and right hands.
Finger
Multi Finger
Bass Invert
Automatically detects Single Finger or Multi Finger
chord types.
Only detects Multi Finger chord type.
Automatically detects chord inversion of bass track.
Chord Basics
Three or more notes played together is defined as a chord . The most
basic chord type is the triad consisting three notes: the root, third and
fifth degree of the corresponding scale. A C major triad , for example,
is made up of the notes C (the root), E (the third note of the C major
scale) and G (the fifth note of the C major scale).
In the C major triad shown, the lowest note is the root of the chord
(this is the chord's root position using other chord notes for the lowest
note results in “inversion”). The root is the central sound of the chord,
which supports and anchors the other chord notes. The distance
(interval) between adjacent notes of triad in root position is either a
major or minor third.
The lowest interval in our root-position trial (between the root and the
third) determines whether the triad is a major or minor chord, and we
can shift the highest note up or down by a semitone to produce two
additional chords, as shown.
“ ”
“ ”
“ ”
“ ”
“ ”
The basic characteristics of the chord sound remain intact even if we
change the order of the notes to create different inversions. Successive
chords in a chord progression can be smoothly connected, for
example, by choosing the appropriate inversions.
Reading Chord Names
Chord names tell you just about everything you need to know about a
chord (other than the inversion/voicing). The chord name tells you what
the root of a chord is, whether it is major, minor or diminished, whether
it requires a major or flatted seventh, what alterations or tension does it
use...all at a glance.
38

Single Finger
Single-finger accompaniment makes it simple to produce beautifully
orchestrated accompaniment using major, seventh, minor and minorseventh chord by pressing a minimum number of keys on the auto
accompaniment section of the keyboard.
Multi Finger
The Fingered type recognizes the various chord types (Details See the
chord list) and can be looked up using the Chord Dictionary function.
Style
Chord Dictionary
If you know the name of a chord but don’t know how to play it, you can
use the Chord Dictionary function.
1. Holding down [A.B.C] button will call up the Chord Setting display.
2. Press “Root C” button to select the root note.
3. Press “Type Major” button to select the chord type.
The notes you need to play to make the selected chord are shown in
the display. (Music Score and Keyboard)
CSU S2
39

Style
Operations for Style Playback
Style Variations
While you play, you can automatically add specially created intros and
endings, as well as variations in the rhythm/chord patterns, for more
dynamic, professional-sounding performances.
INTRO
This is used for the beginning of the song.
Each preset style features two different intros. When the intro finished
playing, accompaniment shifts to the Main section.
Press one of the INTRO [1]–[2] buttons before starting style playback.
Now the LED of INTRO flashes, the style is ready to play.
Press the [START/STOP] button or play a chord (SYNC START is
enabled) to start playing intro.
MAIN
This is used for playing the main part of the song. It plays an
accompaniment pattern of several measures, and repeats indefinitely.
Each preset style features four different patterns.
Press one of the MAIN [A]–[D] buttons during style playback, your
desired MAIN section will start playing at the next measure.
1
2
FILL IN
The fill-in sections let you add dynamic variations and breaks in the
rhythm of the accompaniment, to make your performance sound even
more professional.
Turn on the [AUTO FILL IN] button, the LED of the [AUTO FILL IN]
button will light up. Simply press one of the MAIN (A, B, C, D) buttons
as you play, and the selected fill-in section plays automatically (the
relevant LED of MAIN flashes). When the fill-in is finished,
accompaniment shifts to the Main section.
ENDING
This is used for the ending of the song.
Each preset Style features two different endings. When the ending is
finished, the style stops automatically.
Press one of the ENDING [1]–[2] buttons during style playback (the
relevant LED of MAIN flashes). The ending will start playing at the next
measure.
The Function Description of Control Buttons
START/STOP
Start or stop playing back the style. When the style is playing, the LED
of [START/STOP] button flashes according to the current tempo.
SYNC START
This lets you start playback as soon as you play the keyboard.
1
2
SYNC STOP
This lets you stop the Style anytime you want by simply releasing the
chord notes.
O.T.S LINK
This lets you automatically have One Touch Settings change when you
select a different Main section (A–D).To use the OTS Link function,
press the [OTS LINK] button. The LED of the [OTS LINK] button will
light up.
40

FADE IN
The Fade In produces smooth fade-ins when starting the Style.
Press the [FADE IN/OUT] button when Style playback is stopped, the
LED of the [FADE IN/OUT] button will light up. When the Fade In is
finished, the LED of the [FADE IN/OUT] button will light off.
FADE OUT
The Fade Out produces smooth fade-outs when stopping the Style.
Press the [FADE IN/OUT] button during Style playback, the LED of the
[FADE IN/OUT] button will light up. When the Fade Out is finished, the
style will be stopped automatically and the LED of the [FADE IN/OUT]
button will light off.
Note:
You can set the fade-in and fade-out time, Details see Global SettingUtility.
Adjusting the Tempo
1. Press the [TEMPO+] or [TEMPO-] button to call up the pop-up
tempo setting display.
Style
2. Press the [TEMPO+] or [TEMPO-] button to set the tempo. Pressing
and holding either button lets you continuously increase or
decrease the tempo value when the tempo dialog is popped up.
Press the [TEMPO+] and [TEMPO-] buttons simultaneously to reset
the tempo.
The number in the display indicates how many quarter note beats
there are in one minute. The range is between 30 and 280.
3. Press the [EXIT] button to close the Tempo display.
Note:
When you select another style during style playback, the selected style
will start playing at next measure by current tempo.
If you turn off the Lock Tempo function, it will use the new style's
default tempo when the style changes.
How to turn off the Lock Tempo? Details see Global Setting-Style &
Song.
Using the Metronome
1. Press the [METRO] button to turn the metronome on. The LED of
[METRO] button flashes according to the current tempo.
2. Press the [METRO] button again to turn the metronome off.
Adjusting the metronome tempo is same as adjusting the tempo.
The metronome parameters:
VOLUME
Bell ON/OFF
TIME SIGNATURE
How to set these parameters? Details see
Global Setting-Utility-Metronome.
Determines the level of the metronome sound.
Conventional metronome sound, with bell or no bell.
Determines the time signature of the metronome sound.
41

Style
One Touch Setting
One Touch Setting is a powerful and convenient function that lets you
instantly recognize virtually all Auto-accompaniment-related panel
settings with the touch of a single button.
1. Press the [O.T.S.] button to turns on the One Touch Setting for the
current style. The LED of the [O.T.S.] button will light up.
2. Press one of the [ONE TOUCH SETTING] buttons [M1]-[M4], the
relevant LED will light up, A.B.C and SYNC START are
automatically turned on. Various panel settings (such as voice,
effect, etc.) that match the selected style can be instantly recalled
with just a single button press.
One Touch Setting Parameters:
Part ON/OFF (VOICER1,R2,R3,L)
Voice Selection (VOICER1,R2,R3,L)
Octave (VOICER1,R2,R3,L)
Volume (VOICER1,R2,R3,L)
Reverb Level (VOICER1,R2,R3,L)
Chorus Level (VOICER1,R2,R3,L)
Note:
If the OTS LINK is turned on, various panel settings (such as voice,
effect, etc.) that match the selected Main Section will be instantly
recalled when you select the Main Section. The relevant O.T.S LED will
light up to hint.
Saving, Deleting or Renaming the User Style
1. Press“USER” or “USB” tab on Style Selection display to call up the
relevant display for user styles.
2. Select your desired user style by pressing the relevant name of
user style.
3. Press the “Menu” button to display the relevant buttons on the
current display.
4. Press “SAVE TO USER” to call up soft keyboard display, enter the
new name and press “OK” to save as a new user style to the
internal memory.
5. Press “SAVE TO USB” to call up soft keyboard display, enter the
new name and press “OK” to save as a new user style to the USB
device memory.
6. Press “DELETE” to display the pop-up box, press “OK” to delete
the current user style.
7. Press “RENAME” to call up soft keyboard display, enter the new
name and press “OK” to rename the current user style.
Note:
If the new name you entered is same as the name of exited user
style, a pop-up box will appear.
Please press “OK” and rename the file again.
42

Style Recording
With this powerful Style Record function, you can create your own styles, recording them by yourself or by combining the
internal Style data. The existing Styles and their O.T.S. settings also can be edited. This is useful to make a personalized
performance.
With the Style Record function, you can do following things:
1. Edit an internal style.
2. Record a whole new style.
3. Copy channels from the existing style to make a new combination.
4. Edit detailed notes of a style.
5. Set the note transposition rule of a style.
6. Create or edit the O.T.S. settings of a style.
Basic knowledge of a style
Styles are made up of different sections (INTRO, MAIN, FILL and ENDING) each section has eight separate channels
(PERCUSSION, DRUM, BASS, CHD1, CHD2, CHD3, PHR1 and PHR2). With the style record function, you can create a style
by separately recording the channels, or by importing pattern data from other existing Styles.
Editing Basic Parameters
If you want to adjust the basic parameters like Tempo, Voice and
Volume, easily do as following operations.
1. Enter the style record interface
In the style selection page, select a desired style as the basis for
recording/editing, and then press the “Edit”.
Enter the edit display, and you can see the current editing
information of style.
The channel which selected with red background color is available
to editing. Set an appropriate value to its corresponding Voice,
Volume, Pan and so on.
The channel with its channel name displayed in grey is unavailable
for editing, as there is no music data in this channel.
2. Change default tempo value
The current default TEMPO value will remain the same in all
sections. Press the value button of Tempo to call up the parameter
box. You can use the Up and Down arrows or Dial to adjust the
tempo value.
43

Style Recording
You can also use the panel button [Tempo+]/ [Tempo-] to adjust the
tempo value. Press the [+] and [-] buttons simultaneously to reset
the tempo. Adjustable range: 30~280.
3. Select Section
Select the current section you are going to record/edit, you can
select from Intro (1~2), Main (A~D), Fill (A~D) and Ending (1~2).
Press the [Intro 1] button to call up section selection box. You
can press the panel button of section or directly press the section
name on the display.
4. Select channel (Choose the channel displayed on the screen)
If you are editing the Intro/Ending section, you can select to display
channel 1~8 or channel 9~16 for editing. If you need a channel only
playback when the Major or Minor chords are input, you may
configure this with the chord response buttons for each channel.
If you are recording other sections, you can only record them into
the channel 9~16, and each channel can be played with all chord
types.
Note:
While playing styles, the channel 1~8 and 9~16 will be played in the
same 8 tracks, so please note your settings. For example, the channel
1 and channel 9 will be played back in a same track, if you set these
two channels can both be played under all chords, and set their voice
and volume with different values; the parameters of these two
channels may conflict when playing the style.
5. Length (Set the length of current section)
Press the value button on the top right of display to call up the
parameter box of section measure length. You can use the panel
Dial or press the Up and Down arrows in the screen to adjust the
value.
Note:
If you have selected a Fill in section, the Length value will be fixed as 1
and unchangeable.
6. Voice (Set the voice of current channel)
Press the voice button on the right of channel name; enter the voice
selection interface. You can choose an appropriate voice for current
channel, then press the panel button [EXIT] to continue editing the
style.
Note:
You can select only the percussion voices for Perc and Drum channel,
and only bass voices for the bass channel.
44

7. Volume (Set the volume of current channel)
Press the value button on the right of “Volume” to call up the
volume parameter box. You can press the Up and Down arrow or
use the panel Dial to adjust the volume value.
Parameter range: 0~127.
8. Pan (Set the pan of current channel)
Press the value button on the right of “Pan” to call up the pan value
parameter box. Press the Up and Down arrows or use the panel
Dial to adjust the Pan value.
Parameter range: -64(left) ~63(right).
Style Recording
9. Listen to Your Changes
Press the panel [START/STOP] button, and it will circularly play the
current selected section of the style. Press the [START/STOP]
again to stop the playback.
You can turn on the [A.B.C.] and play a chord to listening to the
effects.
10. Save Changes
Press the “SAVE” button in the style editing interface, enter the file
name you want to save, press “OK” if you sure to save the edited
style into the USER group.
45

Style Recording
Further Editing a Style
In style editing interface, you can press the “Edit” menu at the right end
of channel parameters to select more editing functions.
1. Quantize (Quantize the notes of channel)
Press “Edit” button; select “Quantize” function to enter the
corresponding settings.
Quantize:
The Quantize function allows you to align the timing of all the notes in
a channel. Select the quantize size (resolution). For optimum results,
you should set the Quantize size to the shortest note value in the
channel. For example, if eighth notes are the shortest in the channel,
you should use eighth note as the Quantize accuracy.
You can set the Quantize accuracy of this operation: quarter note,
eighth note, sixteenth note, thirty-second note, quarter note triplet,
eighth note triplet, or sixteenth note triplet.
2. Velocity (Edit the velocity of all notes in a channel)
Press the “Edit” button to call up the velocity display, as the picture
shows:
Velocity: Boosts or cuts the velocity of all notes in the specified
channel, according to the percentage specified here. This
instrument velocity is from 1% to 400%.
Original note:
After eighth note
quantization:
46

3. Copy From (Copy a channel from an existing style)
Open the “Edit” menu, and then select the “Copy From” button, as
picture shows:
Press the style selection button to enter the selection interface, as
picture shows:
You can select a style, then press [EXIT] button to confirm your
selection and return to the style editing.
Back to the style editing interface, you can also select your desired
source section and channel.
Note:
If you are editing the Perc or Drum channel, the only source channel
you can copy from is Perc or Drum.
If you are editing the Bass channel, the only source channel you can
copy from is Bass.
If you are editing the Chord or Phrase channel, you can choose any
channels except for Rhythm and Bass channels as a copy source.
Press the “OK” button after you have selected the copy source, then
the channel contents you are editing will be replaced by the selected
copy source.
Style Recording
4. Clear (Clear all contents of a channel)
Press “Edit” button and then select the “Clear” item to open a new
window confirm your clear operation. As picture shows:
If you select the “OK” button, the channel you are editing will be
cleared.
Note:
The deleted contents cannot be recovered after saving.
Playing the Keyboard and Recording your Performance as a New Style
Besides editing the existing music content, you can also record your
own performance as a channel of style.
1. Create a blank style
If you just want to record a new style which is based on an existing
style, please select a desired style and skip this step.
Press “New” button; set the default time signature and for the new
style, press “OK” button if to confirm the settings.
2. Select the channel for recording
You must select a channel to record; the button will be lightening up
if you press the “R” button corresponding to the right of channel
parameters.
47

Style Recording
3. Start record
Press the RECORD button; the button will change to START and
waiting for recording. Press any keys, START button or panel
[START/STOP button to start record.
The current style section will be playback circularly while recording,
the notes you played will be added to (overdub) the existing music
content of the channel.
Note:
Some of functions and panel buttons are unavailable while recording.
4. Stop recording
Press the STOP button in the display, or press panel
[START/STOP] button to stop recording. You can listen to your
record or edit it later.
Editing Each Note of Style
“ ” “ ”
“ ”
]
With the powerful Event List function, you can edit each note of
channel; this is very helpful for detailed modification with your style.
1. Open the Event List
Press the “Edit menu of channel; select “Event List button to enter
the event list display.
Each row in this display represents an event, you can see following
information about the event:
Time: the event occurs time, express with “Bar: Beat: Tick”.
Event: the event name. You can deal with the “NOTE”,”CTRL” and
“PROG” events.
Data: event parameter.
Length: the length of notes.
” ”
2. Change an event
Press the “Event button; correspond to different event types you
can edit different objects:
“NOTE” event changes the pitch of note;
“CTRL” event changes the number of controllers;
“PROG” event changes the program selection.
”
Note:
If you have selected Main or Fill section, except for two percussion
channels, the NOTE events can only be set to the C Maj7 chord notes.
The selectable control event numbers are: 1(Modulation), 10(Pan),
11(Expression), 91(Reverb Level), 93(Chorus Level).
48

3. Edit the event parameters
Press the “Data button; correspond to different events you can edit
different parameters.
“NOTE” event can change the velocity of notes;
“CTRL” event can change the controller parameters.
”
4. Change the length of notes
The NOTE event, you can press the “Length button to change the
length of notes, change from tick, then beat and measure.
”
Style Recording
5. Delete a note
Select an event, press “DELETE button on the right, you can
delete the event.
”
6. Delete all notes with equal pitch
Select a NOTE event; press the “Delete Note button, if you are
ready to delete all desired notes with the same pitch, press “OK
button to confirm the operation.
”
”
Note:
The deleted contents will not be recovered after saving the file.
7. Select channel
You can directly change channel selection in Event List without
returning to the style editing interface. Just press the “Channel
button in the display to select a different one.
8. Exit Event List
Press panel [EXIT] button; you can exit from Event List and return
to the Style Editing interface. You can save your changes there.
”
49

Style Recording
Seting the Notes Transfer Rules for Chord Changes
While playing style, each note of every channel will response to chord
changes according to their own rule. You can edit these response rules
to achieve your desired effects.
1. Set the type of chords that the current channel should response to.
If you are editing Intro or Ending section, you can set the chord
category for each channel.
Press the chord category setting buttons; you have three choices:
select “Major the channel will only play back when major chords
are inputted; select “Min for playing only under minor chords; or
you can select “All for playing under all chords.
Note:
In style playing mode, channel 1~8 and 9~16 will be played in the
same track, so take care of your settings. For example, the channel 1
and 9 will played in a same track, if you set these two channels are
played in all chords, and like voice, volume, these parameters are
different, then parameters of two channels may conflict while you are
playing the style.
2. The chord control parameters
Press the “Edit menu on the right end of channel parameters, and
then press the “Parameter button to open the chord control
parameter window. You can set detailed parameters response to
chord changes.
3. Note Trans Rule (Note transposition rule)
Press “Note Trans button; this sets the note transposition table for
the source pattern.
”
”
”
”
”
”
By Pass
Melody
Chord
Melodic Minor
Melodic Minor 5th
Harmonic Minor
Harmonic Minor 5th
Harmonic Minor
Natural Minor 5th
Dorian
Dorian 5th
The transposition table used does not do any note conversion.
Suitable for melody line transposition.
Suitable for chord transposition.
When the played chord changes from a major to a minor chord,
this table lowers the third interval in the scale by a semitone.
When the chord changes from a minor to a major chord, the
minor third interval is raised by a semitone. Other notes are not
changed. Use this for melody channels of Sections which
respond only to major/ minor chords, such as Intros and
Endings.
In addition to the Melodic Minor transposition above,
augmented and diminished chords affect the 5th note of the
Source Pattern.
When the played chord changes from a major to a minor chord,
this table lowers the third and sixth intervals in the scale by a
semitone. When the chord changes from a minor to a major
chord, the minor third and flatted sixth intervals are raised by a
semitone. Other notes are not changed. Use this for chord
channels of Sections which respond only to major/minor
chords, such as Intros and Endings.
In addition to the Harmonic Minor transposition above,
augmented and diminished chords affect the 5th note of the
Source pattern.
This table lowers the third, sixth and seventh intervals in the
scale by a semitone when changing from a major to a minor
chord; or raises the minor third, flatted sixth and flattened
seventh intervals by a semitone when changing from a minor to
a major chord. Other notes are not changed. Use for parts
which respond to major/minor chords, e.g. Intros and Endings.
In addition to the table above, augmented and diminished
chords affects the 5th note of the pattern.
When the played chord changes from a major to a minor chord,
this table lowers the third and seventh intervals in the scale by
a semitone. When the chord changes from a minor to a major
chord, the minor third and flatted seventh intervals are raised
by a semitone. Other notes are not changed. Use this for chord
channels of Sections which respond only to a Major/minor
chord such as Intros and Endings.
In addition to the Dorian transposition above, augmented and
diminished chords affect the 5th note of the Source pattern.
50

4. Root Trans Rule (Changing rule with root note)
Select the convert rule which determines the relative position of root
note in the chord, when converted from the Source Pattern in
response to chord changes.
Root: When the root note is transposed, the pitch relationship
between notes is maintained. For example, the notes C3, E3
and G3 in the key of C become F3, A3 and C4 when they
are transposed to F. Use this setting for channels that
contain melody lines.
Fixed: The note is kept as close as possible to the previous note
range. For example, the notes C3, E3 and G3 in the key of
C become C3, F3 and A3 when they are transposed to F.
Use this setting for channels that contain chord parts
5. Root Limit (High key)
This sets the highest key (upper octave limit) of the note
transposition for the chord root change. Any notes calculated to be
higher than the highest key are transposed down to the next lowest
octave. This setting is available only when the NTR parameter is set
to “Root Trans”.
Style Recording
6. Note Range (Note limit)
This sets the note range (highest and lowest notes) for voices
recorded to the style channels. By judicious setting of this range,
you can ensure that the voices sound as realistic as possible — in
other words, that no notes outside the natural range are sounded
(e.g., high bass sounds or low piccolo sounds). The actual notes
that sound are automatically shifted to the set range.
7. Retrigger Rule
These settings determine whether notes stop sounding or not and
how they change pitch in response to chord changes.
Pitch Shift: The pitch of the note will bend without a new
attack to match the type of the new chord.
Pitch Shift to Root: The pitch of the note will bend without a new
attack to match the root of the new chord.
Retrigger: The note is retriggered with a new attack at a
new pitch corresponding to the next chord.
Retrigger to Root: The note is retriggered with a new attack at the
root note of the next chord. However, the octave
of the new note remains the same.
Stop: The notes stop sounding.
51

Style Recording
Seting O.T.S. of Style (One Touch Settings)
One Touch Setting is a powerful and convenient feature that
automatically calls up the most appropriate panel settings (Voices or
effects, etc.) for the currently selected Style, with the touch of a single
button. If you’ve already decided which Style you wish to use, you can
have One Touch Setting automatically select the appropriate Voice for
you.
1. Open the O.T.S. setting display
Press the O.T.S. tab page on the top of the Style Record display;
enter O.T.S. settings.
2. Setting detail parameters
You can individually set the O.T.S. in detail. The parameters you
can set are listed as follows.
Switch layers: R1/R2/R3/L;
Select voice
Volume: 0~127.
Pan: -64~+64.
Octave: -1~+1
Reverb: 0~127.
Chorus: 0~127.
3. Save your settings
Press “Save button to save your O.T.S. settings.”
52

The instrument can play back the following Song types.
Preset Songs
Songs in the Song Selection PRESET display. Try out the different songs
referring to the song list in the appendix.
Your Own Recorded Songs
These are MIDI Songs which you’ve recorded and saved to the USER
display.
These are Audio Songs which you’ve recorded and saved to the USB
display. (USB is available when you connect USB device)
External Songs
SMF (Standard MIDI file)
Standard MIDI Files are generally available as one of two types:
Format 0 or Format 1.
Audio File (MP3/WMA /WAV)
Playing Various Songs
1. Press the [SONG SELECT] button or press SONG display area on
the Main Display to call up the Song Selection display.
2. Press one of the song categories NAME in the screen to select the
song category.
Song
3. Press the cursor button on LCD to select your desired song page.
4. Press the song NAME to select the desired song on the current
page display.
5. Press the [PLAY/STOP] button to start playback.
6. Press the [PLAY/STOP] button again to stop playback.
Note:
If you want to select the user song, press the to select the
USER display or press the to select the USB display.
Playing Songs from USB device in sequence
1. Select a song in the desired folder.
2. Turn on the Loop On function in the top right corner of the screen.
3. Select Folder/Group playing mode.
Now, you can play all Songs in a folder continuously.
How to turn on Loop On and select playing mode in Global Setting
menu? Details see Global Setting-Style & Song.
“USB” tab
“USB” tab
Operations for Song Playback
PLAY/STOP
Start or stop playing back the song. When the song is playing, the LED
of [PLAY/STOP] button flashes according to the current tempo.
PAUSE
Press this button during song playback to pause the current song.
Press it again and the song will resume from the current position.
53

Song
REWIND and FAST FORWARD
Pressing the [REW] or [FF] button automatically calls up a pop-up
window showing the current measure number in the current display.
Press the [REW] or [FF] button to move back or forth.
Pressing and holding either button lets you continuously move back or
forth.
Adjusting the Volume of the Song
Press the [MIXER] button to call up the Mixer Display.
Adjusting the volume balance between the Song and
the keyboard
This lets you adjust the volume balance between Song playback and
the sound you play on the keyboard.
1. Press “Master” tab to call up the relevant setting display.
2. Press Song “110” button in the volume box to call up a pop-up box
showing the adjustable range of volume.
3. Press the “ ” or “ ” button in screen or use the DATA DIAL, the [+]
or the [-] button to adjust the data.
4. Adjust the keyboard volume by pressing the relevant button and
operating according to the above steps.
Adjusting the Volume of each Channel of the MIDI
Song
A MIDI song may contain up to sixteen MIDI channels. You can adjust
the volume of each channel and mute or solo each track.
1. Select a Song.
2. Press the [MIXER] button to call up the Mixer Display.
3. Press “Song” tab to call up the relevant setting display.
4. Press 1 “100” button in the volume box to call up a pop-up box
showing the adjustable range of volume.
5. Press the “ ” or “ ” button or use the DATA DIAL, the [+] or the [-]
button to adjust the data.
6. Adjust the volume of other tracks by pressing the relevant button
and operating according to the above steps.
54

7. Press the “S” button to set the channel to SOLO. You listen to
only one instrument of this track. Press the “S” button again
to cancel SOLO.
8. Press the “M” button to mute the channel.
You can listen to the playback of the song except this track. Press
the “M” button again to cancel MUTE.
9. Press the [EXIT] button to exit the Mixer Display.
Displaying Music Notation (Score)
Song
You can view the music notation of the selected Song.
1. Select a Song.
2. Press the [SCORE] button to display the music notation.
Hint:
Look through the entire score before playing back the Song.
3. Press the [PLAY/STOP] button to start playback. The position
indicator moves through the score, indicating the current position.
Operation for Score Display
Left On/Off: Turn on or off the score of left hand.
Right On/Off: Turn on or off the score of right hand.
Page Up: Goes to the previous page of the score.
Page Down: Goes to the next page of the score.
Set Up
Set the detailed parameters of the view type as desired.
1. Press the “Set Up” button to call up the detailed setting display.
2. Press the relevant button to set the view type.
3. Press the “OK” button to apply the setting.
55
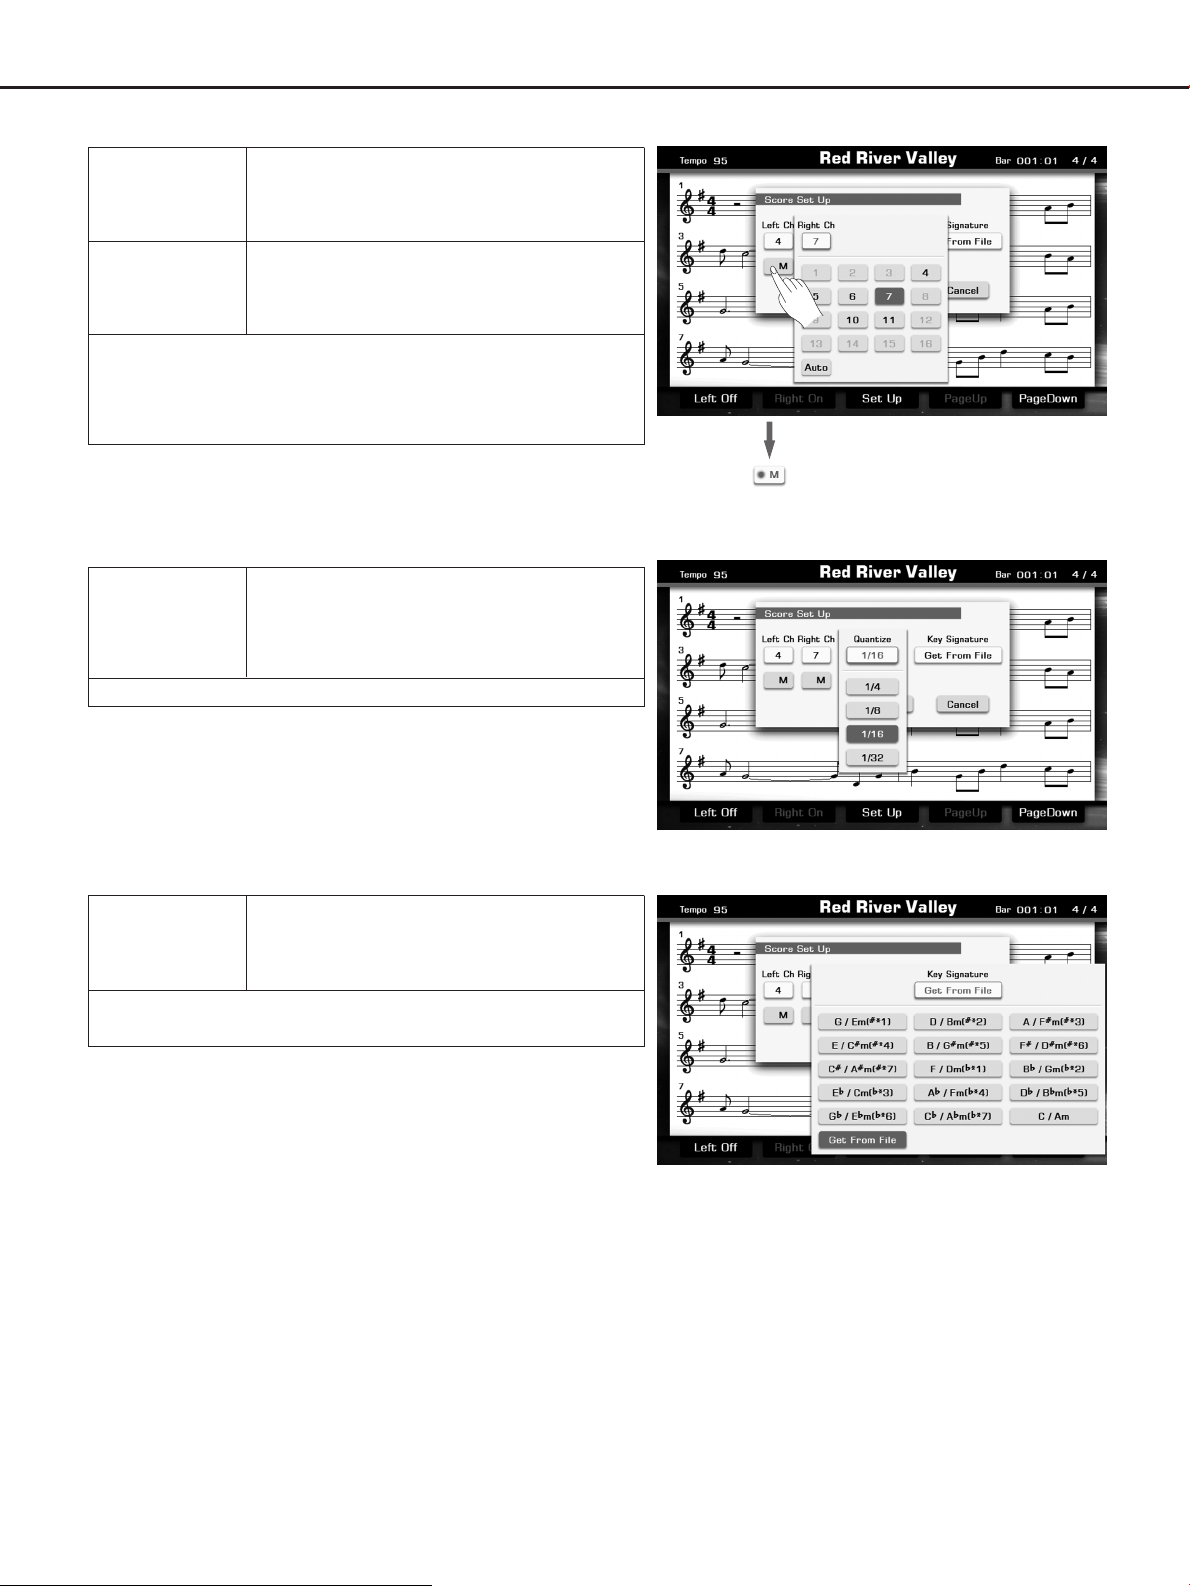
Song
LEFT CH
RIGHT CH
Auto: The MIDI channels in the Song data for the right- and lefthand parts are assigned automatically.
1-16: Assigns the specified MIDI hannel (1–16) to each of the leftand right-hand parts.
Mute: Press the Right Ch“M” button to mute the right channel and
press the Left Ch “M” button to mute the left channel .
Press the “M” button again to cancel MUTE.
QUANTIZE
1/4,1/8,1/16,1/32
Determines which MIDI channel in the Song
data is used for the left-hand part.
Note: This setting returns to Auto when a
different song is selected.
Determines which MIDI channel in the Song
data is used for the right-hand part.
Note: This setting returns to Auto when a
different song is selected.
This gives you control over the note resolution in
the notation, letting you shift or correct the timing
of all displayed notes so that they line up to a
particular note value. Make sure to select the
smallest note value used in the song.
KEY SIGNATURE
Auto: Select the key signature that has been assigned in the song
data.
This lets you enter key signature changes in the
middle of a song, at the stopped position. This
menu is useful when the selected song contains
no key signature settings for displaying notation.
56

Song Recording
You can record your own performances to MIDI and save them to the User tab display.
You can record your own performances as Audios and save them to an external storage device.
MIDI Recording
Two different MIDI recording methods are available:
Quick Recording which lets you record performance conveniently and
quickly, Multi track Recording which lets you record several different
parts to multiple channels.
You can also edit Songs after they’ve been recorded.
Quick Recording
This lets you record your performance conveniently and quickly.
1. Press the [RECORD SONG] and [EFFECT ON/OFF] buttons
simultaneously to call up the Recording Display.
A blank Song (“New Song”) is called up for recording. The LED of
[RECORD SONG] is flashing that means it is in the recording
standby mode.
2. Make the desired panel setting for your keyboard performance.
Recording the RIGHT2,RIGHT3, and LEFT parts
Pressing the “ch mute” button and selecting the relevant part or
pressing the relevant part button directly to turn on the relevant part
and record them.
Select the voice for each keyboard part. Details see
Voice-Playing Various Voices.
Recording Styles
Press the “Rec ACMP” button to switch recording accompaniment
on or off.
Select a style. Details see Style- Selecting Various Styles.
Set the tempo for recording by pressing the [TEMPO+] or [TEMPO-]
buttons.
Using Performance Memories
Press one of the PERFORMANCE MEMORY [1–6] buttons.
Record ACMP as Notes
Select the Record ACMP as Notes” to directly record the ACMP
track as notes.
“
3. Start recording.
Press the [PLAY/STOP] button or Press the [RECORD SONG]
button.
The LED of [RECORD SONG] will light up.
Playing the keyboard.
Recording begins automatically as soon as you play a note on the
keyboard.
Note:
You can turn on the metronome during recording. The metronome
sound will not be recorded.
57

Song Recording
4. Stop recording
Press the “STOP” button on the Record Display or press the
[RECORD SONG] button. The LED of [RECORD SONG] will go
out.
If you are recording style, press the [ENDING] button, when the
Ending is finished, the recording would also stop automatically.
5. Save recording data.
When the soft keyboard is called up, please enter the new name
and press “OK” to save the new user song.
Note:
The recorded song data will be lost without executing the save
operation.
6. Press the [PLAY/STOP] button to playback the song you just
recorded.
Multi Track Recording
A song consists of 16 separate channels. With this method, you can
record data to each channel independently, one by one. Both Keyboard
and Style parts can be recorded.
You can also record over already-recorded parts of an existing User
Song.
1. Press the [RECORD SONG] button to call up the Recording
Display.
If the current song is user song, this user song is called up for new
recording.
If the current song is preset song, a blank song (“New Song”) is
called up for recording.
2. Set the desired channels to record.
Normally, the keyboard parts (R1, R2, R3, L) should be recorded to
channels 1–4, and the styles should be recorded to channels 9–16.
Note:
Press the “Rec ACMP” button to switch accompaniment recording on.
3. Select voices for keyboard parts and select a style.
4. Press the [RECORD SONG] button or press the “RECORD” button
on the Recording Display to enter recording standby mode.
5. Press the [RECORD SONG] button or press the “START” button on
the Recording Display to start recording.
6. Press the [RECORD SONG] button or press the “STOP” button on
the Recording Display to stop recording.
7. Press the [PLAY/STOP] button to listen to your newly recorded
performance.
8. To record another channel, repeat steps 2-7.
58

Editing the Recorded MIDI Song
Press the “Edit” tab on the Recording Display or press the “Edit” button
on the User Song Selection Display to call up the Song Editing Display.
Press the Volume “100” button to call up a pop-up box showing the
adjustable range of volume values. Use the DATA DIAL, the [+] or the
[-] button to adjust the volume.
Song Recording
Press the Pan “0” button to call up a pop-up box showing the
adjustable range of pan values. Use the DATA DIAL, the [+] or the [-]
button to adjust the pan.
Press the “Quantize” button to call up a pop-up box showing the
quantize accuracy. Use the DATA DIAL, the [+] or the [-] button to
adjust the parameter.
Press “OK” to confirm executing quantize.
Press the “Del” button to delete the relevant channel.
Press the “PLAY” button to playback the current edited song before
saving.
Press the “Reset” button to reset all operations.
Press the “Save” button to call up a pop-up box. Press “OK” to confirm
saving.
59

Song Recording
Audio Recording
Audio recording will record your performance into a CD quality WAV file
to your USB storage drive.
The following sounds can be recorded.
Keyboard parts (R1, R2, R3, L), MIDI Song parts, Style parts
Input from another audio device, such as a CD player, MP3 player or
other audio inputs via the [AUX IN] jack.
1. Connect your USB storage device to the instrument. Press the
[RECORD AUDIO] button to start recording your performance. The
LED of [RECORD AUDIO] will light up.
2. Press the [RECORD AUDIO] button again to stop recording your
performance and call up soft keyboard display. The LED of
[RECORD AUDIO] will go out.
3. Enter the new name and press “OK” to save the new audio song.
The recorded data using this function is saved as:
Stereo WAV data
44.1 kHz sample rate/16 bit resolution
Note:
The recorded audio file size is depending on the capacity of
your USB storage device.
When you are recording a midi song or playing a audio file from
USB device, you can’t start audio recording.
Saving, Deleting or Renaming the User Song
1. Press“USER” or “USB” tab on Song Selection display to call up the
relevant display for user songs.
2. Select your desired user song by pressing the relevant name of
user song.
3. Press the “Menu” button to display the relevant buttons on the
current display.
4. Press “SAVE TO USER” to call up soft keyboard display, enter the
new name and press “OK” to save as a new user song to the
internal memory.
5. Press “SAVE TO USB” to call up soft keyboard display, enter the
new name and press “OK” to save as a new user song to the USB
device memory.
6. Press “DELETE” to display the pop-up box, press “OK” to delete the
current user song.
7. Press “RENAME” to call up soft keyboard display, enter the new
name and press “OK” to rename the current user song.
Note:
If the new name you entered is same as the name of exited user song,
a pop-up box will appear.
Please press “OK” and rename the file again.
60

Press the [Global Setting] button to call up the Global Setting display.
The relevant LED will light up.
Keyboard
Pressing “Keyboard” on the Global Setting display will call up the
Keyboard Setting display.
You can adjust the master tune, transpose, Octave and switch scale
tune on or off, etc. Details see Voice-Changing Pitch.
Global Setting
Pressing “Chord” tab on the Keyboard Setting display will call up the
Chord Setting display.
Details see Style-Selecting a Chord Fingering Type.
Pressing “Split & Touch” tab on the Keyboard Setting display will call
up the Split and Touch Setting display.
Details about setting the split point see Style-Split Point Settings.
Details about setting touch sensitivity see Voice-Setting the touch
sensitivity of the keyboard.
Press the [EXIT] button to exit to Global Setting display.
Style & Song
Pressing “Style & Song” on the Global Setting display will call up the
Style and Song Setting display.
Press Chord Velocity Control “ON” to turn it on (orange font display).
This function let you control the style volume by your playing strength
in the chord section of the keyboard.
Press Lock Tempo “ON” to turn it on (orange font display). This
function let you change style without changing the tempo during style
playback.
Press “LOOP ON” to turn it on (orange font display).
Single
Single
Folder/Group
Folder/Group
Loop ON
Loop OFF
Loop ON
Loop OFF
Playback the current song repeatedly until
pressing the [PLAY/STOP] button to stop
playing.
The playback will be stopped once the
current playing song is finished.
Playback the songs in one folder from USB
device or in one group from User song in
sequence repeatedly until pressing the
[PLAY/STOP] button to stop playing.
The playback will be stopped once all
songs in the folder of your USB device or
one group of USER song is finished.
61

Global Setting
Press Voice Link “ON” to turn it on (orange font display). When this
function is ON, if the song is changed when playing preset songs, the
voice R1 is changed according to the melody of selected song
automatically.
Press the [EXIT] button to exit to Global Setting display.
Controllers
Pressing “Controller” on the Global Setting display or pressing
“Controller” on Main Display will call up the Controller Setting display.
This instrument has 2 knobs, 6 Multi pads, 1 pedal that can be
assigned to various functions.
Knob
These knobs let you change various aspects of the sound in real time
while you play. Turn a knob to the right to increase the value, and the
left to decrease it.
Press the [SELECT] button to select your desired group, the relevant
LED will light up.
The groups (1-3) only effect to the current part. The group 4 lets you
control a group of user-assignable functions.
Group 1
Group 2
Group 3
Group 4
Pressing “Knob” tab on the Controller Setting display will call up the
Knob Setting display.
Turning the knob or pressing the “knob” on the Knob Setting display to
select the knob.
These parameters can be assigned to the knob. Press the relevant
parameter button to select it.
The parameters (Volume, Pan, Reverb level, Chorus level, Envelope
Attack, Envelope Release, Cutoff, Resonance) can be applied to the
keyboard part. Press the relevant part button to switch the assigned
function of the part on or off.
The parameters (EQ LOW, EQ LOW MID, EQ HIGH MID, EQ HIGH,
ARP GAE, ARP VELOCITY, ARP RESO, TEMPO) are applied to the
entire system.
VOLUME
ATTACK
CUTOFF
ASSIGN 1
PAN
RELEASE
RESONANCE
ASSIGN 2
How about the effect of these parameters? Details see VOICE.
Reset All Knobs
Holding down the panel [SELECT] button, you will see a prompt
message box, turning a knob (clockwise or anticlockwise) to
reset related parameters.
Press the arrow button to reset all knob parameters.
62

Multi Pad
The Multi Pads can be used to play percussion and pre-recorded chord
that can be used to add impact and variety to your keyboard
performances.
Press any of the MULTI PADS to play the Multi Pad phrase.
Pressing “Pad” tab on the Controller Setting display will call up the Pad
Setting display.
Press the [MULTI PAD] button or press the pad button to select a pad
to be edited.
Assign PLAY DRUM function to the pad
You can assign the pad to PLAY DRUM function.
1. Press the “drum” button to select.
2. Press the “voice” button to call up the Drum Set Selection Display.
3. Press the “Assign” button to start assigning.
4. Play any key and listen until you satisfied with this percussion.
5. Press the “Assign” button again to finish assigning.
Global Setting
Now, Press the pad to play the assigned percussion.
Assign PLAY CHORD function to the pad
You can assign the pad to PLAY CHORD function.
1. Press the “Chord” button to select.
2. Press the “Rec” button to start recording.
3. Play the notes on the keyboard that you want to record.
4. Press the “Rec” button again to stop recording.
Now, Press the pad to play the recorded chord.
Assign other functions to the pad
You can assign the pad to START/STOP function. Press the pad to
start or stop playing the current song or style.
You can assign the pad to TEMPO TAP function. Press the pad four
times to automatically start the song or style at that tapped speed.
You can assign the pad to EFFECT SWITCH function, and press the
relevant button to select the applied keyboard part.
You can assign the SYNC Style function. When you press this pad
while the Style is in play, the Style pattern goes back to the previous
strong beat.
63

Global Setting
Pedal
Pressing “Pedal” tab on the Controller Setting display will call up the
Pedal Setting display.
Assign specific functions to the pedal
Press the relevant button to select.
SUSTAIN
SOSTENUTO
SOFT
Prev. Perf
Next Perf
PORTAMENTO
Score PgUp
Score PgDn
Fade In/Out
Tap Tempo
Start/Stop
When you press and hold the pedal, all notes
played on the keyboard have a longer sustain.
Releasing the pedal immediately stops (damps)
any sustained notes.
If you play a note or chord on the keyboard and
press the pedal while holding the note(s), the notes
will sustain as long as the pedal is held. However,
all subsequent notes will not sustain.
Press this pedal to reduce the volume of the notes
you play.
Press this pedal to select the previous performance
memory.
Press this pedal to select the next performance
memory.
The portamento effect (a smooth slide between
notes) can be produced while the pedal is pressed.
While the song is stopped, you can turn to the
previous score page.
While the song is stopped, you can turn to the next
score page.
Same as the [FADE IN/OUT] button.
Press the pedal four times to automatically start the
song or style at that tapped speed.
Same as the [START/STOP] button. Press this
pedal to start or stop Style/Song playback.
Pitch Bend
You can set the range of the pitch bend wheel here.
RANGE This determines the range of the pitch change in
semitones.
Press the [EXIT] button to exit to Global Setting display.
64

Effect
Pressing “Effect” on the Global Setting display will call up the Effect
Setting display.
Details see Voice.
Press the [EXIT] button to exit to Global Setting display.
MIDI I/O
Pressing “MIDI I/O” on the Global Setting display will call up the MIDI
Setting display.
MIDI IN
Press the relevant button to select the midi data that receive from the
MIDI port or the USB port.
Press the channel button to select the channel that receives the midi
data.
Global Setting
MIDI OUT
Press the relevant button to select the midi data that transmit to the
MIDI port or the USB port.
Press the channel button to select the channel that transmits the midi
data.
Press the “Soft Thru” button to switch the Soft Thru function ON or
OFF.
Press the [EXIT] button to exit to Global Setting display.
Utility
Pressing “Utility” on the Global Setting display will call up the Utility
display.
Metronome
Setting the Time Signature
Press the time signature button1 button to display a pop-up box.
Use the DATA DIAL or Press the [+] and [-] buttons to select your
desired parameter.
Press the time signature button2 button to display a pop-up box.
Use the DATA DIAL or Press the [+] and [-] buttons to select your
desired parameter.
Press this “BELL ON” button to add the bell sound to the metronome
sound or not.
Adjusting the volume
Press the volume button to display a pop-up box.
Use the DATA DIAL or Press the [+] and [-] buttons to adjust the
volume of the metronome.
65

Global Setting
Fade In/Out
FADE IN TIME
FADE OUT TIME
FADE OUT HOLD TIME
Press the relevant time button to display a pop-up box.
Use the DATA DIAL or Press the [+] and [-] buttons to select your
desired time.
Determines the time it takes for the volume
to fade in.
Determines the time it takes for the volume
to fade out.
Determines the time the volume is held at 0
following the fade out.
System Reset
Reset Performance
Clean User Voice
Clean User Style
Clean User Song
To Factory Reset
Press the relevant button to execute the operation.
Restores the all performance memory setting to
the original factory settings.
Delete all user voices.
Delete all user styles.
Delete all user songs.
Restores the all data to the original factory
settings. (user voice, user style, user song,
user performance, utility setting, etc.)
Press the “config2” tab to call up the relevant setting display.
Setting the Date and Time
Press the relevant button to display a pop-up box.
Use the DATA DIAL or Press the [+] and [-] buttons to select your
desired parameter.
Auto Power Off
Press the relevant button to display a pop-up box.
Use the DATA DIAL or Press the [+] and [-] buttons to select your
desired time.
Press the [EXIT] button to exit to Global Setting display.
66

Performance Memory
The Performance Memory feature can make your performance more easily and efficiently. It allows you to save panel settings to
a Performance Memory button, and then instantly recall your custom panel settings by pressing a single button (M1-M6). The
saved settings for six Memory buttons should be saved as a single Bank (Performance file).
Selecting a Performance Bank
Press the [BANK] button or press PERFORMANCE display area on
the Main Display to call up the Performance Selection display.
Press the cursor button on LCD to select your desired performance
page.
Press the performance NAME to select the desired performance on
the current page display.
Note:
If you want to select the user performance, press the “User” to select
the USER display or press the “USB” to select the USB display.
You can edit the preset performance memory and save to user, or
create new user performance by the GrandSuite software.
Recalling a Performance Memory Settings
Press one of the Performance Memory buttons ([M1]-[M6]).
In this example, the panel settings stored in the memory 3 of
performance bank 1 are recalled.
The parameters about the panel settings:
Voice
Style
Song
Effect
Controller
Transpose
Others
R1/R2/R3/Left Part ON/OFF
R1/R2/R3/Left voice selection
R1/R2/R3/Left settings (Volume/Pan/Reverb
Level/Chorus Level)
Pitch (Transpose/Master Tune /Octave Scale/Tune)
Left Split & touch
Style selection
Variations
Mixer settings about style
Chord Split
The settings about chord
Control button status(SYNC, O.T.S LINK, AUTO FILL,
A.B.C)
Tempo and the relevant settings
Song selection
Play mode
Mixer settings about song
Reverb & Chorus
EQ
Effect (Arpeggiator, Harmony, Chopper)
Knob Settings
Multi Pad Settings
Pedal and Pitch bend Settings
Transpose setting
Fade and Fade time settings
Metronome settings
You can use a pedal to select the Performance Memory numbers in
order. The pedal is assigned as Next Perf. or Prev. Perf. function.
67

Performance Memory
Freezing the Specific Item
The freezing function lets you maintain the settings of certain items
and leave them unchanged, even when selecting other Performance
Memory buttons.
Press the [FREEZE ] button to turn the FREEZE function on or off.
How to select the frozen item?
1. Press the [BANK] button or press PERFORMANCE display area on
the Main Display to call up the Performance Selection display.
2. Press the [FREEZE] button on the Performance Selection
display to call up a pop-up box.
3. Press the relevant button to select the frozen items. The parameters
about the frozen item see the above parameter form.
4. Press the “OK” button to confirm it.
Note:
The Settings about the FREEZE function are automatically saved to
the instrument when you exit from this display. However, if you turn the
power off, the settings will be lost.
Registering the Performance Memory Settings
1. Set up the panel controls (such as Voice, Style, effect, and so on)
as desired.
2. Press and hold the [STORE] button, then press one of the
Performance Memory buttons ([M1]-[M6]). All panel setup will be
registered to the selected Performance Memory.
Note:
Any panel setup previously registered to the selected Performance
Memory will be erased and replaced by the new settings.
Saving the Preset Performance
1. Press the [BANK] button or press PERFORMANCE display area on
the Main Display to call up the Performance Selection display.
2. Press the [SAVE] button on the Performance Selection
display to call up a pop-up box.
3. Press the relevant button to select saving to User or saving to USB.
4. Press the [OK] button to call up soft keyboard display, enter
the new name and press “OK” to save as a new user performance
to the internal memory or USB device.
68

Saving, Deleting or Renaming the User Performance
1. Press“USER” or “USB” tab on Performance Selection display to call
up the relevant display for user Performances.
2. Select your desired user performance by pressing the relevant
name of user performance.
3. Press the “Menu” button to display the relevant buttons on the
current display.
4. Press “SAVE TO USER” to call up soft keyboard display, enter the
new name and press “OK” to save as a new user performance to
the internal memory.
5. Press “SAVE TO USB” to display a pop-up box, you can save a
single performance file(*.prf) or save a packing performance
file(*.tpf) to the USB device memory. Press “OK” button to call up
soft keyboard display, enter the new name and press “OK” to save
it.
Performance Memory
6. Press “DELETE” to display the pop-up box, press “OK” to delete the
current user performance.
7. Press “RENAME” to call up soft keyboard display, enter the new
name and press “OK” to rename the current user performance.
Note:
If the new name you entered is same as the name of exited user
performance, a pop-up box will appear.
Please press “OK” and rename the file again.
69

USB Device
By connecting a USB storage device to your instrument, you can save
data you’ve created to the connected device, as well as read data from
the connected device.
Compatible USB device
Recommended Brand: KINGSTON, SANDISK, SONY, LEXAR,
TRANSCEND
Format: FAT 16/32
Capacity: 1G,2G,4G,8G,16G,32G
Using the USB device
1. Connect the USB storage device to the USB port.
2. Press the [USB DEVICE] button to display the folders and files
under the root directory of USB device.
Press the USB tab on each selection display (such as voice, style,
song, performance), enter the relevant folder directly, and save,
rename or delete the user files from USB device.
Note
If you save your files to your USB storage device in file slection
displays (like VOICE Selection or Song Selection), the files would be
saved into folder "PianoUser" in the root directory of your USB storage
device.
File Operations in the File Selection Display
Caution:
While the instrument is accessing data (like during the Save, Copy and
Delete operations), do not unplug the USB device, and do not turn off
the instrument power. Doing so may corrupt the data on either or both
devices.
Executing a file
Press the “Execute” button to executing the operation for the
selected file.
File Format
Voice
Style
Song (midi file)
Audio file
Performance(*.tpf)
Saving a file
Press the “Save to User” button to save the selected file to internal
user memory.
Note:
Storage path depends on the file type.
Press the “Save to USB” button to save the selected file to external
USB device.
Executing Operation
Select the voice file for the current part
Same as [START/STOP] button
Same as [PLAY/STOP] button
Same as [PLAY/STOP] button
Save to internal user performance memory
Deleting a file
Press the “Delete” button to call up a pop-up box.
Press the “OK” button to delete the selected file.
Renaming a file
Press the “ ” button to display the relevant buttons on the current
display.
Press “RENAME” to call up soft keyboard display, enter the new name
and press “OK” to rename the selected file.
Note:
If the new name you entered is same as the name of exited user voice,
a pop-up box will appear. Please press “OK” and rename the file again.
Menu
70
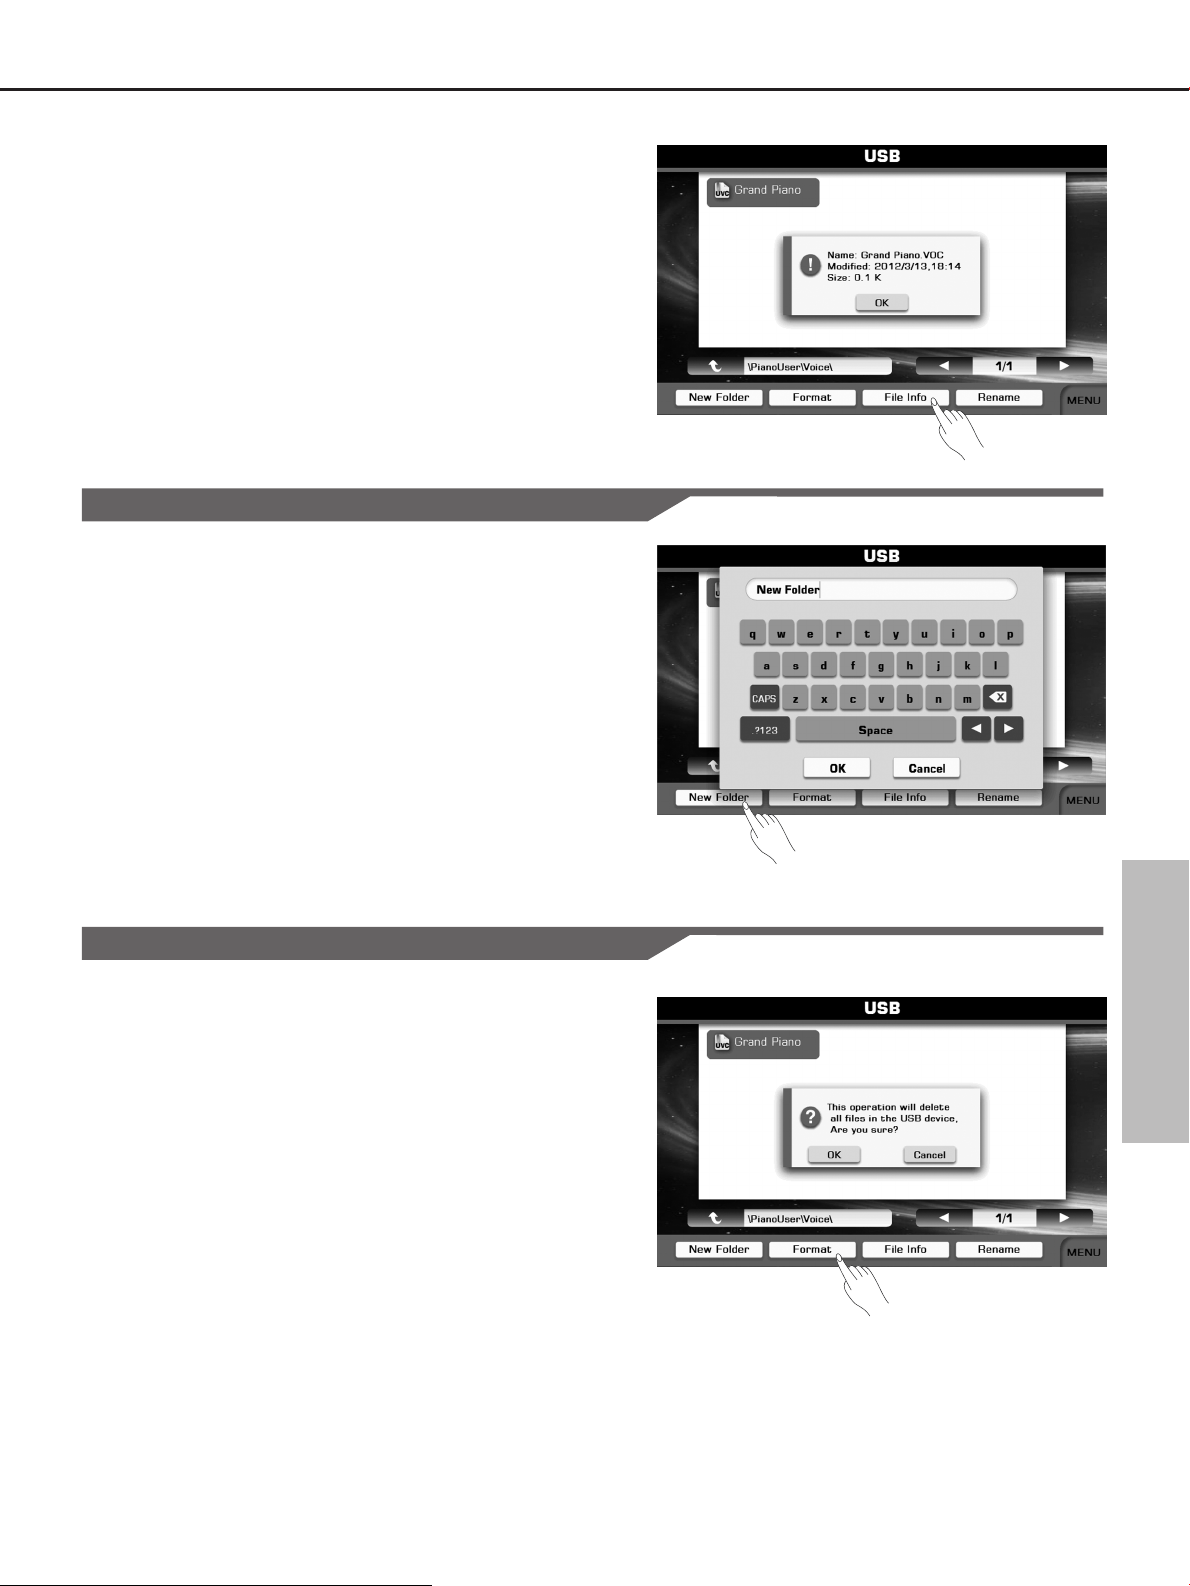
Viewing the file information
Press the “ ” button to display the relevant buttons on the current
display.
Press “File Info” to call up a pop-up box about the file information (EX.
Full name, size, etc.).
Menu
Creating a New Folder
Press the “Menu” button to display the relevant buttons on the current
display.
Press “Folder” to call up soft keyboard display, enter the new folder
name and press “OK” to create it.
USB Device
If the name you entered is same as the name of exited folder, a pop-up
box will appear.
Formatting the USB Device
It is better to use the USB Storage Device which is formatted by the
instrument.
Note:
The format operation overwrites any previously existing data. Proceed
with caution.
Press the “ ” button to display the relevant buttons on the current
display.
Press “Format” to call up a pop-up box.
Press the “OK” button to format the connected USB device.
Menu
71

MIDI
By using the MIDI functions you can expand your musical possibilities. This section explains what MIDI is, and what
it can do, as well as how you can use MIDI on your instrument.
What's MIDI?
MIDI is an acronym that stands for Musical Instrument Digital
Interface, which allows electronic musical instruments to
communicate with each other, by sending and receiving
compatible Note, Control Change, Program Change and various
other types of MIDI data, or messages. The instrument can
control a MIDI device by transmitting note related data and
various types of controller data. The instrument can be
controlled by the incoming MIDI messages which automatically
determine tone generator mode, select MIDI channels, voices
and effects, change parameter values and of course play the
voices specified for the various parts. MIDI messages can be
divided into two groups: Channel messages and System
messages.
MIDI Terminals
In order to exchange MIDI data between multiple devices, each
device must be connected by a cable.
MIDI IN: Receives MIDI data from a computer.
MIDI OUT: Transmits the instrument information as MIDI data to
another MIDI device.
MIDI THRU PORT: You can use MIDI cable to link the MIDI THRU
port to other MIDI instrument MIDI IN port. The message that the
MIDI IN port receives will be auto sent to the MIDI THRU port, so
that one MIDI instrument can control many MIDI instrument at the
same time.
Connect the MIDI OUT of other Device to the MIDI IN jack on the
rear panel, this instrument will as sound module.
Connect the MIDI IN of other Device to the MIDI OUT jack on the
rear panel. this instrument will as Midi Controller.
A USB-MIDI interface
MIDI IN MIDI OUT
MIDI OU T
MIDI IN
72

Troubleshooting
Problem
The speakers produce a “pop” sound whenever the
power is turned ON or OFF.
No sound when the keyboard is played.
When using a mobile phone, noise is produced.
The auto accompaniment does not play back even Sync
is in standby condition and a key is pressed.
Certain notes sound at wrong pitch.
The Harmony function does not operate.
Keyboard
61 Keys with touch response
Possible Cause and Solution
This is normal and is no cause for alarm.
The R1/R2/R3/L voice volume (Mixer) settings could be set too
low. Make sure the voice volumes are set at appropriate levels.
Using a mobile phone in close proximity to the instrument may
produce interference. To prevent this, turn off the mobile phone or
use it further away from the instrument.
You may be trying to start accompaniment by playing a key in the
right-hand range of the keyboard. To start the accompaniment with
Sync Start, make sure to play a key in the left-hand range of the
keyboard.
Make sure that the Master Tune is set to “440.1hz” and turn off the
Scale Tune.
Harmony cannot be turned on when the Full Keyboard fingering
mode is selected. And Harmony cannot be turned on when a drum
kit is selected for the voice R1.
Specification
Tempo
30-280, Tap Tempo
Display
7" TFT,800 x 480 color touch screen
Polyphony
128
Voice
672(Including 256 GM2 instrument voices and 15 drum kits)
Effect
Reverb, Chorus, Master EQ, Arpeggio, Harmony, Chopper
Style
240
Style Control
STYLE SELECT, START/STOP, SYNC STOP, SYNC
START, INTRO 1, INTRO 2, MAIN A, MAIN B, MAIN C,
MAIN D, ENDING 1, ENDING 2, A.B.C., AUTO FILL IN,
O.T.S. LINK, FADE IN/OUT
Song
90 Preset Songs
Song Control
SONG SELECT, PLAY/STOP, PAUSE, RW, FF
SCORE
Display the Music Notation
Performance Memory
10(BANK)*6(M1-M6), FREEZE, STORE
Multi Pad
6
Other Control
MASTER VOLUME SLIDER, SELECT, 2 KNOBS, EFFECT
ON/OFF, GLOBAL SETTING, MIXER, VOICE DIRECT
BUTTONS, DATA DIAL, +, -, PART ON/OFF BUTTONS,
EXIT, SUSTAIN, TRANSPOSE+, TRANSPOSE-, OCTAVE+,
OCTAVE-, O.T.S., MODULATION, PITCH BEND, MASTER
TUNE, SCALE TUNE, METRONOME
USB Device
Save the user data (Ex: User voices, User Song, User
Memory, etc.)
Play the User Song (Format: SMF/WAV/MP3/WMA)
Connectors
DC IN, Headphones, AUX. IN, AUX. OUT, Sustain Pedal,
Volume Pedal, USB, MIDI IN, MIDI OUT, MIDI THRU, USB
PORT.
Power Supply
DC 12V
Speaker
15W+15W, 25W+25W
Record
MIDI Recorder and USB Audio Recorder
Demo
2
Dimensions
970(W)X390(D)X160(H)mm
Weight
9Kg
* All specifications and appearances are subject to change
without notice.
73

Voice List
Full Name
No.
Piano
Acoustic Grand Piano
1
Acoustic Grand Piano (wide)
2
Acoustic Grand Piano (dark)
3
Bright Acoustic Piano
4
Bright Acoustic Piano (wide)
5
Electric Grand Piano
6
Electric Grand Piano (wide)
7
Honky Tonk Piano
8
Honky Tonk Piano (wide)
9
Harpsichord
10
Harpsichord (octave mix)
11
Harpsichord (wide)
12
Acoustic Grand Piano (stereo)
13
Octave Grand Piano 1
14
Octave Grand Piano 2
15
Piano & Strings 1
16
Piano & Pad 1
17
Piano & Choir 1
18
Piano & EP 1
19
Piano & Vibraphone 1
20
Jazz Piano
21
Pop Piano
22
Rock Piano
23
Club Piano
24
Piano & Strings 2
25
Piano & Pad 2
26
Piano & Choir 2
27
Piano & EP 2
28
Piano & Vibraphone 2
29
Electric Grand Piano (dark)
30
Fusion Electric Grand Piano
31
Club Electric Grand Piano
32
Wah Electric Grand Piano
33
Honky Tonk Piano (dark)
34
Honky Tonk Piano (stereo)
35
Harpsichord (with key off)
36
Harpsichord 2
37
E. Piano
Electric Piano 1
38
Electric Piano 2
39
Detuned Electric Piano 1
40
Electric Piano 1 (velocity mix)
41
60's Electric Piano
42
Detuned Electric Piano 2
43
Electric Piano 2 (velocity mix)
44
EP Legend
45
Phase EP 1
46
Clavi
47
Pulse Clavi
48
Fusion Electric Piano
49
Club Electric Piano
50
Jazz Electric Piano
51
Phase EP 2
52
Tremolo EP 1
53
Funk EP 1
54
Modern EP 1
55
LCD Name
Grand Piano
Grand Piano/Wide
Grand Piano/Dark
Bright Piano
Bright Piano/Wide
Electric Grand
Elec.Grand/Wide
Honky Tonk
Honky Tonk/Wide
Harpsichord
Harpsichord/Octave
Harpsichord/Wide
Stereo Grand Piano
Octave Piano 1
Octave Piano 2
Piano&Strings 1
Piano&Pad 1
Piano&Choir 1
Piano&EP 1
Piano&&Vibra 1
Jazz Piano 1
Pop Piano
Rock Piano
Club Piano 1
Piano&Strings 2
Piano&Pad 2
Piano&Choir 2
Piano&EP 2
Piano&Vibra 2
Elec.Grand/Dark
Fusion Piano
Club Piano 2
Wah Piano
Honky Tonk/Dark
Honky Tonk/Stereo
Harpsichord/KeyOff
Harpsichord 2
E.Piano 1
E.Piano 2
Detuned EP 1
Velocity EP 1
60's EP
Detuned EP 2
Velocity EP 2
EP Legend
Phase EP 1
Clavi
Pulse Clavi
Fusion EP
Club EP
Jazz EP
Phase EP 2
Tremolo EP 1
Funk EP 1
Modern EP 1
Warm EP 1
56
Choir EP 1
57
Wah EP 1
58
EP & Strings 1
59
Tremolo EP 2
60
Funk EP 2
61
Modern EP 2
62
Warm EP 2
63
Choir EP 2
64
Wah EP 2
65
EP & Strings 2
66
Clavi 2
67
Phase Clavi
68
Wah Clavi
69
E.Clavi
70
Organ
Drawbar Organ
71
Detuned Drawbar Organ
72
Italian 60's Organ
73
Drawbar Organ 2
74
Percussive Organ
75
Detuned Percussive Organ
76
Percussive Organ 2
77
Rock Organ
78
Church Organ
79
Church Organ (octave mix)
80
Detuned Church Organ
81
Reed Organ
82
Soft Stereo Drawbar Organ
83
Mellow Drawbar Organ
84
Detuned Drawbar Organ 2
85
Bright Drawbar Organ 1
86
Bright Drawbar Organ 2
87
70's Percussive Organ
88
Light Click Organ 1
89
Light Click Organ 2
90
Detuned Percussive Organ 2
91
Stereo Rotary Organ
92
Rock Organ 2
93
Rotary Organ 1
94
Rotary Organ 2
95
Slow Rotary Organ
96
Church Organ 2
97
Detuned Church Organ 2
98
Church Organ 3
99
Puff Organ
100
Accordion & Harmonica
Accordion
101
Accordion 2
102
Harmonica
103
Tango Accordion
104
Accordion 3
105
Chorus Accordion
106
Musette
107
Accord It Solo
108
Sweet Harmonica
109
Harmonica 2
110
Wah Harmonica
111
Warm EP 1
Choir EP 1
Wah EP 1
EP&Strings 1
Tremolo EP 2
Funk EP 2
Modern EP 2
Warm EP 2
Choir EP 2
Wah EP 2
EP&Strings 2
Clavi 2
Phase Clavi
Wah Clavi
E.Clavi
Drawbar Organ
Detuned DrawOrg
60's Organ
Drawbar Organ 2
Percussive Organ
Detuned PercOrgan
Percussive Organ 2
Rock Organ
Church Organ
ChurchOrg/Octave
Detune ChurchOrg
Reed Organ
Soft St DrawOrg
Mellow DrawOrg
Detuned DrawOrg 2
Bright DrawOrg 1
Bright DrawOrg 2
70's PercOrgan
Light Click Org 1
Light Click Org 2
Detuned PercOrg 2
Stereo RotaryOrg
Rock Organ 2
Rotary Organ 1
Rotary Organ 2
Slow Rotary Organ
Church Organ 2
Detune ChurchOrg 2
Church Organ 3
Puff Organ
Accordion
Accordion 2
Harmonica
Tango Accordion
Accordion 3
Chorus Accordion
Musette
Accord It Solo
Sweet Harmonica
Harmonica 2
Wah Harmonica
74

Voice List
Tango Accordion 2
112
Guitar & Bass
Acoustic Guitar (nylon)
113
Ukulele
114
Acoustic Guitar (nylon + key off)
115
Acoustic Guitar (nylon 2)
116
Acoustic Guitar (steel)
117
12-Strings Guitar
118
Mandolin
119
Steel Guitar with Body Sound
120
Electric Guitar (jazz)
121
Electric Guitar (pedal steel)
122
Electric Guitar (clean)
123
Electric Guitar (detuned clean)
124
Mid Tone Guitar
125
Electric Guitar (muted)
126
Electric Guitar (funky cutting)
127
Electric Guitar (muted velo-sw)
128
Jazz Man
129
Overdriven Guitar
130
Guitar Pinch
131
Distortion Guitar
132
Distortion Guitar (with feedback)
133
Distorted Rhythm Guitar
134
Guitar Harmonics
135
Guitar Feedback
136
Velocity Nylon Guitar
137
Chorus Nylon Guitar
138
Bright Nylon Guitar
139
Steel Guitar 2
140
Tremolo Steel Guitar 1
141
Tremolo Steel Guitar 2
142
Velocity Steel Guitar
143
Mandolin 2
144
12-Strings Guitar 2
145
Chorus Steel Guitar
146
Nylon & Steel Guitar
147
Pedal Steel Guitar
148
Electric Guitar (jazz) 2
149
Mellow Guitar
150
Velocity Jazz Guitar
151
Detuned Jazz Guitar
152
Stereo Clean Guitar
153
Velocity Clean Guitar
154
Stereo Muted Guitar
155
Overdriven Guitar 2
156
Distortion Guitar 2
157
Distortion Guitar (with feedback) 2
158
5th Distortion
159
Distortion Guitar Octave
160
Stereo Distorted Guitar
161
Guitar Harmonics 2
162
Acoustic Bass
163
Electric Bass (finger)
164
Finger Slap Bass
165
Electric Bass (pick)
166
Fretless Bass
167
Slap Bass 1
168
Tango Accordion 2
Nylon Guitar
Ukulele
NylonGtr/KeyOff
Nylon Guitar 2
Steel Guitar
12Strings Guitar
Mandolin
SteelGtr/BodySd
Jazz Guitar
Pedal Guitar
Clean Guitar
Detuned CleanGtr
Mid Tone Guitar
Muted Guitar
Funk Guitar
Velocity MutedGtr
Jazz Man
OverdrivenGtr
Guitar Pinch
DistortionGtr 1
Feedback Guitar
Rhythm DistGtr
Guitar Harmonics
Feedback Guitar 3
Velocity NylonGtr
Chorus NylonGtr
Bright NylonGtr
Steel Guitar 2
Tremolo SteelGtr 1
Tremolo SteelGtr 2
Velocity SteelGtr
Mandolin 2
12Strings Guitar 2
Chorus SteelGtr
Nylon&SteelGtr
Pedal Steel Guitar
Jazz Guitar 2
Mellow Guitar
Velocity JazzGtr
Detuned JazzGtr
Stereo CleanGtr
Velocity CleanGtr
Stereo MutedGtr
OverdrivenGtr 2
DistortionGtr 2
Feedback Guitar 2
5th Distortion
Octave DistGtr
Stereo DistGtr
Guitar Harmonics 2
Acoustic Bass
Finger Bass
Finger Slap Bass
Pick Bass
Fretless Bass
Slap Bass 1
Slap Bass 2
169
Synth Bass 1
170
Synth Bass 2
171
Acoustic Bass 2
172
Acoustic Bass 3
173
Acoustic Bass Detuned
174
Acoustic Bass Filter
175
Jazz Style
176
Acoustic Bass & Mute Guitar
177
Electric Bass (finger) 2
178
Detuned Finger Bass
179
Dark Finger Bass
180
Finger Slap Bass 2
181
Resonant Finger Bass
182
Wah Finger Bass
183
Bass & Distorted Electric Guitar
184
Electric Bass (pick) 2
185
Mute Pick Bass
186
Detuned Pick Bass
187
Fretless Bass 2
188
90's Bass
189
Fretless Bass & Sine
190
Fretless Bass Detuned 1
191
Fretless Bass Detuned 2
192
Fretless Bass Detuned 3
193
Slap Bass 3
194
Slap Bass 4
195
Power Slap Bass
196
Lash Thumb Bass
197
Resonant Slap Bass
198
Wah Slap Bass 1
199
Velocity Switch Slap Bass
200
Wah Slap Bass 2
201
Synth Bass (warm)
202
Synth Bass 3 (resonance)
203
Clavi Bass
204
Hammer
205
Synth Bass 4 (attack)
206
Synth Bass (rubber)
207
Attack Pulse
208
Strings & Strings Ensemble
Violin
209
Violin (slow attack)
210
Viola
211
Cello
212
Contrabass
213
Tremolo Strings
214
Pizzicato Strings
215
Orchestral Harp
216
Yang Chin
217
Timpani 1
218
String Ensembles 1
219
String Ensembles 2
220
Strings & Brass
221
60's Strings
222
Synth Strings 1
223
Synth Strings 2
224
Synth Strings 3
225
Slap Bass 2
Synth Bass 1
Synth Bass 2
Acoustic Bass 2
Acoustic Bass 3
Detuned AcousBass
Filter AcousBass
Jazz Style
AcoBass&MuteGtr
Finger Bass 2
Detuned FngrBass
Dark Finger Bass
Finger Slap Bass 2
Resonant FngrBass
Wah Finger Bass
Bass&DistortedGtr
Pick Bass 2
Mute Pick Bass
Detuned Pick Bass
Fretless Bass 2
90's Bass
Fretless&Sine
Detuned Fretless 1
Detuned Fretless 2
Detuned Fretless 3
Slap Bass 3
Slap Bass 4
Power Slap Bass
Lash Thumb Bass
Resonant SlapBass
Wah Slap Bass 1
Velocity SlapBass
Wah Slap Bass 2
Warm Synth Bass
Resonance SynBass
Clavi Bass
Hammer
Attack Bass
Rubber Bass
Attack Pulse
Violin
Slow Violin
Viola
Cello
Contrabass
Tremolo Strings
PizzicatoStr
Orchestral Harp
Yang Chin
Timpani 1
String Ensembles 1
String Ensembles 2
Strings&Brass
60's Strings
Synth Strings 1
Synth Strings 2
Synth Strings 3
75

Voice List
Choir Aahs
226
Choir Aahs 2
227
Voice Oohs
228
Humming
229
Anlong Voice
230
Synth Voice
231
Orchestra Hit
232
The Violin
233
Violin 2
234
Mono Violin
235
Octave Violin
236
Electric Violin
237
Violin & Viola
238
Two Violin
239
Soft Violin
240
Velocity Violin
241
Viola 2
242
Viola 3
243
Dark Viola
244
Cello 2
245
Cello 3
246
Cello 4
247
Celloen 16'
248
Chamber Music
249
Contrabass 2
250
Tremolo Strings 2
251
Slow Tremolo Strings 1
252
Slow Tremolo Strings 2
253
Pizzicato Strings 2
254
Octave Pizzicato
255
Orchestral Harp 2
256
Yang Chin 2
257
Africa 1
258
Africa 2
259
Timpani 2
260
Stereo Slow Strings
261
Slow Strings
262
Legato Strings
263
Orchestra 1
264
Arco Strings
265
Resonant Strings
266
The Strings
267
70's Strings
268
Solo Strings
269
Synth Strings 4
270
Synth Strings 5
271
Choir Aahs 3
272
Choir Aahs 4
273
Mellow Choir
274
Stereo Choir Aahs
275
Strings & Choir 1
276
Strings & Choir 2
277
Strings & Voice 1
278
Strings & Voice 2
279
Analog Voice
280
Bass Hit Plus
281
6th Hit
282
Euro Hit
283
Choir Aahs
Choir Aahs 2
Voice Oohs
Humming
Anlong Voice
Synth Voice
Orchestra Hit
The Violin
Violin 2
Mono Violin
Octave Violin
Electric Violin
Violin&Viola
Two Violin
Soft Violin
Velocity Violin
Viola 2
Viola 3
Dark Viola
Cello 2
Cello 3
Cello 4
Celloen 16'
Chamber Music
Contrabass 2
Tremolo Strings 2
Slow TremoloStr 1
Slow TremoloStr 2
PizzicatoStr 2
Octave Pizzicato
Orchestral Harp 2
Yang Chin 2
Africa 1
Africa 2
Timpani 2
Stereo SlowStr
Slow Strings
Legato Strings
Orchestra 1
Arco Strings
Resonant Strings
The Strings
70's Strings
Solo Strings
Synth Strings 4
Synth Strings 5
Choir Aahs 3
Choir Aahs 4
Mellow Choir
Stereo Choir Aahs
Strings&Choir 1
Strings&Choir 2
Strings&Voice 1
Strings&Voice 2
Analog Voice
Bass Hit Plus
6th Hit
Euro Hit
Octave Orchestra Hit
284
Brass & Saxophone
Trumpet
285
Dark Trumpet Soft
286
Trombone
287
Trombone 2
288
Bright Trombone
289
Tuba
290
Muted Trumpet
291
Muted Trumpet 2
292
French Horn
293
French Horn 2 (warm)
294
Brass Section
295
Brass Section 2 (octave mix)
296
Synth Brass 1
297
Synth Brass 2
298
Synth Brass 3
299
Synth Brass 4
300
Trumpet 2
301
Dark Trumpet Soft 2
302
Resonant Trumpet
303
Sweet Trumpet
304
Wah Trumpet
305
Dark Trombone
306
Dark Trombone 2
307
Strings & Trombone
308
Tuba 2
309
Tuba 3
310
Tuba Solo
311
Soft Tuba
312
Muted Trumpet 3
313
French Horn 3
314
French Horn 4
315
Stereo French Horn
316
Fifth Horn Orchestra
317
Brass Section 3
318
Brass Section 4
319
Dark Brass 1
320
Brassband
321
Bright Brass Section
322
Dark Brass 2
323
Mute Brass Ensemble
324
Sforzato Brass
325
Brass & Strings
326
Analog Synth Brass 1
327
Analog Synth Brass 2
328
Jump Brass
329
Octave Synth Brass
330
Synth Brass & Strings 1
331
Synth Brass & Strings 2
332
Echo Brass
333
Soprano Sax
334
Alto Sax
335
Tenor Sax
336
Baritone Sax
337
Soprano Sax 2
338
Soprano Sax Soft
339
Slow Soprano Sax
340
Octave OrchHit
Trumpet
DarkTrump Soft
Trombone
Trombone 2
Bright Trombone
Tuba
Muted Trumpet
Muted Trumpet 2
French Horn
French Horn 2
Brass Section
Brass Section 2
Synth Brass 1
Synth Brass 2
Synth Brass 3
Synth Brass 4
Trumpet 2
DarkTrump Soft 2
Resonant Trumpet
Sweet Trumpet
Wah Trumpet
Dark Trombone
Dark Trombone 2
Strings&Tromb
Tuba 2
Tuba 3
Tuba Solo
Soft Tuba
Muted Trumpet 3
French Horn 3
French Horn 4
Stereo FrHorn
Fifth HornOrch
Brass Section 3
Brass Section 4
Dark Brass 1
Brassband
Bright Brass
Dark Brass 2
Mute BrassEns
Sforzato Brass
Brass&Strings 1
Analog SynBrass 1
Analog SynBrass 2
Jump Brass
Octave SynBrass
Brass&Strings 2
Brass&Strings 3
Echo Brass
Soprano Sax
Alto Sax
Tenor Sax
Baritone Sax
Soprano Sax 2
Soprano Sax Soft
Slow Soprano Sax
76

Voice List
Sweet Soprano Sax
341
Alto Sax 2
342
Soft Alto Sax
343
Super Alto Sax
344
Sax Band
345
Tenor Sax 2
346
Baritone Sax 2
347
Soft Baritone Sax
348
Flute & Woodwind
Oboe
349
English Horn
350
Bassoon
351
Clarinet
352
Piccolo
353
Flute
354
Recorder
355
Pan Flute
356
Blown Bottle
357
Shakuhachi
358
Whistle
359
Ocarina
360
Oboe 2
361
Sweet Oboe
362
English Horn 2
363
Analog Horns
364
Woodwinds
365
Bassoon 2
366
Clarinet 2
367
Piccolo 2
368
Flute 2
369
Sweet Flute
370
Recorder 2
371
Sweet Pan Flute
372
Pan Flute 2
373
Dark Pan Flute
374
Blown Bottle 2
375
Shakuhachi 2
376
Whistle 2
377
Ocarina 2
378
Lead & Pad
Lead 1 (square)
379
Lead 1a (square 2)
380
Lead 1b (sine)
381
Lead 2 (sawtooth)
382
Lead 2a (sawtooth 2)
383
Lead 2b (saw + pulse)
384
Lead 2c (double sawtooth)
385
Lead 2d (sequenced analog)
386
Lead 3 (calliope)
387
Lead 4 (chiff)
388
Lead 5 (charang)
389
Lead 5a (wire lead)
390
Lead 6 (voice)
391
Lead 7 (fifths)
392
Lead 8 (bass + lead)
393
Lead 8a (soft wrl)
394
Pad 1 (new age)
395
Pad 2 (warm)
396
Sweet Soprano Sax
Alto Sax 2
Soft Alto Sax
Super Alto Sax
Sax Band
Tenor Sax 2
Baritone Sax 2
Soft Baritone Sax
Oboe
English Horn
Bassoon
Clarinet
Piccolo
Flute
Recorder
Pan Flute
Blown Bottle
Shakuhachi
Whistle
Ocarina
Oboe 2
Sweet Oboe
English Horn 2
Analog Horns
Woodwinds
Bassoon 2
Clarinet 2
Piccolo 2
Flute 2
Sweet Flute
Recorder 2
Sweet Pan Flute
Pan Flute 2
Dark Pan Flute
Blown Bottle 2
Shakuhachi 2
Whistle 2
Ocarina 2
Square Lead
Square Lead 2
Sine Lead
Sawtooth
Sawtooth 2
Sawtooth&Pulse
Double Sawtooth
Sequenced analog
Calliope
Chiffer Lead
Charang Lead
Wire Lead
Voice Lead
Fifths Lead
Bass&Lead
Soft wrl
New age Pad
Warm Pad
Pad 2a (sine pad)
397
Pad 3 (polysynth)
398
Pad 4 (choir)
399
Pad 4a (itopia)
400
Pad 5 (bowed)
401
Pad 6 (metallic)
402
Pad 7 (halo)
403
Pad 8 (sweep)
404
Square
405
Slow Square Lead
406
Sine Solo
407
Square Lead
408
Thick Square
409
Corrie
410
Quint
411
2Oscillators Lead
412
Wavy Sawtooth
413
Super Analog
414
Big Lead
415
Bauble Lead
416
PWM 4th
417
PWM 4th Soft
418
Synth Calliope Soft
419
Chiffer Lead 2
420
Chiffer Lead 3
421
Charang 2
422
Wire Lead 2
423
Charang 3
424
Soft Vox
425
5th SawWave 2
426
Fifth Lead Soft
427
Fifth Lead
428
Massiness
429
Delayed Lead 2
430
Delayed Lead 3
431
New Age Pad 2
432
New Age Pad 3
433
Slow Square
434
New Year Pad
435
Warm Pad 2
436
PWM Pad
437
Warmly Pad
438
Horn Pad
439
Poly Synth 2
440
Click Pad
441
Analog Pad
442
Poly Pad
443
Poly Synth 3
444
Space Voice
445
Bowed Pad 2
446
Bowed Pad 3
447
Metallic Pad 2
448
Pan Pad 1
449
Pan Pad 2
450
Halo Pad 2
451
Halo Pad 3
452
Sweep Pad 2
453
Dipolar Pad
454
Sine pad
Poly Synth
Choir Pad
Itopia Pad
Bowed Pad
Metallic Pad
Halo Pad
Sweep Pad
Square
Slow Square Lead
Sine Solo
Square Lead 3
Thick Square
Corrie
Quint
2Oscillators Lead
Wavy Sawtooth
Super Analog
Big Lead
Bauble Lead
PWM 4th
PWM 4th Soft
SynCalliope Soft
Chiffer Lead 2
Chiffer Lead 3
Charang 2
Wire Lead 2
Charang 3
Soft Vox
5th SawWave
Fifth Lead Soft
Fifth Lead 2
Massiness
Delayed Lead 2
Delayed Lead 3
New Age Pad 2
New Age Pad 3
Slow Square
New Year Pad
Warm Pad 2
PWM Pad
Warmly Pad
Horn Pad
Poly Synth 2
Click Pad
Analog Pad
Poly Pad
Poly Synth 3
Space Voice
Bowed Pad 2
Bowed Pad 3
Metallic Pad 2
Pan Pad 1
Pan Pad 2
Halo Pad 2
Halo Pad 3
Sweep Pad 2
Dipolar Pad
77

Voice List
Rising
455
Congregate
456
FX & Effects
FX 1 (rain)
457
FX 2 (soundtrack)
458
Prelude
459
FX 3 (crystal)
460
FX 3a (synth mallet)
461
Crystal 2
462
FX 4 (atmosphere)
463
Warm Air
464
FX 5 (brightness)
465
Smog
466
FX 6 (goblins)
467
Goblin 2
468
Choir Bell 1
469
Choir Bell 2
470
FX 7 (echoes)
471
FX 7a (echo bell)
472
FX 7b (echo pan)
473
Echo Drops 2
474
Echo Bell 2
475
FX 8 (sci-fi)
476
Sci-Fi 2
477
Guitar Fret Noise
478
Guitar Cutting Noise
479
Acoustic Bass String Slap
480
Guitar Fret Noise 2
481
Guitar Cutting Noise 2
482
Acoustic Bass String Slap 2
483
Breath Noise
484
Flute Key Click
485
Breath Noise 2
486
Flute Key Click 2
487
Seashore
488
Rain
489
Thunder
490
Wind
491
Stream
492
Bubble
493
Seashore 2
494
Bird Tweet
495
Dog
496
Horse Gallop
497
Bird Tweet 2
498
Sheep
499
Telephone Ring
500
Telephone Ring 2
501
Door Creaking
502
Door
503
Scratch
504
Wind Chime
505
Helicopter
506
Car Engine
507
Car Stop
508
Car Pass
509
Car Crash
510
Siren
511
Rising
Congregate
FX 1 Rain
FX 2 SoundTrack
Prelude
FX 3 Crystal
Synth Mallet
Crystal 2
FX 4 Atmosphere
Warm Air
FX 5 Brightness
Smog
FX 6 Goblins
Goblin 2
Choir Bell 1
Choir Bell 2
FX 7 Echoes
Echo bell
Echo pan
Echo Drops 2
Echo Bell 2
FX 8 Sci-Fi
Sci-Fi 2
Guitar Fret Noise
Gtr Cutting Noise
AcBass String Slap
Gtr Fret Noise 2
Cutting Noise 2
Bass String Slap 2
Breath Noise
Flute Key Click
Breath Noise 2
Flute Key Click 2
Seashore
Rain
Thunder
Wind
Stream
Bubble
Seashore 2
Bird Tweet
Dog
Horse Gallop
Bird Tweet 2
Sheep
Telephone Ring
Telephone Ring 2
Door Creaking
Door
Scratch
Wind Chime
Helicopter
Car Engine
Car Stop
Car Pass
Car Crash
Siren
Train
512
Jetplane
513
Starship
514
Burst Noise
515
Applause
516
Laughing
517
Screaming
518
Punch
519
Heart Beat
520
Footsteps
521
Gunshot
522
Machine Gun
523
Lasergun
524
Explosion
525
Ethnic & Combined
Sitar
526
Sitar 2 (bend)
527
Sitar & Strings 1
528
Sitar & Strings 2
529
Banjo
530
Banjo 2
531
Shamisen
532
Shamisen 2
533
Koto
534
Taisho Koto
535
Koto 2
536
Taisho Koto 2
537
Kalimba
538
Kalimba 2
539
Bag Pipe
540
Bag pipe 2
541
Fiddle
542
Fiddle 2
543
Shanai
544
Shanai 2
545
Stereo Piano & Strings
546
Stereo Piano & Calliope
547
Stereo Piano & Sweep
548
Honky Tonk Piano & Fifths
549
Honky Tonk Piano & Sweep
550
FM Electric Piano
551
Digital Piano
552
E.Piano & Pad
553
E.Piano & Sweep
554
E.Piano 2 & Pad
555
E.Piano 2 & Sweep
556
E.Piano 2 & Warm
557
Harpsichord & Stereo Strings
558
Music Box & Stereo Strings
559
Vibraphone & Stereo Strings
560
Vibraphone Octave
561
Vibraphone & Marimba & Kalimba
562
Marimba & Kalimba
563
Marimba Delay
564
Xylophone Octave
565
Organ & Stereo Strings
566
Stereo Organ & Piano
567
Rock Organ & Strings
568
Train
Jetplane
Starship
Burst Noise
Applause
Laughing
Screaming
Punch
Heart Beat
Footsteps
Gunshot
Machine Gun
Lasergun
Explosion
Sitar
Sitar 2/Bend
Sitar&Strings 1
Sitar&Strings 2
Banjo
Banjo 2
Shamisen
Shamisen 2
Koto
Taisho Koto
Koto 2
Taisho Koto 2
Kalimba
Kalimba 2
Bag Pipe
Bag pipe 2
Fiddle
Fiddle 2
Shanai
Shanai 2
Piano&Strings
Piano&Callio
Piano&Sweep
Honk&Fifths
Honk&Sweep
FM E.Piano
Digital Piano
E.Piano&Pad
E.Piano&Sweep
E.Piano 2&Pad
E.Piano 2&Sweep
E.Piano 2&Warm
Harpsichord&StStr
MusicBox&StStr
Vibra&StStr
Vibraphone Octave
Vibra&&Mar&Kal
Marimba&Kalimba
Marimba Delay
Xylophone Octave
Organ&StStrings
StereoOrg&Piano
RockOrg&Strings
78

Voice List
Church Organ & Choir
569
Church Organ & Strings
570
Harmonica & Acoustic Guitar
571
Harmonica & Strings
572
Acoustic Guitar & Flute
573
Acoustic Guitar & Clavi
574
24-Strings Guitar
575
24-Strings Guitar & Strings
576
Steel Guitar & Warm Pad
577
Stereo Strings & Horn
578
Orchestra 2
579
Full Strings 1
580
Full Strings 2
581
Symphonic
582
Stereo Choir & Strings
583
Stereo Choir & Steel Guitar
584
3Trumpets Loose
585
Trombone & Stereo Strings
586
3Trombones Loose
587
3Muted Trumpets Loose
588
Club Brass
589
Brass & Woodwinds
590
Woodwinds & Strings
591
Section Woods Small
592
Pan Flute & Strings Pad
593
Koto & Shamisen
594
Koto & Shamisen & Strings
595
Percussive & Drum
Celesta
596
Celesta 2
597
Birght Celesta
598
Celesta & Sine
599
Reecho Bell
600
Celesta & Music Box
601
Glockenspiel l
602
Glockenspiel 2
603
Glockenspiel & Sine
604
Glockenspiel & Celesta
605
Music Box
606
Music Box 2
607
Music Box 3
608
Toy Box
609
Music Box & Harp
610
Vibraphone
611
Vibraphone (wide)
612
Stereo Vibraphone
613
Rigid Vibraphone
614
Vibraphone 2
615
Vibraphone 2 (wide)
616
Vibraphone & Bell
617
Vibraphone & Harpsichord
618
Vibraphone & Strings 1
619
Vibraphone & Strings 2
620
Marimba
621
Marimba (wide)
622
Marimba 2
623
SinMarimba
624
Stereo Marimba
625
ChurchOrg&Choir
ChurchOrg&Str
Harmonica&AcGtr
Harmonica&Str
AcGtr&Flute
AcGtr&Clavi
24-Strings Guitar
24-StrGtr&Str
SteelGtr&WarmPd
Strings&Horn
Orchestra 2
Full Strings 1
Full Strings 2
Symphonic
Choir&Str
Choir&SteelGtr
3Trumpets Loose
Trombone&Str
3Trombones Loose
3MuteTrump Loose
Club Brass
Brass&Wood
Wood&Strings
Woods Small
PanFlute&StrPad
Koto&Shamisen
Koto&Sham&Str
Celesta
Celesta 2
Birght Celesta
Celesta&Sine
Reecho Bell
Celes&MusicBox
Glockenspiel l
Glockenspiel 2
Glockenspiel&Sine
Glocken&Celes
Music Box
Music Box 2
Music Box 3
Toy Box
Music Box&Harp
Vibraphone
Vibraphone/Wide
Stereo Vibraphone
Rigid Vibraphone
Vibraphone 2
Vibraphone/Wide 2
Vibraphone&Bell
Vibra&Harpsic
Vibra&Strings 1
Vibra&Strings 2
Marimba
Marimba/Wide
Marimba 2
SinMarimba
Stereo Marimba
Marimba & Vibraphone
626
Wood Drum
627
Xylophone
628
Xylophone 2
629
Tubular Bells
630
Church Bell
631
Carillon
632
Dulcimer
633
Santur
634
Shorty
635
Tinkle Bell
636
Tinkle Bell 2
637
Agogo
638
Agogo 2
639
Steel Drums
640
Steel Drums 2
641
Woodblock
642
Castanets
643
Woodblock 2
644
Castanets 2
645
Taiko Drum
646
Taiko Drum 2
647
ConcertBass Drum
648
ConcertBass Drum 2
649
Melodic Tom
650
Melodic Tom 2 (power)
651
Synth Drum
652
Rhythm Box Tom
653
Electric Drum
654
Electric Drum 2
655
Reverse Cymbal
656
Reverse Cymbal 2
657
Standard Set
658
Room Set
659
Power Set
660
Electronic Set
661
Analog Set
662
Jazz Set
663
Brush Set
664
Orchestra Set
665
SFX Set
666
Dance Set
667
Funk Set
668
Rock Set
669
Latin Set
670
Pop Set
671
Punk Set
672
Marimba&Vibra
Wood Drum
Xylophone
Xylophone 2
Tubular Bells
Church Bell
Carillon
Dulcimer
Santur
Shorty
Tinkle Bell
Tinkle Bell 2
Agogo
Agogo 2
Steel Drums
Steel Drums 2
Woodblock
Castanets
Woodblock 2
Castanets 2
Taiko Drum
Taiko Drum 2
ConBass Drum
ConBass Drum 2
Melodic Tom
Power Melodic Tom
Synth Drum
Rhythm Box Tom
Electric Drum
Electric Drum 2
Reverse Cymbal
Reverse Cymbal 2
Standard Set
Room Set
Power Set
Electronic Set
Analog Set
Jazz Set
Brush Set
Orchestra Set
SFX Set
Dance Set
Funk Set
Rock Set
Latin Set
Pop Set
Punk Set
79

Style List
No.
Full Name
8Beat & 16Beat
8Beat Ballad
1
8Beat Piano
2
8Beat 1
3
Guitar Pop 1
4
8Beat Hip Hop
5
8Beat Blues Rock
6
8Beat Pop
7
Pop Funk 1
8
Rhythm&Beat 1
9
8Beat Disco 1
10
8Beat Rock
11
Guitar Pop 2
12
8Beat 2
13
Sweet Beat
14
8Beat Dance
15
8Beat Disco 2
16
Pop Funk 2
17
8Beat 3
18
60's 8Beat
19
Rhythm&Beat 2
20
16Beat 1
21
16Beat Funk 1
22
16Beat Ballad 1
23
16Beat R&B
24
Pop 16Beat 1
25
16Beat Funk 2
26
16Beat Dance
27
Pop 16Beat 2
28
16Beat 2
29
Pop 16Beat 3
30
Pop 16Beat 4
31
Modern 16Beat
32
16Beat Hot
33
16Beat Modern
34
16Beat Funk 3
35
16Beat 3
36
Cool Beat
37
16Beat Ballad 2
38
16Beat 4
39
Pop Shuffle
40
Pop & Ballad
Pop Rock 1
41
Pop Dance 1
42
Pop Fusion
43
Analog Night 1
44
6/8 Pop
45
Brit. Pop 1
46
Brit. Pop 2
47
Pop Hit
48
Fusion Shuffle
49
Analog Night 2
50
Guitar Pop 3
51
Pop Beat
52
Soft Beat
53
60's Pop
54
Sting Latin
55
LCD Name
8Beat Ballad
8Beat Piano
8Beat 1
Guitar Pop 1
8Beat Hip Hop
8Beat Blues Rock
8Beat Pop
Pop Funk 1
Rhythm&Beat 1
8Beat Disco 1
8Beat Rock
Guitar Pop 2
8Beat 2
Sweet Beat
8Beat Dance
8Beat Disco 2
Pop Funk 2
8Beat 3
60's 8Beat
Rhythm&Beat 2
16Beat 1
16Beat Funk 1
16Beat Ballad 1
16Beat R&B
Pop 16Beat 1
16Beat Funk 2
16Beat Dance
Pop 16Beat 2
16Beat 2
Pop 16Beat 3
Pop 16Beat 4
Modern 16Beat
16Beat Hot
16Beat Modern
16Beat Funk 3
16Beat 3
Cool Beat
16Beat Ballad 2
16Beat 4
Pop Shuffle
Pop Rock 1
Pop Dance 1
Pop Fusion
Analog Night 1
6/8 Pop
Brit. Pop 1
Brit. Pop 2
Pop Hit
Fusion Shuffle
Analog Night 2
Guitar Pop 3
Pop Beat
Soft Beat
60's Pop
Sting Latin
56
R&B Ballad 1
Guitar Ballad
57
Ballad Rock
58
Piano Pop 1
59
Soft Ballad
60
Natural Ballad
61
Love Ballad
62
Easy Ballad
63
Miami Folk
64
Slow Ballad
65
Folk Ballad
66
Pop Ballad 1
67
Pop Ballad 2
68
EP Ballad
69
New R&B Ballad
70
Rock
Rock
71
New Wave
72
Ska
73
Pop Rock 2
74
Slow Rock
75
70's Rock&Roll
76
Folk Rock
77
Soft Rock
78
Old Rock
79
Easy Rock
80
New Shuffle
81
Rock Hip Hop
82
Rock&Roll 1
83
Rock Shuffle
84
Rock&Roll 2
85
Ballroom
Tango 1
86
Spain Matador
87
Twist 1
88
Twist 2
89
Big Band Fox
90
Tango 2
91
Slow Fox
92
Slow Waltz 1
93
Swing Fox
94
Salsa 1
95
Cha Cha 1
96
Cha Cha 2
97
Beguine 1
98
Beguine 2
99
Rumba 1
100
Samba 1
101
Samba 2
102
Jive
103
Fox Trot
104
Dance
Techno 1
105
Hip Hop 1
106
House 1
107
House 2
108
Pop Dance 2
109
Down Beat
110
R&B Ballad 1
Guitar Ballad
Ballad Rock
Piano Pop 1
Soft Ballad
Natural Ballad
Love Ballad
Easy Ballad
Miami Folk
Slow Ballad
Folk Ballad
Pop Ballad 1
Pop Ballad 2
EP Ballad
New R&B Ballad
Rock
New Wave
Ska
Pop Rock 2
Slow Rock
70's Rock&Roll
Folk Rock
Soft Rock
Old Rock
Easy Rock
New Shuffle
Rock Hip Hop
Rock&Roll 1
Rock Shuffle
Rock&Roll 2
Tango 1
Spain Matador
Twist 1
Twist 2
Big Band Fox
Tango 2
Slow Fox
Slow Waltz 1
Swing Fox
Salsa 1
Cha Cha 1
Cha Cha 2
Beguine 1
Beguine 2
Rumba 1
Samba 1
Samba 2
Jive
Fox Trot
Techno 1
Hip Hop 1
House 1
House 2
Pop Dance 2
Down Beat
111
Techno 2
Progressive
112
Rap 1
113
Rap 2
114
Disco
115
Soft Disco
116
Disco Party
117
70's Disco
118
70's Disco Funk
119
Club Dance
120
Euro Dance
121
Hip Hop 2
122
Garage
123
Soul & Funk
Funk 1
124
Classic Funk
125
Jay R&B
126
Gospel Swing
127
Gospel
128
Funk 2
129
Electric Funk
130
Groove Funk
131
Rubber Funk
132
Cool Funky
133
Jazz Funk
134
Groove
135
Soul
136
Hip Hop Soul
137
Hip Hop Beat
138
R&B
139
Soul Beat
140
R&B Ballad 2
141
British Soul Pop
142
Swing & Jazz
Latin Jazz 1
143
Big Band
144
Dixieland 1
145
Guitar Swing 1
146
Broadway Big Band
147
Swing
148
Latin Jazz 2
149
Fusion
150
Acid Jazz
151
Cool Jazz Ballad
152
Swing Shuffle
153
Big Band Medium
154
Dixieland 2
155
Acoustic Jazz
156
Guitar Swing 2
157
Ragtime
158
Modern Jazz Ballad
159
Swing Ballad
160
Orchestra Swing
161
Country
Country Pop 1
162
Bluegrass 1
163
8Beat Country
164
Modern Country
165
Techno 2
Progressive
Rap 1
Rap 2
Disco
Soft Disco
Disco Party
70's Disco
70's Disco Funk
Club Dance
Euro Dance
Hip Hop 2
Garage
Funk 1
Classic Funk
Jay R&B
Gospel Swing
Gospel
Funk 2
Electric Funk
Groove Funk
Rubber Funk
Cool Funky
Jazz Funk
Groove
Soul
Hip Hop Soul
Hip Hop Beat
R&B
Soul Beat
R&B Ballad 2
British Soul Pop
Latin Jazz 1
Big Band
Dixieland 1
Guitar Swing 1
Broadway B.Band
Swing
Latin Jazz 2
Fusion
Acid Jazz
Cool Jazz Ballad
Swing Shuffle
Big Band Medium
Dixieland 2
Acoustic Jazz
Guitar Swing 2
Ragtime
Modern Jazz Ballad
Swing Ballad
Orchestra Swing
Country Pop 1
Bluegrass 1
8Beat Country
Modern Country
80

Style List
Country Pop 2
166
Bluegrass 2
167
2/4 Country
168
Country Quick Steps
169
Country Folk
170
Country Shuffle
171
Latin & Latin Dance
Samba 3
172
Bossa Nova
173
Latin
174
New Reggae
175
Reggae Dance
176
Paso Doble
177
Lite Bossa
178
Latin Rock
179
Beguine 3
180
Slow Bolero
181
Disco Samba
182
Mambo
183
Meneito
184
Rumba 2
185
Rumba 3
186
Tikitikita
187
Lambada
188
Pop Cha Cha 1
189
Pop Cha Cha 2
190
Salsa 2
191
Waltz & Traditional
Waltz
192
Old Waltz
193
English Waltz
194
German Waltz
195
Italian Mazurka
196
Mexico Waltz
197
Vienna Waltz
198
Slow Waltz 2
199
Jazz Waltz
200
Polka
201
6/8 March
202
German Polka
203
Party Polka
204
Army March
205
March
206
US March
207
Musette
208
French Musette
209
Mazurka
210
World
Enka Ballad
211
Laendler
212
Hawaiian
213
Sirtake
214
Dangdut
215
6/8 Flipper
216
New Age
217
Tarantella
218
Country Pop 2
Bluegrass 2
2/4 Country
Country QuickStp
Country Folk
Country Shuffle
Samba 3
Bossa Nova
Latin
New Reggae
Reggae Dance
Paso Doble
Lite Bossa
Latin Rock
Beguine 3
Slow Bolero
Disco Samba
Mambo
Meneito
Rumba 2
Rumba 3
Tikitikita
Lambada
Pop Cha Cha 1
Pop Cha Cha 2
Salsa 2
Waltz
Old Waltz
English Waltz
German Waltz
Italian Mazurka
Mexico Waltz
Vienna Waltz
Slow Waltz 2
Jazz Waltz
Polka
6/8 March
German Polka
Party Polka
Army March
March
US March
Musette
French Musette
Mazurka
Enka Ballad
Laendler
Hawaiian
Sirtake
Dangdut
6/8 Flipper
New Age
Tarantella
219
Scottish
Norteno
220
Pianist
Pianist 1
221
Pianist 2
222
Pianist 3
223
Jazz 1
224
Jazz 2
225
Jazz Pub
226
Piano Rock
227
Pop Bossa
228
March 1
229
March 2
230
Piano Beat
231
Piano Bar
232
Blues
233
Pop Waltz
234
Slow Waltz
235
Ballad 1
236
Ballad 2
237
6/8 Ballad
238
Pop 1
239
Pop 2
240
Scottish
Norteno
Pianist 1
Pianist 2
Pianist 3
Jazz 1
Jazz 2
Jazz Pub
Piano Rock
Pop Bossa
March 1
March 2
Piano Beat
Piano Bar
Blues
Pop Waltz
Slow Waltz
Ballad 1
Ballad 2
6/8 Ballad
Pop 1
Pop 2
81

Song List
Full Name
No.
Folk & Country
Red River Valley
1
Troika
2
Oh! Susanna!
3
Wave Of The Danube
4
Long Long Ago
5
Old Folks at Home
6
Jambalaya
7
Ding! Dong! Merrily On High
8
Battle Hymn Of The Republic
9
The Old Gray Mare
10
American Patrol
11
Christmas Is Coming
12
Sippin' Cider Through A Straw
13
Christmas Sound
14
On London Bridge
15
Golden & POP
House Of The Rising Sun
16
The Blue Bells Of Scotland
17
Beautiful Dreamer
18
It's Been A Long, Long Time
19
O Sole Mio
20
Der Deitcher's Dog
21
Joy To The World
22
Silent Night
23
Ave Maria
24
Five Hundred Miles
25
Happy New Year
26
It's Beginning To Look A Lot Like Christmas
27
Jeanie With The Light Brown Hair
28
Music Box Dancer
29
Go Tell It On The Mountain
30
Entertainer
31
Annie Laurie
32
Rumba Romance
33
The Last Rose Of Summer
34
The Old King Cole
35
Jazz & Fusion
Samba In June
36
Funk
37
I Can…
38
Sea Shore
39
Guitar&Saxphone
40
The Hip Hop's Night
41
Blue Lunch
42
Cobweb
43
Wine
44
Jazz Old Man
45
Dark Eyes
46
Carlos
47
Sad
48
The Jazz
49
LCD Name
Red River Valley
Troika
Oh! Susanna!
Wave of Danube
Long Long Ago
Old Folks at Home
Jambalaya
Ding! Dong!
Battle Hymn
The Old Gray Mare
American Patrol
Christmas Coming
Sipping Cider
Christmas Sound
On London Bridge
House of Rising
The Blue Bells
Beautiful Dreamer
Been a Long Time
O Sole Mio
Der Deitcher's Dog
Joy to the World
Silent Night
Ave Maria
Five Hundred Mil
Happy New Year
Like Christmas
Jeanie
Music Box Dancer
Tell It on Mountain
Entertainer
Annie Laurie
Rumba Romance
Rose of Summer
The Old King Cole
Samba In June
Funk
I Can…
Sea Shore
Guitar&Saxphone
HipHop's Night
Blue Lunch
Cobweb
Wine
Jazz Old Man
Dark Eyes
Carlos
Sad
The Jazz
Piano
Fur Elise
50
Prelude In C-Sharp Major
51
Innocence
52
The Happy Farmer
53
L' Arabesque
54
Minuet In G Major (BWV Anh. 116)
55
Austria Variation
56
Schos Doll's Dance No. 7
57
The Rag-Time Dance
58
2-Part Invention In A Minor
59
Minuet In G Major (BWV Anh. 114)
60
Turkish March
61
Schos Doll's Dance No. 2
62
Italian Polka
63
Musette In D Major
64
Bourree
65
Piano Sonata In C Major, K.330. III
66
To A Wild Rose
67
Away In A Manger
68
Gavotte I
69
Angels We Have Heard On High
70
Waltz
71
Did You Ever See A Lassie
72
Chopsticks
73
Four Swans' Dance
74
Old French Song
75
Inquietude
76
La Pastorale
77
Santa Claus Is Coming To Town
78
Wilder Reiter
79
Rialto Ripples (Rag)
80
Mazurka
81
Tchaikovsky Waltz
82
Salut d' Amour
83
Gavotte
84
Neapolitan Song
85
Minuet In D Major
86
Prelude In E Major
87
Barcarolle
88
Piano Sonata In A Major, K.331. I
89
Waltz For Piano In G-Sharp Minor
90
Demo List
Full Name
No.
Demo1
1
Demo2
2
Fur Elise
Prelude
Innocence
The Happy Farmer
L' Arabesque
Minuet in G 1
Austria Variation
Doll's Dance No. 7
Rag-Time Dance
Invention A 2 Voix
Minuet in G 2
Turkish March
Doll's Dance No. 2
Italian Polka
Musette in D
Bourree
Sonata K.330. III
To A Wild Rose
Away In A Manger
Gavotte I
Angels We Heard
Waltz
Did You See Lassie
Chopsticks
Four Swans' Dance
Old French Song
Inquietude
La Pastorale
Santa is Coming
Wilder Reiter
Rialto Ripples
Mazurka
Tchaikovsky Waltz
Salut d' Amour
Gavotte
Neapolitan Song
Minuet in D
Prelude in E
Barcarole
Sonata K.331.I
Waltz in G-Sharp
LCD Name
Demo1
Demo2
82

Chord List
Chord Name
Major
Sixth
Major seventh
Major seventh add sharp eleventh
Add ninth
Major seventh ninth
Sixth ninth
Augmented
Seventh augmented
Major seventh augmented
Minor
Minor sixth
Minor seventh
Minor seventh flatted fifth
Minor add ninth
Minor seventh ninth
Minor seventh eleventh
Minor major seventh
Minor major seventh ninth
Diminished
Diminished seventh
Seventh
Seventh suspended fourth
Seventh ninth
Seventh add sharp eleventh
Seventh add thirteenth
Seventh flatted fifth
Seventh flatted ninth
Seventh add flatted thirteenth
Seventh sharp ninth
Suspended fourth
One plus two plus five
Abbreviation
M
6
M7
M7(#11)
(9)
M7(9)
6(9)
aug
7aug
M7aug
m
m6
m7
m7b5
m(9)
m7(9)
m7(11)
mM7
mM7(9)
dim
dim7
7
7sus4
7(9)
7(#11)
7(13)
7b5
7(b9)
7(b13)
7(#9)
sus4
sus2
Normal Voicing
1+3+5
1+(3)+5+6
1+3+(5)+7
1+(2)+3+#4+5+7
1+2+3+5
1+2+3+(5)+7
1+2+3+(5)+6
1+3+#5
1+3+#5+b7
1+(3)+#5+7
1+b3+5
1+b3+5+6
1+b3+(5)+b7
1+b3+b5+b7
1+2+b3+5
1+2+b3+(5)+b7
1+(2)+b3+4+5+(b7)
1+b3+(5)+7
1+2+b3+(5)+7
1+b3+b5
1+b3+b5+6
1+3+(5)+b7
1+4+5+b7
1+2+3+(5)+b7
1+(2)+3+#4+5+b7
1+ 3+(5)+6+b7
1+3+b5+b7
1+b2+3+(5)+b7
1+3+5+b6+b7
1+#2+3+(5)+b7
1+4+5
1+2+5
Display for Root "C"
C
C6
Cm7
CM7(#11)
C(9)
CM7(9)
C6(9)
Caug
C7aug
CM7aug
Cm
Cm6
Cm7
Cm7b5
Cm(9)
Cm7(9)
Cm7(11)
CmM7
CmM7(9)
Cdim
Cdim7
C7
C7sus4
C7(9)
C7(#11)
C7(13)
C7b5
C7(b9)
C7(b13)
C7(#9)
Csus4
C/Csus2
83

MIDI Implementation List
*1
A1000_G10
 Loading...