

Page 1
INSTRUCTIONS
BOOKLET
falmec.com
Lumen wall
FDLUM24W3SS
FDLUM36W5SS
EN INSTRUCTIONS BOOKLET
FR MODE D'EMPLOI
ES MANUAL DE INSTRUCCIONES
IT LIBRETTO ISTRUZIONI
MADE IN VITTORIO VENETO (TV) - ITALY
Page 2
10 1/4”
(261 mm)
19 3/4” max
(max 500 mm)
10 1/8”
(258 mm)
4 1/2”
(115 mm)
1 1/2”
(40 mm)
20 1/2”
(520 mm)
10 3/8”
(263 mm)
18 7/8”
(480 mm)
41 6/8”
10 1/4”
(260 mm)
(max 1060 mm)
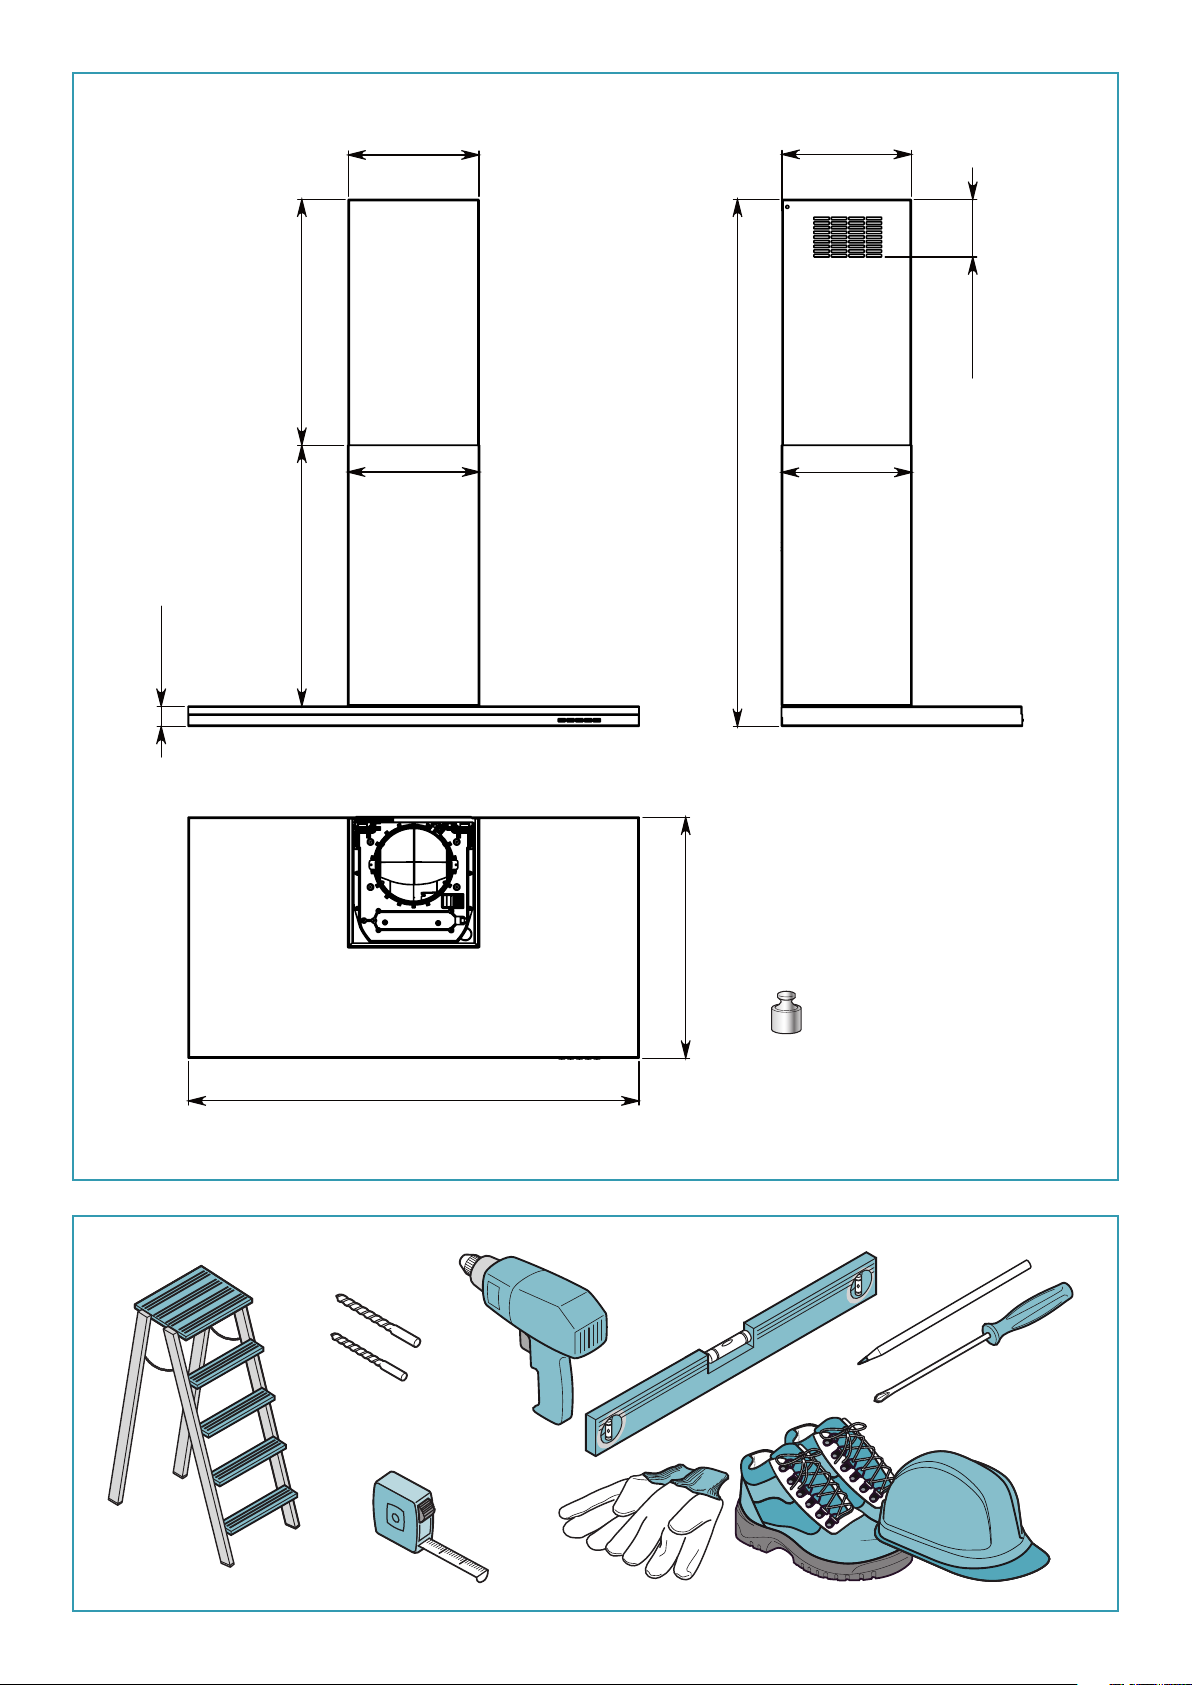
LUMEN 60: FDLUM24W3SS
38lb 17 KG
23 1/2” - 35 3/8”
(598 - 898 mm)
5/16”
Ø8 mm
4/16”
Ø6 mm
LUMEN 90: FDLUM36W5SS
42lb 19 KG
2
Page 3
min. 18 7/8”
(min. 480 mm)
13 3/8”
(340 mm)
1 1/2”
(40 mm)
12 5/8”
(322 mm)
4 3/4”
(120 mm)
4 3/4”
(Ø120 mm)
6 3/4”
(171 mm)
3”
(75 mm)
(265 mm)
10 3/8”
3
Page 4
EN - Installation measurements
Recommended mounting height from cooking sur-
face to hood bottom is indicated by "A" in the drawing
below.
It is recommended to install the hood in this range
to optimize performance. It is recommended to
not exceed 35” (890mm) for dimension “A” as hoods
mounted above this may be dicult to reach for average height users and performance and eciency will
degrade.
Hoods mounted below the lower measurement in
the “A” recommendation could result in damage due
to heat and present a re hazard and would avoid any
warranty claims attributable to the lower mounting
position.
If available, also refer to the cooking appliance manu-
facturer’s height clearance recommendations and
adhere to national and local building and re codes
which supersede any recommendations stipulated
herein.
FR - Mesures pour installation
La hauteur de montage recommandée entre la sur-
face de cuisson et la partie inférieure de la hotte est
indiquée par le « A » dans le dessin ci-dessous.
Il est recommandé d’installer la hotte dans cette plage
pour optimiser sa performance. Il est recommandé
de ne pas dépasser les 890 mm (35 po) pour la dimension « A », car les hottes montées à une distance
au-dessus peuvent être diciles à atteindre pour les
utilisateurs de hauteur moyenne, et cela diminuera
leur performance et ecacité.
Les hottes montées en-dessous de la mesure infé-
rieure de la recommandation « A » pourraient s’abîmer par la chaleur et présenter un risque d’incendie,
ce qui annulerait toute réclamation de garantie attribuable à la position de montage inférieure.
Le cas échéant, reportez-vous également aux recom-
mandations du fabricant de l’appareil de cuisson en
ce qui a trait au dégagement en hauteur et respectez les codes
du bâtiment et de prévention des incendies nationaux et locaux
qui remplacent toutes les recommandations stipulées dans le
présent document.
ES - Medidas instalación
La altura de montaje recomendada desde la supercie de coc-
ción hasta el fondo de la campana se indica con una "A" en el
dibujo siguiente.
Se recomienda instalar la campana en este rango para optimi-
zar el rendimiento. Se recomienda no exceder 35" (890mm) para
la dimensión "A" ya que las campanas montadas por encima de
ésta pueden ser difíciles de alcanzar para los usuarios de altura
media y el rendimiento y la eciencia se degradarán.
Las campanas montadas por debajo de la medida inferior de la
recomendación "A" podrían resultar dañadas por el calor y presentar un riesgo de incendio, y evitarían cualquier reclamación
de garantía atribuible a la posición de montaje inferior.
Si está disponible, consulte también las recomendaciones de al-
tura del fabricante del equipo de cocina y respete los códigos
de construcción y contra incendios, nacionales y locales, que
sustituyen cualquier recomendación estipulada en el presente
documento.
12 5/8”
(322 mm)
1 1/2”
(40 mm)
H
A
S
12 5/8”
3
(322 mm)
IT - Misure per l'installazione
L’altezza di montaggio consigliata tra il piano cottura e la parte
inferiore della cappa è indicata dalla lettera “A” nella gura sottostante.
Per ottenere prestazioni ottimali, si raccomanda di installare la
cappa entro i limiti, massimo e minimo, mostrati nella gura. È
consigliabile che le dimensioni di “A” non superino i 35” (890mm)
in quanto le cappe montate più in alto potrebbero presentare un
livello ridotto di rendimento ed ecienza, oltre a risultare dicili
da raggiungere da parte degli utenti di altezza media.
Al contrario, le cappe montate al di sotto dell’altezza minima
consigliata in “A” potrebbero danneggiarsi per il calore proveniente dal piano cottura e presentare un rischio di incendio. Si ricorda
che la garanzia non risponde di eventuali danni derivanti da un
montaggio in posizione troppo bassa.
Se disponibile, fare riferimento anche all’altezza libera raccoman-
data dal produttore del piano cottura. In ogni caso, è sempre
necessario rispettare le norme edilizie e antincendio in vigore,
a livello sia nazionale sia locale, le quali prevalgono su qualsiasi
raccomandazione contenuta nel presente.
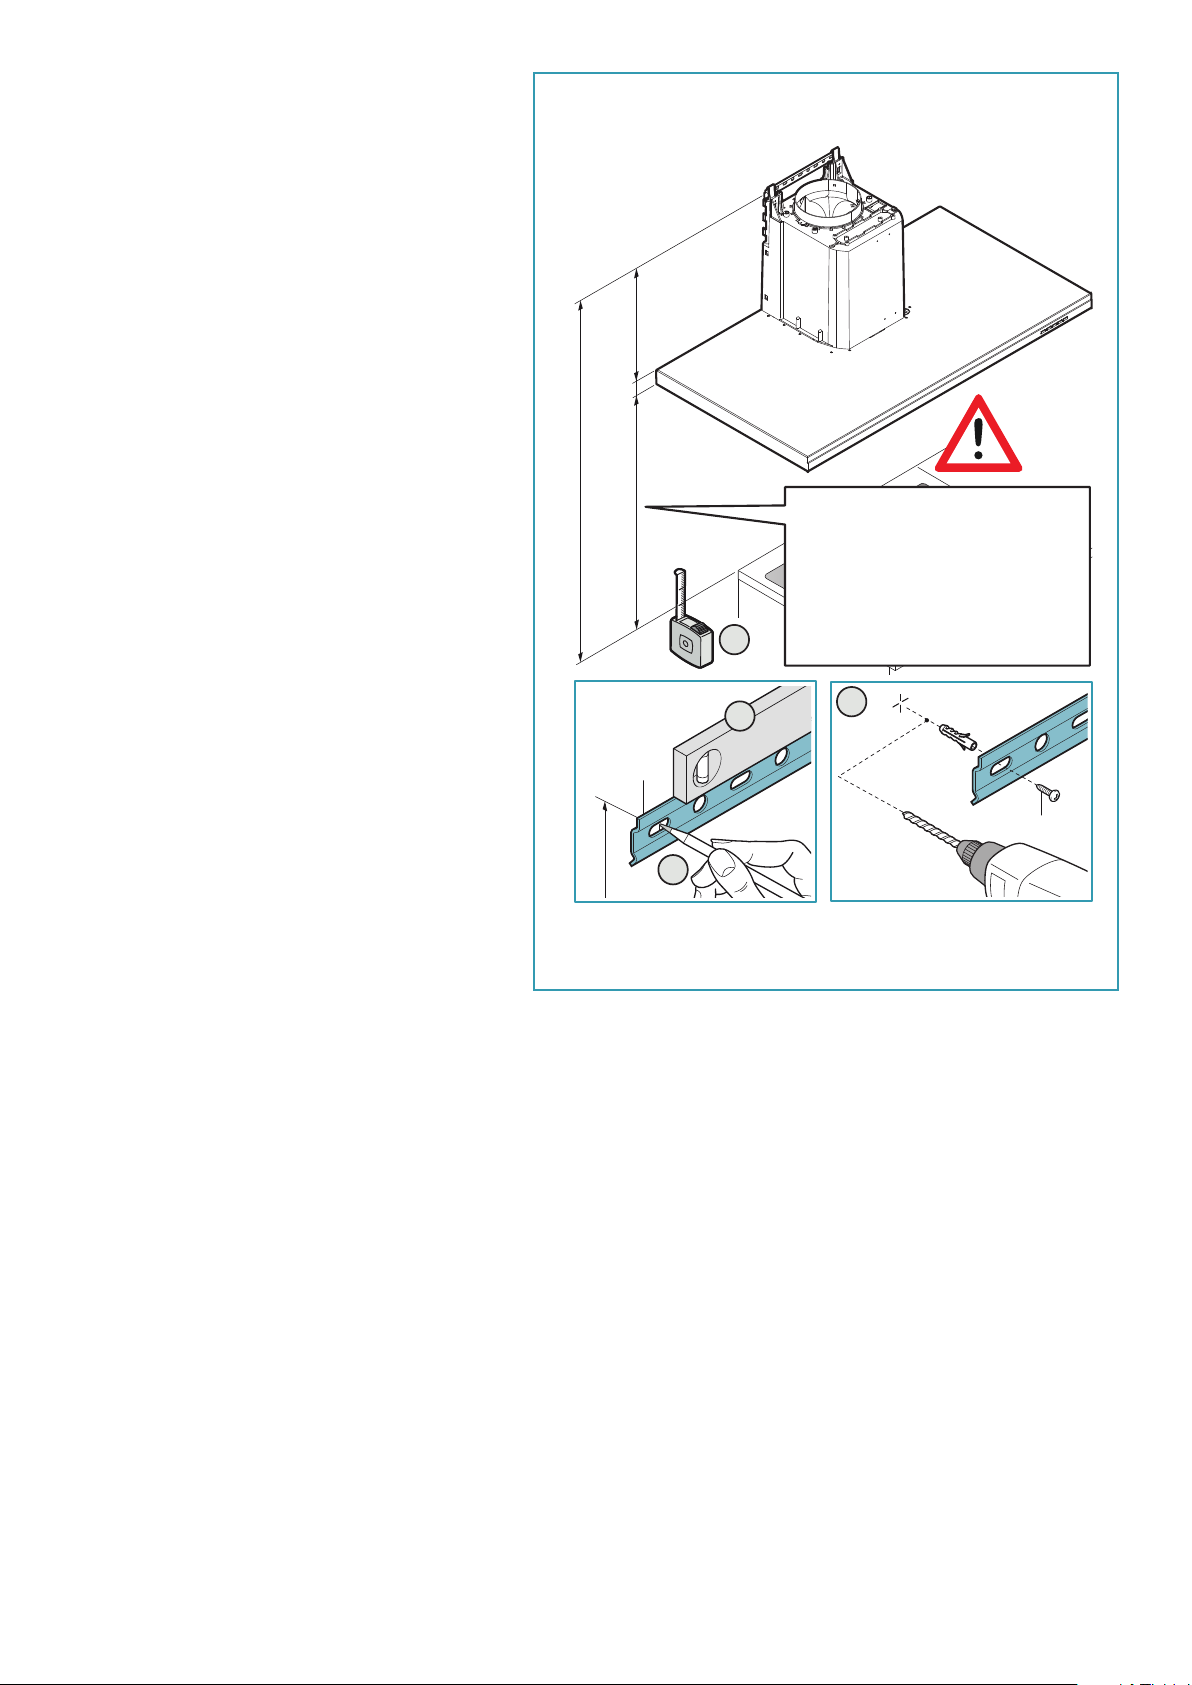
A = 24" - 35"
610 mm - 890 mm
(RECOMMENDED FOR
OPTIMAL PERFORMANCE)
1
2
4
V1 (x2)
Ø5/16”
(Ø8 mm)
4
Page 5
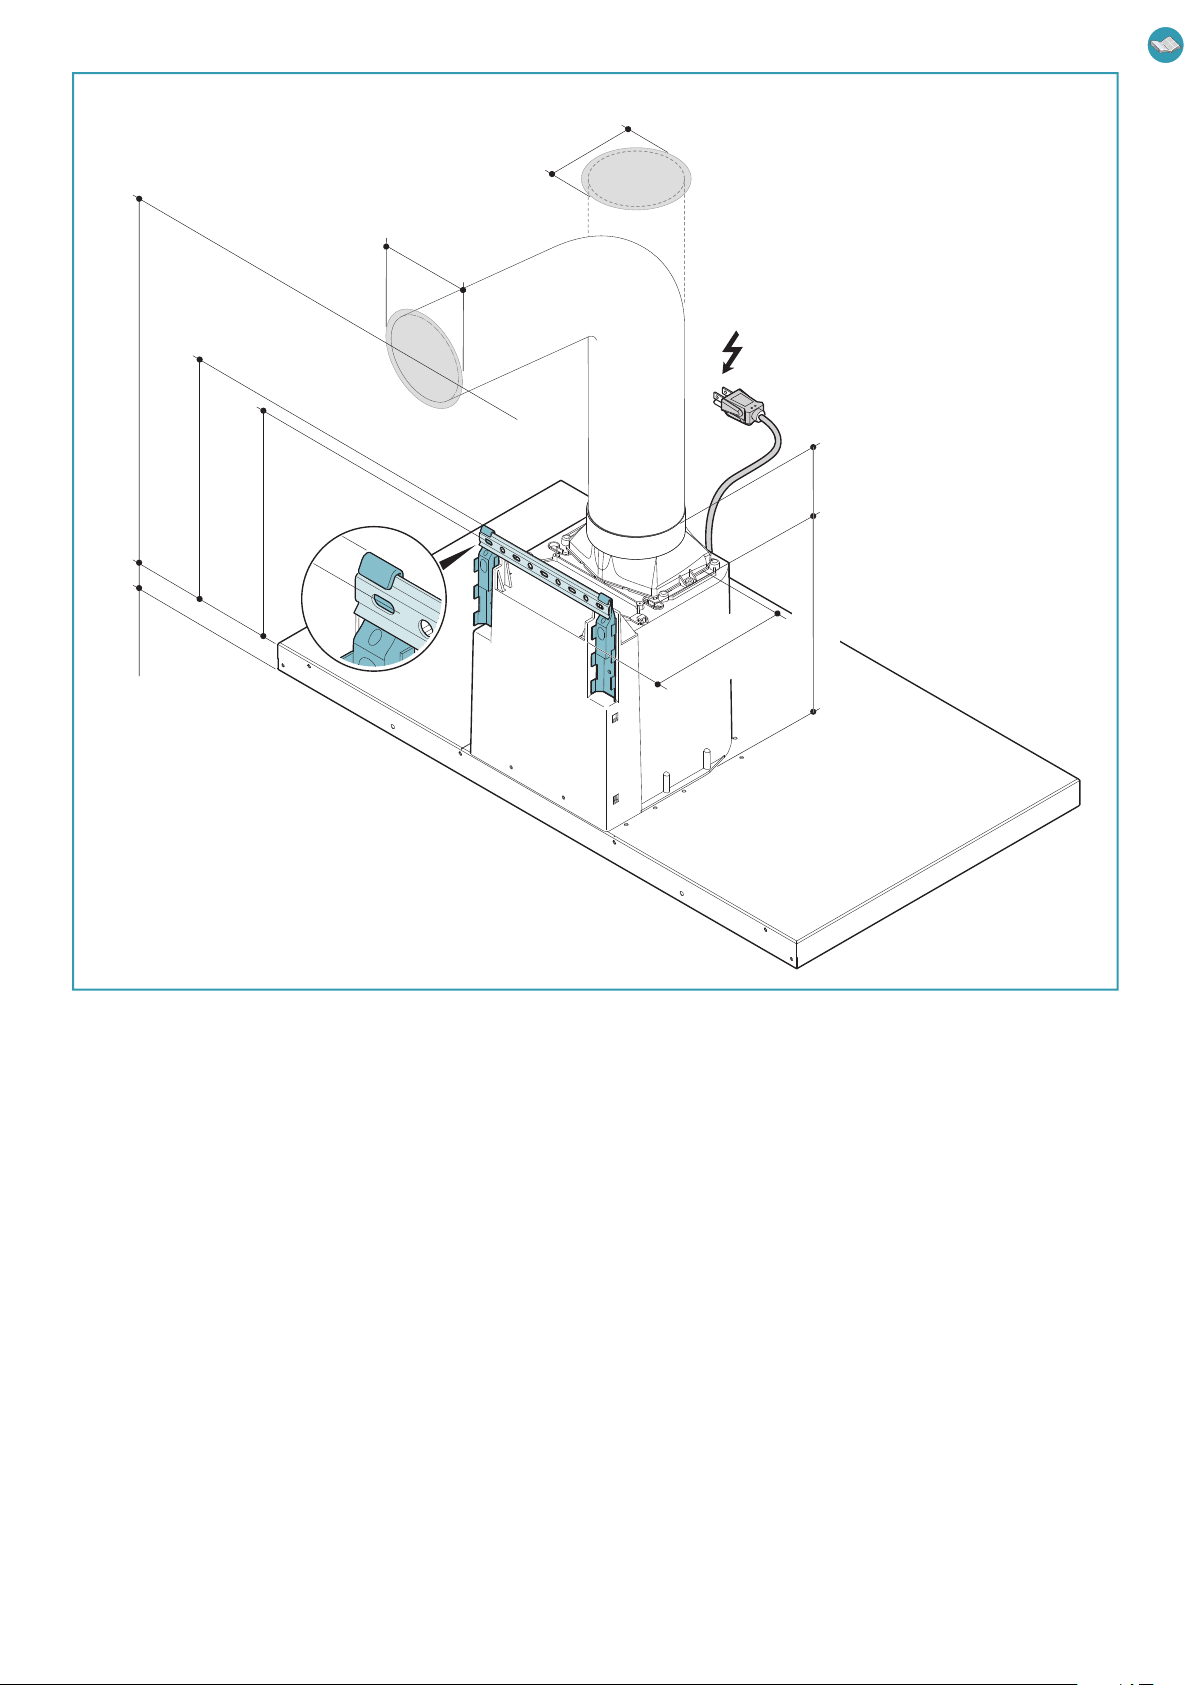
1
B
1
2
C
2
3
V2 (x2)
Ø4 3/8”
(Ø120mm)
122mm
5
Page 6

3
H
4
G
1
2
V3 (x8)
2
L
H
5
L
H
1
V5
3
L
4
ø 6
6
(x2)
ø 6
ø 6 mm
V4 (x2)
Page 7

5 6
1 2
3
2
1
7
Page 8
SAFETY INSTRUCTIONS
AND WARNINGS
Installation operations are to be carried
out by skilled and qualied installers in ac-
cordance with the instructions in this booklet and in compliance with the regulations in
force.
DO NOT use the hood if the power supply cable
or other components are damaged: disconnect
the hood from the electrical power supply and contact the Dealer or an authorised Servicing Dealer for
repairs.
Do not modify the electrical, mechanical or functional structure of the equipment.
Do not personally try to carry out repairs or replacements. Interventions carried out by incompetent and unauthorised persons can cause serious damage to the unit or physical and personal
harm, not covered by the Manufacturer's warranty.
WARNINGS FOR THE INSTALLER
TECHNICAL SAFETY
ELECTRICAL SAFETY
The electrical system to which the hood is
to be connected must be in accordance
with local standards and supplied with
earthed connection in compliance with safety
regulations in the country of use. It must also
comply with European standards regarding radio
antistatic properties.
Before installing the hood, check that the electrical
mains power supply corresponds with what is reported on the identication plate located inside the hood.
The socket used to connect the installed equipment
to the electrical power supply must be within reach:
otherwise, install a mains switch to disconnect the
hood when required.
Any changes to the electrical system must be carried
out by a qualied electrician.
The maximum length of the ue fastening screws
(supplied by the manufacturer) must be 1/2" (13 mm).
Use of non-compliant screws with these instructions
can lead to danger of an electrical nature.
Before installing the hood, check the integrity and function of each part. Should
anomalies be noted, do not proceed with
installation and contact the Dealer.
Do NOT install the hood if an aesthetic (or cosmetic) defect has been detected. Put it back into
its original package and contact the dealer.
No claim can be made for aesthetic (or cosmetic)
defects once it has been installed.
During installation, always use personal protective
equipment (e.g.: Safety shoes) and adopt prudent
and proper conduct.
The installation kit (screws and plugs) supplied with
the hood is only to be used on masonry walls: in case
of installation on walls of a dierent material, assess
other installation options keeping in mind the type
of wall surface and the weight of the hood (indicated
on page 2).
Keep in mind that installations with dierent types of
fastening systems from those supplied, or which are
not compliant, can cause electrical and mechanical
seal danger.
Do not install the hood outdoors and do not expose
it to atmospheric elements (rain, wind, etc.).
Do not try to solve the problem yourself in the event
of equipment malfunction, but contact the Dealer or
an authorised Servicing Department for repairs.
When installing the hood, disconnect the
equipment by removing the plug or switch-
ing o the main switch.
FUMES DISCHARGE SAFETY
Do no connect the equipment to discharge
pipes of fumes produced from combustion
(for example boilers, replaces, etc.).
Before installing the hood, ensure that all standards in
force regarding discharge of air out of the room have
been complied with.
USER WARNINGS
These warnings have been drawn up for
your personal safety and those of others.
You are therefore kindly asked to read the
booklet carefully in its entirety before using the
or cleaning the equipment.
The Manufacturer declines all responsibility for
any damage caused directly, or indirectly, to persons, things and pets as a consequence of failing
to comply with the safety warnings indicated in
this booklet. It is imperative that this instructions
booklet is kept together with the equipment for
any future consultation.
8
Page 9

If the equipment is sold or transferred to another person, make sure that the booklet is also supplied so
that the new user can be made aware of the hood's
operation and relative warnings.
After the stainless steel hood has been installed, it
will need to be cleaned to remove any residues remaining from the protection adhesive as well as any
grease and oil stains which, if not removed, can cause
irreversible damage to the hood surface. To properly
clean the unit, the manufacturer recommends using
the supplied moist wipes, which are also available
sold separately.
Insist on original spare parts.
State of California Proposition 65 Warning
(US only)
Do not leave open, unattended ames under the
hood.
Do not prepare food over an open ame under the
hood.
Never use the hood without the metal anti-grease
lters: in this case, grease and dirt will deposit in the
equipment and compromise its operation.
Accessible parts of the hood can be hot when used at
the same time as the cooking appliances.
Do not carry out any cleaning operations when parts
of the hood are still hot.
There can be a risk of re if cleaning is not carried out
according to the instructions and products indicated
in this booklet.
Disconnect the main switch when the equipment is
not used for long periods of time.
ENGLISH
WARNING
This product contains chemicals known to the State
of California to cause cancer and birth defects or other reproductive harm.
For more information go to www.P65Warnings.ca.gov
INTENDED USE
The equipment is solely intended to be used to
extract fumes generated from cooking food in
non-professional domestic kitchens: any other
use is improper. Improper use can cause damage
to persons, things, pets and exempts the Manufacturer from any liability.
The equipment can be used by children over the age
of 8 and by persons with reduced physical, sensory
and mental abilities, or with no experience or knowledge, as long as they do so under supervision or after
having received relative instructions regarding safe
use of the equipment and understanding of the dangers connected to it.
Children are not to play with the equipment. Cleaning and maintenance by the user must not be carried
out by children without supervision.
USE AND CLEANING WARNINGS
Before cleaning or carrying out maintenance operations, disconnect the equipment by removing the plug or switching
o the main switch.
Do not use the hood with wet hands or bare feet.
Always check that all electrical parts (lights, extractor
fan) are o when the equipment is not being used.
The maximum overall weight of any objects placed
or hung (if applicable) on the hood must not exceed
3lb 5 oz (1.5 Kg).
Always supervise the cooking process during the use
of deep-fryers: Overheated oil can catch re.
If other appliances that use gas or other fu-
els are being used at the same time (boiler,
stove, replaces, etc.), make sure the room
where the fumes are discharged is well-ventilated, in compliance with the local regulations.
INSTALLATION
only intended for qualied personnel
Before installing the hood,
carefully read the chapter
'SAFETY INSTRUCTIONS AND WARNINGS'.
TECHNICAL FEATURES
The technical specications are exhibited on the labels located inside the hood.
POSITIONING
The minimum distance between the highest part of the cooking equipment and the lowest part of the hood is indicated in the installation instructions.
Do not install the hood outdoors and do not expose it to outdoor environment
(rain, wind, etc.).
ELECTRICAL CONNECTION
(only intended for qualied personnel)
Disconnect the equipment from electrical mains power supply before carrying out any operations on the hood.
Ensure that the wires inside the hood are not disconnected or cut:
in the event of damage, contact your nearest Servicing Department.
Refer to qualied personnel for electrical connections.
Connection must be carried out in compliance with the provisions of law
in force.
Before connecting the hood to the electrical mains power supply, check that:
• voltage supply corresponds with what is reported on the data plate located
inside the hood;
• the electrical system is compliant and can withstand the load (see the techni-
cal specications located inside the hood);
• the power supply plug and cable do not come into contact with temperatu-
res exceeding 158°f (70 °C);
• the power supply system is eectively and properly connected to earth in
compliance with regulations in force;
• the socket used to connect the hood is within reach.
In case of:
• devices tted with cables without a plug: the type of plug to use is a ''stan-
dardised'' one. The wires must be connected as follows: yellow-green for earthing, blue for neutral and brown for the phase. The plug must be connected
to an adequate safety socket.
9
Page 10

• xed equipment not provided with a power supply cable and plug, or any
other device that ensures disconnection from the electrical mains, with an
opening gap of the contacts that enables total disconnection in overvoltage
category III conditions.
Said disconnection devices must be provided in the mains power supply in
compliance with installation regulations.
ELECTRONIC PUSHBUTTON PANEL
The yellow/green earth cable must not be cut o by the switch.
The Manufacturer declines all responsibility for failure to comply with the safety
regulations.
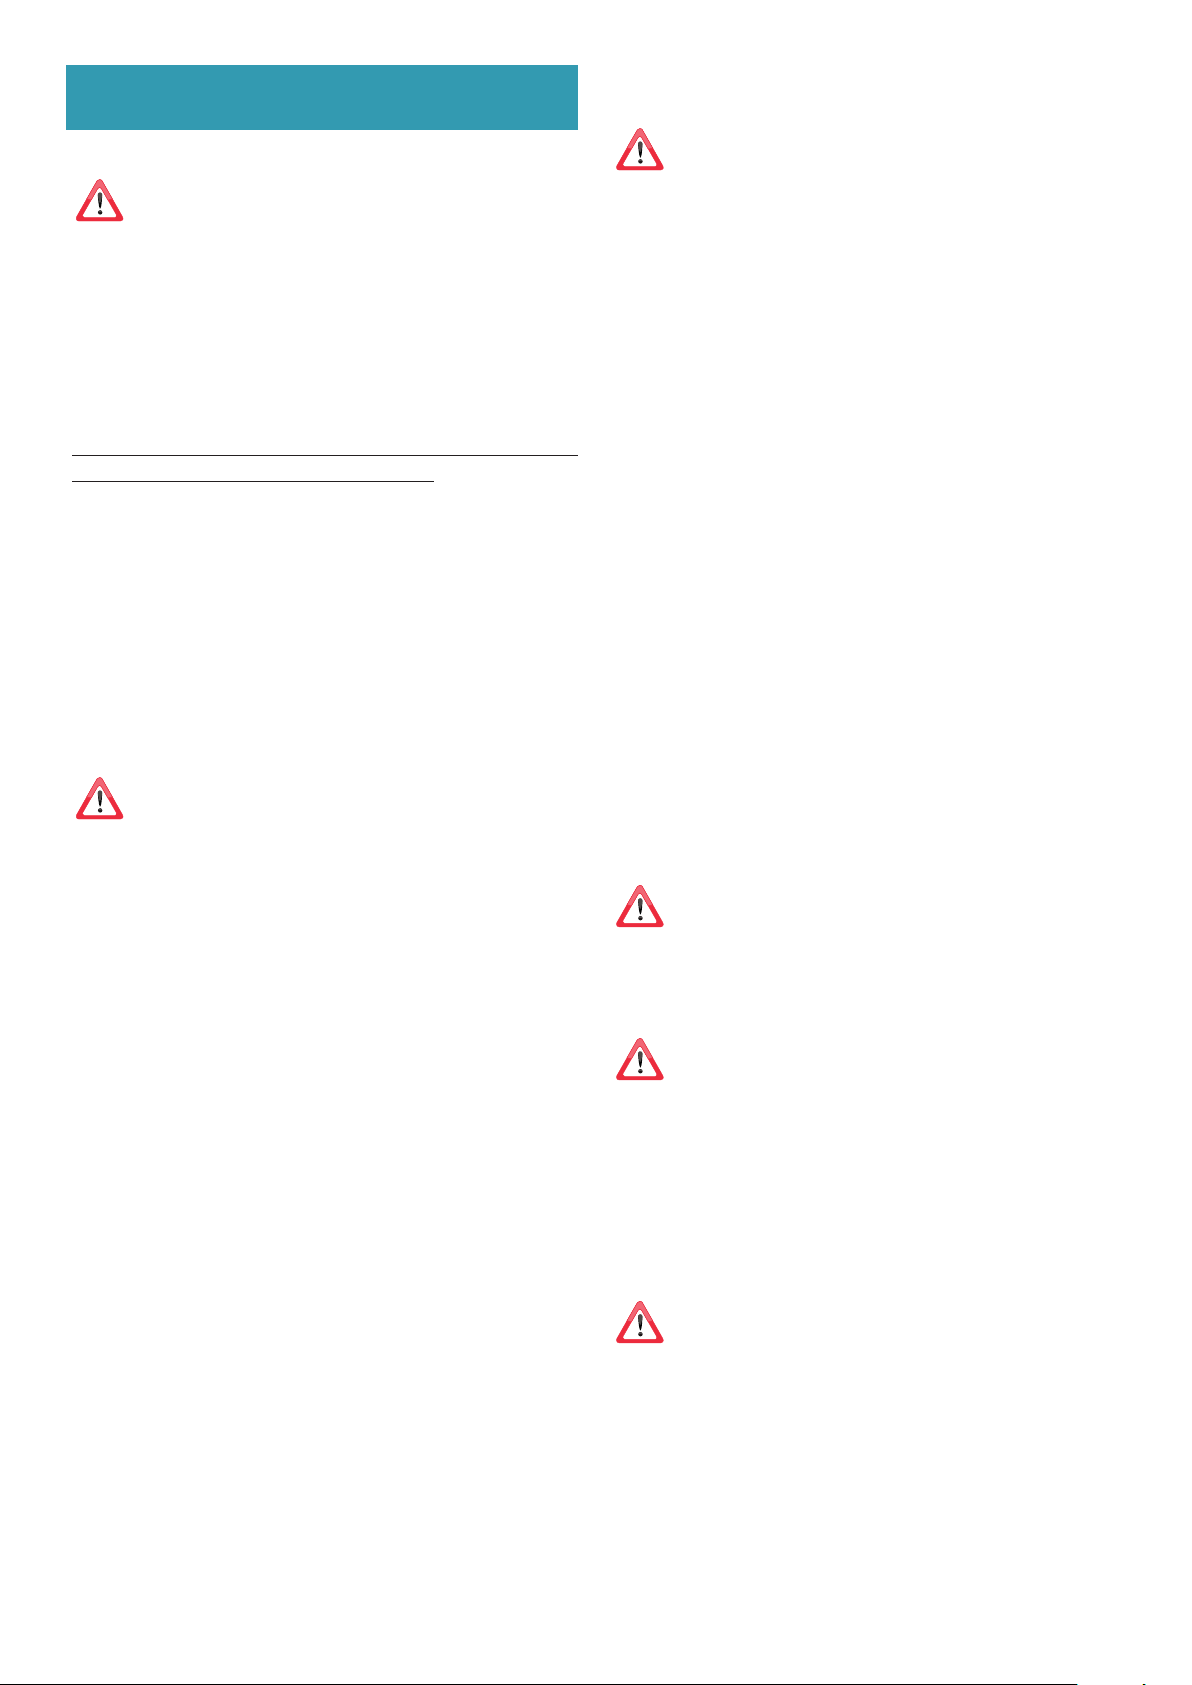
FUMES DISCHARGE
EXTERNAL EXHAUST HOOD SUCTION
In this version the fumes and vapours are discharged outside
through the exhaust pipe.
To this end, the hood outlet tting must be connected via a
pipe, to an external output.
The outlet pipe must have:
• a diameter not less than that of the hood tting.
• a slight slope downwards (drop) in the horizontal sections to prevent con-
densation from owing back into the motor.
• the minimum required number of bends.
• the minimum required length to avoid vibrations and reduce the suction per-
formance of the hood.
You are required to insulate the pipes if it passes through cold environments.
In the presence of motors with 500CFM or higher, a check valve is present to
prevent external air owing back.
HOOD WITH INTERNAL RECIRCULATION FILTERING
In this model, the air passes through the charcoal lters to be
puried and recycled in the environment.
Ensure that the active carbon lters are assembled into the
hood, if not, install them as indicated in the assembly instructions.
In this version the check valve must not be assembled: remove it if it is
on the air outlet tting of the motor.
Motor ON/OFF
Upon start-up, the speed is that stored at the previous operation.
The speeds are indicated by the
Increase speed from 1 to 4
Speed 4 is only active for a few
minutes, then speed 3 activates.
Reduce speed from 4 to 1
Light on/o
LEDs on the keys:
Speed 1
Speed 2
Speed 3
Speed 4
("+" LED ashing)
TIMER (red LED ashing)
Auto switch-o after 15 min.
The function deactivates (red LED o) if:
- The TIMER key ( ) is pressed again.
- The ON/OFF key (
FILTER ALARM (red LED steady on with ( ) o)
Anti-grease lter maintenance after approximately 30 hours of operation.
) the meter for 3 seconds to reset.
Press (
If the pushbutton panel is completely inactive, before contacting
the Technical assistance service, disconnect power temporarily
tch, to restore normal operation.
If this measure has no eect, contact the Technical assistance service.
to the appliance (about 5“), possibly by acting on the main swi-
) is pressed.
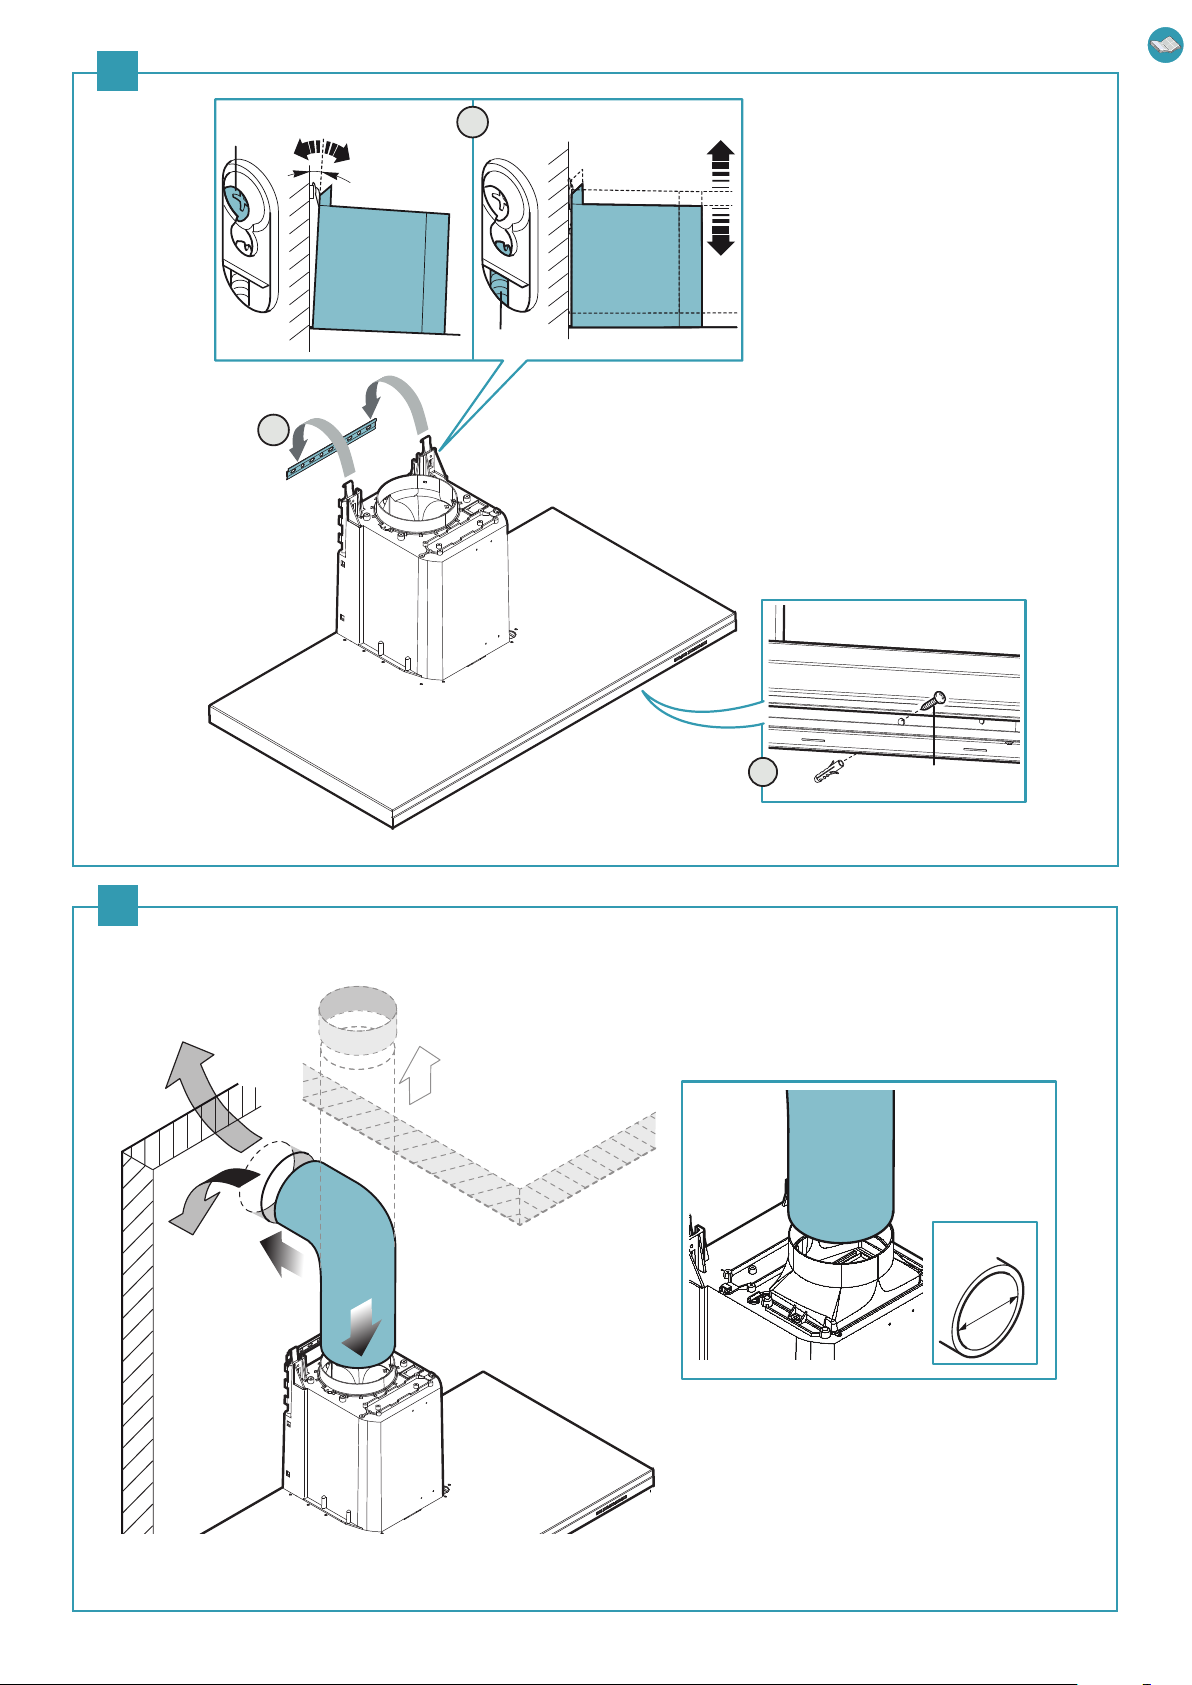
ASSEMBLY INSTRUCTIONS
only intended for personnel qualied
The hood can be installed in various congurations.
The generic assembly steps apply to all installations; for each case,
follow the specic steps provided for the required installation.
OPERATION
WHEN TO TURN ON THE HOOD?
Switch on the hood at least one minute before starting to cook to direct fumes
and vapours towards the suction surface.
After cooking, leave the hood operating until complete extraction of all vapours
and odours. By means of the Timer function, it is possible to set auto switch-o
function which will allow the hood to turn o automatically after 15 minutes of
operation.
WHICH SPEED IS TO BE SELECTED?
1st speed: maintains the circulation of clean air with low electricity consump-
tion.
2nd speed: normal conditions of use.
3rd speed: presence of strong odours and vapours.
4th speed: rapid disposal of odours and vapours.
WHEN SHOULD THE FILTERS BE WASHED OR REPLACED?
The metal lters must be cleaned every 30 hours of operation.
The active carbon lters must be replaced every 3-4 months, depending on the
use of the hood.
For further details see the “MAINTENANCE” chap.
MAINTENANCE
Before cleaning or carrying out maintenance operations, disconnect the equipment by removing the plug or switching o the
main switch.
Do not use detergents containing abrasive, acidic or corrosive substances
or abrasive cloths.
Regular maintenance guarantees proper operation and performance over time.
Special attention is to be paid to the metal anti-grease lters : frequent cleaning of the lters and their supports ensures that no ammable grease is accumulated.
CLEANING OF EXTERNAL SURFACES
You are advised to clean the external surfaces of the hood at least once every
15 days to prevent oily substances and grease from sticking to them. To clean
the brushed stainless steel hood, the Manufacturer recommends using "Magic
Steel" wipes.
Alternatively and for all the other types of surfaces, it can be cleaned using a
damp cloth, slightly moistened with mild, liquid detergent or denatured alcohol.
Complete cleaning by rinsing well and drying with soft cloths.
Do not use too much moisture or water around the push button
control panel and lighting devices in order to prevent humidity
from reaching electronic parts.
The glass panels can only be cleaned with specic, non-corrosive or non-abrasive detergents using a soft cloth.
The Manufacturer declines all responsibility for failure to comply with these instructions.
10
Page 11

CLEANING OF INTERNAL SURFACES
Do not clean electrical parts, or parts related to the motor inside
the hood, with liquids or solvents.
For the internal metal parts, see the previous paragraph.
METAL ANTI-GREASE FILTERS
It is advised to frequently wash the metal lters (at least once a month) leaving
them to soak in boiling water and cleaning solution for 1 hour, taking care not
to bend them.
Do not use corrosive, acid or alkaline detergents.
Rinse them well and wait for them to be completely dry before reassembling
them.
Washing in a dishwasher is permitted, however, it may cause the lter material to
darken: to reduce the possibility of this problem from happening, use low-temperature washes (131°F / 55°C max).
To extract and insert the metal anti-grease lters see the assembly instructions.
ACTIVE CARBON FILTERS
These lters retain the odours in the air that passes through them. The puried
air is recirculated into the environment.
The active carbon lters must be replaced on average every 3-4 months under
normal conditions of use.
See assembly instructions to replace the active carbon lters.
LIGHTING
The range hood is equipped with high eciency, low consumption LED lighting
with extremely long duration under normal use conditions.
In case of failure, contact the Dealer or an authorised Servicing Department for
repairs.
INFORMATION ON DISPOSAL IN EUROPEAN UNION COUNTRIES
The EU WEEE Directive was implemented dierently in each country, accordingly, if you wish to dispose of this appliance we suggest contacting your local
authorities or dealer to nd out what the correct method of disposal is.
INFORMATION ON DISPOSAL IN NONEUROPEAN UNION COUNTRIES
The crossed-out trash or refuse bin symbol is only valid in the European Union: if
you wish to dispose of this appliance in other countries, we suggest contacting
your local authorities or dealer to nd out what the correct method of disposal is.
WARNING!
The Manufacturer reserves the right to make changes to the equipment at any
time and without prior notice. Printing, translation and reproduction, even partial, of this manual are bound by the Manufacturer's authorisation.
Technical information, graphic representations and specications in this manual
are for information purposes and cannot be divulged.
This manual is written in Italian. The Manufacturer is not responsible for any transcription or translation errors.
ENGLISH
DISPOSAL AFTER END OF USEFUL LIFE
The crossed-out trash or refuse bin symbol on the appliance means
that the product is WEEE, i.e. “Waste electrical and electronic equip-
ted waste (i.e. with ''mixed household waste''), but it must be disposed of separately so that it can undergo specic processing for its re-use, or a specic
treatment, to remove and safely dispose of any substances that may be harmful
to the environment and remove the raw materials that can be recycled. Proper
disposal of these products contributes to saving valuable resources and avoid
potential negative eects on personal health and the environment, which may
be caused by inappropriate disposal of waste.
You are kindly asked to contact your local authorities for further information
regarding the designated waste collection points nearest to you. Penalties for
improper disposal of such waste can be applied in compliance with national
regulations.
ment'', accordingly it must not be disposed of with regular unsor-
11
Page 12

CONSIGNES DE SÉCURITÉ
ET MISES EN GARDE
Le travail d'installation doit être eectué
par des installateurs compétents et quali-
és, conformément aux indications du présent manuel et en respectant les normes en vigueur.
Si le câble d'alimentation ou d’autres composants
sont endommagés, la hotte NE doit PAS être utilisée: débrancher la hotte de l'alimentation électrique
et contacter le revendeur ou un Centre d’Assistance
technique agréé pour la réparation.
Ne pas modier la structure électrique, mécanique et fonctionnelle de l'appareil.
Ne pas tenter d'eectuer soi-même des réparations ou des remplacements: les interventions effectuées par des personnes non compétentes et
non qualiées peuvent provoquer des dommages, éventuellement très graves, à des choses et/
ou à des personnes, non couverts par la garantie
du Fabricant.
MISES EN GARDE POUR L’INSTALLATEUR
SÉCURITÉ TECHNIQUE
Avant d'installer la hotte, contrôler l'inté-
grité et la fonctionnalité de chaque partie:
en cas de constatation d'anomalies, ne pas
procéder à l'installation et contacter le Revendeur.
En cas de constatation d'un défaut esthétique, la
hotte NE doit PAS être installée; la remettre dans
son emballage d’origine et contacter le Revendeur.
Après son installation, aucune réclamation ne
sera acceptée pour des défauts esthétiques.
Pendant l'installation, toujours utiliser des équipements de protection individuelle (ex.: des chaussures
de sécurité) et adopter un comportement prudent et
correct.
Le kit de xation (vis et chevilles) fourni avec la hotte
est utilisable uniquement sur des murs en maçonnerie: s'il faut installer la hotte sur des murs de matériau diérent, évaluer d’autres systèmes de xation en
tenant compte de la résistance du mur et du poids de
la hotte (indiqué à la page 2).
Tenir compte du fait que l'installation avec des systèmes de xation diérents de ceux fournis ou non
conformes peut comporter des risques de nature
électrique et de tenue mécanique.
Ne pas installer la hotte à l’extérieur et ne pas l’exposer à des agents atmosphériques (pluie, vent, etc.).
SÉCURITÉ ÉLECTRIQUE
Le circuit électrique, auquel est reliée la
hotte, doit être aux normes et muni d’un
raccordement à la terre, conformément
aux normes de sécurité du pays d’utilisation; il
doit en outre être conforme aux normes européennes sur l'antiparasite radio.
Avant d'installer la hotte, s'assurer que la tension du
secteur correspond à celle reportée sur la plaque qui
se trouve à l'intérieur de la hotte.
La prise utilisée pour le branchement électrique doit
être facilement accessible avec l'appareil installé: si
cela n'était pas possible, prévoir un interrupteur général pour déconnecter la hotte en cas de besoin.
Toute modication de l'installation électrique devra
être uniquement eectuée par un électricien qualié.
La longueur maximum de la vis de xation de la cheminée (fournie par le fabricant) est de 1/2" (13 mm).
L'utilisation de vis non conformes avec les présentes
instructions peut comporter des risques de nature
électrique.
En cas de dysfonctionnements de l'appareil, ne pas
tenter de résoudre personnellement le problème,
mais contacter le revendeur ou un Centre d'Assistance agréé pour la réparation.
Pendant l'installation de la hotte, débran-
cher l'appareil en retirant la prise ou en
agissant sur l'interrupteur général.
SÉCURITÉ ÉVACUATION DES FUMÉES
Ne pas raccorder l'appareil aux conduits
d'évacuation des fumées produites par la
combustion (par ex. chaudières, cheminées, etc.)
Avant l'installation de la hotte, s'assurer que toutes
les normes en vigueur sur l’évacuation de l'air à l'extérieur de la pièce sont respectées.
MISES EN GARDE POUR L'UTILISATEUR
Ces mises en garde ont été rédigées pour
votre sécurité et pour celle d'autrui, nous
vous prions donc de lire attentivement
toutes les parties de ce manuel avant d'utiliser
l'appareil ou de le nettoyer.
Le fabricant décline toute responsabilité pour
d’éventuels dommages, directs ou indirects, pouvant être causés aux personnes, aux choses et
aux animaux domestiques, suite au non-respect
des mises en garde de sécurité indiquées dans ce
manuel.
12
Page 13

Il est très important que ce manuel d'instructions
soit conservé avec l'appareil pour toute consultation future.
Si l'appareil devait être vendu ou transféré à une autre
personne, s'assurer que le manuel soit remis avec celui-ci, de manière à ce que le nouvel utilisateur puisse
connaître le fonctionnement de la hotte et des mises
en garde relatives.
Après l'installation des hottes en acier inox, il est nécessaire d'eectuer le nettoyage de celles-ci pour retirer les résidus de colle de la protection et les taches
éventuelles de graisse et d'huile qui, si on ne les enlève pas, peuvent être cause de détérioration irréversible de la surface de la hotte. Pour cette opération,
le fabricant conseille d'utiliser les serviettes fournies,
disponibles même à l'achat.
Exiger des pièces de rechange originales.
Avertissement de la proposition 65 de l'État de
Californie (US seulement)
ATTENTION
Ce produit contient des produits chimiques connus
de l'État de Californie pour causer le cancer et des
malformations congénitales ou d'autres problèmes
de reproduction. Pour plus d'informations, visitez
www.P65Warnings.ca.gov
DESTINATION D'UTILISATION
L'appareil est destiné, seulement et exclusivement, pour l'aspiration de fumées générées par
la cuisson d'aliments en milieu domestique, non
professionnel: toute autre utilisation diérente
de celle-ci est impropre et peut provoquer des
dommages à des personnes, choses et animaux
domestiques, et dégage le Fabricant de toute responsabilité.
Ne pas utiliser la hotte avec les mains mouillées ou les
pieds nus.
Contrôler toujours que toutes les parties électriques
(lumières, aspirateur) soient éteintes lorsque l'appareil n'est pas utilisé.
Le poids maximum total d'éventuels objets positionnées ou suspendus (où c'est prévu) sur la hotte ne
doit pas dépasser 3lb 5 oz (1,5 kg).
Contrôler les friteuses pendant l'utilisation: l'huile surchauée pourrait s'enammer.
Ne pas allumer de ammes nues sous la hotte.
Ne pas cuisiner avec une amme nue sous la hotte.
Ne jamais utiliser la hotte sans les ltres métalliques
anti-graisse ; dans ce cas, la graisse et la saleté se
déposeraient dans l'appareil et compromettrait son
fonctionnement. Des parties accessibles de la hotte
peuvent être chaudes si elles sont utilisées avec des
appareils de cuisson. Ne pas eectuer d’opérations
de nettoyage si des parties de la hotte sont encore
chaudes. Si le nettoyage n'est pas mené conformément aux modalités et avec les produits indiqués
dans le présent manuel, un risque d’incendie est possible. Couper l'interrupteur général si l'appareil n'est
pas utilisé pendant de longues périodes.
En cas d'utilisation simultanée avec
d'autres éléments (chaudières, poêles, che-
minées, etc.) alimentés au gaz ou avec
d'autres combustibles, pourvoir à une ventilation
adéquate du local où s'eectue l'aspiration de la
fumée, conformément aux normes en vigueur.
INSTALLATION
partie réservée uniquement à un personnel qualié
Avant d’eectuer l'installation de la hotte,
lire attentivement le chap.
«CONSIGNES DE SÉCURITÉ ET MISES EN GARDE».
FRANÇAIS
L'appareil peut être utilisé par des enfants de plus
de 8 ans et des personnes ayant des capacités physiques, sensorielles ou mentales réduites, ou dépourvues d'expérience ou de connaissances nécessaires,
pourvu qu’ils soient sous surveillance ou bien après
qu’ils aient reçu les instructions relatives à une utilisation sûre de l'appareil et qu’ils aient compris les dangers correspondants.
Les enfants ne doivent pas jouer avec l'appareil. Le
nettoyage et la maintenance destinés à être eectués
par l'utilisateur ne doivent pas être eectués par des
enfants sans surveillance.
MISES EN GARDE POUR L'UTILISATION
ET LE NETTOYAGE
Avant de procéder à toute opération de
nettoyage ou d'entretien, désactiver l'appareil en enlevant la che ou en agissant
sur l'interrupteur général.
CARACTÉRISTIQUES TECHNIQUES
Les données techniques de l'appareil sont reportées sur des étiquettes placées
à l'intérieur de la hotte.
POSITIONNEMENT
La distance minimum entre la partie la plus haute de l'appareil de cuisson
et la partie la plus basse de la hotte de cuisine est indiquée dans les instructions de montage.
Ne pas installer la hotte à l’extérieur et ne pas l’exposer à des agents atmosphériques (pluie, vent, etc.).
BRANCHEMENT ÉLECTRIQUE
(partie réservée uniquement à un personnel qualié)
Avant d'eectuer toute opération sur la hotte, débrancher l'appareil du réseau électrique.
Veiller à ce que les ls électriques à l'intérieur de la hotte ne soient
pas débranchés ou coupés:
dans le cas contraire, contacter le Centre d'Assistance le plus proche.
Pour le raccordement électrique contacter un personnel qualié.
Le raccordement doit être eectué conformément aux dispositions de lois
en vigueur.
13
Page 14

Avant de raccorder la hotte au réseau électrique, contrôler que:
• la tension du secteur corresponde à celle reportée sur la plaque des données
qui se trouve à l'intérieur de la hotte;
• le circuit électrique soit aux normes et puisse supporter la charge de l'ap-
pareil (voir la plaque des caractéristiques techniques située à l'intérieur de
la hotte);
• la che et le câble d'alimentation ne rentrent pas en contact avec des tem-
pératures supérieures à 158°F (70 °C);
• l’installation d'alimentation soit munie d'un raccordement à la terre ecace
et correct, conformément aux normes en vigueur;
• la prise utilisée pour le branchement soit facilement accessible, une fois la
hotte installée.
En cas d':
• appareils équipés d'un câble sans che : la che à utiliser doit
être du type «normalisé». Les ls doivent être raccordés de la manière suivante : le l jaune-vert doit pour la mise à la terre, le l bleu
pour le neutre et le l marron pour la phase.
La che doit être raccordée à une prise de sécurité adéquate.
• appareil xe dépourvu de câble d'alimentation et de che ou d'un autre di-
spositif qui assure la déconnexion du réseau, avec une distance d'ouverture
des contacts permettant la déconnexion complète dans les conditions de la
catégorie de surtension III.
Ces dispositifs de déconnexion doivent être prévus dans le réseau d'alimentation conformément aux règles d'installation.
Le câble de terre jaune/vert ne doit pas être interrompu par l'interrupteur.
Le Fabricant décline toute responsabilité si les normes de sécurité ne sont pas
respectées.
FONCTIONNEMENT
QUAND FAUTIL ALLUMER LA HOTTE?
Allumer la hotte au moins une minute avant de commencer à cuisiner pour canaliser les fumées et les vapeurs vers la surface d'aspiration.
Au terme de la cuisson, laisser la hotte en fonction jusqu'à l’aspiration complète
de toutes les vapeurs et odeurs: grâce à la fonction Timer, il est possible de
programmer l'arrêt automatique de la hotte au bout de 15 minutes de fonctionnement.
QUELLE VITESSE CHOISIR ?
I vitesse : maintient l'air pur avec de faibles consommations d'électricité.
II vitesse: conditions normales d'utilisation.
III vitesse: présence de fortes odeurs et vapeurs.
IV vitesse: élimination rapide des odeurs et vapeurs.
QUAND LAVER OU CHANGER LES FILTRES ?
Les ltres métalliques doivent être lavés après 30 heures d'utilisation.
Les ltres au charbon actif (en option) doivent être remplacés tous les 3-4 mois
selon l'utilisation de la hotte.
Pour toute information supplémentaire, voir le chap. « ENTRETIEN ».
COMMANDE ÉLECTRONIQUE
ÉVACUATION DES FUMÉES
HOTTE À ÉVACUATION EXTÉRIEURE ASPIRANTE
Dans cette version, les fumées et les vapeurs sont envoyées
vers l'extérieur à travers un tuyau d'évacuation.
À cette n, le raccord de sortie de la hotte doit être raccordé
par un tuyau à une sortie extérieure.
Le tuyau de sortie doit avoir:
• un diamètre égal ou supérieur à celui du raccord de la hotte.
• une légère inclinaison vers le bas (chute) dans les tronçons horizontaux pour
éviter que la condensation ne reue dans le moteur.
• le nombre minimum indispensable de coudes.
• la longueur minimale indispensable pour éviter toute vibration et réduire la
capacité aspirante de la hotte.
Il est nécessaire d'isoler la tuyauterie si elle passe par des endroits non chaués.
Pour empêcher les retours d'air de l'extérieur, un clapet de non retour est installé
en présence des moteurs avec 500CFM ou supérieurs.
HOTTE À RECIRCULATION INTÉRIEURE FILTRANTE
Dans cette version, l'air passe à travers les ltres au charbon
actif pour être purié et est recyclé dans la pièce.
Contrôler que les ltres au charbon actif soient montés sur la
hotte, sinon les appliquer comme indiqué dans les instructions
de montage.
Dans cette version, le clapet de non retour ne doit pas être monté: le
retirer s'il est présent sur le raccord de sortie de d'air du moteur.
INSTRUCTIONS DE MONTAGE
partie réservée uniquement à un personnel qualié
La hotte peut être installée selon diverses congurations.
Les phases de montage génériques valent pour toutes les installations; par contre, là où il est spécié, suivre les phases correspondant à la conguration désirée.
Moteur ON/OFF
Au démarrage, la vitesse est celle mémorisée à l'arrêt précédent.
Augmentation de la
vitesse de 1 à 4
La vitesse 4 n'est activée
que pendant quelques
minutes, puis la vitesse 3
s'active.
Diminution de la
vitesse de 4 à 1
Allumage / extinction lumière
Les vitesses sont signalées par les lampes LED présentes sur les touches:
Vitesse 1
Vitesse 2
Vitesse 3
Vitesse 4
(LED «+» clignotante)
TIMER (LED rouge clignotante)
Arrêt automatique après 15 min.
La fonction se désactive (LED rouge éteinte) si:
- Vous appuyez une autre fois sur la touche TIMER ( ).
- Si vous appuyez sur la touche ON/OFF ( ).
ALARME FILTRES (LED rouge xe avec ( ) o)
Entretien des ltres anti-graisse après environ 30 heures d'utilisation.
Enfoncer ( ) pendant 3 secondes pour remettre le compteur à zéro.
Si le boîtier de commande est totalement inactif, avant de contacter le service d’Assistance technique, couper momentaném-
ectroménager, de préférence au moyen de l’interrupteur général, pour
rétablir le fonctionnement normal.
Si cette opération ne s’avère pas ecace, contacter le service d’Assistance
technique.
ent (environ 5”) l’alimentation électrique de l’appareil él-
ENTRETIEN
Avant de procéder à toute opération de nettoyage ou d'entretien, désactiver l'appareil en enlevant la che ou en agissant sur
Il ne faut pas utiliser de détergents contenant des substances abrasives,
acides ou corrosives, ni de chions ayant des surfaces rêches.
l'interrupteur général.
14
Page 15

Un entretien constant garantit un bon fonctionnement et un bon rendement
dans le temps.
Il faut accorder une attention particulière aux ltres métalliques anti-graisse: le
nettoyage fréquent des ltres et de leurs supports fait en sorte que les graisses
inammables ne s'accumulent pas.
NETTOYAGE DES SURFACES EXTERNES
Il est conseillé de nettoyer les surfaces externes de la hotte au moins tous les
15 jours an d'éviter que les substances huileuses ou grasses ne puissent les
attaquer. Pour le nettoyage de la hotte, réalisée en acier inox brossé, le Fabricant
conseille l'utilisation des serviettes «Magic Steel».
Sinon, pour tous les autres types de surface, le nettoyage doit être eectué en
utilisant un chion humide légèrement imprégné d'un détergent liquide neutre
ou avec de l'alcool dénaturé.
Terminer le nettoyage en rinçant et en essuyant soigneusement avec des chiffons doux.
Ne pas utiliser trop d'eau à proximité du tableau de commande
et des dispositifs d'éclairage pour éviter que l'humidité atteigne
des parties électroniques.
Le nettoyage des panneaux en verre doit être eectué uniquement avec des
détergents spéciques non corrosifs ni abrasifs avec un chion doux.
Le Fabricant décline toute responsabilité si ces instructions ne sont pas respectées.
NETTOYAGE DES SURFACES INTERNES
Il est interdit de nettoyer les parties électriques ou celles relatives au moteur à l'intérieur de la hotte, avec des liquides ou des
solvants.
Pour les parties métalliques internes, consulter le paragraphe précédent.
FILTRES MÉTALLIQUES ANTI-GRAISSE
Il est conseillé de laver souvent les ltres métalliques (au moins tous les mois)
en les laissant tremper pendant une heure environ dans de l'eau bouillante avec
du produit vaisselle, en évitant de les plier.
Ne pas utiliser de détergents corrosifs, acides ou alcalins.
Les rincer soigneusement et attendre qu'ils soient bien secs avant de les remonter.
Le lavage en lave-vaisselle est permis, mais il pourrait ternir le matériau des ltres
: pour réduire cet inconvénient, utiliser des lavages à basses températures (131°F
/ 55°C max.).
Pour l'extraction et l'introduction des ltres métalliques anti-graisse, voir les instructions de montage.
ÉLIMINATION EN FIN DE VIE
Le symbole de la poubelle barrée reporté sur l'appareil en votre possession indique que le produit est un DEEE, c'est-à-dire un «Déchet
dérivant d'Équipements Électriques et Électroniques» et, par conséq-
uent, il ne doit pas être jeté dans la poubelle non sélective (c'est-à-dire avec
les «déchets urbains mixtes»), mais il doit être géré séparément an d'être soumis aux opérations spéciques pour sa réutilisation ou bien à un traitement
spécique, pour enlever et éliminer en toute sécurité toute substance néfaste
pour l'environnement et extraire les matières premières pouvant être recyclées.
L'élimination correcte de ce produit contribuera à sauvegarder de précieuses
ressources et à éviter de potentiels eets négatifs pour la santé de l’homme et
pour l'environnement, qui pourraient être causés par une élimination inappropriée des déchets.
Nous vous prions de contacter les autorités locales pour de plus amples détails
sur le point d'élimination désigné le plus proche. Des amendes pourraient être
appliquées pour l'élimination incorrecte de ces déchets, conformément à la législation nationale.
INFORMATIONS SUR L'ÉLIMINATION DANS LES PAYS DE L'UNION EURO
PÉENNE
La directive communautaire sur les appareils DEEE a été transposée en mode
diérent par chaque nation, par conséquent si l'on souhaite éliminer cet appareil
nous conseillons de contacter les autorités locales ou le revendeur pour demander la méthode d'élimination correcte.
INFORMATIONS SUR L'ÉLIMINATION DANS LES PAYS QUI N'APPARTIEN
NENT PAS À L'UNION EUROPÉENNE
Le symbole de la poubelle barrée est valable seulement dans l'Union Européenne: si l'on souhaite éliminer cet appareil dans d’autres pays, nous conseillons de contacter les autorités locales ou le revendeur pour demander la
méthode d'élimination correcte.
ATTENTION!
Le Fabriquant se réserve le droit d'apporter des modications aux appareils
à tout moment et sans préavis. L’impression, la traduction et la reproduction,
même partielle, du présent manuel doivent être autorisées par le Fabricant.
Les informations techniques, les représentations graphiques et les spécications
présentes dans ce manuel sont indicatives et non divulguables.
La langue de rédaction du manuel est l'italien, le Fabricant n’est pas responsable
d’éventuelles erreurs de transcription ou de traduction.
FRANÇAIS
FILTRES AU CHARBON ACTIF
Ces ltres retiennent les odeurs présentes dans l'air qui les traverse. L'air épuré est
ainsi renvoyé dans la pièce.
Les ltres au charbon actif doivent être remplacés en moyenne tous les 3-4 mois
dans des conditions d'utilisation normales.
Pour le remplacement des ltres au charbon actif, voir les instructions de montage.
ÉCLAIRAGE
a hotte est équipée d'un éclairage à led à haute ecacité, à basse consommation et à durée très élevée en conditions d'utilisation normales.
En cas de panne, contacter le revendeur ou un Centre d'Assistance agréé pour
la réparation.
15
Page 16

INSTRUCCIONES DE SEGURIDAD
Y ADVERTENCIAS
Las operaciones de instalación deben efectuarlas instaladores competentes y cuali-
cados, siguiendo cuanto se indica en este
manual y respetando las normas en vigor.
Si el cable de alimentación u otros componentes
están dañados, NO utilice la campana. Desconecte
la campana de la alimentación eléctrica y póngase en
contacto con el vendedor o con un centro de asistencia técnica autorizado para la reparación.
No cambie la estructura eléctrica, mecánica y de
funcionamiento del equipo.
No trate de realizar por sí solo reparaciones o
sustituciones: las intervenciones realizadas por
personas no competentes y cualicadas pueden
provocar daños, incluso graves, a cosas y/o personas que no están cubiertos por la garantía del
fabricante.
SEGURIDAD ELÉCTRICA
La instalación eléctrica a la cual se conecta
la campana debe respetar las normas co-
rrespondientes y tener obligatoriamente
una conexión a tierra según las normas de seguridad del país de uso; además debe respetar las
normativas europeas sobre la protección contra
interferencias radio.
Antes de instalar la campana, controle que la tensión
de red coincida con la indicada en la placa colocada
en el interior de la campana.
La toma usada para la conexión eléctrica debe ser fácilmente accesible con el aparato instalado; en caso
contrario, prevea un interruptor general para desconectar la campana.
Cualquier modicación en la instalación eléctrica deberá ser realizada sólo por un electricista cualicado.
ADVERTENCIAS PARA EL INSTALADOR
SEGURIDAD TÉCNICA
Antes de instalar la campana controle la integridad y funcionalidad de cada una de
sus partes: si se notan anomalías no realice
la instalación y póngase en contacto con el revendedor.
NO instale la campana si detecta un defecto estético; vuélvala a colocar en su embalaje original y
póngase en contacto con el revendedor.
Una vez instalada, no se aceptará ninguna reclamación por defectos estéticos.
Durante la instalación, utilice siempre equipos de
protección personal (ej. calzado de protección contra
accidentes) y adopte comportamientos prudentes y
correctos.
El kit de jación (tornillos, tacos y abrazaderas) que se
entrega con la campana se puede usar solo en paredes de mampostería; si es necesario instalar la campana en paredes de material diferente, evalúe otros
sistemas de jación teniendo en cuenta la resistencia
de la pared y el peso de la campana (indicado en la
pág. 2).
Tenga en cuenta que la instalación con sistemas de
jación diferentes a los suministrados o no conformes
puede conllevar riesgos de tipo eléctrico y mecánico.
No instale la campana en exteriores ni la exponga a
agentes atmosféricos (lluvia, viento, etc.).
La longitud máxima del tornillo de jación de la chimenea (proporcionado por el fabricante) es de 1/2"
(13 mm). El uso de tornillos que no sean conformes
con estas instrucciones comporta riesgos de tipo
eléctrico.
En caso de problemas de funcionamiento del equipo, no intente solucionar el problema por sí solo y
póngase en contacto con el vendedor o un centro de
asistencia autorizado para la reparación.
Durante la instalación de la campana, desconecte el equipo quitando el enchufe o
accionando el interruptor general.
SEGURIDAD DESCARGA DE HUMOS
No conecte el aparato a conductos de descarga de los humos producidos por la combustión (por ejemplo, calderas, chimeneas,
etc.).
Antes de instalar la campana asegúrese de que se respeten todas las normativas vigentes sobre la descarga del aire en el exterior del local.
ADVERTENCIAS PARA EL USUARIO
Estas advertencias se han redactado para
su seguridad y la del resto de personas; le
rogamos que lea atentamente este manual
antes de instalar o de usar el aparato o realizar
operaciones de limpieza en el mismo.
16
Page 17

El Fabricante declina toda responsabilidad por
posibles daños que puedan ser provocados directa o indirectamente a personas, animales o cosas
debido al incumplimiento de las advertencias de
seguridad indicadas en este manual.
Es muy importante que conserve este libro de
instrucciones del equipo para consultas futuras.
Si el equipo debe venderse o cederse a otra persona,
compruebe que se adjunte el manual, de manera que
el nuevo usuario pueda estar informado sobre el funcionamiento de la campana y sobre las advertencias
correspondientes.
Después de instalar las campanas de acero inoxidable es necesario limpiarlas para eliminar los residuos
de cola del protector y las posibles manchas de grasa
o y aceites que, de no eliminarse, pueden causar un
deterioro irreparable en la supercie de la campana.
Para esta operación, el fabricante recomienda usar las
toallitas suministradas de serie, disponibles también
a la venta.
Exija piezas de recambio originales.
Advertencia de la Propuesta 65 del Estado de California (solo EE. UU.)
ATENCIÓN
Este producto contiene productos químicos que el
estado de California reconoce como causantes de
cáncer y defectos de nacimiento u otros daños reproductivos.
Para obtener más información, visite www.P65Warnings.ca.gov
DESTINO DE USO
El aparato se puede usar única y exclusivamente para la aspiración de humos generados por la
cocción de alimentos en cocinas domésticas, no
profesionales; cualquier otro uso es inapropiado,
puede provocar daños a personas, cosas y animales domésticos y exime al fabricante de toda responsabilidad.
Los niños cuya edad no sea inferior a los 8 años y las
personas con capacidades físicas, sensoriales o mentales reducidas y sin experiencia ni los conocimientos
necesarios, pueden usar el equipo siempre que estén
bajo supervisión o hayan recibido las correspondientes instrucciones para el uso seguro del equipo y para
la comprensión de los peligros relacionados con este.
Los niños no deben jugar con el equipo. Los niños no
deben realizar sin vigilancia la limpieza y el mantenimiento destinados al usuario.
ADVERTENCIAS PARA EL USO Y LA LIMPIEZA
Antes de realizar cualquier tipo de limpieza
o de mantenimiento, desconecte el equipo
desenchufándolo o usando el interruptor
general.
No use la campana con las manos mojadas o los pies
descalzos.
Controle siempre que todas las partes eléctricas, (luces, aspirador), estén apagadas cuando no se use el
equipo.
El peso máximo total de los posibles objetos colocados o colgados (cuando esté previsto) en la campana
no debe superar los 3lb 5 oz (1,5 kg).
Controle las freidoras mientras las está usando:
El aceite recalentado podría inamarse.
No encienda llamas libres debajo de la campana.
No cocine con llamas "libres" debajo de la campana.
No use nunca la campana sin los ltros metálicos antigrasa; en este caso la grasa y la suciedad se depositarían en el equipo perjudicando su funcionamiento.
Las partes accesibles de la campana pueden estar calientes cuando se usan con equipos de cocción.
No realice operaciones de limpieza con las partes de
la campana aún calientes.
Si no se realiza la limpieza según las modalidades y
los productos indicados en este manual, esto puede
conllevar un riesgo de incendio.
Desconecte el interruptor general, si no va a usar el
equipo durante un periodo de tiempo prolongado.
En caso de utilizar simultáneamente otros
equipos (calderas, estufas, hogares, etc.)
alimentados con gas o con otros combustibles, prevea una adecuada ventilación del ambiente donde se realiza la aspiración de humos,
según las normas vigentes.
INSTALACIÓN
parte reservada al personal cualicado
Antes de instalar la campana,
lea atentamente el cap.
"INSTRUCCIONES DE SEGURIDAD Y ADVERTENCIAS".
CARACTERÍSTICAS TÉCNICAS
Los datos técnicos del aparato se encuentran en unas etiquetas colocadas dentro de la campana.
POSICIONAMIENTO
La distancia mínima entre la parte más alta del aparato para la cocción y
la parte más baja de la campana de cocina se indica en las instrucciones
de montaje.
No instale la campana en exteriores ni la exponga a agentes atmosféricos (lluvia,
viento, etc.).
ESPAÑOL
17
Page 18

CONEXIÓN ELÉCTRICA
(parte reservada solo a personal cualicado)
FUNCIONAMIENTO
Antes de efectuar cualquier tipo de operación en la campana, desconecte el equipo de la corriente eléctrica.
Asegúrese de que no estén desconectados o cortados los hilos
eléctricos montados dentro de la campana:
en caso contrario, póngase en contacto con el Centro de Asistencia más
cercano.
Para la conexión eléctrica consulte con el personal cualicado.
La conexión debe realizarla conforme a las disposiciones de ley en vigor.
Antes de conectar la campana a la red eléctrica, controle que:
• la tensión de red corresponda a la referida en los datos de la placa situada
dentro de la campana;
• la instalación eléctrica cumpla la normativa y pueda soportar la carga (véanse
las características técnicas presentes dentro de la campana);
• el enchufe y el cable de alimentación no entren en contacto con temperatu-
ras superiores a los 158°F (70 °C);
• la instalación de alimentación disponga de una conexión de tierra ecaz y
correcta según las normas vigentes;
• la toma usada para la conexión sea fácilmente accesible una vez instalada la
campana.
En caso de:
• aparatos equipados con cable sin enchufe: el enchufe debe ser de tipo “nor-
malizado”. Los cables deben conectarse de la siguiente forma: amarillo-verde
para la puesta a tierra, azul para el neutro y el hilo marrón para la fase. El
enchufe ha de conectarse a una adecuada toma de seguridad.
• aparato jo sin cable de alimentación ni enchufe, ni de otro dispositivo que
asegure la desconexión de la red, con una distancia de apertura de los contactos que permita la desconexión completa en las condiciones de la cate-
goría de sobretensión III.
Estos dispositivos de desconexión deben preverse en la red de alimentación en
conformidad con las reglas de instalación.
El cable de tierra amarillo/verde no debe ser interrumpido por el interruptor.
El fabricante se exime de toda responsabilidad en caso de que se incumplan las
normas de seguridad.
DESCARGA DE HUMOS
CAMPANA DE EVACUACIÓN EXTERNA EXTRACTORA
En esta versión, los humos y vapores son canalizados hacia el
ambiente exterior a través del tubo de descarga.
Para ello, el racor de salida de la campana debe conectarse.
mediante un tubo, a una salida externa.
El tubo de salida debe tener:
• un diámetro no inferior al del racor de la campana.
• una ligera inclinación hacia abajo (caída) en los tramos horizontales para evi-
tar que la condensación uya hacia el motor.
• el número mínimo indispensable de codos.
• la longitud mínima indispensable para evitar vibraciones y reducir la capaci-
dad aspirante de la campana.
Es necesario aislar la tubería si pasa a través de ambientes fríos.
Para impedir retornos de aire desde el exterior, hay una válvula de no-retorno en
presencia de motores con 500CFM o superiores.
CUÁNDO HAY QUE ENCENDER LA CAMPANA?
Encienda la campana al menos un minuto antes de comenzar a cocinar para
transportar los humos y vapores hacia la supercie de aspiración.
Cuando nalice la cocción, deje en funcionamiento la campana hasta que se
aspiren todos los vapores y los olores; con la función Temporizador, es posible
congurar el apagado automático de la campana después de 15 minutos de
funcionamiento.
QUÉ VELOCIDAD SELECCIONAR?
I velocidad: mantiene el aire limpio con bajos consumos de energía eléctrica.
II velocidad: condiciones normales de uso.
III velocidad: presencia de olores fuertes y de vapores.
IV velocidad: eliminación rápida de olores y vapores.
CUÁNDO LAVAR O CAMBIAR LOS FILTROS?
Los ltros metálicos deben lavarse cada 30 horas de uso.
Los ltros de carbón activo deben sustituirse cada 3-4 meses en función del uso
de la campana.
Para más detalles, consulte el cap. “MANTENIMIENTO”.
PANEL DE MANDOS ELECTRÓNICO
Motor ON/OFF
Cuando se activa, la velocidad es la memorizada en el momento del
anterior apagado.
Aumento de la
velocidad de 1 a 4
La velocidad 4 se activa
solo por algunos minutos,
después de activa la velocidad 3.
Reducción de la
velocidad de 4 a 1
Encendido / Apagado luz
Los led presentes en los botones indican las velocidades:
Velocidad 1
Velocidad 2
Velocidad 3
Velocidad 4
(led "+" intermitente)
TIMER (Led rojo intermitente)
Apagado automático tras 15 min.
La función se desactiva (Led rojo apagado) si:
- Se presiona otra vez la tecla TIMER ( ).
- Se presiona la tecla ON/OFF ( ).
ALARMA FILTROS (Led rojo jo ( ) o)
Mantenimiento de los ltros antigrasa tras unas 30 horas de uso.
Presione ( ) durante 3 segundos para poner a cero el contador.
CAMPANA DE RECIRCULACIÓN INTERNA FILTRANTE
En esta versión, el aire pasa a través de los ltros de carbón
activo para ser puricado y reciclado en el ambiente.
Controle que los ltros de carbón activo estén montados en
la campana; si no es así, móntelos tal como se indica en las
instrucciones de montaje.
En esta versión, la válvula de no-retorno no debe estar montada; desmóntela si está presente en el racor de salida del aire del motor.
INSTRUCCIONES DE MONTAJE
parte reservada al personal cualicado
La campana puede instalarse en diferentes conguraciones.
Las fases de montaje generales valen para todas las instalaciones,
mientras que para la instalación especíca deben seguirse las indicaciones precisas correspondientes.
Si el panel de mandos está totalmente inactivo, antes de contactar con el servicio de asistencia técnica, corte temporalmente
(unos 5”) la alimentación eléctrica al electrodoméstico, en lo posible, a través del interruptor general, para restablecer el funcionamiento
normal.
Si este procedimiento no resulta ecaz, póngase en contacto con el servicio de asistencia técnica.
18
Page 19

MANTENIMIENTO
ELIMINACIÓN AL FINAL DE LA VIDA ÚTIL
Antes de realizar cualquier tipo de limpieza o de mantenimiento,
desconecte el equipo desenchufándolo o usando el interruptor
general.
No deben utilizarse detergentes que contengan sustancias abrasivas,
ácidas o corrosivas ni paños con supercies rugosas.
Un mantenimiento constante asegura un buen funcionamiento y un óptimo
rendimiento a lo largo del tiempo.
Preste especial atención a los ltros metálicos antigrasa: la limpieza frecuente
de los ltros y de sus soportes asegura que en la campana no se acumulen grasas inamables.
LIMPIEZA DE LAS SUPERFICIES EXTERNAS
Se recomienda limpiar las supercies externas de la campana al menos cada 15
días, para evitar que las sustancias aceitosas o grasosas puedan dañarlas. Para
limpiar la campana, fabricada en acero inoxidable cepillado, el fabricante recomienda el uso de las toallitas "Magic Steel".
Como alternativa, y para todos los otros tipos de supercies, la limpieza de la
campana se realiza con un paño húmedo ligeramente embebido en detergente
líquido neutro o alcohol desnaturalizado.
Termine la limpieza enjuagando bien y secando con paños suaves.
No utilice demasiada agua cerca del panel de mandos y de los
dispositivos de iluminación, para evitar que la humedad alcance
partes electrónicas.
La limpieza de los paneles de vidrio debe efectuarse únicamente con detergentes especícos no corrosivos o abrasivos y con un paño suave.
El fabricante se exime de toda responsabilidad en caso de que se incumplan
dichas instrucciones.
El símbolo del contenedor tachado que se encuentra en su equipo
indica que el producto es un RAEE, es decir, un “Residuo de Aparatos
Eléctricos y Electrónicos” y, por tanto, no se puede eliminar en la ba-
sura indiferenciada (o sea, junto con los “residuos urbanos mixtos”), sino que se
tiene que eliminar por separado siguiendo las operaciones correspondientes
para su reciclaje, o someterse a un tratamiento especíco para eliminar de forma
segura las sustancias dañinas para el medio ambiente y extraer las materias primas que se pueden reciclar. La eliminación correcta de este producto contribuye a salvar importantes recursos y evitar potenciales efectos negativos para la
salud humana y para el medio ambiente, que podrían ser causados por una eliminación inapropiada de los residuos.
Por favor, póngase en contacto con las autoridades locales para obtener mayor
información acerca del punto de eliminación más cercano. Se podrían aplicar
sanciones por la eliminación incorrecta de estos residuos, según la legislación
nacional.
INFORMACIÓN ACERCA DE LA ELIMINACIÓN EN LOS PAÍSES DE LA
UNIÓN EUROPEA
La directiva comunitaria sobre los equipos RAEE ha sido acatada de forma diversa en cada país, por tanto, si quiere eliminar este equipo, le sugerimos ponerse
en contacto con las autoridades locales o el revendedor para obtener información sobre el método de eliminación correcto.
INFORMACIÓN ACERCA DE LA ELIMINACIÓN EN LOS PAÍSES QUE NO
PERTENECEN A LA UNIÓN EUROPEA
El símbolo del contenedor tachado es válido solo en la Unión Europea: si quiere
eliminar este equipo en otros países, le sugerimos que se ponga en contacto
con las autoridades locales o el revendedor para obtener información sobre el
método de eliminación correcto.
¡ATENCIÓN!
ESPAÑOL
LIMPIEZA DE LAS SUPERFICIES INTERNAS
Se prohíbe limpiar las partes eléctricas o las partes del motor si-
tuadas dentro de la campana con líquidos o solventes.
Para las partes metálicas internas, consulte el apartado anterior.
FILTROS METÁLICOS ANTIGRASA
Se aconseja lavar frecuentemente los ltros metálicos (al menos cada mes)
dejándolos en remojo durante 1 hora en agua hirviendo con detergente para
platos, evitando doblarlos.
No use detergentes corrosivos, ácidos o alcalinos.
Enjuáguelos con cuidado y espere a que estén secos para volver a montarlos.
Es posible lavar los ltros en el lavavajillas, pero este tipo de lavado podría oscurecer el material de los ltros; para reducir este inconveniente, utilice bajas temperaturas (131°F / 55°C max.).
Para extraer y montar los ltros metálicos, consulte las instrucciones de montaje.
FILTROS DE CARBÓN ACTIVO
Estos ltros retienen los olores presentes en el aire que los atraviesa. El aire depurado vuelve a recircular por el ambiente.
Los ltros de carbón activo deben ser sustituidos cada 3-4 meses en condiciones
de uso normal.
Para sustituir los ltro de carbón activo, consulte las instrucciones de montaje.
ILUMINACIÓN
La campana cuenta con iluminación de led de elevada eciencia, un bajo consumo y una vida útil prolongada, en condiciones de uso normales.
En caso de rotura, póngase en contacto con el Vendedor o con un Centro de
Asistencia Técnica autorizado para la reparación.
El fabricante se reserva el derecho a realizar cualquier cambio a los equipos en
cualquier momento y sin previo aviso. La impresión, traducción y reproducción
de este manual, incluso parcial, se deben realizar con la autorización del fabricante.
La información técnica, las representaciones grácas y las indicaciones presentes
en este manual son indicativas y no se pueden divulgar.
El idioma original del manual es el italiano, y el fabricante se exime de toda responsabilidad por posibles daños de transcripción o traducción.
19
Page 20

ISTRUZIONI DI SICUREZZA
E AVVERTENZE
Prima di installare la cappa vericare che la tensione
di rete corrisponda a quella riportata dalla targhetta
posta all’interno della cappa.
Il lavoro d’installazione deve essere esegui-
to da installatori competenti e qualicati,
secondo quanto indicato nel presente libretto e rispettando le norme in vigore.
Se il cavo di alimentazione o altri componenti
sono danneggiati, la cappa NON deve essere utilizzata: staccare la cappa dall'alimentazione elettrica
e contattare il Rivenditore o un Centro Assistenza Tecnica autorizzato per la riparazione.
Non modicare la struttura elettrica, meccanica e
funzionale dell'apparecchiatura.
Non tentare di eettuare da soli riparazioni o sostituzioni: gli interventi eettuati da persone non
competenti e qualicate possono provocare danni, anche molto gravi, a cose e/o persone non coperti da garanzia del Costruttore.
AVVERTENZE PER L'INSTALLATORE
SICUREZZA TECNICA
Prima di installare la cappa controllare l'in-
tegrità e funzionalità di ogni sua parte: se
si notano anomalie non procedere nell'installazione e contattare il Rivenditore.
Nel caso sia stato riscontrato un difetto estetico la
cappa NON deve essere installata; riporla nel suo
imballo originale e contattare il Rivenditore.
Una volta installata non sarà accettato alcun reclamo per difetti estetici.
Durante l'installazione utilizzare sempre mezzi di protezione personale (es.: scarpe antiinfortunistiche) ed
adottare comportamenti prudenti e corretti.
Il kit di ssaggio (viti e tasselli) fornito con la cappa è
utilizzabile unicamente su pareti in muratura: in caso
di installazione su pareti di materiale diverso, valutare
altri sistemi di ssaggio tenendo conto della resistenza del muro e del peso della cappa (indicato a pag. 2).
Tenere presente che l’installazione con sistemi di ssaggio diversi da quelli forniti o non conformi può
comportare rischi di natura elettrica e di tenuta meccanica.
Non installare la cappa in ambienti esterni e non
esporla ad agenti atmosferici (pioggia, vento, ecc...).
SICUREZZA ELETTRICA
L’impianto elettrico al quale viene collega-
ta la cappa deve essere a norma e munito
di collegamento a terra secondo le norme
di sicurezza del Paese di utilizzo; deve essere inoltre conforme alle normative Europee sull’antidisturbo radio.
La presa usata per il collegamento elettrico deve essere facilmente raggiungibile con l’apparecchiatura
installata: in caso contrario, prevedere un interruttore
generale per disconnettere la cappa al bisogno.
Ogni eventuale modica all’impianto elettrico dovrà
essere eseguita solo da un elettricista qualicato.
La lunghezza massima della vite di ssaggio del camino (fornita dal fabbricante) è di 1/2" (13 mm).
L'utilizzo di viti non conformi con le presenti istruzioni
può comportare rischi di natura elettrica.
In caso di malfunzionamenti dell’apparecchio, non
tentare di risolvere da soli il problema, ma contattare il Rivenditore o un Centro di Assistenza autorizzato
per la riparazione.
Durante l'installazione della cappa, disinserire l’apparecchio togliendo la spina o
agendo sull’interruttore generale.
SICUREZZA SCARICO FUMI
Non collegare l’apparecchio a condotti di
scarico dei fumi prodotti dalla combustione (ad es. caldaie, caminetti, ecc...)
Prima dell'installazione della cappa assicurarsi che siano rispettate tutte le normative vigenti sullo scarico
dell’aria all’esterno del locale.
AVVERTENZE PER L'UTILIZZATORE
Queste avvertenze sono state redatte per
la vostra sicurezza e per quella degli altri, Vi
preghiamo, dunque, di leggere attentamente questo libretto in tutte le sue parti prima
di utilizzare l’apparecchio o di eettuare operazioni di pulizia sullo stesso.
Il Costruttore declina ogni responsabilità per
eventuali danni che possano, direttamente o indirettamente, essere causati a persone, cose ed
animali domestici conseguenti alla mancata osservanza delle avvertenze di sicurezza indicate in
questo libretto.
È molto importante che questo libretto istruzioni sia conservato insieme all’apparecchiatura per
qualsiasi futura consultazione.
Se l’apparecchio dovesse essere venduto o trasferito
ad un’altra persona, assicurarsi che anche il libretto
venga fornito, in modo che il nuovo utente possa essere messo al corrente del funzionamento della cappa e delle avvertenze relative.
20
Page 21

Dopo l’installazione delle cappe in acciaio inox è necessario eseguire la pulizia della stessa per rimuovere i residui di collante del protettivo e le eventuali
macchie di grasso e oli, che, se non rimosse, possono
causare il deterioramento irreversibile della supercie
della cappa. Per questa operazione il costruttore raccomanda l’utilizzo delle salviette in dotazione, disponibili anche in acquisto
Esigere parti di ricambio originali.
Avvertimento sulla Proposta 65 dello Stato della
California (solo Stati Uniti)
ATTENZIONE:
Questo prodotto contiene sostanze chimiche che lo
Stato della California riconosce come causa di cancro,
difetti alla nascita o altri danni riproduttivi.
Per maggiori informazioni,
visitare www.P65Warnings.ca.gov
DESTINAZIONE D'USO
L’apparecchio è destinato solo ed esclusivamente
per l'aspirazione di fumi generati dalla cottura di
alimenti in ambito domestico, non professionale:
qualsiasi utilizzo diverso da questo è improprio,
può provocare danni a persone, cose ed animali
domestici e solleva il Costruttore da qualsiasi responsabilità.
L’apparecchio può essere utilizzato da bambini di età
non inferiore a 8 anni e da persone con ridotte capacità siche, sensoriali o mentali, o prive di esperienza
o della necessaria conoscenza, purché sotto sorveglianza oppure dopo che le stesse abbiano ricevuto
istruzioni relative all’uso sicuro dell’apparecchio e alla
comprensione dei pericoli ad esso inerenti.
I bambini non devono giocare con l’apparecchio.
La pulizia e la manutenzione a cura dell’utilizzatore
non deve essere eettuata da bambini senza sorveglianza.
AVVERTENZE PER L'UTILIZZO E LA PULIZIA
Prima di procedere a qualsiasi operazione
di pulizia o di manutenzione, disinserire
l’apparecchio togliendo la spina o agendo
sull’interruttore generale.
Non utilizzare la cappa con le mani bagnate o piedi
scalzi.
Quando l’apparecchio non viene usato, controllare
sempre che tutte le parti elettriche, (luci, aspiratore),
siano spente.
Il peso massimo complessivo di eventuali oggetti posizionati o appesi (ove previsto) sulla cappa non deve
superare 3 lb 5 oz (1,5 Kg).
Controllare le friggitrici durante l’uso: I’olio surriscaldato potrebbe inammarsi.
Non accendere amme libere sotto la cappa.
Non preparare cibi alla amma sotto la cappa.
Non utilizzare mai la cappa senza i ltri metallici antigrasso; grasso e sporco in questo caso si depositerebbero nell'apparecchio compromettendone il funzionamento.
Parti accessibili della cappa possono essere calde se
utilizzate insieme con apparecchi di cottura.
Non eettuare operazioni di pulizia quando parti della cappa sono ancora calde.
Se la pulizia non è condotta secondo le modalità e i
prodotti indicati nel presente libretto è possibile un
rischio di incendio.
Disinserire l’interruttore generale quando l’apparecchio non viene utilizzato per periodi prolungati di
tempo.
In caso di utilizzo contemporaneo di altre
utenze (caldaie, stufe, caminetti, ecc.) ali-
mentate a gas o con altri combustibili,
provvedere ad una adeguata ventilazione del locale in cui avviene l’aspirazione dei fumi, secondo
le norme vigenti.
INSTALLAZIONE
parte riservata solo a personale qualicato
Prima di eettuare l'installazione della cappa,
LEGGERE ATTENTAMENTE
il capitolo "ISTRUZIONI DI SICUREZZA E AVVERTENZE".
CARATTERISTICHE TECNICHE
I dati tecnici dell'apparecchio sono riportati su delle targhette, posizionate all’interno della cappa.
POSIZIONAMENTO
La distanza minima fra la parte più alta dell'apparecchiatura per la cottura
e la parte più bassa della cappa da cucina viene indicata nelle istruzioni di
montaggio.
Non installare la cappa in ambienti esterni e non esporla ad agenti atmosferici
(pioggia, vento, ecc...).
ALLACCIAMENTO ELETTRICO
(parte riservata solo a personale qualicato)
Prima di eettuare qualsiasi operazione sulla cappa scollegare
l’apparecchio dalla rete elettrica.
Assicurarsi che non vengano scollegati o tagliati li elettrici all’interno della cappa:
in caso contrario contattare il Centro Assistenza più vicino.
Per l’allacciamento elettrico rivolgersi a personale qualicato.
Il collegamento deve essere eseguito in conformità con le disposizioni di
legge in vigore.
Prima di collegare la cappa alla rete elettrica, controllare che:
• la tensione di rete corrisponda a quella riportata sui dati di targa posti all’in-
terno della cappa;
• l’impianto elettrico sia a norma e possa sopportare il carico (vedi caratteristi-
che tecniche posizionate all’interno della cappa);
• la spina e il cavo, di alimentazione, non devono entrare in contatto con tem-
perature superiori a 158°F (70 °C);
• l’impianto di alimentazione sia munito di ecace e corretto collegamento di
terra secondo le norme vigenti;
• la presa usata per il collegamento sia facilmente raggiungibile una volta in-
stallata la cappa.
ITALIANO
21
Page 22

In caso di :
• apparecchi dotati di cavo senza spina: la spina da utilizzare deve essere di tipo
“normalizzato”. Il li devono essere collegati come segue: giallo-verde per
la messa a terra, blu per il neutro e il lo marrone per la fase. La spina deve
essere collegata ad un'adeguata presa di sicurezza.
• apparecchio sso non provvisto di cavo di alimentazione e di spina, o di altro
dispositivo che assicuri la disconnessione dalla rete, con una distanza di apertura dei contatti che consenta la disconnessione completa nelle condizioni
della categoria di sovratensione III.
Tali dispositivi di disconnessione devono essere previsti nella rete di alimentazione conformemente alle regole di installazione.
Il cavo di terra giallo/verde non deve essere interrotto dall’interruttore.
Il Costruttore declina ogni responsabilità nel caso le norme di sicurezza non vengano rispettate.
SCARICO FUMI
CAPPA AD EVACUAZIONE ESTERNA ASPIRANTE
In questa versione, fumi e vapori vengono convogliati verso
l'esterno attraverso il tubo di scarico.
A tal ne, il raccordo d'uscita della cappa, deve essere collegato tramite un tubo, ad un'uscita esterna.
Il tubo d'uscita deve avere:
• un diametro non inferiore a quello di raccordo della cappa.
• una leggera inclinazione verso il basso (caduta) nei tratti orizzontali per evita-
re che la condensa reuisca nel motore.
• il numero minimo indispensabile di curve.
• la lunghezza minima indispensabile per evitare vibrazioni e di ridurre la capa-
cità aspirante della cappa.
E' necessario isolare la tubazione se passa attraverso ambienti freddi.
Per impedire ritorni d'aria dall'esterno, una valvola di non ritorno è presente in
presenza di motori con 500CFM o superiori.
CAPPA A RICICLO INTERNO FILTRANTE
In questa versione l’aria passa attraverso i ltri al carbone attivo
per essere puricata e riciclata nell’ambiente.
QUANDO LAVARE O CAMBIARE I FILTRI?
I ltri metallici devono essere lavati ogni 30 ore di utilizzo.
I ltri carbone attivo, vanno sostituiti ogni 3-4 mesi a seconda dell’utilizzo della
cappa.
Per ulteriori dettagli vedere cap “MANUTENZIONE”.
PULSANTIERA ELETTRONICA
Motore ON/OFF
All’avvio, la velocità è quella memorizzata al precedente spegnimento.
Incremento velocità
da 1 a 4
Velocità 4 è attiva solo per
alcuni minuti, poi si attiva
velocità 3.
Riduzione velocità
da 4 a 1
Accensione / spegnimento luce
Le velocità sono segnalate dai led
presenti nei tasti:
Velocità 1
Velocità 2
Velocità 3
Velocità 4
(led "+" lampeggiante)
TIMER (Led rosso lampeggiante)
Autospegnimento dopo 15min.
La funzione si disattiva (Led rosso spento) se:
- Si preme un'altra volta il tasto TIMER ( ).
- Si preme il tasto ON/OFF ( ).
ALLARME FILTRI (Led rosso sso con (
Manutenzione ltri antigrasso dopo circa 30 ore di utilizzo.
Premere (
) per 3 secondi per azzerare il contatore.
) o)
Controllare che i ltri al carbone attivo siano montati sulla cappa, in caso negativo applicarli come indicato nelle istruzioni
di montaggio.
In questa versione valvola di non ritorno non deve essere montata: rimuoverla se presente sul raccordo di uscita aria del motore.
ISTRUZIONI DI MONTAGGIO
parte riservata solo a personale qualicato
La cappa ha la possibilità di essere installata in varie congurazioni.
Le fasi di montaggio generiche valgono per tutte le installazioni;
seguire invece dove specicato le fasi corrispondenti all’installa-
zione desiderata.
FUNZIONAMENTO
QUANDO ACCENDERE LA CAPPA?
Accendere la cappa almeno un minuto prima di iniziare a cucinare per convogliare fumi e vapori verso la supercie di aspirazione.
Al termine della cottura lasciare in funzione la cappa no a completa aspirazione
di tutti i vapori e odori: con la funzione Timer, è possibile impostare l'autospegnimento della cappa dopo 15 minuti di funzionamento.
QUALE VELOCITÀ SCEGLIERE?
I velocità: mantiene l’aria pulita con bassi consumi di energia elettrica.
II velocità: condizioni normali di utilizzo.
III velocità: presenza di forti odori e vapori.
IV velocità: rapidi smaltimenti di odori e vapori.
Se la pulsantiera è completamente inattiva, prima di contattare il
servizio di Assistenza tecnica, togliere temporaneamente (circa
5”) l'alimentazione elettrica all'elettrodomestico, possibilmente
agendo sull'interruttore generale, per ripristinare il normale funzionamento.
Se questo accorgimento non risultasse ecace, contattare il servizio di
Assistenza tecnica.
MANUTENZIONE
Prima di procedere a qualsiasi operazione di pulizia o di manu-
tenzione, disinserire l’apparecchio togliendo la spina o agendo
sull’interruttore generale.
Non si devono utilizzare detergenti contenenti sostanze abrasive, acide o
corrosive e panni con superci ruvide.
Una costante manutenzione garantisce un buon funzionamento e rendimento
nel tempo.
Particolari attenzioni vanno rivolte ai ltri metallici antigrasso: la pulizia frequente dei ltri e dei loro supporti garantisce che non si accumulino grassi inammabili.
PULIZIA SUPERFICI ESTERNE
Si raccomanda di pulire le superci esterne della cappa almeno ogni 15 giorni
per evitare che le sostanze oleose o grasse possano intaccarle. Per la pulizia della
cappa, realizzata in acciaio inox spazzolato, il Costruttore consiglia l'utilizzo delle
salviette "Magic Steel" che si possono anche ordinare on-line sul sito www.e-falmec.com.
In alternativa e per tutti gli altri tipi di superci, la pulizia va eseguita usando
un panno umido leggermente imbevuto di detersivo neutro liquido o con alcool
denaturato.
Terminare la pulizia con un accurato risciacquo e asciugatura con panni morbidi.
22
Page 23

Non utilizzare troppa acqua in prossimità della pulsantiera e dei
dispositivi di illuminazione per evitare che l'umidità raggiunga
parti elettroniche.
La pulizia dei pannelli in vetro va eseguita solo con detergenti specici non corrosivi o abrasivi utilizzando un panno morbido.
Il Costruttore declina ogni responsabilità qualora non vengano rispettate tali
istruzioni.
PULIZIA SUPERFICI INTERNE
E’ vietata la pulizia di parti elettriche o parti relative al motore
all’interno della cappa, con liquidi o solventi.
Per le parti metalliche interne vedi paragrafo precedente.
INFORMAZIONI SULLO SMALTIMENTO IN NAZIONI DELL'UNIONE EURO
PEA
La Direttiva comunitaria sulle apparecchiature RAEE è stata recepita in modo
diverso da ciascuna nazione, pertanto se si desidera smaltire questa apparecchiatura suggeriamo di contattare le autorità locali o il Rivenditore per chiedere
il metodo corretto di smaltimento.
INFORMAZIONI SULLO SMALTIMENTO IN NAZIONI NON APPARTENENTI
ALL'UNIONE EUROPEA
Il simbolo del cestino barrato è valido solamente nell’Unione Europea: se si desidera smaltire questa apparecchiatura in altri Paesi suggeriamo di contattare le
autorità locali o il Rivenditore per chiedere il metodo corretto di smaltimento.
ATTENZIONE!
ITALIANO
FILTRI METALLICI ANTIGRASSO
Si consiglia di lavare frequentemente i ltri metallici (almeno ogni mese) lasciandoli in ammollo per circa 1 ora in acqua bollente con detersivo per piatti,
evitando di piegarli.
Non usare detergenti corrosivi, acidi o alcalini.
Risciacquarli con cura ed attendere che siano ben asciutti prima di rimontarli.
Il lavaggio in lavastoviglie è permesso, ma potrebbe creare imbrunimenti al materiale dei ltri: per ridurre questo inconveniente utilizzare lavaggi a basse temperature (131°F / 55°C max.).
Per l’estrazione e l'inserimento dei ltri metallici antigrasso vedi istruzioni di
montaggio.
FILTRI AL CARBONE ATTIVO
Questi ltri trattengono gli odori presenti nell’aria che li attraversa. L’aria depurata viene così rimessa nell’ambiente.
I ltri al carbone attivo devono essere sostituiti mediamente ogni 3-4 mesi in
condizioni di utilizzo normale.
Per la sostituzione dei ltri al carbone attivo vedi istruzioni di montaggio.
ILLUMINAZIONE
La cappa è dotata di illuminazione a led ad alta ecienza, basso consumo e
durata molto elevata in condizioni di normale utilizzo.
In caso di rottura contattare il Rivenditore o un Centro Assistenza Tecnica autorizzato per la riparazione.
SMALTIMENTO A FINE VITA
Il Costruttore si riserva il diritto di apportare modiche alle apparecchiature in
qualsiasi momento e senza preavviso. La stampa, la traduzione e la riproduzione
anche parziale del presente manuale s’intendono vincolate dall’autorizzazione
del Costruttore.
Le informazioni tecniche, le rappresentazioni grache e le speciche presenti in
questo manuale sono indicative e non divulgabili.
La lingua di stesura del manuale è l’italiano, il Costruttore non si rende responsabile per eventuali errori di trascrizione o traduzione.
Il simbolo del cestino barrato riportato sull’apparecchiatura in suo possesso indica che il prodotto è un RAEE, cioè un “Riuto derivante dal-
essere gettato nella spazzatura indierenziata (cioè insieme ai “riuti urbani
misti”), ma deve essere gestito separatamente così da essere sottoposto ad apposite operazioni per il suo riutilizzo, oppure a uno specico trattamento, per rimuovere e smaltire in modo sicuro le eventuali sostanze dannose per l’ambiente
ed estrarre le materie prime che possono essere riciclate. Lo smaltimento corretto di questo prodotto contribuirà a salvare preziose risorse ed evitare potenziali
eetti negativi per la salute umana e per l’ambiente, che potrebbero essere causati da uno smaltimento inappropriato dei riuti.
Vi preghiamo di contattare le autorità locali per ulteriori dettagli sul punto di
smaltimento designato più vicino. Potrebbero venire applicate delle penali per
lo smaltimento scorretto di questi riuti in conformità alla legislazione nazionale.
INFORMAZIONI SULLO SMALTIMENTO IN ITALIA
In Italia le apparecchiature RAEE devono perciò essere consegnate:
- ai Centri di Raccolta (chiamati anche isole ecologiche o piattaforme ecologi-
- al negozio presso il quale si acquista una nuova apparecchiatura, che è tenuto
- ad un negozio qualunque*, che è tenuto a ritirarle gratuitamente e senza
In questo caso:
1) l’apparecchiatura RAEE, per poter essere riconsegnata, deve avere “piccolis-
* 2) il negozio al quale viene riconsegnata l’apparecchiatura RAEE deve avere
le Apparecchiature Elettriche ed Elettroniche” e pertanto non deve
che) allestiti dai Comuni o dalle Società di igiene urbana (in molte località viene anche eettuato il servizio di ritiro a domicilio delle apparecchiature RAEE
ingombranti);
a ritirarle gratuitamente (ritiro “uno contro uno”);
obbligo di acquisto (ritiro “uno contro zero”).
sime dimensioni” (altezza, profondità e larghezza minori di 25 cm);
una supercie di vendita superiore a 400 mq.
23
Page 24

Falmec S.p.A
via dell’Artigianato, 42 z.i.
31029 Vittorio Veneto
Treviso — Italy
info@falmec.com
falmec.com
Codice / Code
Matricola / Serial Number
Cod. 110033091 ED. 01/2020
 Loading...