

Page 1
User Manual
Thank you for purchasing a BATRIBIKE Electric Bicycle
from Fallowgate Limited.
With care and correct usage your bicycle
will give many years of service.
Please read the manual fully before use.
Page 2
Thank you for purchasing a BATRIBIKE
Please read
the manual
fully before
use.
Electric Bicycle from Fallowgate Limited.
With care and correct usage your bicycle
will give many years of service.
®
PURCHASE DATE:-
DAY MONTH YEAR
/
/
Service & Spares
Remember to check all nuts and screws before and after the first ride. This will
need to be repeated after a week or so of riding and periodically to maintain safe
use of your BATRIBIKE® bicycle.
Cables may also stretch a little during the first few uses. Brakes and gears may
need to be adjusted after the first few days to ensure correct operation. Refer to
your local cycle shop if you are not familiar with this operation.
Your BATRIBIKE® bicycle uses standard cycle parts wherever possible. Items
such as tyres, tubes, lights, brake pads/blocks and cables may be obtained from
your local cycle shop or retailer.
Specialist parts such as the motor, battery, torque sensor or frame components
are only available from Fallowgate Limited or their authorised distributors.
1 PART ASSEMBLED BICYCLE
1 FRONT WHEEL
1 SADDLE & POST
1 BATTERY CHARGER
1 PAIR PEDALS
1 SMALL BOX CONTAINING
1 BATTERY CHARGER
2 SPANNERS
BOX CONTENTS
Page 3
CAUTION
Your new BATRIBIKE® Buzz needs assembling by a competent
person. If you are in any doubt about assembly you should contact a
local cycle shop for assistance.
Your BATRIBIKE® Buzz is heavy and should not be lifted by one
person.
Assembly Instructions
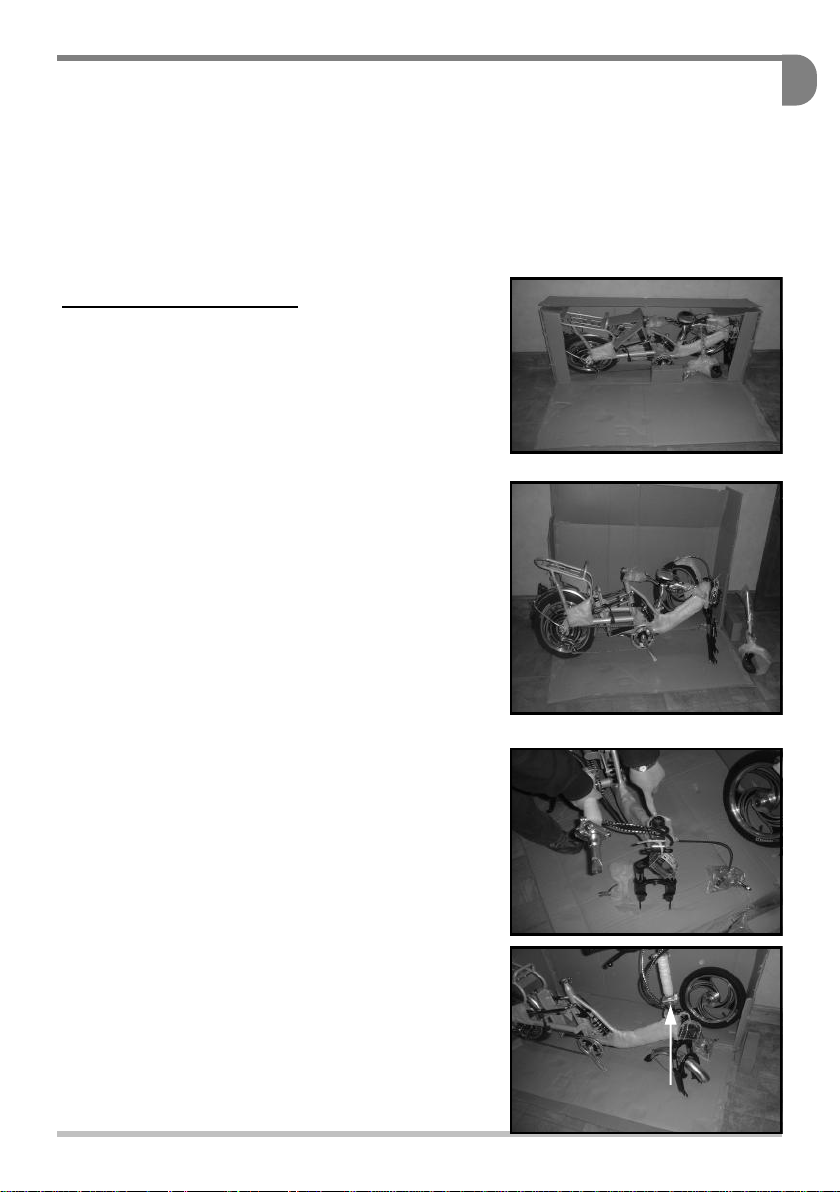
1) Remove straps from the box, open top
& cut down the front sides as indicated.
Fold the front of the box down & use
this to protect the bottom of the front
forks until the wheel is inserted.
2) Unlock & remove battery if fitted,
(battery may come in a separate
parcel). The keys are located on the
front fork tube. Put battery on charge.
( see user instructions on page 6 for
charging procedure)
3) Remove the bicycle from the main
body of the box & stand on the folded
down front of the box, put the side
stand down to prevent the bicycle
falling over. Cut the tie holding the front
wheel & front mudguard, stand the
wheel to one side.
4) Remove the tie straps holding the
handle bar assembly to the frame &
remove packing from the bottom.
Insert handlebars into tube as shown.
Slightly tighten bars into the tube using
the 6mm hex key supplied. The head of
the stud is under the folding
mechanism as shown. Final tightening
& alignment should be carried out after
front wheel is inserted.
3
Page 4
5) Remove packaging from front mudguard & fit loosely to the holding
bracket across the front forks. DO NOT TIGHTEN UNTIL WHEEL
IS IN PLACE.
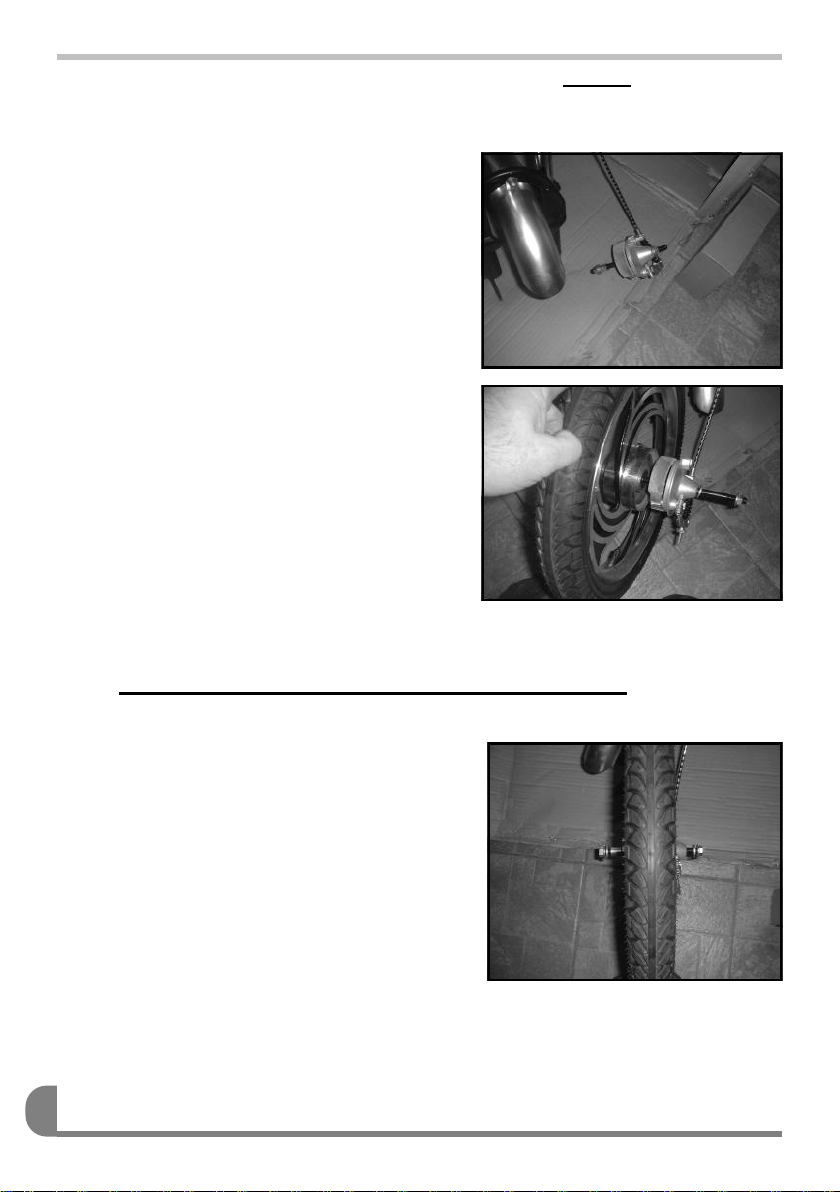
6) Remove packaging from front brake
assembly. Remove the nut, washer
& 2 spacers from the end of the axle
furthest from the brake lever. Insert
the end of the axle into the wheel
centre so that the brake shoes go
into the brake drum, push the axle
through to come out of the other
side.
Place the 2 spacers onto the axle,
then the washer with the tag facing
inwards followed by the nut with the
serrated edge inwards. Leave the
nuts at the outer ends of the axle to
make it easier to locate the wheel in
the front forks.
You will need assistance with lifting for this step
7) Lift up the front forks & place the
axle into the slots on the forks with
the brake assembly on the left hand
side of the bike, making sure the ‘U’
shaped slot on the brake assembly
goes over the locating peg on the left
hand fork leg. The two spacers
should be on the inside of the forks,
there should be a washer on the
outside of the forks on each side with
the tag facing inwards. Put the tag of
each washer into the hole on each fork leg, tighten the two nuts to
leave equal amounts of thread showing on the axle on both sides.
4
Page 5
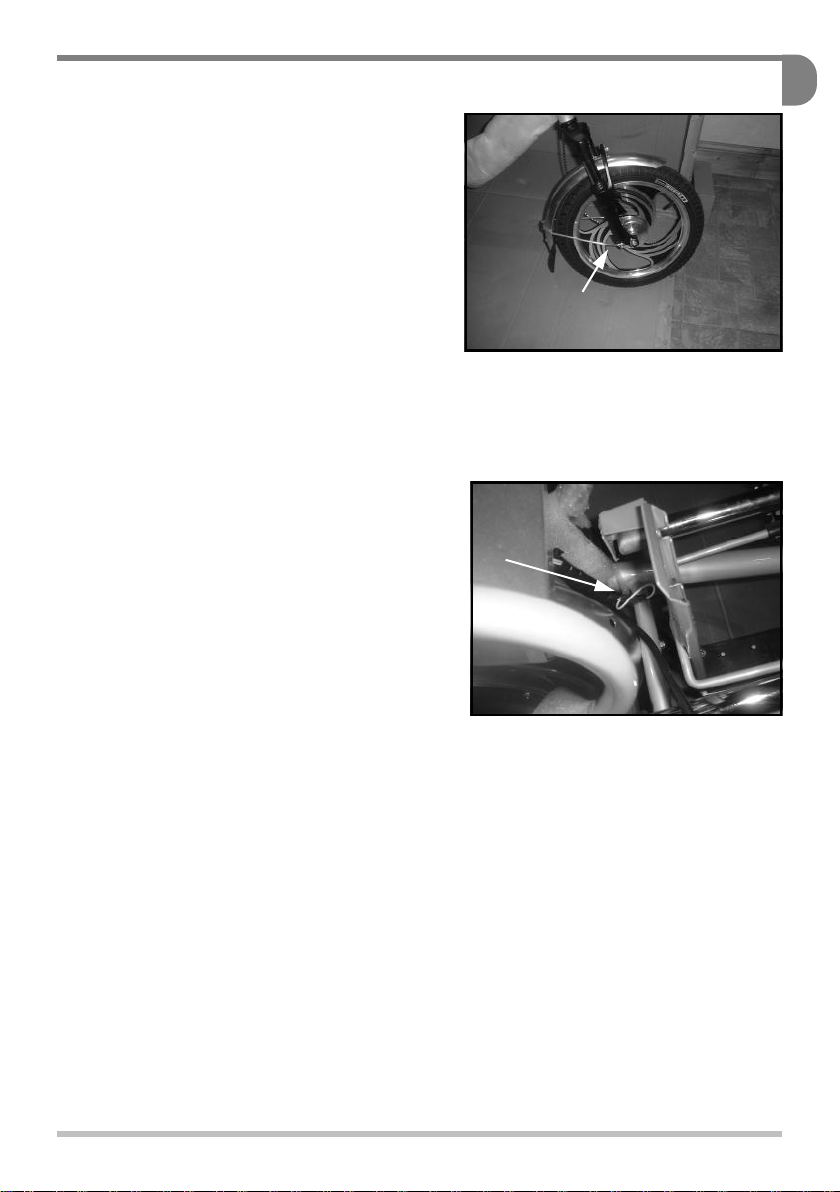
8) Fasten the front mudguard stays to the bottom of the fork legs, just
behind the axle with the screws
provided. Lift the mudguard to its
highest point in the slot on the top
of the fixing bracket & tighten all
three fasteners.
9) Align the handlebars at 90
degrees to the front wheel &
tighten stud left loose in instruction
4.
Remove pedals from packaging &
screw into the correct side crank. The left hand crank has a left
hand thread & the pedal is marked with an ‘L’ stamped in the end.
The left pedal screws anti-clockwise & the right pedal (chain side)
screws in clockwise. Tighten both pedals.
10) SPEED RESTRICTOR WIRE, in
certain countries it is illegal to ride
on throttle alone at more than
20kmh. To de-restrict the speed to
be able to travel up to 15mph on
throttle disconnect the plug &
socket in the white wire located
under the battery lock. Fasten both
ends to the wiring loom to prevent
them catching in moving parts.
11) Remove the rest of the packaging
12) Inflate tyres to correct pressure (located on tyre wall)
13) When charging is complete replace battery & connect battery
cable, lock in position.
14) Insert seat to desired height & lock in position.
NOTE maximum height is marked on seat tube.
15) Congratulations you have built your BATRIBIKE® Buzz. Please
read the user instructions for correct use of controls before you
ride.
5
Page 6
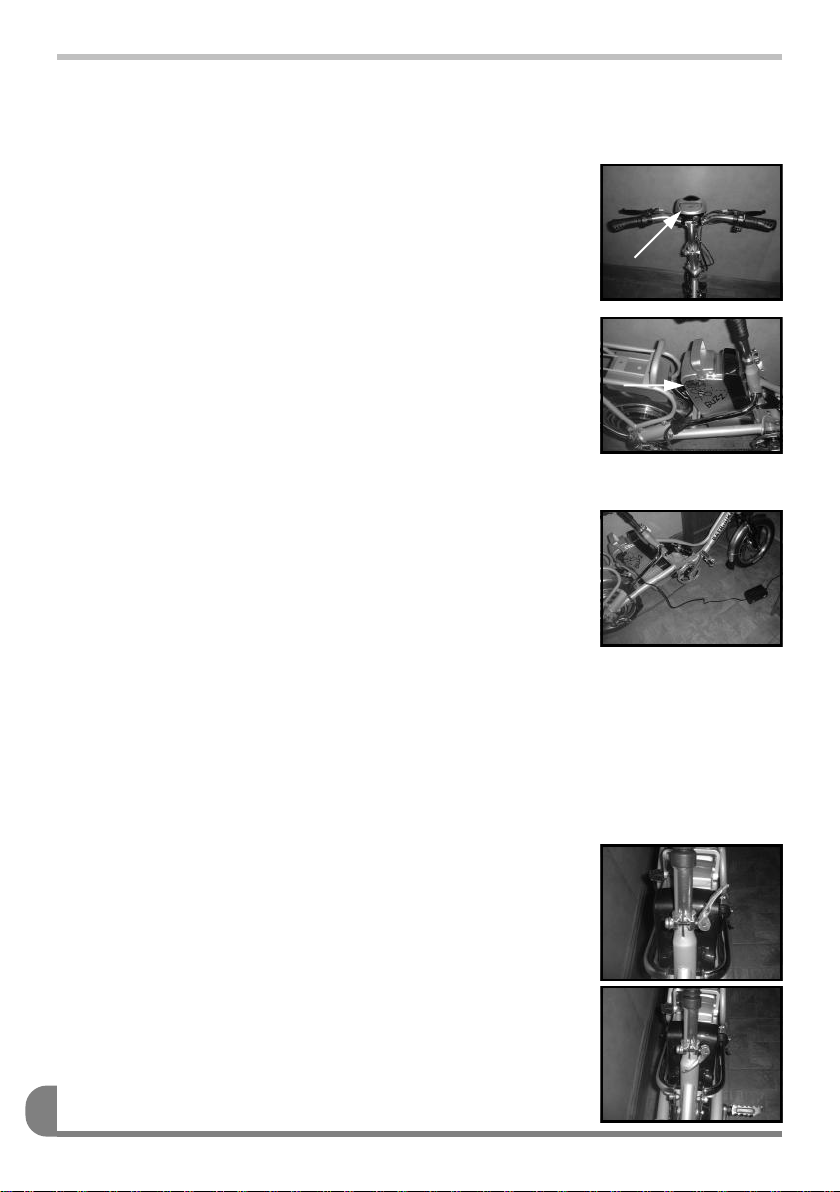
User Instructions
Battery Charging.
The battery can be either charged on or off the bicycle but must be
charged inside in dry conditions to avoid the risk of
electrical shock. Only use the charger supplied with
the bicycle.
1. Ensure the power is turned off at the key switch
2. Pull back the cable retaining clip to allow cable to
be removed.
3. Pull out power plug from battery
4. Insert charger lead into socket on battery casing
5. Insert 3 pin mains plug into mains socket & switch on
6. There are two indicator lights on the charger as
follows POWER -Glows red when mains power
connected & turned on. CHARGE—Glows red
when charging & green when charge is complete.
7. When battery is charged firstly turn off the mains supply, unplug
then remove the charging plug from the battery.
8) Insert bicycle power lead into battery & push retaining clip over plug.
If your BATRIBIKE® Buzz is not in use for an extended period
charge the battery once a month to prevent deterioration
Quick release fittings for seat & handle bar height
adjustment.
With the locking lever in the loose position, tighten the
nut until finger tight, The final tightening is done by
moving the lever to the locked position. To undo move
lever to loose position to enable height adjustment.
Handlebar folding mechanism
To fold down, move locking lever to the loose position
& pivot the lever & bolt forward, the handlebars will
now fold.
6
Page 7
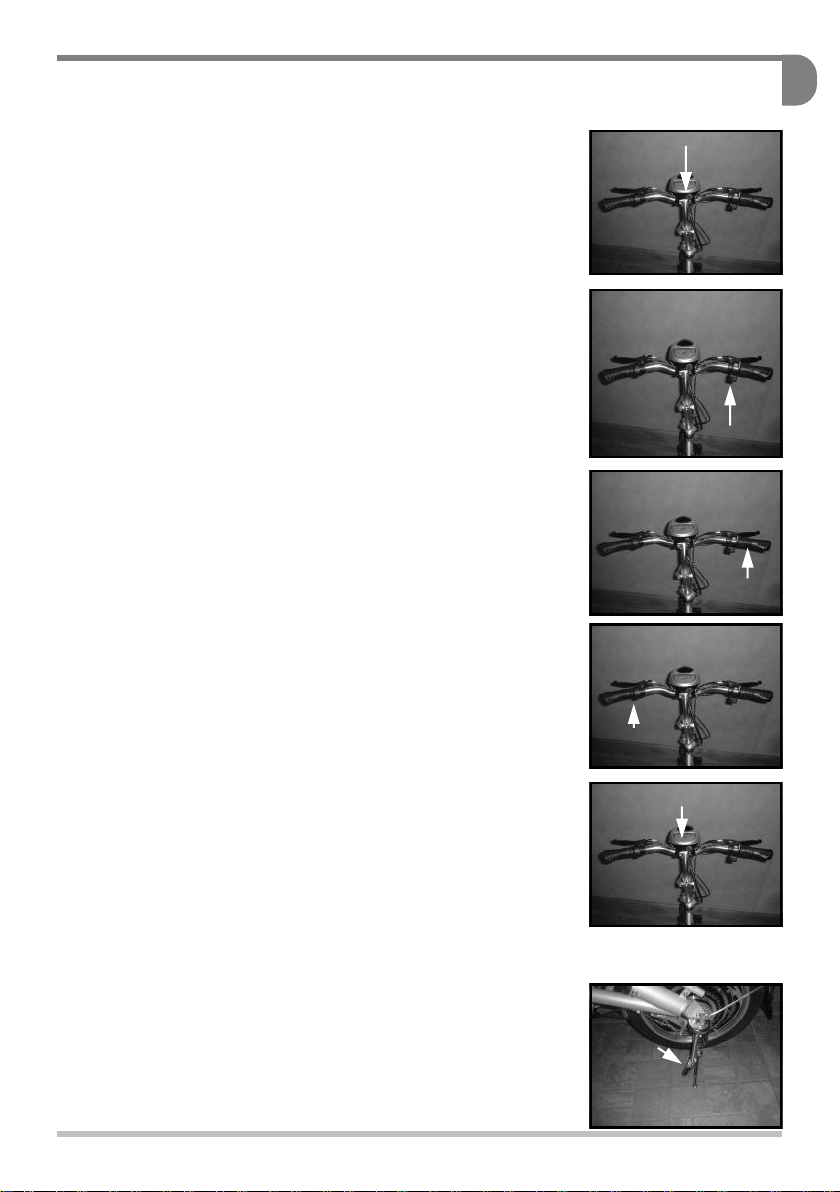
Handlebars MUST be locked back into position correctly
before riding.
Riding
To turn the power on insert the key in the slot on the
back of the headlight & turn 1 click clockwise. The
red power indicator should now illuminate.
When you pedal the motor will automatically cut in to
assist.
To use the throttle turn the activate / deactivate
switch on (I position) Now when you turn the throttle
the bicycle will move forward under electrical power,
the further you twist the throttle the more power will
be applied & the faster you will travel.
Using on full throttle will
reduce the range achieved.
Horn
To operate the horn press the red button on the left
handlebar
Front Light
To turn the light on turn the key to the second click,
the light & indicator light will illuminate. Always turn
the power off when not in use.
Braking
To stop release the throttle & pull the brake levers.
Side Stand
To put the bicycle on its stand
1) While holding the bicycle upright, push the
stand to its full extent.
2) Push spring loaded locking lever into place
3) Lean bicycle over onto stand
Make sure bicycle is on solid ground.
7
Page 8
Warranty
Please retain your receipt as this is your proof of purchase and entitlement to
Warranty.
Your new BATRIBIKE® Buzz is guaranteed for 1 year from
date of purchase.
The battery is covered for 6 months as battery life is determined
by User care
In the event of warranty repairs becoming necessary you should return your
bicycle to Batribike at the address below, delivery & collection charges are not
redeemable under warranty.
Brake blocks/pads, tyres, lights and cables etc. are considered as
consumables and replacements are available from BATRIBIKE or may be
obtained from your local cycle shop.
BATRIBIKE
®
Electric Bicycles are exclusive to:-
Fallowgate Limited
Kellaway House
Marton Road
Sturton-by-Stow
Lincoln
LN1 2AH
Phone: 01427-787774
E-mail: [email protected]
————————— USER MANUAL — BATRIBIKE Buzz — ISSUE 2 — ©2009 Fallowgate Limited —————————
 Loading...