

Page 1
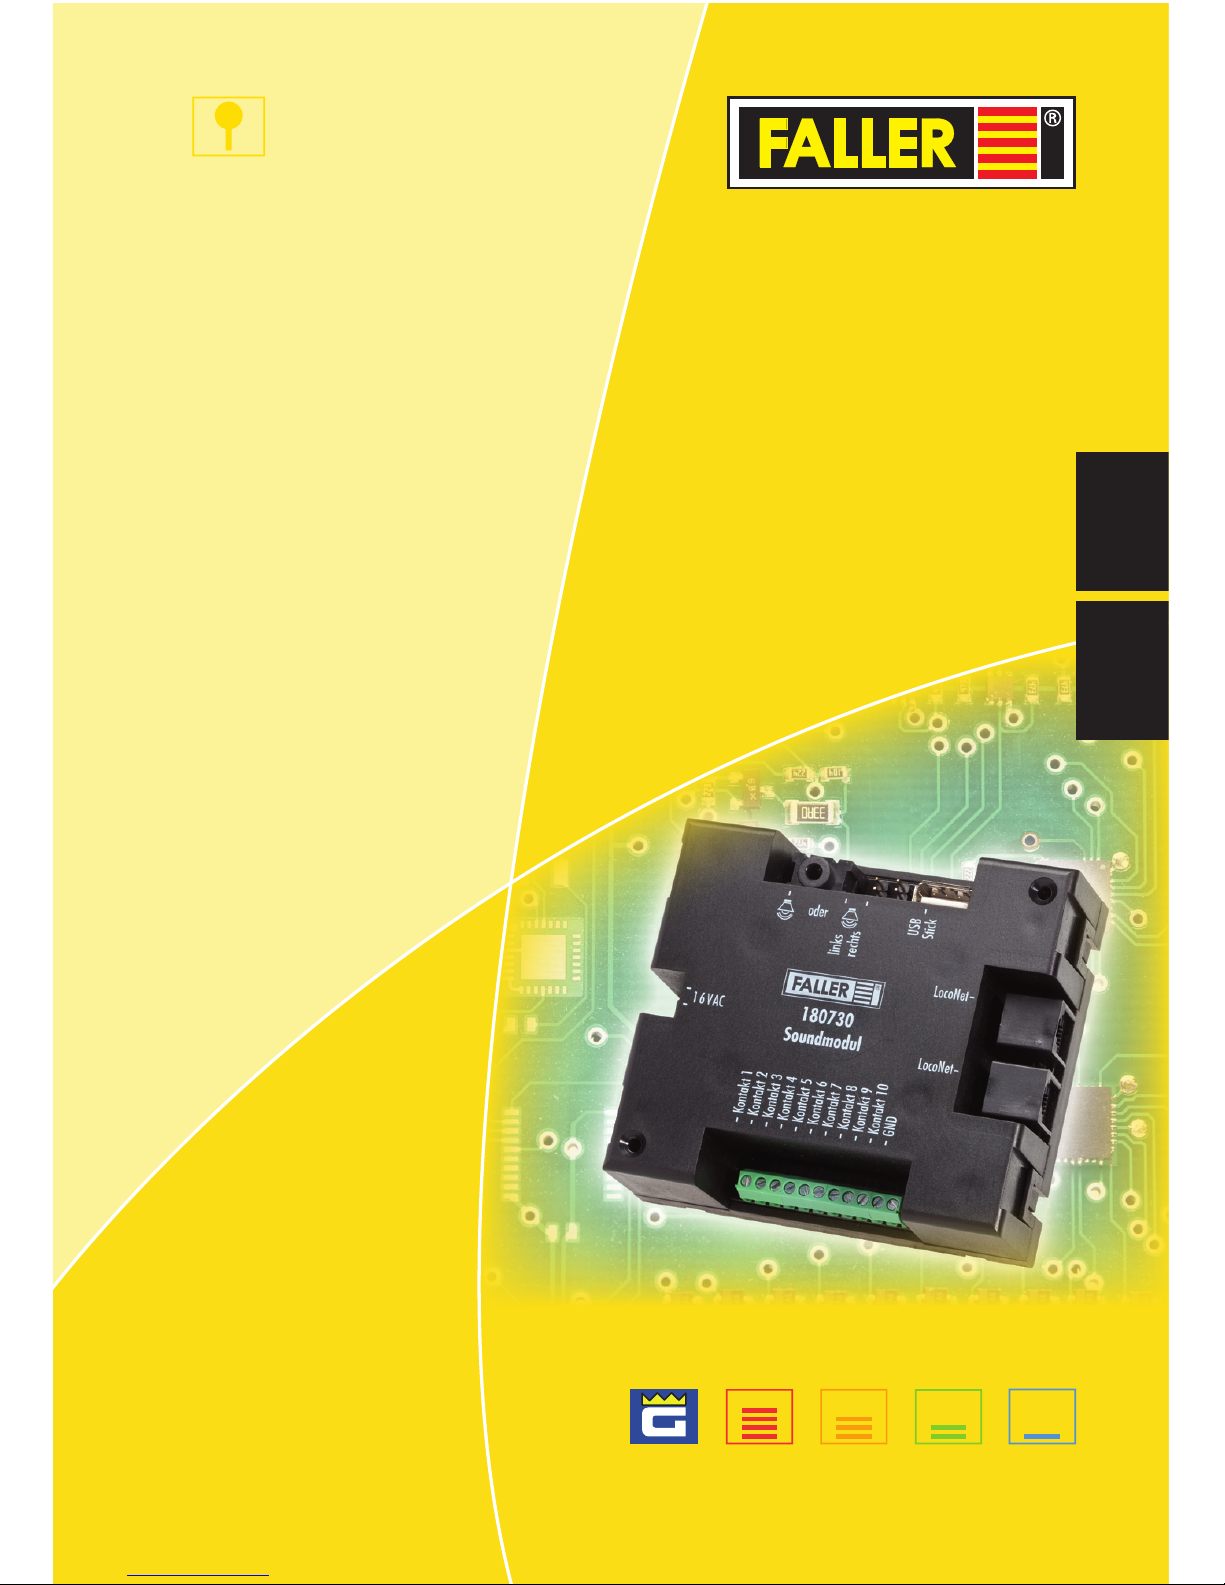
180730
Soundmodul
Bedienungsanleitung
Instruction Manual
DE
EN
H0
POLA G
TT
N
180730
Sound module
ANLAGENBAU
Page 2

2
ANLAGENBAU
DE
Inhalt
1. Willkommen in der Welt von FALLER ............................................... 3
2. Sicherheit und Verantwortung .......................................................... 4
Bestimmungsgemäßer Gebrauch ...................................................... 4
Zu Ihrer Sicherheit ............................................................................ 4
Umweltgerecht entsorgen ................................................................ 5
3. Produktübersicht .............................................................................. 6
Lieferumfang ................................................................................... 6
Bedienelemente ............................................................................... 6
4. Soundmodul anschließen ................................................................. 8
Lautsprecher anschließen ................................................................. 9
Kontakte anschließen ..................................................................... 10
LocoNet anschließen ...................................................................... 10
In Betrieb nehmen.......................................................................... 11
5. SoundDirector ................................................................................ 12
Ereignisse ...................................................................................... 12
SoundDirector installieren .............................................................. 14
SoundDirector starten ................................................................... 14
Bedienoberfläche ........................................................................... 16
Sound-Dateien einem Ereignis zuweisen ........................................ 18
Einstellungen SoundDirector .......................................................... 26
Werkseinstellungen ........................................................................ 28
6. Was tun wenn? .............................................................................. 31
7. Wissenswertes ............................................................................... 32
LISSY ............................................................................................ 32
LocoNet ......................................................................................... 33
8. Technische Daten ........................................................................... 34
Elektrische Werte ........................................................................... 34
Symbole ......................................................................................... 34
Zeichen .......................................................................................... 35
Page 3
3
Willkommen in der Welt von FALLER
ANLAGENBAU
DE
1. Willkommen in der Welt von FALLER
Herzlichen Glückwunsch – Sie sind fündig geworden!
Mit dem FALLER Soundmodul haben Sie das leistungsfähigste und vielseitigste Soundmodul erworben, das es je von FALLER gab.
Das Soundmodul verfügt über zahlreiche Möglichkeiten, Ihre Modellanlage
oder ein Diorama zu emotionalisieren. Vom Hundegebell über eine Fahrzeughupe bis hin zu komplexen Glockenspielen ist alles möglich.
Durch die auf dem USB-Stick integrierte Software (SoundDirector) können
Sie einfach und schnell Sound-Dateien im mp3-Format einem Ereignis auf
Ihrer Modellanlage zuweisen.
Das Soundmodul bietet Ihnen außerdem die Möglichkeit, sich mit einer Digitalzentrale via LocoNet zu verbinden und zu synchronisieren.
Viele kreative Ideen und viel Freude mit Ihrem Produkt wünscht Ihnen Ihre
Gebr. FALLER GmbH!
Page 4
4
Sicherheit und Verantwortung
ANLAGENBAU
DE
2. Sicherheit und Verantwortung
Bestimmungsgemäßer Gebrauch
Das Soundmodul ist ausschließlich zur Wiedergabe von Sound-Dateien auf
einer Modellanlage bestimmt. Sie können die Funktionen des Soundmoduls
individuell an Ihre Anforderungen anpassen.
Für Schäden oder Mängel, die durch Nichtbeachten der Bedienungs anleitung
entstehen, entfällt die Gewährleistung.
Zu Ihrer Sicherheit
X
Lesen Sie die Bedienungsanleitung sorgfältig vor Gebrauch.
X
Beachten Sie die Sicherheitshinweise und Warnungen in der Bedienungsanleitung und am Produkt.
X
Informieren Sie ggf. Kinder über den Inhalt der Bedienungsanleitung
und über Gefahren bei der Verwendung des Produkts.
X
Betreiben Sie das Produkt nur in einwandfreiem Zustand.
X
Halten Sie die Bedienungsanleitung beim Produkt verfügbar.
X
Geben Sie das Produkt nur zusammen mit dieser Bedienungsanleitung
an Dritte weiter.
Page 5

5
Sicherheit und Verantwortung
ANLAGENBAU
DE
Explosionsgefahr
Betrieb des Produkts in explosionsgefährdeter Umgebung kann Explosionen
auslösen und zu schweren Verletzungen und Sachschäden führen.
X
Nicht in explosionsgefährdeter Umgebung betreiben!
Brandgefahr
Betrieb des Produkts bei nicht ordnungsgemäßem Anschluss oder gebrückten Anschlüssen kann zu Brand oder Rauchentwicklung führen.
X
Nicht unbeaufsichtigt betreiben!
X
Produkt bei Rauchentwicklung sofort von der Spannungsversorgung
trennen!
Korrosionsgefahr
Betrieb des Produkts in feuchten Räumen und Kontakt mit Wasser kann zu
Sachschäden führen.
X
Nur in trockenen Räumen betreiben!
X
Kontakt mit Wasser vermeiden!
Gefahr von Personen- und Sachschaden
Unsachgemäßer Betrieb des Produkts kann zu Verletzungen und Sachschäden führen.
X
Soundmodul nicht öffnen!
X
Wenn das Produkt nicht oder nicht mehr richtig funktioniert: Wenden
Sie sich an den FALLER-Kundendienst!
Umweltgerecht entsorgen
X
Beachten Sie die örtlichen Bestimmungen zur Abfallbeseitigung.
Page 6
6
Produktübersicht
ANLAGENBAU
DE
3. Produktübersicht
Lieferumfang
Soundmodul, Art.Nr. 180730
2 Lautsprecher
USB-Stick (inkl. vorinstallierter Software)
Bedienungsanleitung
Bedienelemente
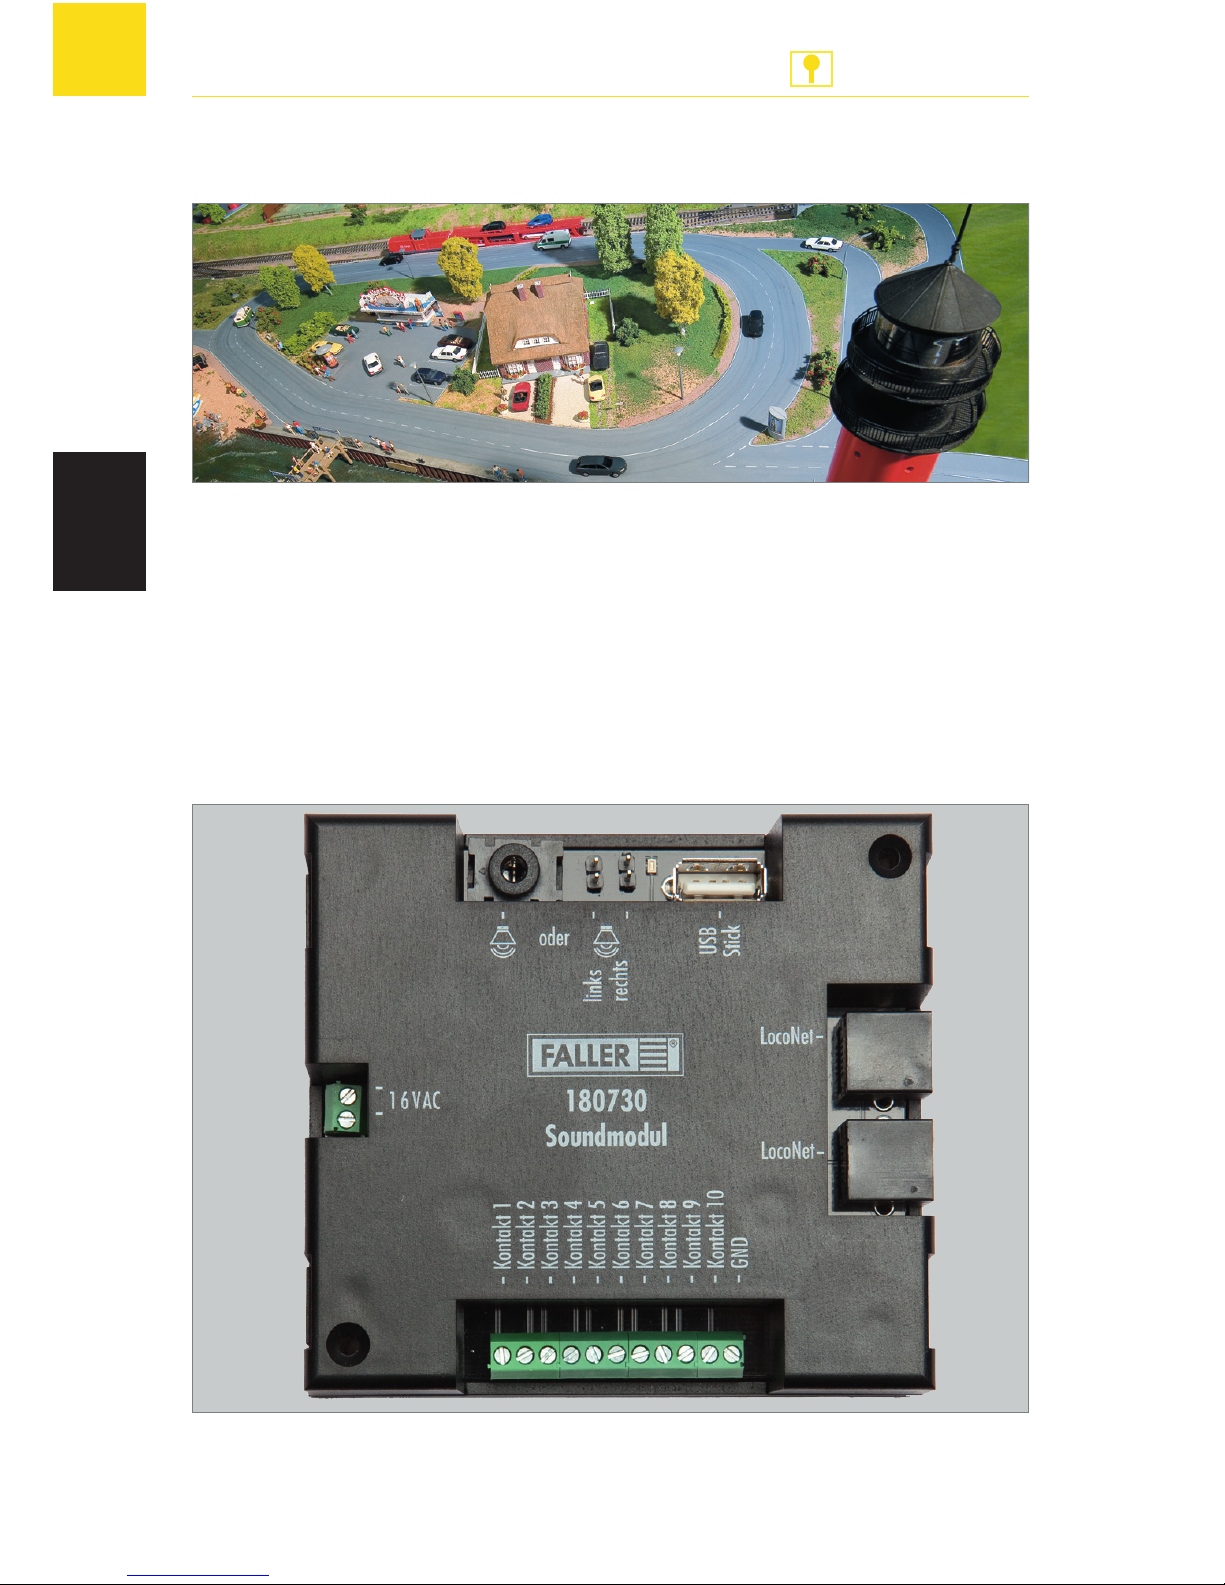
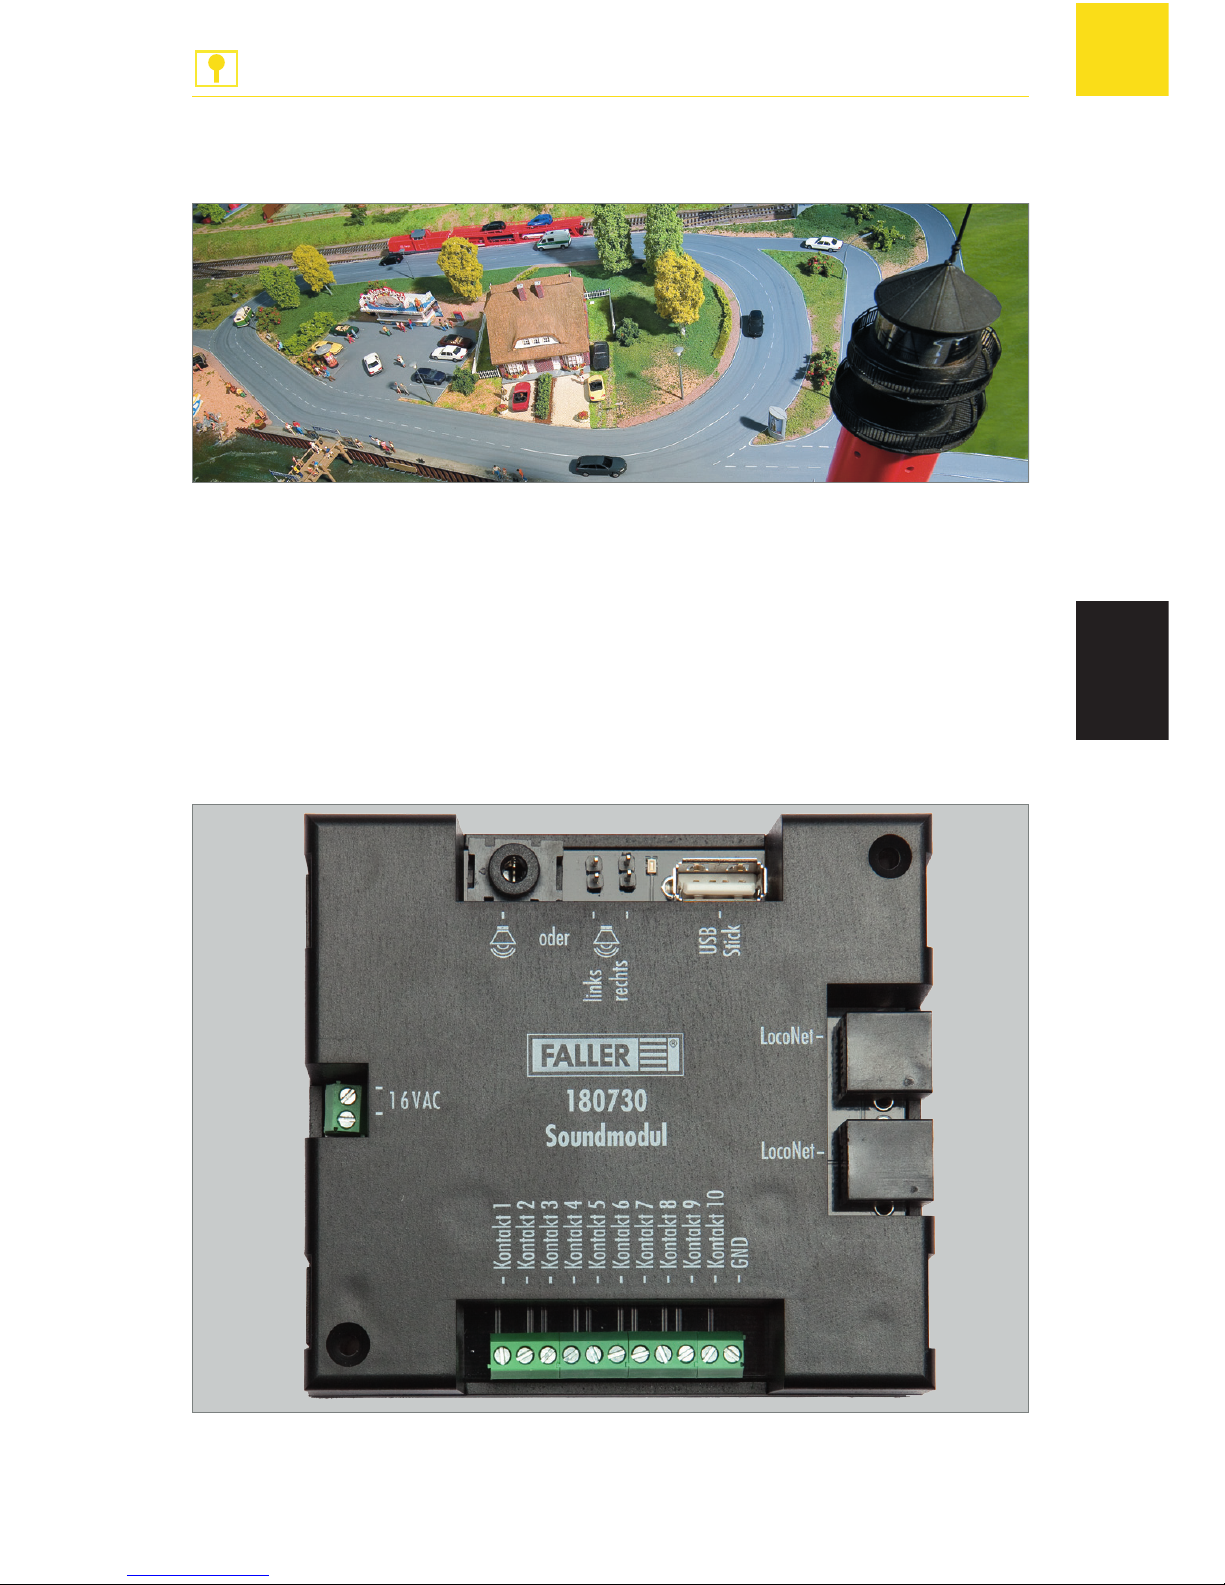
Abb. 1: Soundmodul, Art.Nr. 180730
Page 7
7
Produktübersicht
ANLAGENBAU
DE
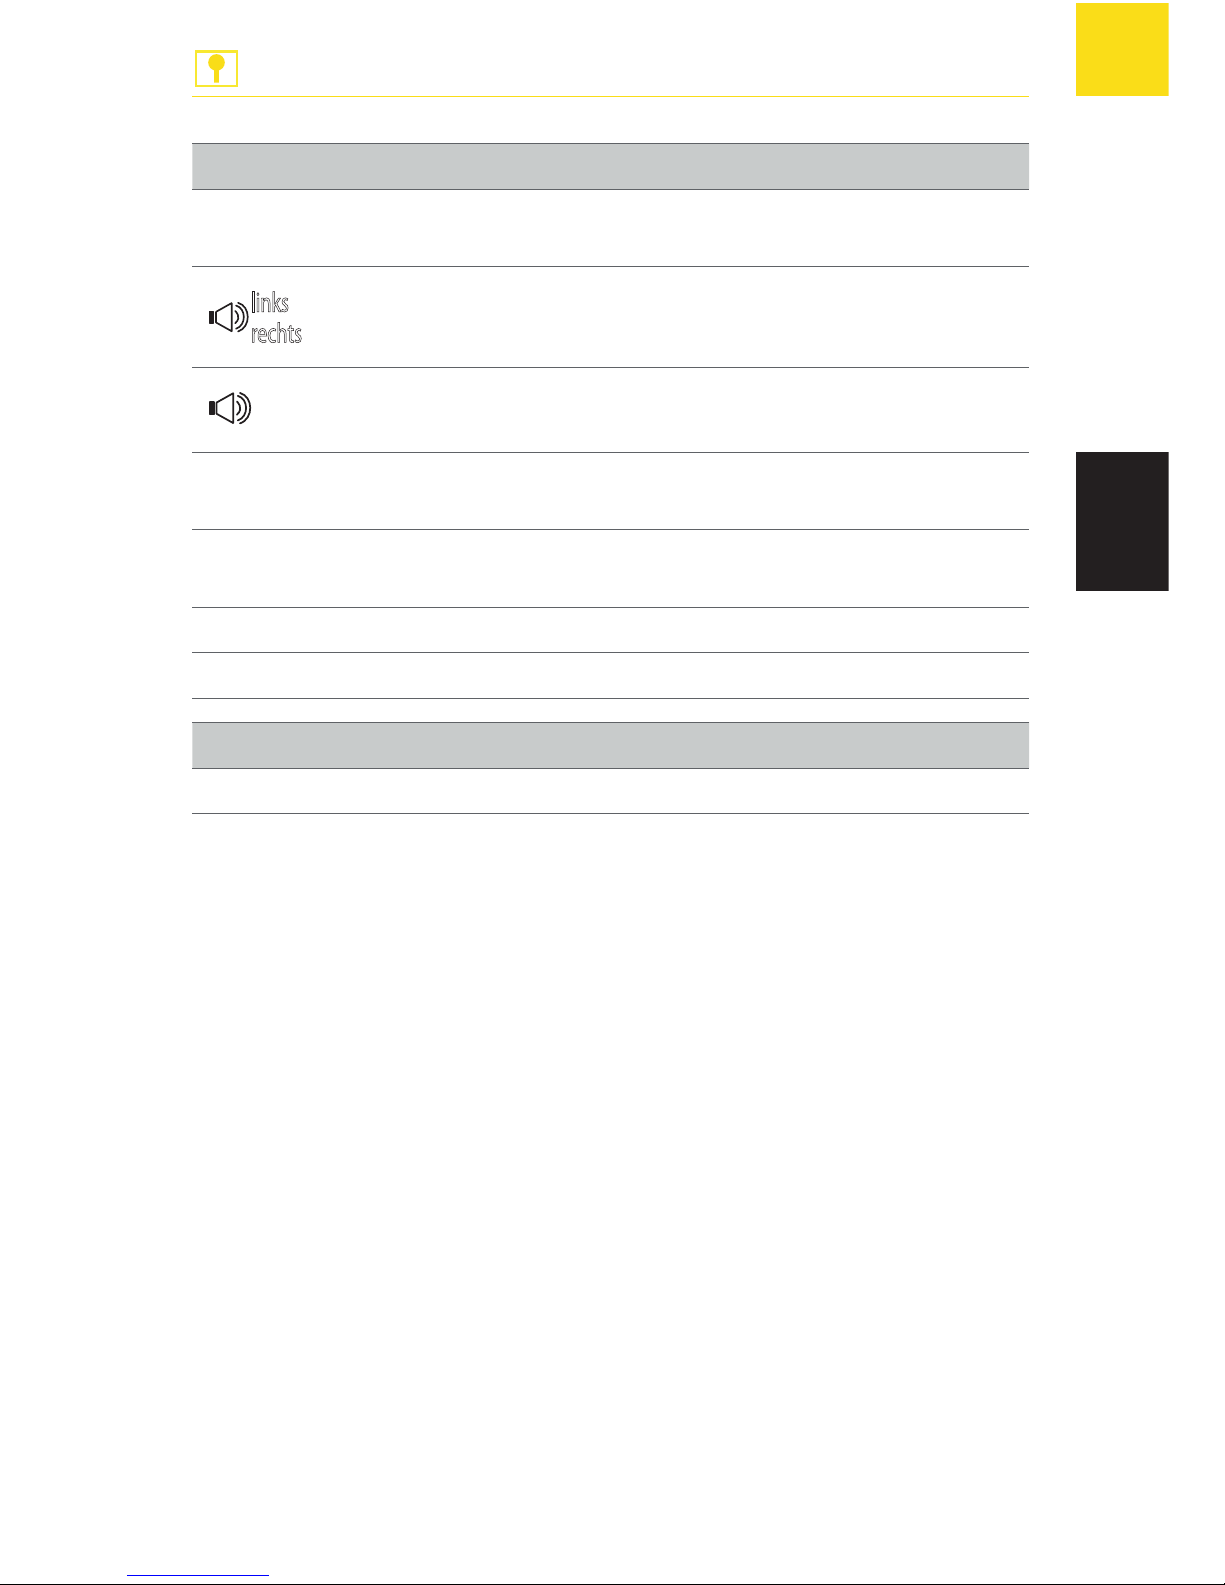
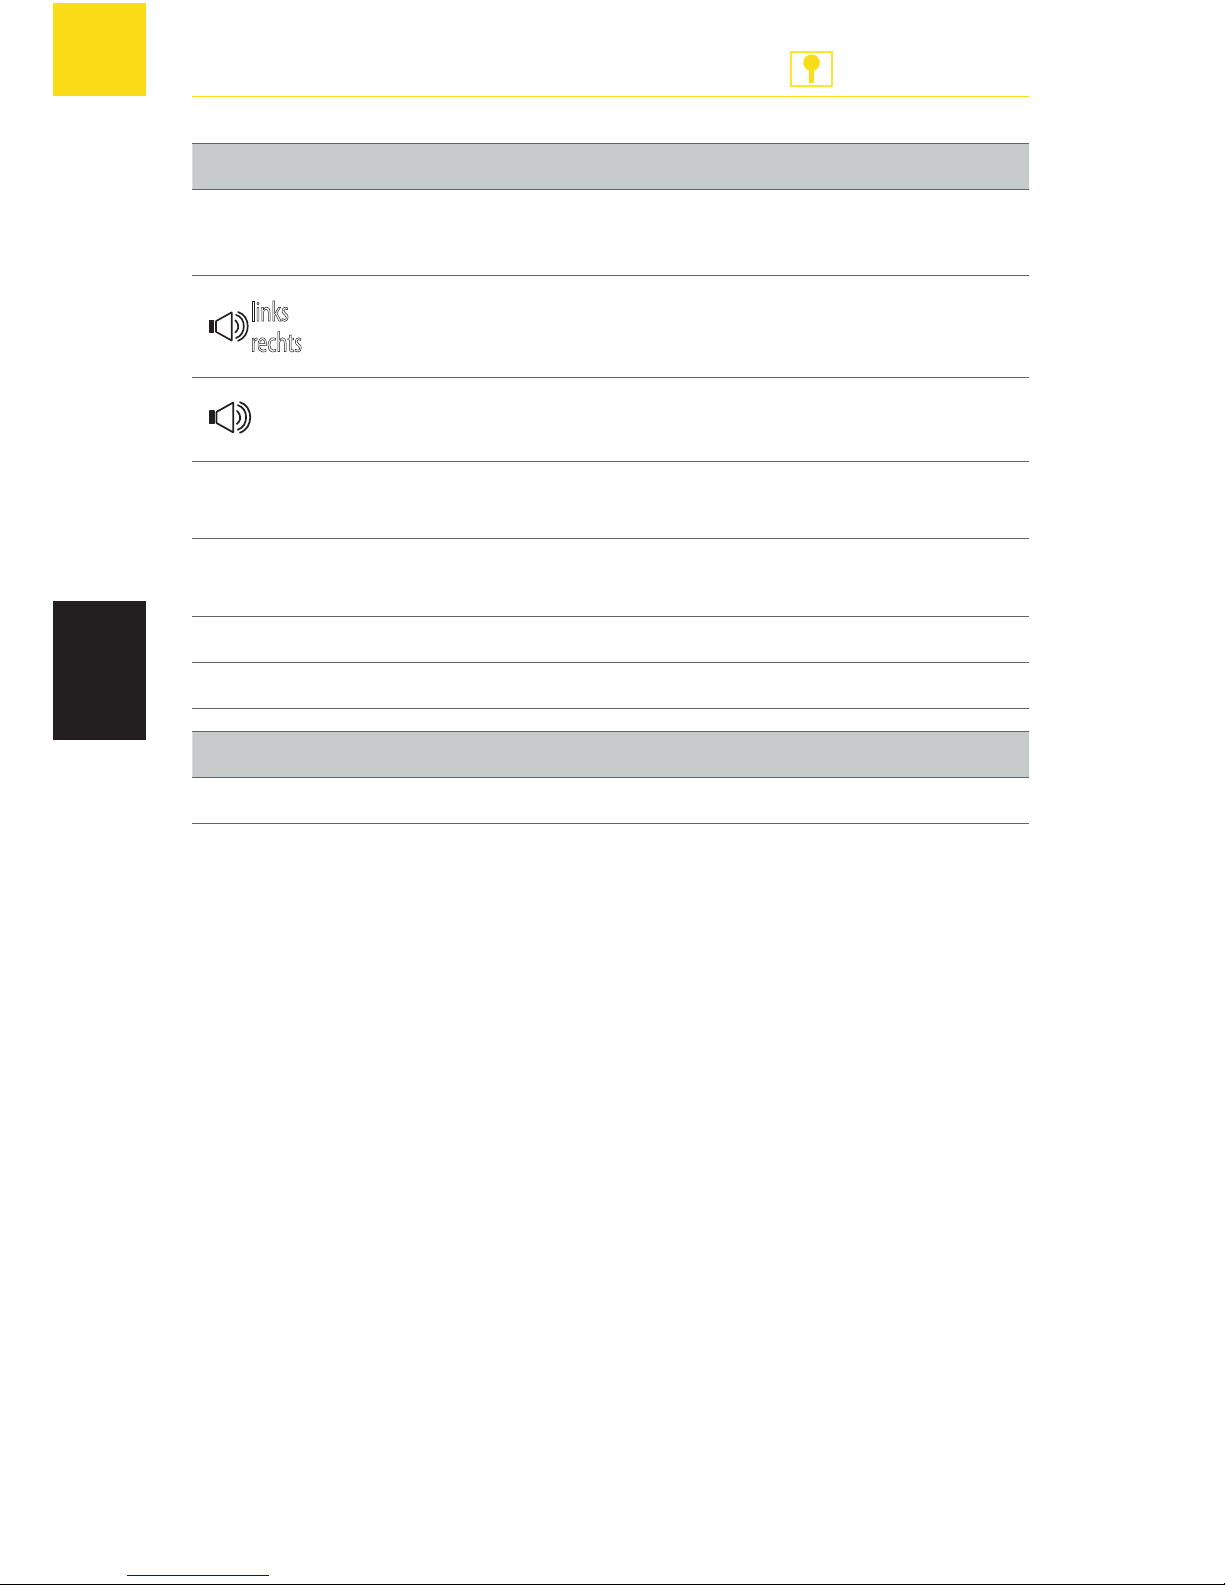
Anschluss Beschreibung
16 VAC Anschluss für die Spannungsversorgung
(16 V Wechselspannung)
links
rechts
Linker und rechter Lautsprecheranschluss
Anschluss für ein Aktiv-Lautsprechersystem
USB
Stick
Anschluss des USB-Sticks
LocoNet Anschluss einer LocoNet-Verbindung, siehe Kapitel 7.
Wissenswertes »LocoNet«, Seite 33
Kontakt 1-10 Anschluss von Tastern
GND (Masse) Anschluss von Tastern
LED Beschreibung
[LED] Kontroll-LED (blinkt bei korrektem Anschluss)
Tab. 1: Bedienelemente
Page 8
8
Soundmodul anschließen
ANLAGENBAU
DE
4. Soundmodul anschließen
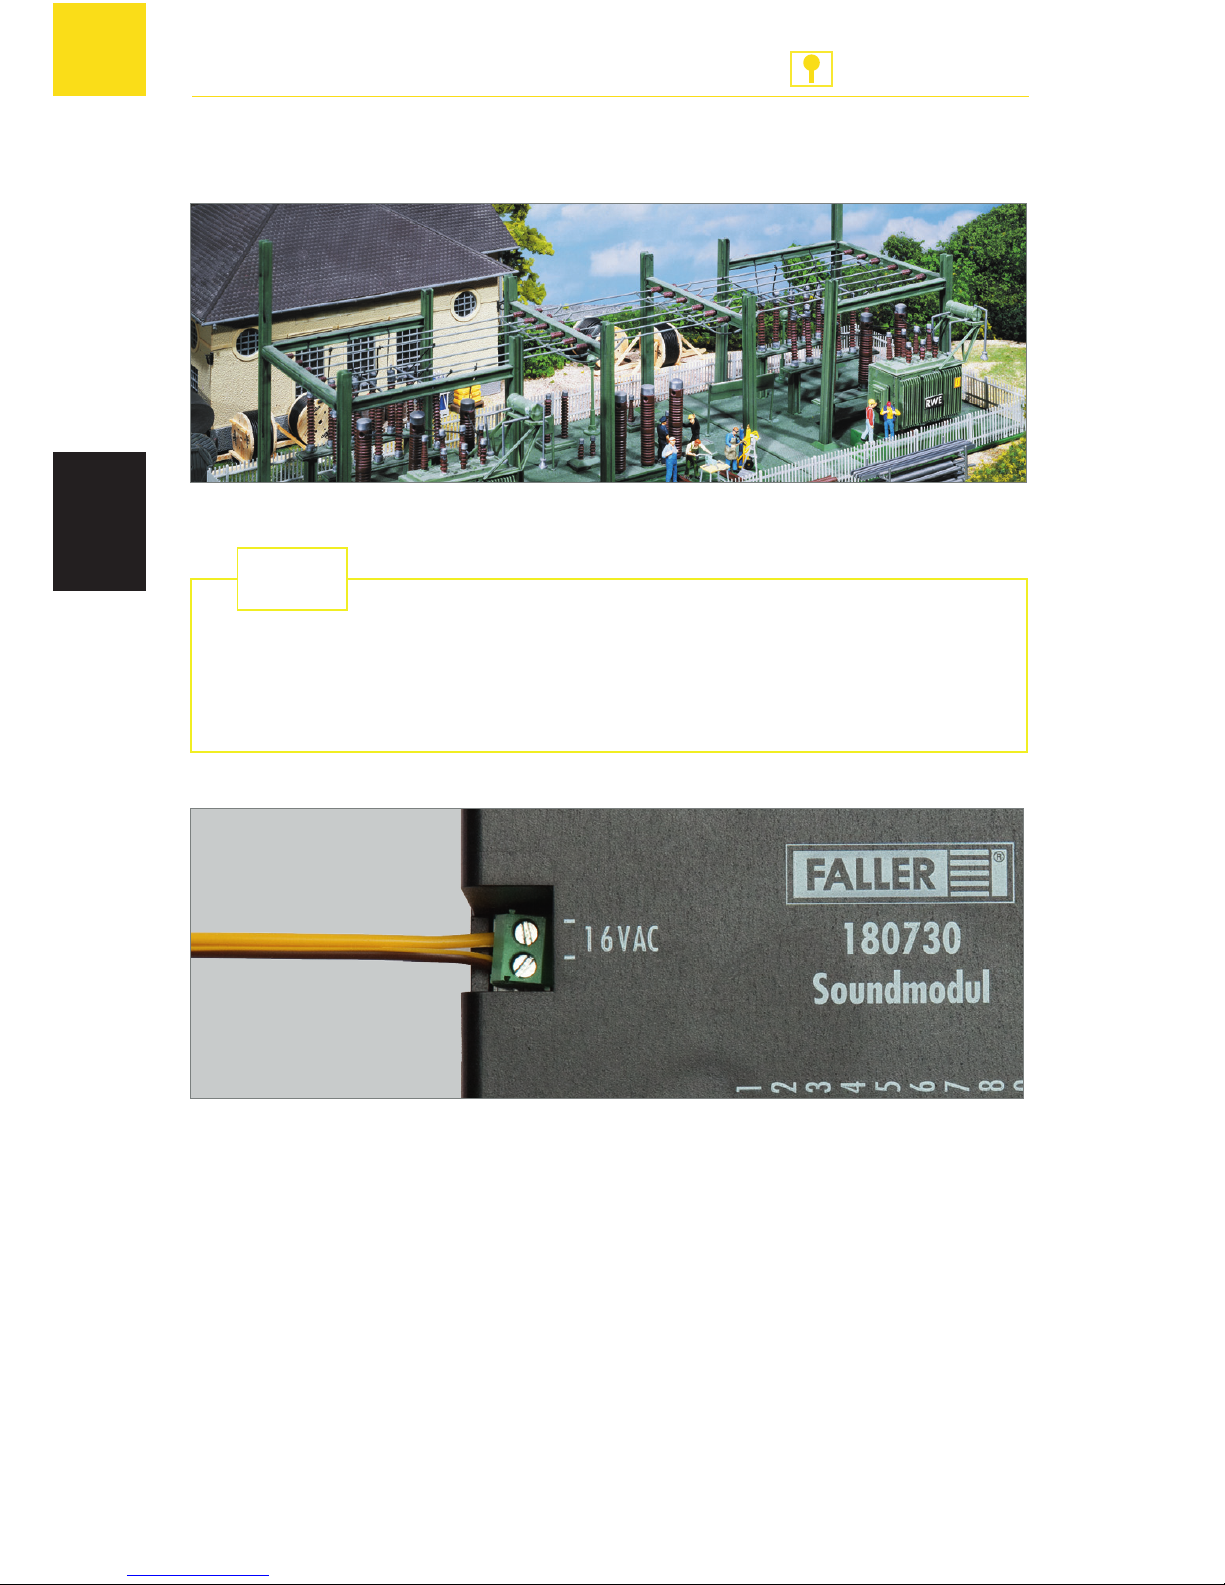
Das Soundmodul wird mit 16 V Wechselspannung betrieben.
Die notwendige Wechselspannung können Sie zum Beispiel mit dem
FALLER-Transformator 50 VA 50-60Hz, Art.Nr. 180641, erzeugen.
TIPP
Abb. 2: Soundmodul anschließen
X
Schließen Sie das Soundmodul an 16 V Wechselspannung an, siehe
Abb. 2.
Das Soundmodul ist an die Stromversorgung angeschlossen.
Page 9
9
Soundmodul anschließen
ANLAGENBAU
DE
Lautsprecher anschließen
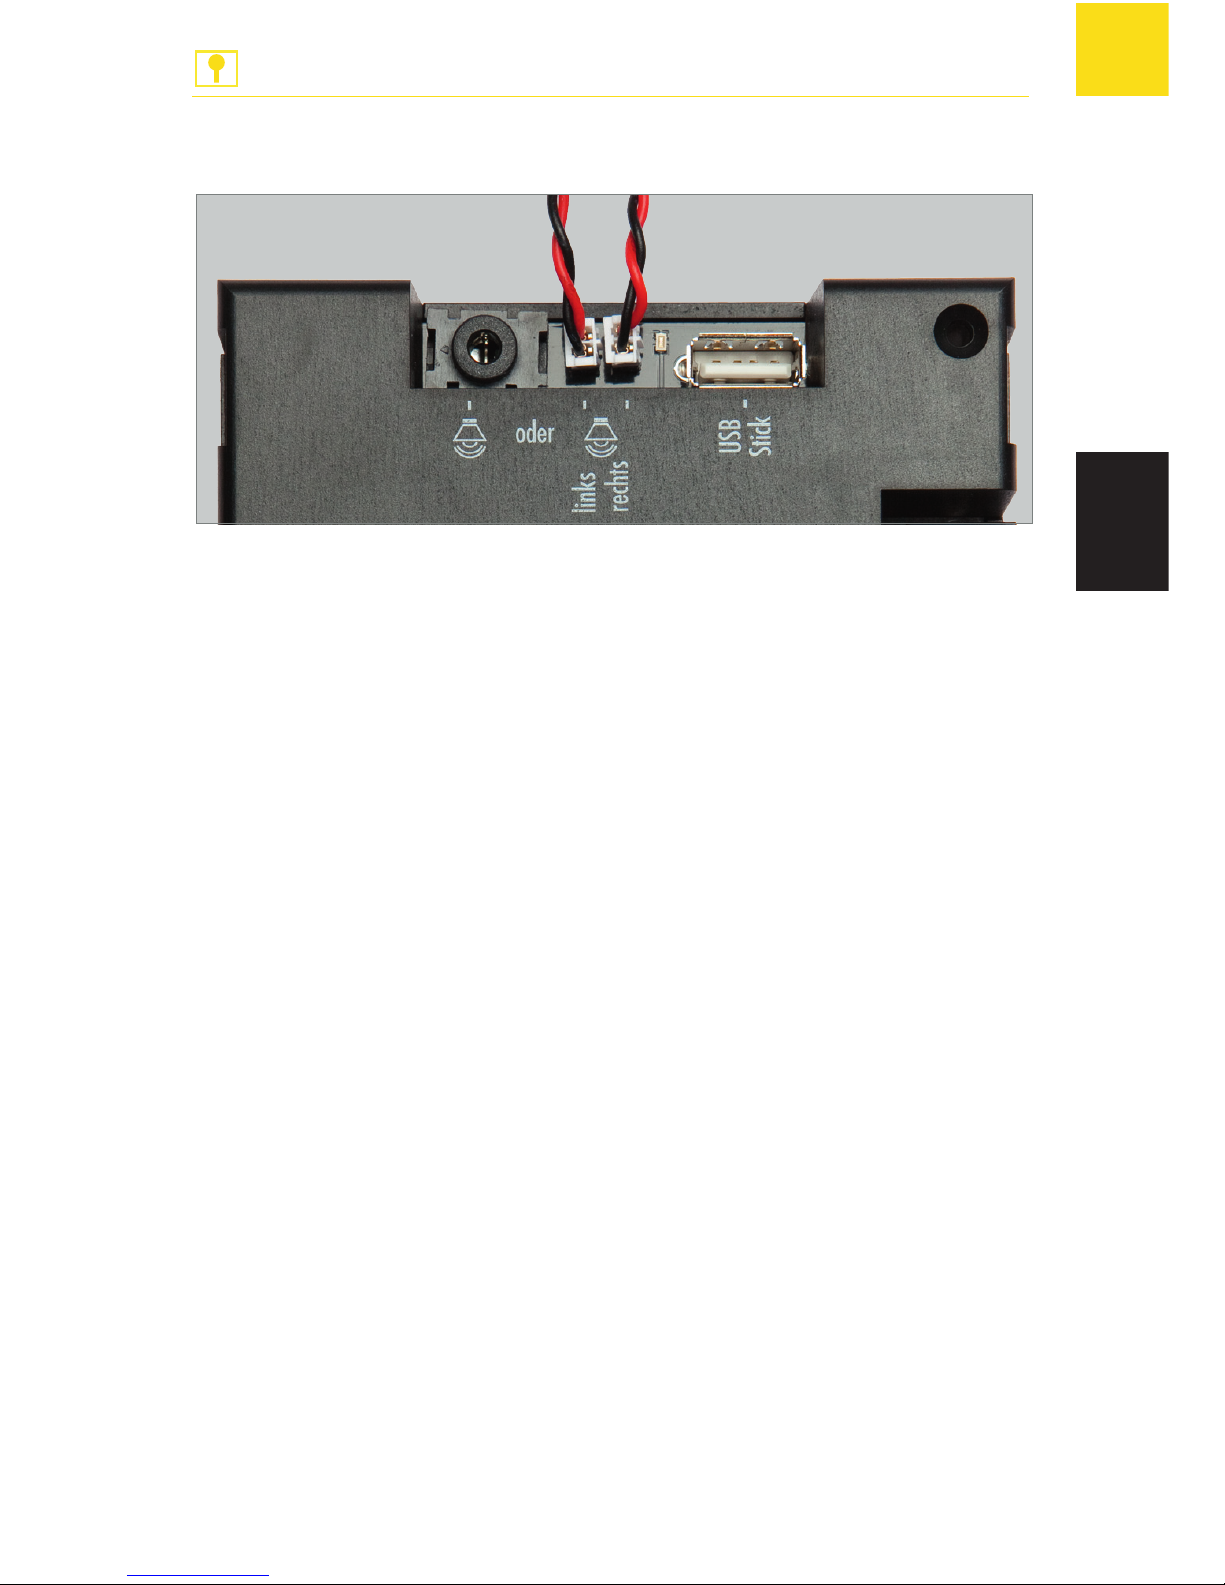
Abb. 3: Lautsprecher anschließen
HINWEIS: Sie haben die Möglichkeit, das Soundmodul mit den mitgelieferten Lautsprechern oder mit aktiven Lautsprechern zu betreiben.
Mitgelieferte Lautsprecher anschließen
X
Schließen Sie die Lautsprecher an, siehe Abb. 3
Die Lautsprecher sind angeschlossen.
Externe Lautsprecher anschließen
X
Stecken Sie den Klinkenstecker ein, siehe Abb. 3
Die Lautsprecher sind angeschlossen.
Page 10
10
Soundmodul anschließen
ANLAGENBAU
DE
Kontakte anschließen
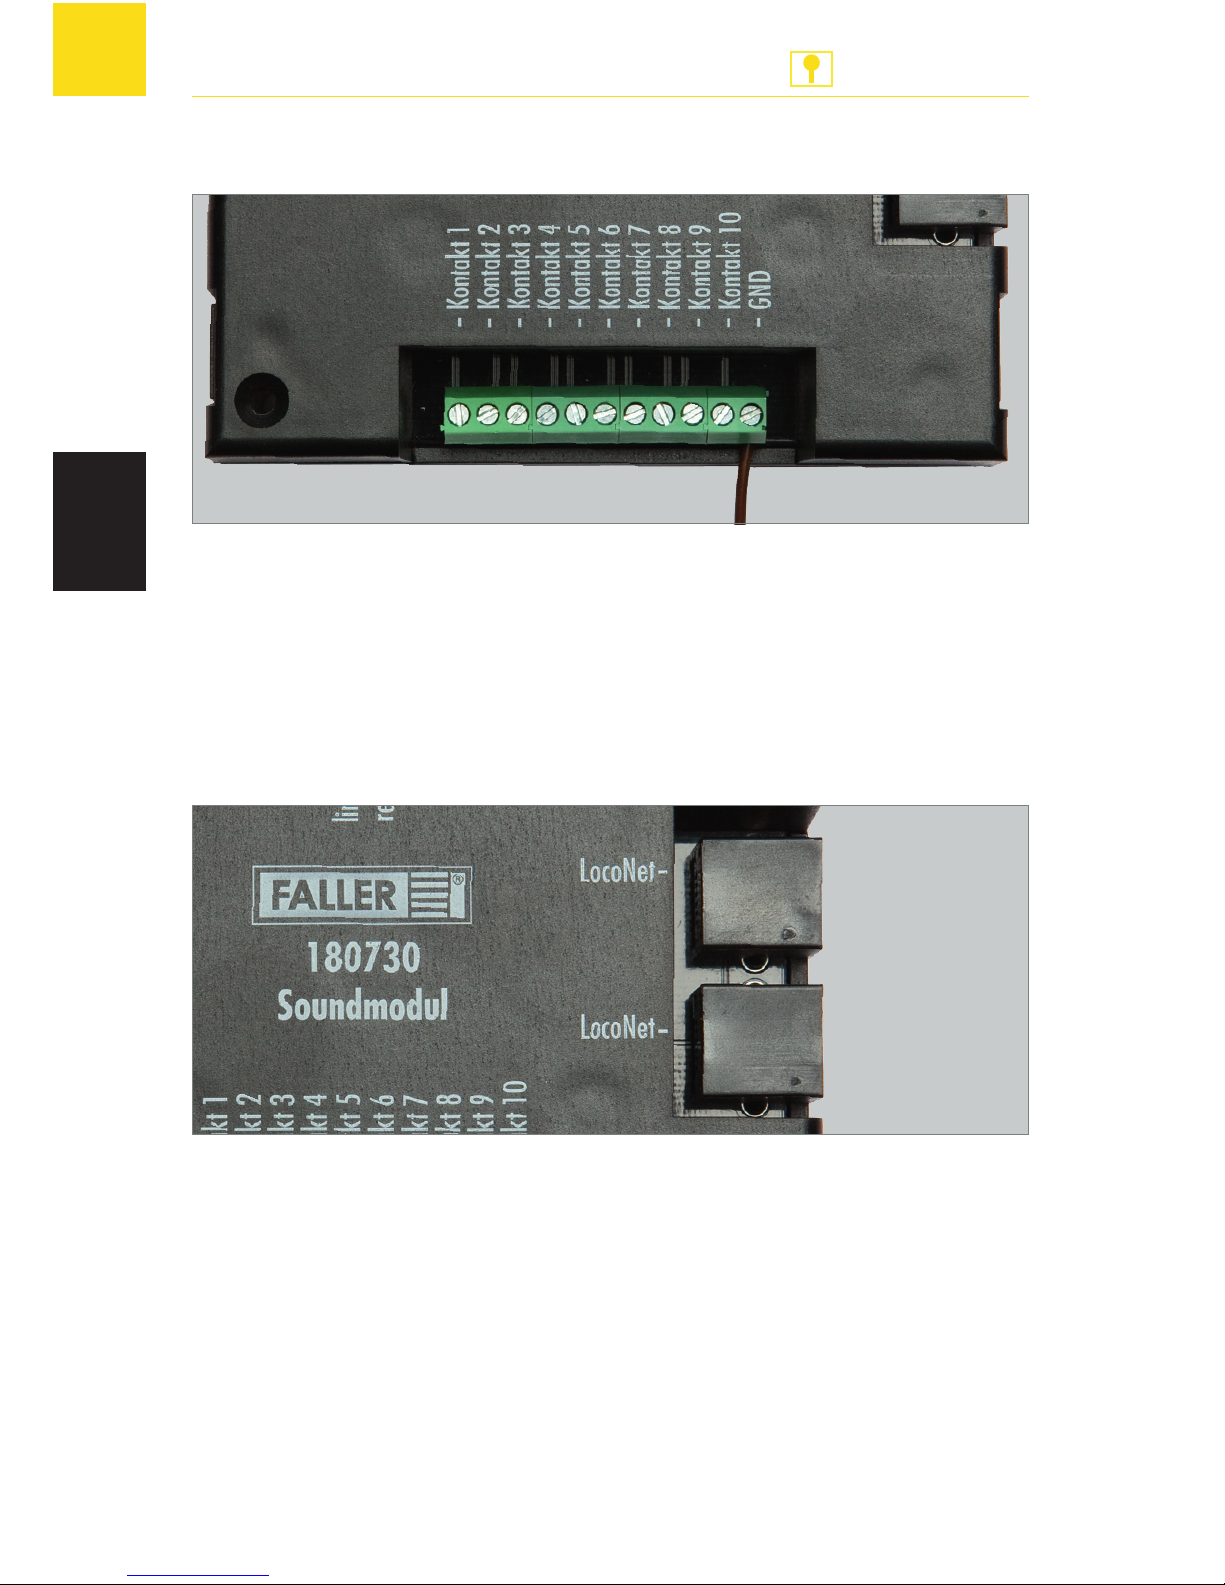
Abb. 4: Kontakte anschließen
X
Schließen Sie die Leitung des Kontakts an der gewünschten Position
an, siehe Abb. 4.
X
Schließen Sie die Leitung des Kontaktes an GND (Masse) an.
Der Kontakt ist angeschlossen, siehe Abb. 4.
LocoNet anschließen
Abb. 5: LocoNet anschließen
X
Stecken Sie den LocoNet-Anschluss in die Buchse, bis dieser einrastet,
siehe Abb. 5.
LocoNet ist angeschlossen.
Page 11

11
Soundmodul anschließen
ANLAGENBAU
DE
In Betrieb nehmen
Auf dem Soundmodul sind bei Auslieferung bereits verschiedene SoundDateien hinterlegt. Diese sind verschiedenen Ereignissen zugewiesen, so
dass Sie das Soundmodul sofort in Betrieb nehmen können.
HINWEIS: Das Soundmodul kann nur mit eingestecktem USB-Stick betrieben werden.
X
Stecken Sie den USB-Stick ein.
Die Kontroll-LED blinkt.
Das Soundmodul beginnt mit der Wiedergabe der hinterlegten Sound-
Dateien.
Page 12
12
SoundDirector
ANLAGENBAU
DE
5. SoundDirector
Ereignisse
Mit Hilfe von Ereignissen haben Sie die Möglichkeit, Aktionen auf Ihrer
Modellanlage zu steuern.
Sie können aus sieben verschiedenen Ereignissen wählen und diese unterschiedlich einstellen.
Element Ereignis Beschreibung
Kontakte / Eingänge
Sound-Dateien werden durch
Drücken eines Tasters wiedergegeben
Magnetartikel Sound-Dateien werden durch Drü-
cken eines Magnetschalters wiedergegeben
Hintergrundgeräusche
Sound-Dateien werden in einer
voreingestellten Reihenfolge endlos wiedergegeben
Zufällige Wiedergabe
Sound-Dateien werden in zufälliger Reihenfolge wiedergegeben
Zeitabhängige
Geräusche
Sound-Dateien werden in einem
voreingestellten Takt (in Modellzeit) wiedergegeben
Page 13
13
SoundDirector
ANLAGENBAU
DE
LISSY Fahrzeugabhängige Geräusche
Sound-Dateien werden durch Meldungen eines Sender und Empfängers wiedergegeben, siehe Kapitel
7. Wissenswertes »Lissy«, Seite 32
Rückmelderabhängige Geräusche
Sound-Dateien werden zum Beispiel durch einen von einem Zug
belegten Gleisabschnitt wiedergegeben
HINWEISE:
Abspielprioritäten können nur einmal innerhalb einer Ereignisgruppe
vergeben werden.
Wiedergabepositionen können nicht doppelt vergeben werden.
Geben Sie auch ohne die Verwendung einer Digitalzentrale immer eine
Adresse an.
Voraussetzung: Die benötigten Komponenten, wie z.B. Magnetartikel oder
Lissy-Empfänger, müssen vorhanden sein.
Page 14

14
SoundDirector
ANLAGENBAU
DE
SoundDirector installieren
HINWEIS: Beachten Sie die Systemvoraussetzungen Ihres Betriebssystems,
siehe Kapitel 8. Technische Daten, Seite 34
X
Stecken Sie den USB-Stick in einen USB-Port ein.
Ein Fenster öffnet sich.
X
Öffnen Sie den Dateiordner.
X
Öffnen Sie den Dateiordner 'Software'.
X
Starten Sie die Datei 'Setup.exe'.
Die Installation auf Ihrem Computer wird vorbereitet.
X
Folgen Sie den Aufforderungen des Setup-Assistenten.
Die Software ist auf Ihrem Computer installiert.
SoundDirector starten
Voraussetzung: Zum Starten des SoundDirectors muss der USB-Stick eingesteckt sein.
Um alle Funktionen des SoundDirectors nutzen zu können,
ist eine Internetverbindung notwendig.
TIPP
Page 15
15
SoundDirector
ANLAGENBAU
DE
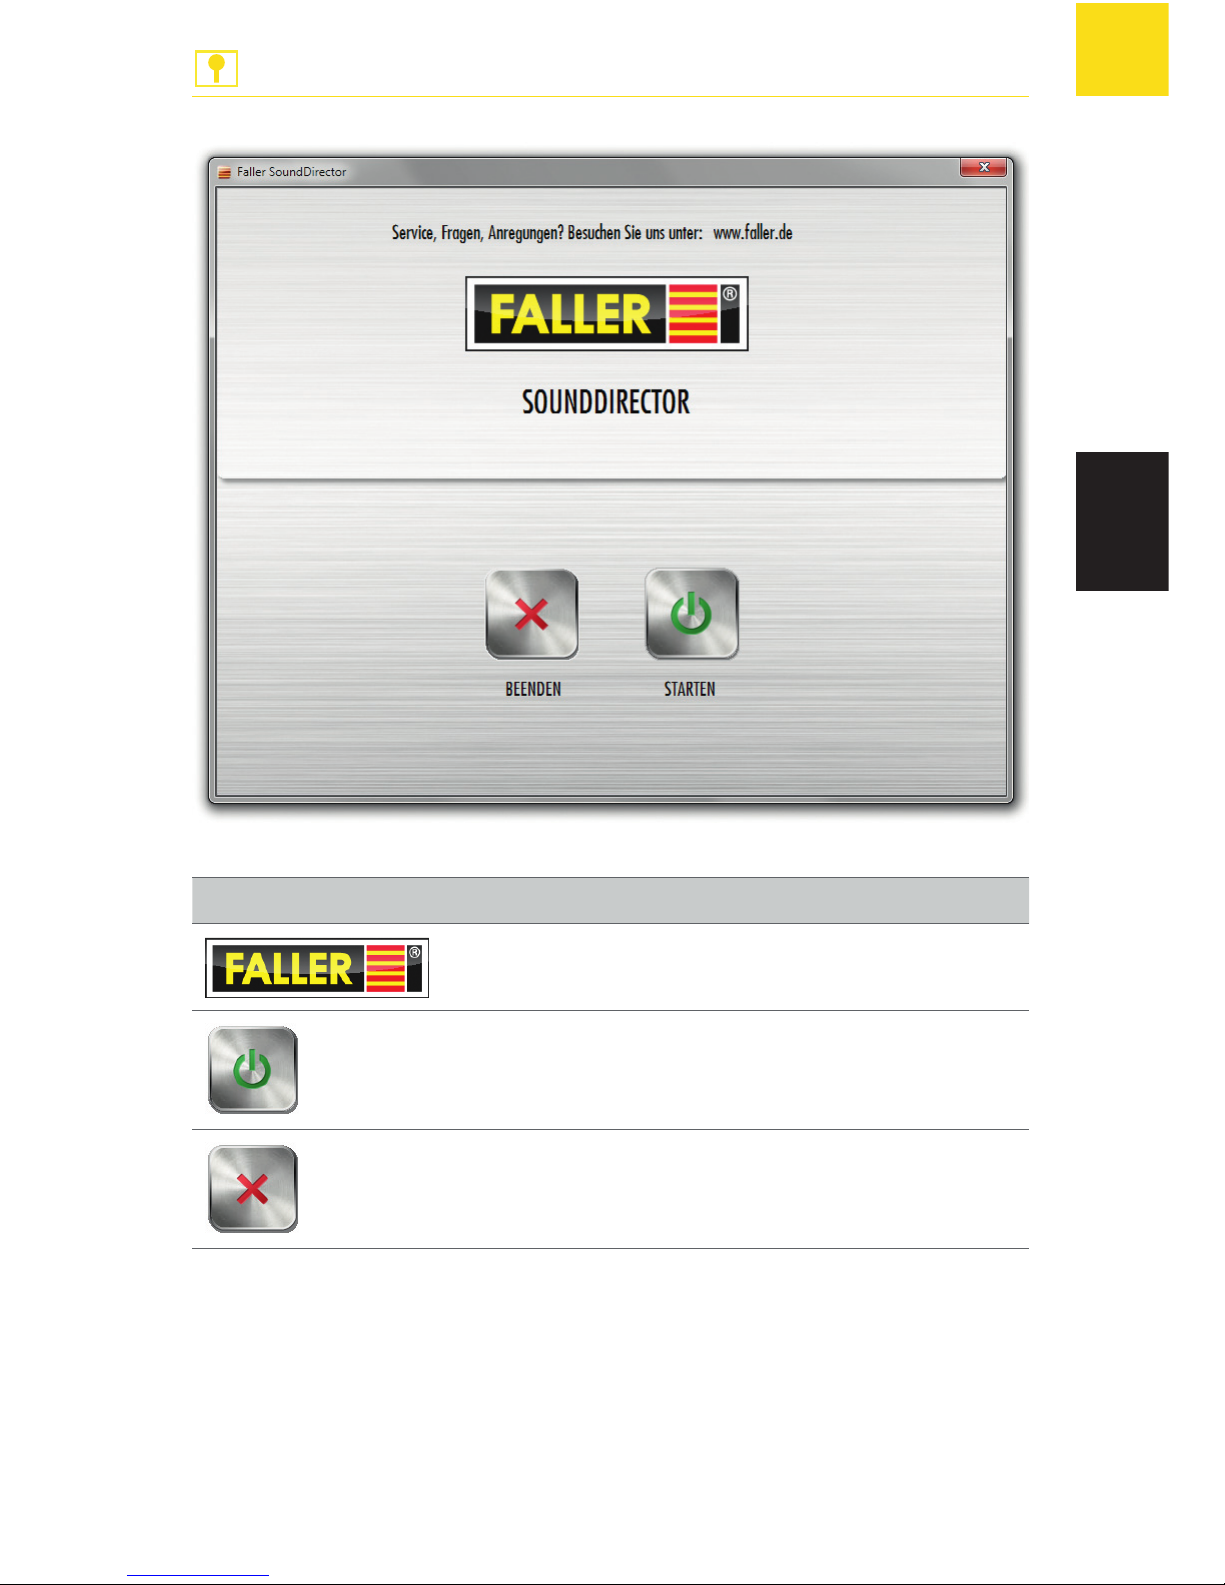
Abb. 6: Startbild
Element Beschreibung
Weiterleitung auf www.faller.de
Startet den SoundDirector
Beendet den SoundDirector
Tab. 2: Elemente Startbild
X
Starten Sie den SoundDirector.
Das Startbild erscheint, siehe Abb. 6.
X
Drücken Sie 'Starten'.
Das Übersichtsbild erscheint, siehe Abb. 7.
Page 16
16
SoundDirector
ANLAGENBAU
DE
Bedienoberfläche
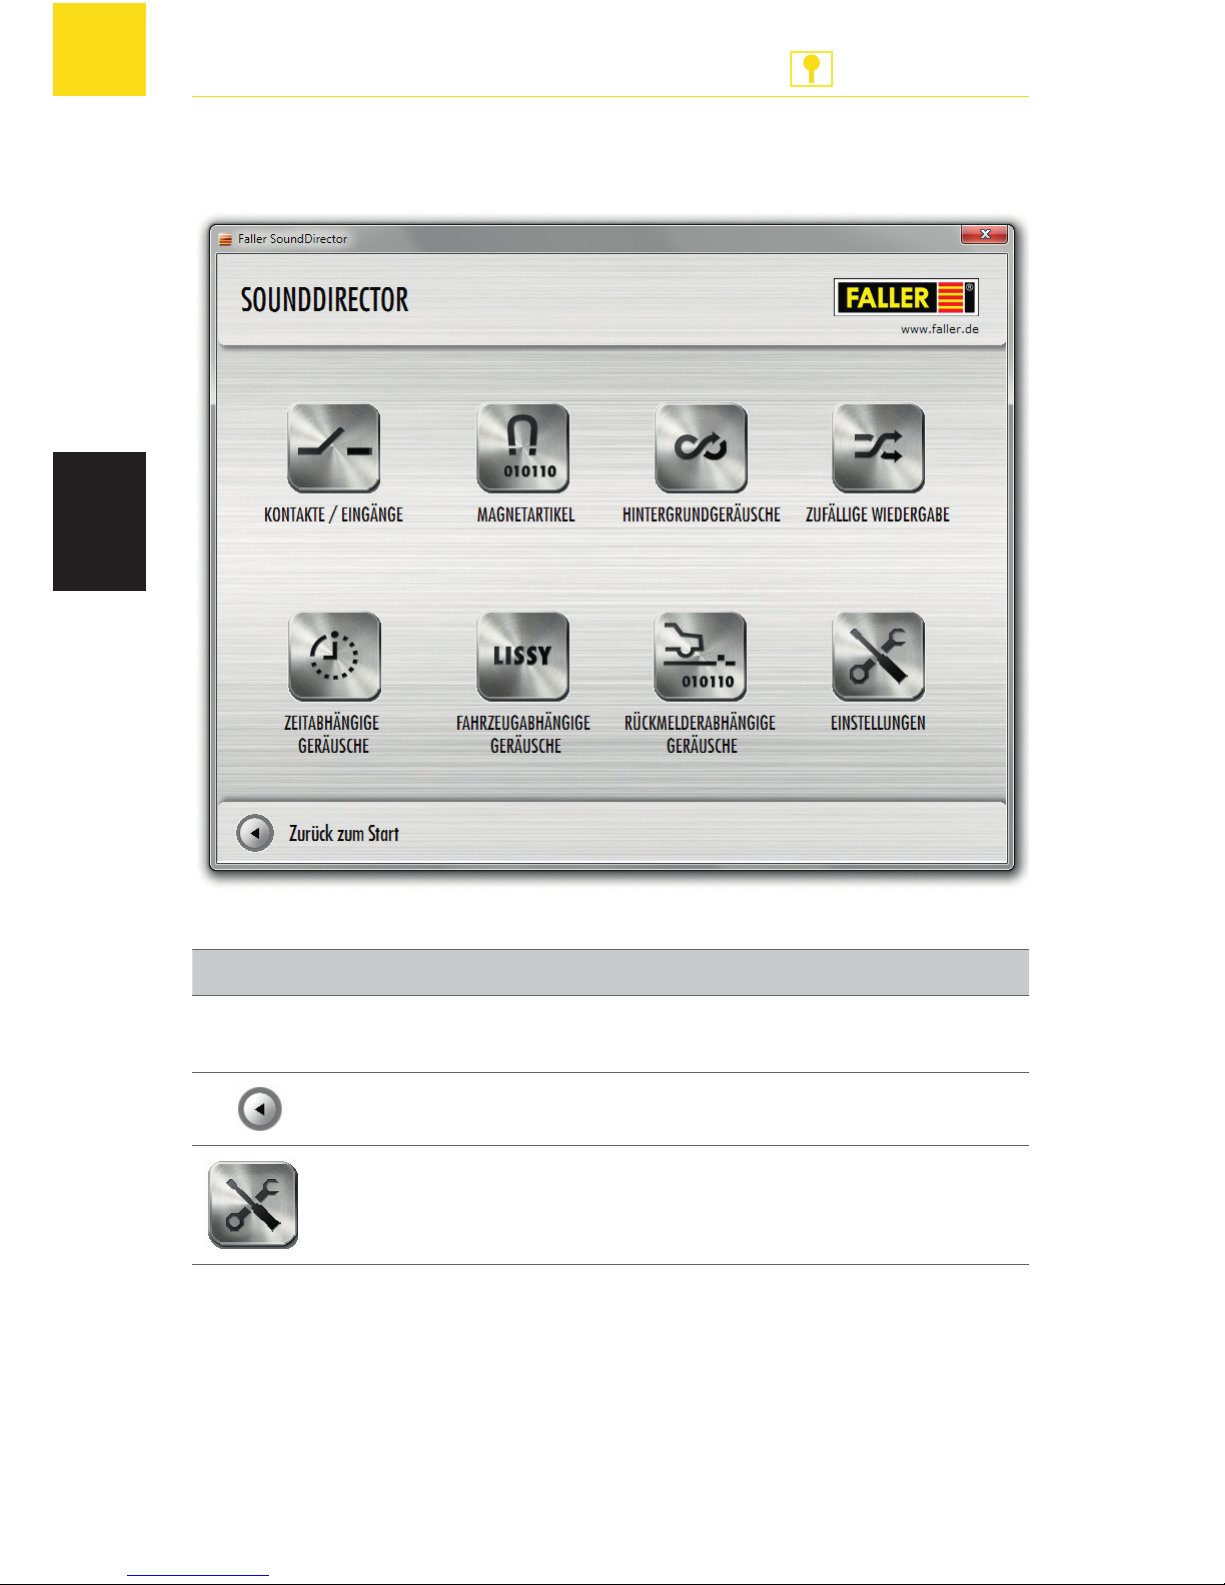
Abb. 7: Übersichtsbild
Element Beschreibung
Ereignisbild Ein Ereignis wird mit den dazugehörigen Einstel-
lungen angezeigt, siehe Abb. 8
Das Startbild wird angezeigt, siehe Abb. 6
Das Einstellungsfenster wird gezeigt, siehe Abb. 9
Tab. 3: Elemente Übersichtsbild
Page 17
17
SoundDirector
ANLAGENBAU
DE
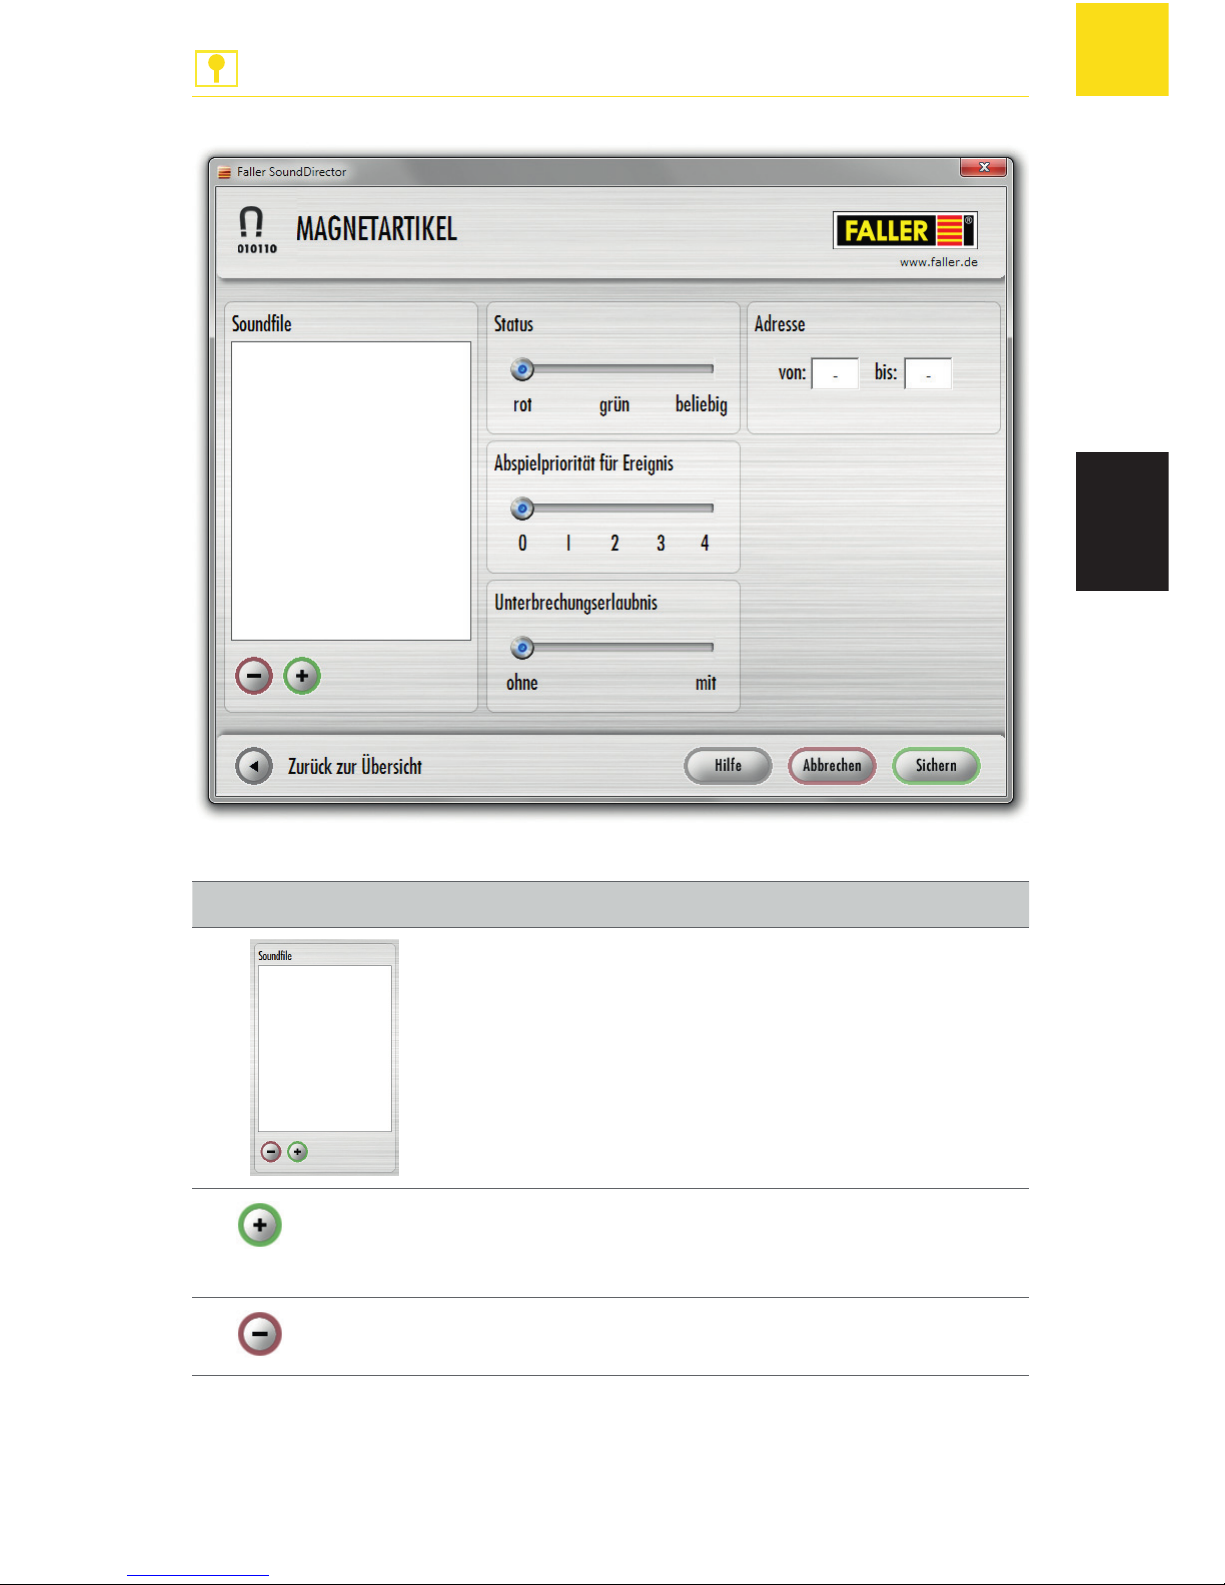
Abb. 8: Beispiel Ereignisbild
Element Beschreibung
Liste der Sound-Dateien, die einem
Ereignis zugeordnet sind
Sound hinzufügen
Liste aller Sound-Dateien auf dem USBStick
Sound löschen
Aus
Page 18
18
SoundDirector
ANLAGENBAU
DE
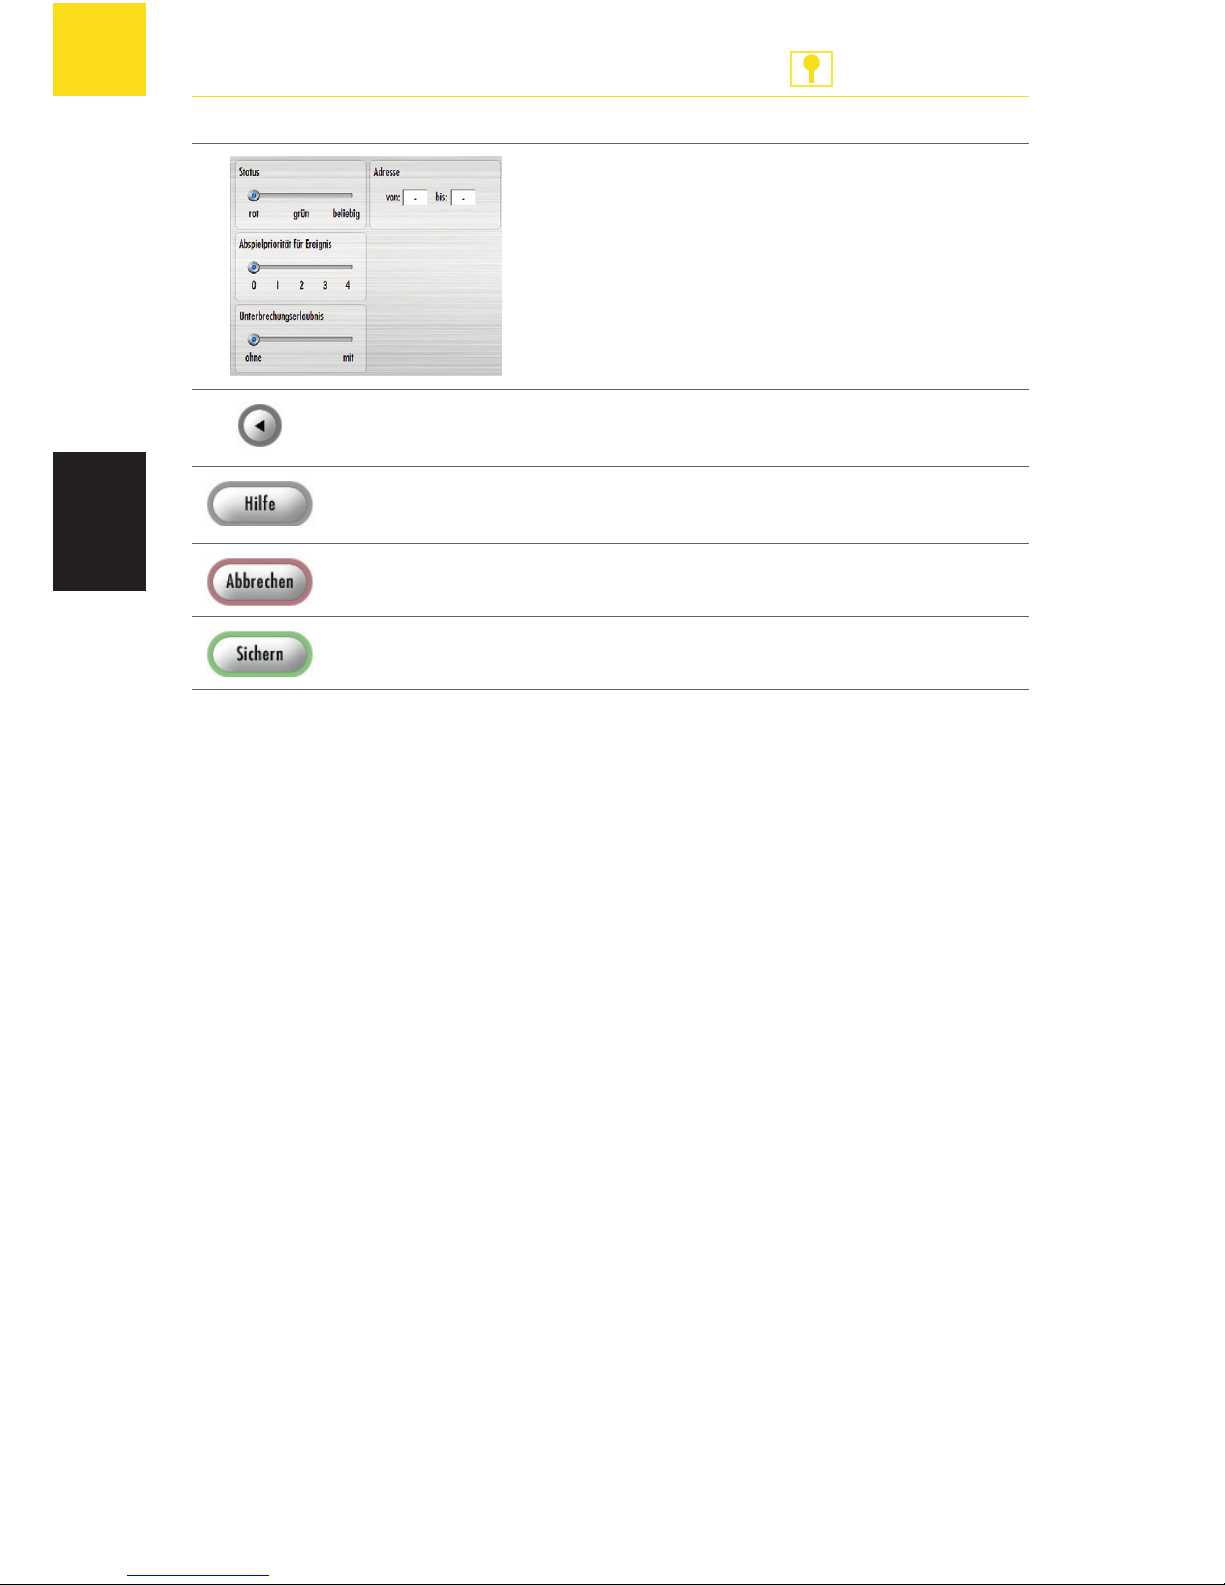
Mögliche Einstellungen des Ereignisses
Das Übersichtsbild wird angezeigt, siehe
Abb. 7
Weiterleitung auf die Bedienungsanleitung des Soundmoduls
Die Einstellungen werden abgebrochen
Die Einstellungen werden gespeichert
Tab. 4: Elemente Ereignisbild
Sound-Dateien einem Ereignis zuweisen
Der SoundDirector legt nach dem Zuweisen eines Ereignisses eine Datei mit
für ihn wichtigen Informationen auf dem USB-Stick ab.
HINWEISE:
Der Dateiname darf nicht verändert, verschoben oder gelöscht werden.
Neu hinzugefügte Sound-Dateien werden als letzter Eintrag einer Liste
aufgeführt.
Nicht eingestellte Sound-Dateien werden beim Beenden gelöscht.
Drücken Sie immer 'Beenden' zum Schließen des SoundDirectors.
Page 19
19
SoundDirector
ANLAGENBAU
DE
Magnetartikel
Anwendungsbeispiel: Warnsignal Bahnübergang
X
Drücken Sie auf das Ereignisbild 'Magnetartikel'.
X
Drücken Sie auf 'Sound hinzufügen'.
X
Wählen Sie eine Sound-Datei aus der Liste aus.
Die Sound-Datei erscheint unter 'Soundfile'.
X
Wählen Sie den Status 'grün' des Magnetartikels.
Die Sound-Datei wird beim Betätigen des grünen Schalters wiederge-
geben.
X
Wählen Sie die Abspielpriorität für Ereignis '1'.
X
Wählen Sie 'ohne Unterbrechungserlaubnis'.
Der Sound wird nicht von anderen Ereignissen unterbrochen.
X
Drücken Sie 'Sichern'.
Die Einstellungen werden gespeichert.
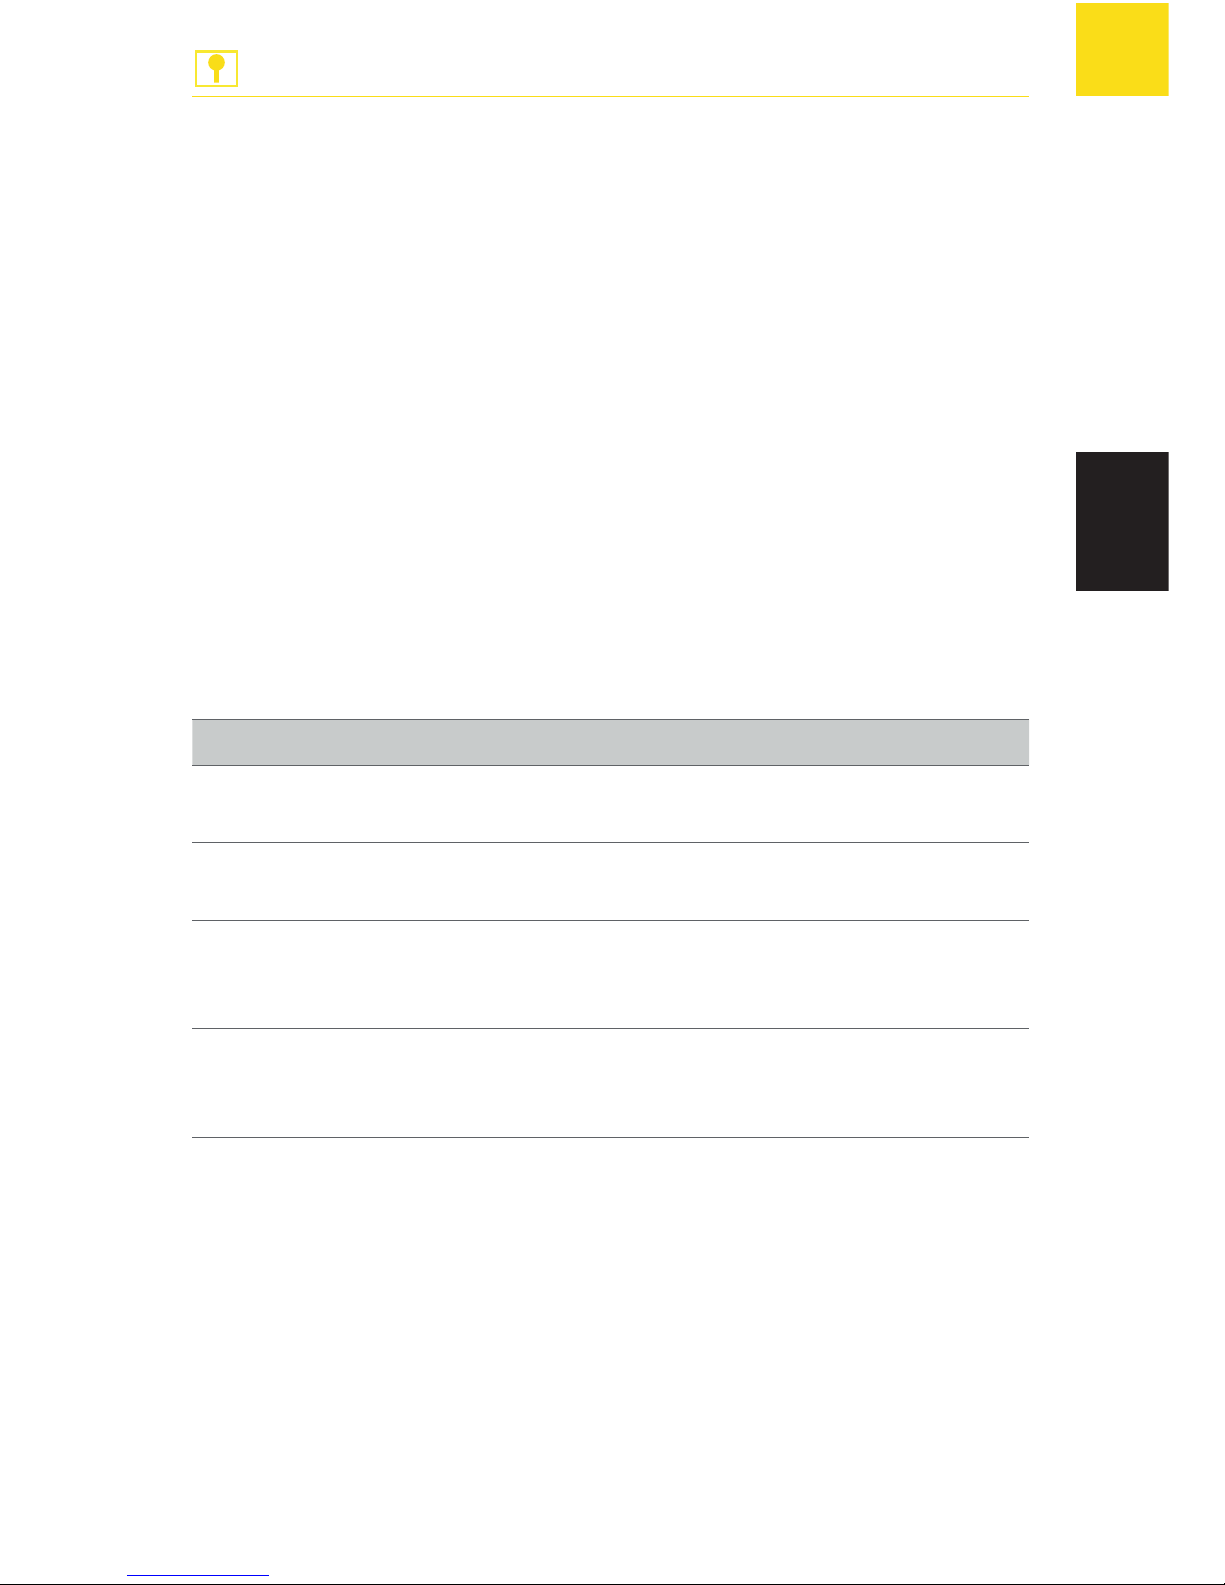
Einstellung Erläuterung
Status
'rot', 'grün', 'beliebig'
Belegung, bei der der Sound wiedergegeben werden soll
Adresse
'von:','bis:'
Belegung in der Digitalzentrale
Abspielpriorität für Ereignis Priorisierung, wenn mehrere Sound-
Dateien auf eine Adresse eingestellt
sind
Unterbrechungserlaubnis
'ohne', 'mit'
Unterbrechung des Sounds durch ein
anderes Ereignis erlauben oder verbieten
Tab. 5: Einstellungen Magnetartikel
Page 20
20
SoundDirector
ANLAGENBAU
DE
Rückmelderabhängige Geräusche
Anwendungsbeispiel: Durchsage bei einem einfahrenden Zug
X
Drücken Sie auf das Ereignisbild 'Rückmelderabhängige Geräusche'.
X
Drücken Sie auf 'Sound hinzufügen'.
X
Wählen Sie eine Sound-Datei aus der Liste aus.
Die Sound-Datei erscheint unter 'Soundfile'.
X
Wählen Sie den Status 'belegt' aus.
Die Sound-Datei wird wiedergegeben, wenn der Teilabschnitt belegt
(befahren) wird.
X
Wählen Sie die Abspielpriorität für Ereignis '1'.
X
Wählen Sie 'ohne Unterbrechungserlaubnis'.
Der Sound wird nicht von anderen Ereignissen unterbrochen.
X
Drücken Sie 'Sichern'.
Die Einstellungen werden gespeichert.
Einstellung Erläuterung
Status
'belegt', 'frei', 'beliebig'
Zustand des Rückmelders, bei dem
der Sound wiedergegeben werden
soll
Adresse
'von:','bis:'
In der Digitalzentrale hinterlegte
Adresse des Rückmelders
Abspielpriorität für Ereignis Priorisierung, wenn mehrere Sound-
Dateien auf eine Adresse eingestellt
sind
Unterbrechungserlaubnis
'ohne', 'mit'
Unterbrechung des Sounds durch ein
anderes Ereignis erlauben oder verbieten
Tab. 6: Einstellungen Rückmelderabhängige Geräusche
Page 21

21
SoundDirector
ANLAGENBAU
DE
LISSY Fahrzeugabhängige Geräusche
Anwendungsbeispiel: Beschleunigender Zug
X
Drücken Sie auf das Ereignisbild 'LISSY Fahrzeugabhängige Geräusche'.
X
Drücken Sie auf 'Sound hinzufügen'.
X
Wählen Sie eine Sound-Datei aus der Liste aus.
Die Sound-Datei erscheint unter Soundfile.
X
Wählen Sie die Fahrtrichtungsoption 'S1 -> S2' aus.
Die Sound-Datei wird wiedergegeben, während der Zug von Sensor 1
nach Sensor 2 fährt.
X
Wählen Sie die Abspielpriorität für Ereignis '1'.
X
Wählen Sie 'ohne Unterbrechungserlaubnis'.
Der Sound wird nicht von anderen Ereignissen unterbrochen.
X
Drücken Sie 'Sichern'.
Die Einstellungen werden gespeichert.
Einstellung Erläuterung
Fahrtrichtungsoption
'unabhängig', 'S1 -> S2',
'S2 -> S1'
Fahrtrichtung abhängig von der
Anordnung der Empfänger
Adresse
'von', 'bis:'
In der Digitalzentrale hinterlegte
Adresse des Lissy-Empfängers
Abspielpriorität für Ereignis Priorisierung, wenn mehrere Sound-
Dateien auf eine Adresse eingestellt
sind
Unterbrechungserlaubnis
'ohne, mit'
Unterbrechung des Sounds durch ein
anderes Ereignis erlauben oder verbieten
Tab. 7: Einstellungen Lissy Fahrzeugabhängige Geräusche
Page 22
22
SoundDirector
ANLAGENBAU
DE
Kontakte / Eingänge
Anwendungsbeispiel: Fahrzeughupe
X
Drücken Sie auf das Ereignisfeld 'Kontakte / Eingänge'.
X
Drücken Sie auf 'Sound hinzufügen'.
X
Wählen Sie eine Sound-Datei aus der Liste aus.
Die Sound-Datei erscheint unter 'Soundfile'.
X
Wählen Sie den Status 'schließen' aus.
Die Sound-Datei wird beim Betätigen des Kontakts wiedergegeben.
X
Wählen Sie einen Kontakt aus (Bsp.: von: 10 bis: 10)
X
Wählen Sie die Abspielpriorität für Ereignis '1'.
X
Wählen Sie 'ohne Unterbrechungserlaubnis'.
Der Sound wird nicht von anderen Ereignissen unterbrochen.
X
Drücken Sie 'Sichern'.
Die Einstellungen werden gespeichert.
Einstellung Erläuterung
Status
'öffnen', 'schließen', 'ändern'
Bei welchem Zustand des Tasters die
Sound-Datei wiedergegeben wird
Kontakt 1 bis 10 Anschlussposition eines Tasters am
Soundmodul
Abspielpriorität Priorisierung, wenn mehrere Sound-
Dateien auf eine Adresse eingestellt
sind
Unterbrechungserlaubnis
'ohne', 'mit'
Unterbrechung des Sounds durch ein
anderes Ereignis erlauben oder verbieten
Tab. 8: Einstellungen Kontakte / Eingänge
Page 23

23
SoundDirector
ANLAGENBAU
DE
Zufällige Wiedergabe
Anwendungsbeispiel: Hundegebell
X
Drücken Sie auf das Ereignisfeld 'Zufällige Wiedergabe'.
X
Drücken Sie auf 'Sound hinzufügen'.
X
Wählen Sie eine Sound-Datei aus der Liste aus.
Die Sound-Datei erscheint unter Soundfile.
X
Wählen Sie 'mit Unterbrechungserlaubnis'.
Der Sound wird von anderen Ereignissen unterbrochen (Bspw. einfah-
render Zug).
X
Drücken Sie 'Sichern'.
Die Einstellungen werden gespeichert.
Einstellung Erläuterung
Unterbrechungserlaubnis
'ohne', 'mit'
Unterbrechung des Sounds durch ein
anderes Ereignis erlauben oder verbieten
Tab. 9: Einstellungen Zufällige Wiedergabe
Page 24

24
SoundDirector
ANLAGENBAU
DE
Zeitabhängige Geräusche
Anwendungsbeispiel: Glockenspiel
X
Drücken Sie auf das Ereignisbild 'Zeitabhängige Geräusche'.
X
Drücken Sie auf 'Sound hinzufügen'.
X
Wählen Sie eine Sound-Datei aus der Liste aus.
Die Sound-Datei erscheint unter 'Soundfile'.
X
Wählen Sie '00:15' aus.
Der Sound wird im 15 min. Takt (in Modellzeit) wiedergegeben.
X
Wählen Sie 'ohne Unterbrechungserlaubnis'.
Der Sound wird nicht von anderen Ereignissen unterbrochen.
X
Drücken Sie 'Sichern'.
Die Einstellungen werden gespeichert.
Einstellung Erläuterung
Zeitangabe Wiederholzeit in Modellzeit
Unterbrechungserlaubnis
'ohne', 'mit'
Unterbrechung des Sounds durch ein
anderes Ereignis erlauben oder verbieten
Tab. 10: Einstellungen Zeitgesteuerte Wiedergabe
Page 25

25
SoundDirector
ANLAGENBAU
DE
Hintergrundgeräusche
Anwendungsbeispiel: Vogelgezwitscher
HINWEIS: Sound-Dateien dieser Ereignisgruppe werden immer durch andere
Ereignisse unterbrochen.
X
Drücken Sie auf das Ereignisbild 'Hintergrundgeräusche'.
X
Drücken Sie auf 'Sound hinzufügen'.
X
Wählen Sie eine Sound-Datei aus der Liste aus.
Die Sound-Datei erscheint unter 'Soundfile'.
X
Wählen Sie die Priorität '5' aus.
Der Sound wird als fünfter Sound in der Liste der 'Endlose Wieder-
gabe' wiedergegeben.
X
Drücken Sie 'Sichern'.
Die Einstellungen werden gespeichert.
Einstellung Erläuterung
Bereich 1 bis 127 Wiedergabeposition des Sounds in
der Wiedergabeliste
Tab. 11: Einstellungen Endlose Wiedergabe
Sound-Datei löschen
X
Wählen Sie eine Sound-Datei aus.
X
Drücken Sie 'Sound löschen' oder klicken Sie die rechte Maustaste und
'Zeile löschen'.
Die Sound-Datei wird gelöscht.
Page 26
26
SoundDirector
ANLAGENBAU
DE
Einstellungen SoundDirector
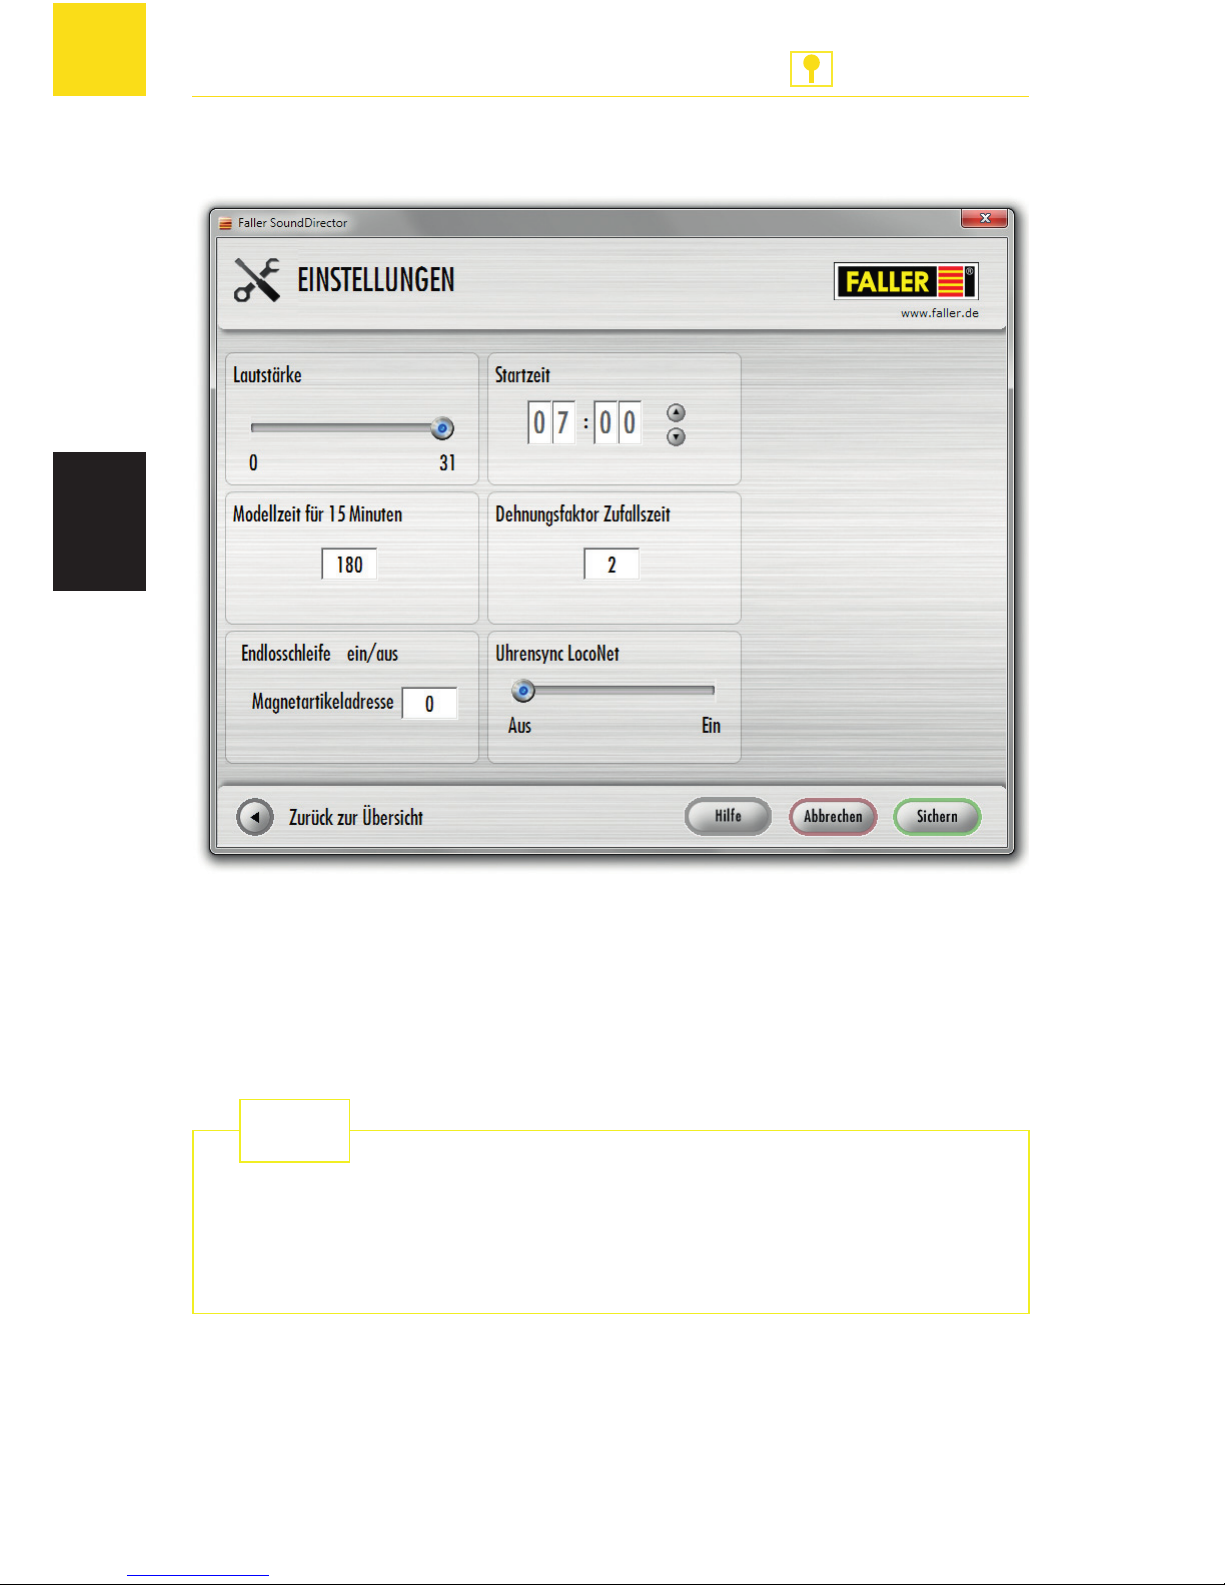
Abb. 9: Einstellungen
Lautstärke einstellen
X
Schieben Sie den Regler auf den gewünschten Wert, siehe Abb. 9.
X
Drücken Sie 'Sichern' um die Einstellung zu übernehmen.
Bei der Verwendung von aktiven Lautsprechern sollten Sie den Regler des Soundmoduls nicht auf Maximal stellen, um ein Übersteuern
der Lautsprecher zu vermeiden.
TIPP
Page 27

27
SoundDirector
ANLAGENBAU
DE
Startzeit vorwählen
Mit der Startzeit können Sie einstellen, wann Ihre Modellzeit beginnen soll.
HINWEIS: Die Startzeit beginnt mit Einstecken des USB-Sticks oder mit dem
Einschalten des Soundmoduls.
X
Geben Sie die gewünschte Startzeit ein, siehe Abb. 9.
X
Drücken Sie 'Sichern' um die Einstellungen zu übernehmen.
Modellzeit für 15 Minuten
Mit der Modellzeit können Sie einstellen wie viele Sekunden 15 Minuten
der Modellzeit entsprechen sollen.
X
Geben Sie die gewünschte Modellzeit ein.
X
Drücken Sie 'Sichern' um die Einstellungen zu übernehmen.
Dehnungsfaktor Zufallszeit
Mit dem Dehnungsfaktor der Zufallszeit können Sie das Abspielen von zufälligen Wiedergaben verzögern.
X
Geben Sie den gewünschten Faktor ein.
X
Drücken Sie 'Sichern' um die Einstellungen zu übernehmen.
Uhrensync LocoNet
Mit der Uhrensynchronisation auf LocoNet können Sie die Zeiteinstellungen
einer über LocoNet angeschlossenen Digitalzentrale übernehmen.
X
Drücken Sie 'Ein' um die Zeiteinstellungen der Digitalzentrale zu über-
nehmen.
X
Drücken Sie 'Aus' um die Zeiteinstellungen des Soundmoduls zu über-
nehmen.
X
Drücken Sie 'Sichern' um die Einstellungen zu übernehmen.
Endlosschleife ein/aus
Hier kann gewählt werden, bei welchem Sound im Ereignisfeld 'Endlose Wiedergabe' begonnen werden soll.
Page 28
28
SoundDirector
ANLAGENBAU
DE
Werkseinstellungen
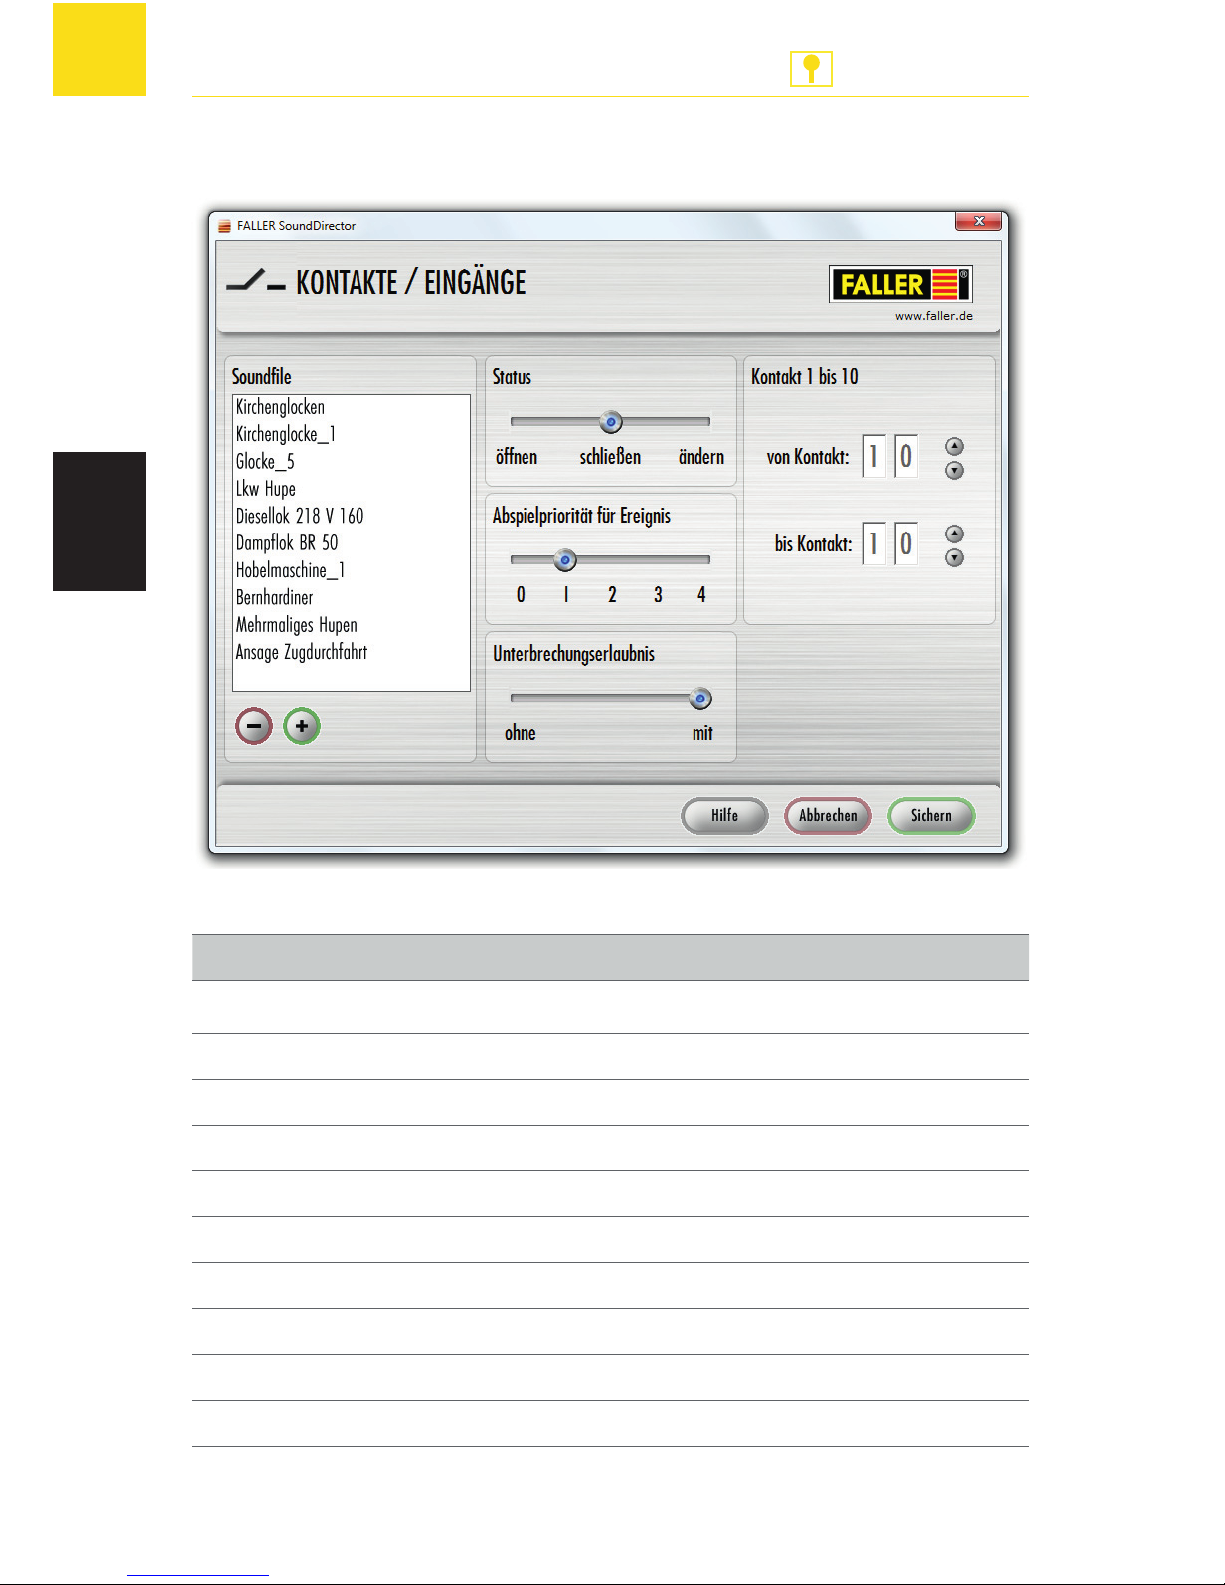
Abb. 10: Werkseinstellungen Kontakte / Eingänge
Kontakt Soundfile
1 Kirchenglocken
2 Kirchenglocke_1
3 Glocke_5
4 Lkw Hupe
5 Diesellok 218 V 160
6 Dampflok BR 50
7 Hobelmaschine_1
8 Bernhardiner
9 Mehrmaliges Hupen
10 Ansage Zugdurchfahrt
Tab. 12: Werkseinstellungen Kontakte / Eingänge
Page 29
29
SoundDirector
ANLAGENBAU
DE
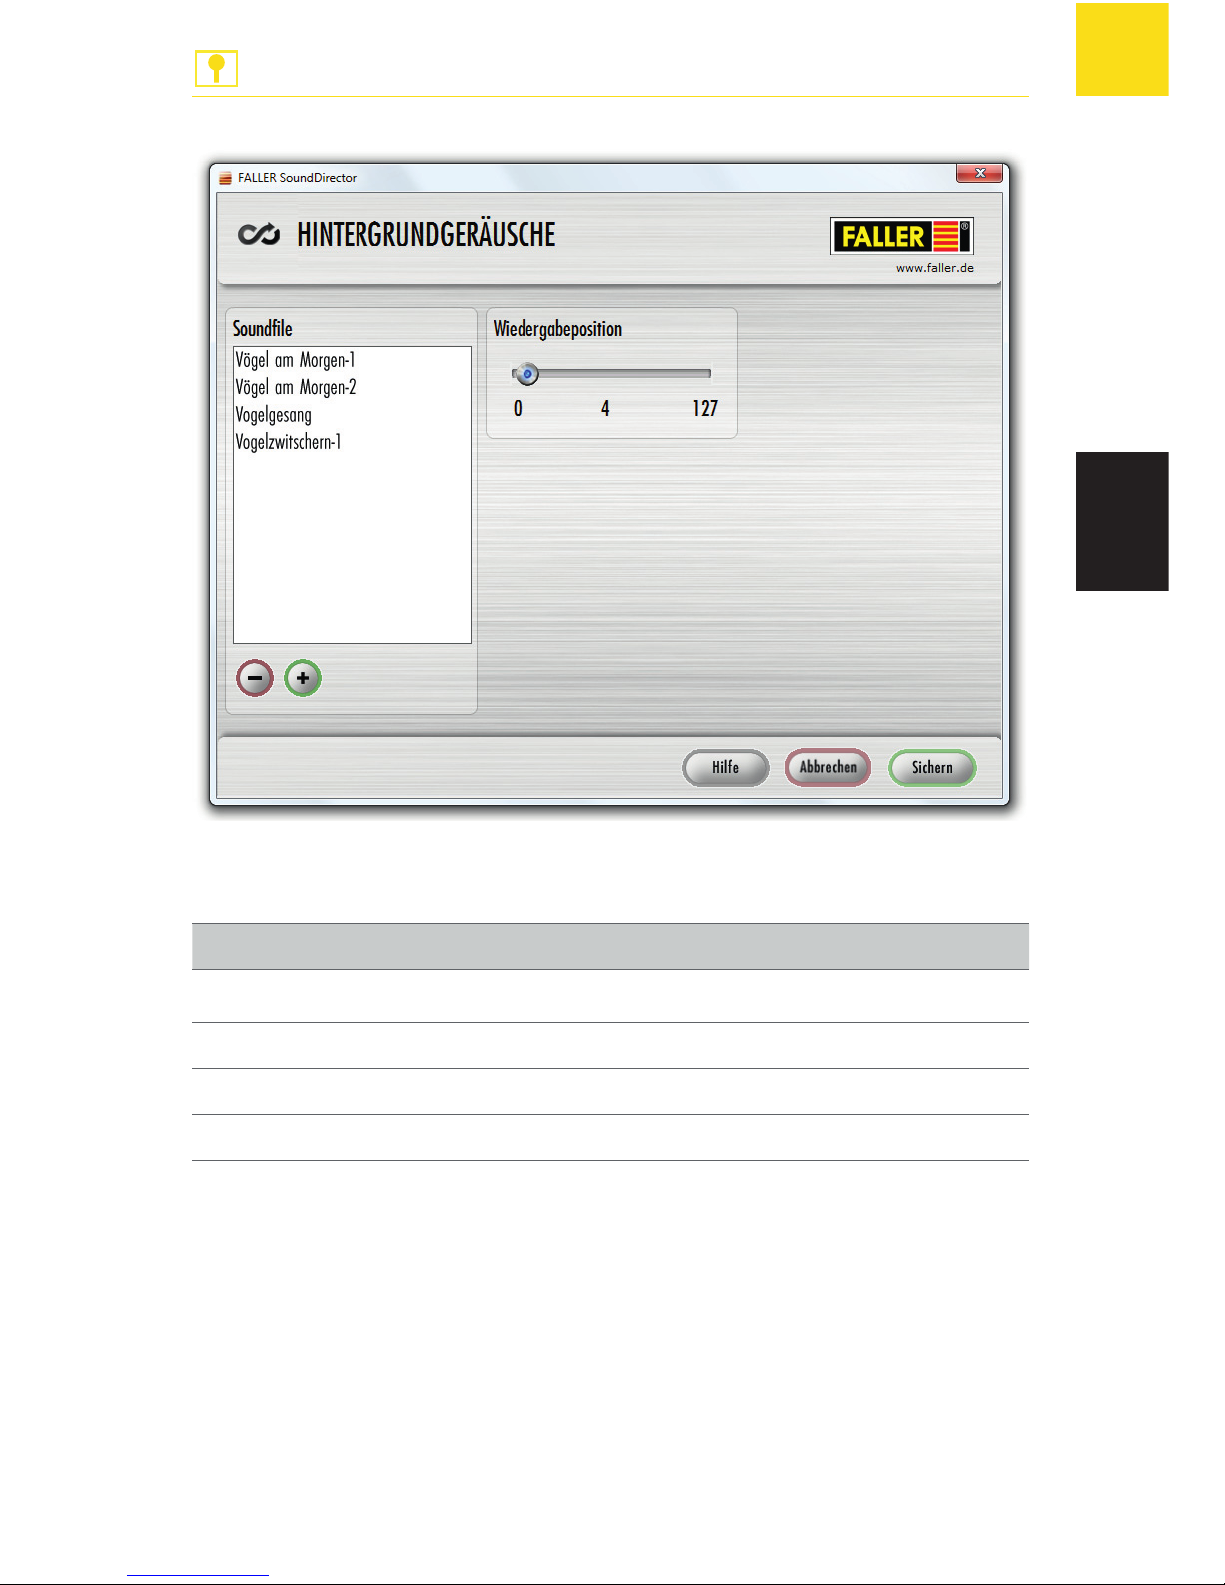
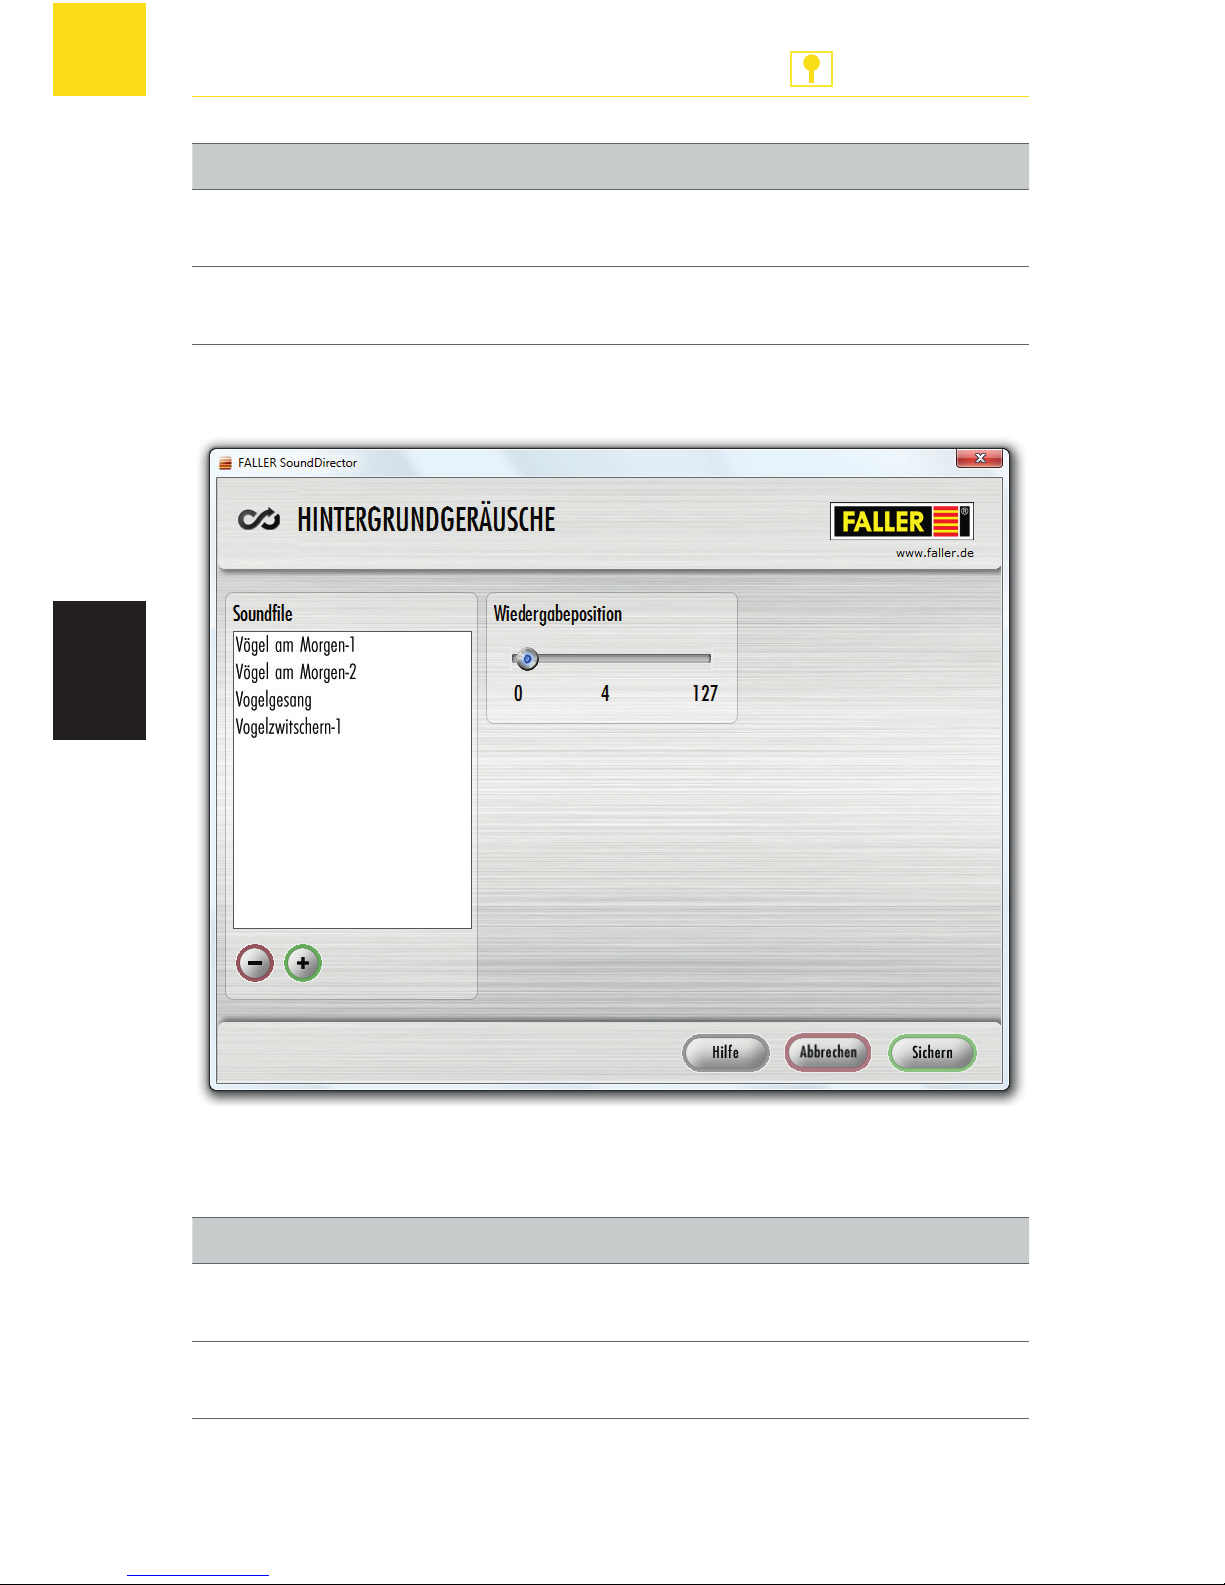
Abb. 11: Werkseinstellungen Hintergrundgeräusche
Kontakt Soundfile
1 Vögel am Morgen-1
2 Vögel am Morgen-2
3 Vogelgesang
4 Vogelzwitschern-1
Tab. 13: Werkseinstellungen Hintergrundgeräusche
Page 30
30
SoundDirector
ANLAGENBAU
DE
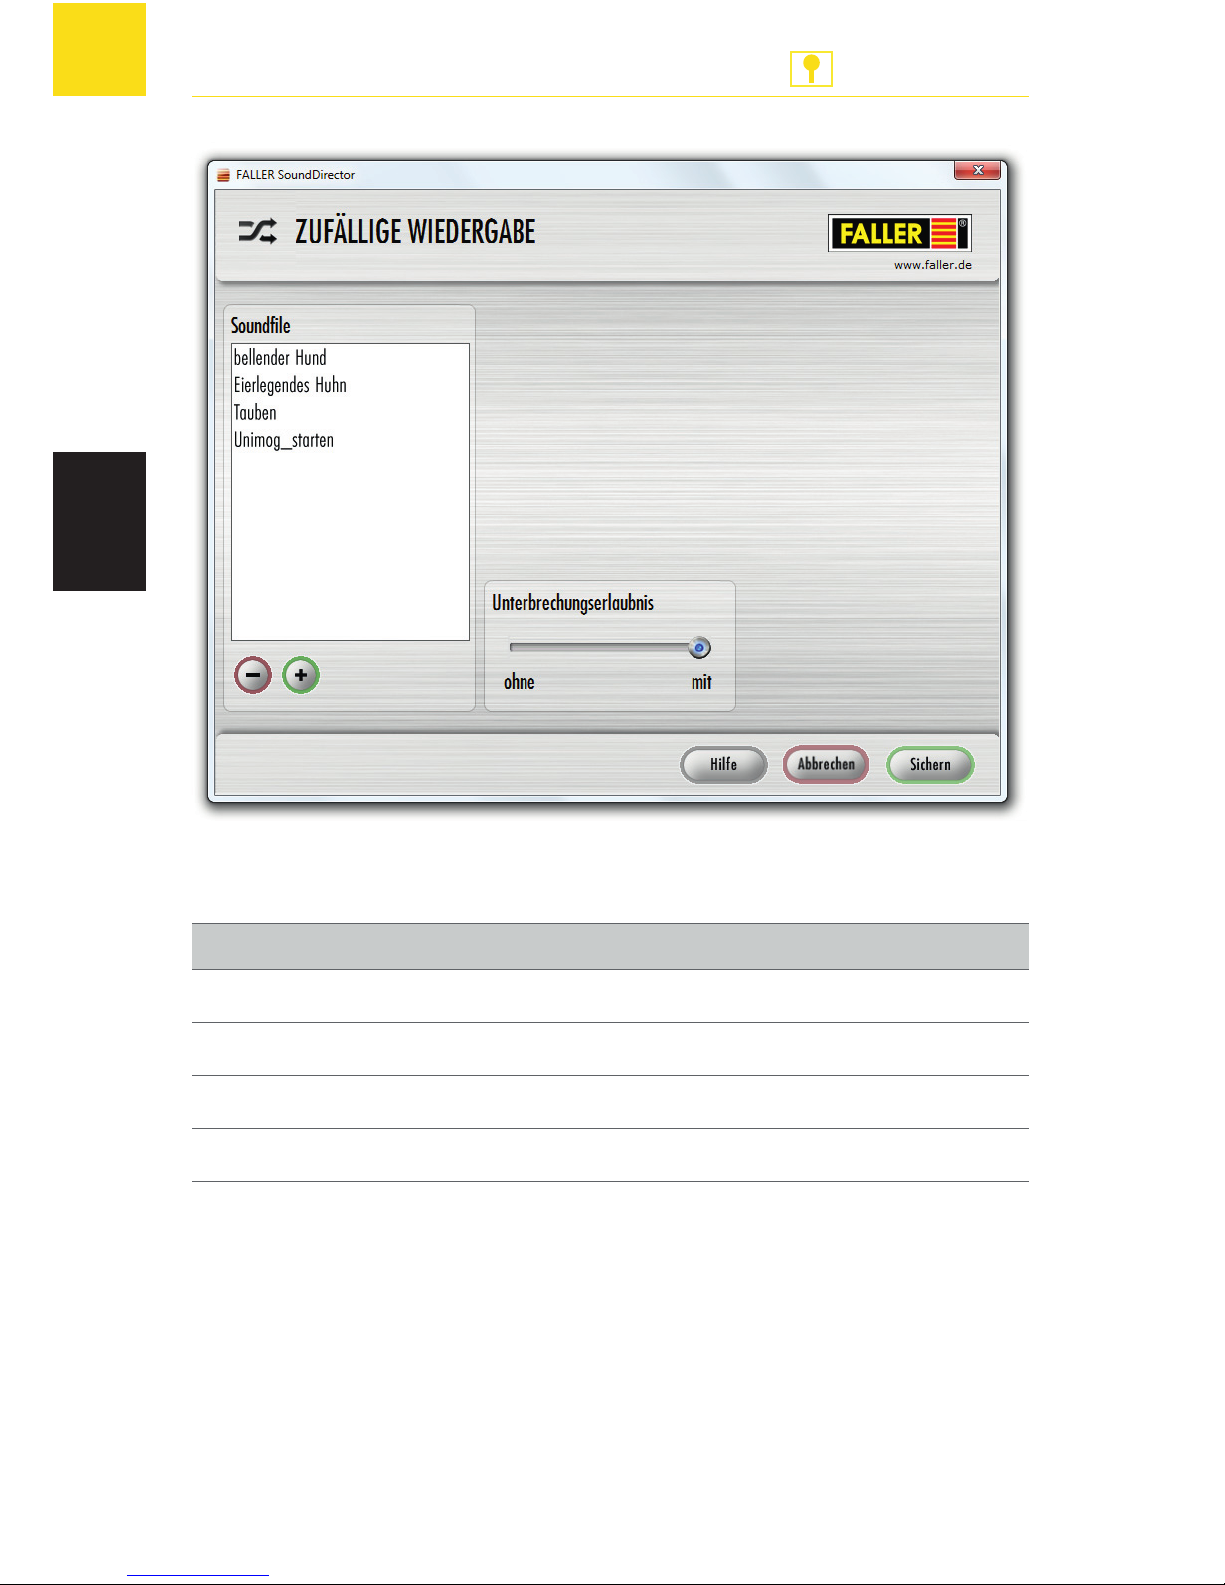
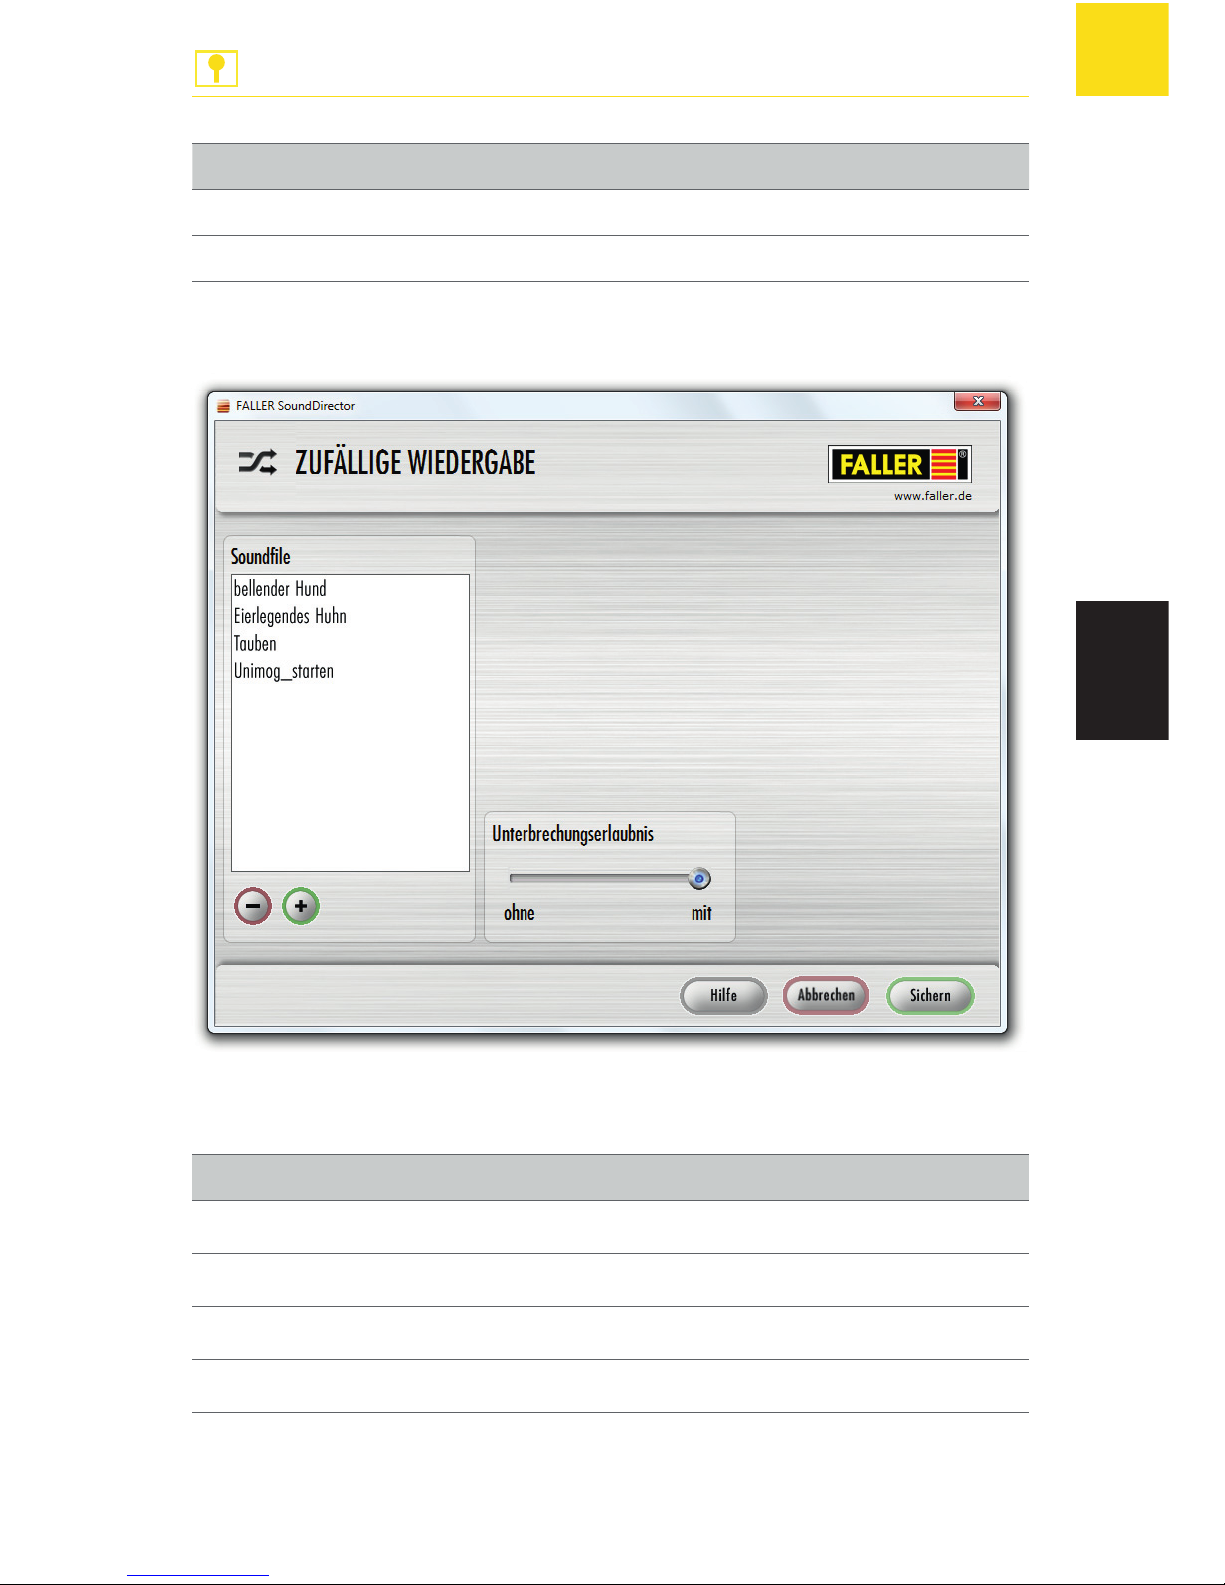
Abb. 12: Werkseinstellungen Zufällige Wiedergabe
Soundfile
bellender Hund
Eierlegendes Huhn
Tauben
Unimog_starten
Tab. 14: Werkseinstellungen Zufällige Wiedergabe
Page 31
31
Was tun wenn?
ANLAGENBAU
DE
6. Was tun wenn?
Fehlermeldungen
Fehlerbild Fehlerquelle Behebung
Software startet nicht
Software gelöscht
X
Starten Sie die Setup.exe
unter C:/Programme/
SoundDirector mit Doppelklick
X
Gehen Sie auf www.faller.de
und laden Sie die Software
herunter
Sound-Datei
nicht lesbar
Falsches Dateiformat
X
Prüfen Sie, ob ein mp3Dateiformat vorliegt
Soundmodul
funktioniert
nicht
Beschädigung am
Soundmodul
X
Wenden Sie sich an den
FALLER-Kundendienst
Tab. 15: Was tun wenn?
Der direkte Draht zum FALLER-Kundendienst:
Telefon + 49 (0) 77 23 / 651-106
E-Mail [email protected]
TIPP
Page 32
32
Wissenswertes
ANLAGENBAU
DE
7. Wissenswertes
LISSY
Mit Lissy können Sie Ihre Modellanlage bei der Verwendung eines Digitalsystems automatisch steuern.
Lissy besteht aus einem Infrarot-Sender, der am Zug montiert wird und
Infrarot-Empfängern, die ins Gleis eingebaut werden können.
Die vom Infrarot-Sender gemeldete Lokadresse und Zugkategorie wird vom
Empfänger erkannt und mit LocoNet übermittelt. Zusätzlich sind, ohne den
Einsatz eines Computers, verschiedene automatische Steuerfunktionen zu
realisieren.
Lissy erkennt den Zug und zeigt an, welcher Zug auf Gleis 1 des Bahn-
hofs eingefahren ist.
Lissy verwaltet Ihren Schattenbahnhof, findet selbstständig für jeden
Zug ein individuelles Gleis und lässt bei Bedarf die Züge automatisch
wieder aus dem Schattenbahnhof herausfahren.
Lissy ist ein Blocksystem für Digitalanlagen und steuert die Blockstellen
auf der Anlage automatisch, ohne Einsatz eines Computers.
Lissy bremst jede Digital-Lokomotive vor einem roten Signal mit der
internen Bremsverzögerung langsam ab.
Lissy misst die Geschwindigkeit vorbeifahrender Lokomotiven maß-
stabsgetreu.
Lissy schaltet situationsabhängig den Sound von Lokomotiven, z.B.
den Pfeifton vor dem Tunnel oder das Signalhorn am Bahnübergang
vor der Pfeiftafel.
Lissy blendet bei Fahrten in unsichtbare Bereiche (Schattenbahnhof, Tun-
nel) den Sound von mit Intellisound ausgerüsteten Lokomotiven aus.
Page 33

33
Wissenswertes
ANLAGENBAU
DE
Lissy schaltet das Licht einer bestimmten Lok nach einer bestimmten Zeit
ein oder aus, z.B. wenn der Lokführer die Lok abgestellt hat.
Lissy steuert die Geschwindigkeit von Loks, z.B. in Bahnhofseinfahrten
oder auf Langsamfahrstrecken.
Lissy arbeitet ohne jede Gleisunterbrechung und kann deshalb in jede
Modellanlage nachträglich leicht eingebaut werden.
Lissy steuert realitätsnah das Fahrverhalten Ihrer Lokomotiven.
Besuchen Sie auch www.uhlenbrock.de/INTERN/PRODUKTE/lissy/ für weitere Informationen über LISSY - das Lok-individuelle Steuerungssystem.
LocoNet
Der LocoNet-Bus ist die preiswerte und sichere Verkabelung von Digitalzentrale, Steuer- und Bediengeräten, Rückmeldern, Schaltmodulen und weiteren Elementen.
Alle Geräte, die über das LocoNet angeschlossen werden, beziehen ihre
Betriebsspannung aus dem LocoNet.
Der benötigte Strom wird dem LocoNet von der Digitalzentrale zur Verfügung gestellt. Übersteigt der Stromverbrauch der angeschlossenen Geräte
den von der Digitalzentrale gelieferten Strom, so ist eine zusätzliche LocoNet-Stromeinspeisung erforderlich.
Wollen Sie noch mehr wissen? Stillen Sie Ihren Wissensdurst auf
unserer Internetseite – www.faller.de. Dort finden Sie interessante
Hintergrundinformationen und viele kreative Anregungen rund um
das Thema Modellbau.
TIPP
Page 34
34
Technische Daten
ANLAGENBAU
DE
8. Technische Daten
Elektrische Werte
Bezeichnung Wert
Spannungsversorgung 16 V
Leistung 1,5 Watt an 8 Ohm
Lautsprecherimpedanz Mindestens 8 Ohm
USB-Stick USB 2.0
Betriebssystem Ab Microsoft® Windows 98 SE
USB Port ab USB 1.0
Tab. 16: Elektrische Werte
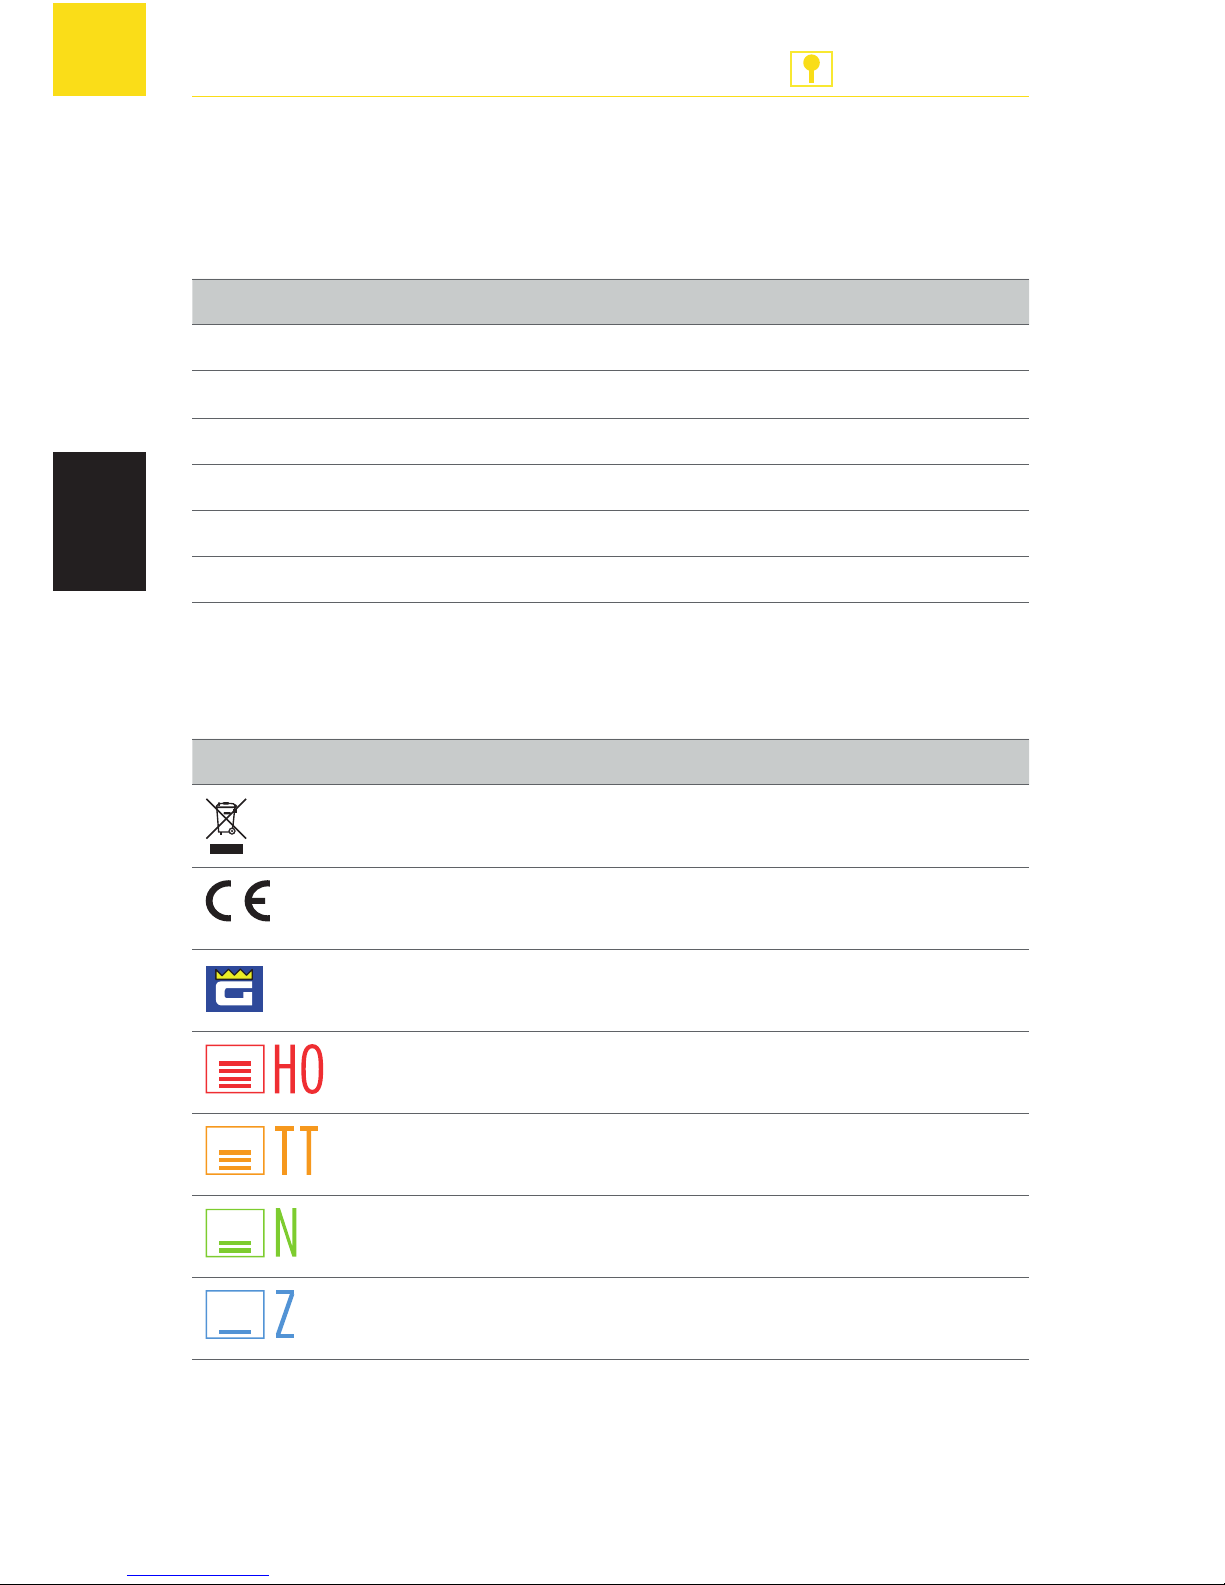
Symbole
Symbol Bedeutung
Das Produkt unterliegt der europäischen Richtlinie 2002/96/EC
CE-Konformitätskennzeichen
POLA G
1:22,5/G/Spurweite 22,5 mm
1:87/H0/Spurweite 16,5 mm
1:120/TT/Spurweite 12 mm
1:160/N/Spurweite 9 mm
1:220/Z/Spurweite 6,5 mm
Tab. 17: Symbole
Page 35

35
Technische Daten
ANLAGENBAU
DE
Zeichen
Zeichen Wert
X
Handlungsaufforderung
g
Hinweis
Tab. 18: Zeichen
Page 36

36
Notizen
ANLAGENBAU
DE
9. Notizen
Page 37

37
ANLAGENBAU
EN
Contents
1. Welcome to FALLER's world .......................................................... 38
2. Safety and responsibility ................................................................. 39
Proper use...................................................................................... 39
For your safety ............................................................................... 39
Environmentally friendly disposal ................................................... 40
3. General view of product ................................................................. 41
Articles supplied ............................................................................. 41
Operating elements ....................................................................... 41
4. Connecting the Sound module ....................................................... 43
Connecting loudspeakers ............................................................... 44
Connecting contacts ...................................................................... 45
Connecting LocoNet ...................................................................... 45
Putting into operation .................................................................... 45
5. SoundDirector ................................................................................ 47
Events ........................................................................................... 47
Installing the SoundDirector ........................................................... 49
Starting the SoundDirector ............................................................ 49
User interface................................................................................. 51
Assigning sound files to an event ................................................... 53
Settings on the SoundDirector ........................................................ 61
Default settings ............................................................................. 63
6. How to deal with problems ............................................................ 66
7. Interesting facts ............................................................................. 67
LISSY ............................................................................................ 67
LocoNet ......................................................................................... 68
8. Technical data ................................................................................ 69
Power supply ................................................................................. 69
Symbols ......................................................................................... 69
Signs 70
Page 38
38
Welcome to FALLER's world
ANLAGENBAU
EN
1. Welcome to FALLER's world
Congratulations – You have found the right thing!
By buying the FALLER Sound module you have acquired the most powerful
and versatile sound module that FALLER has ever made available to modellers.
The Sound module features great possibilities of conjuring up feelings on
your model installation or in a diorama. From the barking of a dog through
elaborate glockenspiels up to a horn signal, everything is possible.
Using the SoundDirector software available from the USB memory stick you
will be able to assign - easily and quickly - sound files in mp3 format to any
event occurring on your model installation.
Moreover, the Sound module offers you the possibility of linking with a digital control unit via LocoNet in order to synchronize with it.
Gebr. FALLER GmbH wishes you a lot of creative ideas and plenty of fun with
your new acquisition!
Page 39
39
Safety and responsibility
ANLAGENBAU
EN
2. Safety and responsibility
Proper use
The Sound module is exclusively designed to play sound files on a model
installation. You will be able to adjust the functions of the Sound module to
your specific requirements.
The guarantee offered will not apply to any damage or defect resulting from
the non-observance of the directions given in the present instruction manual.
For your safety
X
Carefully read through the instruction manual before use.
X
Pay attention to the safety recommendations and warnings given in the
instruction manual or provided on the product.
X
If necessary, inform children of the contents of the instruction manual
and of the potential hazards related to the use of the product.
X
Use the product only when it is in perfect condition.
X
Always retain the instruction manual available near to the product itself.
X
Hand over the product to any third person only together with the present instruction manual.
Page 40

40
Safety and responsibility
ANLAGENBAU
EN
Explosion hazard
Using the product in explosive environments may trigger explosions and
cause severe injuries and property damage.
X
Do not use the product in explosive environments!
Fire hazard
Operating the product while connections are wrong or shunted may trigger a fire or generate smoke.
X
Do not use the product without supervision!
X
Immediately disconnect the product from the mains supply if smoke
is generated!
Corrosion hazard
Using the product in moist rooms or any contact of the product with water
may cause property damage.
X
Use only in dry rooms!
X
Avoid any contact with water!
Risk of physical injury and property damage
Improper use of the product may cause physical injury and property damage.
X
Do not open the enclosure of the Sound module!
X
If the product does not operate, or no longer operates, correctly: Consult FALLER's customer service department!
Environmentally friendly disposal
X
Comply with the local regulations applying to waste disposal.
Page 41
41
General view of product
ANLAGENBAU
EN
3. General view of product
Articles supplied
Sound module, Art. no. 180730
Two loudspeakers
USB memory stick (including installed software)
Instruction manual
Operating elements
Fig. 1: Sound module, Art. no. 180730
Page 42
42
General view of product
ANLAGENBAU
EN
Port Description
16 VAC Port for the supply voltage
(16 V alternating voltage)
links
rechts
Left and right loudspeaker ports
Port for an active loudspeaker system
USB
Stick
Port for the USB memory stick
LocoNet Port for a LocoNet connection, see also chapter 7. Inte-
resting facts »Loco-Net«, page 68
Kontakt 1-10 Ports for push buttons
GND (Masse) Ground
LED Description
[LED] Indicator LED (flashes when connection is correct)
Tab. 1: Operating elements
Page 43
43
Connecting the Sound module
ANLAGENBAU
EN
4. Connecting the Sound module
The Sound module operates on 16 V alternating voltage.
The required alternating voltage can be made available using FALLER
50 VA, 50 to 60 Hz transformer, Art. no. 180641, for instance.
TIP
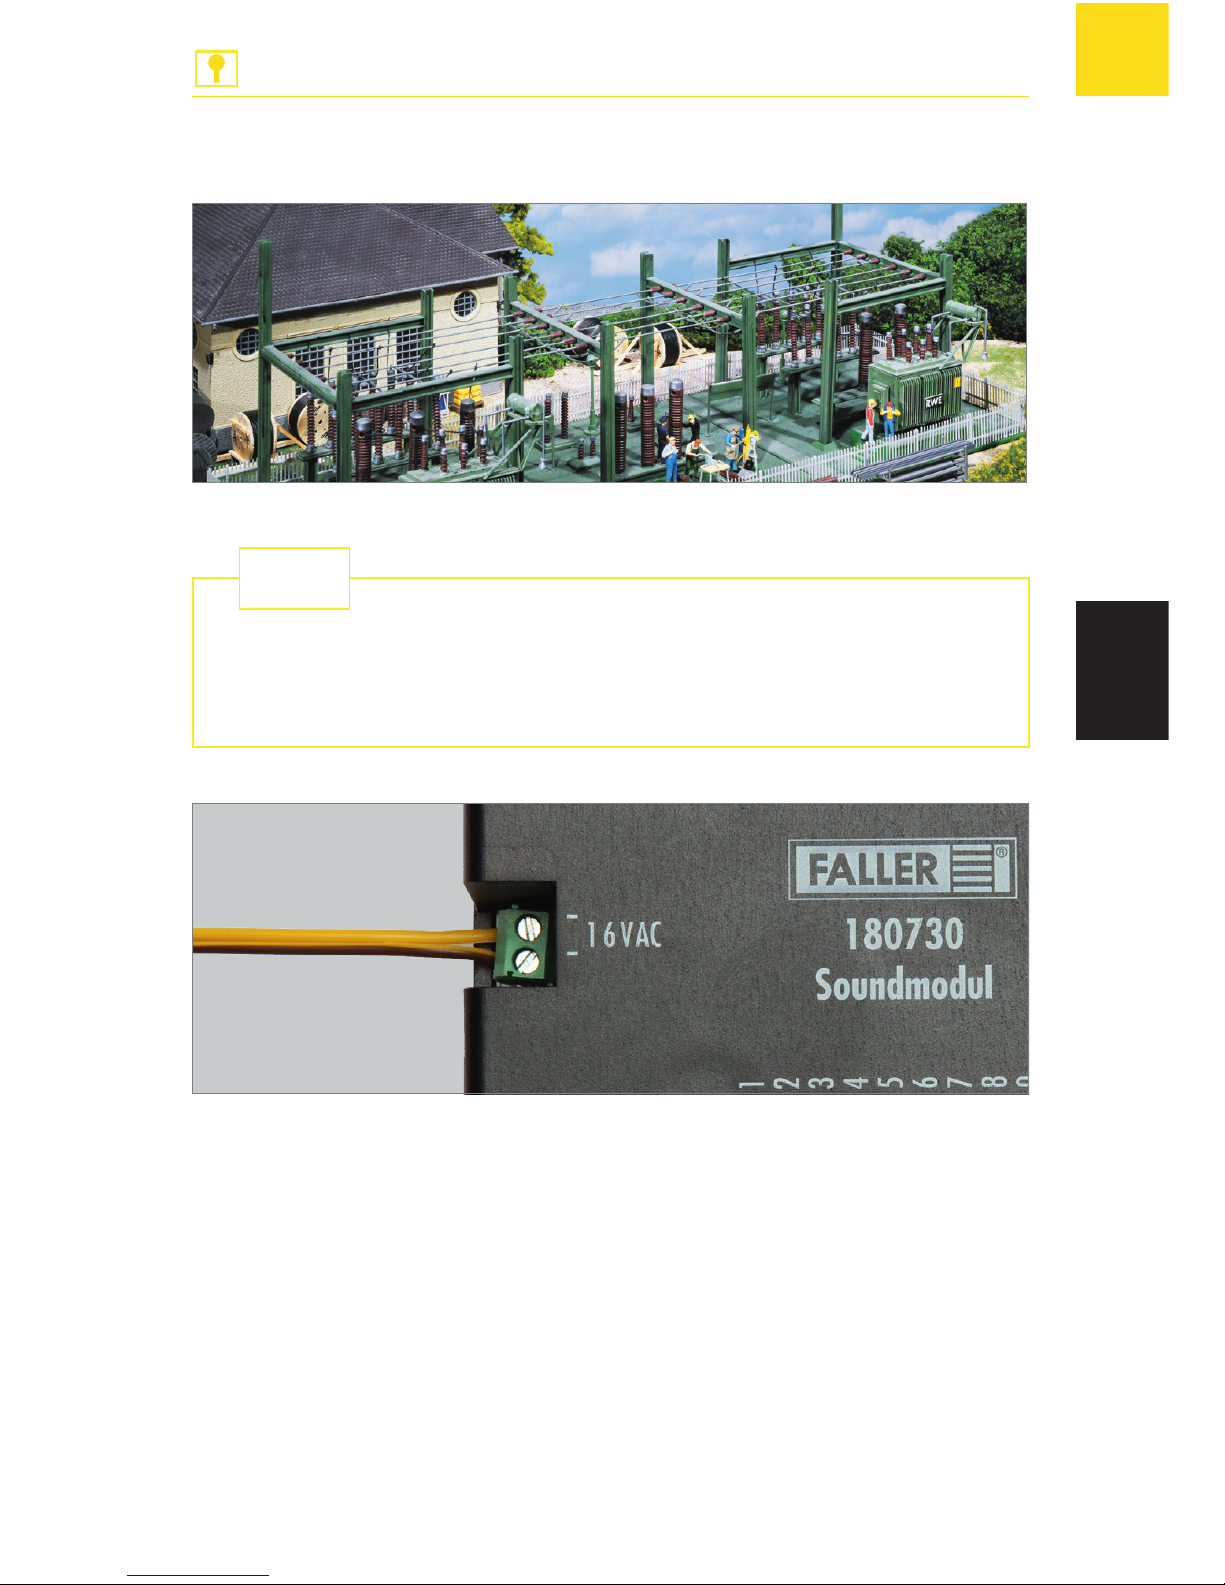
Fig. 2: Connecting the Sound module
X
Connect the Sound module to 16 V alternating voltage, see Fig. 2.
The Sound module is thus connected to its supply voltage.
Page 44
44
Connecting the Sound module
ANLAGENBAU
EN
Connecting loudspeakers
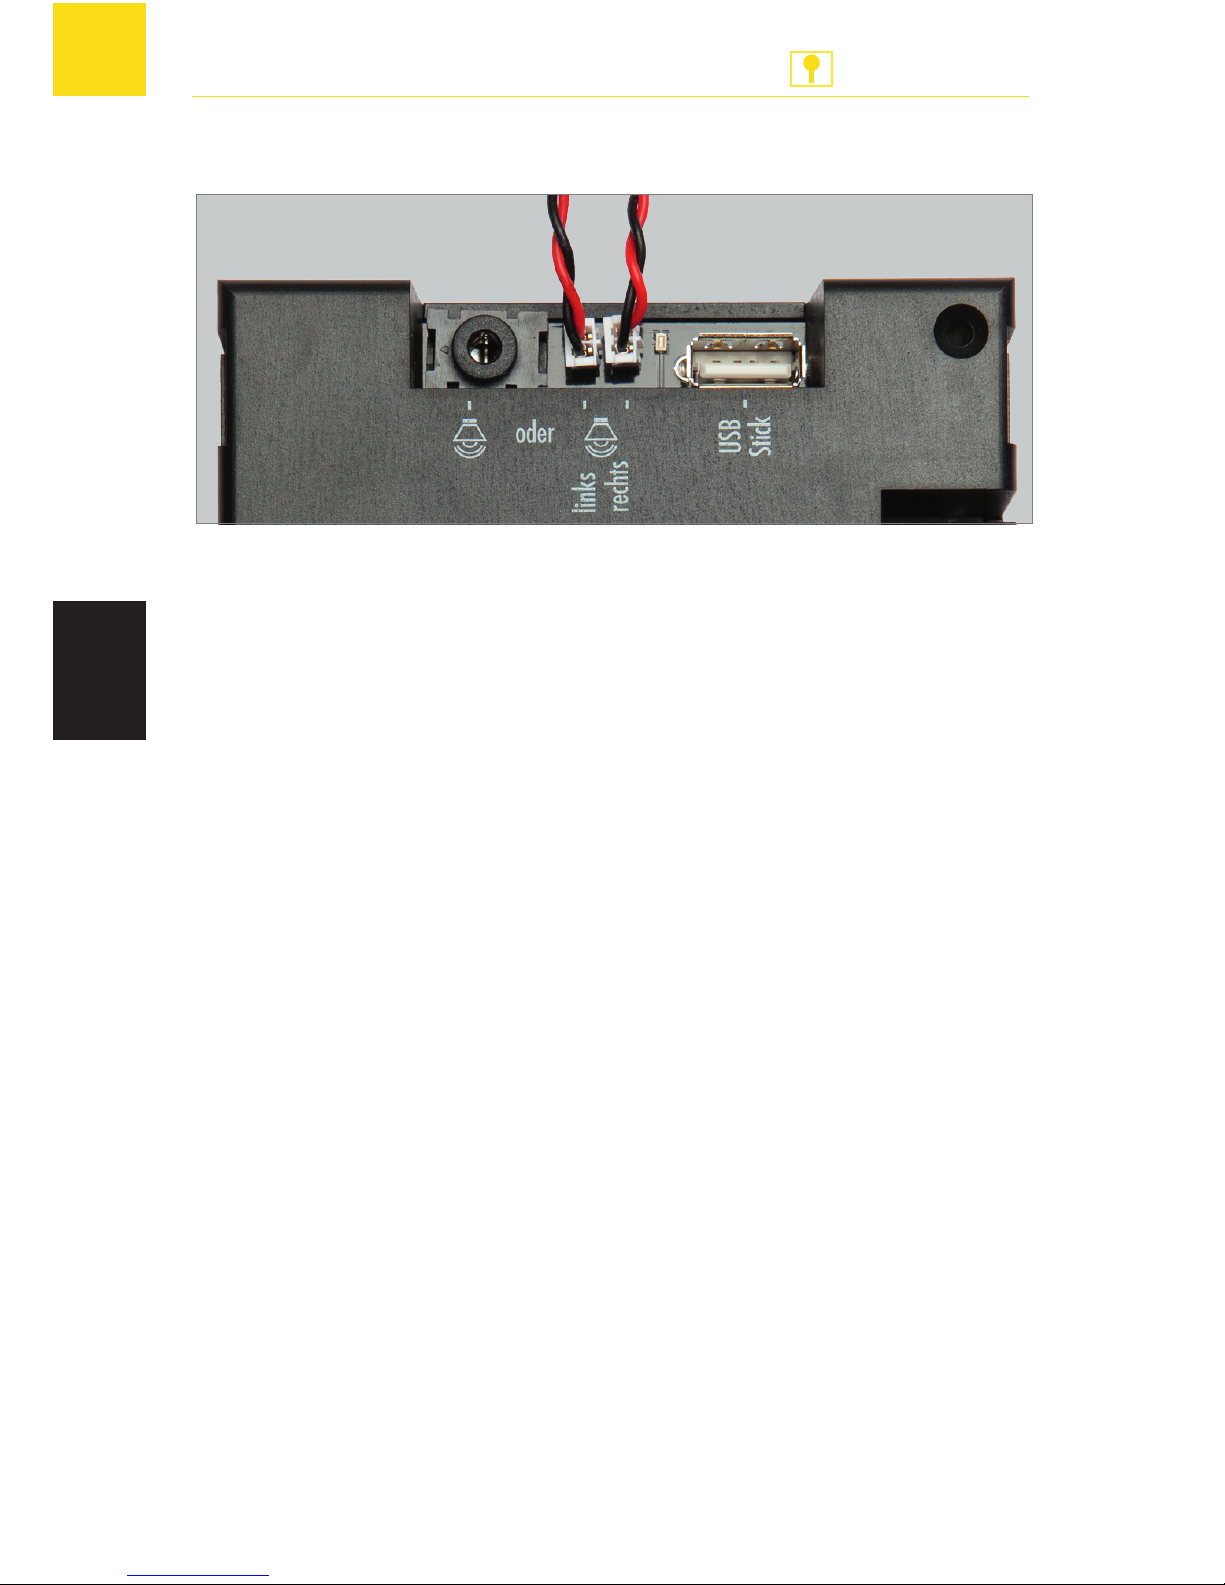
Fig. 3: Connecting loudspeakers
ADVICE: You are free to operate the Sound module with the loudspeakers
supplied or with active loudspeakers.
Connecting the loudspeakers supplied
X
Connect the loudspeakers, see Fig. 3.
The loudspeakers are now connected.
Connecting external loudspeakers
X
Plug the jack in, see Fig. 3.
The loudspeakers are now connected.
Page 45
45
Connecting the Sound module
ANLAGENBAU
EN
Connecting contacts
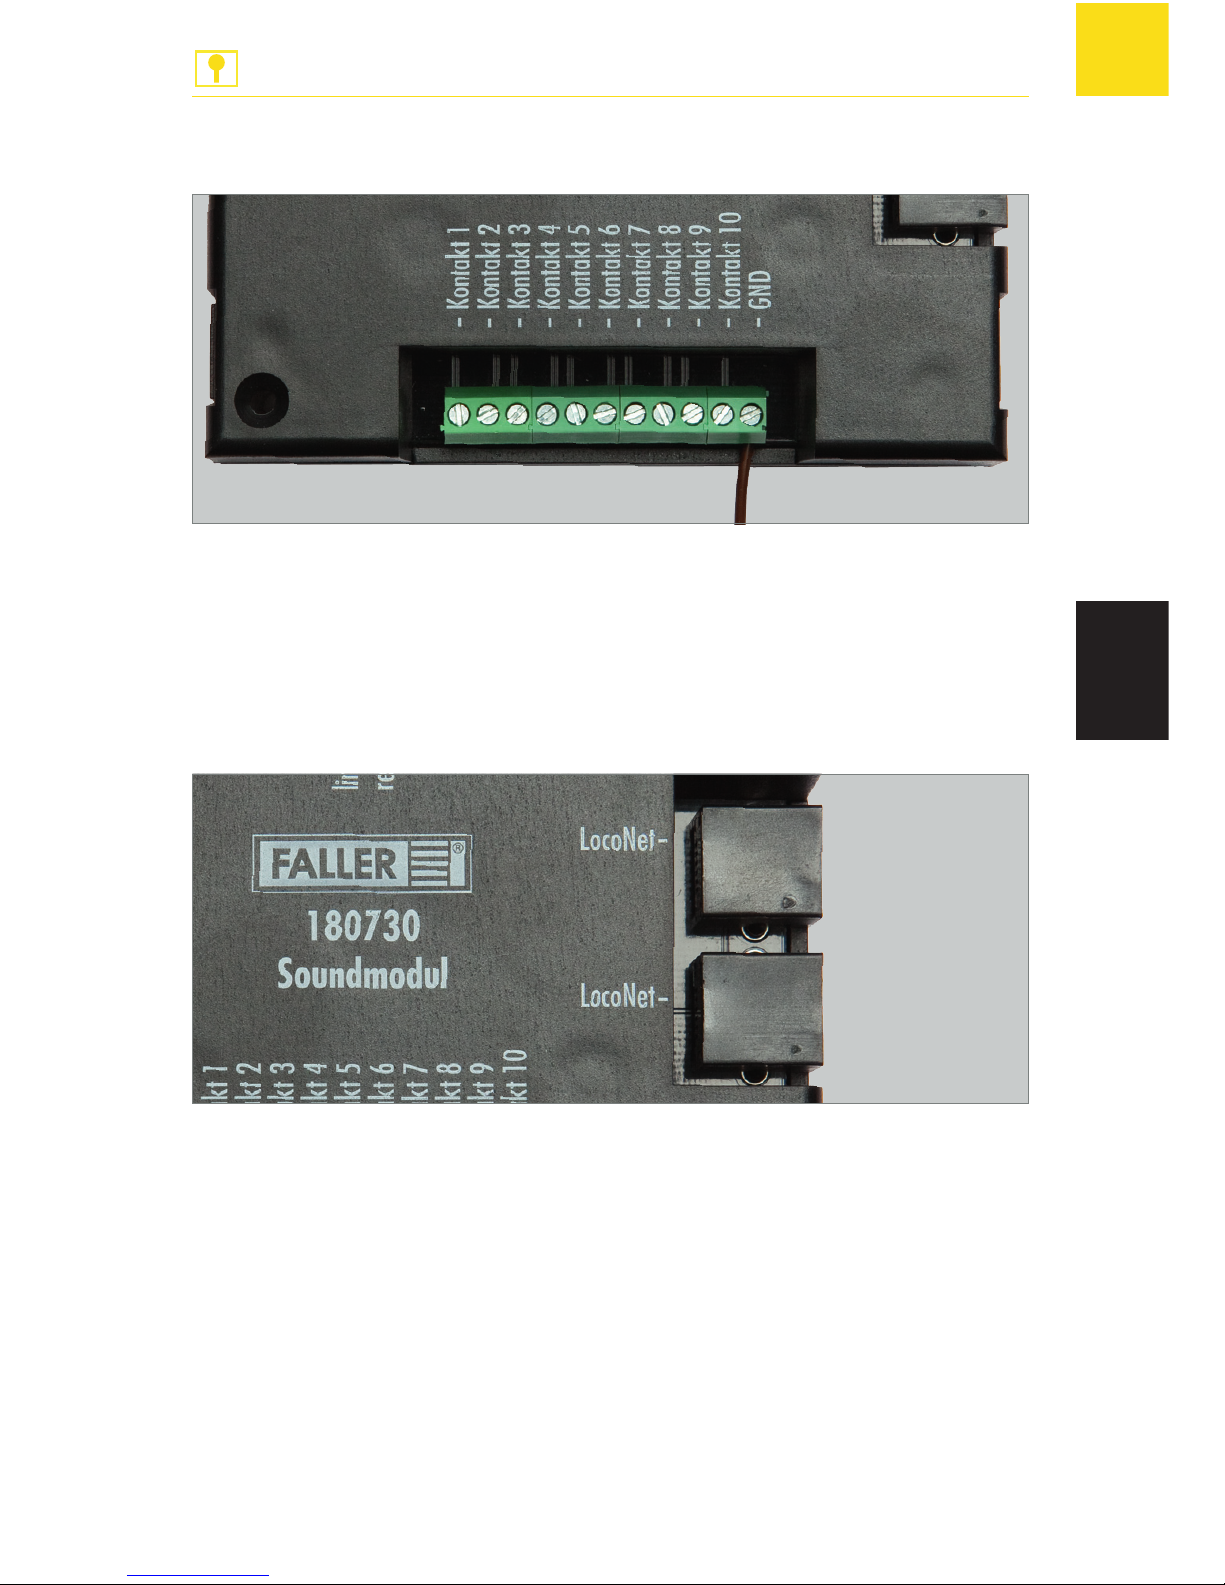
Fig. 4: Connecting contacts
X
Connect the cable of the contact to the desired position, see Fig. 4.
X
Connect the cable of the contact to GND.
The contact is now connected, see Fig. 4.
Connecting LocoNet
Fig. 5: Connecting LocoNet
X
Insert the LocoNet connector into the socket until it snaps on, see Fig. 5.
LocoNet is now connected.
Putting into operation
Various sound files have been stored in the Sound module before dispatch.
These files have been assigned to various events so as to allow you to put
the Sound module into operation immediately.
Page 46

46
Connecting the Sound module
ANLAGENBAU
EN
ADVICE: The Sound module cannot be operated until the USB memory stick
has been plugged in.
X
Plug the USB memory stick in.
The indicator LED flashes.
The Sound module will start playing the sound files stored.
Page 47
47
SoundDirector
ANLAGENBAU
EN
5. SoundDirector
Events
Events will give you the possibility of controlling actions on your model installation.
You can select from seven different events and set each one differently.
Element Event Description
Contacts / Inputs Sound files will be played on
pressing a push button
Coil items Sound files will be played on actu-
ating a coil item
Background
sounds
Sound files will be played continuously in a preset order
Random play Sound files will be played at ran-
dom
Time-dependent
sounds
Sound files will be played according to a preset rhythm (true to
the model installation time)
Page 48
48
SoundDirector
ANLAGENBAU
EN
Lissy Vehicledependent sounds
Sound files will be played on receiving a message from a receiver and
transmitter, see also chapter 7.
Interesting facts »Lissy«, page 67
Checkback-signal
dependent sounds
Sound files will be played on receiving a signal from a given section
of rail track occupied by a train,
for instance
ADVICE:
Play priorities can be assigned only once within a group of events.
Play positions cannot be assigned twice.
Always indicate an address even if you do not use any digital control unit.
Requirement: The required component parts, such as for instance coil items
or Lissy receiver, must be present in the installation.
Page 49

49
SoundDirector
ANLAGENBAU
EN
Installing the SoundDirector
ADVICE: Please take into account the requirements to be fulfilled by your
operating system, see also chapter 8. Technical data, page 69
X
Insert the USB memory stick into a USB port.
A window will open.
X
Open the file directory.
X
Open the file directory 'Software'.
X
Start the file 'Setup.exe'.
Your computer will be made ready for the installation.
X
Follow the instructions given by the setup assistant.
The software will be installed on your computer.
Starting the SoundDirector
Requirement: To start the SoundDirector the USB memory stick must be
plugged in.
To be able to use all the functions of the SoundDirector an internet
connection is required.
TIP
Page 50
50
SoundDirector
ANLAGENBAU
EN
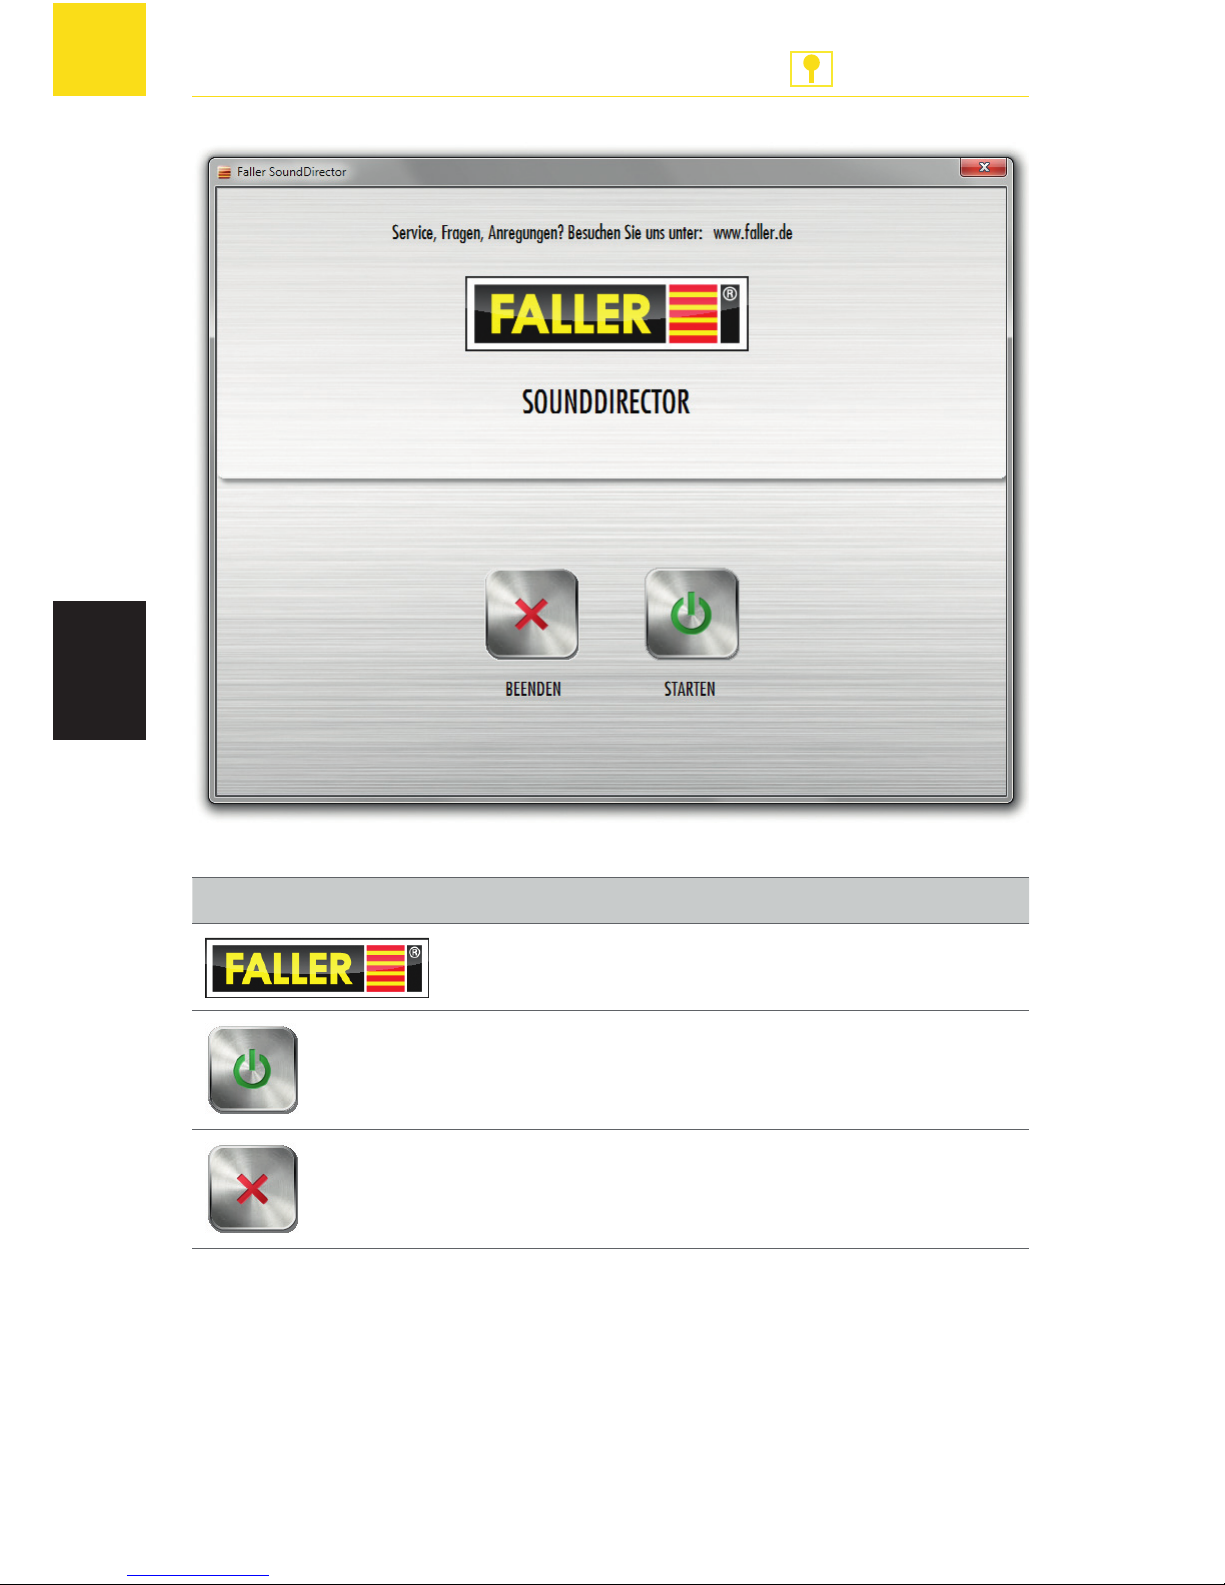
Fig. 6: Start picture
Element Description
Routes to www.faller.de
Starts the SoundDirector
Exits the SoundDirector
Tab. 2: Elements in Start picture
X
Now, start the SoundDirector.
The start picture will appear, see Fig. 6.
X
Press 'Start'.
The synopsis picture will appear, see Fig. 7.
Page 51
51
SoundDirector
ANLAGENBAU
EN
User interface
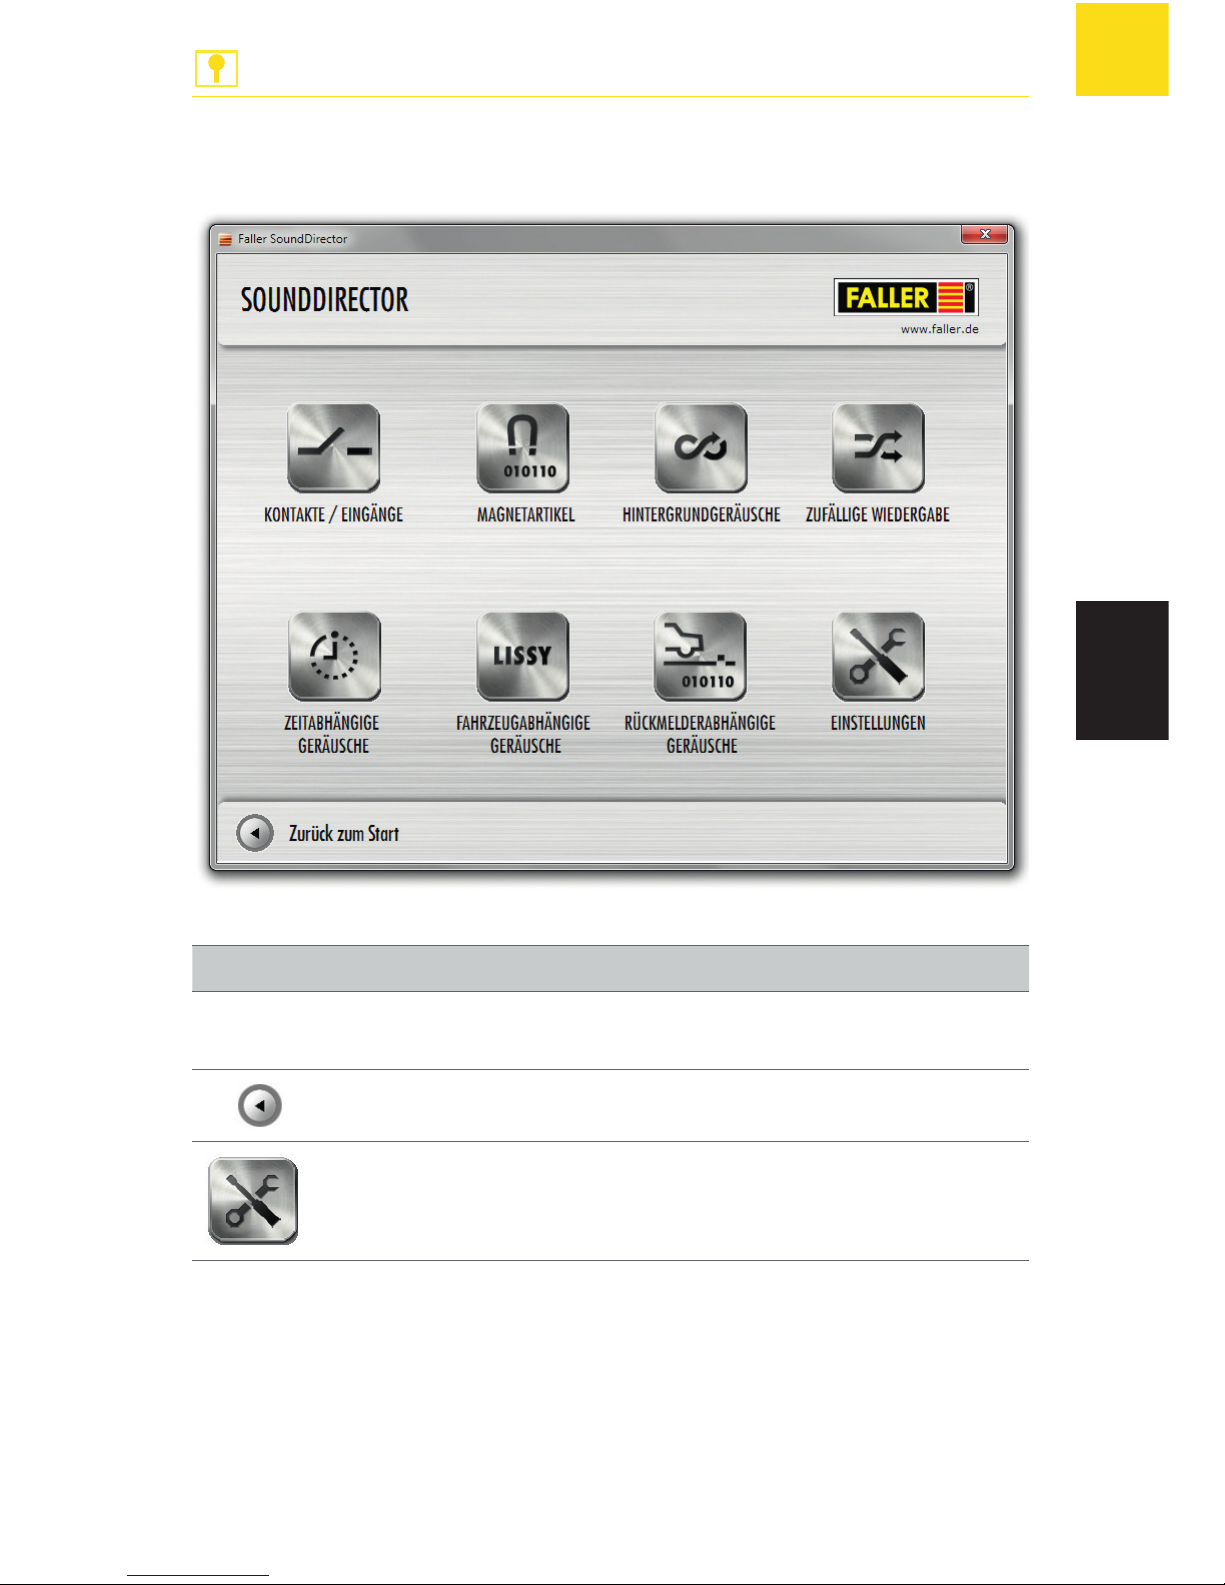
Fig. 7: Synopsis picture
Element Description
Event picture Each event is represented with the correspon-
ding settings, see Fig. 8
Displays the start picture, see Fig. 6
Displays the Settings picture, see Fig. 9
Tab. 3: Elements in the Synopsis picture
Page 52
52
SoundDirector
ANLAGENBAU
EN
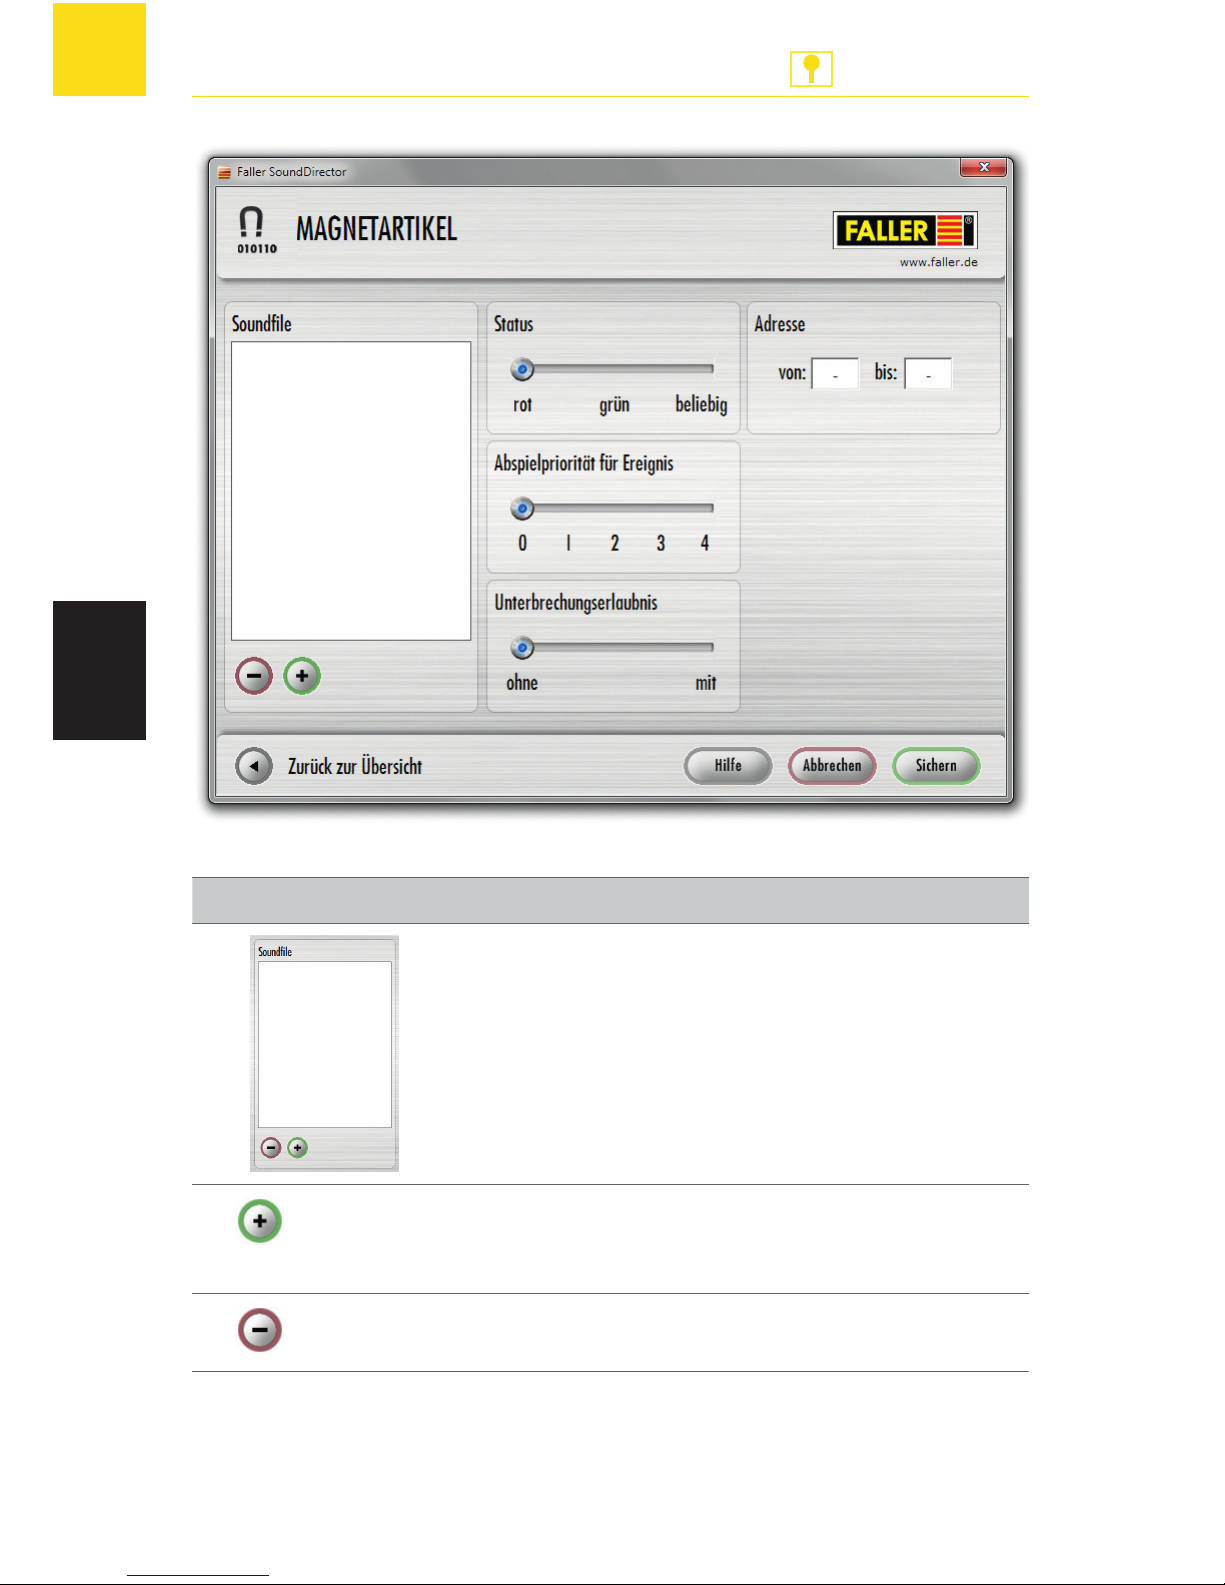
Fig. 8: Example - Event picture
Element Description
List of the sound files associated with
an event
Adds a sound.
List of all sound files on the USB
memory stick
Deletes a sound
Off
Page 53
53
SoundDirector
ANLAGENBAU
EN
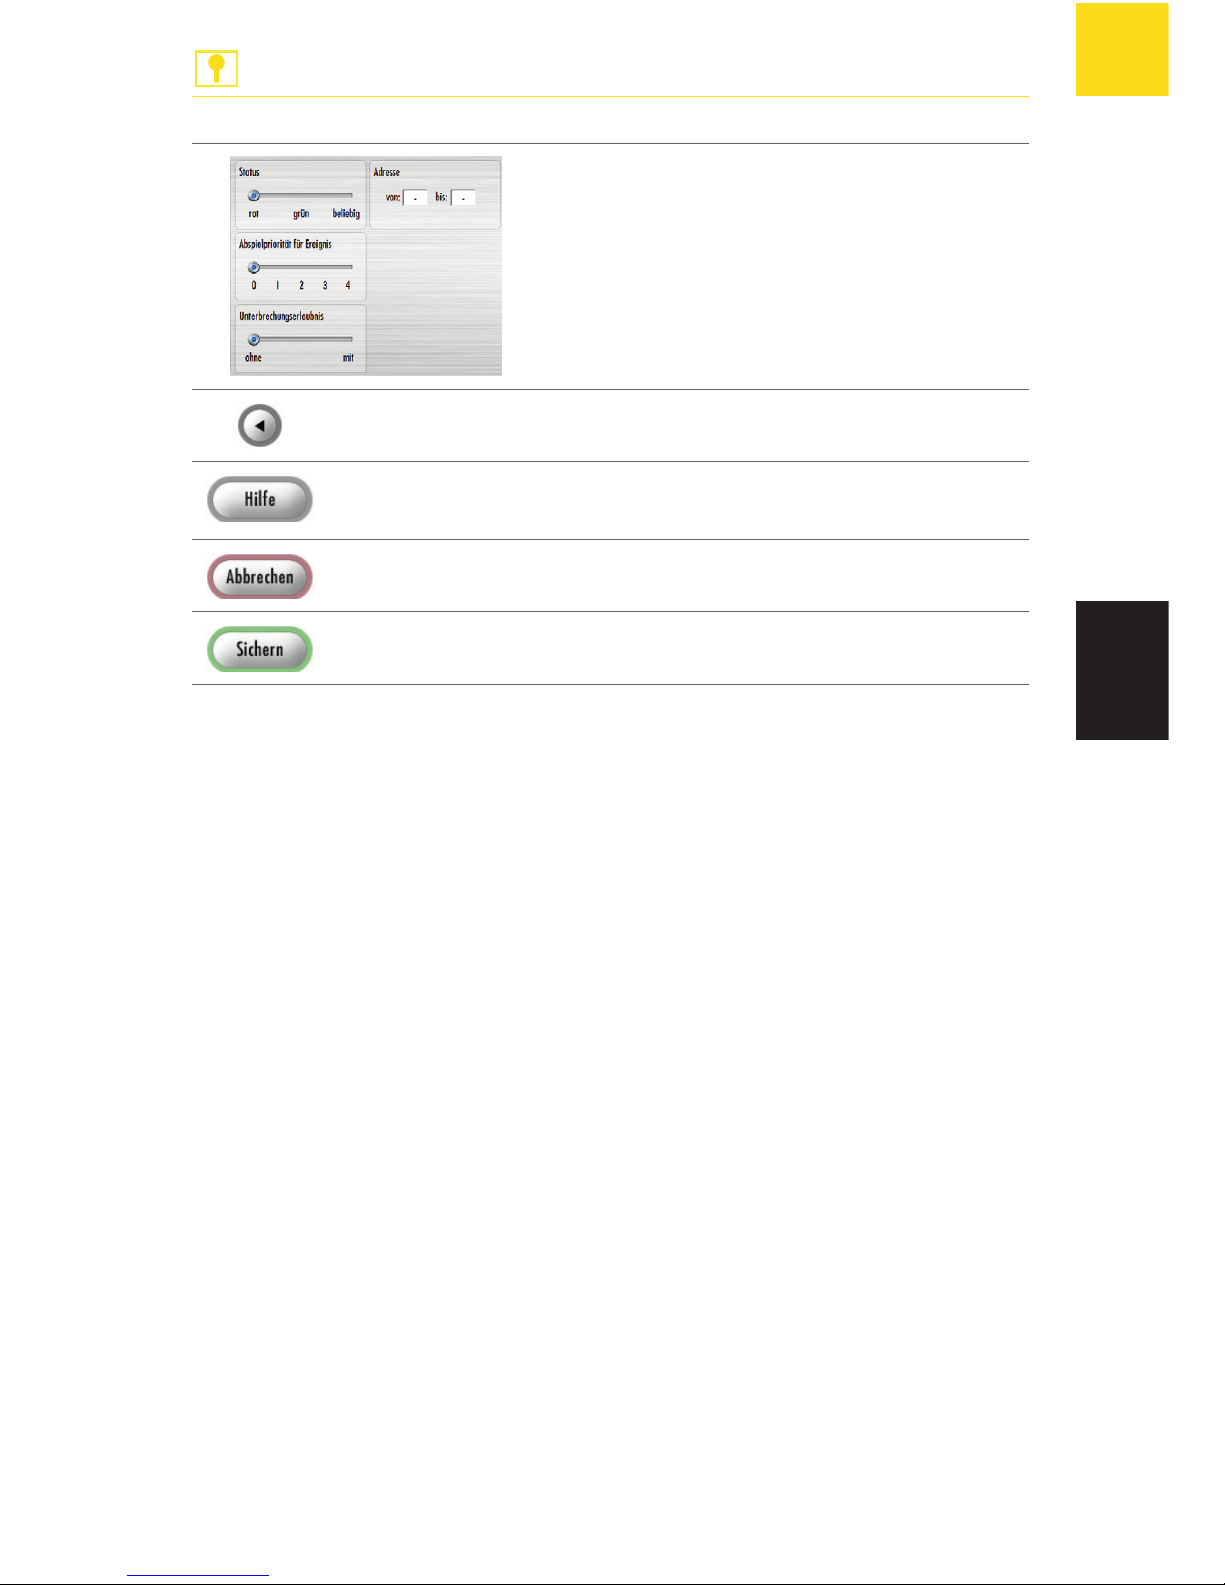
Possible settings for the event
Displays the synopsis picture, see Fig. 7
Routes to the instruction manual of the
Sound module
Interrupts the setting procedure
Stores the settings
Tab. 4: Elements in the Event picture
Assigning sound files to an event
After assigning an event, the SoundDirector stores – on the USB memory
stick – a file containing some information that is essential to him.
ADVICE:
File names may not be modified, moved or deleted.
The most recent sound file added is always the latest item in a list.
Sound files that have not been given any setting will be deleted when
exiting the SoundDirector.
Always press 'Beenden' [Exit] to close the SoundDirector.
Page 54
54
SoundDirector
ANLAGENBAU
EN
Coil items
Example of use: Warning light at a level crossing
X
Press the event picture 'Magnetartikel' [Coil items].
X
Press 'Sound hinzufügen' [Add a sound].
X
Select a sound file from the list.
That sound file appears under 'Soundfile'.
X
Select the status 'grün' [green] for the coil item.
The sound file will be played when actuating the green button.
X
Select the play priority you want to assign to the event '1'.
X
Select 'ohne Unterbrechungserlaubnis' [without authorization to interrupt].
The sound will not be interrupted by other events.
X
Press 'Sichern' [Store].
The settings are stored.
Setting Explanation
Status
'rot' [red], 'grün' [green],
'beliebig' [arbitrary]
Assignment for which the sound shall
be played
Address
'von:' [from:], 'bis:' [to:]
Assignment within the digital control unit
Play priority for the event Setting of priority whenever seve-
ral sound files are set to the same
address
Authorization to interrupt
'ohne' [without], 'mit' [with]
Allows or forbids the interruption of
the sound by another event
Tab. 5: Settings for Coil items
Page 55
55
SoundDirector
ANLAGENBAU
EN
Checkback-signal dependent sounds
Example of use: Announcement on a train pulling in
X
Press the event picture 'Rückmelderabhängige Geräusche' [Checkbacksignal dependent sounds].
X
Press 'Sound hinzufügen' [Add a sound].
X
Select a sound file from the list.
That sound file appears under 'Soundfile'.
X
Select status 'belegt' [occupied].
The sound file will be played whenever the section of the rail track is
occupied (busy).
X
Select the play priority you want to assign to event '1'.
X
Select 'ohne Unterbrechungserlaubnis' [without authorization to interrupt].
The sound will not be interrupted by other events.
X
Press 'Sichern' [Store].
The settings are stored.
Setting Explanation
Status
'belegt' [occupied], 'frei' [free],
'beliebig' [arbitrary]
Status of the checkback contact, for
which the sound shall have to be
played
Address
'von:' [from:], 'bis:' [to:]
Address stored in the digital control
unit for the checkback contact
The play priority you want to
assign to the event
Setting of priority whenever several sound files are set to the same
address
Authorization to interrupt
'ohne', 'mit'
Allows or forbids the interruption of
the sound by another event
Tab. 6: Settings for Checkback-signal dependent sounds
Page 56
56
SoundDirector
ANLAGENBAU
EN
LISSY Vehicle-dependent sounds
Example of use: Accelerating train
X
Press the event picture 'Lissy Fahrzeugabhängige Geräusche' [Lissy
Vehicle-dependent sounds].
X
Press 'Sound hinzufügen' [Add a sound].
X
Select a sound file from the list.
That sound file appears under 'Soundfile'.
X
Select the option Direction of drive 'S1 -> S2'.
The sound file will be played whenever the train drives from sensor 1
to sensor 2.
X
Select the play priority you want to assign to event '1'.
X
Select 'ohne Unterbrechnungserlaubnis' [without authorization to interrupt].
The sound will not be interrupted by other events.
X
Press 'Sichern' [Store].
The settings are stored.
Setting Explanation
Option Direction of drive
'unabhängig' [unrestrained],
'S1 -> S2', 'S2 -> S1'
The direction of drive depends on the
order of the receivers
Address
'von:' [from:], 'bis:' [to:]
Address stored in the digital control
unit for the Lissy receiver
The play priority you want to
assign to the event
Setting of priority whenever several sound files are set to the same
address
Authorization to interrupt
'ohne' [without], 'mit' [with]
Allows or forbids the interruption of
the sound by another event
Tab. 7: Settings for Lissy Vehicle-dependent sounds
Page 57
57
SoundDirector
ANLAGENBAU
EN
Contacts / Inputs
Example of use: Vehicle horn
X
Press the event field 'Kontakte / Eingänge' [Contacts / Inputs].
X
Press 'Sound hinzufügen' [Add a sound].
X
Select a sound file from the list.
That sound file appears under 'Soundfile'.
X
Select 'Schließen' [close].
The sound file will be played whenever the contact is actuated.
X
Select a contact (For instance: from: 10 to: 10)
X
Select the play priority you want to assign to event '1'.
X
Select 'ohne Unterbrechungserlaubnis' [without authorization to interrupt].
The sound will not be interrupted by other events.
X
Press 'Sichern' [Store].
The settings are stored.
Setting Explanation
Status
'öffnen' [open], 'schließen'
[close], 'ändern' [change]
For which status of the push button a
sound file will be played
Contact 1 to 10 The place where a push button is
connected to the Sound module
The play priority you want to
assign
Setting of priority whenever several sound files are set to the same
address
Authorization to interrupt
'ohne Erlaubnis' [without
authorization], 'mit Erlaubnis'
[with authorization]
Allows or forbids the interruption of
the sound by another event
Tab. 8: Settings for Contacts / Inputs
Page 58

58
SoundDirector
ANLAGENBAU
EN
Random play
Example of use: Barking of a dog
X
Press the event field 'Zufällige Wiedergabe' [Random play].
X
Press 'Sound hinzufügen' [Add a sound].
X
Select a sound file from the list.
That sound file appears under 'Soundfile'.
X
Select 'mit Unterbrechungserlaubnis' [with authorization to interrupt].
The sound will be interrupted by others events (a train pulling in, for
instance).
X
Press 'Sichern' [Store].
The settings are stored.
Setting Explanation
Authorization to interrupt
'ohne' [without authorization],
'mit' [with authorization]
Allows or forbids the interruption of
the sound by another event
Tab. 9: Settings for Random play
Page 59
59
SoundDirector
ANLAGENBAU
EN
Time-dependent sounds
Example of use: Glockenspiel
X
Press the event picture 'Zeitabhängige Geräusche' [Time-dependent
sounds].
X
Press 'Sound hinzufügen' [Add a sound].
X
Select a sound file from the list.
That sound file appears under 'Soundfile'.
X
Select '00:15'.
The sound will be played every 15 minutes (to model installation
time).
X
Select 'ohne Unterbrechungserlaubnis' [without authorization to interrupt].
The sound will not be interrupted by other events.
X
Press 'Sichern' [Store].
The settings are stored.
Setting Explanation
Time option Repetition time to model installa-
tion time
Authorization to interrupt
'ohne' [without authorization],
'mit' [with authorization]
Allows or forbids the interruption of
the sound by another event
Tab. 10: Settings Time-controlled play
Page 60

60
SoundDirector
ANLAGENBAU
EN
Background sounds
Example of use: Bird twittering
ADVICE: Sound files of that group of events are always interrupted by
other events.
X
Press the event picture 'Hintergrundgeräusche' [Background sounds].
X
Press 'Sound hinzufügen' [Add a sound].
X
Select a sound file from the list.
That sound file appears under 'Soundfile'.
X
Select priority '5'.
The sound will be played as fifth file in the list of 'Endlose Wiedergabe' [Continuous play].
X
Press 'Sichern' [Store].
The settings are stored.
Setting Explanation
Range 1 to 127 Order of playing the sound in the
play list.
Tab. 11: Settings for Continuous play
Delete a sound file
X
Select a sound file.
X
Press 'Sound löschen' [Delete a sound] or click on the right mouse key
and 'Zeile löschen' [Delete line].
The sound file will be deleted.
Page 61
61
SoundDirector
ANLAGENBAU
EN
Settings on the SoundDirector
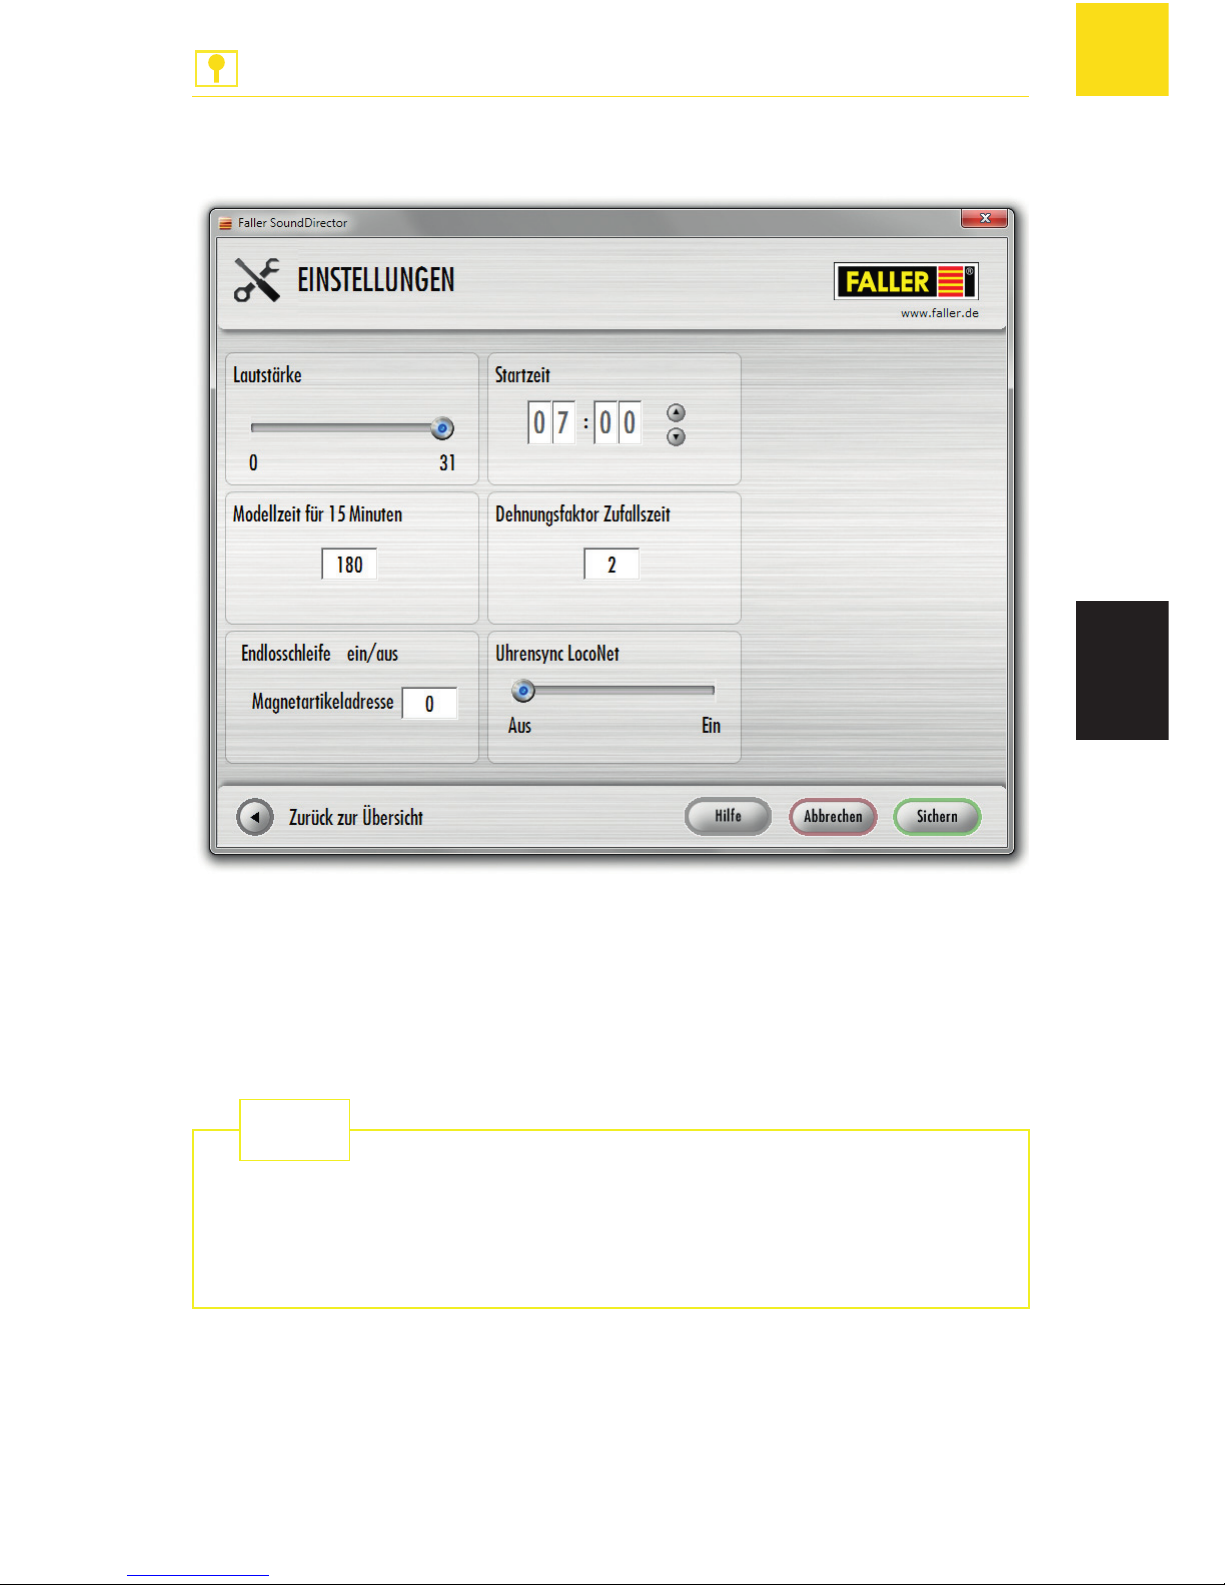
Fig. 9: Settings
To set the volume
X
Push the regulator to the required value, see Fig. 9.
X
Press 'Sichern' [Store] to have the setting adopted.
If you use active loudspeakers the regulator of the Sound module
should not be pushed to the maximum position to avoid overdriving
the loudspeakers.
TIP
To select the start time [Startzeit]
Startzeit [Start time] will allow you to set the moment at which your model
installation time should begin.
Page 62

62
SoundDirector
ANLAGENBAU
EN
ADVICE: Start time will begin with the USB memory stick being plugged in
or when the Sound module is switched on.
X
Enter the start time you want to use, see Fig. 9.
X
Press 'Sichern' [Store] to have the settings adopted.
Model installation time for 15 minutes
Model installation time allows you to adjust how many seconds of your real
time should correspond to 15 minutes of model installation time.
X
Enter the model installation time you consider appropriate.
X
Press 'Sichern' [Store] to have the settings adopted.
Expansion factor Random time
The expansion factor of the random time will allow you to delay the playing of random plays.
X
Enter the factor you consider appropriate.
X
Press 'Sichern' [Store] to have the settings adopted.
Uhrensync LocoNet
Clock synchronization to LocoNet will allow you to take over the time settings of a digital control unit that is connected via LocoNet.
X
Press 'Ein' [On] to have the time settings of the digital control unit
adopted.
X
Press 'Aus' [Off] to have the time settings of the Sound module adopted.
X
Press 'Sichern' [Store] to have the settings adopted.
Endlosschleife [Continuous loop] On/Off
Here you are able to select with which sound in the event field 'Endlose Wiedergabe' [Continuous play] the loop should begin.
Page 63
63
SoundDirector
ANLAGENBAU
EN
Default settings
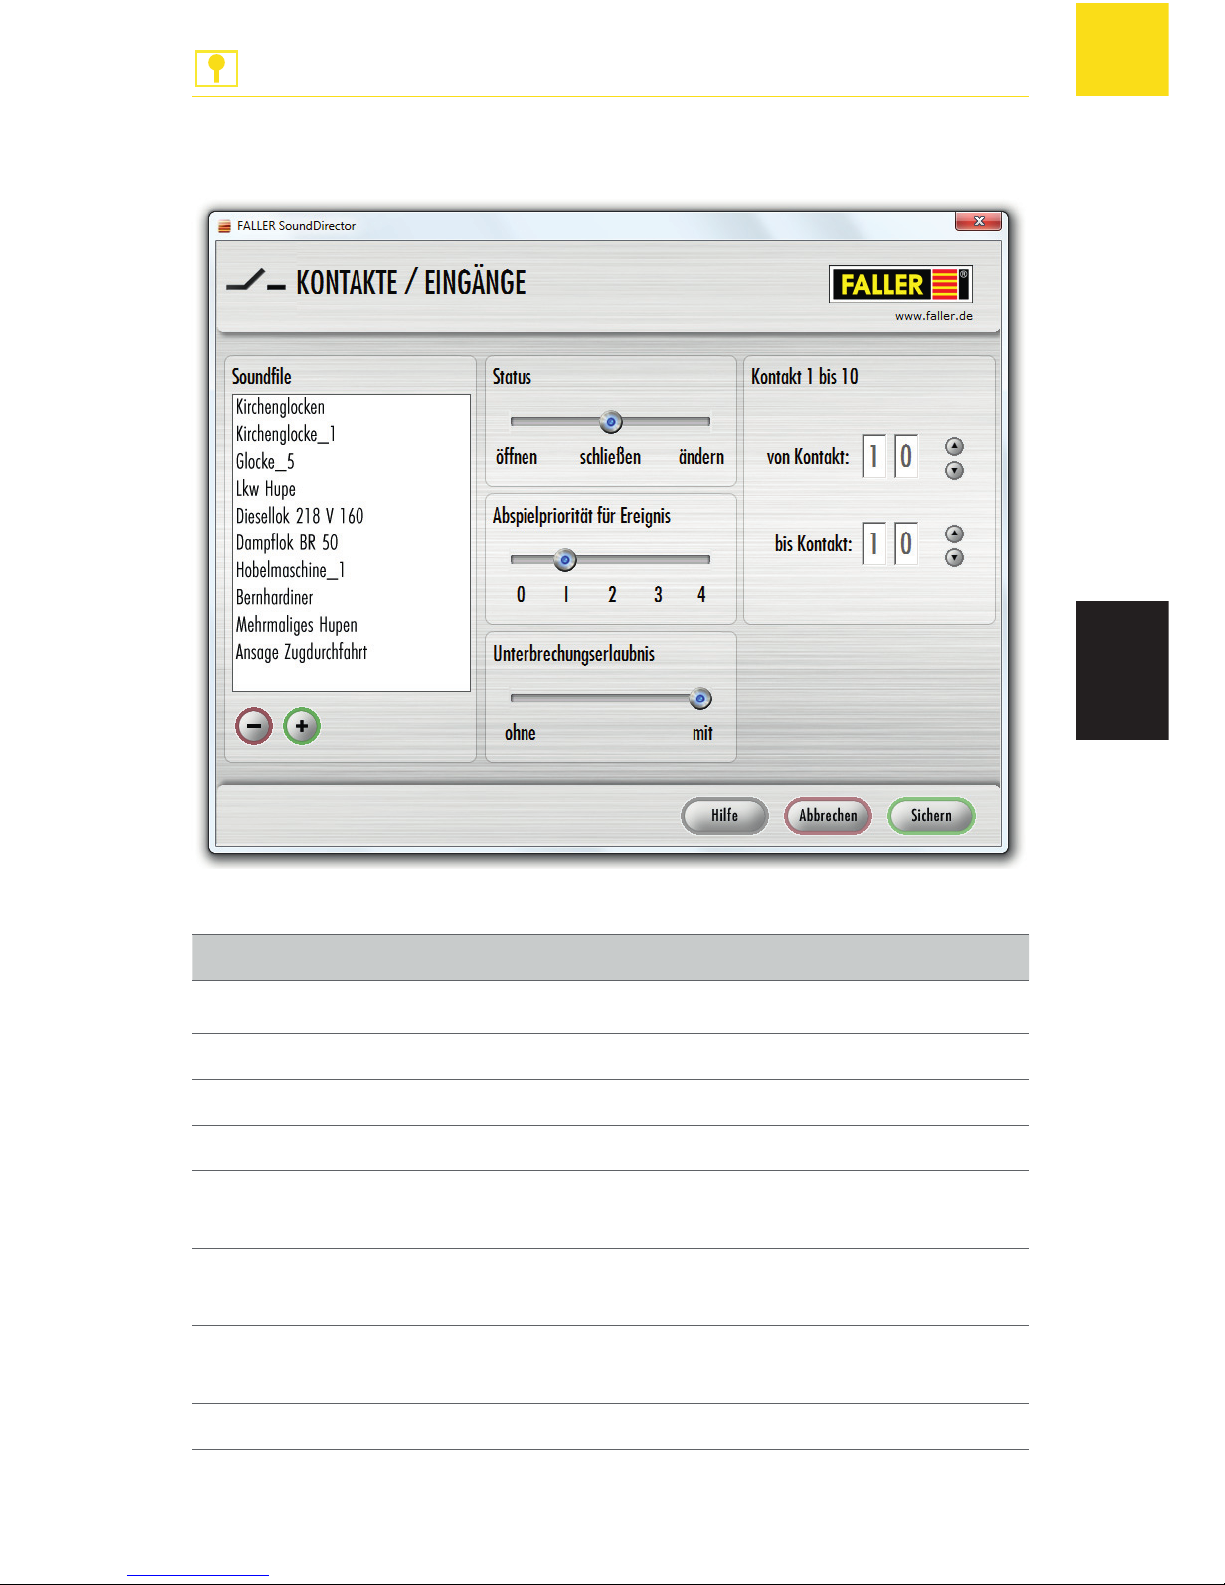
Fig. 10: Werkseinstellungen Kontakte / Eingänge
Kontakt [Contact] Soundfile
1 Kirchenglocken [Church bells]
2 Kirchenglocke_1 [Church bell 1]
3 Glocke_5 [Bell 5]
4 Lkw Hupe [Lorry horn]
5 Diesellok 218 V 160 [Diesel locomo-
tive 218 V 160]
6 Dampflok BR 50 [Steam locomo-
tive BR 50]
7 Hobelmaschine_1 [Planing machine
1]
8 Bernhardiner [St. Bernard]
Page 64
64
SoundDirector
ANLAGENBAU
EN
Kontakt [Contact] Soundfile
9 Mehrmaliges Hupen [Repeated horn
signal]
10 Ansage Zugdurchfahrt [Announce-
ment Passage of a train]
Tab. 12: Default settings Contacts / Inputs
Fig. 11: Default settings Background Sounds
Order of playing Soundfile
1 Vögel am Morgen-1 [Birds in the
morning 1]
2 Vögel am Morgen-2 [Birds in the
morning 2]
Page 65
65
SoundDirector
ANLAGENBAU
EN
Order of playing Soundfile
3 Vogelgesang [Birdsong]
4 Vogelzwitschern-1 [Bird twittering 1]
Tab. 13: Default settings Background Sounds
Fig. 12: Default settings Random Play
Soundfile
bellender Hund [Dog barking]
Eierlegendes Huhn [Egg-laying hen]
Tauben [Doves]
Unimog_starten [Unimog starting]
Tab. 14: Default settings Random Play
Page 66
66
How to deal with problems
ANLAGENBAU
EN
6. How to deal with problems
Error messages
Error Source Remedy
Software does
not start
Software deleted
X
Start the file Setup.exe
under C:/Programme/
SoundDirector by means of
a double click
X
Download the software
from the FALLER Website
A sound file
cannot be read
Wrong file format
X
Check whether the file format is mp3
Sound module
does not operate
Sound module
damaged
X
Consult FALLER's customer
service department
Tab. 15: How to deal with problems
Direct line to FALLER's customer service department:
Phone + 49 (0) 77 23 / 651-106
E-Mail [email protected]
TIP
Page 67
67
Interesting facts
ANLAGENBAU
EN
7. Interesting facts
LISSY
Lissy will allow you to control your model installation automatically when
using a digital system.
Lissy consists of an infrared transmitter installed on the train and of infrared
receivers that can be built into the track.
The railway engine address and the type of train signalled by the infrared transmitter are identified by the receiver and transmitted via LocoNet.
Moreover, various automatic control functions can be triggered without
having to use a computer.
Lissy identifies the train and indicates which train has arrived at plat-
form 1 of the station.
Lissy ensures the management of your shadow station, finds there on
its own a particular track for each train and, if necessary, will cause the
trains automatically leave the shadow station again.
Lissy actually is a block system for digital installations and automati-
cally controls the block posts on your installation without having to
use a computer.
Lissy slowly applies the brakes in every digital railway engine whenever
it encounters a red light, by using the internal time lag braking device.
Lissy measures the speed of passing railway engines, true to scale.
Lissy switches on the sound of engines in conformity with the particular
situation, for instance the whistle before entering a tunnel or the horn
at a level-crossing when passing the whistle board.
Lissy fades out the sound of railway engines fitted with Intellisound
whenever they drive through invisible areas (shadow station, tunnels).
Page 68

68
Interesting facts
ANLAGENBAU
DE
Lissy switches on or off the lights of a particular engine after a given
period of time, after the driver has shed his railway engine, for instance.
Lissy controls the speed of railway engines, when pulling in at a station
or on speed restriction sections for instance.
Lissy operates without any interruption whatsoever on the track, and
can thus easily be built into any model railway installation subsequently.
Lissy realistically controls the driving behaviour of your railway engines.
Visit also www.uhlenbrock.de/INTERN/PRODUKTE/lissy/ for more information on LISSY - the individual locomotive control system
LocoNet
The LocoNet bus represents the safe and low-priced device allowing to wire
together a digital control unit, control and operating devices, checkback contacts, switching modules and other elements.
All devices that are connected via the LocoNet will get their operating voltage from the LocoNet.
The required current is made available to the LocoNet by the digital control
unit. If the current consumption of all connected devices exceeds the intensity supplied by the digital control unit, it will be necessary to connect another LocoNet current supply.
Do you want to find out more about the subject? Quench your thirst
for knowledge on our website – www.faller.de. You will find there
some interesting background information and a lot of creative suggestions for all areas of model making.
TIP
Page 69
69
Technical data
ANLAGENBAU
EN
8. Technical data
Power supply
Designation Value
Supply voltage 16 V
Load 1.5 watts on 8 ohms
Loudspeaker impedance At least 8 ohms
USB memory stick USB 2.0
Operating system Microsoft® Windows 98 SE and
above
USB port USB 1.0 or higher
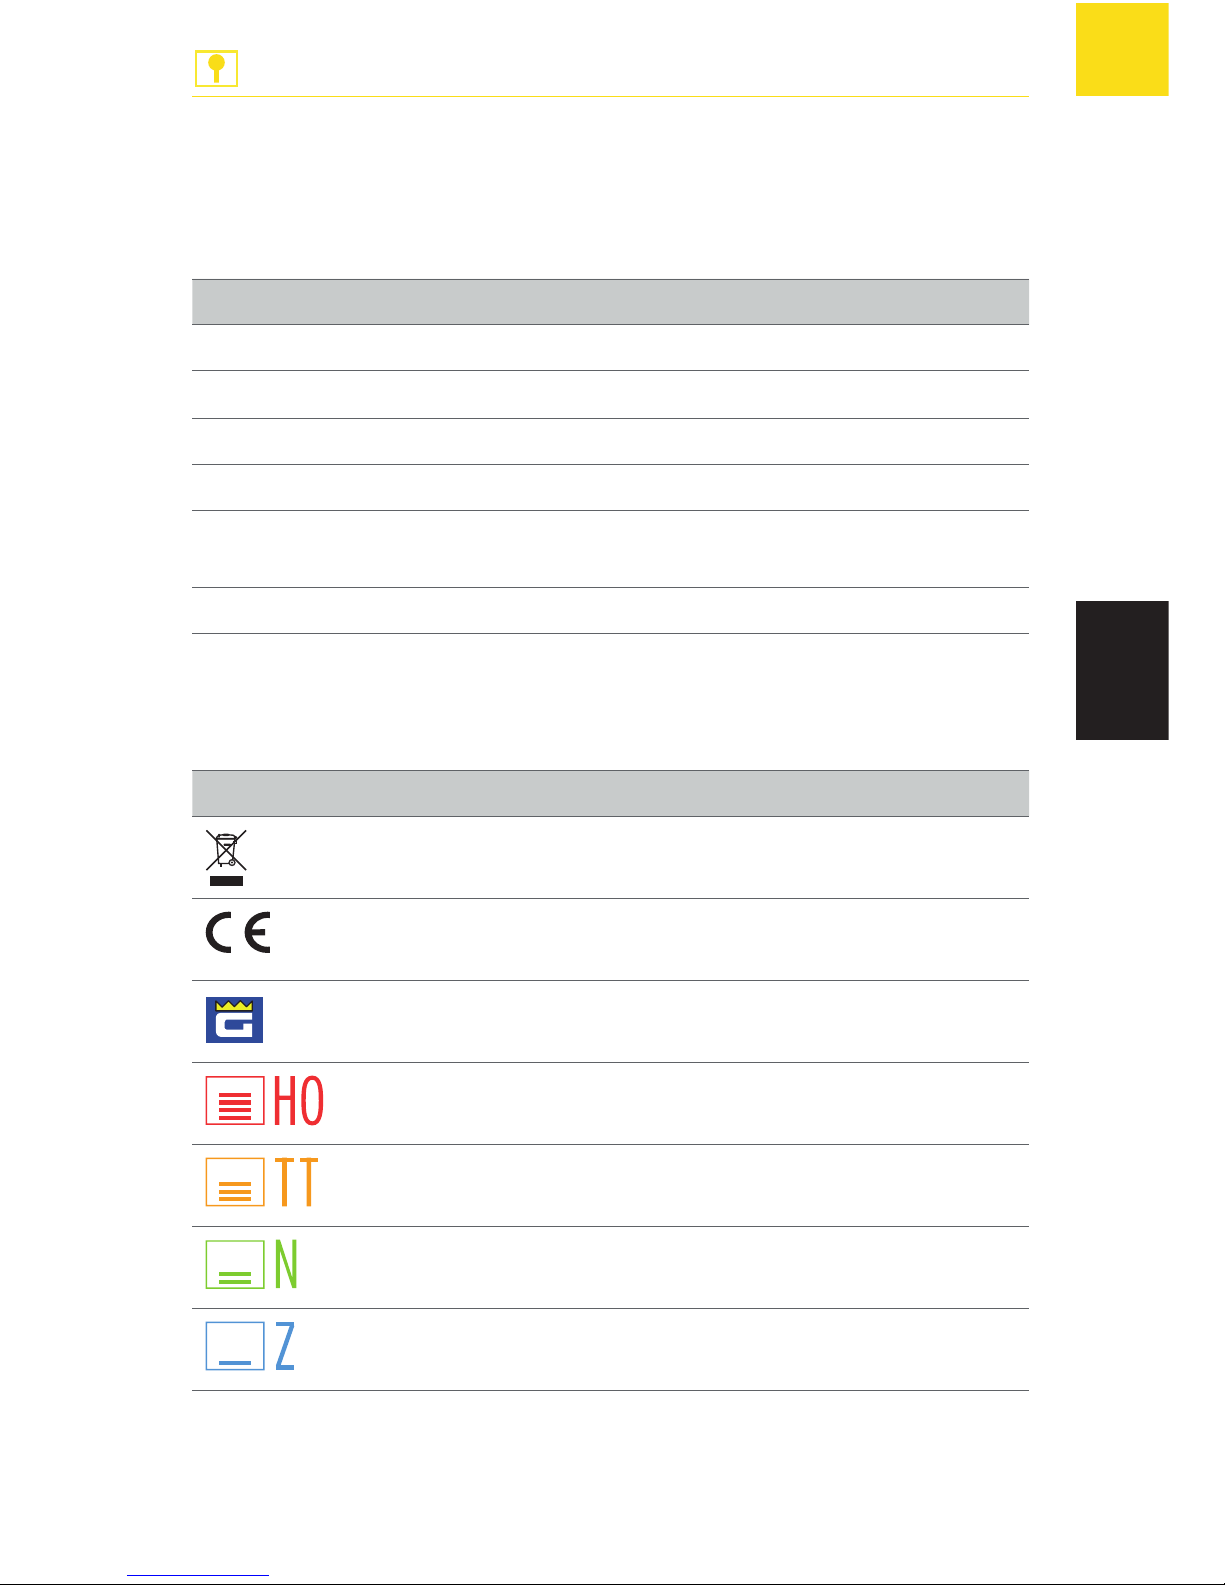
Tab. 16: Power supply
Symbols
Symbol Meaning
Product subject to the 2002/96/
EC European Directive
CE conformity label
POLA G
1:22.5 / G / 22.5 mm track gauge
1:87 / H0 / 16.5 mm track gauge
1:120 / TT / 12 mm track gauge
1:160 / N / 9 mm track gauge
1:220 / Z / 6.5 mm track gauge
Tab. 17: Symbols
Page 70
70
Technical data
ANLAGENBAU
EN
Signs
Sign Value
X
Prompting
g
Advice
Tab. 18: Signs
Page 71

71
Notice
ANLAGENBAU
EN
9. Notice
Page 72

© Gebr. FALLER GmbH | Sachnr. 180 730 1 | Änderungen vorbehalten | 15.11.2012
Gebr. FALLER GmbH
Kreuzstraße 9
78148 Gütenbach
Telefon +49 (0) 77 23 / 651-0
Telefax +49 (0) 77 23 / 651-123
www.faller.de
[email protected]
 Loading...