

Page 1
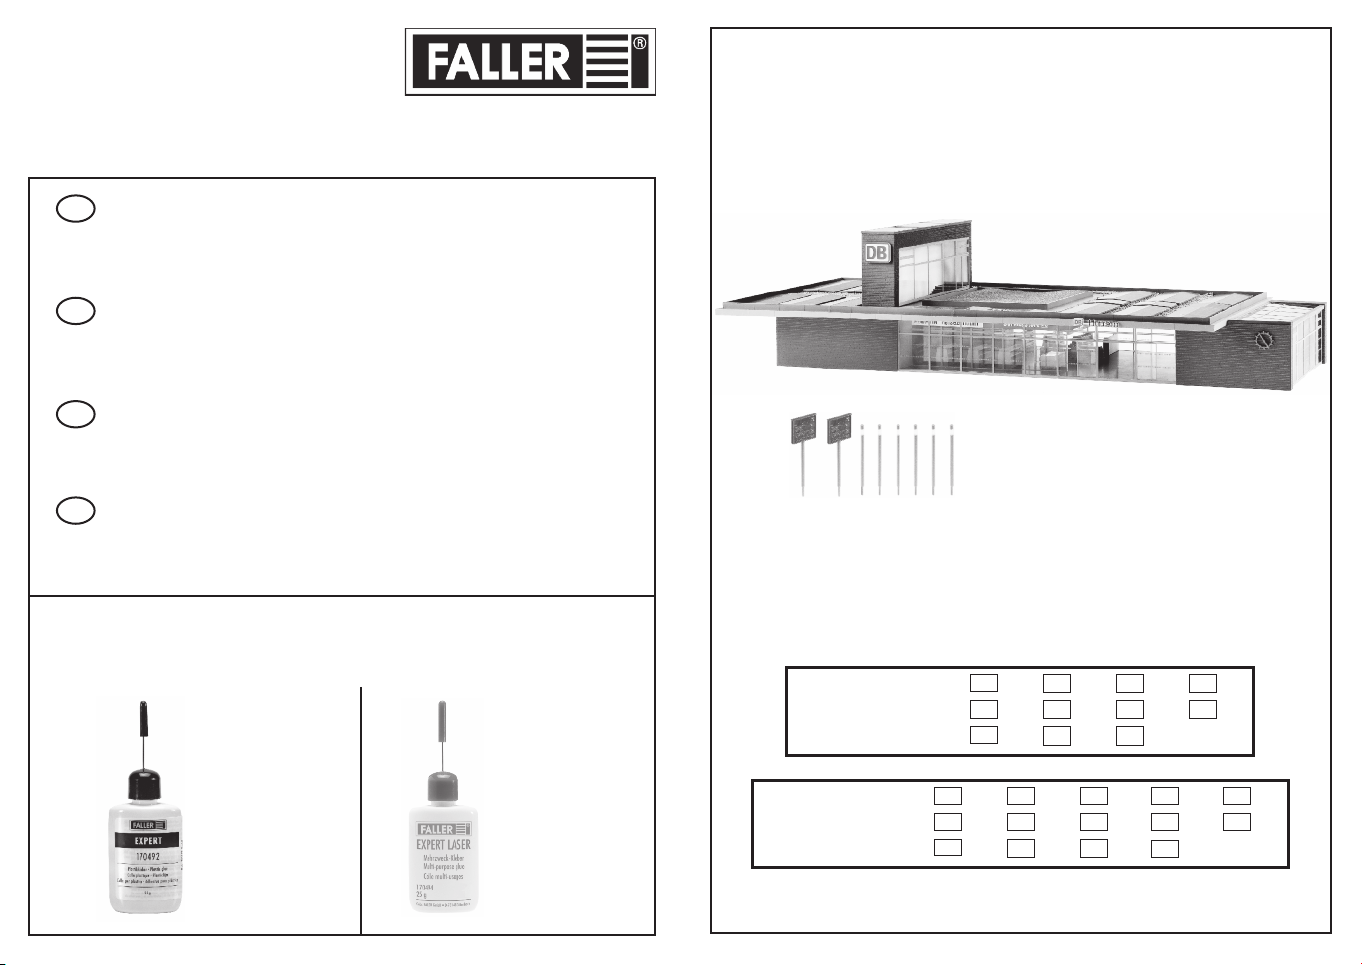
BAHNHOF »HORREM«
»HORREM« STATION
GARE DE »HORREM«
STATION »HORREM«
Vor Beginn des Bastelns sollten Sie sich mit den Spritzlingen und der Anleitung vertraut machen.
Sollte es einmal vorkommen, dass ein Teil im Bausatz fehlt, kreuzen Sie bitte das fehlende Teil in
D
der Anleitung an und schicken Sie diese bitte an Fa. Gebr. FALLER GmbH, Abt. Kundendienst,
[email protected], Kreuzstraße 9, 78148 Gütenbach. Sie erhalten dann umgehend Ersatz.
Es kann vorkommen, dass bei einem Bausatz Einzelteile übrig sind.
Before beginning with the assembly please familiarize yourself with the parts and read the instructions carefully.
GB
NL
In case of missing parts please indicate these on the instructions leaflet with a circle and return
the leaflet to Gebr. FALLER GmbH, [email protected], Kreuzstraße 9, D-78148 Gütenbach, Germany.
You will receive the replacement by return.
It may happen in a kit that some parts are not required.
Avant de commencer le montage de votre maquette bien lire la notice et repérer les grappes.
Si une pièce manque dans une boîte, cochez la pièce correspondante sur la notice et renvoyez-la-nous à
F
Gebr. FALLER GmbH, [email protected], Kreuzstraße 9, D-78148 Gütenbach (R.F.A.).
Nous vous ferons parvenir la pièce par retour.
Dans certains kits, il est possible que certaines pièces ne soient pas utilisées.
Vóór het bouwen zou men de gietstukken en de handleiding moeten bestuderen.
Indien onverhoopt een onderdeel aan het bouwpakket ontbreekt, gelieve men het ontbrekende deel
in de handleiding aan te kruisen en deze te zenden aan Gebr. FALLER GmbH, [email protected],
Kreuzstraße 9, D-78148 Gütenbach. U ontvangt dan omgaand en gratis het ontbrekende onderdeel.
Het kan voorkomen dat u bij bepaalde bouwdozen onderdelen overhoudt.
Für den Zusammenbau des Modells empfehlen wir folgende FALLER-Artikel (sind nicht im Bausatz enthalten):
For the assembly of the kit we recommend following FALLER products (not included in the kit):
Pour l’assemblage du modèle, nous vous recommandons les articles FALLER suivants (non inclus dans le kit):
Om dit model te bouwen adviseren wij de volgende FALLER producten (maken geen deel uit van deze bouwset):
Art. Nr. 170492
FALLER-EXPERT
Flüssigkleber in Plastikflasche mit
Spezialkanüle für feinste Klebstoffdosierung.
Liquid cement in plastic bottle with
canule for very fine dosage.
Colle liquide en bouteille plastique
avec bec verseur pour un dosage précis.
Vloeibare lijm in plastic-flacon met doseerbuisje
om nauwkeurig te lijmen.
Art. Nr. 110130
Art. Nr. 170494
FALLER-EXPERT LASERCUT
Dieser Klebstoff verbindet Holz-, Karton-, Styroporund Decorflexteile miteinander.
Ideal für den Bau von Laser-Cut-Modellen geeignet.
This glue joins wood, cardboard, Styrofoam,
and decorating parts.
Ideal for building Laser-Cut-Models.
Cette colle relie les pièces en bois, carton,
polystyrène deco-flex.
Idéal pour la construction de modèles laser-cut.
Deze lijm verbindt houten, kartonnen,
piepschuimen en decorflex delen met elkaar.
Ideaal geschikt voor het bouwen van laser cu
modellen.
Expert Art. Nr. 170494 für Lasercut-Teile und Lasercut/Kunststoff-Verbindungen verwenden.
Use Expert adhesive Art. no. 170494 for laser-cut parts and their bonding to plastic parts.
Utiliser l’Expert Art. n°170494 pour les pièces découpées au laser et leurs assemblages avec des pièces en plastique.
Expert artikelnummer 170494 voor de laser-cut onderdelen gebruiken
Inhalt Spritzlinge
Contents Sprues
Contenu Moulages
Inhoud Gietstukken
Inhalt Spritzlinge
Contents Sprues
Contenu Moulages
Inhoud Gietstukken
7 A I1x
7 A II1x
7 A III
1 B1x
1 B1x
2 A1x
x
1
7 A IV3x
7 B2x
7 AC I
1
2 B1x
3ABCX1x
3ABCY1x
x
7 C1x
8 A1x
8
1
4 C1x
4 C1x
6 A4x
x
91x
101x
121x
6 BC4x
6 C4x
131x
141x
Sa. Nr. 110 130 1
Page 2
2
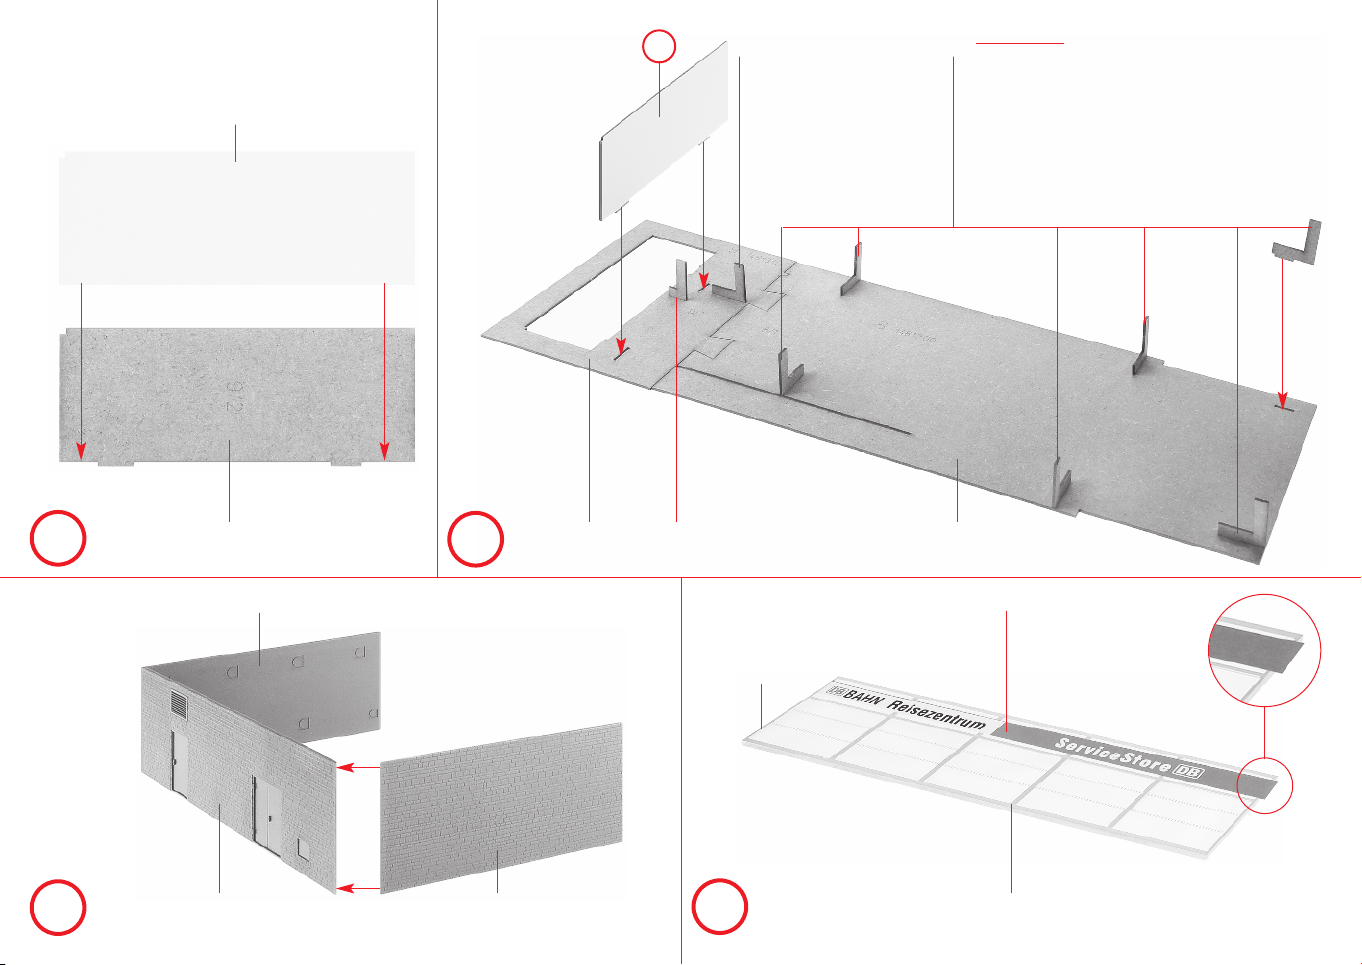
Papiermaske
Papermask
Masque
Masker
M3
Lasercut-Kleber verwenden.
Use Lasercut glue.
Utilisez la colle Lasercut.
Gebruik Lasercutlijm.
A
10/3
10/3
nicht kleben
do not glue
ne pas coller
niet lijmen
A
C
9/2 9/1 8/1
B
10/4
Rahmen oben
Frame top
Cadre en haut
Ramen boven
D
Deco 13/6 X
7/1 IV3/6 Y8/1
Page 3
7/10
D
E
C
3
E
7/1
F
B
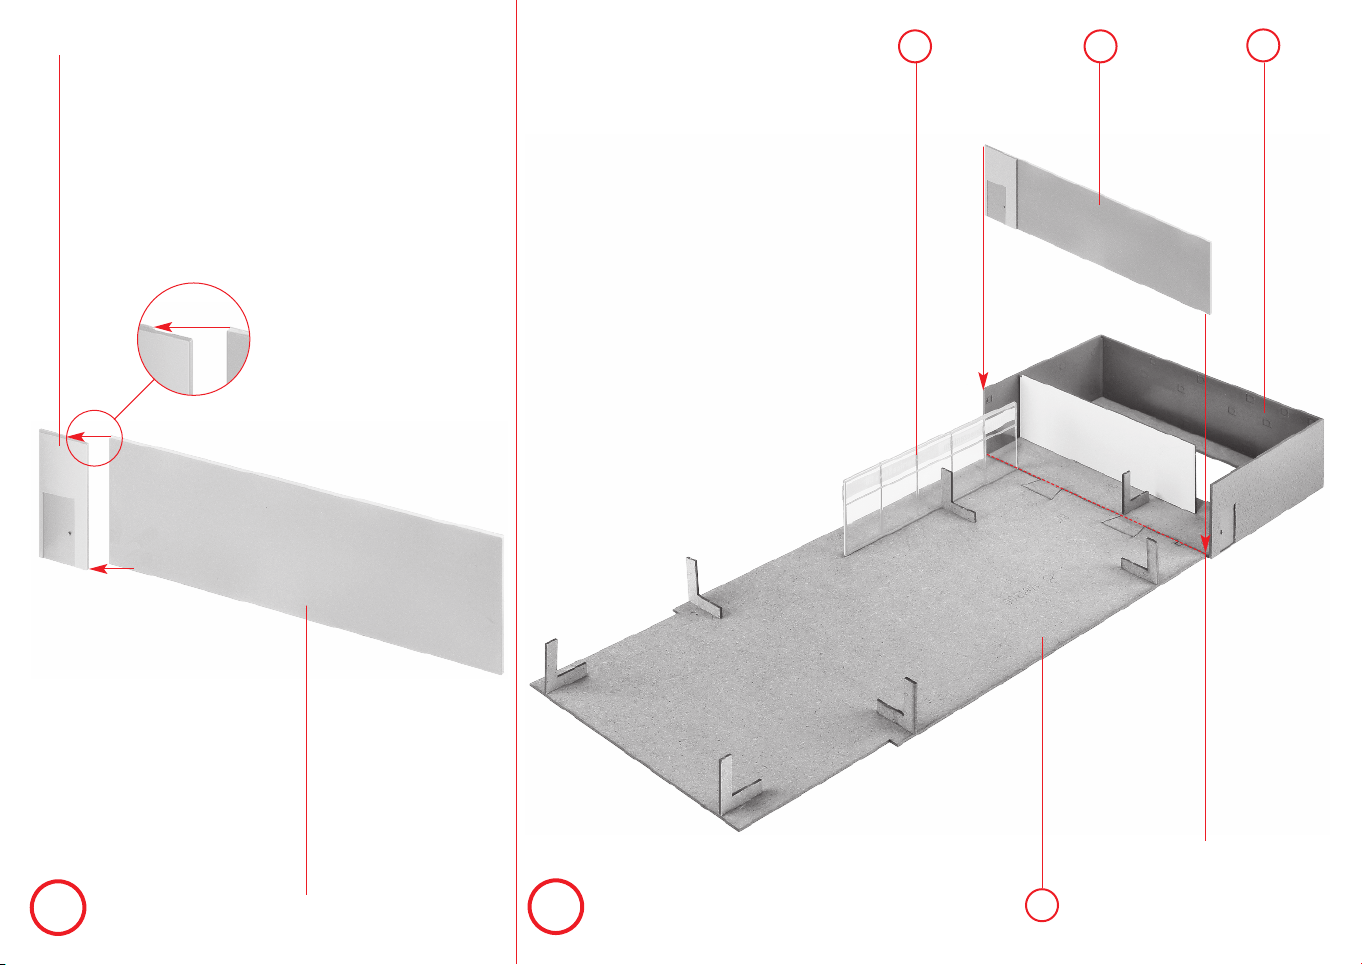
Nur an dieser Stelle kleben.
Only apply glue to this point.
Coller exclusivement cet emplacement.
Alleen op deze plaats lijmen.
Page 4
4
7/3
7/3 7/1 IV 7/1 IV
G
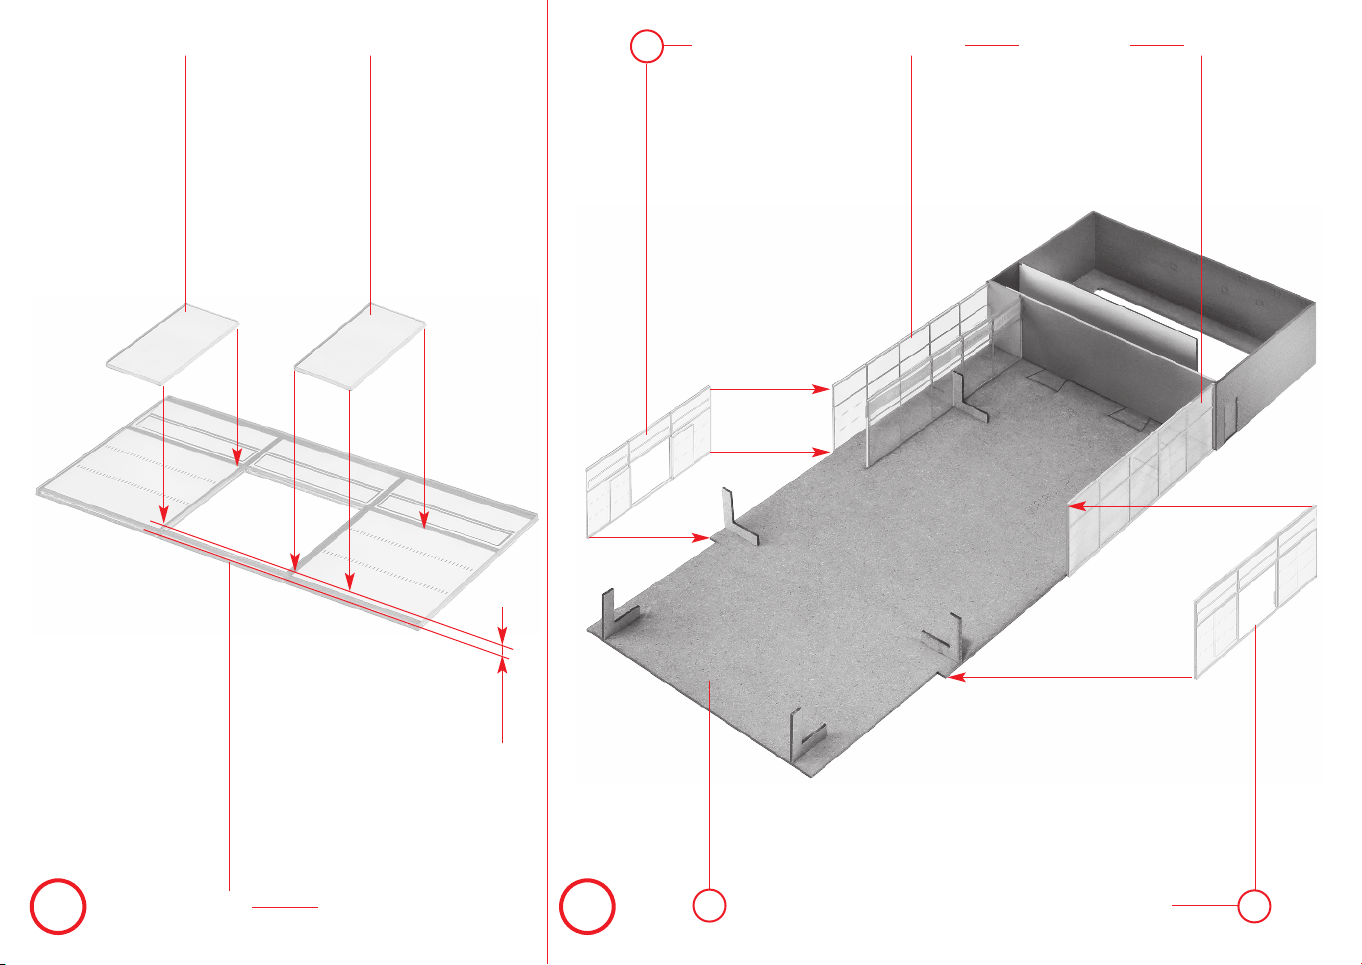
Türen innen!
Doors inside!
Intérieur des portes !
Deuren binnen!
Rahmen außen
Frame outside
Cadre extérieur
Ramen buiten
G
2 x
7/4
Rahmen unten
Frame bottom
Cadre en bas
Ramen onder
2 mm
H
Türen innen!
Doors inside!
F
Intérieur des portes !
Deuren binnen!
G
Page 5
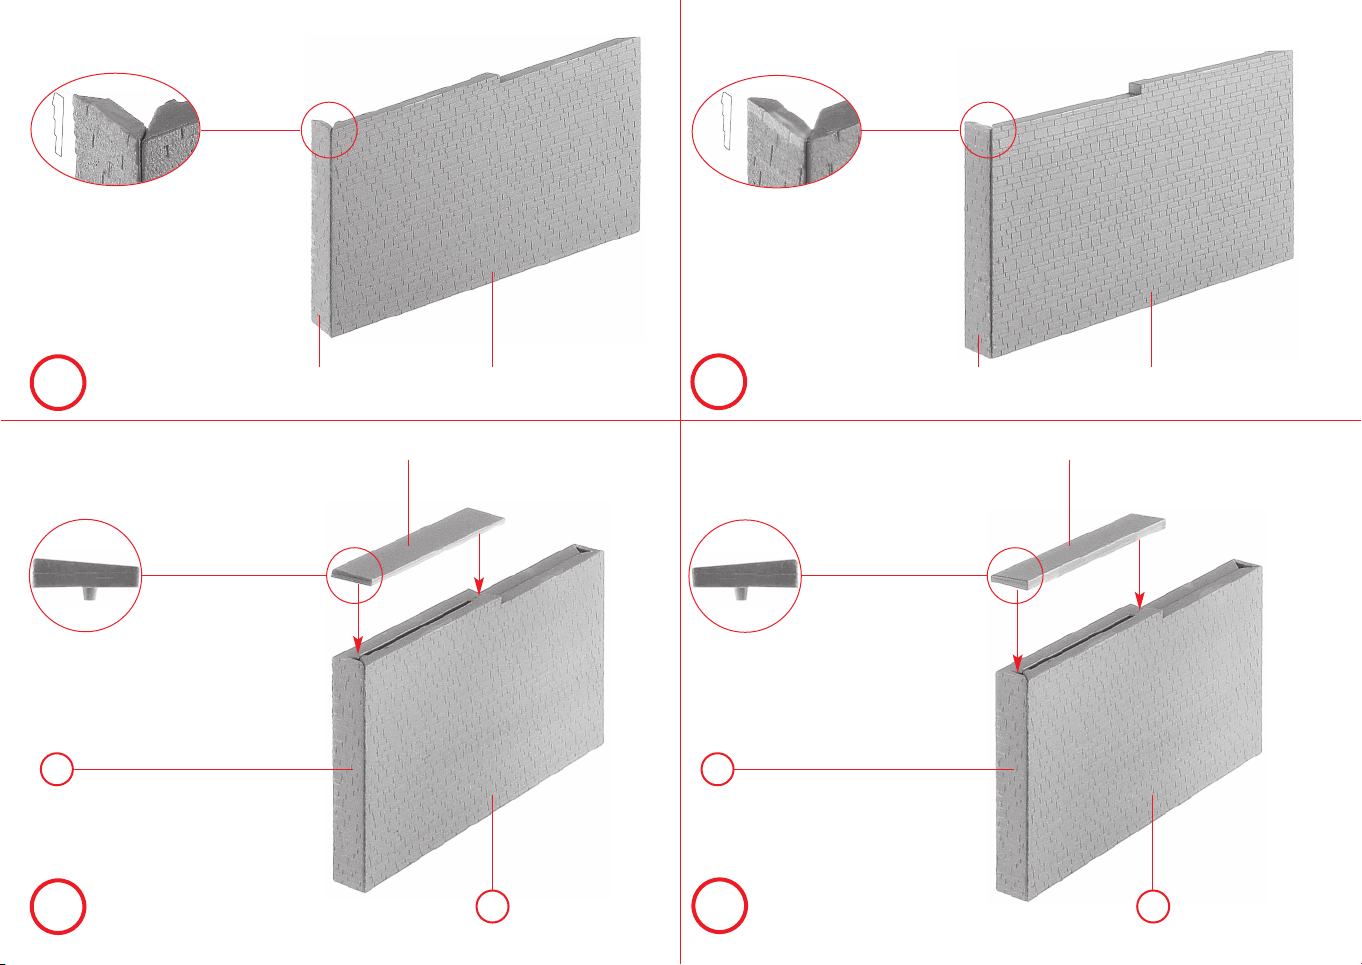
5
!!
I
J
K
2 x
3/3 3/2
3/5
I
J
J
L
2 x
3/9 3/1
3/5
I
Page 6
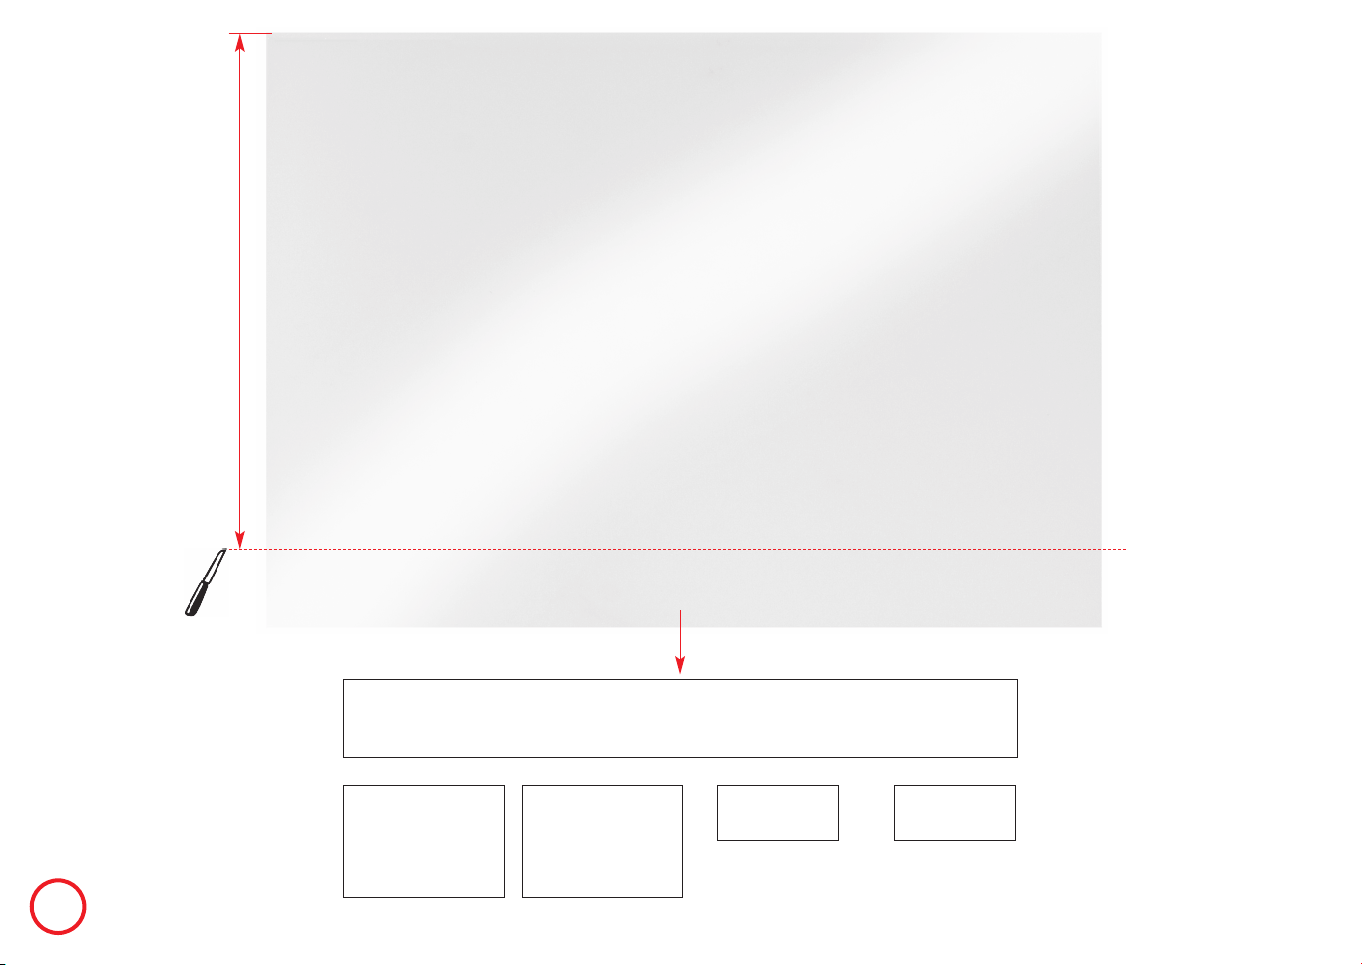
6
M
182 mm
Fensterfolie 119 x 14 mm
Window foil
Feuillet transparent
Vensterfolie
M 1:1
M 1:1
Fensterfolie 28,5 x 20 mm
Window foil
Feuillet transparent
Vensterfolie
Fensterfolie A4
Window foil A4
Feuillet transparent A4
Vensterfolie A4
Fensterfolie 28,5 x 20 mm
Window foil
Feuillet transparent
Vensterfolie
M 1:1 M 1:1
Fensterfolie 21,5 x 10 mm
Window foil
Feuillet transparent
Vensterfolie
Fensterfolie 21,5 x 10 mm
Window foil
Feuillet transparent
Vensterfolie
Page 7
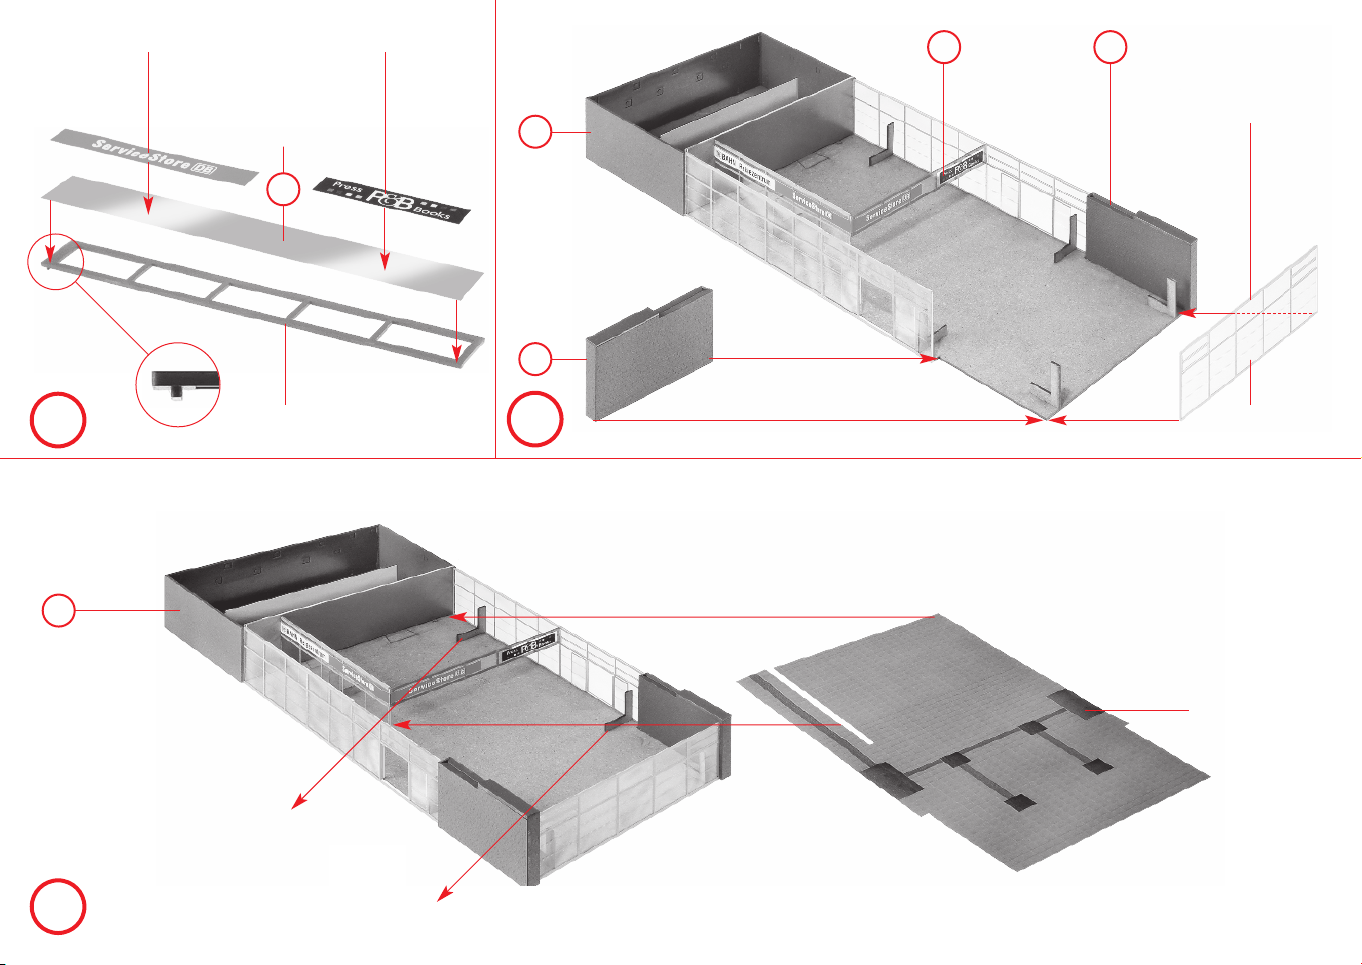
Deco 2 Deco 3
Fensterfolie
119 x 14 mm
Window foil
Feuillet transparent
Vensterfolie
M
H
K
N
L
Rahmen außen
Frame outside
Cadre extérieur
Ramen buiten
7
N
O
P
6/19
6 x 10/3
entfernen!
remove!
supprimer !
verwijderen!
O
7/1
Papiermaske
Papermask
Masque
Masker
M1
Page 8
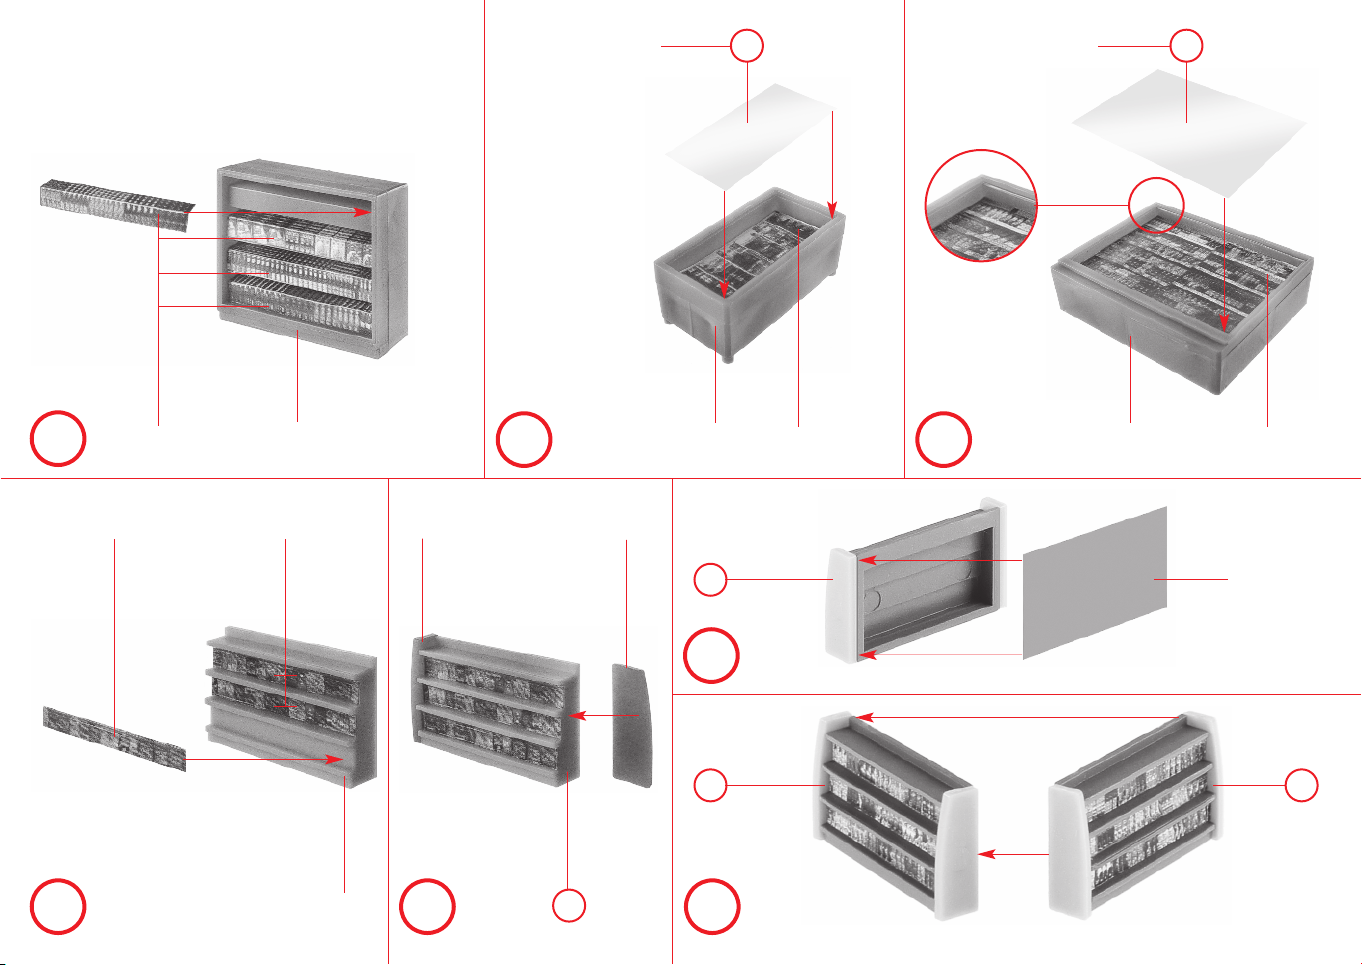
8
hellbraun
light brown
brun clair
lichtbruin
Fensterfolie 21,5 x 10 mm
Window foil
Feuillet transparent
Vensterfolie
M M
Fensterfolie 28,5 x 20 mm
Window foil
Feuillet transparent
Vensterfolie
Q
Deco 10
T
Deco 17
10 x
4/27
Deco 10
hellbraun
light brown
brun clair
lichtbruin
1/11
hellbraun
light brown
brun clair
lichtbruin
R S
4/21 4/21
U
10 x
T
hellbraun
light brown
brun clair
lichtbruin
4/25 Deco 13 4/26 Deco 12
U
Deco 26
V
U U
4 x
W
Page 9
1/10
Deco 7
1/12
b
Deco 16 Deco 15
9
hellbraun
light brown
brun clair
lichtbruin
a
hellbraun
light brown
brun clair
lichtbruin
Deco 21
Deco 8
1/9
f
hellbraun
light brown
brun clair
lichtbruin
b
4 x
Deco 14
2/3
2/1
2/2
c
4/19 4/20
a
d
g
g
c
2/5
e
4 x Deco 22
g
4 x
f
h
2 x
2/4
2 x
i
h
Page 10
10
weiß / silber
white / silver
blanc / argent
wit / zilver
Fensterfolie 21,5 x 10 mm
Window foil
Feuillet transparent
Vensterfolie
M M
Fensterfolie 28,5 x 20 mm
Window foil
Feuillet transparent
Vensterfolie
j
m
Deco 18
Deco 9
7 x
4/27
Deco 9
weiß / silber
white / silver
blanc / argent
wit / zilver
1/11
weiß / silber
white / silver
blanc / argent
wit / zilver
k
4/21 4/21
n
7 x
m
weiß / silber
white / silver
blanc / argent
wit / zilver
4/25 Deco 13 4/26 Deco 11
n n
3 x
o
l
Page 11
1/10 1/12
Deco 5
q
Deco 16 Deco 15
11
weiß / silber
white / silver
blanc / argent
wit / zilver
p q
7/7 7/7
Deco 6
weiß / silber
white / silver
blanc / argent
wit / zilver
Deco 14
t
7/6 II
7/6 I
4/19 4/20
r
p
t
s
weiß / silber
white / silver
blanc / argent
wit / zilver
Deco 19
r
1/9
u
7/5 I
v
7/5 II
w
u
v
x
4 x Deco 20
Page 12
12
n
o
Q
o
k
s
w
l
j
x
S
e
R
U
W
d
V
y
i
P
i
Page 13
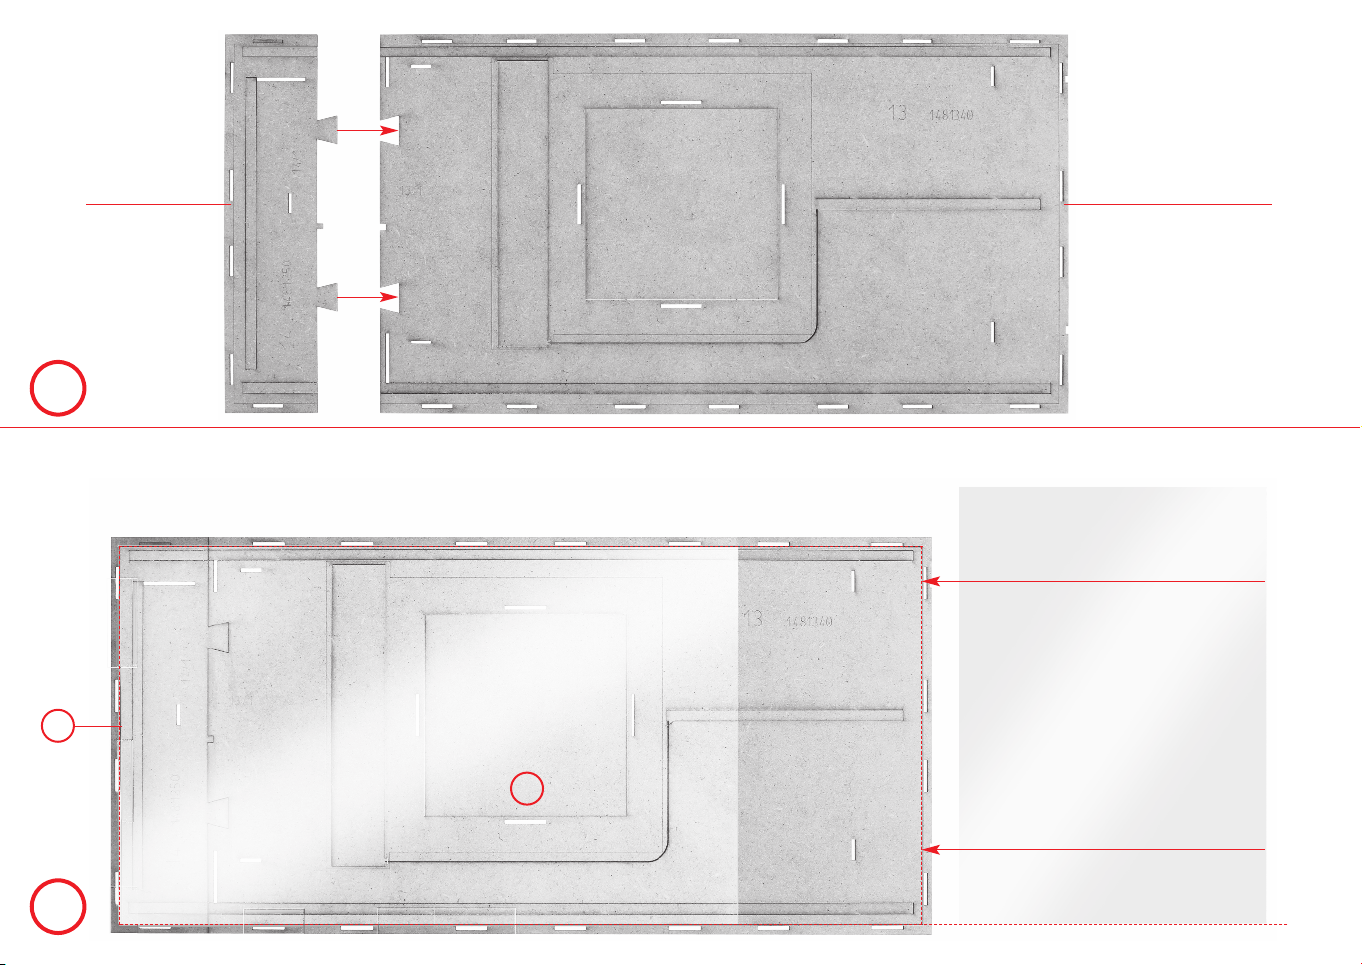
Lasercut-Kleber verwenden.
Use Lasercut glue.
Utilisez la colle Lasercut.
Gebruik Lasercutlijm.
1
14/
A
Die Folien mit Klebestreifen fixieren und entlang der schwarzen Linien mit Lineal und Messer genau ausschneiden.
Fix the plastic sheets using adhesive tape and accurately cut it out along the black lines using ruler and knife.
Fixer la feuilles avec un ruban adhésif et la découper de façon précise le long de la lignes noire à l’aide d’une règle et d’un couteau.
Folien met plakstrook fixeren en langs de zwarte lijnes met behulp van lineaal en mes precies uitsnijden.
13
13/
1
A
B
Fensterfolie A4
Window foil A4
Feuillet transparent A4
Vensterfolie A4
M
Fensterfolie A5
Window foil A5
Feuillet transparent A5
Vensterfolie A5
Page 14
14
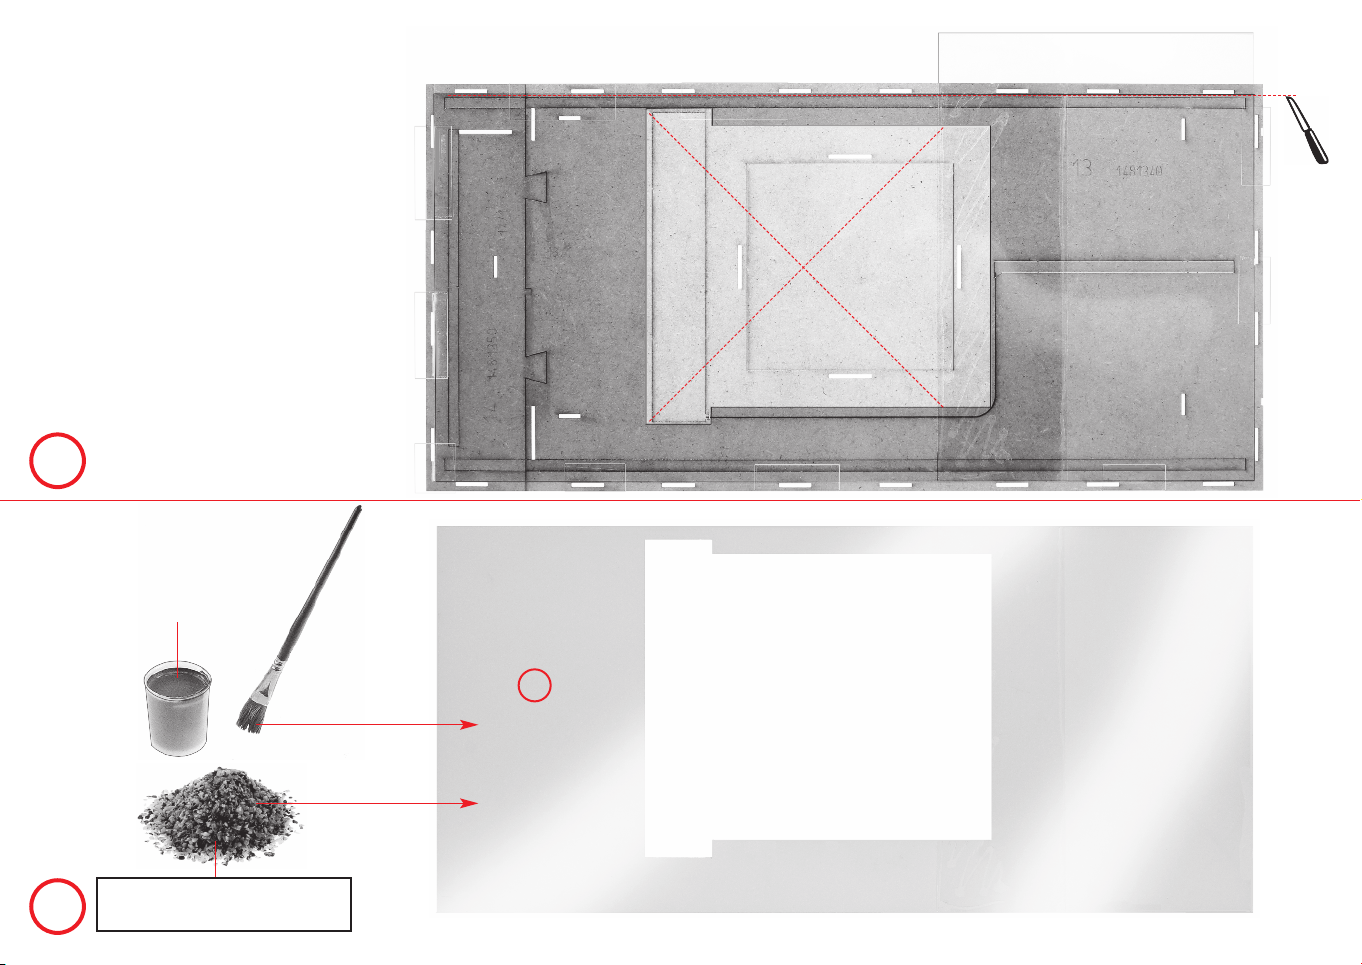
Die Folien mit Klebestreifen fixieren und entlang der schwarzen
Linien mit Lineal und Messer genau ausschneiden (nur Folie).
Fix the plastic sheets using adhesive tape and accurately cut it out
along the black lines using ruler and knife (plastic sheet only).
Fixer la feuilles avec un ruban adhésif et la découper de façon
précise le long de la lignes noire à l’aide d’une règle et d’un couteau.
Folien met plakstrook fixeren en langs de zwarte lijnes
met behulp van lineaal en mes precies uitsnijden.
C
Art.-Nr. 170659 liegt nicht bei
not included
non jointe
niet bijgevoegd
Inhalt Tüte Contents bag
Contenu sachet Inhoud zakje
D
C
Fensterfolie
Window foil
Feuillet transparent
Vensterfolie
Page 15
D
E
15
10/1
F
heraustrennen
rip out
retirer
eruit nemen
heraustrennen
rip out
retirer
eruit nemen
Page 16
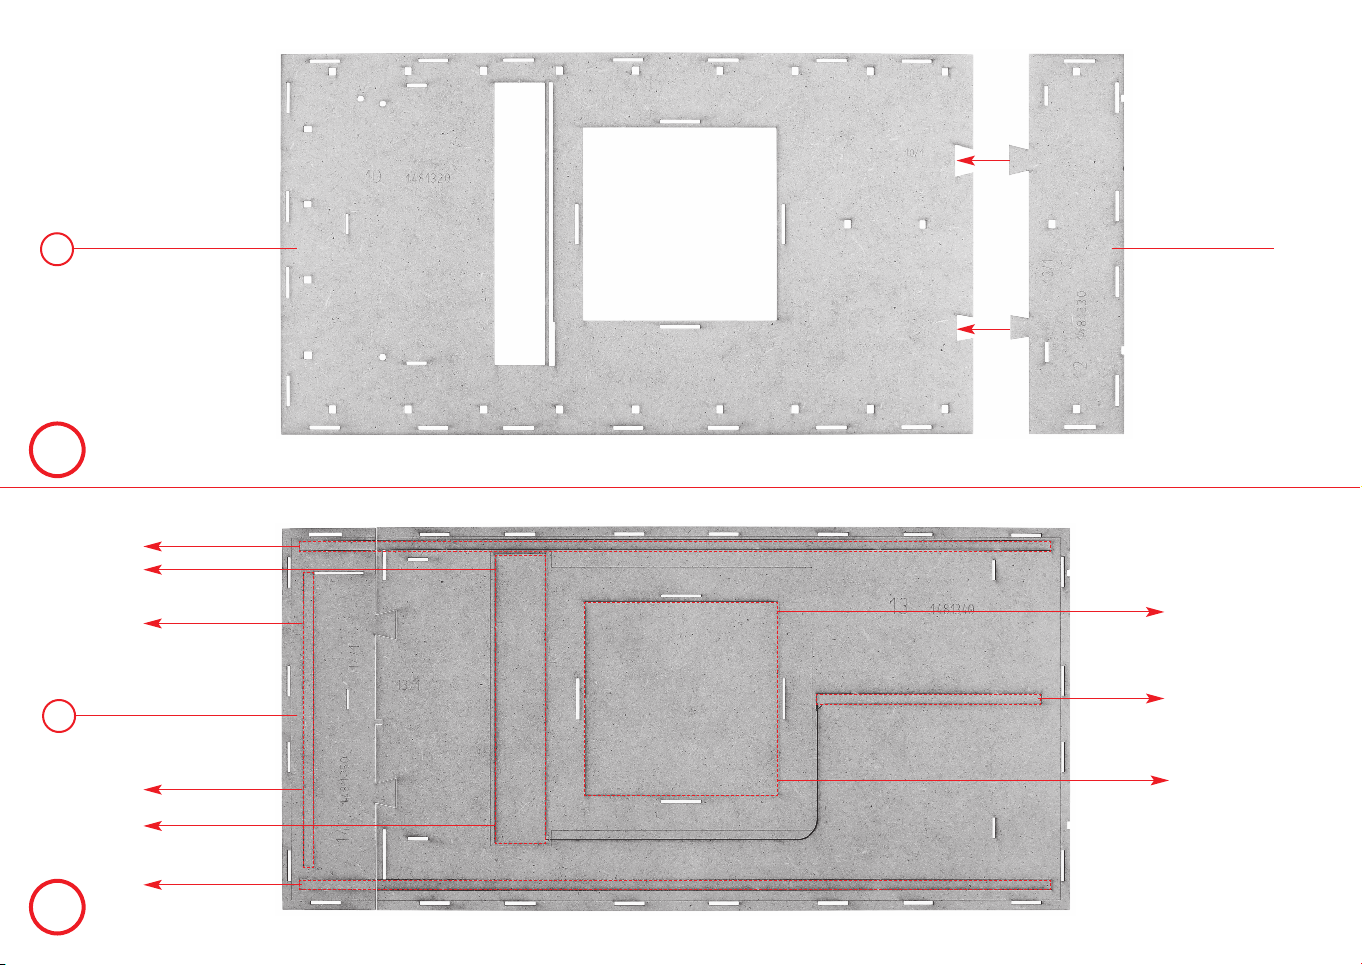
Lasercut-Kleber verwenden.
16
Use Lasercut glue.
Utilisez la colle Lasercut.
Gebruik Lasercutlijm.
F
G
C
heraustrennen
rip out
retirer
eruit nemen
12/1
heraustrennen
rip out
retirer
eruit nemen
H
Page 17
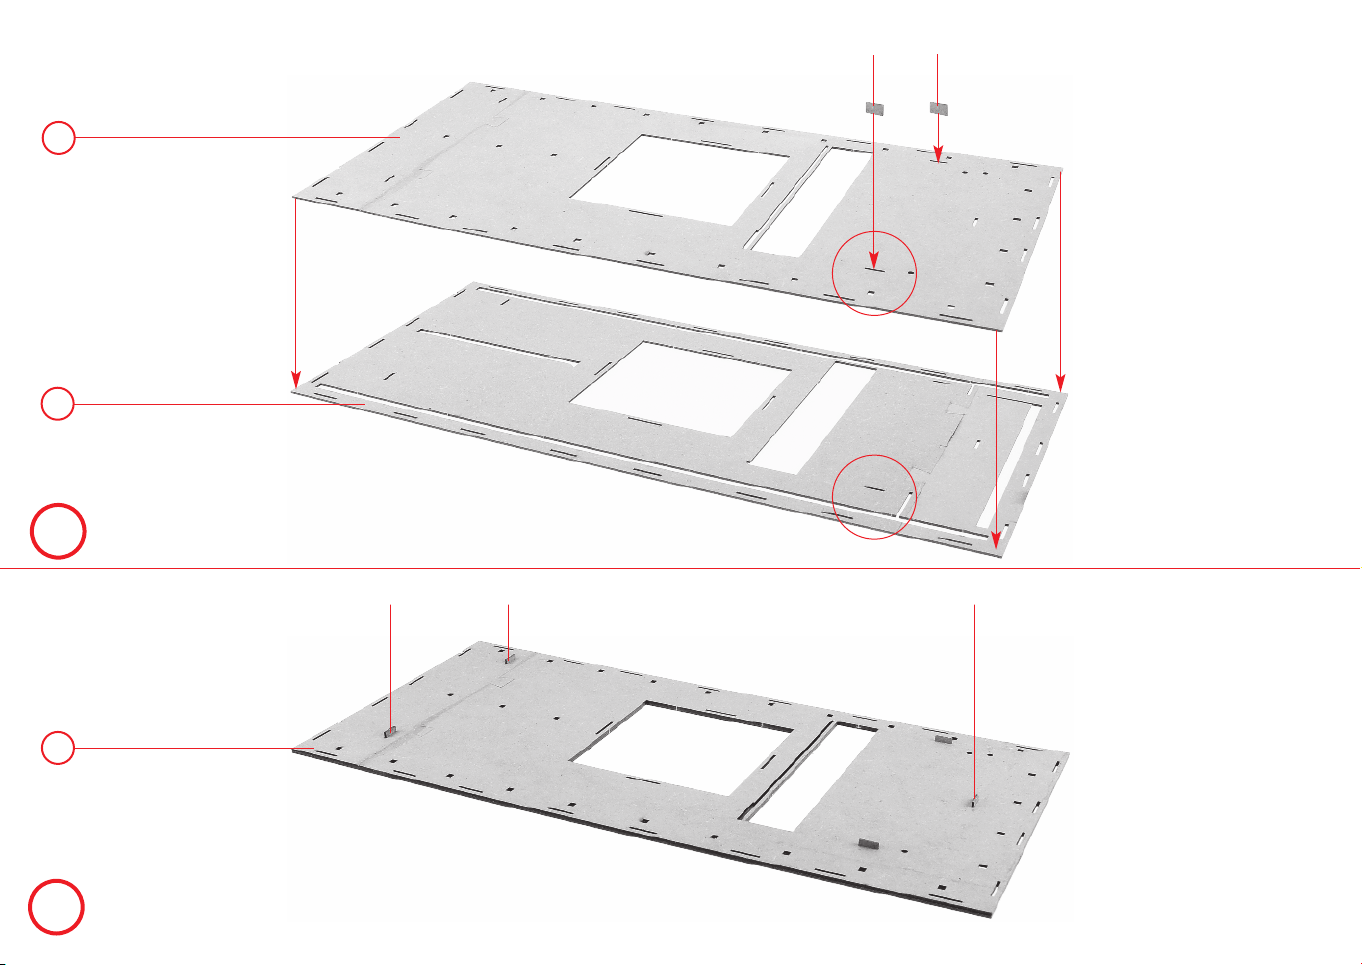
Lasercut-Kleber verwenden.
Use Lasercut glue.
Utilisez la colle Lasercut.
Gebruik Lasercutlijm.
G
H
I
10/2 10/2
!
17
Lasercut-Kleber verwenden.
Use Lasercut glue.
Utilisez la colle Lasercut.
Gebruik Lasercutlijm.
I
J
10/210/2 10/2
Page 18
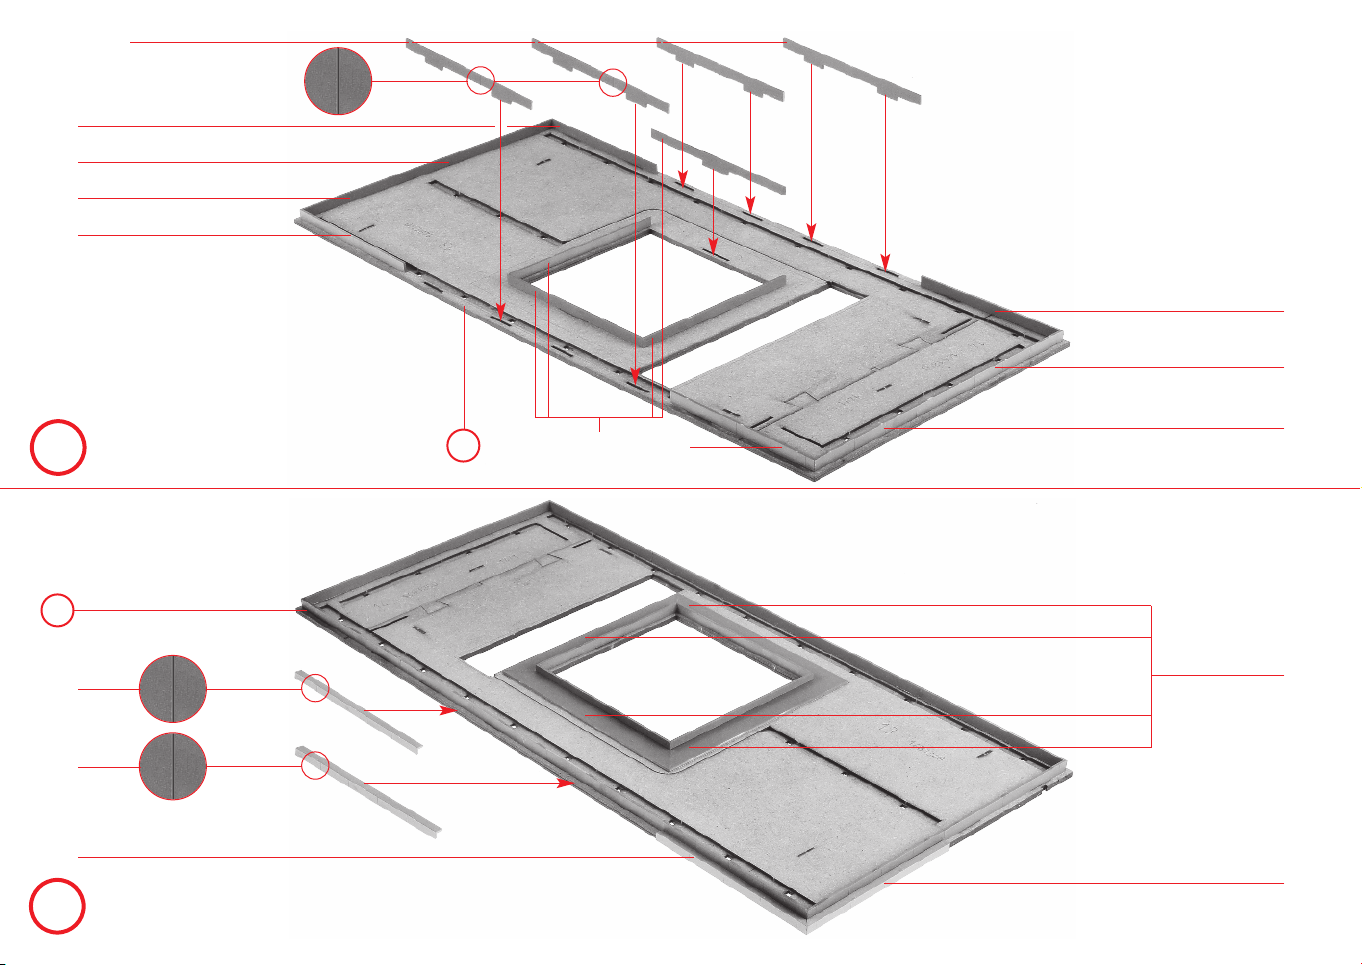
18
6/8
6/7
6/8
6/7
6/9
Lasercut-Kleber verwenden.
Use Lasercut glue.
Utilisez la colle Lasercut.
Gebruik Lasercutlijm.
K
Lasercut-Kleber verwenden.
Use Lasercut glue.
Utilisez la colle Lasercut.
Gebruik Lasercutlijm.
K
6/3
6/3
6/2
L
6/7
6/8
J
6/12
6/8
6/7
6/13
6/1
Page 19
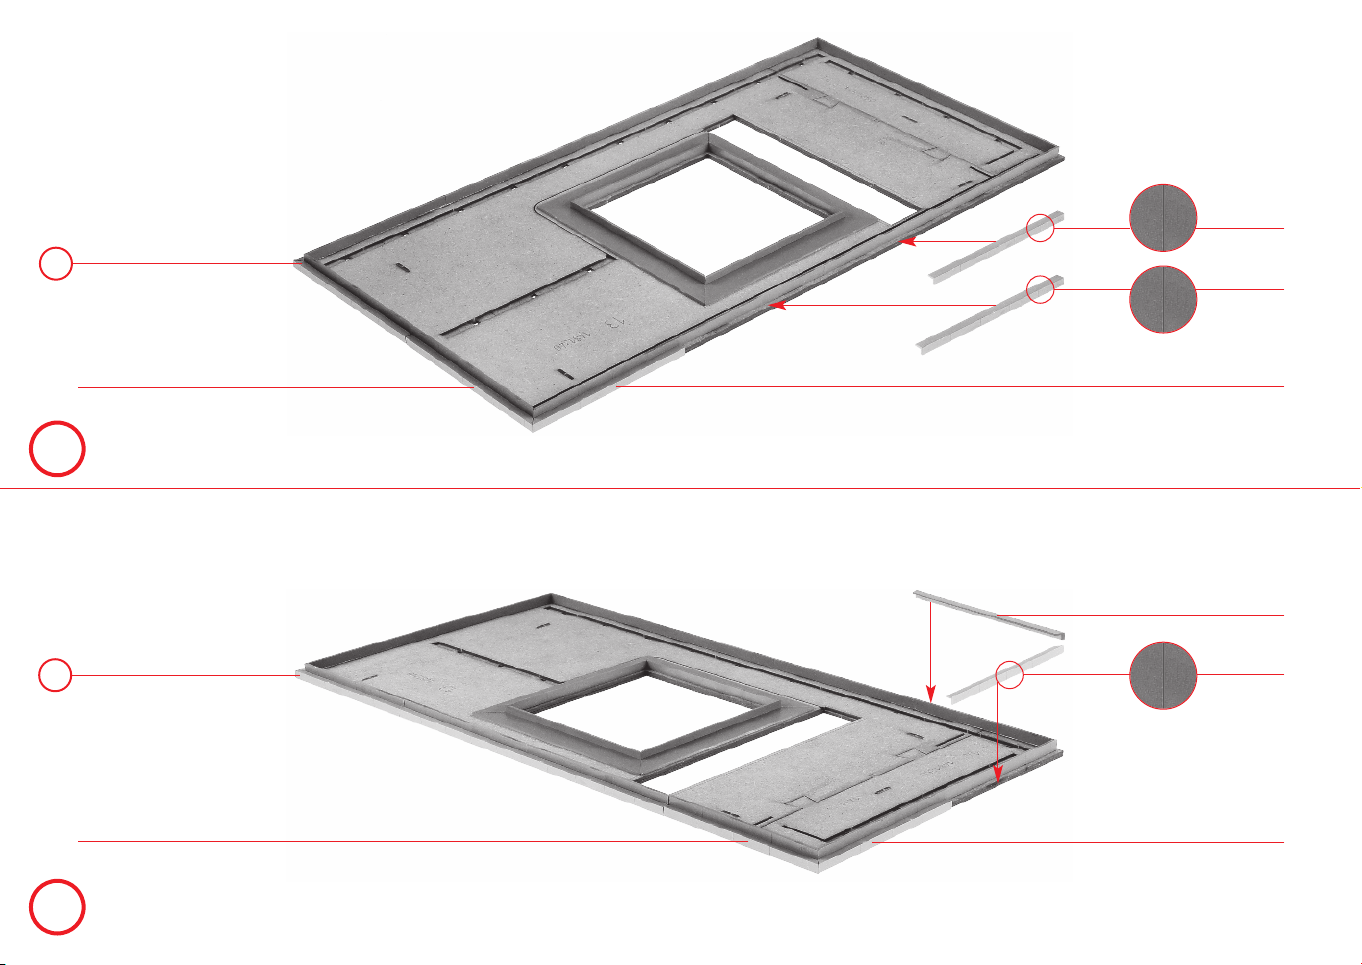
Lasercut-Kleber verwenden.
Use Lasercut glue.
Utilisez la colle Lasercut.
Gebruik Lasercutlijm.
L
19
6/3
6/3
6/2
M
Lasercut-Kleber verwenden.
Use Lasercut glue.
Utilisez la colle Lasercut.
Gebruik Lasercutlijm.
M
6/2
N
6/1
6/1
6/2
6/1
Page 20
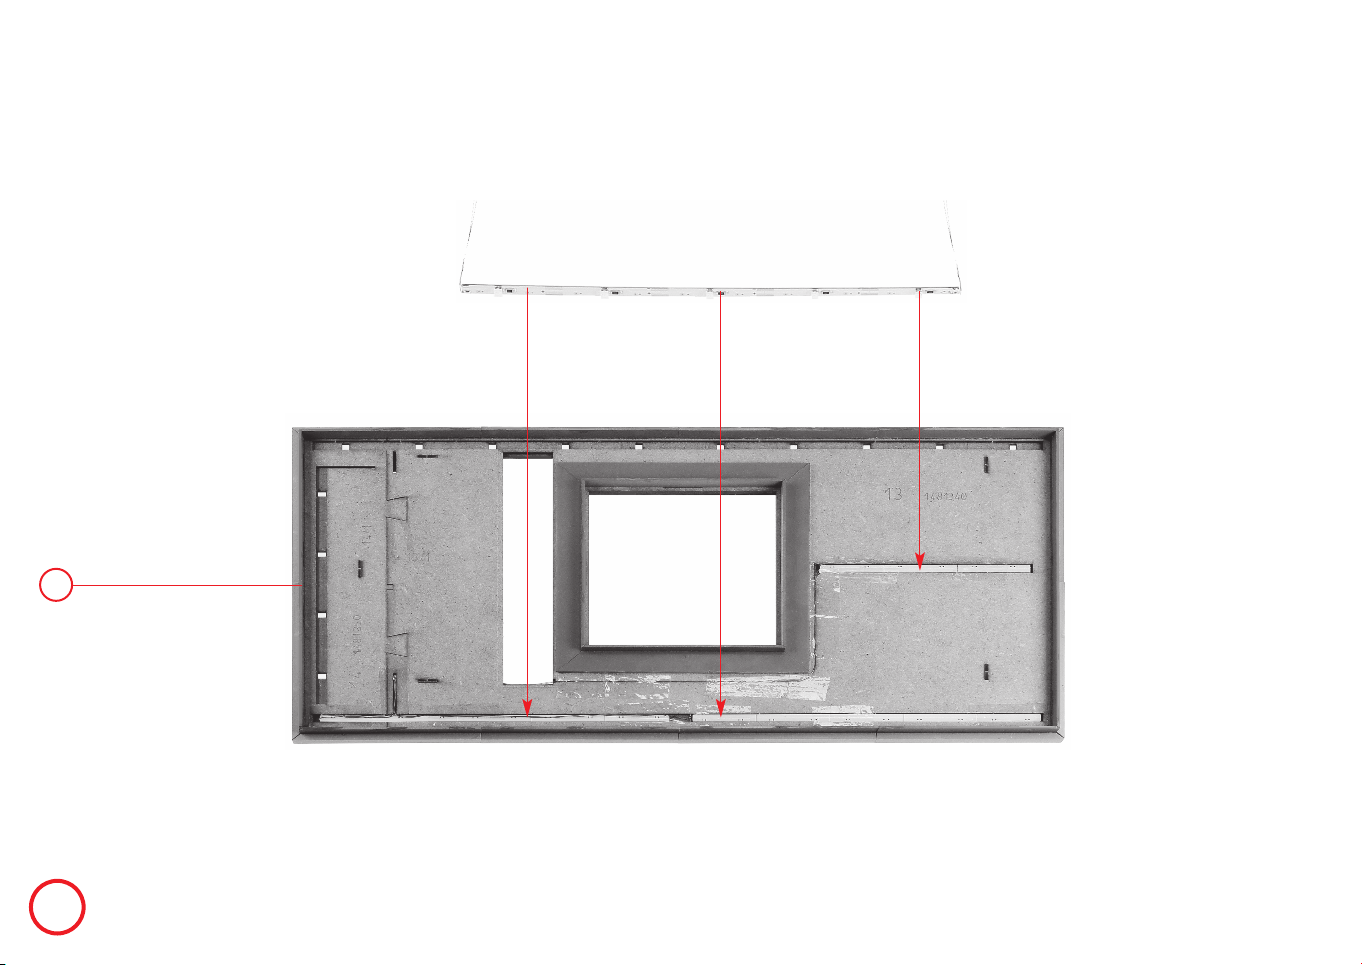
20
N
Achtung: zum Brechen der Lichtleiste die genaue Position ermitteln, die Lichtleiste kann nicht beliebig eingelegt werden.
Caution: to break the light strip determine the exact position, the light strip cannot be placed arbitrarily.
Attention : pour casser la rampe d’écairage, déterminer la position exacte, on ne peut pas placer la rampe de façon arbitraire.
Let op: voor het breken van de verlichtingstrip de juiste positie bepalen, de verlichtingstrip kan niet overal geplaatst worden.
3 x Art.-Nr. 180654 liegt nicht bei
not included
non jointe
niet bijgevoegd
O
Lichtleistenposition beachten, Sie kann nicht beliebig eingelegt werden.
Pay attention to the position of the light strip, it cannot be placed arbitrarily.
Faire attention à la position de la rampe d’éclairage, on ne peut pas la placer de façon arbitraire.
Verlichtingstrip positie in de gaten houden, deze kan niet overal geplaatst worden.
Page 21
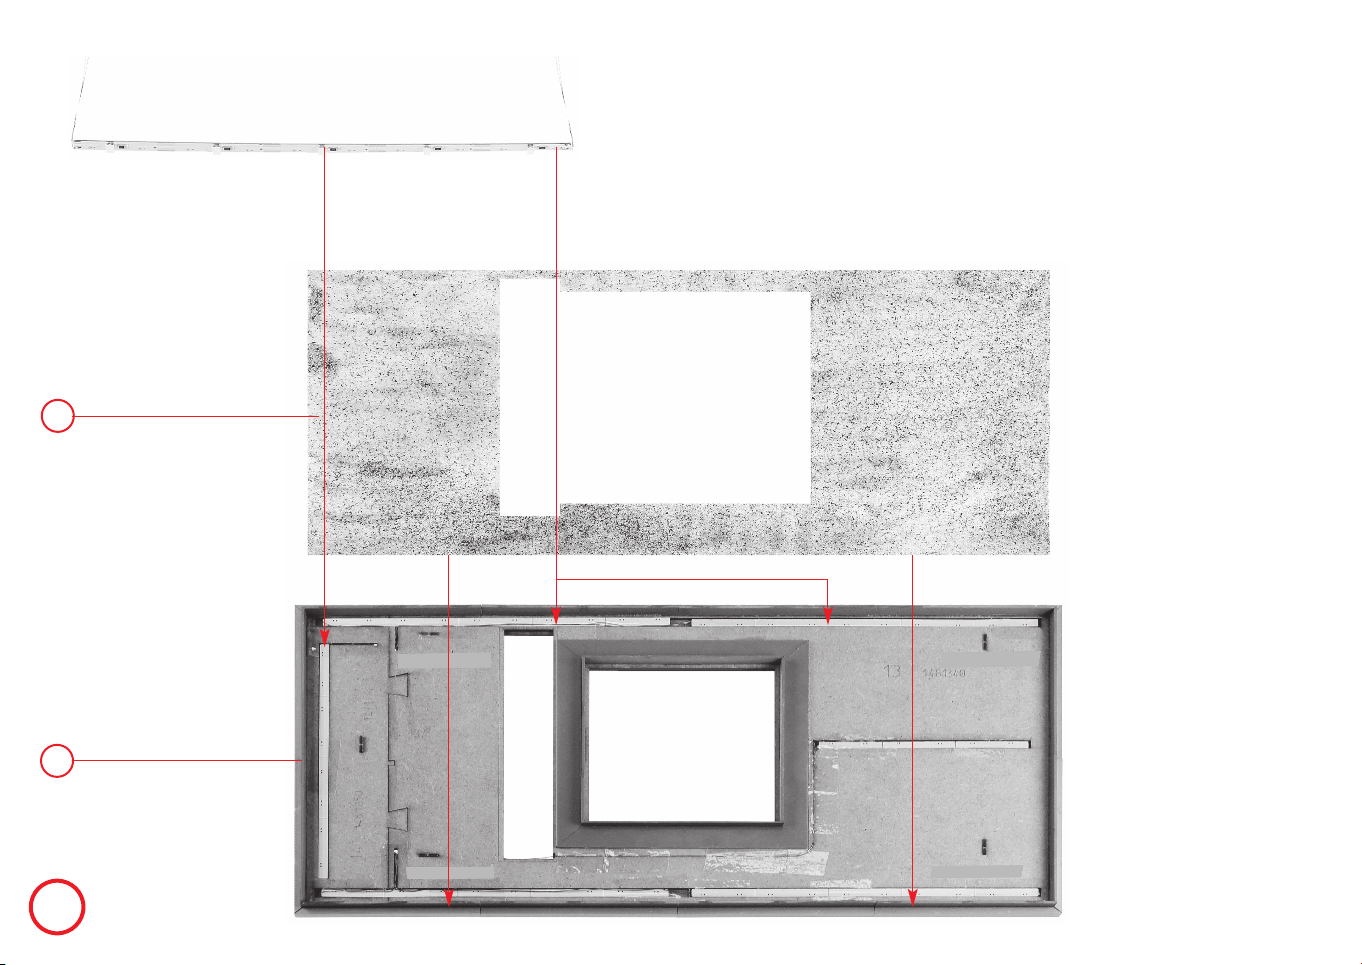
E
3 x Art.-Nr. 180654 liegt nicht bei
not included
non jointe
niet bijgevoegd
21
Die besandete Folie mit doppelseitigem Klebeband auf dem Dach fixieren.
Fix the sanded plastic sheet to the roof using double-sided adhesive tape.
Fixer la feuille sablée sur le toit avec une bande adhésive double face.
De met zand bestrooide folie met dubbelzijdig plakband op het dak plakken.
O
P
Page 22
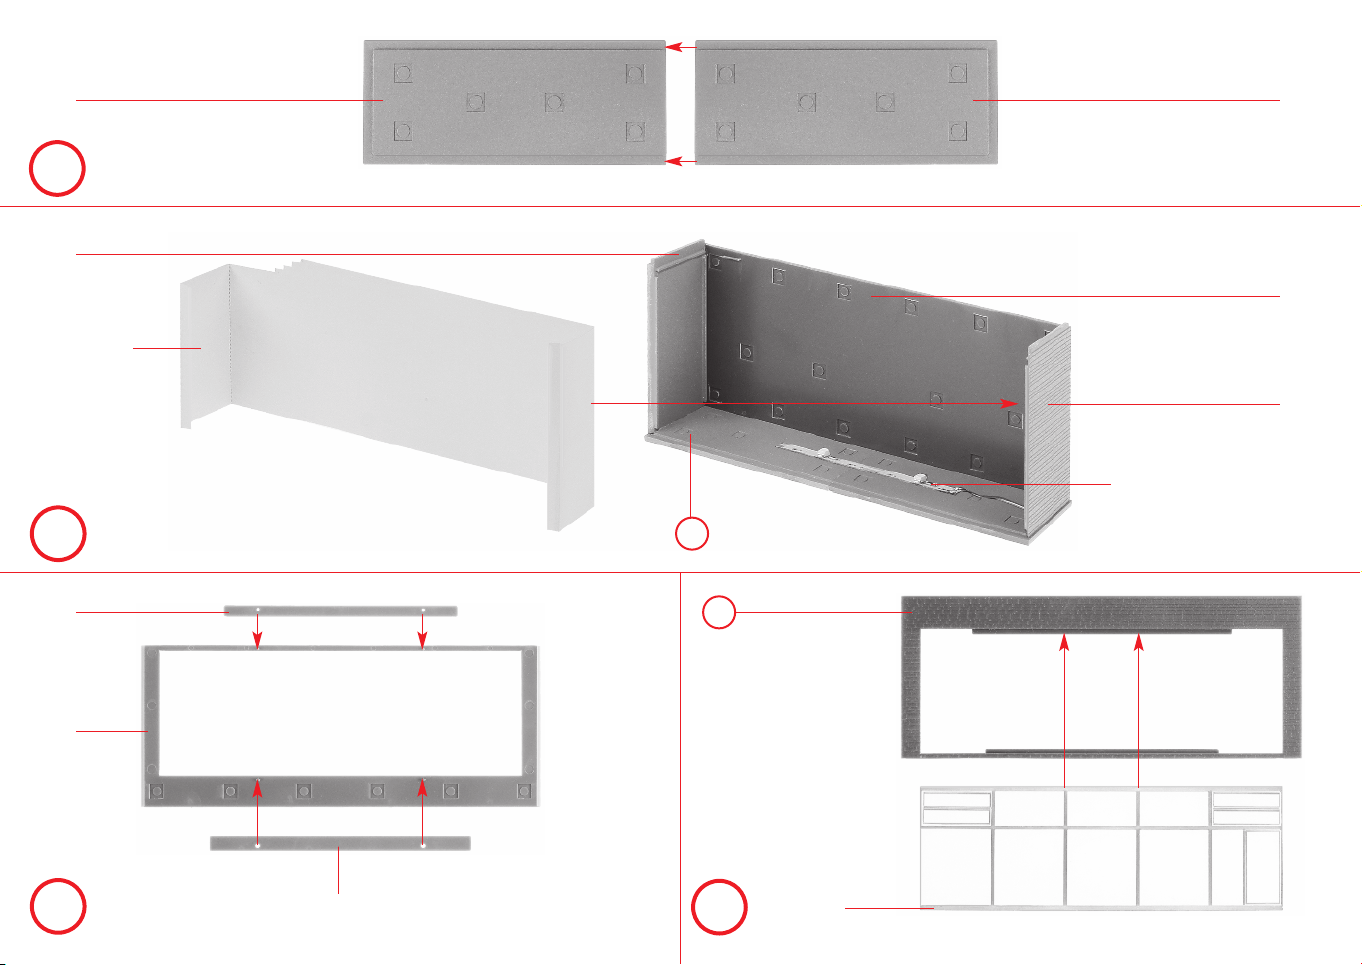
22
3/8 3/8
Q
3/7
Papiermaske
Papermask
Masque
Masker
R
M2
Q
Art.-Nr. 180654 liegt nicht bei
not included
non jointe
niet bijgevoegd
8/3
3/7
8/5
8/2
S
S
Rahmen vorne / außen
Frame front / outside
Cadre devant / extérieur
Ramen voor / buiten
8/4 7/1 II
T
Page 23
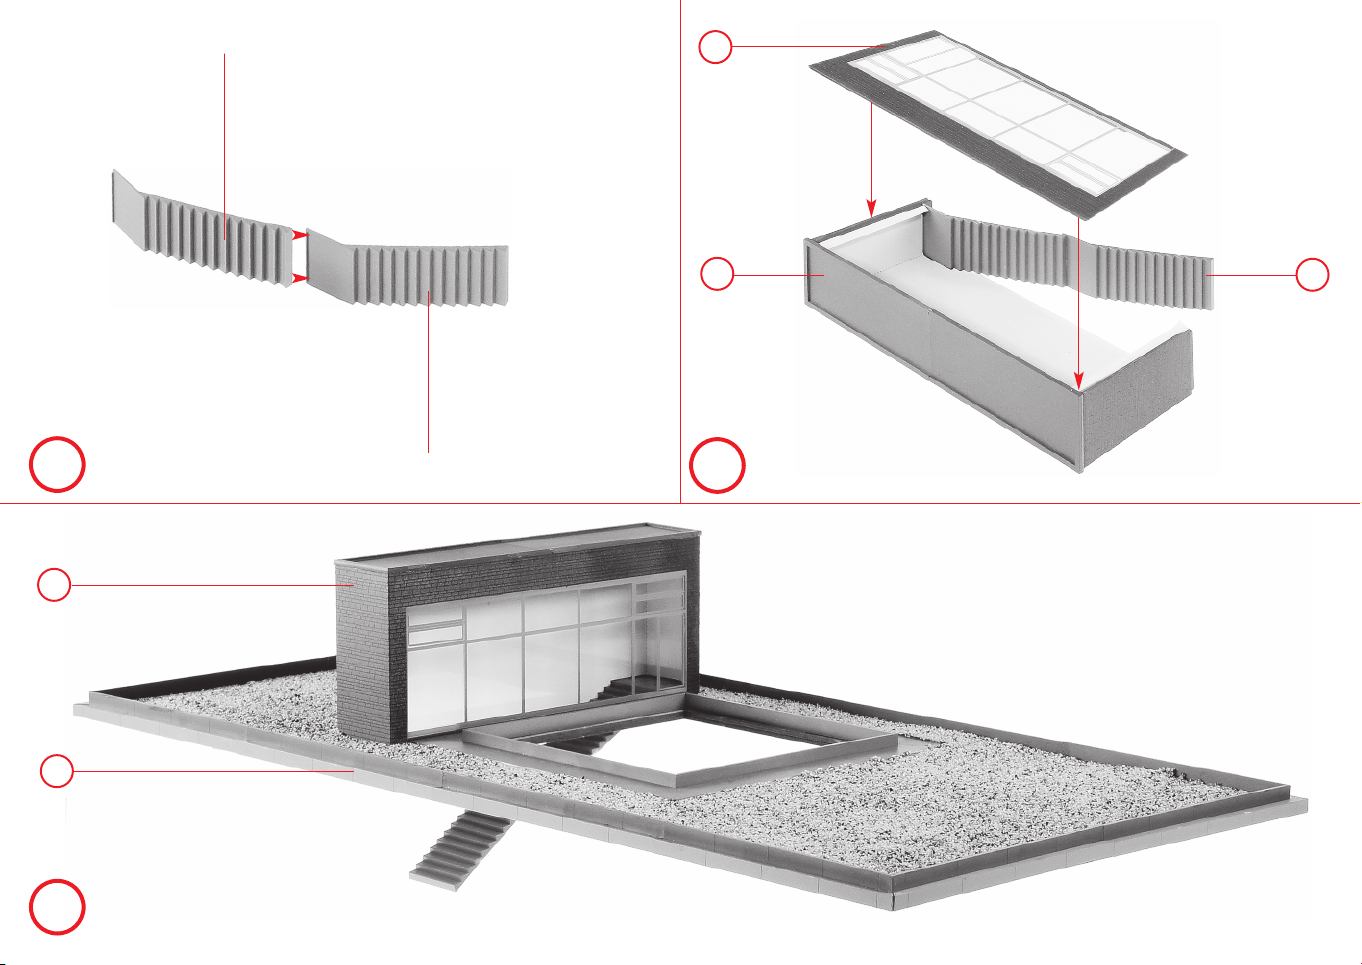
6/11
T
23
U
V
P
nicht kleben
do not glue
ne pas coller
niet lijmen
6/11
R
V
U
W
Page 24
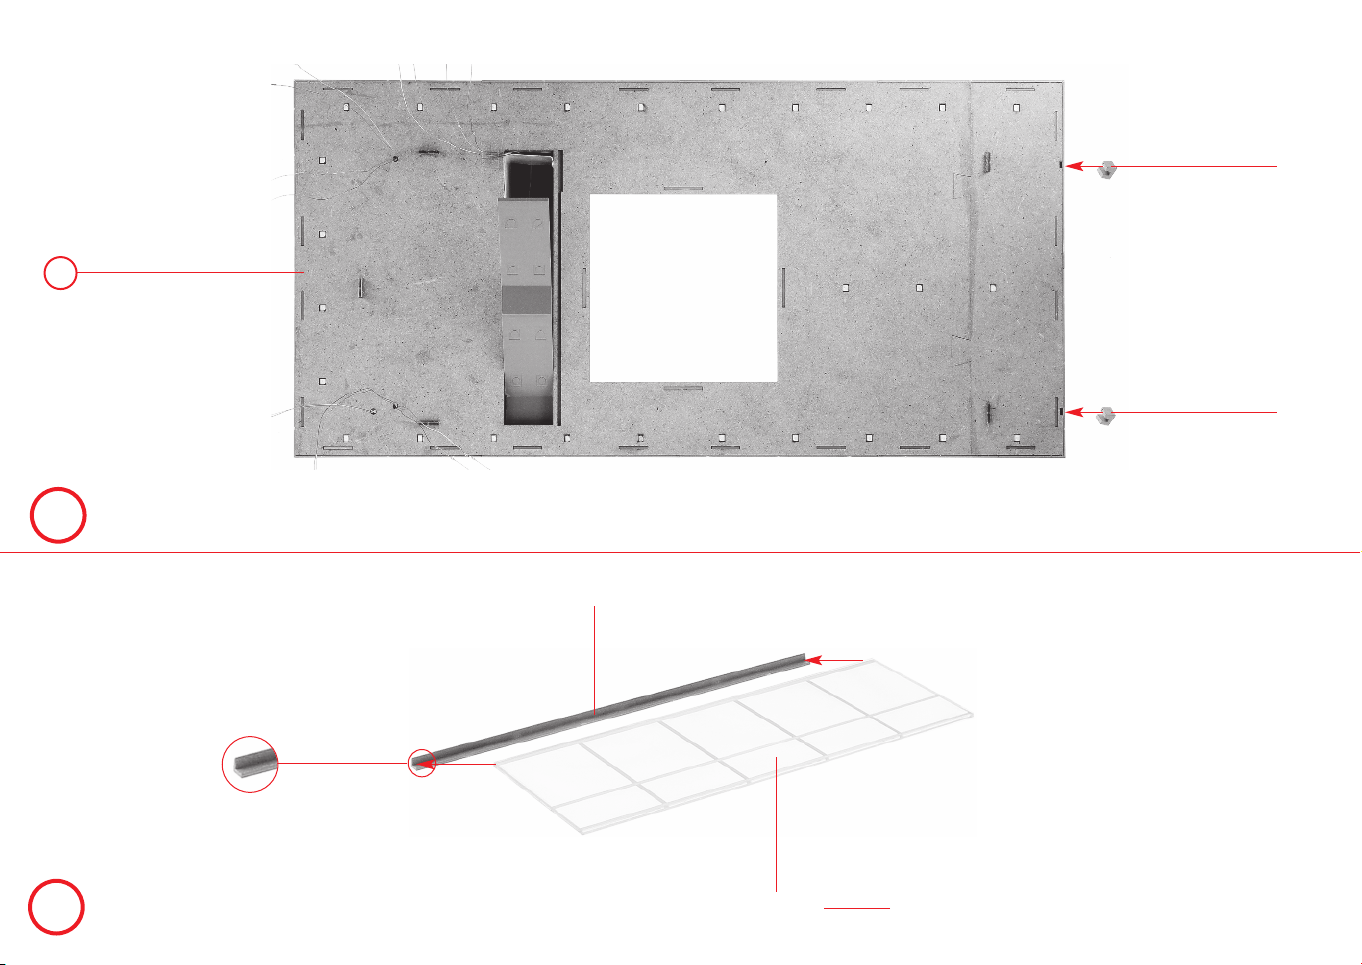
24
W
a
6/4
6/4
6/14
b
7/1 III
Rahmen unten
Frame bottom
Cadre en bas
Ramen onder
Page 25
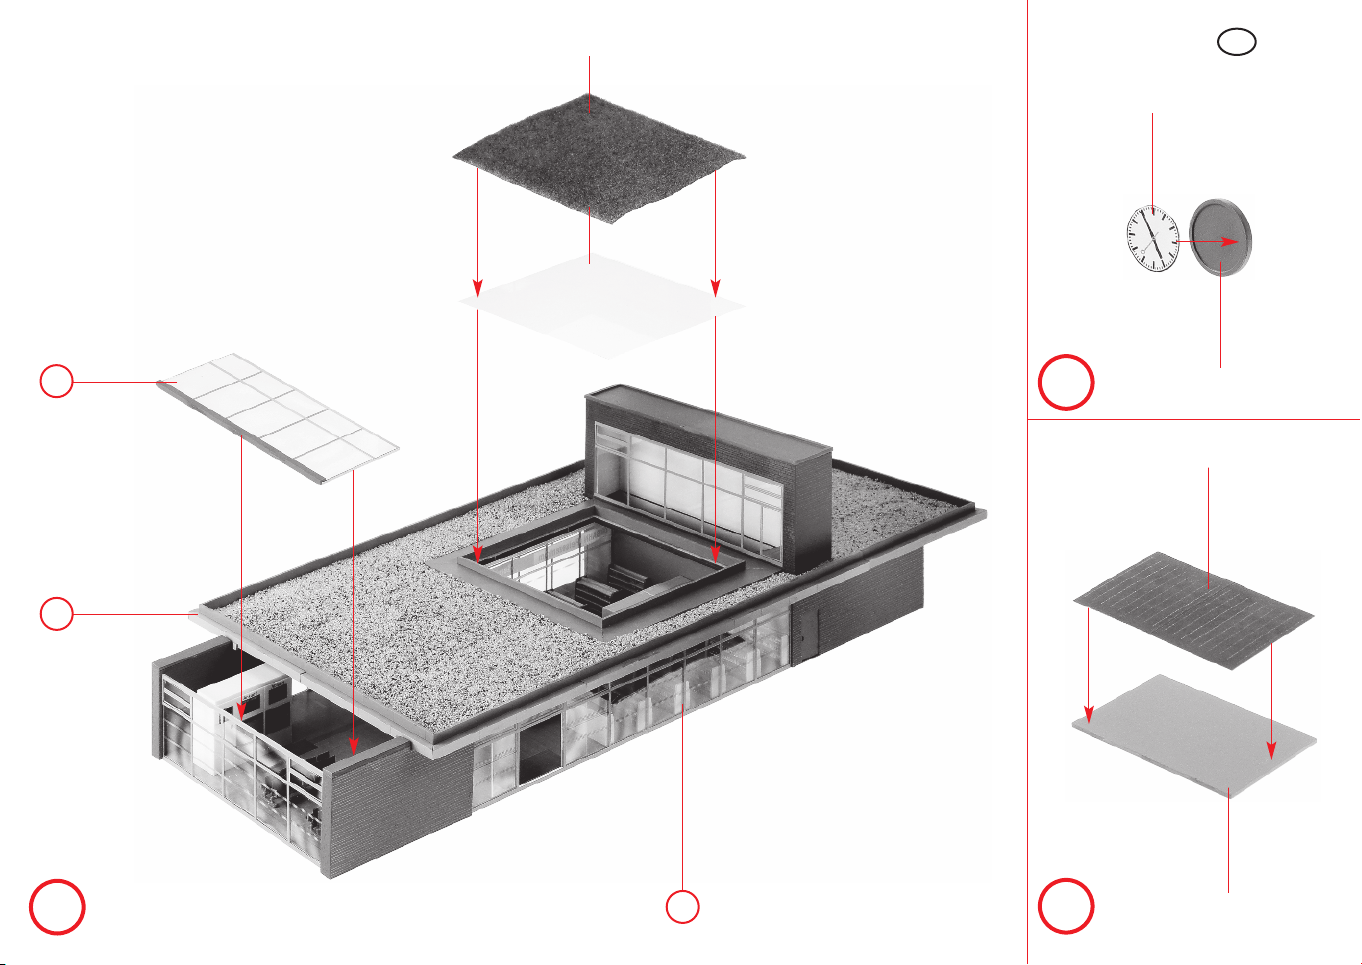
Variante
Plexiglas
Variante
Deco
CH
25
b
a
c
2 x
d
y
e
3 x
6/18
Deco 25
6/17
Page 26
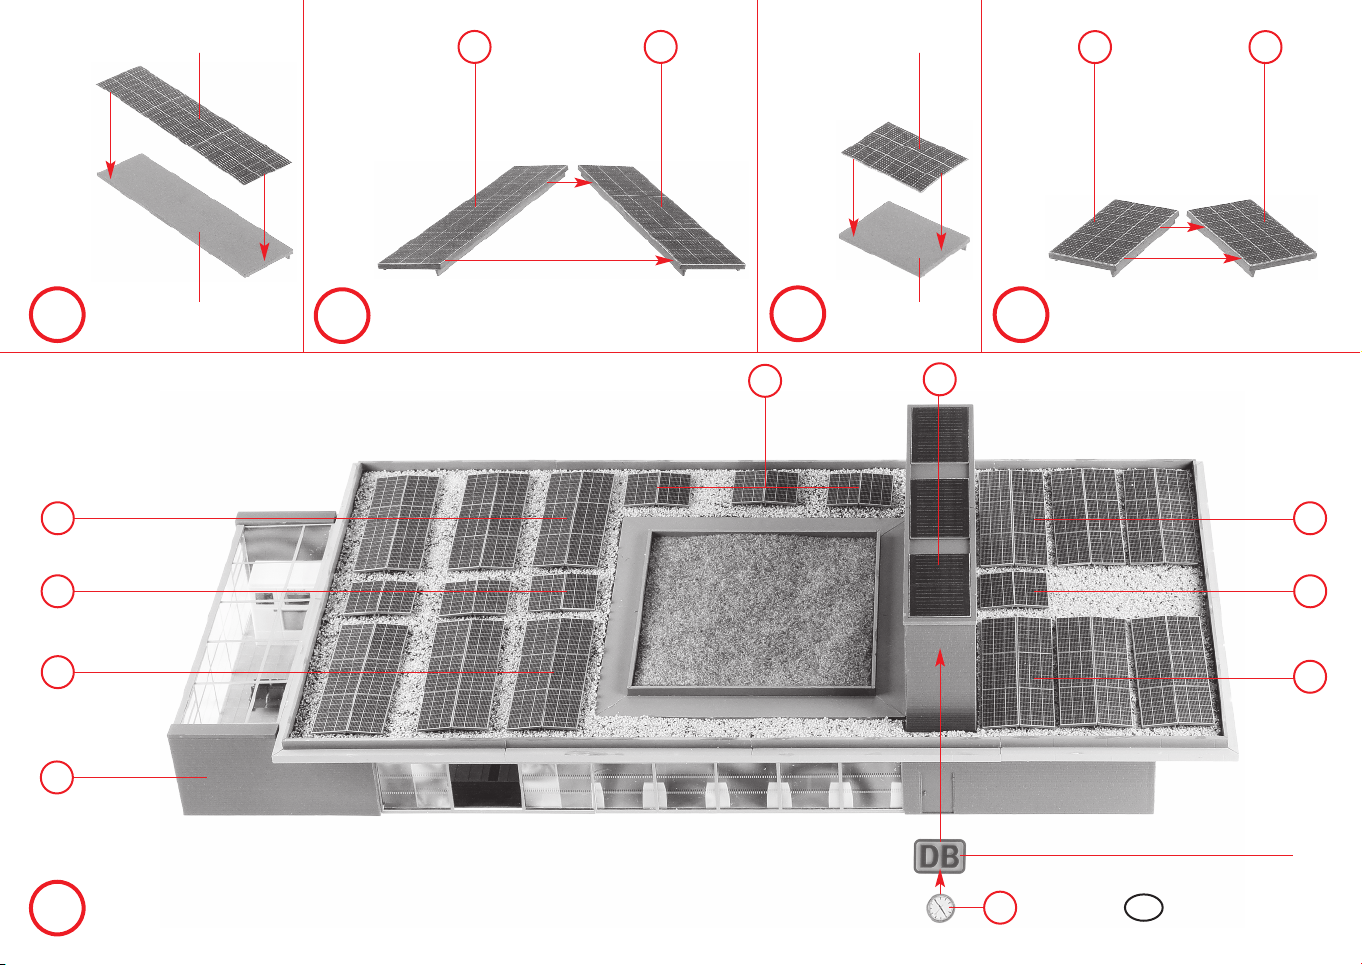
26
Deco 23
f f
Deco 24
h h
24 x 14 x 7 x12 x
f
g g
i
g
c
6/15
g
h
i
6/16
i
e
7/8
i
g
Variante
j
d
CH
Page 27
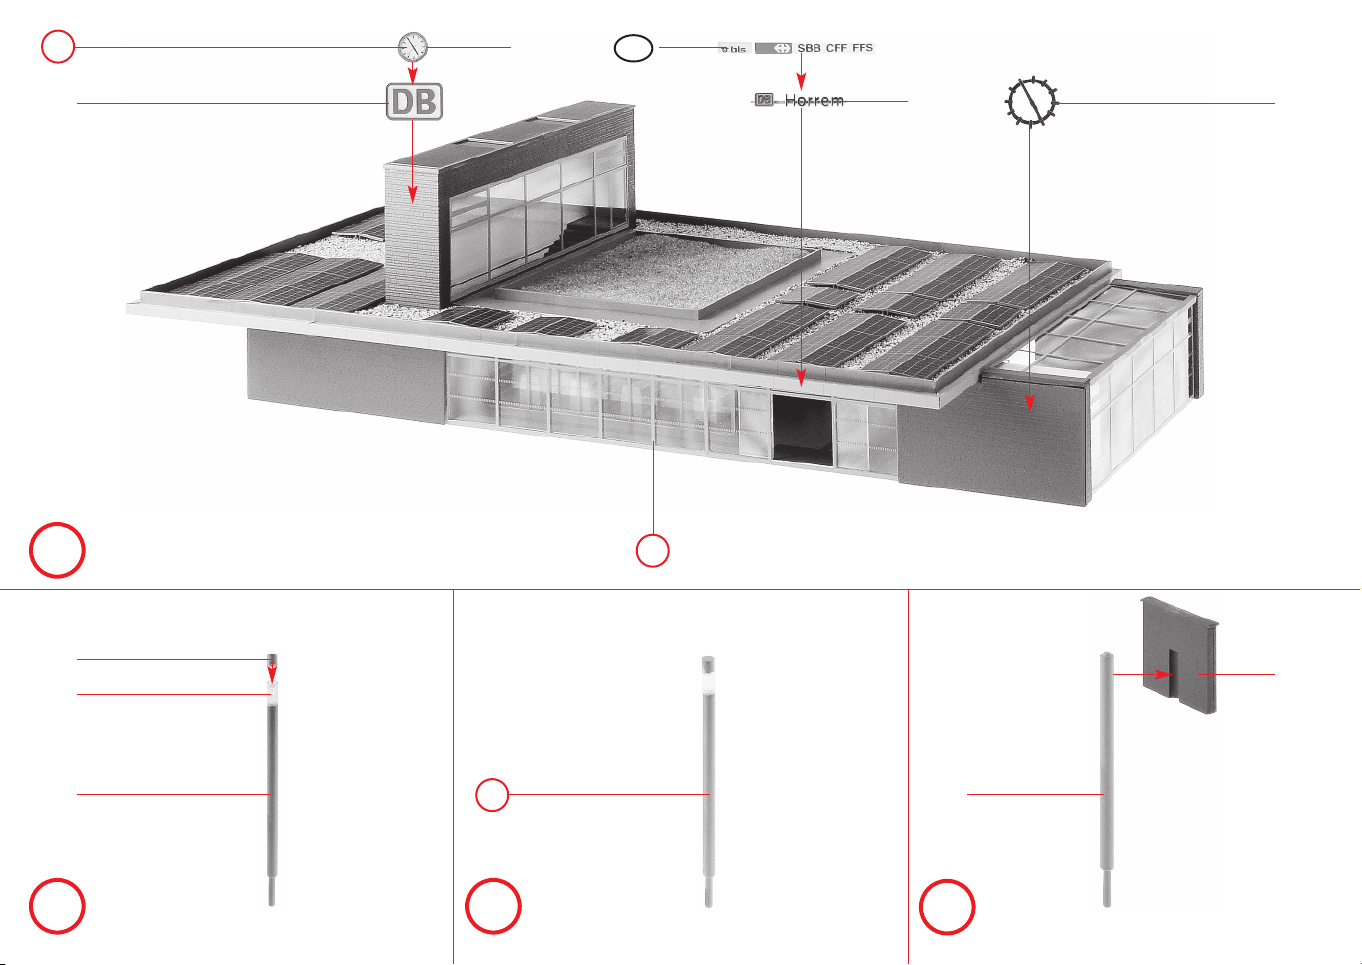
d
Variante
CH
27
7/8
k
6/6
7/2
7/9
j
6/10
3/4
6/5 6/5
l
l
m
n
2 x6 x 6 x
Page 28
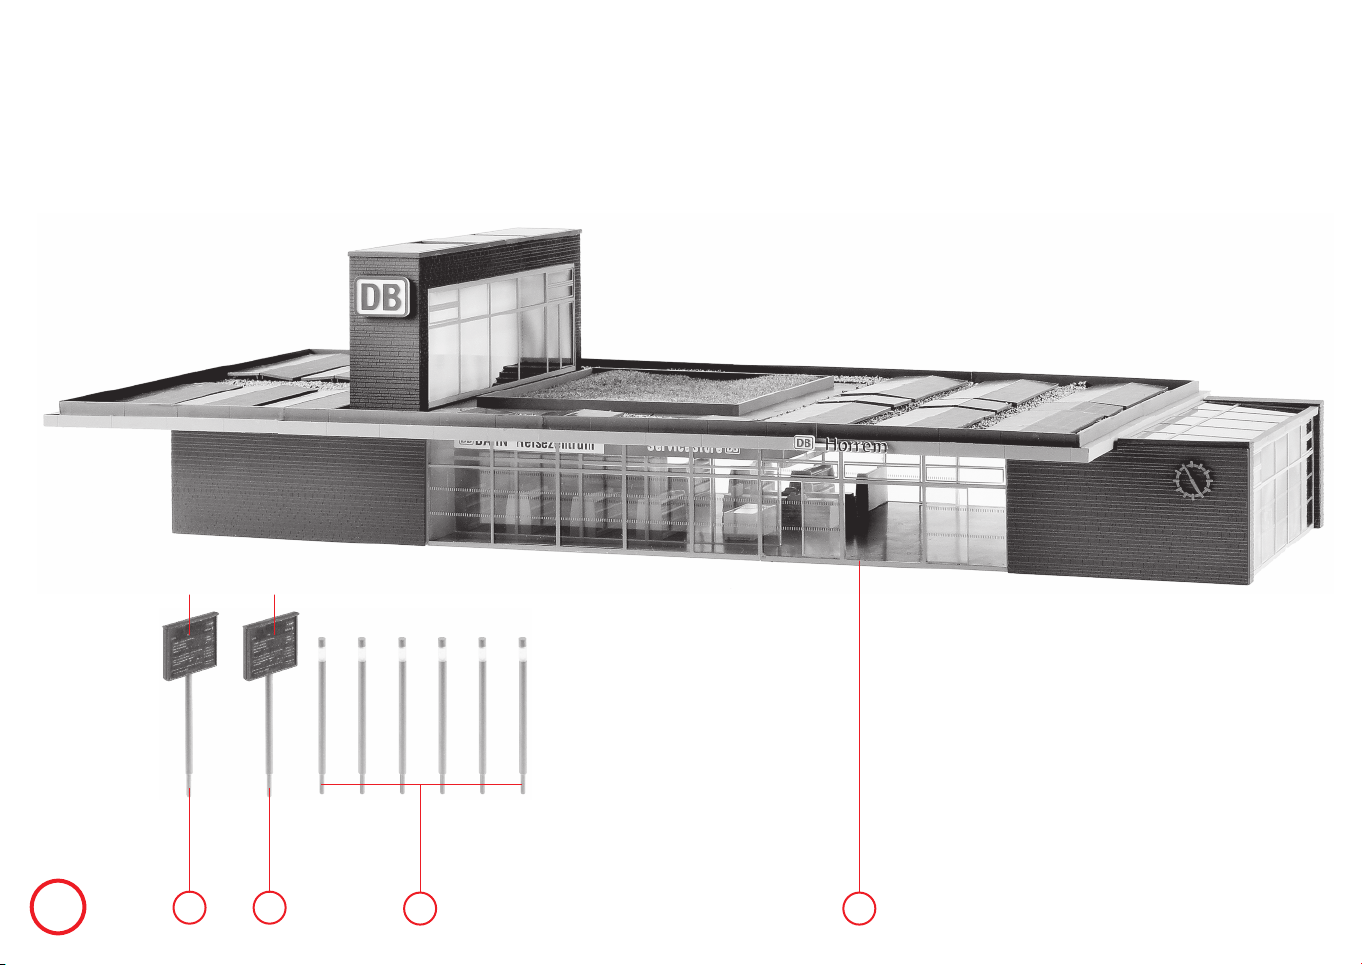
28
Deco 4 Deco 4
o
n n
m
k
 Loading...