

Page 1

Smart Reliable Secure
Faleemi Technologies Ltd
Home Wireless IP Camera
QUICK START GUIDE
FSC750/FSS850
www.faleemi.com
Apple, Apple Store, iPad, iPhone, MAC (Text, Logo, Picture) are trademarks of Apple, Inc.
Android, Google Play (Text, Logo, Picture) are trademarks of Google Inc.
Samsung (Text, Logo, Picture) is a registered trademark of Samsung Electronics Co., Ltd.
MicroSD text and logo are the trademark of SD-3C, LLC.
Wi-Fi is a registered trademark of the Wi-Fi Alliance.
All other products, names or companies are the brands or registered trademarks of their
respective owners.
www.facebook.com/faleemi
Technical specifications are subject to change without notice.
No responsibility is taken for errors in contents or printing.
© Faleemi Technologies Ltd or its affiliates. All rights reserved.
Version . 01.2018
FSC750 720P FSC850 1080P
We at Faleemi are committed to do our part in protecting our environment.
In this continuing effect, we have supplied the detailed manual and startup
guide on our website http://support.faleemi.com.
www.faleemi.com
Page 2
)
FSC750/FSC850 QUICK START GUIDE FSC750/FSC850 QUICK START GUIDE
Dear Customer,
Thanks for purchasing our products. If you encounter any problem while
configuring your camera, or need additional information, please feel free to
contact the Faleemi Support by email/skype: [email protected].
Or visit the Faleemi website : https://www.faleemi.com/faq.
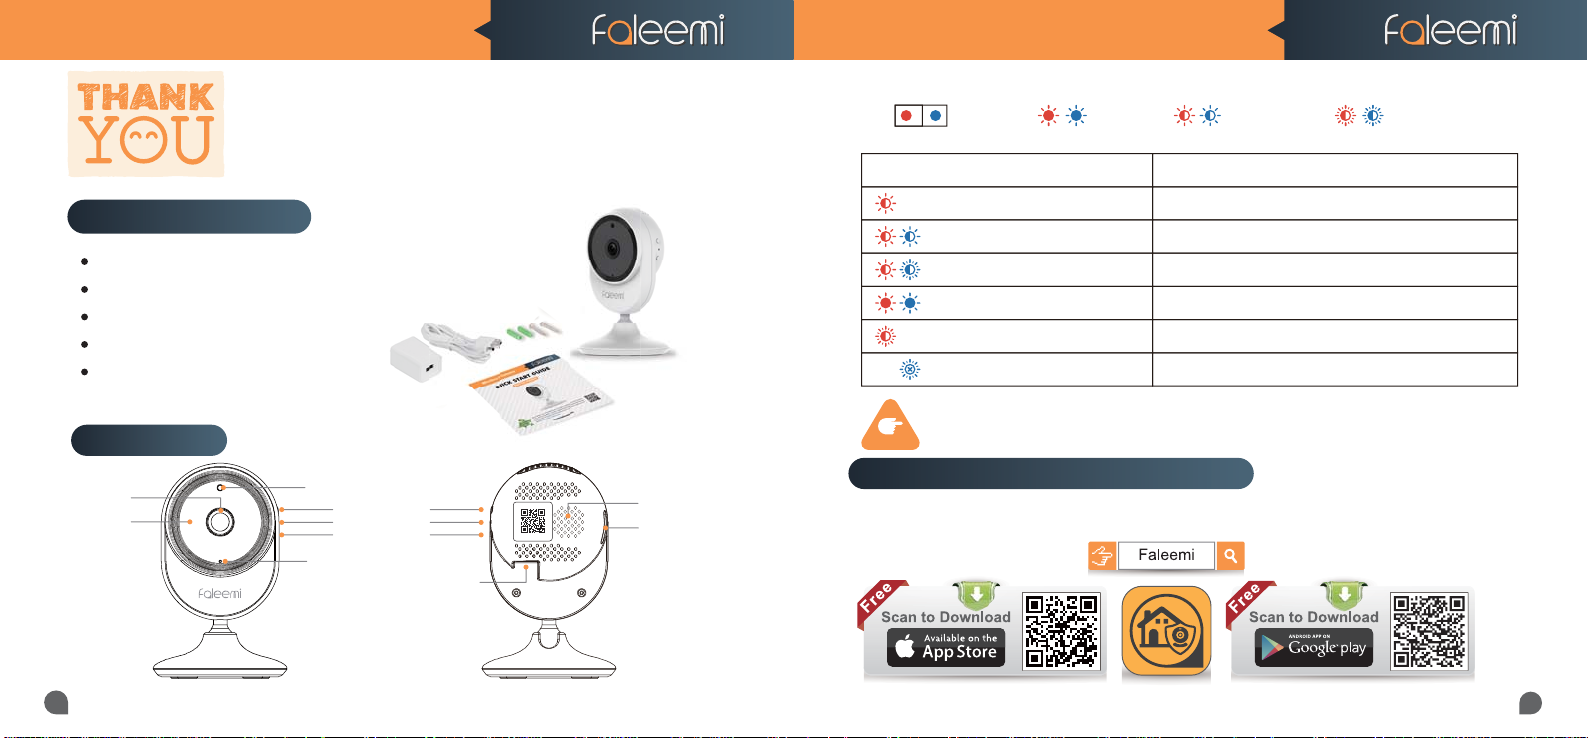
What’s in the box ?
Faleemi Wifi IP Camera FSC750(720P)/FSC850(1080P)
Ceiling/Wall Mounting Bracket
Mounting Screws & Plugs
Power Adapter
Quick Start Guide
/FSC850(1080P
Connections
Lens
IR LEDs
Light Sensor
WPS Button
Status LED
Reset Button
Built-in Microphone
DC 5V Power
Faleemi WiFi IP Camera
DID: VIEW-575554-JPRZV
Speaker
Memory Card slot
*
TIPS
Status LED
Indicator Light Status Device Status
Red light is blinking slowly Power up and activating
Red and blue lights are blinking slowly The device is ready to connect
Blue light is blinking quickly The device is receiving the wifi signal or connecting to the wifi
Blue and red lights are solid and steady The device is connected to the network
Red light is blinking quickly The device is reset to restore to factory default
Blue light goes off The device failed to connect to the network
Please download the Faleemi APP before doing the setup
Download the App (Android and iOS)
First, connect your mobile device to your WiFi and download the App “Faleemi” from the App Store
or Google Play store,or scan below QR code to download it.
Solid Light Blinking Quickly
Blinking Slowly
01
02
Page 3
FSC750/FSC850 QUICK START GUIDE FSC750/FSC850 QUICK START GUIDE
WPS
Reset
WPS
Now, please follow below instructions to get your camera set up.
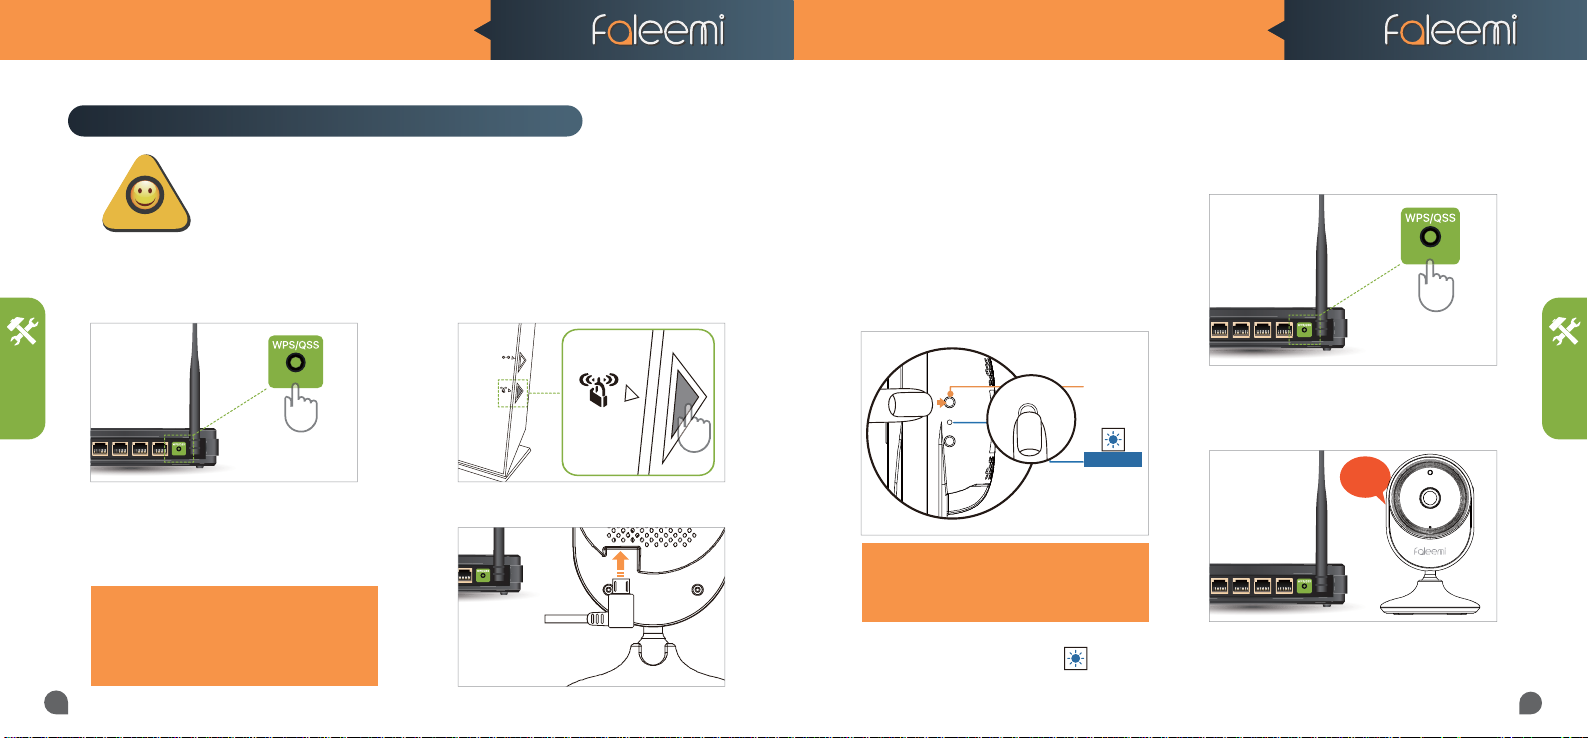
Setup Method 1 WPS/QSS Connection Method
SETUP
03
Please check if your wifi router has a "WPS/QSS" button or a WPS icon (see
below picture).
TIPS
WPS:
Usually it is on the top of your router, or 2 sides, back or bottom. If you find there
is a WPS/QSS button, please follow below steps to do the setup. If you don’t find
this button, please turn to page 7 to use your mobile phone to do the setup.
Wi-Fi Protected Setup (Wi-Fi Simple Config) is a network security standard to create a secure
wireless home network, The standard emphasizes usability and security.
WPS Button WPS Icon
1. Please move the camera to be close to
your wifi router and plug it in.
TIPS:
Make sure your wifi name and password do
not have the special characters " & " and " ' ".
2. Please wait for about 1 minute until the
camera is initialized. You will see both red
and blue lights are flashing. Please press
down the reset button for about 3 seconds
and then let it go.
(Please don’t push it down for a longer
time, because if too long, it goes for
Reset, not WPS.)
WPS/Reset
Button
Solid Light
3S+
Because the reset button is very small, not easy
to hold down, please make sure to push down
the Reset button for about 3 seconds and then
let it go.
And then you will see the blue light turns on,
solid and steady (not blinking).
3. At this time, press the WPS button on
your router once.
4. You will hear the sound “beep beep” in 5
seconds, that means the camera is connecting to your WiFi.
Beep
Beep
Wait for around 30 seconds, Please follow
below steps to add the camera to your
mobile phone.
SETUP
04
Page 4
FSC750/FSC850 QUICK START GUIDE FSC750/FSC850 QUICK START GUIDE
SETUP
05
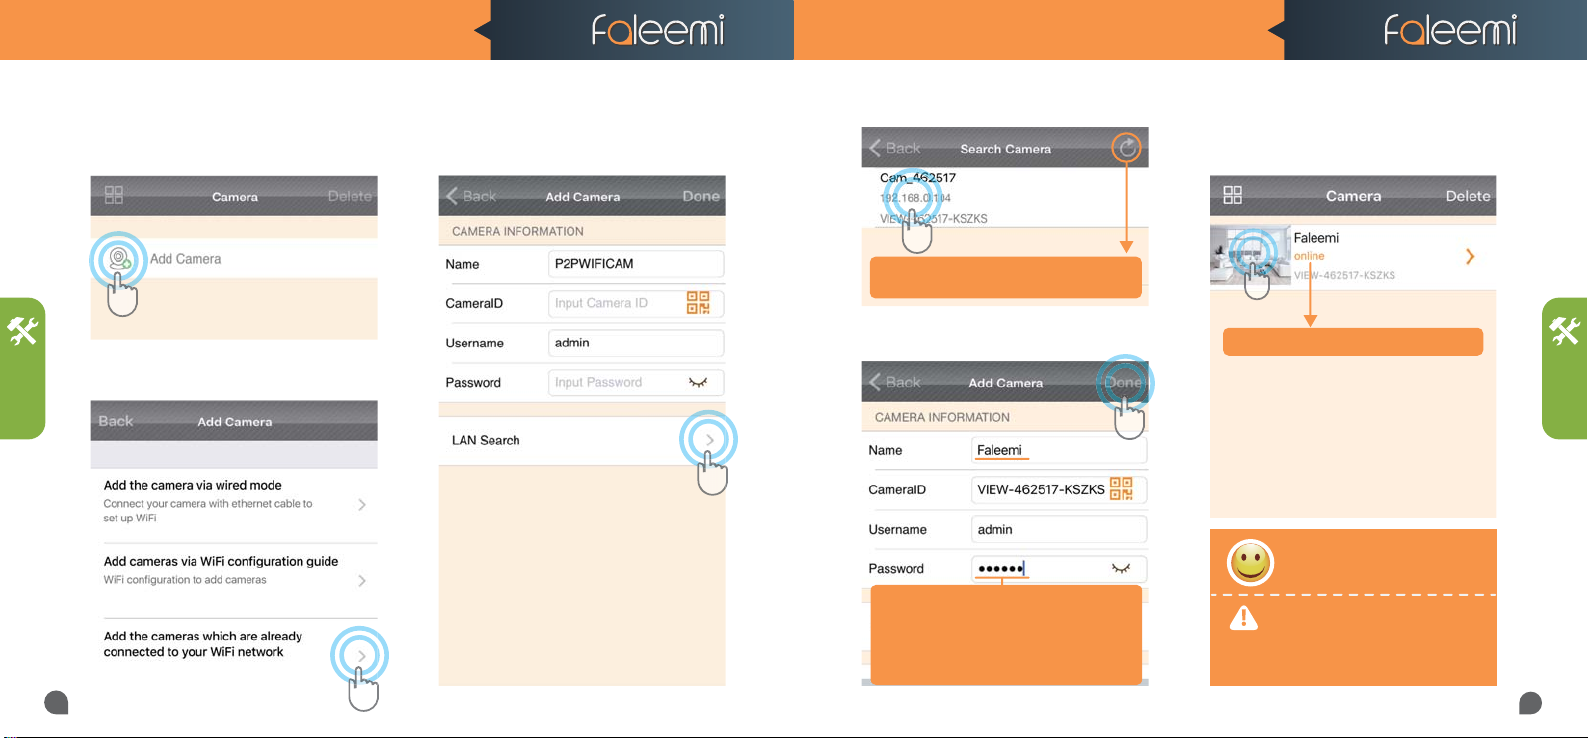
Please make sure your phone is connected to your WiFi (the same WiFi what your camera
connected to), Open the Faleemi App.
1. Click on [Add Camera]. 3. Click on [LAN Search].
2. Click on [Add the cameras which are
already connected to your WiFi network]
4.Click on the camera searched.
If you don’t find it, please click on this icon
to refresh.
5. Give your camera a name, and Default
Password(123456), click on [Done]
Please don't change the camera password and
username here. Please use the default password of
123456 and username of admin. After your camera
is connected successfully, please refer to the
instructions in page 21 to change the password
and username.
6. It will go back to below interface automatically. It will show online. And just click
on the image to start to view & control.
You will see it shows the camera online
SETUP
Congratulations!
Your camera is connected now
To ensure the security of your camera,
you are suggested to change the default password. Please refer to the instruction in Page 21.
06
Page 5
FSC750/FSC850 QUICK START GUIDE FSC750/FSC850 QUICK START GUIDE
SETUP
07
Setup Method 2 Mobile Phone Setup
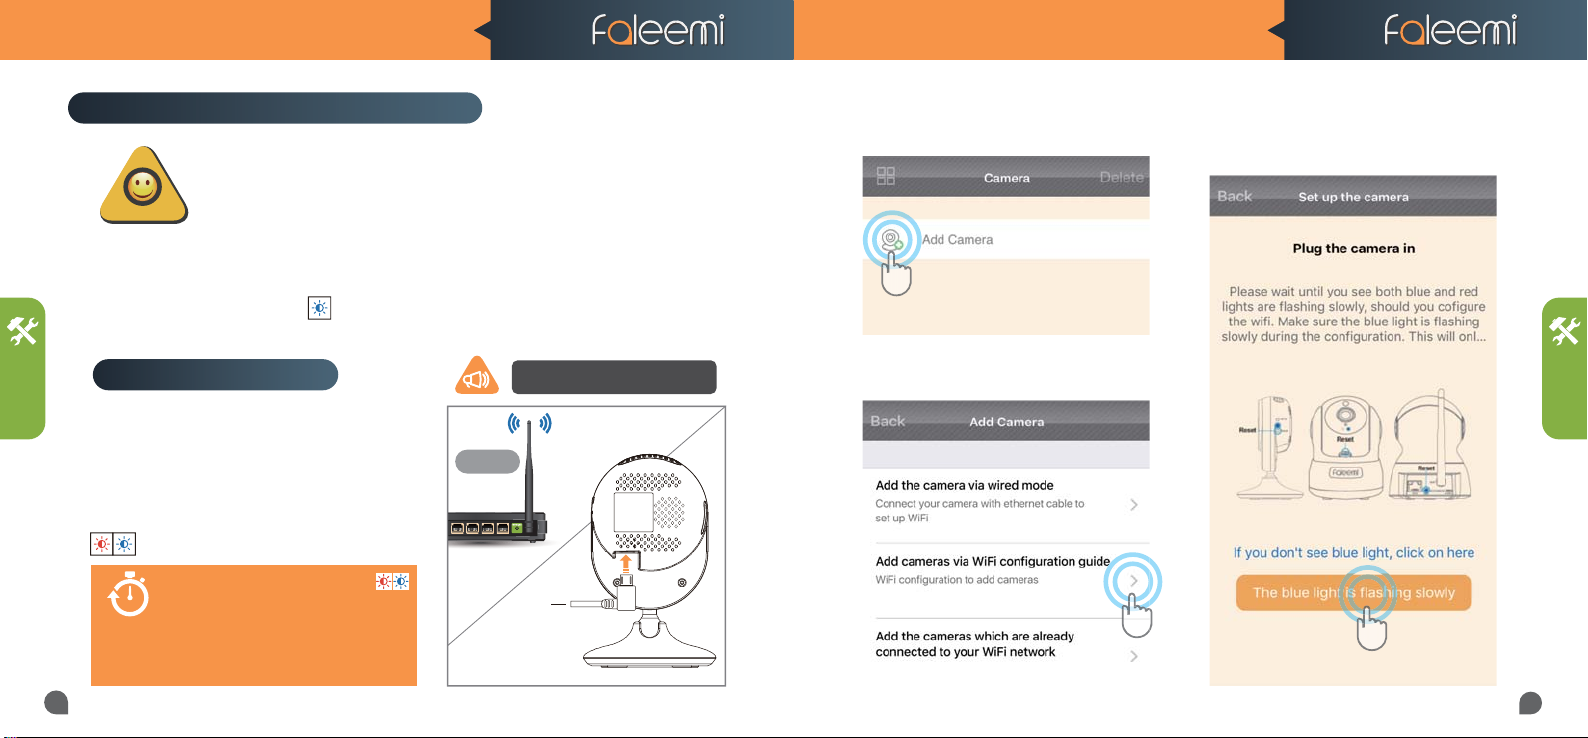
Before configuring your camera, please read the points below.
1. To ensure the camera works stable, please make sure to put your camera close
TIPS
3.
Make sure your phone is connected to your 2.4GHz WiFi (not cellular data and 5GHz WiFi)
before doing the setup.
4. Make sure your wifi name and password do not have the special characters " & " and " ' ".
5. If you don’t see the blue light , please do a “Factory Reset”. This process is outlined on
Page 22 of this manual. (“How to restore to factory default”).
Camera Configuration
1. Please put your camera close to your wi
router and plug it in, you will hear “beep” after
40 seconds. The camera is initializing by
rotating from left to right and up to down and
stop in center finally (25s). And then you will
see the red and blue lights are blinking slowly
(around 80s after the camera powered up).
5 mins
NOTE
to your wifi router, if you could put them in the same room, that will be better.
2. Make sure your wifi router is connected to the Internet.
Note, when the camera is startup,
it will sound one“beep”
2.4GHz
Router
Only when it blinks red & blue slowly ,
you are able to set up the camera. It lasts
only 5 mins after the camera is powered
up. If you don't do the configuration during
this time period, please unplug the camera
and plug it in again to get another 5 mins
setting time.
Plug
2. Open the Faleemi App,
click on [Add Camera].
3. Click on [Add cameras via WiFi cong-
uration guide].
4. Click on
[The blue light is ashing slowly].
SETUP
08
Page 6
FSC750/FSC850 QUICK START GUIDE FSC750/FSC850 QUICK START GUIDE
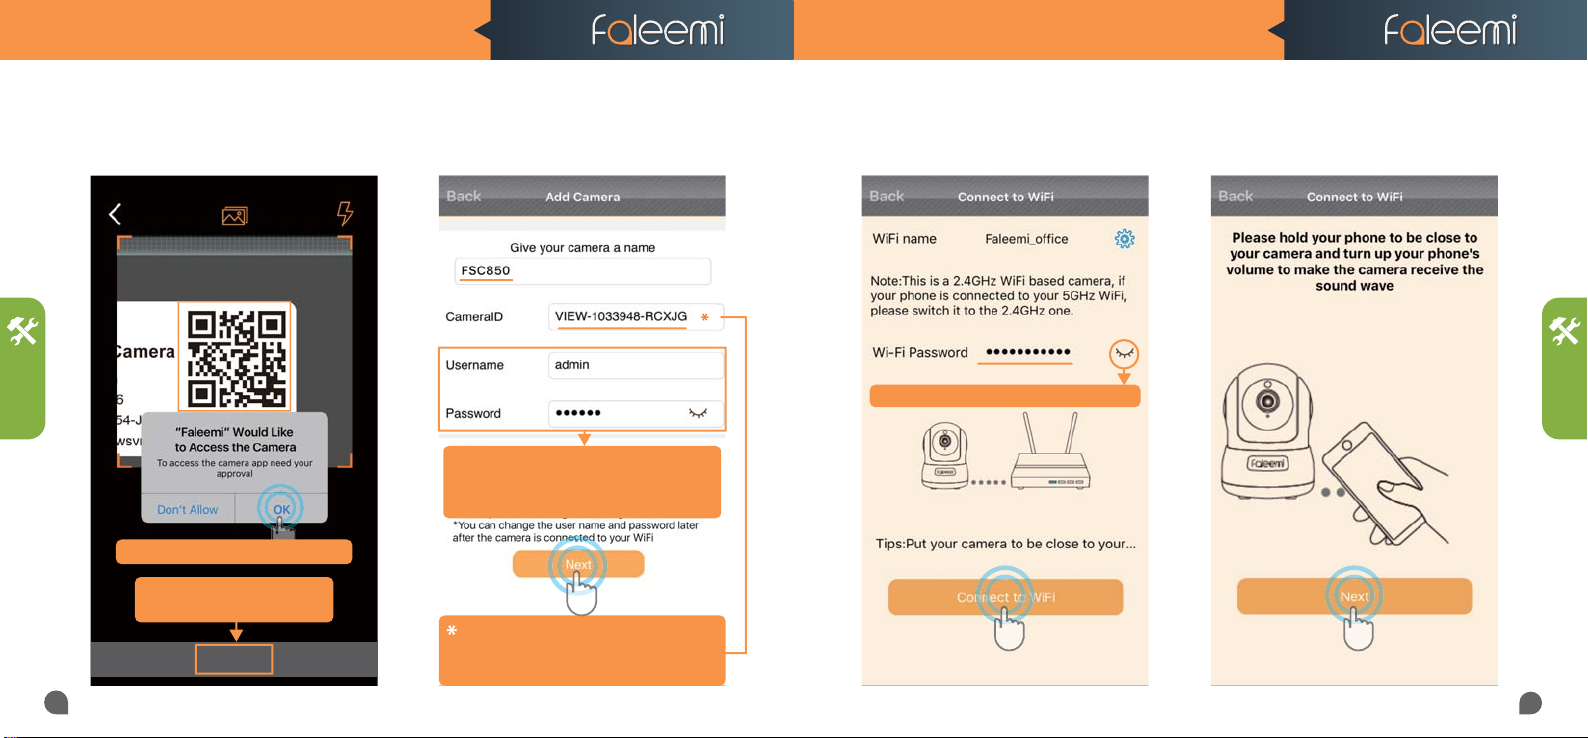
5. Please scan the QR Code at the bottom of
the camera
QR Code
SETUP
If you see this, please click on "OK"
If you can’t scan the QRcode,
please Click on [Skip]
Skip
09
6.Type in the name you have selected for your
camera and click on [Next].
Please don't change the user name and password.
You have to use the default ones here. But you can
change them after your camera is connected. Please
refer to the instruction on page 21.
if you can't scan the QR code, please enter the
DID (something like VIEW-1234567-ABCDE) in
the label on the camera manually.
7. Input your WiFi password and click on
[Connect to WiFi].
Click on it to show and check your password
8. Click on [Next].
SETUP
10
Page 7
FSC750/FSC850 QUICK START GUIDE FSC750/FSC850 QUICK START GUIDE
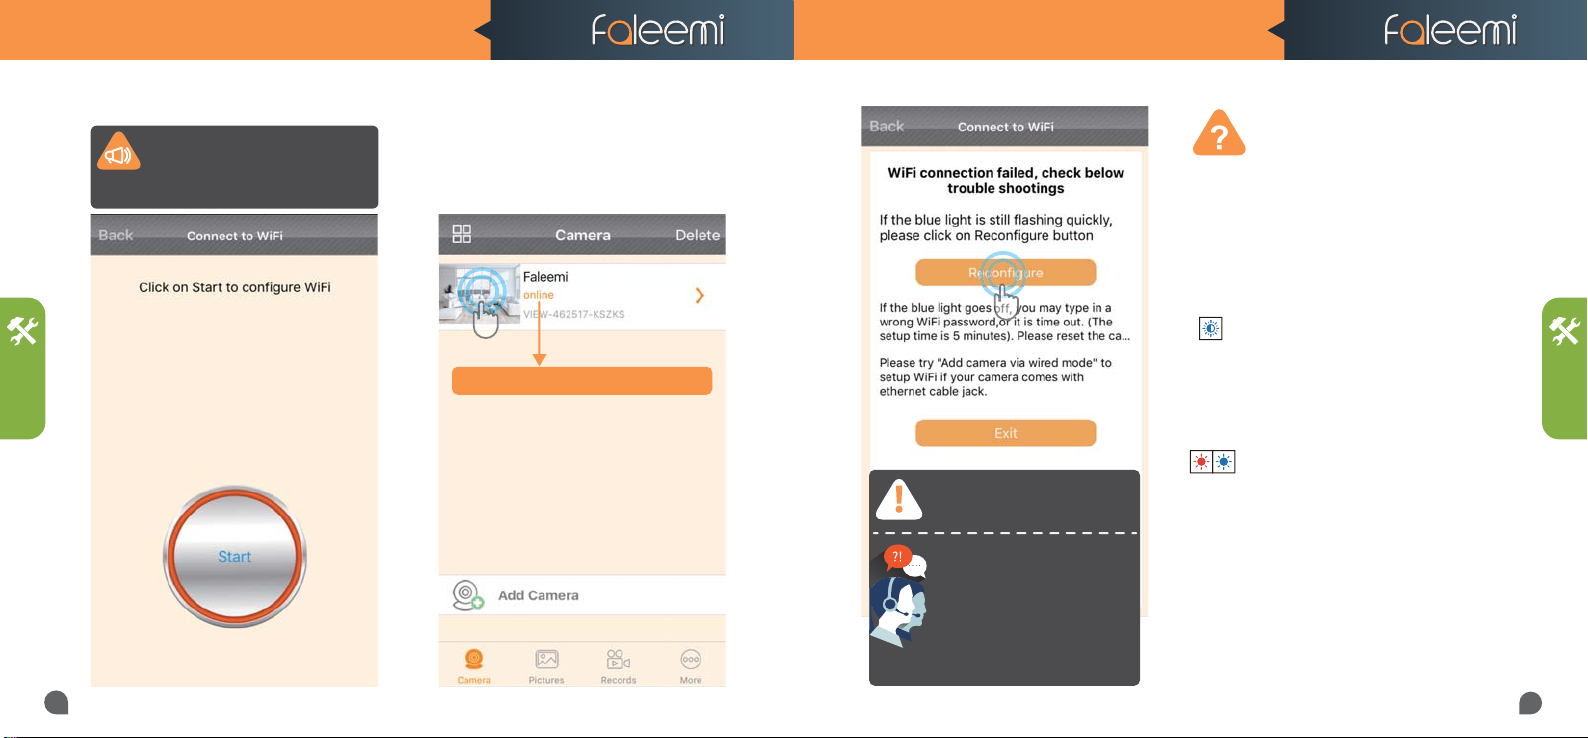
9. Click on [Start] 10. After the wifi is connected, it will go back
Note: Please click on "Start" button. Your
phone will make a loud sound to
transmit the data to the camera. When
the camera receives the wifi signal, it will
sound with 2 beeps.
to below interface automatically. It will show
online. And just click on the image to view
live video.
You will see it shows the camera online
SETUP
11
If the setting is failed, please find
below solution or contact us by
Email: [email protected]
Skype: [email protected]
Phone: 213 293 3560
EST: 6am~11am, 8pm-11pm
PST: 6am~8am, 5pm-12pm
When you call us, please wait some more
moment until it gets through.
If the setting is failed,
please nd below solution.
1. Please check if your WiFi password is correct
and re-configure it again.
2. If the wifi password is correct, it always lets
you try again. This is because for some routers,
you may not hear double beep after the WiFi
connection is succeeded.
( If the blue LED is blinking rapidly (See table
bottom at page 2), it indicates that the camera
setup has taken longer than 4 mins.
Please unplug the camera and plug it in again,
wait around 90 seconds, after it is initialized,
you will see both red and blue lights are solid.
(This means the camera is connected to
your wifi) Then please go back to home page
and follow the steps in Page 5 to add the
camera to your Faleemi App and no need to set
up wi again.
3. If you still can't add it to your Faleemi APP,
please follow the guide in Page 22 [5. How to
restore to factory default?] to reset your
camera and follow the steps since Page 7 to do
the settings again.
SETUP
12
Page 8
FSC750/FSC850 QUICK START GUIDE FSC750/FSC850 QUICK START GUIDE
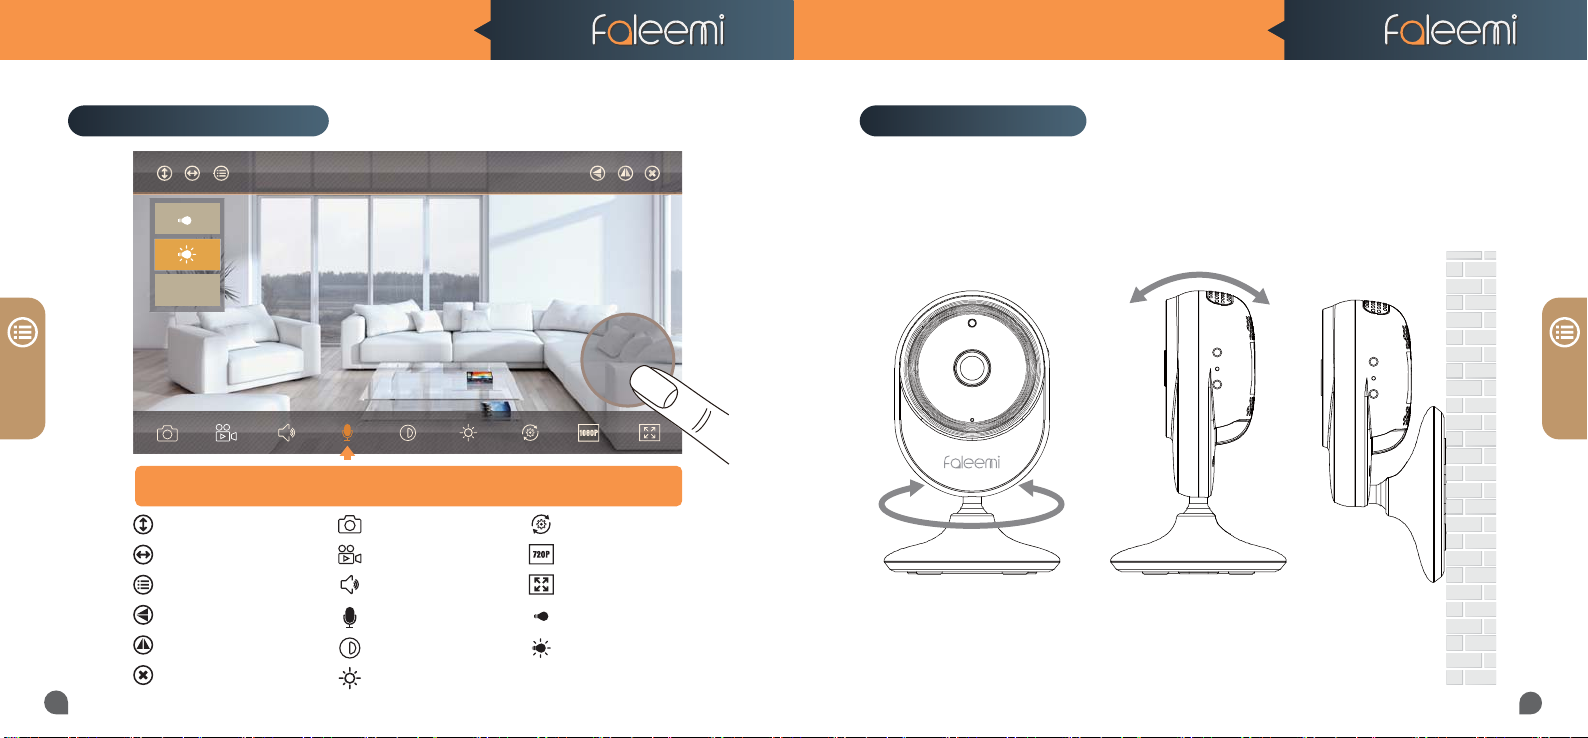
Live Video Interface
PANEL
13
Faleemi_FSC850
Preset
Hold Talk
Turn on the Microphone; you will see a pop-up button “Hold Talk”, press down
Cruise Vertically (N/A)
Cruise Horizontally(N/A)
Menu
Flip
Mirror
Exit
this button to talk to the people at the camera side.
Snapshot to phone
Record video to phone
Audio on/off
Microphone on/off
Contrast
Brightness
Preset
Restore to default
480P/720P/1080P*(*FSC850)
Contract
IR LED Off
Auto
Set or Call Preset (N/A)
Pan & Tilt Control
Please move the camera to adjust the angle.
WPS
Reset
WPS
Reset
EL
14
Page 9
FSC750/FSC850 QUICK START GUIDE FSC750/FSC850 QUICK START GUIDE
How to connect the camera to the second Phone?
ADD
15
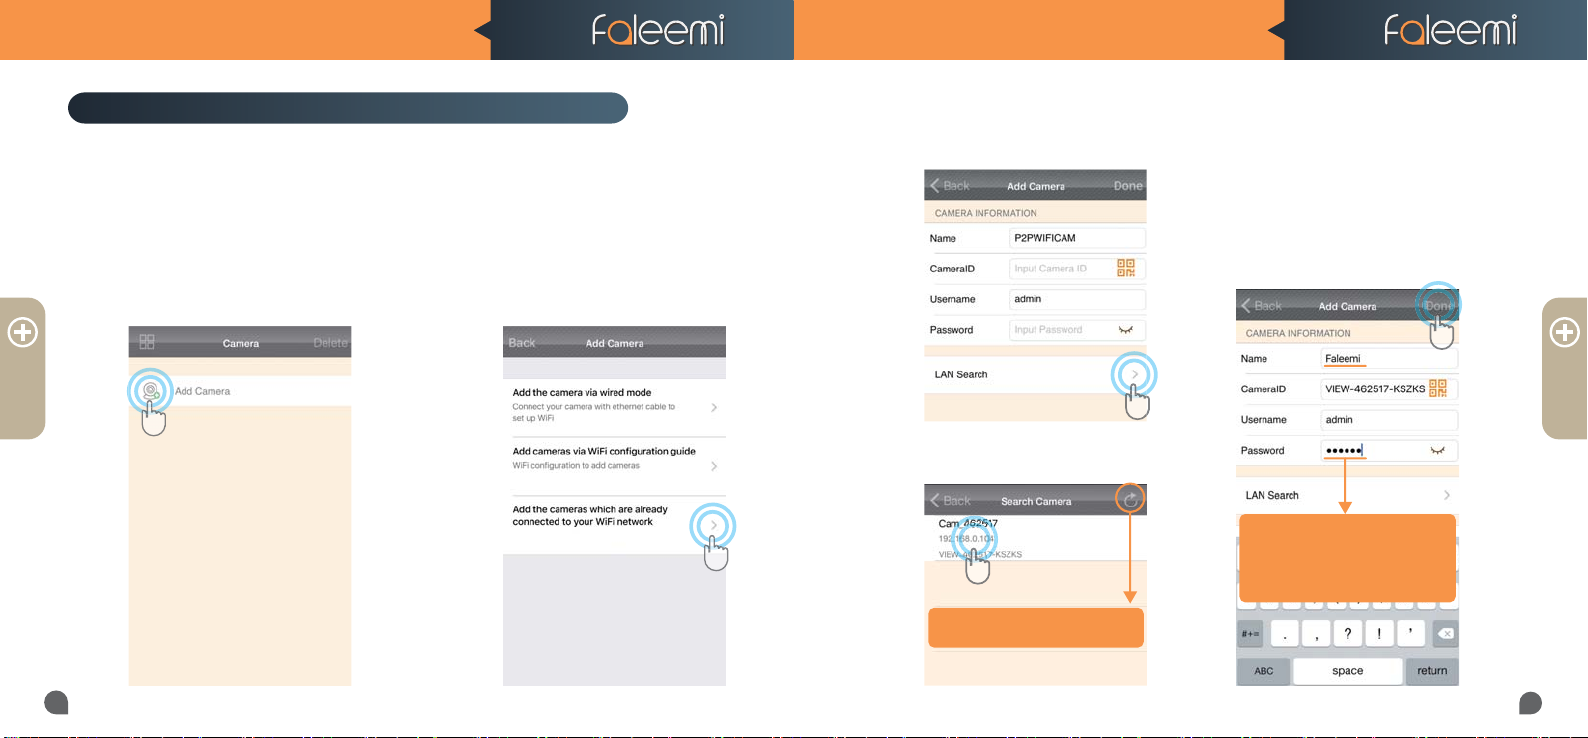
After you use one phone to get your camera connected to your WiFi and you can view the live
video from your first phone.
If you would like to add your camera to the second phone, please ensure your second phone
connects to your WiFi (the same WiFi your camera connected to) .
1. Download the Faleemi App to your second phone.
2. Open the Faleemi App,
Click on [Add Camera].
3. Click on [Add the cameras
which are already connected to
your Wi network]
4. Click on [LAN Search].
5.Click on the camera searched.
If you don’t find it, please click on
this icon to refresh.
6. Give your camera a name, and
input your Password, click on
[Done] go back to home to start
to view & control.
ADD
Tips:
Default (123456), but if you
changed the password on your
first phone, please enter your
new password here.
16
Page 10
FSC750/FSC850 QUICK START GUIDE FSC750/FSC850 QUICK START GUIDE
Advanced Settings
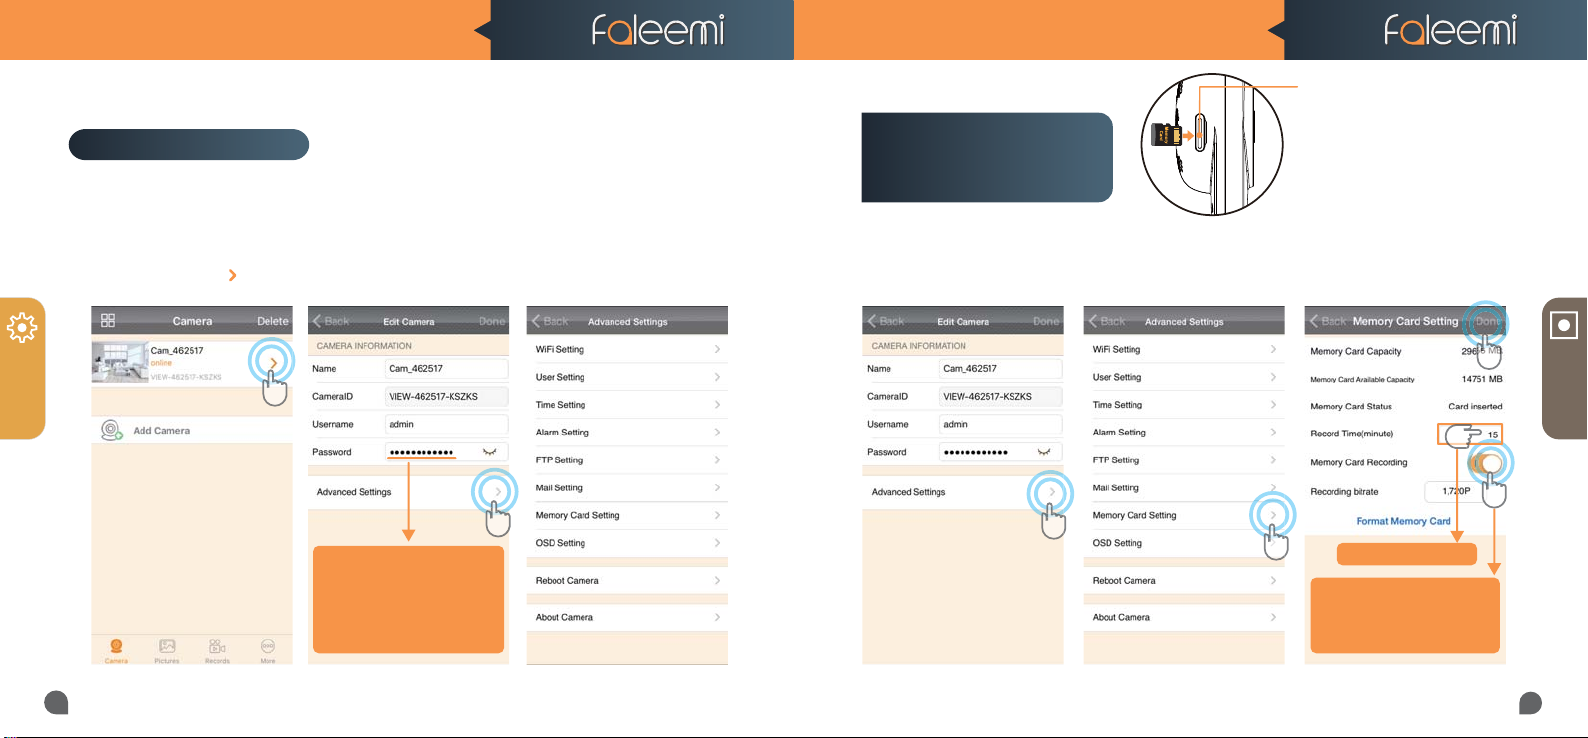
Please follow below steps to go to Advanced Settings to do more settings.
2. Click on [Advanced Settings]. 3. Do advanced settings here.1. Click on the icon [ ].
How to set it to record
constantly to the
memory card?
* Please format your memory card before using.
1. Click on [Advanced Settings].
2. Click on [Memory Card Setting].
Meromy Card Slot
Please insert the Micro SD card as what
shows at left.
Suggest to use MicroSDHC* Class10
UHS-1 Memory Card.
(* MicroSD, MicroSDHC text and logo are the trademark
of SD-3C, LLC)
3. Enable [Memory Card Recording]
4. Set [Record Time] (15 mins Max)
5. Click on [Done].
5
MORE
17
If you change your password,
Tips:
please remember to update
the new password to your
other phone and click on
"Done"
4
RECORD
3
1
2
Tips: Max 15 Minutes
Tips:
If you just want to record alarm
video to the memory card,
please disable this button.
18
Page 11
FSC750/FSC850 QUICK START GUIDE FSC750/FSC850 QUICK START GUIDE
RECORD
19
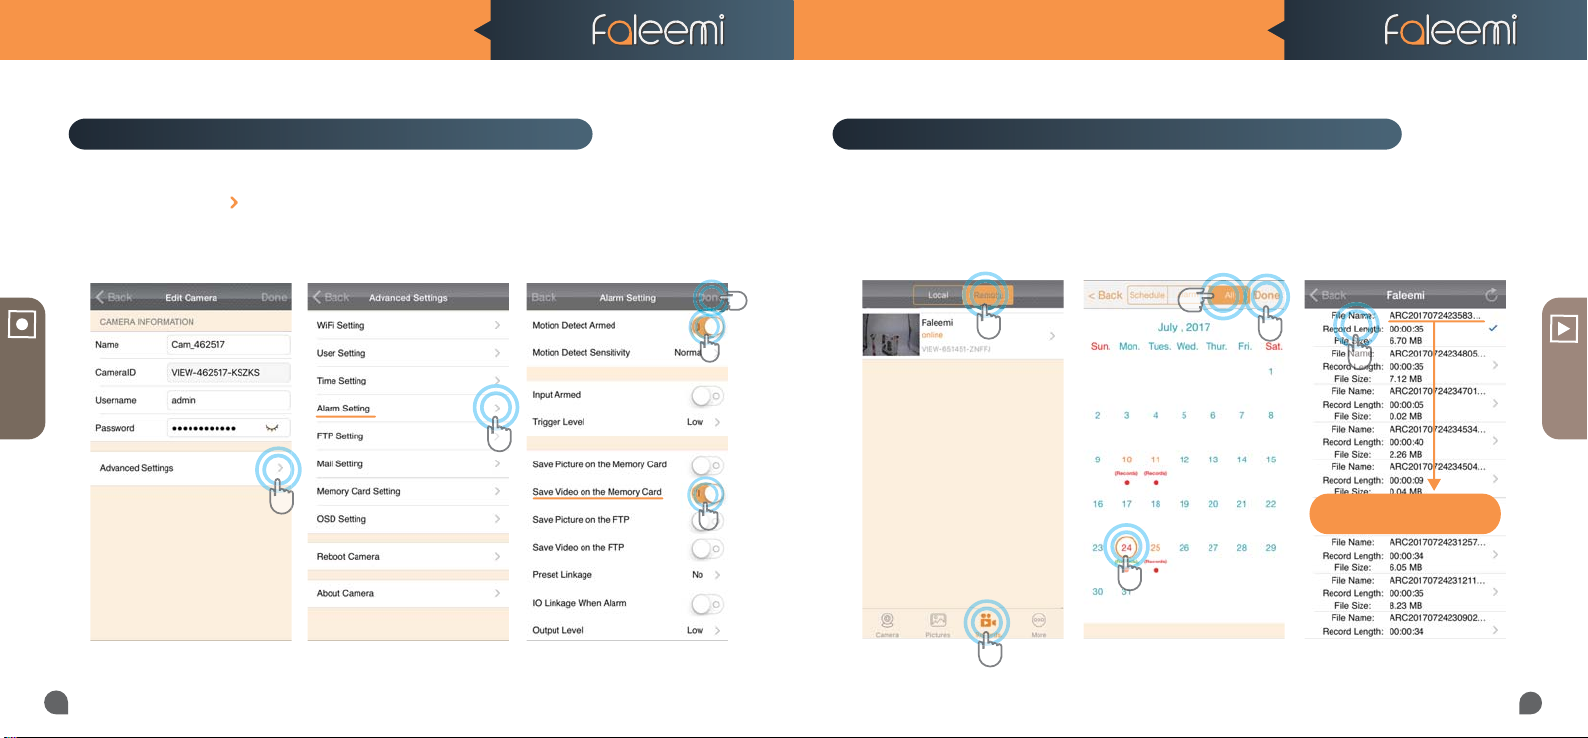
How to record alarm video to the memory card?
1. Click on the icon [ ]. 3. Click on [All], select recording
2.Click on [Alarm Setting] 3. Enable [Motion Detect Armed]
4. Enable [Save Video on the
memory card]
5. Click on [Done]
5
3
How to view the recorded video on memory card?
1. Click on [Records],
2. Click on [Remote].
4. Select Date
5. Click on [Done]
3
2
5
2
1
4
4
1
6. Click the file to play the
recorded video
6
ARC 2017-07-24 23:58:30
Tips:
ARC YEAR-MM-DD-Start Time
VIEW
20
Page 12
FSC750/FSC850 QUICK START GUIDE FSC750/FSC850 QUICK START GUIDE
WPS
Reset
Rese
Trouble Shooting Frequently Asked Questions
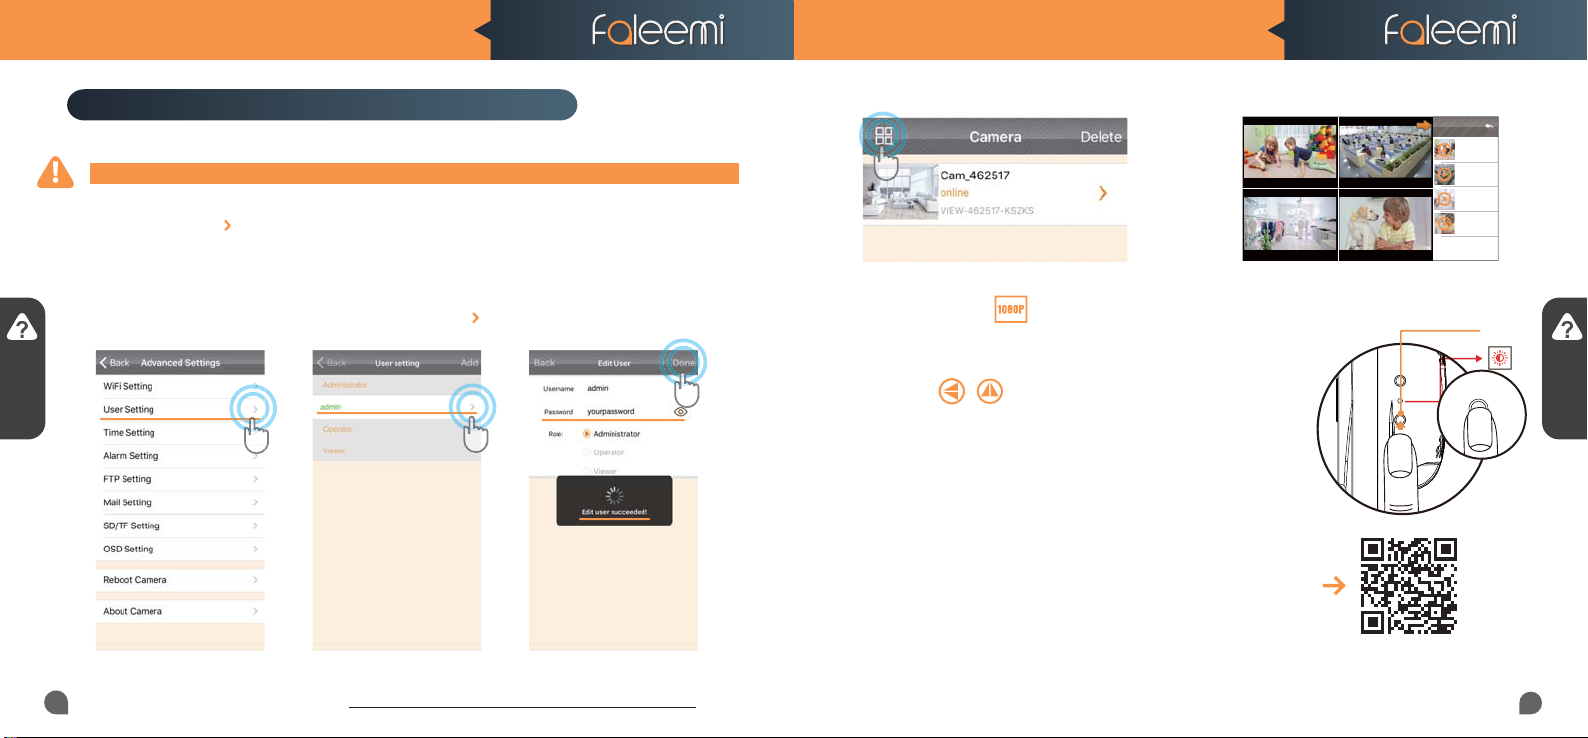
1. How do I change my camera password?
To ensure the security of your camera, you are suggested to change the default password.
Please follow below steps to do it.
Click on the icon [ ] at the right of the camera and select [Advanced Settings] and next [User
Setting]. Enter your new password and click on [Done] on the top right. Note that once the password
is changed here, it will take effect immediately.
1. Click on the [User Setting].
Q & A
Record your new password here:
21
2. Select [admin], Click on [ ].
3. Enter your new password,
Click on [Done].
2.If you have several cameras, please follow below steps to use multi-view function.
Home
Home Oce
Store
Store Pets
Oce
Pets
Four Cameras
Home
online
Playing
VIEW-462517-FHO..
Oce
online
Playing
VIEW-462517-OFF..
Store
online
Playing
VIEW-462517-STO..
Pets
online
Playing
VIEW-462517-FPE..
3. How do I change my video stream resolution?
Click on the icon to change the resolution.
4. I mounted my camera upside down, how do I flip my camera’s
Reset
Button
video stream?
Click on to flip and mirror your camera.
5. How to restore to factory default?
Push down the “Reset” button for around 10-15 seconds until
the red light changes from blinking slowly to very quickly
and then let the Reset button go. If the reset is done successfully,
you will hear beep. The camera will reboot automatially.
6. How to set email alert?
Please visit
http://support.faleemi.com/FSC850/Email_alert.pdf
If there is no the guide for your email server,
please email us [email protected].
Scan the
QR Code
to view
7. How to link your camera to your PC/Mac by Faleemi Plus
Windows: Please visit https://youtu.be/sEuauwrchbs
Mac: Please visit https://youtu.be/pljGg0l86N8
Q & A
22
 Loading...