

Falcon SxS 628 User Manual
SxS 628
Refrigerator
User Guide
&
Installation & Service Instructions
U110201 - 03A

1. Before You Start 1
Safety 1
Refrigerant Gas Information 2
Caring for the Environment 2
2. About Your Refrigerator 3
About the Fresh Food Compartment 4
About the Freezer Compartment 6
The Icemaker/Water Dispenser 7
Fridge-Freezer Operation 9
Operating the Water and Ice Dispenser 12
Safety 12
Automatic Defrosting 12
Alarm Function 12
Display Power Down 12
3. Food Storage Tips 13
Tips on Storing Fresh Food 13
Tips on Freezing Food 14
Due to our policy of continual improvement, we reserve the right to change specications without prior notice.
Contents
4. Installation 15
Positioning Your Appliance 15
Removing and Installing the Doors 16
Levelling the Fridge-freezer and
Adjusting the Doors
17
Fitting the Handles 17
Electrical Supply Connection 18
Water Supply Connection 18
5. Cleaning and Maintenance 19
Defrosting 19
Cleaning 19
Shutting O the Refrigerator 19
When Not in Use 19
Water Filter 19
6. Troubleshooting 20
7. Warranty/After Sales Service 23
8. Technical Data 24

1
1. Before You Start
Thank you for buying this appliance. We hope that it provides
a stylish and practical solution to your cooling needs. We
hope that this handbook supplies all the information you
require. If there is anything you are unsure of please contact
us (see the ‘Warranty’ section for Customer Care’s details).
WARNING! This appliance must be earthed.
Please leave the appliance to stand for at least six
hours. This will allow the cooling system to settle
following transportation.
Always make sure a qualied person installs this
appliance.
The freezer compartment is rated at 4 stars.
This appliance is designed for domestic use only.
Using it for any other purpose could invalidate any
warranty or liability claim.
• Before you plug the appliance into the mains, clean
the inside of the appliance using warm water and
bicarbonate of soda, then dry thoroughly.
• Check that no parts of the appliance are damaged,
especially parts of the cooling system, pipes or leads. If
damage has occurred, DO NOT install the appliance; you
should contact a qualified service engineer or contact
Customer Care.
• If the accessories inside the appliance have been
disturbed during transit, reposition them in accordance
with the instructions.
• Make sure that the electrical supply to your plug socket
is correct for this appliance – the required information is
on the data badge of the appliance.
• Once the appliance is installed, cleaned and dry, it is
ready to be plugged in and switched on.
Safety
The data badge is located inside the appliance
(refrigeration compartment).
WARNING! Use drinking water only with this
appliance.
WARNING! Keep this appliance clear of any
obstruction.
DO NOT damage the refrigerant circuit. If it does
become damaged, do not use the appliance.
WARNING! DO NOT use mechanical devices (such as
hair dryers) to defrost this appliance.
• When replacing old appliances, make sure that you
have disabled any locking mechanisms before disposal
– it may even be best to remove the appliance door
completely to prevent children from becoming trapped
inside the appliance.
• The appliance must be connected to the power supply
safely. Loose connections, broken plugs and bare wires
are a safety hazard. Make sure that all connections are
sound.
• Before undertaking any routine maintenance or minor
repairs, disconnect the appliance from the electrical
supply. This includes cleaning and changing light bulbs.
• DO NOT touch cold surfaces of the appliance while it is
in use as this will cause hands to stick to them leading
to freezer burns.
• When moving the appliance take care not to damage
the leads, pipes or condenser unit. Should these parts
become damaged, contact a qualified service engineer.
• Effervescent liquids (fizzy drinks) should never be
frozen. These liquids expand during freezing and
this may lead to the bottles/containers shattering or
exploding.
• Foods that are intended to be defrosted or cooked first,
such as breads or meats, must not be eaten in their
frozen state.
• If food looks or smells strange, do not attempt to eat it.
If in doubt throw it away.
• Never use sharp, metal implements to scrape ice off the
surface of this appliance. Only use implements, which
are fit for this purpose (such as plastic scrapers) and use
carefully to avoid damaging the lining of the appliance.
• The cooling system contains refrigerant and oils, all of
which are harmful to health if leaked. Should leakage
occur, disconnect the appliance and ventilate the room.
Make sure that you do not get any coolant near to, or in,
your eyes.
Contact a service engineer or arrange to have the
appliance removed.
Electrical Safety
• Connections to the mains supply should be in
accordance with local regulations.
• The plug MUST be accessible after the appliance has
been positioned.
• Make sure that the refrigerator does not trap the electric
cable.
• Do not step on the cable.
• Avoid damage to the electric cable when moving the
refrigerator.
Damaged electrical cable
If the electrical cable is damaged or worn, turn o the
refrigerator and consult an authorised agent for replacement.

2
Refrigerant Gas Information
IMPORTANT: This appliance is provided with refrigerant
gas, ISOBUTHANE (R600a). When moving the appliance
take care to ensure that it is not excessively struck or
shaken. Failure to do so could damage the appliance.
Damage to the refrigerating circuit, with possible leaking of
refrigerating gas, could create a risk of explosion caused by
external sparks or ames.
In the Event of Accidental Leakage
Allow the material to evaporate providing that adequate
ventilation is provided.
Behaviour of the Gas
This refrigerant gas is highly ammable so do not allow the
gas to come into contact with hot surfaces or naked ames.
Gas R600a is heavier than air: if released it forms a high
concentration at oor level where ventilation is poor.
First Aid
Inhalation
Take the exposed person from the polluted area and carry
them to a warm, well ventilated place.
Long exposure can cause the onset of asphyxia and
possible loss of consciousness. If necessary, practice articial
respiration, and in the most serious cases, administer oxygen
under close medical supervision.
Skin Contact
It is unlikely that occasional contact with the skin is
dangerous. If this should happen thoroughly wash the
aected zone.
Liquid splashes and atomised liquid can cause freezing burns.
Wash the aected part with plenty of water and call a doctor
to treat any burns.
Eye Contact
Wash with plenty of water, with eyelids well open, and call a
specialist doctor as soon as possible.
In any event, should you inhale or come into contact with
R600a gas, we advise you to consult your own doctor.
Caring for the Environment
Disposing of Your Packaging
Your new refrigerator was protected by suitable packaging
while on its way to you. All of the materials used are
environmentally friendly for disposal and can be recycled.
Please make a contribution to protecting the environment by
disposing of the packaging appropriately.
Disposing of Your Old Refrigerator
ArtNo.000-0019
Do not bin logo
This symbol on the product or its packaging
indicates that the product may not be treated as
household waste. Instead it should be handed
over your local community waste collection/
recycling centre.
Old appliances still have some residual value. An
environmentally friendly method of disposal will ensure that
valuable raw materials can be recovered and used again.
When an appliance has reached the end of its working life
unplug it from the mains. Cut o the mains cable and dispose
of it together with the plug.
Make the door unt for use (by removing the seals) or remove
the door so that children cannot accidentally lock themselves
in.
Cycloisopenthane, a ammable substance not harmful to
ozone, is used as an expander for the insulating foam.
When transporting the appliance, take care not to damage
the cooling circuit.
By ensuring this product is disposed of correctly, you will
help prevent potential negative consequences for the
environment and human health, which could otherwise be
caused.
For more detailed information about recycling of this
product, please contact your local council, your household
waste disposal service or the shop where you purchased the
product.
3
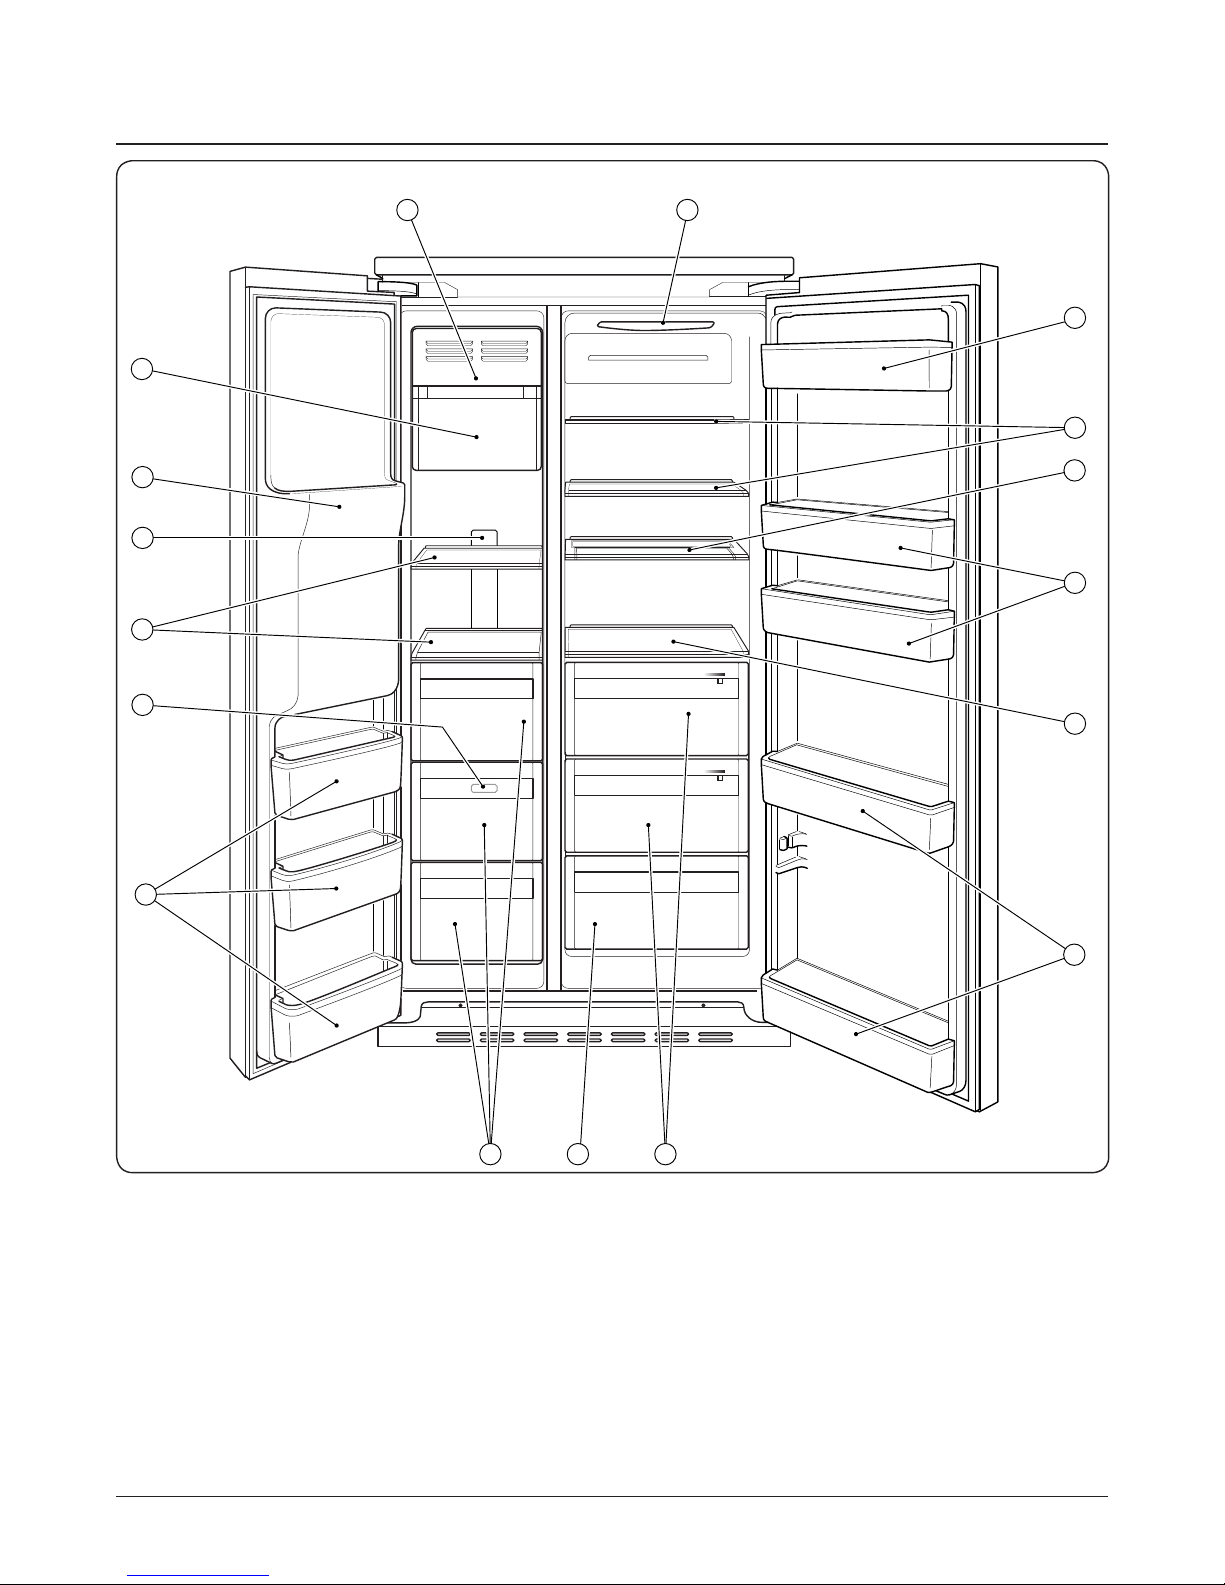
2. About Your Refrigerator
The SxS 628 (Fig.2-1) has the following features:
1. Ice cream shelf
2. Ice bin with ice maker (inside bin)
3. Water and ice dispenser
4. Freezer LED light
5. 2 freezer storage shelves
6. Freezer LED light (behind drawer)
7. 3 freezer door tilting shelves
8. 3 freezer drawers
9. Lower crisper drawer
10. 2 glide-out crisper drawers with humidity control
11. 5 fridge door shelves
12. 3 fridge storage shelves
13. 1 two-piece adjustable storage shelf
14. Fridge LED light
CFC free and frost free
Super-freeze, super-cool and holiday options
Automatic temperature display
Excessive temperature and door ajar alarms
LOW HIGH
LOW
HIGH
1
2
6
7
10
11
14
4
3
5
8 9
12
13
11
11
12
Freezer compartment
Fridge compartment
Fig.2-1
4
Shelf
Shelf runner
Rear shelf
Shelf runner
LOW HIGH
LOW HIGH
1
2
6
7
4
3
5
8
Fig.2-2
Fig.2-3
Fig.2-5
Fig.2-4
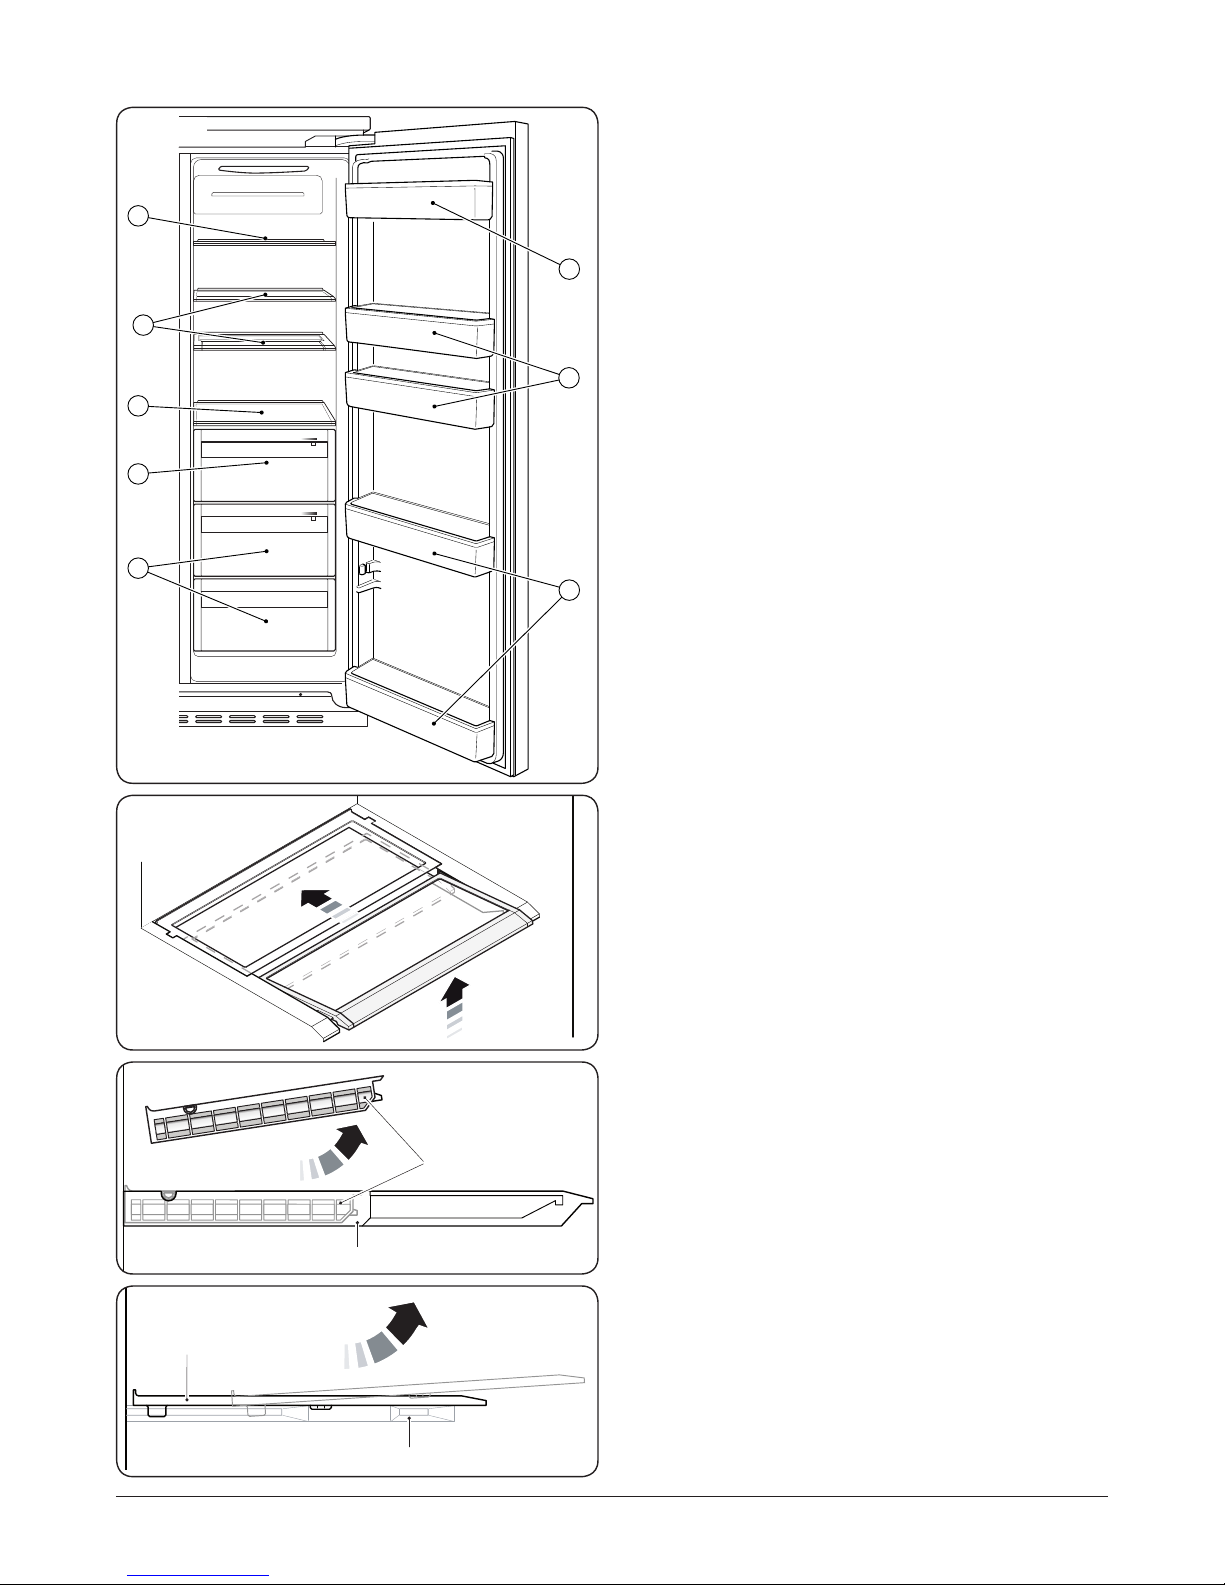
About the Fresh Food Compartment
It is recommended to leave storage space between the
foods for good cold air circulation. The temperatures in the
refrigerator are slightly warmer near the top and colder near
the base.
Foods that are likely to perish quickly should be placed
towards the rear of the appliance – where it is coolest.
Suggestions for storage (Fig.2-2):
1. Eggs, butter, cheese, etc.
2. Tins, cans, condiments, etc.
3. Drinks and all kinds of bottled foods.
4. Pickled foods, drinks or cans.
5. Meat, poultry, sh and raw foods.
6. Flour foods, cans, dairy, etc.
7. Cooked meats, sausage, etc.
8. Fruits, vegetables or salads.
Shelves
The height of the shelves can be adjusted to t your storage
needs.
The shelves will not pull out accidentally when you remove
foodstu from the appliance.
When adjusting the height of a shelf, rst remove
any food placed on the shelf.
Two-piece Glass Shelf
The top shelf is in two parts so that the front section can be
positioned under the rear one. This allows you to create a
space for cooling bottles or other tall containers. To move the
front shelf backwards, simply lift the front of the shelf and
then slide it under the rear shelf (Fig.2-3).
To remove the shelf, rst slide to front piece under the rear.
Lift the complete shelf up so that the restraining pegs are
clear of the side guides and (Fig.2-4) and lift clear.
When repositioning the two piece glass shelf, make sure
the shelf is pushed back fully and the restraining pegs have
located securely.
One-piece Glass Shelf
To remove the shelf, tilt the front upwards so that the
restraining pegs are clear of the side guides (Fig.2-5) and pull
towards you. Keep the shelf tilted to allow the retaining stops
to clear the side guides.
When repositioning, make sure the shelf is pushed back fully
and the retaining stops have located securely.
5
Drawer
Glide-out
drawer runner
Drawer
Glide-out
drawer runner
HIGHLOW
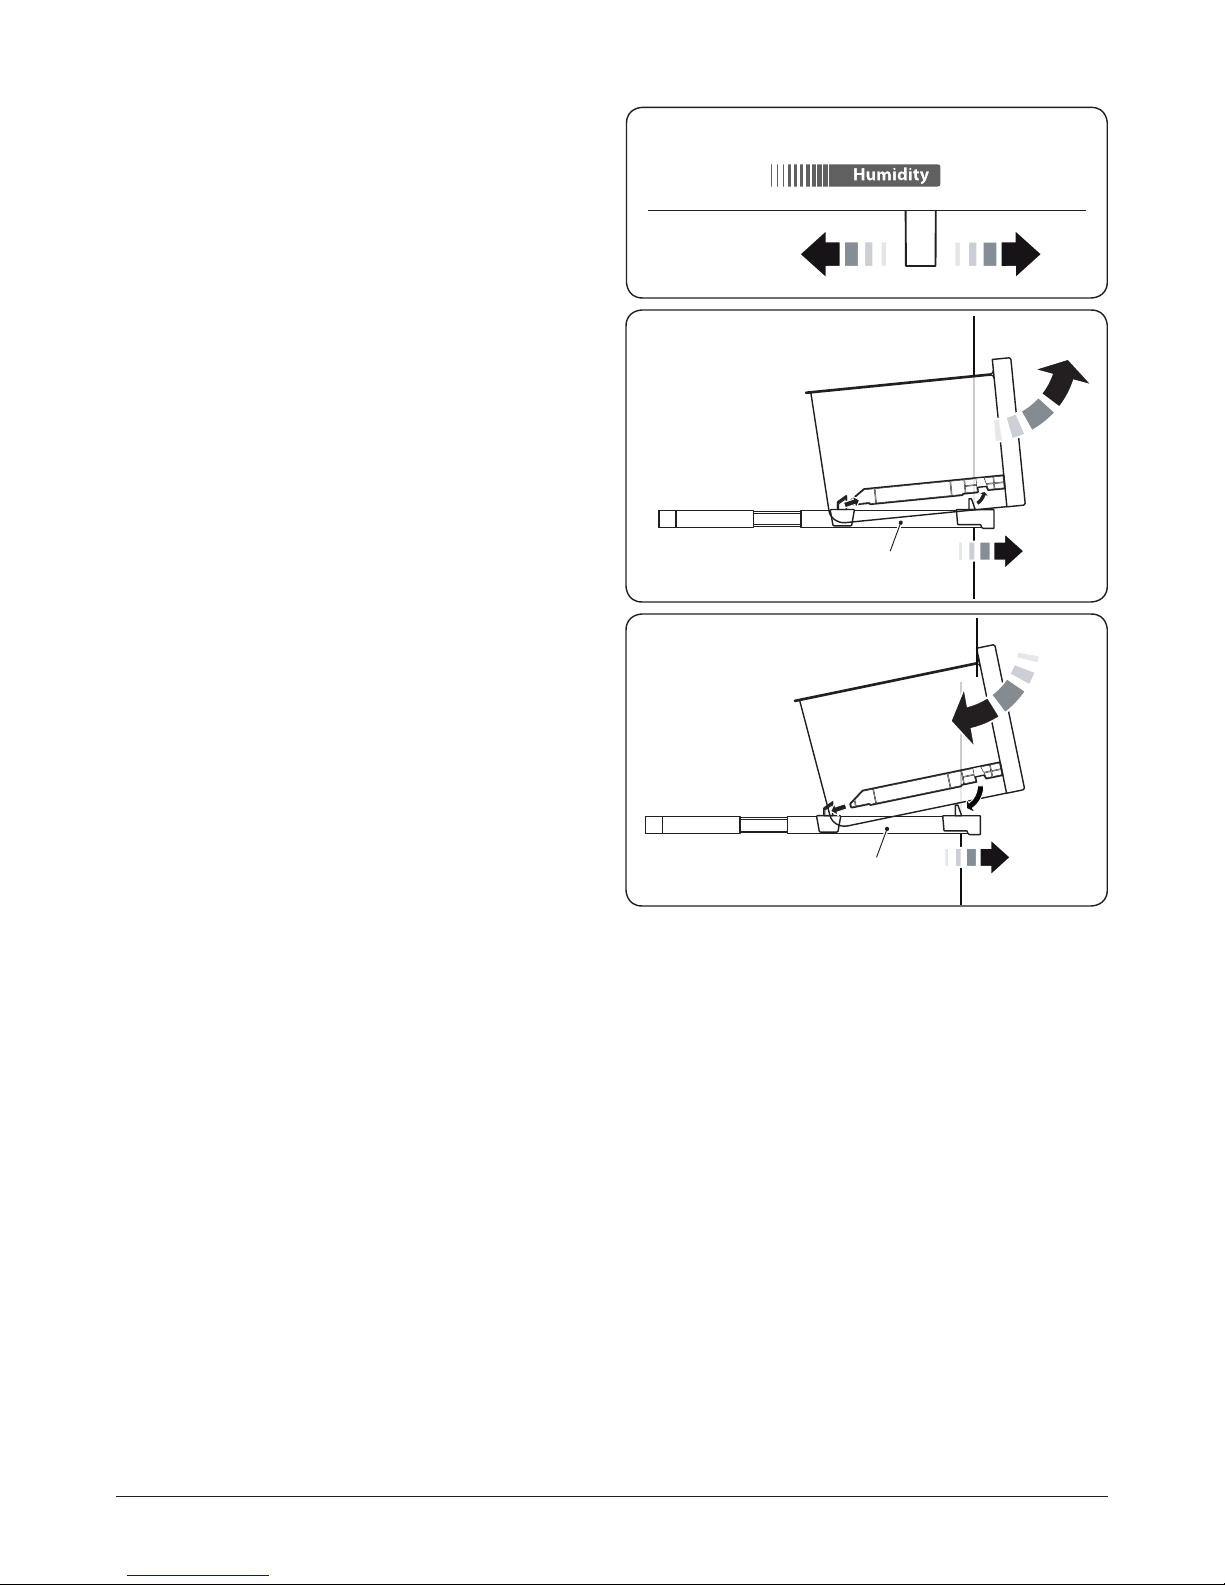
Crisper
The refrigerator is designed to include a fruits, vegetables
and/or deli crisper. Its inside temperature can be adjusted
according to the type of food being stored.
The upper drawer inside the refrigerator can be used to store
fresh meat so that it will avoid cross contamination with other
fresh foods.
Humidity Control
Slide the humidity control (Fig.2-6) to the left to increase
the humidity inside. In doing this, the crisper is suitable for
storing cucumbers, grapes, oranges, apples, peaches, lettuce
and other produce with a high moisture content.
Slide the humidity control (Fig.2-6) to the right to reduce the
humidity inside. This is suitable for storing meats, cheeses,
onions and other drier foods.
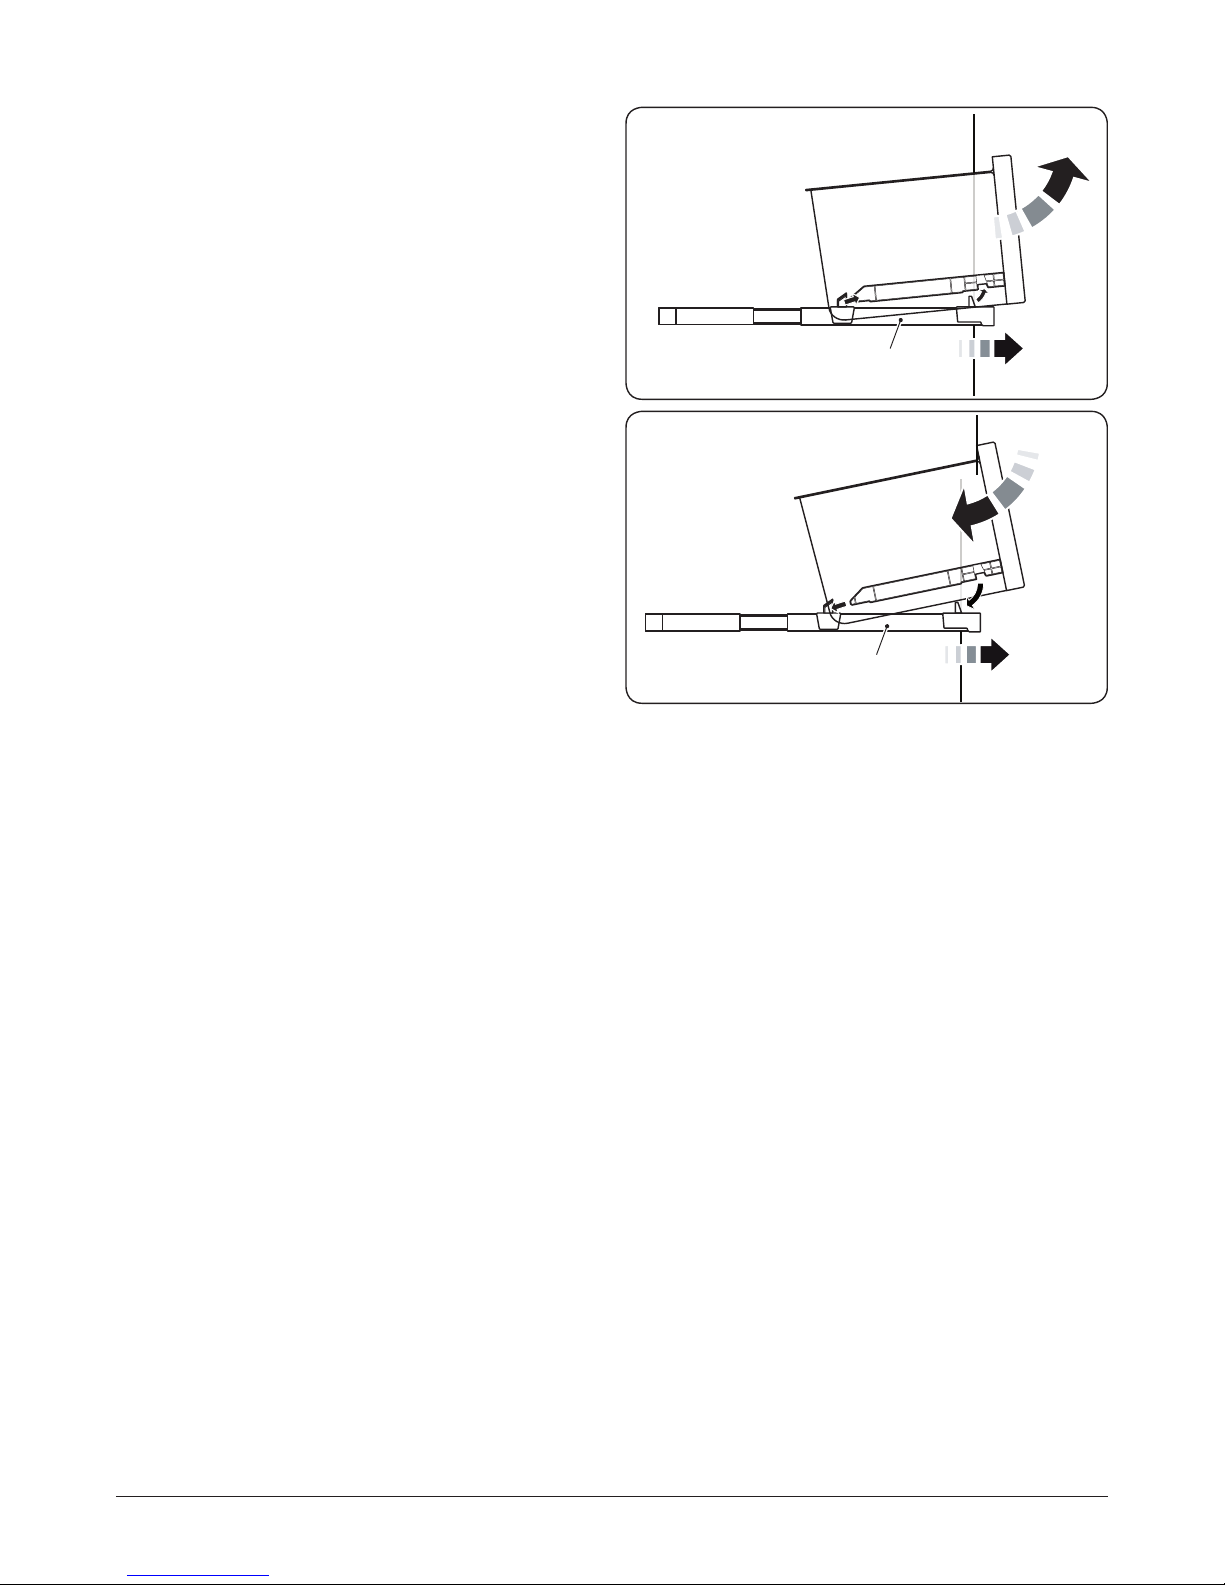
Removing and Retting the Upper Drawers
To remove one of the upper crisper drawers, pull it out fully
and lift it of the glide-out runners (Fig.2-7). the drawer will
‘pop’ out of the runner.
To avoid accidents, make sure to push the runners
fully back.
To ret one of the upper drawers, pull the runners fully out.
Locate the rear drawer tabs to the rear of the runner and then
push the drawer down carefully until the front of the drawer
‘pops’ back into the runner (Fig.2-8).
Removing and Retting the Bottom Drawer
To remove, pull the drawer out fully then tilt upwards and pull
towards you.
To ret, tilt the rear of the drawer onto the runners and slide
back fully.
The Light
The LED interior light comes on when the door is opened.
The performance of the light is not aected by any of the
appliances other settings.
Fig.2-7
Fig.2-8
Fig.2-6

6
Shelf
Shelf runner
About the Freezer Compartment
The freezer compartment consists of three drawers, an ice
cream shelf, two glass shelves and three door shelves
(Fig.2-9).
As with the fridge, certain areas of the freezer are better for
storage of certain foods.
Ice creams and water ices are best stored the ice cream shelf
or towards the rear of the appliance where it is coldest.
Large/heavier portions of food, such as meats joints for
roasting are best stored in the drawers at the bottom of the
appliance, while less weighty items should be stored on the
shelves – this is to prevent damage to the appliance.
You should always make sure that food stored is suitable
for freezing, and that you have stored it securely inside the
appliance.
Shelves
To remove the shelf, tilt the front upwards so that the
restraining pegs are clear of the side guides (Fig.2-10) and
pull towards you. Keep the shelf tilted to allow the retaining
stops to clear the side guides.
When repositioning, make sure the shelf is pushed back fully
and the retaining stops have located securely.
Storage Drawers
Removing and Retting the Upper Drawers
To remove one of the upper crisper drawers, pull it out fully
and lift it of the glide-out runners (Fig.2-11). the drawer will
‘pop’ out of the runner.
To avoid accidents, make sure to push the runners fully
back.
To ret one of the upper drawers, pull the runners fully out.
Locate the rear drawer tabs to the rear of the runner and then
push the drawer down carefully until the front of the drawer
‘pops’ back into the runner (Fig.2-12).
Removing and Retting the Bottom Drawer
To remove, pull the drawer out fully then tilt upwards and pull
towards you.
To ret, tilt the rear of the drawer onto the runners and slide
back fully.
The Light
The LED interior lights comes on when the door is opened.
The performance of the lights is not aected by any of the
appliances other settings.
1
2
5
3
4
Fig.2-9
Fig.2-10
1. Ice cream shelf
2. Ice bucket
3. Storage shelf
4. Storage drawers
5. Tilting door shelves
7
Defrosting Food for Cooking
Should food become partially thawed or defrosted, it should
be consumed as soon as possible as the quality will be
aected by defrosting.
Always make sure that food is thoroughly defrosted
before cooking and no ice crystals remain. This
is especially important for poultry, as this can be
extremely harmful to health.
Always follow the defrosting instructions on packaging when
defrosting ready meals – manufacturers’ guidelines are always
best, as some frozen foods should be cooked from frozen.
The Icemaker/Water Dispenser
Precautions
• NEVER expose the water pipe to temperatures below
0 °C to avoid freezing.
• Test the tubing for leaks by flushing the tube through
with water, until the water runs clear.
• After the appliance has been sited into the location of
your choice, make sure that the water tube is arranged
so it does not incur damage through bends and kinks
and is clear of any heat sources.
•
Once the temperature inside the freezer is at –15 °C ice
production will begin.
• DO NOT over use the icemaker. If you attempt to use
the ice cube button too often it will go into a shut down
mode. This is perfectly normal and requires you to wait
for one hour before attempting to re-use it.
• DO NOT use delicate or fragile glassware.
• DO NOT touch the ice cube outlet with your hands, or
any implements to avoid injury or damage.
How the Icemaker Works
Capacity of the icemaker depends on the freezer
temperature, the ambient temperature of the environment
around the appliance and how often the freezer door is
opened.
Do not store ice cubes, which are produced during the
rst batch of cubes following appliance start up, or after a
prolonged break. Discard these cubes.
To allow the ice cube tray to ll to maximum capacity, you will
need to manually arrange the ice cubes periodically.
Some ice cubes may stick together when dropped into the
storage box – you will need to separate these to ensure
maximum use of the icebox.
Drawer
Glide-out
drawer runner
Drawer
Glide-out
drawer runner
Fig.2-11
Fig.2-12
 Loading...