

Falcon Pro-Lite LD32, Pro-Lite LD36, Pro-Lite LD35, Pro-Lite LD33, Pro-Lite LD38 Installation And Servicing Instrucnions
...Page 1
Installation and Servicing Instructions
for
LD32, LD33, LD35, LD36, LD38 and LD39 DRY BAINS MARIE
LD34, LD37 and LD43 WET BAINS MARIE
Important Installation Information
The installer must ensure that installation of the unit(s) is in conformity with regulations in force at the time.
For the UK, particular attention requires to be paid to:-
BS7671 IEE Wiring Regulations
Electricity at Work Regulations
Health and Safety at Work Act
Fire Precautions Act
The unit has been CE-marked on the basis of compliance with the Low Voltage and EMC Directives for the voltage
stated on the data plate.
WARNING: THIS APPLIANCE MUST BE EARTHED!
Preventive Maintenance Contract
In order to obtain maximum performance from the equipment, we would recommend that a maintenance contract be
arranged with
AFE Serviceline.
Visits may then be made at agreed intervals to carry out adjustments and repairs. A quotation for this service will be
provided upon request. Contact
AFE Serviceline
as detailed below
:-
Tel: 01438 363 000 Fax: 01438 369 900
Falcon Foodservice Equipment
Wallace View, Hillfoots Road, Stirling. FK9 5PY. Scotland.
e-mail: info@afefalcon.com
T100330 Ref. 2
Page 2
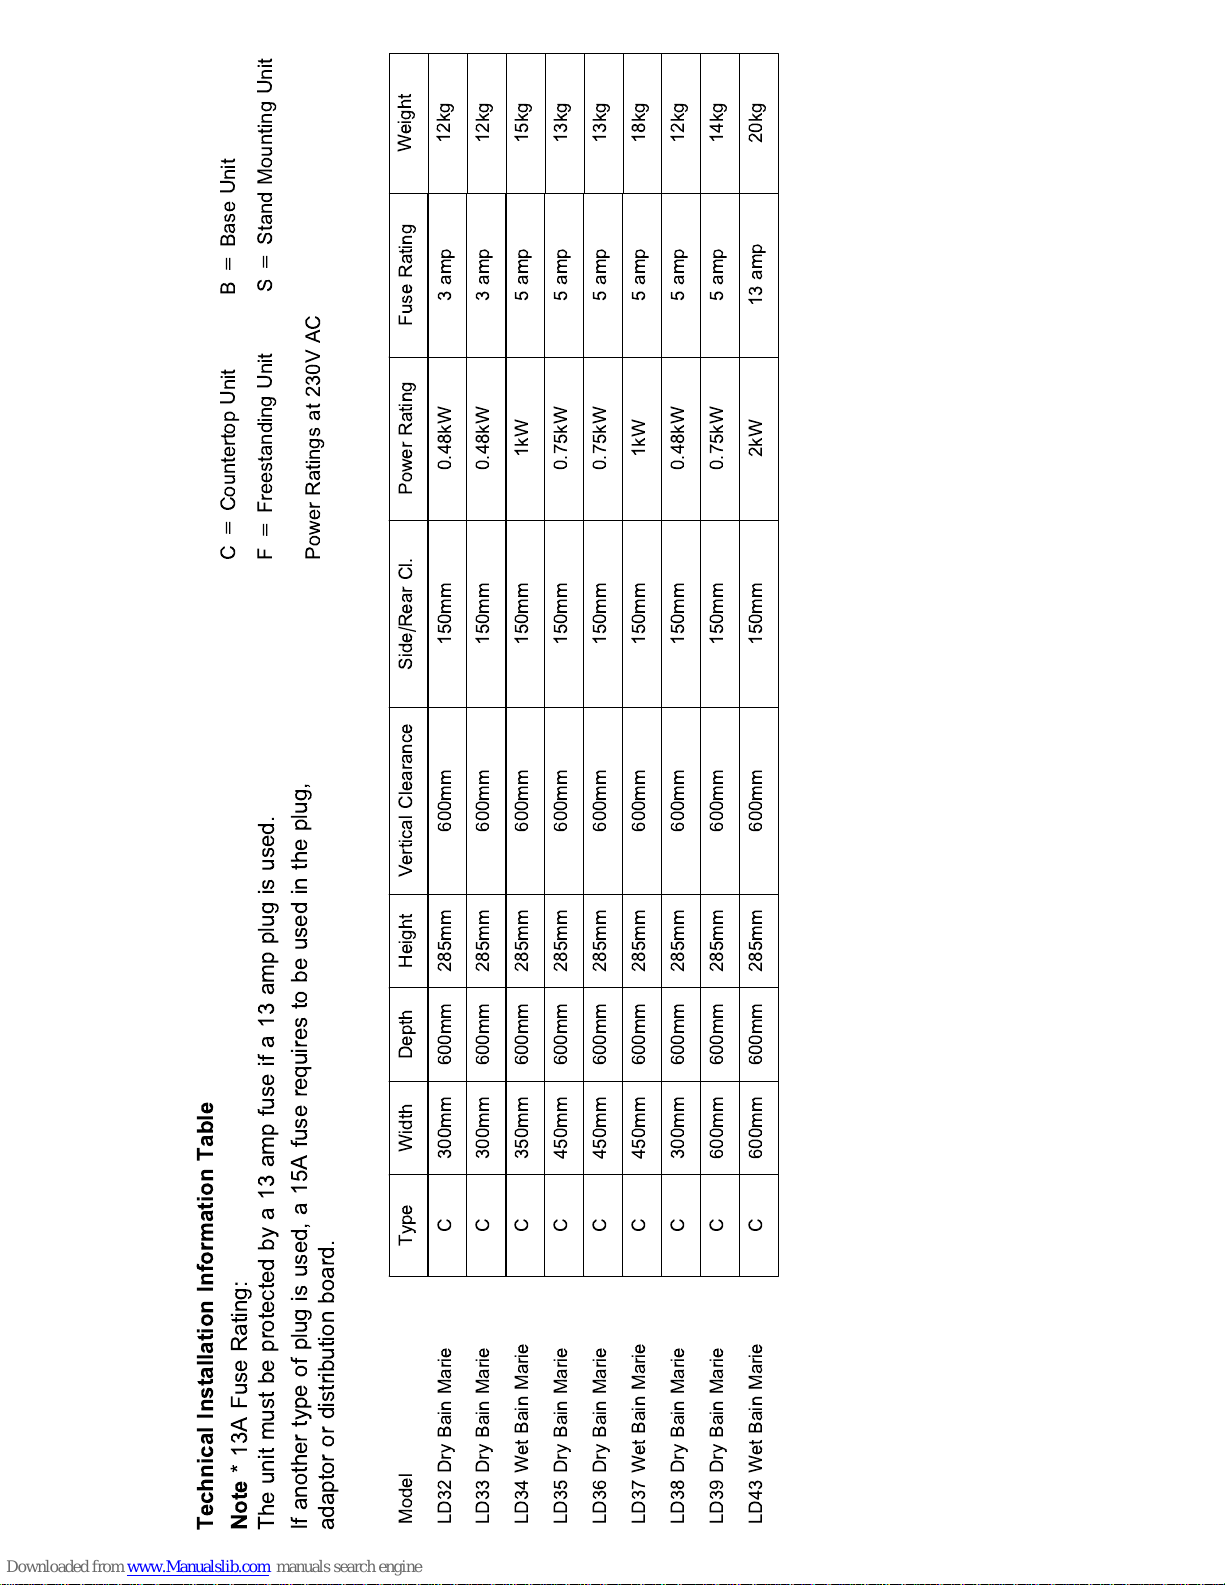
C = Countertop Unit B = Base Unit
F = Freestanding Unit S = Stand Mounting Unit
Power Ratings at 230V AC
Type Width Depth Height Vertical Clearance Side/Rear Cl. Power Rating Fuse Rating
LD32 Dry Bain Marie
Model
C 300mm 600mm 285mm 600mm 150mm 0.48kW 3 amp
LD33 Dry Bain Marie
C 300mm 600mm 285mm 600mm 150mm 0.48kW 3 amp
LD34 Wet Bain Marie
C 350mm 600mm 285mm 600mm 150mm 1kW 5 amp
LD35 Dry Bain Marie
C 450mm 600mm 285mm 600mm 150mm 0.75kW 5 amp
LD36 Dry Bain Marie
C 450mm 600mm 285mm 600mm 150mm 0.75kW 5 amp
LD37 Wet Bain Marie
C 450mm 600mm 285mm 600mm 150mm 1kW 5 amp
LD38 Dry Bain Marie
C 300mm 600mm 285mm 600mm 150mm 0.48kW 5 amp
LD39 Dry Bain Marie
C 600mm 600mm 285mm 600mm 150mm 0.75kW 5 amp
LD43 Wet Bain Marie
C 600mm 600mm 285mm 600mm 150mm 2kW 13 amp
Weight
12kg
12kg
15kg
13kg
13kg
18kg
12kg
14kg
20kg
Technical Installation Information Table
Note
* 13A Fuse Rating:
The unit must be protected by a 13 amp fuse if a 13 amp plug is used.
If another type of plug is used, a 15A fuse requires to be used in the plug,
adaptor or distribution board.
Page 3

Figure 1 - Front View
SECTION 1 - SITING
All PRO-LITE models have been designed in a modular
form which consists of base, counter and free-standing
units.
Information which relates to individual models is listed in
Table 1.
Free-standing and base models should be installed
upon a firm, level surface and adjustable feet are
provided for levelling purposes.
Counter units must be positioned upon a table, counter
or similar surface.
Vertical and horizontal clearances required from the top
and sides of a particular unit to any overlying
combustible surface (ie wall, partition, etc) are listed in
Table 1. Relevant fire regulations must be complied
with.
Mounting Counter Units on the Oven
When mounting a counter unit upon a PRO-LITE oven,
it is recommended that units which carry liquids,
i.e. fryers and bain marie, are secured as follows:
Remove oven outer back panel.
Remove oven crown plate.
Position unit(s) which require to be secured upon oven.
Secure hob unit(s) to oven through side flange centre
holes into the threaded inserts in the base(s) of hob
unit(s). Use fixings provided (packed separately) and
replace oven back panel.
The unit is now ready for electrical connection.
Mounting Counter Units upon a Hotcupboard
PRO-LITE hotcupboards are designed to be used in
conjunction with counter models. Assembly is achieved
by means of two shouldered fixings being applied to the
underside of a top unit from inside a base appliance as
detailed in Figure 1.
SECTION 2 - ELECTRICAL SUPPLY
AND CONNECTION
Electrical ratings are as stated on the unit data
plate. The listing in Table 1 is based on standard UK
specification at 230V
~
.
Wiring must be executed in accordance with the
regulations listed in this booklet.
WARNING: Each individual appliance must be
earthed!
After completion of installation, the method of operation
should be demonstrated to the kitchen staff.
The isolating switch location, for use in an emergency
or during cleaning should also be pointed out.
LD32, LD33, LD35, LD36, LD38 and LD39
DRY BAINS MARIE
LD34, LD37 and LD43 WET BAINS MARIE
These models are designed to be connected to a single
phase AC supply using the 2 metre mains lead fitted as
standard.
Wires are coloured in accordance with the following
code and should be connected to the plug as follows:
EARTH to terminal marked E
or coloured GREEN or GREEN/YELLOW.
NEUTRAL to terminal marked N or coloured BLACK.
LIVE to terminal marked L or coloured RED.
Units which receive power from a plug, adaptor or
distribution board must be individually protected by a
fuse with an appropriate rating. (See Table 1)
For models with two mains leads, each lead requires to
be protected by a fuse with an appropriate rating.
(See Table 1)
Any replacement supply cable must be 1.5mm
2
, cord
code designation 245 IEC 57 (CENELEC H05 RN-F).
For internal connection, outer sheathing must be
stripped 140mm from the cable end. The live and
neutral conductors must be trimmed so that Earth
conductor is longer by 50mm. Pass inlet cable through
the rear panel cord grip and ensure that cable is routed
without leaving excessive free length inside unit.
SECTION 3 -
USING AND CLEANING PRO-LITE UNITS
IMPORTANT: GENERAL NOTES ON CLEANING
Disconnect unit from electricity supply prior to
cleaning
Never use a coarse abrasive to clean exterior
panels. A soft cloth with a warm wate r and
detergent solution is sufficient.
Never attempt to steam clean a unit or hose it down
with a jet of water.
LD32, LD33, LD35, LD36, LD38 and LD39
DRY BAINS MARIE
LD34, LD37 and LD43 WET BAINS MARIE
The LD32, LD33, LD34,
LD35, LD36 and LD37 are
supplied with 4.5 litre pots.
The LD38, LD39 and
LD43 models accomodate
a mix of gastronorm
containers and b ridging
bars are provided as
standard. Containers are
not
supplied.
The LD39 and LD43
models are designed to
hold 1/4, 1/2 and 1/1 size
gastronorm trays.
Page 4

The LD38 is supplied with 3 x 1/4 gastronorm trays and
lids.
Wet bains marie require a water level of approx. 38mm
to be maintained during operation. This will allow pot
bases to be immersed. A drain valve with safety catch is
located on unit front for well draining. Never drain well
until water cools.
Using a Bains Marie
A bains marie is used to store hot food prior to and
during serving whilst maintaining the proper
temperature. Successful achievement of this is
dependent upon a number of factors, such as type of
food, container amount and skill and experience of the
operator. The following hints may be found useful in
achieving satisfactory results.
Containers should be warm before being loaded with
hot food. Place complete with lids, in the chosen
position(s). Switch on at Full (6) setting until the desired
temperature is reached. Load food quickly and replace
cover(s) before setting control as required.
When serving, it is advantageous to raise the setting to
counteract heat loss incurred by lid removal. Take care
not to overheat food and replace lids when it is
practicable to do so.
Cleaning a Bains Marie
Clean containers as soon as possible after use with hot
water and detergent. Soap filled pads may be used to
remove stubborn deposits. Avoid leaving empty used
containers in the unit. Food deposits may bake on.
SECTION 4 - SERVICING
LD32, LD33, LD35, LD36, LD38 and LD39
DRY BAINS MARIE
LD34, LD37 and LD43 WET BAINS MARIE
SERVICE ACCESS
Base Plate
Upturn unit and rest it at edge of a work surface with
rear upstand overhanging edge.
Undo base plate fixings to remove base plate.
FUNCTIONAL COMPONENTS
Temperature Control.
Remove access panel.
Remove control knob.
Remove electrical connections, noting their positions.
Carefully remove phial from retaining clips and clear
structure.
Undo fixings that secures control to panel and remove.
Replace in reverse order.
Elements
Remove access panel.
Undo electrical connections, noting positions.
Undo element fixings and remove.
Replace in reverse order.
Terminal Block
Remove base plate.
Remove electrical connections at terminal block, noting
positions.
Undo fixings that secure block to unit and remove.
Replace in reverse order.
Cable
Remove base plate.
Undo mains cable cord grip at unit rear.
Undo electrical connections at terminal block and
remove cable.
Replace in reverse order. Ensure cable is fed through
securing clamp and pulled taut before tightening clamp.
PRO-LITE BAIN MARIE SHORT SPARES
735230001 Control Knob
735230002 Thermostat for dry bain marie
735300000 Thermostat for wet bain marie
735300001 Element (0.48kW)
for LD32, LD33 & LD38
735230003 Element (0.75kW) for
LD35, LD36, LD39, LD58 & LD60
735300002 Element (1kW) for LD34
735300003 Element (1kW) for LD37
735300004 Element (2kW) for LD43
735300005 Round Pan c/w Lid (Stainless steel)
735300006 Round Pan c/w Lid (Aluminium)
735300007 Gastronorm Tray (1/4 size)
735300008 Gastronorm Lid (1/4 size)
735120013 Amber Neon
735120020 Drain Valve
735110110 Supply Cable
Page 5

LD32, LD33, LD35, LD36, LD38 and LD39
DRY BAINS MARIE
WIRING DIAGRAM
LD34, LD37 and LD43 WET BAINS MARIE
WIRING DIAGRAM
 Loading...