

Page 1

G2844F/G2845F PREMIX
FRYERS
CAUTION: Read the instructions before
using the appliance
INSTALLATION, SERVICING
and USER INSTRUCTIONS
These appliances must be installed and serviced by a qualified person as stipulated by the Gas Safety
(Installation & Use) Regulations.
IMPORTANT
The installer must ensure that the installation of the appliance is in conformity with these instructions and
National Regulations in force at the time of installation. Particular attention MUST be paid to -
Gas Safety (Installation & Use) Regulations I.E.E. Regulations for Electrical Installations
Health And Safety At Work etc. Act Electricity at Work Regulations
Local and National Building Regulations
Fire Precautions Act
Detailed recommendations are contained in Institute of Gas Engineers published documents :
IGE/ UP/ 1, IGE/ UP/ 2, BS6173 and BS5440
These appliances have been CE-marked on the basis of compliance with the Gas Appliance Directive for the
Countries, Gas Types and Pressures as stated on the data plate.
WARNING TO PREVENT SHOCKS, ALL APPLIANCES, GAS OR ELECTRIC, MUST BE EARTHED.
On completion of the installation, these instructions should be left with the Engineer-in-Charge for
reference during servicing. Further to this, the user instructions should be handed over to the user, having
had a demonstration of the operation and cleaning of the appliance.
PREVENTATIVE MAINTENANCE CONTRACT
In order to obtain maximum performance from this unit we would recommend that a Maintenance
Contract be arranged with SERVICELINE. Visits may then be made at agreed intervals to carry out
adjustments and repairs. A quotation will be given upon request to the SERVICELINE contact
numbers below.
WEEE Directive Registration No. WEE/DC0059TT/PRO
At end of unit life, dispose of appliance and any replacement parts in a safe manner, via a
licenced waste handler. Units are designed to be dismantled easily and recycling of all material is
encouraged whenever practicable.
This equipment is ONLY FOR PROFESSIONAL USE, and shall be operated by QUALIFIED persons. It is the
responsibility of the supervisor or equivalent to ensure that users wear SUITABLE PROTECTIVE
CLOTHING and to draw attention to the fact that some parts will, by necessity, become VERY HOT and will
cause burns if touched accidentally.
Falcon Foodservice Equipment
HEAD OFFICE AND WORKS
Wallace View, Hillfoots Road, Stirling. FK9 5PY. Scotland.
SERVICELINE CONTACT
Phone: 01438 363 000 Fax: 01438 369 900
Page 2

2
IMPORTANT INFORMATION
Warranty Policy Shortlist
Warranty does not cover :-
• Correcting faults caused by incorrect installation of a product.
• Where an engineer cannot gain access to a site or a product.
• Repeat commission visits.
• Replacement of any parts where damage has been caused by misuse.
• Engineer waiting time will be chargeable.
• Routine maintenance and cleaning.
• Gas conversions i.e. Natural to Propane gas.
• Descaling of water products and cleaning of water sensors where softeners/ conditioners are not fitted,
or are fitted and not maintained.
• Blocked drains
• Independent steam generation systems.
• Gas, water and electrical supply external to unit.
• Light bulbs
• Re-installing vacuum in kettle jackets.
• Replacement of grill burner ceramics when damage has been clearly caused by misuse.
• Where an engineer finds no fault with a product that has been reported faulty.
• Re-setting or adjustment of thermostats when unit is operating to specification.
• Cleaning and unblocking of fryer filter systems due to customer misuse.
• Lubrication and adjustment of door catches.
• Cleaning and Maintenance
• Cleaning of burner jets
• Poor combustion caused by lack of cleaning
• Lubrication of moving parts
• Lubrication of gas cocks
• Cleaning/adjustment of pilots
• Correction of gas pressure to appliance.
• Renewing of electric cable ends.
• Replacement of fuses
• Corrosion caused by use of chemical cleaners.
------------------------------------------------------------------------------------------------------------------------------------------
Contents
Section
1.
Topic
Installation
Page No.
1 - 4
2.
Assembly and Commissioning
4 - 6
3.
Servicing
7 - 8
4.
Spare parts
8
5.
Critical dimensions/Troubleshooting
9 - 10
6.
Operating instructions
11 - 13
7.
Changing/filtering oil
14 - 15
8.
Cleaning and maintenance
16
9.
Preparation of solid fats/oil
17
10.
Cooking Hints
17
11.
Circuit / Wiring Diagrams
18 - 19
Page 3
3
SECTION 1 – INSTALLATION
UNLESS OTHERWISE STATED, PARTS WHICH HAVE BEEN PROTECTED BY THE MANUFACTURER ARE
NOT TO BE ADJUSTED BY THE INSTALLER.
Please ensure that any plastic coatings are removed prior to use. Before operation, pan requires to be thoroughly
cleaned and dried.
Discolouration of heated parts is caused by factory testing to ensure a satisfactory unit. It does not affect quality
or performance.
1.1 MODEL NUMBERS, NETT WEIGHTS and DIMENSIONS
Model
Width
(mm)
Depth
(mm)
Height
(mm)
Weight
(kg)
G2844F Fryer
400
840
1200
94
G2845F Fryer
400
840
1200
94
Pan oil capacity: 16 litres cold, good quality oil
(to -MIN- mark)
1.2 SITING
Each unit must be installed on a firm level floor in a well-lit draught free position. The fryer should be installed in a
freestanding position to prevent any possibility of sideways tipping under force. The means of restraint may be the
manner of installation, such as connection to a battery of appliances or installing the fryer in an alcove, or by
separate means, such as adequate ties.
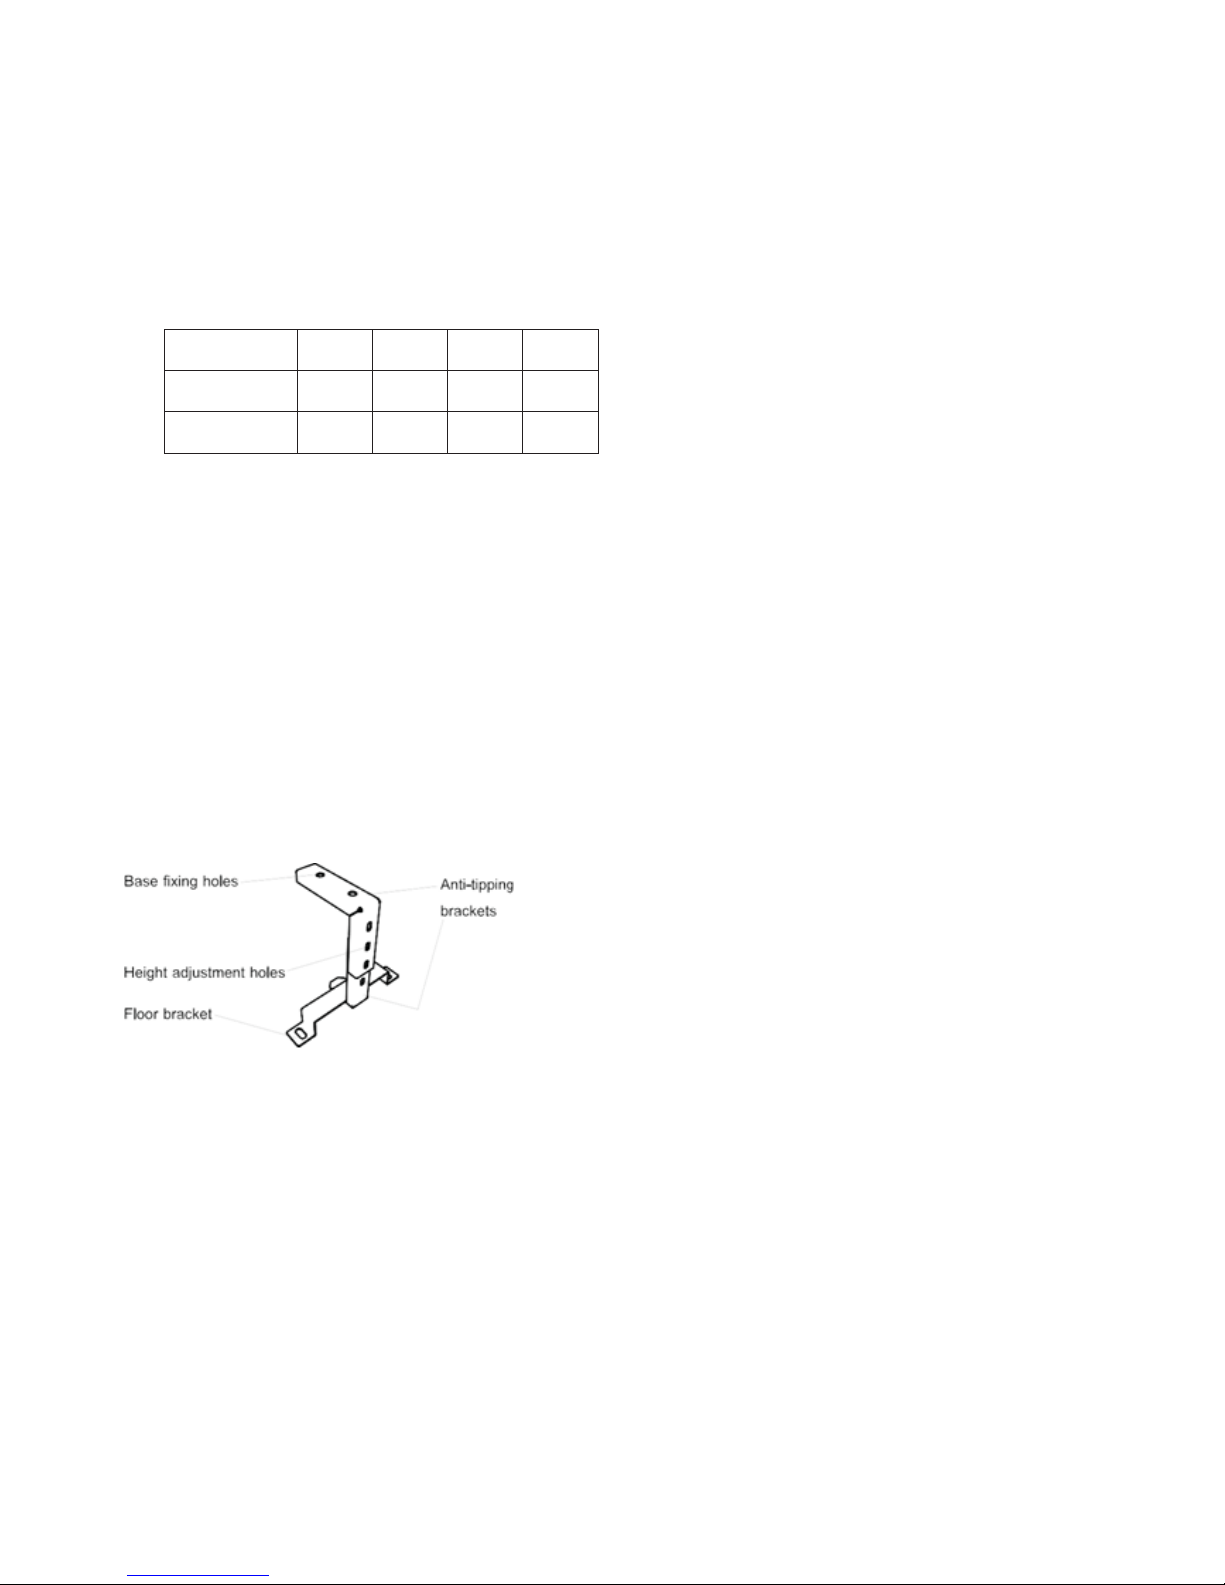
1.2.1 Anti-tipping Accessory
An anti-tipping mechanism is also available as an accessory. If these are to be fitted, the brackets must be fitted to
locate the fryer in the correct position relative to any walls as detailed below. Fixing holes are provided in the fryer
base to accommodate the bracket. The bracket should be fitted as detailed in Figure 1. The retaining chain has a
quick release eyelet. Secure to fixing point and secure bracket to floor after alignment with anti-tipping device
attached to the fryer. Adjust to slide below floor bracket.
Figure 1 - Anti-tipping Bracket
1.2.2 Clearances
The unit requires a clearance of at least 150mm all round between unit and any combustible wall.
A minimum vertical clearance of 750mm should be allowed between top edge of flue outlet and any overlying
combustible surface.
Important
If fryer is to be installed with other appliances then instructions for every model should be consulted to
determine necessary clearance to any combustible wall or overlying surface.
Some appliances require greater clearance distances than others. The largest clearance will therefore
determine overall distance for a complete suite of adjoining appliances.
1.3 VENTILATION
The appliance ventilation requirements should be in line with national and local regulations applying at the time.
The ventilation rate for these models is 26m³/min.
The appliance MUST be installed level in a well lit and draught free position. Adequate ventilation, whether natural or
mechanical, must be provided to ensure sufficient air for combustion and removal of combustion products and
cooking vapours, which may be harmful to health.
Page 4

4
This appliance is to be installed with sufficient ventilation to prevent the occurrence of unacceptable concentrations of
substances harmful to health in the room which they are installed.
The fresh air requirement for this appliance at a rate of 2M³/hour per kW is 44 M³ of fresh air per hour.
Care must be taken not to disturb the air for combustion admission and evacuation of products of combustion.
Recommendations for Ventilation of Catering Appliances are given in BS5440:2.
For multiple installations the requirements for individual appliances should be added together. A competent installer
MUST BE employed.
The appliance flue discharges vertically through the grille at the top of the unit. There must be no direct connection of
the flue to any mechanical extraction system or the outside air. Siting the unit under a ventilated canopy is the ideal
arrangement. Remember, dirty extraction filters and drip trays may become a fire hazard due to drip-down on to
equipment below. Regular cleaning of extraction filters and drip trays must be carried out.
1.4 GAS SUPPLY (Both models)
Inlet pressure
Natural Gas (I2H) 20mbar
Propane Gas (I3P) 37mbar
The incoming service must be of sufficient size to supply full rate without excessive pressure drop. A gas meter
is connected to service pipe by gas supplier. Any existing meter should be checked preferably by the gas
supplier to ensure that it is adequate to deal with the rate of gas supply required.
Installation pipe work should be fitted in accordance with IGE/UP/2. The size of the pipes from meter to appliance
must not be less than that of appliance inlet connection. A ¾" BSP inlet connection is fitted to the unit.
An isolating valve must be located close to the appliance to facilitate shut down during an emergency or routine
servicing. The cock must be easily accessible to the user. The installation must be tested for gas tightness as stated in
IGE/UP/1.
Domestic type, flexible rubber tube connections must NOT be used with this appliance.
Only tube complying with BS669 Part 2, Specification for corrugated metallic flexible hoses for
catering appliances, shall be used. These hoses must be no longer than 1.5 Metres, and should
be periodically checked / replaced as necessary.
1.5 ELECTRICAL SUPPLY
The unit is equipped with a 3-core flexible cord with standard 3 pin plug fitted with a 13A fuse. A regular 13A
socket outlet can be used.
If supply is through a distribution fuse box, this must be via a fuse with a maximum rating of 13A.
In the event of mains cable being replaced, any new cable should comply with 60245 IEC 57 designation.
(H05 RN - F)
Rated Voltage
Rated Current
G2845F
230V~
1.37amps
G2844F
230V~
1.37amps
THE APPLIANCE MUST BE EARTH BONDED.
Check that no damage has occurred to the appliance, power cable and plug face during transit. If damage has
occurred do not use the appliance.
Ensure that the mains power cable is routed free from the appliance to avoid damage.
We recommend supplementary electrical protection with the use of a residual current device (RCD). Periodical
testing, repair and fixing wiring connection should only be undertaken by a skilled and competent electrician.
This appliance is also provided with a terminal for connection of an external equipotential conductor. This
terminal is in effective electrical contact with all fixed exposed metal parts of the appliance, and shall allow
the connection of a conductor having a normal cross-sectional area of up to 10mm². it is located on the rear
panel and is identified by the following symbol and must only be used for bonding purposes.
Page 5

5
1.6 TOTAL RATED HEAT INPUTS
Natural (I2H)
and
Propane (I3P) Gas
22kW (net), 82,500 btu/hr (gross).
SECTION 2 - ASSEMBLY and
COMMISSIONING
The gas supply piping and connection to appliance must be installed in accordance with the various regulations
listed on the cover of this manual.
2.1 ASSEMBLY
a) Unpack appliance
b) Unpack fryer baskets and accessories.
c) Place basket support grid and basket in pan.
d) Level appliance and fit all service protection kits.
(Anti-tilt kit, if ordered as accessory).
2.2 CONNECTION TO A GAS SUPPLY. (also refer to section 1.4 above)
Connect gas supply and test for gas tightness.
Caution - Ensure that pan contains an acceptable level of liquid before igniting burner.
If you are in the fat melting cycle <<fat melting cycle>> (FMC) and loading solid fat for the first time, always
remove basket support plate as detailed in Section 9. Solid fat should be in direct contact with fryer pan.
Refer to Section 9.
Due to the presence of mains electrics, integral pipe work should be checked for gas tightness using an appropriate gas
leak detector.
Caution - Installation engineers should note that for first time connection of appliance to supply, it is essential that inlet
gas supply to fryer is completely purged of air prior to first lighting attempt. Otherwise initial lighting attempts may fail,
resulting in burner reset switch having to be used. This should not initially be treated as a fault.
Please note that several attempts will still be required after air purge to fryer for first time lighting. This is due to
capacity of valve and governor.
2.3 CONNECTION TO AN ELECTRICAL SUPPLY. (also refer to section 1.5 above)
Ensure flexible cable does not come into contact with any hot parts. The fuse rating should be 13A.
The colour codings of power supply cables are as follows: Live - Brown, Neutral - Blue, Earth - Green/Yellow
2.4 STARTING UP
If you are in the fat melting cycle <<fat melting cycle>> (FMC) and loading solid fat for the first time, always
remove basket support plate as detailed in Section 9. Solid fat should be in direct contact with fryer pan.
Refer to Section 9.
Page 6
6
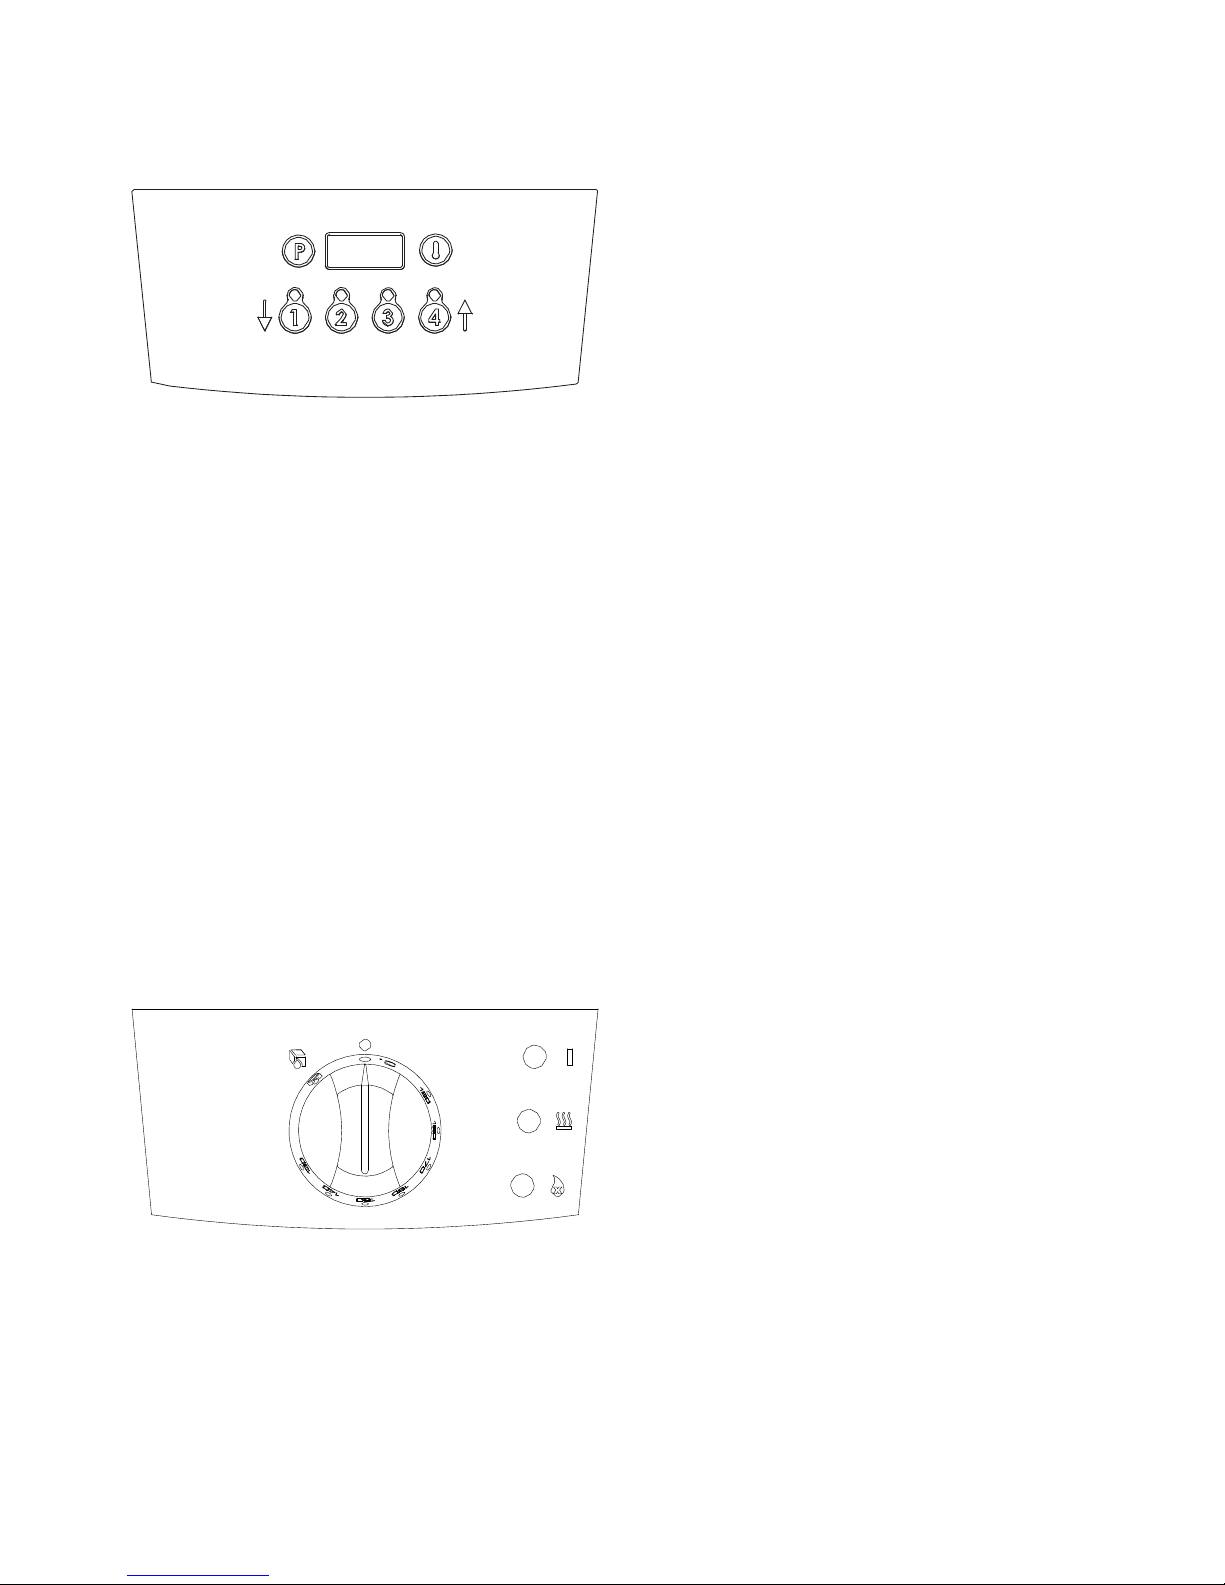
2.4.1 G2844F Fryer Control Panel
(See Figure 2)
1
2 5 3
4
Figure 2 – G2844F Control Panel
1) Four Digit LED Display
Displays Set temp, Actual temp, cook time remaining and also used for programming purposes.
2) Program Button
Used to enter timer program mode (to change each of the 4 pre-set timer select channels - See Section 6).
3) Temperature Button
Used to view actual/Set temperature and also to enter Set temperature mode (See Section 6).
4) Timer Keys (1 – 4)
Used to start/cancel pre set cook times. Buttons 1 & 4 also used to change times or temperatures when in
either set mode (See Section 6).
5) Heat demand LED indicator
This indicator will illuminate when thermostat demands heat, i.e. oil is more than 2⁰C below the programmed set
temperature.
The indicator will extinguish when desired setting is reached.
2.4.2 G2845F Fryer Control Panel
(See Figure 3).
3
2
4
1 5
Figure 3 – G2845F Control Panel
1. ON/OFF and Temperature Control Knob
Temperature Selection (140 - 190°C).
(Unit is off when in position indicated).
2. Fat Melt Position
Feature for slow pulsed heating of solid fats.
3. Power on indicator.
Page 7
7
4. Heat Demand Indicator
This indicator will illuminate when thermostat demands heat, i.e. oil temperature is more than 5 ⁰C below the
temperature setting.
The indicator will extinguish when desired setting is reached.
5. Burner Lock-Out Indicator
Indicates flame failure (burner is not lit).
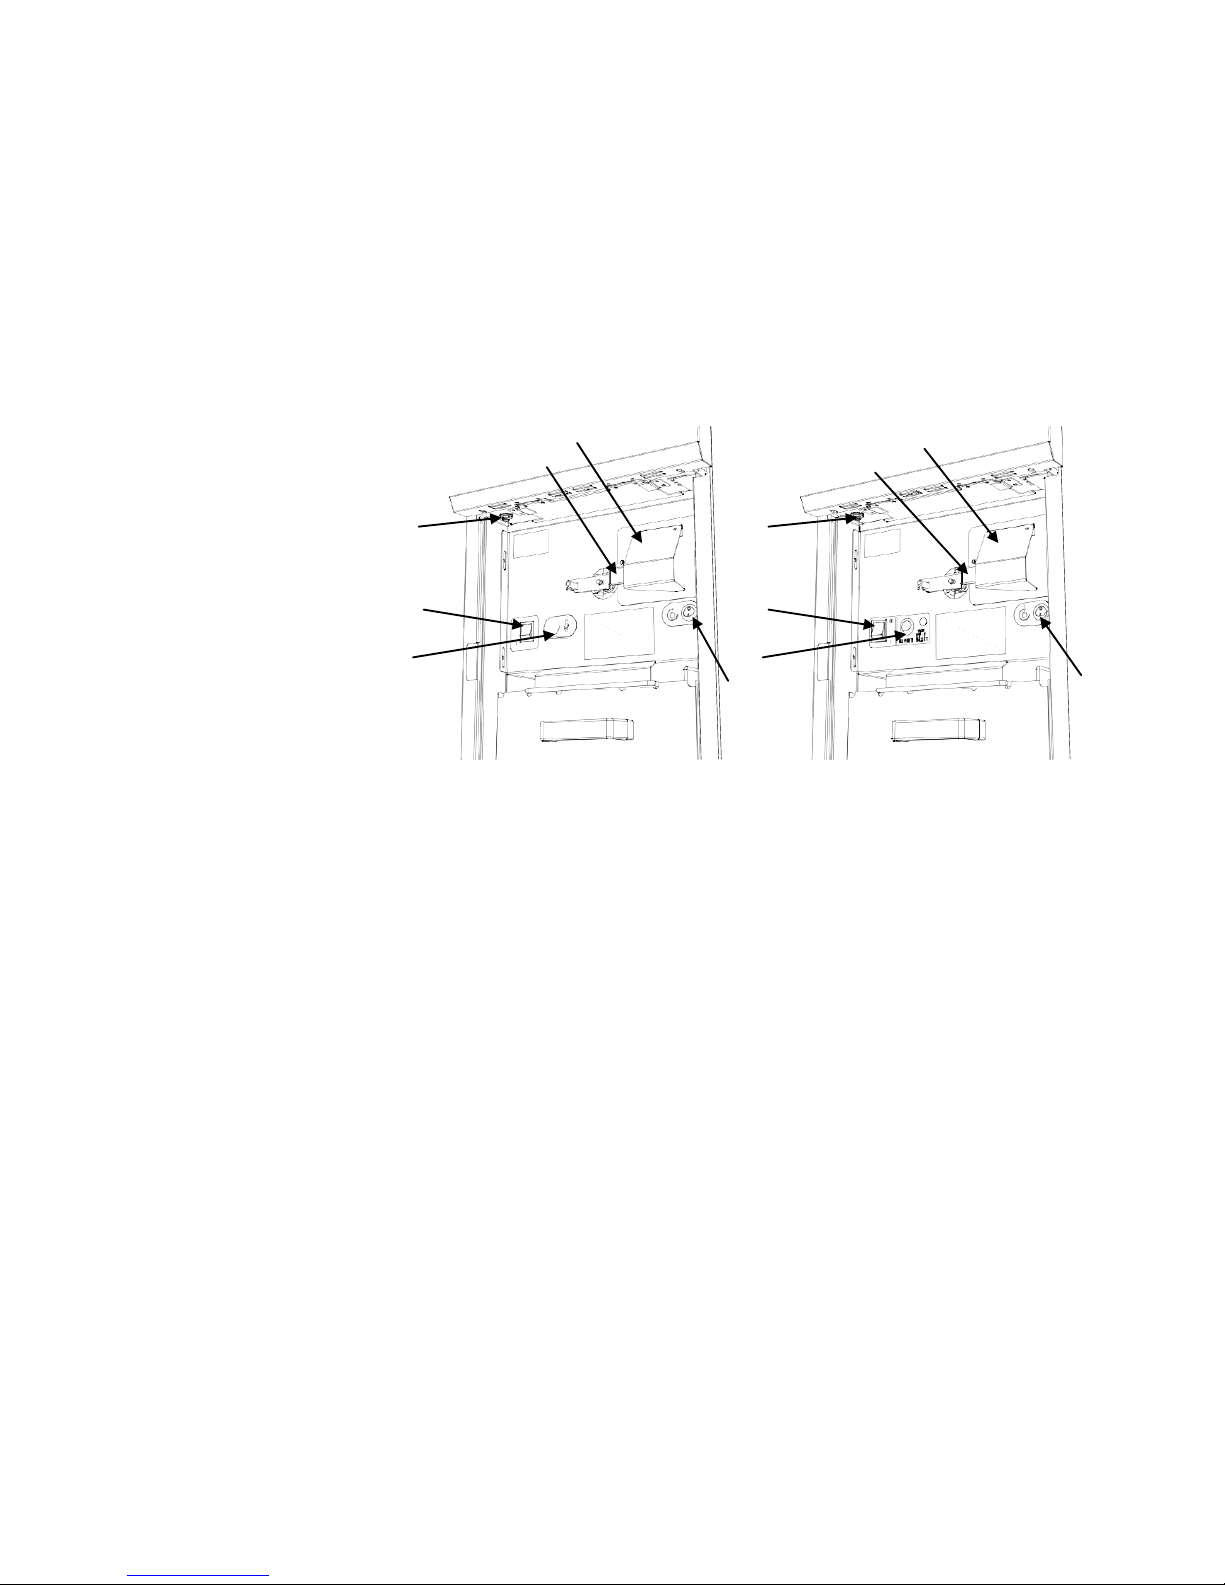
Filtration Pump Switch (2845F only)
(See Figure 4.)
Energises filtration pump when burner switch is in OFF (O) position.
Temperature Safety Limiter Reset Button
(See Figure 4.)
Inside red recess.
B B
A A
Key to Controls
A. Drain Valve
B. Access Plate C C
C. Temperature Limit Device
D. Burner switch
E. Burner lockout reset switch
F. Burner lockout reset switch D D
and indicator (G2844/F only)
G. Filtration pump switch E F
G G
G2845F G2844F
Figure 4 – G2844 & G2845 - Additional Controls
2.4.3 G2844F/G2845F
- Additional Controls (See Figure 4)
The following additional controls are located behind cabinet door.
1) Burner and Temperature Controls ON/OFF Switch
Cuts power to burner and temperature controls.
2) Burner Lockout Indicator
Indicates flame failure.
2.5 PRE-COMMISSIONING CHECK
1) Clean out pan thoroughly using hot water and detergent. Rinse out and dry thoroughly.
Note
For further detail with regard to cleaning, refer to Section 8.
2) Ensure drain valve is closed. Fill pan with clean cooking oil to -MIN- (maximum cold fill mark) indicated
on basket hanging rail. (See Figure 6). Note: -MAX- refers to maximum hot fill mark.
3) With gas supply still shut off, turn on electrical mains supply.
4) Open door and press temperature limit thermostat reset button (red), refer to Section 2.6. Set burner switch
to Position 'I' (ON position).
5) Turn control knob to desired temperature (140⁰C) (G2845 only). Heat demand indicator will illuminate (Figure
2, item 4).
Page 8

8
6) Fryer premix fan will run and spark ignition may be heard before unit locks out.
7) A neon will illuminate to indicate that lockout has occurred and that no burner flame is present.
8) Turn on gas supply.
9) Press lockout reset switch. See Figure 4 (Lock out indicator will extinguish).
10) Burner will ignite and heat indicator will illuminate to signify that burner is on.
Note: If lockout should occur, repeat Steps 9 -10 until air is bled from supply.
2.5.1 Checking Controller Operation
To check operation of controls, refer to “ Appliance controls” - Section 6.1.
2.5.2 Checking Oil Filtration Pump
To check operation of oil filtration pump, refer to Section 7.
Important
After installation, the responsible technician should check for gas leaks and ensure the appliance is operating safely and
satisfactorily before handing over to the user.
2.6 TEMPERATURE LIMIT THERMOSTAT
The unit is equipped with an additional temperature limit thermostat, independent of the main controller.
In the case of operating thermostat failure, allowing oil temperature to rise above predetermined legislation safe
zone (230⁰C), limit device will activate and cut power to controller. It will also stop the flow of gas to burner.
To re-set temperature limit thermostat, refer to Figure 4.
G2844F and G2845F Models
1) Turn burner and temperature controls ON/OFF switch to OFF position.
2) Allow oil to cool below 180⁰C
3) Reset red button on limit thermostat with a pen or similar item. The button is located behind cabinet door at
upper RH, below facia panel.
4) Turn burner and temperature controls ON/OFF switch to ON position.
5) Reselect temperature.
6) If limit thermostat reactivates carry out fault finding on temperature control circuitry.
2.7 INSTRUCTION TO USER
After installing and commissioning appliance, please hand Instructions to user or purchaser and ensure that the
person(s) responsible understands the instructions to correctly operate and clean unit in a safe manner.
Emphasis should be given to safe operation and use of drain valve and oil bucket. Oil bucket should not be
overfilled to allow safe movement. Oil should be allowed to cool before any manual handling.
Note: The oil container may be heavy. Drain small amounts at a time if necessary, before lifting container. Manual
handling regulations should be observed.
Weight of Empty oil bucket + filter – 4.25kg
Each litre of oil – approx 1kg.
It is important to ensure that location of gas shutoff valve is made known to user and that procedure for operation in
an emergency be demonstrated.
Page 9

9
SECTION 3 SERVICING AND CONVERSION
BEFORE ATTEMPTING ANY SERVICING, TURN OFF GAS SHUT-OFF VALVE AND ELECTRICAL SUPPLY.
TAKE STEPS TO ENSURE THAT THESE CANNOT BE INADVERTENTLY TURNED ON.
AFTER ANY MAINTENANCE TASK, CHECK UNIT TO ENSURE THAT IT PERFORMS SAFELY AND
CORRECTLY AS DESCRIBED IN SECTION 2.5.
ALWAYS CHECK FOR GAS LEAKS.
3.1 GAS CONVERSION
(Natural to propane or propane to natural)
This model is suitable for field conversion.
3.2 INTEGRAL COMPONENTS
The following parts must be checked and serviced regularly:
1) Premix fan - check for dust, grease ingress.
2) Oil ingress to electrical components.
3) Flue for any blockages.
4) Visual inspection of components, gaskets and fryer pan.
3.3 ACCESS PROCEDURES
Before removal of any fryer components:
a) Ensure appliance electrical and gas supply has been shut off and cannot be accidentally turned back on.
b) Allow oil to cool before any operation that requires pan to be drained.
c) Only use parts specified by the manufacturer.
d) All components replaced MUST be fully checked after fitting to ensure safe operation.
e) A full pre-commissioning check as detailed in Section
2.5 should be carried out.
3.4 PREMIX FAN
(Preset venturi must not be changed)
a) Remove mains pipework from rear then remove back panel to gain access to fan.
b) Disconnect plug from fan.
c) Remove bolts at flange of pipework.
d) Undo fixing that secures ignition control box to gas valve and remove.
e) Fan and valve assembly may now be lifted clear.
f) Remove fixings that secure fan to valve/venturi system. Replace in reverse order.
Check system for gas leaks.
3.5 GAS CONTROL VALVE
(Preset Venturi Must Not Be Changed)
a) Remove premix fan and valve assembly as detailed in
Section 3.4 and lift clear.
b) Remove bolts to disconnect valve from fan assembly.
c) Replace parts in reverse order and check system for gas leaks.
3.6 BURNER
a) Remove both sides and back panel.
b) Split pipework from both fan and burner.
c) Remove igniter/sensor. Refer to Section 3.9.
d) Disconnect burner bolts and carefully drop burner.
e) Fit new gasket and replace burner.
f) Reconnect in reverse order.
g) Check gasket connection is sealed where fitted.
h) Check all gas connections for leaks.
Page 10

1
3.7 BURNER RESET SWITCH
a) Remove drain handle and front panel fixings.
b) Remove electrical connections and remove switch by squeezing side fixings to push it through aperture.
c) Replace part in reverse order.
3.8 CONTROL BOARD (small)
a) Remove bolts from top and bottom of control panel.
b) Pull control panel forward then drop down.
c) Disconnect electrics and remove fixings enabling controller to be removed.
Replace part in reverse order.
3.9 IGNITER/SENSOR
a) Remove side panels and undo connection wires from ignition control box.
b) Undo electrode/igniter nuts from underside of burner.
c) Pull igniter and gasket out of location.
d) Fit new gasket to igniter and replace parts in reverse order. Ensure that a good earth connection is made.
Note: This can be achieved by removing LH side panel only and/or access plate. Refer to Section 2,
Figure 4.
3.10 DRAIN VALVE
a) Ensure fry pot is empty. Refer to Section 8.
b) Remove nut from handle and lift handle off.
c) Remove front panel fasteners.
d) Disconnect wiring, noting all connections.
e) Remove front panel to access drain valve.
f) Undo drain pipe and using appropriate size of spanner, remove drain valve.
g) Replace in reverse order and check for oil leak.
3.11 FILTRATION PUMP (When Fitted)
a) Remove back panel and remove flexi-hose at filtration pump.
b) Disconnect electrical coupling plug.
c) Undo bolts from below base panel that secure pump bracket to base and lift clear.
d) Disconnect pump from bracket and replace in reverse order.
Note: Check for oil leaks before replacing any panels.
3.12 FILTRATION PUMP PIPEWORK
a) Remove back panel and flue bolts from rear.
b) Undo quick release connection from top of outer flue.
c) Remove flexi-hose at filtration pump.
d) Lift entire flue assembly clear.
e) Replace in reverse order.
f) Check for oil leaks before replacing any panels.
3.13 FAN SPEED BOARD (larger board)
a) Open control panel as detailed in Section 3.8.
b) Undo electrical connections and pull ignition board gently from fasteners. Carefully replace board in reverse
order.
3.14 IGNITION CONTROL BOX
a) Remove LH side panel at rear of side enclosure.
b) Remove fixing from control box lid.
c) Slide control box from pins on valve and pull clear of case.
d) Undo electrical connections.
e) Replace in reverse order & test.
Note: Control is in “lock-out” when new.
Page 11

1
3.15 USER/TEMPERATURE LIMIT THERMOSTAT
a) Open and drop control panel. Remove cover box and undo thermostat nuts to remove thermostat.
b) Disconnect thermostat wires.
c) Carefully replace in reverse order. Check for any oil leaks.
SECTION 4 – SPARES
When ordering spare parts, always quote appliance type and serial number. This information will be found on unit data
plate, located inside the fryer door on LH leg support face.
Burner reset switch G2844/5
Control knob G2845
Drain valve G2844/5
Filter bag G2844/5
Fan speed board G2845
Fuse anti surge 5A G2844/5
Fuse anti surge 2A G2844/5
Neon amber G2844/5
Neon amber Heat G2845
Neon red Mains G2845
On/off switch G2844/5
Pump switch G2844/5
Relay 24v AC Double G2844
Relay base G2845
Snubber circuit G2845
Timer G2844/5
Timer pump relay G2845
Thermistor probe G2844
Thermistor probe G2845
Thermostat/Controller G2845
Thermostat safety G2844/5
Transformer 24V G2844/5
Page 12

1
SECTION 5 - TROUBLESHOOTING and CRITICAL DIMENSIONS
5.1 TROUBLESHOOTING
G2845F
PROBLEM - No power.
Action:
a) Check power is being supplied to unit.
b) Check temperature limit thermostat has not tripped (Refer to Section 2.6).
G2844F
PROBLEM - No power
Cause: Circuit breaker off.
Solution: Check and reset.
Cause: Appliance not plugged in.
Solution: Plug cord in.
Cause: Defective 24V AC transformer.
Solution: Replace transformer and/or controller.
PROBLEM - No sound
Cause: Inoperable speaker.
Solution: Replace controller.
PROBLEM – Button
Cause: Inoperable key.
Solution: Replace controller.
PROBLEM: PROB is displayed.
Cause: Defective temperature probe.
Solution: Replace temperature probe
Cause: Probe not plugged in
Solution: Plug probe in
PROBLEM: Reading Wrong Temperature
Cause: Defective temperature probe.
Solution: Replace temperature probe.
PROBLEM: Not Heating.
Cause: Check gas circuit.
Solution: Replace defective part.
Cause: Defective controller.
Solution: Replace controller.
Page 13
1
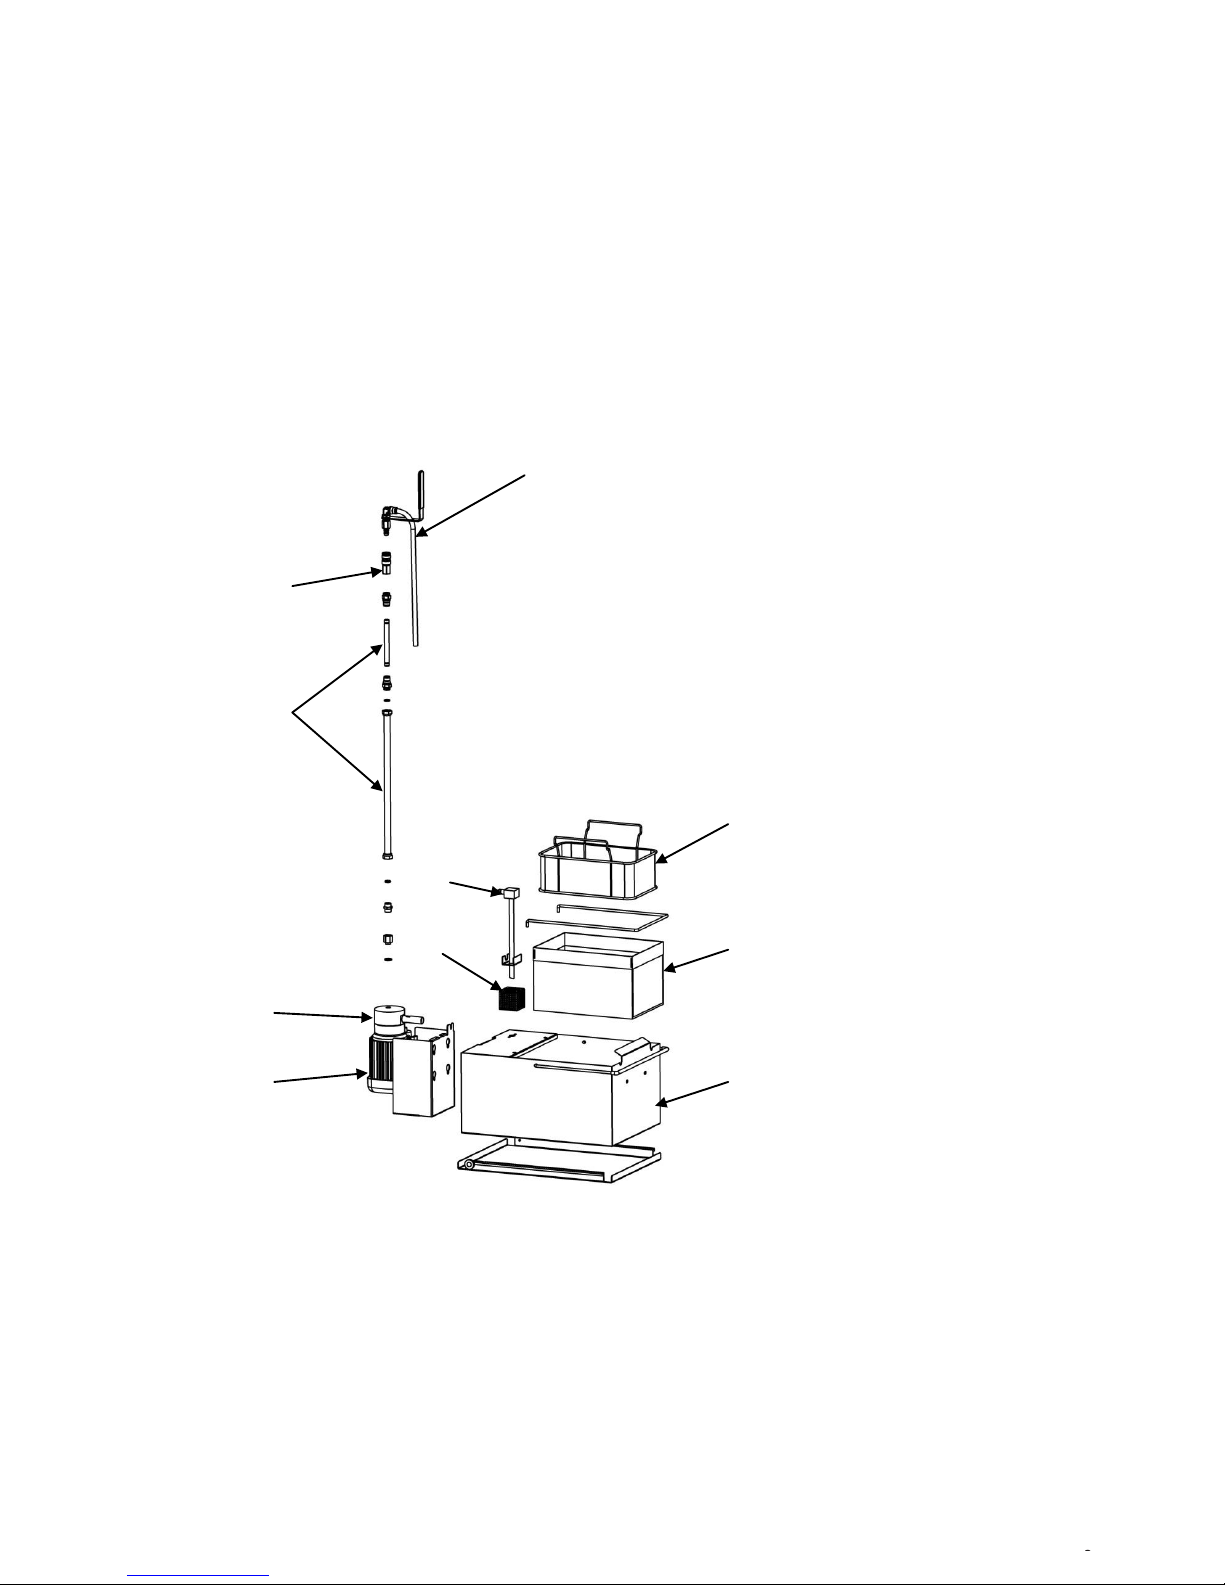
Condition - The filtration pump (where fitted) is not working. (Refer to Figure 5)
Action 1 - Burner ON/OFF control must be switched to OFF before pressing filter pump switch.
Action 2 - The oil suction pipe has become blocked. Clean it and dry thoroughly.
Note: This is caused by debris in the bottom of oil bucket. The microfilter and strainer have not been cleaned or have
been damaged.
This can cause unfiltered oil to overflow into the oil bucket.
Action 3 - The pipework has become blocked (refer to Action 2) or has been inserted incorrectly into one of the
quick release connections.
Action 4 - The oil is too hot. Pump is fitted with a thermal safety device. This must be allowed to cool before pressing
reset switch directly below pump on base panel.
A
B
C
D
E
J I
F
H K
Key to components Figure 5
A Oil return pipe
B Flue quick release connection
C Internal filter pipework
D Strainer basket
E Suction pipe
F Oil pump
G Oil decant hose (not illustrated)
H Pump motor
I Micro filter
J Suction pipe filter
K Oil bucket
Page 14
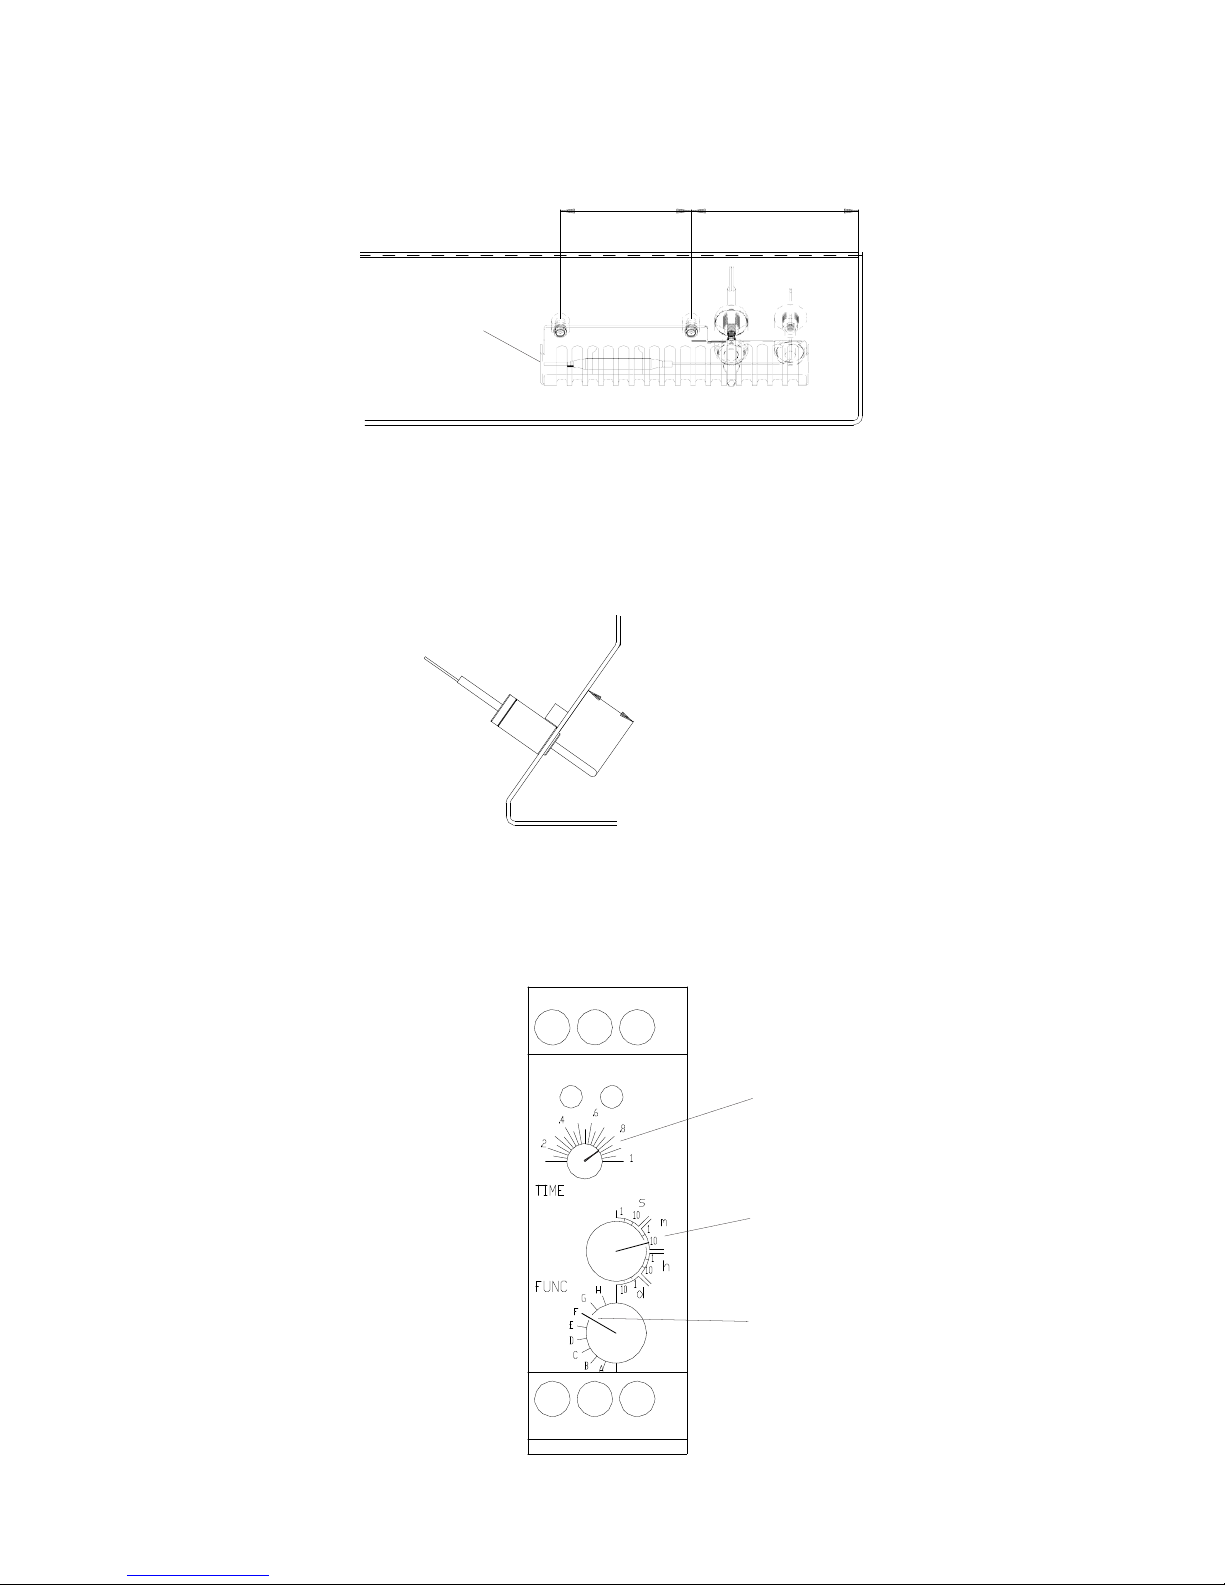
10
5.1 CRITICAL DIMENSIONS
90mm (+/-1mm) 102.5mm
Phial pushed
against end of
guard
Safety Thermostat
32mm (+/-1mm) from boss
Operating Thermostat
Probe
Set to 0.8
Set to 10 minutes
Oil Pump Timer Settings
Set to F
Set to 24V
Page 15

15
SECTION 6 OPERATING INSTRUCTIONS
Training and competence
To help ensure the safe use of this appliance there is a requirement for you to provide whatever information, instruction,
training and supervision as is necessary to ensure, so far as is reasonably practicable, the health and safety of all
users.
For further help and information on training and competence we would refer you the Health and Safety Executive
website; www.hse.gov.uk document ref: health and safety training INDG345. International customers should default to
the health and safety guidelines provided by your government body.
Risk assessment
As part of managing the health and safety of your business you must control any risks identified in your commercial
kitchen. To do this you need to think about what might cause harm to people and decide whether you are taking
reasonable steps to prevent that harm. This is known as risk assessment. It is important to consider the environment
around the product as well as the product itself. For example oil or food spills will present a significant risk so users so
the need to immediately clean up such spills must be reflected in staff training.
For further help and information on risk assessments we would refer you to you the Health and Safety Executive
website; www.hse.gov.uk document ref: risk assessment INDG163. International customers should default to the health
and safety guidelines provided by your government body.
PARTS WHICH HAVE BEEN PROTECTED BY THE MANUFACTURER ARE NOT TO BE
ADJUSTED BY THE USER.
The fryers are of single pan type and the following units are covered by this manual.
G2845F - Manual control model with built-in filtration.
Note: The oil bucket may be heavy. Drain small amounts at a time if necessary, before lifting container. Manual
handling regulations should be observed.
Weight of Empty oil bucket + filter – 4.25kg
Each litre of oil – approx 1kg.
Warning: Appliances on Castors.
When the fryer is supplied with castors it should be connected to supply piping by means of a connector for
moveable appliances. In addition, a restraining chain should be connected between appliance and wall. Ensure this
restraint is re-connected when unit is returned to original position.
Moving the fryer with hot or cold oil in fry pot can be dangerous to the operator. Scalding could occur. Spilled oil or
fat on the kitchen floor could cause slipping accidents and any such deposit should be cleaned up straight away.
To prevent any such hazard, DO NOT move fryer until all liquid has been drained from fry pot.
USE OF OILS/SHORTENING/SOLIDS
(COOKING MEDIUM)
These are highly flammable in their liquid state, caution should always be taken when using cooking medium.
Recommendation
PPE (Personal Protective Equipment) should be used when cleaning or handling medium within this fryer.
Medium should not be overheated as this will increase the risk of fire.
Note: Fryer is fitted with a thermal safety device. This will stop heating of medium if it becomes overheated.
This appliance will always fail safe.
Note: NEVER leave a working unit unattended. Medium must always be maintained within fry pot. Always turn this
Page 16

16
product off at the end of service.
Cold Medium - when filling with cold medium (see Figure 6), DO NOT FILL MEDIUM PAST -MIN- LEVEL MARK
(Maximum cold fill mark) also, for Solid Medium - See Section 10.
-MIN- Level Mark: Medium should NEVER be allowed to drop below this mark. Should this occur, top up
immediately or switch fryer OFF.
Figure 6
Hot Medium and Topping Up Medium
DO NOT FILL MEDIUM PAST -MAX- LEVEL MARK
(Maximum Hot Fill Mark).
(See Figure 6).
CAUTION: SUITABLE PROTECTIVE CLOTHING
MUST BE WORN when topping up whilst fat in fryer is hot.
Medium and Foodstuffs
As foodstuffs increase volume during cooking - follow these rules:
DO NOT ADD WATER TO FRYING MEDIUM AT ANY TIME!
Do not introduce excessively wet food into the fryer
WARNING
No attempt must be made to operate this appliance during a power supply failure.
Please ensure that any plastic coated items are removed prior to use. Before operation, pan requires to be
thoroughly cleaned and dried.
Discolouration of heated parts is caused by factory testing to ensure unit is satisfactory. It will not affect quality
or performance.
All Models
A neon indicator is incorporated to indicate flame failure when illuminated.
An electronic thermostat with temperature probe is fitted. The operating thermostat automatically controls oil
temperature. The temperature limit thermostat ensures that the oil will not reach a dangerous temperature level.
If limit thermostat should ac tiv ate dur ing operation , an investigation to determine the reason must be carried
out by a qualified technician.
Burner is protected by an electronic flame sensor device.
6.1 APPLIANCE CONTROLS
Refer to Sections 2.4.1, 2.4.2 and 2.4.3 for control layout. (Figure 4)
6.2 LIGHTING and OPERATION Safety Precautions
The installer must fit a gas shut-off valve in gas pipe that supplies the unit.
The user MUST be familiar with the location and operation of the valve for shutting off gas in event of an
emergency.
IF A SMELL OF GAS IS EVIDENT:
a) TURN OFF GAS SUPPLY.
b) VENTILATE AREA.
c) CALL YOUR LOCAL GAS SUPPLIER.
NEVER USE AN OPEN FLAME TO CHECK FOR GAS LEAKS!
Page 17

17
6.2.1 Lighting Instructions
Remove lid (if fitted) and baskets and set these aside. Ensure fryer pan is clean and completely dry. Ensure also that
drain valve is closed. Pour clean, cold oil to -MIN- pan level mark on basket hanging rail.
Note: If you are in the fat melting cycle <<fat melting cycle>> (FMC) and loading solid fat for the first time,
always remove basket support plate as detailed in Section 9. Solid fat should be in direct contact with fryer pan.
Refer to Section 9.
Warning:
Do not select any setting other than FMC when using solid fats as this will trip safety thermostat or in the
worst case scenario, ignite liquefied oils.
6.2.1.1 G2845F Model Only (for switch locations, see figure 4 )
a) Ensure pan is filled with solid/shortening to indicated level and gas supply is established.
b) Ensure burner switch is in off position (O).
c) Press burner switch to on position (1).
d) Turn knob to select temperature.
(If solid fat is used - Select FMC fat melt cycle)
e) Heat on indicator will illuminate.
f) If burner fails to light, lock-out indicator will illuminate.
g) Reset burner by turning control knob to off position. Press lock-out switch ( Fig 4, E) and wait 30 seconds then repeat
from Step d).
h) If burner repeatedly fails to light, switch off electrical and gas supplies. Call service engineer.
Warning:
Do not select any setting other than FMC when using solid fats as this will trip safety thermostat or in the
worst case scenario, ignite liquefied oils.
6.2.1.2 G2844F model only (for switch locations, see figure 4 )
a) Ensure pan is filled with solid/shortening to indicated level and gas supply is established.
b) Ensure burner switch is in off position (O).
c) Press burner switch to on position (1).
d) G2844 - Factory preset for a temperature of 180⁰C
(See Section 6.3 for instructions for change set temp).
e) Display will illuminate with figures 8888 for 2 secs, CTT for 2 secs, r 06 for 2 secs and then displays Louu.
Heat demand LED indicator will illuminate.
f) If burner fails to light, lockout reset indicator will illuminate.
g) Wait 30 seconds and reset burner by pressing lock-out reset switch.
h) If burner repeatedly fails to light, switch off electrical and gas supplies and call a service engineer.
6.2.2 Operating Instructions
6.2.2.1 G2845F Models Only - Manually Operated
When unit has been lit as above, fryer may be operated as following:
a) If using solid fat, turn control knob clockwise to select FMC (Fat Melt Cycle).
b) When solid/shortening has liquified, select desired
temperature.
Warning: Do not select any setting other than FMC when using solid fats as this will trip safety
thermostat or in worst case scenario, ignite liquefied oils.
c) Fat or oil temperature will then be governed by controller to desired set temperature, selected by user.
Page 18

18
6.2.2.2 G2844F Models only – Programmable
When unit is lit as detailed in Section 6.2.1 lighting instructions above, fryer may be operated as follows:-
NOTES:
1) There is NO solid fat melt pulsing cycle (FMC) incorporated in this controller.
2) The oil temperature will be governed by controller at a factory preset temperature of 180⁰C. See Section 6.3 for
instructions on how to change set temperature.
3) When actual temperature is within 10⁰C of set point the display reads redy. (See Section 6.3 for
instructions on how to display actual or set temperature).
4) Before carrying out any cooking operations, controller should be set up for particular application of use (e.g.
up to four timer programmes, product frying temperature, ⁰C/⁰F). This can all be carried out using the
following guide in Section 6.3.
Operating the Controller:
a) Start a timing cycle: Press any product key (1 to 4) to start a timing cycle. If key is programmed, the correct
time will be displayed and will immediately start to count down and LED above key will flash. DONE will
display when cook cycle has ended and alarm will sound. If DONE is displayed immediately and alarm
sounds, the key has not been programmed See Section 6.3 for programming details.
b) Stop a timing cycle: Press and hold an active product key for 3 seconds, or press key 3 times within 2 seconds.
c) Respond to a DONE alarm: Cancel signal by pressing same product key used to start timing cycle.
d) Multiple timing cycles: If a second or third product key is pressed while the first is still active, the shortest time
remaining key is displayed and only the LED above key flashes, the other(s) remain constantly lit. Once
shortest time programme ends and is accepted, next shortest is displayed and LED above flashes. Note: All
product key timers will count down although not displayed until shorter one ends.
e) Action Alarms (Shake, etc.): If control is programmed for action alarm, they will signal at a preset time during
the timing cycle. The signal, a dual-rhythm beeping, will last 5 seconds and then self-cancel. The display
will flash action alarm time and then will continue counting towards 0:00.
f) Viewing Actual/Set Temperatures: Pressing the temperature key once will display “AXXX” where XXX is actual
temperature in degrees (C or F depending on how controller is programmed – See Section 6.3). Pressing the
temperature key again within 5 seconds will display “PXXX” where XXX is the programmed Set temperature of
the controller in degrees (C or F depending on how controller is programmed – See Section 6.3). If temperature
key is not pressed again within 5 seconds, display returns to idle or timer mode.
6.3 PROGRAMMING THE G2844F Display Descriptions
Louu
Controller is in operating mode. Actual vat temperature is more than 10° below programmed vat temperature.
rEdy
Controller is in operating mode. Actual vat temperature is within proper cooking temperature range. The vat is ready to
start a cook cycle.
HI
Controller is in operating mode. Actual vat temperature is more than 30° above highest programmed vat
temperature.
Prob
Control probe is either open circuited or short circuited. Display will be accompanied by an audible alarm if
shorted. Check or replace probe.
2:30
The control is in operating mode and a cook cycle is in progress.
Page 19

19
done
The control is in operating mode and a cook cycle has been completed. Display will be accompanied by a pulsing
audible alarm.
6.3.1 Programming temperature set point and temperature scale. (Factory set for 180⁰C, range available
is 30⁰C to 190⁰C)
a) Press and hold temperature key for 3 seconds. “Prog” will be displayed. Then press DOWN (key 1) or UP (key
4) key.
b) The display will show either “⁰C” or “⁰F” (degrees celsius or degrees fahrenheit). Once desired temperature
scale is displayed, press temperature key to accept/enter.
c) Display will now alternate between “Sett” and “XXXZ” (where X denotes temperature and Z indicates
temperature scale).
d) Adjust temperature using DOWN (key 1) and UP (key
4) keys. The longer key is pressed, the faster temperature scrolls.
e) When desired temperature has been reached, press temperature key to accept/enter.
f) To exit temperature programming, press temperature key again.
6.3.2 Programming a Product Cycle Time and Action Alarm
a) Press and hold P key for 3 seconds. “Prog” will be displayed. Note: Programming mode will exit
automatically if no keys are pressed within 2 minutes.
b) Select a product key to program (1 to 4). The display will alternate between “ti-z” and “X:XX” where z is the
number of the key pressed and X:XX is the set time in minutes and seconds.
c) Adjust the time up or down using the DOWN (key 1) and the UP (key4) keys. The longer key is held, the
faster the time will scroll.
d) Once desired time is reached, press P key to accept/enter.
e) The display will now alternate between “PrEz” and “X:XX” where z is the number of the key pressed and
X:XX is action alarm time in minutes and seconds.
NOTE: The time entered here is the time action is required before the end of the total cycle time entered above.
If NO Action time is required, leave at “0:00”. Adjust time as c) above.
f) Once desired time is reached, press P key to accept/enter.
g) “Prog” will again be displayed and another product key can be selected for programming. Repeat above
steps. When no more keys are required to be programmed and “Prog” is displayed, press P key to exit
programming mode and return to idle mode.
SECTION 7 - CHANGING/FILTERING THE OIL
Warning
After filtering, wait 30 seconds before removing oil bucket.
It is dangerous to use shortening that is too old. This medium has a reduced flash point temperature and is
prone to surge boiling.
Caution
To prevent surge boiling. DO NOT EXCEED recommended loads or charge the pan with over-wet food items.
NEVER LEAVE a working appliance unattended.
Page 20

20
Warning
When draining solids/shortening, ensure that the oil has time to strain through strainer basket. Heavily unfiltered oil
may overflow.
Note
This could cause pump to block over a period of time and is considered as misuse of equipment.
Warning
When pumping solids/shortening back into fryer pan. Ensure all trace of solids/shortening is emptied from
receptacle (bucket).
If oil is not emptied on a regular basis or if oil is left in the receptacle (bucket), it may solidify and overflow or spill on
to the kitchen floor to create a hazard.
7.1 STARTING THE FILTRATION PROCESS
Refer to Figure 5 for details of filtration components.
1.
With burner switch in OFF position, allow oil to cool below 170°C (or if cold, heat to minimum temperature of
60°C). Open cabinet door and pull filter bucket forward.
2.
Ensure o i l bucket is clean and emptied of all solid/ shortening and debris. Refer to Section 8 for details of
how to clean filter components.
3.
Ensure that strainer and microfilter are clean.
4.
With strainer and microfilter in position, slide oil bucket back on to runner cradle and back into fryer.
Please Note - Warning: Do not handle filter components or adjacent surfaces when pump is operating.
Components will remain hot for a period after filtering. Allow cooling. Use of PPE is recommended.
Note: Burner and temperature controls ON/OFF switch must be in OFF position before operation of filter pump can
begin.
7.2 G2845F and G2844F MODELS Filtering Oil into Receptacle (Oil Bucket).
1.
Slide drain locking pin to left before turning drain handle clockwise.
2.
Pan will drain through strainer basket and microfilter into oil bucket and will pump back into pan.
3.
Clear debris from pan.
4.
If pan drain becomes blocked, clear using drain prod.
5.
When debris has been removed from pan, turn valve handle anti-clockwise to close valve.
6.
Press filtration pump switch to turn on pump.
Note: With cabinet door open, switch is located at RH side of drain valve (Refer to Figure 4).
7.
Allow pan to refill.
8.
When pan has re filled completely, switch off pump.
Warning
Ensure all shortening has been pumped from receptacle (bucket), before topping up pan.
9.
Top up fryer if required.
7.3 REMOVAL OF SPOILED/USED OIL
This can be easily removed into a transport container or a special barrel for used oil.
Page 21

21
7.3.1 Filter Oil into Receptacle (Oil Bucket) as 7.2 Above
Warning
Removal of fryer oil must be carried out under controlled circumstances. Refer to Health and Safety, Manhandling
and Local Dispensing of Oil regulations.
7.3.2 Manual Removal of Oil from Receptacle (Oil Bucket)
1.
Slide receptacle forward, and remove strainer basket and microfilter.
Note: The oil container may be heavy. Drain small amounts at a time if necessary, before lifting container. Manual
handling regulations should be observed.
This practice should be carried out when oil is lukewarm.
Weight of Empty oil bucket + filter – 4.25kg
Each litre of oil – approx 1kg.
2.
Using handles provided, lift receptacle clear by pulling up and forward.
Note
Care should be taken not to pull runner cradle out during this operation. Be careful also, not to spill oil.
3.
Lift oil container and dispense according to local regulations.
4.
Replace strainer basket and microfilter.
5.
Replace oil container in reverse order.
Note
Cleaning of filters and oil container should be carried out on a regular basis as required.
7.3.3 Using Oil Decanting Hose
(Refer to Figure 5)
Warning
The decanting hose must ONLY be used to decant oil from unit oil container to recommended disposal
vessel. Always wear the recommended Personal Protective Equipment (PPE) to prevent injury as the hose
and components will be HOT.
DANGER
NEVER operate decanting hose for purposes other than recommended.
With pump OFF and fry pot empty:
a) Disconnect oil return pipe from flue quick-release connection.
b) Connect decanting hose to flue quick-release connection and connect oil return pipe to other end of hose.
c) Using handle, point hose into disposal vessel.
d) Press filtration pump switch to switch pump on.
e) When oil has decanted, press filtration pump switch to switch pump off.
f) When cooled to touch temperature, disconnect de can ting hose from flue quick-release and oil return pipe.
g) Reconnect oil return pipe to quick release connection.
Page 22

22
SECTION 8 CLEANING and MAINTENANCE
When removing heavy items to aid cleaning or maintenance particular care should be taken. A manual handling risk
assessment is the best way to determine the level of risk to anyone using or maintaining this equipment. To help with
such an evaluation we have included the weights of individual components that may present significant risk.
For further help and information on manual handling and associated risk assessment we would refer you to you the
Health and Safety Executive website; www.hse.gov.uk document ref: manual handling at work INDG143.
International customers should default to the health and safety guidelines provided by your government body.
The cleaning of fryers or other products that use hot oil present significant risks to end users and particular care
should be taken. Cold water and hot oil for example are an explosive mix and should be avoided at all costs.
Other useful references for health and safety issues
www.hse.gov.uk
Essentials of health and safety at work ISBN978
Noise at work INDG362
Safe systems of work
Other notes added to the body of the instructions
RECOMMENDATION
Personal protective equipment (PPE) should be used when cleaning or handling medium within this appliance.
WARNING - NEVER PUMP WATER THROUGH THE FILTRATION PUMP AT ANY TIME! Water and hot oil are
an explosive mix.
Warning
The fryer is supplied with castors at rear and should be connected to supply piping by means of a connector for
moveable appliances. An anti-tipping restraint can be attached to unit and, if so, this must be disconnected
before fryer is moved. Ensure restraint is re-connected when unit is returned to original position.
Moving the fryer with hot or cold oil in fry pot can be dangerous to the operator. Scalding could occur. Spilled oil
or fat on the kitchen floor could cause slipping accidents and any such deposit should be cleaned up straight
away.
To prevent any such hazard, DO NOT move fryer until all liquid has been drained from fry pot.
The following procedure should be undertaken, AT LEAST DAILY.
IMPORTANT: Disconnect electrical supply before any cleaning is undertaken.
Warning
Oil must be allowed to cool to a safe temperature before draining. Do not overfill draining receptacle (Oil
Bucket)
.
THE APPLIANCE MUST NOT BE CLEANED WITH A JET OF WATER OR BE STEAM CLEANED. DO NOT
USE ACID OR HALOGEN-BASED (e.g. chlorine) DESCALING LIQUIDS, FLAMMABLE LIQUIDS, CLEANING
AIDS OR CLEANING POWDERS.
Never clean this product while it is hot.
Stainless Steel Surfaces
It should be noted that certain scouring pads including nylon types, could easily mark stainless steel. Care
should be exercised during cleaning process.
When rubbing stainless steel with a cloth, always rub along in grain direction.
8.1 CLEANING THE APPLIANCE
1) All spills on to this product and on the floor should be cleaned up immediately.
2) Unit should be switched OFF and fry pot drained of oil.
Page 23

23
3) Remove baskets, fish plate and crumb catcher. Soak these components in hot soapy water.
4) With drain valve open, remove any traces of debris from fry pot using a clean, damp cloth.
NOTE: Care should be taken not to damage sensors located at pan front.
5) Remove strainer and microfilter, soak these in hot soapy water.
6) Wash, rinse and dry removed items thoroughly. Set these aside.
7) Close drain valve.
8) Fill fry pot 3/4 full with hot water.
9) Clean pan using a soft, clean cloth and hot soapy water, rub away any stubborn staining with a
scouring pad and suitable detergent.
10) Open drain valve. Drain water into bucket below.
11) Use clean water to rinse fry pot and dry thoroughly (including inside of drain valve).
12) Close drain valve.
13) Return fish plate and baskets to pan.
14) Remove oil bucket by pulling forward then upward.
15) Use handles and lift oil bucket to sink.
16) Pour away soiled water.
17) Thoroughly wash, rinse and dry oil bucket and oil suction pipe.
18) Replace strainer and micro filter in oil bucket and return oil bucket to cradle.
19) Fill fry pot with clean oil/solid/shortening to -MIN- mark. To relight, refer to Section 6.2.
Warning. Ensure that all fitments are thoroughly dry and clear of water before returning to appliance.
No water should be allowed to mix with the oil.
SECTION 9 - PREPARATION OF SOLID FATS/SHORTENING
COOKING HINTS
Allow approximately 10 minutes for unit to heat up from cold to required operating temperature.
CHOICE OF FRYING MEDIUM
Select a top quality medium to obtain optimum results. Shortening or solid fats can be used if necessary.
Solid fats MUST be heated carefully as these have a lower smoke point temperature than shortening.
The fryer is equipped with a fat melt cycle that will pulse heat into the fryer.
A quality shortening is a more stable frying medium. It allows longer periods of use without smoking or
foaming. It will also give food a better flavour.
Quality shortening has a higher flashpoint temperature and will reduce gumming around the pan.
Regular filtering will help improve lifespan of the medium.
WARNING - NEVER MIX SHORTENING AND SOLID FAT!
Charging The Pan
Prior to operation, clean fry pot out using hot water and detergent.
Rinse out and dry thoroughly. (including inside of drain valve).
Ensure drain valve is closed. Fill fry pot with cold shortening to MIN level mark on basket hanging rail.
Approximate maximum oil level capacity is 18 litres.
Page 24

24
Solid Fat
If solid fat is to be used, remove fish plate and cut fat into small pieces. Place 17kg in fry pot and pack it down.
Position fish plate upon top of the fat. Push front end into fat lightly until front edge is below temperature
probe. Ensure that FAT MELT CYCLE (G2845/2845F) is selected for this process.
Note
Fish plate will lower slowly into fry pot as solid fat melts.
Warning
Check correct shortening level is achieved when all solid fat has melted. Required temperature may then be set.
Solid fat should always be heated this way to prevent overheating and burning.
WARNING: It is dangerous to use shortening that is too old. Such shortening has a reduced flash point
temperature and is prone to surge boiling.
CAUTION: To prevent surge boiling. DO NOT EXCEED recommended loads or charge pan with over-wet food
items. NEVER leave a working appliance unattended.
SECTION 10 - COOKING HINTS
Frying food involves many variables and the following information is a guide only.
1.
Ensure frying medium is clean and free of debris.
2.
When topping up with oil, ensure oil level does not exceed -MIN- line when cold and -MAX- line when hot.
3.
Never overfill baskets with food product.
4.
Filter oil as often as is practically possible. Remember, this can be done whilst oil is below 180°C.
5.
It is advised that a skimmer is used continuously between frying batches to remove any floating debris.
Failure to do this can result in a shorter effective oil life.
6.
During quiet spells, it is recommended that thermostat is turned down to a lower setting. This will conserve
energy in addition to extending expected oil life.
7.
To ensure a good eating experience, fry food as near to serving time as possible.
8.
After serving and when fryer has been turned off, replace lid to ensure that no foreign bodies can contaminate
frying medium.
Page 25
25
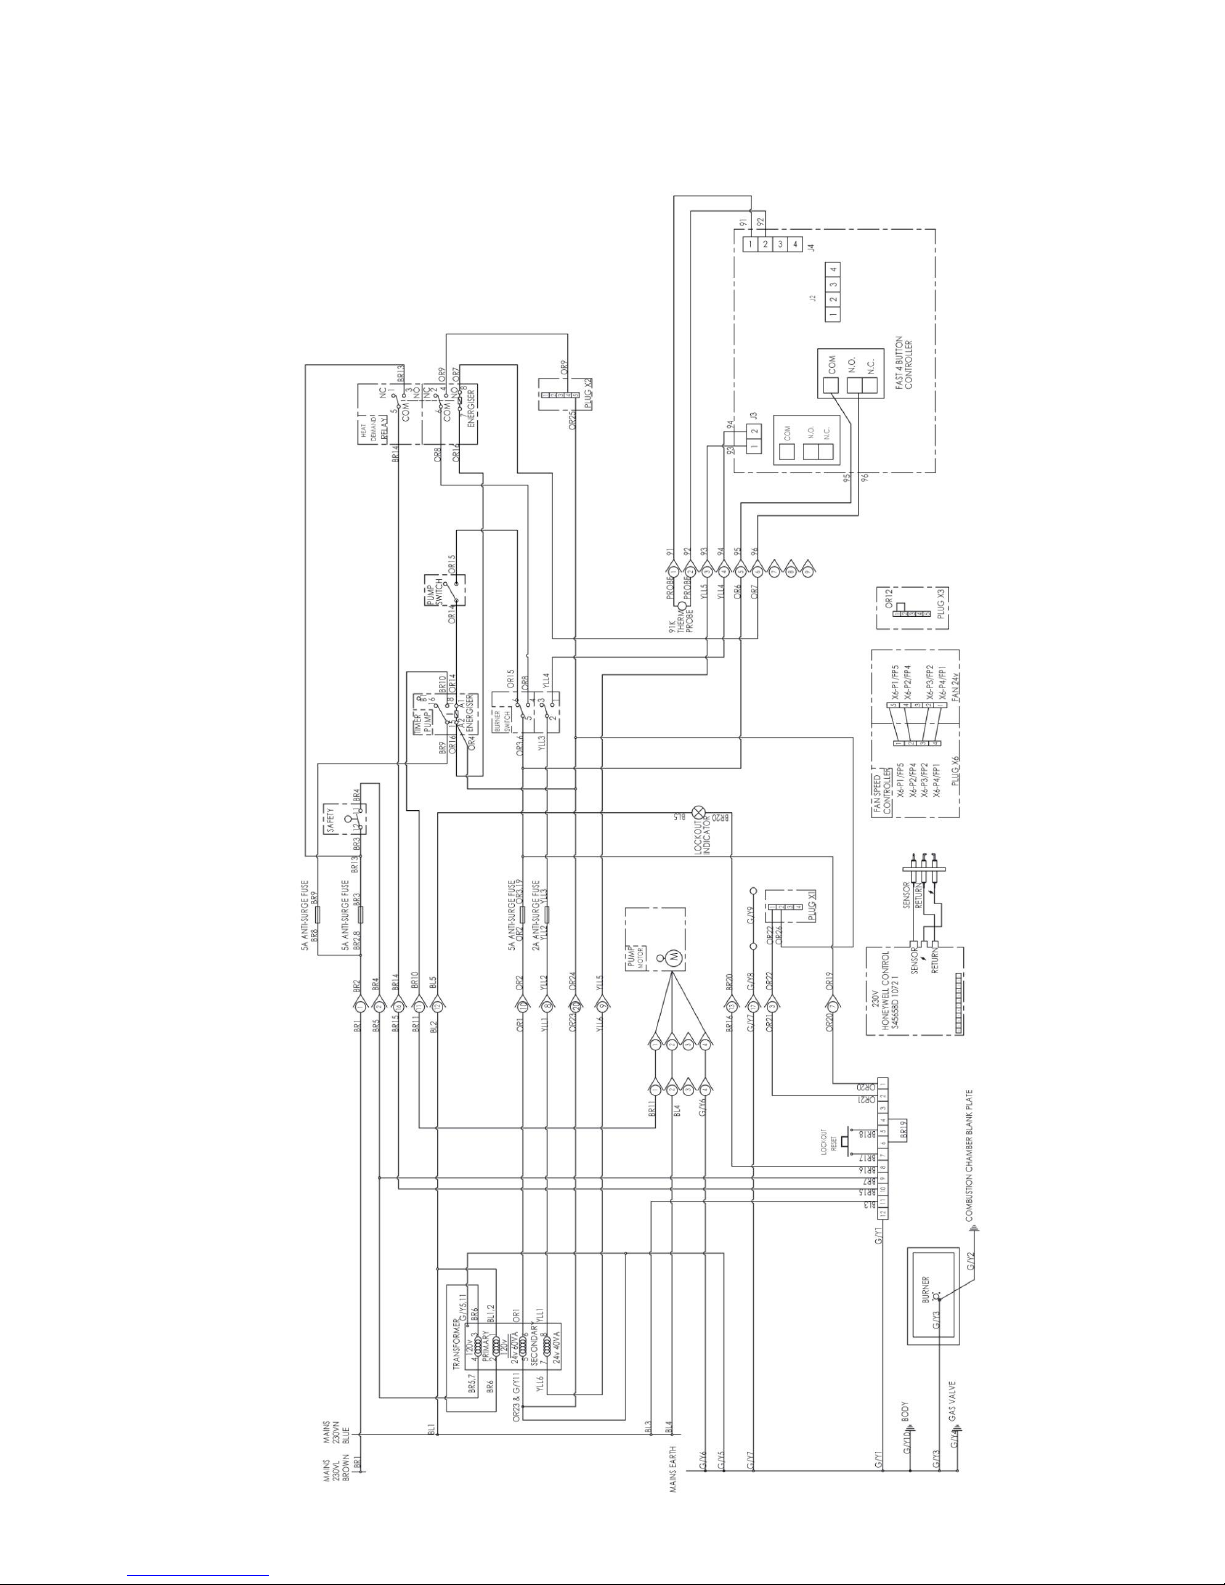
SECTION 11
G2844F CIRCUIT DIAGRAM
Page 26
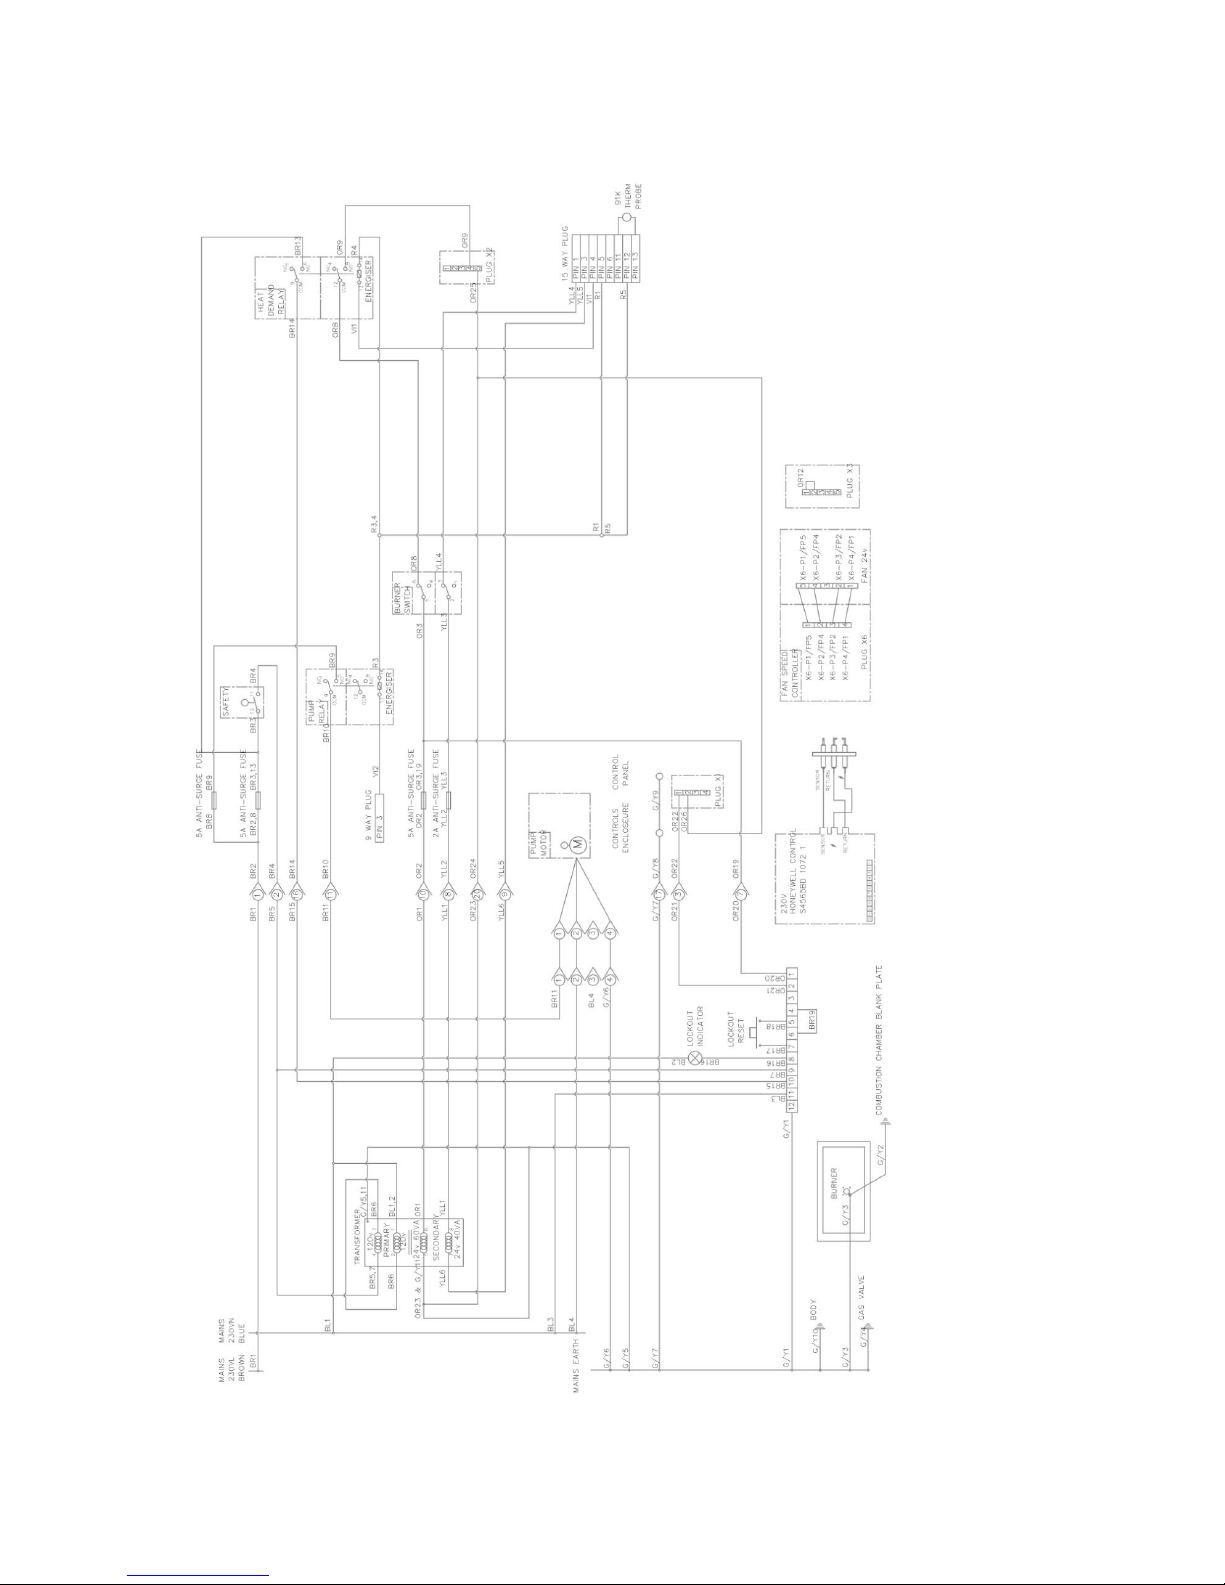
G2845F CIRCUIT DIAGRAM
Page 27
27
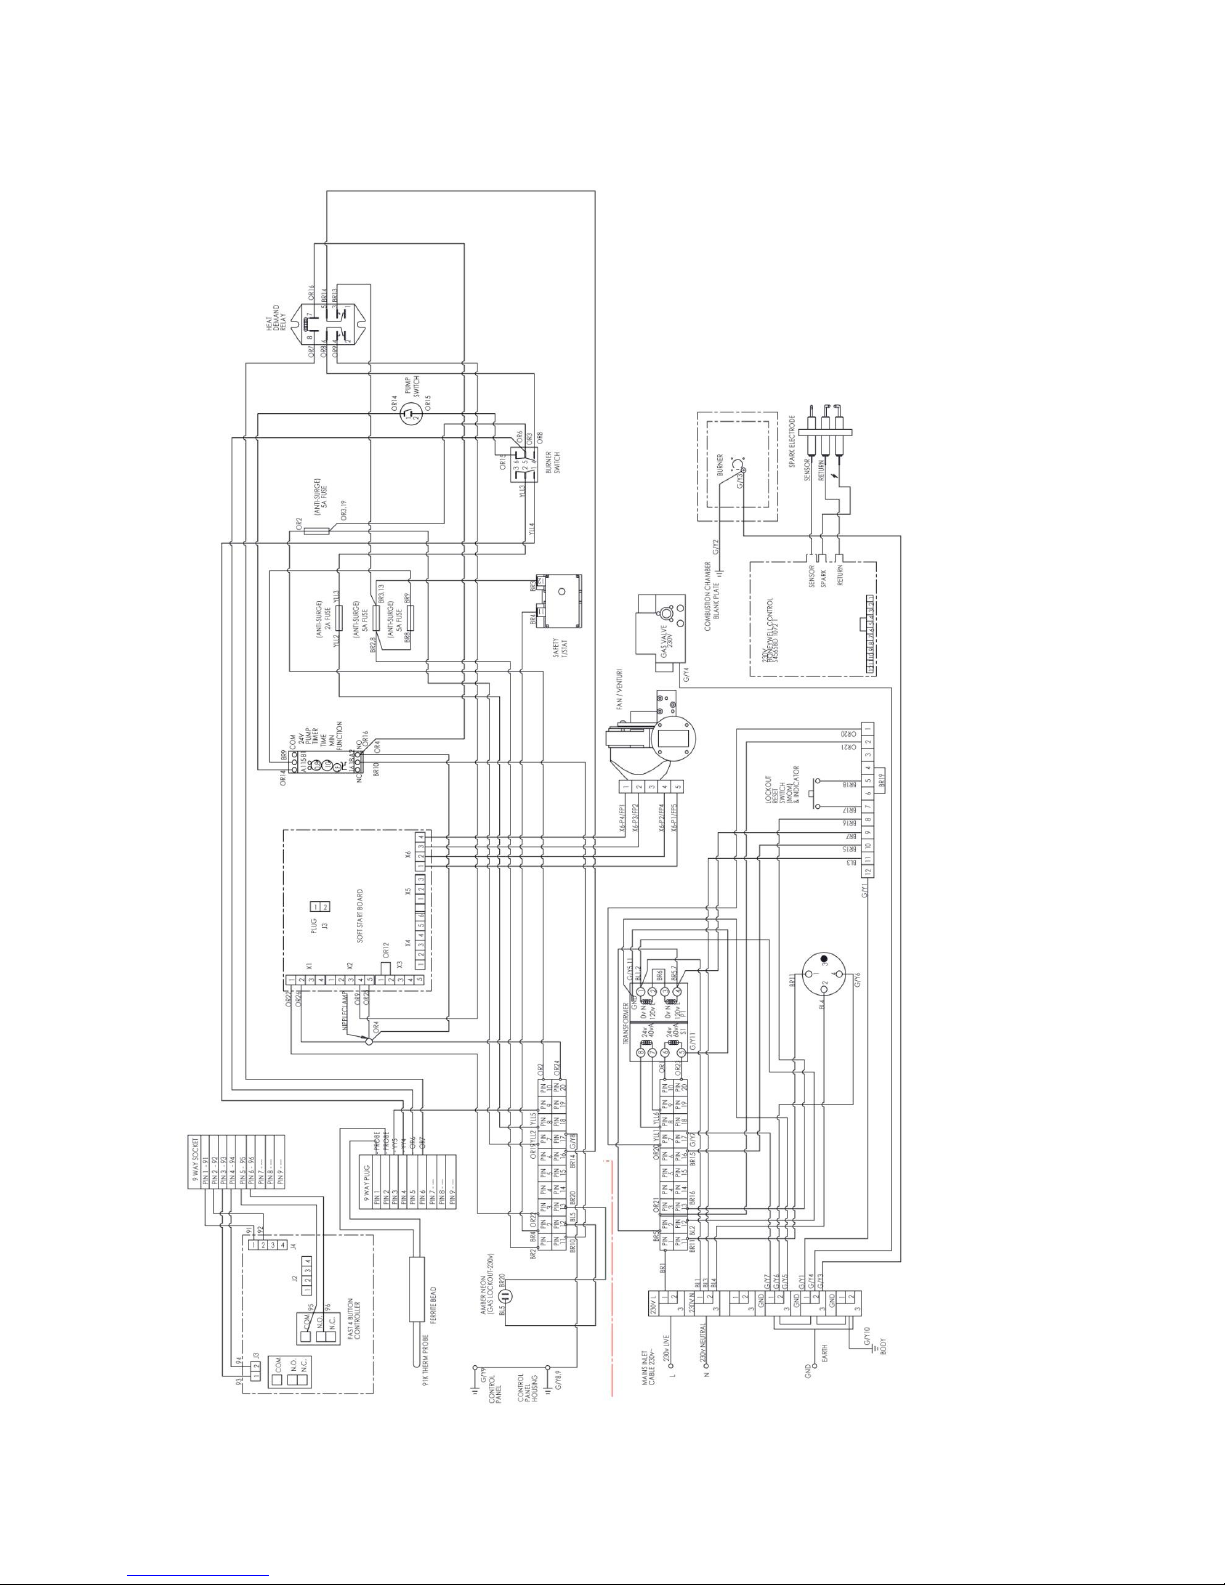
G2844F WIRING DIAGRAM
Page 28
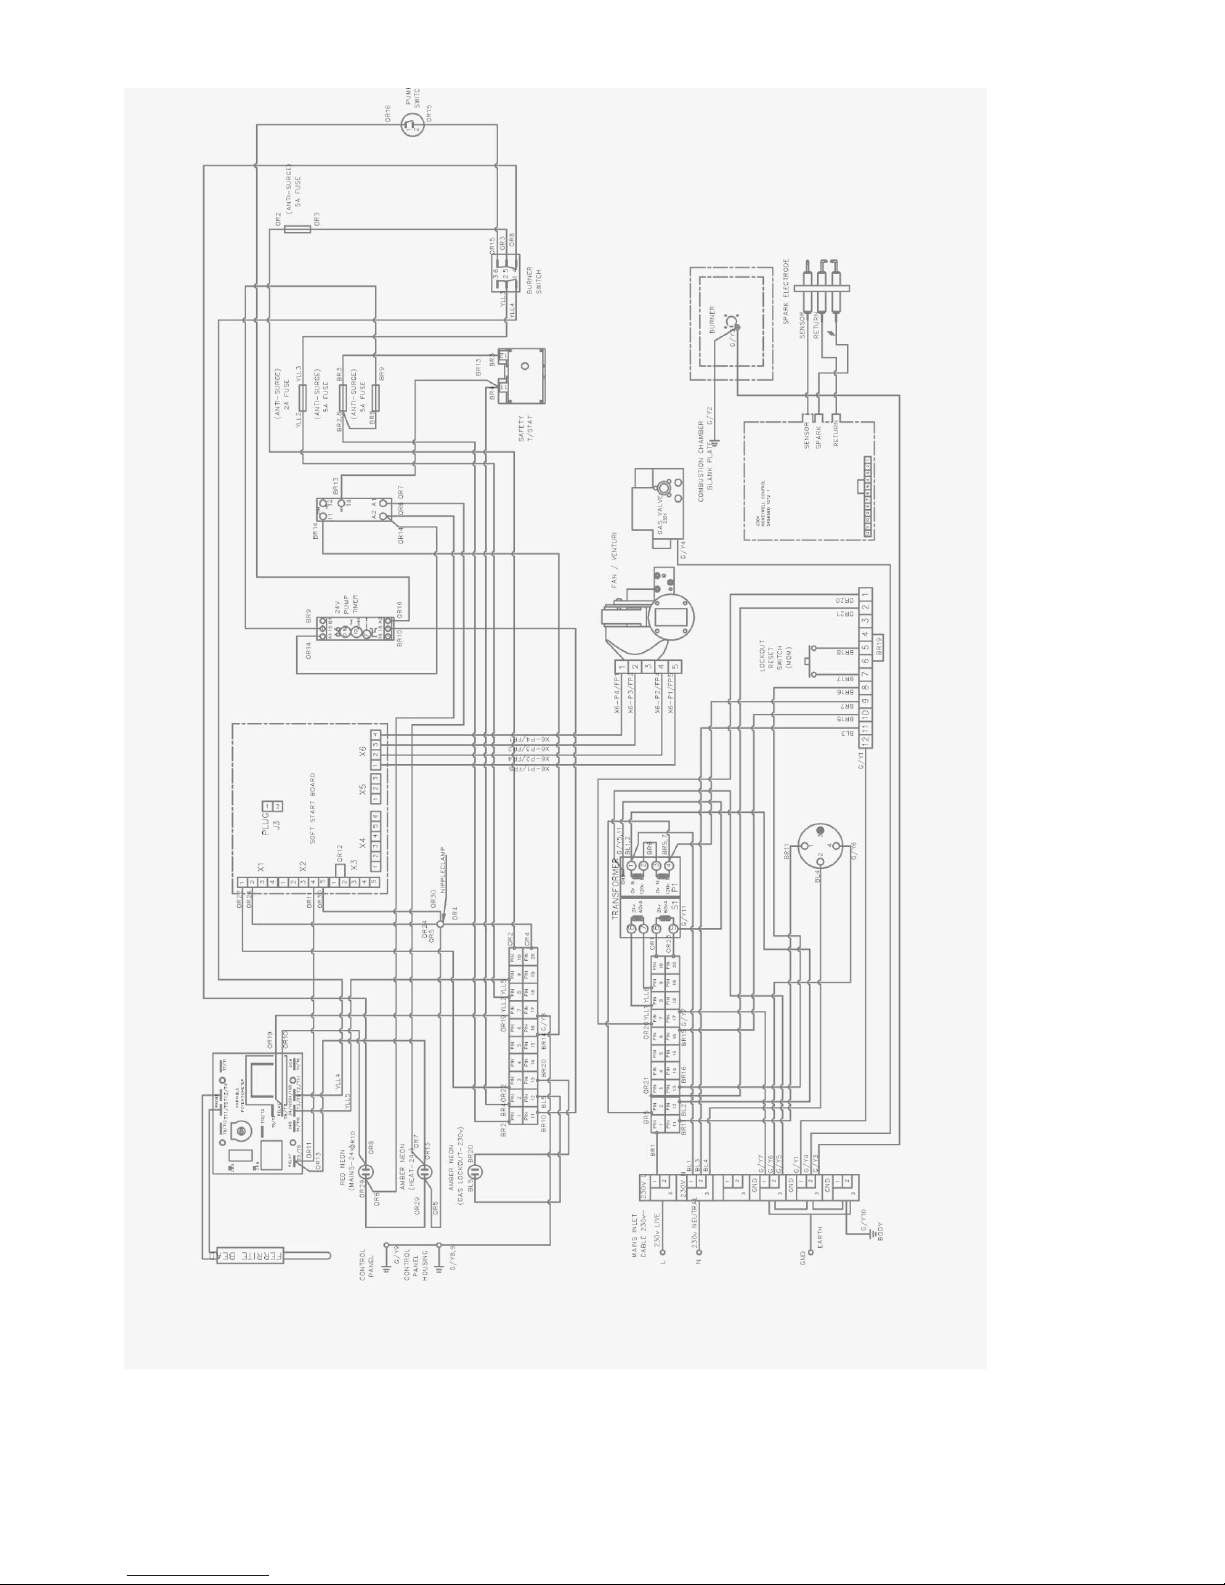
G2845F WIRING DIAGRAM
 Loading...