

Page 1
T100555 Ref.1
G350/1 OPEN TOP RANGE
G350/2 SOLID TOP RANGE
USERS INSTRUCTIONS
SECTION 1 - GENERAL DESCRIPTION
SECTION 2 - LIGHTING and OPERATIONS
SECTION 3 - COOKING HINTS
SECTION 4 - CLEANING and MAINTENANCE
These Appliances have been CE-marked on the basis of compliance with the Gas Appliance Directive
for the Countries, Gas Types and Pressures as stated on the Data Plate.
These Appliances MUST BE installed by a competent person in compliance with the INSTALLATION AND
SERVICING INSTRUCTIONS and National Regulations in force at the time. Particular attention MUST be paid
to the following:
Gas Safety ( Installation & Use) Regulations
Health and Safety at Work Act
Furthermore, if a need arises to convert the Appliance for use with another gas, a competent person must be
consulted. Those parts which have been protected by the manufacturer MUST NOT be adjusted by the User.
Users should be conversant with the appropriate provisions of the Fire Precautions Act and the requirements of
the Gas Safety Regulations. in particular the need for regular servicing by a competent person to ensure the
continued safe and efficient performance of the Appliance.
Upon receipt of the User's Instruction manual, the installer should instruct the responsible person(s) of the
correct operation and maintenance of the Appliance.
This equipment is ONLY FOR PROFE SSIONAL USE, and s hall be operated by QUALIFIED persons. It is the
responsibility of the Supervisor or equivalent to ensure that users wear SUITABLE PROTECTIVE CLOTHING
and to draw attention to the fact that, some parts will, by necessity, become VERY HOT and will cause burns if
touched accidentally.
WEEE Directive Registration No. WEE/DC0059TT/PRO
At end of unit life, dispose of appliance and any replacement parts
in a safe manner, via a licenced waste handler.
Units are designed to be dismantled easily and recycling of all
material is encouraged whenever practicable.
Falcon Foodservice Equipment
HEAD OFFICE AND WORKS
Wallace View, Hillfoots Road, Stirling. FK9 5PY. Scotland.
SERVICELINE CONTACT -
PHONE - 01438 363 000 FAX - 01438 369 900
Page 2
SECTION 1 - GENERAL DESCRIPTION
The 350/1 open-top range and G350/2 solid-top
range are two floor standing ranges in the Falcon
350 series. All individual units comprising the Series
are of modular dimensions, enabling suites of
appliances to be installed in a matching line. Some
units are for "counter" mounting, meaning that they
can be installed either on a table or similar, or
alternatively on purpose-made stands, supplied by
Falcon, which ensure perfect matching of hob- height
when installed with floor-standing appliances such as
the ranges.
The G350/1 is a range with 4 open-top burners each
4.3kW(14,700 Btu/hr) heat rating, controlled by safety
taps.
The oven, fitted two doors, is heated by a
thermostatically controlled burner of 4.75kW
(16,200 Btu/hr), protected by a flame failure device
and equipped with push-button ignition.
The oven has a nominal volume of approximately
0.09m
3
(3.26ft3) and is supplied with two wire
grid shelves. Five shelf positions are provided.
The G350/2 solid top range has an oven identical to
the G350/1 , but has a heavy-duty solid-top. The solid
top consists of the traditional centre ring and side
fillings and is heated by a single burner of 7.7kW
(26,800 Btu/hr) capacity. It is controlled by a
combined on/off tap and flame-failure device, ignition
of the burner being by a manually-lit pilot. The tap has
indented positions for full flame and "simmer".
Open Top Taps
Oven Control
(Thermostat)
Spark Igniter Flame Failure
Button (in Front Button (in Front
Frame behind Frame behind
LH Door) RH Door)
Figure 1 - Open Top Range
Solid Top Control
(Thermostat)
Oven Control
(Thermostat)
Spark Igniter Flame Failure
Button (in Front Button (in Front
Frame behind Frame behind
LH Door) RH Door)
Figure 2 - Solid Top Range
SECTION 2 - LIGHTING and OPERATIONS
2.1 Open Top
All four burners are equally rated and may be used for
fast boiling or simmering. The pan supports, which
are interchangeable, will safely accommodate pans
from 125mm diameter upwards.
The gas taps are of the safety type and include a
flame failure device.
To Light The Burner
Identify appropriate tap by observing the facia panel
marker . Push the tap knobs inwards then turn fully
anti-clockwise to the FULL FLAME setting and hold
the control knob in for approximately 20 seconds
whilst applying a lit match or taper to burner head rim.
The knob can then be turned anti-clockwise to reduce
flame, if desired.
To Turn The Burner OFF
Simply turn knob clockwise as far as it will go
(see Figure 3).
OFF FULL ON SIMMER
(turn anti-clockwise) (turn further
anti-clockwise)
Figure 3
2.2 Solid Top
Warning
If pilot is extinguished intentionally or unintentionally,
no attempt to re-light the gas should be made until at
least 3 minutes have elapsed.
The procedures are as follows -
Lighting The Burner (Refer to Figure 4)
1. Remove solid-top centre ring using special tool
provided.
2. Have a lit taper or match ready in one hand.
3. With other hand, push in control knob and turn it
anti-clockwise until mark on knob is opposite
ignition symbol.
4. Apply light to pilot, still keeping knob pushed in.
5. After about 20 seconds, release knob, pilot should
remain alight. If not, push in control knob and turn
clockwise to OFF position. Wait 3 minutes, then
repeat from step 2.
6. With pilot flame established, replace solid top
centre ring.
7. Push knob in again and turn it anti-clockwise to
FULL FLAME symbol thus lighting burner.
Page 3
Condition TempoC
Min. Heat 120
Moderate 150
Fairly Hot 180
Condition TempoC
Hot 210
Very Hot 240
Max. Heat 270
8. If desired, burner can be turned down to LOW or
SIMMER setting by further depression of knob
and turning it fully anti-clockwise to small flame
symbol.
To Turn The Burner OFF
9. To turn off main burner but leaving pilot lit, push in
knob and turn to ignition symbol.
10. To turn off main burner and pilot, push in knob
and turn to OFF position.
Note
It will be seen from the above detailed instructions
that every turning movement of the knob has to be
preceded by pushing it in.
Ignition
Full Flame
Figure 4
Low Flame
2.3 OVEN
To Light The Oven Burner
Proceed as follows -
1. Open oven doors to gain access to the flame-
failure and igniter buttons (see Figures 1 & 2).
2. Push in and turn thermostat knob anti-clockwise to
maximum setting.
3. Push in flame-failure button and keep pressed in.
4. Push igniter button and burner should light. If it
does not light immediately, repeatedly press and
release igniter button until it does.
5. Keep flame-failure button pressed in for
approximately 15 seconds, then release it. Burner
flame will now increase to maximum and oven
doors can be closed. The thermostat knob can be
turned to desired setting.
To Turn The Oven OFF
Push in and turn thermostat knob fully clockwise to
OFF position.
SECTION 3 - COOKING HINTS
3.1 Solid Top
Getting the best out of this type of heat source is
obviously largely a matter of experience, coupled with
the needs of the particular task in hand.
For certain applications, such a s heating a pot
quickly, it will be found expedient to remove the
centre ring and place the pot directly over the burner.
If on the other hand, it is necessary to heat the entire
surface, the ring must be in place. In the interests of
economy it is recommended that the solid-top should
not be left unattended with the gas on FULL setting.
If it is necessary to keep the top hot for any length of
time, control should be turned down to LOW setting.
Do not at any time leave the gas on whilst centre ring
is removed - such practice simply wastes gas.
The hottest area of the plate is in the centre and
toward the rear, the front and side are cooler.
3.2 Using The Oven
The cooking chart provides a selection of conditions
for cooling selected types of food, and to ensure
satisfactory performance the following instructions
should be observed.
Grid Shelves
Space these at least two runners apart. In the cooking
chart, the runners are numbered downwards. i.e. No.
1 is at the top.
Tray Size
A cake tray up to 400mm x 490mm (15
3
/4"x191/4")
can be used on each shelf. Alternatively, gastronorm
1/1 trays can be used. A single baking tin (e.g. School
meals type) 405mm x 265mm (16" x 10
1
/2") can be
accommodated on each shelf.
Pre-Heat Time
Allow at least 40 minutes from lighting a cold oven
before loading the oven. Put the food in quickly and
close the doors without delay.
Thermostat
The desired oven temperature will be maintained
automatically at the temperature (
o
C) selected.
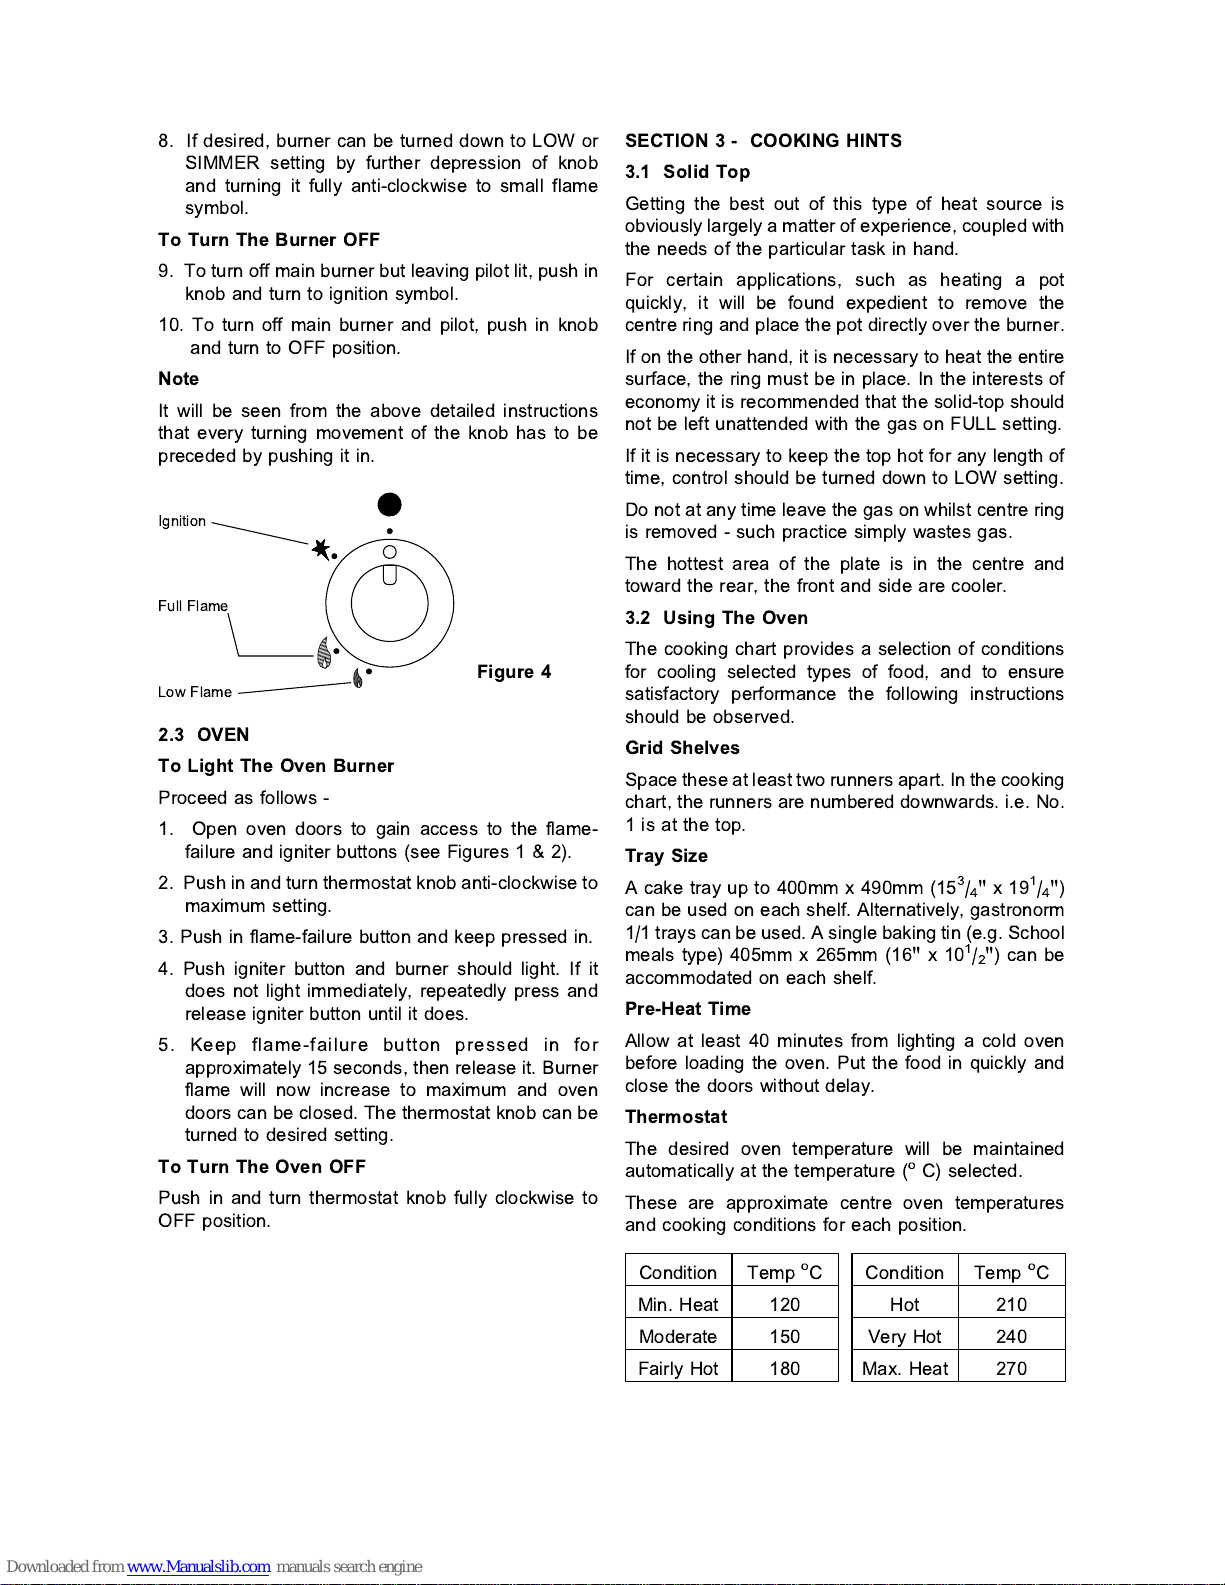
These are approximate centre oven temperatures
and cooking conditions for each position.
Page 4
Meat/Poultry
QUICK ROASTING SLOW ROASTING
Beef
(on the bone)
allow 15 mins per
0.5kg (1 lb)
allow 20 mins per
0.5kg (1 lb)
Beef
(no bones)
allow 20 mins per
0.5kg (1 lb)
allow 30 mins per
0.5kg (1 lb)
Mutton, Lamb
allow 20 mins per
0.5kg (1 lb)
allow 30 mins per
0.5kg (1 lb)
Veal, Pork
allow 25 mins per
0.5kg (1 lb)
allow 35 mins per
0.5kg (1 lb)
Chicken
45 - 90 mins acc. to
size and age
60 to 120 mins acc.
to size and age
Goose, Duck,
Turkey
15 mins per 0.5kg
(1 lb) plus 15 mins
20 mins per 0.5kg
(1 lb) plus 15 mins
MEAT
Thermostat
Setting
o
C
Runner
Position
Time Note
Meat Roast
(Fast)
210 according to weight 1&2
Meat Roast
(Slow)
160 according to weight 1&2
Poultry
(Slow)
160 according to weight 1&2
Braising
145 30 mins per 0.5kg
(1lb) + 30 mins.
Casseroles
120
11/2to 3 hours
PUDDINGS
Thermostat
Setting
o
C
Runner
Position
Time Note
Custard
145 40 to 60 minutes 3&4
Milk
120 45 to 90 minutes 3&4
Yorkshire
Pudding
225 40 to 50 minutes
3&4
PASTRY
Thermostat
Setting
Runner
Position
Time Note
Fruit Pies
210 30 to 40 minutes 3&4
Plate Pies
210 40 to 50 minutes 3&4
Puff and
Rough Puff
225 - 250 10 to 15 minutes
3&4
Sausage
Rolls
225 - 250 20 to 25 minutes
3&4
Scones
250 10 to 15 minutes 3&4
CAKES
Thermostat
Setting
Runner
Position
Time Note
Slab Cake
(Rich)
120 5
Slab Cake
(Plain)
145 5
Queen
Cakes
200 15 to 20 minutes
3&4
Sponge
Sandwich
200 20 to 25 minutes
3&4
Very Rich
Cakes(Xmas)
145 2 to 3 hours 5
Bread Rolls
225 - 250 15 to 25 minutes 5
SUGGESTIONS FOR ROASTING MEAT
1. High Temperature Method (FAST)
Times are for average requirements. The quality and
shape of meat will affect the time required.
2. Low Temperature Method (SLOW)
This requires a longer cooking time but reduces loss
in weight and allows more even cooking. This method
is preferable for less tender joints.
3. Baking on ONE Shelf
When cooking small cakes, scones, etc, in small
quantities, position the grid shelf on runner 2 or 3.
4. Baking onTWO Shel ves (Small cakes etc)
For larger quantities of cakes, scones etc, which
necessitates two shelf cooking. use runners 2 and 4.
Normally the top tray will have to be removed from the
oven first, the lower tray being moved up to the
vacated position.
5. Milk Puddings, etc.
Milk puddings, including Yorkshire can also be
cooked on two shelves. Both can normally be taken
out of the oven at the same time if interchanged half
way through.
6. Baking Large Cakes - Fruit Cakes in Large Tins
These can be cooked on two shelves. It is advisable
to interchange the upper and lower tins halfway
through the estimated cooking times, thus enabling
both to be cooked in about the same time, and
lessening the chances of over or undercooking.
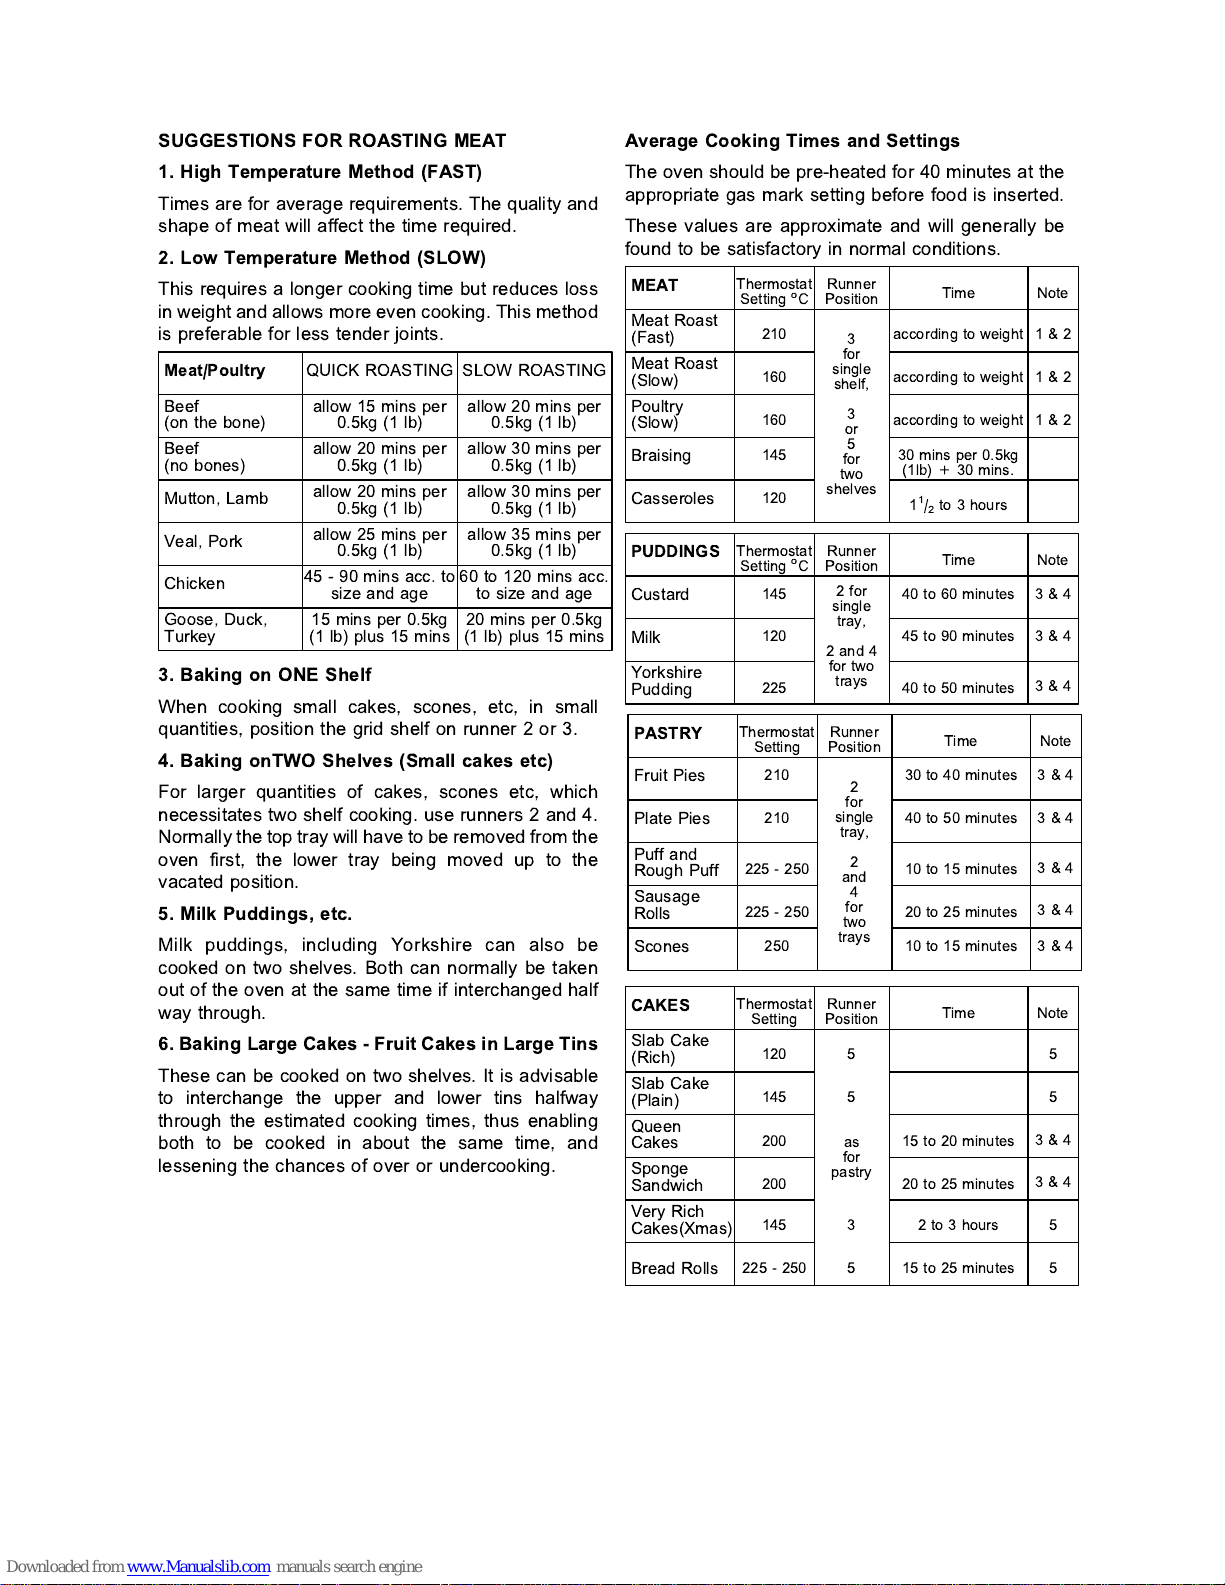
Average Cooking Times and Settings
The oven should be pre-heated for 40 minutes at the
appropriate gas mark setting before food is inserted.
These values are approximate and will generally be
found to be satisfactory in normal conditions.
3
for
single
shelf,
3
or
5
for
two
shelves
2 for
single
tray,
2 and 4
for two
trays
2
for
single
tray,
2
and
4
for
two
trays
5
3
5
5
as
for
pastry
Page 5
SECTION 4 - CLEANING and MAINTENANCE
Before cleaning, allow unit to cool sufficiently.
Clean with warm soapy water at the finish of each
working day, using nylon pads for stubborn deposits.
After cleaning, rinse with clean water and dry.
DO NOT use proprietary cleaners, especially those
which may have a high caustic content, on the
vitreous enamelled surfaces of this unit.
Before removing any parts for cleaning, take note
how they are located to assist in fitting them in later.
Solid Top
It is recommended that after cleaning solid top, the
castings should be lightly smeared with cooking oil.
Oven
Clean whilst oven is warm (not hot).
The enamelled base plate lifts out and the grid
shelves and side shelf-runners can be removed.
The grid shelves are removed by tilting them upward
until the shelf tops are passed, then pulled forward
until the second shelf stop is reached. Tilt shelf
upward over stop and pull it clear of oven.
The wire shelf runners can be removed by lifting
upwards until the lower ends are clear, then
downwards.
Pan Supports
Clean with warm soapy water. Abrasives such as fine
steel wool, proprietary cleaning pads or nylon pan
scrubbers, should be used with care and only in
cases of extreme overspill. Dry off the pan supports
by hand. NEVER LEAVE TO DRY NATURALLY.
After drying, apply a light film of vegetable oil. This will
prevent oxidisation.
Door Catch
1. Occasional lubrication will extend catch working
life. To do this, press roller and pass high melting
point lubrication behind roller.
2. Adjustment to ensure positive door closure can be
provided by pressing and turning roller left to
slacken or right to tighten.
 Loading...