

Page 1
T100565 Ref. 7
G2625, G2925, G21225
G21525 and G21825 CHARGRILLS
G2625B, G2925B, G21225B
G21525B and G21825B CHARGRILLS
USERS INSTRUCTIONS
SECTION 1 - GENERAL DESCRIPTION
SECTION 2 - LIGHTING and OPERATIONS
SECTION 3 - COOKING HINTS
SECTION 4 - CLEANING and MAINTENANCE
These appliances have been CE-marked on the basis of compliance with the Gas Appliance Directive, for the
Countries, Gas Types and Pressures as stated on the Data Plate.
These appliances MUST BE installed by a qualified person in compliance with the INSTALLATION AND
SERVICING INSTRUCTIONS and National Regulations in force at the time. Particular attention MUST be paid
to the following:
Gas Safety (Installation & Use) Regulations
Health and Safety at Work Act
Furthermore, if a need arises to convert the appliance for use with another gas, a qualified person must be
consulted. Those parts which have been protected by the manufacturer MUST NOT be adjusted by the User.
Users should be conversant with the appropriate provisions of the Fire Precautions Act and the requirements of
the Gas Safety Regulations. In particular, the need for regular servicing by a competent person to ensure the
continued safe and efficient performance of the Appliance.
WARNING - TO PREVENT SHOCKS, ALL APPLIANCES WHETHER
GAS OR ELECTRIC, MUST BE EARTHED
Upon receipt of the User's Instruction manual, the installer should instruct the responsible person(s) of the
correct operation and maintenance of the Appliance.
This equipment is ONLY FOR PROFESSIONAL USE, and shall be operated by QUALIFIED persons. It is the
responsibility of the Supervisor or equivalent to ensure that users wear SUITABLE PROTECTIVE CLOTHING
and to draw attention to the fact that, some parts will, by necessity, become VERY HOT and will cause burns if
touched accidentally.
WEEE Directive Registration No. WEE/DC0059TT/PRO
At end of unit life, dispose of appliance and any replacement parts
in a safe manner, via a licenced waste handler.
Units are designed to be dismantled easily and recycling of all
material is encouraged whenever practicable.
Falcon Foodservice Equipment
HEAD OFFICE AND WORKS
Wallace View, Hillfoots Road, Stirling FK9 5PY
SERVICELINE CONTACT -
PHONE - 01438 363 000 FAX - 01438 369 900
Page 2
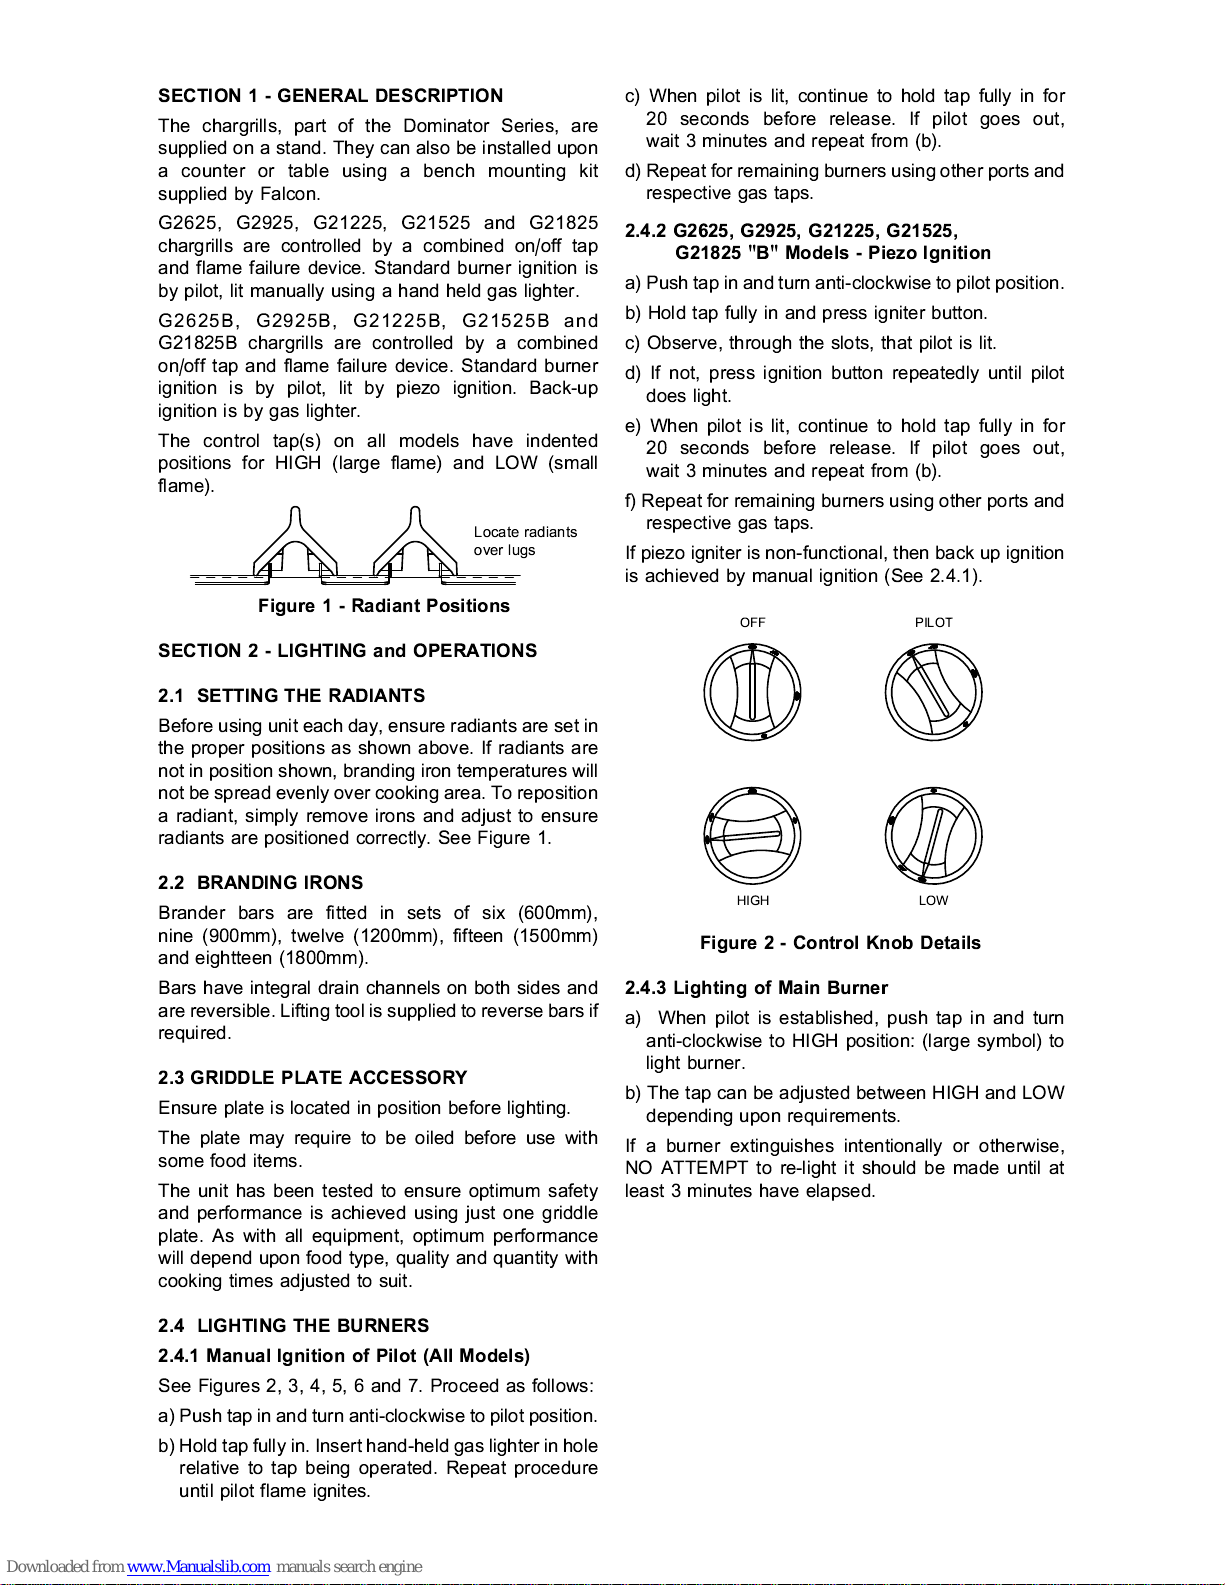
Locate radiants
over lugs
OFF
PILOT
HIGH LOW
SECTION 1 - GENERAL DESCRIPTION
The chargrills, part of the Dominator Series, are
supplied on a stand. They can also be installed upon
a counter or table using a bench mounting kit
supplied by Falcon.
G2625, G2925, G21225, G21525 and G21825
chargrills are controlled by a combined on/off tap
and flame failure device. Standard burner ignition is
by pilot, lit manually using a hand held gas lighter.
G2625B, G2925B, G21225B, G21525B and
G21825B chargrills are controlled by a combined
on/off tap and flame failure device. Standard burner
ignition is by pilot, lit by piezo ignition. Back-up
ignition is by gas lighter.
The control tap(s) on all models have indented
positions for HIGH (large flame) and LOW (small
flame).
Figure 1 - Radiant Positions
SECTION 2 - LIGHTING and OPERATIONS
2.1 SETTING THE RADIANTS
Before using unit each day, ensure radiants are set in
the proper positions as shown above. If radiants are
not in position shown, branding iron temperatures will
not be spread evenly over cooking area. To reposition
a radiant, simply remove irons and adjust to ensure
radiants are positioned correctly. See Figure 1.
2.2 BRANDING IRONS
Brander bars are fitted in sets of six (600m m),
nine (900mm), twelve (1200mm), fifteen (1500mm)
and eightteen (1800mm).
Bars have integral drain channels on both sides and
are reversible. Lifting tool is supplied to reverse bars if
required.
2.3 GRIDDLE PLATE ACCESSORY
Ensure plate is located in position before lighting.
The plate may require to be oiled before use with
some food items.
The unit has been tested to ensure optimum safety
and performance is achieved using just one griddle
plate. As with all equipment, optimum performance
will depend upon food type, quality and quantity with
cooking times adjusted to suit.
2.4 LIGHTING THE BURNERS
2.4.1 Manual Ignition of Pilot (All Models)
See Figures 2, 3, 4, 5, 6 and 7. Proceed as follows:
a) Push tap in and turn anti-clockwise to pilot position.
b) Hold tap fully in. Insert hand-held gas lighter in hole
relative to tap being operated. Repeat procedure
until pilot flame ignites.
c) When pilot is lit, continue to hold tap fully in for
20 seconds before release. If pilot goes out,
wait 3 minutes and repeat from (b).
d) Repeat for remaining burners using other ports and
respective gas taps.
2.4.2 G2625, G2925, G21225, G21525,
G21825 "B" Models - Piezo Ignition
a) Push tap in and turn anti-clockwise to pilot position.
b) Hold tap fully in and press igniter button.
c) Observe, through the slots, that pilot is lit.
d) If not, press ignition button repeatedly until pilot
does light.
e) When pilot is lit, continue to hold tap fully in for
20 seconds before release. If pilot goes out,
wait 3 minutes and repeat from (b).
f) Repeat for remaining burners using other ports and
respective gas taps.
If piezo igniter is non-functional, then back up ignition
is achieved by manual ignition (See 2.4.1).
Figure 2 - Control Knob Details
2.4.3 Lighting of Main Burner
a) When pilot is established, push tap in and turn
anti-clockwise to HIGH position: (large symbol) to
light burner.
b) The tap can be adjusted between HIGH and LOW
depending upon requirements.
If a burner extinguishes intentionally or otherwise,
NO ATTEMPT to re-light it should be made until at
least 3 minutes have elapsed.
Page 3
2.5 TURNING THE BURNER OFF
Refer to Figure 2. Proceed as follows -
For Short Periods
To turn off burner leaving pilot lit, push in knob and
turn it clockwise to pilot position.
For Long Periods e.g. Overnight
To turn off burner and pilot, push in knob and turn
clockwise to OFF position.
Note
Every turn of the tap has to be preceded by control
being pushed in.
Safety Precautions
A stopcock must be fitted in pipe which supplies gas
to appliance. The user must be familiar with the
location and operation of this to enable gas to be
turned OFF in an emergency.
Page 4
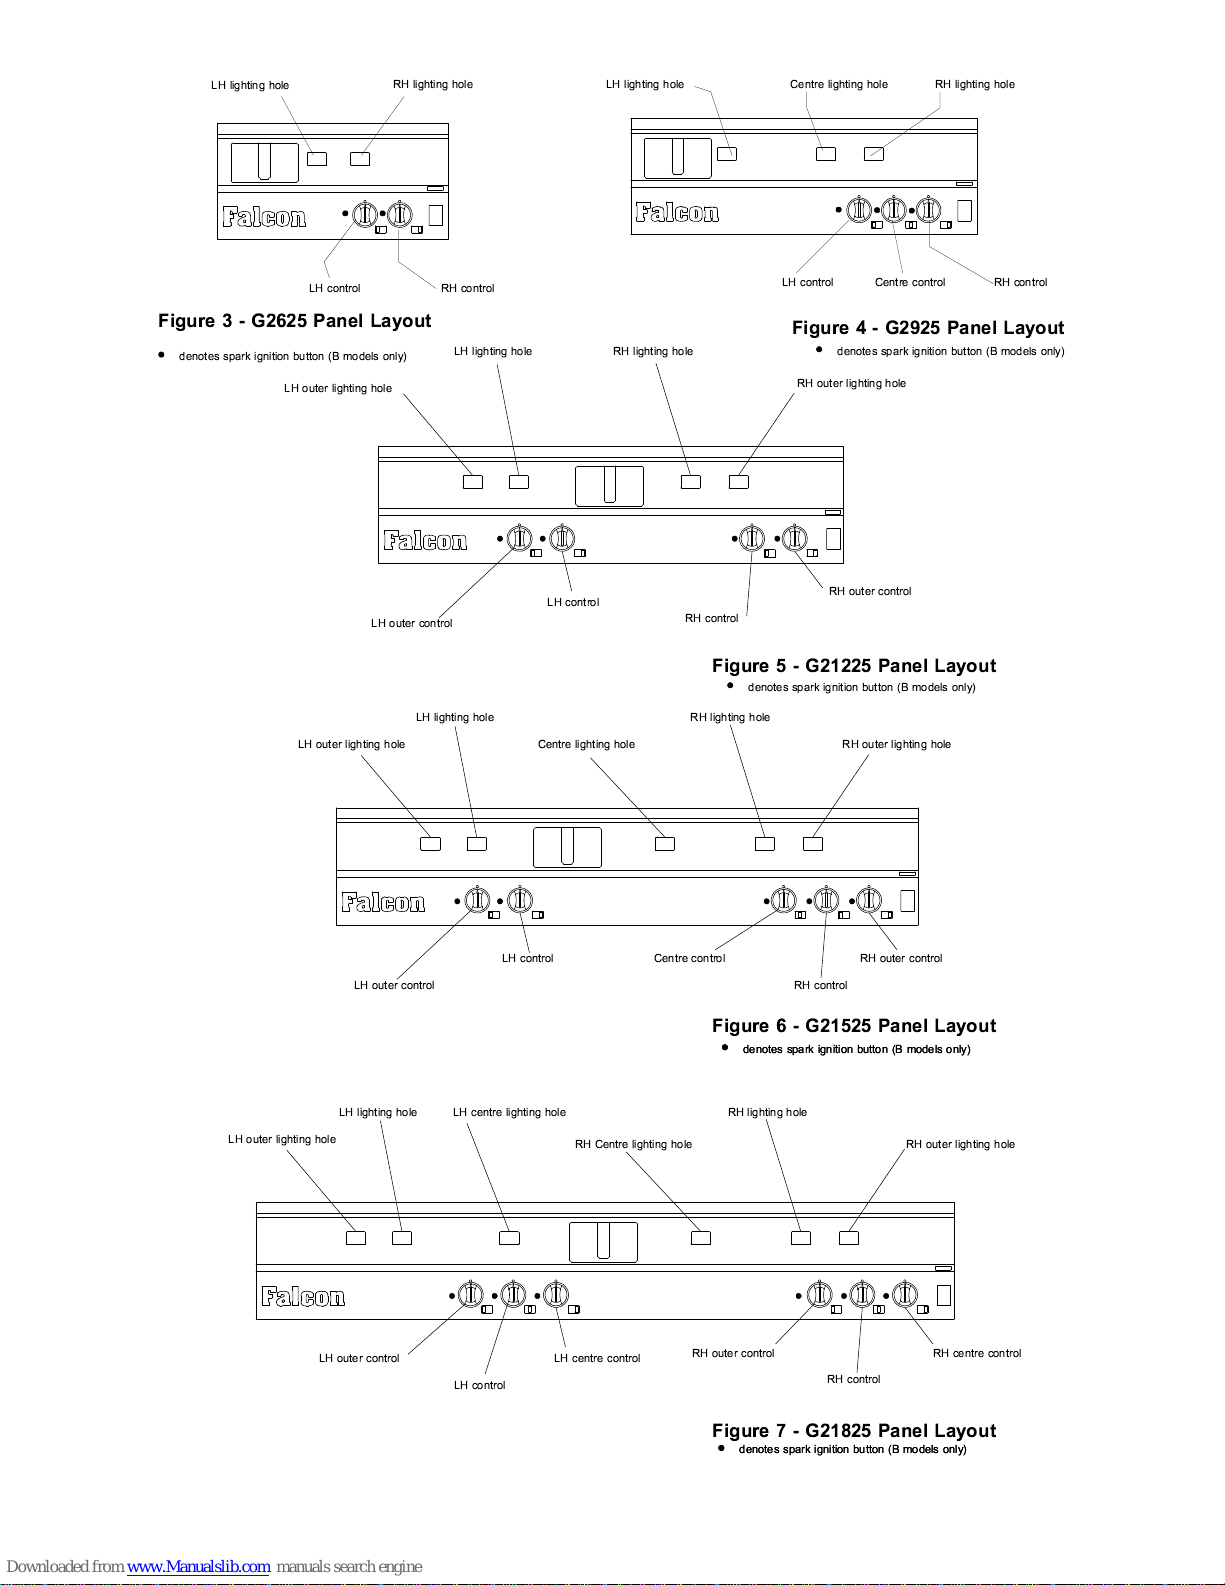
LH lighting hole RH lighting holeCentre lighting hole
LH control RH controlCentre control
LH lighting hole
RH lighting hole
LH control RH control
denotes spark ignition button (B models only)denotes spark ignition button (B models only)
LH lighting hole
LH outer lighting hole
RH lighting hole
RH outer lighting hole
LH outer control
LH control
RH control
RH outer control
LH lighting hole
Centre lighting holeLH outer lighting hole
RH lighting hole
RH outer lighting hole
LH outer control
LH control Centre control
RH control
RH outer control
LH lighting hole LH centre lighting hole
RH Centre lighting hole
LH outer lighting hole
RH lighting hole
RH outer lighting hole
LH outer control
RH outer control
LH centre control
RH centre control
LH control
RH control
denotes spark ignition button (B models only)
denotes spark ignition button (B models only)
denotes spark ignition button (B models only)denotes spark ignition button (B models only)
denotes spark ignition button (B models only)
Figure 3 - G2625 Panel Layout
Figure 4 - G2925 Panel Layout
Figure 5 - G21225 Panel Layout
Figure 6 - G21525 Panel Layout
Figure 7 - G21825 Panel Layout
Page 5
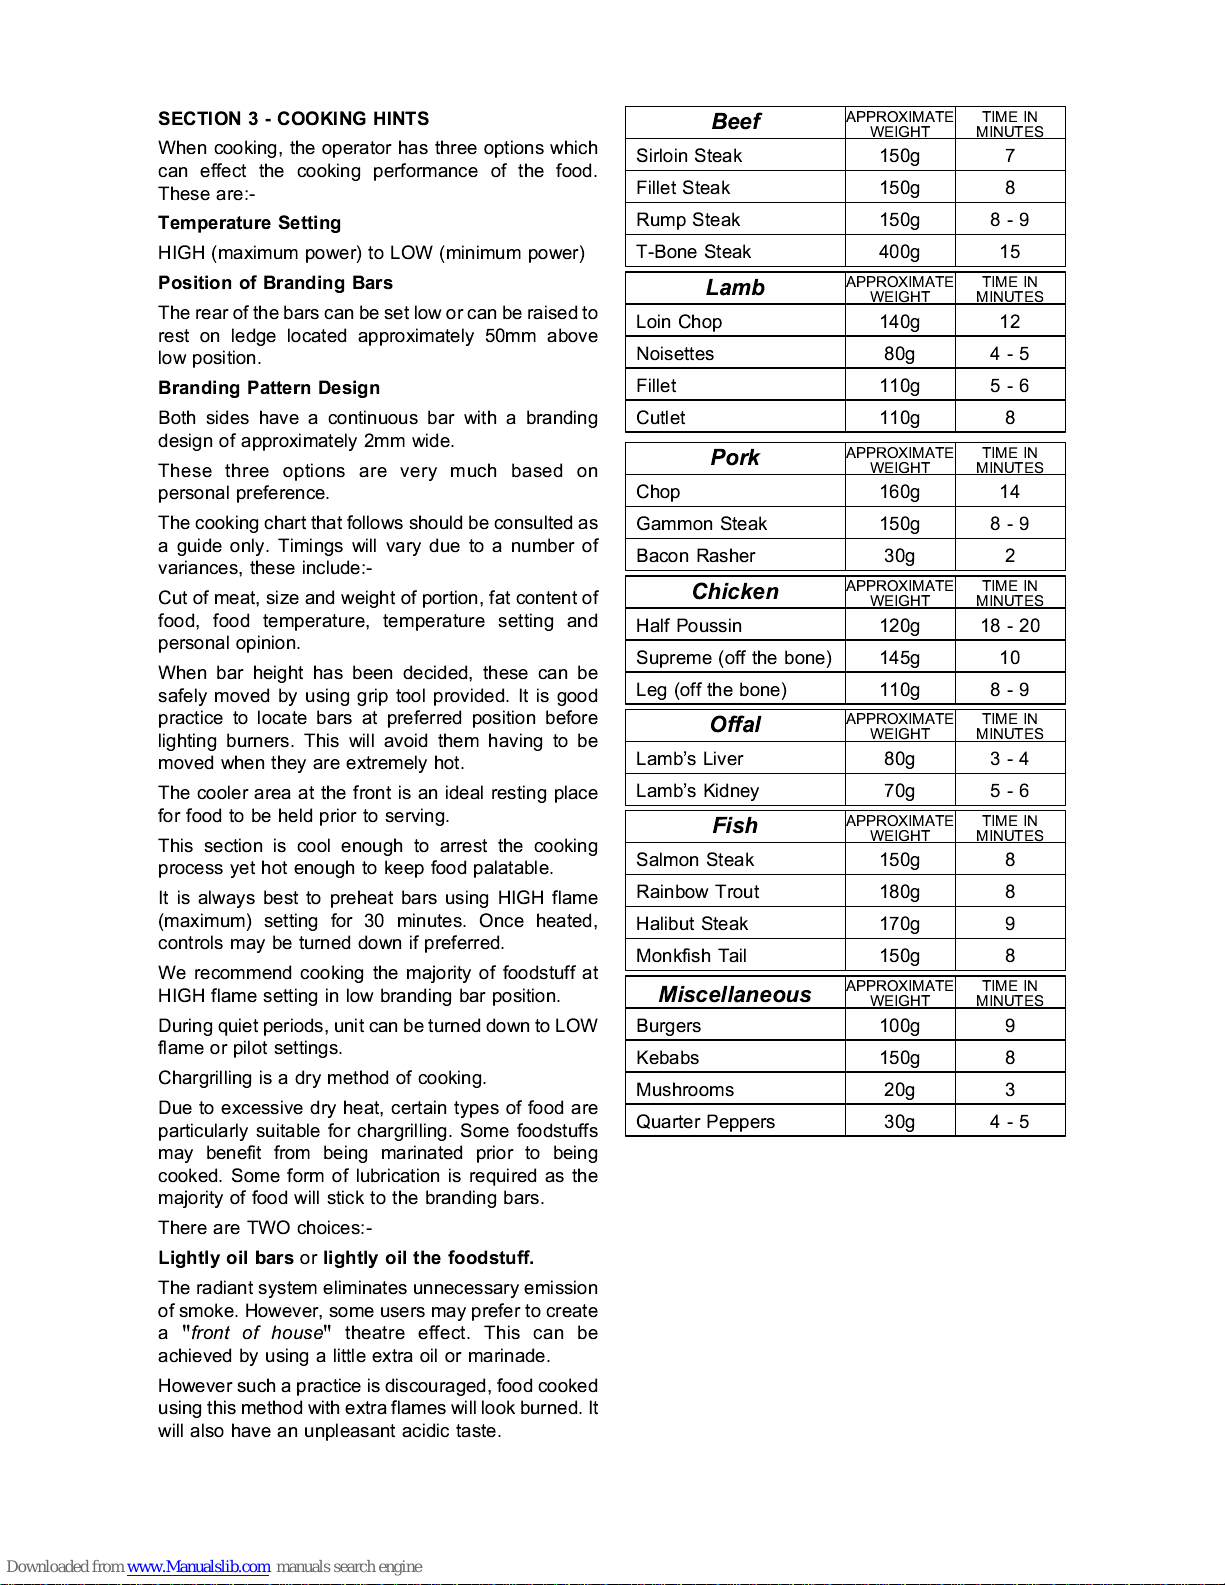
Beef
APPROXIMATE
WEIGHT
TIME IN
MINUTES
Sirloin Steak 150g 7
Fillet Steak 150g 8
Rump Steak 150g 8-9
T-Bone Steak 400g 15
Lamb
APPROXIMATE
WEIGHT
TIME IN
MINUTES
Loin Chop 140g 12
Noisettes 80g 4-5
Fillet 110g 5-6
Cutlet 110g 8
Pork
APPROXIMATE
WEIGHT
TIME IN
MINUTES
Chop 160g 14
Gammon Steak 150g 8-9
Bacon Rasher 30g 2
Chicken
APPROXIMATE
WEIGHT
TIME IN
MINUTES
Half Poussin 120g 18 - 20
Supreme (off the bone) 145g 10
Leg (off the bone) 110g 8-9
Offal
APPROXIMATE
WEIGHT
TIME IN
MINUTES
Lamb's Liver 80g 3-4
Lamb's Kidney 70g 5-6
Fish
APPROXIMATE
WEIGHT
TIME IN
MINUTES
Salmon Steak 150g 8
Rainbow Trout 180g 8
Halibut Steak 170g 9
Monkfish Tail 150g 8
Miscellaneous
APPROXIMATE
WEIGHT
TIME IN
MINUTES
Burgers 100g 9
Kebabs 150g 8
Mushrooms 20g 3
Quarter Peppers 30g 4-5
SECTION 3 - COOKING HINTS
When cooking, the operator has three options which
can effect the cooking performance of the food.
These are:-
Temperature Setting
HIGH (maximum power) to LOW (minimum power)
Position of Branding Bars
The rear of the bars can be set low or can be raised to
rest on ledge located approximately 50mm above
low position.
Branding Pattern Design
Both sides have a continuous bar with a branding
design of approximately 2mm wide.
These three options are very much based on
personal preference.
The cooking chart that follows should be consulted as
a guide only. Timings will vary due to a number of
variances, these include:-
Cut of meat, size and weight of portion, fat content of
food, food temperature, temperature setting and
personal opinion.
When bar height has been decided, these can be
safely moved by using grip tool provided. It is good
practice to locate bars at preferred position before
lighting burners. This will avoid them having to be
moved when they are extremely hot.
The cooler area at the front is an ideal resting place
for food to be held prior to serving.
This section is cool enough to arrest the cooking
process yet hot enough to keep food palatable.
It is always best to preheat bars using HIGH flame
(maximum) setting for 30 minutes. Once heated,
controls may be turned down if preferred.
We recommend cooking the majority of foodstuff at
HIGH flame setting in low branding bar position.
During quiet periods, unit can be turned down to LOW
flame or pilot settings.
Chargrilling is a dry method of cooking.
Due to excessive dry heat, certain types of food are
particularly suitable for chargrilling. Some foodstuffs
may benefit from being marinated prior to being
cooked. Some form of lubrication is required as the
majority of food will stick to the branding bars.
There are TWO choices:-
Lightly oil barsorlightly oil the foodstuff.
The radiant system eliminates unnecessary emission
of smoke. However, some users may prefer to create
a
"front of house"
theatre effect. This can be
achieved by using a little extra oil or marinade.
However such a practice is discouraged, food cooked
using this method with extra flames will look burned. It
will also have an unpleasant acidic taste.
Page 6
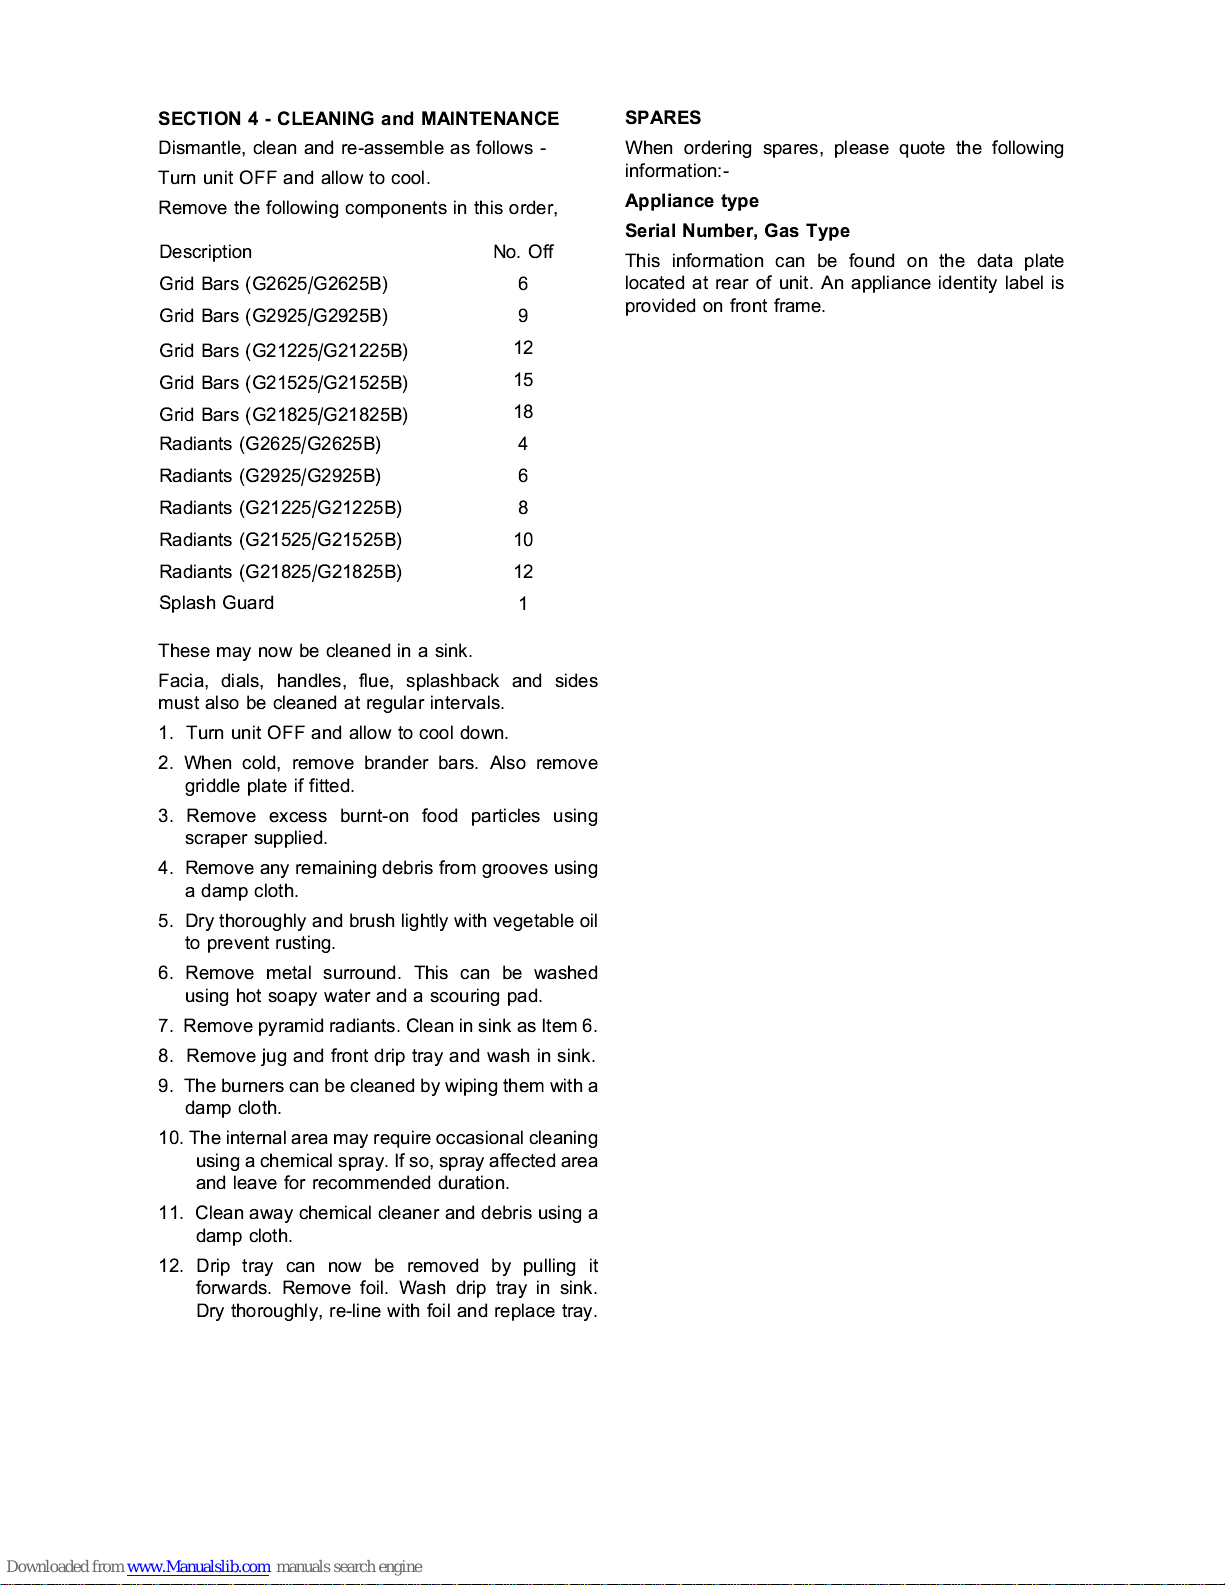
Description No. Off
Grid Bars (G2625/G2625B) 6
Grid Bars (G2925/G2925B) 9
Grid Bars (G21225/G21225B)
12
Grid Bars (G21525/G21525B)
15
Grid Bars (G21825/G21825B)
18
Radiants (G2625/G2625B) 4
Radiants (G2925/G2925B) 6
Radiants (G21225/G21225B) 8
Radiants (G21525/G21525B) 10
Radiants (G21825/G21825B) 12
Splash Guard
1
SECTION 4 - CLEANING and MAINTENANCE
Dismantle, clean and re-assemble as follows -
Turn unit OFF and allow to cool.
Remove the following components in this order,
These may now be cleaned in a sink.
Facia, dials, handles, flue, splashback and sides
must also be cleaned at regular intervals.
1. Turn unit OFF and allow to cool down.
2. When cold, remove brander bars. Also remove
griddle plate if fitted.
3. Remove excess burnt-on food particles using
scraper supplied.
4. Remove any remaining debris from grooves using
a damp cloth.
5. Dry thoroughly and brush lightly with vegetable oil
to prevent rusting.
6. Remove metal surround. This can be washed
using hot soapy water and a scouring pad.
7. Remove pyramid radiants. Clean in sink as Item 6.
8. Remove jug and front drip tray and wash in sink.
9. The burners can be cleaned by wiping them with a
damp cloth.
10. The internal area may require occasional cleaning
using a chemical spray. If so, spray affected area
and leave for recommended duration.
11. Clean away chemical cleaner and debris using a
damp cloth.
12. Drip tray can now be removed by pulling it
forwards. Remove foil. Wash drip tray in sink.
Dry thoroughly, re-line with foil and replace tray.
SPARES
When ordering spares, please quote the following
information:-
Appliance type
Serial Number, Gas Type
This information can be found on the data plate
located at rear of unit. An appliance identity label is
provided on front frame.
 Loading...