

Page 1

E7202S CONVECTION OVEN
USERS INSTRUCTIONS
CAUTION: Read the instructions before
using the appliance.
SECTION 1 - GENERAL DESCRIPTION
SECTION 2 - CONTROLS and OPERATION
SECTION 3 - CLEANING and MAINTENANCE
SECTION 4 - COOKING HINTS
The appliance has been CE-marked on the basis of compliance with the Low Voltage and
EMC Directives for the voltages stated on the Data Plate.
IMPORTANT
This appliance must only be installed by a competent person in compliance with the
regulations in force at the time.
UK regulations are listed on the front of the Installation and Service Manual.
Regular servicing by a qualified person is recommended to ensure the continued safe and
efficient performance of the appliance.
WARNING - THIS APPLIANCE MUST BE EARTHED!
Upon receipt of this manual, the installer should instruct a responsible person (or persons)
as to the correct operation and maintenance of the unit.
This equipment is designed FOR PROFESSIONAL USE ONLY and be operated by
QUALIFIED persons. It is the responsibility of the supervisor or equivalent to ensure that the
user wears SUITABLE PROTECTIVE CLOTHING. Attention should also be drawn to the fact
that some parts of the appliance will, by necessity, become VERY HOT and could cause
burns if touched accidentally.
WEEE Directive Registration No. WEE/DC0059TT/PRO
At end of unit life, dispose of appliance and any replacement parts in a safe
manner, via a licenced waste handler.
Units are designed to be dismantled easily and recycling of all material is
encouraged whenever practicable.
Falcon Foodservice Equipment
HEAD OFFICE AND WORKS
Wallace View, Hillfoots Road, Stirling. FK9 5P Y. Scotland.
SERVICELINE CONTACT
Phone: 01438 363 000 Fax: 01438 369 900
T100677 Ref. 4
Page 2
SECTION 1 - GENERAL DESCRIPTION
The E7202 ovens have a stainless steel interior. The fan pulls air from oven chamber
through a centre hole and passes it over heating elements that surround the fan. This blows
back into the chamber at top and bottom of rear panel.
A smell may be noticeable when the oven is used for the first time. This will disappear after a
few hours.
SECTION 2 - CONTROLS and OPERATION
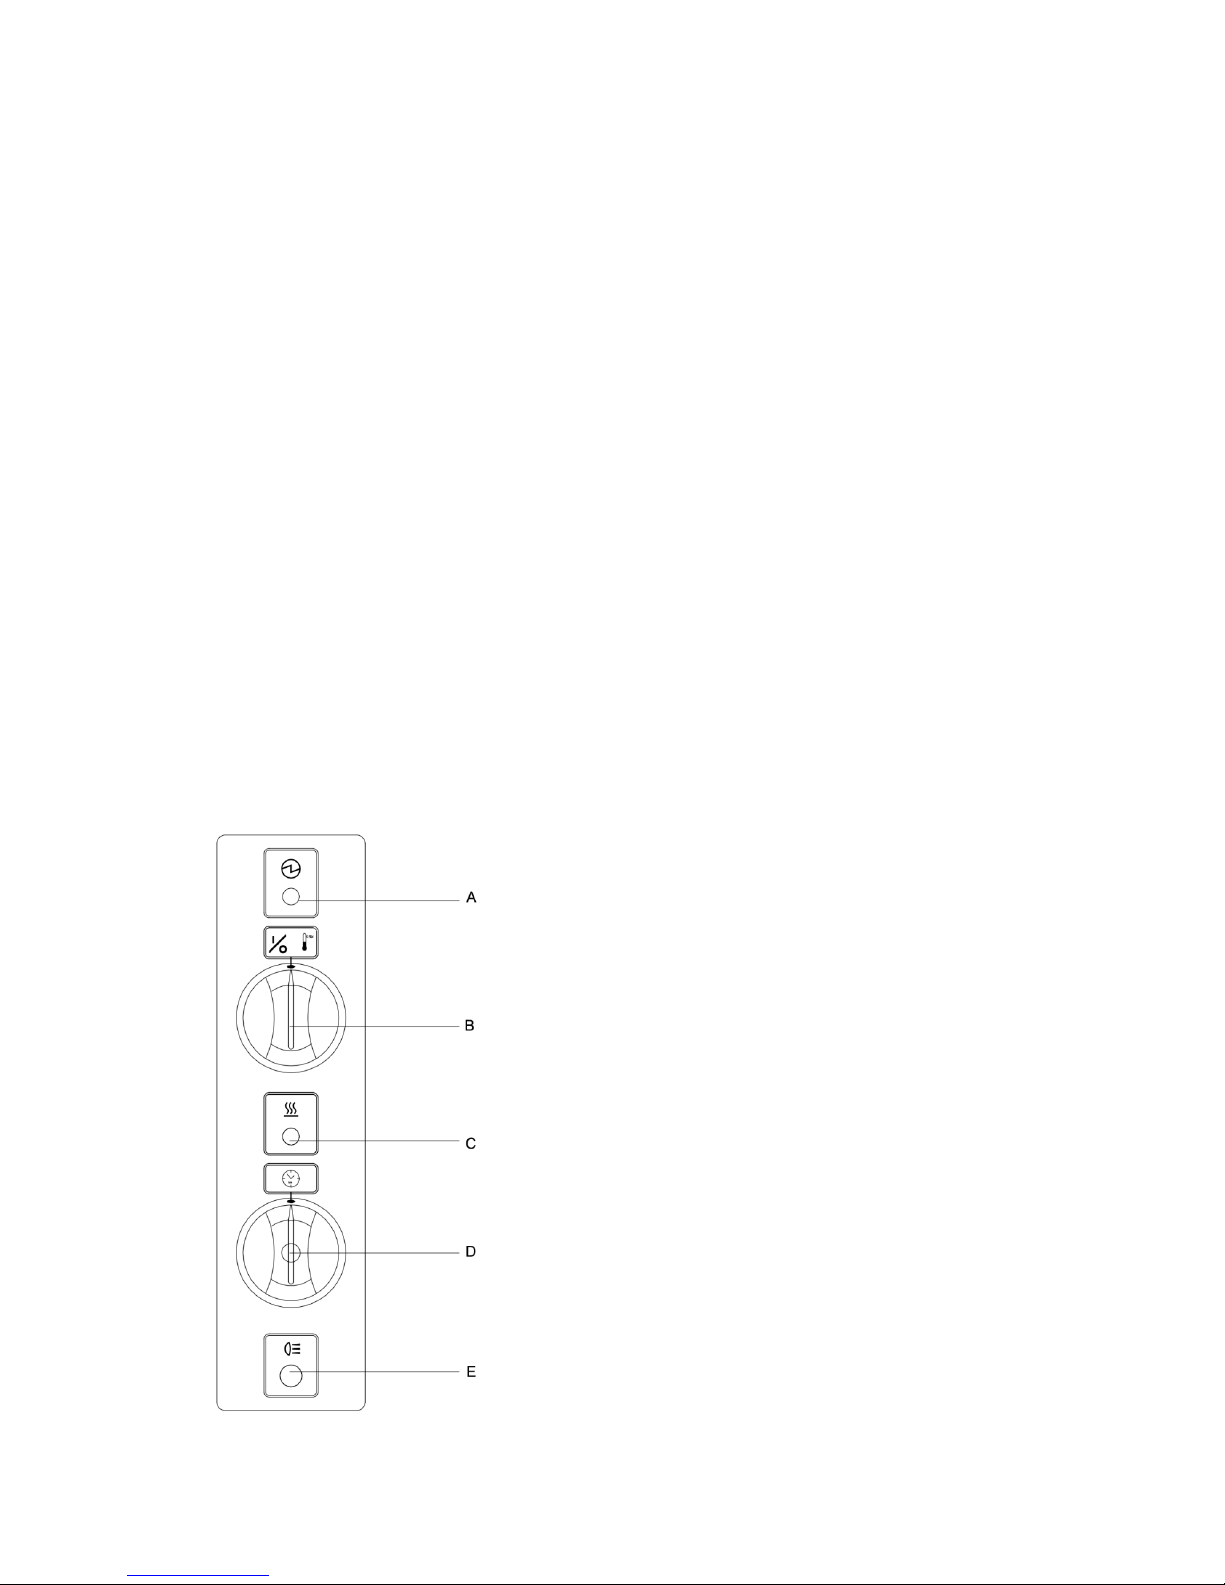
CONTROLS (Refer to Figure 1)
A. Power On Indicator
This lamp will glow when oven is connected to electrical power supply.
B. Temperature Control/Fan Switch
This control allows an oven temperature to be set between 50Žo• and 270Žo•C. It will also
switch fan on and off.
C. Heat Indicator
This lamp will glow while oven is heating up to set temperature.
D. Timer
This is a countdown clock with up to 120 minutes (2 hours) operation.
E. Oven Light Switch
Oven lamp will light when button is pressed.
Figure 1
Page 3

SECTION 3 – OPERATION
3.1 CONNECT TO POWER
Ensure oven is connected to electrical power supply. The power indicator lamp (A) should
glow.
3.2 SWITCHING ON
Turn temperature control knob (B) clockwise to desired temperature setting. Oven fan will
rotate and heat indicator lamp (C) will glow to signal that heat is required. The light will go
out when correct oven temperature has been reached.
3.3 SWITCHING OFF
Turn temperature control knob (B) fully anti-clockwise to 0 position when oven is not in use.
The fan should stop.
3.4 LOADING
When oven has reached selected temperature, the heat indicator light (C) will go out. Oven
is now ready to be loaded. Note- heat will continue to go on and off to ensure a steady
temperature. Heat indicator light will therefore switch ON and OFF after initial heat up period.
Load oven quickly to minimise heat loss. The temperature and amount of food loaded will
affect oven temperature. The heat will therefore come on as soon as oven has been loaded.
Overloading oven will affect cooking performance.
3.5 SHELVES
The shelves are designed so that they cannot be accidentally removed from the rail.
To remove a shelf, pull forward to stop position, then tilt it upward.
When inserting a shelf, ensure that rail stop is at rear, pointing downward.
Six runner positions are available. Top position is intended for use when a joint is hung from
shelf. A roasting tin should be placed on base to catch meat juices.
3.6 TIMER
3.6.1 Buzzer (Cook Mode Only)
Timer knob is marked in minutes. To operate, turn knob fully clockwise then back to required
setting. This is a countdown clock. When timer reaches zero, buzzer will sound and heating
elements will switch off.
3.6.3 Switching The Timer Off
Turn timer knob to 'MAN' when above operations are not required. This will switch main
temperature control back on.
3.7 High Temperature Limit Device
This ensures that oven does not overheat. If device trips, it may be reset by pushing button
detailed in Figure 2.
If problem persists, it will be necessary for a service engineer to investigate and rectify the
cause.
Reset button
Page 4

SECTION 4 - CLEANING and MAINTENANCE
Warning
NEVER ALLOW WATER OR STEAM TO COME INTO CONTACT WITH THE FAN OR
ELECTRICS DURING CLEANING.
WHEN CLEANING THE OVEN INTERIOR, BE CAREFUL NOT TO DISTURB THE
TEMPERATURE CONTROL SENSORS WHICH ARE LOCATED ON THE RH WALL.
Oven Exterior
To remove greasy finger marks, wipe with warm soapy water. Rinse with a cloth dampened
in clean water and dry thoroughly.
On occasion, the stainless steel may be polished using a proprietry brand of stainless steel
cleaner.
Oven Interior
The oven interior consists entirely of stainless steel.
The following steps should be taken during cleaning.
1. Allow oven to cool.
2. Remove shelves and both shelf supports. Soak these in a sink filled with soapy water.
3. Clean oven chamber.
4. Use a scouring pad to scrub components being soaked in sink. Rinse parts thoroughly
after scrubbing.
5. Replace shelf supports and shelves within oven cavity.
Hint
A tray lined with foil, positioned upon oven floor will protect base by catching drips and
debris.
Remove any staining using a mild sponge scourer moistened with hot soapy water.
Stubborn stains can be cleaned with a proprietry oven spray and observing manufacturer
recommendations for use.
Page 5

SECTION 5 - COOKING GUIDE
The following times and temperatures are provided as a guide. These will vary with the
quantity and quality of the food being prepared.
Food Product
Shelf Position
Shelf Quantity
Temp (°C)
Time (mins)
Sultana Scones
(¾”)
2, 4, 6
12
200
10½
Vol-au-Vent
Cases ( Medium)
2, 4, 6
12
210
15
Jacket potatoes
(8oz)
2, 4. 6
12
250
60
Plain Scones
(½”)
2, 4, 6
12
200
9
Bread Rolls (2oz)
2, 4, 6
6
210
10
Bread Loves
(500g tin)
3, 6 3 200
35
Yorkshire
Puddings (3 x 12)
2, 4, 6
12
230
28
Quiche Bases
(blind)
2, 4, 6
4
170
18
Quiche Loraine
(6” dia)
2, 4, 6
4
165
27
 Loading...