

Page 1
E711 CONVECTION OVEN
USER INSTRUCTIONS
SECTION 1 - GENERAL DESCRIPTION
SECTION 2 - CONTROLS and OPERATION
SECTION 3 - OPERATING HINTS
SECTION 4 - CLEANING and MAINTENANCE
This appliance has been CE-marked on the basis of compliance with the Low Voltage and EMC
directives for the voltages stated on the data plate.
IMPORTANT
This appliance must only be installed by a competent person in compliance with the regulations
in force at the time.
UK regulations are listed on the front of the Installation and Service Manual.
Regular servicing by a qualified person is recommended to ensure the continued safe and efficient
performance of the appliance.
WARNING - THIS APPLIANCE MUST BE EARTHED!
Upon receipt of this manual, the installer should instruct a responsible person (or persons) as to the
correct operation and maintenance of the unit.
This equipment is designed FOR PROFESSIONAL USE ONLY and be operated by QUALIFIED
persons. It is the responsibility of the supervisor or equivalent to ensure that the user wears SUITABLE
PROTECTIVE CLOTHING. Attention should also be drawn to the fact that some parts of the appliance
will, by necessity, become VERY HOT and could cause burns if touched accidentally.
WEEE Directive Registration No. WEE/DC0059TT/PRO
At end of unit life, dispose of appliance and any replacement
parts in a safe manner, via a licenced waste handler.
Units are designed to be dismantled easily and recycling of all
material is encouraged whenever practicable.
Falcon Foodservice Equipment
HEAD OFFICE AND WORKS
Wallace View, Hillfoots Road, Stirling. FK9 5PY. Scotland.
SERVICELINE CONTACT
Phone: 01438 363 000 Fax: 01438 369 900
T100741 Ref.1
Page 2
SECTION 1 - GENERAL DESCRIPTION
The oven interior is enamelled. The fan pulls air from
oven chamber through a centre hole to pass over heating
elements that surround fan. This blows back into
chamber at top and bottom of rear panel.
A smell may be noticeable when oven is used for the first
time. This will disappear after a few hours.
SECTION 2 - CONTROLS and OPERATION
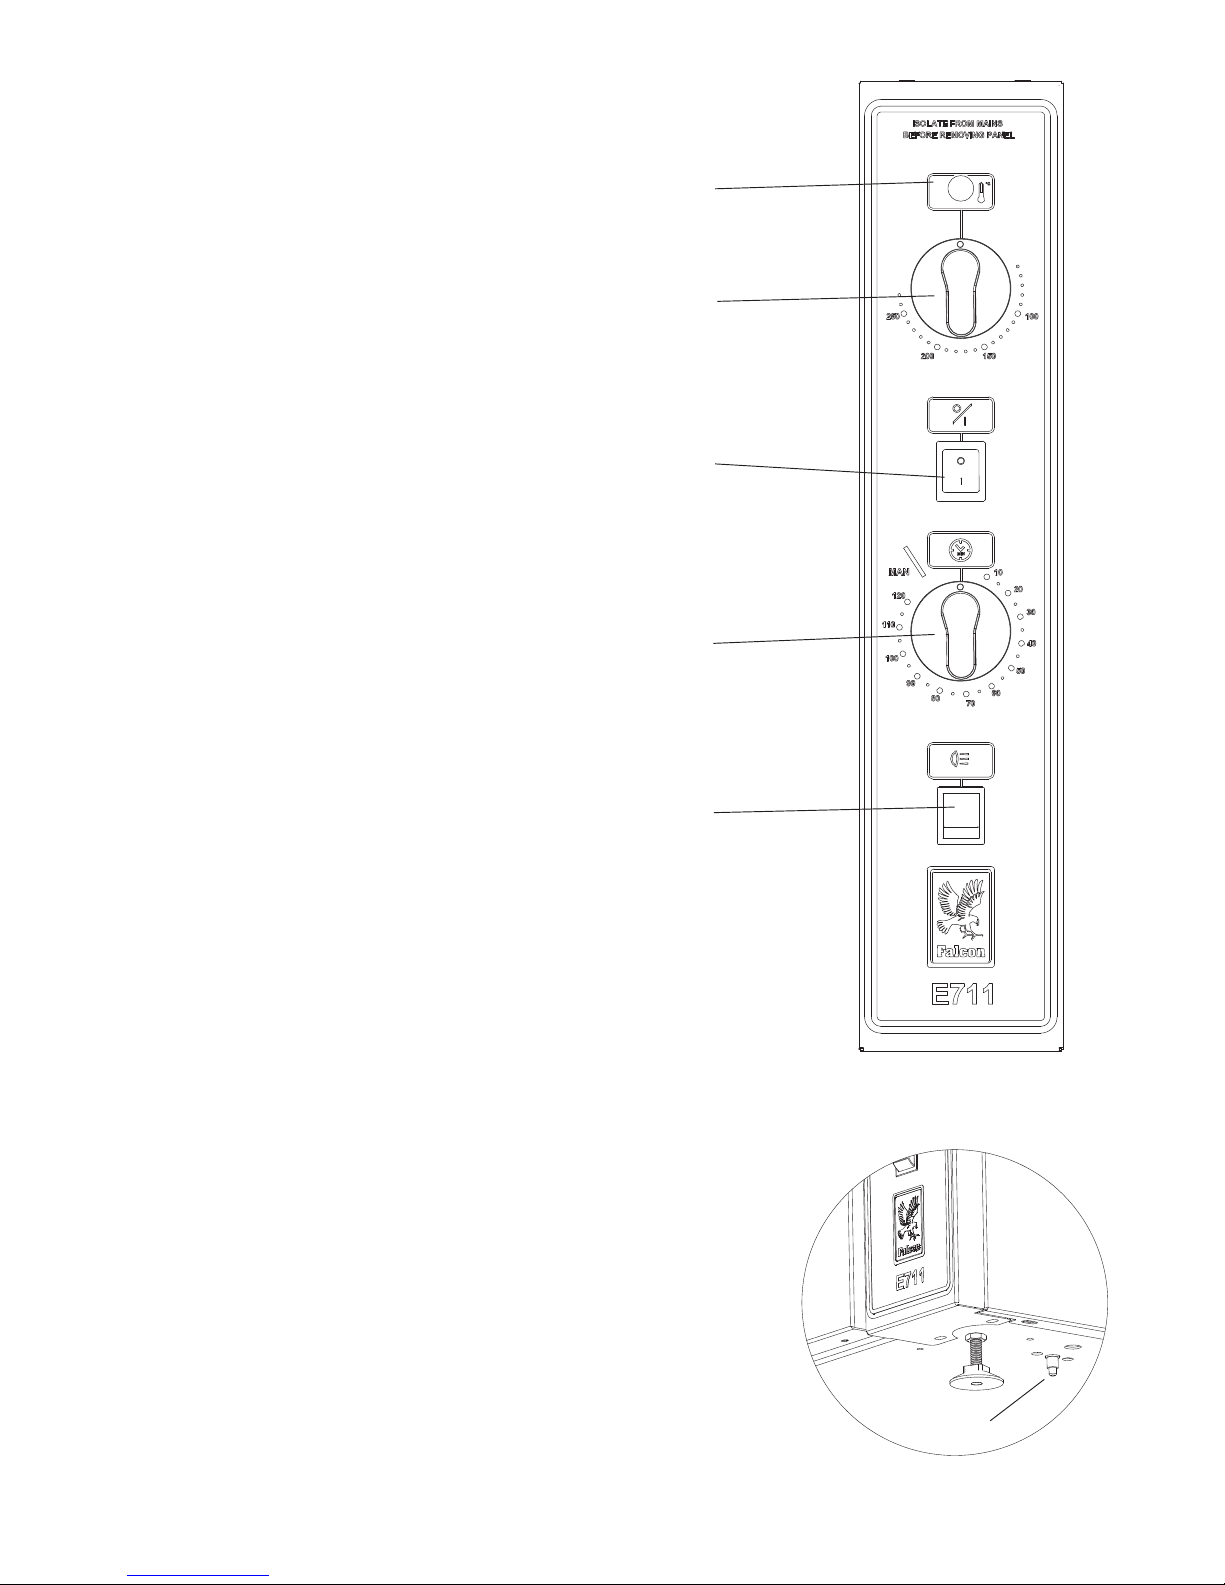
CONTROLS (Refer to Figure 1)
A. Heat On Indicator Neon
This lamp will glow when oven is heating to set
temperature.
B. Temperature Control/Fan Switch
This control allows an oven temperature to be set
between 50° and 270°C.
C. On/Off Switch
Turns power to the unit on and off.
D. Timer
This is a countdown clock with up to 120 minutes
(2 hours) operation or manual operation.
E. Oven Light Switch
Oven lamp will light when button is pressed down.
F. Limit Device Reset Button
150mm behind control panel on base panel.
SECTION 3 - OPERATION
3.1 CONNECT TO POWER
Ensure oven is connected to electrical power supply.
3.2 SWITCHING ON
Press on/off switch (C) down to turn oven fan on.
Turn timer knob (D) to desired setting, anti-clockwise for
manual setting or turn clockwise to required timed
setting.
Turn temperature control knob (B) and heat indicator
lamp (A) will glow to signal that heat is required. This will
go out when set oven temperature has been reached.
3.3 SWITCHING OFF
Turn temperature control knob (B) fully anti-clockwise to
0 position when oven is not in use. Turn off switch (C).
A
B
C
D
E
Figure 1
F
Figure 2
Page 3

3.4 LOADING
When oven has reached selected temperature, heat
indicator neon (A) will go out. This signals that the oven
is now ready to be loaded.
Note - the elements will continue to go on and off to
ensure a steady temperature. Heat indicator neon will
therefore switch ON and OFF after initial heat up period.
Load oven quickly to minimise heat loss.
The temperature and amount of food loaded will affect
the setting and heat will be supplied when oven has been
loaded and the door is closed.
Overloading will affect cooking performance.
3.5 SHELVES
Three shelves are supplied and six runner positions are
available.
A roasting tin should be placed below any meat to collect
residual juices for gravy.
This model is designed primarily as a general purpose
oven. However, it can be used to deliver industry
standard baking results across 2 shelves depending on
the item(s) being baked.
If greater throughput is required, Falcon offers a range of
powerful convection ovens, details of which are available
from your preferred dealer.
3.6 TIMER
3.6.1 Buzzer (Cook Mode Only)
Timer knob is marked in minutes. To operate, turn knob
fully clockwise to required setting. This is a countdown
clock. When timer reaches zero, buzzer will sound and
heating elements will switch off.
To operate in manual mode, turn timer knob (D) to “MAN”
setting.
3.6.2 Switching The Timer Off
Turn timer knob (D) to “MAN” position.
3.7 HIGH TEMPERATURE LIMIT DEVICE
This ensures that the oven does not overheat. If device
trips, it may be reset by pushing button (F).
If problem persists, it will be necessary for a service
engineer to investigate and rectify the cause.
SECTION 4 CLEANING and MAINTENANCE
Warning
NEVER ALLOW WATER OR STEAM TO COME INTO
CONTACT WITH THE FAN OR ELECTRICS DURING
CLEANING.
WHEN CLEANING OVEN INTERIOR, BE CAREFUL
NOT TO DISTURB THE TEMPERATURE CONTROL
SENSORS WHICH ARE LOCATED ON THE RH WALL.
Oven Exterior
To remove greasy finger marks, wipe with warm soapy
water. Rinse with a cloth dampened in clean water and
dry thoroughly.
On occasion, the stainless steel may be polished using a
proprietry brand of stainless steel cleaner.
Oven Interior
The following steps should be taken during cleaning.
1. Allow oven to cool.
2. Remove shelves and both shelf supports. Soak these
in a sink filled with soapy water.
3. Clean oven chamber.
4. Use a scouring pad to scrub components being soaked
in sink. Rinse parts thoroughly after scrubbing.
5. Replace shelf supports and shelves within oven cavity.
Hint
A tray lined with foil, positioned upon oven floor will
protect base by catching drips and debris.
Remove any staining using a mild sponge scourer
moistened with hot soapy water.
Stubborn stains can be cleaned with a proprietry oven
spray and observing manufacturer recommendations for
use.
Page 4

E711D Convection Oven
ADDENDUM TO OPERATING INSTRUCTIONS
Falcon Foodservice Equipment
HEAD OFFICE AND WORKS
Wallace View, Hillfoots Road, Stirling. FK9 5PY. Scotland.
SERVICELINE CONTACT
t: 01438 363 000 f: 01438 369 900
T100801 Ref.1
To Operate:
1. Turn oven on by means of power ON/OFF switch (4).
2. Turn oven controller on by means of ON/OFF button (9).
3. Controller will display actual cooking temperature. Repeated
pressing of down arrow button (7) will toggle through set
temperature and time then back to actual oven temperature.
4. Press timer button (6) once. Pre-heat cycle will commence.
5. Oven will pre-heat to 210⁰C and “Oven Ready – Load Food”
neon (2) will illuminate. Sounder will operate. Press timer
button (6) twice*. NOTE: First press cancels sounder.
Second press resets time to 58 mins, ready for cook cycle.
Sounder will make 8 beeps to signify that all is OK and timer
is reset. * only press timer button (6) TWICE if sounder is still
audible. If silent, press ONCE only.
6. Open oven door and load food, shut door.
7. Press timer button (6) and countdown timer will commence.
NOTE: Pressing timer button (6) again will cancel timer.
8. Oven will control at a temperature of 145⁰C.
9. The controller sounder will beep during cook period for
1 minute at preset time for desserts to be loaded into oven.
To silence sounder during this period, press timer button (6)
ONCE. If sounder is silent, do NOT press any button.
Open door, load desserts as quickly as possible and shut door.
10. Controller sounder will start to beep 1 minute before
countdown time is complete. press timer button (6) ONCE
to silence sounder.
11. When countdown time is complete, food can be
removed and served.
12. Switch OFF oven controller by means of controller
ON/OFF button (9).
13. Switch OFF by means of power ON/OFF switch (4).
14. If a second batch is required, repeat from instruction 1.
To Change Cook Time (Default is 58 minutes)
With controller switched ON.
1. Press & hold timer button (6) for 4 seconds.
2. Hours set time will flash in display. Change by means of
up button (8) or down button (7).
3. Press timer button (6).
4. Minutes set time will flash in display. Change by means
of up button (8) or down button (7).
5. Leave for 15 seconds. New time will be stored
automatically.
To Change Set point cook temperature (Default is 145
⁰
C)
With controller switched ON.
1. Press Set button (5).
2. Oven set point temperature will be displayed.
3. Change by means of up button (8) or down button (7).
4. Leave for 15 seconds. New temperature will be stored
automatically.
Key to Controls Layout
1. EVCO Controller. Display shows cook
time, oven temp or oven set temp.
(Switch on default – Oven temperature).
2. Oven ready indicator.
Oven at preheat temp (210
⁰
C).
3. Heat ON indicator.
4. Oven power ON/OFF switch.
5. Set button.
6. Timer button.
7. Down button.
8. Up button.
9. Controller ON/OFF button.
10. Multifunction button.
1
7
5
6
10
2
3
4
8
9
 Loading...