

Page 1

DOMINATOR
PLUS
E3441, E3441R, E3481, E3481R
GRIDDLE PLATES
INSTALLATION and
SERVICING INSTRUCTIONS
CAUTION - READ THESE INSTRUCTIONS BEFORE INSTALLING, COMMISSIONING OR USING
THIS APPLIANCE!
The installer must ensure that the installation of the appliance is in conformity with these instructions
and National Regulations in force at the time of installation. Particular attention MUST be paid to:
BS7671 IEE Wiring Regulations
Electricity at Work Regulations
Health And Safety At Work Act
Fire Precautions Act
This appliance has been UKCA/CE marked based on compliance with the relevant Electrical and Electromagnetic
Compatibility (EMC) Regulations/Directives for the voltages stated on the data plate.
WARNING: THIS APPLIANCE MUST BE EARTHED.
On completion of the installation, these instructions should be left with the Engineer-in-Charge for
reference during servicing. Further to this, The Users Instructions should be handed over to the User,
having had a demonstration of the operation and cleaning of the appliance.
IT IS MOST IMPORTANT THAT THESE INSTRUCTIONS BE CONSULTED BEFORE INSTALLING
AND COMMISSIONING THIS APPLIANCE. FAILURE TO COMPLY WITH THE SPECIFIED
PROCEDURES MAY RESULT IN DAMAGE OR THE NEED FOR A SERVICE CALL.
PREVENTATIVE MAINTENANCE CONTRACT
To obtain maximum performance from this unit regular servicing of the appliance should be undertaken to ensure
correct operation, it is functioning as intended, and safe to use. We recommend servicing in accordance with SFG20
Maintenance Schedules and as a minimum, after 2,500 hours of use, or annually, whichever comes first and that a
maintenance contract be arranged with an appointed service contact. Visits may then be made at agreed intervals
to carry out adjustments and repairs.
WEEE Directive Registration No. WEE/DC0059TT/PRO
At end of unit life, dispose of appliance and any replacement
parts in a safe manner, via a licenced waste handler.
Units are designed to be dismantled easily and recycling of all
material is encouraged whenever practicable.
Falcon Foodservice Equipment
Wallace View, Hillfoots Road, Stirling,
FK9 5PY, Scotland
Phone 01786 455 200
T100825 Ref. 12
Page 2

IMPORTANT INFORMATION
ELECTRICAL SAFETY AND ADVICE REGARDING SUPPLEMENTARY ELECTRICAL
PROTECTION
Commercial kitchens and foodservice areas are environments where electrical appliances may be located
close to liquids, or operate in and around damp conditions or where restricted movement for installation
and service is evident.
The installation and periodic inspection of the appliance should only be undertaken by a qualified, skilled
and competent electrician; and connected to the correct power supply suitable for the load as stipulated
by the appliance data label.
The electrical installation and connections should meet the necessary requirements to the local electrical
wiring regulations and any electrical safety guidelines.
We recommend:-
• Supplementary electrical protection with the use of a type A residual current device (RCD)
• Fixed wiring appliances incorporate a locally situated switch disconnector to connect to, which is easily
accessible for switching off and safe isolation purposes. The switch disconnector must meet the
specification requirements of IEC 60947.
Your attention is drawn to:BS 7671:2018–Guidance Note 8 - 8.13 : Other locations of increased risk
It is recognized that there may be locations of increased risk of electric shock other than those specifically
addressed in Part 7 of BS 7671. Examples of such locations could include laundries where there are washing
and drying machines in close proximity and water is present, and commercial kitchens with stainless steel
units, where once again, water is present.
Where because of the perception of additional risks being likely, the installation designer decides that an
installation or location warrants further protective measures, the options available include:
• Automatic Disconnection of Supply (ADS) by means of a residual current device having a residual
operating current not exceeding 30mA;
• Supplementary protective equipotential bonding; and
• Reduction of maximum fault clearance time.
The provision of RCDs and supplementary bonding must be specified by the host organization’s appointed
installation designer or electrical contractor and installed by a suitably qualified and competent electrician
so as to comply with Regulations 419.2 and 544.2
Page 3
SECTION 1 - INSTALLATION
UNLESS OTHERWISE STATED, PARTS WHICH HAVE BEEN PROTECTED BY THE
MANUFACTURER ARE NOT TO BE ADJUSTED BY THE INSTALLER.
1.1 MODEL NUMBERS, NETT WEIGHTS and DIMENSIONS
Model
Width
(mm)
Depth
(mm)
Height
(mm)
Weight
(kg)
E3441
400
770
455
59
E3441R
400
770
455
59
E3481
800
770
455
98
E3481R
800
770
455
98
1.2 SITING
The appliance should be installed on a level, fireproof surface, in a well lit and draught free position.
If floor is constructed of combustible material, local fire requirements should be checked to ensure compliance. A
clear space of 150mm should be left between rear and side of unit and any non-combustible wall.
If this is not possible these surfaces should be clad in a suitable non-combustible, heat-insulating material. Close
attention be paid to fire regulations.
1.3 ELECTRICAL SUPPLY
The units are suitable for AC supplies only. The E3441/E3441R models are for use on single phase supplies
only. E3481/E3481R models can be operated on single phase or alternatively on a 2 phase supply.
WARNING - THIS APPLIANCE MUST BE EARTHEDSUPPLY CONNECTION
A suitable mains input cable should be fitted that conforms to code designation 60245 IEC 57,
cable type H07RN-F.
A suitably rated isolating switch with contact separation of at least 3mm in all poles must be installed
and wiring executed in accordance with relevant regulations.
Access to mains terminal block is gained by removing control panel.
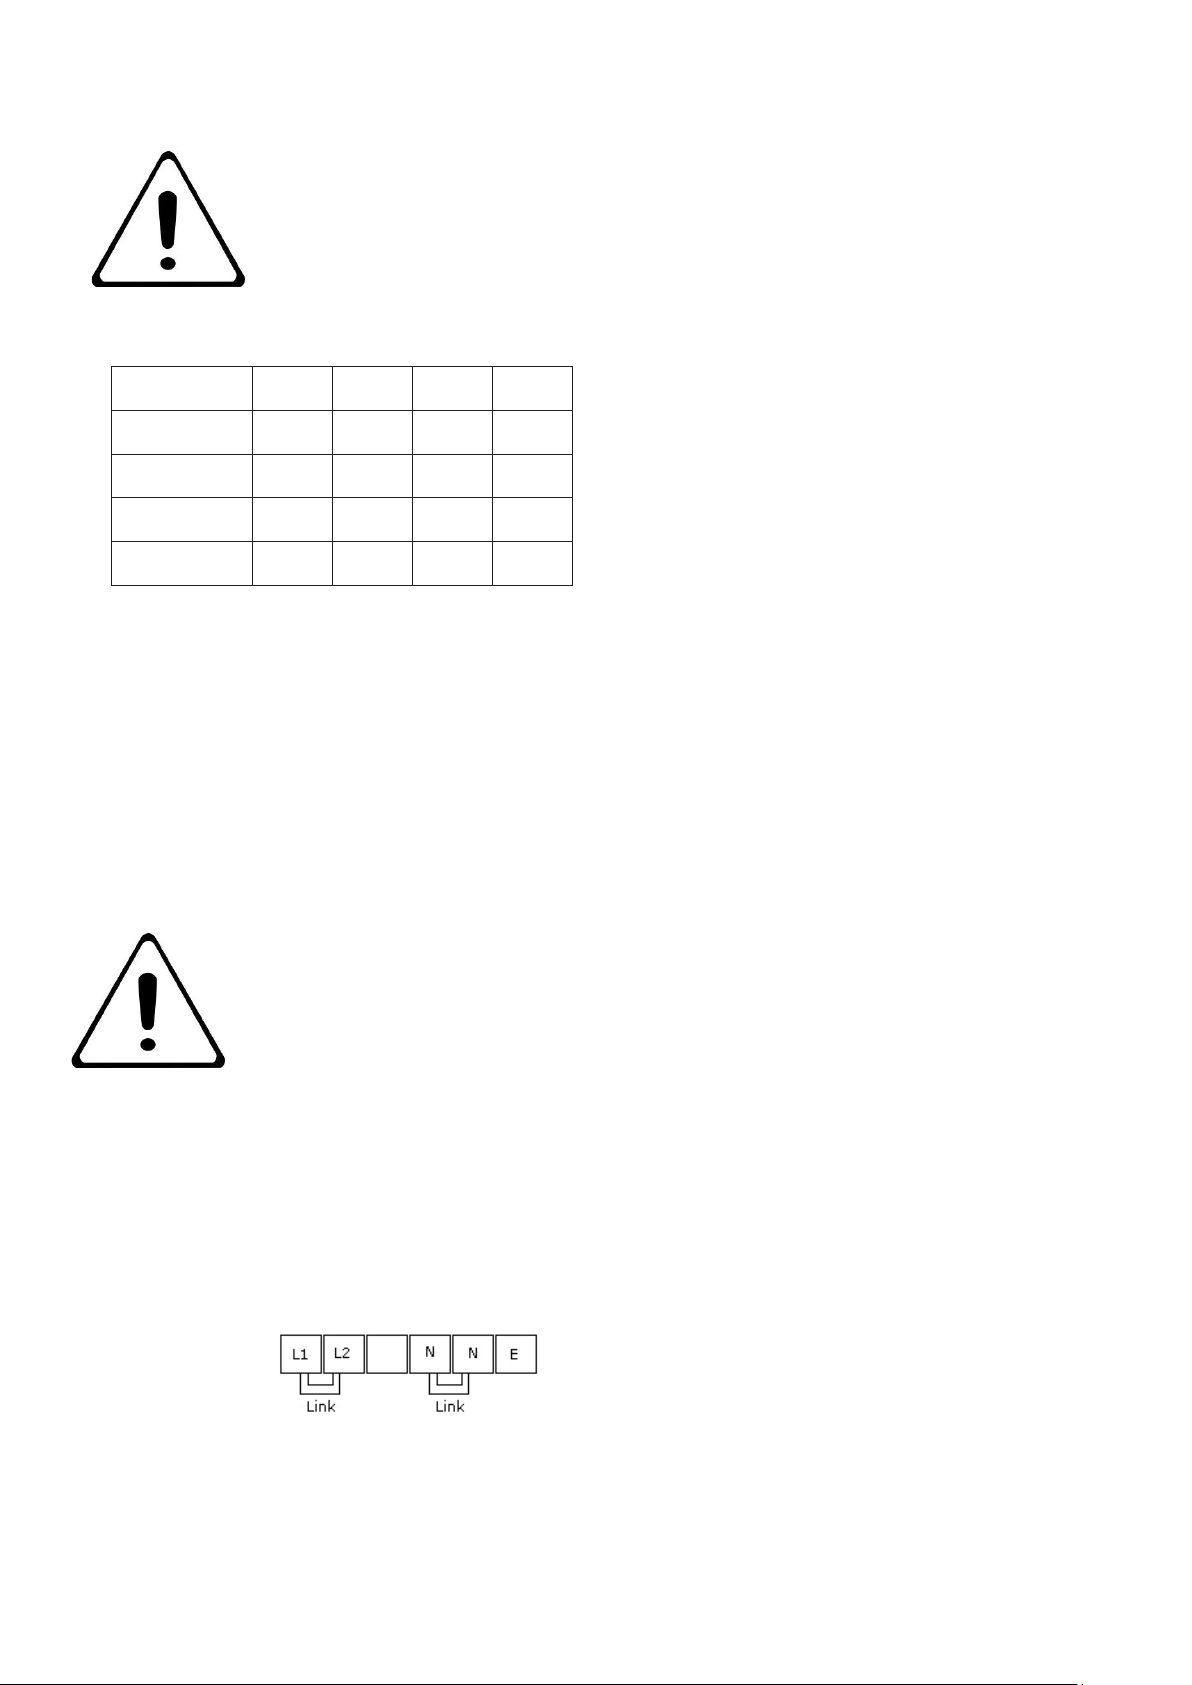
E3481/E3481R
Links should be inserted as detailed in Figure 1 to convert from two phase to single phase supply. Consideration
must be given to required draw of current.
Figure 1.
Page 4

1.4 ELECTRICAL RATINGS
Electrical loading is as stated in table below and also on appliance data plate.
The location of mains isolating switch should be identified for use in any event of an emergency or during cleaning.
1.4.1 E3441/E3441R
Connection
Amps (A)
L1
14.97
1.4.2 E3481/E3481R
Connection
Amps (A)
L1
14.97
L2
14.97
Page 5

SECTION 2 - ASSEMBLY and
COMMISSIONING
Note
The following information should be read as applicable to the unit being assembled.
2.1 ASSEMBLY
a) Position unit. Level it using feet adjusters. To mount unit upon a purpose built stand, refer to details supplied
with stand.
b) Unit is supplied with terminals for connection to a suitable mains supply. All wiring must be in accordance with
local regulations.
c) To gain access to terminals, remove control panel and proceed as follows:
d) Remove fat drawer. Undo and remove upper fixings.
e) Undo fixings below control panel. Remove panel carefully and set aside.
f) Terminals are now accessible and supply cables can be fed through rear of unit.
g) After connecting mains supply, replace control panel and fat drawer.
2.2 CONNECTION TO AN ELECTRICAL SUPPLY
Connect as detailed in Sections 1.3 and 1.4.
2.3 STARTING UP
Switch on mains supply, red neon will light. Click on/off switch to ON. Amber neon will light.
2.4 INSTRUCTION TO USER
After installation and commissioning is completed, please hand User Instructions to user.
Ensure that person(s) responsible understand correct operation and cleaning of appliance.
Page 6
SECTION 3 - SERVICING and MAINTENANCE
SERVICE INFORMATION
This unit carries an extensive mainland UK warranty. The warranty is in addition to and does not change
your statutory or legal rights.
The warranty policy can be found on our website which details the conditions of the warranty and the
exclusions.
https://www.falconfoodservice.com/info-centre/policy
Service calls to equipment under warranty will be carried out in accordance with the conditions of sale.
Warranty calls can be made between 8:30 am and 5:00 pm weekdays only.
To ensure your warranty enquiry is handled as efficiently as possible, ensure you have the following
appliance information prior to calling us:
1. Model number – found on data plate
2. Serial number – found on data plate
3. Brief description of the issue
To contact Falcon for a warranty issue dial (UK only) 01786 455 200 and select Warranty Issues from the
menu.
ELECTRICAL MAINTENANCE WARNING:
BEFORE ATTEMPTING ANY MAINTENANCE, ISOLATE APPLIANCE AT MAIN SWITCH
AND TAKE STEPS TO ENSURE THAT IT IS NOT INADVERTENTLY SWITCHED ON.
MAINTENANCE CHECK
Regular servicing of the appliance should be undertaken to ensure correct operation, it is
functioning as intended, and safe to use. We recommend servicing after 2,500 hours of use,
or annually, whichever comes first.
Any maintenance schedule should be carried out in accordance with SFG20 Maintenance
Schedules. Should any issues with the integrity of the components be identified these should be
replaced. If the appliance is not considered safe the unit should be removed from service and the
responsible person advised why the unit is not safe to use and what remedial action is needed.
Contents of the maintenance schedule should be agreed with the maintenance provider.
The plate is very heavy, so care must be exercised when lifting it up to carry out maintenance. The initial lifting
points are through side holes of splash guard. A suitable batten of wood should be inserted between plate and
front hob rail to support the weight.
Rest plate upon a batten and take a strong grip below plate front edge. Raise to the desired angle for access.
Place a wooden prop to support the weight below plate. Ensure prop is secured to prevent accidental slipping.
Ensure unit base, which is considerably lighter than plate, cannot move during lifting.
When ordering spares, please quote model number, serial number and voltage as stated on data plate.
Page 7

3.1 CONTROL PANEL - To Remove
a) To gain access to terminals, remove control panel and proceed as follows:
b) Remove fat drawer. Undo and remove upper fixings.
c) Undo fixings below control panel. Remove panel carefully and set aside.
3.2 THERMOSTAT - To Replace
Remove control panel as detailed in Section 3.1. Undo element tail connections before lifting plate.
Remove fixings that secure plate in position wihin control compartment top. Raise plate from front.
Prop it up with a suitable piece of wood. Take care not to strain thermostat capillary tube.
Undo clamping plate fixings to release phial.
Pull off thermostat connections, noting the locations according to wire numbers. Pull off thermostat knob and
remove fixings below to release control from panel.
Feed capillary tube and phial forward through rear of control compartment and remove assembly.
Replace in reverse order, taking care to fit insulating sleeving over capillary before fitting thermostat. (Refer to
Figure 2)
Ensure earth bonding connection is replaced behind thermostat fixing lug. After fitting thermostat, test unit
using a low setting. Check amber light goes out when set temperature is reached.
3.3 PILOT LAMPS - To Replace
a) Remove control panel as detailed in Section 3.1.
b) Pull off lamp connections.
c) Remove nut at rear to remove lamp.
3.4. HEATING ELEMENTS - To Replace
a) Ensure power is switched off and remove control panel as detailed in Section 3.1.
b) Undo fixings from retaining bar.
c) Remove element tail connections before lifting plate.
d) Ensure that thermocouple has been freed.
e) Prop up hotplate as detailed in Section 3.2.
f) Remove clamping plates that secure element.
(Refer to Figure 2)
When fitting replacement, ensure element is properly secured to underside of hotplate.
Page 8
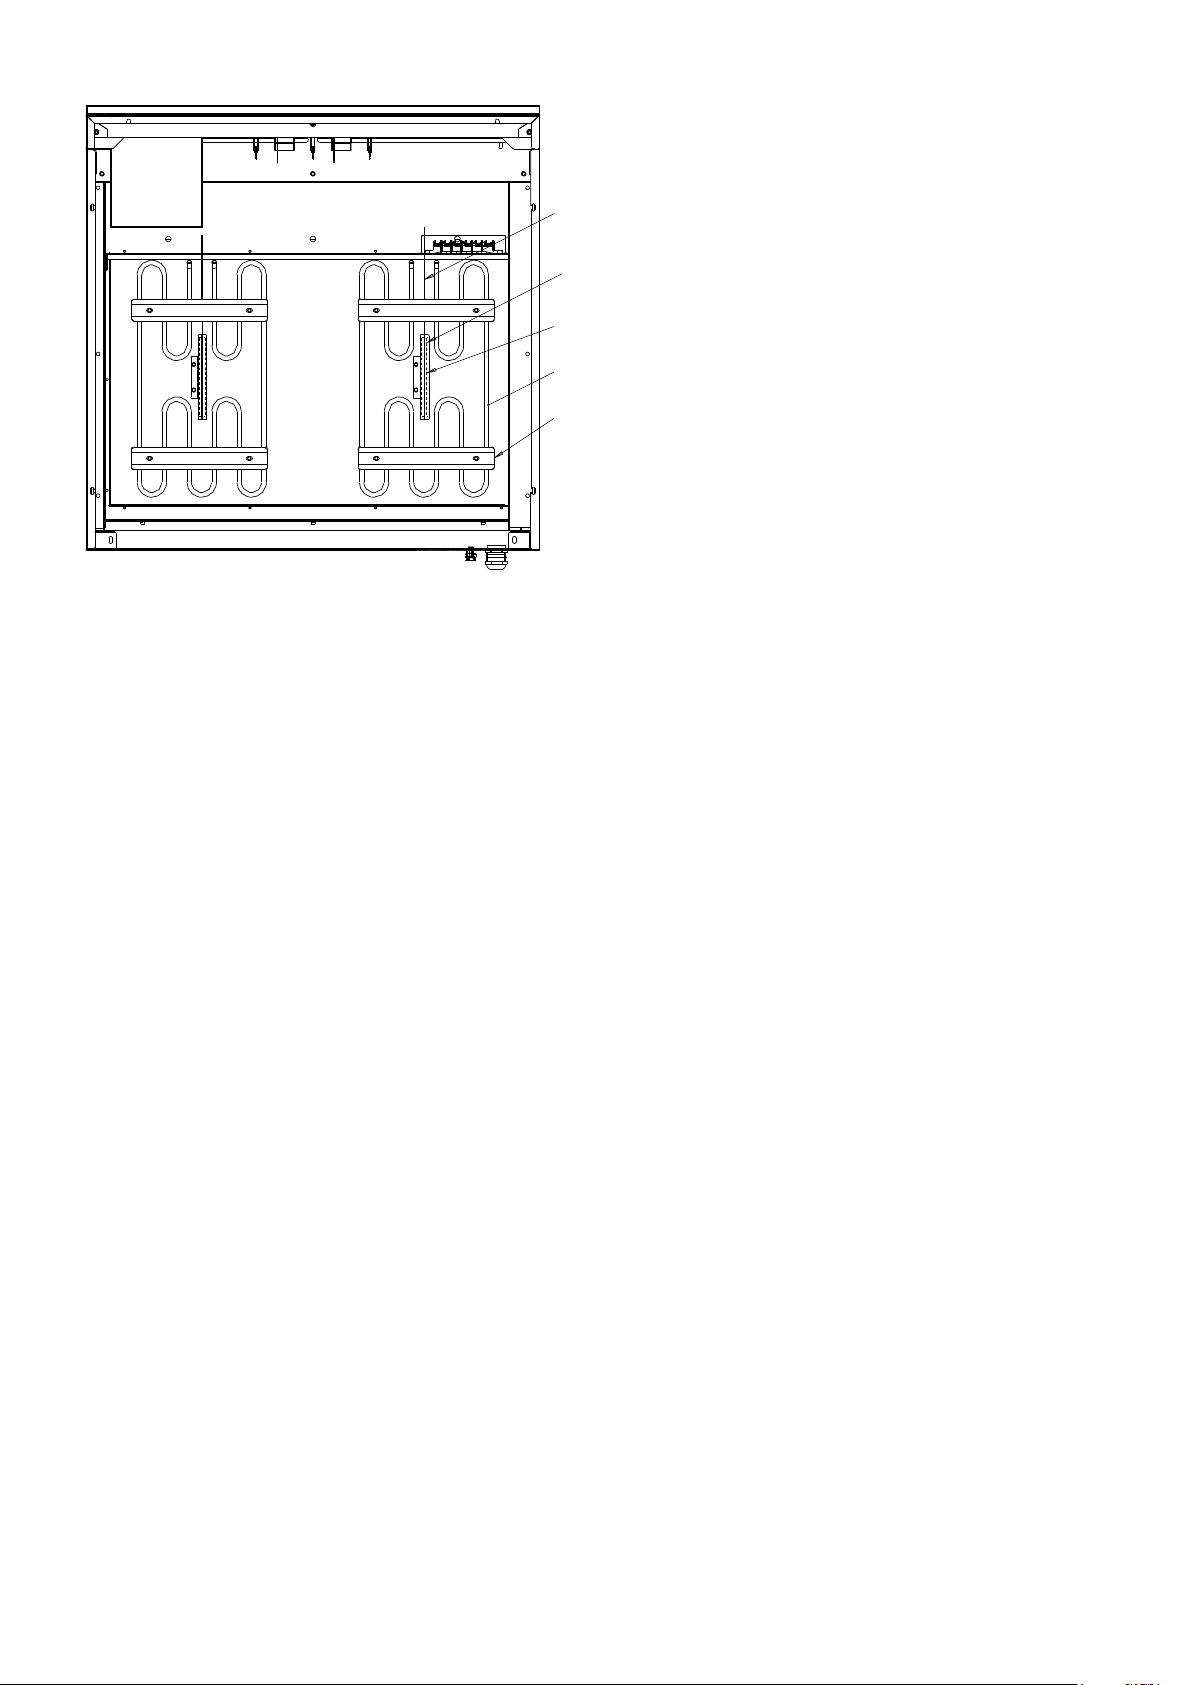
THERMOSTAT CAPILLARY TUBE
PHIAL POSITION
PHIAL CLAMP PLATE
ELEMENT
ELEMENT CLAMP PLATE
Figure 2.
SECTION 4 - SPARES and ACCESSORIES
When ordering spare parts, always quote appliance type and serial number.
This information will be found on data plate.
Short list of spares Thermostat, Element, Contactor.
Red neon, Amber neon, Control knob, Griddle plate, Fat drawer.
Page 9
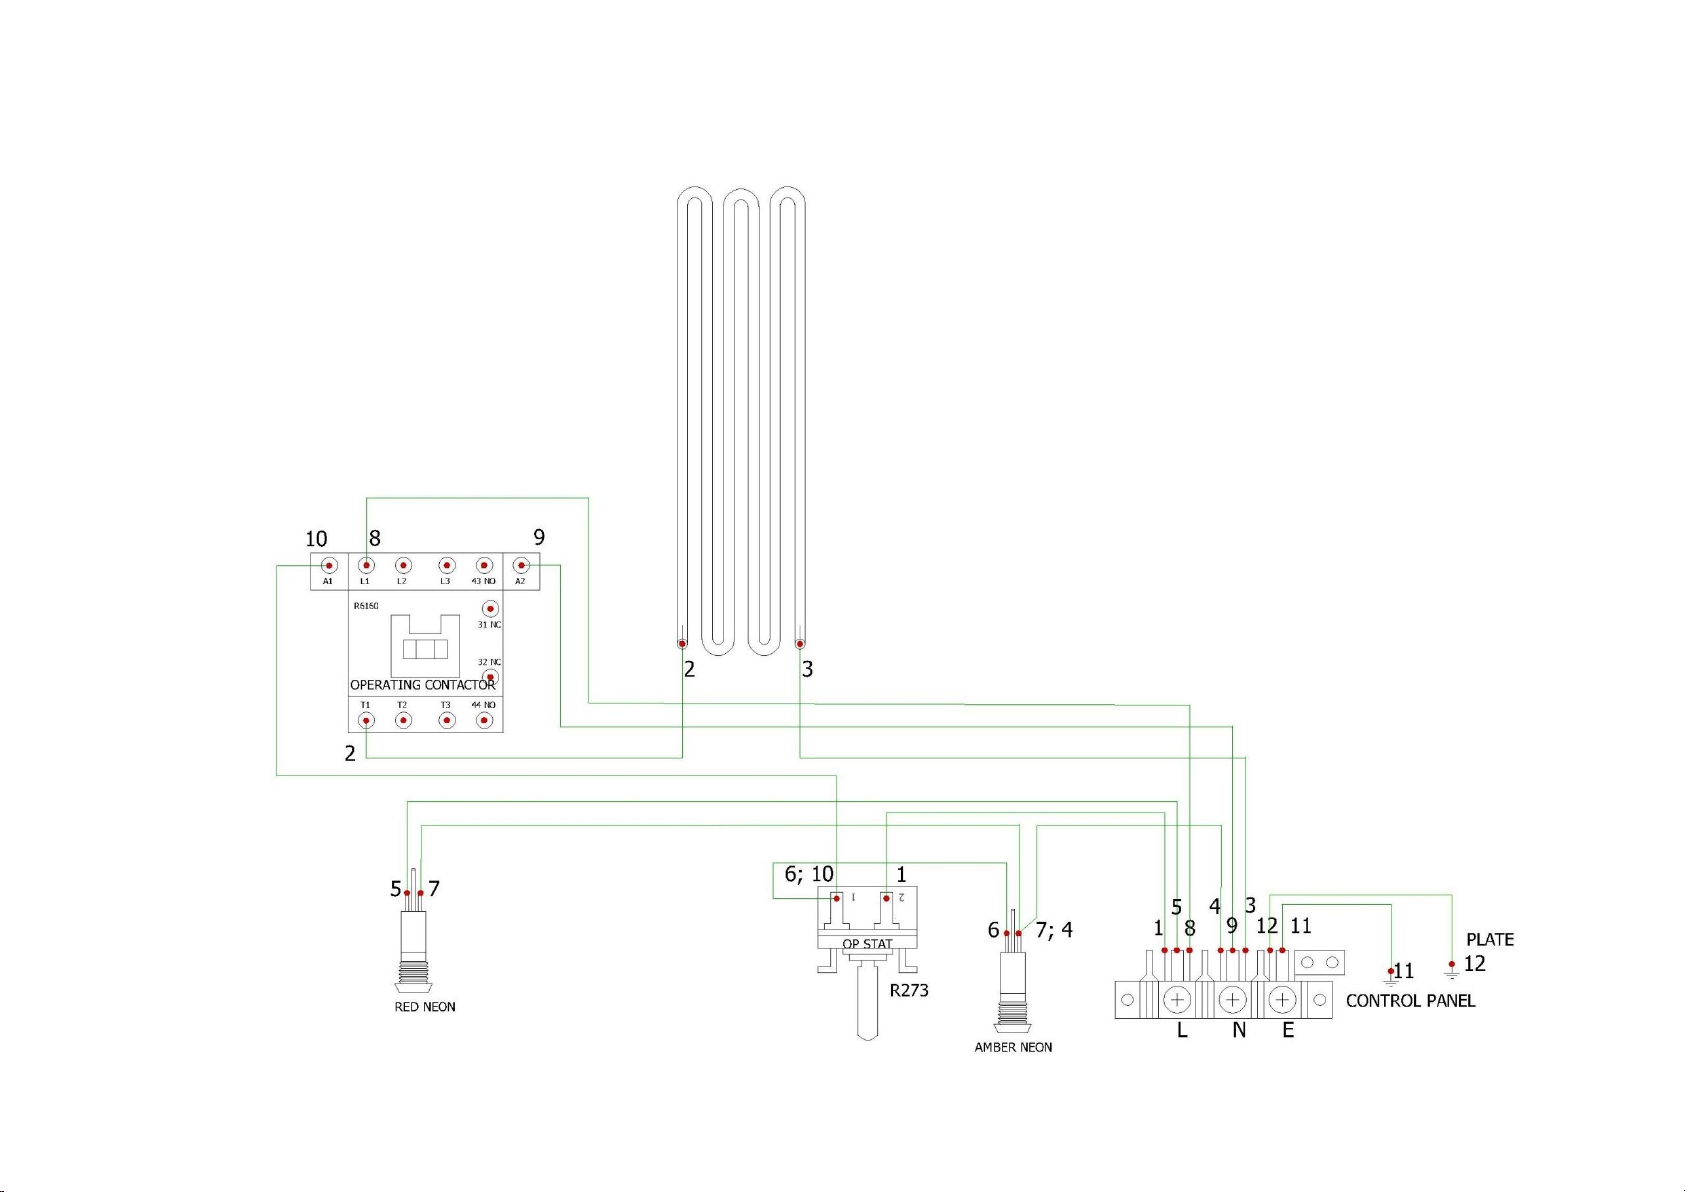
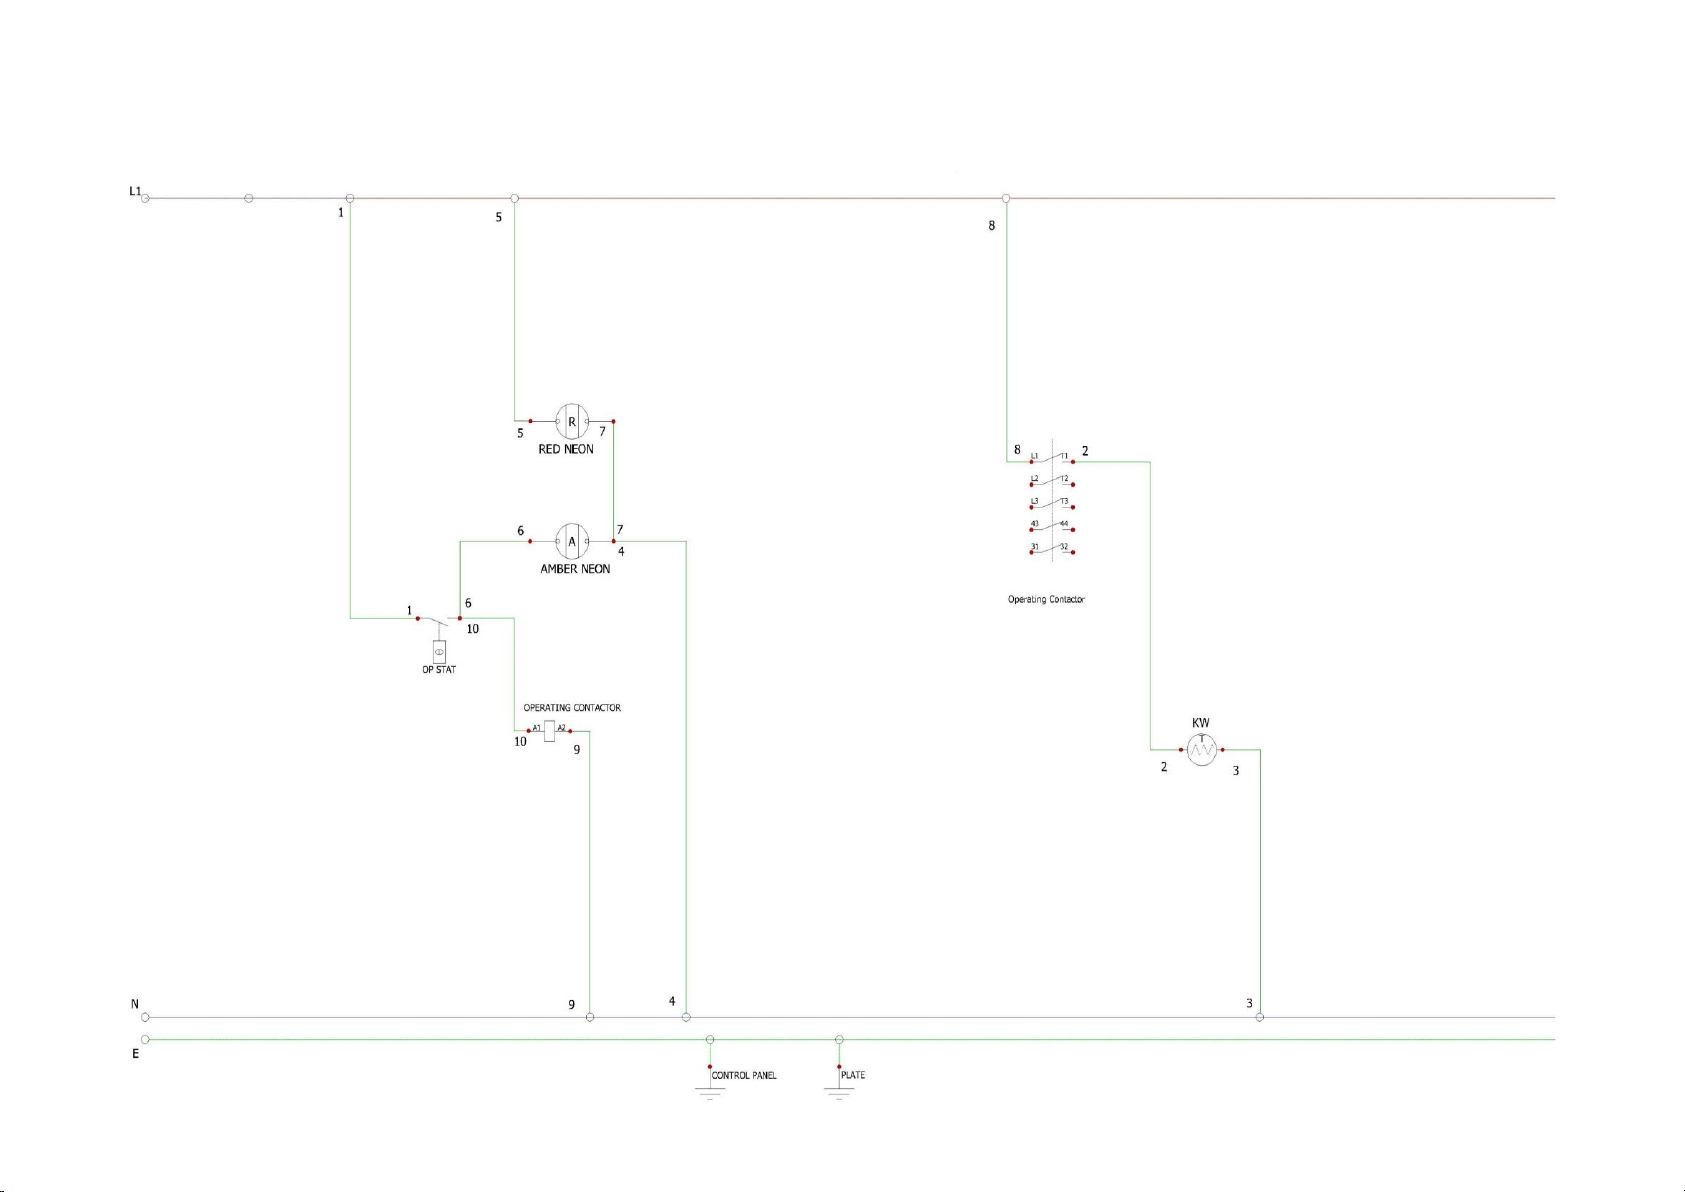
E3441/E3441R WIRING DIAGRAM
E3441/E3441R WIRE DIAGRAM
Page 10
E3481/E3481R WIRING DIAGRAM 3~
E3441/E3441R CIRCUIT DIAGRAM
E3481/E3481R WIRING DIAGRAM 2N~
E3481/E3481R CIRCUIT DIAGRAM 2N~
Page 11
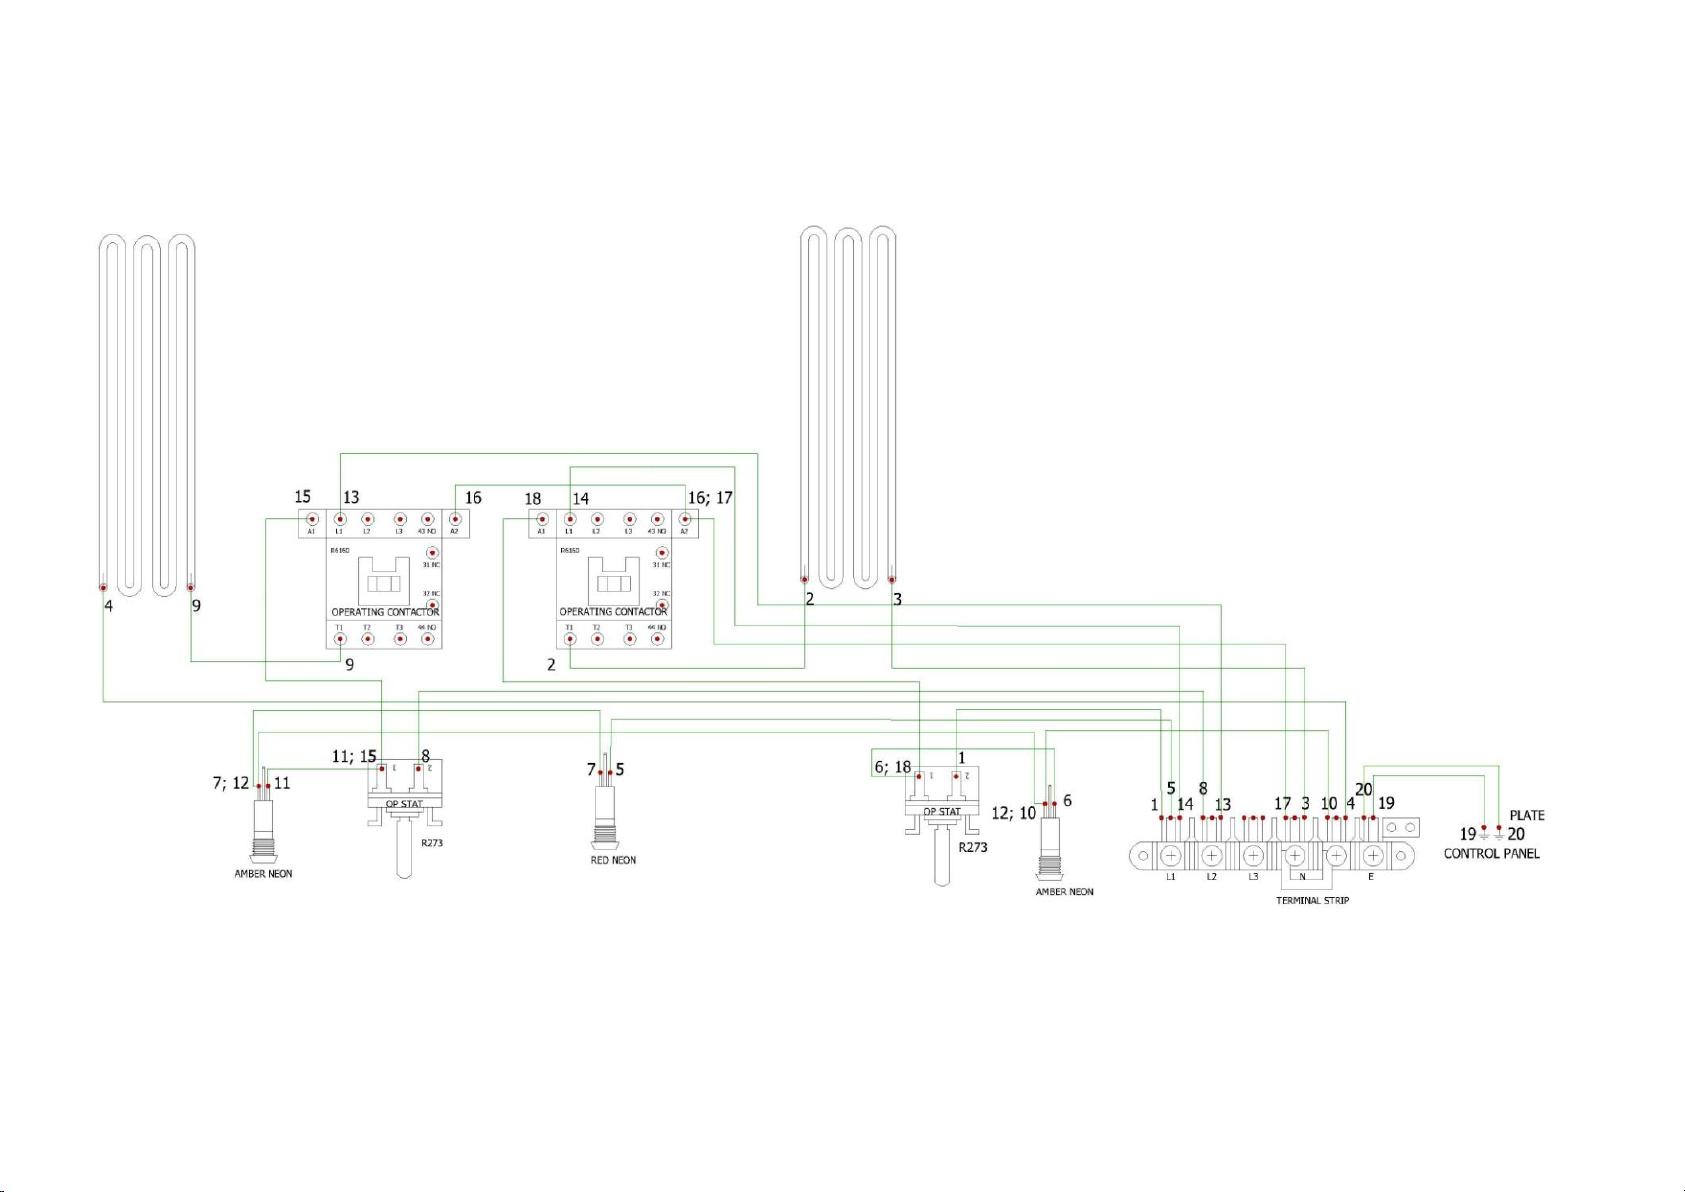
E3481/E3481R WIRE DIAGRAM
Page 12
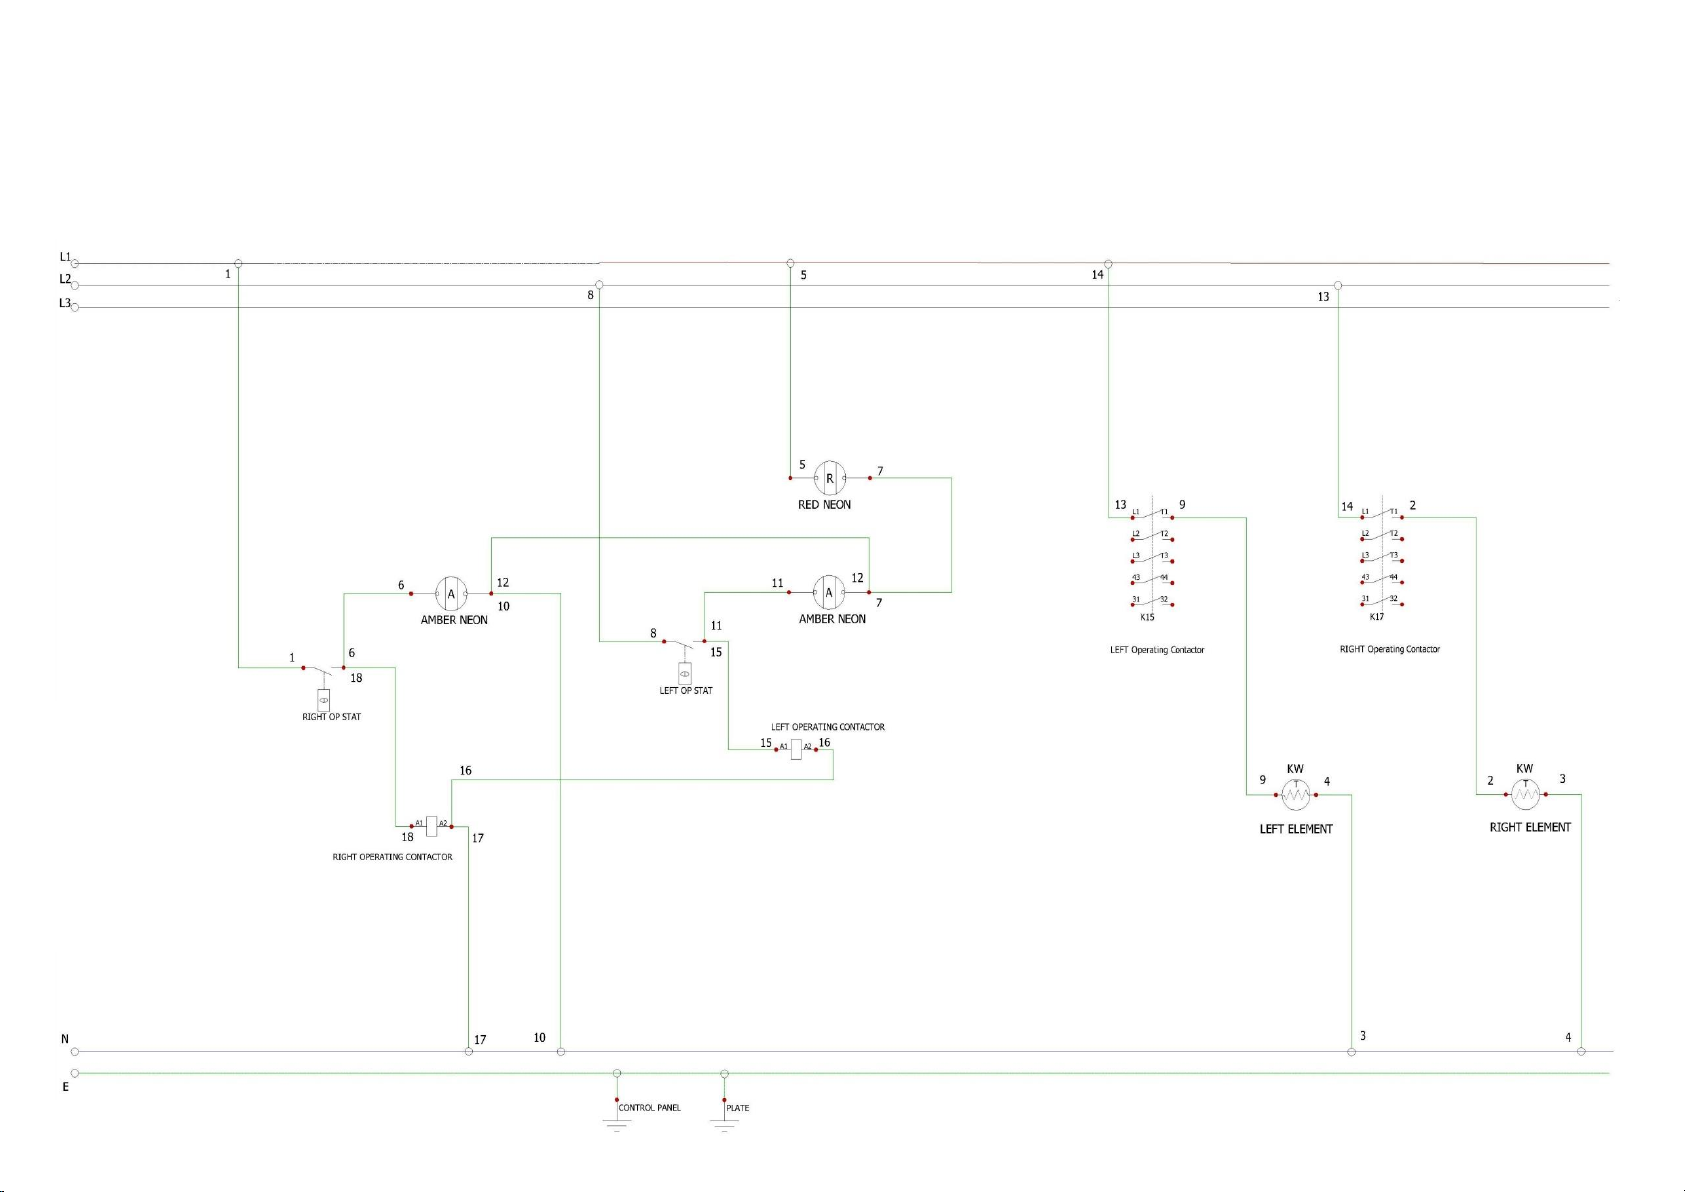
E3481/E3481R CIRCUIT DIAGRAM
 Loading...