

Page 1
DOMINATOR
PLUS
ELECTRIC RANGE APPLIANCE
INSTALLATION and
SERVICING INSTRUCTIONS
IMPORTANT
The installer must ensure that the installation of the appliance is in conformity with these instructions and National
Regulations in force at the time of installation. Particular attention MUST be paid to:
BS7671 IEE Wiring Regulations
Electricity at Work Regulations
Health and Safety at Work Act
Fire Precautions Act
This appliance has been UKCA/CE marked based on compliance with the relevant Electrical and Electromagnetic
Compatibility (EMC) Regulations/Directives for the voltages stated on the data plate.
WARNING: THIS APPLIANCE MUST BE EARTHED
On completion of the installation, these instructions should be left with the Engineer-in-Charge for reference during
servicing. Further to this, the User’s Instructions should be handed over to the User, having had a demonstration of the
operation and cleaning of the appliance.
IT IS MOST IMPORTANT THAT THESE INSTRUCTIONS BE CONSULTED BEFORE INSTALLING AND
COMMISSIONING THIS APPLIANCE. FAILURE TO COMPLY WITH THE SPECIFIED PROCEDURES MAY
RESULT IN DAMAGE OR THE NEED FOR A SERVICE CALL.
PREVENTATIVE MAINTENANCE CONTRACT
To obtain maximum performance from this unit regular servicing of the appliance should be undertaken to ensure
correct operation, it is functioning as intended, and safe to use. We recommend servicing in accordance with SFG20
Maintenance Schedules and as a minimum, after 2,500 hours of use, or annually, whichever comes first and that a
maintenance contract be arranged with an appointed service contact. Visits may then be made at agreed intervals to
carry out adjustments and repairs.
WEEE Directive Registration No. WEE/DC0059TT/PRO
At end of unit life, dispose of appliance and any replacement
parts in a safe manner, via a licensed waste handler.
Units are designed to be dismantled easily and recycling of all
material is encouraged whenever practicable.
Falcon Foodservice Equipment
Wallace View, Hillfoots Road, Stirling,
FK9 5PY, Scotland
Phone: 01786 455200
T100763 Ref. 18
Page 2

IMPORTANT INFORMATION
ELECTRICAL SAFETY AND ADVICE REGARDING SUPPLEMENTARY
ELECTRICAL PROTECTION
Commercial kitchens and foodservice areas are environments where electrical appliances may be located close to
liquids, or operate in and around damp conditions or where restricted movement for installation and service is evident.
The installation and periodic inspection of the appliance should only be undertaken by a qualified, skilled and competent
electrician; and connected to the correct power supply suitable for the load as stipulated by the appliance data label.
The electrical installation and connections should meet the necessary requirements to the local electrical wiring
regulations and any electrical safety guidelines.
We recommend:-
• Supplementary electrical protection with the use of a type A residual current device (RCD).
• Fixed wiring appliances incorporate a locally situated switch disconnector to connect to, which is easily accessible
for switching off and safe isolation purposes. The switch disconnector must meet the specification requirements of
IEC 60947.
Your attention is drawn to:BS 7671:2018–Guidance Note 8 - 8.13: Other locations of increased risk
It is recognized that there may be locations of increased risk of electric shock other than those specifically addressed in
Part 7 of BS 7671. Examples of such locations could include laundries where there are washing and drying machines in
close proximity and water is present, and commercial kitchens with stainless steel units, where once again, water is
present.
Where because of the perception of additional risks being likely, the installation designer decides that an installation or
location warrants further protective measures, the options available include:
• Automatic Disconnection of Supply (ADS) by means of a residual current device having a residual operating current
not exceeding 30mA;
• Supplementary protective equipotential bonding; and
• Reduction of maximum fault clearance time.
The provision of RCDs and supplementary bonding must be specified by the host organization’s appointed installation
designer or electrical contractor and installed by a suitably qualified and competent electrician so as to comply with
Regulations 419.2 and 544.2
Page 3
SECTION 1 – INSTALLATION
UNLESS OTHERWISE STATED, PARTS WHICH HAVE BEEN PROTECTED BY THE
MANUFACTURER ARE NOT TO BE ADJUSTED BY THE INSTALLER.
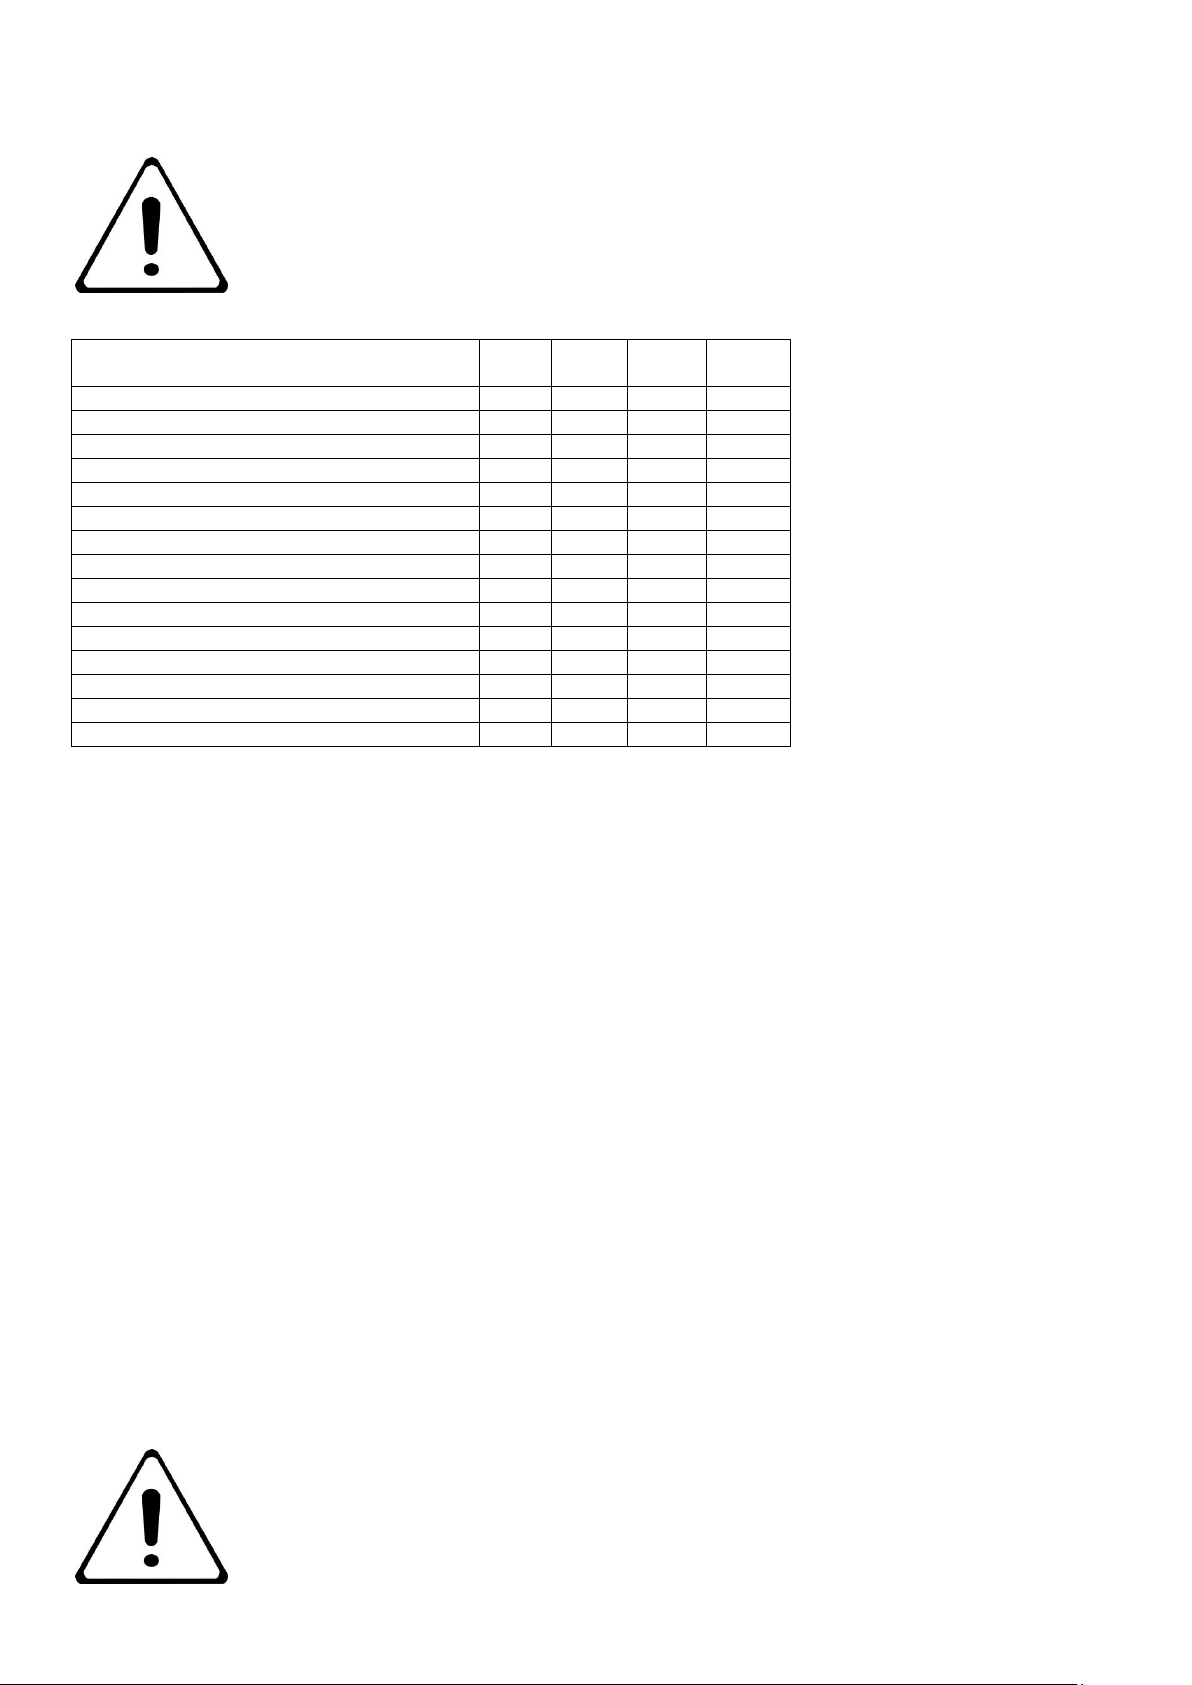
1.1 MODEL NUMBERS, NETT WEIGHTS and DIMENSIONS
Model
Width
(mm)
Depth
(mm)
Height
(mm)
Weight
(kg)
E3101/D Three Hotplate Range
900
770
890
154
E3101/D Four Hotplate Range
900
770
890
154
E3101P/D Six Hotplate Range
900
770
890
105
E3101OTC Three Hotplate Range
900
770
890
157
E3101OTC Four Hotplate Range
900
770
890
157
E3101POTC Six Hotplate Range
900
770
890
122
E3117/D General Purpose Oven
900
770
890
102
E3117/D General Purpose Oven on Stand
900
770
1310
140
E3117/2 Two Tier General Purpose Oven
900
770
1715
204
E3121 Three Hotplate Boiling Table
900
770
455
70
E3121 Four Hotplate Boiling Table
900
770
455
71
E3122 Two Hotplate Boiling Table
400
770
455
25
E3161/D Three Hotplate Range
600
770
890
144
E3162 Two Hotplate Boiling Table
600
770
455
60
E3163 Three Hotplate Boiling Table
600
770
455
61
1.2 SITING
The appliance should be installed on a level, fireproof surface, in a well-lit and draught free position.
If the floor is constructed of combustible material, then local fire requirements should be checked to ensure
compliance. A clear space of 150mm should be left between the rear and side of the appliance and any noncombustible wall.
If this is not possible, these surfaces should be clad in a suitable non-combustible, heat insulating material. Close
attention should be paid to Fire Regulations.
1.3 ELECTRICAL SUPPLY
The appliance is suitable for AC supplies only.
E3101/P/D/PD, E3161/D Ranges and E3121/63 Boiling Tables
On ranges and boiling tables, the terminal arrangement is for 3 phase/4 wire connection.
E3162 Boiling Table
The terminal arrangement is for 2 phase/4 wire connection.
E3117/D GP Ovens and E3122 Boiling Table
These are for single phase operation only.
E3101OTC/POTC Ranges
The terminal arrangement is for 3 phase/4 wire connection.
1.4 SUPPLY CONNECTION
Cable entry is at rear of appliance in base of terminal box and is suitable for 25mm diameter conduit. A suitably rated
isolating switch with contact separation of at least 3mm in all poles must be installed and wiring executed in
accordance with relevant regulations listed on the cover of this manual.
Warning – This appliance must be earthed. (Earth terminal is provided within terminal box).
Page 4
1.5 ELECTRICAL RATINGS
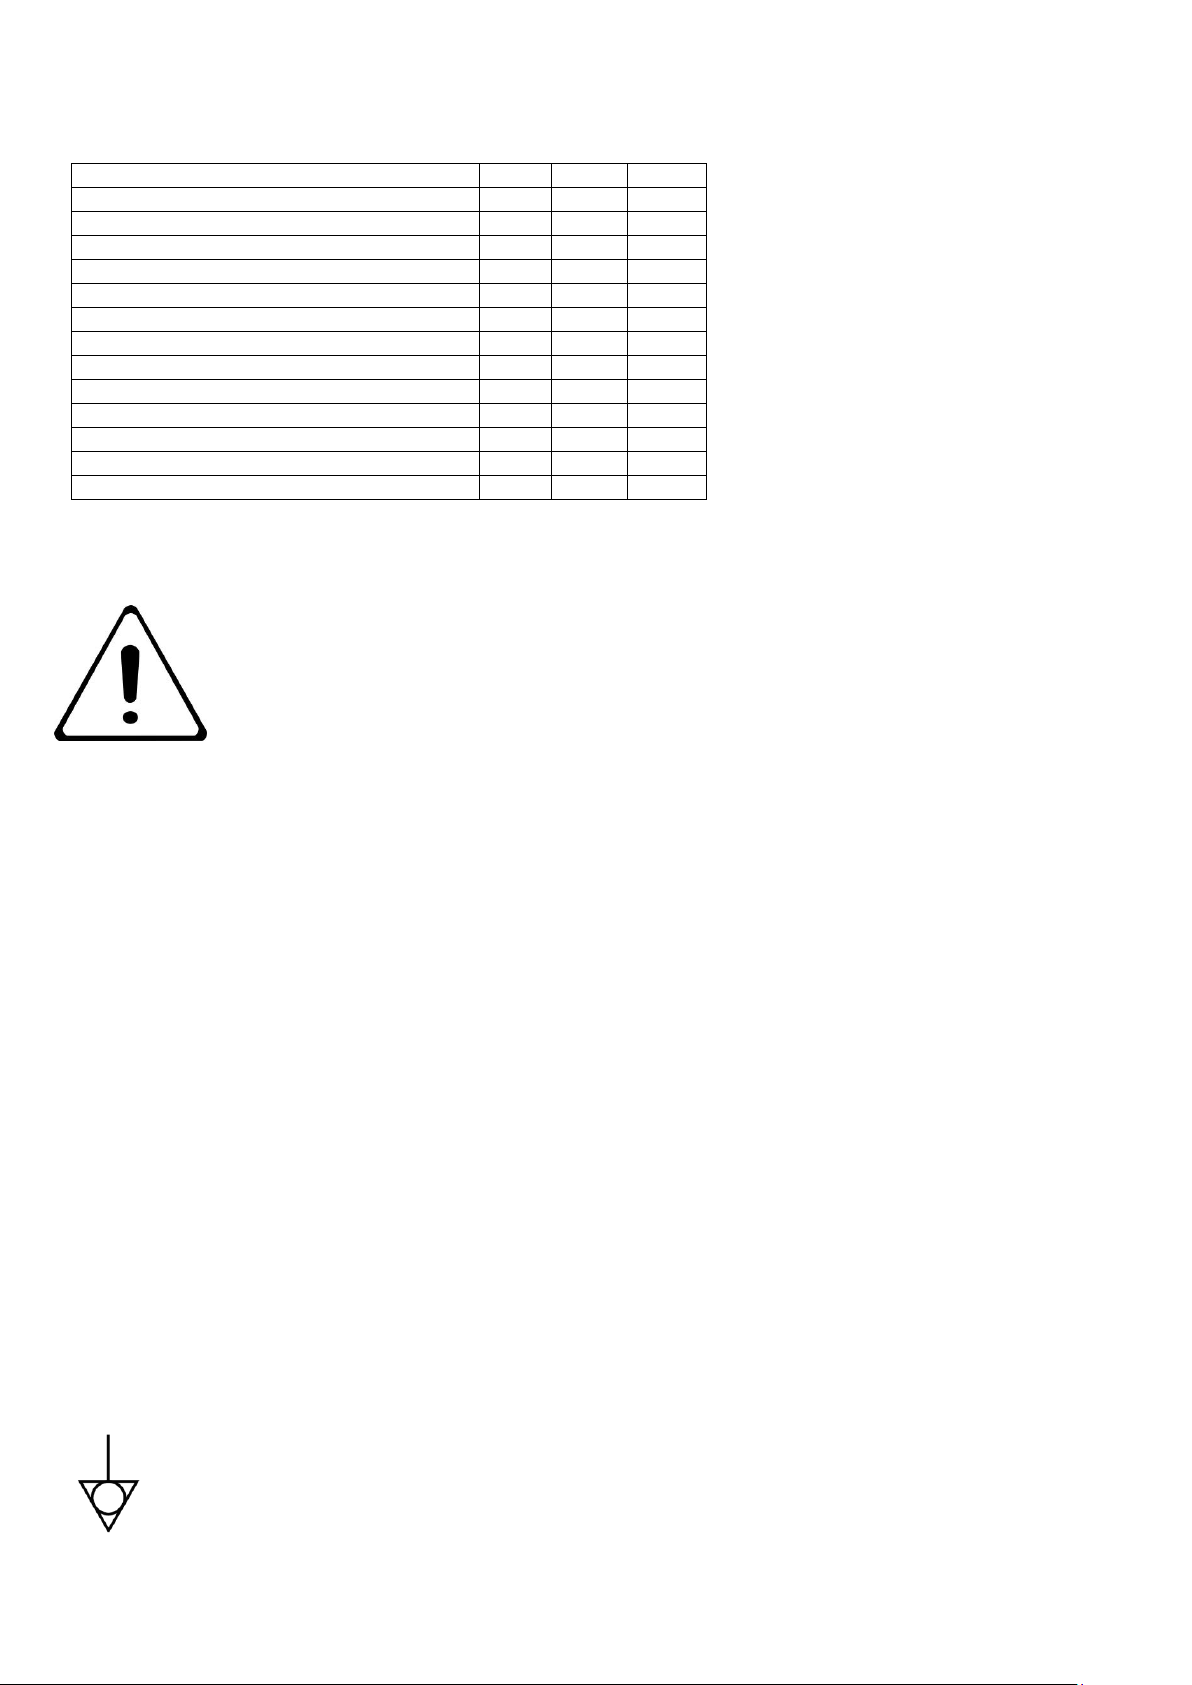
Electrical loading is as stated below.
Model
L1
L2
L3
E3101/D Three Hotplate Range
14
28
22
E3101/D Four Hotplate Range
22
22
22
E3101P/D Six Hotplate Range
24
24
22
E3101OTC Three Hotplate Range
28
14
28.3
E3101OTC Four Hotplate Range
22.7
22.7
28.3
E3101POTC Six Hotplate Range
24
24
28.3
E3117/D General Purpose Oven
22
E3117/D General Purpose Oven on Stand
22
E3117/2 Two Tier General Purpose Oven
22*2
E3121 Three Hotplate Boiling Table
14
14
14
E3121 Four Hotplate Boiling Table
16
14
14
E3122 Two Hotplate Boiling Table
16
E3161/D Three Hotplate Range
16
14
20
Note – The round, fast plates embody a temperature limiting device which automatically switches off part of the
element circuit if the plate is overheated due to being left switched on without a pot on it.
Important
After completion of installation, the engineer should check that appliance is operating satisfactorily
and demonstrate the method of operation to kitchen staff. Location of mains isolating switch should
be identified for use in the event of an emergency or during cleaning.
SECTION 2 – ASSEMBLY and COMMISSIONING
Note
The following information should be read as applicable to the appliance being assembled.
2.1 RANGES, GP OVENS and BOILING TABLES
a) Position appliance and level by adjusting screwed feet as necessary.
b) Open oven door and remove all packing material. Remove base panel and check that nothing has fallen below.
Check oven drip trays are in place.
c) Check hotplates are level and free from ‘rocking’. Check hotplate drip trays are correctly located.
2.2 OTC Range
a) Position appliance and level by adjusting screwed feet as necessary.
b) Open oven door and remove all packing material.
c) Check hotplates are level and free from ‘rocking’. Check that hotplate drip trays are correctly located.
2.3 DOUBLE TIER GENERAL PURPOSE OVEN
a) Position lower tier appliance in position and level by adjusting screwed feet as necessary. (Lower tier has no
worktop supplied).
b) Place upper tier (fitted with stainless steel plinth base) upon lower tier. Ensure upper appliance sits on ledges of
front and rear hob rails and between enamelled side drip sheds of lower tier.
c) The loose worktop panel sits upon the upper tier oven.
d) Open oven door and remove all packing material. Remove base panel and check that nothing has fallen
underneath. Ensure that oven drip trays are in position.
2.4 ALL APPLIANCES
These appliances are provided with a terminal for the connection of an external equipotential conductor.
This terminal is in effective electrical contact with all fixed exposed metal parts of the appliance, and shall
allow the connection of a conductor having a nominal cross-sectional area of up to 10mm². It is located on
the rear panel, is identified by the following label and must only be used for bonding purposes.
Page 5
SECTION 3 – SERVICING and MAINTENANCE
SERVICE INFORMATION
This unit carries an extensive mainland UK warranty. The warranty is in addition to and does not change
your statutory or legal rights.
The warranty policy can be found on our website which details the conditions of the warranty and the
exclusions.
https://www.falconfoodservice.com/info-centre/policy
Service calls to equipment under warranty will be carried out in accordance with the conditions of sale.
Warranty calls can be made between 8:30 am and 5:00 pm weekdays only.
To ensure your warranty enquiry is handled as efficiently as possible, ensure you have the following
appliance information prior to calling us:
1. Model number – found on data plate
2. Serial number – found on data plate
3. Brief description of the issue
To contact Falcon for a warranty issue dial (UK only) 01786 455 200 and select Warranty Issues from the
menu.
BEFORE ATTEMPTING ANY MAINTENANCE, ISOLATE THE APPLIANCE AT THE MAIN
SWITCH AND TAKE STEPS TO ENSURE THAT IT IS NOT INADVERTAENTLY SWITCHED
ON.
MAINTENANCE CHECK
Regular servicing of the appliance should be undertaken to ensure correct operation, it is
functioning as intended, and safe to use. We recommend servicing after 2,500 hours of use,
or annually, whichever comes first.
Any maintenance schedule should be carried out in accordance with SFG20 Maintenance
Schedules. Should any issues with the integrity of the components be identified these should be
replaced. If the appliance is not considered safe the unit should be removed from service and the
responsible person advised why the unit is not safe to use and what remedial action is needed.
Contents of the maintenance schedule should be agreed with the maintenance provider.
3.1 CONTROL PANEL – To Remove
a) Remove drip tray and control knobs.
b) Loosen but DO NOT remove oven thermostat fixings (not OTC). Leave loose until control panel is replaced and
tighten thermostat fixings.
c) Remove fixings at top and bottom of control panel.
d) Open oven door and pull control panel forward whilst slightly easing the bottom edge up. Support control panel
upon door.
e) When replacing panel, take care not to trap any connecting wires. Replace shakeproof washers below fixings.
Page 6

3.2 REMOVAL OF DROP-DOWN DOOR
a) Open door completely and insert a suitable pin into the marked hole on both hinges.
b) The action of closing the door will result in the hinge pulling out of the bracket to allow the door to be removed.
c) Due to hinge springs being under tension, do not disturb the hinge pins while door is removed from the range.
d) Replace in reverse order.
3.3 CONTROL SWITCHES, THERMOSTATS, INDICATOR LAMPS (All models). LIGHT SWITCH (OTC only)
If any of these components prove faulty, they must be replaced. Adopt following procedures and refer to appropriate
wiring diagrams in this manual.
3.3.1 Control Switches (All models)
a) Remove control panel as detailed in Section 3.1.
b) Remove switch connections and note wire arrangement. Pull off control knob. Undo fixings to release switch.
c) Fit replacement switch, ensuring that shakeproof washers are fitted under fixing screws.
3.3.2 Oven Thermostat (not OTC) – To Remove
a) Remove control panel as detailed in Section 3.1.
b) Lift RH hotplate at rear and prop it up as detailed in Section 3.3.
c) Remove clip that secures capillary tube below RH hotplate.
d) Remove thermostat phial from oven roof clips.
e) Remove fixings that secures thermostat to mounting bracket. Ease thermostat back until spindle is through
bracket, and then move it to one side and pull forward.
f) Remove cables and pull capillary tube clear of appliance. Slight bending of phial may be necessary in order to
withdraw it. Replace in reverse order.
g) Before fitting, slide insulating sleeve (from insulating thermostat) over capillary, down to the head of the
thermostat. Excess capillary must be neatly coiled (as on old appliance) by wrapping it around an object of
approximately 25mm diameter.
h) Take care not to kink tubing.
3.3.3 Thermostat Calibration (not OTC)
a) To adjust temperature setting, remove knob. Insert small screwdriver into hole in thermostat spindle centre.
b) Engage screwdriver in slotted screw inside hole and turn to adjust temperature setting.
c) The screw should be turned clockwise to lower temperature setting (L) and anti-clockwise to increase temperature
setting (R). Turn in small increments only and allow oven time to settle between adjustments.
3.3.4 Indicator Lamps – To Remove (All models)
a) Remove control panel as detailed in Section 3.1.
b) Disconnect wires from lamp.
c) Remove indicator lamp from panel and withdraw.
d) Replace in reverse order.
3.3.5 Oven Thermostat and Fan Switch – OTC Models
a) Remove thermostat control knob.
b) Remove control panel as detailed in Section 3.1.
c) Undo fixings from facia panel.
d) Remove wiring, noting connection positions.
e) The combined switch and thermostat may now be removed from front panel. The parts are secured by screw
fixings and are supplied together.
f) To remove phial, undo from bracket inside oven and ease back through oven side wall.
g) Replace in reverse order.
h) Electrical connections to be restored as detailed in respective wiring diagram.
3.3.6 Oven Light (Push Button) – (OTC Models)
a) Remove control panel as detailed in Section 3.1.
b) Disconnect wires from switch.
c) Undo retaining nut and withdraw switch.
d) Replace in reverse order.
3.4 LARGE HOTPLATE ELEMENTS – To Remove (All models)
a) Remove top facia panel.
b) Disconnect element tails, taking note of their respective positions for correct replacement. Also disconnect earth
wire.
c) Lift hotplate evenly all around about 25mm to release locating pins. Lift up from rear and pivot on front edge. Prop
plate in this position.
d) Withdraw flexible tails through insulating bushes.
e) Lift hotplate assembly clear.
f) Remove insulating box and clamping plates and prise out faulty element(s).
Page 7
Note – When fitting a new element, ensure that it beds comfortably within hotplate grooves. Tighten clamping
plate evenly and firmly from centre.
g) Check earth connection. Ensure earth wire is connected by fixing to hole in control box.
h) Replace in reverse order.
3.5 FAST BOILING PLATES (All models except E3101P/D/OTC)
a) Proceed as Section 3.3 until assembly is clear from range.
b) Proceed to lower box and disconnect beaded connecting leads, noting their locations.
c) Remove nut fixing hotplate in position and remove hotplate.
d) When re-fitting, ensure all earth-bonding wires are properly re-connected.
3.51 FAST BOILING PLATES (E3101P/D/OTC only)
e) Proceed as Section 3.1 & remove the control panel.
f) Remove the 2x 8mm Hex headed screws located each side that retain the hob from the beneath.
g) Lift the hinged hob up at the front & use the side stays to secure the hob in the maintenance position.
h) Disconnect the leads, noting their locations then remove nut fixing hotplate in position and remove hotplate.
i) When re-fitting, ensure all earth-bonding wires are properly re-connected.
3.6 OVEN BOTTOM ELEMENTS – To Remove (not OTC)
a) Remove grid shelves, shelf supports and base plate.
b) Remove fixing from element flange and draw element in to enable cables to be disconnected.
c) Replace in reverse order.
3.7 OVEN UPPER ELEMENT – To Remove (not OTC)
a) Remove grid shelves and shelf supports.
b) Remove fixing from element flange and all clips that secure element to the roof.
c) Draw element into oven, enabling cables to be disconnected.
d) Replace in reverse order.
Important Note
When re-fitting an element (top or bottom), it is essential, for reasons of safety, to ensure that the
small earth bonding wire is re-connected to the element flange. Fit a shakeproof washer between
flange and terminal on wire.
3.8 OVEN ELEMENTS (OTC Models)
Remove shelves and back baffle. Undo element fixing screw and withdraw into oven.
3.9 OVEN FAN (OTC Models)
a) Remove oven shelves, back baffle and fan impellor (Note – The nut is LH thread).
b) Remove fan support plate and tilt forward into oven.
c) Undo fan support plate fixings and electrical connections.
d) Fan may now be removed. Replace in reverse order.
e) Electrical connections to be restored as detailed in wiring diagram.
3.10 RELAYS (OTC Models)
a) Remove cover plate from outer back panel.
b) Undo electrical connections from relay and remove fixings.
c) Replace in reverse order. Electrical connections to be restored as detailed in wiring diagram.
3.11 CONTROL FUSE (OTC Models)
The control fuse may be accessed through the outer back panel cover plate.
3.12 OVERHEAT SAFETY TRIP (OTC Models)
a) An overheat safety trip is fitted to the oven chamber back panel. Access through the outer back panel cover plate
(see note below).
b) To reset, press button.
c) To remove, undo bracket fixings.
d)
Warning
If safety trip has been activated, reason for overheating must be identified before returning the
appliance to service.
Page 8

e) Replace in reverse order.
f) Electrical connections to be restored as detailed in wiring diagram.
Note (Refer to Section 3.12)
a) In any condition where space is restricted at appliance rear, the overheat safety trip may be accessed through the
oven compartment by removal of pan support panel.
b) Undo top and bottom fixings of fan baffle and tilt baffle forward to remove.
c) Undo fan support panel fixings and fold sideways.
d) Take care not to strain the electrical wiring.
3.13 ELECTRICAL SUPPLY – FAULT CHECK LIST (OTC Models)
a) Check main services are on.
b) Check internal fuse.
c) Check manual reset overheat trip.
3.14 OVEN LAMPS (OTC Models)
3.14.1 To Replace Bulb
a) Undo lens cover fixings.
b) Undo bulb and replace.
c) Refit lens cover and ensure seal is not damaged.
3.14.2 To Replace Assembly
a) Remove control panel as detailed in Section 3.1.
b) Remove RH or LH door (as required) by undoing door hinge fixings. Support door during this process.
c) Remove fixings from side panel front.
d) Remove fixings from side panel rear.
e) Disconnect electrical connections.
f) Remove lamp assembly.
g) Replace in reverse order.
SECTION 4 – SPARES and ACCESSORIES
When ordering spare parts for this appliance, please quote model number, serial number and voltage stated
on the data plate. This is located on the rear of the appliance.
Circular Hotplate
Rectangular Hotplate
6-heat Switch
Hotplate Control Knob
Red Neon
Amber Neon
Oven Thermostat
Oven Control Knob
Terminal Block 3-way
Terminal Block 5-way
Terminal Block 7-way
Oven Element (Top)
Oven Element (Bottom)
Oven Light
Oven Light Switch
Oven Thermostat (with fan switch)
Oven Fan
3.2kW Oven Element
Safety Thermostat
Relay
2A Fuse
Page 9
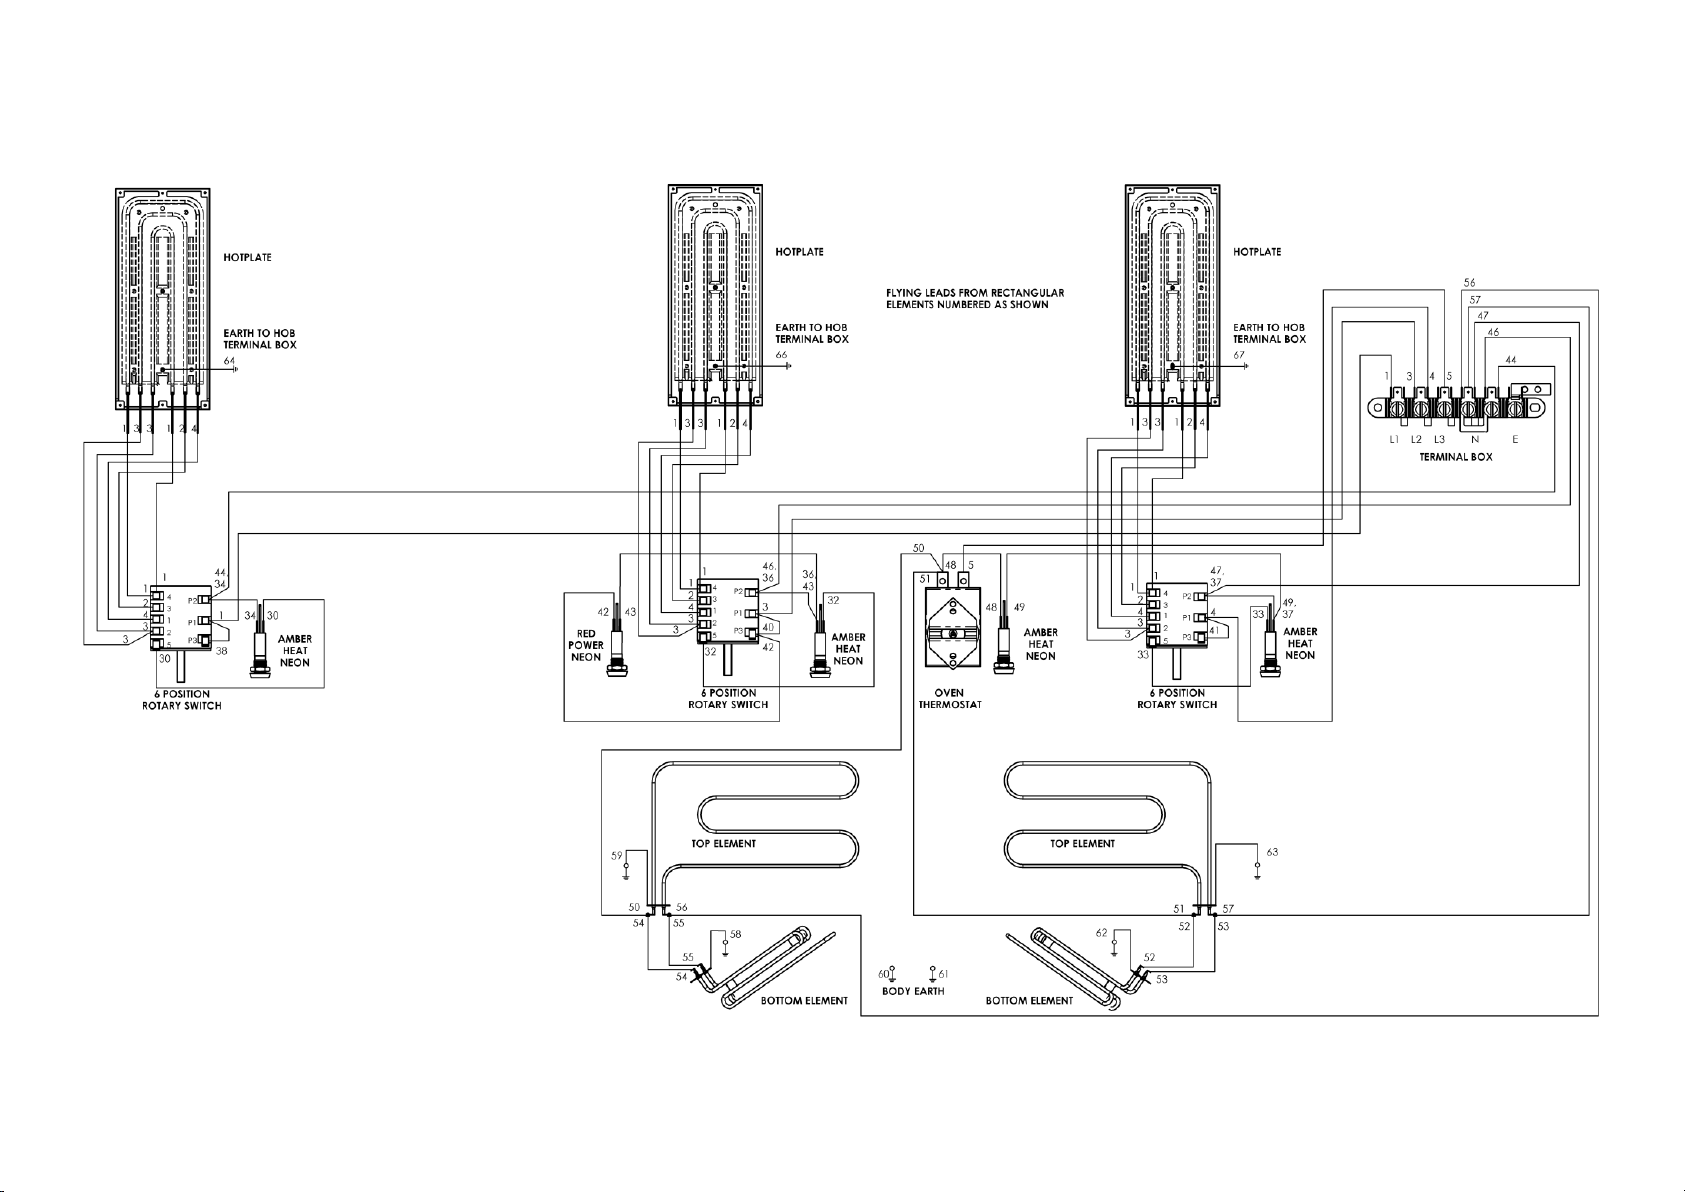
E3101 THREE HOTPLATE RANGE WIRING DIAGRAM
Page 10
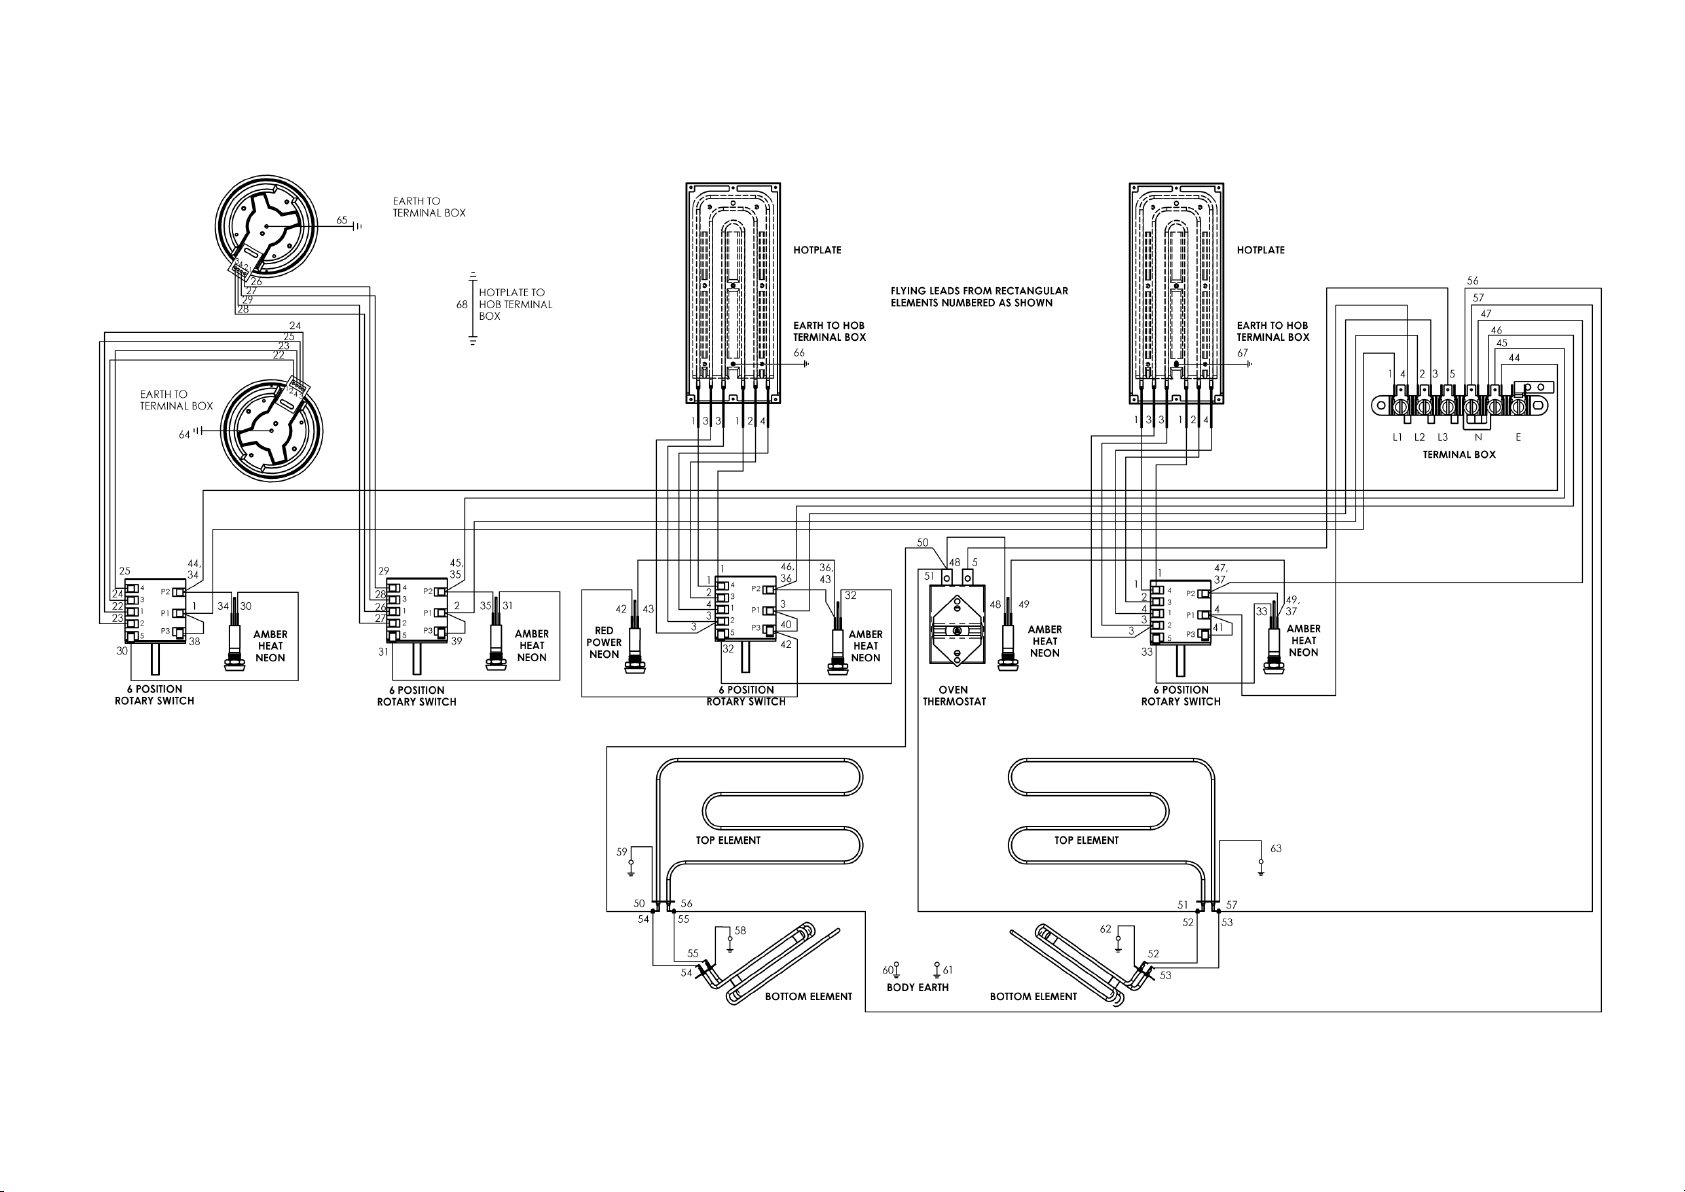
E3101 FOUR HOTPLATE RANGE WIRING DIAGRAM
Page 11
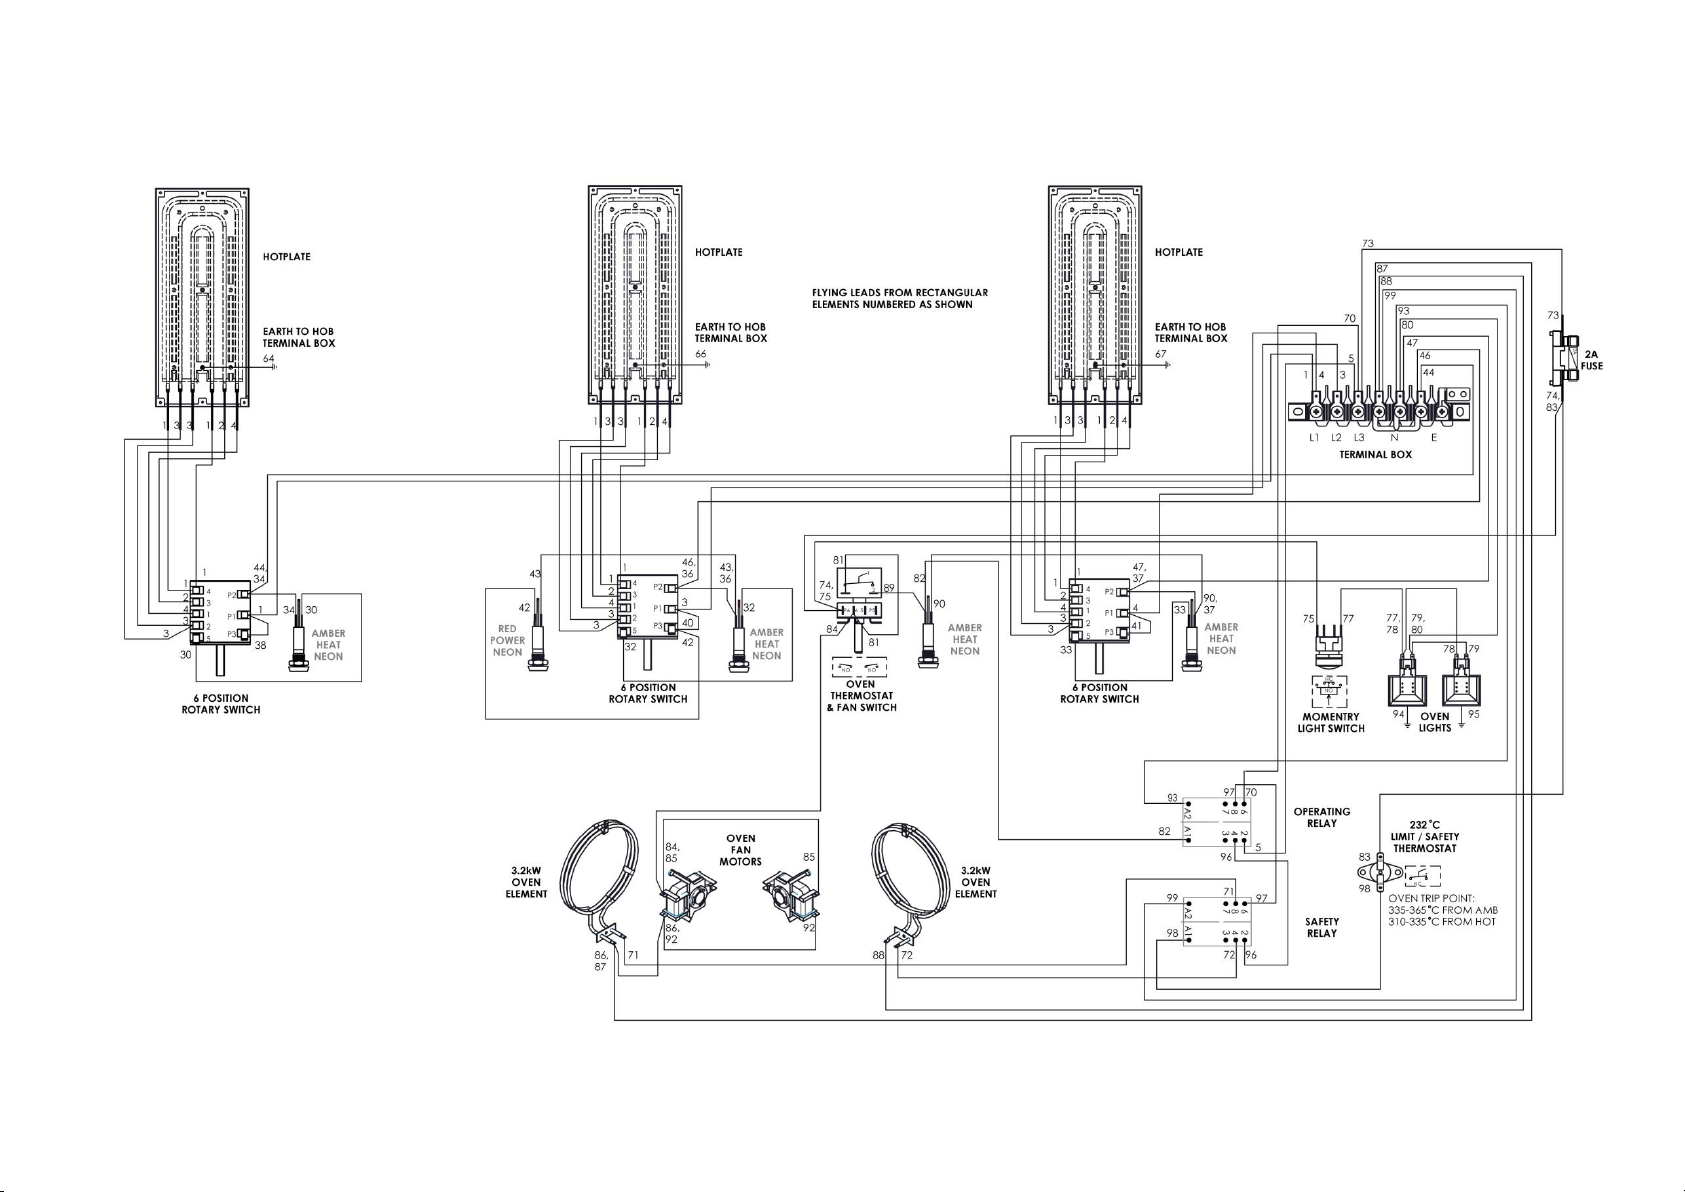
E3101 OTC THREE HOTPLATE RANGE WIRING DIAGRAM
Page 12
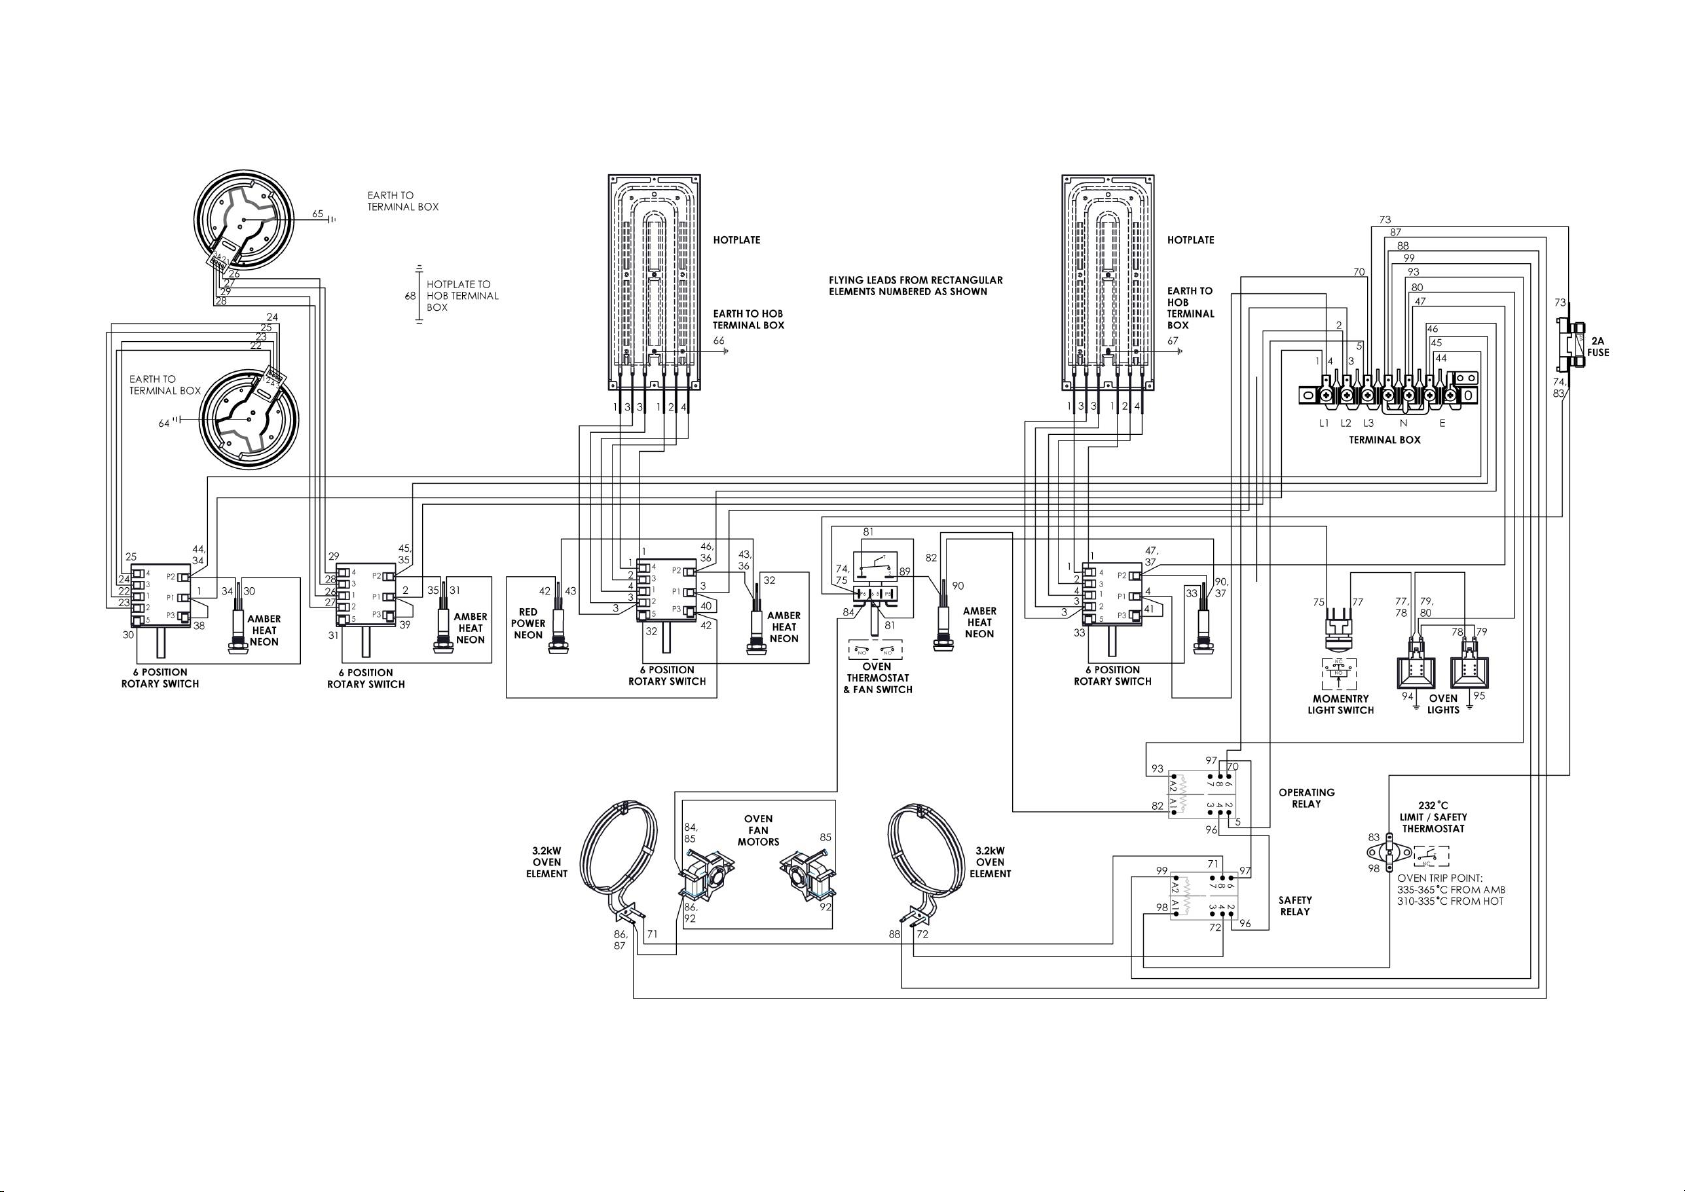
E3101 OTC FOUR HOTPLATE RANGE WIRING DIAGRAM
Page 13
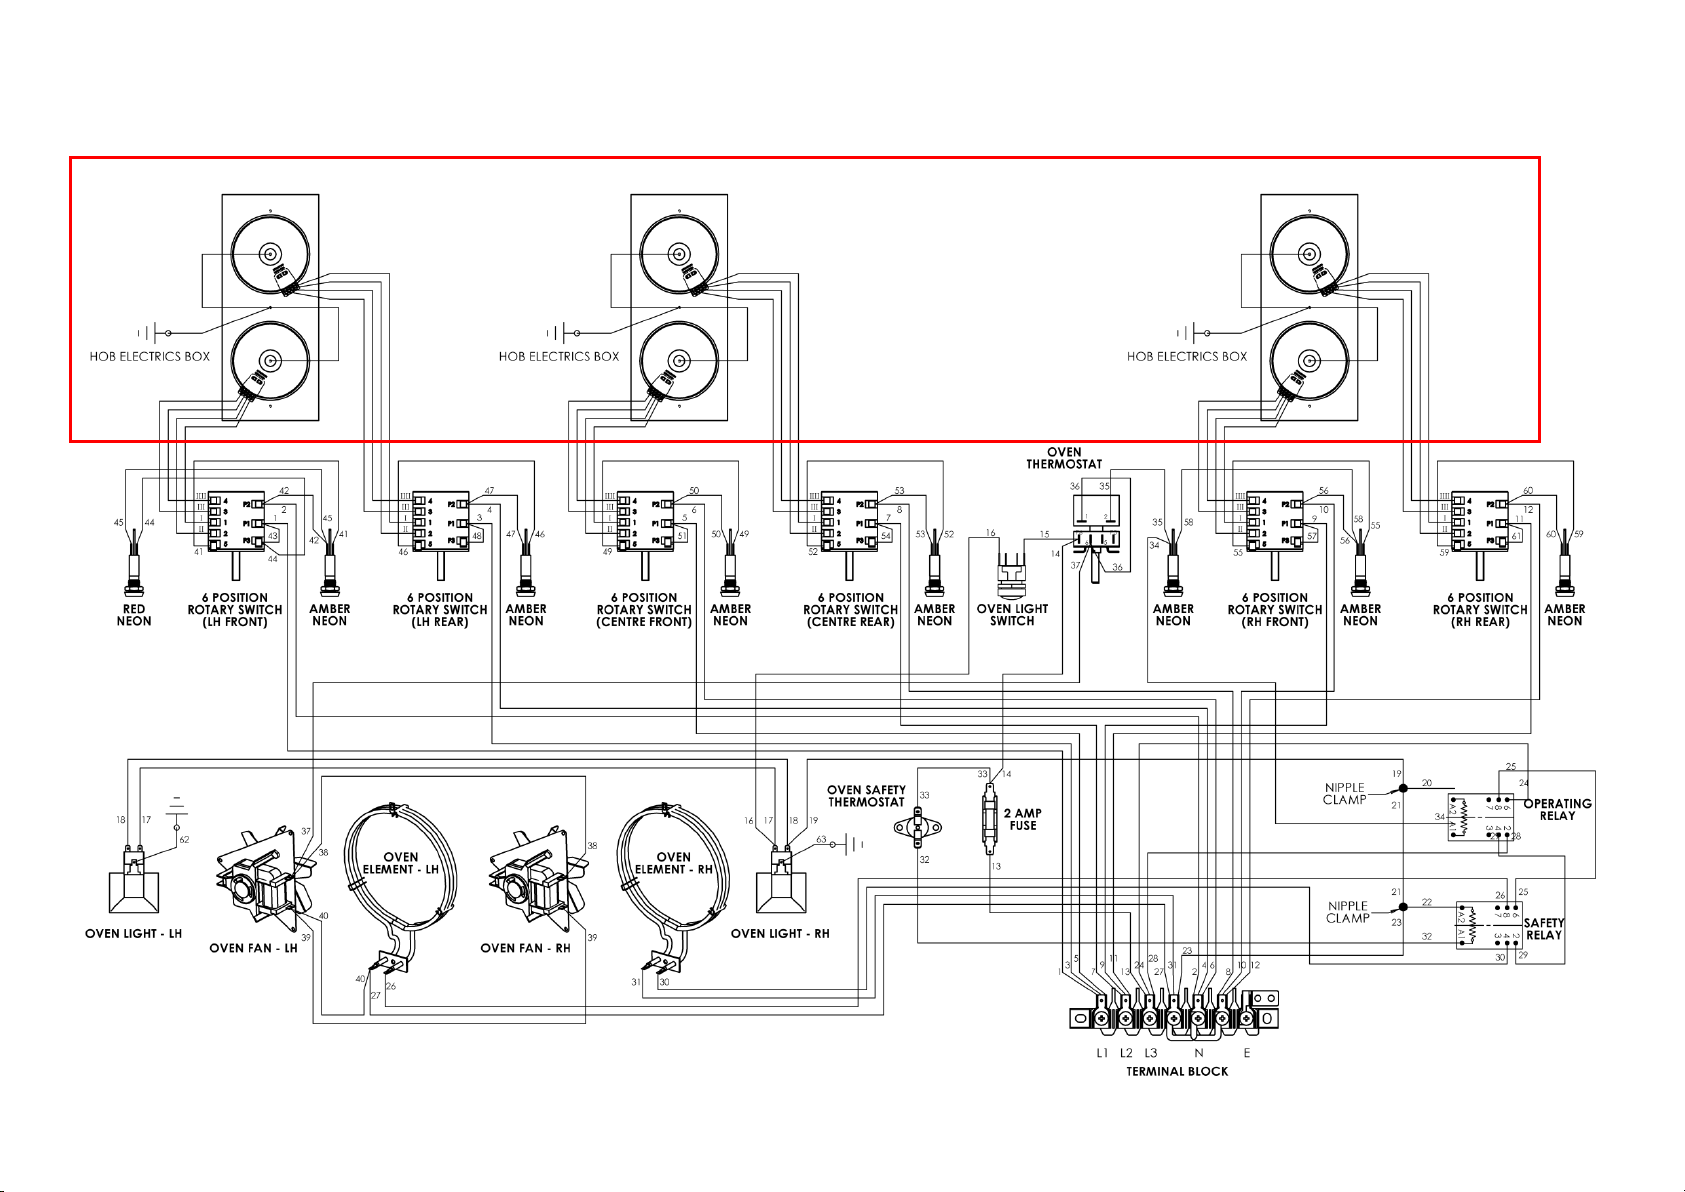
E3101P OTC SIX HOTPLATE RANGE WIRING DIAGRAM
Page 14
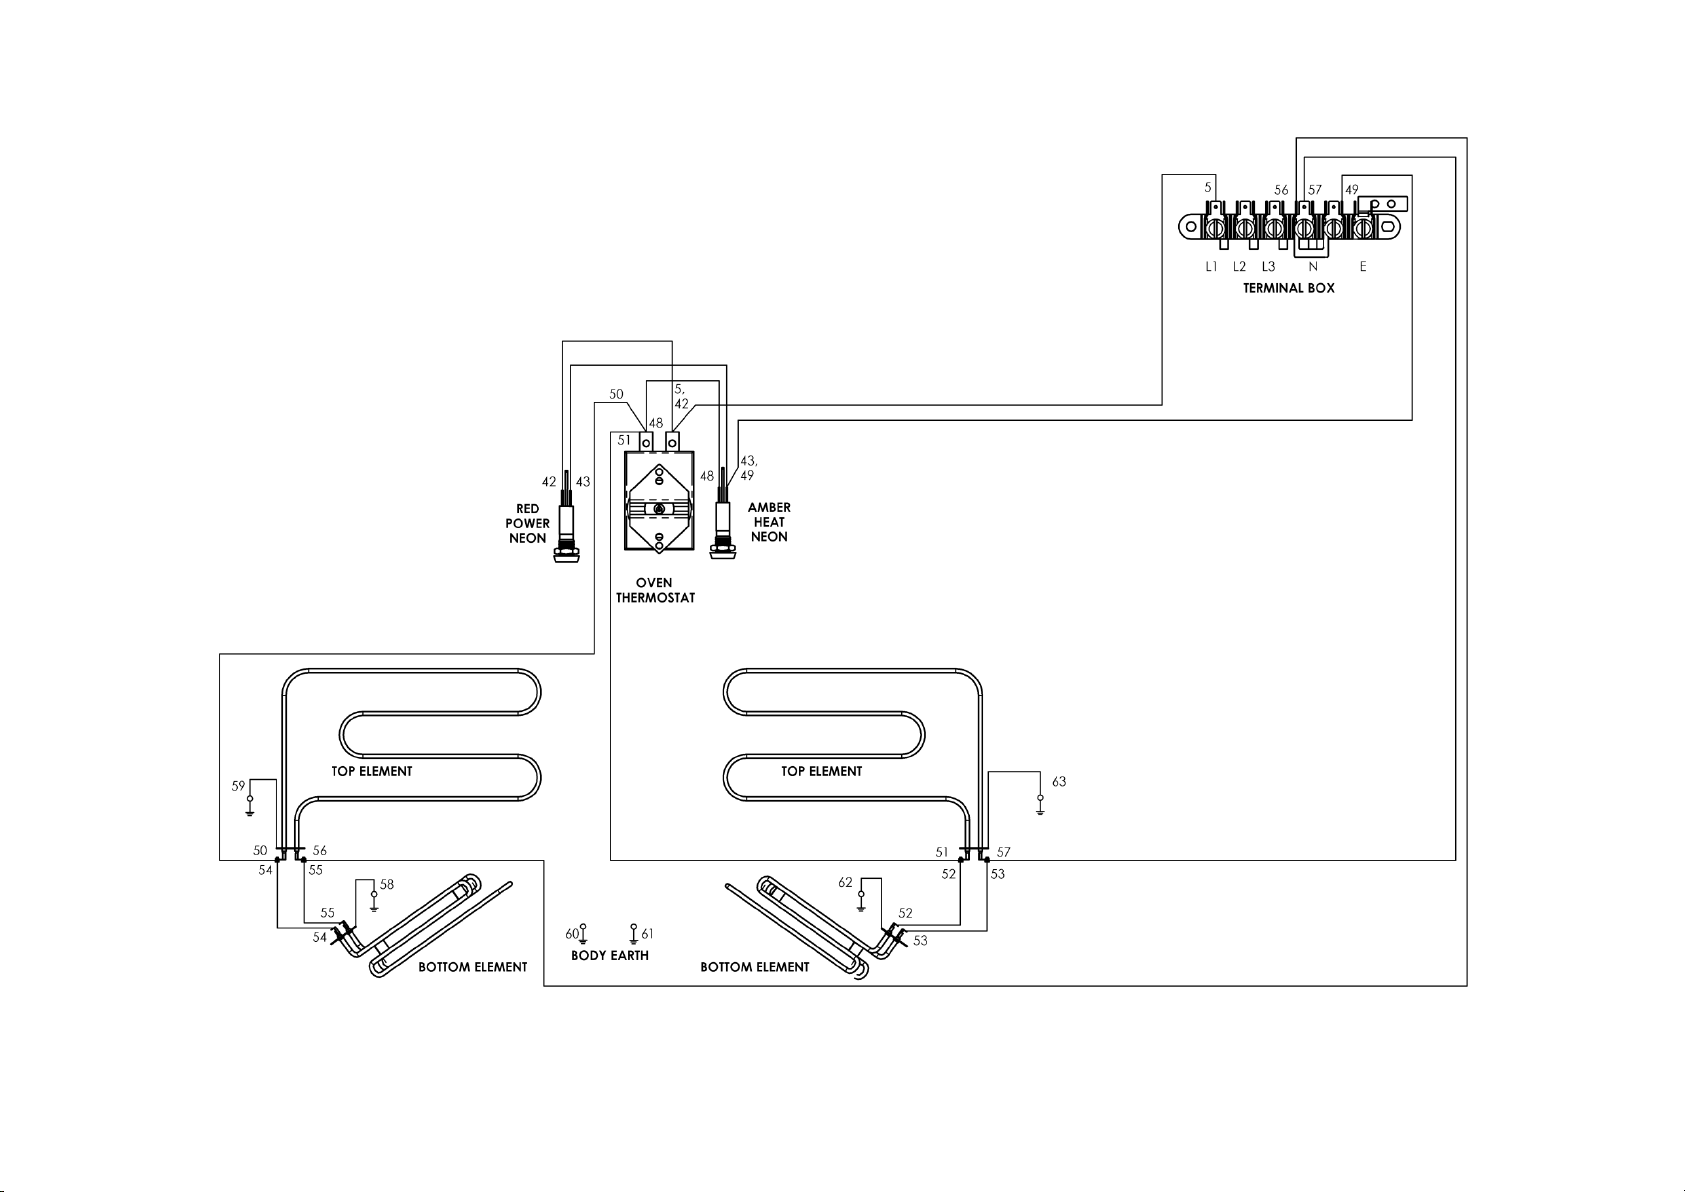
E3117 GENERAL PURPOSE OVEN WIRING DIAGRAM
Page 15
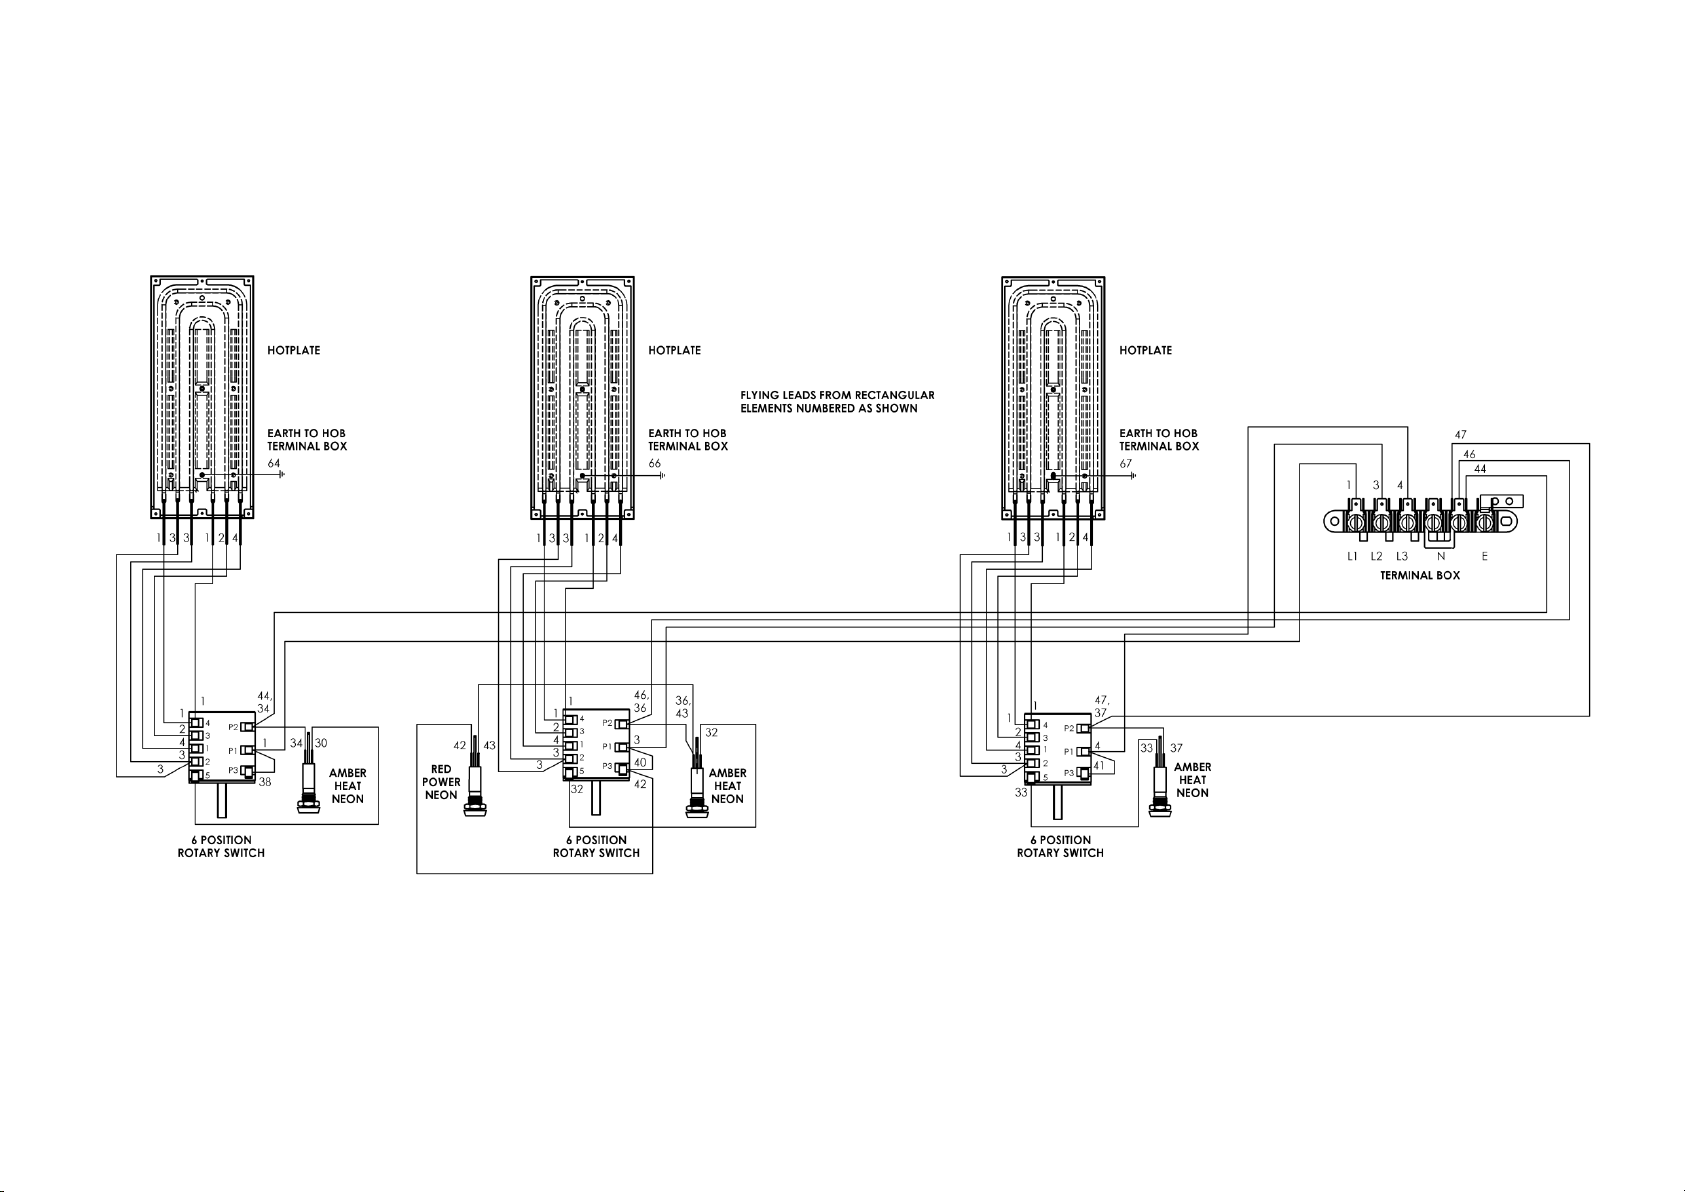
E3121 THREE HOTPLATE BOILING TABLE WIRING DIAGRAM
Page 16
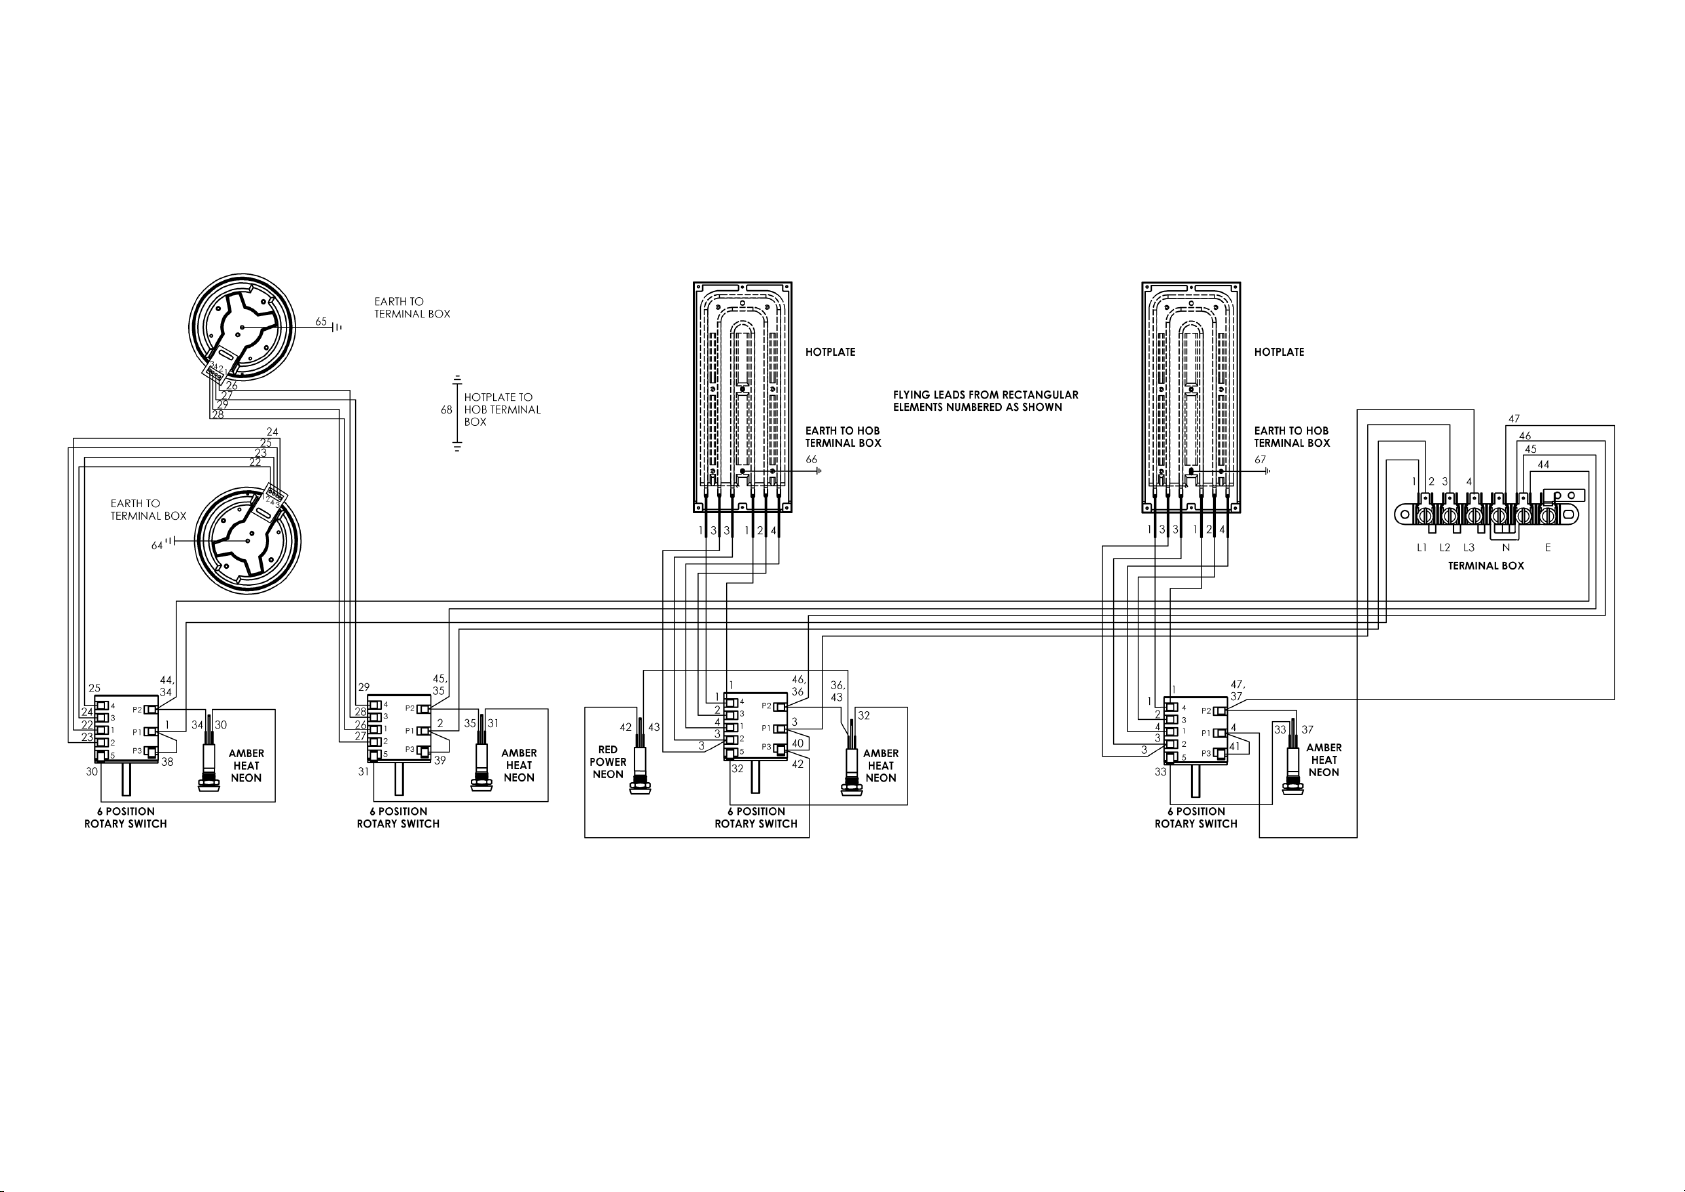
E3121 FOUR HOTPLATE BOILING TABLE WIRING DIAGRAM
Page 17
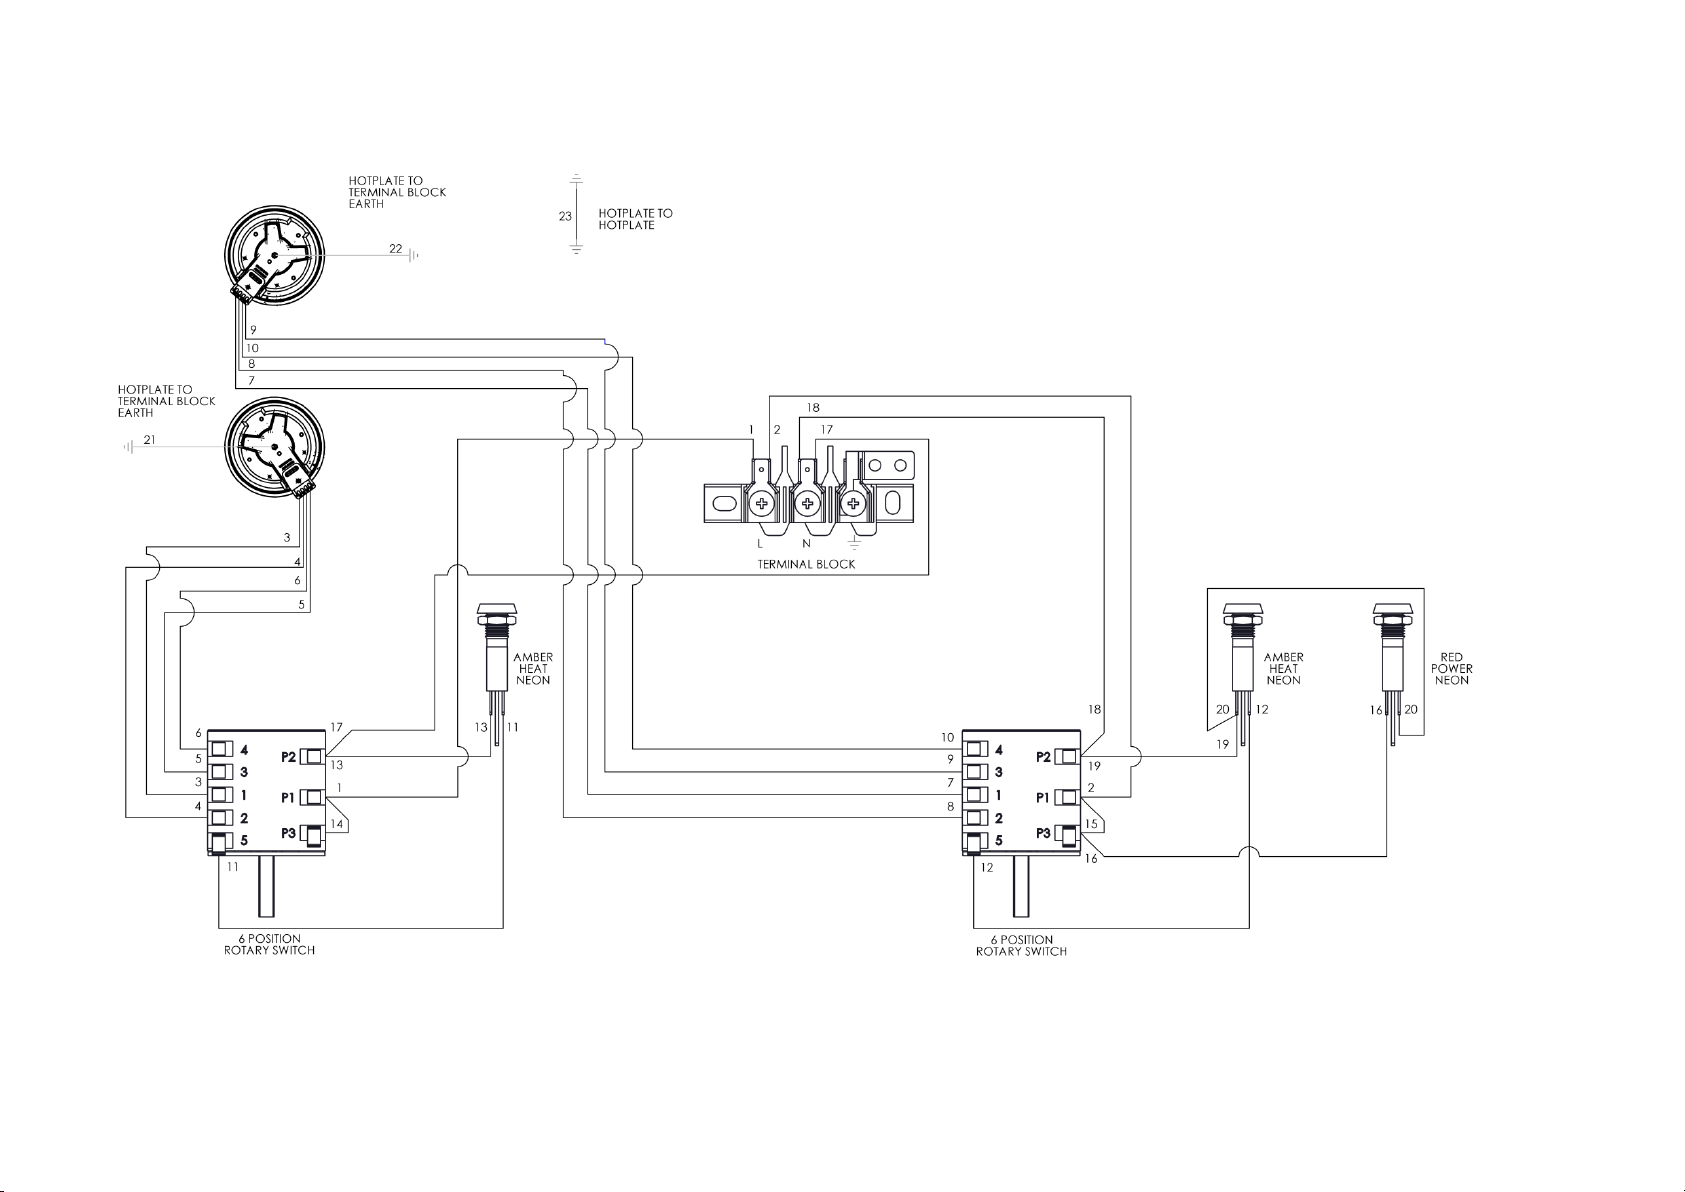
E3122 TWO HOTPLATE BOILING TABLE WIRING DIAGRAM
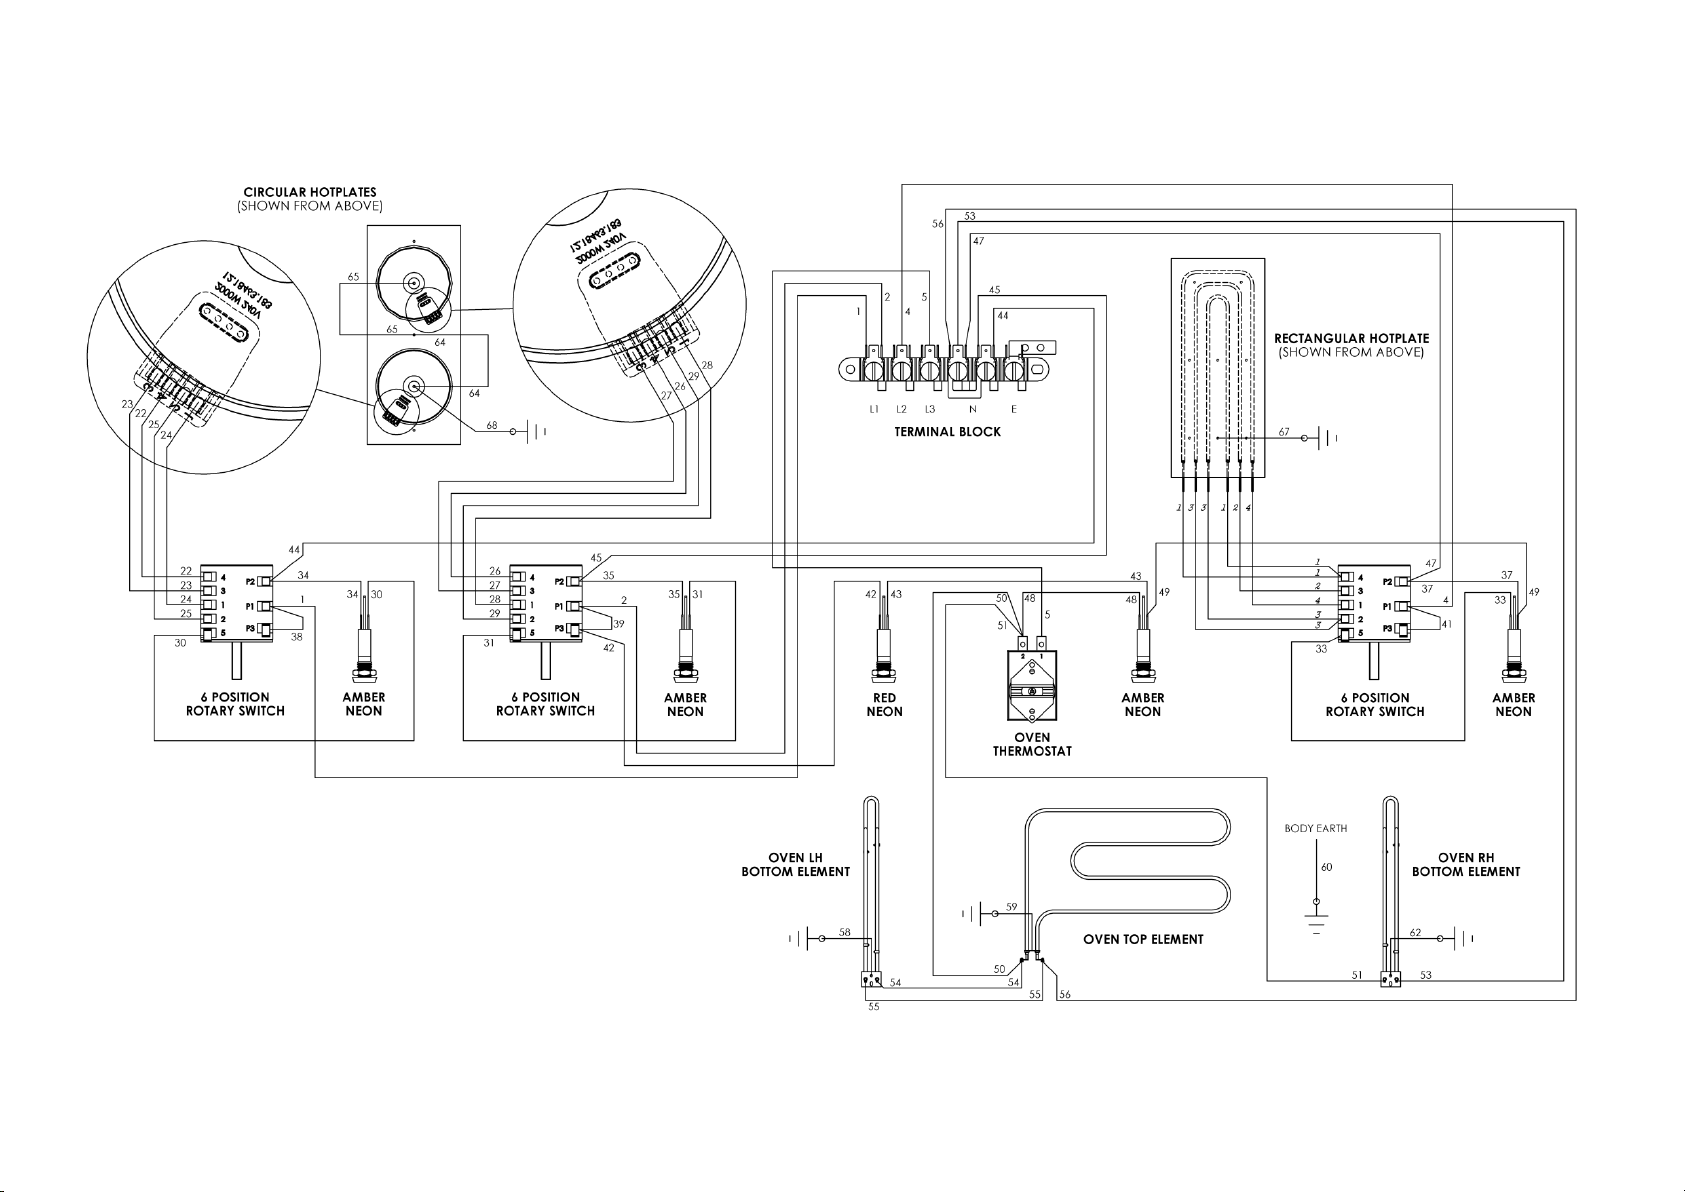
E3161 THREE HOTPLATE RANGE WIRING DIAGRAM
Page 18
Page 19
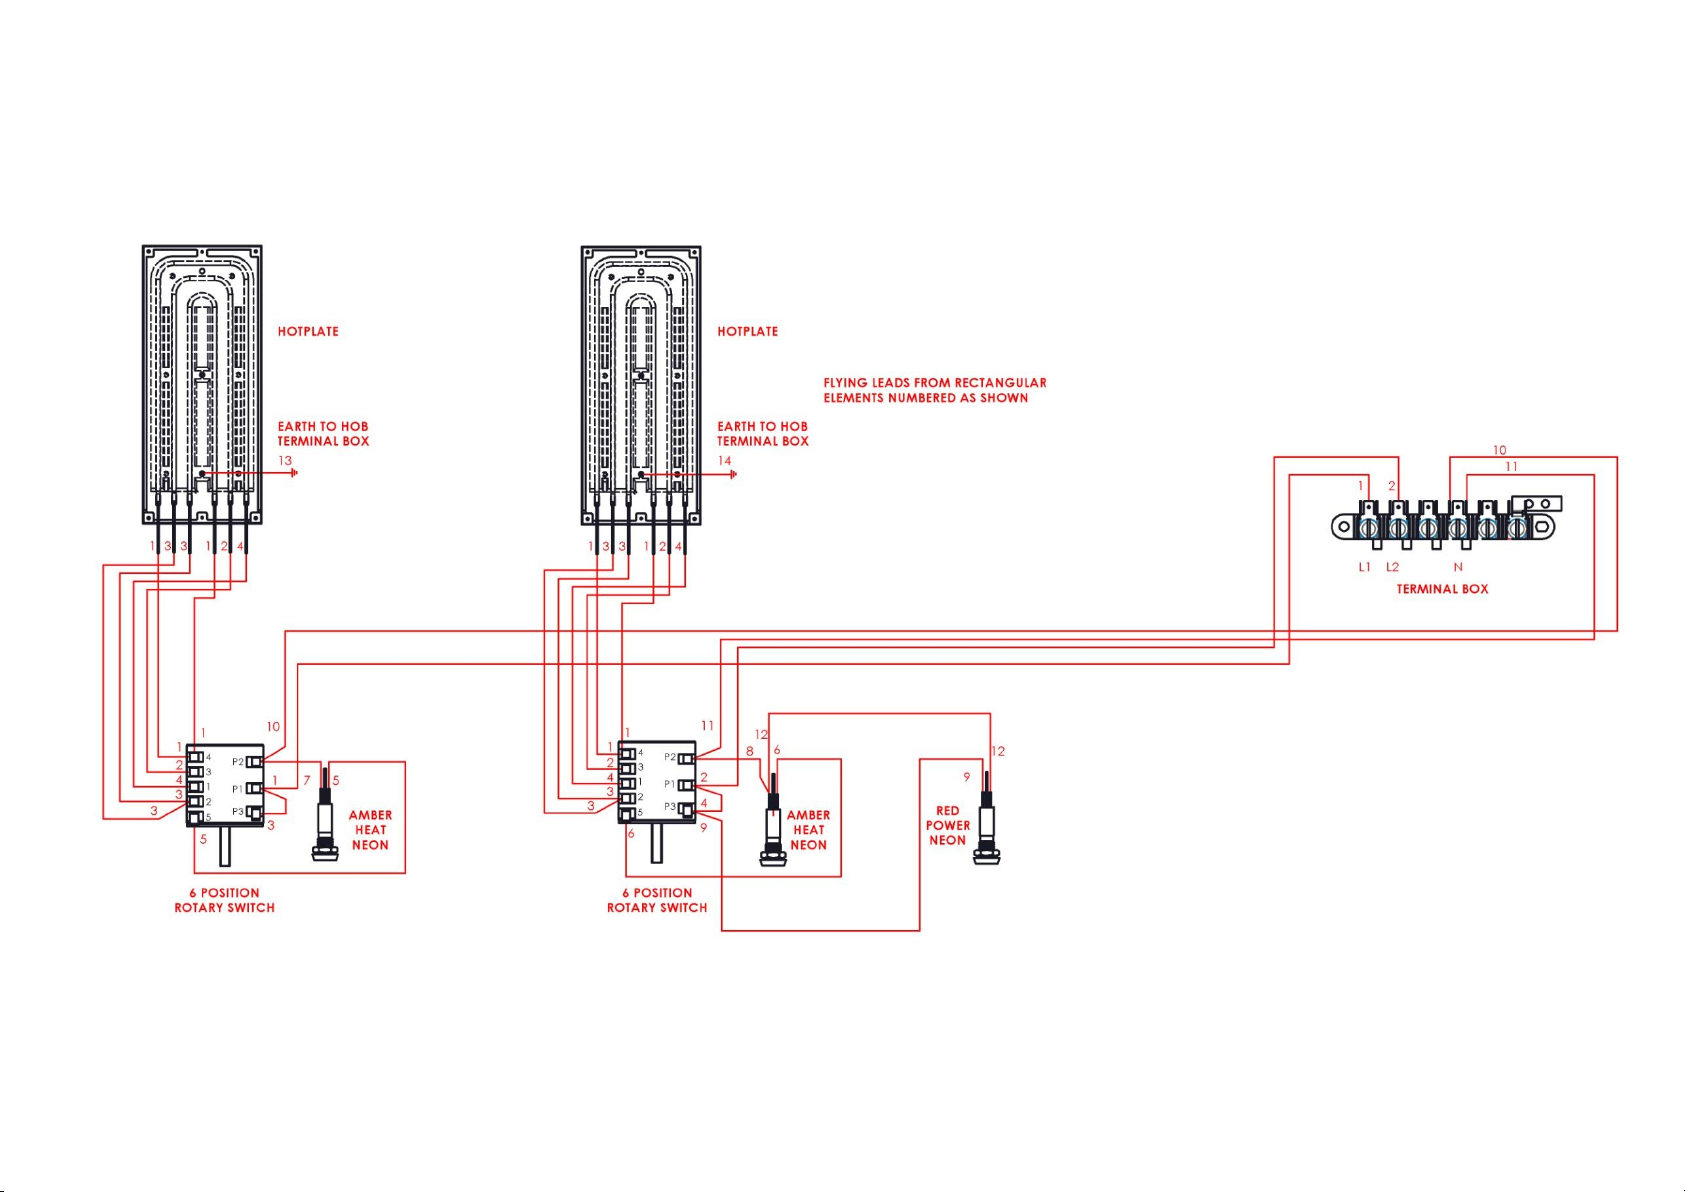
E3162 TWO HOTPLATE BOILING TOP WIRING DIAGRAM
Page 20
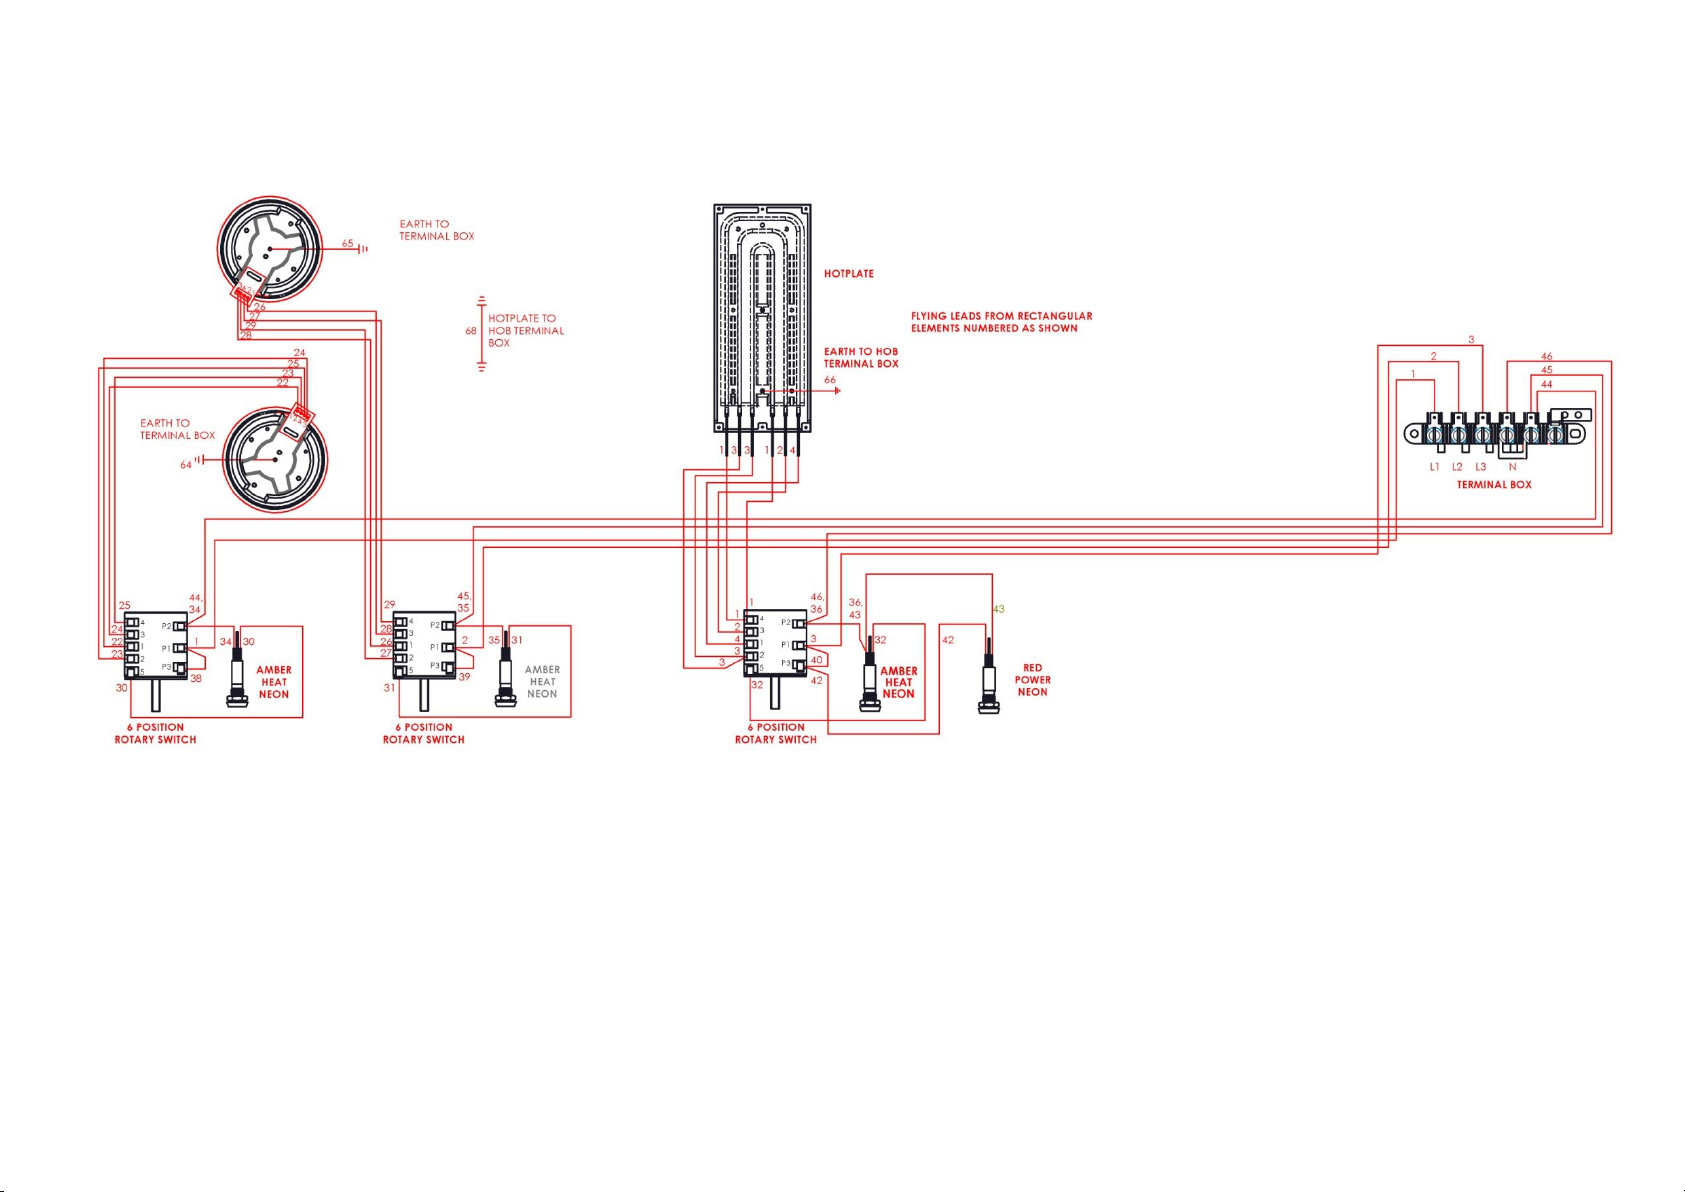
E3163 THREE HOTPLATE BOILING TOP WIRING DIAGRAM
 Loading...