

Page 1
T100508 Ref. 1
E2102 Forced
Convection Oven Range
E2112 Forced
Convection Oven
USERS INSTRUCTIONS
SECTION 1 - GENERAL DESCRIPTION
SECTION 2 - CONTROLS and OPERATION
SECTION 3 - COOKING HINTS
SECTION 4 - CLEANING and MAINTENANCE
This appliance has been CE-marked on the basis of compliance with the Low Voltage and EMC Directives for
the voltages stated on the Data Plate.
IMPORTANT
This appliance must only be installed by a competent person in compliance with the regulations in
force at the time.
UK regulations are listed on the front of the Installation and Service Manual.
Regular servicing by a qualified person is recommended to ensure the continued safe and efficient
performance of the appliance.
WARNING - THIS APPLIANCE MUST BE EARTHED!
Upon receipt of this manual, the installer should instruct a responsible person (or persons) as to the correct
operation and maintenance of the unit.
This equipment is designed FOR PROFESSIONAL USE ONLY and be operated by QUALIFIED persons. It is
the responsibility of the supervisor or equivalent to ensure that the user wears SUITABLE PROTECTIVE
CLOTHING. Attention should also be drawn to the fact that some parts of the appliance will, by necessity,
become VERY HOT and could cause burns if touched accidentally.
WEEE Directive Registration No. WEE/DC0059TT/PRO
At end of unit life, dispose of appliance and any replacement parts
in a safe manner, via a licenced waste handler.
Units are designed to be dismantled easily and recycling of all
material is encouraged whenever practicable.
Falcon Foodservice Equipment
HEAD OFFICE AND WORKS
Wallace View, Hillfoots Road, Stirling FK9 5PY
SERVICELINE CONTACT -
PHONE - 01438 363 000 FAX - 01438 369 900
Page 2
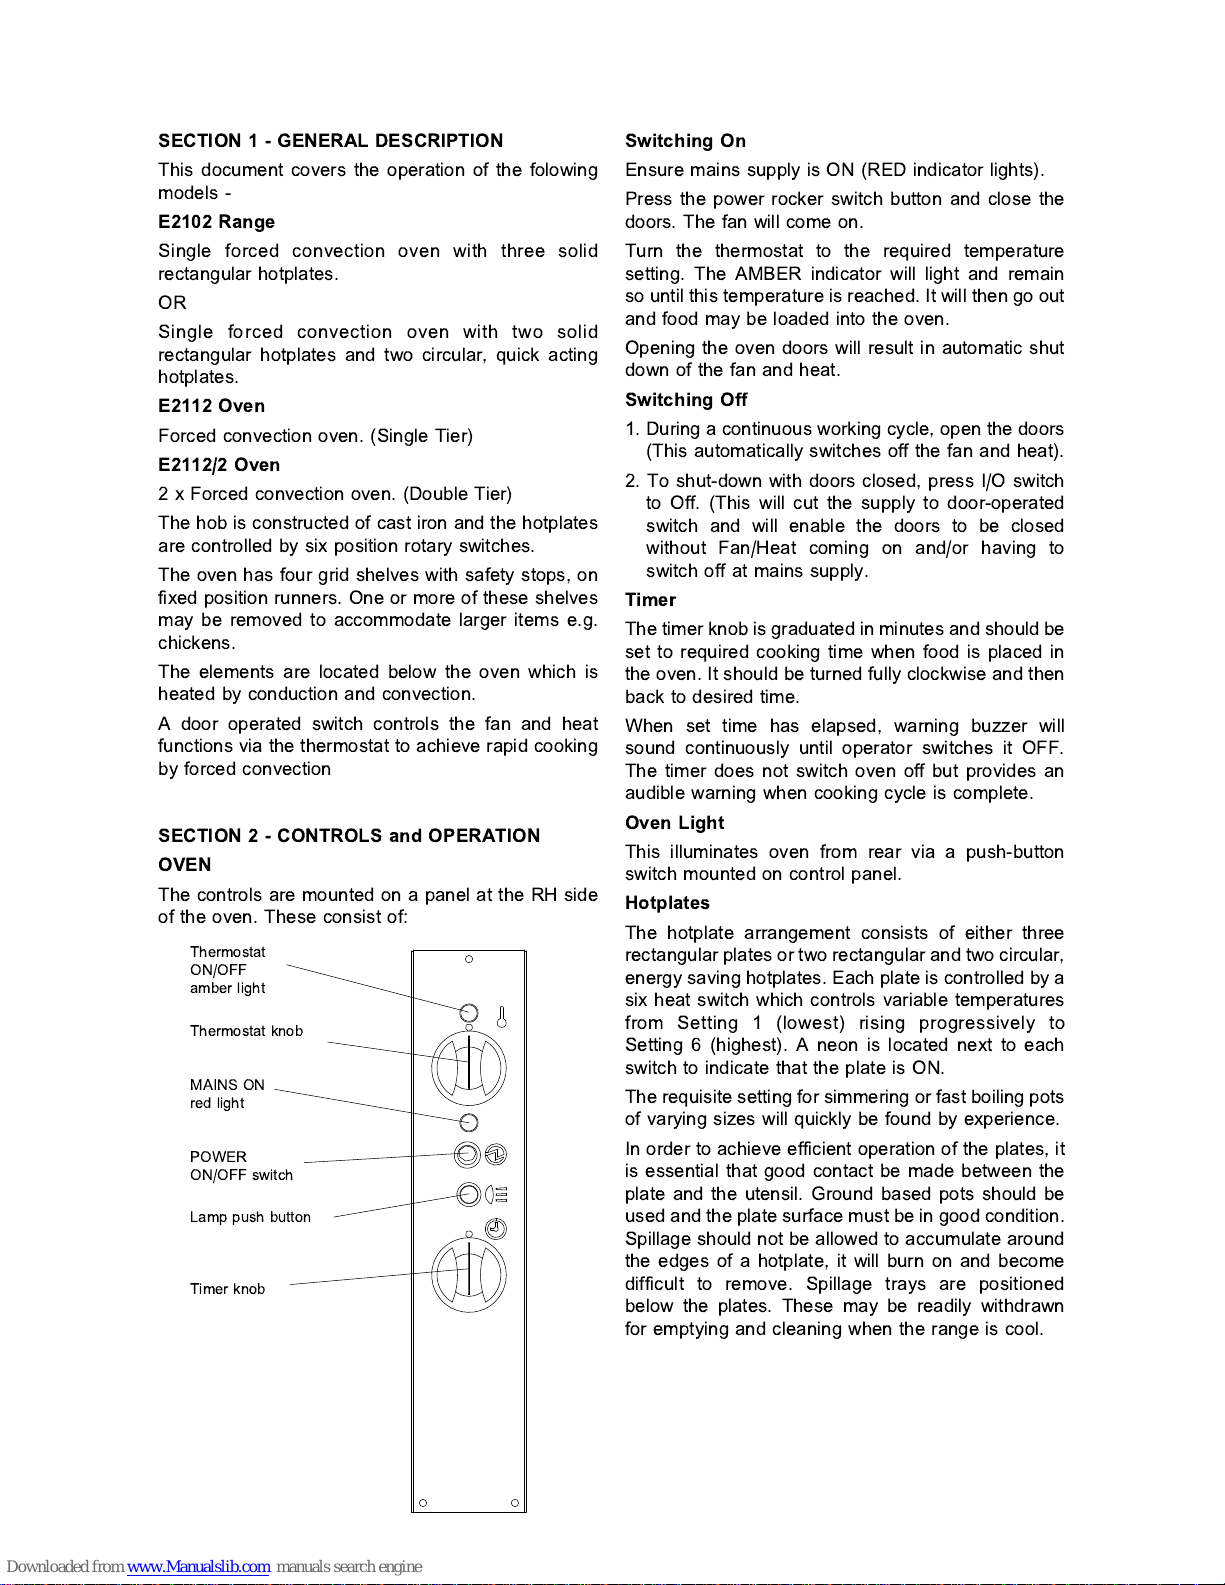
Thermostat
ON/OFF
amber light
Thermostat knob
MAINS ON
red light
POWER
ON/OFF switch
Lamp push button
Timer knob
SECTION 1 - GENERAL DESCRIPTION
This document covers the operation of the folowing
models -
E2102 Range
Single forced convection oven with three solid
rectangular hotplates.
OR
Single forced convection oven with two solid
rectangular hotplates and two circular, quick acting
hotplates.
E2112 Oven
Forced convection oven. (Single Tier)
E2112/2 Oven
2 x Forced convection oven. (Double Tier)
The hob is constructed of cast iron and the hotplates
are controlled by six position rotary switches.
The oven has four grid shelves with safety stops, on
fixed position runners. One or more of these shelves
may be removed to accommodate larger items e.g.
chickens.
The elements are located below the oven which is
heated by conduction and convection.
A door operated switch controls the fan and heat
functions via the thermostat to achieve rapid cooking
by forced convection
SECTION 2 - CONTROLS and OPERATION
OVEN
The controls are mounted on a panel at the RH side
of the oven. These consist of:
Switching On
Ensure mains supply is ON (RED indicator lights).
Press the power rocker switch button and close the
doors. The fan will come on.
Turn the thermostat to the required temperature
setting. The AMBER indicator will light and remain
so until this temperature is reached. It will then go out
and food may be loaded into the oven.
Opening the oven doors will result in automatic shut
down of the fan and heat.
Switching Off
1. During a continuous working cycle, open the doors
(This automatically switches off the fan and heat).
2. To shut-down with doors closed, press I/O switch
to Off. (This will cut the supply to door-operated
switch and will enable the doors to be closed
without Fan/Heat coming on and/or having to
switch off at mains supply.
Timer
The timer knob is graduated in minutes and should be
set to required cooking time when food is placed in
the oven. It should be turned fully clockwise and then
back to desired time.
When set time has elapsed, warning buzzer will
sound continuously until operator switches it OFF.
The timer does not switch oven off but provides an
audible warning when cooking cycle is complete.
Oven Light
This illuminates oven from rear via a push-button
switch mounted on control panel.
Hotplates
The hotplate arrangement consists of either three
rectangular plates or two rectangular and two circular,
energy saving hotplates. Each plate is controlled by a
six heat switch which controls variable temperatures
from Setting 1 (lowest) rising progressively to
Setting 6 (highest). A neon is located next to each
switch to indicate that the plate is ON.
The requisite setting for simmering or fast boiling pots
of varying sizes will quickly be found by experience.
In order to achieve efficient operation of the plates, it
is essential that good contact be made between the
plate and the utensil. Ground based pots should be
used and the plate surface must be in good condition.
Spillage should not be allowed to accumulate around
the edges of a hotplate, it will burn on and become
difficult to remove. Spillage trays are positioned
below the plates. These may be readily withdrawn
for emptying and clean ing when the range is cool.
Page 3

Important
To ensure long life of the hotplates and to conserve
energy, DO NOT leave the plates switched on when
not in use. Particularly at high settings. If for any
reason it is considered necessary to retain a plate on
heat, reduce the setting to Mark 2 or 3.
Circular plates embody a temperature limiting device
which automatically shuts down part of the element
circuit should it become overheated when left on
without a pot on it. The full circuit is reacivated when a
pot is placed upon the plate.
Lift Off Fryplate (Optional Extra)
This is placed over the fast boiling plates with the
drain slot to the front and the pads on the underside
locating around the rim of the boiling plates.
The drainage tray slides in from either side at the front
below the slot during operation (see diagram. It may
be removed, without di sturbing the fryplate, for
draining and/or washing.
SECTION 3 - COOKING HINTS
Using the Oven
When the oven has reached working temperature,
the AMBER light will go out. Operate ON/OFF as the
thermostat maintains the temperature.
Opening the doors or switching the power button off
shut down the fan and thermostat.
Pre-Heating Time
Allow at least 45 minutes from switching on a cold
oven, irrespective of the desired temperature setting.
Insert the food as quickly as possible and close the
doors firmly.
Loading
All four shelves may be used simultaneously and
normally, no manipulation of items on the shelves is
necessary.
Containers of food up to 75mm in depth can be
prepared when using four shelves. If deeper trays
require to be cooked, i.e. chicken, one or more
shelves may be removed as necessary.
The shelves have stops to prevent accidental
removal. To remove, lift the stops above the front of
the side runners.
When loading, the oven doors should be kept open
for as short a time as possible in order to minimise
heat loss.
Tray Size
The oven will accept gastronorm Trays of dimensions
650mm x 530mm or conventional trays up to this size.
Trays and dishes must always be located centrally on
the shelves.
Heating the Fryplate
Turn both boiling plate controls to 6. It is advisable to
have both plates on simultaneously for even-ness of
heating across the fryplate.
The normal time for heating to 200
o
C is 25 minutes
with the controls switched FULL ON. As the Boiling
Plates are thermostatically controlled, no adjustment
of the controls is necessary to maintain maximum
temperature.
When lower cooking temperatures are required e.g.
120
o
C for eggs, set the controls at 3 and allow
10 minutes heat up time.
Page 4

Baking
TEMP TIME
No. of
SHELVES
Scones and Small Buns 230 15 mins 4
Vol-au-Vent Cases 200 10 mins 4
Gingerbread, etc 150 2 hours 4
Meringue (white) 100
2 hours
30 minutes
4
Shortbread 175
15 to 20
minutes
4
Biscuits 175
10 to 15
minutes
4
Fish
TEMP TIME
No. of
SHELVES
Poached Haddock
175 45 mins 4
Puddings
TEMP
TIME
No. of
SHELVES
Baked Rice
175
1hrto1hr
15 minutes
4
Bakewell Tarts
190
30 to 45
minutes
4
Large Sponge Slab
(25 - 38mm deep)
200 30 mins
4
Yorkshire Pudding (Large) 240 25 mins 4
Meats
TEMP TIME
No. of
SHELVES
Lamb, Roast Beef, etc. 150 - 175
25 minutes
per 0.5kg
2
Chicken 150
1.8kg (4lbs)
in 1 hour
2
Braised Steak 175
1 hour 30
mins - 2hrs
4
Pork Chops 175
15 to 20
minutes
4
Lancashire Hotpot 175
1 hour 30
mins - 2hrs
4
Cornish Pasties 190 30 mins 4
Miscellaneous
TEMP TIME
No. of
SHELVES
Roast Potatoes 200 30 mins 4
Baked Potatoes 215 45 mins 4
Tomatoes 190
8to10
minutes
4
Toad in the Hole 215 30 mins 4
Baked Apples 200 30 mins 4
SECTION 4 - CLEANING and MAINTENANCE
Importance
BEFORE CLEANING IS UNDERTAKEN, ENSURE
THAT THE POWER SUPPLY IS ISOLATED FROM
MAINS. APPLIANCE MUST NOT BE CLEANED
WITH A JET OF WATER, OR STEAM CLEANED.
General
Clean with soapy water as often as possible then
rinse and dry thoroughly. Grease should be removed
using nylon or scotch pads with care, especially when
new as these may scratch the enamelled surfaces.
Before removing any parts, note their arrangement
and replace them in the same positions after
completion.
Oven
The oven shelves may be removed for cleaning by
lifting the stops over the front side of the runners.
The enamelled linings should not be removed,
except in the event of servicing.
Daily cleaning is recommended, preferably while
oven is still warm.
Use of a disposable cloth with a proprietary detergent
is the best method. For st ubborn deposits, a
proprietary oven cleaner may be used in accordance
with its manufacturer's instruction.
Hotplate and Fryplate
A smooth bladed metal scraper is handy for removing
deposits of burned-on grease from hotplate and
fryplate su rface.
The hotplate spillage trays are simply removed for
cleaning by sliding these out from front of range.
 Loading...