

Page 1
1
ONE SERIES
User, installation, and servicing instructions
6 ZONE INDUCTION RANGE
E161i & E163i
4 ZONE INDUCTION RANGE
E143i
Please read these instructions before use
T101029
Rev 12
DATE PURCHASED:
MODEL NUMBER:
SERIAL NUMBER:
DEALER:
SERVICE PROVIDER:
Page 2
2
Falcon Foodservice Equipment
HEAD OFFICE
Wallace View, Hill foots Road, Stirling, FK9 5PY, Scotland
Phone: 01786 455200
PREVENTATIVE MAINTENANCE CONTRACT
To obtain maximum performance from this unit regular servicing of the appliance should be undertaken to
ensure correct operation, it is functioning as intended, and safe to use. We recommend servicing in accordance
with SFG20 Maintenance Schedules and as a minimum, after 2,500 hours of use, or annually, whichever comes
first and that a maintenance contract be arranged with an appointed service contact. Visits may then be made
at agreed intervals to carry out adjustments and repairs.
WEEE Directive Registration No. WEEE/DC0059TT/PRO
At end of appliance life, dispose of appliance and any replacement parts in a
safe manner, via a licensed waste handler. Appliances are designed to be
dismantled easily and recycling of all material is encouraged whenever
practicable.
Dear Customer
Thank you for choosing Falcon Foodservice Equipment.
This manual can be downloaded from www.falconfoodservice.com or scan
here:
IMPORTANT: Please keep this manual for future reference.
Page 3

3
CONTENTS
1.0 SYMBOLS & LABELS 5
2.0 SAFETY GUIDANCE 6
2.1 GENERAL SAFETY 6
2.2 INSTALLATION SAFETY 7
2.3 ELECTRICAL SAFETY 7
2.4 FIRE SAFETY 7
2.5 MAINTENANCE SAFETY 9
3.0 APPLIANCE INFORMATION 12
4.0 OPERATION 13
4.1 COMPONENT PARTS 14
4.1 COMPONENT PARTS – E161i & E163i 14
4.1 COMPONENT PARTS – E143i 15
4.2 CONTROLS – E161i & E163i 16
4.2 CONTROLS – E143i 17
4.3 USING THE APPLIANCE 18
4.4 HOB SETTINGS 19
4.5 POWER BOOST 19
4.6 AUTOMATIC HEAT-UP CONTROL 19
4.7 CONTROL LOCK FUNCTION 19
4.8 PAN DETECTION 20
4.9 RESIDUAL HEAT DISPLAY 20
4.10 DIGITAL DISPLAY CODES 20
4.11 E143i, E161i & E163i – USING THE OVEN 20
5.0 CLEANING AND MAINTENANCE 21
5.1 CLEANING 22
5.2 MAINTENANCE 22
6.0 SPECIFICATION 23
6.1 APPLIANCE WEIGHT TABLE 23
6.2 ELECTRICAL DATA TABLE 23
7.0 DIMENSIONS / CONNECTION LOCATIONS 24/25
8.0 INSTALLATION 26
8.1 SITING / CLEARANCES 27
8.2 ASSEMBLY 28
8.3 ELECTRIC SUPPLY & CONNECTION 29
8.4 COMMISSIONING 32
8.5 INSTRUCTION TO USER 32
Page 4

4
9.0 SERVICING 33
9.1 CONTROL PANEL REMOVAL 33
9.2 DOOR REMOVAL 34
9.3 CONTROL SWITCHES REMOVAL 34
9.4 INDUCTION GENERATOR REMOVAL 35
9.5 HOB COOLING THERMOSTAT REMOVAL 37
9.6 REAR COOLING FAN REMOVAL 37
9.7 OVEN THERMOSTAT AND FAN SWITCH 38
9.8 OVEN LIGHT 38
9.9 OVEN ELEMENT REMOVAL 38
9.10 OVEN FAN REMOVAL 38
9.11 SAFETY & OPERATION RELAY REMOVAL 39
9.12 OVEN & REAR COOLING FAN CONTROL FUSES 39
9.13 OVEN SAFETY TRIP SWITCH REPLACEMENT 40
9.14 OVEN SAFETY TRIP SWITCH (FRONT ACCESS) 40
9.15 OVEN LAMP ASSEMBLY REPLACEMENT 41
9.16 CIRCUIT DIAGRAMS 42
9.17 WIRING DIAGRAMS 45
10.0 FAULT FINDING 48
11.0 SPARE PARTS 50
12.0 SERVICE INFORMATION 51
Page 5

5
1.0 SYMBOLS
SCREWDRIVER
SPANNER
COOKING OIL
GREASE
WARNING
SPARK IGNITION
FLAME
VIEWPORT
ALLEN KEY
IGNITER
C SPANNER
REMOVE DEVICE
PLUG REMOVER
NON-IONISING
ELECTROMAGNETIC
RADIATION
WARNING
ELECTRICITY
READ MANUAL
FIRE RISK
Page 6
6
2.0 SAFETY GUIDANCE
2.1 GENERAL SAFETY
2.1.1 These instructions are only valid if the country code appears on the appliance. If the
code does not appear on the appliance, refer to the technical instructions for
adapting the appliance to the conditions for use in that country.
2.1.2 These appliances have been UKCA/CE-marked based on compliance with the Gas
Appliance Regulations/Product Safety and Metrology Regulations, Electrical and
Electromagnetic Compatibility (EMC) Regulations/Directives for the Countries, Gas
Types and Pressures as stated on the data plate.
2.1.3 This equipment is for professional use only and must be used by qualified persons.
2.1.4 Never leave this appliance unsupervised when in use and always turn products off at
the end of service.
2.1.5 The installer must instruct the responsible person(s) of the correct operation and
maintenance of the appliance.
2.1.6 Check that no damage has occurred to the appliance or supply cord during transit. If
damage has occurred, do not use this appliance.
2.1.7 Ensure the supply cord is routed free from the appliance to avoid damage.
2.1.8 The appliance has been designed and approved to use Falcon kick plates; nonFalcon kick plates could potentially adversely affect the performance of the appliance
by restricting the air to the appliance.
2.1.9 Training and Competence: To help ensure the safe use of this appliance there is a
requirement for you to provide whatever information, instruction, training and
supervision as is necessary to ensure, so far as is reasonably practicable, the health
and safety of all users.
2.1.10 For further help and information on training and competence we refer you to the
Health & Safety Executive website; www.hse.gov.uk document ref: health and safety
training INDG345. International customers should default to the health and safety
guidelines provided by your government body.
2.1.11 Risk Assessment: As part of managing the health and safety of your business you
must control any risks identified in your commercial kitchen. To do this you need to
think about what might cause harm to people and decide whether you are taking
reasonable steps to prevent that harm. This is known as risk assessment. It is
important to consider the environment around the product as well as the product
itself. For example, oil or food spills will present a significant risk to users so the
need to immediately clean up such spills must be reflected in staff training.
2.1.12 Record the training that you provide and support it by providing safe system of work
(SSOW) documents that set out procedures to be followed for potentially hazardous
tasks.
2.1.13 For further help and information on risk assessments we would refer you to you the
Health and Safety Executive website; www.hse.gov.uk document ref: risk
assessment INDG163. International customers should default to the health and
safety guidelines provided by your government body.
Page 7
7
2.2 INSTALLATION SAFETY
2.2.1 Installation must meet national or local regulations. Attention must be paid to safety
(installation & use) regulations, health and safety at work act, local and national
building regulations, fire precautions act.
2.2.2 The installer must instruct the responsible person(s) of the correct operation and
maintenance of the appliance.
2.2.3 2.2.4 Put a documented system in place for periodic inspections, testing and
maintenance of electrical appliances. Check that the fixed electrical installation has
been inspected and tested by a competent electrical contractor (e.g. NICEICapproved or ECA member) as prescribed in BS7671, within the last 5 years.
2.3 ELECTRICAL SAFETY
2.3.1 To prevent shocks, this appliance must be earthed.
2.3.2 This unit is fitted with an equipotential connection at the rear on the base.
2.3.3 Before attempting any maintenance, isolate the appliance at the mains switch and
take steps to ensure that it is not inadvertently switched on.
2.3.4 We recommend, Supplementary electrical protection with the use of a type A
residual current device (RCD).
2.3.5 We recommend fixed wiring appliances incorporate a locally situated switch
disconnector to connect to, which is easily accessible for switching off and safe
isolation purposes. The switch disconnector must meet the specification
requirements of IEC 60947.
2.4 FIRE SAFETY
Appliances can present various hazards in the catering environment if not correctly used,
operated, and maintained. Hazards including fire, burns from hot pans, contact with hot surfaces,
fumes from boiling cleaning chemicals, eye injuries from splashes and slips from oil spillages.
Operator Competency and Training
2.4.1 Ensure you are trained in the safe and proper use of the appliance and know how to
turn it off and switch the power off at the mains.
2.4.2 Ensure you are familiar with the kitchen fire safety procedures and the location and
proper use of correct fire safety equipment.
Fire Safety Equipment
Page 8

8
2.4.3 Provide an appropriate BS compliant fire blanket, and an adequate number of fire
extinguishers that comply with BS EN 3 (parts 1-6) and carry a BAFE or LPCB
approval mark. At least one must be appropriate for use on electrical fires.
Fire Suppression System
2.4.4 We recommend kitchen equipment and extraction systems are protected with a fire
suppression system. Check your insurance as this may also be a condition of your
policy.
2.4.5 Protect cooking and extraction equipment (including any associated extraction
ductwork and hoods inside the building) by having an extinguishing system installed,
in line with (or the equivalent of) LPS 1223. The system should include a local alarm,
automatic activation by a detection system and manual activation – located a safe
distance away from the cooking equipment, preferably by a fire escape route door.
Operational Safety
2.4.6 Do not leave the appliance unattended when powered on or when it is in use.
2.4.7 Always switch the appliance off and remove items from the glass-ceran surface
when not in use.
Cleaning
2.4.8 Ensure appliances are regularly cleaned serviced and maintained by a qualified and
competent service provider, and there is access around the appliance to do so.
2.4.9 Ensure that the appliance, surrounding work area and extraction system are
regularly cleaned, (at least weekly) to avoid the build-up of fats oils and greases that
could present a fire risk. A deep clean should be undertaken at least every 6 months
by a specialist contractor.
Electrical Isolation Points
2.4.10 Ensure any separate electric switches provided for cooking equipment and/or
extractor fans are accessible and clearly labelled.
Care and Maintenance of Thermal and Operational Safety Devices
2.4.11 The appliance is fitted with a thermal safety device. This will stop oven operation if it
becomes overheated due to a fault. This appliance will always fail safe so long as
there is no damage to the thermal safety device.
Page 9

9
2.5 MAINTENANCE SAFETY
2.5.1 Unless otherwise stated, parts which have been protected by the manufacturer must
not be adjusted by the installer or end user.
2.5.2 Before any maintenance or cleaning is undertaken, isolate appliance from mains
power supply at isolator switch.
2.5.3 Suitable protective clothing (PPE) must be worn when maintaining or cleaning this
appliance.
2.5.4 The appliance must be allowed to cool to a safe temperature before maintenance or
cleaning is undertaken.
2.5.5 The appliance must not be cleaned with a jet of water or be steam cleaned. Do not
use acid or halogen-based (e.g. chlorine) descaling liquids, flammable liquids,
cleaning aids or cleaning powders.
2.5.6 Failure due to lack of proper cleaning is not covered by warranty.
2.5.7 Take care when cleaning not to dislodge or damage thermostat sensor mounted on
the side of the oven.
2.5.8 If the thermostat or capillary are damaged then do not turn the appliance on and
contact Falcon or you approved service provider to undertake the necessary repairs.
2.5.9 To obtain maximum performance from this unit regular servicing of the appliance
should be undertaken to ensure correct operation, it is functioning as intended, and
safe to use. We recommend servicing in accordance with SFG20 Maintenance
Schedules and as a minimum, after 2,500 hours of use, or annually, whichever
comes first and that a maintenance contract be arranged with an appointed service
contact. Visits may then be made at agreed intervals to carry out adjustments and
repairs.
2.5.10 During Servicing of the appliance, where applicable, please ensure the oven door
seal is checked. If the integrity of the seal is compromised, it must be replaced.
Page 10

10
• This appliance may be discoloured due to testing.
• These instructions are only valid if the country code appears on the appliance. If the code does
not appear on the appliance, refer to the technical instructions for adapting the appliance to the
conditions for use in that country.
• Installation must meet national or local regulations. Attention must be paid to: safety
(installation & use) regulations, health and safety at work act, local and national building
regulations, fire precautions act.
• To prevent shocks, this appliance must be earthed.
• This unit is fitted with an equipotential connection at the rear on the base.
• This appliance has been UKCA/CE marked based on compliance with the relevant Electrical and
Electromagnetic Compatibility (EMC) Regulations/Directives for the voltages stated on the data
plate.
• This equipment is for professional use only and must be used by qualified persons.
• The installer must instruct the responsible person(s) of the correct operation and maintenance
of the appliance.
• Unless otherwise stated, parts which have been protected by the manufacturer must not be
adjusted by the installer.
• Check that no damage has occurred to the appliance or supply cord during transit. If damage
has occurred, do not use this appliance.
• Ensure the supply cord is routed free from the appliance to avoid damage.
• The appliance has been designed and approved to use Falcon kick plates; non-Falcon kick
plates could potentially adversely affect the performance of the appliance by restricting the air
to the appliance.
• All apparatus connected to a potable water network and including water drain device has to be
provided with an air break before its discharge to the drainage system. Type AA.
PREVENTATIVE MAINTENANCE CONTRACT
To obtain maximum performance from this unit regular servicing of the appliance should be undertaken to
ensure correct operation, it is functioning as intended, and safe to use. We recommend servicing in
accordance with SFG20 Maintenance Schedules and as a minimum, after 2,500 hours of use, or annually,
whichever comes first and that a maintenance contract be arranged with an appointed service contact.
Visits may then be made at agreed intervals to carry out adjustments and repairs.
Page 11

11
Training and competence
To help ensure the safe use of this appliance there is a requirement for you to provide whatever
information, instruction, training, and supervision as is necessary to ensure, so far as is reasonably
practicable, the health and safety of all users.
For further help and information on training and competence we would refer you the Health and Safety
Executive website; www.hse.gov.uk document ref: health and safety training INDG345. International
customers should default to the health and safety guidelines provided by your government body.
Risk assessment
As part of managing the health and safety of your business you must control any risks identified in your
commercial kitchen. To do this you need to think about what might cause harm to people and decide
whether you are taking reasonable steps to prevent that harm. This is known as risk assessment. It is
important to consider the environment around the product as well as the product itself. For example, oil
or food spills will present a significant risk so users so the need to immediately clean up such spills
must be reflected in staff training.
For further help and information on risk assessments we would refer you to you the Health and Safety
Executive website; www.hse.gov.uk document ref: risk assessment INDG163. International customers
should default to the health and safety guidelines provided by your government body.
Page 12
12
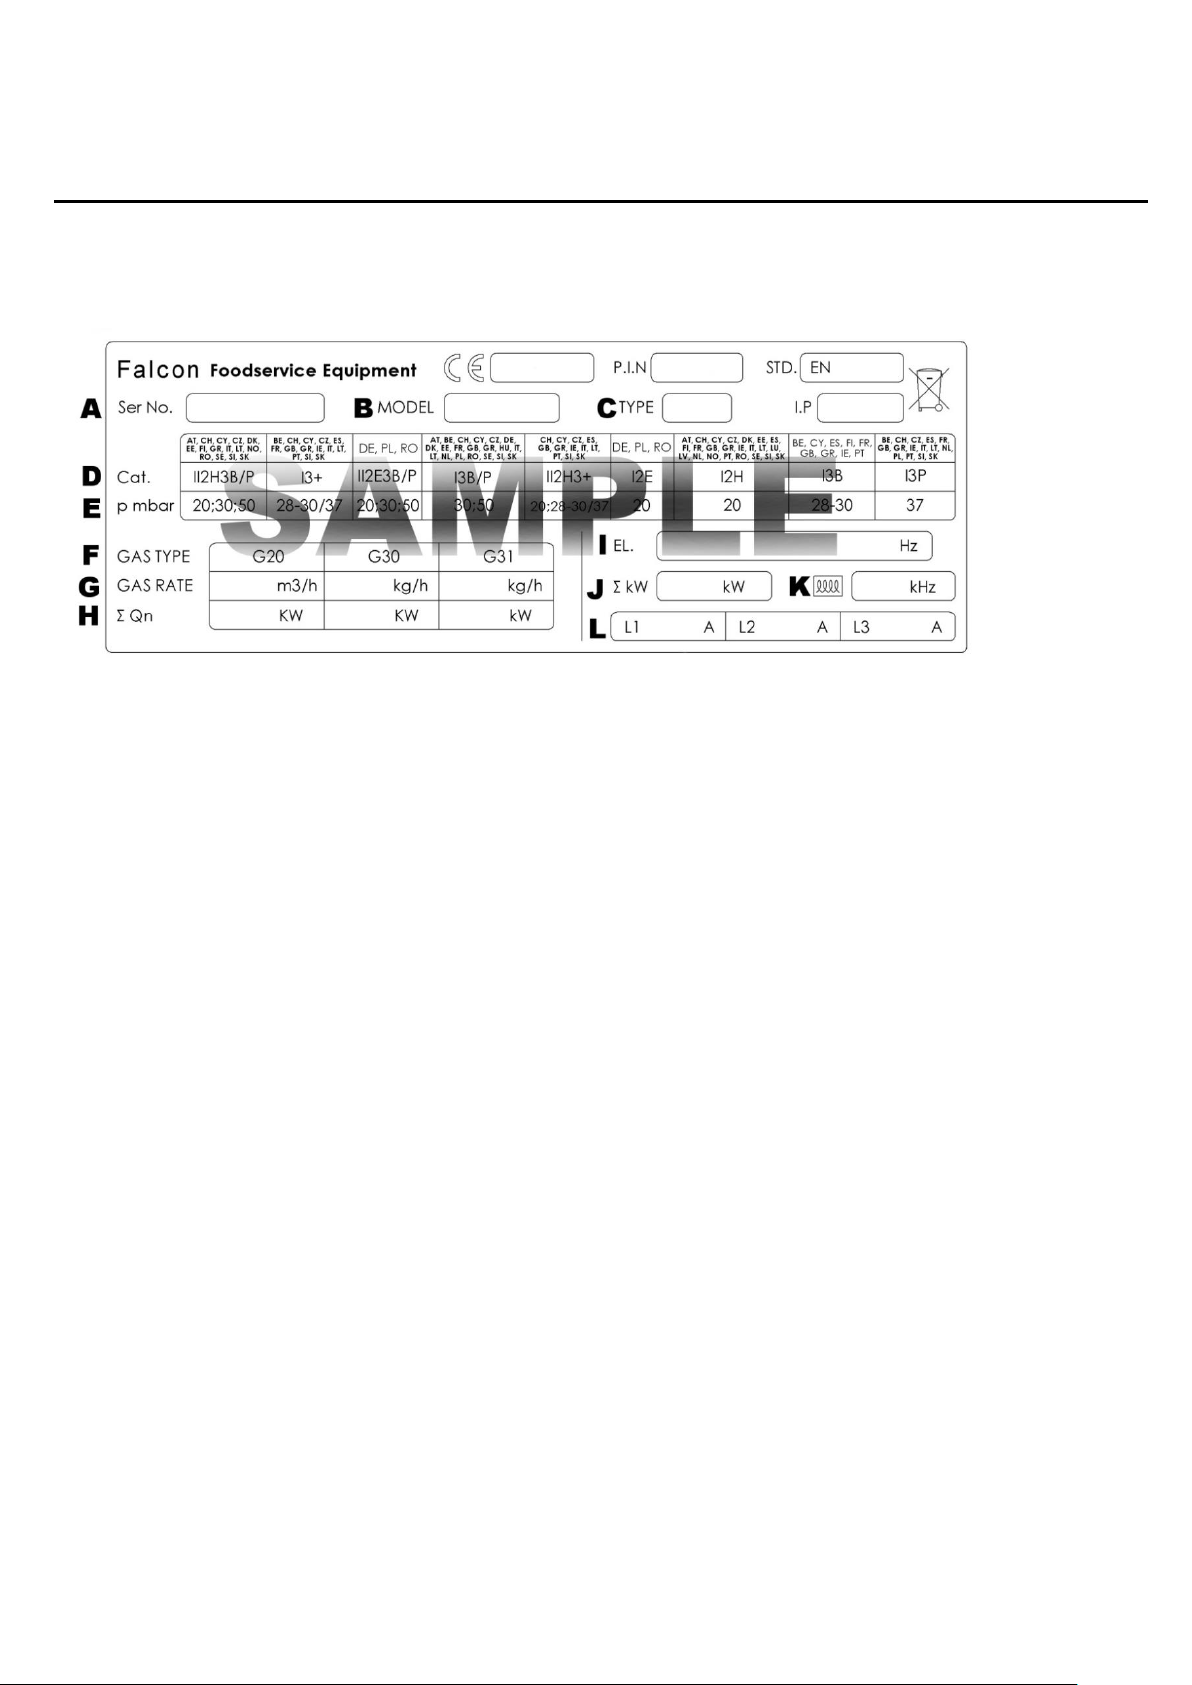
3.0 APPLIANCE INFORMATION
These appliances have been UKCA/CE-marked based on compliance with the Gas Appliance Regulations/Product
Safety and Metrology Regulations, Electrical and Electromagnetic Compatibility (EMC) Regulations/Directives
for the Countries, Gas Types and Pressures as stated on the data plate.
A - Serial No
B - Model No
C - Flue Type
D - Gas Category
E - Gas Pressure
F - Gas Type
G - Gas Rate
H - Total Heat Input
I - Electrical Rating
J - Total Electrical Power
K - Magnetic Field Frequency
L - Electrical Phase Loading
Page 13
13
4.0 OPERATION
IF GLASS-CERAMIC TOP IS CRACKED OR BROKEN IMMEDIATELY
DISCONNECT APPLIANCE FROM POWER SUPPLY AND CONTACT
YOUR SERVICE AGENT.
THE AIR INTAKE FILTER MUST BE IN POSITION DURING
OPERATION IT SHOULD BE CLEANED REGULARLY AND DO NOT
OBSTRUCT AIR FILTER ENTRY BELOW.
USERS MUST BE MADE AWARE THAT INDIVIDUALS FITTED WITH
A PACEMAKER SHOULD CONSULT THEIR DOCTOR IF IN A CLOSE
PROXIMITY TO THIS UNIT. THIS INDUCTION UNIT EMANATES AN
19 kHz TO 35 kHz OUTPUT THAT MAY AFFECT OLDER TYPES OF
PACEMAKERS.
USE OF THE CORRECT TYPE OF PAN IS ESSENTIAL FOR
CORRECT OPERATION.
DO NOT PLACE ANY METAL OBJECTS, SUCH AS KITCHEN
UTENSILS, CUTLERY, ALUMINIUM FOIL, OR PLASTIC VESSELS,
ON THE GLASS CERAMIC TOP.
THE USER MUST ALSO BE AWARE OF POTENTIAL TO HEAT
JEWELLERY AND DISRUPT ELECTRONIC EQUIPMENT PLACED
OVER THE INDUCTION ZONES MAGNETIC FIELD.
DO NOT PLACE CREDIT CARDS, ETC, ON THE GLASS-CERAMIC
TOP AS DATA COULD BE WIPED OFF.
NEVER LEAVE THE INDUCTION HOB UNSUPERVISED WHEN IN
USE. THE GLASS-CERAMIC TOP MUST NOT BE USED FOR
STORAGE.
DAMAGED PANS CAN REDUCE APPLIANCE EFFICIENCY.
Page 14
14
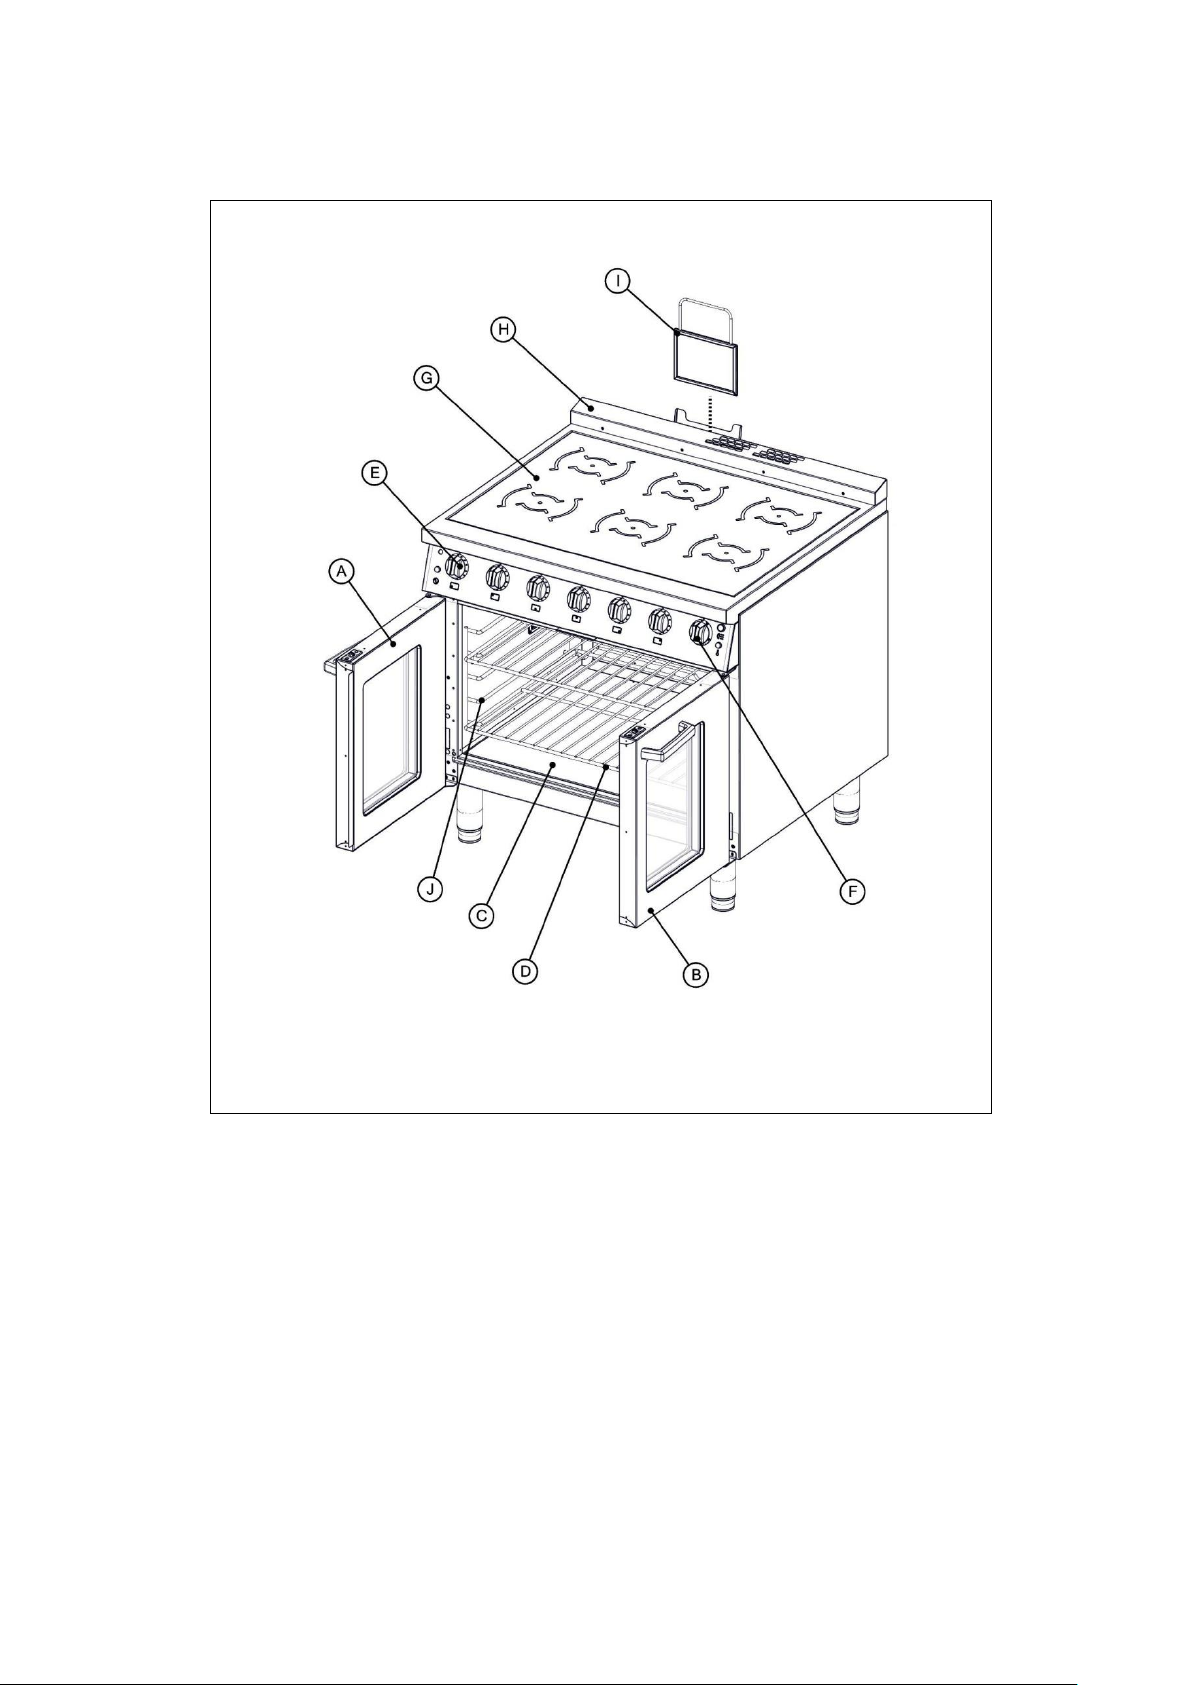
4.1 COMPONENT PARTS – E161i & E163i
A -
Left hand door
F -
Oven temperature control
B -
Right hand door
G -
Glass
C -
Drip tray
H -
Rear up stand
D -
Shelf
I -
Filter
E -
Hob zone control
J-
Oven shelf hanger
Page 15
15
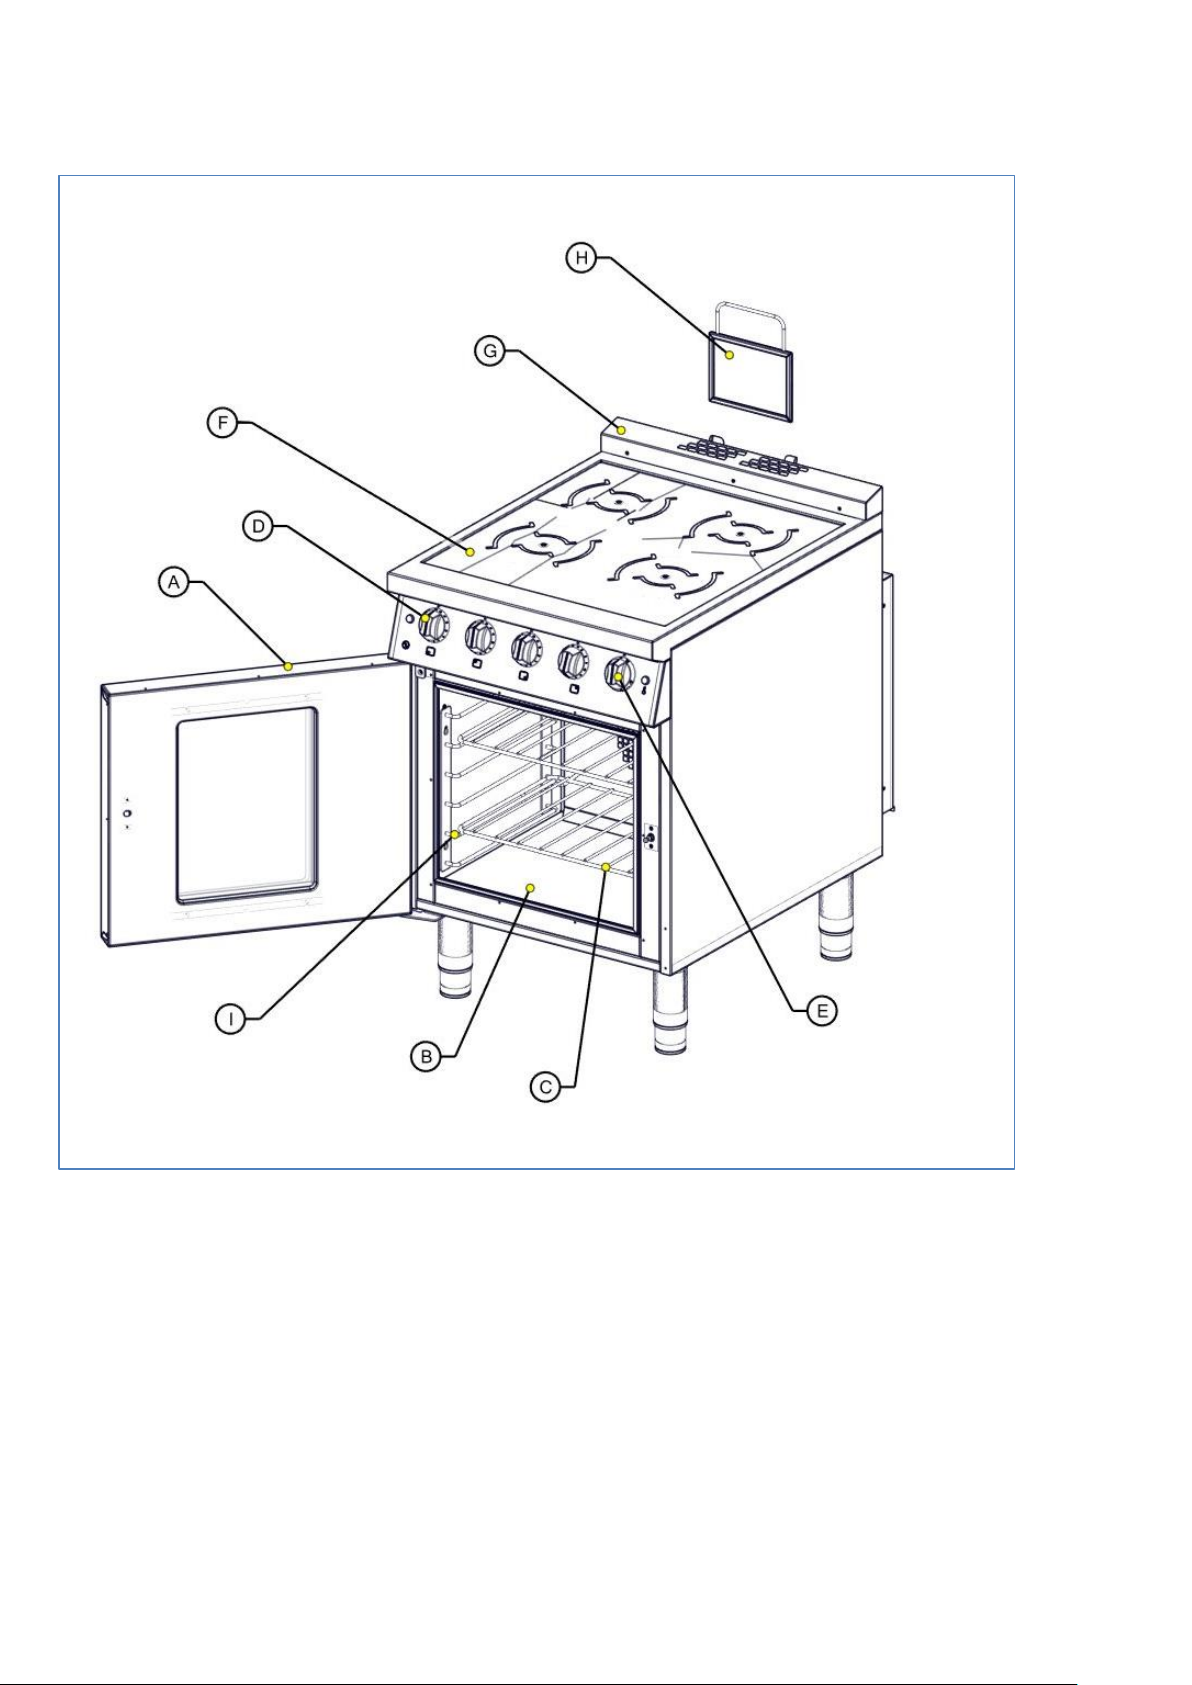
E143i
A -
Door
F -
Glass
B -
Drip Tray
G -
Rear upstand
C -
Shelf
H -
Filter
D -
Hob zone control
I -
Oven shelf hanger
E -
Oven temperature control
Page 16
16
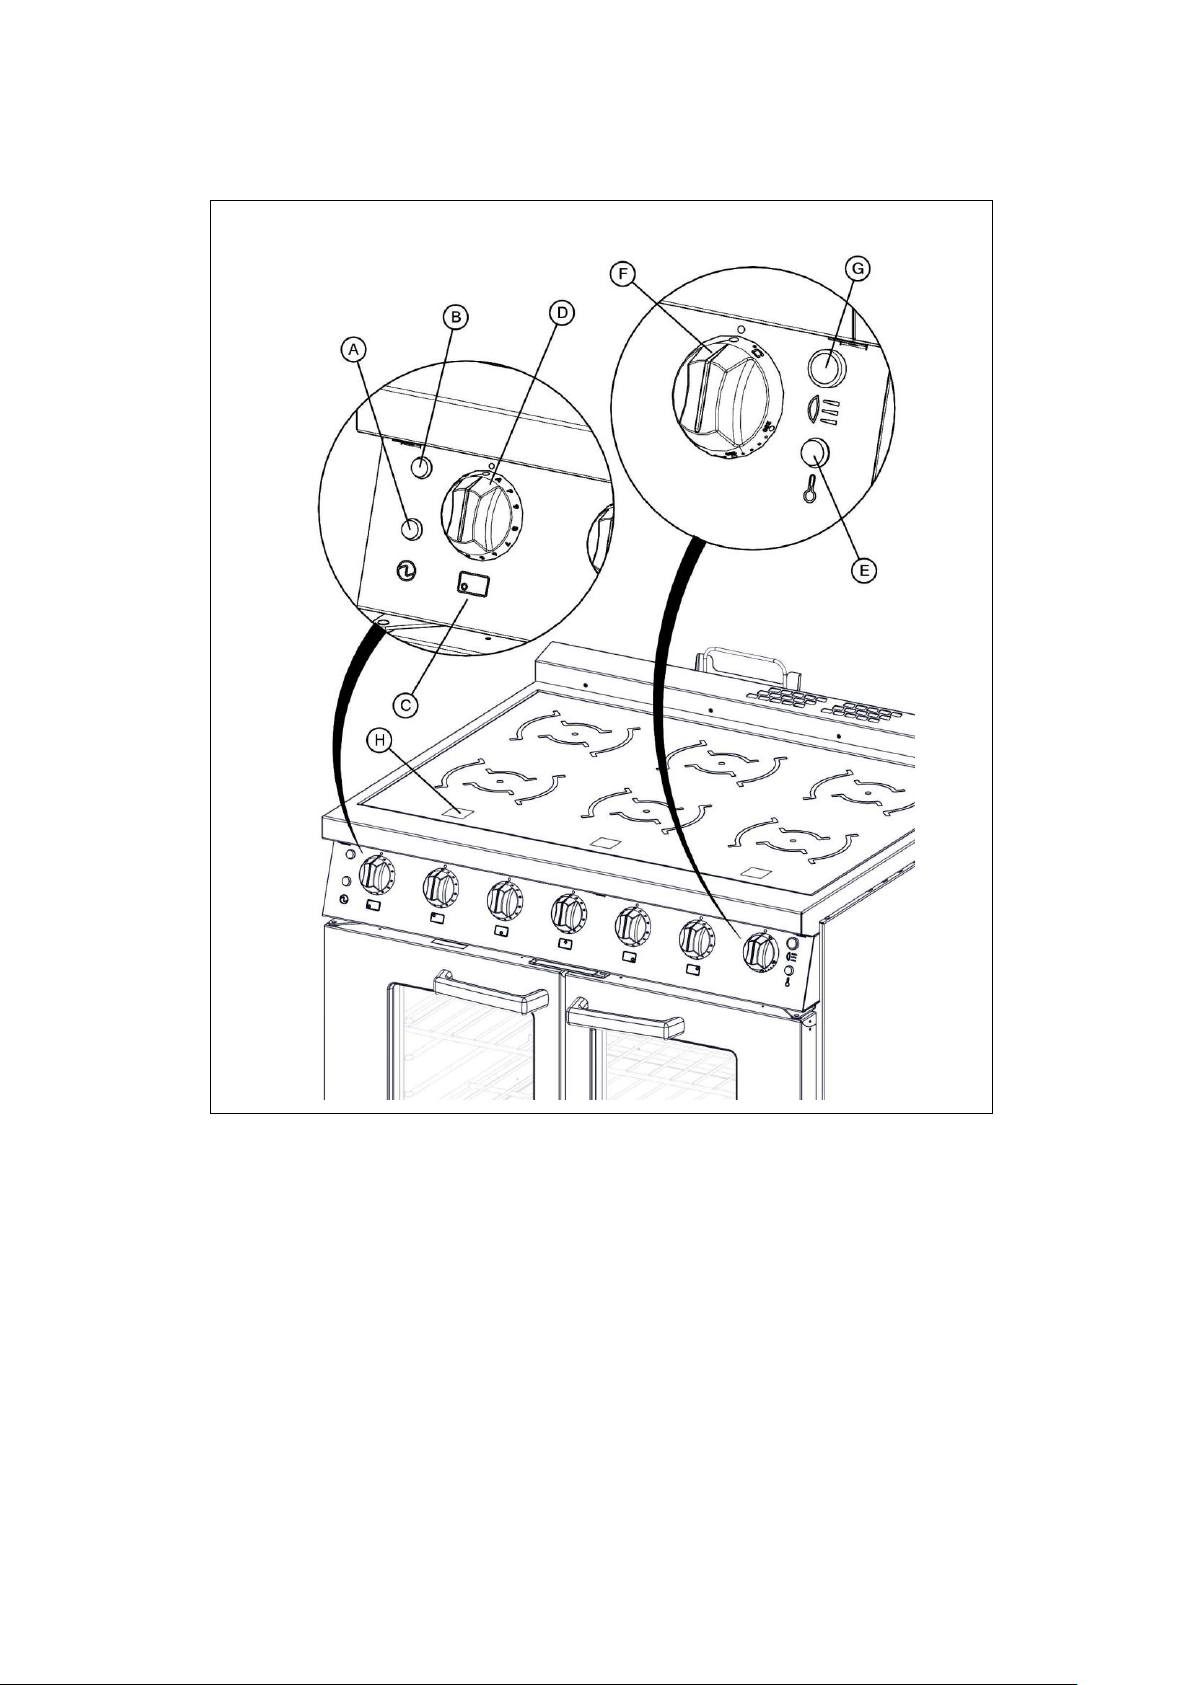
4.2 CONTROLS – E161i & E163i
A -
Circuit 1 power neon (red)
F -
Oven temperature control
B -
Circuit 2 power neon (red) Only on E161i model
G -
Oven light switch
C -
Induction zone Indicator
H-
Induction zone digital display
D -
Induction control
E -
Oven heat neon (amber)
Page 17
17
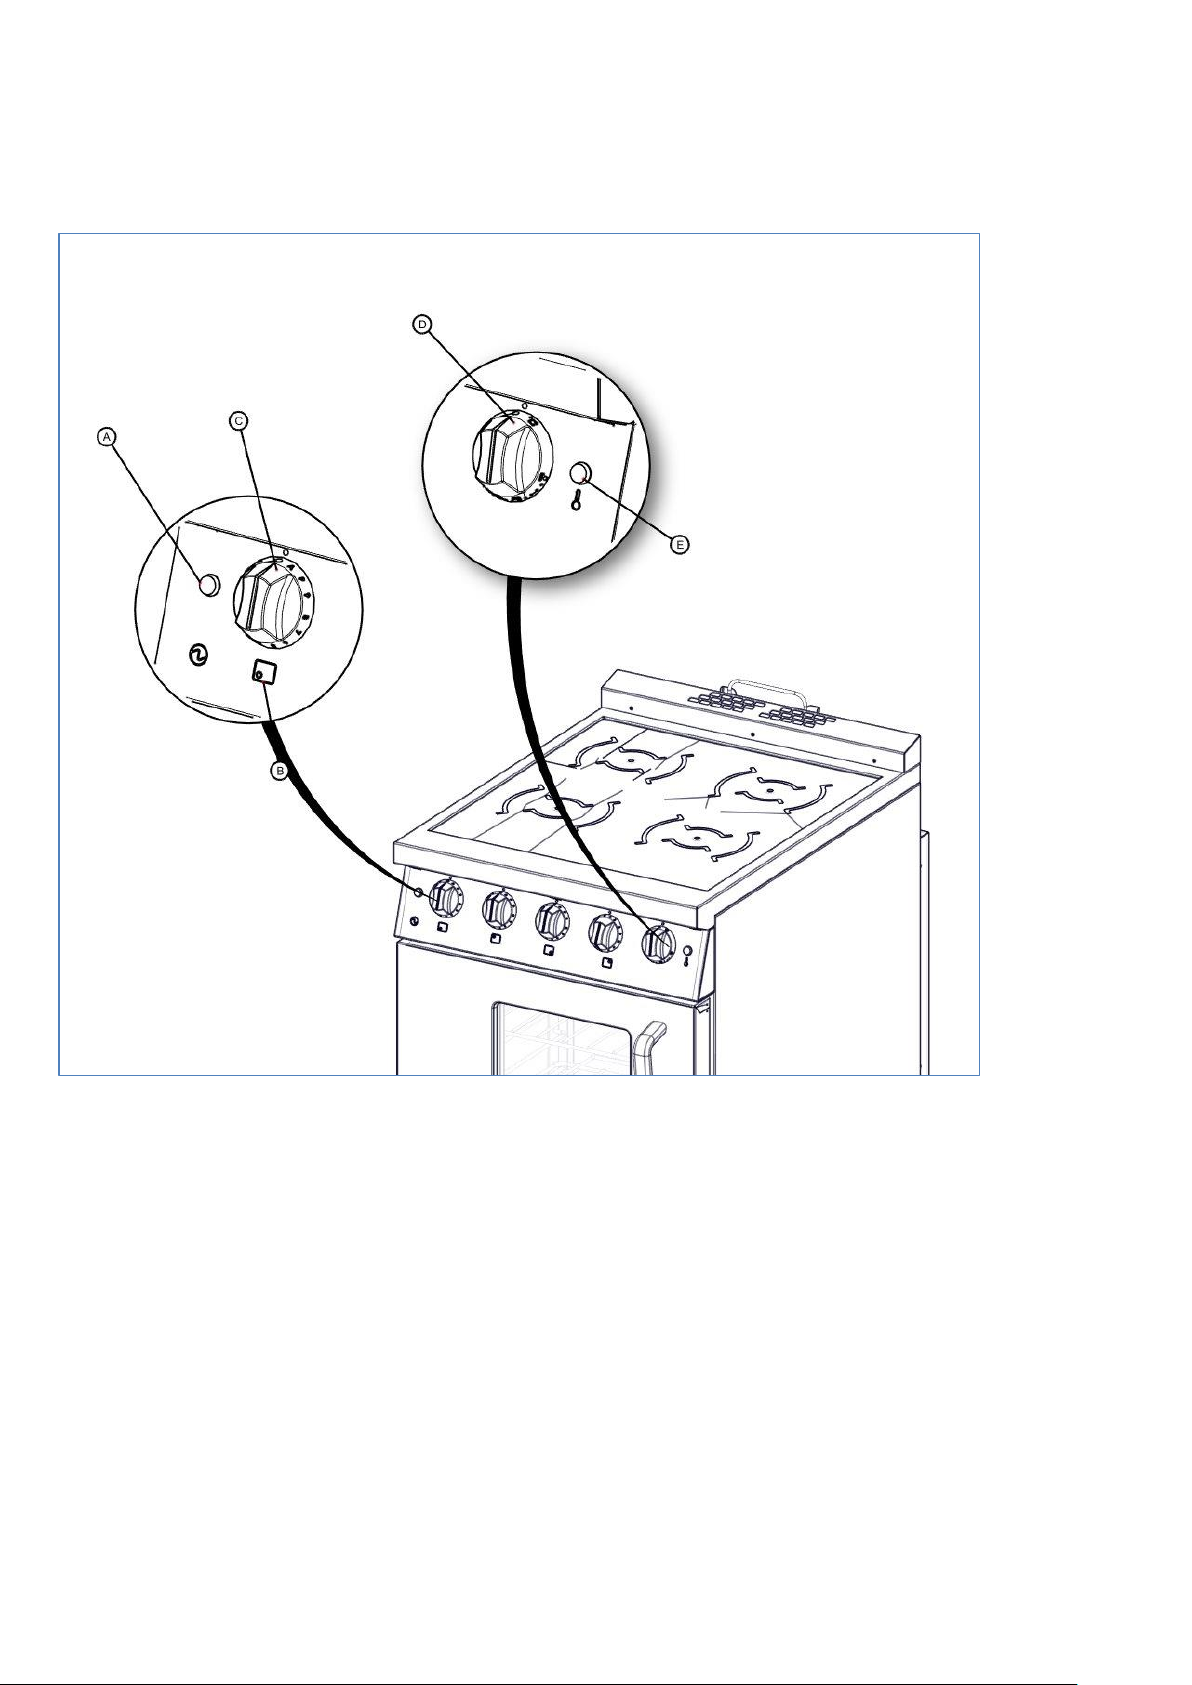
E143i
A -
Circuit 1 power neon (red)
B -
Induction zone indicator
C -
Induction control
D -
Oven temperature control
E -
Oven heat neon (amber)
Page 18
18
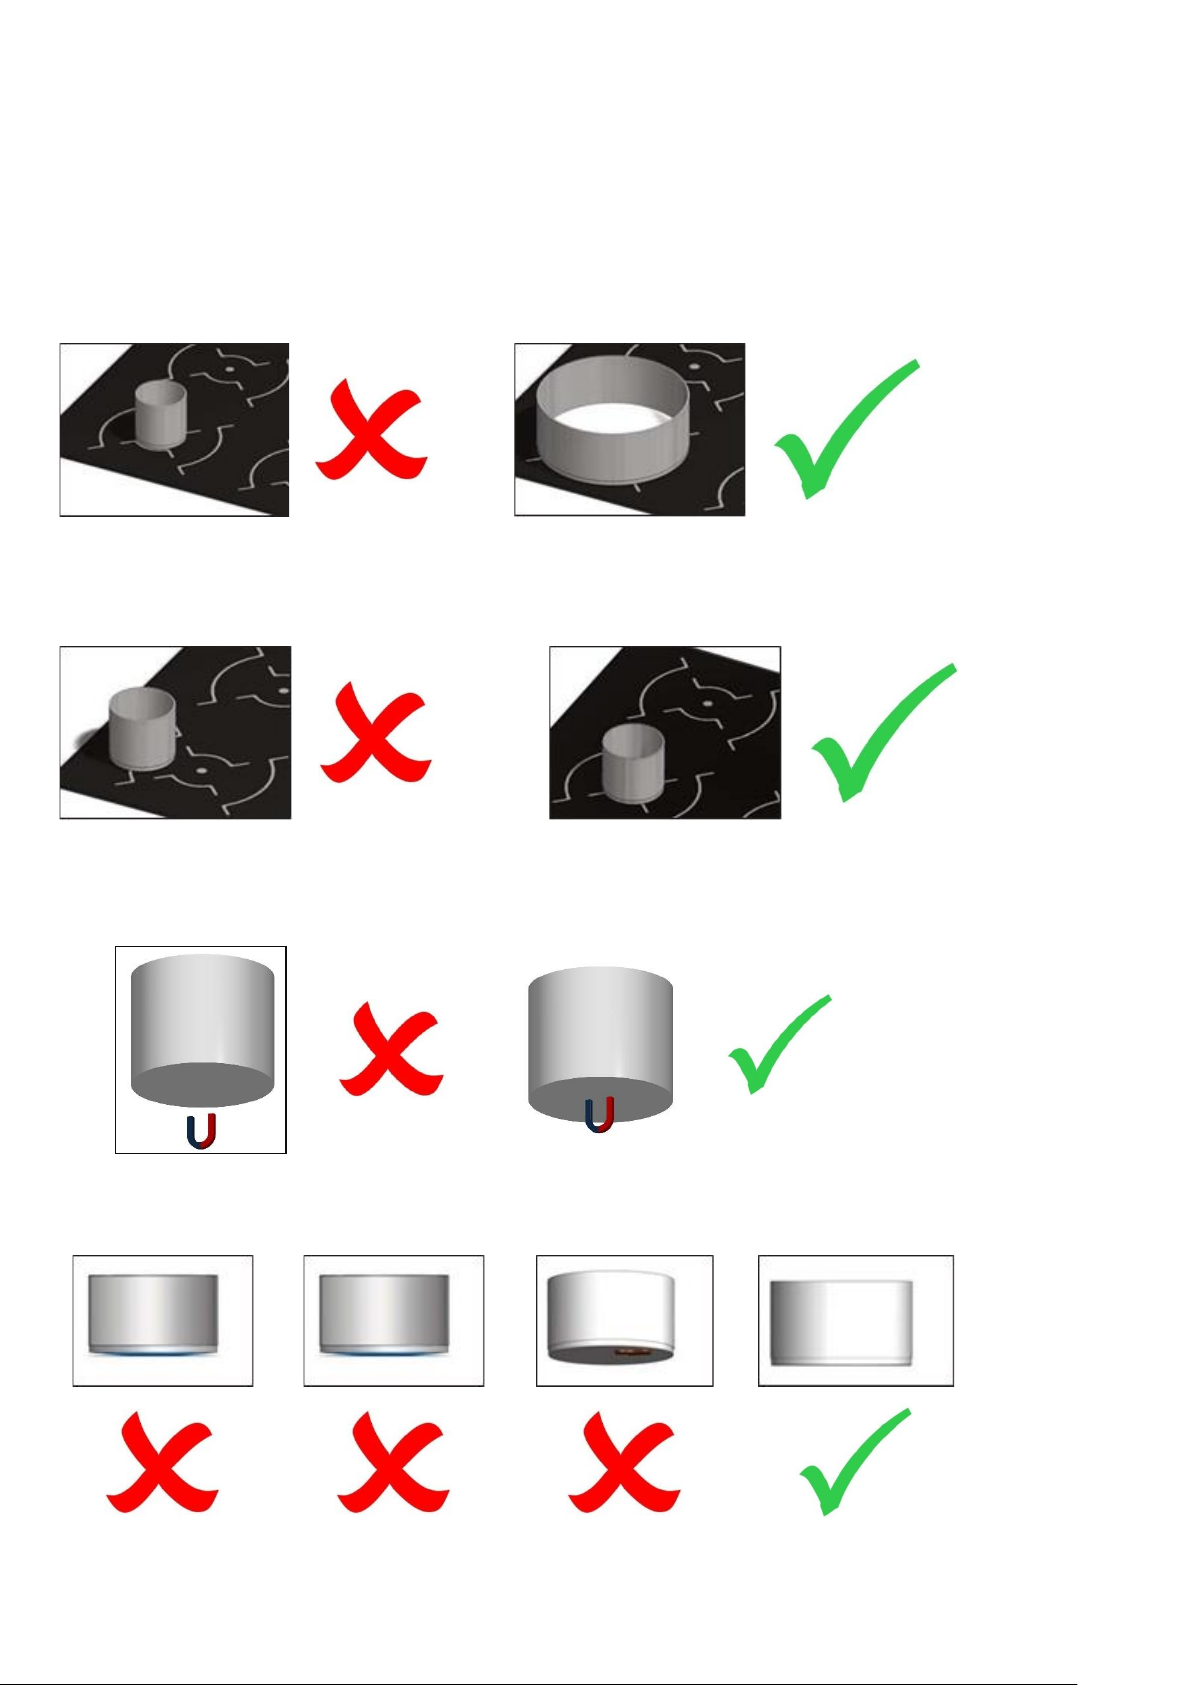
4.3 USING THE APPLIANCE
4.3.1 Ensure you use the correct size of pan.
<Ø120
Ø120 – Ø250
4.3.2 Ensure the pans are central in the cooking zone.
4.3.3 Ensure you use the correct type of pan .
*
4.3.4 Ensure you use a clean flat bottom pan.
Page 19

19
4.4 HOB SETTINGS 1-9
4.4.1 Each cooking zone is controlled by a marked, variable control from 1 (lowest) to 9 (highest).
Turn induction control knob clockwise to switch on and increase power, turn anti-clockwise to decrease
power and switch off.
Table below gives guidance on the power for each setting and relevant time limits for each operation.
Power Level
Low temp
hold
1 2 3 4 5 6 7 8 *9
Power %
n/a
3%
5%
8%
12%
18%
28%
42%
64%
100%
Time limit (mins)
120
520
402
318
260
212
170
139
113
90
*On Model E161i : Due to power management restrictions setting 9 will not be available on both zones
simultaneously. 1 zone will switch to setting 8.
4.4.2 Melt function is indicated by a single bar. This heats the pan to approx. 45 Degrees.
4.4.3 Keep warm is indicated by 2 bars. This heats the pan to approx. 70 Degrees.
4.4.4 Simmer function is indicated by 3 bars. This heats the pan to approx. to 94 Degrees.
4.5 POWER BOOST
4.5.1 This is activated by turning the control knob clockwise from level 9. Only one zone per front to
back pair can be boosted at a time. It may be boosted again if the system internal temperatures are
satisfactory. Boost will run for a maximum of 10 minutes.
4.6 AUTOMATIC HEAT UP CONTROL (AHC):
4.6.1 AHC will give a power of setting to the zone for a pre-set time before reducing to a lower power
level set by the control.
(1) To activate the control, turn anti clockwise from the “Off” position to “A” and hold for approx 3 seconds.
(2) Whilst the “A” symbol is illuminated on the glass turn the control knob clockwise to the required setting
(1-8).
(3) The display reverts to the “A” symbol and the hob will run at maximum power for the time shown in the
below table before reducing power to the final setting.
Power level setting
1 2 3 4 5 6 7
8
Pre-set time (secs)
40
72
120
176
256
432
120
192
4.7 CONTROL LOCK FUNCTION
4.7.1 This function prevents unwanted operation of the hob. When the control lock is active the “L”
symbol is shown. It operates in pairs of controls (Left, centre and right). It is activated by turning control
knobs anti-clockwise to control lock position and held for approximately 5 seconds. Repeat the same
process to unlock.
Page 20
20
4.8 PAN DETECTION
4.8.1 This prevents the zone becoming energised until a suitable pan is placed on the zone.
Removing a pan will temporarily de-energise the zone, but the zone will remain active.
Always switch zone(s) off when not in use. Do not use pan-detection as a substitute on\off switch.
If the pan is made from unsuitable material for induction equipment, the “no pan present” symbol will
be displayed.
4.9 RESIDUAL HEAT DISPLAY
4.9.1 When the temperature of the hob exceeds 60 Degrees the “H” symbol will appear, indicating a
hot surface. When shown the induction generator will engage its cooling fans. Do not switch off the
appliance and allow cooling to occur. When “H” Symbol disappears either continue operation or switch off.
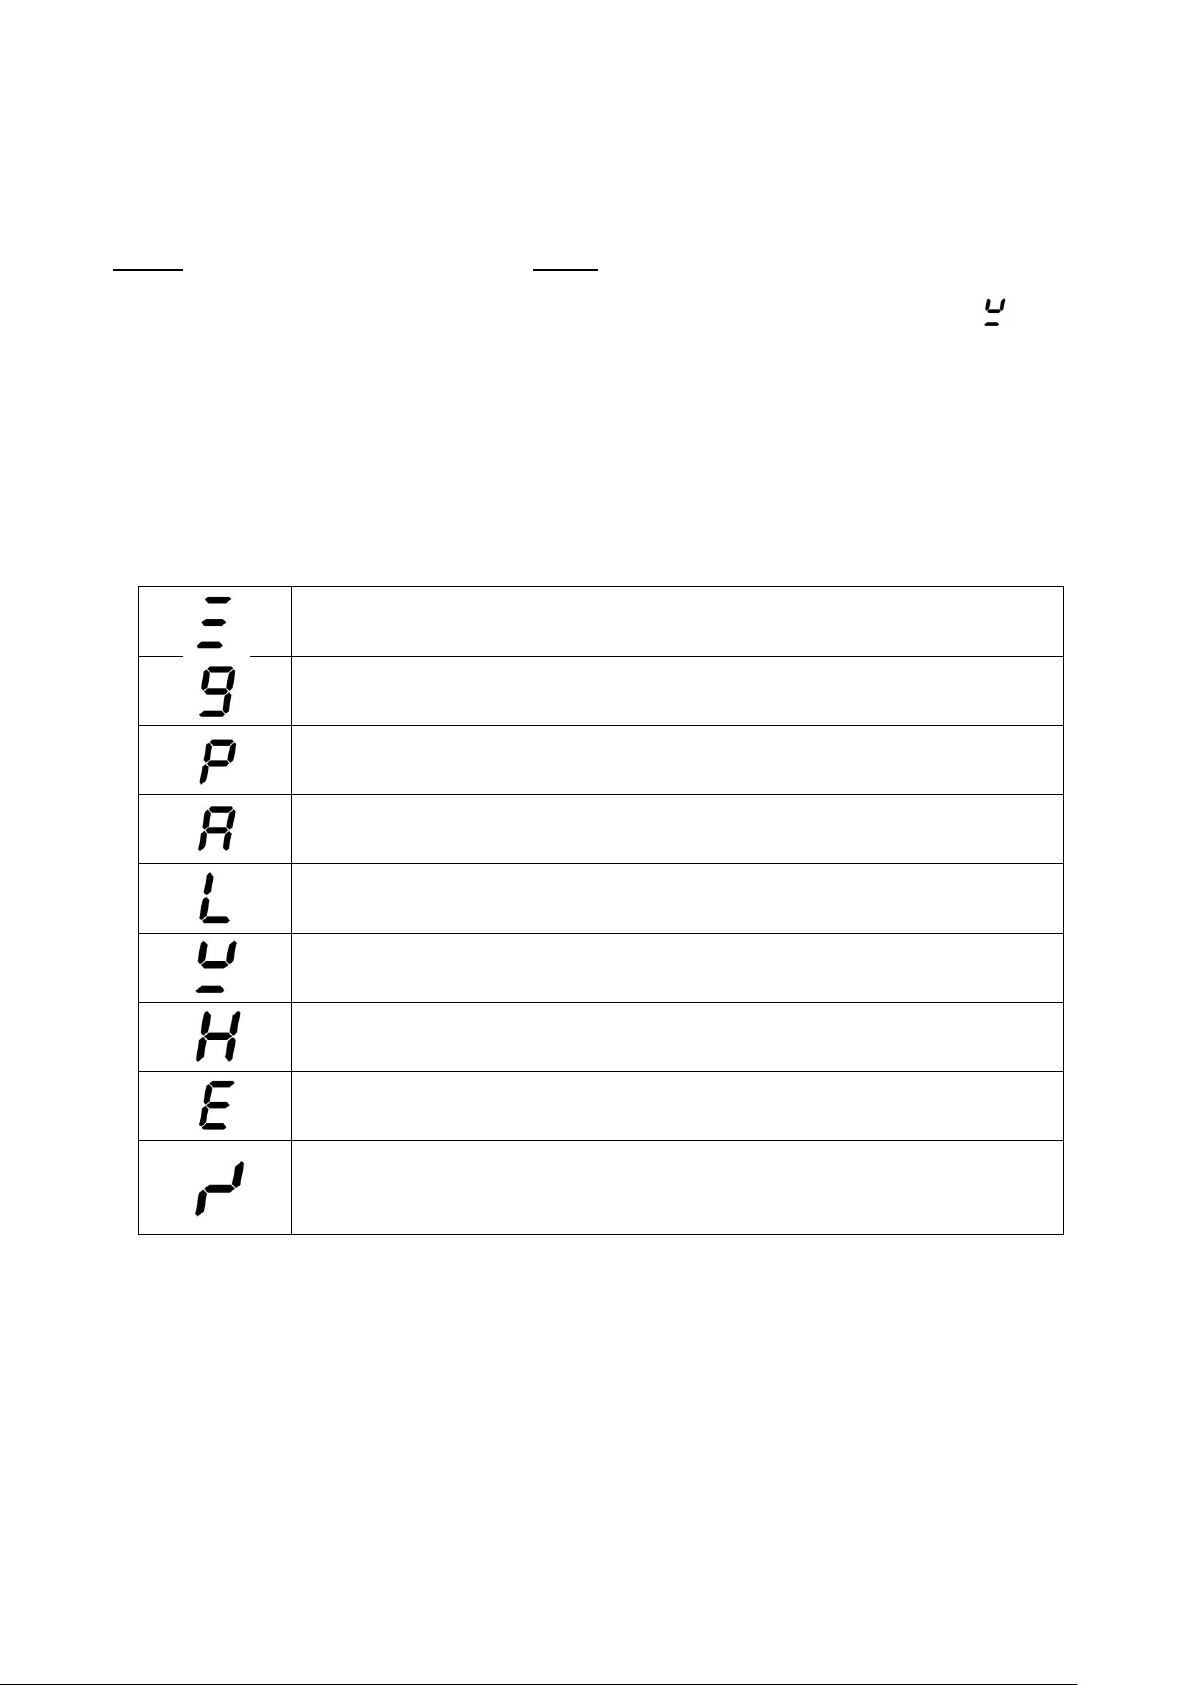
4.10 DIGITAL DISPLAY CODES
Melt, Keep warm and simmer functions.
Power level settings (1-9)
Power boost function.
Automatic heat up control.
Controls lock function.
Pan detection (no pan present).
Residual heat display.
Error codes for generator.
Error rotary control (lightning symbol).
4.11 E143I, E161i & E163i - USING THE OVEN
4.11.1 To use oven, turn temperature control knob clockwise to desired temperature Ensure heat
demand (amber) light illuminates.
4.11.2 When oven has reached temperature, the heat demand (amber) light will extinguish. The light
will then illuminate and extinguish at regular intervals as the oven cycles.
4.11.3 Always switch the oven off when not in use.
Page 21
21
5.0 CLEANING AND MAINTENANCE
When removing heavy items to aid cleaning or maintenance particular care should be taken. A manual handling
risk assessment is the best way to determine the level of risk to anyone using or maintaining this equipment. To
help with such an evaluation we have included the weights of individual components that may present
significant risk.
For further help and information on manual handling and associated risk assessment we would refer you to you
the Health and Safety Executive website; www.hse.gov.uk document ref: manual handling at work INDG143.
International customers should default to the health and safety guidelines provided by your government body.
The cleaning of fryers or other products that use hot oil present significant risks to end users and particular care
should be taken. Cold water and hot oil for example are an explosive mix and should be avoided at all costs.
Other useful references for health and safety issues:
• www.hse.gov.uk
• Essentials of health and safety at work ISBN978
• Noise at work INDG362
• Safe systems of work
• Other notes added to the body of the instructions
BEFORE ANY CLEANING IS UNDERTAKEN,
ISOLATE THE APPLIANCE FROM MAINS POWER SUPPLY
AT ISOLATOR SWITCH.
E161i MODEL HAS TWO POWER SUPPLIES. ENSURE BOTH
SUPPLIES HAVE BEEN ISOLATED.
SUITABLE PROTECTIVE CLOTHING MUST BE WORN WHEN
CLEANING THIS APPLIANCE.
THE APPLIANCE MUST NOT BE STEAM CLEANED. DO NOT
USE ACID OR HALOGEN-BASED (E.G. CHLORINE)
DESCALING LIQUIDS, FLAMMABLE LIQUIDS, CLEANING
AIDS OR CLEANING POWDERS.
FAILURE DUE TO LACK OF PROPER CLEANING IS NOT
COVERED BY WARRANTY.
NOTE: All surfaces are easier to clean if spillages are removed before becoming burnt on, and the appliance is
cleaned daily.
It should be noted that certain scouring pads including nylon types can easily mark stainless steel. Care should
be exercised during cleaning process. When rubbing stainless steel with a cloth, always rub in the direction of
the grain.
Page 22
22
5.1 CLEANING
5.1.1 Switch off appliance. Allow appliance to cool down before cleaning.
CLEAN THE AIR INTAKE FILTER REGULARLY. FAILURE TO
CLEAN THE FILTER REGULARLY MAY CAUSE PROBLEMS
WHICH WILL NOT BE COVERED BY WARRANTY. THE AIR
INTAKE FILTER MUST BE IN-PLACE DURING OPERATION.
DO NOT ATTEMPT TO REPAIR OR REPLACE ANY PART
OTHER THAN THE AIR INTAKE FILTER. REFER TO THE ERROR
CODE LIST TO DEBUG THE PROBLEM.
E161i, E163i & E143i - The air filter is located at the rear of the unit. It can be removed by sliding upwards
from the guide. Clean using hot soapy water and refit after drying.
5.1.2 Clean the Ceran-glass hob with hot soapy water and a soft cloth. DO NOT USE metal scrapers.
5.1.3 Enamelled surfaces within oven chamber approved cleaning agents which bear the Vitreous
Enamel Development Centre (VEDC) mark are recommended.
5.1.4 Oven chamber - Wipe enamelled surfaces clean while still warm. Use a soft cloth and hot soapy
water. Badly stained removable parts should be soaked in hot water with an approved detergent using
nylon or scotch cleaning pads will provide good results.
5.2 MAINTENANCE
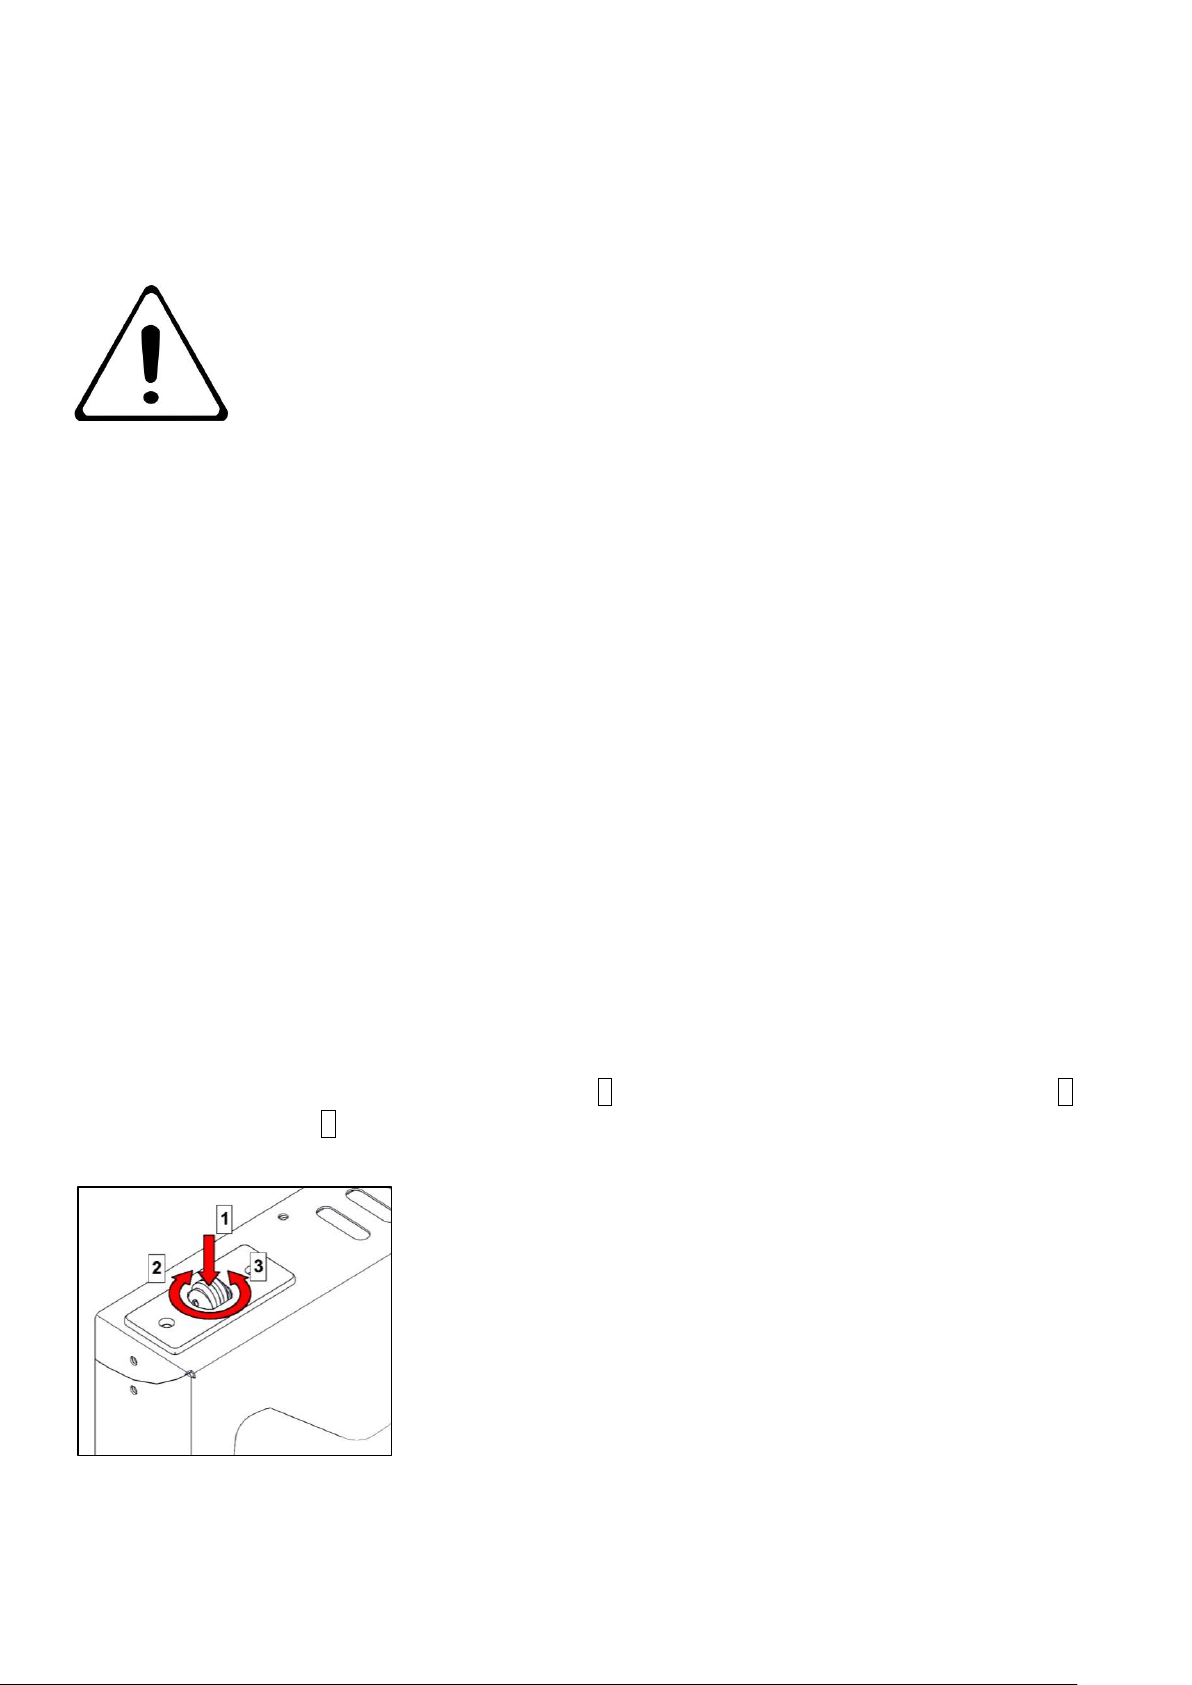
5.2.1 E161i & E163i - Oven door catch may need to be occasionally lubricated. Push down on roller
and apply high melting point lubricant inside the catch and onto roller itself.
5.2.2 If there are issues with closing of the door, try adjusting the catch Use your hands or an
appropriate implement to push down on the roller 1 as shown. Whilst holding it down, turn it right 2 to
adjust it down, or left 3 to adjust it up as shown.
Page 23
23
6.0 SPECIFICATION
6.1 APPLIANCE WEIGHT TABLE
APPLIANCE
UNIT WEIGHT (kg)
PACKED WEIGHT (kg)
E161i
116
137
E163i
116
137
E143i
72
82.5
6.2 TECHNICAL DATA TABLE(S)
E161i 1 ph x 2
CURRENT
POWER
PHASE
MIN (A) @
230V
MAX (A) @
230V
ACTUAL (A) @
230V
(kW) @ 230V
L
27.36
31.92
30.4
7 L 23.49
27.41
26.1
6
E163i 3N~
CURRENT
POWER
PHASE
MIN (A) @
230V
MAX (A) @
230V
ACTUAL (A) @
230V
(kW) @ 230V
L1
27
31.5
30
7
L2
27
31.5
30
7
L3
14.49
16.91
16.1
4
E143i 3N~
CURRENT
POWER
PHASE
MIN (A) @
230V
MAX (A) @
230V
ACTUAL (A) @
230V
(kW) @ 230V
L1
12.5
14.6
13.9
3.2
L2
14.4
16.8
16
3.7
L3
14.
16.8
16
3.7
IF ANY CURRENT IS OUT WITH THESE TOLERANCES, THE
CAUSE MUST BE INVESTIGATED AND RECTIFIED.
Page 24
24
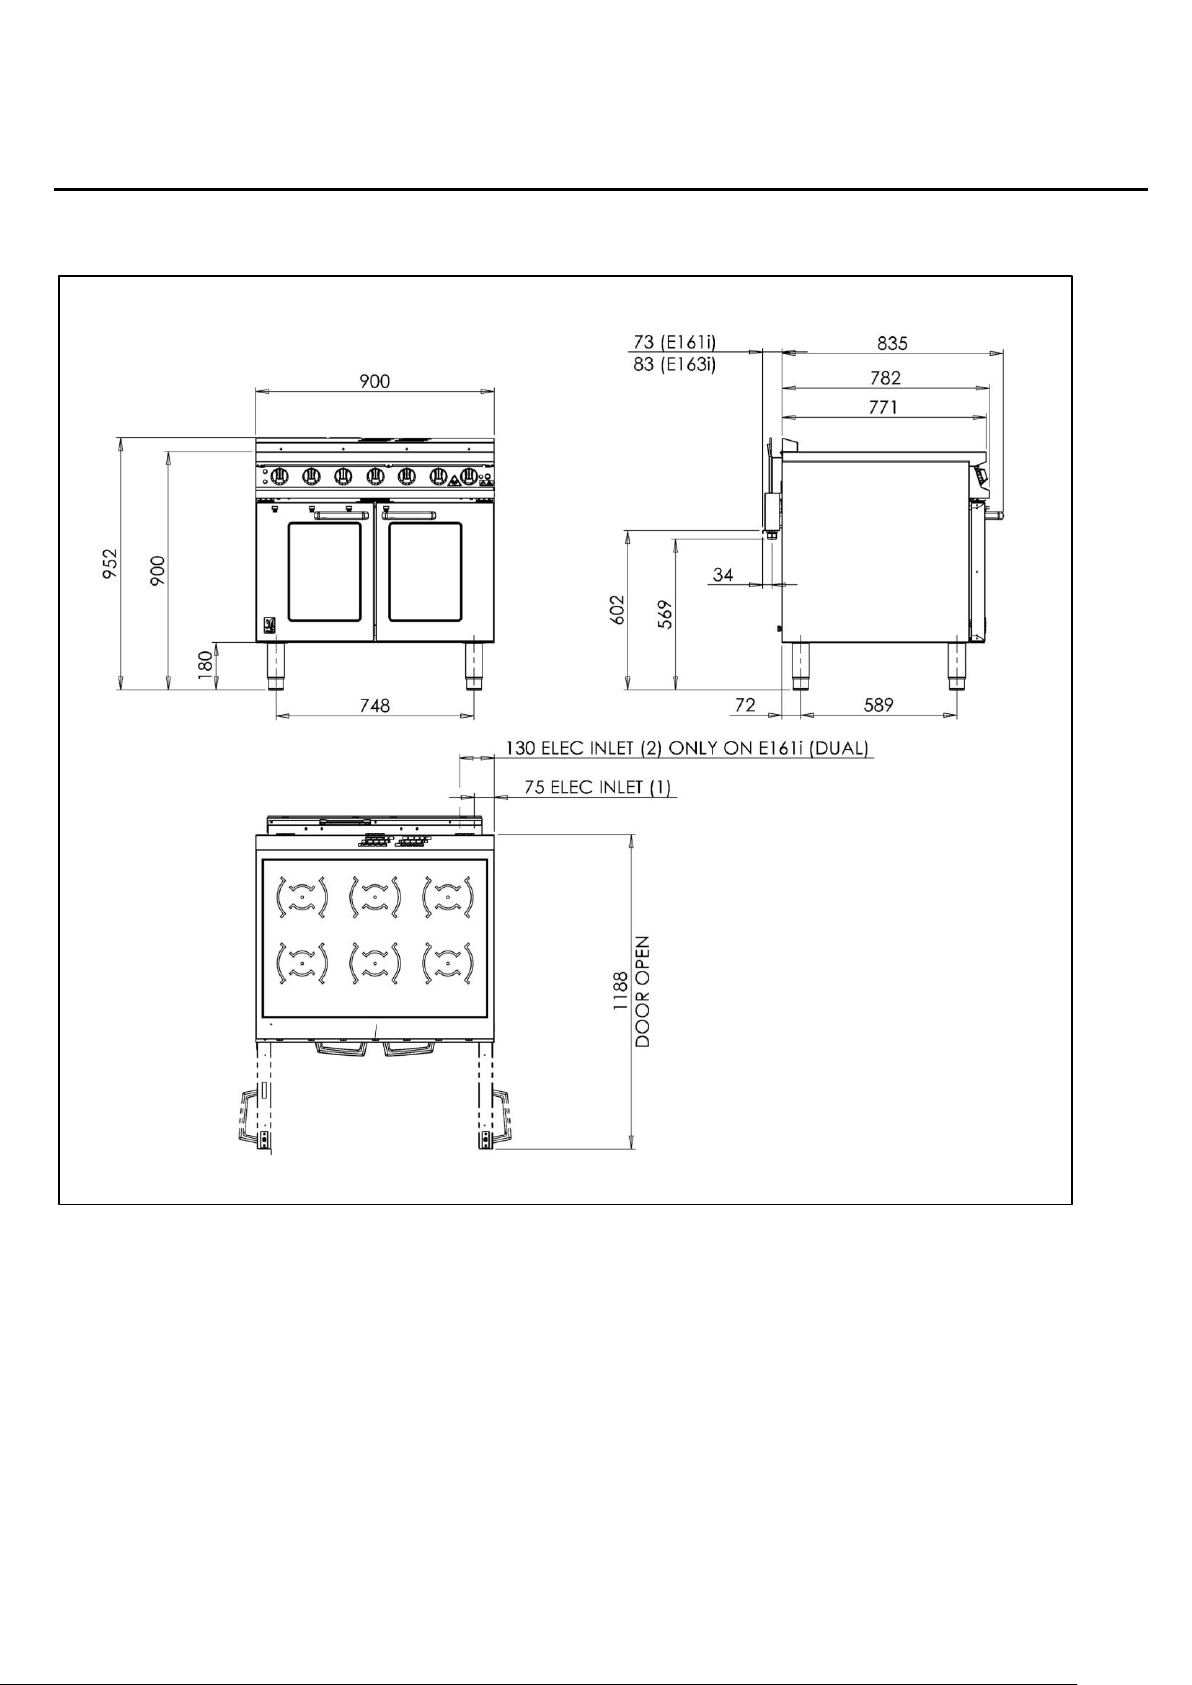
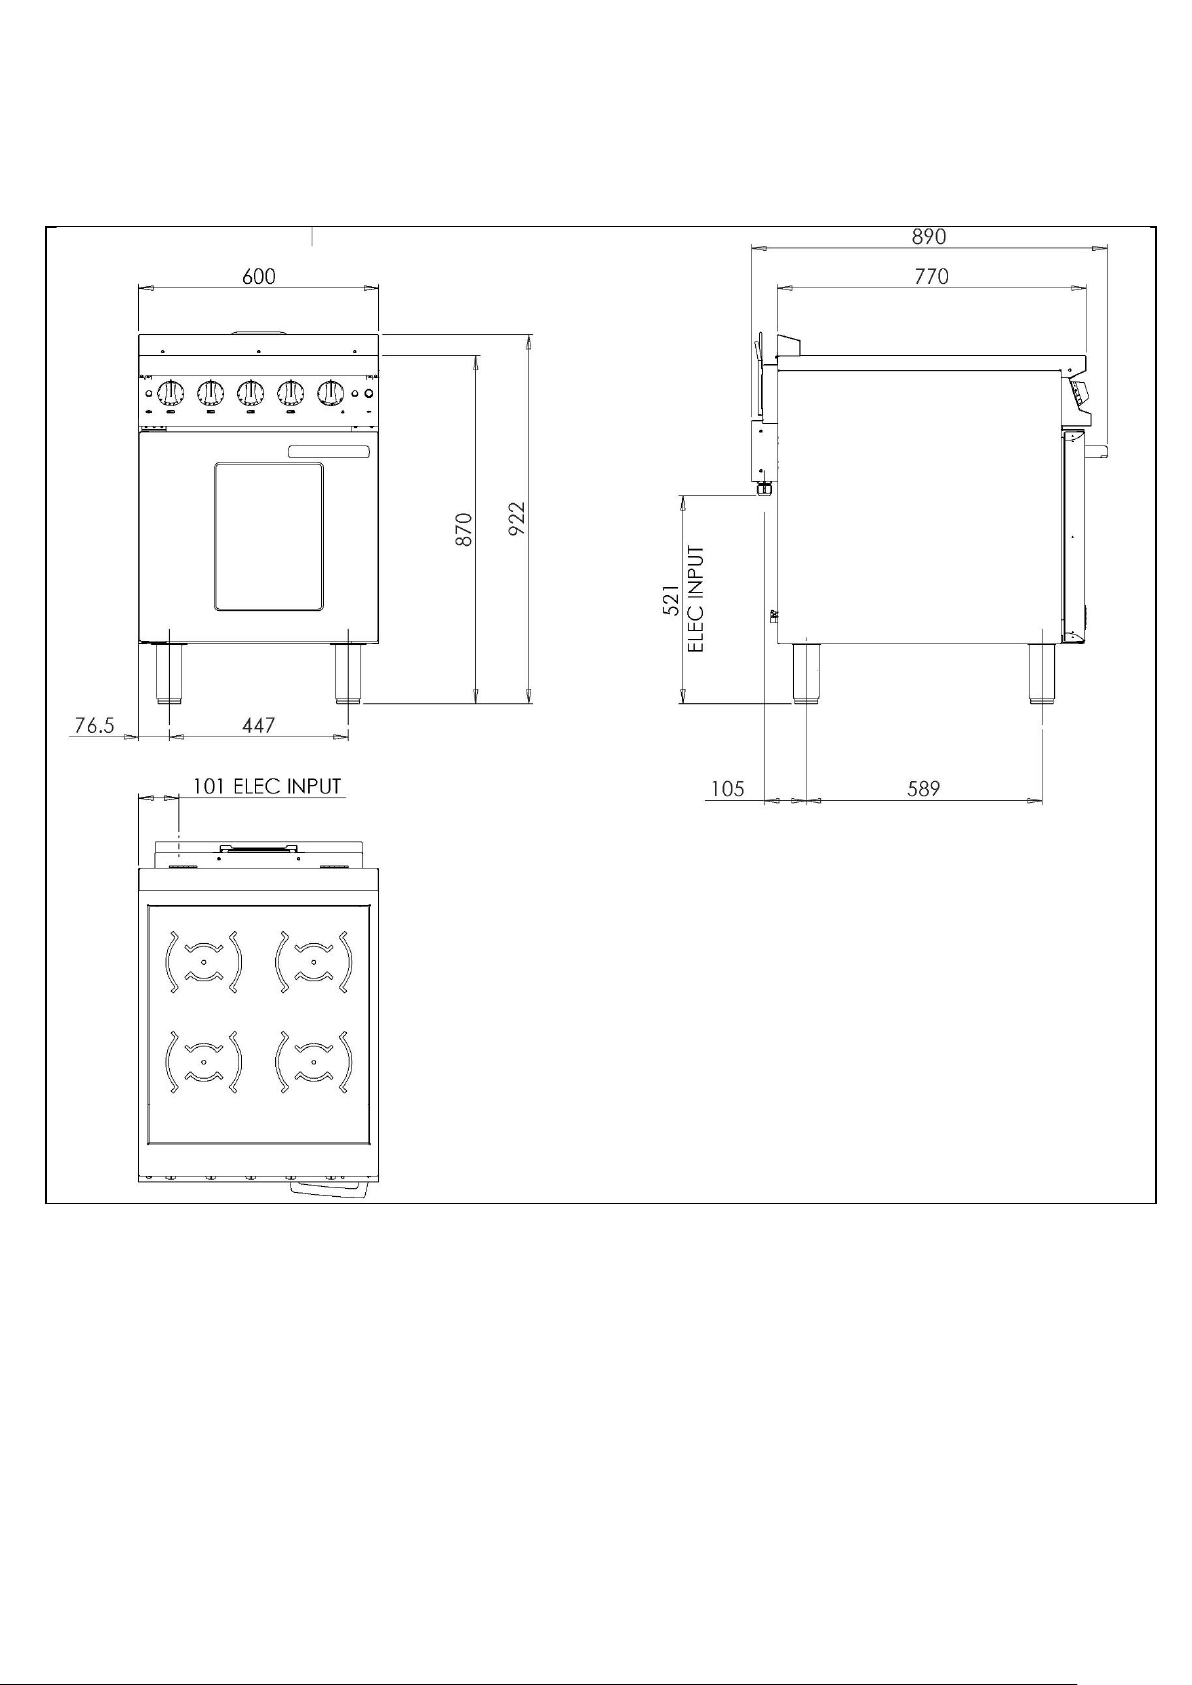
7.0 DIMENSIONS / CONNECTION LOCATIONS
E161i & E163i
Page 25
25
E143i
Page 26

26
8.0 INSTALLATION
Electrical Safety and Advice Regarding Supplementary Electrical Protection
Commercial kitchens and foodservice areas are environments where electrical appliances may be located close
to liquids, or operate in and around damp conditions or where restricted movement for installation and service is
evident.
The installation and periodic inspection of the appliance should only be undertaken by a qualified, skilled and
competent electrician; and connected to the correct power supply suitable for the load as stipulated by the
appliance data label.
The electrical installation and connections should meet the necessary requirements to the local electrical wiring
regulations and any electrical safety guidelines.
We recommend: -
• Supplementary electrical protection with the use of a type A residual current device (RCD)
• Fixed wiring appliances incorporate a locally situated switch disconnector to connect to, which is easily
accessible for switching off and safe isolation purposes. The switch disconnector must meet the
specification requirements of IEC 60947.
Your attention is drawn to: BS 7671:2018–Guidance Note 8 - 8.13: Other locations of increased risk.
It is recognized that there may be locations of increased risk of electric shock other than those specifically
addressed in Part 7 of BS 7671. Examples of such locations could include laundries where there are washing
and drying machines in close proximity and water is present, and commercial kitchens with stainless steel units,
where once again, water is present.
Where because of the perception of additional risks being likely, the installation designer decides that an
installation or location warrants further protective measures, the options available include:
• Automatic Disconnection of Supply (ADS) by means of a residual current device having a residual operating
current not exceeding 30mA;
• Supplementary protective equipotential bonding; and
• Reduction of maximum fault clearance time.
The provision of RCDs and supplementary bonding must be specified by the host organization’s appointed
installation designer or electrical contractor and installed by a suitably qualified and competent electrician so as
to comply with Regulations 419.2 and 544.2
.
Page 27
27
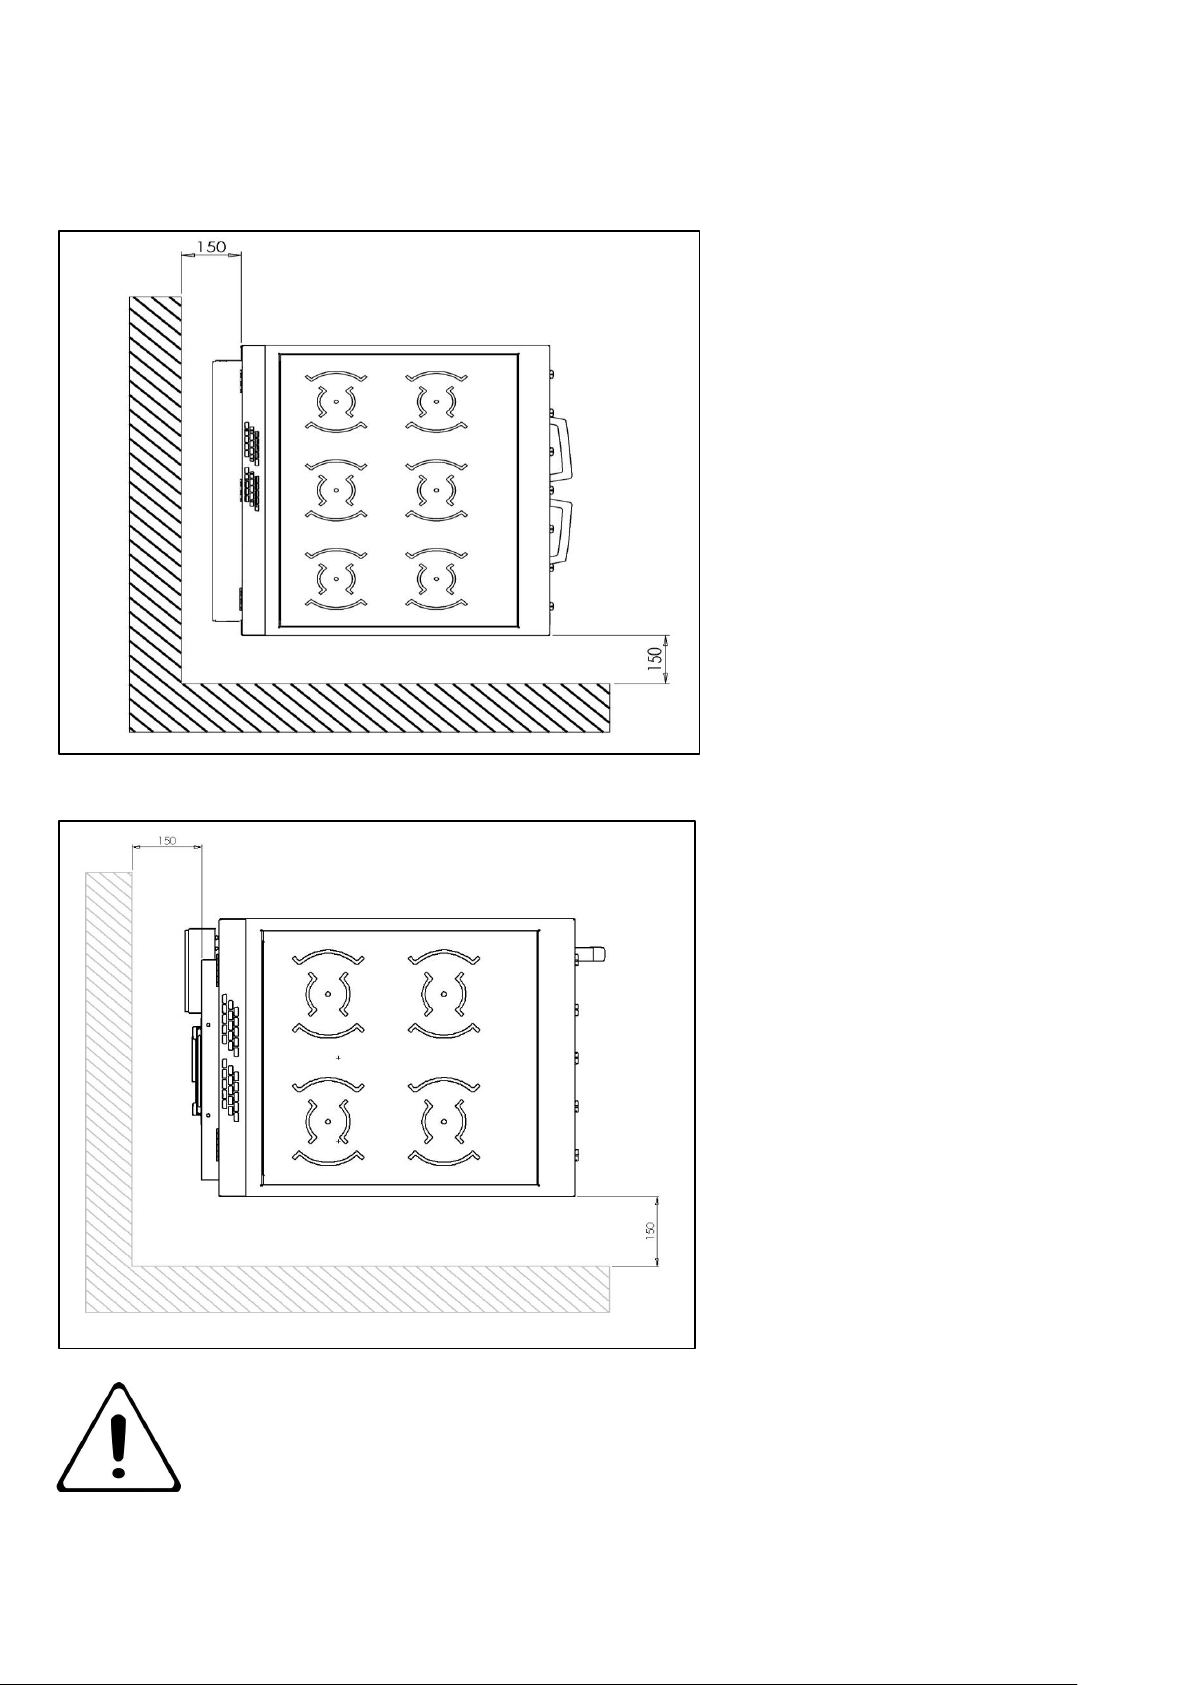
8.1 SITING / CLEARANCES
E161i & E163i
E143i
CAUTION: WALLS CLOSER THAN 150mm TO THE APPLIANCE
MUST BE NON-COMBUSTIBLE. IF SUITING THE NECESSARY
CLEARANCES TO ANY COMBUSTIBLE WALL MUST BE THE
LARGEST FIGURE GIVEN FOR INDIVIDUAL APPLIANCES
INSTRUCTIONS.
Page 28
28
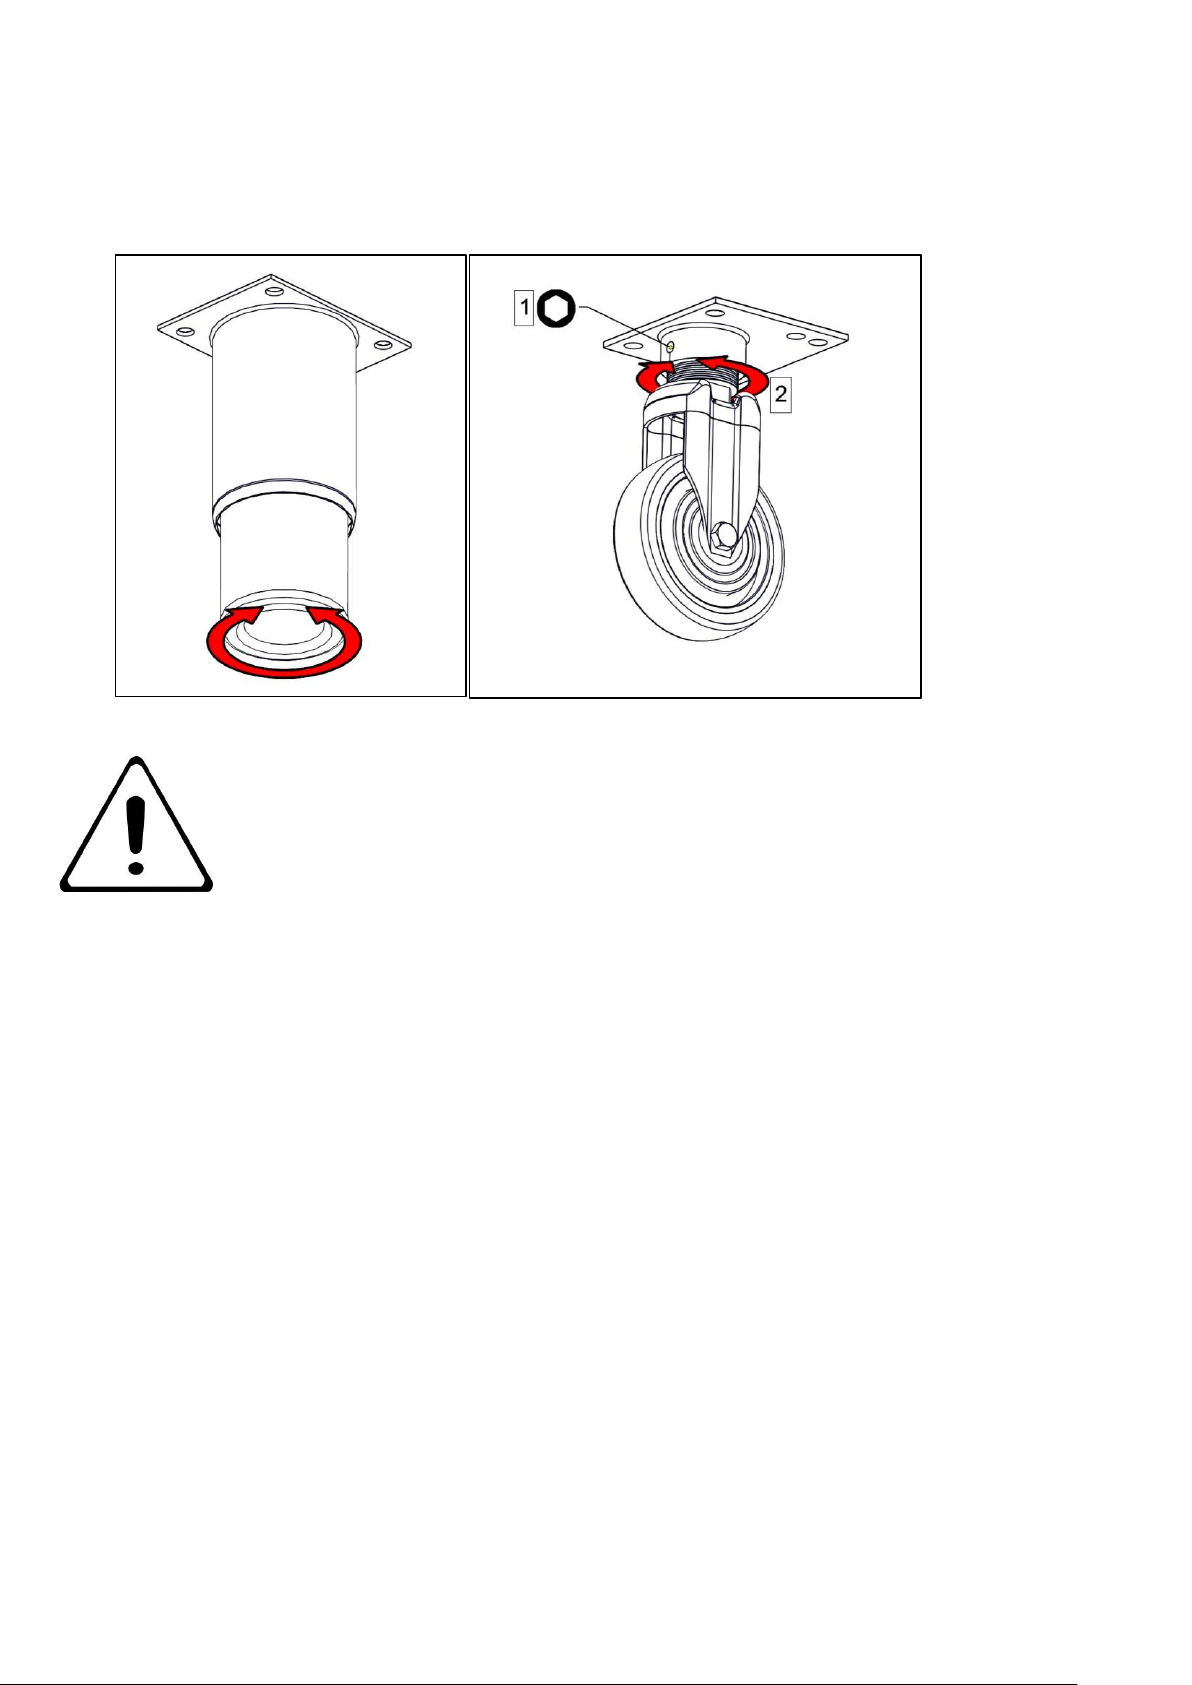
8.2 ASSEMBLY
8.2.1 Position the appliance and level using feet adjusters as shown below.
TAKE CARE WHEN MOVING AN APPLIANCE FITTED WITH
CASTORS.
Page 29
29
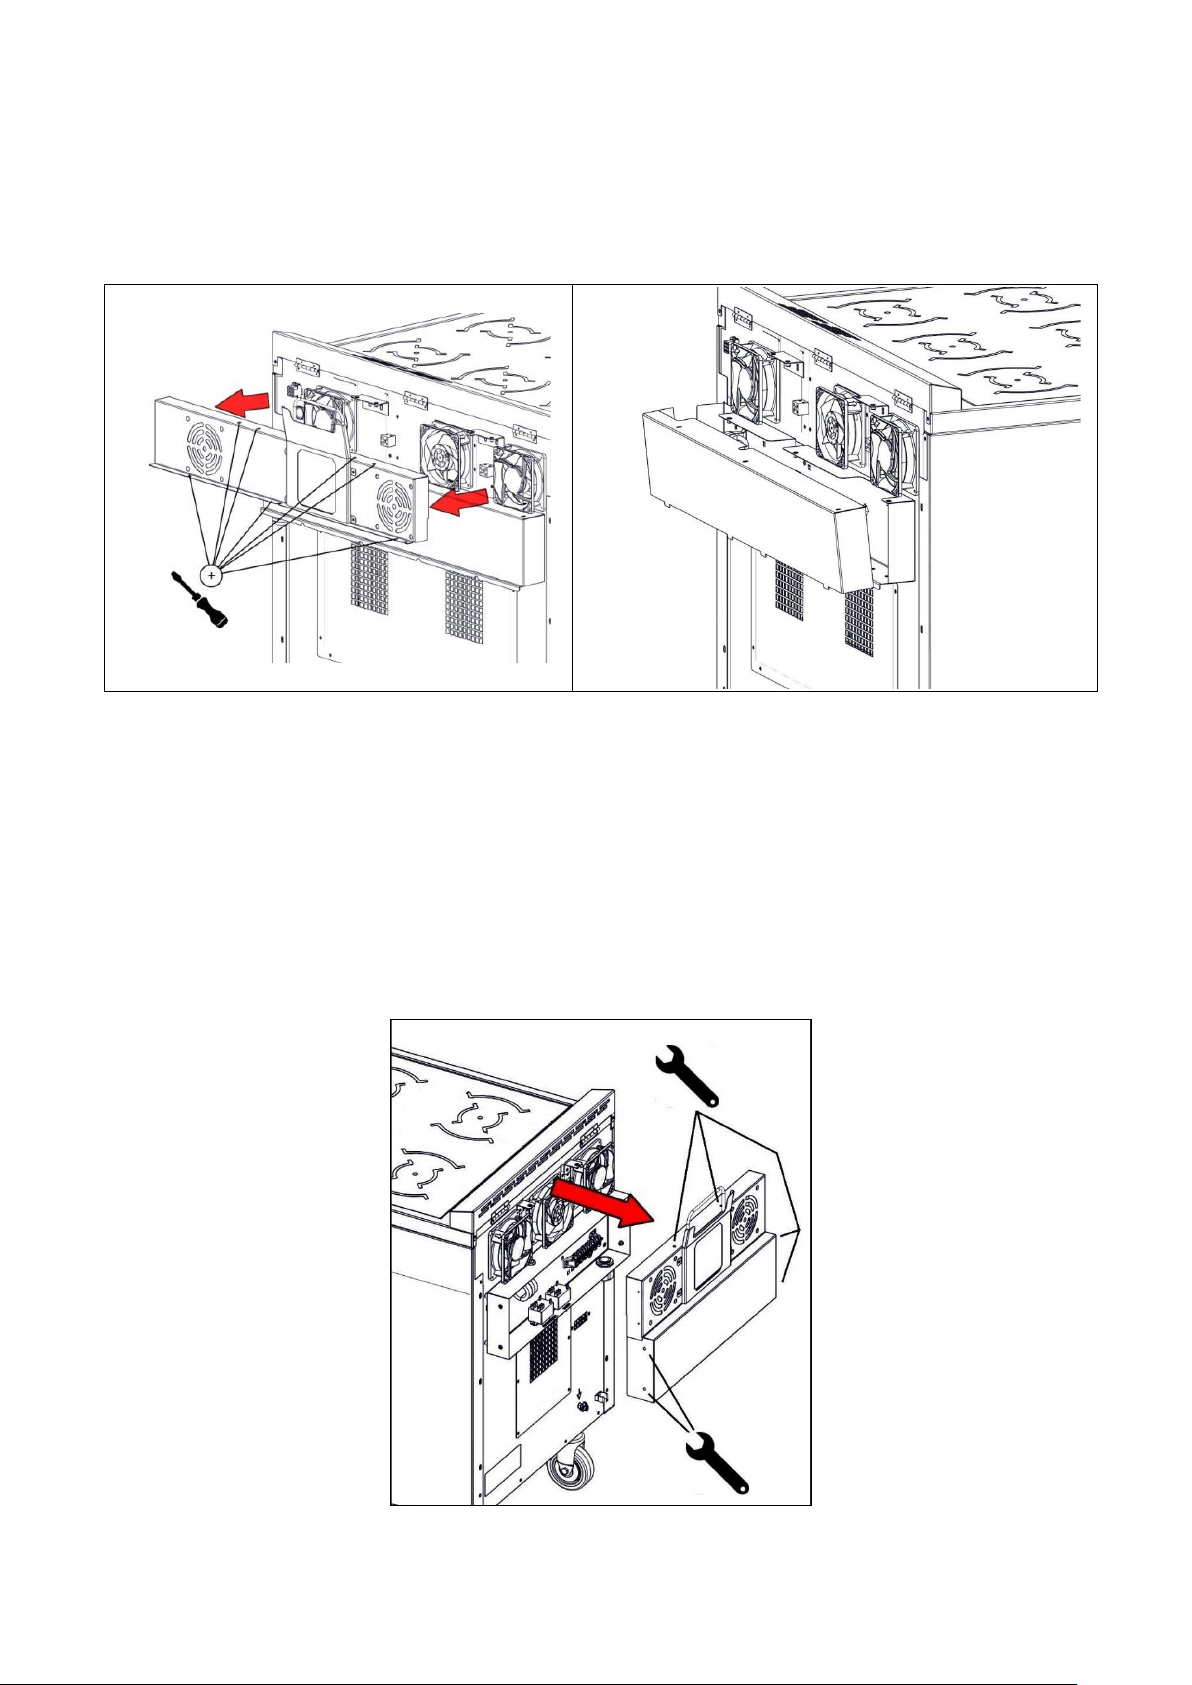
8.3 ELECTRIC SUPPLY & CONNECTION
The location of the electrical connection is as seen in section 7.0. this unit is suitable for AC supplies only.
E161i & E163i ACCESS PANEL REMOVAL
To install the mains cable, remove upper rear fan cover and lower terminal cover panel as shown above and
feed the cable through the cable gland(s) and connect the mains supply to the terminal block(s).
E143i ACCESS PANEL REMOVAL
To install the mains cable, remove the rear fan/electrics cover as shown above and feed the cable
through the cable gland(s) and connect the mains supply to the terminal block(s).
Page 30
30
THIS APPLIANCE MUST BE EARTHED
This appliance is also provided with a terminal for connection of an
external equipotential conductor. This terminal is an effective electrical
contact with all fixed exposed metal parts of the appliance and shall
allow the connection of conductor having a nominal cross-section area
of up to 10mm². It is located at the rear of the unit and identified by the
following label and must only be used for bonding purposes.
MAINS INPUT CONNECTION CABLE IS NOT SUPPLIED;
SUITABLE CABLE WILL CONFORM TO CODE DESIGNATION IEC
60245-57.
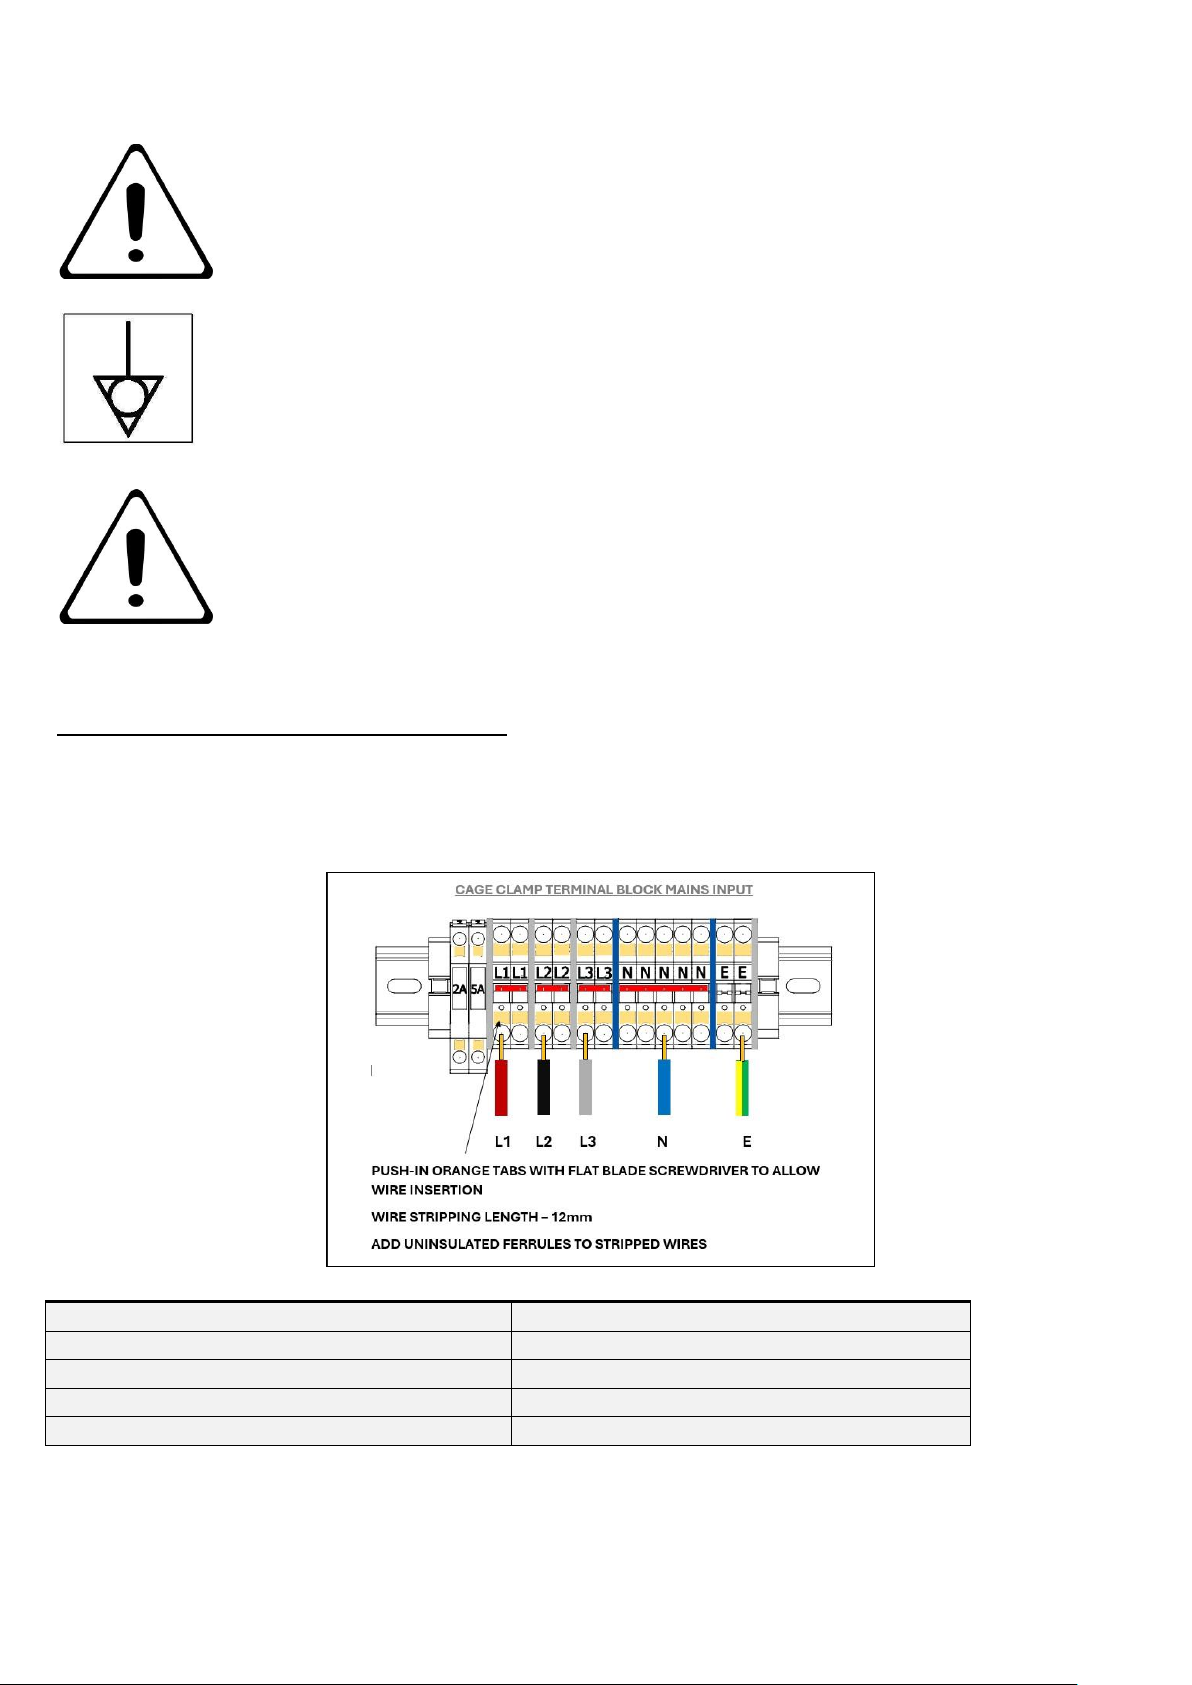
E163i MODEL (DIN rail mounted terminal block)
The standard terminal arrangement is Three phase (400V 3N~).
Refer to image below and wiring diagram in section 9.17.
Install an appropriate three phase mains supply cable with a 32amp plug.
Live 1 ( Phase 1)
Brown
Live 2 ( Phase 2)
Black
Live 3 ( Phase 3)
Grey
Neutral
Blue
Earth
Yellow/Green
Page 31
31
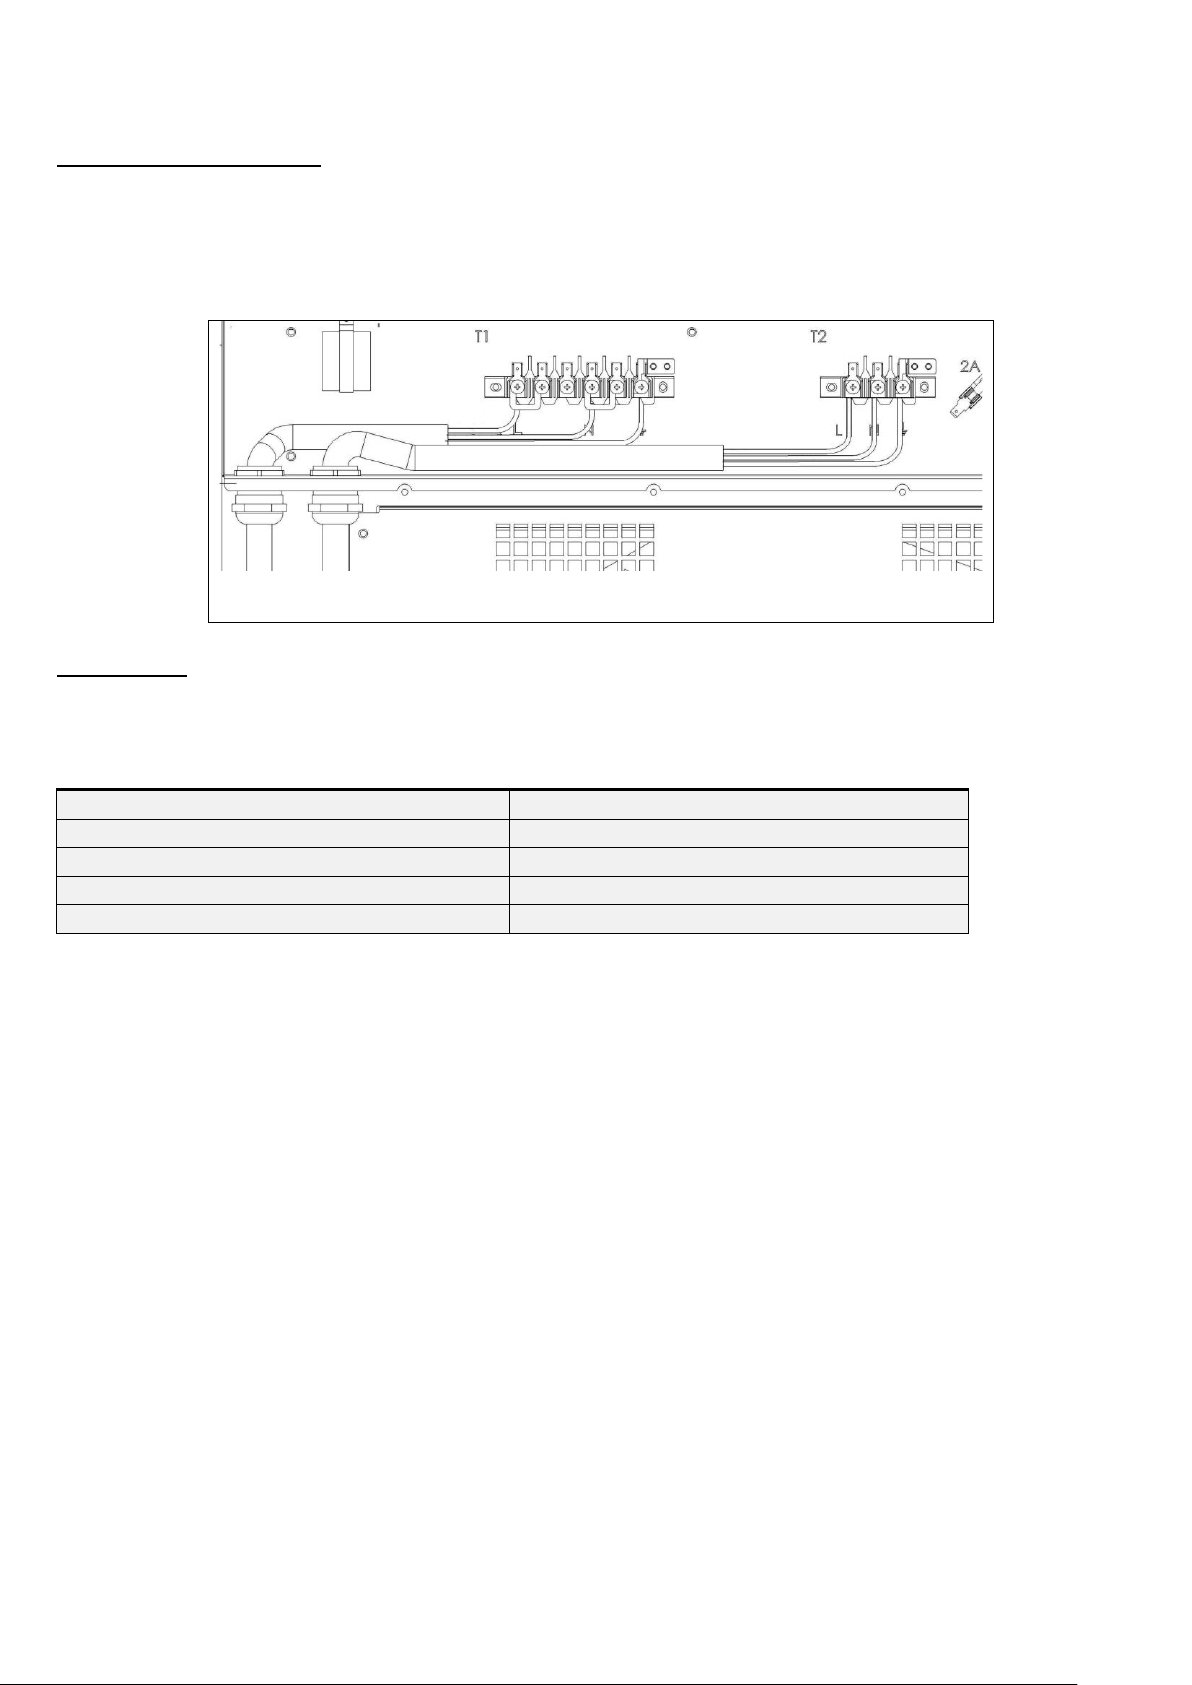
E161i MODEL (Twin supply)
On Model E161i there is a requirement for two separate power supplies.
The standard terminal arrangement is Single phase (2x 230V~).
On this model there are two independent terminal blocks for each separate supply. This must be wired as per
the circuit diagram.
Guide / example of E161I single phase dual power supply layout.
E143i MODEL
On Model E143i the standard terminal arrangement is Three phase (400V 3N~). Install an
appropriate three phase mains supply cable with a 16-amp plug.
Live 1 ( Phase 1)
Brown
Live 2 ( Phase 2)
Black
Live 3 ( Phase 3)
Grey
Neutral
Blue
Earth
Yellow/Green
Page 32

32
8.4 COMMISSIONING
Refer to section 4.0 for operation. If the oven safety thermostat is activated, refer to section 9.13 to reset it.
Carry out the following operation:
8.4.1 Turn on mains power supply on.
8.4.2 Ensure red neon(s) illuminates.
8.4.3 Place a pan suitable for induction cooker tops, filled with water, upon a cooking zone.
The pan minimum diameter cannot be less than 120mm.
8.4.4 Switch all cooking zones on to position 8.
8.4.5 Ensure that corresponding digital display on hob illuminates and remains lit. This indicates that the “Pan
detection” feature is working.
8.4.6 Repeat on all cooking zones.
8.4.7 Leave pots to heat until water boils.
8.4.8 Switch controls off.
E143i, E161i & E163i – Oven
8.4.9 Turn the oven temperature control knob to 200°C.
8.4.10 Ensure amber neon illuminates.
8.4.11 Let the oven heat up. When amber neon switches off, check the oven temperature. Ensure the
temperature is 200°C +/-10°C.
8.4.12 Switch appliance off.
8.5 INSTRUCTION TO USER
8.5.1 After installation and commissioning is completed, please hand the user instructions to the user
and ensure that the person/s responsible understand the instructions regarding correct operation and
cleaning of the appliance.
PLEASE FILL OUT THE INFORMATION TABLE ON THE FRONT
COVER AFTER COMMISSIONING
If the appliance does not operate correctly, please refer to section 9.0 to rectify the problem.
Page 33
33
9.0 SERVICING
BEFORE ATTEMPTING ANY MAINTENANCE, ISOLATE THE
APPLIANCE AT THE MAINS SWITCH AND TAKE STEPS TO
ENSURE THAT IT IS NOT INADVERTENTLY SWITCHED ON.
MAINTENANCE CHECK
Regular servicing of the appliance should be undertaken to ensure correct operation, it is functioning
as intended, and safe to use. We recommend servicing after 2,500 hours of use, or annually,
whichever comes first.
Any maintenance schedule should be carried out in accordance with SFG20 Maintenance
Schedules. Should any issues with the integrity of the components be identified these should be
replaced. If the appliance is not considered safe the unit should be removed from service and the
responsible person advised why the unit is not safe to use and what remedial action is needed.
Contents of the maintenance schedule should be agreed with the maintenance provider.
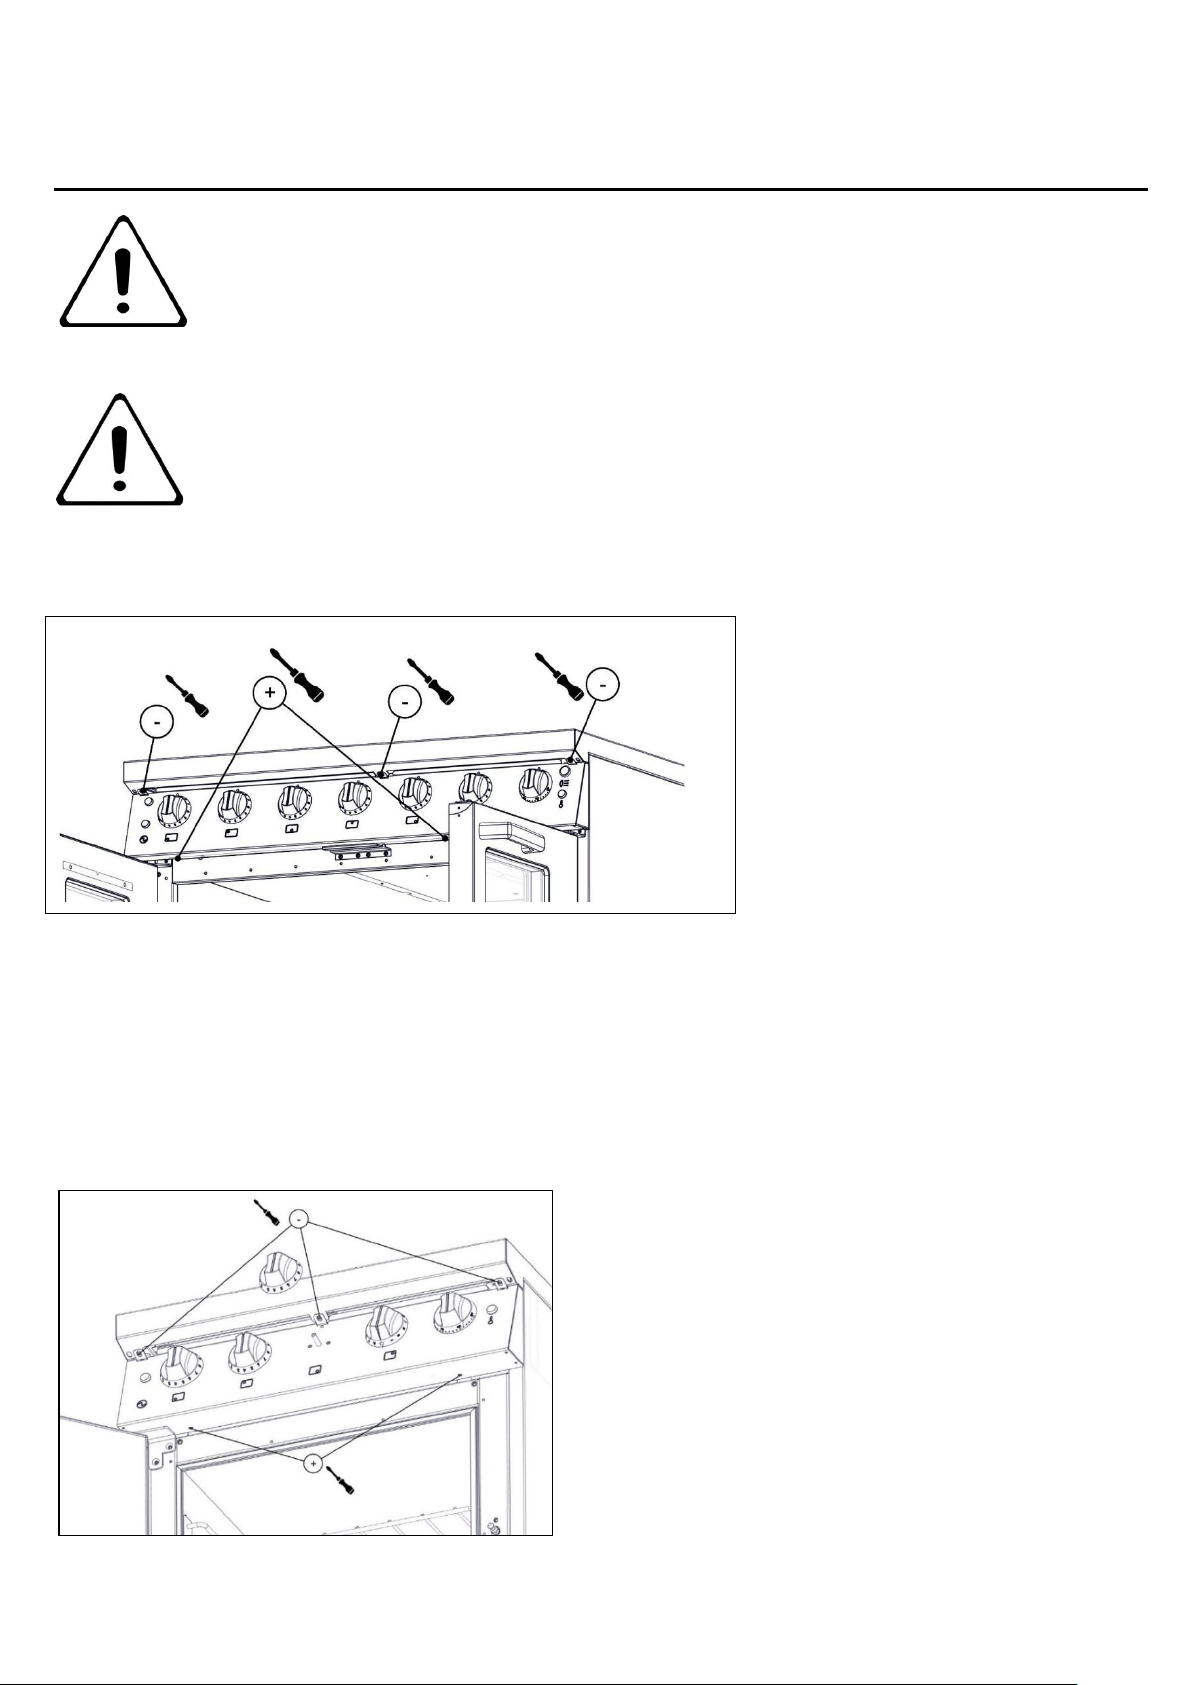
9.1 CONTROL PANEL REMOVAL – E161i & E163i
9.1.1 Remove fixings at top and bottom of control panel.
9.1.2 Open oven door and pull control panel forward whilst slightly easing the bottom edge up. Support
control panel upon door.
9.1.3 When replacing panel, take care not to trap any connecting wires. Replace shake proof washers below
fixings.
CONTROL PANEL REMOVAL - E143i
Page 34
34
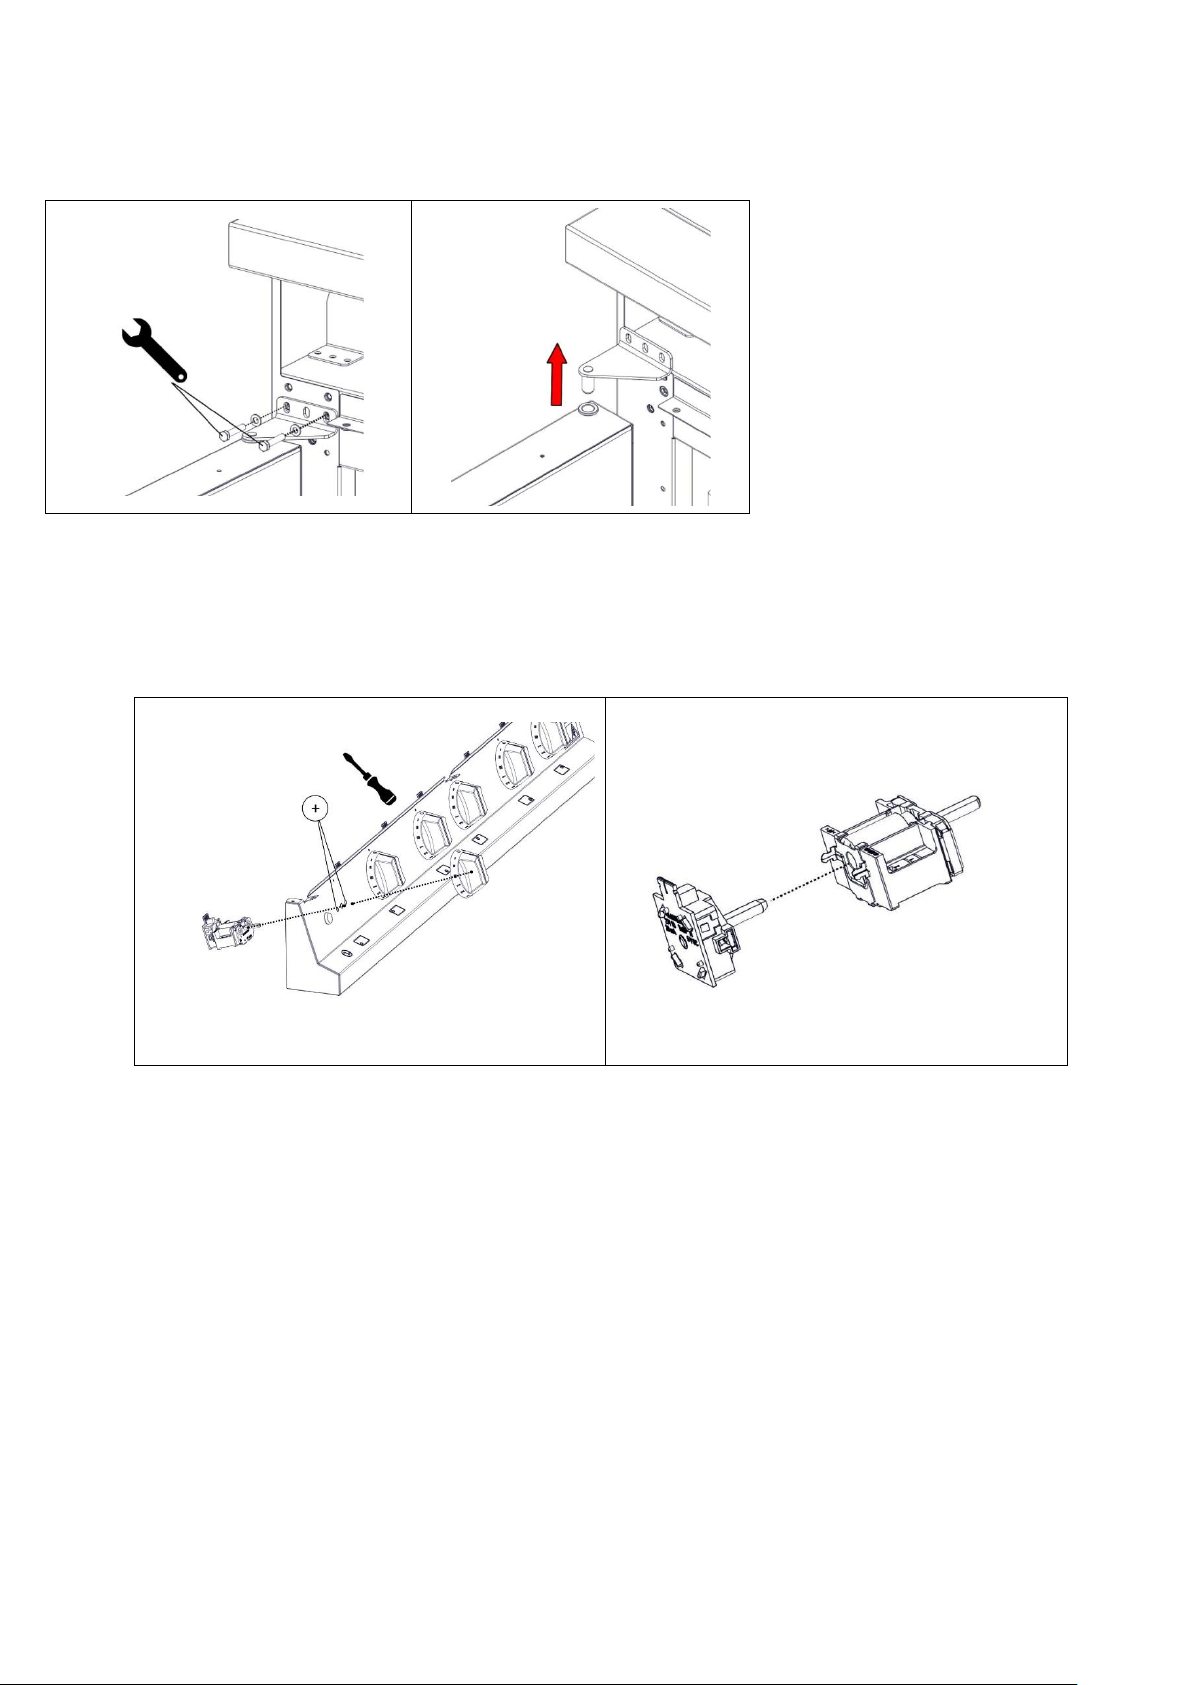
9.2 DOOR REMOVAL
9.2.1 Remove control panel as per section 9.1.
9.2.2 Remove bolts from hinge bracket and then hold door remove bracket and lift door from the appliance.
9.3 CONTROL SWITCHES REMOVAL
Hob switch - detach as shown.
9.3.1 E161i & E163i - Remove control panel as detailed in Section 9.1
9.3.2 E143i – Remove top screws from control panel. Raise hob and support with struts.
9.3.3 Remove switch connections and note wire arrangement. Pull off control knob. Undo fixings to
release switch.
9.3.4 Fit replacement switch, ensuring that shake proof washers are fitted under fixing screws.
Page 35
35
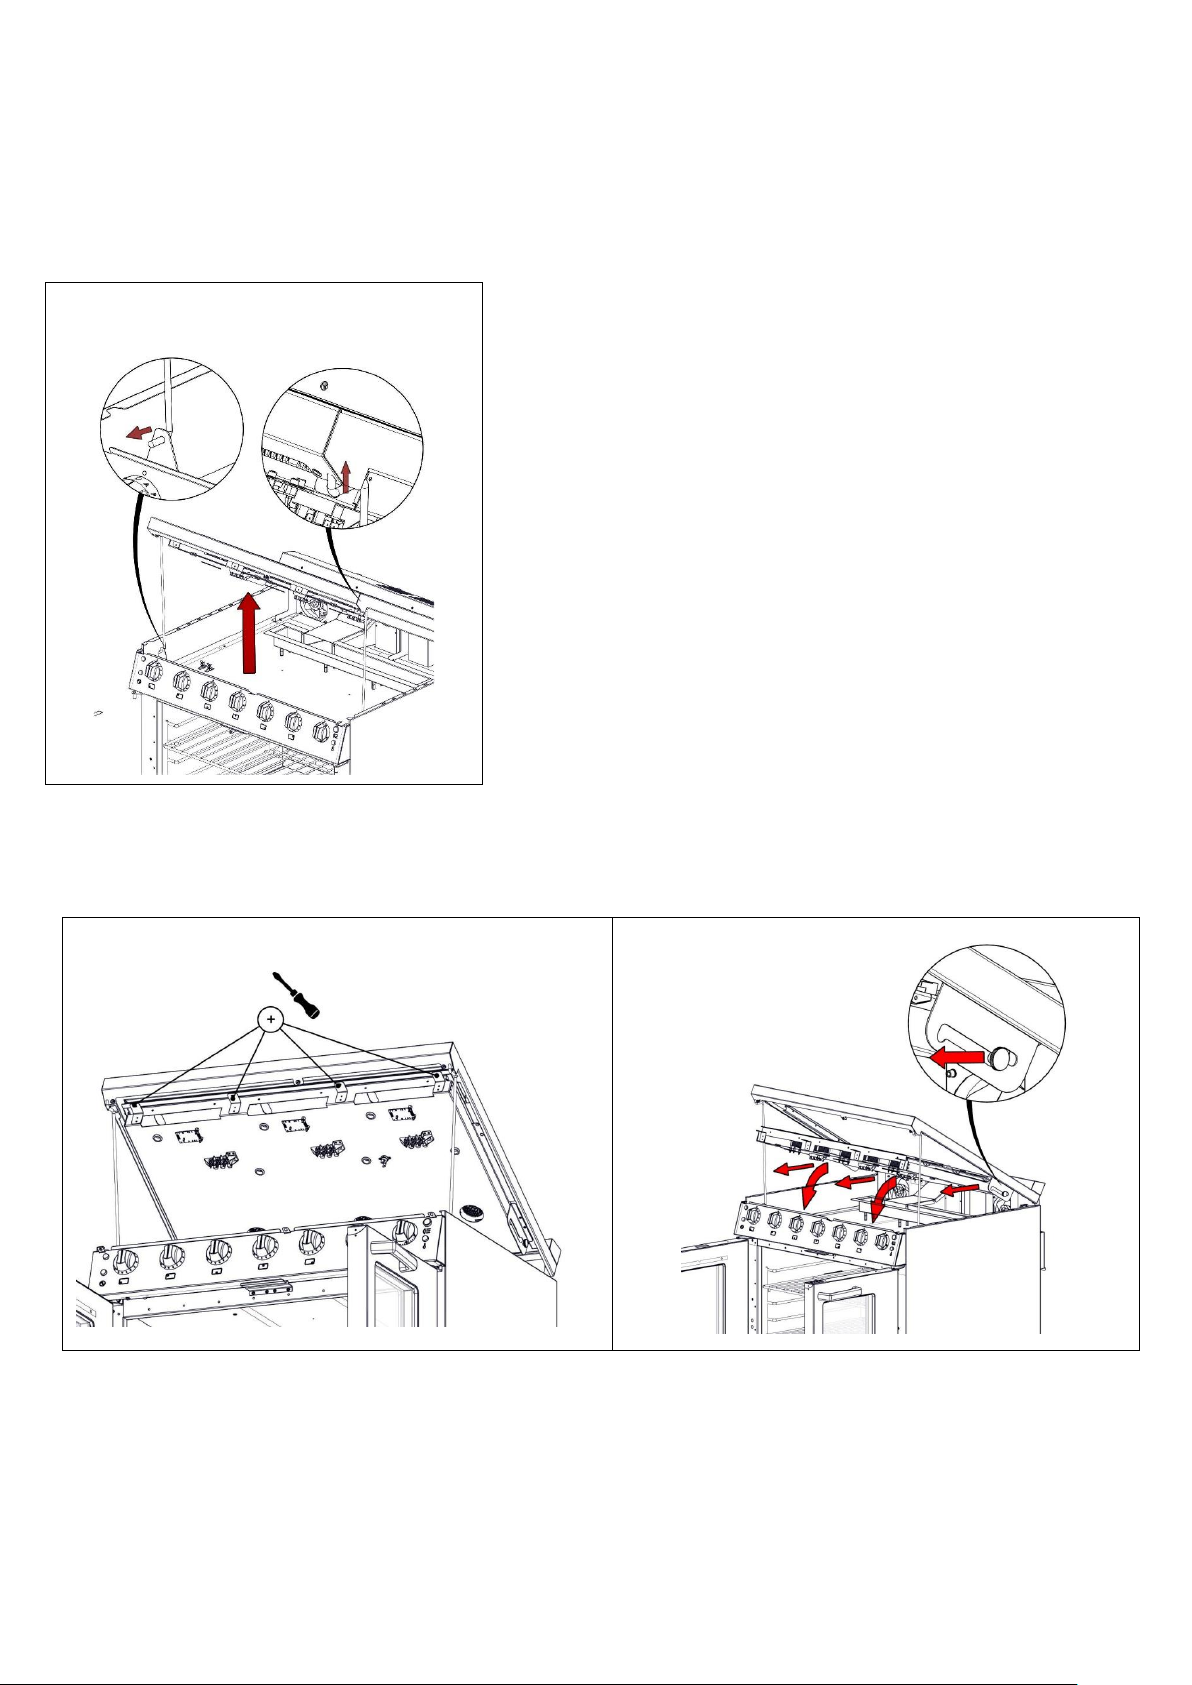
9.4 INDUCTION GENERATOR REMOVAL – E161i & E163i
9.4.1 Remove control panel as detailed in Section 9.1 but do not take out the bottom screws, unless
the control panel must also be removed.
9.4.2 Tilt hob up and lift out hob stay. Fit hob stay into lower mounting bracket and cranked end into
slot on hob as shown above. Fit second hob stay on other end. Ensure both are secure before work is
carried out.
9.4.3 Un-fasten four screws on inner cradle assembly pull cradle forward and tilt down.
9.4.4 Disconnect generator wires from three-way terminal block. Remove wiring, noting connection
positions.
Page 36
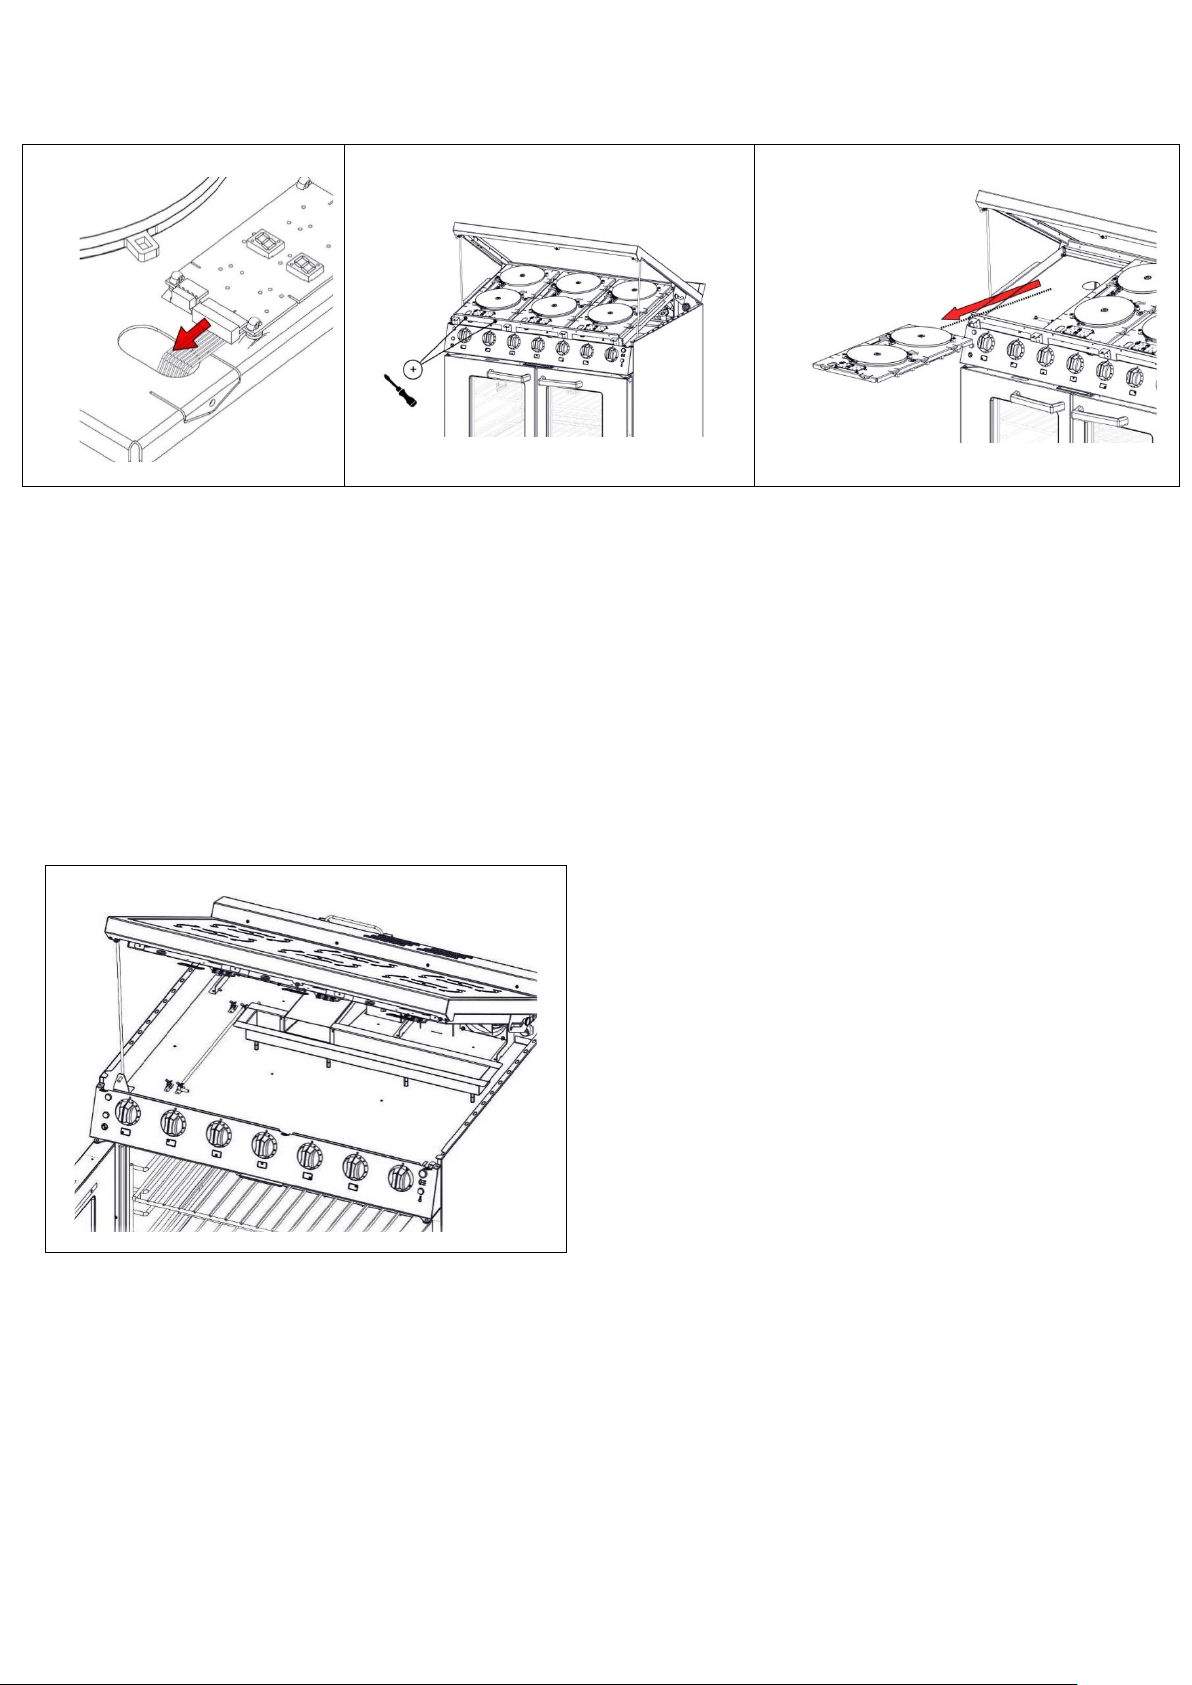
36
9.4.5 Unplug 8 Pole ribbon cable from PCB display board. Un-fasten two screws per generator. Whilst
removing induction generator from the cradle assembly feed electrical cables out of the cable entry holes.
9.4.6 When re-fitting feed cable back into cable entry holes and position generator into the cradle.
Ensure Generator is placed between the stop at the rear of the cradle. Fit two screws and secure the
generator in place on the cradle. Reconnect the 8 Pole ribbon cable onto display board.
9.4.7 . Re-Fasten four screws ( three on E143i) on inner cradle assembly and ensure electrical
connections are restored as per detailed in wiring diagram.
9.4.8 Remove stay and place back into centre fixing position,
9.4.9 * Remove second stay whilst holding hob and place back into centre fixing position. Gently lower
hob down and fix with three fixing screws.
Page 37
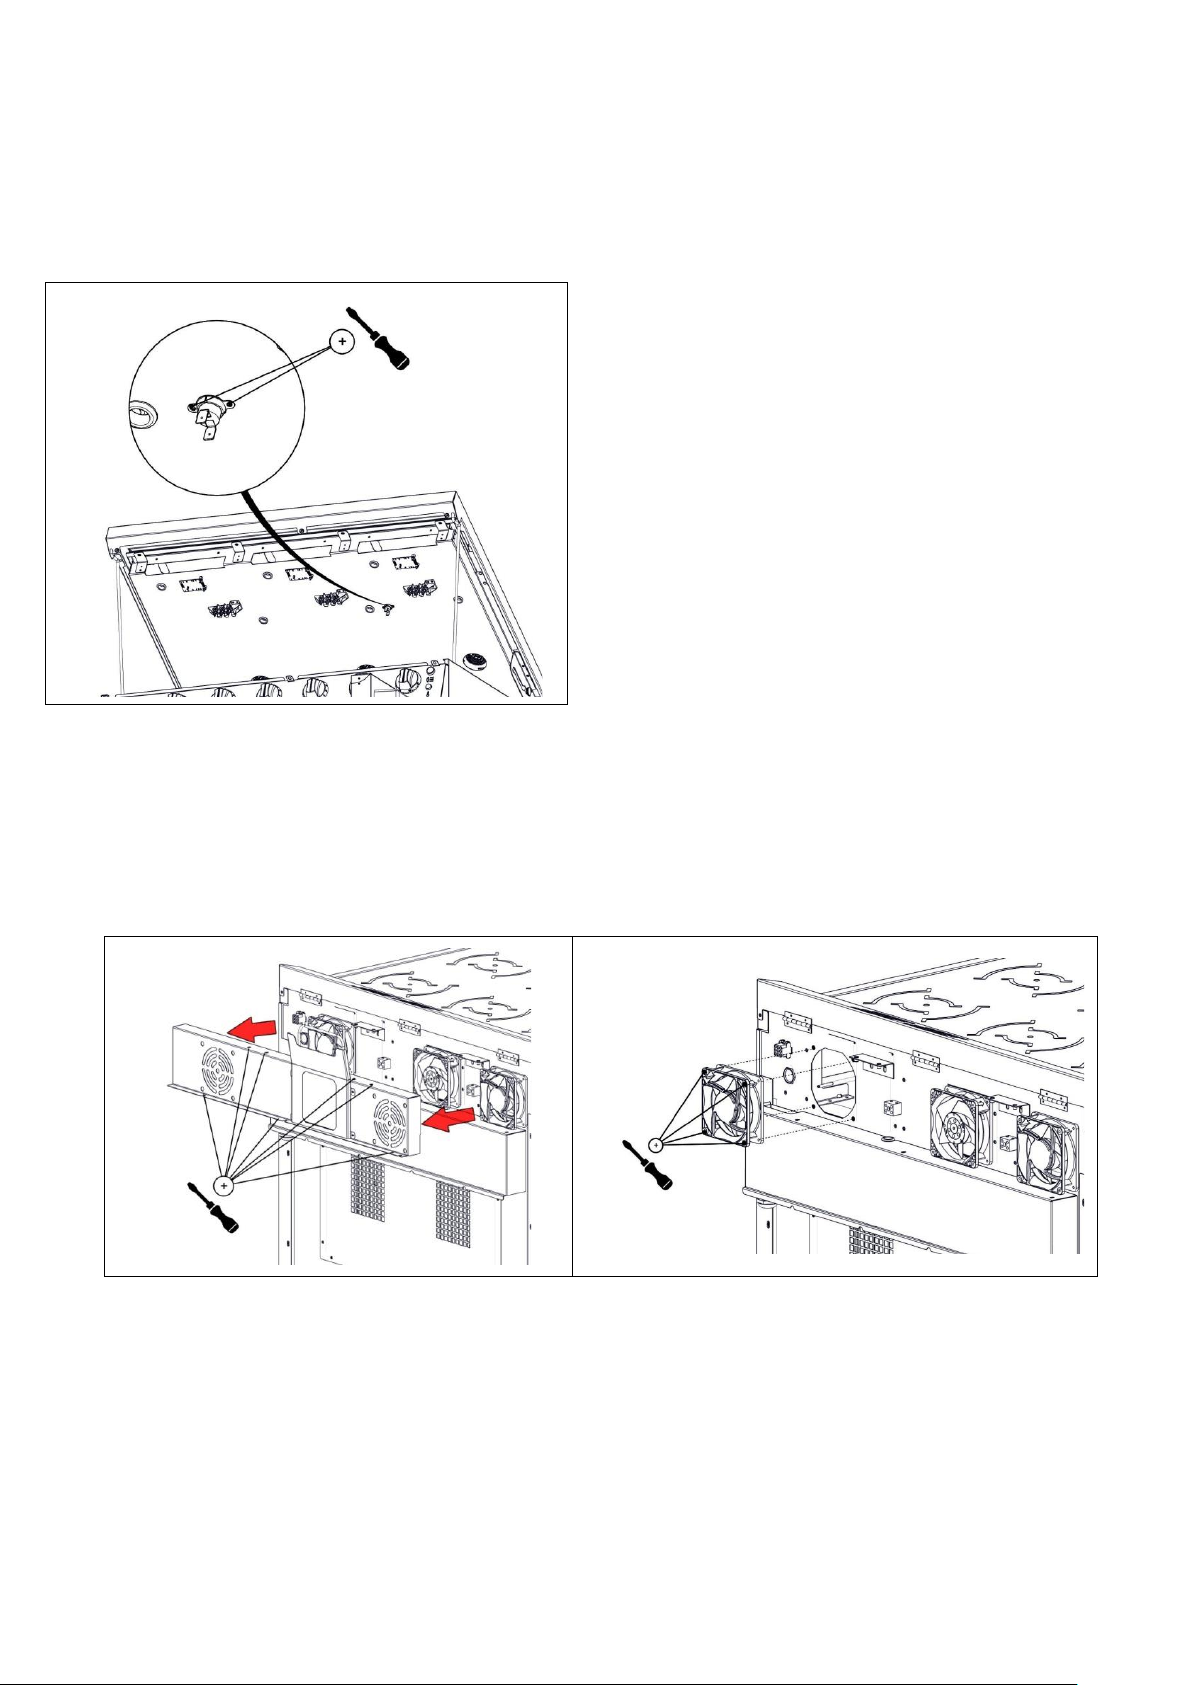
37
9.5 HOB COOLING THERMOSTAT REMOVAL
9.5.1 The hob chamber temperature is controlled with a thermostat, the thermostat is self-resetting. It
is located on the Hob cradle assembly.
9.5.2 To remove undo two screws on the flanged collar and release.
9.5.3 Electrical connections to be restored as per detailed in wiring diagram.
9.6 REAR COOLING FAN REMOVAL
Note: Two outer fans extract the hot air from inside the appliance. Centre Fan Induces clean air into the
appliance.
Page 38

38
9.7 OVEN THERMOSTAT AND OVEN FAN SWITCH
9.7.1 Remove control panel as detailed in Section 9.1.
9.7.2 Undo fixings from control panel.
9.7.3 Remove wiring, noting connection positions.
9.7.4 The combined switch and thermostat may now be removed from front panel. The parts are
secured by screw fixings and are supplied together.
9.7.5 To remove phial, undo from bracket inside oven and ease back through oven side wall.
9.7.6 Replace in reverse order.
9.7.7 Electrical connections to be restored as detailed in respective wiring diagram.
9.8 OVEN LIGHT (PUSH BUTTON)
9.8.1 Remove control panel as detailed in Section 9.1.
9.8.2 Disconnect wires from switch.
9.8.3 Undo retaining nut and withdraw switch.
9.8.4 Replace in reverse order.
9.9 OVEN ELEMENTS REMOVAL
9.9.1 Remove shelves and back baffle. Undo element fixing screw and withdraw into oven.
9.10 OVEN FAN REMOVAL
9.10.1 Remove oven shelves, back baffle and fan impellor (Note – The nut is LH thread).
9.10.2 Remove fan support plate and tilt forward into oven.
9.10.3 Undo fan support plate fixings and electrical connections.
9.10.4 Fan may now be removed. Replace in reverse order.
9.10.5 Electrical connections to be restored as detailed in wiring diagram.
Page 39
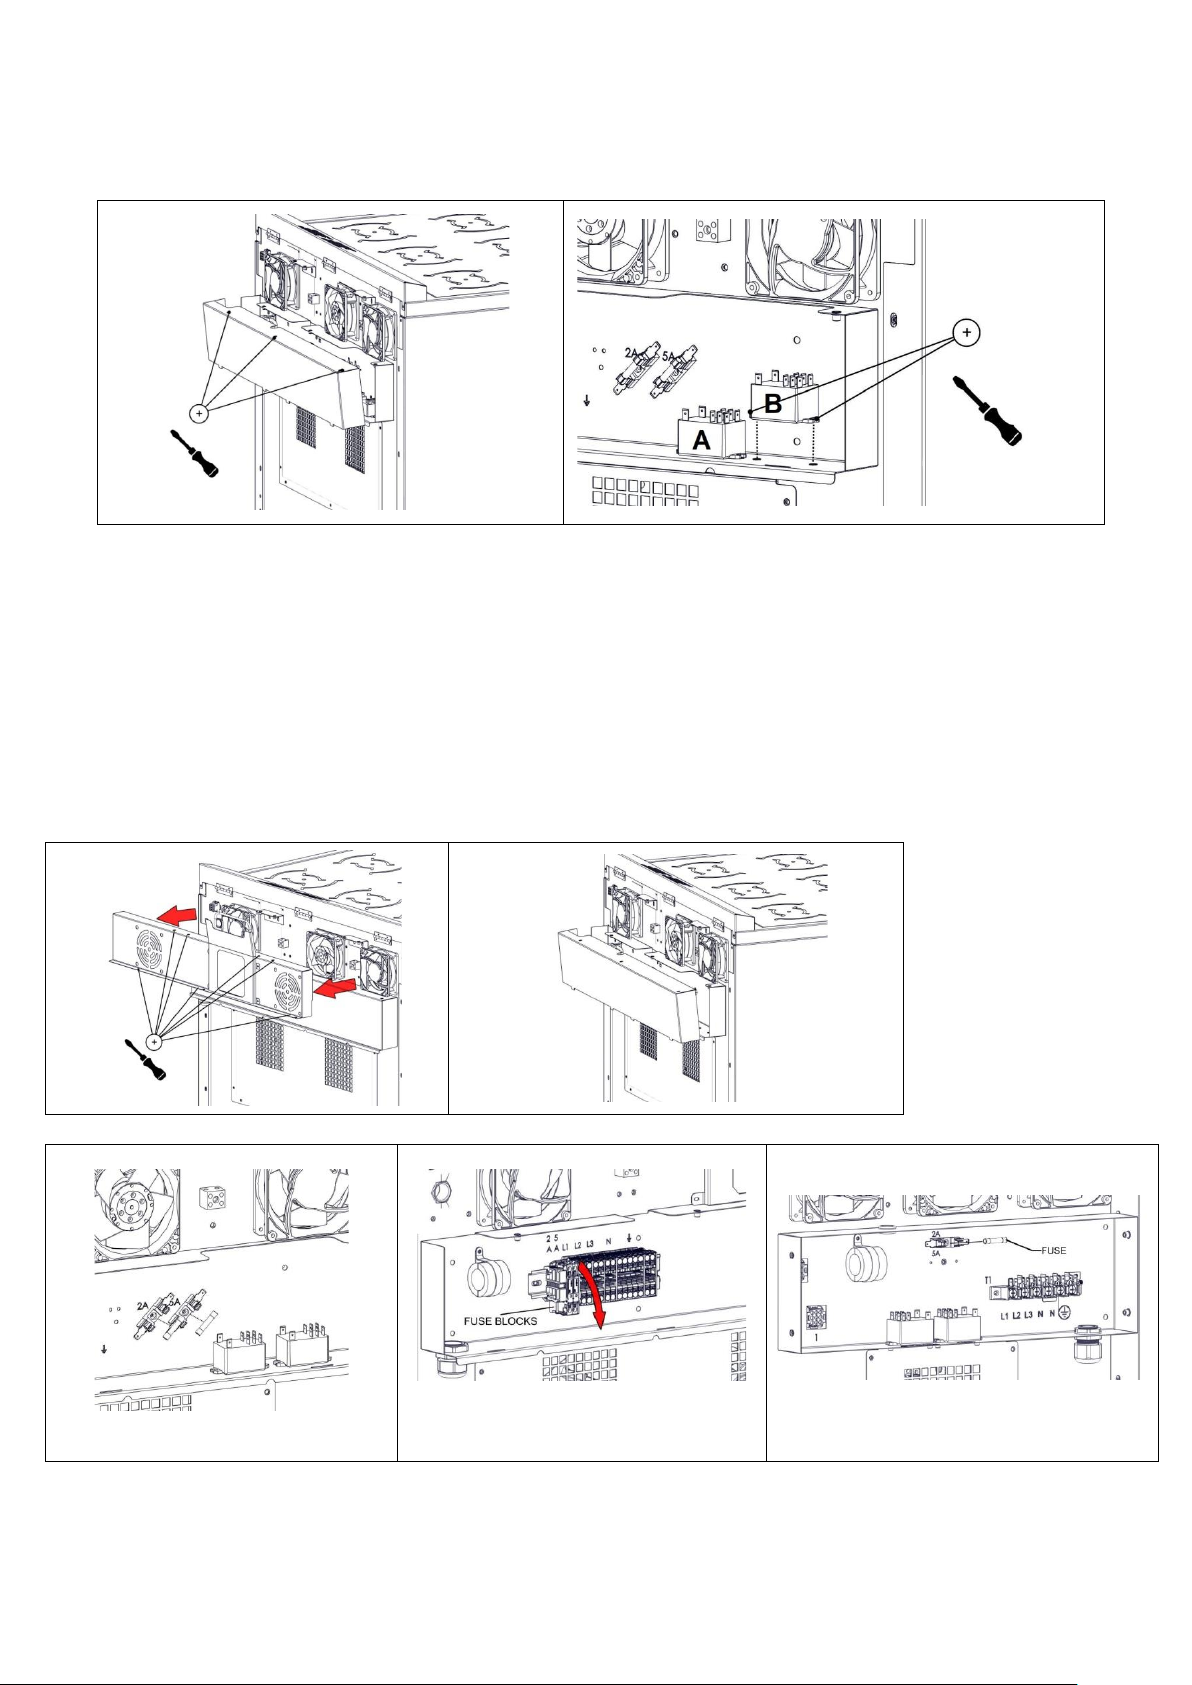
39
9.11 SAFETY AND OPERATION RELAY REMOVAL
9.11.1 Remove cover plate from outer back panel.
9.11.2 Undo electrical connections from relay and remove fixings.
9.11.3 Replace in reverse order. Electrical connections to be restored as detailed in wiring diagram.
9.11.4 Unit is fitted with two relays: “A” is the operating relay and “B” is the safety relay.
9.12 OVEN AND REAR COOLING FAN CONTROL FUSES
E161i
E163i
E143i
Page 40
40
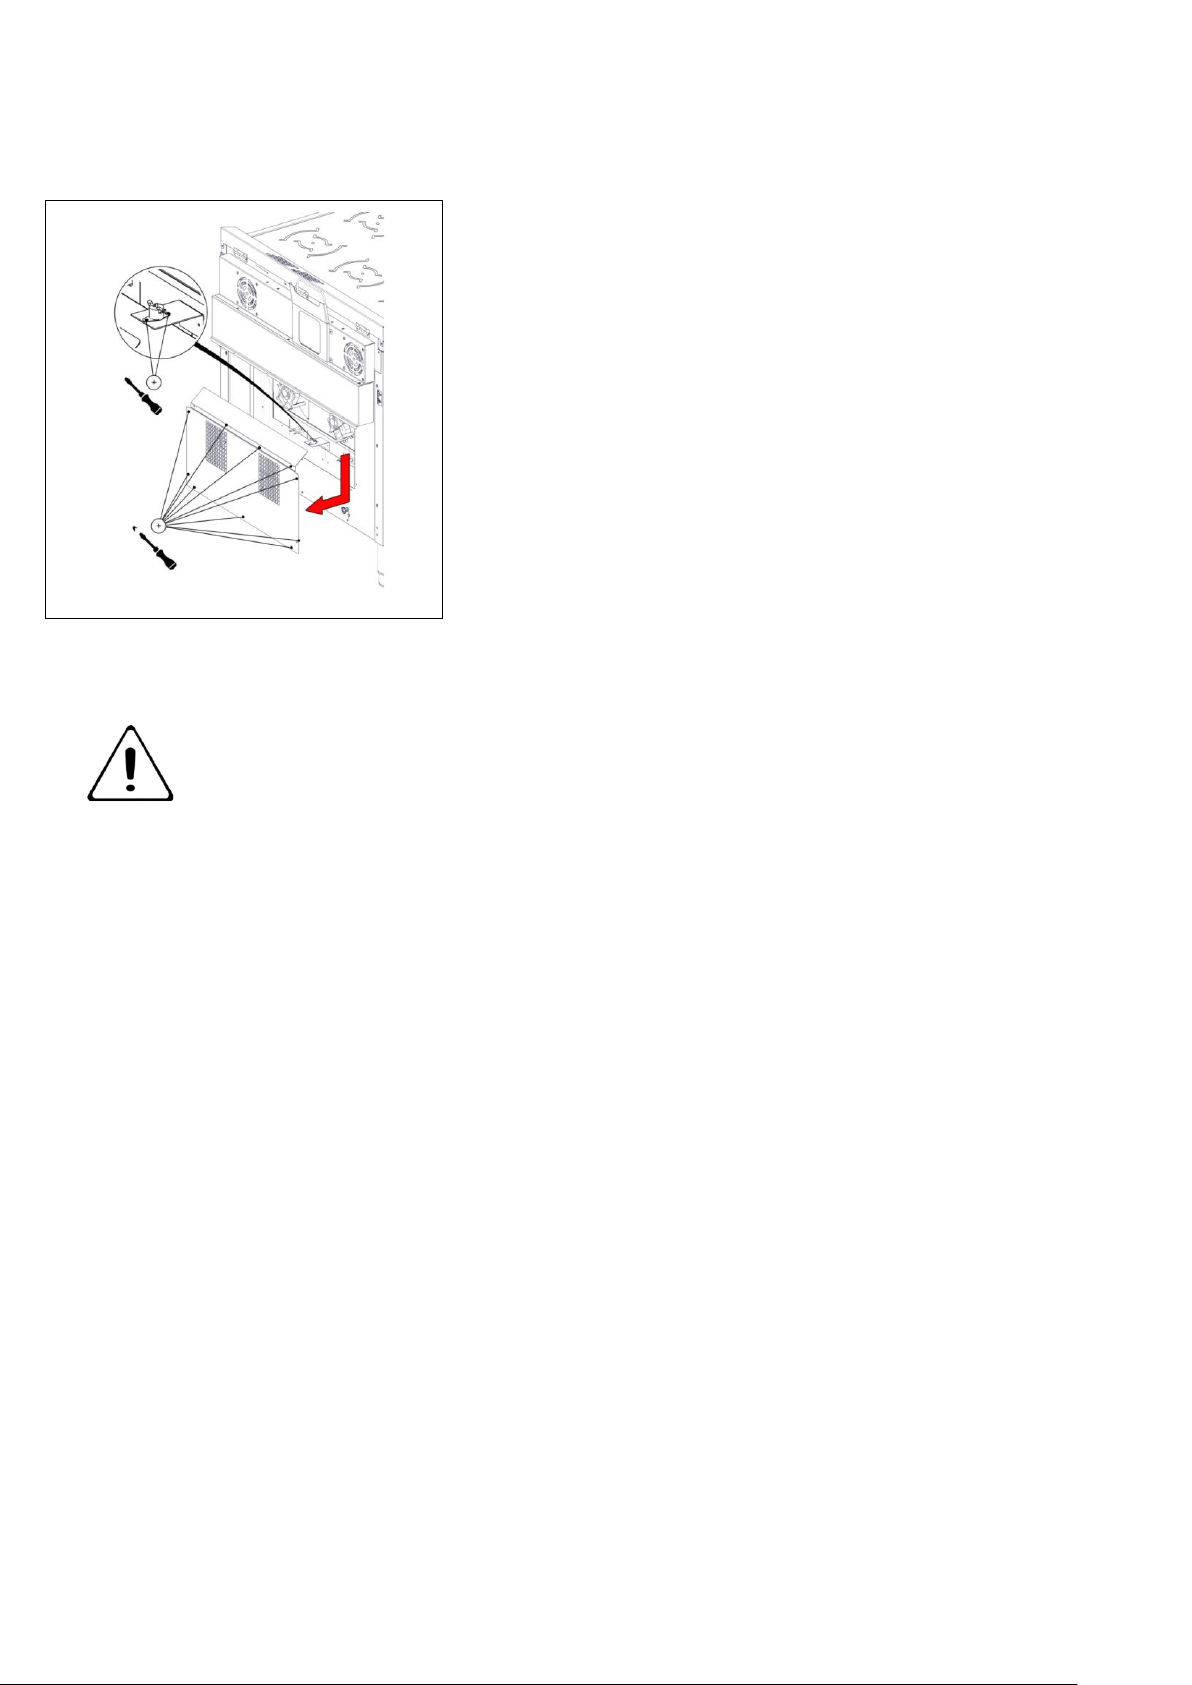
9.13 OVEN SAFETY TRIP SWITCH REPLACEMENT
9.13.1 An overheat safety trip is fitted to the oven chamber back panel. Accesses through the outer
back panel cover plate (see warning note below).
Warning If safety trip has been activated, reason for overheating must be
identified before returning the appliance to service.
9.13.2 To reset, press button.
9.13.3 If the switch is faulty remove by undoing two fixing screws on mounting plate.
9.13.4 Apply heat sink paste to underside of thermostat plate and re-attach new thermostat to mounting
plate.
9.13.5 Electrical connections to be restored as per detailed in wiring diagram.
9.14 OVEN SAFETY TRIP SWITCH REPLACEMENT (FRONT ACCESS)
9.14.1 In any condition where space is restricted at appliance rear, the overheat safety trip may be
accessed through the oven compartment by removal of pan support panel.
9.14.2 Undo top and bottom fixings of fan baffle and tilt baffle forward to remove.
9.14.3 Take care not to strain the electrical wiring.
Page 41

41
9.15 OVEN LAMP ASSEMBLY REPLACEMENT
9.15.1 Remove control panel as detailed in Section 9.1
9.15.2 Remove right or left-hand door (as required) by undoing door hinge fixings. Support door during
this process.
9.15.3 Remove fixings from side panel front.
9.15.4 Remove fixings from side panel rear.
9.15.5 Disconnect electrical connections.
9.15.6 Remove lamp assembly
9.15.7 Replace in reverse order.
Page 42
42
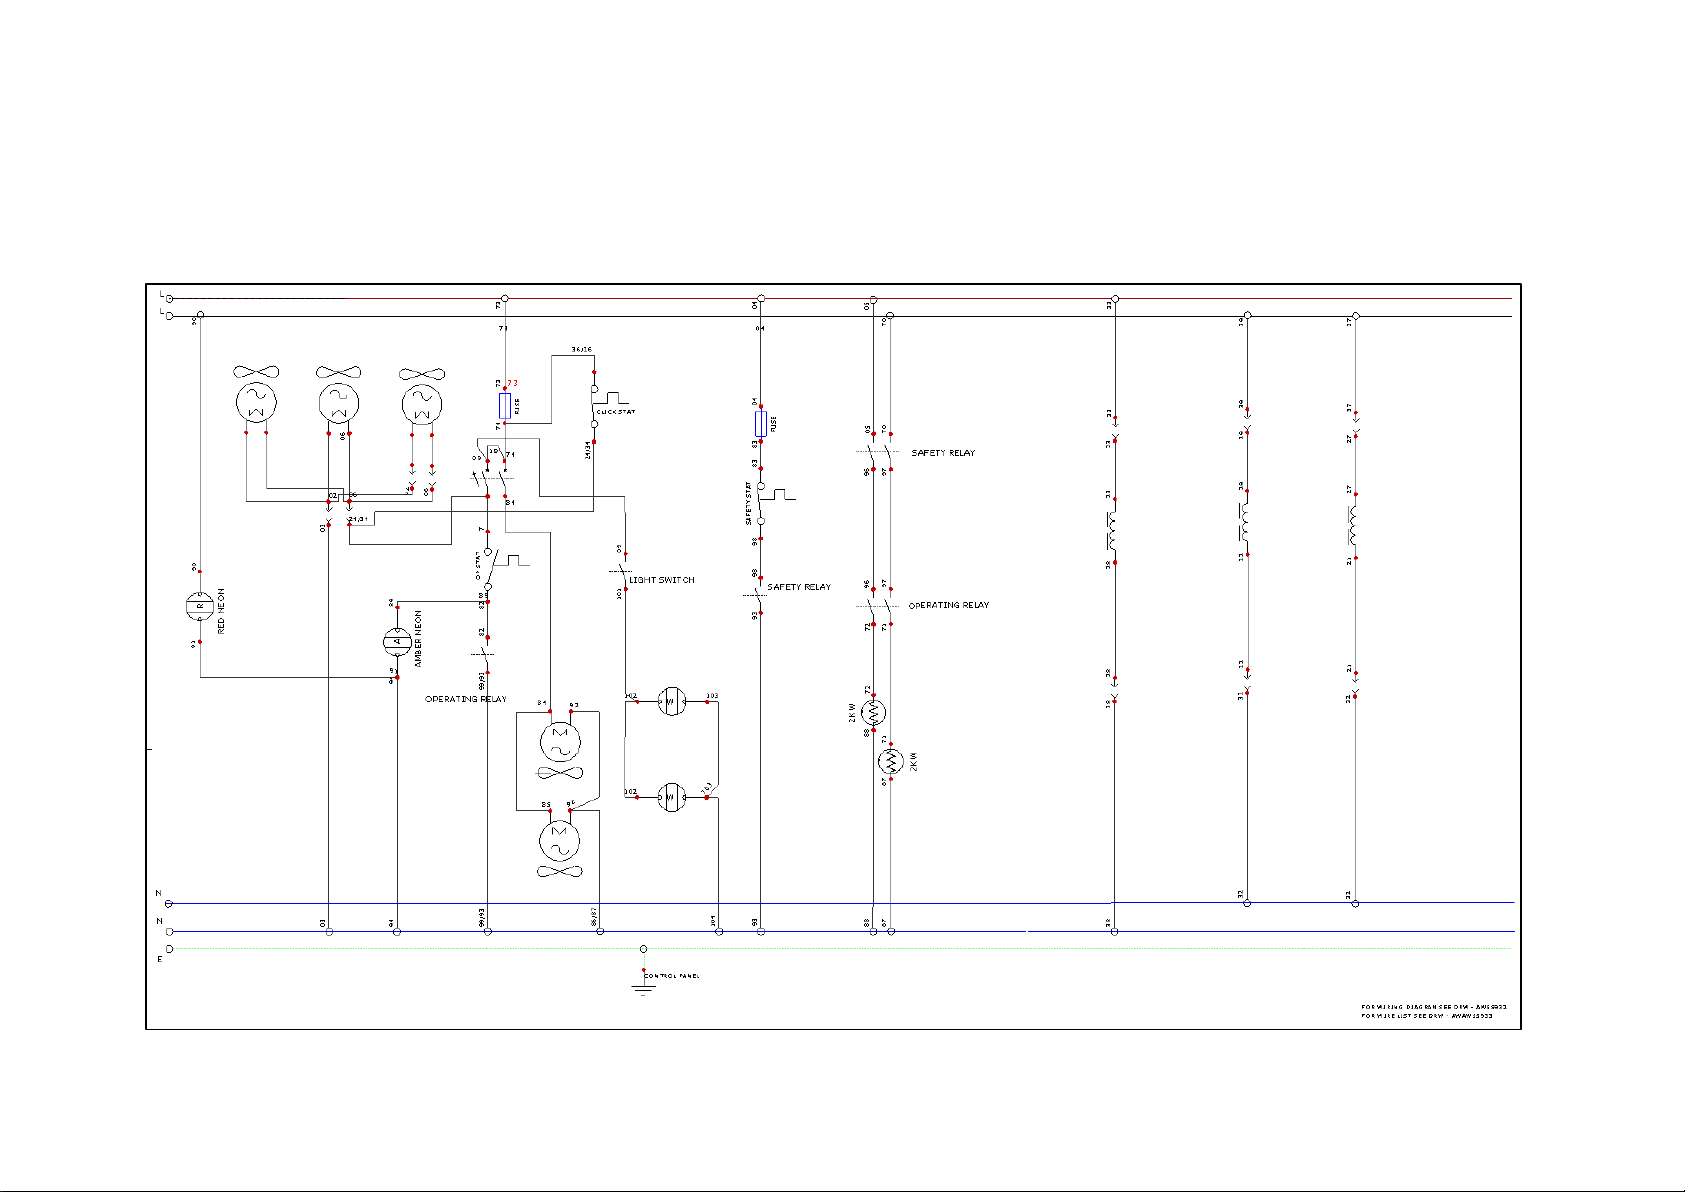
9.16 CIRCUIT DIAGRAMS
9.16.1 E161i Circuit diagram
Page 43
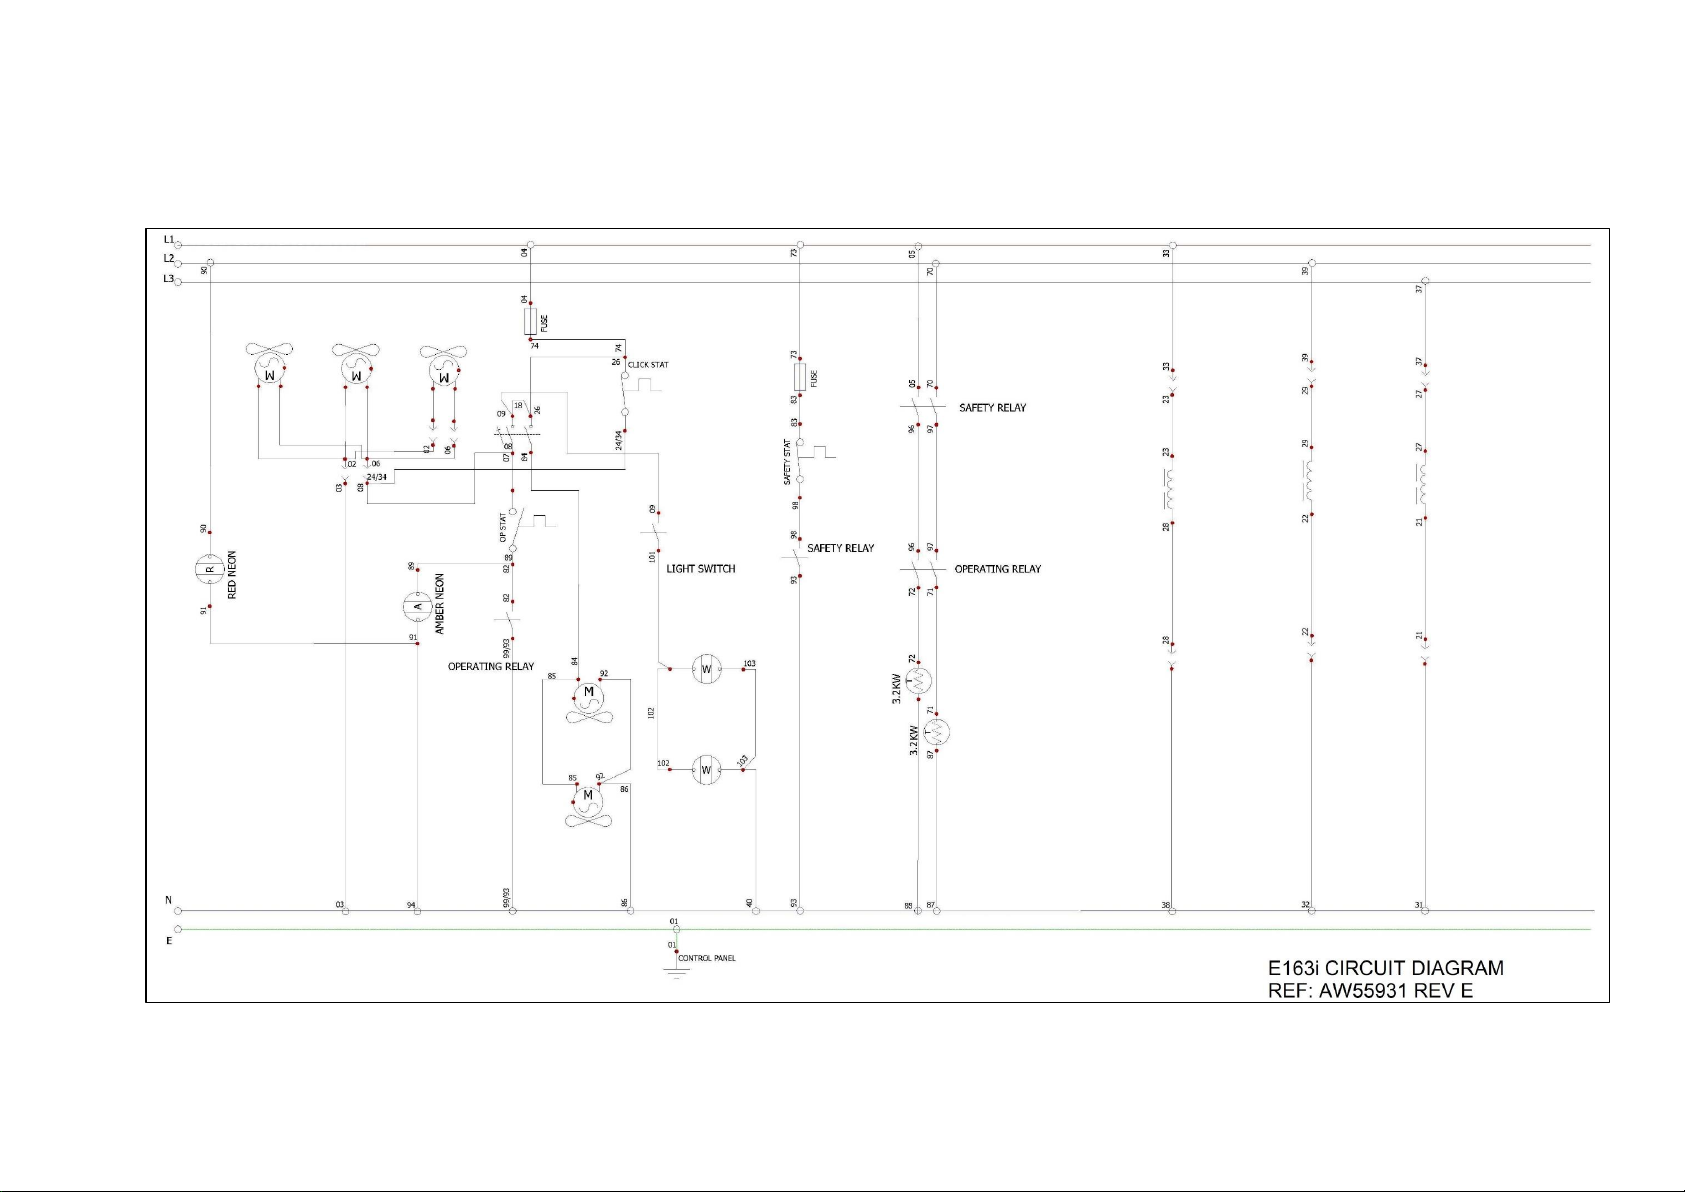
43
9.16.2 E163i Circuit Diagram
Page 44
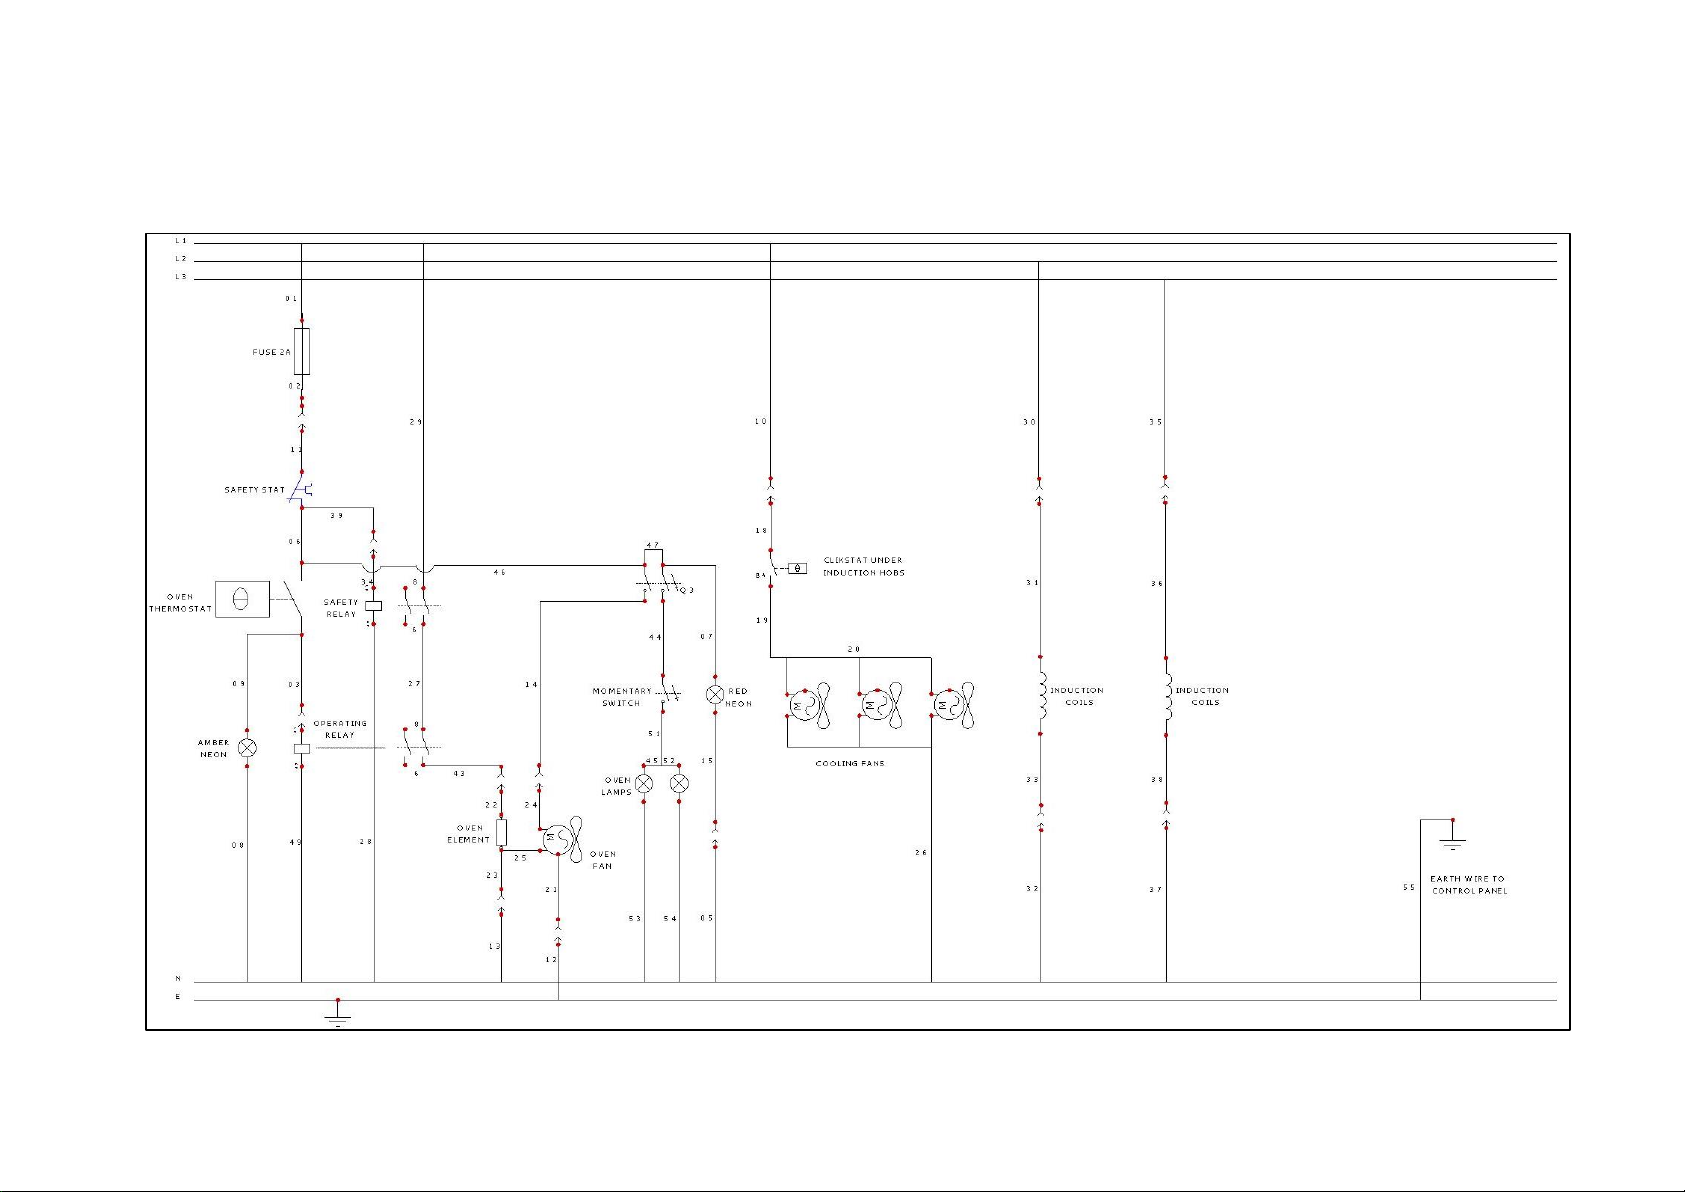
44
9.16.3 E143i Circuit Diagram
Page 45
45
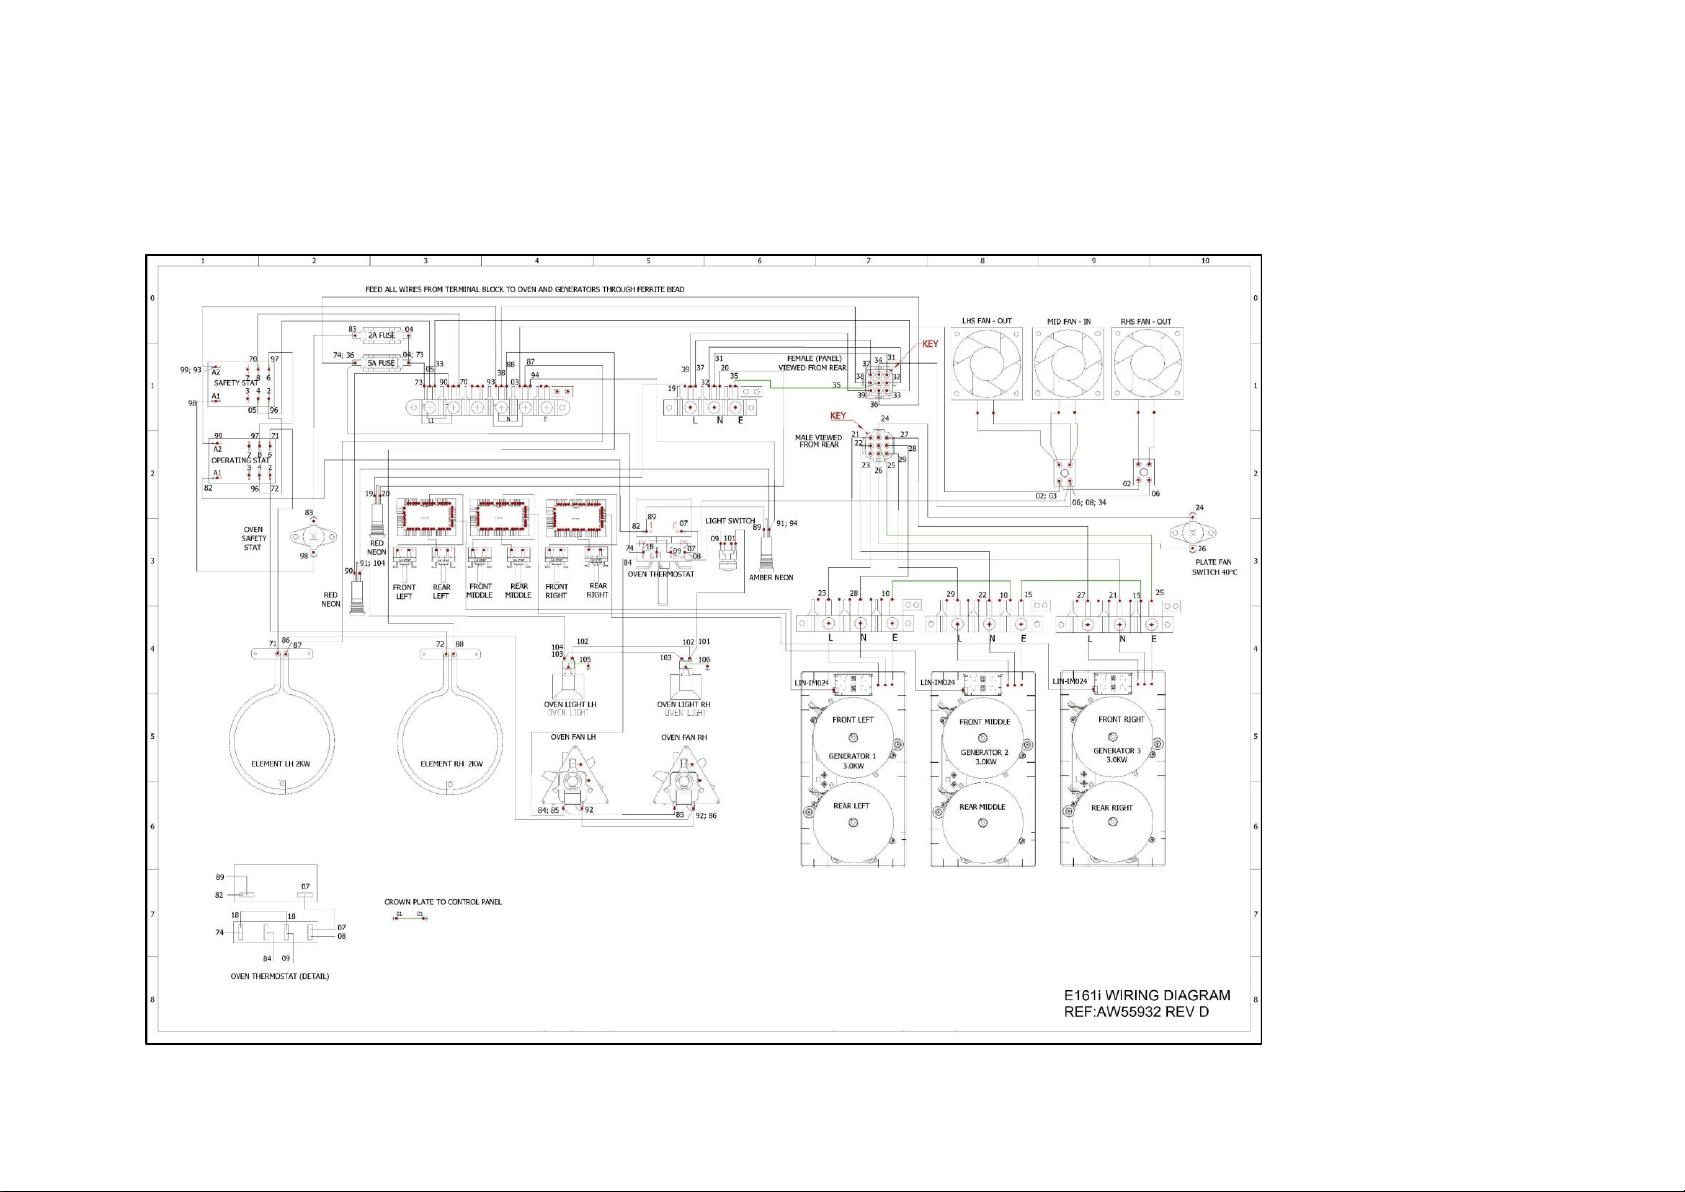
9.17 WIRING DIAGRAMS
9.17.1 E161i Wiring Diagram
Page 46
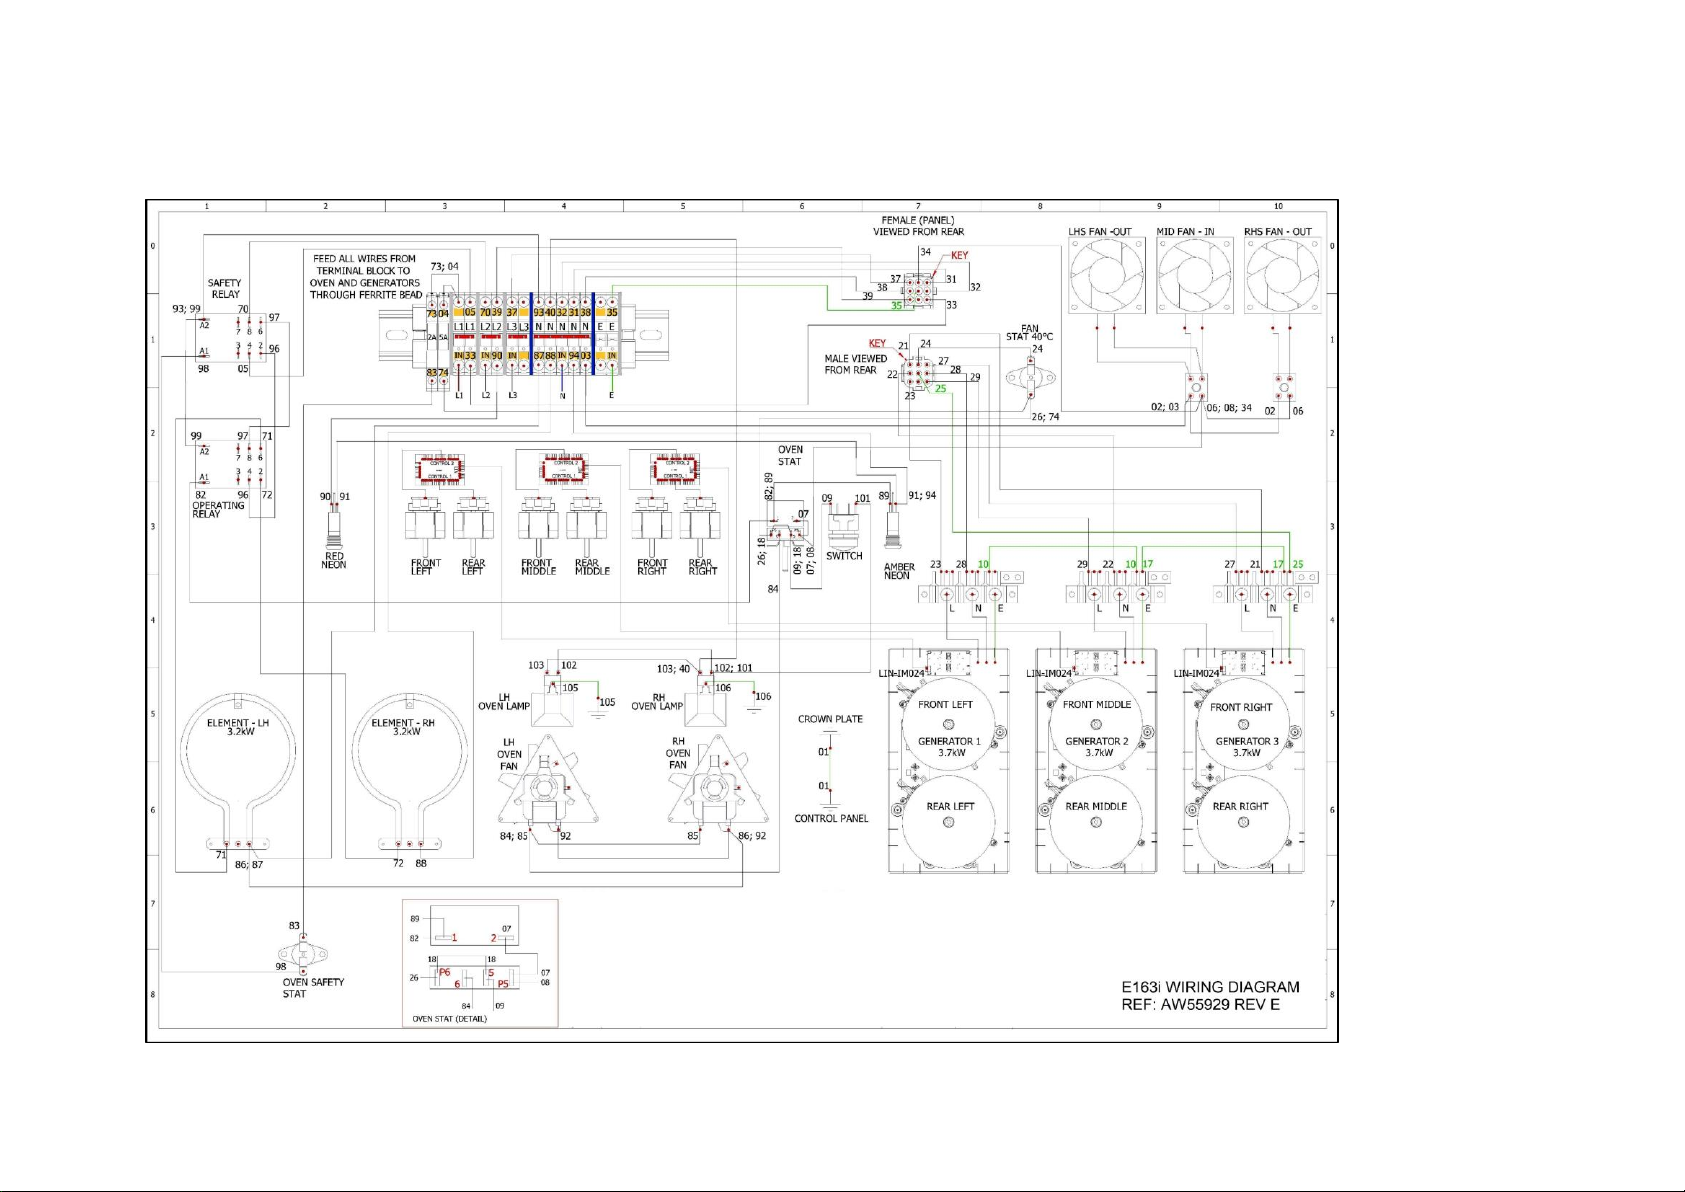
46
9.17.2 E163i Wiring Diagram
Page 47
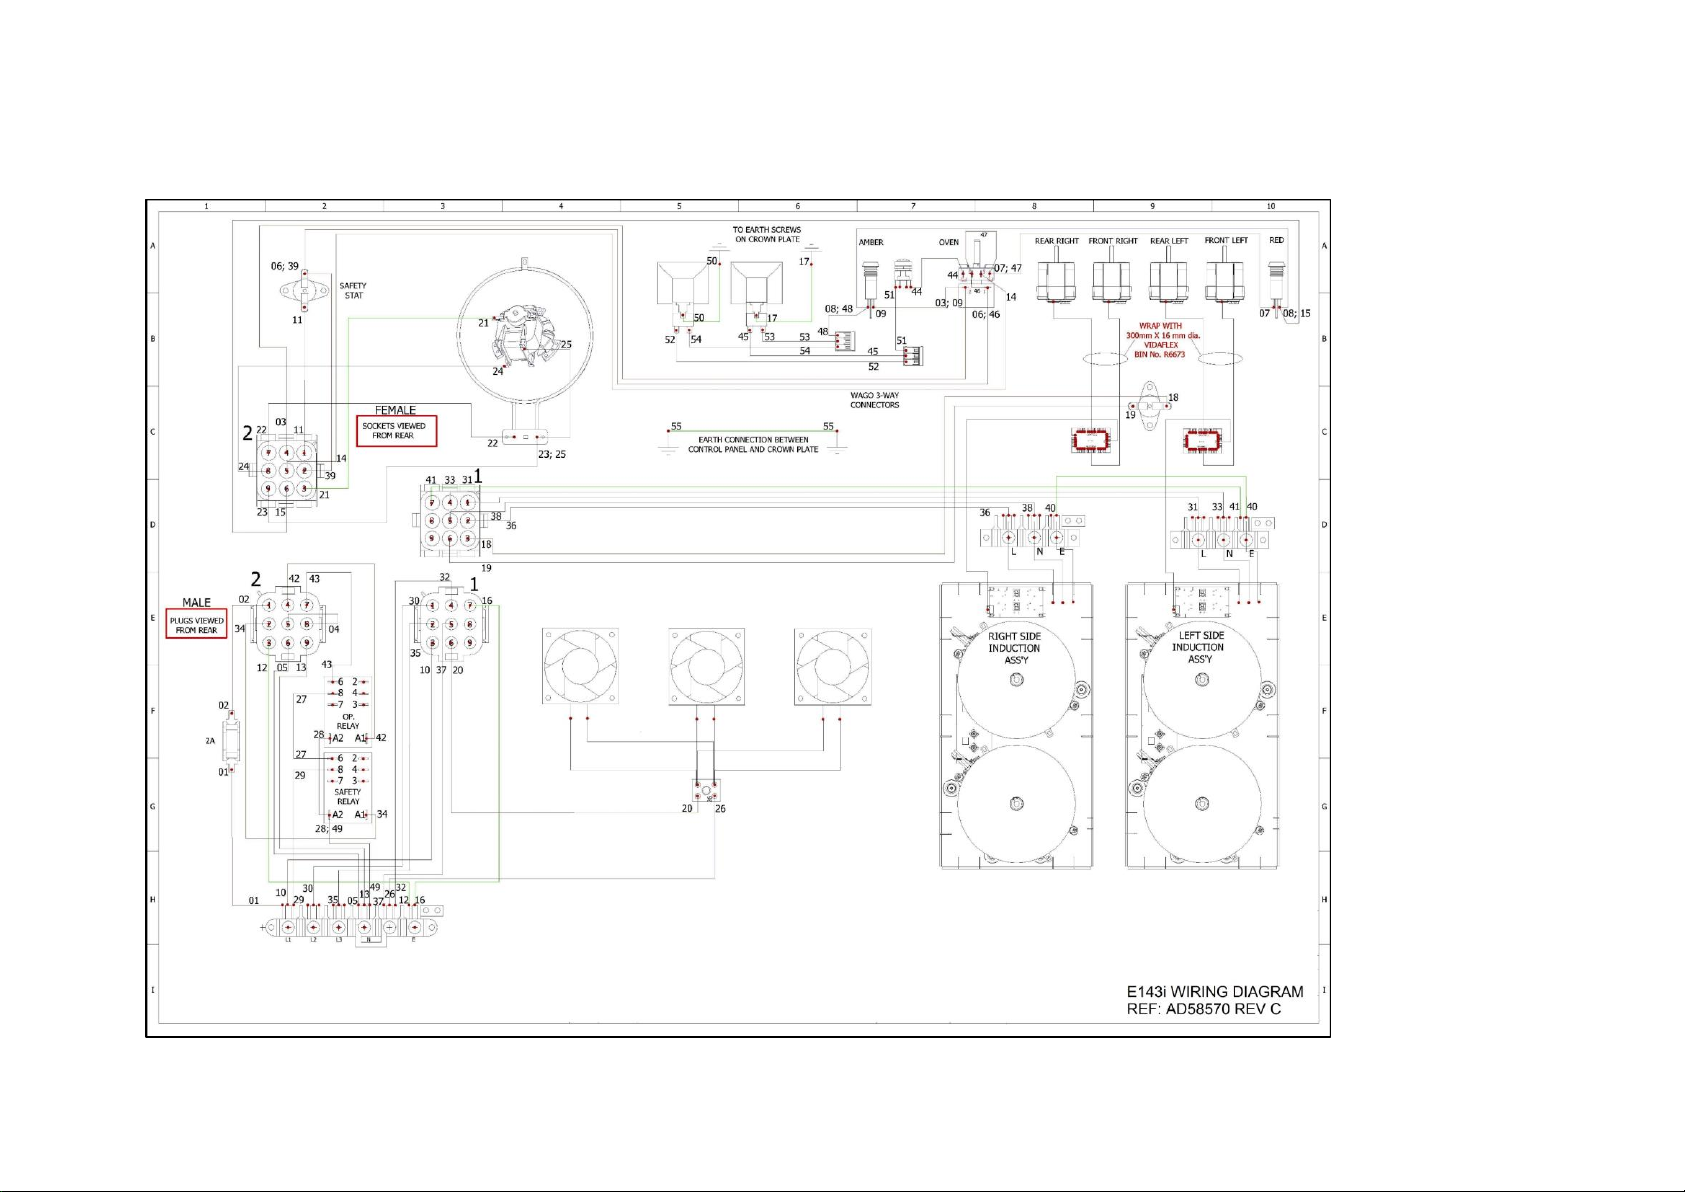
47
9.17.3 E143i Wiring Diagram
Page 48
48
10.0 FAULT FINDING
10.1 ERROR CODES
10.1.1 Most faults can be rectified by simply switching unit off for 10 seconds. After
this time, turn power back on at mains supply. If fault continues to occur, please refer
to the table below. This will provide a solution to rectify the condition.
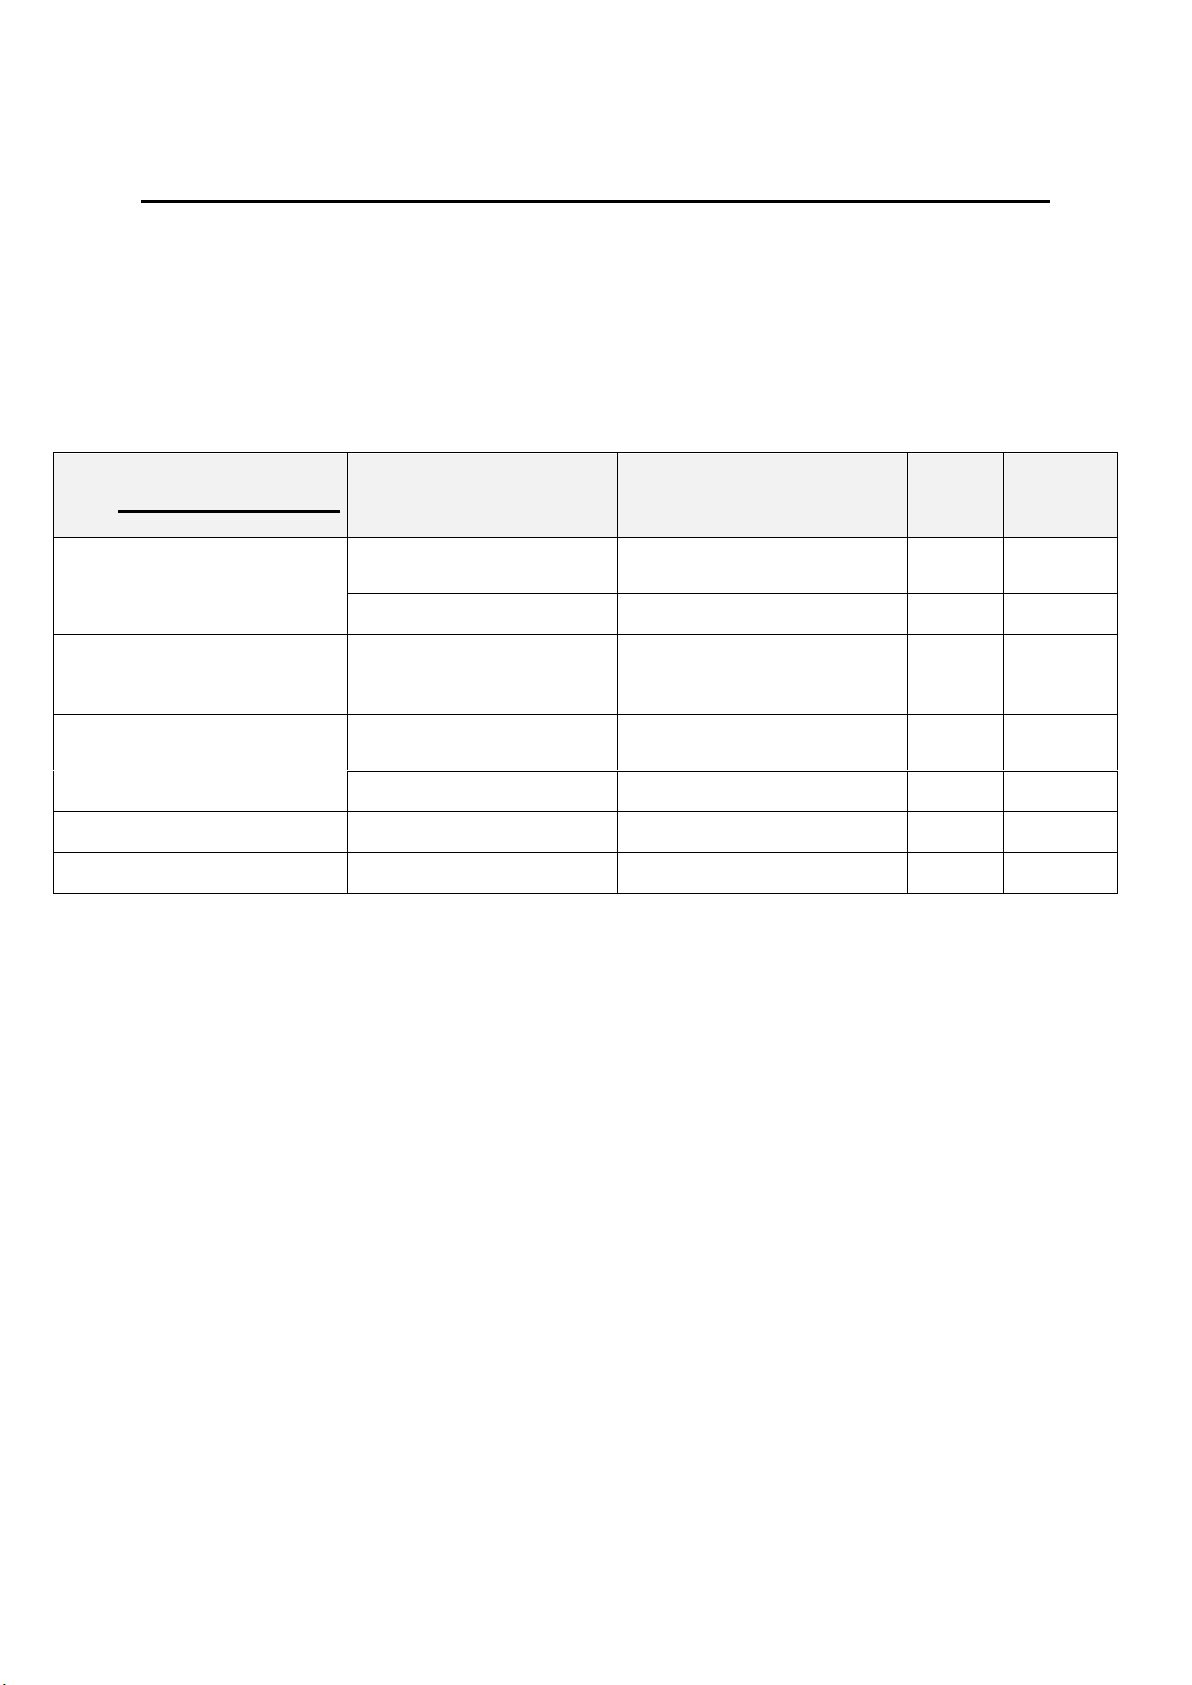
FAULT
POSSIBLE CAUSES
REMEDY
USER
*ENG
Unit will not turn ON
No power to unit
Check mains power is
connected and turned on
✓
Fuse has blown
Call Engineer
✓
Hob cooking zones will
not operate
Control knob at off
position
Rotate hob control knob
clockwise to switch on.
✓
Reduced performance on
hob cooking zones.
Blocked air filter
Clean Air filter (See
section 3.1.2)
✓
Damaged pan
Replace pan
✓
Oven will not operate
Safety stat tripped
Call Engineer
✓
Oven not heating
Faulty Element
Call Engineer
✓
Page 49
49
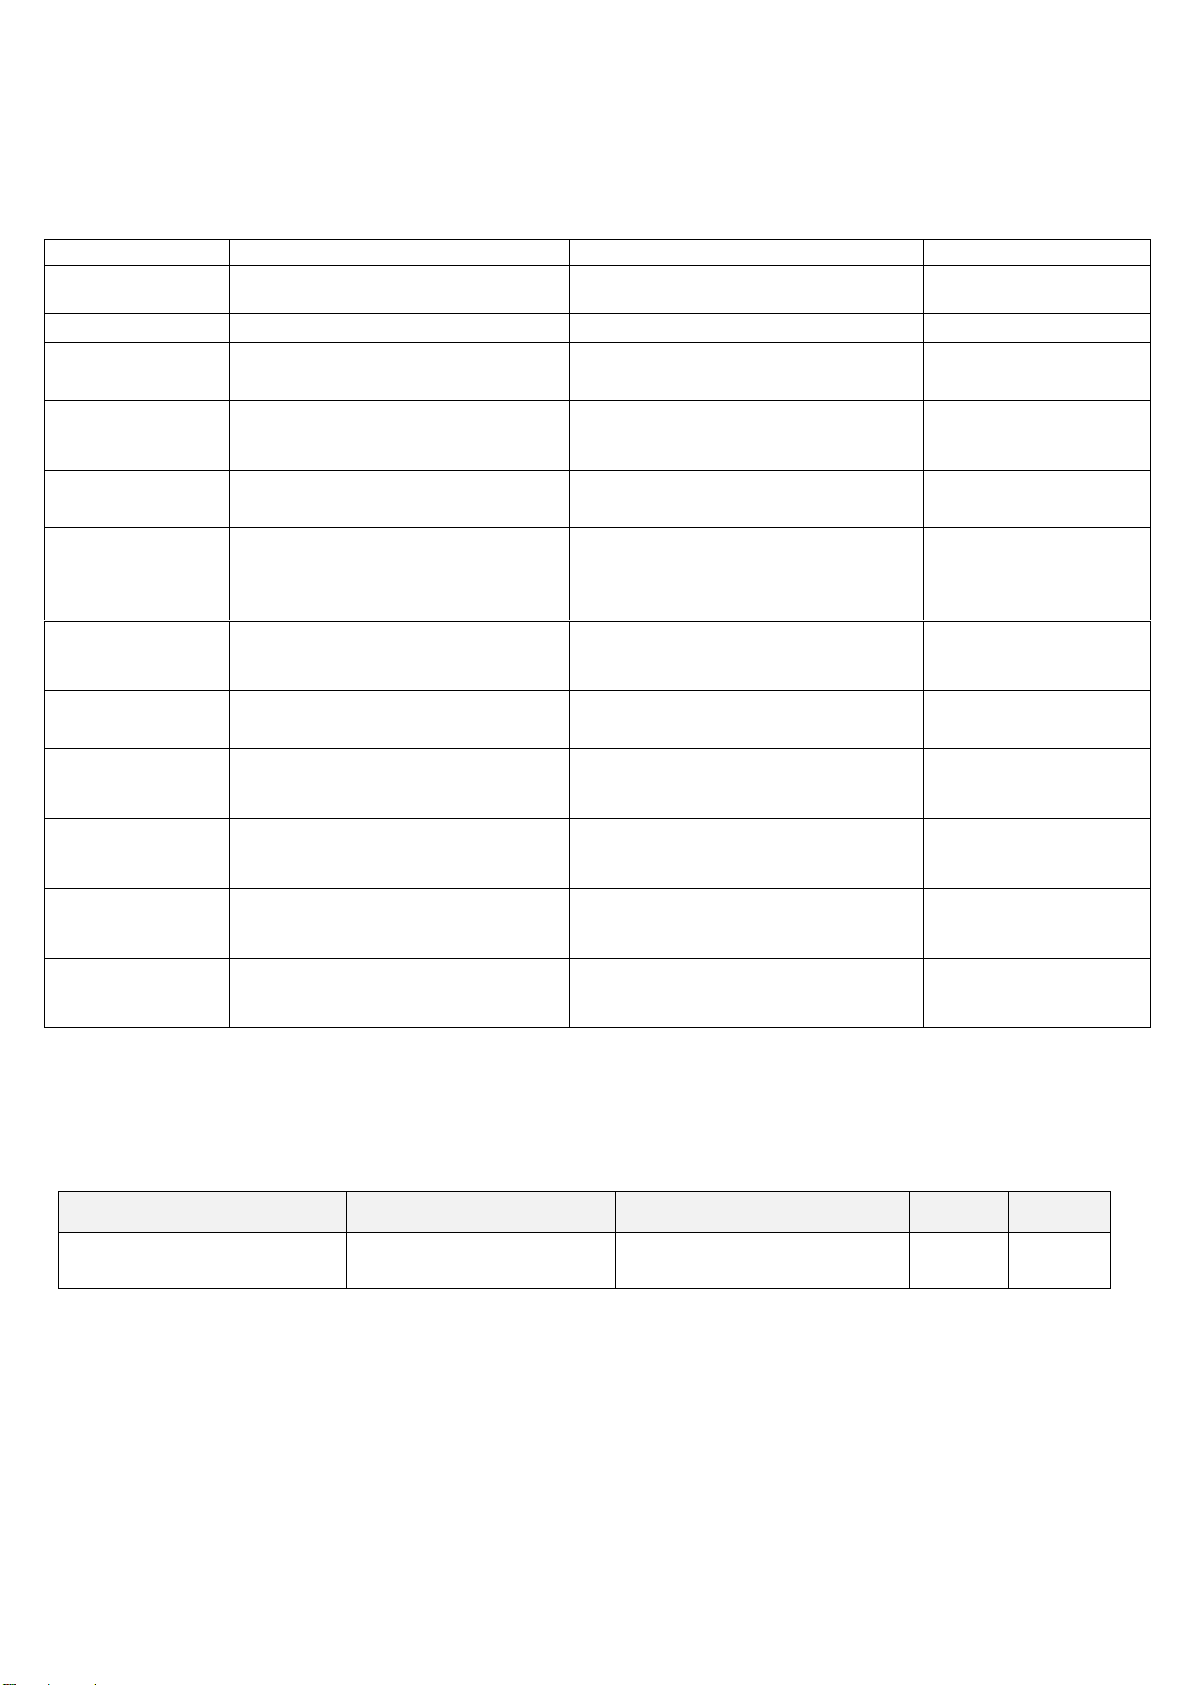
Induction Hob Error Codes.
ERROR CODE
DESCRIPTION
POSSIBLE CAUSE OF ERROR
REMEDY
E / 2
Excess temperature of the
induction element
Overload of cooktop or
empty boiled cookware
Switch off.
Let system cool down.
Er 20
Flash memory – TC error
μC- defective
Replace generator
Er 22
Button evaluation defective, UI
shuts off after 3.5-7.5 sec
Short or open circuit in the
area of the button sensorics
Replace generator
Er 31
Incorrect configuration data or
deviation between generator and
Controls
New configuration of the
induction generator
required
Replace generator
Er 36
NTC value defective on Control; UI
turns off
Short or open circuit of
NTC
Replace generator
Er 47
Communication error between
TC and induction
No or erroneous LIN
communication! (Slave
does not answer to
request of master)
Connection cable not
correctly plugged in or
defective.
U 400
Continuous tone
Power supply on inlet too high
Incorrect connection of the
cook top
The cook top Correct
power supply
connection
E / A
Error on the power board
Component failure
Replace generator
E / 6
Error on power board or supply
element
No power supply of the
power element or error on
power board
1. Check wiring
2. Replace generator
E/ 7
Mains connection error Issue
Incorrectly wired
1. Check mains supply
wiring
E / 8
Incorrect fan speed
Error on fan left or right
1. Air exhaust blocked,
e.g. by paper
2. Replace Generator
E / 9
Defective temperature sensor on
inductor
Replace generator
PROBLEM
POSSIBLE CAUSES
REMEDY
USER
*ENG
Food keeps burning
Oven dial setting too
high
Lower dial setting
✓
*ENG Service engineer only.
Page 50

50
11.0 SPARE PARTS
PART DESCRIPTION
SPARES NUMBER
Power neon red
730962010
Heat demand neon amber
730962040
Oven temperature control knob
535300004
Induction zone control knob
733990003
Oven operating thermostat
535420006
Coding switch
733990006
Oven safety thermostat
535420015
Oven door seal assembly
535210001
Rear hob cooling fan
735400360
Hob cooling thermostat
733990011
Oven fan
535420010
Oven light switch
535500037
Oven light bulb
734350190
Oven lamp assembly c/w glass
732910390
E161i Control panel
733990001
E161i Oven element 2kw
733990000
E161i Induction Heater (13A)
733990004
E163i Control panel
733990002
E163i Oven element 3.2kw
535420009
E163i & E1403i Induction Heater (16A)
733990005
When ordering spare parts please quote the following:
Model Number
Serial number
This information will be found on data plate attached to the appliance
Visit our website for further spares information.
Page 51
51
12.0 SERVICE INFORMATION
This unit carries an extensive mainland UK warranty. The warranty is in addition to and does
not change your statutory or legal rights.
The warranty policy can be found on our website which details the conditions of the warranty
and the exclusions.
https://www.falconfoodservice.com/info-centre/policy
Service calls to equipment under warranty will be carried out in accordance with the
conditions of sale.
Warranty calls can be made between 8:30 am and 5:00 pm weekdays only.
To ensure your warranty enquiry is handled as efficiently as possible, ensure you have the
following appliance information prior to calling us:
1. Model number – found on data plate
2. Serial number – found on data plate
3. Brief description of the issue
To contact Falcon for a warranty issue dial (UK only) 01786 455 200 and select Warranty
Issues from the menu.
 Loading...