

Page 1
User’s Guide
Page 2

Copyright and Trademarks
All rights reserved. No part of this publication may be reproduced, stored in a retrieval system, or transmitted in any
form or by any means, electronic, mechanical, photocopying, recording, or otherwise, without the prior written
permission of Seiko Epson Corporation. The information contained herein is designed only for use with this Epson
printer. Epson is not responsible for any use of this information as applied to other printers.
Neither Seiko Epson Corporation nor its affiliates shall be liable to the purchaser of this product or third parties for
damages, losses, costs, or expenses incurred by the purchaser or third parties as a result of accident, misuse, or
abuse of this product or unauthorized modifications, repairs, or alterations to this product.
Seiko Epson Corporation and its affiliates shall not be liable for any damages or problems arising from the use of
any options or any consumable products other than those designated as Original Epson Products or Epson
Approved Products by Seiko Epson Corporation.
Seiko Epson Corporation shall not be held liable for any damage resulting from electromagnetic interference that
occurs from the use of any interface cables other than those designated as Epson Approved Products by Seiko
Epson Corporation.
Epson is a registered trademark, Epson Exceed Your Vision is a registered logomark, Epson Supplies Central is
a service mark, and EPSON Web-to-Page is a trademark of Seiko Epson Corporation.
Microsoft, Windows, and Windows Vista are registered trademarks of Microsoft Corporation.
Apple
and Macintosh are registered trademarks of Apple Inc.
General Notice: Other product names used herein are for identification purposes only and may be trademarks of
their respective companies. Epson disclaims any and all rights in those marks.
This information is subject to change without notice.
12/08
© 2008 Epson America, Inc.
Copyright and Trademarks 2
Page 3

Contents
Copyright and Trademarks
Safety Instructions
Important Safety Instructions. . . . . . . . . . . . . . . . . . . . . . . . . . . . . . . . . . . . . . . . . . . . . . . . . . 9
Setting Up the Printer. . . . . . . . . . . . . . . . . . . . . . . . . . . . . . . . . . . . . . . . . . . . . . . . . . . . 9
Choosing a Place for the Printer . . . . . . . . . . . . . . . . . . . . . . . . . . . . . . . . . . . . . . . . . . 10
Using the Printer . . . . . . . . . . . . . . . . . . . . . . . . . . . . . . . . . . . . . . . . . . . . . . . . . . . . . . 11
Handling Ink Cartridges . . . . . . . . . . . . . . . . . . . . . . . . . . . . . . . . . . . . . . . . . . . . . . . . . 11
Warnings, Cautions, and Notes . . . . . . . . . . . . . . . . . . . . . . . . . . . . . . . . . . . . . . . . . . . 13
Chapter 1 Using Your Software
Overview of Printer Driver and Status Monitor . . . . . . . . . . . . . . . . . . . . . . . . . . . . . . . . . . . 14
Accessing the Printer Driver for Windows . . . . . . . . . . . . . . . . . . . . . . . . . . . . . . . . . . . 14
Accessing the Printer Driver for Mac OS X . . . . . . . . . . . . . . . . . . . . . . . . . . . . . . . . . . 15
Printing Web Pages to Fit to Your Paper Size. . . . . . . . . . . . . . . . . . . . . . . . . . . . . . . . . . . . 16
Accessing EPSON Web-To-Page . . . . . . . . . . . . . . . . . . . . . . . . . . . . . . . . . . . . . . . . . 17
Uninstalling the Printer Software . . . . . . . . . . . . . . . . . . . . . . . . . . . . . . . . . . . . . . . . . . . . . . 17
Uninstalling the Printer Driver . . . . . . . . . . . . . . . . . . . . . . . . . . . . . . . . . . . . . . . . . . . . 17
Uninstalling the User’s Guide. . . . . . . . . . . . . . . . . . . . . . . . . . . . . . . . . . . . . . . . . . . . . 19
Chapter 2 Paper Handling
Using Special Paper . . . . . . . . . . . . . . . . . . . . . . . . . . . . . . . . . . . . . . . . . . . . . . . . . . . . . . . 21
Paper Loading Capacities . . . . . . . . . . . . . . . . . . . . . . . . . . . . . . . . . . . . . . . . . . . . . . . 21
Loading Paper . . . . . . . . . . . . . . . . . . . . . . . . . . . . . . . . . . . . . . . . . . . . . . . . . . . . . . . . . . . . 22
Front Paper Cassette. . . . . . . . . . . . . . . . . . . . . . . . . . . . . . . . . . . . . . . . . . . . . . . . . . . 23
Rear Sheet Feeder . . . . . . . . . . . . . . . . . . . . . . . . . . . . . . . . . . . . . . . . . . . . . . . . . . . . 25
Using the Optional Legal-Size Paper Support. . . . . . . . . . . . . . . . . . . . . . . . . . . . . . . . . . . . 26
Loading Envelopes . . . . . . . . . . . . . . . . . . . . . . . . . . . . . . . . . . . . . . . . . . . . . . . . . . . . . . . . 27
Setting Up the Output Tray . . . . . . . . . . . . . . . . . . . . . . . . . . . . . . . . . . . . . . . . . . . . . . . . . . 29
Selecting the Correct Paper Type or Media Type . . . . . . . . . . . . . . . . . . . . . . . . . . . . . . . . . 29
Contents 3
Page 4

Chapter 3 Basic Printing
Introduction . . . . . . . . . . . . . . . . . . . . . . . . . . . . . . . . . . . . . . . . . . . . . . . . . . . . . . . . . . . . . . 30
Printing Documents . . . . . . . . . . . . . . . . . . . . . . . . . . . . . . . . . . . . . . . . . . . . . . . . . . . . 30
Printing Photos. . . . . . . . . . . . . . . . . . . . . . . . . . . . . . . . . . . . . . . . . . . . . . . . . . . . . . . . 30
Printing Web Pages . . . . . . . . . . . . . . . . . . . . . . . . . . . . . . . . . . . . . . . . . . . . . . . . . . . . 31
Printing on Envelopes . . . . . . . . . . . . . . . . . . . . . . . . . . . . . . . . . . . . . . . . . . . . . . . . . . 31
Printing Documents . . . . . . . . . . . . . . . . . . . . . . . . . . . . . . . . . . . . . . . . . . . . . . . . . . . . . . . . 31
Loading Paper . . . . . . . . . . . . . . . . . . . . . . . . . . . . . . . . . . . . . . . . . . . . . . . . . . . . . . . . 32
Printer Settings for Windows . . . . . . . . . . . . . . . . . . . . . . . . . . . . . . . . . . . . . . . . . . . . . 32
Printer Settings for Mac OS X 10.5 . . . . . . . . . . . . . . . . . . . . . . . . . . . . . . . . . . . . . . . . 33
Printer Settings for Mac OS X 10.3 or 10.4 . . . . . . . . . . . . . . . . . . . . . . . . . . . . . . . . . . 35
Printing Photos . . . . . . . . . . . . . . . . . . . . . . . . . . . . . . . . . . . . . . . . . . . . . . . . . . . . . . . . . . . 37
Preparing the Print File . . . . . . . . . . . . . . . . . . . . . . . . . . . . . . . . . . . . . . . . . . . . . . . . . 37
Loading Paper . . . . . . . . . . . . . . . . . . . . . . . . . . . . . . . . . . . . . . . . . . . . . . . . . . . . . . . . 38
Printer Settings for Windows . . . . . . . . . . . . . . . . . . . . . . . . . . . . . . . . . . . . . . . . . . . . . 38
Printer Settings for Mac OS X 10.5 . . . . . . . . . . . . . . . . . . . . . . . . . . . . . . . . . . . . . . . . 39
Printer Settings for Mac OS X 10.3 or 10.4 . . . . . . . . . . . . . . . . . . . . . . . . . . . . . . . . . . 41
Printing Web Pages. . . . . . . . . . . . . . . . . . . . . . . . . . . . . . . . . . . . . . . . . . . . . . . . . . . . . . . . 43
Loading Paper . . . . . . . . . . . . . . . . . . . . . . . . . . . . . . . . . . . . . . . . . . . . . . . . . . . . . . . . 43
Using EPSON Web-To-Page. . . . . . . . . . . . . . . . . . . . . . . . . . . . . . . . . . . . . . . . . . . . . 44
Printing on Envelopes . . . . . . . . . . . . . . . . . . . . . . . . . . . . . . . . . . . . . . . . . . . . . . . . . . . . . . 46
Loading Envelopes . . . . . . . . . . . . . . . . . . . . . . . . . . . . . . . . . . . . . . . . . . . . . . . . . . . . 46
Printer Settings for Windows . . . . . . . . . . . . . . . . . . . . . . . . . . . . . . . . . . . . . . . . . . . . . 46
Printer Settings for Mac OS X 10.5 . . . . . . . . . . . . . . . . . . . . . . . . . . . . . . . . . . . . . . . . 48
Printer Settings for Mac OS X 10.3 or 10.4 . . . . . . . . . . . . . . . . . . . . . . . . . . . . . . . . . . 50
Canceling Printing . . . . . . . . . . . . . . . . . . . . . . . . . . . . . . . . . . . . . . . . . . . . . . . . . . . . . . . . . 51
Using the Cancel Button on the Printer . . . . . . . . . . . . . . . . . . . . . . . . . . . . . . . . . . . . . 51
Canceling from Windows . . . . . . . . . . . . . . . . . . . . . . . . . . . . . . . . . . . . . . . . . . . . . . . . 52
Canceling from Mac OS X . . . . . . . . . . . . . . . . . . . . . . . . . . . . . . . . . . . . . . . . . . . . . . . 52
Chapter 4 Printing with Special Layout Options
Introduction . . . . . . . . . . . . . . . . . . . . . . . . . . . . . . . . . . . . . . . . . . . . . . . . . . . . . . . . . . . . . . 54
Double-Sided (Duplex) Printing . . . . . . . . . . . . . . . . . . . . . . . . . . . . . . . . . . . . . . . . . . . 54
Fit to Page Printing . . . . . . . . . . . . . . . . . . . . . . . . . . . . . . . . . . . . . . . . . . . . . . . . . . . . 54
Pages Per Sheet Printing. . . . . . . . . . . . . . . . . . . . . . . . . . . . . . . . . . . . . . . . . . . . . . . . 55
Poster Printing (for Windows only). . . . . . . . . . . . . . . . . . . . . . . . . . . . . . . . . . . . . . . . . 55
Watermark Printing (for Windows only) . . . . . . . . . . . . . . . . . . . . . . . . . . . . . . . . . . . . . 55
Double-sided (Duplex) Printing . . . . . . . . . . . . . . . . . . . . . . . . . . . . . . . . . . . . . . . . . . . . . . . 56
Standard Double-sided Printing for Windows . . . . . . . . . . . . . . . . . . . . . . . . . . . . . . . . 58
Standard Double-sided Printing for Mac OS X 10.5 . . . . . . . . . . . . . . . . . . . . . . . . . . . 64
Standard Double-sided Printing for Mac OS X 10.3 or 10.4 . . . . . . . . . . . . . . . . . . . . . 70
Folded Booklet Double-sided Printing (for Windows only). . . . . . . . . . . . . . . . . . . . . . . 72
Contents 4
Page 5

Fit to Page Printing . . . . . . . . . . . . . . . . . . . . . . . . . . . . . . . . . . . . . . . . . . . . . . . . . . . . . . . . 76
Printer Settings for Windows . . . . . . . . . . . . . . . . . . . . . . . . . . . . . . . . . . . . . . . . . . . . . 77
Printer Settings for Mac OS X 10.5 . . . . . . . . . . . . . . . . . . . . . . . . . . . . . . . . . . . . . . . . 79
Printer Settings for Mac OS X 10.4 . . . . . . . . . . . . . . . . . . . . . . . . . . . . . . . . . . . . . . . . 82
Pages Per Sheet Printing . . . . . . . . . . . . . . . . . . . . . . . . . . . . . . . . . . . . . . . . . . . . . . . . . . . 84
Printer Settings for Windows . . . . . . . . . . . . . . . . . . . . . . . . . . . . . . . . . . . . . . . . . . . . . 84
Printer Settings for Mac OS X 10.5 . . . . . . . . . . . . . . . . . . . . . . . . . . . . . . . . . . . . . . . . 87
Printer Settings for Mac OS X 10.3 or 10.4 . . . . . . . . . . . . . . . . . . . . . . . . . . . . . . . . . . 89
Poster Printing (for Windows only) . . . . . . . . . . . . . . . . . . . . . . . . . . . . . . . . . . . . . . . . . . . . 92
Printer Settings . . . . . . . . . . . . . . . . . . . . . . . . . . . . . . . . . . . . . . . . . . . . . . . . . . . . . . . 93
How to Make a Poster from Your Printouts . . . . . . . . . . . . . . . . . . . . . . . . . . . . . . . . . . 96
Watermark Printing (for Windows only) . . . . . . . . . . . . . . . . . . . . . . . . . . . . . . . . . . . . . . . . . 97
Printing the Watermark . . . . . . . . . . . . . . . . . . . . . . . . . . . . . . . . . . . . . . . . . . . . . . . . . 98
Creating Your Own Watermark . . . . . . . . . . . . . . . . . . . . . . . . . . . . . . . . . . . . . . . . . . 100
Chapter 5 Using the Control Panel
Introduction . . . . . . . . . . . . . . . . . . . . . . . . . . . . . . . . . . . . . . . . . . . . . . . . . . . . . . . . . . . . . 103
For B-500DN Users . . . . . . . . . . . . . . . . . . . . . . . . . . . . . . . . . . . . . . . . . . . . . . . . . . . 103
For B-300 Users. . . . . . . . . . . . . . . . . . . . . . . . . . . . . . . . . . . . . . . . . . . . . . . . . . . . . . 103
For B-500DN Users . . . . . . . . . . . . . . . . . . . . . . . . . . . . . . . . . . . . . . . . . . . . . . . . . . . . . . . 104
Buttons and Lights . . . . . . . . . . . . . . . . . . . . . . . . . . . . . . . . . . . . . . . . . . . . . . . . . . . . 104
Icons on the LCD . . . . . . . . . . . . . . . . . . . . . . . . . . . . . . . . . . . . . . . . . . . . . . . . . . . . . 106
How to Access the Control Panel Menus. . . . . . . . . . . . . . . . . . . . . . . . . . . . . . . . . . . 107
Control Panel Menu List. . . . . . . . . . . . . . . . . . . . . . . . . . . . . . . . . . . . . . . . . . . . . . . . 107
Status and Error Messages . . . . . . . . . . . . . . . . . . . . . . . . . . . . . . . . . . . . . . . . . . . . . 110
Printing the Status Sheet . . . . . . . . . . . . . . . . . . . . . . . . . . . . . . . . . . . . . . . . . . . . . . . 112
For B-300 Users . . . . . . . . . . . . . . . . . . . . . . . . . . . . . . . . . . . . . . . . . . . . . . . . . . . . . . . . . 112
Buttons and Lights . . . . . . . . . . . . . . . . . . . . . . . . . . . . . . . . . . . . . . . . . . . . . . . . . . . . 113
Status and Error Lights . . . . . . . . . . . . . . . . . . . . . . . . . . . . . . . . . . . . . . . . . . . . . . . . 114
Printing the Status Sheet . . . . . . . . . . . . . . . . . . . . . . . . . . . . . . . . . . . . . . . . . . . . . . . 118
Chapter 6 Installing Options
Optional Legal-size Paper Support . . . . . . . . . . . . . . . . . . . . . . . . . . . . . . . . . . . . . . . . . . . 119
Installing the Optional Legal-size Paper Support. . . . . . . . . . . . . . . . . . . . . . . . . . . . . 119
Optional Duplex Unit (B-300 only) . . . . . . . . . . . . . . . . . . . . . . . . . . . . . . . . . . . . . . . . . . . . 119
Installing the Optional Duplex Unit. . . . . . . . . . . . . . . . . . . . . . . . . . . . . . . . . . . . . . . . 119
Uninstalling the Optional Duplex Unit . . . . . . . . . . . . . . . . . . . . . . . . . . . . . . . . . . . . . 120
Contents 5
Page 6

Chapter 7 Replacing Consumables
Ink Cartridges . . . . . . . . . . . . . . . . . . . . . . . . . . . . . . . . . . . . . . . . . . . . . . . . . . . . . . . . . . . 122
Checking the Ink Cartridge Status . . . . . . . . . . . . . . . . . . . . . . . . . . . . . . . . . . . . . . . . 122
Purchasing Epson Cartridges . . . . . . . . . . . . . . . . . . . . . . . . . . . . . . . . . . . . . . . . . . . 126
Handling Precautions. . . . . . . . . . . . . . . . . . . . . . . . . . . . . . . . . . . . . . . . . . . . . . . . . . 126
Replacing an Ink Cartridge . . . . . . . . . . . . . . . . . . . . . . . . . . . . . . . . . . . . . . . . . . . . . 128
Maintenance Box. . . . . . . . . . . . . . . . . . . . . . . . . . . . . . . . . . . . . . . . . . . . . . . . . . . . . . . . . 131
Checking the Maintenance Box Status . . . . . . . . . . . . . . . . . . . . . . . . . . . . . . . . . . . . 131
Purchasing a Replacement Maintenance Box. . . . . . . . . . . . . . . . . . . . . . . . . . . . . . . 134
Handling Precautions. . . . . . . . . . . . . . . . . . . . . . . . . . . . . . . . . . . . . . . . . . . . . . . . . . 135
Replacing the Maintenance Box . . . . . . . . . . . . . . . . . . . . . . . . . . . . . . . . . . . . . . . . . 135
Chapter 8 Maintaining Your Printer
Checking the Print Head Nozzles . . . . . . . . . . . . . . . . . . . . . . . . . . . . . . . . . . . . . . . . . . . . 137
Using the Nozzle Check Utility for Windows . . . . . . . . . . . . . . . . . . . . . . . . . . . . . . . . 137
Using the Nozzle Check Utility for Mac OS X . . . . . . . . . . . . . . . . . . . . . . . . . . . . . . . 137
Using the Control Panel (B-500DN). . . . . . . . . . . . . . . . . . . . . . . . . . . . . . . . . . . . . . . 138
Using the Printer Buttons (B-300) . . . . . . . . . . . . . . . . . . . . . . . . . . . . . . . . . . . . . . . . 138
Cleaning the Print Head. . . . . . . . . . . . . . . . . . . . . . . . . . . . . . . . . . . . . . . . . . . . . . . . . . . . 139
Using the Head Cleaning Utility for Windows . . . . . . . . . . . . . . . . . . . . . . . . . . . . . . . 140
Using the Head Cleaning Utility for Mac OS X. . . . . . . . . . . . . . . . . . . . . . . . . . . . . . . 141
Using the Control Panel (B-500DN). . . . . . . . . . . . . . . . . . . . . . . . . . . . . . . . . . . . . . . 141
Using the Printer Buttons (B-300) . . . . . . . . . . . . . . . . . . . . . . . . . . . . . . . . . . . . . . . . 142
Aligning the Print Head . . . . . . . . . . . . . . . . . . . . . . . . . . . . . . . . . . . . . . . . . . . . . . . . . . . . 143
Using the Print Head Alignment Utility for Windows . . . . . . . . . . . . . . . . . . . . . . . . . . 143
Using the Print Head Alignment Utility for Mac OS X . . . . . . . . . . . . . . . . . . . . . . . . . 143
Using the Control Panel (B-500DN). . . . . . . . . . . . . . . . . . . . . . . . . . . . . . . . . . . . . . . 144
Cleaning Your Printer . . . . . . . . . . . . . . . . . . . . . . . . . . . . . . . . . . . . . . . . . . . . . . . . . . . . . 144
Cleaning the Inside of Your Printer . . . . . . . . . . . . . . . . . . . . . . . . . . . . . . . . . . . . . . . . . . . 145
Using the Control Panel (B-500DN). . . . . . . . . . . . . . . . . . . . . . . . . . . . . . . . . . . . . . . 145
Using the Printer Buttons (B-300) . . . . . . . . . . . . . . . . . . . . . . . . . . . . . . . . . . . . . . . . 146
Transporting Your Printer . . . . . . . . . . . . . . . . . . . . . . . . . . . . . . . . . . . . . . . . . . . . . . . . . . 146
Storing Your Printer . . . . . . . . . . . . . . . . . . . . . . . . . . . . . . . . . . . . . . . . . . . . . . . . . . . . . . . 147
Chapter 9 Using the Printer on a Network
Setting Up the Printer on a Network (for B-500DN Users only). . . . . . . . . . . . . . . . . . . . . . 148
Setting Up Your Computers to Use the Printer . . . . . . . . . . . . . . . . . . . . . . . . . . . . . . 148
Setting Up the Printer as a Shared Printer for Windows (B-300/B-500DN). . . . . . . . . . . . . 153
Setting Up the Print Server . . . . . . . . . . . . . . . . . . . . . . . . . . . . . . . . . . . . . . . . . . . . . 154
Setting Up Each Client. . . . . . . . . . . . . . . . . . . . . . . . . . . . . . . . . . . . . . . . . . . . . . . . . 155
Contents 6
Page 7

Setting Up the Printer as the Shared Printer for Mac OS X. . . . . . . . . . . . . . . . . . . . . . . . . 157
Chapter 10 Troubleshooting
Diagnosing the Problem . . . . . . . . . . . . . . . . . . . . . . . . . . . . . . . . . . . . . . . . . . . . . . . . . . . 158
Error Indicators . . . . . . . . . . . . . . . . . . . . . . . . . . . . . . . . . . . . . . . . . . . . . . . . . . . . . . 158
Running a Printer Operation Check (for B-500DN Users) . . . . . . . . . . . . . . . . . . . . . . 158
Running a Printer Operation Check (for B-300 Users) . . . . . . . . . . . . . . . . . . . . . . . . 159
Checking Printer Status . . . . . . . . . . . . . . . . . . . . . . . . . . . . . . . . . . . . . . . . . . . . . . . . . . . . 160
For Windows . . . . . . . . . . . . . . . . . . . . . . . . . . . . . . . . . . . . . . . . . . . . . . . . . . . . . . . . 160
Using the Progress Meter . . . . . . . . . . . . . . . . . . . . . . . . . . . . . . . . . . . . . . . . . . . . . . 161
Using EPSON Status Monitor 3 . . . . . . . . . . . . . . . . . . . . . . . . . . . . . . . . . . . . . . . . . . 162
For Mac OS X . . . . . . . . . . . . . . . . . . . . . . . . . . . . . . . . . . . . . . . . . . . . . . . . . . . . . . . 164
The Paper Jams . . . . . . . . . . . . . . . . . . . . . . . . . . . . . . . . . . . . . . . . . . . . . . . . . . . . . . . . . 165
Print Quality Problems. . . . . . . . . . . . . . . . . . . . . . . . . . . . . . . . . . . . . . . . . . . . . . . . . . . . . 169
Horizontal Banding. . . . . . . . . . . . . . . . . . . . . . . . . . . . . . . . . . . . . . . . . . . . . . . . . . . . 170
Vertical Misalignment or Banding . . . . . . . . . . . . . . . . . . . . . . . . . . . . . . . . . . . . . . . . 170
Incorrect or Missing Colors . . . . . . . . . . . . . . . . . . . . . . . . . . . . . . . . . . . . . . . . . . . . . 171
Blurry or Smeared Printout . . . . . . . . . . . . . . . . . . . . . . . . . . . . . . . . . . . . . . . . . . . . . 171
Ink Bleeds Through the Page . . . . . . . . . . . . . . . . . . . . . . . . . . . . . . . . . . . . . . . . . . . 172
Miscellaneous Printout Problems . . . . . . . . . . . . . . . . . . . . . . . . . . . . . . . . . . . . . . . . . . . . 172
Incorrect or Garbled Characters . . . . . . . . . . . . . . . . . . . . . . . . . . . . . . . . . . . . . . . . . 172
Incorrect Margins . . . . . . . . . . . . . . . . . . . . . . . . . . . . . . . . . . . . . . . . . . . . . . . . . . . . . 173
Printout Has a Slight Slant . . . . . . . . . . . . . . . . . . . . . . . . . . . . . . . . . . . . . . . . . . . . . . 173
Inverted Image . . . . . . . . . . . . . . . . . . . . . . . . . . . . . . . . . . . . . . . . . . . . . . . . . . . . . . . 173
Blank Pages Print . . . . . . . . . . . . . . . . . . . . . . . . . . . . . . . . . . . . . . . . . . . . . . . . . . . . 173
Printed Side is Smeared or Scuffed. . . . . . . . . . . . . . . . . . . . . . . . . . . . . . . . . . . . . . . 174
Printing is too Slow . . . . . . . . . . . . . . . . . . . . . . . . . . . . . . . . . . . . . . . . . . . . . . . . . . . 174
Paper Does Not Feed Correctly. . . . . . . . . . . . . . . . . . . . . . . . . . . . . . . . . . . . . . . . . . . . . . 175
Paper Does Not Feed . . . . . . . . . . . . . . . . . . . . . . . . . . . . . . . . . . . . . . . . . . . . . . . . . 175
Multiple Pages Feed . . . . . . . . . . . . . . . . . . . . . . . . . . . . . . . . . . . . . . . . . . . . . . . . . . 176
Paper is Improperly Loaded. . . . . . . . . . . . . . . . . . . . . . . . . . . . . . . . . . . . . . . . . . . . . 176
Paper is not Ejected Fully or is Wrinkled . . . . . . . . . . . . . . . . . . . . . . . . . . . . . . . . . . . 177
The Printer Does Not Print. . . . . . . . . . . . . . . . . . . . . . . . . . . . . . . . . . . . . . . . . . . . . . . . . . 177
All Lights Are Off . . . . . . . . . . . . . . . . . . . . . . . . . . . . . . . . . . . . . . . . . . . . . . . . . . . . . 177
Lights Came On and then Went Out . . . . . . . . . . . . . . . . . . . . . . . . . . . . . . . . . . . . . . 177
The Power Light is On . . . . . . . . . . . . . . . . . . . . . . . . . . . . . . . . . . . . . . . . . . . . . . . . . 177
Increasing the Print Speed (for Windows only) . . . . . . . . . . . . . . . . . . . . . . . . . . . . . . . . . . 179
Other Problems . . . . . . . . . . . . . . . . . . . . . . . . . . . . . . . . . . . . . . . . . . . . . . . . . . . . . . . . . . 180
Print Head Cleaning Does Not Start . . . . . . . . . . . . . . . . . . . . . . . . . . . . . . . . . . . . . . 180
Color Ink is Consumed Even When Printing in Black Ink Only . . . . . . . . . . . . . . . . . . 181
Contents 7
Page 8

Appendix A Where To Get Help
Epson Technical Support. . . . . . . . . . . . . . . . . . . . . . . . . . . . . . . . . . . . . . . . . . . . . . . . . . . 182
Speak to a Support Representative. . . . . . . . . . . . . . . . . . . . . . . . . . . . . . . . . . . . . . . 182
Purchase Accessories . . . . . . . . . . . . . . . . . . . . . . . . . . . . . . . . . . . . . . . . . . . . . . . . . 182
Appendix B Product Information
Printer Parts. . . . . . . . . . . . . . . . . . . . . . . . . . . . . . . . . . . . . . . . . . . . . . . . . . . . . . . . . . . . . 183
B-500DN . . . . . . . . . . . . . . . . . . . . . . . . . . . . . . . . . . . . . . . . . . . . . . . . . . . . . . . . . . . 183
B-300 . . . . . . . . . . . . . . . . . . . . . . . . . . . . . . . . . . . . . . . . . . . . . . . . . . . . . . . . . . . . . . 185
Paper, Consumables, and Options . . . . . . . . . . . . . . . . . . . . . . . . . . . . . . . . . . . . . . . . . . . 187
Paper . . . . . . . . . . . . . . . . . . . . . . . . . . . . . . . . . . . . . . . . . . . . . . . . . . . . . . . . . . . . . . 187
Ink Cartridges. . . . . . . . . . . . . . . . . . . . . . . . . . . . . . . . . . . . . . . . . . . . . . . . . . . . . . . . 187
Maintenance Box . . . . . . . . . . . . . . . . . . . . . . . . . . . . . . . . . . . . . . . . . . . . . . . . . . . . . 188
Duplex Unit (B-300 Users only) . . . . . . . . . . . . . . . . . . . . . . . . . . . . . . . . . . . . . . . . . . 188
Legal-size Paper Support . . . . . . . . . . . . . . . . . . . . . . . . . . . . . . . . . . . . . . . . . . . . . . 188
System Requirements . . . . . . . . . . . . . . . . . . . . . . . . . . . . . . . . . . . . . . . . . . . . . . . . . . . . . 188
Technical Specifications . . . . . . . . . . . . . . . . . . . . . . . . . . . . . . . . . . . . . . . . . . . . . . . . . . . 189
Paper . . . . . . . . . . . . . . . . . . . . . . . . . . . . . . . . . . . . . . . . . . . . . . . . . . . . . . . . . . . . . . 189
Ink Cartridges. . . . . . . . . . . . . . . . . . . . . . . . . . . . . . . . . . . . . . . . . . . . . . . . . . . . . . . . 191
Mechanical. . . . . . . . . . . . . . . . . . . . . . . . . . . . . . . . . . . . . . . . . . . . . . . . . . . . . . . . . . 192
Electrical . . . . . . . . . . . . . . . . . . . . . . . . . . . . . . . . . . . . . . . . . . . . . . . . . . . . . . . . . . . 193
Environmental . . . . . . . . . . . . . . . . . . . . . . . . . . . . . . . . . . . . . . . . . . . . . . . . . . . . . . . 194
Standards and Approvals. . . . . . . . . . . . . . . . . . . . . . . . . . . . . . . . . . . . . . . . . . . . . . . 194
Interface . . . . . . . . . . . . . . . . . . . . . . . . . . . . . . . . . . . . . . . . . . . . . . . . . . . . . . . . . . . . 194
Options. . . . . . . . . . . . . . . . . . . . . . . . . . . . . . . . . . . . . . . . . . . . . . . . . . . . . . . . . . . . . 195
FCC Compliance Statement . . . . . . . . . . . . . . . . . . . . . . . . . . . . . . . . . . . . . . . . . . . . . . . . 195
For United States Users. . . . . . . . . . . . . . . . . . . . . . . . . . . . . . . . . . . . . . . . . . . . . . . . 195
WARNING . . . . . . . . . . . . . . . . . . . . . . . . . . . . . . . . . . . . . . . . . . . . . . . . . . . . . . . . . . 196
For Canadian Users. . . . . . . . . . . . . . . . . . . . . . . . . . . . . . . . . . . . . . . . . . . . . . . . . . . 196
Operating System Versions
Index
Contents 8
Page 9

Safety Instructions
Important Safety Instructions
Read all of the instructions in this section before using the printer. Also, be sure to follow
all warnings and instructions marked on the printer.
Setting Up the Printer
Observe the following when setting up the printer:
❏ Do not block or cover the vents and openings in the printer.
❏ Use only the type of power source indicated on the printer’s label.
❏ Use only the power cord that comes with the printer. Use of another cord may result in
fire or electric shock.
❏ The printer’s power cord is for use with the printer only. Use with other equipment may
result in fire or electric shock.
❏ Be sure your AC power cord meets the relevant local safety standard.
❏ Avoid using outlets on the same circuit as photocopiers or air control systems that
regularly switch on and off.
❏ Avoid electrical outlets controlled by wall switches or automatic timers.
❏ Keep the entire computer system away from potential sources of electromagnetic
interference, such as loudspeakers or the base units of cordless telephones.
❏ Do not use a damaged or frayed power cord.
❏ If you use an extension cord with the printer, make sure that the total ampere rating of
the devices plugged into the extension cord does not exceed the cord’s ampere rating.
Also, make sure that the total ampere rating of all devices plugged into the wall outlet
does not exceed the wall outlet’s ampere rating.
❏ Do not attempt to service the printer yourself.
Safety Instructions 9
Page 10

❏ Unplug the printer and refer servicing to qualified service personnel under the following
conditions:
The power cord or plug is damaged; liquid has entered the printer; the printer has been
dropped or the casing damaged; the printer does not operate normally or exhibits a
distinct change in performance.
❏ When connecting the printer to a computer or other device with a cable, ensure the
correct orientation of the connectors. Each connector has only one correct orientation.
Inserting a connector in the wrong orientation may damage both devices connected by
the cable.
❏ If damage occurs to the plug, replace the cord set or consult a qualified electrician. If
there are fuses in the plug, make sure you replace them with fuses of the correct size
and rating.
❏ Do not hold the duplex unit when you lift the printer to prevent the duplex unit from
becoming detached. Also, make sure that the duplex unit is attached correctly after
setting up the printer.
Choosing a Place for the Printer
Observe the following when choosing a place for the printer:
❏ Place the printer on a flat, stable surface that extends beyond the base of the printer in
all directions. If you place the printer by the wall, leave at least 4 inches (10 cm)
between the back of the printer and the wall. The printer will not operate properly if it is
tilted at an angle.
❏ When storing or transporting the printer, do not tilt it, stand it on its side, or turn it upside
down. Otherwise, ink may leak from the ink packs.
❏ Leave enough space in front of the printer for the paper to be fully ejected.
❏ Avoid places subject to rapid changes in temperature and humidity. Also, keep the
printer away from direct sunlight, strong light, or heat sources.
❏ Avoid places subject to dust, shocks, or vibrations.
❏ Leave enough room around the printer to allow for sufficient ventilation.
❏ Place the printer near a wall outlet where the plug can be easily unplugged.
Safety Instructions 10
Page 11

Using the Printer
Observe the following when using the printer:
❏ Avoid touching the components inside the printer unless instructed to do so in this
guide.
❏ Do not insert objects through the slots in the printer.
❏ Take care not to spill liquid on the printer.
❏ Do not touch the white flat cable inside the printer.
❏ Do not put your hand inside the printer during printing.
❏ Do not use aerosol products that contain flammable gases inside or around this
product. Doing so may cause fire.
❏ Do not move the print head by hand; otherwise, you may damage the printer.
❏ Do not move the cartridge lever during printing.
❏ Always turn off the printer using the P Power button. When this button is pressed, the
P Power light flashes. Do not unplug the printer or turn off the power to the outlet until
the P Power light stops flashing.
❏ Before transporting the printer, make sure that the print head is in the home (far right)
position.
❏ Be careful not to trap your fingers when closing the printer cover.
Handling Ink Cartridges
Observe the following when handling ink cartridges:
❏ Keep ink cartridges out of the reach of children and do not drink the ink.
❏ If ink gets on your skin, wash it off with soap and water. If it gets in your eyes, flush them
immediately with water.
Safety Instructions 11
Page 12
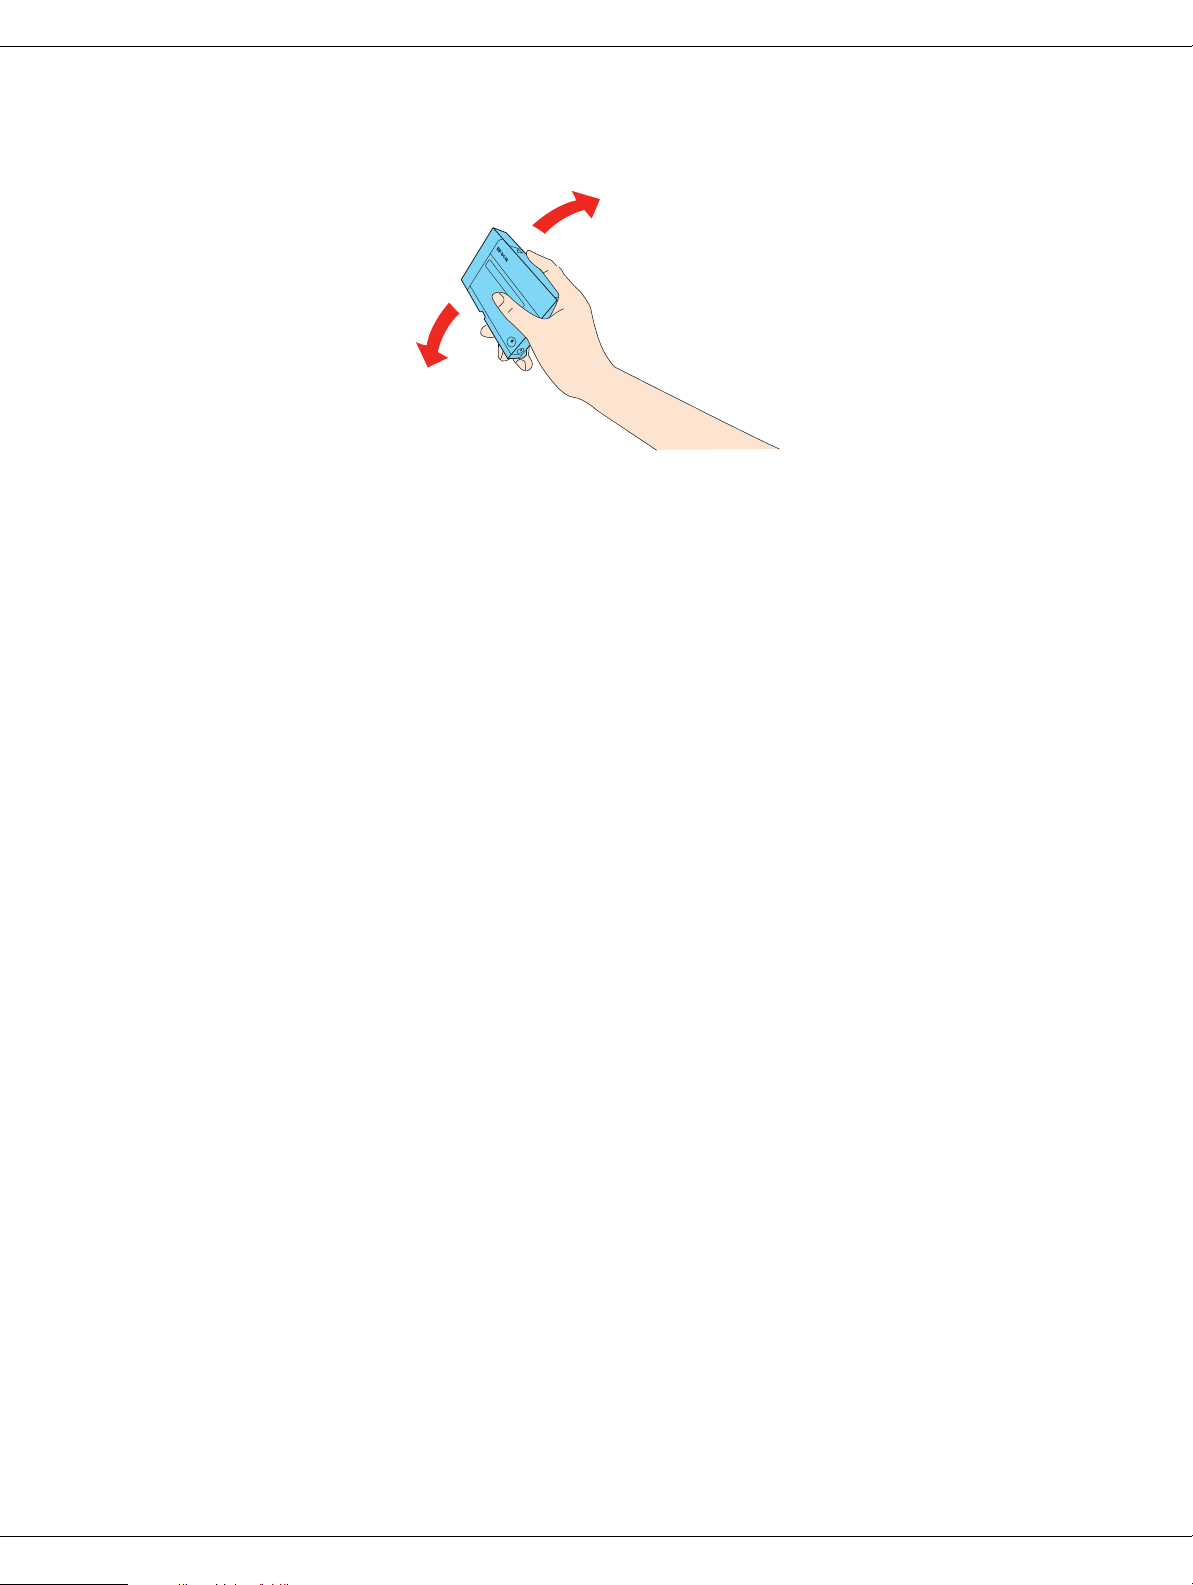
❏ Shake the ink cartridge for 5 seconds before installing it for best results.
Caution:
Do not shake cartridges (that have been installed previously) with too much force.
c
❏ Do not use an ink cartridge beyond the date printed on the cartridge carton.
❏ Use up the ink cartridge within six months of installation for best results.
❏ Do not disassemble or modify the ink cartridge. This may affect normal operation and
printing.
❏ Store ink cartridges in a cool, dark place.
❏ After bringing an ink cartridge inside from a cold storage site, allow it to warm up at
room temperature for at least three hours before using it.
❏ Do not touch the green IC chip on the side of the cartridge. This may affect normal
operation and printing. The IC chip on this ink cartridge retains a variety of cartridge
related-information, such as the ink cartridge status, so that the cartridge may be
removed and reinserted freely. However, each time the cartridge is inserted, some ink
is consumed because the printer automatically performs a reliability check. If you
remove an ink cartridge for later use, protect the ink supply area from dirt and dust, and
store it in the same environment as this product. Note that there is a valve in the ink
supply port, making covers or plugs unnecessary, but care is needed to prevent the ink
from staining items that the cartridge touches. Do not touch the ink supply port or
surrounding area.
Safety Instructions 12
Page 13

Warnings, Cautions, and Notes
Warnings, Cautions, and Notes in this User’s Guide are defined as follows:
Warnings
must be followed carefully to avoid bodily injury.
w
Cautions
must be observed to avoid damage to your equipment.
c
Notes
contain important information and useful tips on the operation of the printer.
Safety Instructions 13
Page 14

Chapter 1
Using Your Software
Overview of Printer Driver and Status Monitor
The printer driver lets you choose from a wide variety of settings to get the best printing
results. Status Monitor and the printer utilities help you check the printer and keep it in top
operating condition.
Accessing the Printer Driver for Windows
You can access the printer driver from most Windows applications, the Windows Start
menu, or the taskbar.
To make settings that apply only to the application you are using, access the printer driver
from that application.
To make settings that apply to all of your Windows applications, access the printer driver
from the Start menu or the taskbar.
Refer to the following sections to access the printer driver.
Note:
Screen shots of the printer driver windows in this User's Guide are from Windows XP.
From Windows Applications
1. Click Print or Print Setup on the File menu.
2. In the window that appears, click Printer, Setup, Options, Preferences, or
Properties. (Depending on your application, you may need to click one or a
combination of these buttons.)
From the Start Menu
1. Windows Vista:
Click the start button, select Control Panel, and then select Printer from the Hardware
and Sound category. (If the Control Panel is in Classic View, click Printers.)
Windows XP and Server 2003:
Click Start, Control Panel, then click Printers and Faxes. (If the Control Panel is in
Category View, click Printers and Other Hardware, then click Printers and Faxes.)
Using Your Software 14
Page 15
Windows 2000:
Click Start, point to Settings, then click Printers.
2. Windows Vista:
Select the printer and then click Select printing preferences.
Windows XP, Server 2003, and 2000:
Select the printer, then click Printing Preferences on the File menu.
From the Shortcut Icon on the Taskbar
Right-click the printer icon on the taskbar, then select Printer Settings.
To add a short cut icon to the Windows taskbar, first access the printer driver from the Start
menu as described above. Next, click the Maintenance tab, the Speed & Progress
button, and then the Monitoring Preferences button. In the Monitoring Preferences
window, select the Select Shortcut Icon check box.
Getting Information through Online Help
You can access online help for items in the printer driver from your application or the
Windows Start menu.
& See “Accessing the Printer Driver for Windows” on page 14.
In the printer driver window, try one of the following procedures:
❏ Right-click the item, then click Help.
❏ Click the button at the top right of the window, then click the item (for Windows XP
and 2000 only).
Accessing the Printer Driver for Mac OS X
The table below describes how to access the printer driver dialog.
Dialog How to Access It
Page Setup Click Page Setup on the File menu of your application.
Note for Mac OS X 10.5:
Depending on your application, the Page Setup menu may not
appear in the File menu.
Print Click Print on the File menu of your application.
Using Your Software 15
Page 16
EPSON Printer
Utility3
You can access this software in the following three ways:
❏ Double-click the EPSON Printer Utility3 icon in the Applications
folder in Macintosh HD. Select the printer from the Printer List, then
click OK.
❏ Click Print from your application’s File menu, choose Print Settings in
the Print window that is displayed, then click the Utility icon. This
Utility icon is not displayed when the printer is shared.
❏ For Mac OS X 10.3 and 10.4 only
Open the Applications folder on your hard drive, then open the
Utilities folder and double-click the Print Center or Printer Setup
Utility icon. Select the appropriate printer from the list, then click the
Configure or Utility button.
Getting information through online help
Click the Help button in the Print dialog.
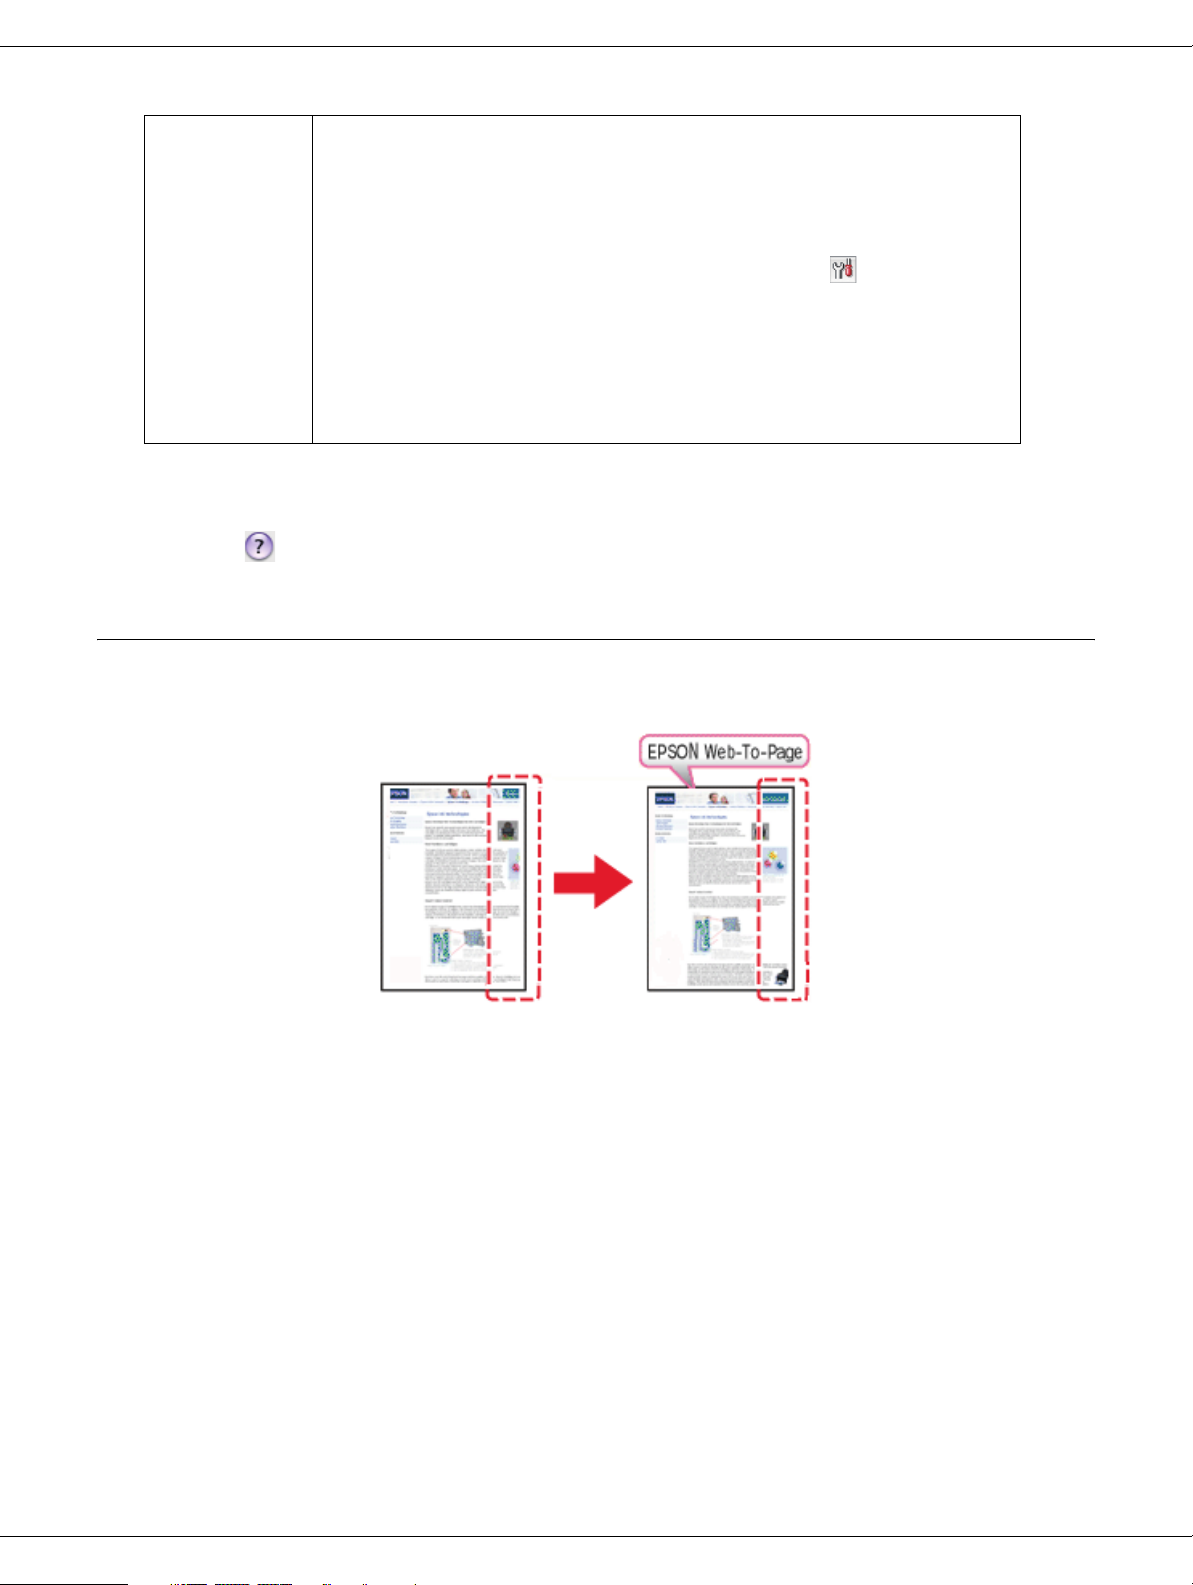
Printing Web Pages to Fit to Your Paper Size
EPSON Web-To-Page™ lets you make Web pages fit to your paper size when printing.
You can also see a preview before printing.
Note for Windows Users:
This software is not available for Windows Vista and XP x64.
Note for Windows Internet Explorer 7 users:
Printing web pages to fit to your paper size is a standard feature in Windows Internet Explorer 7, so
EPSON Web-To-Page is not necessary.
Note for Mac OS X users:
❏ This software is not available for Mac OS X.
❏ Printing web pages to fit to your paper size is available by using the printer driver.
Using Your Software 16
Page 17
& See “Printer Settings for Mac OS X 10.5” on page 33.
& See “Printer Settings for Mac OS X 10.3 or 10.4” on page 35.
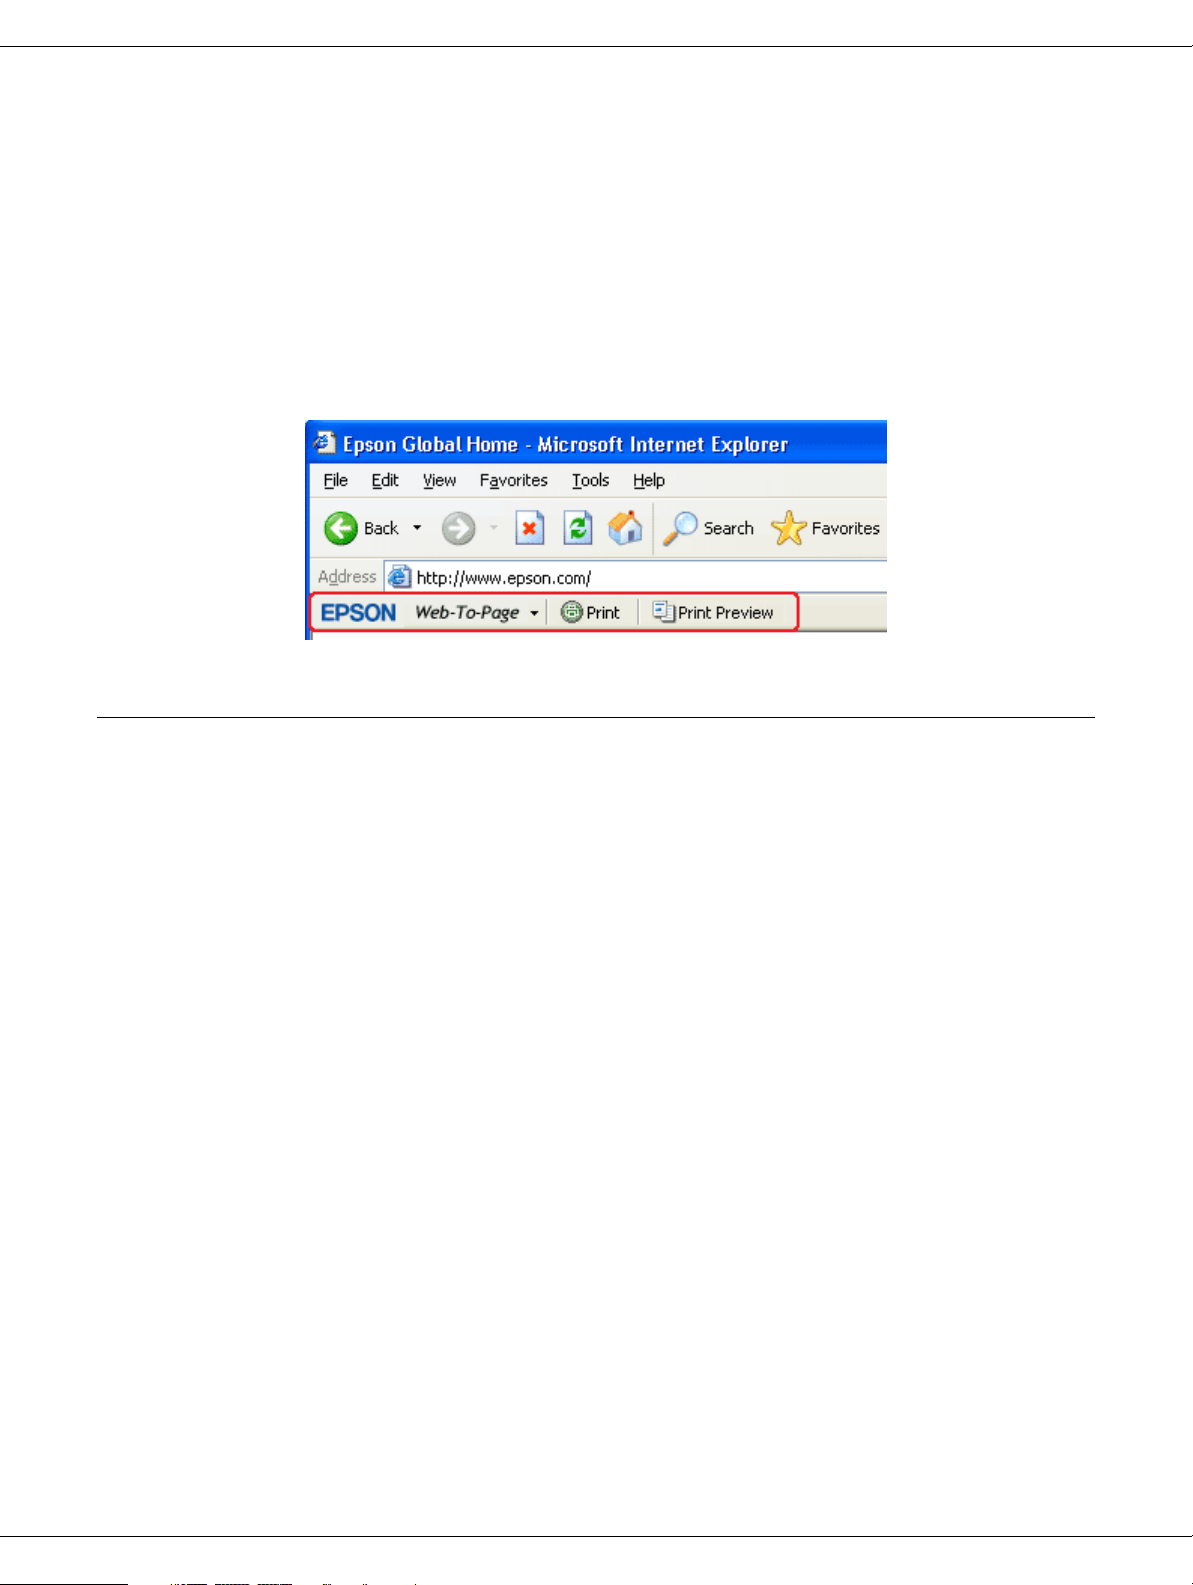
Accessing EPSON Web-To-Page
After you install EPSON Web-To-Page, the menu bar is displayed on the Windows Internet
Explorer Toolbar. If it does not appear, select Toolbars from the View menu of Internet
Explorer, and then select EPSON Web-To-Page.
Uninstalling the Printer Software
Uninstalling the Printer Driver
You may need to uninstall your printer driver if you:
❏ Upgrade your computer’s operating system.
❏ Update your printer driver with a newer version.
❏ Have a problem with the printer driver.
If you are upgrading your operating system or updating the printer driver version, be sure
to uninstall the current printer driver before upgrading or installing the new driver.
Otherwise, the driver update will not work.
For Windows
Note:
❏ To uninstall programs in Windows Vista, you need an administrator account and the password
if you log on as a standard user.
❏ To uninstall programs in Windows XP, you must log on to a Computer Administrator account.
Using Your Software 17
Page 18

❏ To uninstall programs in Windows 2000, you must log on as a user with administrative
privileges (belonging to the Administrators group).
1. Turn off the printer and disconnect its interface cable.
2. Windows Vista:
Click the start button and select Control Panel.
Windows XP and Server 2003:
Click Start and select Control Panel.
Windows 2000:
Click Start, point to Settings, and select Control Panel.
3. Windows Vista:
Click Uninstall a program from the Programs category, and then select EPSON
Printer Software from the list.
Windows XP and 2000:
Select Add/Remove Programs and then select EPSON Printer Software from the list.
4. Windows Vista:
Click Uninstall/Change.
Windows XP, Server 2003, and 2000:
Click Change/Remove.
5. Select the icon for your printer and click OK.
6. Click OK to uninstall the printer driver.
For Mac OS X
Note:
To uninstall the programs, you must log on to a Computer Administrator account. You cannot
uninstall programs if you log on as a Limited account user.
1. Quit all running applications.
2. Insert the Epson printer software CD-ROM into your Macintosh.
3. Double-click the Mac OS X icon in the Epson folder. The CD Installer screen is
displayed. Click Custom Install.
4. Select Printer Driver.
Note:
If the Authenticate dialog appears, enter your password or phrase and click OK.
Using Your Software 18
Page 19

5. Read the software license agreement and click Accept.
6. Select Uninstall from the menu in the upper left and click Uninstall.
7. Follow the on-screen instructions to uninstall the printer driver.
Note for Mac OS X 10.3 or 10.4:
If the name of your printer remains in the Print Center or Printer Setup Utility, select the name from
Printer List and click Delete.
Uninstalling the User’s Guide
For Windows
Note:
❏ To uninstall programs in Windows Vista, you need an administrator account and the password
if you log on as a standard user.
❏ To uninstall programs in Windows XP, you must log on to a Computer Administrator account.
❏ To uninstall programs in Windows 2000, you must log on as a user with administrative
privileges (belonging to the Administrators group).
1. Turn off the printer and disconnect its interface cable.
2. Windows Vista:
Click the start button and select Control Panel.
Windows XP and Server 2003:
Click Start, then select Control Panel.
Windows 2000:
Click Start, point to Settings, and select Control Panel.
3. Windows Vista:
Click Uninstall a program from the Programs category.
Windows XP, Server 2003, and 2000:
Select Add or Remove Programs.
4. Select this printer’s Manual from the list.
5. Windows Vista:
Click Uninstall/Change.
Windows XP, Server 2003, and 2000:
Click Change/Remove.
Using Your Software 19
Page 20

6. Click OK.
For Mac OS X
Note:
To uninstall the programs, you must log on to a Computer Administrator account. You cannot
uninstall programs if you log on as a Limited account user.
1. Quit all running applications.
2. Insert the Epson printer software CD-ROM into your Macintosh.
3. Double-click the Mac OS X icon in the Epson folder. The CD Installer screen is
displayed. Click Custom Install.
4. Select User’s Guide.
5. Select Uninstall from the menu in the upper left and click Uninstall.
6. Follow the on-screen instructions to uninstall the User’s Guide.
Using Your Software 20
Page 21
Chapter 2
Paper Handling
Using Special Paper
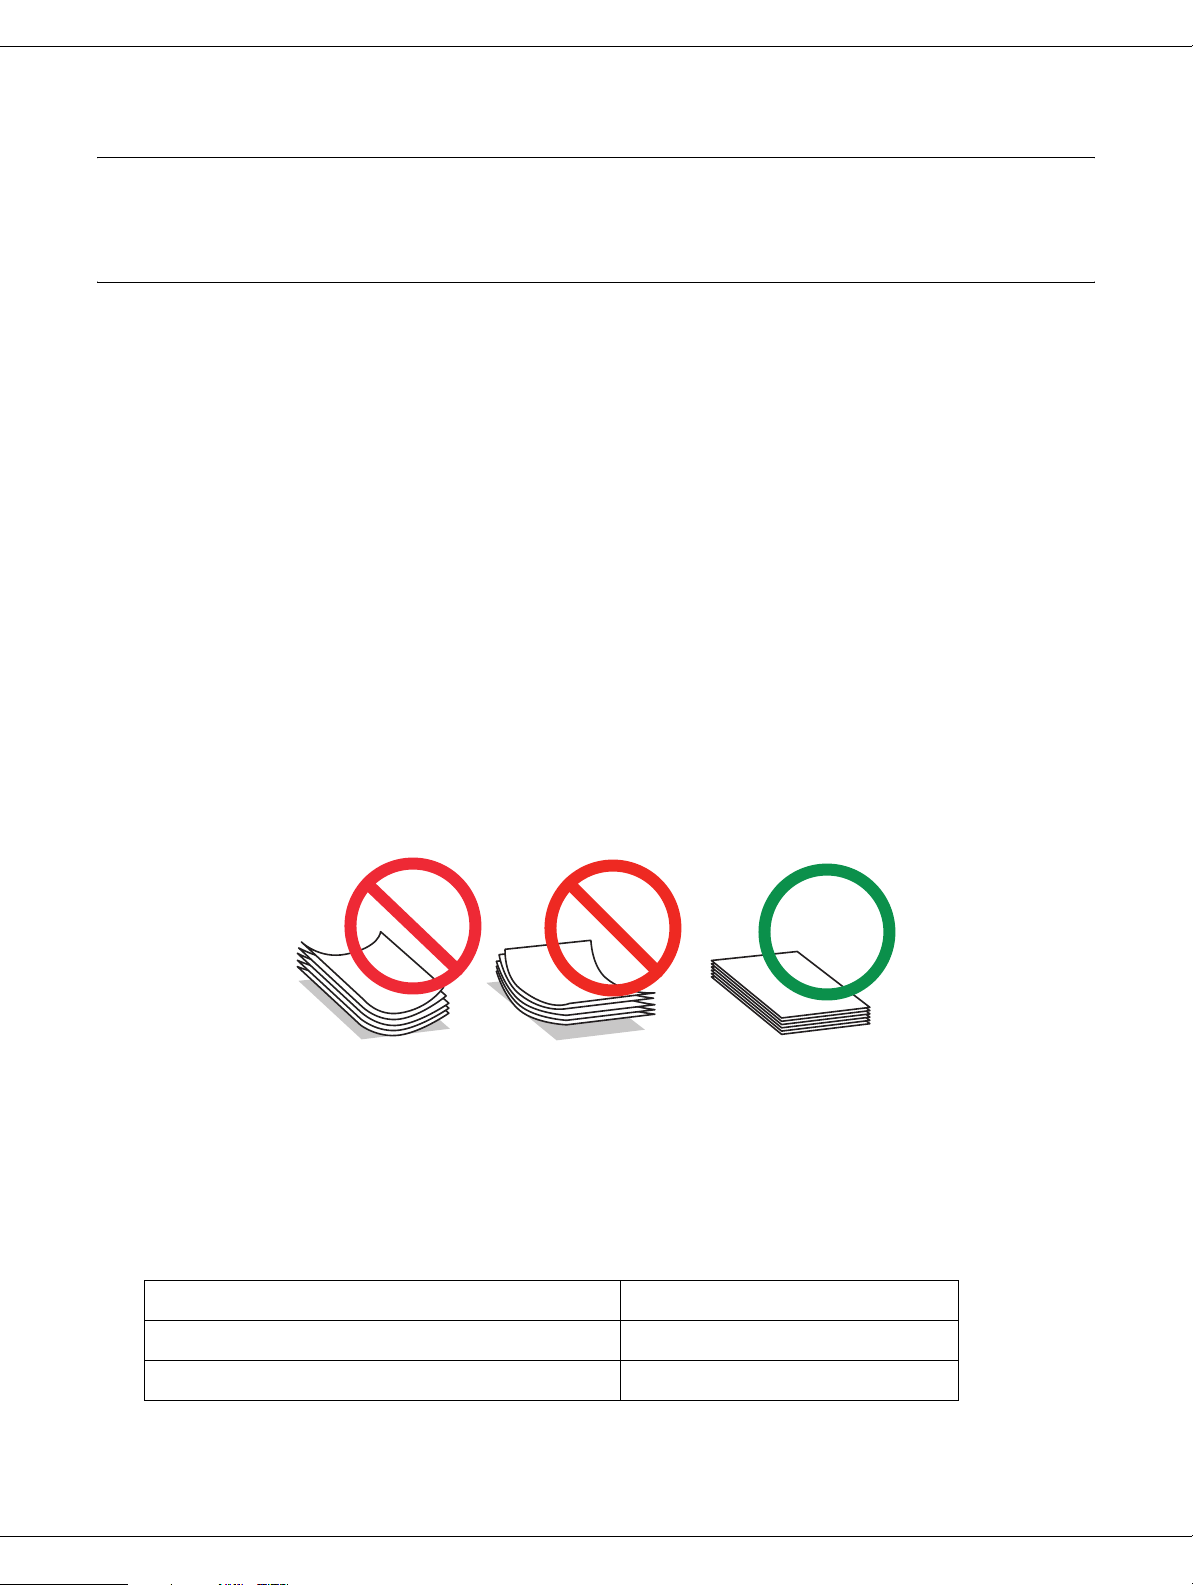
You can achieve good results with most types of plain bond paper. However, coated
papers provide superior printouts because they absorb less ink.
Epson provides special papers that are formulated for the ink used in Epson ink jet printers,
and recommends these papers to ensure high-quality results.
& See “Paper, Consumables, and Options” on page 187.
When loading special paper distributed by Epson, read the instruction sheets packed with
the paper first and keep the following points in mind.
Note:
❏ Load the paper into the rear sheet feeder printable side up. The printable side is usually whiter
or glossier. See the instruction sheets packed with the paper for more information.
❏ If the paper is curled, flatten it or curl it slightly in the opposite direction before loading. Printing
on curled paper may cause ink to smear on your printout.
Paper Loading Capacities
Refer to the table below for the loading capacities of Epson special paper and other paper.
Front paper cassette:
Media Type Loading Capacity
Epson Bright White Paper Up to 400 sheets
Plain paper Up to 500 sheets
Paper Handling 21
Page 22
Rear sheet feeder:
Media Type Loading Capacity
Plain paper (letter-size) Up to 150 sheets
Plain paper (legal-size) 1 sheet at a time (up to 60
sheets with the optional
legal-size paper support)
Epson Bright White Paper Up to 100 (70 sheets for manual
double-sided printing)
Epson Premium Presentation Paper Matte Up to 20 sheets
Epson Premium Presentation Paper Matte
Double-Sided
Epson Photo Quality Self Adhesive Sheets 1 sheet at a time
Epson Presentation Paper Matte Up to 100 sheets
Envelopes Up to 15 envelopes
1 sheet at a time
Note:
❏ If the paper is curled, flatten it or curl it slightly in the opposite direction. Make sure the paper
stack fits under the c arrow mark inside the edge guide.
❏ Maximum capacity for plain paper depends on the weight and thickness of the paper.
❏ The output tray has a maximum capacity of 170 sheets.
You can purchase genuine Epson ink and paper at Epson Supplies CentralSM at
www.epson.com/ink3 (U.S. sales) or www.epson.ca (Canadian sales). You can also purchase
supplies from an Epson authorized reseller. To find the nearest one, call 800-GO-EPSON
(800-463-7766).
Loading Paper
Follow these steps to load paper:
Paper Handling 22
Page 23
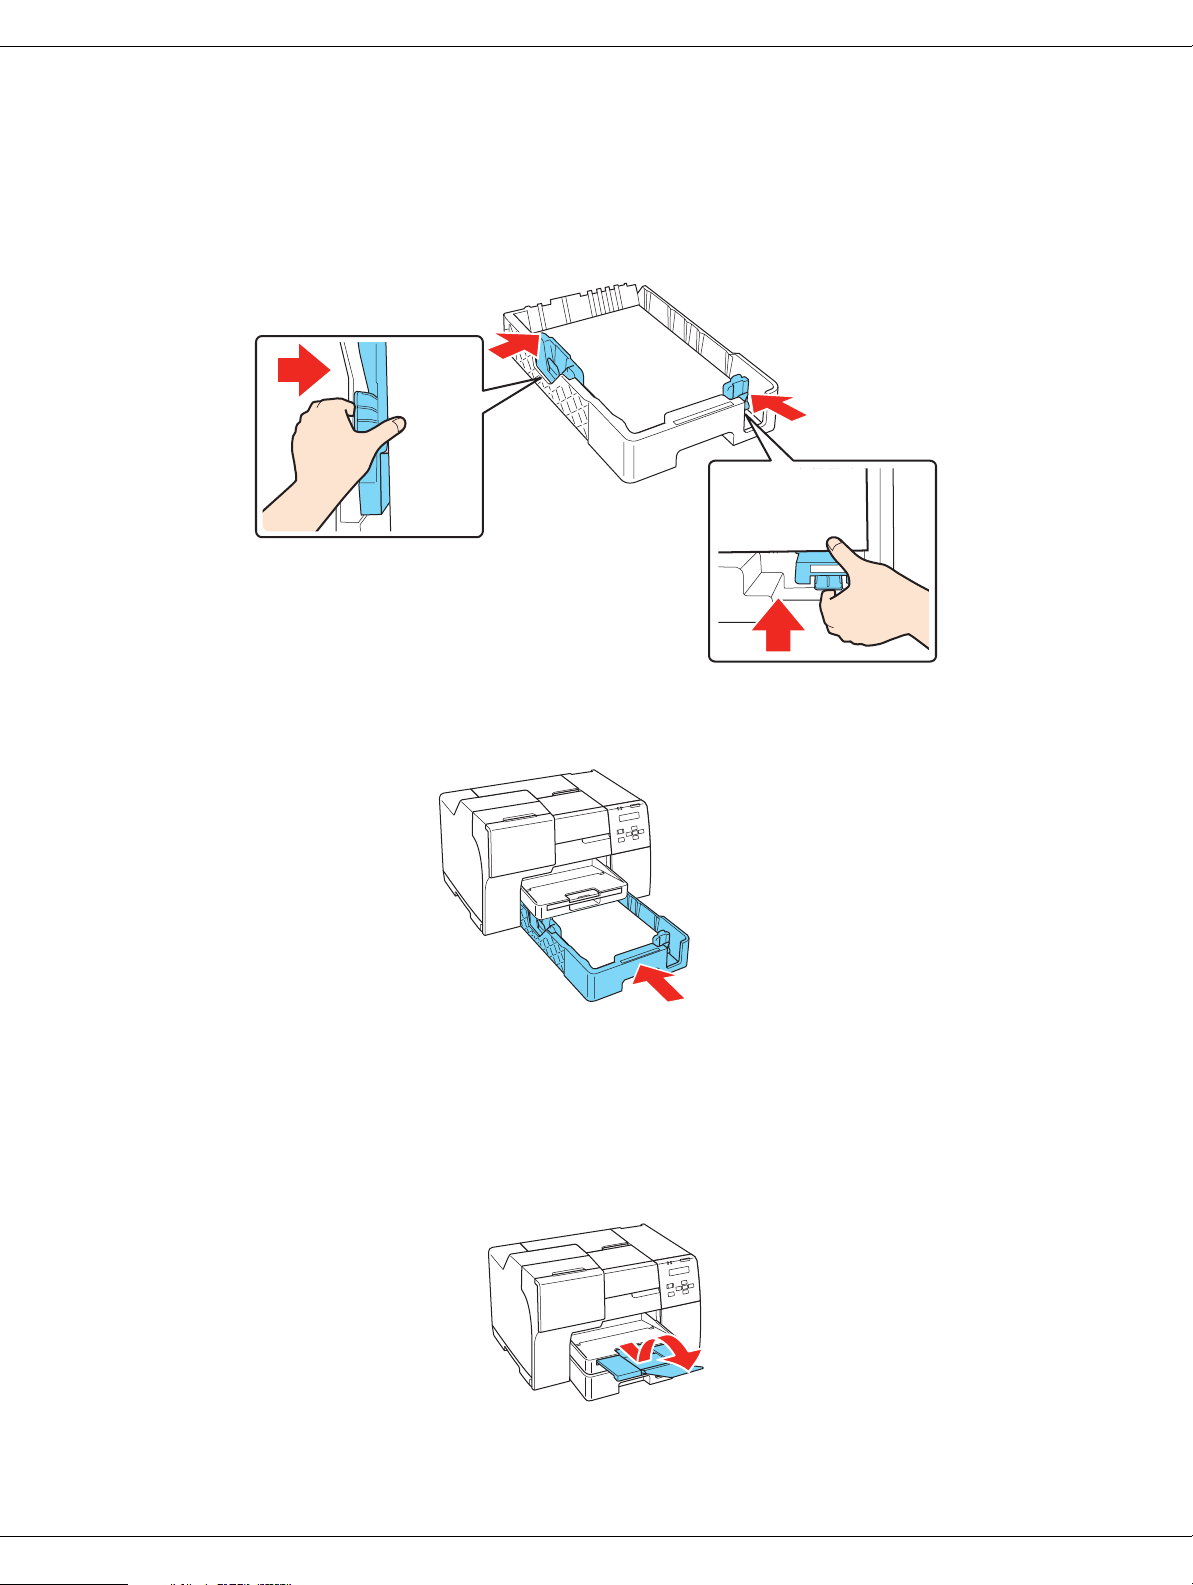
Front Paper Cassette
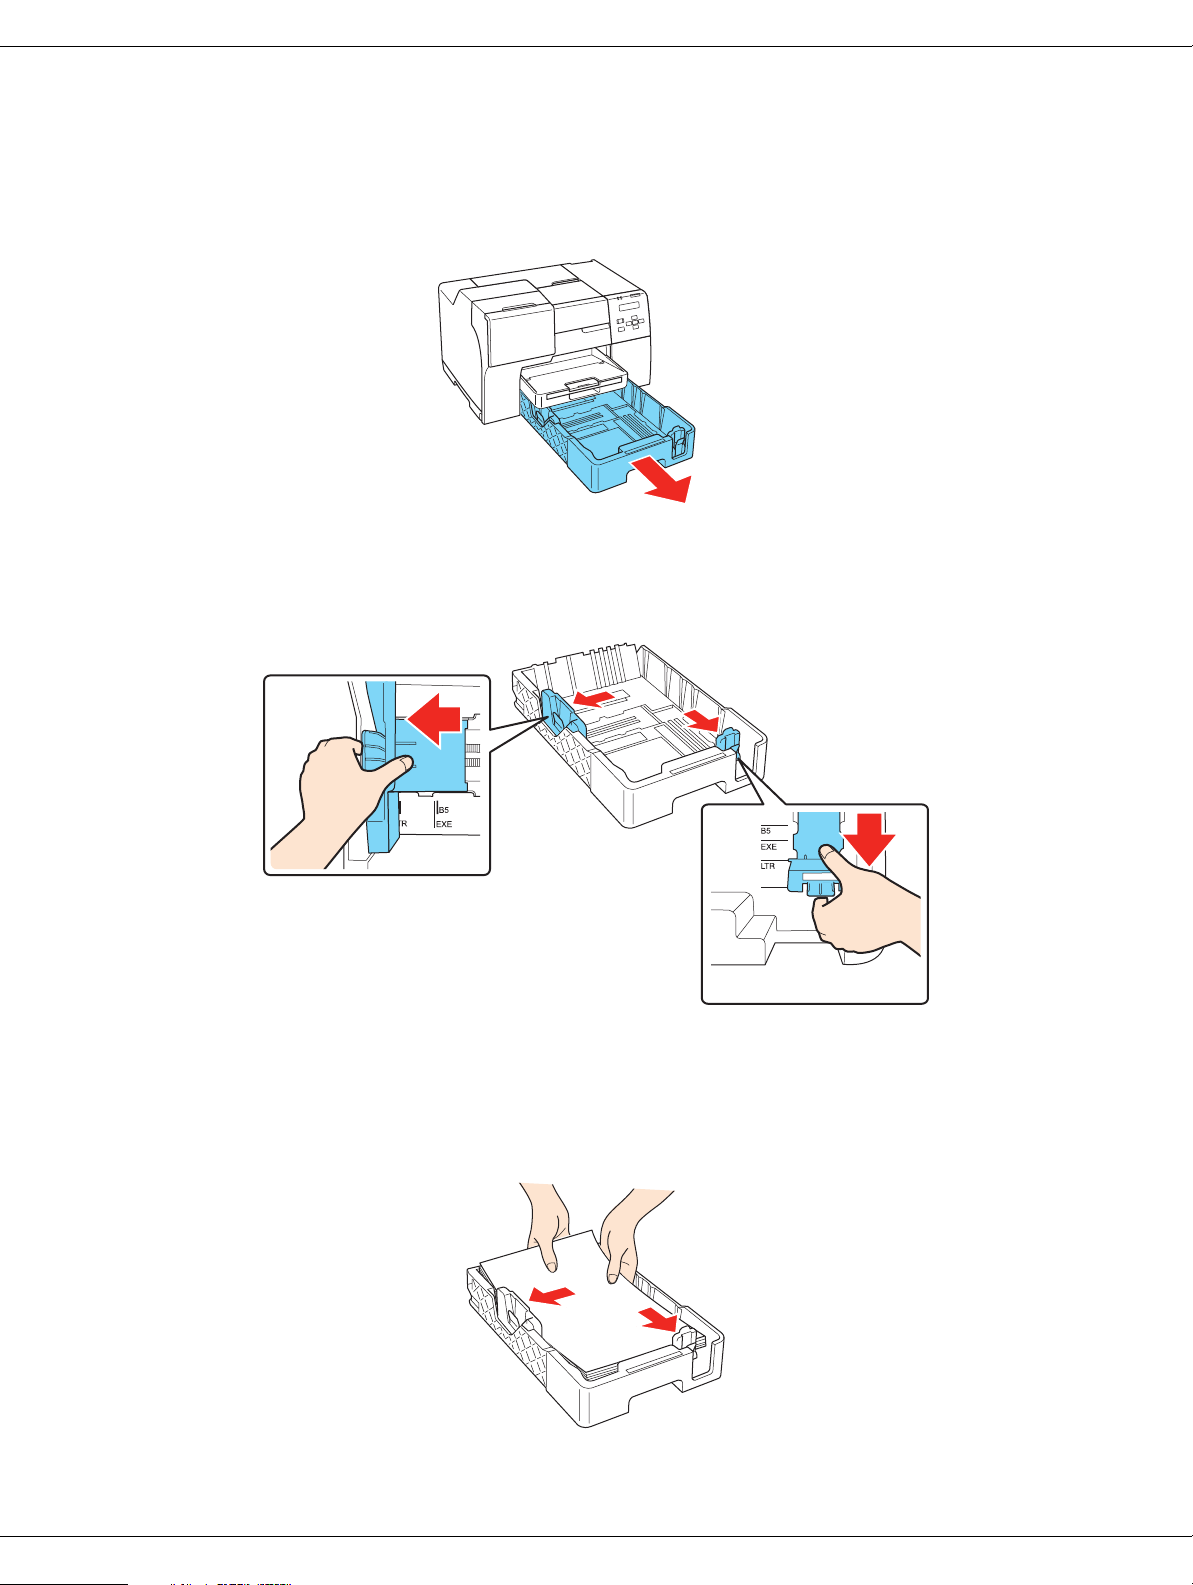
1. Pull out the front paper cassette.
2. Squeeze the edge guides and slide them out until they click into place.
MODIFY TO SHOW LETTER SIZE
3. Fan a stack of paper, then tap it on a flat surface to even the edges.
4. Load the paper with the printable side down.
Paper Handling 23
Page 24
Note:
Avoid adding paper before running out of paper. Doing so may prevent the paper from feeding
smoothly.
5. Squeeze the edge guides and slide them against the paper until they click.
6. Gently reinsert the cassette into the printer.
Caution:
To avoid paper jams, do not force the front paper cassette into the printer and check the
c
edge guides after inserting the cassette.
7. Slide out and extend the extension tray.
Paper Handling 24
Page 25
Note:
❏ Leave enough space in front of the printer for the paper to be fully ejected.
❏ Make sure the paper stack fits under the c arrow mark inside the left edge guide.
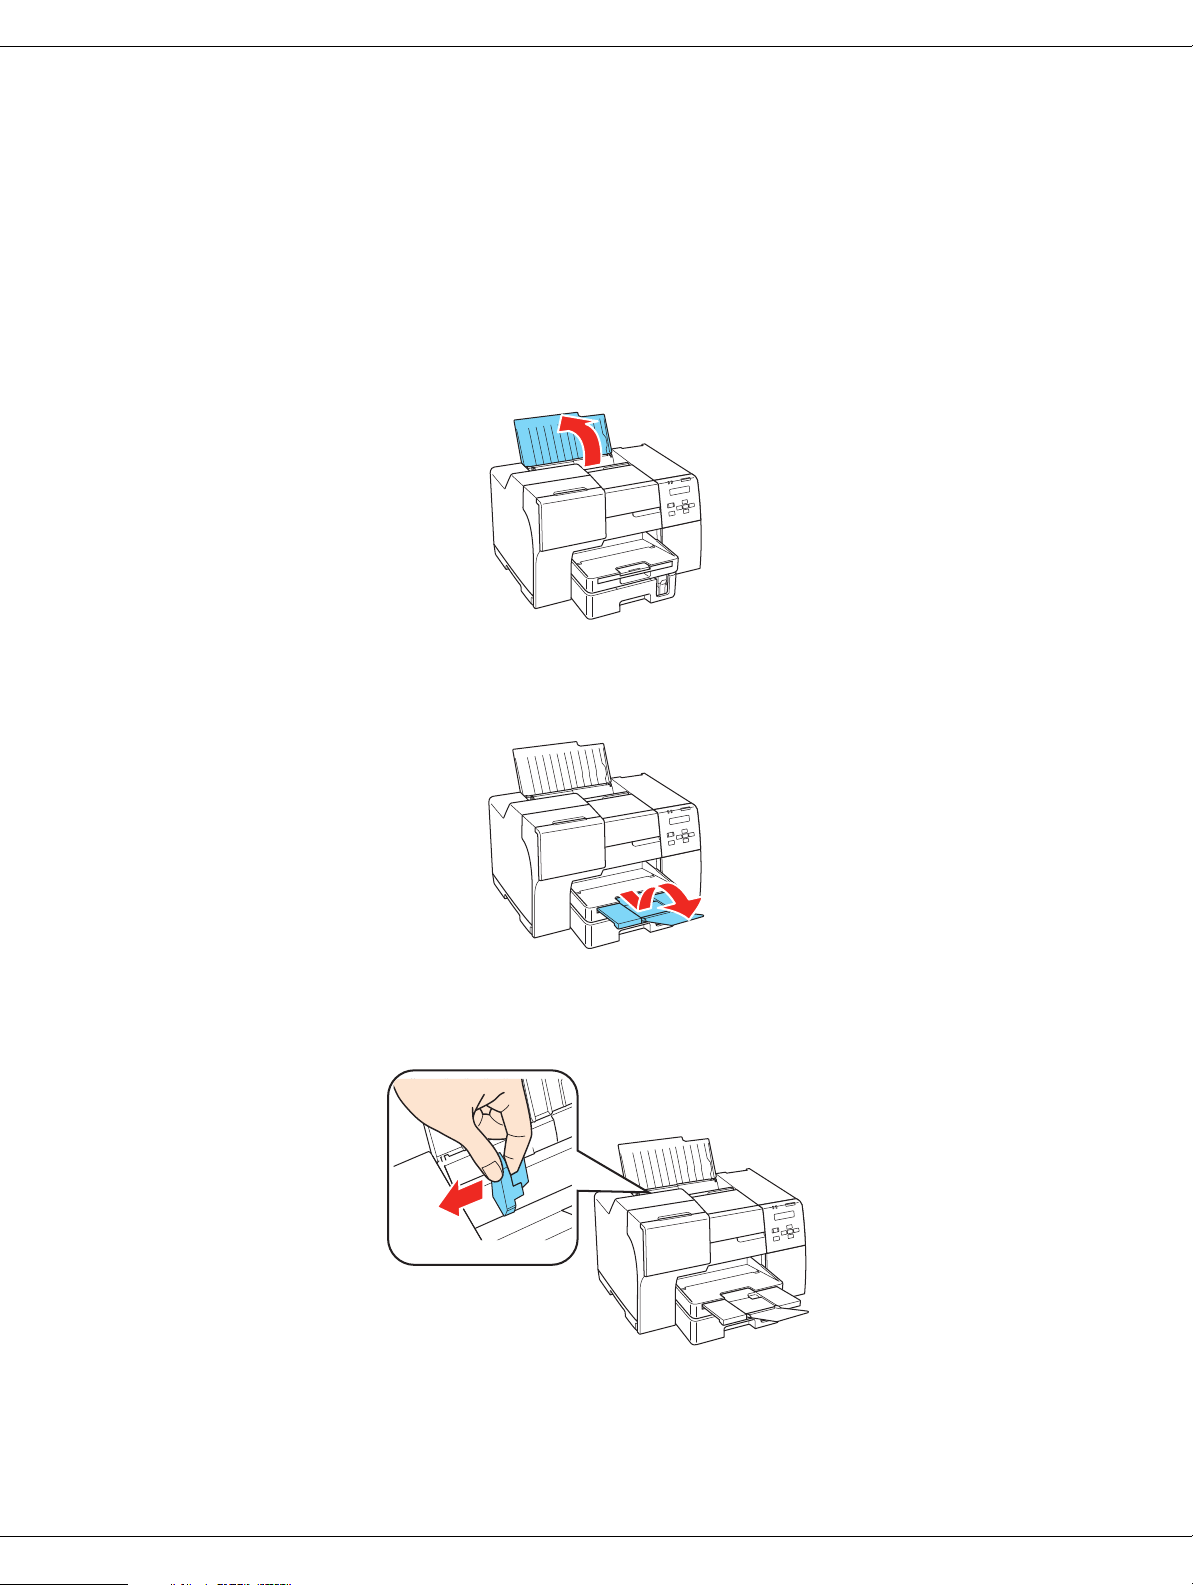
Rear Sheet Feeder
1. Open the paper support.
2. Slide out and extend the extension tray.
3. Slide the edge guide to the left.
4. Fan a stack of paper, then tap it on a flat surface to even the edges.
Paper Handling 25
Page 26
5. Load the paper with the printable side up, against the right side of the rear sheet feeder.
Then slide the edge guide against the left edge of the paper.
Note:
❏ Leave enough space in front of the printer for the paper to be fully ejected.
❏ Always load paper into the rear sheet feeder short edge first, even when you are printing
landscape-oriented pictures.
❏ Avoid adding paper before running out of paper. Doing so may prevent the paper from feeding
smoothly.
❏ Make sure the paper stack fits under the c arrow mark inside the left edge guide.
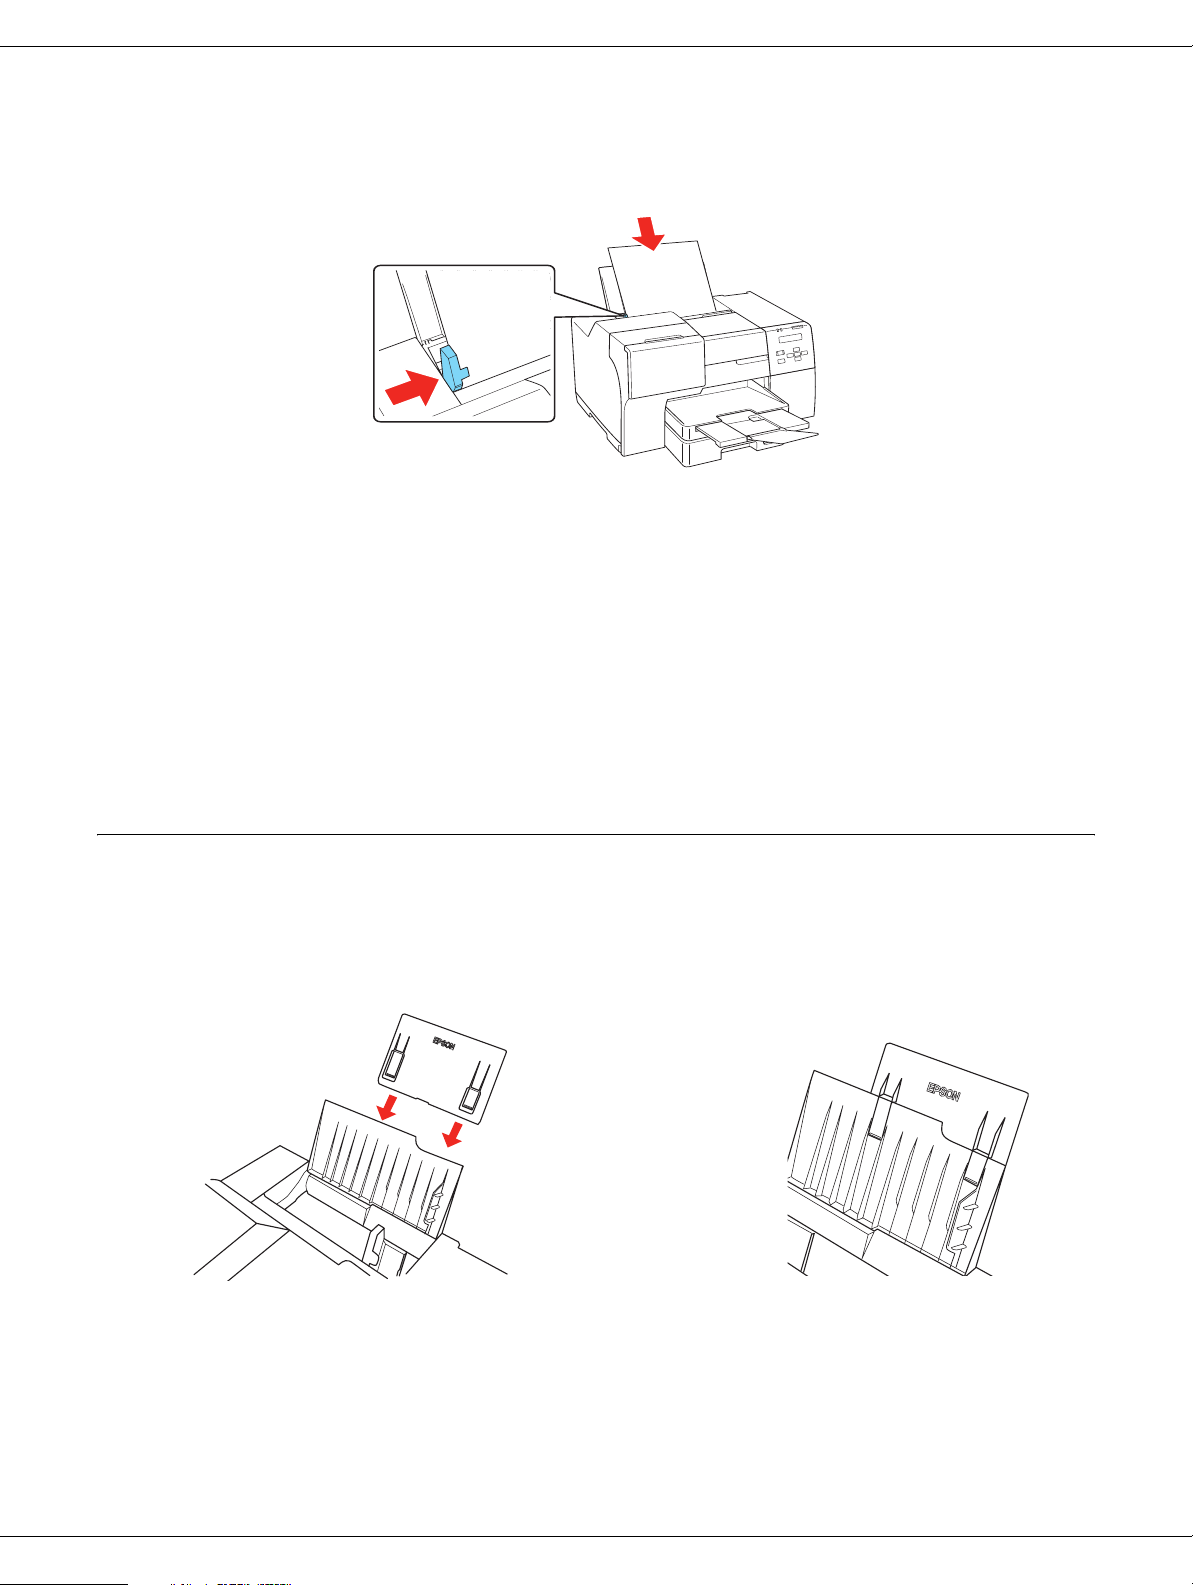
Using the Optional Legal-Size Paper Support
Align the legal-size paper support with the right side of the paper support and attach it as
shown. You can load up to 60 sheets of plain legal-size paper (up to 20 lb or 75 g/m²).
Do not leave legal-size paper in the rear sheet feeder when you are not printing, or the
sheets may curl.
Paper Handling 26
Page 27
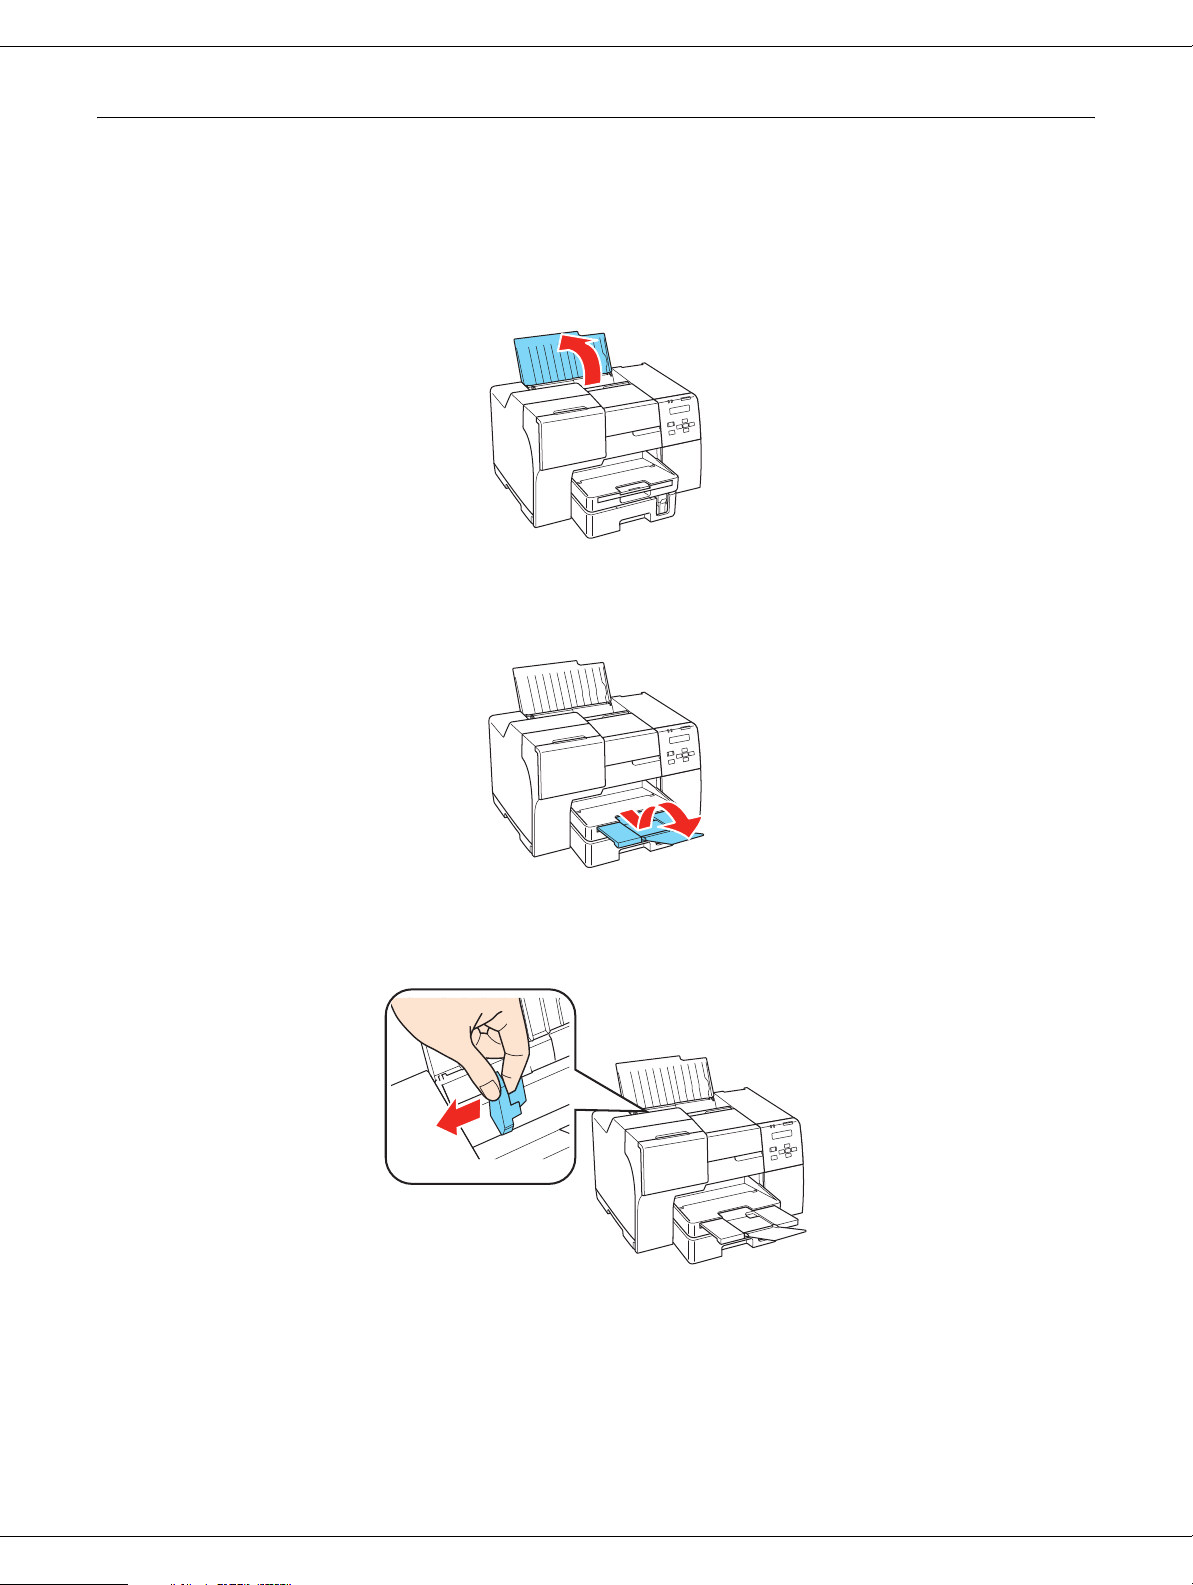
Loading Envelopes
Follow these steps to load envelopes:
1. Open the paper support.
2. Slide out and extend the extension tray.
3. Slide the left edge guide to the left.
Paper Handling 27
Page 28
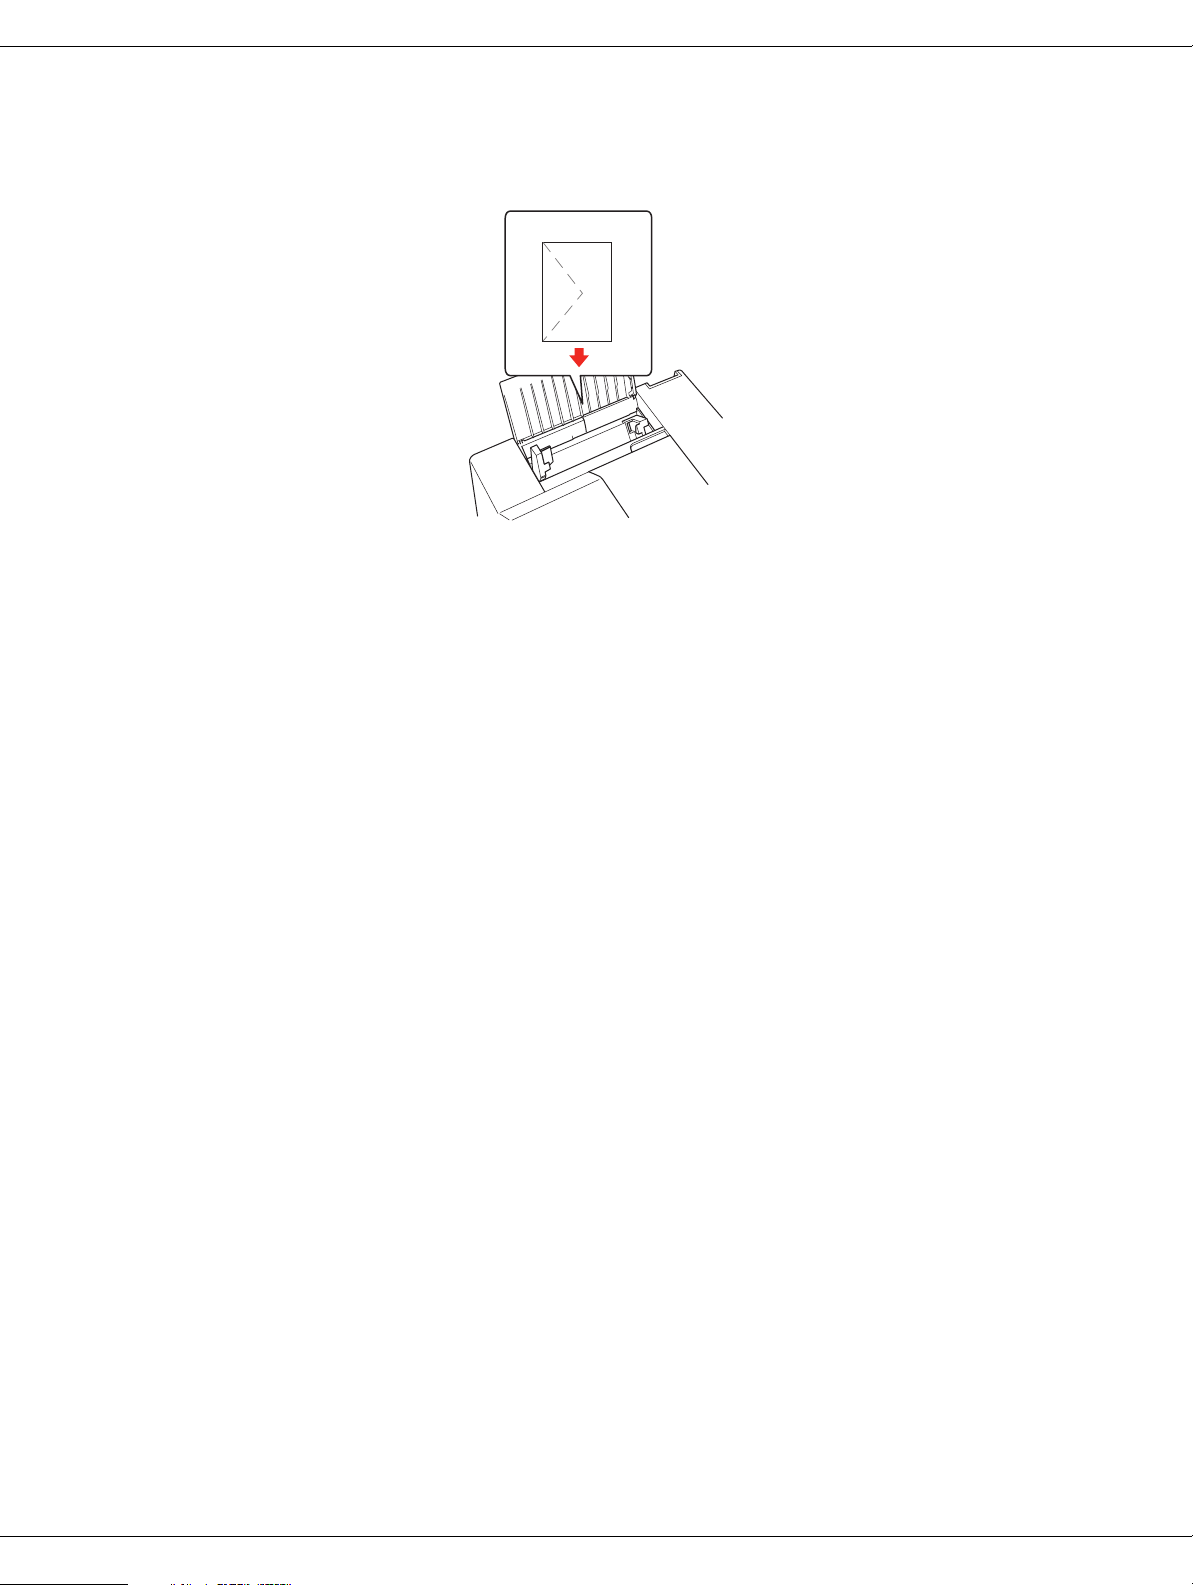
4. Load envelopes short edge first with the flap facing down and to the left. Then slide the
left edge guide against the left edge of the envelopes.
Note:
❏ The thickness of envelopes and their ability to fold vary widely. If the total thickness of the stack
of envelopes exceeds 0.6 inch (15 mm), press down on the envelopes to flatten them before
loading. If print quality declines when a stack of envelopes is loaded, load one envelope at a
time.
❏ You can load up to 15 envelopes at a time in the rear sheet feeder.
❏ Do not use envelopes that are curled or folded.
❏ Flatten the envelope flaps before loading.
❏ Flatten the leading edge of the envelope before loading.
❏ Avoid using envelopes that are too thin, as they may curl during printing.
For printing instructions, see the following instructions.
& See “Printing on Envelopes” on page 46.
Paper Handling 28
Page 29
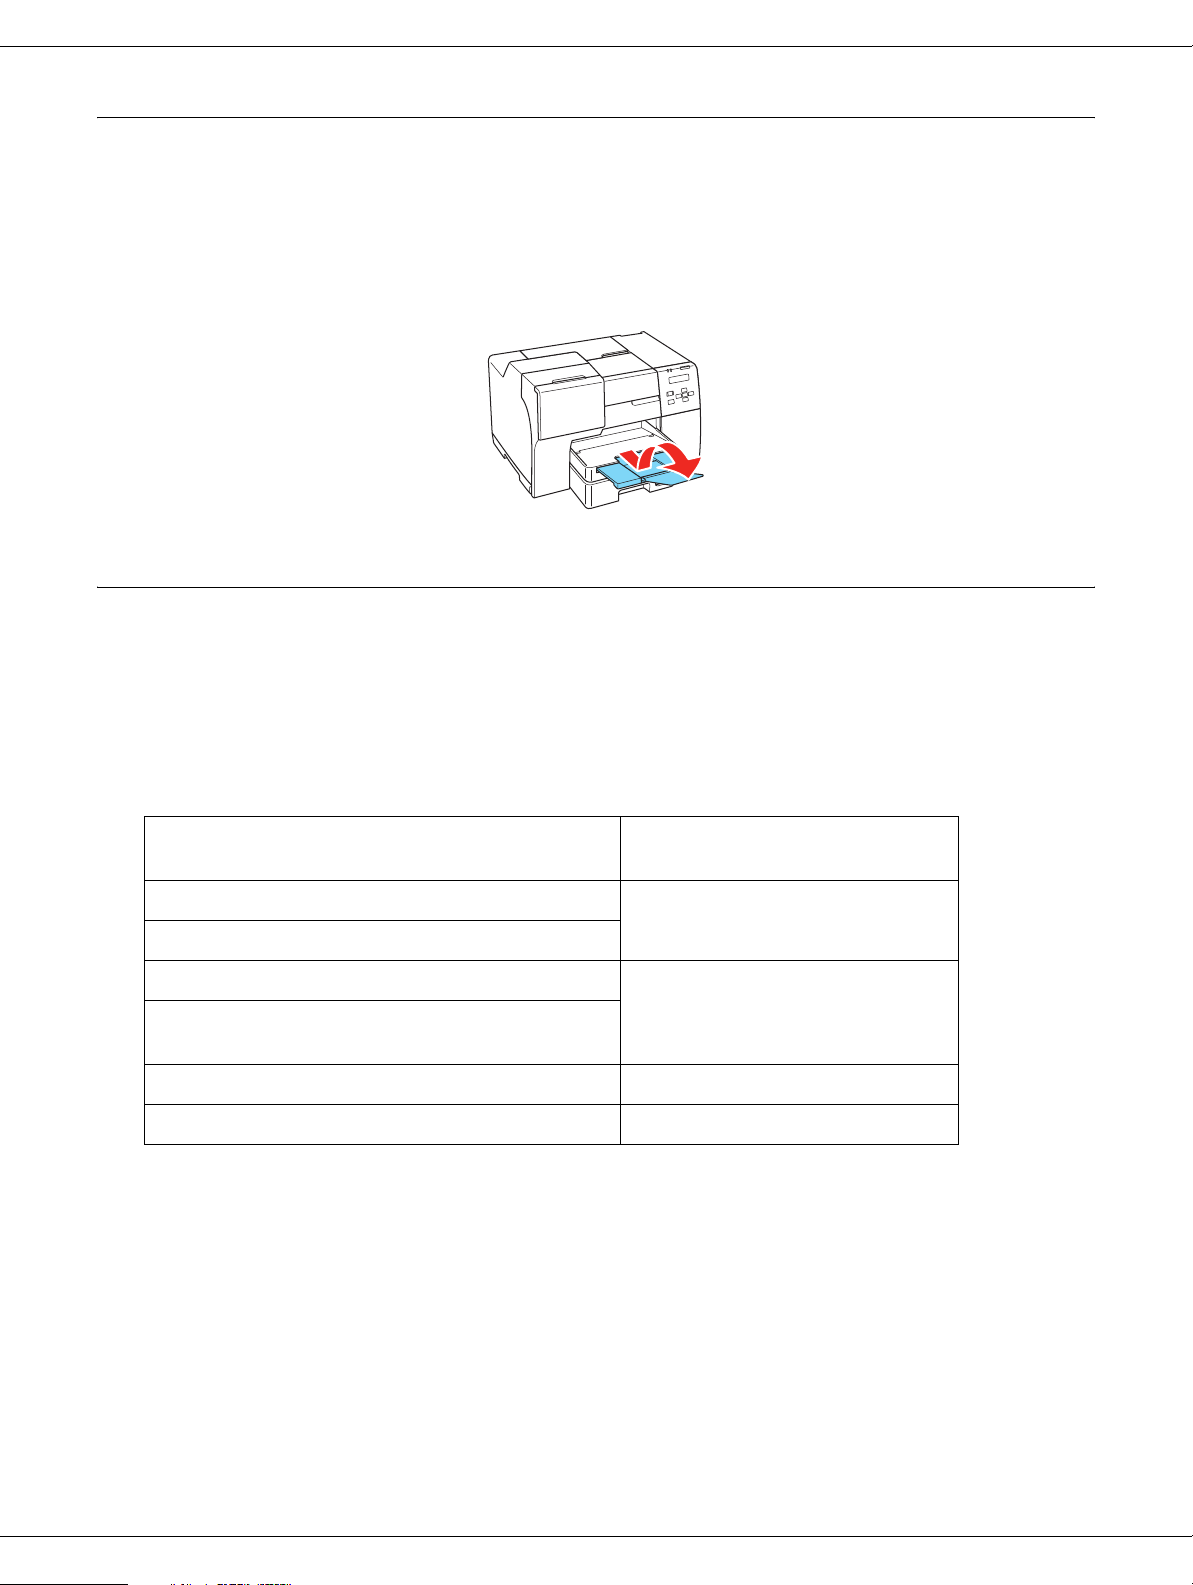
Setting Up the Output Tray
The output tray is located on the front paper cassette. Slide out the extension tray and then
open the flap on the extension tray to prevent your prints from slipping off the printer. The
maximum capacity of the output tray is 170 sheets.
Selecting the Correct Paper Type or Media Type
The printer automatically adjusts itself for the type of paper you select in your print settings.
That is why the paper type or media type setting is so important. It tells your printer what
kind of paper you are using and adjusts the ink coverage accordingly. The table below lists
the settings you should choose for your paper.
For this paper Select this paper type (media
type) setting
Plain paper Plain Paper/Bright White Paper
Epson Bright White Paper
Epson Premium Presentation Paper Matte Premium Presentation Paper
Epson Premium Presentation Paper Matte
Double-Sided
Epson Presentation Paper Matte Presentation Paper Matte
Envelopes Envelope
Matte
Paper Handling 29
Page 30
Chapter 3
Basic Printing
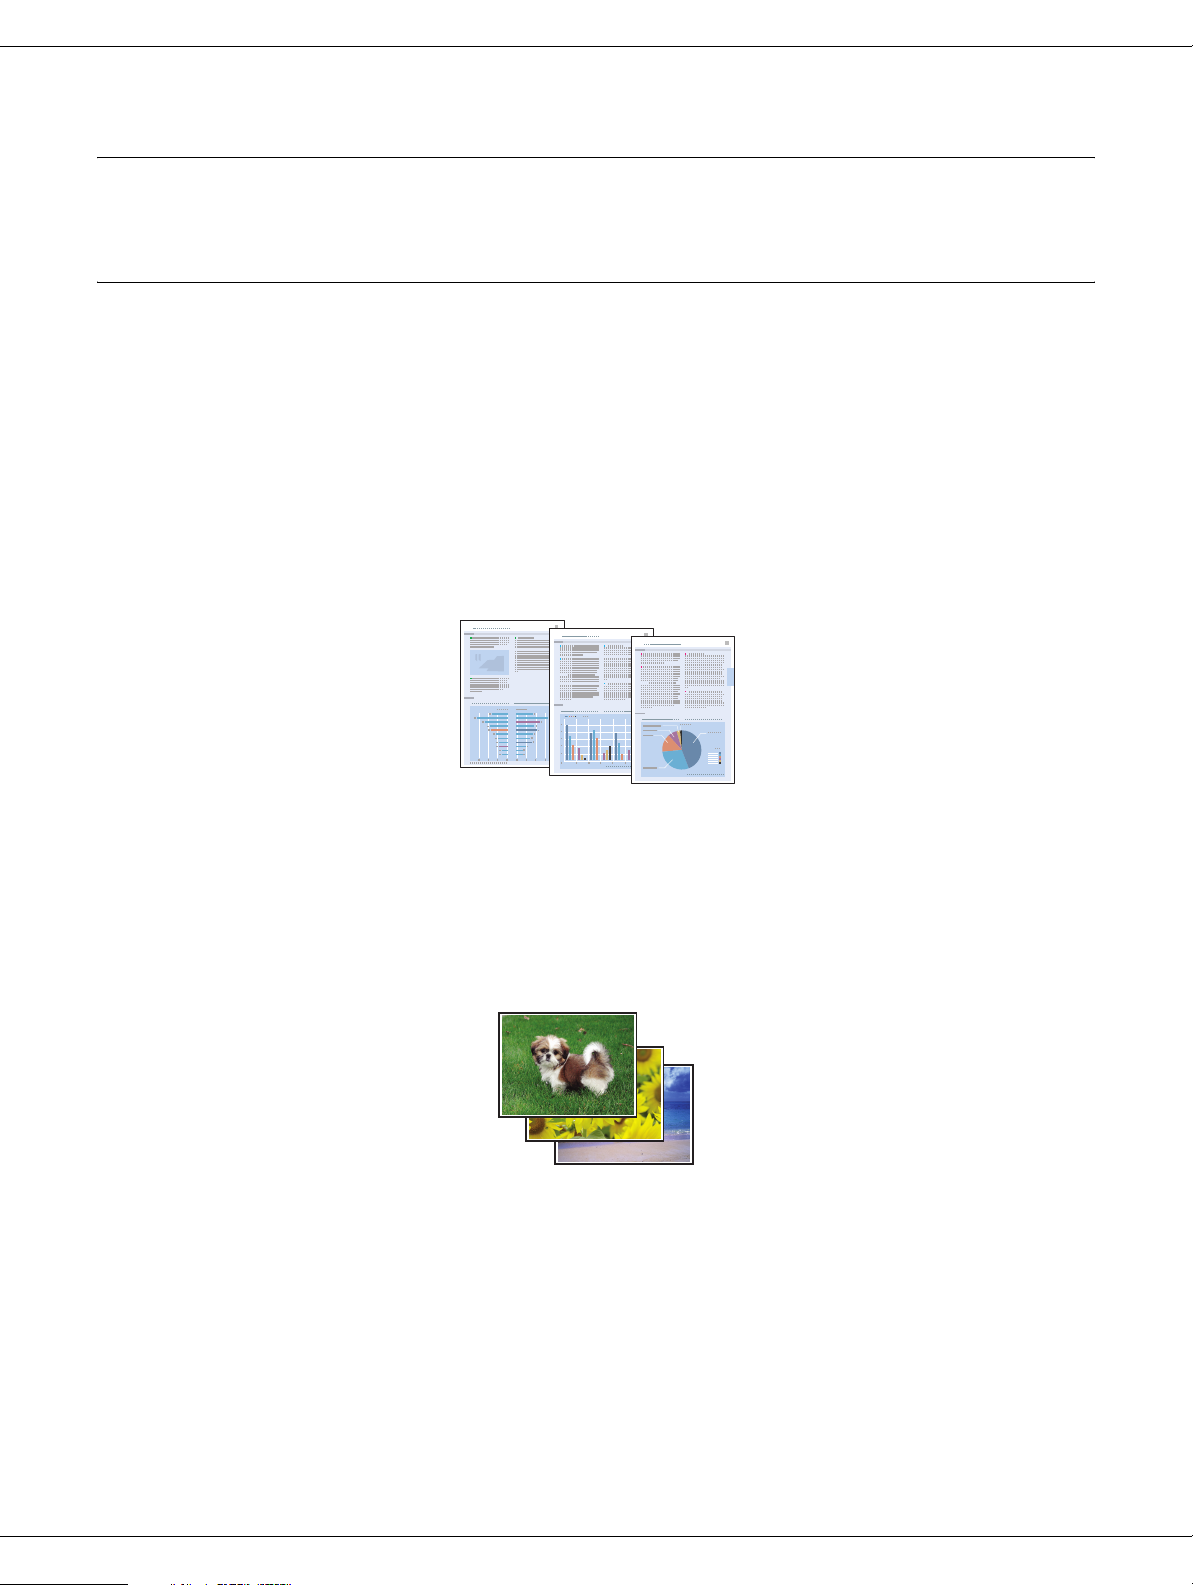
Introduction
This section guides you through the procedures for different kinds of printing.
Printing Documents
Explains how to print documents on various types of paper.
& See “Printing Documents” on page 31.
Printing Photos
Explains how to print photos on various types of paper.
& See “Printing Photos” on page 37.
Basic Printing 30
Page 31

Printing Web Pages
Explains how to print Web pages so that they fit on a sheet of paper without getting cut off
on the right side.
& See “Printing Web Pages” on page 43.
Printing on Envelopes
Explains how to print on envelopes.
& See “Printing on Envelopes” on page 46.
Printing Documents
Basic Printing 31
Page 32

Loading Paper
Refer to the section below for details on loading paper.
& See “Loading Paper” on page 22.
When using special Epson paper, refer to the section below.
& See “Using Special Paper” on page 21.
Printer Settings for Windows
1. Open the file you want to print.
2. Access the printer settings.
& See “Accessing the Printer Driver for Windows” on page 14.
Basic Printing 32
Page 33

3. Click the Main tab, then select one of the following Quality Option settings:
❏ Draft for rough drafts with reduced print quality
❏ Text for text-only documents with higher text quality
❏ Text & Image for higher quality documents with text and images
4. Select the paper source as the Source setting.
5. Select the appropriate Type setting.
& See “Selecting the Correct Paper Type or Media Type” on page 29.
6. Select the appropriate Size setting. You can also define a custom paper size. For
details, see the online help.
7. Select Portrait (tall) or Landscape (wide) to change the orientation of your printout.
8. Click OK to close the printer settings window.
9. Print your file.
Note:
You can also print on both sides of the paper.
& See “Double-Sided (Duplex) Printing” on page 54.
Printer Settings for Mac OS X 10.5
Follow these steps to adjust your printer settings.
1. Open the file you want to print.
2. Access the Print dialog.
& See “Accessing the Printer Driver for Mac OS X” on page 15.
Basic Printing 33
Page 34

3. Click the d button to extend this dialog.
4. Select the printer you are using as the Printer setting, and then make suitable settings.
Note:
Depending on your application, you may not be able to select some of the items in this dialog.
If so, click Page Setup on the File menu of your application, and then make suitable settings.
Basic Printing 34
Page 35

5. Select Print Settings from the pop-up menu.
6. Make the settings that you want to use to print. See online help for details of Print
Settings.
& See “Selecting the Correct Paper Type or Media Type” on page 29.
7. Click Print to start printing.
Printer Settings for Mac OS X 10.3 or 10.4
1. Open the file you want to print.
2. Access the Page Setup dialog.
Basic Printing 35
Page 36

& See “Accessing the Printer Driver for Mac OS X” on page 15.
3. Select the printer you are using as the Format for setting, and then make suitable
settings.
4. Click OK to close the Page Setup dialog.
5. Access the Print dialog.
& See “Accessing the Printer Driver for Mac OS X” on page 15.
6. Select the printer you are using as the Printer setting. Then make the Copies & Pages
settings.
Basic Printing 36
Page 37

7. Select Print Settings from the pop-up menu.
8. Make the settings that you want to use to print. See online help for details of Print
Settings.
& See “Selecting the Correct Paper Type or Media Type” on page 29.
9. Click Print to start printing.
Printing Photos
Preparing the Print File
You need to adjust the image file to the size of the paper. If your application has margin
settings, make sure that the margins are within the printable area of the page.
& See “Printable Area” on page 190.
Basic Printing 37
Page 38

Loading Paper
Refer to the section below for details on loading paper.
& See “Loading Paper” on page 22.
When using special Epson paper, refer to the section below.
& See “Using Special Paper” on page 21.
Printer Settings for Windows
Follow these steps to adjust your printer settings.
1. Access the printer settings.
& See “Accessing the Printer Driver for Windows” on page 14.
2. Click the Main tab, then select Photo in the Quality Option settings.
Basic Printing 38
Page 39

3. Select the paper source as the Source setting.
4. Select the appropriate Type setting.
& See “Selecting the Correct Paper Type or Media Type” on page 29.
5. Select the appropriate Size setting. You can also define a custom paper size. For
details, see the online help.
6. Select Portrait (tall) or Landscape (wide) to change the orientation of your printout.
7. Click OK to close the printer settings window.
After completing the steps above, print one test copy and examine the results before
printing an entire job.
Printer Settings for Mac OS X 10.5
Follow these steps to adjust your printer settings.
1. Access the Print dialog.
& See “Accessing the Printer Driver for Mac OS X” on page 15.
2. Click the d button to extend this dialog.
Basic Printing 39
Page 40

3. Select the printer you are using as the Printer setting, and then make suitable settings.
Note:
Depending on your application, you may not be able to select some of the items in this dialog.
If so, click Page Setup on the File menu of your application, and then make suitable settings.
Basic Printing 40
Page 41

4. Select Print Settings from the pop-up menu.
5. Make the settings that you want to use to print. See online help for details of Print
Settings.
& See “Selecting the Correct Paper Type or Media Type” on page 29.
After completing the steps above, print one test copy and examine the results before
printing an entire job.
Printer Settings for Mac OS X 10.3 or 10.4
Follow these steps to adjust your printer settings.
1. Access the Page Setup dialog.
Basic Printing 41
Page 42

& See “Accessing the Printer Driver for Mac OS X” on page 15.
2. Select the printer you are using as the Format for setting, and then make suitable
settings.
3. Click OK to close the Page Setup dialog.
4. Access the Print dialog.
& See “Accessing the Printer Driver for Mac OS X” on page 15.
5. Select the printer you are using as the Printer setting. Then make the Copies & Pages
settings.
Basic Printing 42
Page 43

6. Select Print Settings from the pop-up menu.
7. Make the settings that you want to use to print. See online help for details of Print
Settings.
& See “Selecting the Correct Paper Type or Media Type” on page 29.
After completing the steps above, print one test copy and examine the results before
printing an entire job.
Printing Web Pages
Loading Paper
Refer to the section below for details on loading paper.
& See “Loading Paper” on page 22.
When using special Epson paper, refer to the section below.
& See “Using Special Paper” on page 21.
Basic Printing 43
Page 44

Using EPSON Web-To-Page
The EPSON Web-To-Page software lets you print Web pages so that they fit within the
width of your selected paper.
Note for Windows users:
This software is not available for Windows Vista and XP x64.
Note for Windows Internet Explorer 7 users:
Printing web pages to fit to your paper size is a standard feature in Windows Internet Explorer 7.
Note for Mac OS X users:
❏ This software is not available for Mac OS X.
❏ Printing web pages to fit to your paper size is available by using the printer driver.
& See “Printer Settings for Mac OS X 10.5” on page 33.
& See “Printer Settings for Mac OS X 10.3 or 10.4” on page 35.
1. In Internet Explorer, go to the Web page you want to print.
If you have installed EPSON Web-To-Page, the EPSON Web-To-Page toolbar appears
on the Internet Explorer window.
2. Click the Print button on the toolbar. The Print window appears.
Note:
If you want to preview the layout of your printout, click the Preview button on the toolbar.
Basic Printing 44
Page 45

3. Right-click the printer icon and choose Printing Preferences in Windows XP and 2000.
4. Click the Main tab, then select Web as the Quality Option settings:
5. Select the paper source as the Source setting.
6. Select the appropriate Type setting.
& See “Selecting the Correct Paper Type or Media Type” on page 29.
7. Select the appropriate Size setting. You can also define a custom paper size. For
details, see the online help.
8. Select Portrait (tall) or Landscape (wide) to change the orientation of your printout.
9. Click OK to close the printer settings window.
10.Print your page.
Basic Printing 45
Page 46

Printing on Envelopes
Loading Envelopes
Refer to the section below for loading envelopes.
& See “Loading Envelopes” on page 27.
Refer to the section below for the printable area.
& See “Printable Area” on page 190.
Printer Settings for Windows
1. Access the printer settings.
Basic Printing 46
Page 47

& See “Accessing the Printer Driver for Windows” on page 14.
2. Click the Main tab, then select one of the following Quality Option settings:
❏ Text for most envelopes
❏ Text & Image to print images on the envelope
3. Select Rear Tray as the Source setting.
4. Select Envelope as the Type setting.
5. Select the appropriate envelope size from the available Size settings. You can also
define a custom size. For details, see the online help.
6. Select Landscape as the Orientation setting.
7. Click OK to close the printer settings window.
8. Print your envelope.
Basic Printing 47
Page 48

Printer Settings for Mac OS X 10.5
Follow these steps to adjust your printer settings.
1. Access the Print dialog.
& See “Accessing the Printer Driver for Mac OS X” on page 15.
2. Click the d button to extend this dialog.
3. Select the printer you are using as the Printer setting, and then select a suitable
envelope size as the Paper Size setting. You can also define a custom envelope size.
For details, see the online help.
4. Select Landscape as the Orientation setting.
Note:
Depending on your application, you may not be able to select some of the items in this dialog.
If so, click Page Setup on the File menu of your application, and then make suitable settings.
Basic Printing 48
Page 49

5. Select Print Settings from the pop-up menu.
6. Select Envelope as the Media Type setting.
7. Make other settings that you want to use to print. See online help for details of Print
Settings.
8. Click Print to start printing.
Basic Printing 49
Page 50

Printer Settings for Mac OS X 10.3 or 10.4
1. Access the Page Setup dialog.
& See “Accessing the Printer Driver for Mac OS X” on page 15.
2. Select the printer you are using as the Format for setting.
3. Select the appropriate envelope size as the Paper Size setting. You can also define a
custom envelope size. For details, see the online help.
4. Select Landscape as the Orientation setting.
5. Click OK to close the Page Setup dialog.
6. Access the Print dialog.
& See “Accessing the Printer Driver for Mac OS X” on page 15.
Basic Printing 50
Page 51

7. Select the printer you are using as the Printer setting, then make the Copies & Pages
settings.
8. Select Print Settings from the pop-up menu.
9. Select Envelope as the Media Type setting.
10.Make other settings that you want to use to print. See online help for details of Print
Settings.
11.Click Print to start printing.
Canceling Printing
If you need to cancel printing, follow the instructions in the appropriate section below.
Using the Cancel Button on the Printer
For B-500DN users
Press the + Cancel button to cancel a print job in progress.
For B-300 users
Press the ) Paper/Cancel button to cancel a print job in progress.
Basic Printing 51
Page 52

Canceling from Windows
When you start printing, the progress meter appears on your computer screen.
Click the Stop button to cancel printing.
Canceling from Mac OS X
Follow the steps below to cancel a print job.
1. Click your printer icon in the Dock.
2. In the Document Name list, select the document that is printing.
Basic Printing 52
Page 53

3. Click the Delete button to cancel the print job.
Basic Printing 53
Page 54

Chapter 4
Printing with Special Layout Options
Introduction
You can print with a variety of layouts for special projects, such as booklets and posters.
Double-Sided (Duplex) Printing
Lets you print on both sides of the paper.
& See “Double-sided (Duplex) Printing” on page 56.
Fit to Page Printing
Lets you automatically enlarge or reduce the size of your document to fit the paper size
selected in the printer driver.
& See “Fit to Page Printing” on page 76.
Printing with Special Layout Options 54
Page 55

Note for Mac OS X users:
This feature is not available for Mac OS X 10.3.
Pages Per Sheet Printing
Lets you print two or four pages on a single sheet of paper.
& See “Pages Per Sheet Printing” on page 84.
Poster Printing (for Windows only)
Lets you enlarge material on a single document page to cover 4, 9, or 16 printed sheets of
paper, and then make a poster.
& See “Poster Printing (for Windows only)” on page 92.
Watermark Printing (for Windows only)
Lets you print text or an image as a watermark on each page of your printout.
& See “Watermark Printing (for Windows only)” on page 97.
Printing with Special Layout Options 55
Page 56

For example, you can put “Confidential” on an important document.
Double-sided (Duplex) Printing
Two types of double-sided printing are available: standard and folded booklet.
Standard double-sided printing lets you automatically print on both sides of the page (on
plain paper only), using the duplex unit.
Without the duplex unit, you can print the odd-numbered pages first. Once these pages are
printed, you can reload them to print the even-numbered pages onto the opposite side of
the paper.
Printing with Special Layout Options 56
Page 57

Folded booklet double-sided printing allows you to make single-fold booklets. The pages
that will appear on the outside (after the page is folded) are printed first. The pages that will
appear inside the booklet can then be printed after you reload the paper into the printer.
✽: Binding edge
You can create a booklet by printing pages 1 and 4 on the first sheet of paper, pages 5 and
8 on the second sheet, and pages 9 and 12 on the third sheet.
After you reload these sheets into the rear sheet feeder, you can then print pages 2 and 3
on the back of the first sheet of paper, pages 6 and 7 on the back of the second sheet, and
pages 10 and 11 on the back of the third sheet.
The resulting pages can then be folded and bound together into a booklet.
Note:
❏ Depending on the paper, stacks of up to 30 sheets can be loaded into the rear sheet feeder
during double-sided printing.
❏ Only use papers that are suitable for double-sided printing. Otherwise, the printout quality may
deteriorate.
❏ Depending on the paper and the amount of ink used to print text and images, ink may bleed
through to the other side of the paper.
❏ The surface of the paper may be smeared during double-sided printing.
Printing with Special Layout Options 57
Page 58

Standard Double-sided Printing for Windows
Automatic Double-sided Printing (Using the Duplex Unit)
Follow the steps below to print odd- and even-numbered pages onto opposite sides of the
sheet using the duplex unit.
Note:
The duplex unit is standard on the B-500DN and available as an option for the B-300. Automatic
double-sided printing supports plain paper and Epson Bright White Paper only. Thick plain paper is
not supported for automatic double-sided printing.
1. Access the printer settings.
& See “Accessing the Printer Driver for Windows” on page 14.
2. Click the Main tab, then select one of the following Quality Option settings:
❏ Draft for rough drafts with reduced print quality
❏ Text for text-only pages
Printing with Special Layout Options 58
Page 59

❏ Text & Image for higher quality pages with text and images
❏ Web for web pages
❏ Photo for good quality and speed
3. Select the paper source as the Source setting.
4. Select Plain Paper/Bright White Paper as the Type setting.
& See “Selecting the Correct Paper Type or Media Type” on page 29.
5. Select the appropriate Size setting.
6. Select Portrait (tall) or Landscape (wide) to change the orientation of your printout.
7. Select Duplex Printing.
8. Click OK to save your settings.
9. Click OK or Print to start printing.
Note:
Do not try to pull out your prints before both sides of the page are printed.
Special Settings for Automatic Double-sided Printing (Using the Duplex
Unit)
When you print photos or heavy text on both sides of the page, you can adjust the print
density and drying time to prevent ink from bleeding through to the other side. You can also
adjust the margins to allow for binding your pages.
Note:
Automatic double-sided printing supports plain paper and Epson Bright White Paper only.
1. Access the printer settings.
& See “Accessing the Printer Driver for Windows” on page 14.
2. Select the appropriate Quality Option, Paper Options, and Orientation.
& See “Automatic Double-sided Printing (Using the Duplex Unit)” on page 58.
Printing with Special Layout Options 59
Page 60

3. Click the Page Layout tab, then select the Duplex Printing check box.
4. Select Auto to use the automatic double-sided printing function.
5. Click Adjust Print Density to open the Print Density Adjustment window.
6. Select the appropriate document type as the Select Document Type setting.
7. Specify the Print Density and Increased Ink Drying Time as the Adjustments setting.
Printing with Special Layout Options 60
Page 61

Note:
When you print dense photos on both sides of the paper, reduce the print density and increase
the drying time to improve quality.
8. Click OK to return to the Page Layout window.
9. Click Margins to open the Margins window.
10.Specify the edge of the paper where the binding will be placed. You can choose Left,
Top, or Right.
11.Choose cm or inch as the Unit setting. Then specify the width of the binding margin.
You can enter any width from 0.12 to 1.18 inches or 0.3 to 3.0 cm.
Note:
The actual binding margin may be different from the specified settings depending on your
application. Experiment with a few sheets to examine actual results before printing the entire
job.
12.Click OK to return to the Page Layout window. Then click OK to save your settings.
13.Load paper into the printer, then send the print job from your application.
& See “Loading Paper” on page 22.
Note:
Do not try to pull out your prints before both sides of the page are printed.
Manual Double-sided Printing
Follow the steps below to print odd- and even-numbered pages onto opposite sides of the
sheet.
1. Access the printer settings.
Printing with Special Layout Options 61
Page 62

& See “Accessing the Printer Driver for Windows” on page 14.
2. Click the Main tab, then select one of the following Quality Option settings:
❏ Draft for rough drafts with reduced print quality
❏ Text for text-only pages
❏ Text & Image for higher quality pages with text and images
❏ Web for web pages
❏ Photo for good quality and speed
3. Select Rear Tray as the Source setting.
4. Select the appropriate Type setting.
& See “Selecting the Correct Paper Type or Media Type” on page 29.
5. Select the appropriate Size setting.
Printing with Special Layout Options 62
Page 63

6. Select Portrait (tall) or Landscape (wide) to change the orientation of your printout.
7. Click the Page Layout tab, then select the Duplex Printing check box.
8. Select Manual to use manual double-sided printing function.
9. Click Margins to open the Margins window.
Printing with Special Layout Options 63
Page 64

10.Specify the edge of the paper where the binding will be placed. You can choose Left,
Top, or Right.
11.Choose cm or inch as the Unit setting. Then specify the width of the binding margin.
You can enter any width from 0.12 to 1.18 inches, or from 0.3 to 3.0 cm.
Note:
The actual binding margin may be different from the specified settings depending on your
application. Experiment with a few sheets to examine actual results before printing the entire
job.
12.Click OK to return to the Page Layout window. Then click OK to save your settings.
13.Load paper into the rear sheet feeder, then send the print job from your application.
Instructions for generating the even-numbered pages will be displayed while the
odd-numbered pages are printed.
& See “Loading Paper” on page 22.
14.Follow the on-screen instructions to reload the paper.
Note:
❏ The paper may curl during printing due to the amount of ink used. Should this occur, slightly
curl the sheets in the opposite direction before reloading them.
❏ Align the sheet stack by tapping its edges against a hard, flat surface before reloading the
stack.
❏ Follow the on-screen instructions when reloading the printouts. Otherwise, paper may jam
or the binding margins may be incorrect.
❏ If a paper jam occurs, refer to the following.
& See “The Paper Jams” on page 165.
15.Once the paper is reloaded, click Resume to print the even-numbered pages.
Standard Double-sided Printing for Mac OS X 10.5
Automatic Double-sided Printing (Using the Duplex Unit)
Follow the steps below to print odd- and even-numbered pages onto opposite sides of the
sheet using the duplex unit.
Note:
❏ Automatic double-sided printing supports plain paper only.
❏ Thick plain paper is not supported for automatic double-sided printing.
Printing with Special Layout Options 64
Page 65

1. Access the EPSON Printer Utility3 dialog.
& See “Accessing the Printer Driver for Mac OS X” on page 15.
2. Click the Printer and Option Information button.
Printing with Special Layout Options 65
Page 66

3. Make sure that Duplexer Installed is displayed in the Auto Duplex Printing Information
section, and then click OK.
4. Close the EPSON Printer Utility3 dialog.
5. Access the Print dialog.
& See “Accessing the Printer Driver for Mac OS X” on page 15.
6. Click the d button to extend this dialog.
Printing with Special Layout Options 66
Page 67

7. Select the printer you are using as the Printer setting, and then make suitable settings.
Note:
Depending on your application, you may not be able to select some of the items in this dialog.
If so, click Page Setup on the File menu of your application, and then make suitable settings.
Printing with Special Layout Options 67
Page 68

8. Select Print Settings from the pop-up menu.
9. Select Plain Paper/Bright White Paper as the Media Type setting.
10.Make other settings that you want to use to print. See online help for details of Print
Settings.
Printing with Special Layout Options 68
Page 69

11.Select Auto Duplex Printing Settings from the pop-up menu.
12.Select the Auto Duplex Printing check box.
13.Select the Binding edge setting.
14.Select one of the Document Type settings. This automatically adjusts Print Density and
Ink Drying Time.
Note:
If you are printing high-density data, such as photos or graphs, we recommend adjusting the
Print Density.
15.Load paper into the printer, and click Print.
& See “Loading Paper” on page 22.
Printing with Special Layout Options 69
Page 70

Standard Double-sided Printing for Mac OS X 10.3 or 10.4
Automatic Double-sided Printing (Using the Duplex Unit)
Follow the steps below to print odd- and even-numbered pages onto opposite sides of the
sheet using the duplex unit.
Note:
❏ Automatic double-sided printing supports plain paper only.
❏ Thick plain paper is not supported for automatic double-sided printing.
1. Access the EPSON Printer Utility3 dialog.
& See “Accessing the Printer Driver for Mac OS X” on page 15.
2. Click the Printer and Option Information button.
3. Make sure that Duplexer Installed is displayed in the Auto Duplex Printing Information
section, and then click OK.
4. Close the EPSON Printer Utility3 dialog.
5. Access the Page Setup dialog.
& See “Accessing the Printer Driver for Mac OS X” on page 15.
6. Select the printer you are using as the Format for setting.
7. Select A4, Letter, or B5 as the Paper Size setting.
8. Select the appropriate Orientation setting, and click OK to close the Page Setup dialog.
Printing with Special Layout Options 70
Page 71

9. Access the Print dialog.
& See “Accessing the Printer Driver for Mac OS X” on page 15.
10.Select Print Settings from the pop-up menu.
11.Select plain papers as the Media Type setting.
12.Make the settings that you want to use to print. See online help for details of Print
Settings.
Printing with Special Layout Options 71
Page 72

13.Select Auto Duplex Printing Settings from the pop-up menu.
14.Select the Auto Duplex Printing check box.
15.Select the Binding edge setting.
16.Select one of the Document Type settings. This automatically adjusts Print Density and
Ink Drying Time.
Note:
If you are printing high-density data, such as photos or graphs, we recommend adjusting the
Print Density.
17.Load paper into the printer, and click Print.
& See “Loading Paper” on page 22.
Folded Booklet Double-sided Printing (for Windows only)
Manual double-sided printing
Use the following steps to create a folded booklet.
Note:
Folded booklet double-sided printing function is available only when manual double-sided printing
is set.
Printing with Special Layout Options 72
Page 73

1. Access the printer settings.
& See “Accessing the Printer Driver for Windows” on page 14.
2. Click the Main tab, then select one of the following Quality Option settings:
❏ Draft for rough drafts with reduced print quality
❏ Text for text-only pages
❏ Text & Image for higher quality pages with text and images
❏ Web for web pages
❏ Photo for good quality and speed
3. Select Rear Tray as the Source setting.
4. Select the appropriate Type setting.
& See “Selecting the Correct Paper Type or Media Type” on page 29.
Printing with Special Layout Options 73
Page 74

5. Select the appropriate Size setting.
6. Select Portrait (tall) or Landscape (wide) to change the orientation of your printout.
7. Click the Page Layout tab and select the Duplex Printing check box. Then select
Manual and select the Folded Booklet check box.
8. Click Margins to open the Margins window.
Printing with Special Layout Options 74
Page 75

9. Specify the edge of the paper where the binding will be placed. You can choose Left,
Top, or Right.
Note:
When you select Portrait as the Orientation setting, the Left or Right binding positions are
available. The Top binding position is available when you select Landscape as the Orientation
setting.
10.Choose cm or inch as the Unit setting. Specify the width of the binding margin.
Portrait Landscape
* : Folding edge
** : Margin
You can enter any width from 0.12 to 1.18 inches, or from 0.3 to 3.0 cm. The specified
margin width will be used on both sides of the fold. For example, if you specify a 1 inch
margin, you will get a 2 inch margin (a margin of 1 inch will be placed on each side of
the fold).
11.Click OK to return to the Page Layout window. Then click OK to save your settings.
12.Load paper into the rear sheet feeder, then send the print job from your application.
Instructions for printing the inside pages will be displayed while the outside pages are
printed.
& See “Loading Paper” on page 22.
13.Follow the on-screen instructions to reload the paper.
Note:
❏ The paper may curl during printing due to the amount of ink used. Should this occur, slightly
curl the sheets in the opposite direction before reloading them.
❏ Align the sheet stack by tapping its edges against a hard, flat surface before reloading it in
the printer.
Printing with Special Layout Options 75
Page 76

❏ Follow the instructions provided when reloading the printouts. Otherwise, paper may jam or
the binding margins may be incorrect.
❏ If a paper jam occurs, refer to the following.
& See “The Paper Jams” on page 165.
14.Once the paper is reloaded, click Resume to print the inside pages.
15.Once printing is complete, fold the sheets and bind them together using a stapler or
other binding method.
Fit to Page Printing
You can use the Fit to Page printing function when you want to print, for example, a letter
size document on another size paper.
Fit to Page printing automatically resizes your page to the paper size you select. You can
also resize your page manually.
Printing with Special Layout Options 76
Page 77

Printer Settings for Windows
1. Access the printer settings.
& See “Accessing the Printer Driver for Windows” on page 14.
2. Click the Main tab, then select one of the following Quality Option settings:
❏ Draft for rough drafts with reduced print quality
❏ Text for text-only pages
❏ Text & Image for higher quality pages with text and images
❏ Web for web pages
❏ Photo for good quality and speed
3. Select the paper source as the Source setting.
4. Select the appropriate Type setting.
Printing with Special Layout Options 77
Page 78

& See “Selecting the Correct Paper Type or Media Type” on page 29.
5. Select the appropriate Size setting.
6. Select Portrait (tall) or Landscape (wide) to change the orientation of your printout.
7. Click the Page Layout tab, then select the Reduce/Enlarge Document check box.
8. Do one of the following:
❏ If you selected By Output Paper Size, select the size of the paper you are using
from the drop-down list.
❏ If you selected By Percentage, use the arrows to choose a percentage.
9. Click OK to close the printer settings window.
After completing the steps above, print one test copy and examine the results before
printing an entire job.
Printing with Special Layout Options 78
Page 79

Printer Settings for Mac OS X 10.5
1. Access the Print dialog.
& See “Accessing the Printer Driver for Mac OS X” on page 15.
2. Click the d button to extend this dialog.
3. Select the printer you are using as the Printer setting, and then make suitable settings.
Note:
Depending on your application, you may not be able to select some of the items in this dialog.
If so, click Page Setup on the File menu of your application, and then make suitable settings.
Printing with Special Layout Options 79
Page 80

4. Select Paper Handling from the pop-up menu.
5. Select the Scale to fit paper size.
6. Make sure that the appropriate size is displayed in Destination Paper Size.
Printing with Special Layout Options 80
Page 81

7. Select Print Settings from the pop-up menu.
8. Make the settings that you want to use to print. See online help for details of Print
Settings.
& See “Selecting the Correct Paper Type or Media Type” on page 29.
After completing the steps above, print one test copy and examine the results before
printing an entire job.
Printing with Special Layout Options 81
Page 82

Printer Settings for Mac OS X 10.4
1. Access the Page Setup dialog.
& See “Accessing the Printer Driver for Mac OS X” on page 15.
2. Select the printer you are using as the Format for setting and then make suitable
settings.
3. Click OK to close the Page Setup dialog.
4. Access the Print dialog.
& See “Accessing the Printer Driver for Mac OS X” on page 15.
5. Select the printer you are using as the Printer setting, then make the Copies & Pages
settings.
Printing with Special Layout Options 82
Page 83

6. Select Paper Handling from the pop-up menu.
7. Select Scale to fit paper size as the Destination Paper Size.
8. Select the appropriate paper size from the pop-up menu.
9. Select Print Settings from the pop-up menu.
10.Make the settings that you want to use to print. See online help for details of Print
Settings.
Printing with Special Layout Options 83
Page 84

& See “Selecting the Correct Paper Type or Media Type” on page 29.
After completing the steps above, print one test copy and examine the results before
printing an entire job.
Pages Per Sheet Printing
Pages Per Sheet printing allows you to print two or four pages on single sheets of paper.
Printer Settings for Windows
1. Access the printer settings.
Printing with Special Layout Options 84
Page 85

& See “Accessing the Printer Driver for Windows” on page 14.
2. Click the Main tab, then select one of the following Quality Option settings:
❏ Draft for rough drafts with reduced print quality
❏ Text for text-only pages
❏ Text & Image for higher quality pages with text and images
❏ Web for web pages
❏ Photo for good quality and speed
3. Select the paper source as the Source setting.
4. Select the appropriate Type setting.
& See “Selecting the Correct Paper Type or Media Type” on page 29.
5. Select the appropriate Size setting.
Printing with Special Layout Options 85
Page 86

6. Select Portrait (tall) or Landscape (wide) to change the orientation of your printout.
7. Click the Page Layout tab, select Multi-Page, then select Pages Per Sheet.
8. Select from the following settings for Pages Per Sheet printing:
2, 4 Prints two or four pages of your document on a single piece of
paper.
Print Page
Borders
Page Order Allows you to specify the order in which the pages will be printed on
Prints frames around the pages printed on each sheet.
the sheet of paper. Some settings may be unavailable, depending
on the Orientation setting on the Main window.
9. Click OK to close the printer settings window.
After completing the steps above, print one test copy and examine the results before
printing an entire job.
Printing with Special Layout Options 86
Page 87

Printer Settings for Mac OS X 10.5
1. Access the Print dialog.
& See “Accessing the Printer Driver for Mac OS X” on page 15.
2. Click the d button to extend this dialog.
3. Select the printer you are using as the Printer setting, and then make suitable settings.
Note:
Depending on your application, you may not be able to select some of the items in this dialog.
If so, click Page Setup on the File menu of your application, and then make suitable settings.
Printing with Special Layout Options 87
Page 88

4. Select Layout from the pop-up menu.
5. Select from the following settings:
Pages per
Sheet
Layout
Direction
Border Prints a border around the pages printed on each sheet. You can
Prints multiple pages of your document on a single piece of paper.
You can choose from 1, 2, 4, 6, 9, or 16.
Allows you to specify the order in which the pages will be printed on
the sheet of paper.
choose from None, Single Hairline, Single Thin Line, Double Hairline,
or Double Thin Line.
Printing with Special Layout Options 88
Page 89

6. Select Print Settings from the pop-up menu.
7. Make the settings that you want to use to print. See online help for details of Print
Settings.
& See “Selecting the Correct Paper Type or Media Type” on page 29.
After completing the steps above, print one test copy and examine the results before
printing an entire job.
Printer Settings for Mac OS X 10.3 or 10.4
1. Access the Page Setup dialog.
Printing with Special Layout Options 89
Page 90

& See “Accessing the Printer Driver for Mac OS X” on page 15.
2. Select the printer you are using as the Format for setting, and then make suitable
settings.
3. Click OK to close the Page Setup dialog.
4. Access the Print dialog.
& See “Accessing the Printer Driver for Mac OS X” on page 15.
5. Select the printer you are using as the Printer setting, then make the Copies & Pages
settings.
Printing with Special Layout Options 90
Page 91

6. Select Layout from the pop-up menu.
7. Select from the following settings:
Pages per
Sheet
Layout
Direction
Border Prints a border around the pages printed on each sheet. You can
Prints multiple pages of your document on a single piece of paper.
You can choose from 1, 2, 4, 6, 9, or 16.
Allows you to specify the order in which the pages will be printed on
the sheet of paper.
choose from None, Single Hairline, Single Thin Line, Double Hairline,
or Double Thin Line.
Printing with Special Layout Options 91
Page 92

8. Select Print Settings from the pop-up menu.
9. Make the settings that you want to use to print. See online help for details of Print
Settings.
& See “Selecting the Correct Paper Type or Media Type” on page 29.
After completing the steps above, print one test copy and examine the results before
printing an entire job.
Poster Printing (for Windows only)
Poster printing allows you to print poster-size images by enlarging one page to cover
several sheets of paper.
Printing with Special Layout Options 92
Page 93

Printer Settings
1. Access the printer settings.
& See “Accessing the Printer Driver for Windows” on page 14.
2. Click the Main tab, then select one of the following Quality Option settings:
❏ Draft for rough drafts with reduced print quality
❏ Text for text-only documents
❏ Text & Image for higher quality pages with text and images
❏ Web for web pages
❏ Photo for good quality and speed
3. Select the paper source as the Source setting.
4. Select the appropriate Type setting.
Printing with Special Layout Options 93
Page 94

& See “Selecting the Correct Paper Type or Media Type” on page 29.
5. Select the appropriate Size setting.
6. Select Portrait (tall) or Landscape (wide) to change the orientation of your printout.
7. Click the Page Layout tab and select Multi-Page, then select Poster Printing. Click
the up or down arrow to select 2x1, 2x2, 3x3, or 4x4.
Printing with Special Layout Options 94
Page 95

8. Click Settings to adjust the way your poster will be printed. The Poster Settings window
opens.
9. Make the following settings:
Print Cutting
Guides
Overlapping
Alignment
Marks
Trim Lines Prints border lines on the panels to guide you when trimming the
Note:
If you want to print only a few of the panels without printing the entire poster, click the panels
that you do not want to print.
Prints guide lines for cutting.
Slightly overlaps the panels and prints alignment markers so that the
panels can be aligned more precisely.
pages.
10.Click OK to close the Poster Settings window.
After completing the steps above, print one test copy and examine the results before
printing an entire job. Then follow the instructions.
& See “How to Make a Poster from Your Printouts” on page 96.
Printing with Special Layout Options 95
Page 96

How to Make a Poster from Your Printouts
Here is an example of how to make a poster with 2x2 selected under Poster Printing and
Overlapping Alignment Marks selected as the Print Cutting Guides.
1. Cut off the margin of Sheet 1 along a vertical line through the center of the top and
bottom cross marks:
2. Place the edge of Sheet 1 on top of Sheet 2 and align the cross marks, then temporarily
tape the two sheets together from the back:
3. Cut the taped sheets in two along a vertical line through the alignment markers (this
time, a line to the left of the cross marks):
Printing with Special Layout Options 96
Page 97

4. Align the edges of the paper using the alignment markers and tape them together from
the back:
5. Repeat the instructions from step 1 to step 4 to tape Sheets 3 and 4 together.
6. Repeat the instructions from step 1 to step 4 to tape the top and bottom edges of the
paper:
7. Cut off the remaining margins.
Watermark Printing (for Windows only)
Watermark printing allows you to print a text-based or image-based watermark on your
document.
Printing with Special Layout Options 97
Page 98

Printing the Watermark
1. Access the printer settings.
& See “Accessing the Printer Driver for Windows” on page 14.
2. Click the Main tab, then select one of the following Quality Option settings:
❏ Draft for rough drafts with reduced print quality
❏ Text for text-only documents with higher text quality
❏ Text & Image for higher quality documents with text and images
3. Select the paper source as the Source setting.
4. Select the appropriate Type setting.
& See “Selecting the Correct Paper Type or Media Type” on page 29.
5. Select the appropriate Size setting.
Printing with Special Layout Options 98
Page 99

6. Select Portrait (tall) or Landscape (wide) to change the orientation of your printout.
7. Click the Page Layout tab, choose the desired watermark from the Watermark list, then
click Settings.
If you want to create your own watermark, see the following instructions.
& See “Creating Your Own Watermark” on page 100.
Printing with Special Layout Options 99
Page 100

8. Specify the settings you want for the watermark. You can change the position and size
of the watermark by dragging the image within the preview window.
9. Click OK to return to the Page Layout window.
10.Click OK to close the printer settings window.
After completing the steps above, print one test copy and examine the results before
printing an entire job.
Creating Your Own Watermark
You can add your own text-based or image-based watermarks to the Watermark list.
Printing with Special Layout Options 100
 Loading...