

Falcon 26-Key, Falcon 4420 48-Key, 52-Key NU, 4400 26-Key, 4420 48-Key Quick Reference Manual
...
Quick Reference Guide
Falcon® 4400 Series
with Windows Mobile
®
26-Key model
Falcon 4420
48-Key model
52-Key NU model

PSC Inc
959 Terry Street
Eugene, Oregon 97402
Telephone: (541) 683-5700
Fax: (541) 345-7140
An Unpublished Work - All rights reserved. No part of the contents of this documentation or the procedures
described therein may be reproduced or transmitted in any form or by any means without prior written permission of
PSC Inc. or its wholly owned subsidiaries ("PSC"). Owners of PSC products are hereby granted a non-exclusive,
revocable license to reproduce and transmit this documentation for the purchaser's own internal business purposes. Purchaser shall not remove or alter any proprietary notices, including copyright notices, contained in this
documentation and shall ensure that all notices appear on any reproductions of the documentation.
Should future revisions of this manual be published, you can acquire printed versions by contacting your PSC representative. Electronic versions may either be downloadable from the PSC website (www.psc.com) or provided on
appropriate media. If you visit our website and would like to make comments or suggestions about this or other
PSC publications, please let us know via the “Contact PSC” page.
Disclaimer
PSC has taken reasonable measures to provide information in this manual that is complete and accurate, however,
PSC reserves the right to change any specification at any time without prior notice.
PSC is a registered trademark of PSC Inc. The PSC logo is a trademark of PSC. All other trademarks and trade
names referred to herein are property of their respective owners.
Falcon
®
is a registered trademark of PSC Inc. and of its wholly owned subsidiaries.
Microsoft Windows®, Windows® 2000, Windows®CE, Windows Mobile®, Windows® NT, Windows® XP and the Windows
logo are registered trademarks of Microsoft Corporation.
Patents
This product may be covered by one or more of the following patents: 4603262 • 4639606 • 4652750 • 4672215 • 4699447 • 4709369 •
4749879 4786798 • 4792666 • 4794240 • 4798943 • 4799164 • 4820911 • 4845349 • 4861972 • 4861973 • 4866257 • 4868836 •
4879456 • 4939355 • 4939356 • 4943127 • 4963719 • 4971176 • 4971177 • 4991692 • 5001406 • 5015831 • 5019697 • 5019698 •
5086879 • 5115120 • 5144118 • 5146463 • 5179270 • 5198649 • 5200597 • 5202784 • 5208449 • 5210397 • 5212371 • 5212372 •
5214270 • 5229590 • 5231293 • 5232185 • 5233169 • 5235168 • 5237161 • 5237162 • 5239165 • 5247161 • 5256864 • 5258604 •
5258699 • 5260554 • 5274219 • 5296689 • 5298728 • 5311000 • 5327451 • 5329103 • 5330370 • 5347113 • 5347121 • 5371361 •
5382783 • 5386105 • 5389917 • 5410108 • 5420410 • 5422472 • 5426507 • 5438187 • 5440110 • 5440111 • 5446271 • 5446749 •
5448050 • 5463211 • 5475206 • 5475207 • 5479011 • 5481098 • 5491328 • 5493108 • 5504350 • 5508505 • 5512740 • 5541397 •
5552593 • 5557095 • 5563402 • 5565668 • 5576531 • 5581707 • 5594231 • 5594441 • 5598070 • 5602376 • 5608201 • 5608399 •
5612529 • 5629510 • 5635699 • 5641958 • 5646391 • 5661435 • 5664231 • 5666045 • 5671374 • 5675138 • 5682028 • 5686716 •
5696370 • 5703347 • 5705802 • 5714750 • 5717194 • 5723852 • 5750976 • 5767502 • 5770847 • 5786581 • 5786585 • 5787103 •
5789732 • 5796222 • 5804809 • 5814803 • 5814804 • 5821721 • 5822343 • 5825009 • 5834708 • 5834750 • 5837983 • 5837988 •
5852286 • 5864129 • 5869827 • 5874722 • 5883370 • 5905249 • 5907147 • 5923023 • 5925868 • 5929421 • 5945670 • 5959284 •
5962838 • 5979769 • 6000619 • 6006991 • 6012639 • 6016135 • 6024284 • 6041374 • 6042012 • 6045044 • 6047889 • 6047894 •
6056198 • 6065676 • 6069696 • 6073849 • 6073851 • 6094288 • 6112993 • 6129279 • 6129282 • 6134039 • 6142376 • 6152368 •
6152372 • 6155488 • 6166375 • 6169614 • 6173894 • 6176429 • 6188500 • 6189784 • 6213397 • 6223986 • 6230975 • 6230976 •
6237852 • 6244510 • 6259545 • 6260763 • 6266175 • 6273336 • 6276605 • 6279829 • 6290134 • 6290135 • 6293467 • 6303927 •
6311895 • 6318634 • 6328216 • 6332576 • 6332577 • 6343741 • 6454168 • 6478224 • 6568598 • 6578765 • 6705527 • 6974084 •
6991169 •7051940 • AU703547 • D312631 • D313590 • D320011 • D320012 • D323492 • D330707 • D330708 • D349109 • D350127 •
D350735 • D351149 • D351150 • D352936 • D352937 • D352938 • D352939 • D358588 • D361565 • D372234 • D374630 • D374869 •
D375493 • D376357 • D377345 • D377346 • D377347 • D377348 • D388075 • D446524 • EP0256296 • EP0260155 • EP0260156 •
EP0295936 • EP0325469 • EP0349770 • EP0368254 • EP0442215 • EP0498366 • EP0531645 • EP0663643 • EP0698251 •
GB2252333 • GB2284086 • GB2301691 • GB2304954 • GB2307093 • GB2308267 • GB2308678 • GB2319103 • GB2333163 •
GB2343079 • GB2344486 • GB2345568 • GB2354340 • ISR107546 • ISR118507 • ISR118508 • JP1962823 • JP1971216 • JP2513442
• JP2732459 • JP2829331 • JP2953593 • JP2964278 • MEX185552 • MEX187245 • RE37166 • Other Patents Pending

Quick Reference Guide
1
Table of Contents
Falcon® 4400 Series with Windows Mobile®....................................................... 3
Overview ......................................................................................................................3
Getting Started ..............................................................................................................4
System Requirements ...............................................................................................4
Connecting to a PC ...................................................................................................5
Features of the Falcon .............................................................................................6
Powering the Falcon .......................................................................................................9
Battery Pack ...........................................................................................................9
Installing the Battery Pack ..................................................................................... 10
Checking Battery Power .......................................................................................... 12
Battery Status Indicators ........................................................................................ 12
Charging the Batteries .................................................................................................. 13
Charging with the Dock ........................................................................................... 15
Backup Battery ...................................................................................................... 16
Charging with a Battery Charger .............................................................................. 16
Battery Discharge Characteristics ............................................................................ 16
Setting Up the Mobile Computer ..................................................................................... 16
Touchscreen Calibration .......................................................................................... 17
Entering a Password ............................................................................................... 17
Radio Card Setup ................................................................................................... 18
Entering Data .............................................................................................................. 18
Using the Stylus .................................................................................................... 19
Navigating the Display ............................................................................................ 20
Keypads ............................................................................................................... 25
Scanning Bar Codes ..................................................................................................... 33
Laser Scanning ...................................................................................................... 33
Bar Code Scanning with 2D Imager .......................................................................... 36
Image Capture ............................................................................................................ 38
Accessing Help ............................................................................................................ 38
Resetting the Falcon ..................................................................................................... 38
Warm Reset .......................................................................................................... 39

Table of Contents
2
Falcon® 4400 Series with Windows Mobile
®
Hard Reset ............................................................................................................ 40
Maintaining the Falcon .................................................................................................. 42
Troubleshooting ........................................................................................................... 42
RF Connectivity Troubleshooting .............................................................................. 46
Technical Support ........................................................................................................ 47
PSC Website Support .............................................................................................. 47
PSC Website TekForum ........................................................................................... 47
Reseller Technical Support ......................................................................................47
Telephone Technical Support ...................................................................................47
Appendix A. PSC Falcon® Windows Mobile End User License Agreement .......... 49
Appendix B. Microsoft® Windows Mobile Addendum to EULA ............................ 52
Appendix C: PSC Falcon
®
Windows Mobile® Product Series Warranty ............... 55
Appendix D: Safety Information ........................................................................ 56
Laser Safety Label ........................................................................................................ 56
Advisory Statement ................................................................................................56
Regulatory Statements .................................................................................................56
Radio Frequency Interference ..................................................................................56
Canadian Compliance Statement .............................................................................. 56
Appendix E: Laser Safety ................................................................................... 57
International Caution Statements for CLASS 1, 2, 3R, II, and IIA Laser Devices ....................57
English ................................................................................................................. 57
French .................................................................................................................. 57
German ................................................................................................................ 58
Italian .................................................................................................................. 58
Danish .................................................................................................................. 59
Dutch ................................................................................................................... 59
Swedish ................................................................................................................ 59
Finnish ................................................................................................................. 60
Norwegian ............................................................................................................ 60
Portuguese ............................................................................................................ 61
Spanish ................................................................................................................ 61
Chinese ................................................................................................................ 62
Japanese .............................................................................................................. 62

Quick Reference Guide 3
Falcon® 4400 Series
with Windows Mobile
®
Overview
The Falcon® 4400 combines the flexibility of Windows Mobile® with the
power of the Intel XScale processor, WiFi wireless technology, a large color display, laser (1D) and imaging (1D and 2D) scanning in an ergonomic PDT.
The Falcon
®
4400 Series is designed for warehouses, distribution centers,
retail in-store environments, and other inventory management applications
requiring maximum performance and durability.
New options available for the Falcon 4400 include Bluetooth
®
, 128/128
memory, a full alphanumeric Numbers Up Keypad, and a high-density 2D
scan engine. Overmolded models will handle 5’ / 1.5M drops to concrete, and
have an IP54 environmental rating; and an 86dBA (at 24") / 100dBA (at 10
cm) beeper. The Falcon
®
4400 will handle demanding data collection tasks in
industrial environments.
The Falcon Management Utility (FMU) and Falcon Desktop Utility (FDU)
are included on the CD that comes with every unit, providing remote management and configurability.
This Quick Reference Guide contains the following sections:
• Getting Started on page 4 — getting your Falcon up and running.
• Features of the Falcon on page 6 — describes the functions and keys of
the Falcon.
• Powering the Falcon on page 9 — gives information about the batteries,
shows how to install the battery pack, and provides options for charging.
• Setting Up the Mobile Computer on page 16 — tells how to calibrate
the Touchscreen and set up a Password.
• Entering Data on page 18 — using the stylus, navigating the display,
about keypads, and bar code scanning.
• Accessing Help on page 38 — accessing Help from the Falcon.

Getting Started
4 Falcon
®
4400 Series with Windows Mobile
®
• Resetting the Falcon on page 38 — describes Warm Reset and Hard
Reset.
• Troubleshooting and Technical Support on page 47.
Getting Started
Before using the Falcon for the first time, you must install the battery pack
into the Falcon, then charge both the battery pack and the backup battery. See
Installing the Battery Pack on page 10 for instructions
.
System Requirements
Minimum Desktop Computer Requirements
• Microsoft Windows XP, Windows 2000, or Server 2003 with the most
current Service Pack installed.
• Microsoft Outlook 98 or later required for synchronization to the desktop or portable computer of e-mail, calendar, contacts, tasks, and notes.
(Outlook 2003 is recommended).
• Microsoft Internet Explorer 4.01 SP1 or later.
• Hard disk drive with 12 to 65 MB of available hard disk space (actual
requirements will vary based on selection of features and user's current
system configuration).
• Available 9- or 25-pin communications port (adaptor required for 25pin communications port), or USB port.
• VGA graphics card or compatible video graphics adapter at 256 color or
better.
•Keyboard.
• Microsoft Mouse or compatible input device.
CAUTION
You must charge the battery pack and backup battery in a dock or with a power
cable prior to your first use of the Falcon. The initial charge time is approximately
24 hours. See Charging the Batteries on page
13 for more information.

Getting Started
Quick Reference Guide 5
Connecting to a PC
Falcons communicate with the host PC using Microsoft ActiveSync protocol
via either a USB port or a serial port. Connect the Falcon to your PC as
shown:
1. Connect the appropriate interface cable to the Falcon Dock and the
computer.
2. Plug the power adapter into a power source, then plug the Power Cord
into the Dock.
3. Seat the Falcon securely into the Dock.
Figure 1. Connecting your Falcon to a PC
Installing ActiveSync
If you don’t already have ActiveSync (v4.0 or above) on your computer, you
can install it from the Getting Started CD included with your device, or
download it from the Microsoft website (www.microsoft.com).
USB Cable
AC Adapter
Power Cord
When the device is connected to the PC using ActiveSync, a Desktop Pass-Through
(DTPT) connection is established, causing any WiFi connections to be disconnected.
To continue to use a WiFi connection while the device is in a cradle that is connected
to a PC, disable the “Synchronization” option in Activesync on the Falcon.

Getting Started
6 Falcon
®
4400 Series with Windows Mobile
®
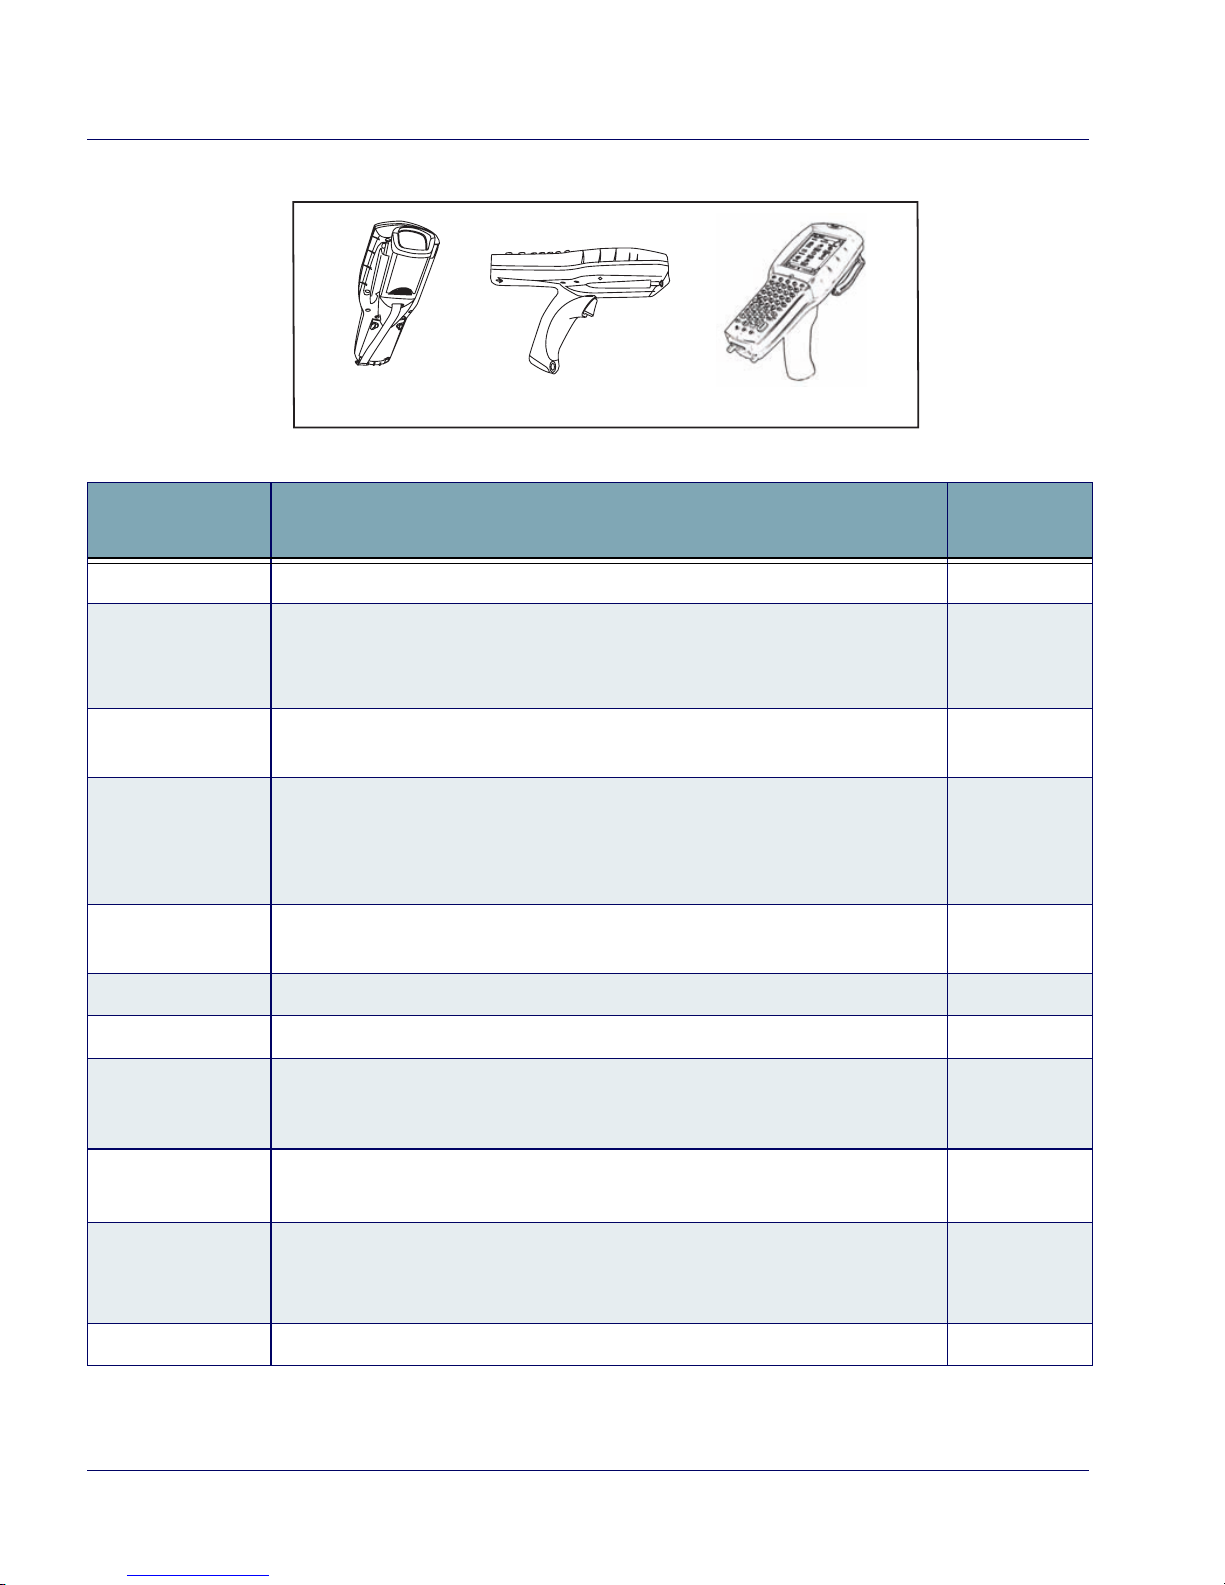
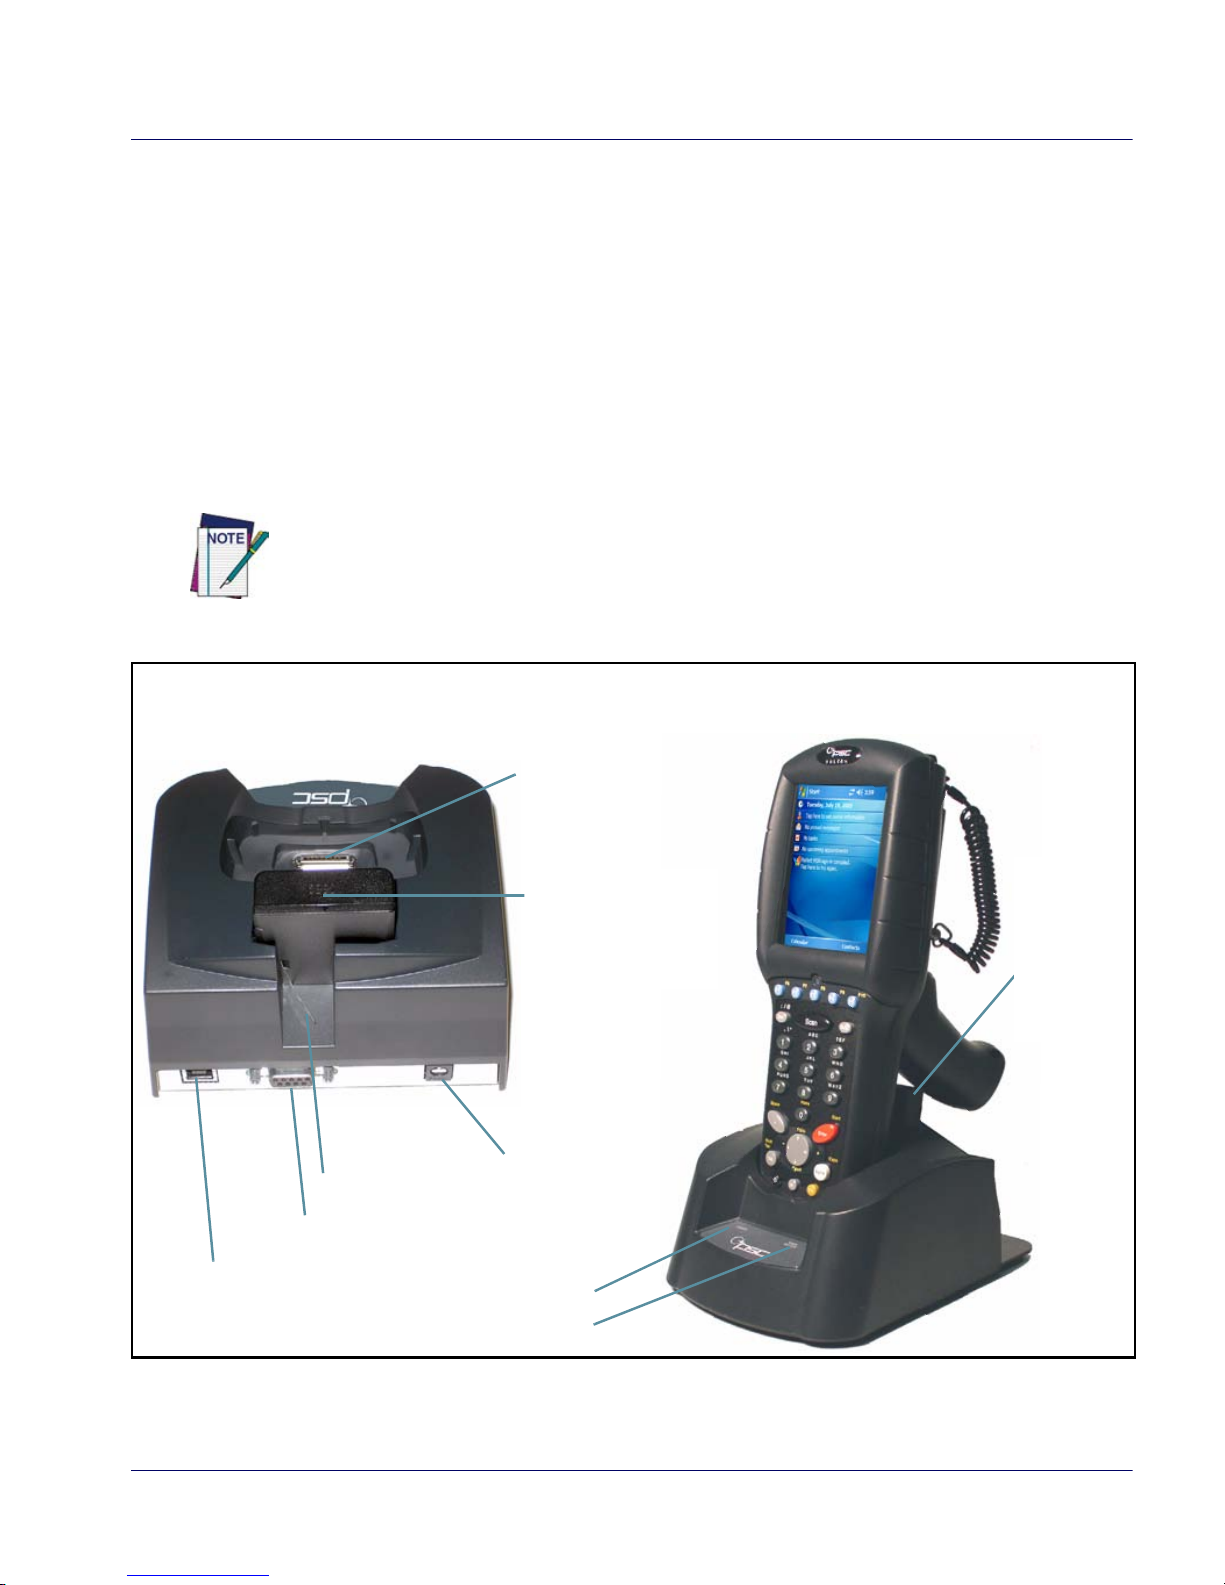
Features of the Falcon
Four perspectives of the Falcon® 4400 with Windows® Mobile are shown.
Refer to Table 1 on page 8 for a list of the illustrated parts with references to
more detailed information.
Figure 2. Falcon Keypad and Connector Views
For a complete description of each key on the Falcon, refer to page 25.
Touchscreen
Display
POWER
Reset (part of the key sequence for a Hard Reset)
Handle
USB/Serial Connector
Strap Studs
w/Rubber
Bumpers
Falcon 4420
Handled model
LED Scanning/
Charging Indicator
Falcon
26-Key Keypad

Getting Started
Quick Reference Guide 7
Figure 3. Falcon Scanner and Battery Door Views
For more information, please refer to the Falcon® 4400 Windows Mobile®
Product Reference Guide (PRG), located on the Falcon 4400 Product CD that
came with your device.
Strap Studs
Trigger
Handle
Stylus
Tether/Lanyard Port
Stylus Holder
Battery Door
Speaker
Battery
Door
Latch
(2 each)
Scanner Aperture
Getting Started
8 Falcon
®
4400 Series with Windows Mobile
®
Figure 4. Model comparison
Table 1. Features of the Falcon
Feature Function/Description
More
Information
Battery Door Rotate the latches to unlock the battery door to remove the battery pack.
Figure 5,
Display/Touch
Screen
The equivalent of a PC monitor for viewing and interacting with the current
application. This display is touch-sensitive; use it like you would a mouse on
a PC.
Figure 2,
page
17,
page
20
Handle
The Falcon 4420 comes with a handle that is ergonomically designed for
ease of use with a scanner trigger.
Figure 2
Reset
Insert an object, such as a paper clip, into this hole as part of the procedure
to perform a Hard Reset of the unit. Do not use a sharp object, or you could
disable the reset function, puncture the keypad’s industrial seal, and void
your warranty.
page 38
Keypad
Use the alpha-numeric, function, and navigation keys on the keypad t o enter
numbers, letters, symbols and navigate with the keypad.
page
25
Lanyard Port Insert a lanyard to secure a Falcon to a person or work station.
page 7
Scanner Aperture The laser or imaging scanning beam is emitted from this aperture.
page
33
LED
When scanning, a red LED indicates the laser is on and a green LED indicates a
good read. When the Falcon is charging in the dock, a red LED on the Falcon indicates charging and a green LED on the Falcon indicates fully charged.
Figure 2
POWER
Press POWER to turn the Falcon on and off, or to toggle the device between
suspend (sleep) mode and resume (on).
Figure 2,
page
25
Speaker
The speaker plays *.WAV and other media files, and emits beeps or tones
to indicate errors or good reads when scanning bar codes or entering data
using the keypad or stylus.
Figure 3
Strap Studs The Falcon 4410 comes with a handstrap that connects to the strap studs.
Figure 3
Model 4420
Model 4410
Model 4420 with Overmold
Powering the Falcon
Quick Reference Guide 9
Powering the Falcon
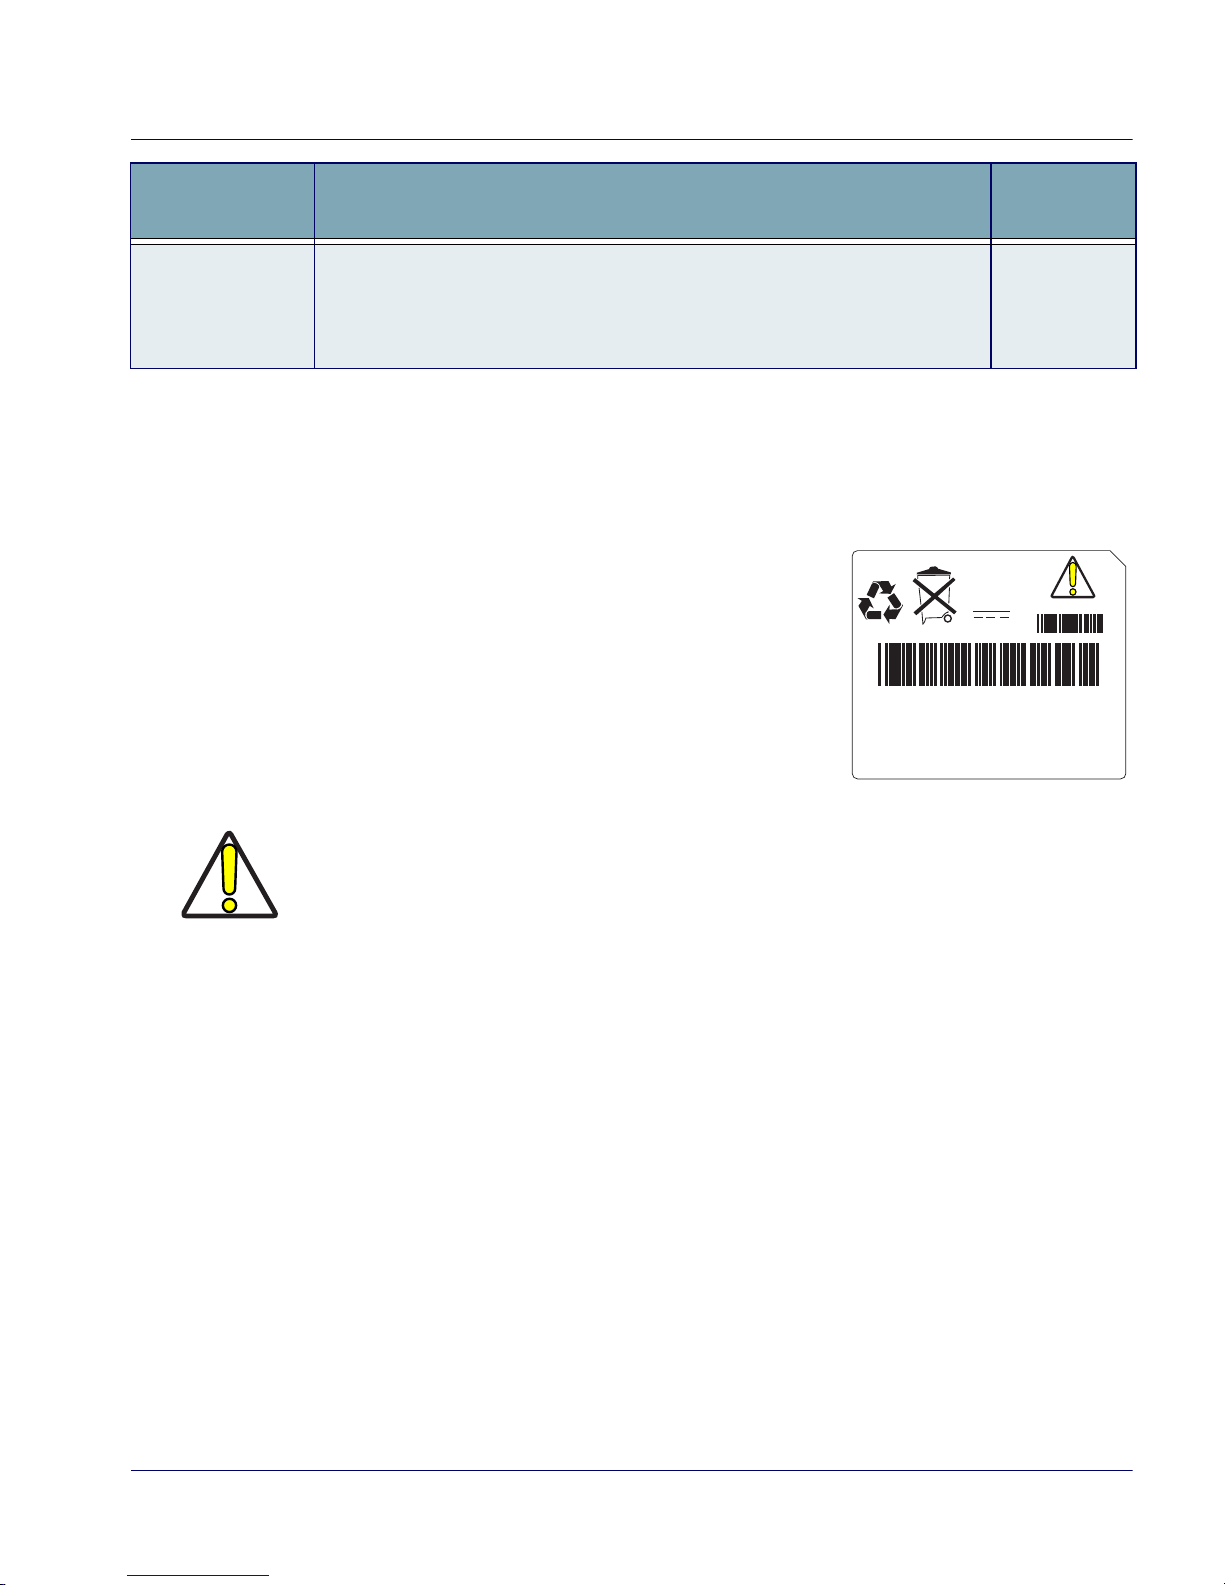
Battery Pack
The battery pack in the Falcon is a 3.7 V, Lithium Ion battery pack. You will be alerted with a
message dialog box when the battery pack
reaches a low state.
After charging the first time, a complete charge
takes about four (4) hours depending on the battery pack’s state and the recharging method. A
sample battery pack label is shown at the right.
Stylus
Use the stylus for navigation and to select items on the touch screen, and to
select characters on the on-screen keyboard. Place the stylus in the holder
after use so you don’t lose or misplace it. An optional Stylus Tether is available for all models.
Figure 13,
page
20
Feature Function/Description
More
Information
3.7V
Li-ion
CAUTION: Battery can explode, leak or catch
fire if exposed to high temperature, water or fire.
Do not short circuit, open or disassemble battery.
Recycle or dispose of properly.
2000mAh
5-1764
Product of USA
U S
CAUTION
You must charge the battery pack and backup battery in a dock or with a power
cable prior to your first use of the Falcon. The initial charge time is approximately
24 hours.
If you remove the battery pack or it fails, there is a 30 minute window in which to
insert a charged battery pack before the backup battery fails. If your backup battery fails, the contents of the RAM memory will be lost. If your backup battery is
less than fully charged, there is a proportionally smaller window of time available
to replace the main battery. Usage time will also be reduced.
Always charge the battery pack within the temperature range of 32°–113°F (0°–
45°C).
Use only the authorized power supplies, battery packs, chargers, and docks supplied by your PSC reseller. The use of any other power supplies can damage the
Falcon and void your warranty. Refer to the PRG for the correct power supplies
and Accessories.

Powering the Falcon
10 Falcon
®
4400 Series with Windows Mobile
®
Installing the Battery Pack
When you first remove the Falcon from the box, you must charge both the
battery pack and the backup battery for a minimum of 24 hours.
Complete the following instructions to install the battery pack:
1. On a 441X, detach the elastic handstrap by releasing its hook from
the strap studs at the base of the unit (refer to the PRG).
WARNING
Lithium-ion battery packs may get hot, explode, ignite, or/and cause serious injury if
exposed to abusive conditions.
• Do not place the battery in or near fire, direct sunlight, or other high temperature locations, or heat the battery.
• Do not connect the positive terminal and negative terminal of the battery to
each other with any metal object (such as wire or coin).
• Do not expose the battery to liquids, or allow the battery to get wet.
• Do not disassemble, modify, or pierce the battery. The battery contains safety
and protection devices, which, if damaged, may cause the battery to generate
heat, explode or ignite.
In the event the battery leaks and the fluid gets into your eye, do not rub the eye.
Rinse well with water and immediately seek medical care. If left untreated, the battery
fluid could cause damage to the eye.
PSC recommends annual replacement of rechargeable battery packs to ensure
maximum performance.
Powering the Falcon
Quick Reference Guide 11
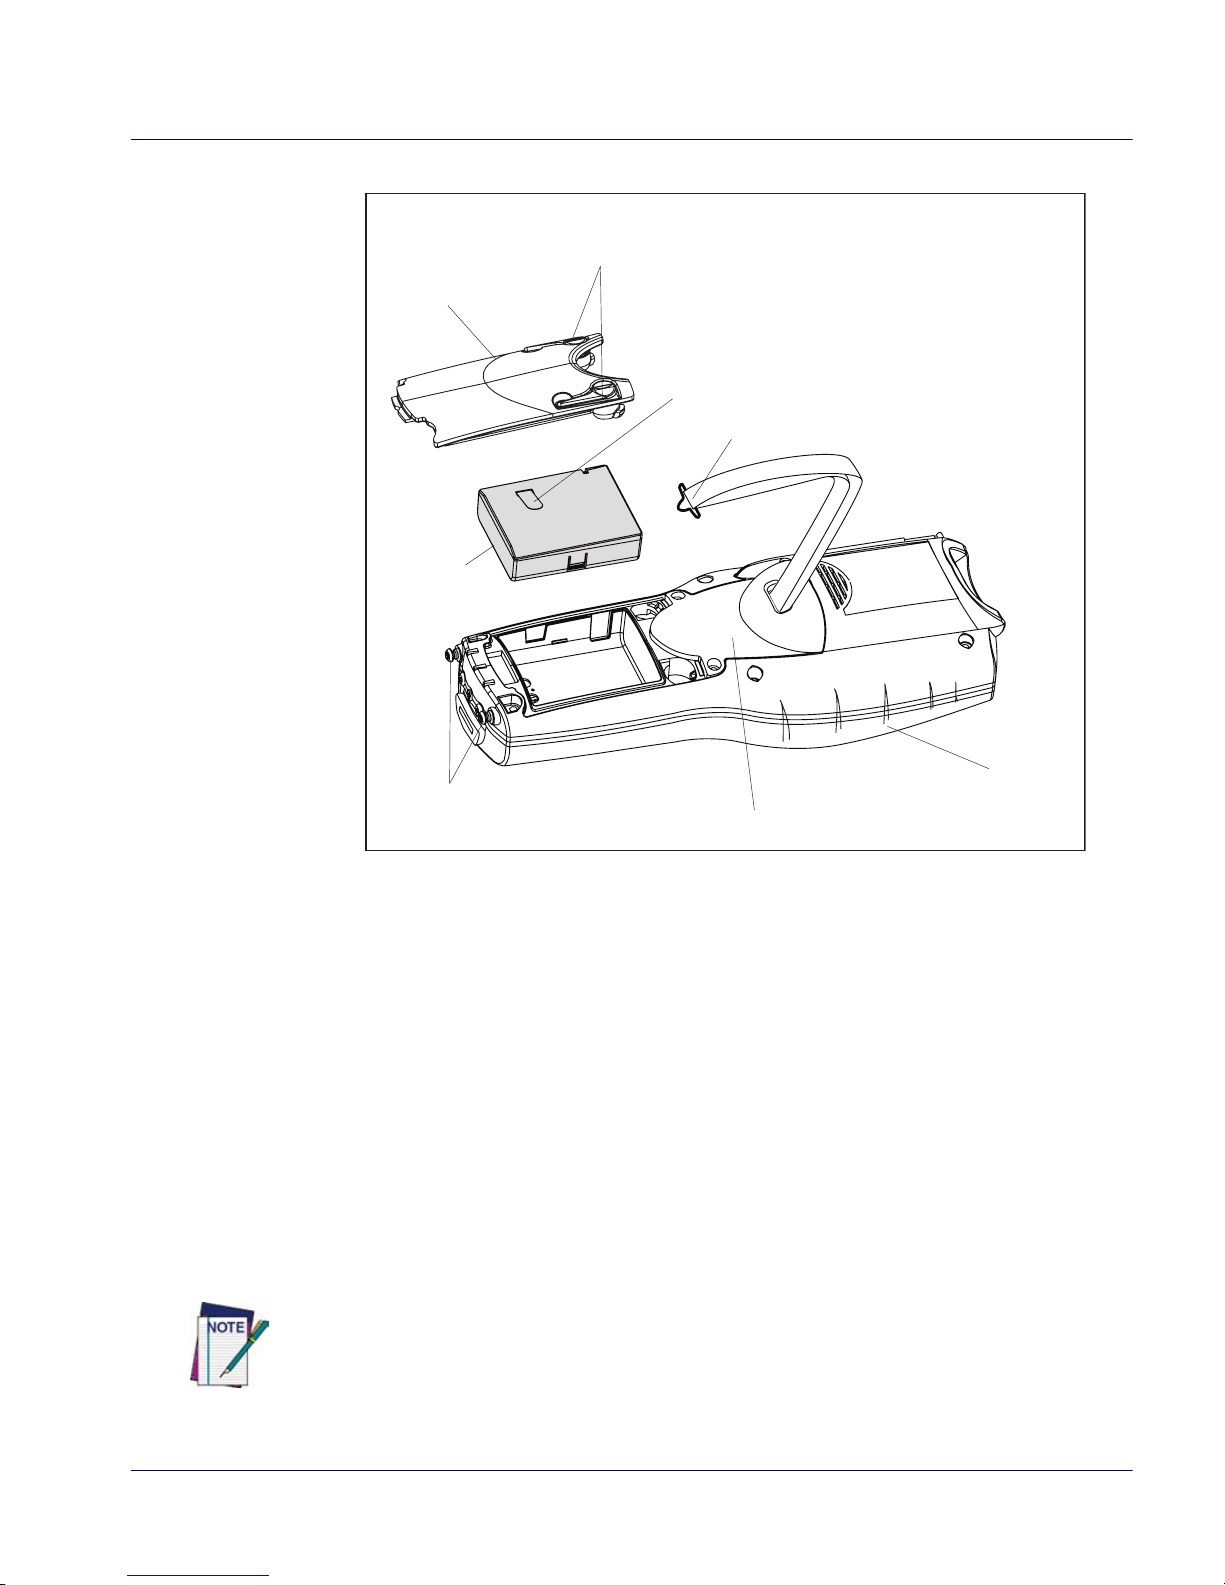
Figure 5. Installing the Battery Pack
2. Turn the battery door latches to unlock the battery door. Remove the
door.
3. Insert the battery pack with the pull tab on the outside and the battery contacts aligned with the matching contacts inside the battery
compartment. The battery pack has a keying feature on one side to
prevent incorrect installation (refer to Figure 5).
4. Replace the battery door by inserting the bottom tab into the slot. If
the battery pack is installed incorrectly, the door will not seat properly.
5. Rotate the battery door latches on the battery door towards the base
of the unit.
6. On the 441X, replace the handstrap hook on the strap stud at the base
of the unit.
Battery Door
Cover Plate (unit may have Handle here instead)
Falcon
Battery Door Latches
Unhook/hook Strap As Needed
Battery
Plastic Pull Tab
Strap Studs
If you remove the battery pack or the battery fails, you have about 30 minutes to swap
in a new battery pack or charge the battery pack before the backup battery fails (if the
backup battery has been fully charged).
Powering the Falcon
12 Falcon
®
4400 Series with Windows Mobile
®
Checking Battery Power
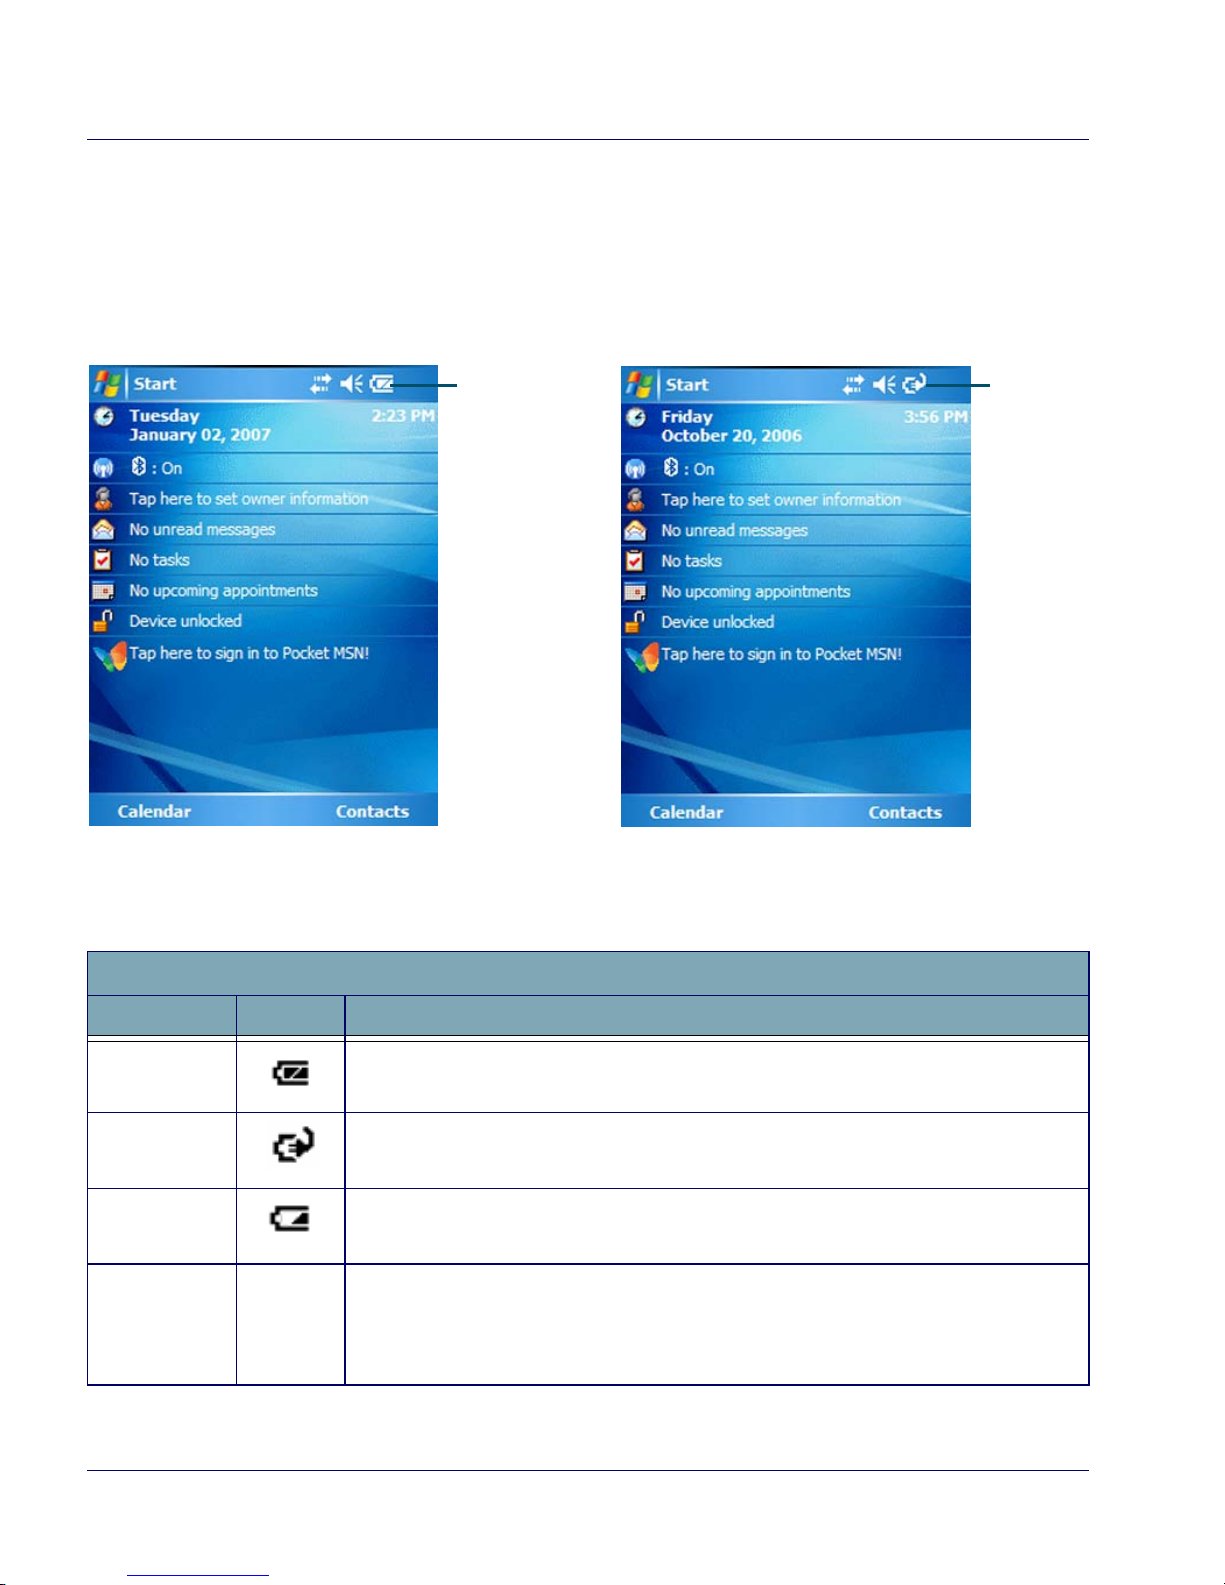
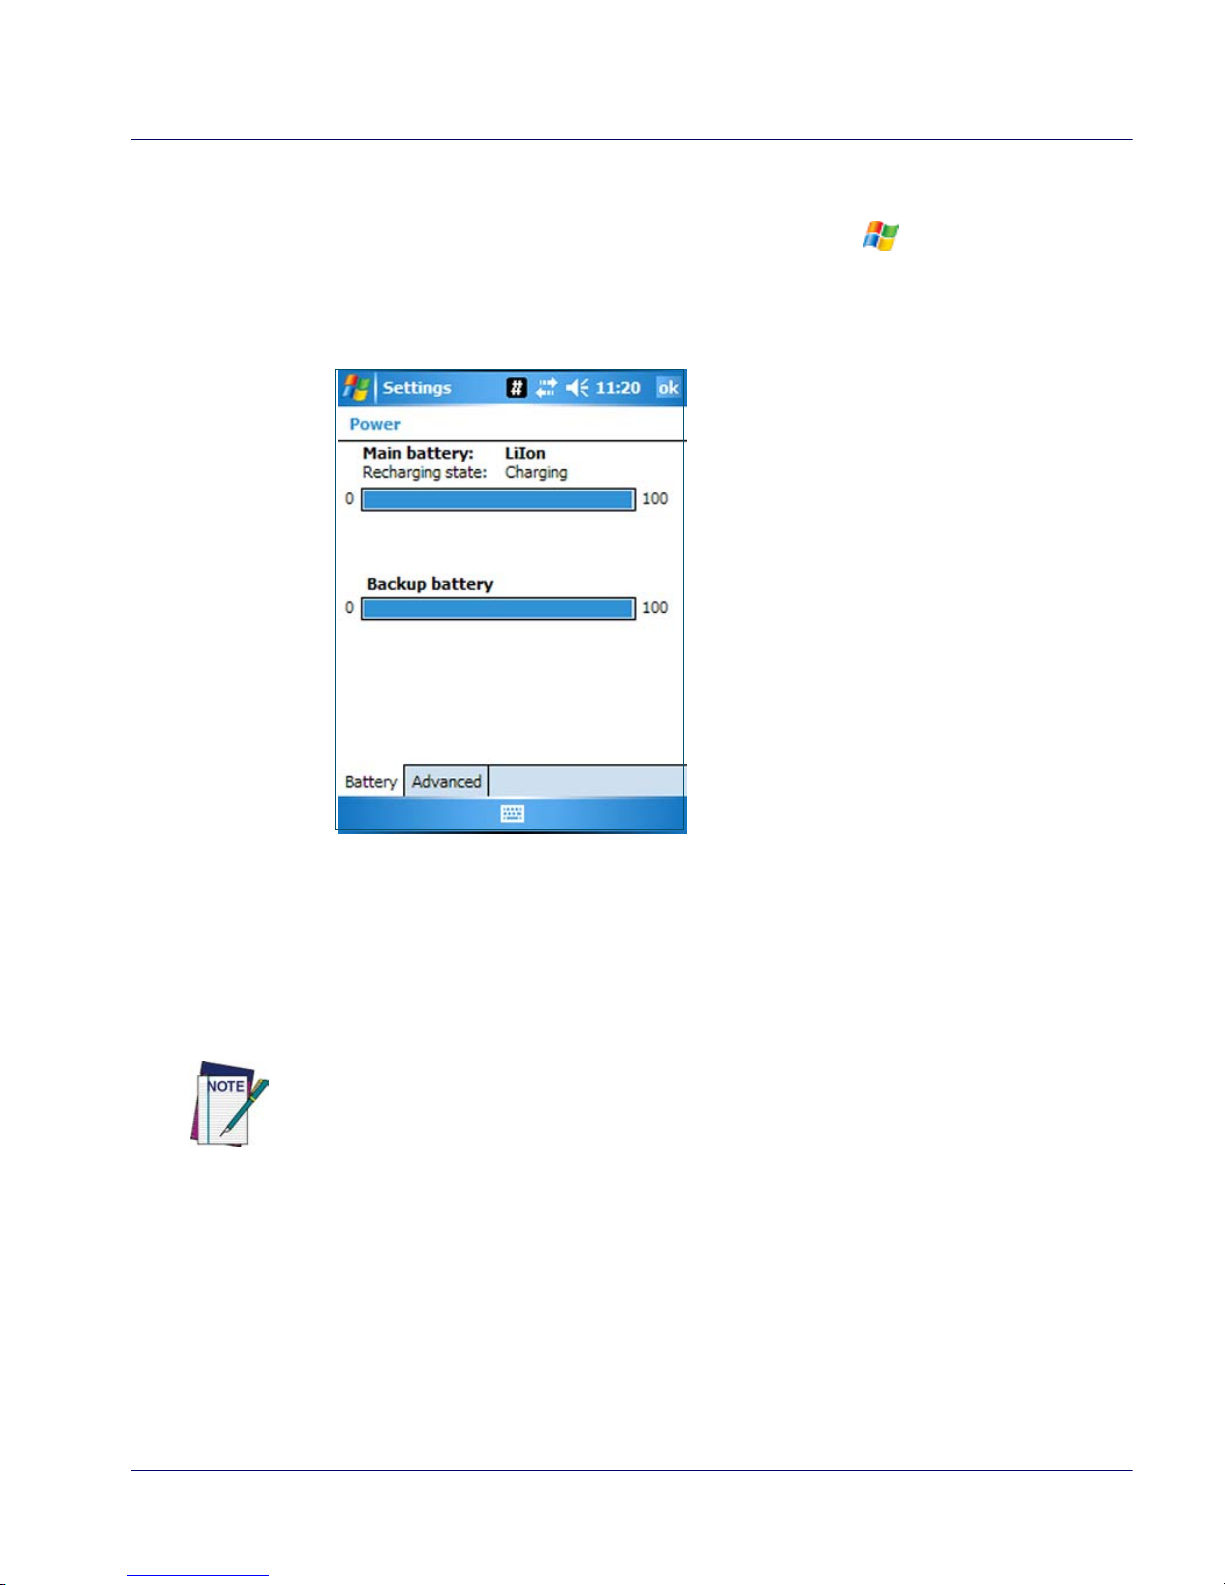
Battery Status Indicators
Tap the Battery icon at the top of the screen to view the Battery status.
Figure 6. Battery level
Table 2. Battery Status Indicators
Battery
Charging
Icon
Full
Battery
Icon
Battery Status Icons
Battery Status Icon Description
Battery Full
This icon indicates that the battery is fully charged.
Battery
Charging
This icon indicates that the battery pack is in the process of recharging.
Battery Low
This icon indicates that the battery pack is low.
Discharged
Battery
Condition
no icon
When the battery is totally discharged, the battery sensor initiates a shutdown of all
applications, and closes the RF Network connection. If the battery pack has completely discharged, when the battery pack is charged or replaced, the unit will
resume as before.
Charging the Batteries
Quick Reference Guide 13
Additionally, the Power control applet displays a battery power gauge. You can
check the status of both the Main Battery and the Backup battery. From the
Today screen you can tap the Battery icon, or go to
> Settings > System >
Power.
See the Falcon 4400 with Windows Mobile® Product Reference Guide
(PRG) for more information on configuration items.
Figure 7. Battery Power Gauge
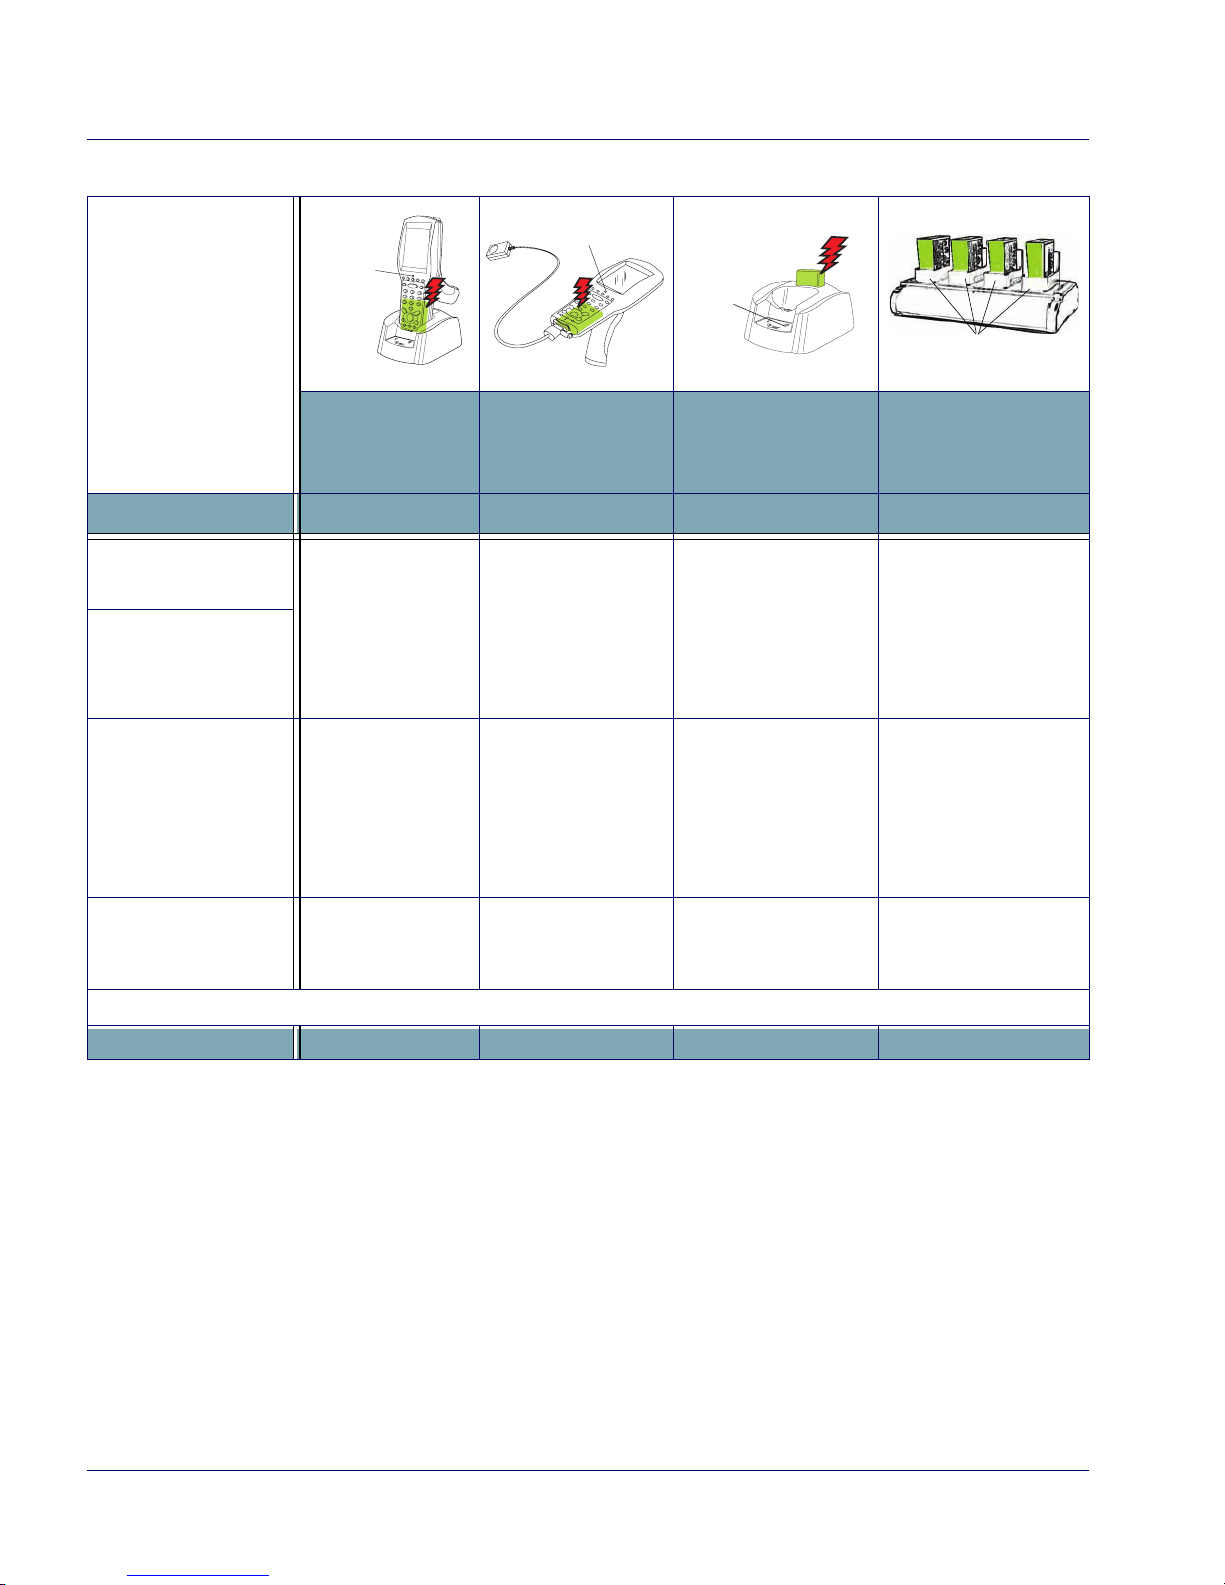
Charging the Batteries
There are several methods for charging the battery pack and backup battery.
LEDs on the Falcon, the Single-Slot Dock, Four-Slot Dock, and Four-Slot
Battery chargers give visual indication of the charge state.
Tab l e 3 o n page 14 gives an overview of all the LEDs and what they indicate.
The initial charge for a Falcon should be done in a Dock in order to charge the Backup
Battery.
Charging the Batteries
14 Falcon
®
4400 Series with Windows Mobile
®
Table 3. Battery Charging Methods and Indications
Charging Location:
Falcon seated in a
Dock (Single or
Four-Slot)
Falcon connected
to an external
power supply
Charging slot of
Dock (Single or
Four-Slot)
Four-Slot Battery
Charger
Charging Duration 4-6 hours 4-6 hours 3-5 hours > 3 hours
Battery Pack Charge
Indication:
Charging: RED
Fully Charged:
GREEN
Charging: RED
Fully Charged:
GREEN
N/A N/A
Falcon Charge LED
Dock or Charger
Battery Charge
LED(s)
No effect No effect
Charging:
Solid RED
Fully charged:
GREEN
*Fault:
Flashing RED
Charging: Charging
LEDs are AMBER
Fully charged: Ready
LEDs are GREEN
Simultaneously
Charges
Backup Battery?
YES YES NO NO
* Refer to page
46 for more information.
PDT
Charge
LED
PDT Charge LED
Spare
Battery
Charge
LED
Charge Indicator LEDs
Charging the Batteries
Quick Reference Guide 15
Charging with the Dock
There are two models of docks for the Falcon: a Single-Slot dock and a FourSlot dock. On both models, an external power supply (AC adaptor) provides
power to the dock.
There are two methods for charging a battery pack using a Single-Slot dock.
Refer to Table 3 on page 14 to view methods of battery pack charging using
the dock, charge duration, dock status indicators and their purpose. For more
information on the dock, refer to the dock Operating Instructions that come
with each dock.
Figure 8. Charging the Battery Pack in a Single-Slot Dock
Refer to Table 3 on page 14 for a list of LED indicators and their purpose.
Refer to the PRG for more information on storage and disposal of batteries.
Use only the correct battery charger and docks with this color Falcon. This technology used for these models is incompatible with other PSC Falcon chargers and
docks, including the Falcon 4410/4420 monochrome models.
Spare Battery LED
Power LED
Power Port
RS-232 Serial Port
USB Port
Battery Tab
USB/Serial
Connector
Top/Rear View of Single-Slot Dock
B
A
Battery Pack in
Spare Battery
Charging Slot
Battery
Pack in
Spare
Battery
Charging
Slot

Setting Up the Mobile Computer
16 Falcon
®
4400 Series with Windows Mobile
®
Backup Battery
The 3V Lithium Backup Battery receives its charge from the Battery Pack. To
retain date, time, data, and other settings for the Falcon, maintain at least a
minimal charge on the Battery Pack.
See Figure 7 on page 13 for information on viewing the Backup Battery status.
Charging with a Battery Charger
A LiIon Four-Slot Battery Charger is available to charge batteries independently from the Falcon. To use, align the battery contacts with those in the
Charger and insert them into the slots.
Figure 9. Four-Slot Battery Charger
Battery Discharge Characteristics
Battery discharge characteristics vary from eight to nine and a half (8-9.5)
hours, depending upon device usage, number of scans per minute, backlight
usage, and other factors that draw upon battery power.
Setting Up the Mobile Computer
At first use, the unit will go through a series of initial bootup sequences. See
Touchscreen Calibration on page 17, Entering a Password on page 17, and
Radio Card Setup on page 18.
Power Indicator LED
Setting Up the Mobile Computer
Quick Reference Guide 17
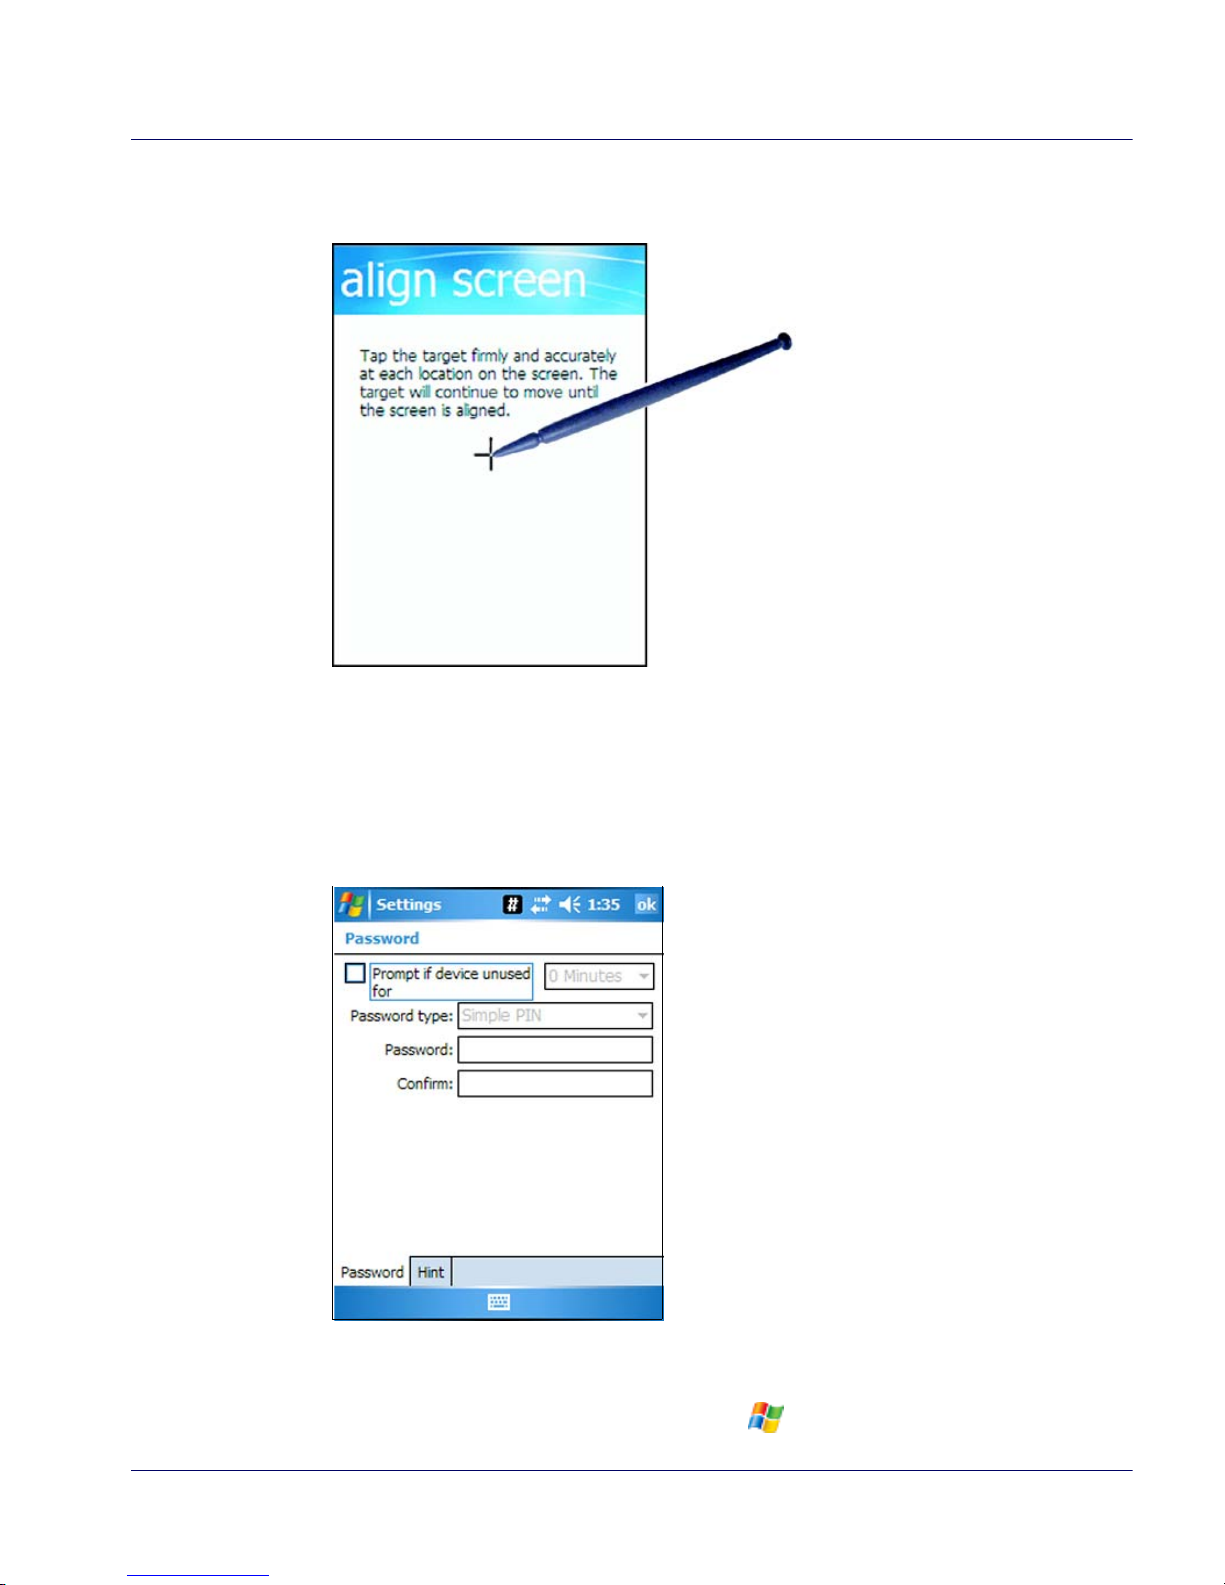
Touchscreen Calibration
Figure 10. Touchscreen Calibration
Entering a Password
The first time you use the Falcon you will be prompted to enter a password.
Ta p
Next to continue, or Skip if you do not want the device to be password-
protected.
Figure 11. Password setup
Follow the onscreen instructions to enter your password. Reference the
Microsoft help system on your device for more information. You can return to
the Password screen anytime by tapping
> Settings > Personal > Lock.
Follow the on-screen directions to calibrate the touchscreen.
For more information on touchscreen
calibration, refer to the PRG and the
Microsoft help on your device.

Entering Data
18 Falcon
®
4400 Series with Windows Mobile
®
Radio Card Setup
Windows Zero Config should be used to administer the radio setup. For assistance in configuring the radio card, reference the online help on your Falcon.
Go to
> Help for further information.
Entering Data
To open an application, tap a link on the Today page, or tap > Programs to
display a
list of available programs. Tap a program icon to open it.
There are several ways to enter data with the Falcon:
• Use the keypad. Refer to Keypads starting on page 25.
• Use the stylus on the touchscreen display. Refer to Using the Stylus on
page 19 for more information on using the stylus.
• Use the on-screen keyboard by tapping with the stylus. Refer to OnScreen Keyboard on page 23.
• Select text. Use the stylus to highlight the desired text by dragging the
stylus across the desired text, double-tapping to select one word, and
triple-tapping to select an entire paragraph.
• Use the bar code scanner or imager to enter data. Press the trigger or
scan button (26 or 52-key only) to initiate a scan. The scanned data
will be entered into the current application’s open file. Refer to Scanning Bar Codes starting on page 33 for more information on using
the scanner.
• If your Falcon has the 2D Imaging module installed, you can read and
decode traditional 1D linear bar codes, 2D and composite symbols,
and OCR fonts. You can also capture images such as signatures, labels,
and other items. See Bar Code Scanning with 2D Imager starting on
page 36 for further information.
Entering Data
Quick Reference Guide 19
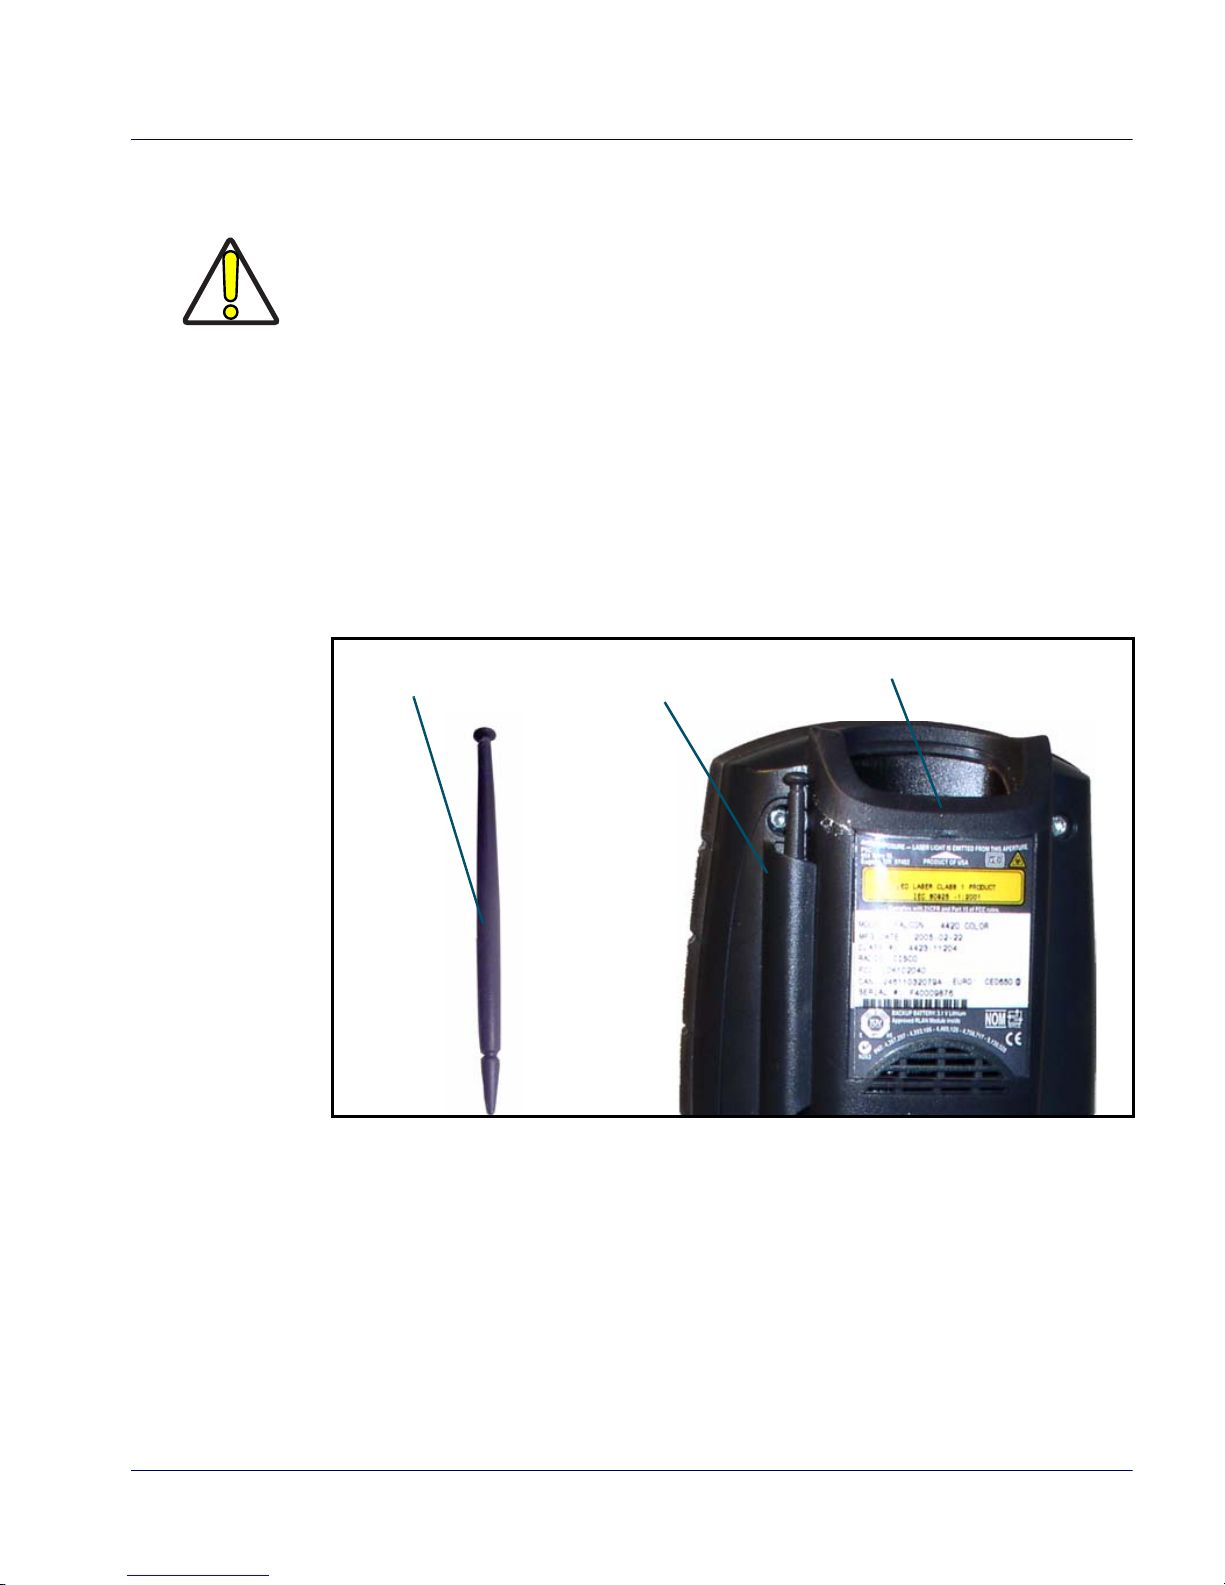
Using the Stylus
The stylus is located next to the scanning pod as illustrated in Figure 12. The
stylus on the Falcon is the equivalent of the mouse on a PC. Use the stylus to:
• Navigate the touchscreen display.
• Select characters in the on-screen keyboard.
• Start programs.
• Select tabs, fields and text within applications and dialog boxes.
Figure 12. Back View of a Falcon 4420 with a Stylus
It is good practice to replace the stylus in the holder after each use so you don’t
misplace it. An optional Tethered Stylus is also available, preventing accidental
loss of the stylus.
Never use a pen, pencil, or other sharp object on the Falcon’s touchscreen display. Use only the supplied stylus or plastic-tipped pens intended for use with a
touch-sensitive display. Contact your reseller to replace a missing stylus; refer to
the PSC price book at www.psc.com.
Stylus
Stylus Holder
Scanner Pod
 Loading...