

Page 1
1000 DF
1000 Dual Fuel User’s Manual & Installation and Servicing
Instructions
Guide de l’utilisateur et instructions d’installation et
d’entretien du modèle 1000 mixte
U106300 - 01
Page 2

2
Page 3
3
English 4
Français 30
FR
GB IE
Page 4

4
English
Be safe
Warning
Accessible parts will become hot in use. To avoid burns and scalds children
should be kept away.
You need clean fresh air - so does your cooker. Burner fl ames produce exhaust gases,
heat and moisture. Make sure that the kitchen is well ventilated: keep natural ventilation
holes open or install a powered cooker hood that vents outside. If you have several
burners on or use the cooker for a long time, open a window or turn on an extractor fan.
For more detail see the Installation Instructions.
We recommend you read the ‘General Safety Instructions’ section especially if you have
not used a gas cooker before. We describe some basic guidelines on how to use a gas
cooker safely.
Gas and Electricity on
Make sure that the gas supply is turned on and that the cooker is wired in and switched
on.
The cooker needs electricity.
Peculiar smells
When you fi rst use your cooker it may give off a slight odour. This should stop after a little
use.
Be safe Page 4
Hotplate Burners Page 5
Wok Centre Ring Page 6
The Slow Cooking Oven Page 7
The Grill (Top Right) Page 8
The Fan Ovens Page 9
Oven Cooking Guide Page 9
Cleaning your cooker Page 10
Troubleshooting Page 12
General Safety Instructions Page 13
Service and spares Page 14
Installation Page 15
Servicing Page 20
Conversion to LP Gas Page 24
Circuit Diagram Page 26
Technical Data Page 28
Page 5
5
English
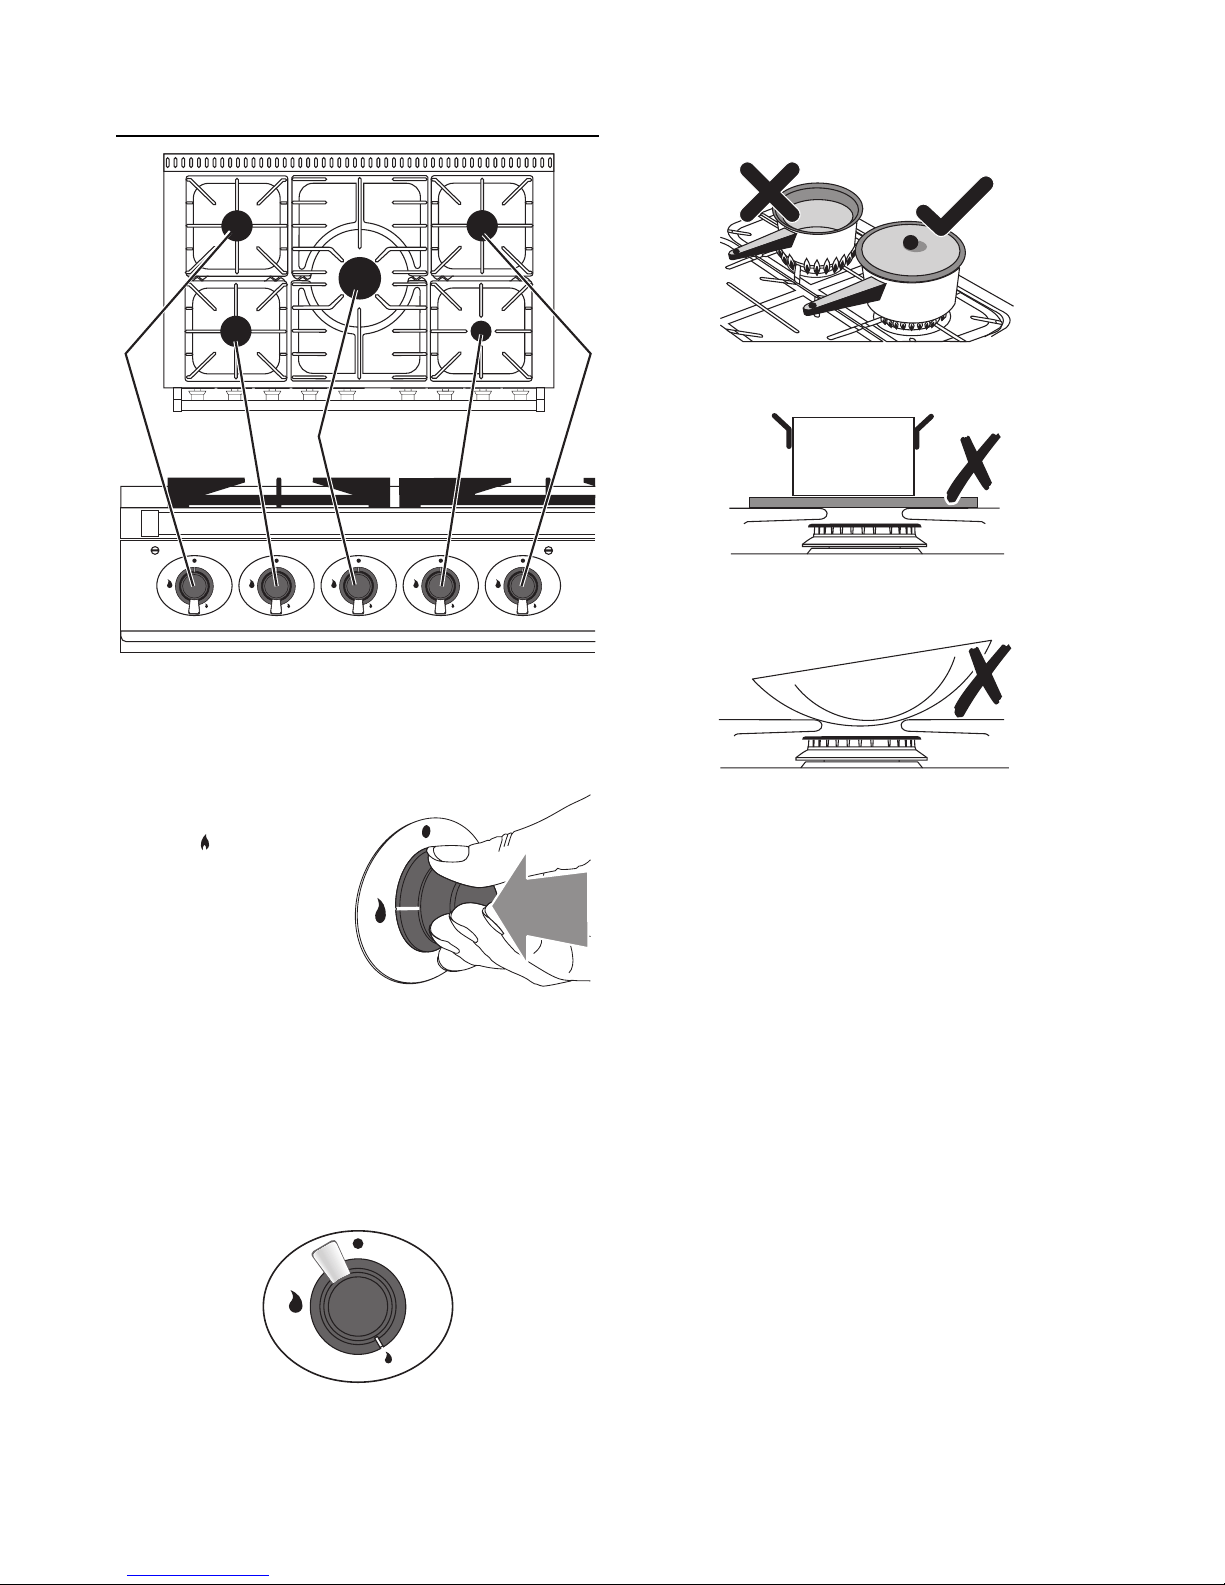
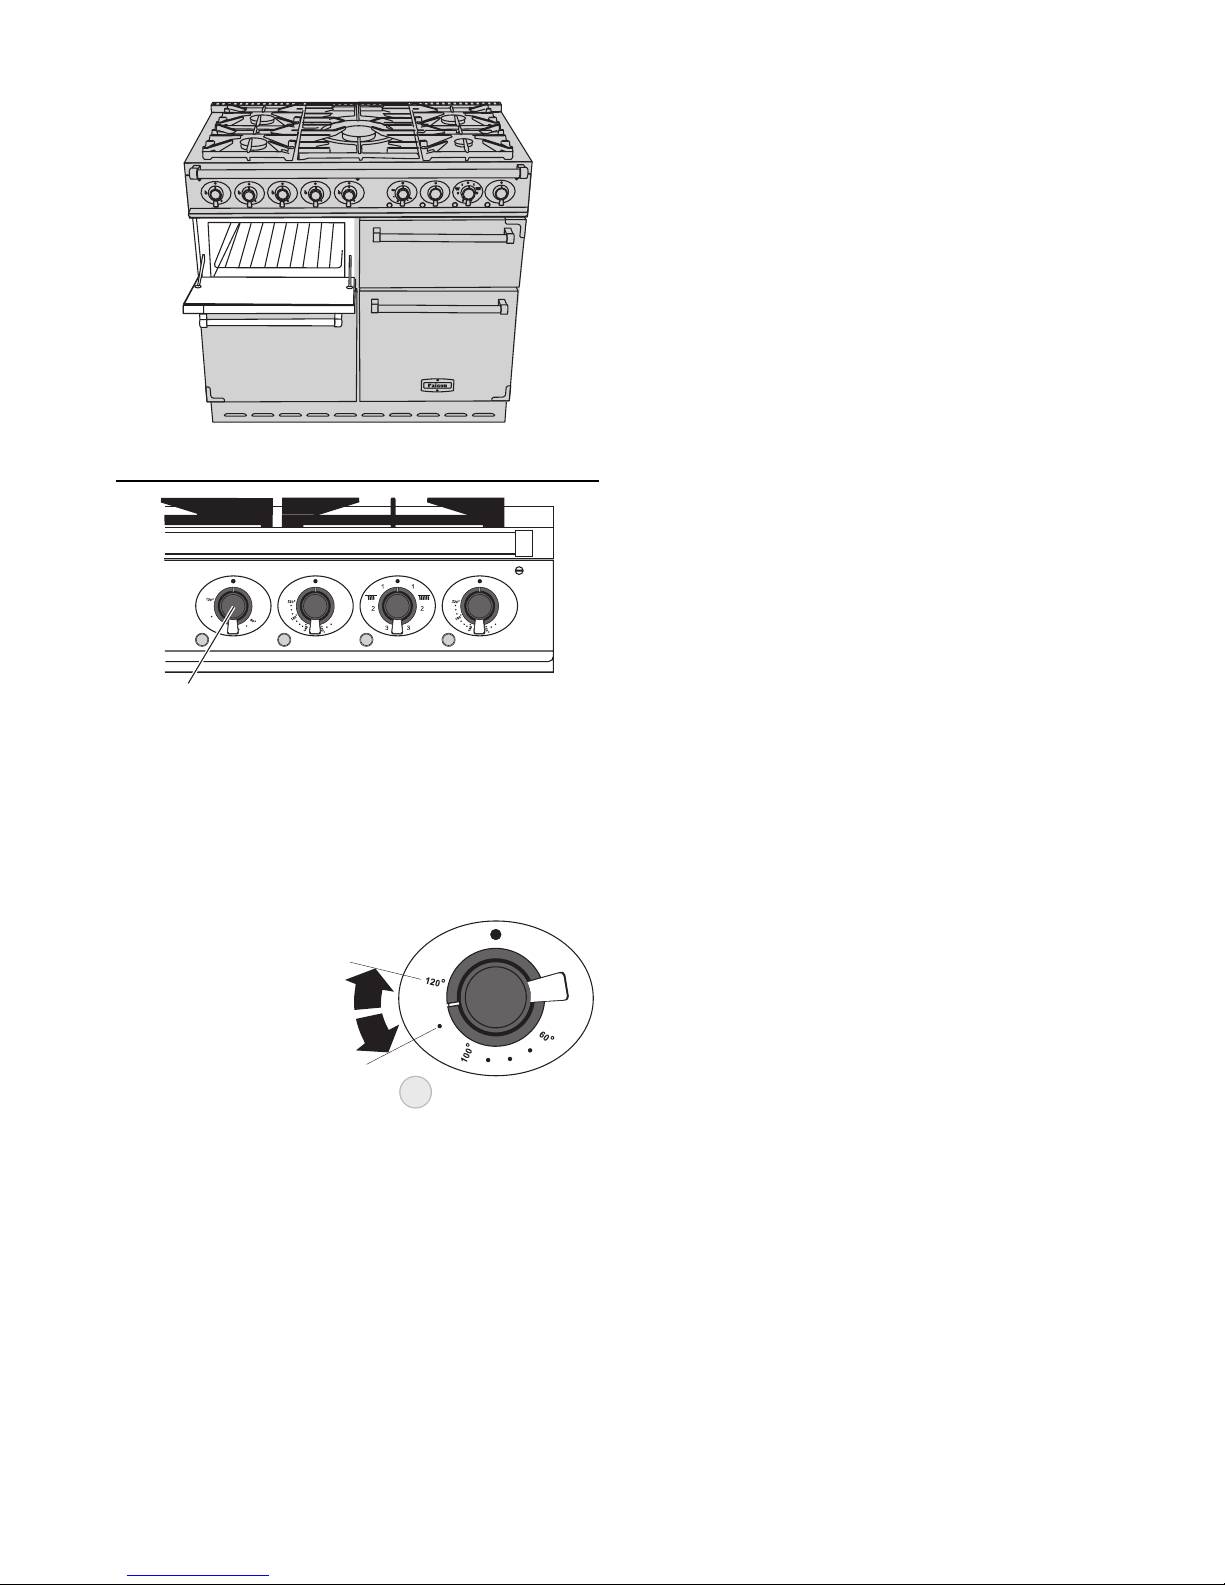
Hotplate Burners
The drawing below each knob indicates which burner
that knob controls. There is a spark ignition system that
works when the knob is pressed in. Each burner also
has a special safety device that stops the fl ow of gas if
the fl ame goes out.
Push in and turn a
knob to the large fl ame
symbol ( ).
Keep holding the knob
pressed in to let the gas
through to the burner for
few seconds. The igniter
will spark and light the
gas automatically.
Keep holding the knob pressed in to let the gas through
to the burner for few seconds. The igniter should spark
and light the gas.
If, when you let go of the control knob, the burner goes
out, the safety device has not held in. Turn the control to
the off position and wait one minute, then try again this
time holding in the control knob for slightly longer.
Adjust the fl ame height to suit by turning the knob.
The small fl ame marks the ‘low position’.
Turn the knob towards it after the contents of a pan have
boiled.
Make sure fl ames are under the pans. Using a lid will
help the contents boil more quickly.
Pans and kettles with concave bases or down turned
base rims should not be used.
Simmering aids, such as asbestos or mesh mats,
are NOT recommended. They will reduce burner
performance and could damage the pan supports.
Avoid using unstable and misshapen pans that may tilt
easily and pans with a very small base diameter e.g.
milk pans, single egg poachers.
Mimimum pan sizes
The minimum pan diameter recommended is 120mm for
the outer burners and 160mm for the centre burner..
When hotplate control knob is pressed in, sparks will be
made at every burner, this is normal.
If after lighting, a hotplate burner’s fl ame goes out, turn it
off and leave it for one minute before relighting it.
You can remove the burner head for cleaning, see page
‘Cleaning your cooker’.
You should wipe the top surface of the cooker around
the hotplate burners as soon as possible after spills
occur. Try to wipe them off while the hotplate is still
warm.
Note:
Use of aluminium pans may cause metallic marking of
the pan supports. This does not affect the durability of
the enamel and may be cleaned off with a proprietary
metal polish.
Page 6
6
English
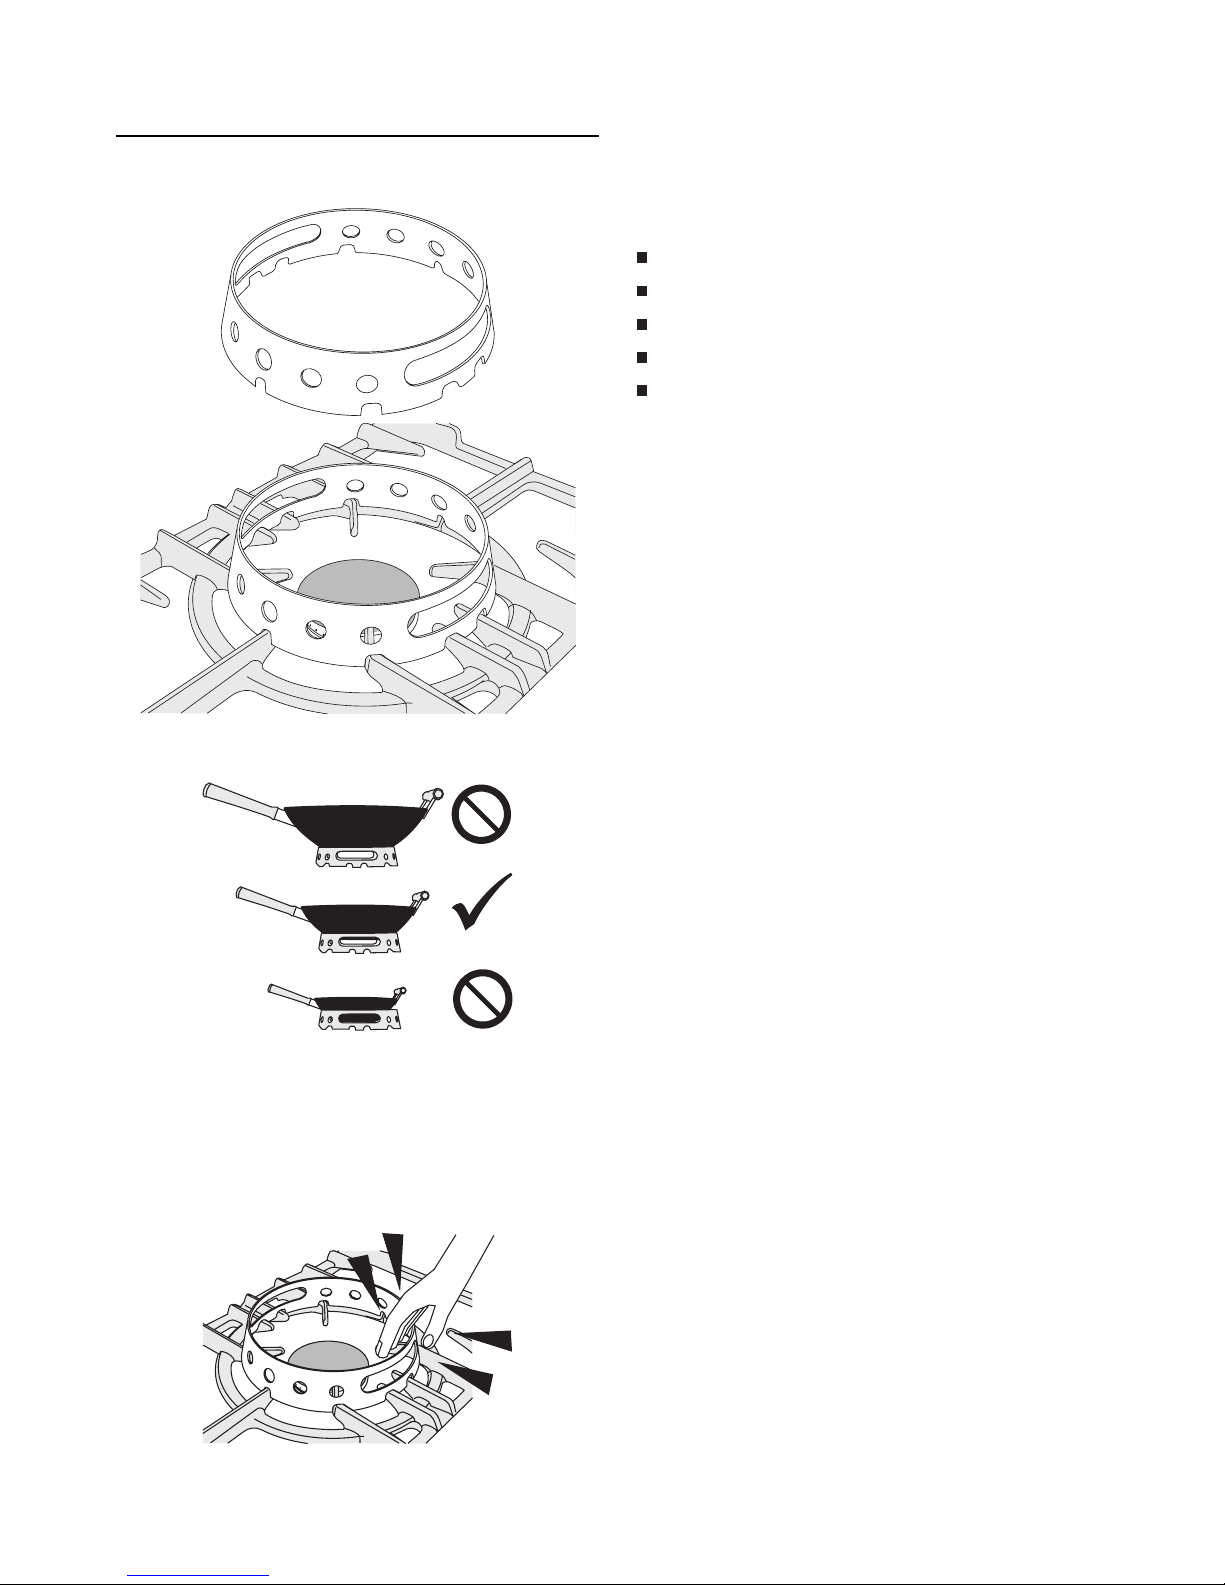
Wok Centre Ring
The Wok ring is designed fi t the centre burner. It will not
fi t any of the other burner pan supports
It should be located so that the cut-outs in the ring sit
directly on the projecting burner supports.
Woks vary very widely in size and shape. It’s important
that the Wok is securely held - but if the Wok is too big or
too small the ring will not support it properly.
When you fi t the ring, check that it is properly located on
the pan support fi ngers.
Make sure that it is stable and that the Wok is sitting
level in the ring.
The cradle will get very hot in use - allow plenty of
time for it to cool before you pick it up.
Wok Cooking
A Wok may be used for 5 traditional methods of oriental
cooking: -
Stir Frying
Shallow Frying
Deep Frying
Steaming
Braising
Stir frying has become the most familiar and popular
method of oriental cooking. The continual manual
process requires the addition of one food item at a time
with the relatively fast preparation time offering the
benefi t of colour and nutrient retention whilst retaining a
crisp texture.
The other 4 types of Wok cooking do not require
constant stirring. These methods require a steadier base
for the utensil as the Wok contains very hot water or
oil. The Wok ring gives greater stability when practising
these methods of cooking - but take care.
Deep Fat Frying
Do not try to fry too much food at a time, especially
frozen food.
This only lowers the temperature of the oil or fat too
much, resulting in greasy food.
Always dry food thoroughly before frying and lower it
slowly into the hot oil or fat. Frozen foods in particular,
will cause frothing or spitting, if added too quickly.
Never heat fat, or fry with a lid on the pan.
Keep the outside of the pan, clean and free from streaks
of oil or fat.
Only re-heat food once.
Page 7
7
English
The Slow Cooking Oven
Slow cooking oven control knob
This oven is for long, slow cooking over 6-8 hours,
keeping food warm and warming plates for short periods.
Extra care must be taken when
warming bone china - use the
lowest setting.
Using the Slow Cooking Setting
The slow cooking setting
is the area marked
between 110°C - 120°C
on the oven control knob.
The slow cooking oven has side panels that are coated
with a special enamel that partly cleans itself. For more
on cleaning the ovens see the ‘Cleaning your cooker’
section of these instructions
Points to bear in mind when preparing food.
Do not place dishes directly on to the oven base. Always
place onto shelf supplied.
The shelf is designed to lock in place, but is removable
for cleaning. See the ‘Cleaning your cooker’ section of
these instructions.
Push dishes well back in the oven to ensure that they
are positioned over the element beneath the base plate.
Make sure all dishes will fi t into the oven before
preparing the food.
All dishes cooked by the slow cooking method should be
cooked for a minimum of 6 hours. They will ‘hold’ at this
setting for a further 1-2 hours but marked deterioration in
appearance will be noticed in some cases.
Joints of meat and poultry should be cooked at 180°C
for 30 minutes before transferring to the slow cooking
oven.
Meat over 2.7kg and poultry over 2kg are unsuitable for
the slow cooking method
Always stand covered joints on a rack over a meat tin, to
allow good air circulation.
Make sure that pork and poultry reach an internal
temperature of at least 90°C.
Slow cooking is unsuitable for stuffed meat and poultry.
Always bring soups, casseroles and liquids to the boil
before putting in the oven. When casseroles are used,
cover the food fi rst with foil and then the lid to prevent
loss of moisture.
Always thaw frozen food completely before cooking.
Root vegetables will cook better if cut into small pieces.
Adjust seasonings and thickenings at the end of the
cooking time.
Egg and fi sh dishes need only 1-5 hours cooking and
should be included in day cooking sessions, where they
can be observed from time to time.
Dried red kidney beans must be boiled for a minimum of
ten minutes, after soaking, and before inclusion in any
dish.
Storage and Re-Heating of Food
If food is to be frozen or not served immediately, cool it
in a clean container as quickly as possible.
Thaw frozen food completely in the refrigerator before
re-heating.
Re-heat food thoroughly and quickly either on the
hotplate or in a hot oven 180°C, and then serve
immediately.
Only re-heat food once.
Page 8
8
English
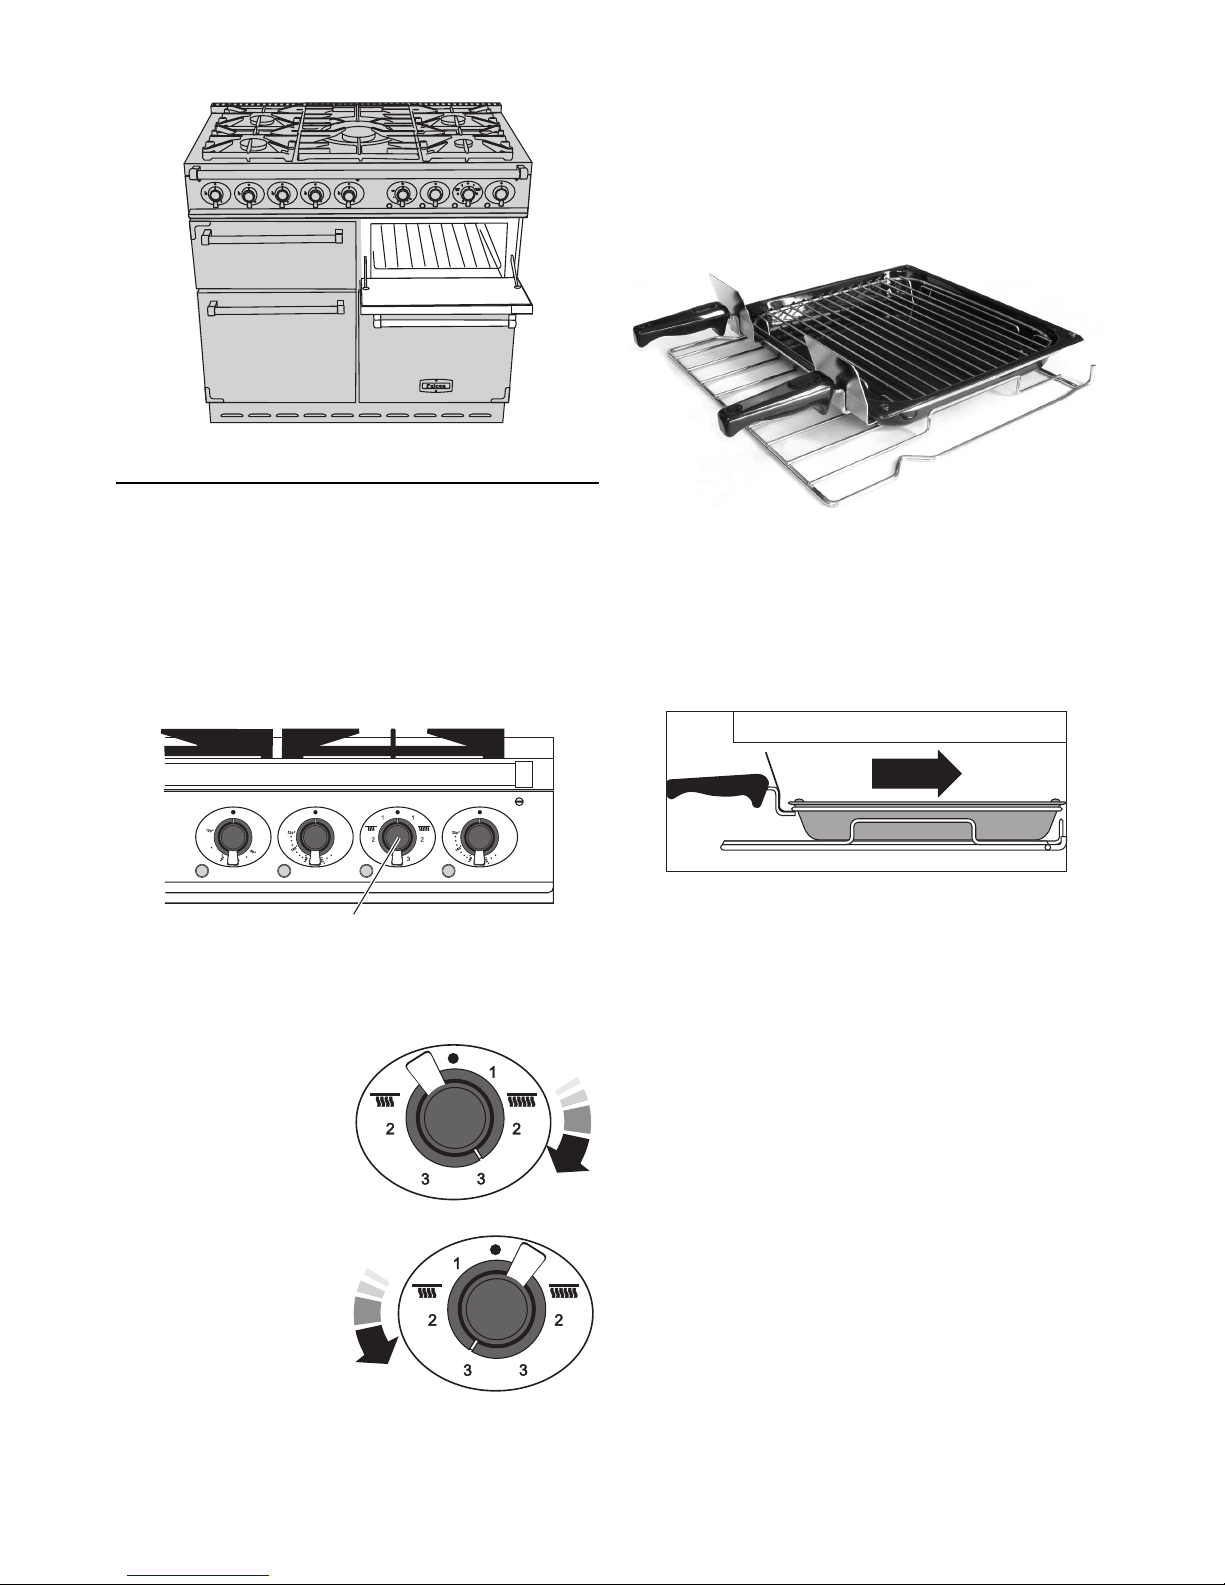
The Grill (Top Right)
Caution: Accessible parts may be hot when
the grill is in use. Young children should be
kept away.
If you fi nd a crack in the glass surface of the grill
immediately disconnect the appliance from the electricity
supply. Do not reconnect the appliance until it is
repaired.
THE GRILL COMPARTMENT DOOR MUST BE KEPT
OPEN WHEN THE GRILL IS ON.
Grill control knob
The very high speed instant grill is divided into two
areas to save energy and to suit individual grilling
requirements.
Turn the grill control
clockwise and the whole
of the grilling area can be
used for large amounts of
food.
For small amounts of food
e.g. 2 slices of toast, one
or two chops etc. turn the
control anti-clockwise.
Only the middle area of
the grill heats up.
Most food is cooked at a high setting but for thicker
pieces of meat/poultry and for food such as well done
steak the heat can be reduced by turning the control
down to a lower setting.
For best results pre-heat at a high setting for
approximately 2 minutes.
The grill pan fi ts on the shelf supplied. (shown out of the
grill chamber for clarity)
The shelf is designed to lock in place, but is removable
for cleaning. See the ‘Cleaning your cooker’ section of
these instructions.
Make sure the grill pan is pushed right to the back of the
grill chamber.
Food should be cooked on the grid or in the base of the
grill pan. You can brown the top of dishes, cooked in the
oven, under the grill by placing the dish onto the base of
the grill pan, which can easily slide along the fl oor of the
grill cavity.
The grill chamber has side panels that are coated with
a special enamel that partly cleans itself. For more on
cleaning the cooker see the ‘Cleaning your cooker’
section of these instructions.
Page 9
9
English
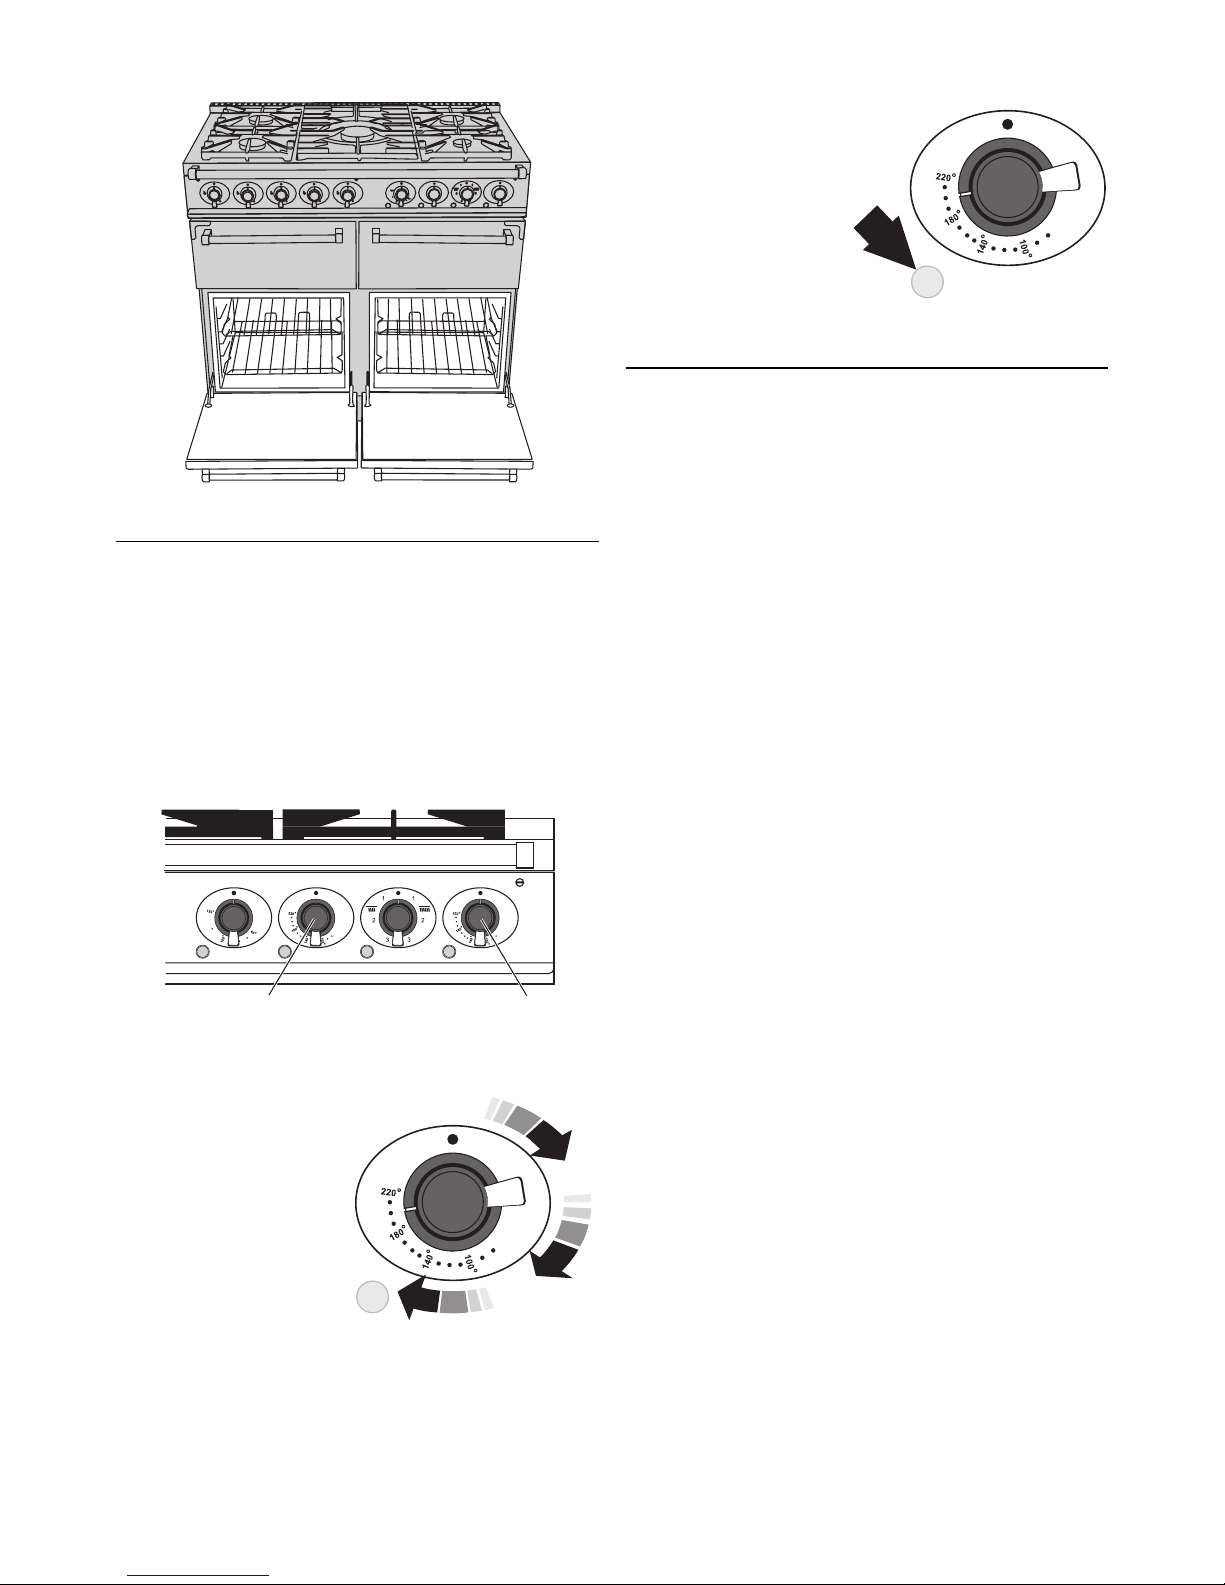
The Fan Ovens
During use the appliance becomes hot. Care should be
taken to avoid touching the heating elements inside the
ovens.
Both the lower ovens are fan ovens. The fans circulate
hot air continuously, which means faster more even
cooking
It is only necessary to pre-heat the ovens for food such
as scones, puff pastry, Yorkshire Pudding, bread etc.
To operate either oven
Left hand fan oven Right hand fan oven
Before using for the fi rst time, heat the ovens to 200°C
for 30 minutes to dispel manufacturing odours.
The recommended
cooking temperatures
for fanned ovens are
generally lower than a
non-fanned ovens.
Turn the oven
temperature knob to the
temperature you need.
The oven indicator
light will glow until
the oven has reached
the temperature you
selected.
It will then cycle on and
off during cooking.
Oven Cooking Guide
Cooking Hints
When using the fan ovens, reduce conventional oven
settings by 10°C-20°C and cooking time by up to 10
minutes for every hour.
It is important to check that food is piping hot before
serving.
Fan oven cooking is particularly suitable for baking on
several shelves at one time
The wire shelves should always be pushed fi rmly to the
back of the oven.
Baking trays, meat tins et cetera should be placed
level centrally on the oven’s shelves. Keep all trays
and containers away from the sides of the oven, as
overbrowning of the food may occur.
For even browning, the maximum recommended size of
a baking tray is 300mm x 240mm.
When the oven is on, don’t leave the door open for
longer than necessary, otherwise the knobs may get
very hot.
Always leave a ‘fi ngers width’ between dishes on the
same shelf; this allows the heat to circulate freely around
them.
If you want to brown the base of a pastry dish, preheat
the baking tray for 15 minutes before placing the dish in
the centre of the tray.
Where dishes may boil and spill over during cooking,
place them on a baking tray
Please remember that all cookers vary - temperatures
in your new Falcon ovens may differ to those in your
previous cooker. You can change the settings and
cooking times to suit your tastes.
The cooking chart is a general guide but times and
temperatures may vary according to individual recipes.
The meat sections should be used as a general guide
but may vary according to the size, shape of joint on or
off the bone.
Thaw frozen joints before cooking them.
The times are for open roasting. If covered allow extra
time.
Page 10
10
English
The turkey/chicken is cooked when the juices run clear
when pierced with a skewer. If the juices are still pink
continue to cook checking every 15 minutes.
Do not place the shelf or food on the base of the ovens.
For effective heat distribution, leave at least a fi ngers
width between dishes and between dishes and the sides
of the oven.
Steam
When cooking foods with high water content (e.g. oven
chips) there may be some steam visible at the grille at
the rear of the hotplate.
Condensation may form on the cooker. This is quite
normal and nothing to worry about. The condensation
forms when heat and moisture are present. Whenever
possible try to make sure that food which contains a lot
of moisture for example casseroles are covered. If you
do notice any condensation, wipe it up straight away.
Do not leave food in the oven to cool after it has been
switched off.
Cooking high moisture content foods can create a
‘steam burst’, when the oven door is opened. When
opening the oven stand well back and allow any steam
to disperse.
General
The fan ovens are fi tted with side, roof and back panels
that are coated with a special enamel that partly cleans
itself. The oven liners (see Cleaning your cooker) work
better when fat splashes are avoided. Cover meat when
cooking.
To reduce fat splashing when you add vegetables to hot
fat around a roast, dry them thoroughly or brush lightly
with cooking oil.
For more on cleaning the ovens see the ‘Cleaning your
cooker’ section of these instructions.
Do not allow young children to stand on the drop
down oven doors.
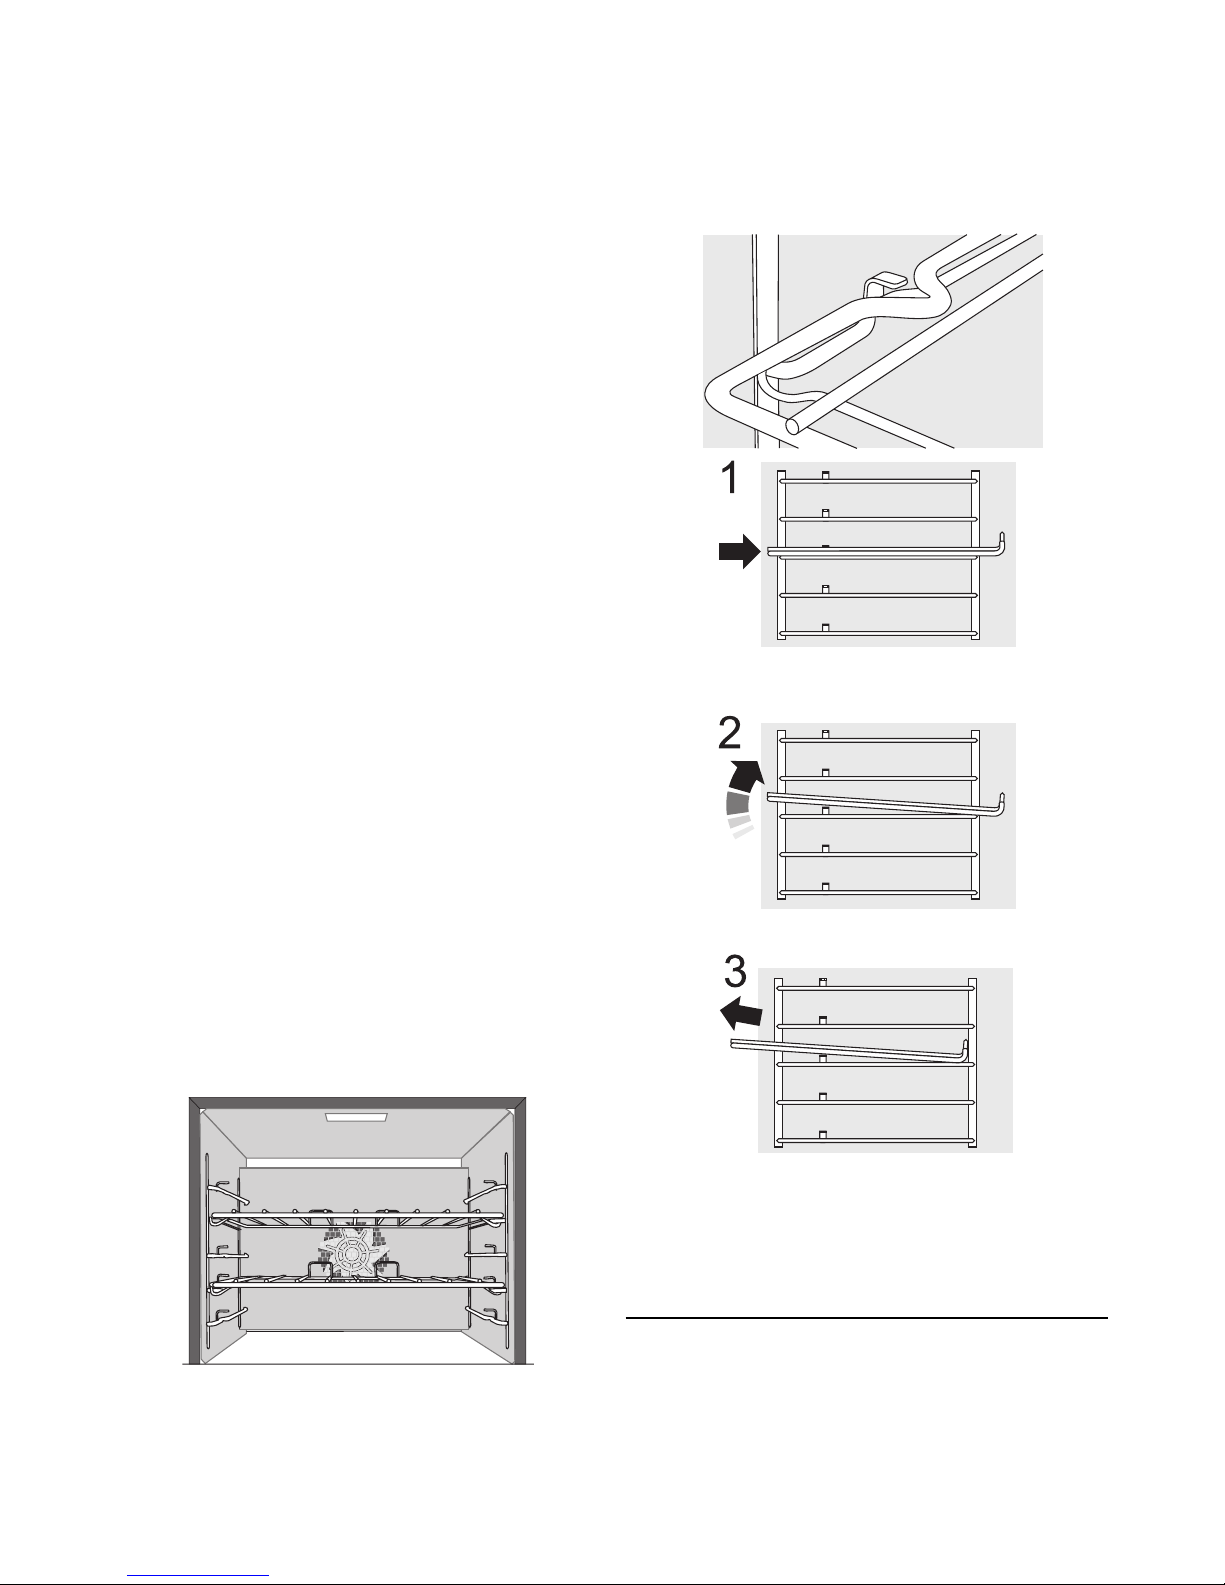
The Fan Oven shelves
The shelves should not be fi tted directly one above the
other. When cooking on more than one shelf always
leave at least one runner space between them.
The oven shelves are retained when pulled forward but
can be easily removed and refi tted.
To remove a shelf fi rst make sure it is pushed fully back,
so that the shelf stop is in line with the kink in the side of
the shelf.
Lift up the front of the shelf so the shelf will pass over
the shelf stop.
Pull the shelf forward.
To refi t the shelf, hold it so it is slightly up at the front
and rest the back of the shelf on the side wires. Push the
shelf to the back of the oven and then lower the front so
that it is resting on the side wires.
Cleaning your cooker
Before thorough cleaning, isolate from the electricity
supply. Remember to switch on the electricity supply
before use.
Never use paint solvents, washing soda, caustic
cleaners, biological powders, bleach, chlorine based
bleach cleaners, coarse abrasives or salt. Don’t mix
Page 11
11
English
different cleaning products - they may react together
with hazardous results.
All parts of the cooker can be cleaned with hot soapy
water - but take care that no surplus water seeps into
the appliance.
Stainless Steel Hob
Lift away pots or pans from hob. Remove pan supports
from spillage area and carefully place in a sink of warm
soapy water. Wipe loose debris from hob.
Avoid using any abrasive cleaners including cream
cleaners on brushed Stainless Steel surfaces. For best
results use a liquid detergent cleaner.
Rinse with cold water and thoroughly dry with a clean,
soft cloth. Ensure all parts are dry before repositioning.
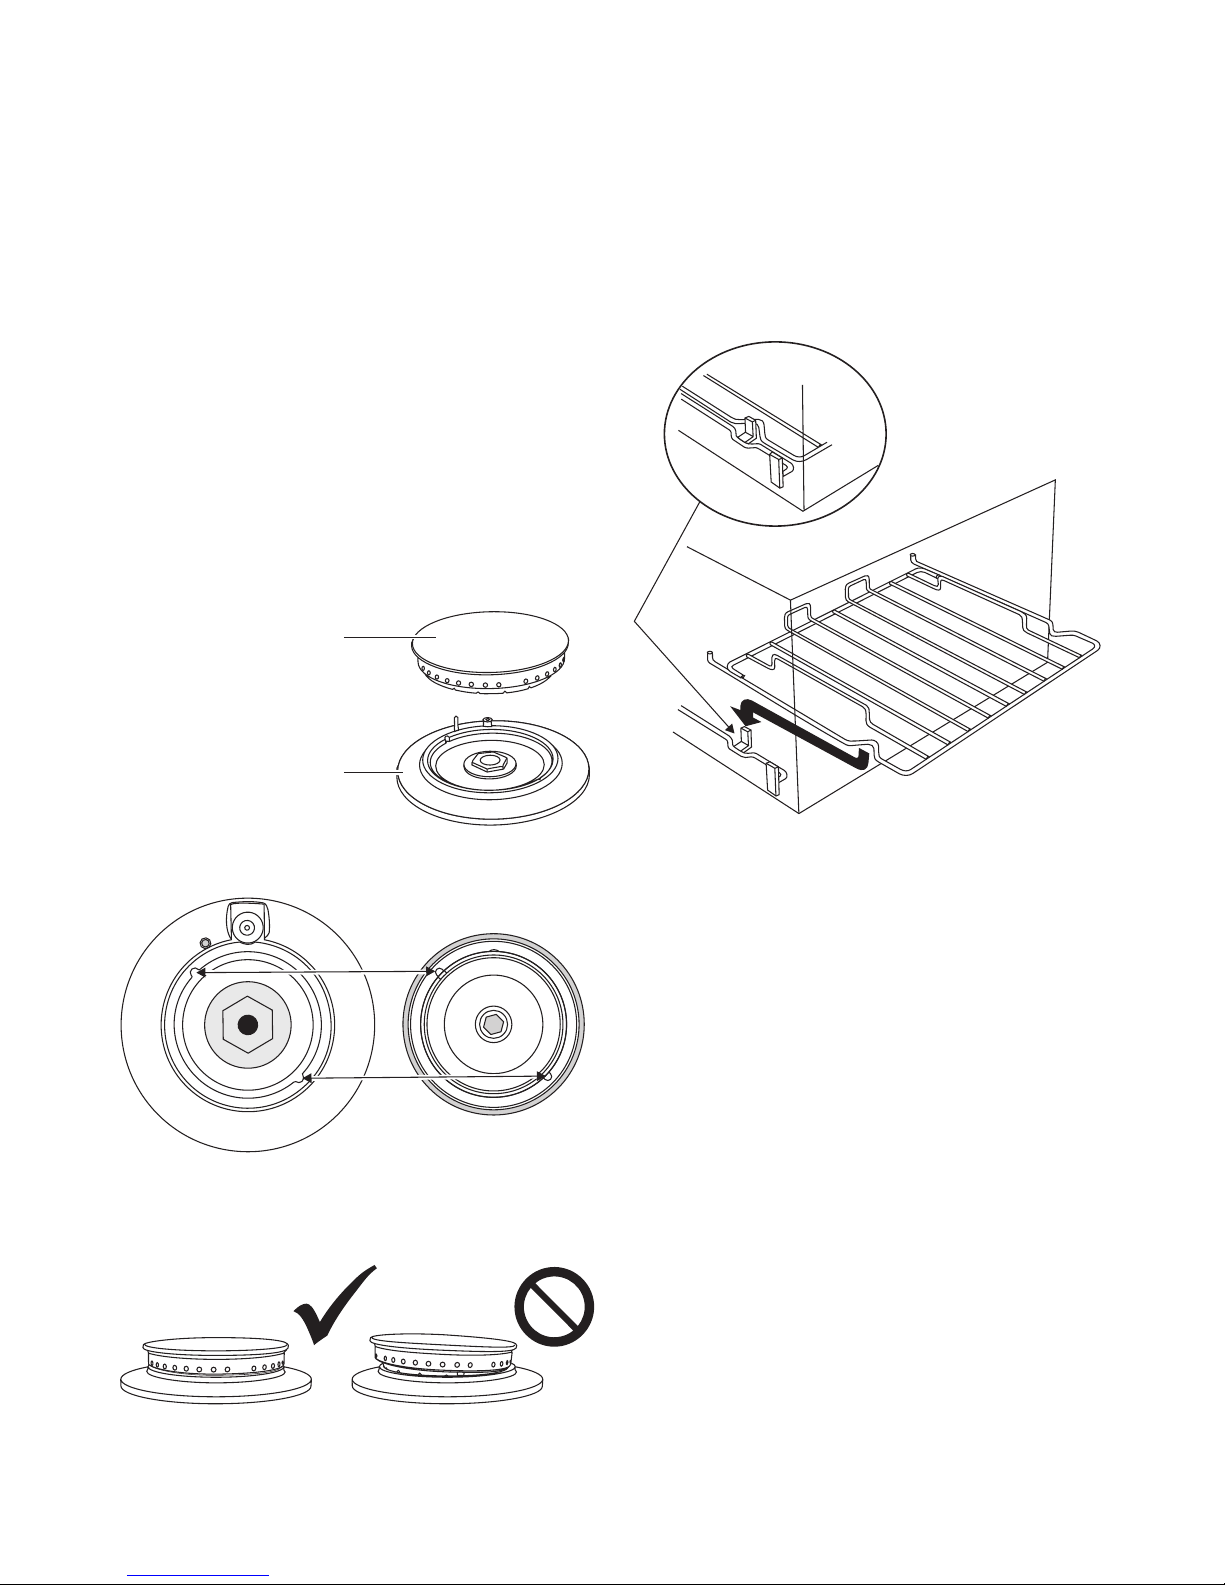
Hotplate burners
The burner heads and caps can be removed for
cleaning. Make sure they are absolutely dry before
replacing.
Burner head
Burner Bezel
When fi tting burner head, ensure this locates properly
within the bezel.
base of hotplate burner bottom of burner head
If you look at the bottom of the burner head you will see
two ‘pips’; these fi t into the two notches in the burner
base.
Check burner ports are not blocked. If blockage occurs,
remove stubborn particles using a piece of fuse wire.
The Slow Cooking Oven and the Grill
The slow cooking oven and the grill have side panels
that are coated with a special enamel that partly cleans
itself.
Do not use any cleaning material which may clog the
pores of the special coating e.g. Pastes and powders,
soap fi lled pads wire wool, spray cleaners, brush-on
oven cleaners, caustic solutions, metal scrapers/knives,
and prevent the continuous cleaning action.
The shelf is designed to lock in place, but is removable
for cleaning. To remove lift up at the front then pull
forward.
The grill pan and grid should be washed in hot soapy
water.
After grilling meats or any foods that soil, leave to soak
for a few minutes in the sink immediately after use.
Stubborn particles may be removed from the grid by
using a nylon brush.
Control Panel and Oven Doors
For best results liquid detergents should be used.
The control panel and control knobs should only be
cleaned with a soft cloth wrung out in clean hot soapy
water - but take care that no surplus water seeps into
the appliance. Wipe with a clean dampened cloth then
polish with a dry cloth. The oven doors should only be
cleaned with a soft cloth wrung out in clean hot soapy
water.
Cleaning Brass Components
Uncoated natural brass is used as part of the authentic
unit fi nish on some models and may tarnish with age.
To regain a polished fi nish, these areas should be
cleaned using a proprietary metal polish. Stubborn
marks on the aluminium burner rings can be removed
Page 12

12
English
using a similar cleaning material. This will also restore
the polished fi nish.
The Fan Ovens
The ovens have panels which have been coated with a
special enamel that partly cleans itself.
This does not stop all marks on the lining, but helps to
reduce the amount of manual cleaning needed.
The panels work better above 200°C. If you do most
of your cooking below this temperature, occasionally
remove the shelf supports and wipe the panels with a lint
free cloth and hot soapy water. The panels should then
be dried and the oven heated at 200°C for about one
hour. This will ensure the panels are working effectively.
This does not stop all marks on the lining, but helps to
reduce the amount of manual cleaning needed.
Don’t use steel wool (or any other materials that will
scratch the surface). Don’t use oven cleaning pads.
Troubleshooting
Steam is coming from the oven
When cooking foods with a high water content (e.g.
oven chips) there may be some steam visible at the
rear grille. Take care when opening the oven door, as
there may be a momentary puff of steam when the oven
door is opened. Stand well back and allow any steam to
disperse.
The oven fan is noisy
The note of the oven fan may change as the oven heats
up - this is perfectly normal.
The knobs get hot when I use the
oven or the grill, can I avoid this?
Yes, this is caused by heat rising from the oven or the
grill, and heating them up. Don’t leave the oven door
open. Make sure that the grill pan is pushed fully in when
grilling.
If there is an installation problem
and I don’t get my original
installer to come back to fix it who
pays?
You do. Service organisations will charge for their call
outs if they are correcting work carried out by your
original installer. It’s in your interest to track down your
original installer.
Current Operated Earth Leakage
Breakers
Where the cooker installation is protected by a 30milliamp sensitivity residual current device (RCD),
the combined use of your cooker and other domestic
appliances may occasionally cause nuisance tripping.
In these instances the cooker circuit may need to be
protected by fi tting 100mA device. This work should be
carried out by a qualifi ed electrician.
Food is cooking too slowly, too
quickly, or burning
Cooking times may differ from your previous oven.
Individual tastes may require the temperature to be
altered either way, to get the results you want. Try
cooking at a higher temperature setting.
The oven is not cooking evenly
Do not use a tin or tray larger than 300mm x 240mm.
If you are cooking a large item, be prepared to turn it
round during cooking.
If two shelves are used, check that space has been left
for the heat to circulate. When a baking tray is put into
the oven, make sure it is placed centrally on the shelf.
Check that the door seal is not damaged and that the
door catch is adjusted so that the door is held fi rmly
against the seal.
A dish of water when placed on the shelf should be the
same depth all over. (For example, if it is deeper at the
back, then the back of the cooker should be raised up or
the front lowered). If the cooker is not level arrange for
your supplier to level it for you.
Oven temperature getting hotter as
the cooker gets older
If turning the knob down has not worked or only worked
for a short time then you may need a new thermostat.
This should be fi tted by a service person.
Grill not cooking properly
Are you using the pan and trivet supplied with the
cooker? Is the pan being used on the grill carriage, not
the fl oor of the compartment? Is the grill tray pushed
fully back to the stop?
Hotplate ignition or hotplate
burners faulty
Is the power on?
Are the sparker (ignition electrode) or burner slots
blocked by debris?
Are the burner caps correctly located?
Hotplate burners will not light
If only one or all the hotplate burners will not
light, make sure that the parts have been replaced
correctly after wiping or removing for cleaning.
Check that there is not a problem with your gas
supply. You can do this by making sure that other
gas appliances you may have are working.
Do the burners spark when you push in the control
knob? If not, check the power is on.
Page 13

13
English
General Safety Instructions
This appliance must be installed by a competent person
in accordance with the installation instructions. The
installation must comply with the relevant regulations
and also the local electricity supply company
requirements.
If you smell gas
Don’t
Smoke or strike matches
Turn electric switches on or off.
Do
Put out naked fl ames
Turn off the gas at the meter or cylinder
Open doors and windows to get rid of the gas
Keep people away from the area affected.
Call your gas supplier.
If you are using natural gas in the UK ring British Gas
- Trans Co on
0800 111 999
This appliance is designed for domestic cooking only.
Use for any other purpose could invalidate any warranty
or liability claim.
The use of a gas cooking appliance results in the
production of heat and moisture in the room in which it
is used. Ensure that the kitchen is well ventilated: keep
natural ventilation holes open or install a mechanical
ventilation device, (mechanical extractor hood).
Prolonged intensive use may call for additional
ventilation, for example opening a window. Use extractor
fans or hoods when fi tted.
The cooker should be serviced by a qualifi ed service
engineer and only approved spare parts used. Have
the installer show you the location of the cooker control
switch. Mark it for easy reference. Always allow the
cooker to cool and then switch off at the mains and
before cleaning or carrying out any maintenance work,
unless specifi ed otherwise in this guide.
All parts of the cooker become hot with use and will
retain heat even after you have stopped cooking.
Take care when touching cooker, to minimize the
possibility of burns, always be certain that the controls
are in the OFF position and that it is cool before
attempting to clean the cooker.
Use dry oven gloves when applicable - using damp
gloves might result in steam burns when you touch a hot
surface. Never operate the cooker with wet hands.
Do not use a towel or other bulky cloth in place of a
glove. They might catch fi re if they touch a hot surface.
Clean with caution. If a wet sponge or cloth is used to
wipe spills on a hot surface, be careful to avoid steam
burns. Some cleansers can produce noxious fumes if
applied to a hot surface.
Do not use unstable saucepans and position the handles
away from the edge of the hotplate.
Babies, toddlers and young children should not be
allowed near the cooker at any time. They should never
be allowed to sit or stand on any part of the appliance.
Teach them not to play with controls or any other part of
the cooker.
Never store anything of interest to children in cabinets
above a cooker - children climbing on the cooker to
reach them could be seriously injured.
Clean only parts listed in this guide.
In the interests of hygiene and safety the cooker should
be kept clean at all times as a build up in fats and other
food stuff could result in a fi re.
Always keep combustible wall coverings or curtains etc.
a safe distance away from your cooker.
Do not spray aerosols in the vicinity of the cooker while
it is in on.
Do not store or use combustible materials, or fl ammable
liquids in the vicinity of this appliance.
Do not use water on grease fi res. Never pick up a
fl aming pan. Turn the controls off. Smother a fl aming
pan on a surface unit by covering the pan completely
with a well fi tting lid or baking tray. If available use a
multipurpose dry chemical or foam-type fi re extinguisher.
Never leave the hotplate unattended at high heat
settings. Pans boiling over can cause smoking and
greasy spills may catch on fi re.
Never wear loose-fi tting or hanging clothes while using
the appliance. Be careful when reaching for items stored
in cabinets over the hotplate. Flammable material could
be ignited if brought in contact with a hot surface unit
and may cause severe burns.
Take great care when heating fats and oils, as they will
ignite if they get too hot.
Use a deep fat thermometer whenever possible to
prevent overheating fat beyond the smoking point.
Never leave a chip pan unattended. Always heat fat
slowly, and watch as it heats. Deep fry pans should
be only one third full of fat. Filling the pan too full of fat
can cause spill over when food is added. If you use a
combination of oils or fats in frying, stir them together
before heating, or as the fats melt.
Foods for frying should be as dry as possible. Frost on
frozen foods or moisture on fresh foods can cause hot
fat to bubble up and over the sides of the pan. Carefully
watch for spills or overheating of foods when frying at
Page 14
14
English
high or medium high temperatures. Never try to move a
pan of hot fat, especially a deep fat fryer. Wait until the
fat is cool.
When the grill is on, do not use the top of the fl ue (the
slot along the back of the cooker) for warming plates,
dishes, drying tea towels or softening butter.
When using an electrical appliance near the hotplate, be
sure that the cord of the appliance does not come into
contact with the hotplate.
Take care that no water seeps into the appliance
Only certain types of glass, glass-ceramic, earthenware
or other glazed containers are suitable for hotplate
cooking; others may break because of the sudden
change in temperature.
Do not allow anyone to climb, stand or hang on any part
of the cooker.
Do not use aluminium foil to cover shelves, linings or the
oven roof.
Never heat unopened food containers. Pressure build up
may make container burst and cause injury.
The cooker is designed for cooking foods only and must
not be used for any other purpose.
The oven should NOT be used for heating the kitchen.
This wastes fuel and the control knobs may become
overheated.
When the oven is on DO NOT leave the oven door open
for longer than necessary.
The specifi cation of this cooker should not be altered.
This appliance is heavy, take care when moving it.
When the cooker is not in use ensure that the control
knobs are in the off position.
Service and spares
Please complete the appliance details below and keep
them safe for future reference - this information will
enable us to accurately identify your particular appliance
and help us to help you. Filling this in now will save you
time and inconvenience if you later have a problem with
your appliance. It may also be of benefi t to keep your
purchase receipt with this leafl et. You may be required to
produce the receipt to validate a warranty fi eld visit.
Fuel Type:
Dual Fuel
Name of Appliance & Colour*
Falcon 1000
Appliance Serial Number *
Retailers Name & Address
Date of Purchase
Installers Name & Address
Date of Installation
* This information is on the appliance data badge.
If you have a problem
In the unlikely event that you have a problem with your
appliance, please refer to rest of this booklet, especially
the problem solving section, fi rst to check that you are
using the appliance correctly.
If you are still having diffi culty, contact your retailer
Please note
If your appliance is outside the warranty period, our
service provider may charge for this visit.
If you request an engineer to visit and the fault is not the
responsibility of the manufacturer, our service provider
reserves the right to make a charge.
Appointments not kept by you may be subject to a
charge.
Out of Warranty
We recommend that our appliances are serviced
regularly throughout their life to maintain the best
performance and effi ciency.
Page 15

15
English
Service work should only be carried out by technically
competent and suitably qualifi ed personnel.
Spare Parts
To maintain optimum and safe performance, only use
genuine spare parts. Do not use re-conditioned or
unauthorised gas controls. Contact your retailer.
Installation
This appliance is designed for domestic cooking only.
Use for any other purpose could invalidate any warranty
or liability claim.
Before installation, ensure that cooker is suitable for your
gas type and supply voltage. See the the appliance data
badge.
Check the data badge to determine which gas the
cooker is set for.
Conversion
This appliance is supplied as: -
G 20 20millibar
CAT
II2H3+
A conversion kit for other gases is supplied with the
cooker.If the appliance is to be converted to another
gas we recommend that this is done before installation.
See the Conversion section of this instruction for more
details. After converting the appliance please attach the
Gas Conversion sticker over the appropriate area of the
data badge, this will identify the gas type the appliance
is now set for.
This appliance is designed for domestic cooking
only. Use for any other purpose could invalidate any
warranty or liability claim.
Safety Requirements/Regulations
You must be aware of the following safety
requirements & regulations
Prior to installation, ensure that the local distribution
conditions (nature of the gas and gas pressure) and the
adjustment of the appliance are compatible.
This appliance shall be installed in accordance with the
regulations in force and only in a well ventilated space.
Read the instructions before installing or using this
appliance.
In the UK the regulations and standards are as follows:-
In your own interest and that of safety, it is law that all
gas appliances be installed by competent persons.
CORGI registered installers undertake to work to
safe and satisfactory standards. Failure to install the
appliance correctly could invalidate any warranty or
liability claims and lead to prosecution. The cooker must
be installed in accordance with
All relevant British Standards / Codes of Practice,
in particular BS 5440 Part 2 2000,
or Natural Gas - BS 6172 : 1990 and BS 6891 :
1998
For LP Gas - BS 5482-1:1994 (when the
installation is in a permanent dwelling), BS 54822:1977, (when the installation is in a caravan or
other non permanent dwelling), or BS 5482-3:1999
, (when the installation is in a boat).
The Gas Safety (Installation and Use) regulations
1998.
The relevant Building / IEE regulations.
In the Republic of Ireland:-
The installation must be carried out by a Competent
Person and installed in accordance with the current
edition of I.S.813 “Domestic Gas Installations”, the
current Building Regulations and reference should be
made to the current ETCI rules for electrical installation.
Provision of Ventilation
This appliance is not connected to a combustion
products evacuation device. Particular attention shall be
given to the relevant requirements regarding ventilation.
In the UK
The room containing the cooker should have an air
supply in accordance with BS 5440 Part 2 : 2000. All
rooms require an openable window or equivalent, while
some rooms require a permanent vent in addition to the
openable window. The cooker should not be installed
in a bedsitting room with volume less than 20m3. If it is
installed in a room of volume less than 5m3 an air vent
of effective area 100cm2 is required; if it is installed in
a room of volume between 5m3 and 10m3, an air vent
of effective area 50cm2 is required; while if the volume
exceeds 11m3, no air vent is required.
If there are other fuel burning appliances in the same
room, BS 5440 Part 2 : 2000 should be consulted to
determine the requisite air vent requirements.
In the Republic of Ireland:-
Reference should be made to the current edition of IS
813 which makes clear the conditions that must be met
to demonstrate that suffi cient ventilation is available.
Location of Cooker
The cooker may be installed in a kitchen/kitchen diner
but NOT in a room containing a bath or shower.
NOTE:
An appliance for use on LPG shall not be installed in
a room or internal space below ground level. e.g. in
a basement.
Page 16
16
English
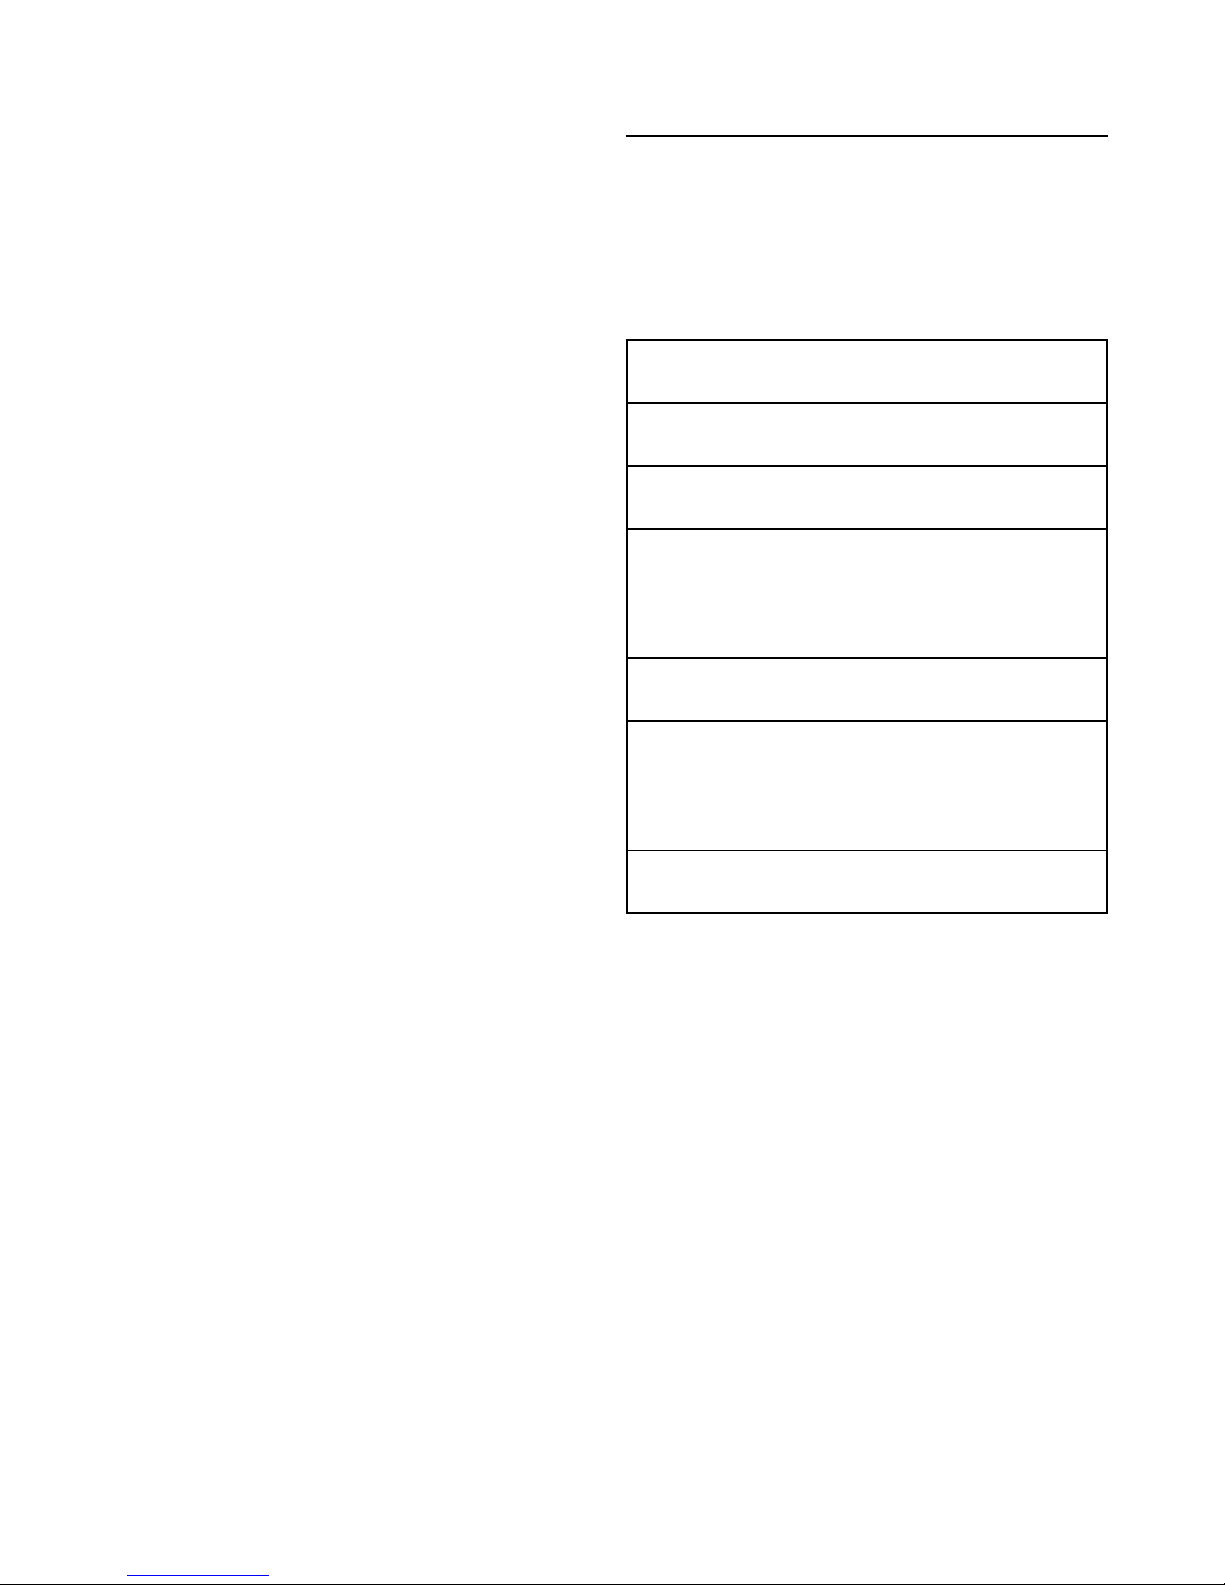
Positioning the Cooker
The diagrams show the minimum recommended
distance from the cooker to nearby surfaces.
The 3mm gaps each side are to allow for moving the
cooker
The hotplate surround should be level with, or above,
any adjacent work surface. Above hotplate level a gap
of 75mm should be left between each side of the cooker
and any adjacent vertical surface.
For non-combustible surfaces (such as unpainted metal
or ceramic tiles) this can be reduced to 25mm.
A minimum space of 800mm is required between the top
of the hotplate and a horizontal combustible surface.
Any cooker hood should be installed in accordance with
the hood manufacturer’s instructions.
Surfaces of furniture and walls at the sides and rear
of the appliance should be heat, splash and steam
resistant. Certain types of vinyl or laminate kitchen
furniture are particularly prone to heat damage and
discolouration. We cannot accept responsibility for
damage caused by normal use of the cooker to any
material that de-laminates or discolours at temperatures
less than 65°C above room temperature.
For safety reasons curtains must not be fi tted
immediately behind the cooker.
We recommend a gap of 1006mm between units to
allow for moving the cooker. If a fl ush fi t is required, fi t
the cooker up to the unit at one side then fi t the unit the
other side.
Unpacking the Cooker
Do not take any packaging off the cooker until it is
directly in front of the place it is to be installed (unless it
will not fi t through a door in its outer packaging).
Moving the Cooker
The cooker is very heavy. Take great care.
We recommend two people manoeuvre the cooker.
Remove all the doors by opening the door fully, then
rotate the hinge locking disc 90° clockwise on both door
hinges to lock door in open position.
Carefully close door and at approximately half closed the
hinges will release themselves from the cooker frame.
hinge
location
slot
original
position
locked
position
slotted
disc
hinge quadrant
Carefully put the doors in a safe place.
Ensure that the fl oor covering is fi rmly fi xed, or removed
to prevent it being disturbed when moving the cooker
around. You will need the levelling tool.
From the front tilt the cooker backwards and remove the
front half of the polystyrene base pack.
Repeat from the back and remove the rear half of the
poly base.
The cooker has three base rollers. The hexagonal
adjusters are positioned as shown below.
Fit the levelling tool on the a hexagonal adjusters as
shown below.
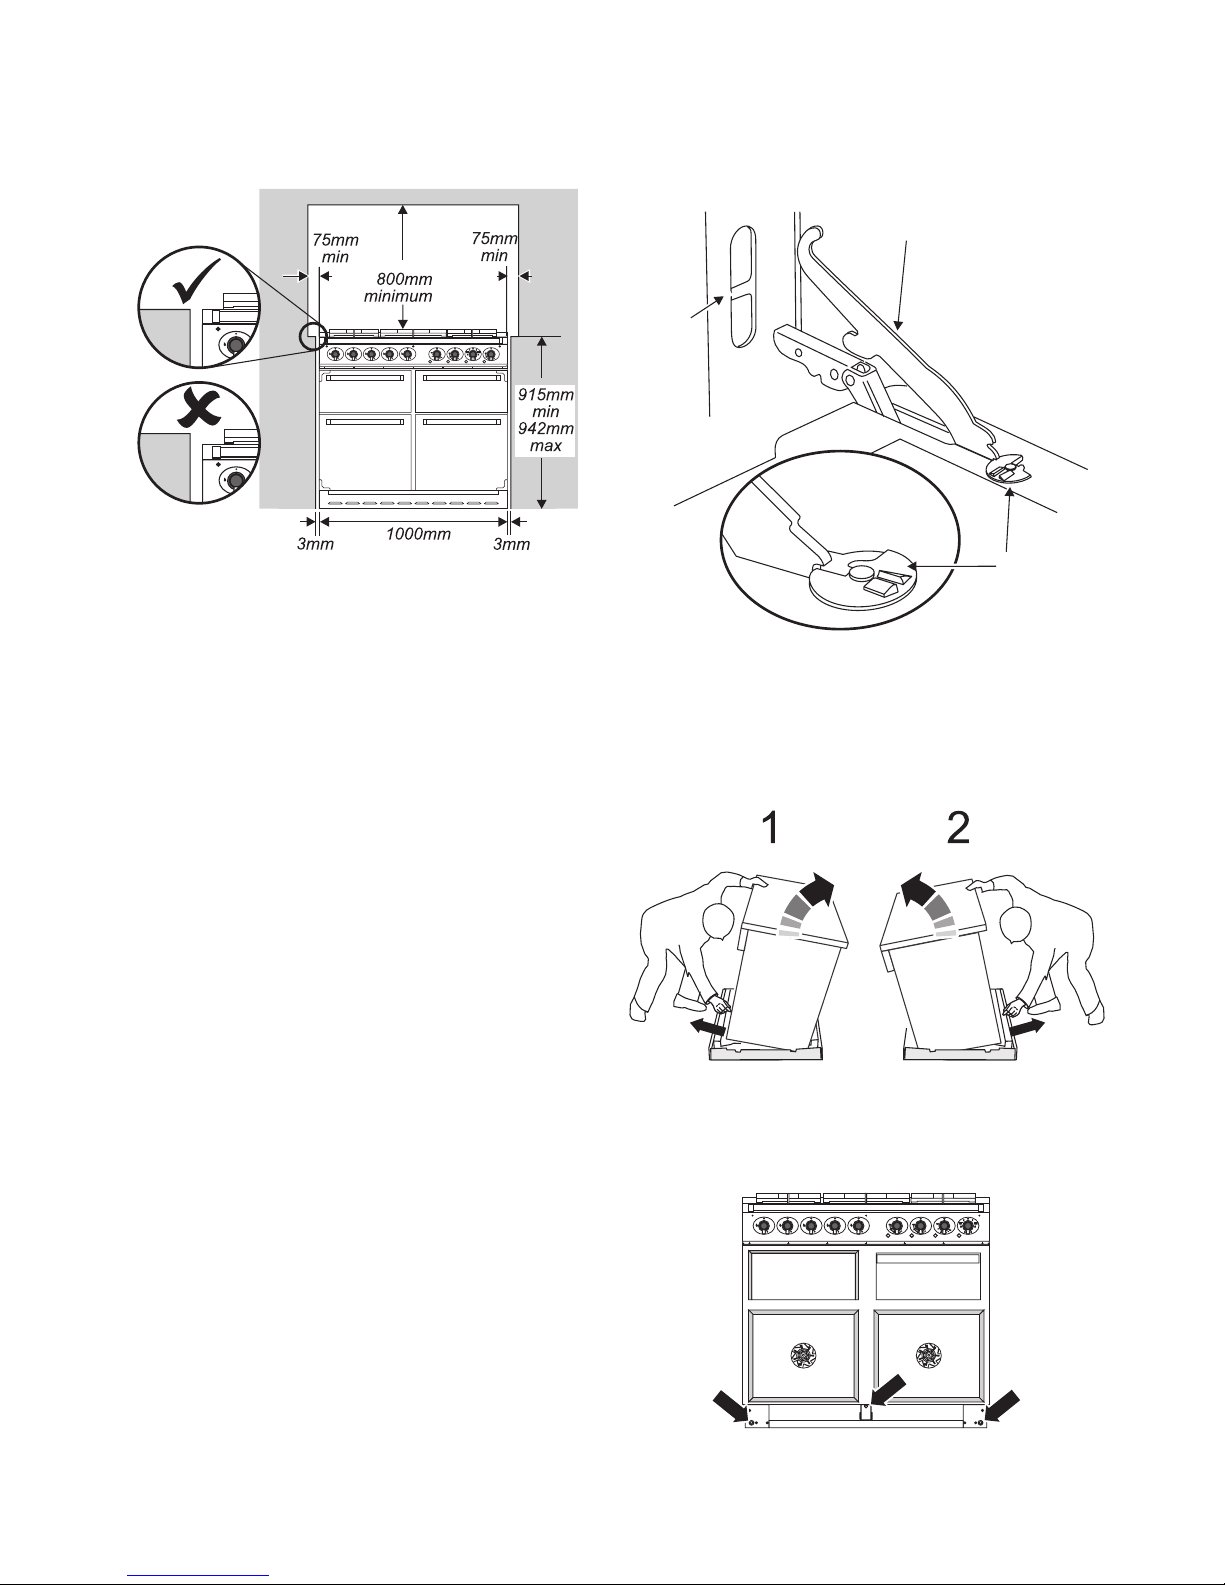
Page 17
17
English
Screw down the roller until it touches the bottom and
then make 10 complete (360°) turns clockwise.
Make sure you lower all three rollers. Unfold the rear
edge of pack base tray. Carefully push the cooker
backwards off the base pack and remove the pack base.
Push the cooker close to its fi nal position, leaving just
enough space to get behind it.
Conversion to LP
If the appliance is to be converted to LP gas do the
conversion at this point. See the conversion section of
these instructions.
Levelling
You are recommended to use a spirit level on a shelf in
one of the ovens to check for level.
Place the cooker in its intended position taking care not
to twist it within the gap between the kitchen units as
damage may occur to the cooker or the units.
The rollers can be adjusted to level the cooker. To adjust
the height of the rear of the cooker use the levelling tool
supplied to turn the adjusting nuts at the front bottom
corners of the cooker.
Adjust the height of the front roller to level the cooker.
Turn clockwise to raise the cooker and anticlockwise to
lower.
When you are satisfi ed with the height and level raise
the front of the cooker by one turn of the front roller
adjuster. Screw down the front feet to meet the fl oor.
Screw the front roller adjuster anticlockwise to raise the
front roller so that the front of the cooker is supported
on the feet, not the front roller, to prevent accidental
movement of the cooker.
Gas Connection
Fitting a stability bracket
A stability bracket or chain (not supplied by with the
cooker) should be fi tted when the cooker is connected
to a fl exible gas supply. Any restraining device should be
secured to the fabric of the building and should be able
to be released so that the cooker can be pulled out for
cleaning and maintenance.
When fi tting a stability bracket read these instructions
together with the leafl et supplied with the bracket.
Page 18

18
English
a) Position and level the appliance.
b) Draw a pencil line along the front edge of the
base of the cooker and along the right hand edge.
c) Remove the range.
d) Mark off 570mm from the RH side of the unit to
indicate the centre line for the bracket.
e) Mark off 415mm to locate the front edge of the
lower bracket. Fix bracket to fl oor.
f) Measure the height from fl oor level to the bottom
of the opening in the cooker back. Add 3mm to
this dimension and assemble the stability bracket
to this height (i.e. from fl oor level to underside of
top member)
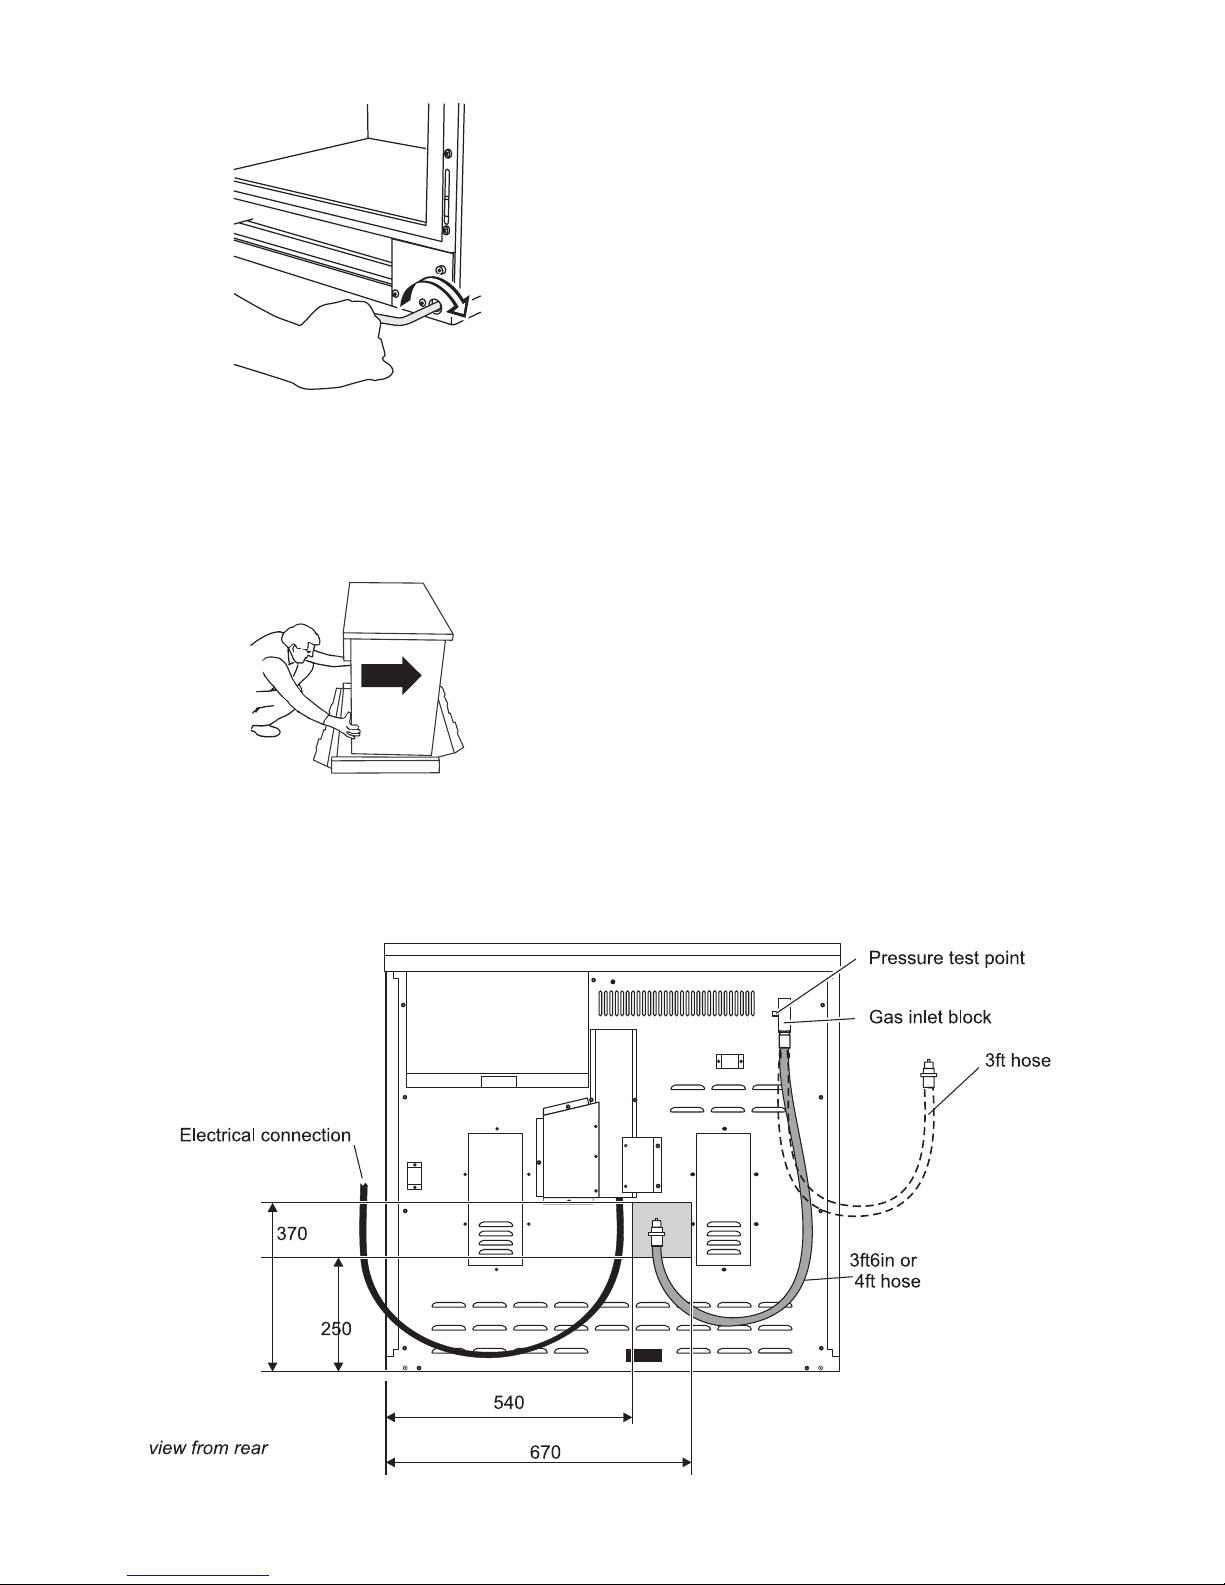
Gas Connection
The Gas supply needs to terminate with a down facing
bayonet. The rear cover boxes limit the position of the
supply point.
view from the rear
Because the height of the cooker can be adjusted and
each connection is different it is diffi cult to give precise
dimensions. Ideally the house supply bayonet should
be in the shaded area shown in the diagram. The hose
should be fi tted so that both inlet and outlet connections
are vertical so that the hose hangs downwards in a ‘U’
shape. A 3ft (915mm) hose will need to be connected
from the side
For Natural Gas the fl exible hose must be in accordance
with B.S.669.
For LP Gas it should be capable of 50mbar pressure,
70C temperature rise and carry a red stripe, band or
label.
If in doubt contact, your supplier.
Screw connect the threaded end of the hose into the gas
inlet in the underside of the connector block on the back
of the cooker.
After completing the gas connection, check the cooker
is gas sound with a pressure test. When checking
for gas leaks do not use washing up liquid - this can
corrode. Use a product specifi cally manufactured for leak
detection.
Pressure testing
The gas pressure can be measured at the pressure test
point on the gas connection block.
Connect the pressure gauge. Turn on and light one of
the hotplate burners.
For Natural Gas the pressure should be 20mbar.
For Propane the pressure should be 37mbar.
Electrical Connection
This appliance must be installed by a qualifi ed
electrician to comply with the relevant regulations and
also the local electricity supply company requirements.
WARNING: THIS APPLIANCE MUST BE EARTHED
Note
The cooker must be connected to the correct electrical
supply as stated on the voltage label on the cooker,
through a suitable cooker control unit incorporating
a double pole switch having a contact separation of
at least 3mm in all poles. This cooker must not be
connected to an ordinary domestic power point.
The total electrical load of the appliance is approximately
8.8kW. The cable size used should be suitable for this
load and comply with all local requirements.
Access to the mains terminal is gained by removing the
electrical terminal cover box on the back panel.
Connect the mains cable to the correct terminals for your
electrical supply type.
Page 19

19
English
Check that the links are correctly fi tted and that the
terminal screws are tight. Secure the mains cable using
the cable clamp.
Current Operated Earth Leakage Breakers
Where the installation is protected by a 30-milliamp
sensitivity residual current device (RCD), the combined
use of your cooker and other domestic appliances may
occasionally cause nuisance tripping. In these instances
the cooker circuit may need to be protected by fi tting
a 100mA device. This work should be carried out by a
qualifi ed electrician.
Refit the doors
Refi t all the oven doors to the cooker.
Hotplate
Check each burner in turn. There is a fl ame safety
device that stops the fl ow of gas to the burner if the
fl ame goes out. There is also a spark ignition system
that works when the knob is pressed in.
For each burner, push in and turn the knob to the large
fl ame symbol ( ).
The igniter should spark and light the gas. Keep holding
the knob pressed in to let the gas through to the burner
for few seconds.
If, when you let go of the control knob, the burner goes
out, the safety device has not held in. Turn the control to
the off position and wait one minute, then try again this
time holding in the control knob for slightly longer.
Grill
Open the grill compartment door. Turn on the grill control
and check that the grill heats up.
Oven check
Turn on the ovens and check that they start to heat up.
Turn off the ovens.
Fitting the plinth
Remove the 2 screws along the front bottom edge of the
cooker. Hold the plinth in place and refi t the 2 screws.
Customer care
Please inform the user how to operate the cooker and
hand over these instructions.
Thank you.
Page 20

20
SERVICING - WARNING
Disconnect from electricity and gas before servicing. Check appliance is safe when you have finished.
Servicing
When servicing or replacing gas carrying components,
disconnect from the gas supply before commencing
operation.
Check the appliance is gas sound after completion of
service. When checking for gas leaks do not use washing
up liquid - this can corrode. Use a product specifi cally
manufactured for leak detection.
CAUTION: DO NOT USE A FLAME TO CHECK FOR
GAS LEAKS.
Do not use re-conditioned or unauthorised gas controls.
Disconnect from the electricity supply before commencing
servicing, particularly before removing any of the following:
- control panel, side panels, hotplate tray or any electrical
components or covers.
Before electrical re-connection, check that the appliance is
electrically safe.
Note - References to left handand right hand oven apply as
viewed from the front.
BEFORE SERVICING ANY GAS CARRYING
COMPONENTS. TURN OFF THE GAS SUPPLY.
1 To Remove the Hotplate
Disconnect the appliance from the electricity supply. Pull
the unit forward to gain access.
a) Remove the pan supports/hotplate accessories and
burner caps.
b) Remove the brass venturi in the centre of each
hotplate burner bezel.
c) Remove the bezel from the hotplate and disconnect
the spark ignition lead from the spark electrode.
d) Lift the hotplate at the front and disconnect the
hotplate earth lead. Lift the hotplate clear of the
appliance.
e) Replace in reverse order.
2 To Remove the Control Panel
Disconnect the appliance from the electricity supply.
a) Remove the pan supports/hotplate accessories and
burner caps.
b) Slacken the brass venturi at the centre of each burner.
c) Remove the control knobs from all taps.
d) Open the grill and right hand oven doors. Remove 3
fi xings on the top front and 3 fi xings on the control
panel underside.
e) Pull the control panel forward. Remove the
connections from the rear of the three neons.
Disconnect the earth lead and lift the panel clear of
the unit.
f) Replace all parts in reverse order.
g) When replacing any electrical connections refer to the
wiring diagram.
3 To Remove an Outer Side Panel
Disconnect the appliance from the electricity supply.
a) Remove the 3 screws from the side at the front edge
and the 3 screws at the rear of the cooker.
b) Remove the panel by pulling it away from the unit.
c) Replace parts in reverse order.
4 To Remove an Oven or Grill Neon
Disconnect the appliance from the electricity supply.
a) Remove the control panel as detailed in Section 2
b) Remove the relevant neon connection and undo the
nut which secures the neon to the control panel.
c) Replace parts in reverse order. Ensure the
replacement neon functions correctly.
5 To Remove a Thermostat
Disconnect the appliance from the electricity supply.
a) Remove the hotplate as detailed in Section 1.
b) Remove the control panel as detailed in Section 2
c) Open the appropriate oven door and remove the oven
shelves.
d) Remove the screws holding the thermostat phial to
the top right hand side of the oven.
e) Pull the unit forward to gain access rear of the cooker.
Remove the screws holding the back panel.
f) Remove thermostat phial and capillary through back
of cooker, note correct capillary route.
g) Disconnect the thermostat wiring. Undo the fi xings
that secure the device to the mounting plate.
e) Fit the replacement and re-assemble in reverse order.
Ensure that the phial is clipped to the oven side,
positioned centrally between the clips. Check that the
thermostat functions correctly
6 To Replace a Grill Controller
Disconnect the appliance from the electricity supply.
a) Remove the hotplate as detailed in Section 1.
b) Remove the control panel as detailed in Section 2.
c) Disconnect the controller wiring. Undo the fi xings that
secure the device to the mounting plate.
d) Fit the replacement and re-assemble parts in reverse
order. Check that the replacement functions correctly.
7 To Remove an Oven Cut-Off Thermostat
Disconnect the appliance from the electricity supply.
a) Pull the unit forward to gain access to the cover box.
Undo the cover screws and lift clear.
b) The control is located on the earth plate beside the
oven element connections.
c) Disconnect the thermostat wiring. Undo the fi xings
that secure the thermostat to the earth plate and
remove.
d) Fit replacement control and re-assemble parts in
reverse order.
8 To Remove a Hotplate Tap
a) Remove the hotplate as detailed in Section 1.
b) Remove the control panel as detailed in Section 2.
c) Unplug the FSD lead from the rear of the tap. Undo
compression fi tting at the rear of the tap. Remove the
fi xings that secure the tap to the gas rail. Disconnect
the ignition switch wiring.
Page 21

SERVICING - WARNING
Disconnect from electricity and gas before servicing. Check appliance is safe when you have finished.
21
d) Remove the tap. Remove and discard the gasket seal.
Fit new gasket seal to replacement tap.
e) Re-assemble in reverse order. Check the appliance is
gas sound. Check hotplate ignition.
9 To Change an Ignition Switch
Change the gas tap as detailed in Section 8.
10 To Remove a Hotplate Burner Injector
a) Remove the hotplate as detailed in Section 1.
b) Remove the injector directly from the burner body.
c) Fit the appropriate injector.
d) Re-assemble in reverse order. Check the appliance is
gas sound.
11 To Remove a Hotplate Burner Spark
Electrode
a) Remove the pan supports, hotplate accessories and
burner heads.
b) Undo the bezel venturi and remove the bezel from the
hotplate. The spark ignition wire will be pulled through
the electrode clearance hole.
c) Disconnect the spark electrode from the ignition wire.
Note
Take care to prevent the ignition wire from falling back
through the clearance hole.
d) Undo the spark electrode from the bezel by removing
the spring clip and spring.
e) Fit the replacement electrode to the burner bezel.
Ensure that the spring and clip are properly located.
f) Replace in reverse order and check correct burner
ignition.
12 To Remove a Hotplate Burner
a) Remove the pan supports, hotplate accessories and
burner heads.
b) Remove the hotplate as detailed in Section 1.
c) Remove the nut that secures the burner body to the
support channel.
d) Remove the fi xings that secure the support channel to
the chassis. Lift the channel clear of the appliance.
e) Undo the compression fi tting which connects the
burner body to the gas pipe. Remove the burner body
from the appliance.
f) Replace in reverse order. Check the appliance is gas
sound and that the burner operates satisfactorily.
13 To Remove the Oven Door
a) Open the oven door.
b) Rotate hinge locking disc 90° clockwise on both door
hinges to lock door in open position.
c) Carefully close door and at approximately half closed
the hinges will release themselves from the cooker
frame.
d) Re-assemble in reverse order.
14 To Remove the Oven Outer Door Panel
a) Remove the door from the cooker (see section 13).
b) Remove screws holding the outer panel to the door.
c) Remove the outer door panel.
d) Undo the nuts that secure the handle to the door
panel. Fit the handle to the replacement door panel.
e) Fit the replacement panel to the oven inner door
making sure that the door insulation is correctly
located.
f) Re-assemble in reverse order.
15 To Remove the Oven Door Seal
a) Open oven door. The seal is held in place by small
hooks on the rear face. At the corner pull seal
diagonally away from the door centre until that hook is
released.
b) Proceed to the next hook and release it in a similar
way, and so on. Use force if the hooks are stiff, as the
old seal will be discarded.
c) Hook the new seal in one of the corner holes of the
door, and proceed round the door opening snapping
in each hook in turn.
16 To Remove the Hotplate Electrode Leads
Disconnect from the electricity supply.
Pull the unit forward to access the rear of the appliance.
a) Remove the pan supports, hotplate accessories and
burner heads.
b) Remove the hotplate as detailed in Section 1.
c) Remove the cover box and disconnect all HT leads at
the generator.
d) Pull the sleeved bundle of HT leads up through the
rear upright.
e) Pull the appropriate lead from the sleeve and push in
the replacement.
f) Replace the leads in the rear upright.
g) Re-connect the leads at the generator.
h) Re-assemble in reverse order and check ignition.
17 To Remove Spark Generator
a) Isolate from electric supply.
b) Lower front mobility wheels (see section ‘MOBILITY
WHEELS’ in Users instructions) and pull cooker
forwards to gain access to the rear of the cooker.
CAUTION: DO NOT STRAIN FLEXIBLE GAS
CONNECTION disconnect if necessary.
c) Remove mains cable inlet cover, 8 screws.
d) Disconnect electric cables to generator.
e) Remove two screws securing generator mounting
bracket to cooker frame and carefully withdraw
generator suffi ciently to disconnect electrode leads.
f) Re-assemble in reverse order.
Page 22

22
SERVICING - WARNING
Disconnect from electricity and gas before servicing. Check appliance is safe when you have finished.
18. To Remove Grill Element
a) Isolate from electric supply.
b) Remove two screws securing grill pelmet and remove
pelmet.
c) Remove two screws securing grill element fi xing
carrier to grill cavity and allow element and carrier to
hinge down from the rear.
d) Disconnect the terminals from the element (you may
need to use pliers). Take note of their termination
sequence and routing to avoid trapping cables during
re-assembly.
d) Remove the carrier and element from the grill
chamber. Remove the two screws at the rear holding
the grill element to the carrier. The element can now
be lifted out of the carrier.
f) Re-assemble in reverse order.
19. To Remove Upper Oven/grill Liners
a) Remove the door - see section 13.
b) Remove door seal (upper oven only) by unhooking
from the front frame at the four corners.
c) Remove left handand right handshelf runners (2
screws per runner). The liners can now be withdrawn.
Also remove 4 top fi xing screws.
20. To Remove Lower Oven Liners
a) Remove the oven door - see section 13.
b) Remove door seal by unhooking from its four corners.
c) Slide out the roof liner.
d) Remove the oven shelves and remove the screws
securing shelf runners (4 each side).
d) Remove rear liner 4 screws.
e) Remove side linings. Slide the right hand side liner
down to clear the thermostat phial fi xings taking care
not to disturb the phial.
f) Re-assemble in reverse order.
21. To Remove Slow Cooking (Upper) Oven
Elements
a) Isolate from electric supply.
b) Proceed as ‘To Remove Upper Oven Liners’.
c) Lift out oven base to gain access to the oven element.
d) Remove screw securing element to frame.
e) Carefully withdraw element from frame so that the
electric terminals can be disconnected, take care
not to allow the cables to drop down the back of the
appliance
22 To Remove Fan Oven Element
a) Isolate from electric supply.
b) Proceed as ‘To Remove Oven Liners’.
Page 23

SERVICING - WARNING
Disconnect from electricity and gas before servicing. Check appliance is safe when you have finished.
23
c) Remove 3 screws securing element to frame and
carefully withdraw element until access can be made
to the electrical terminals.
d) Disconnect terminals taking care not to allow the
cable to fall down the rear of the appliance.
e) Re-assemble in reverse order.
23 To Remove Oven Fan
a) Isolate from electric supply.
b) Proceed as ‘To Remove Oven Element’.
c) Remove 4 fi xing screws securing fan assembly to
frame.
d) Withdraw fan assembly suffi ciently to gain access to
motor electrical terminals and disconnect cables.
e) Remove fan blade.
NOTE: Fan blade fi xing nuts is left handthread.
f) Remove motor from mounting plate screws.
g) Re-assemble in reverse order.
24 To Remove a Grill Element
Disconnect the appliance from the electricity supply.
a) Pull the unit forward to access the cover boxes at the
rear of the appliance. Remove the fi xings that secure
the cover and lift it clear.
b) Undo the terminal connections, noting their positions.
c) Remove the grill pan.
d) Remove the fi xings that secure the element front
support from within the chamber.
e) Remove a fi xing from each of the elements and
withdraw the elements from the chamber.
f) Fit the replacement element(s) and re-assemble parts
in reverse order. Check operation of the grill.
Page 24

24
SERVICING - WARNING
Disconnect from electricity and gas before servicing. Check appliance is safe when you have finished.
Conversion to LP Gas
Servicing - warning
This conversion must be performed by a competent person.
After conversion the installation must comply with the
relevant regulations and also the local electricity supply
company requirements. Read the instructions before
converting this appliance.
Failure to convert the appliance correctly could invalidate
any warranty or liability claims and lead to prosecution.
This instruction must be used in conjunction with the rest
of the appliance instruction, in particular for information on
Standards, cooker positioning, connection hose suitability
etc.
When servicing or replacing gas-carrying components
disconnect from gas before commencing operation and
check appliance is gas sound after completion.
Do not use re-conditioned or unauthorised gas controls.
Conversion
Disconnect from electricity and gas before servicing. Check
appliance is safe when you have fi nished.
This appliance is CAT II
2H3+
. It is supplied set for G20
natural gas at 20millibar
A conversion kit for LP gas (G30 29mbar/G31 37mbar) is
supplied with the cooker.
Injectors
Remove pan supports burner caps and heads.
Undo the large brass nuts and remove the brass venturis.
Lift up the front of the hotplate top and disconnect the
ignition leads from the electrodes. Remove the hotplate top.
Remove old jets. Fit the new jets (see the table for correct
jets).
Tap adjustment
Pull off all the control knobs.
Open the oven door & grill door and remove the fi xing
screws underneath the control panel.
Remove the 3 fi xing screws at the top of the control panel.
Pull the control panel forward. Rest it on the open grill door
and the open right hand oven door.
To convert the control taps
Unscrew the tap bypass screw.
Using a pair of long nose pliers carefully remove the bypass
screw and fi t the correct replacement screw. Tighten the
screw down.
See table for correct size.
Refi t the control panel.
Natural Gas LP Gas
Hotplate
Injector Bypass Injector Bypass
Centre burner
165 96 107 57
Large Burners
120 54 82 40
Right front burner
95 39 64 32
Page 25

SERVICING - WARNING
Disconnect from electricity and gas before servicing. Check appliance is safe when you have finished.
25
Reassemble
Find the large ring in the conversion kit.
Fit the large ring to the centre burner and assemble the
burner base using the larger internal diameter (10.5mm)
venturi.
10.5mm venturi 7mm venturi
the centre burner
Fit the smaller rings to the outer burners
Fit the larger internal diameter (10.5mm) venturis to all the
burners. Tighten the large brass nuts.
an outer burner
Reassemble burner tops, making sure they are
reassembled in the correct way on the burner bodies.
Stick on label
Stick the appropriate label on to the data badge to indicate
the gas the appliance is now set for.
Pressure Testing
Connect the appliance to the gas supply. Check the
appliance is gas sound.
See Technical data section at the back of this book for test
pressures.
The gas pressure can be measured at the pressure test
point on the gas connection block. Turn and light one of the
hotplate burners.
CHECK THE APPLIANCE IS GAS SOUND.
CHECK OPERATION OF ALL THE BURNERS.
Page 26

26
SERVICING - WARNING
Disconnect from electricity and gas before servicing. Check appliance is safe when you have finished.
Circuit Diagram
Page 27

SERVICING - WARNING
Disconnect from electricity and gas before servicing. Check appliance is safe when you have finished.
27
Key to circuit diagram
A Tap switches
B Generator
C Grill regulator
D Inner grill
F Outer grill
G Neon
H Cut out
I Right hand oven thermostat
J Fan oven element
K Oven fan
M Left hand oven thermostat
O Slow cooking oven thermostat
P Base element
Q Earth on Main Terminal Block
Colour Code
b Blue
bl Black
br Brown
r Red
v Violet
w White
y Yellow
Page 28

28
SERVICING - WARNING
Disconnect from electricity and gas before servicing. Check appliance is safe when you have finished.
Technical Data
This cooker is category II
2H3+
It is supplied set for group H natural gas. A conversion kit from NG to LP gas is included.
INSTALLER: Please leave these instructions with the User.
DATA BADGE LOCATION : Behind plinth panel, serial number repeater badge below right hand fan oven opening.
Country of Destination: GB/IE
Gas Electric
Natural Gas 20mbar 220 - 240V 50Hz
Propane 37mbar
(See appliance data badge for test pressures)
Dimensions
Overall height
minimum 915mm maximum 940mm
Overall width
1000mm See ‘Positioning of Cooker’
Overall depth including handles
660mm
Overall depth excluding handles
600mm
Space for fixing
See ‘Positioning of Cooker’
Minimum space above hotplate
800mm
Connections
Gas: Electric
Rp 1/2 at rear right-hand side 220 - 240V 50Hz
Ratings
Natural Gas LP Gas
Hotplate
Injector Bypass Injector Bypass
Centre burner
5kW 165 96 5kW (357g/h) 107 57
Large Burners
3kW 120 54 3kW (214g/h) 82 40
Right front burner
1.7kW 95 39 1.7kW (121g/h) 64 32
Gas burner inputs based on Gross Calorifi c Value
Fan Ovens
Forced air convection
2.5kW
Energy effi ciency class on a scale of A (more effi cient) to G (less effi cient) C
Energy consumption based on standard load 1.05kWh
Usable volume (litres) 49
Size
Medium
Grill
2.5kW
Slow cooking oven
1.2kW
Maximum total electrical load at 230V 8.7kW (approximate total inc. oven fans etc.)
Page 29

SERVICING - WARNING
Disconnect from electricity and gas before servicing. Check appliance is safe when you have finished.
29
Page 30

30
Français
Sécurité avant tout
Mise en garde
Les composants accessibles deviendront chauds pendant
l’utilisation. Eloignez les enfants de la cuisinière pour prévenir le
risque de brûlures et d’ébouillantage.
Tout comme vous, votre cuisinière a besoin d’air frais. Les fl ammes des
brûleurs produisent des gaz de combustion, de la chaleur et de l’humidité.
Veillez à ce que la cuisine soit bien ventilée : laissez les ouvertures de
ventilation naturelle ouvertes ou installez une hotte aspirante à évacuation
extérieure. En cas d’utilisation simultanée de plusieurs brûleurs ou
d’utilisation prolongée de la cuisinière, ouvrez une fenêtre ou mettez
en marche une hotte aspirante. Pour des informations plus détaillées,
reportez-vous aux Instructions d’installation.
Nous vous conseillons de lire les « Consignes générales de sécurité », en
particulier si vous n’avez jamais utilisé de cuisinière à gaz. Nous y donnons
des conseils de base en vue d’une utilisation sûre d’une cuisinière à gaz.
Alimentation en gaz et électricité
Vérifi ez que l’alimentation en gaz est en marche et que l’alimentation
électrique de la cuisinière est raccordée et en marche.
La cuisinière a besoin d’électricité.
Odeur de neuf
Une légère odeur de neuf peut se dégager lors de la première utilisation de
la cuisinière. Elle disparaîtra rapidement à l’usage.
Sécurité avant tout Page 30
Brûleurs de table de cuisson Page 31
Brûleur Wok central Page 32
Four Cuisson lente Page 33
Gril (Partie supérieure droite) Page 34
Fours ventilés Page 35
Guide pour la cuisson au four Page 35
Nettoyage de la cuisinière Page 37
Dépannage Page 38
Consignes générales de sécurité Page 39
Entretien et pièces de rechange Page 41
Installation Page 41
Entretien Page 47
Fiche technique Page 51
Modifi cation en vue de l’utilisation d’un autre gaz Page 52
Schéma de câblage Page 54
Page 31

31
Français
Veillez à ce que les fl ammes ne dépassent pas des
récipients de cuisson. Utilisez un couvercle sur les
récipients de cuisson pour porter à ébullition plus
rapidement.
N’utilisez pas de casseroles ou marmites à fond concave
ou à fond à rebord incurvé vers le bas.
L’utilisation de dispositifs de mijotage, de type plaques
d’amiante ou plaques métalliques, est DECONSEILLEE.
Ces dispositifs diminueront les performances de la
cuisinière et risquent d’endommager les grilles de la
table de cuisson.
N’utilisez pas de récipients de cuisson instables ou
déformés susceptibles de se renverser, ni de récipients
de cuisson à fond de très petit diamètre (casseroles à
lait, pocheuses individuelles, etc.).
Diamètres minimum des récipients de cuisson
Il est recommandé d’utiliser des récipients de
diamètre minimum de 120 mm pour les brûleurs
extérieurs et 160 mm pour le brûleur central.
Lorsque vous appuyez sur un bouton de la table de
cuisson, une étincelle se produit à chaque brûleur, ce
qui est tout à fait normal.
Si la fl amme d’un brûleur de la table de cuisson s’éteint
aussitôt après son allumage, éteignez le brûleur et
attendez une minute avant de rallumer.
Vous pouvez retirer la tête du brûleur pour le nettoyer.
Reportez-vous à la page « Nettoyage de la cuisinière ».
En cas de débordement, essuyez dès que possible
la surface située autour des brûleurs de la table de
cuisson. Essayez d’essuyer la substance renversée
pendant que la table est encore chaude.
Remarque :
Les récipients en aluminium peuvent laisser des traces
de métal au niveau des grilles de la table de cuisson.
Brûleurs de table de cuisson
Le schéma au-dessous de chaque bouton indique le
brûleur associé à ce bouton. En appuyant sur le bouton,
le brûleur est mis en marche par le biais d’un système
d’allumage par étincelle. Chaque brûleur est également
doté d’un dispositif de sécurité spécial qui coupe
l’alimentation en gaz en cas d’extinction de la fl amme.
Appuyez sur un bouton et
mettez-le sur le symbole
grande fl amme ( ).
Continuez d’appuyer sur
le bouton pour permettre
l’arrivée du gaz dans le
brûleur pendant quelques
secondes. Le système
d’allumage produit une
étincelle et allume le gaz.
Si le brûleur s’éteint lorsque vous relâchez le bouton
de commande, le dispositif de sécurité n’a pas été
enclenché. Mettez le bouton de commande sur la
position Arrêt [Off] et attendez une minute avant
d’essayer de nouveau, en appuyant sur le bouton
pendant un peu plus longtemps.
Tournez le bouton pour régler la hauteur de fl amme.
Le symbole petite fl amme indique la « position
minimum ». Tournez le bouton vers celle-ci lorsqu’un plat
est parvenu à ébullition.
Page 32

32
Français
Ces traces sont sans incidence sur la durabilité de
l’émail et l’emploi d’un nettoyant pour métaux permettra
de les supprimer.
Brûleur Wok central
Le brûleur Wok est conçu pour être placé sur le brûleur
central. Il n’est pas conçu pour être placé sur les autres
grilles.
Il doit être placé de sorte que les découpes du brûleur
reposent directement sur les grilles de brûleur saillantes.
Les Woks peuvent avoir des tailles et des formes très
variées. Il est important que le Wok soit posé de manière
stable. Toutefois, si le Wok est trop grand ou trop petit, il
ne sera pas bien maintenu en place par le brûleur.
Lors de la pose du brûleur, vérifi ez qu’il repose bien sur
les barres de la grille.
Assurez-vous qu’il est stable et que le Wok est placé à
niveau sur le brûleur.
Le support spécial deviendra très chaud pendant
l’utilisation – attendez suffi samment longtemps pour
le laisser refroidir avant de le retirer.
Cuisine au Wok
Le Wok permet de faire appel à 5 méthodes de cuisson
traditionnelle orientale : -
Friture rapide à feu vif
Aliments sautés
Aliments frits
Cuisson à la vapeur
Aliments braisés
La technique de la friture rapide à feu vif est à présent la
méthode de cuisine orientale typique la plus populaire.
Ce procédé de manipulation continue du Wok nécessite
l’addition individuelle de chaque ingrédient, le temps
de préparation très rapide permettant aux aliments de
conserver leur couleur et leur valeur nutritive tout en
restant croquants.
Les 4 autres méthodes de cuisson au Wok ne
nécessitent pas de remuer constamment les aliments.
Ces techniques exigent d’utiliser un support très stable
car le Wok contient généralement de l’eau ou de l’huile
à une température très élevée. Si vous recourez à ces
méthodes de cuisson, le brûleur Wok permettra d’obtenir
une meilleure stabilité, mais restez vigilant.
Friture
Ne faites pas frire une trop grande quantité d’aliments à
la fois, en particulier dans le cas d’aliments congelés.
L’huile refroidirait trop et les aliments frits seraient gras.
Séchez toujours soigneusement les aliments avant
la cuisson et plongez-les lentement dans l’huile ou la
graisse chaude. En particulier, des aliments congelés
plongés trop rapidement dans le bain de friture
provoqueront des éclaboussures brûlantes ou un
bouillonnement important.
Ne placez jamais de couvercle sur le récipient pendant
le chauffage du bain de friture ou pendant la friture.
Veillez à ce que l’extérieur du récipient de friture soit
propre, sans traces d’huile ou de graisse.
Ne réchauffez les aliments qu’une seule fois.
Page 33

33
Français
Four Cuisson lente
Bouton de commande du four Cuisson lente
Ce four permet une cuisson lente, de longue durée (6 à
8 heures), et le maintien des aliments au chaud. Il peut
également servir de chauffe-plats.
Faites particulièrement attention lors du chauffage
de plats en porcelaine - utilisez la température
minimale.
Utilisation du réglage Cuisson
lente
Le réglage Cuisson
lente correspond à
la partie située entre
110°C et 120°C sur le
bouton de commande
du four.
Le four Cuisson lente est doté de panneaux latéraux à
revêtement émaillé spécial, partiellement autonettoyants.
Pour plus de renseignements sur le nettoyage des fours,
reportez-vous à la section « Nettoyage de la cuisinière »
des présentes instructions.
Points importants lors de la préparation des aliments.
Ne placez pas les plats directement sur la sole du four.
Placez-les toujours sur la grille fournie avec le four.
La grille peut être bloquée en position, mais est
amovible pour permettre le nettoyage. Reportez-vous à
la section « Nettoyage de la cuisinière » des présentes
instructions.
Enfoncez bien les plats dans le four pour bien les placer
au-dessus de l’élément sous la plaque inférieure.
Avant de préparer les aliments, vérifi ez que les plats ne
sont pas trop grands pour le four.
Tous les plats cuits en mode Cuisson lente exigent un
temps de cuisson minimum de 6 heures. On peut les
laisser sur ce mode de cuisson pendant 1 à 2 heures
supplémentaires, mais dans certains cas, ceci peut
entraîner une détérioration visible de l’apparence des
aliments.
Les rôtis et la volaille doivent être cuits à 180°C pendant
30 minutes avant d’être transférés dans le four Cuisson
lente.
N’utilisez pas le mode Cuisson lente pour les rôtis de
plus de 2,7 kg et la volaille de plus de 2 kg.
Placez toujours les rôtis couverts sur une grille placée
au-dessus d’un plat à viande, pour faciliter la circulation
de l’air.
Dans le cas de viande de porc et de volaille, veillez à
ce que la température interne de la viande atteigne au
minimum 90°C.
N’utilisez pas le mode Cuisson lente pour la viande ou la
volaille farcie.
Les soupes, les plats cuits en cocotte et les liquides
doivent toujours être parvenus à ébullition avant d’être
mis au four. Dans le cas des plats cuits en cocotte,
recouvrez les aliments avec une feuille d’aluminium
avant de placer le couvercle, pour prévenir l’évaporation.
Avant la cuisson, décongelez toujours complètement les
aliments congelés.
Coupez les légumes-racines en petits morceaux pour
faciliter la cuisson.
Vérifi ez l’assaisonnement et la consistance à la fi n de la
cuisson.
Les plats à base d’œufs et de poisson nécessitent
seulement entre 1 et 5 heures de cuisson et doivent
être cuits pendant la journée, pour permettre le contrôle
occasionnel de la cuisson.
Les haricots rouges secs doivent bouillir pendant dix
minutes au minimum, après trempage, et avant d’être
ajoutés à un plat, quel qu’il soit.
Conservation et réchauffage des
aliments
Si les aliments doivent être congelés ou ne seront
pas servis immédiatement, faites-les refroidir dans un
récipient propre, le plus rapidement possible.
Les aliments congelés doivent être décongelés
complètement au réfrigérateur avant d’être réchauffés.
Réchauffez les aliments complètement et rapidement,
sur la table de cuisson ou à four chaud à 180°C, puis
servez immédiatement.
Ne réchauffez les aliments qu’une seule fois.
Page 34

34
Français
Gril (Partie supérieure droite)
Attention : Des composants accessibles risquent de
devenir chauds pendant l’utilisation du gril. Eloignez
les enfants de la cuisinière.
Si la surface en verre du gril est fi ssurée, mettez
immédiatement la cuisinière hors tension. Ne remettez
pas la cuisinière sous tension tant qu’elle n’a pas été
réparée.
LA PORTE DU COMPARTIMENT DU GRIL DOIT
RESTER OUVERTE PENDANT L’UTILISATION DU
GRIL.
Bouton de commande du gril
Le gril instantané ultra-rapide est divisé en deux parties
pour économiser l’énergie et répondre aux besoins de
cuisson individuels.
Tournez le bouton de commande du gril en sens horaire
pour utiliser la totalité de la surface du gril, pour la
cuisson de quantités importantes d’aliments.
Pour de petites quantités d’aliments (2 tranches de pain
à griller, une ou deux côtelettes, etc.), tournez le bouton
en sens anti-horaire. Seule la partie centrale du gril sera
en marche.
La plupart des aliments sont cuits à température élevée,
mais dans le cas de morceaux de viande/volaille plus
épais, et pour obtenir un steak bien cuit, on peut réduire
la température en mettant le bouton sur un réglage
inférieur.
Un pré-chauffage à température élevée, pendant 2
minutes environ, est recommandé.
La lèchefrite se place sur la grille fournie à cet effet.
(pour la photo, la lèchefrite et la grille ont été retirées du
compartiment du gril)
La grille peut être bloquée en position, mais est
amovible pour permettre le nettoyage. Reportez-vous à
la section « Nettoyage de la cuisinière » des présentes
instructions.
Vérifi ez que la lèchefrite est bien enfoncée, jusqu’au
fond du compartiment du gril.
Les aliments doivent être cuits sur la grille ou à même
la lèchefrite. Les plats cuits au four peuvent être ensuite
dorés au gril; pour ce faire, placez le plat dans la
lèchefrite et insérez celle-ci dans la partie inférieure du
compartiment du gril.
Le compartiment du gril est doté de panneaux latéraux à
revêtement émaillé spécial, partiellement autonettoyants.
Pour plus de renseignements sur le nettoyage des fours,
reportez-vous à la section « Nettoyage de la cuisinière »
des présentes instructions.
Page 35

35
Français
Fours ventilés
L’appareil devient chaud lorsqu’il est en marche. Veillez à
ne pas toucher les éléments chauffants à l’intérieur des
fours.
Les deux fours inférieurs sont des fours ventilés. Les
ventilateurs brassent l’air chaud en permanence, pour
une cuisson plus rapide et plus uniforme.
Le pré-chauffage des fours n’est nécessaire que pour
la cuisson des petits gâteaux (scones), de la pâte
feuilletée, des Yorkshire puddings, du pain, etc.
Fonctionnement des fours
Four ventilé gauche Four ventilé droit
Avant la première utilisation des fours, faites chauffer les
fours à 200°C pendant 30 minutes afi n d’éliminer l’odeur
de neuf.
En général, les températures de cuisson recommandées
pour les fours ventilés sont inférieures à celles des fours
conventionnels.
Tournez le bouton de réglage de température du four
pour le mettre sur la température requise.
Le voyant du four s’allumera jusqu’à ce que le four
atteigne la température requise.
Il s’allumera et s’éteindra pendant la cuisson.
Guide pour la cuisson au four
Conseils de cuisson
Lors de l’utilisation des fours ventilés, réduisez
la température de cuisson utilisée avec un four
conventionnel de 10°C à 20°C et le temps de cuisson
de 10 minutes (au maximum) pour chaque heure de
cuisson.
Avant de servir, vérifi ez que les aliments sont très
chauds.
La cuisson au four ventilé est particulièrement
recommandée pour la cuisson sur plusieurs grilles du
four à la fois.
Veillez à ce que les grilles soient toujours insérées à
fond dans le four.
Placez les plaques de cuisson, moules à viande, etc.,
à niveau, au centre des grilles du four. Eloignez les
plaques et les plats de cuisson des bords du four, afi n
de ne pas trop dorer les aliments.
Pour un dorage uniforme, il est recommandé d’utiliser
une plaque de cuisson de 300 mm x 240 mm au
maximum.
Lorsque le four est en marche, ne laissez pas la porte
du four ouverte plus longtemps que nécessaire, afi n de
prévenir une surchauffe des boutons de commande.
Laissez toujours un doigt de largeur entre des plats
placés sur une grille de four, pour faciliter la circulation
de chaleur autour des plats.
Si vous souhaitez dorer un fond de tarte, préchauffez la
plaque de cuisson pendant 15 minutes avant de placer
le plat au centre de la plaque.
Page 36

36
Français
Placez les plats susceptibles de bouillir et déborder
pendant la cuisson sur une plaque de cuisson.
N’oubliez pas : toutes les cuisinières sont différentes –
les températures de vos nouveaux fours Falcon peuvent
être différentes de celles de votre ancienne cuisinière.
Vous pouvez adapter les températures et les temps de
cuisson en fonction de vos goûts.
Le tableau de cuisson est un guide général, et les temps
et températures de cuisson peuvent varier selon les
recettes individuelles. Les sections sur la cuisson des
viandes doivent être utilisées à titre de guide général,
mais peuvent varier en fonction du poids et de la forme
des rôtis (désossés ou non).
Avant la cuisson, décongelez les rôtis congelés.
Les temps de cuisson sont donnés pour une cuisson
à découvert. Prolongez le temps de cuisson en cas de
cuisson couverte.
La dinde/le poulet est cuit lorsque le jus de viande est
de couleur claire lorsqu’on insère une brochette dans la
viande. Si le jus est toujours rose, continuez la cuisson,
en vérifi ant toutes les 15 minutes.
Ne placez pas la grille ou les aliments sur la sole du four.
Pour faciliter la circulation de chaleur, laissez toujours un
doigt de largeur entre les plats et entre les plats et les
parties latérales du four.
Vapeur
Pendant la cuisson d’aliments à haute teneur en eau
(frites surgelées, par exemple) un peu de vapeur peut
être visible à la grille à l’arrière du chauffe-plats.
Il peut y avoir formation de condensation sur la
cuisinière. Ceci est tout à fait normal et il n’y a pas lieu
de s’inquiéter. La condensation se forme en présence
de chaleur et d’humidité. Si possible, veillez à ce que
les aliments à forte teneur en humidité (plats cuits
en cocotte, par exemple) soient couverts. Si vous
constatez la formation de condensation, essuyez-la
immédiatement. Ne laissez pas les aliments refroidir
dans le four après l’avoir éteint.
La cuisson d’aliments à haute teneur en eau peut
produire une « bouffée de vapeur » à l’ouverture de
la porte du four. Lorsque vous ouvrez la porte du four,
reculez-vous et attendez que la vapeur se soit dissipée.
Généralités
Les fours ventilés sont dotés de panneaux latéraux,
supérieurs et arrière, à revêtement émaillé spécial,
partiellement autonettoyants. Les panneaux internes
autonettoyants (voir la section « Nettoyage de la
cuisinière ») sont plus effi caces lorsqu’on prévient
les projections grasses. Couvrez la viande pendant la
cuisson.
Pour réduire les projections grasses lorsque vous
ajoutez des légumes dans la graisse chaude autour d’un
rôti, séchez soigneusement les légumes ou enduisez-les
d’un peu d’huile à friture.
Pour plus de renseignements sur le nettoyage des fours,
reportez-vous à la section « Nettoyage de la cuisinière »
des présentes instructions.
Ne laissez pas les jeunes enfants grimper sur les
portes de four ouvertes.
Grilles de four ventilé
Ne placez pas une grille directement sur une autre grille.
Si vous utilisez plusieurs grilles, laissez toujours au
minimum un espace de glissière entre chaque grille.
Les grilles du four sont retenues par des butées
lorsqu’elles sont tirées vers l’avant, mais peuvent être
retirées complètement et remises en place facilement.
Pour retirer une grille, vérifi ez d’abord qu’elle est bien
insérée jusqu’au fond, afi n que la butée d’arrêt soit
alignée sur le rebord coudé de la grille.
Soulevez l’avant de la grille pour la faire passer audessus de la butée.
Page 37

37
Français
Tirez la grille vers l’avant.
Pour replacer la grille, tenez-la de façon à la surélever
légèrement à l’avant, et placez la partie arrière sur
les glissières latérales. Insérez la grille jusqu’au fond
du four, puis abaissez l’avant de la grille pour la faire
reposer sur les glissières latérales.
Nettoyage de la cuisinière
Avant un nettoyage complet, mettez la cuisinière hors
tension. N’oubliez pas de remettre sous tension lorsque
le nettoyage est terminé.
N’utilisez jamais de solvants pour peinture, de
cristaux de soude, de nettoyants caustiques, de
poudres biologiques, d’eau de Javel, de nettoyants
chlorés, de produits abrasifs à gros grain ou de sel.
Ne mélangez pas plusieurs produits nettoyants, car
ils risquent de réagir entre eux et d’avoir des effets
nocifs.
Toutes les parties de la cuisinière peuvent être lavées
à l’eau savonneuse chaude, mais veillez à prévenir
toute infi ltration d’eau dans l’appareil.
Table de cuisson en acier
inoxydable
Retirez les récipients de la table de cuisson. Enlevez
les grilles de brûleur de l’endroit où s’est produit le
débordement et placez-les avec précaution dans l’évier,
dans de l’eau savonneuse chaude. Essuyez tout débris
qui se trouverait sur la table de cuisson.
N’utilisez pas de produits nettoyants abrasifs, y compris
des produits nettoyants semi-liquides, sur les surfaces
en acier inoxydable. Pour obtenir les meilleurs résultats
possibles, utilisez un produit détergeant liquide.
Rincez à l’eau froide et séchez soigneusement avec un
chiffon doux propre. Vérifi ez que toutes les pièces sont
sèches avant de les remettre en place.
Brûleurs de table de cuisson
Les têtes et chapeaux de brûleurs sont amovibles pour
faciliter le nettoyage. Vérifi ez qu’ils sont absolument secs
avant de les remettre en place.
Chapeau de brûleur
Encadrement de brûleur
Lorsque vous reposez un chapeau de brûleur, veillez à
le placer correctement dans son encadrement.
socle du brûleur de table de
cuisson
partie inférieure du
chapeau du brûleur
Si vous regardez la partie inférieure du chapeau
du brûleur, vous verrez deux petits « ergots » qui
s’inséreront dans les deux encoches dans le socle du
brûleur.
Assurez-vous que les orifi ces de brûleur ne sont pas
bloqués. En cas d’obstruction des orifi ces, retirez les
particules tenaces à l’aide d’un bout de fusible.
Four Cuisson lente et Gril
Le four Cuisson lente et le gril sont dotés de panneaux
latéraux à revêtement émaillé spécial, partiellement
autonettoyants.
N’utilisez pas de produits de nettoyage susceptibles
d’obstruer les pores du revêtement spécial (pâtes et
poudres, tampons à récurer, paille de fer, aérosols,
dégraisseurs applicables au pinceau, solutions
caustiques, récureurs métalliques/couteaux) et
d’empêcher le nettoyage continu.
Page 38

38
Français
La grille peut être bloquée en position, mais est
amovible pour permettre le nettoyage. Pour retirer la
grille, soulevez l’avant de la grille et tirez vers l’avant.
Lavez la lèchefrite et la grille à l’eau savonneuse
chaude.
Après les grillades de viandes ou d’aliments salissants,
faites tremper dans l’évier, pendant quelques minutes,
immédiatement après la cuisson. Les taches tenaces
sur la grille peuvent être enlevées à l’aide d’une brosse
en nylon.
Panneau de commande et portes
des fours
Les meilleurs résultats s’obtiennent avec des détergents
liquides.
Le panneau et les boutons de commande doivent être
nettoyés uniquement avec un chiffon doux imbibé d’eau
savonneuse chaude. Veillez à prévenir toute infi ltration
d’eau dans l’appareil. Essuyez avec un chiffon humide
propre, puis lustrez à l’aide d’un chiffon sec. Les portes
des fours doivent être nettoyées uniquement avec un
chiffon doux imbibé d’eau savonneuse chaude.
Nettoyage des composants en cuivre
Sur certains modèles, un revêtement de cuivre naturel
non enduit qui risque de ternir avec le temps donne un
aspect authentique à l’appareil.
Pour redonner son aspect lustré à la cuisinière, nettoyez
ces zones à l’aide d’un nettoyant spécial métaux. Les
tâches tenaces sur les brûleurs en aluminium peuvent
être enlevées à l’aide d’un produit similaire. Ce qui
permettra également de redonner à l’appareil son
aspect lustré.
Fours ventilés
Les fours sont dotés de panneaux amovibles à
revêtement émaillé, partiellement autonettoyants.
Ceci n’empêche pas complètement la formation de
taches sur le revêtement, mais réduit le nettoyage
manuel nécessaire.
Le nettoyage automatique des panneaux est plus
effi cace à une température supérieure à 200°C. Si,
en général, vous utilisez le four à des températures
inférieures, retirez occasionnellement les supports
de grille et essuyez les panneaux avec un chiffon non
pelucheux imbibé d’eau savonneuse chaude. Séchez
et replacez les panneaux dans le four chauffé à 200°C
pendant environ une heure. Ceci assurera un bon
fonctionnement des panneaux autonettoyants.
Ceci n’empêche pas complètement la formation de
taches sur le revêtement, mais réduit le nettoyage
manuel nécessaire.
N’utilisez pas de paille de fer (ou tout autre matériau
susceptible de rayer la surface). N’utilisez pas de
tampons de nettoyage pour fours.
Dépannage
De la vapeur s’échappe du four
Pendant la cuisson d’aliments à haute teneur en eau
(frites surgelées, par exemple) un peu de vapeur peut
être visible à la grille arrière. Faites attention en ouvrant
la porte du four, une bouffée de vapeur peut s’échapper
momentanément à l’ouverture du four. Reculez-vous et
attendez que la vapeur se soit dissipée.
Le ventilateur du four est bruyant
Le bruit du ventilateur peut changer pendant le
chauffage du four – ceci est tout à fait normal.
Les boutons de commande deviennent chauds
lorsque j’utilise le four ou le gril; comment
faire pour empêcher cela ?
Ceci est dû à la chaleur provenant du four ou du gril.
Ne laissez pas la porte du four ouverte. Lorsque vous
utilisez le gril, vérifi ez que la lèchefrite du gril est bien
insérée jusqu’au fond.
En cas de problème concernant l’installation,
si mon installateur d’origine ne peut pas venir
résoudre le problème, à qui incombent les
frais ?
C’est à vous qu’incombent ces frais. Les sociétés
d’entretien factureront leurs interventions si elles
réparent une installation effectuée par votre installateur
d’origine. Il est de votre intérêt de contacter votre
installateur d’origine.
Disjoncteurs-détecteurs de fuites de terre
commandés par injection de courant
Lorsque l’installation de la cuisinière est protégée
par un dispositif pour courant résiduel (DCR) d’une
sensibilité de 30 milliampères, l’utilisation combinée
de votre cuisinière et d’autres appareils domestiques
peut occasionnellement causer des disjonctions
fortuites. Dans ce cas, il est utile de protéger le circuit
Page 39

39
Français
de la cuisinière avec un dispositif de 100 mA. Cette
intervention doit être effectuée par un électricien qualifi é.
Les aliments cuisent trop lentement, trop
rapidement, ou brûlent
Les temps de cuisson peuvent être différents de ceux de
votre ancien four. En fonction des goûts individuels, les
températures devront peut-être être modifi ées dans un
sens ou dans l’autre, pour obtenir les résultats que vous
recherchez. Essayez une cuisson à des températures
plus élevées.
La cuisson au four n’est pas uniforme
N’utilisez pas de plat ou de plaque de dimensions
supérieures à 300mm x 240 mm.
Dans le cas de la cuisson d’un grand plat, vous devrez
peut-être le tourner pendant la cuisson.
Si vous utilisez deux grilles, vérifi ez qu’il y a assez de
place pour permettre à la chaleur de circuler. Lorsque
vous insérez une plaque de cuisson dans le four, veillez
à la placer bien au centre de la grille.
Vérifi ez que le joint d’étanchéité de la porte n’est pas
endommagé et que le loquet de porte est réglé de façon
à ce que la porte soit bien appuyée contre le joint.
Un récipient d’eau placé sur la grille doit avoir une
profondeur uniforme. (S’il est plus profond à l’arrière,
par exemple, l’arrière de la cuisinière doit être levé ou
l’avant de la cuisinière abaissé). Si la cuisinière n’est pas
à niveau, demandez à votre fournisseur de la mettre à
niveau.
Avec le temps, la température du four de la
cuisinière devient plus chaude
Si le fait de mettre le bouton de réglage sur une
température inférieure n’a pas eu d’effet ou a eu un
effet temporaire, vous devrez peut-être remplacer le
thermostat. Cette intervention doit être effectuée par un
spécialiste de l’entretien.
Le gril ne cuit pas correctement
Utilisez-vous la lèchefrite et la grille fournies avec la
cuisinière ? Utilisez-vous la lèchefrite sur le support de
gril et non pas directement sur la surface inférieure de
l’enceinte du gril ? La lèchefrite est-elle insérée à fond
jusqu’à la butée arrière ?
Défaillance de l’allumage ou des brûleurs de
table de cuisson
L’appareil est-il sous tension ?
Les encoches du générateur d’étincelles (électrode
d’allumage) ou du brûleur sont-elles obstruées par des
débris ?
Les chapeaux des brûleurs sont-ils placés
correctement ?
Les brûleurs de la table de cuisson ne
s’allument pas
Si un des brûleurs ou tous les brûleurs de la table de
cuisson ne s’allument pas, vérifi ez que les composants
ont été remis en place correctement après leur
essuyage ou retrait à des fi ns de nettoyage.
Vérifi ez que l’alimentation en gaz n’est pas défectueuse.
Pour ce faire, vérifi ez le fonctionnement de vos autr es
appareils à gaz.
Les brûleurs produisent-ils une étincelle lorsque vous
appuyez sur le bouton de commande ? Dans le cas
contraire, vérifi ez si l’appareil est sous tension.
Consignes générales de sécurité
Cet appareil doit être installé par une personne
compétente, conformément aux instructions
d’installation. L’installation doit être conforme aux
réglementations applicables, ainsi qu’aux prescriptions
de la compagnie d’électricité locale.
Si vous sentez une odeur de gaz
Veuillez ne pas
Fumer ou allumer d’allumettes
Actionner un interrupteur électrique, ni pour
allumer ni pour éteindre.
Veillez à
Eteindre toute fl amme nue
Couper le gaz au compteur ou au niveau de la
bouteille de gaz
Ouvrir portes et fenêtres pour évacuer le gaz.
Eloigner toute personne de l’endroit concerné.
Appeler votre fournisseur de gaz.
Cette cuisinière est conçue uniquement pour un usage
domestique. Toute autre utilisation n’engage ni la
responsabilité, ni la garantie du fabricant.
L’utilisation d’un appareil de cuisson à gaz produit de
la chaleur et de l’humidité dans la pièce contenant
l’appareil. Veillez à ce que la cuisine soit bien ventilée :
laissez les ouvertures de ventilation naturelle ouvertes
ou installez un dispositif de ventilation mécanique, (hotte
d’extraction mécanique).
Une utilisation intensive prolongée peut nécessiter une
ventilation supplémentaire, par exemple l’ouverture
d’une fenêtre. Utilisez des extracteurs ou des hottes
aspirantes dans la mesure du possible.
La cuisinière doit faire l’objet d’un entretien effectué
par un technicien d’entretien qualifi é, lequel doit
utiliser uniquement des pièces de rechange
approuvées. Demandez à l’installateur de vous indiquer
l’emplacement du commutateur de commande de
la cuisinière. Notez cet emplacement à des fi ns de
référence. Laissez toujours la cuisinière refroidir et
mettez-la hors tension avant de la nettoyer ou d’effectuer
une intervention d’entretien, sauf indication contraire
dans les présentes instructions.
Toutes les parties de la cuisinière deviennent chaudes
lorsque l’appareil est en marche et resteront chaudes
même lorsque la cuisson est terminée.
Page 40

40
Français
Prenez garde lorsque vous touchez la cuisinière ; pour
limiter les risques de brûlure, vérifi ez toujours que les
commandes sont sur ARRET (OFF) et que la cuisinière
a refroidi avant de la nettoyer.
Au besoin, utilisez des gants de cuisine secs – l’emploi
de gants humides risque de causer des brûlures dues à
la vapeur lors du contact avec une surface chaude. Ne
faites jamais fonctionner la cuisinière avec des mains
mouillées.
N’utilisez pas de torchon ou autre chiffon épais à la
place d’un gant de cuisine. Ils risquent de s’enfl ammer
au contact d’une surface chaude.
Nettoyez avec précaution. Si vous utilisez une éponge
ou un chiffon humide pour essuyer des taches sur
une surface chaude, prenez garde aux brûlures par la
vapeur. Certains produits nettoyants peuvent produire
des vapeurs nocives au contact d’une surface chaude.
N’utilisez pas de casseroles instables et tournez les
manches vers l’intérieur de la table de cuisson.
Ne laissez jamais les bébés, les touts-petits et les
jeunes enfants s’approcher de la cuisinière. Ne les
laissez jamais s’asseoir ni monter sur une partie de
la cuisinière. Apprenez-leur à ne pas jouer avec les
commandes ou avec une partie quelconque de la
cuisinière.
Ne rangez jamais dans des placards au-dessus d’une
cuisinière quoi que ce soit susceptible d’attirer l’attention
des enfants – des enfants grimpant sur une cuisinière
pour atteindre des objets risquent de se blesser
gravement.
Nettoyez uniquement les pièces indiquées dans les
présentes instructions.
Pour des raisons d’hygiène et de sécurité, la cuisinière
doit toujours être propre, afi n de prévenir le risque
d’incendie causé par l’accumulation de graisse et autres
particules alimentaires.
Veillez à ce que les revêtements muraux infl ammables,
rideaux, etc. soient toujours suffi samment éloignés de la
cuisinière.
N’utilisez pas d’aérosols à proximité de la cuisinière
lorsque celle-ci est en marche.
N’entreposez pas de matériaux combustibles ou de
liquides infl ammables à proximité de la cuisinière.
N’utilisez pas d’eau pour éteindre les incendies dus à la
graisse. Ne soulevez jamais un récipient de cuisson qui
a pris feu. Eteignez la cuisinière. Etouffez un récipient
qui a pris feu, sur un plan de travail, en le recouvrant
complètement avec un couvercle de taille appropriée ou
une plaque de cuisson. Si possible, utilisez un extincteur
à poudre chimique ou à mousse de type polyvalent.
Ne laissez jamais la cuisinière en marche sans
surveillance si les brûleurs de la table de cuisson sont
réglés sur hautes températures. Le débordement des
récipients de cuisson peut produire de la fumée et des
taches de gras qui risquent de s’enfl ammer.
Ne portez pas de vêtements amples ou fl ottants lorsque
vous utilisez la cuisinière. Prenez garde lorsque vous
essayez d’atteindre des objets dans des placards
situés au-dessus de la table de cuisson. Des matériaux
infl ammables risquent de s’enfl ammer au contact d’une
surface chaude et provoquer des brûlures graves.
Faites très attention lors du chauffage des graisses et
des huiles car celles-ci risquent de s’enfl ammer en cas
de surchauffe.
Si possible, utilisez un thermomètre à bain de friture
pour prévenir une surchauffe de l’huile au-delà du point
de fumée.
Ne laissez jamais une friteuse sans surveillance. Faites
toujours chauffer l’huile lentement, en la surveillant.
Les friteuses ne doivent être remplies qu’à un tiers de
leur capacité. Une friteuse trop pleine peut déborder
lorsqu’on y plonge des aliments. Si vous utilisez un
mélange d’huile et de graisse pour la friture, mélangezles avant de chauffer, ou pendant la fonte des graisses.
Les aliments à frire doivent être le plus sec possible.
La présence de cristaux de glace sur des aliments
congelés ou d’humidité sur des aliments frais peut
provoquer une ébullition et un débordement de l’huile.
Surveillez attentivement pour prévenir les débordements
et la surchauffe pendant la friture à haute ou moyenne
température. N’essayez jamais de déplacer un récipient
de cuisson contenant de l’huile chaude, en particulier
une friteuse. Attendez que l’huile ait refroidi.
Lorsque le gril est en marche, ne vous servez pas de la
grille d’évacuation (la grille le long de la partie arrière de
la cuisinière) pour réchauffer des assiettes ou des plats,
sécher des torchons ou ramollir du beurre.
Si vous utilisez un appareil électrique à proximité de la
table de cuisson, veillez à ce que le cordon de l’appareil
n’entre pas en contact avec la table de cuisson.
Veillez à prévenir toute infi ltration d’eau dans la
cuisinière.
Seuls certains types de récipients en verre,
vitrocéramique, terre cuite ou autres récipients émaillés
peuvent être utilisés sur la table de cuisson; les autres
risquent de se briser en raison du changement soudain
de température.
N’autorisez personne à grimper, se tenir debout ou
s’accrocher sur ou à une partie de la cuisinière.
Ne recouvrez pas les grilles, les panneaux internes ou la
voûte du four de papier aluminium.
Ne chauffez jamais des récipients alimentaires qui n’ont
pas été ouverts. La pression accumulée à l’intérieur du
récipient peut le faire éclater et blesser l’utilisateur.
La cuisinière est conçue uniquement pour la cuisson
domestique et ne doit pas être utilisée à d’autres fi ns.
N’UTILISEZ PAS le four pour chauffer la cuisine. Non
seulement c’est un gaspillage d’énergie, mais il peu y
avoir surchauffe des boutons de commande.
Page 41

41
Français
Lorsque le four est en marche, NE LAISSEZ PAS la
porte du four ouverte plus longtemps que nécessaire.
Les caractéristiques techniques de cette cuisinière ne
doivent pas être modifi ées.
Cet appareil est lourd; prenez garde lorsque vous le
déplacez.
Lorsque la cuisinière n’est pas utilisée, vérifi ez que les
boutons de commande sont sur la position Arrêt (Off).
Entretien et pièces de rechange
Veuillez remplir la fi che technique ci-dessous et la
conserver à des fi ns de référence ultérieure – cette
information nous permettra d’identifi er exactement
votre cuisinière et de mieux répondre à vos besoins.
Cette fi che vous fera gagner du temps et vous sera
très utile plus tard en cas de problème concernant
votre cuisinière. Nous vous conseillons également de
conserver votre reçu d’achat avec la présente brochure.
Vous devrez peut-être présenter ce reçu pour valider
une visite sur place dans le cadre de la garantie.
Type de combustible :
Mixte
Nom et Couleur de l’appareil*
Falcon 1000
Appliance Serial Number *
Numéro de série de l’appareil*
Date d’achat
Nom et Adresse de l’installateur
Date d’installation
* Cette information fi gure sur le badge technique de
l’appareil.
En cas de problème
Dans le cas peu probable où vous auriez un problème
avec votre cuisinière, veuillez d’abord lire le reste
de la présente brochure, en particulier la section de
dépannage, pour vérifi er que l’appareil est utilisé
correctement.
Si le problème persiste, contactez votre fournisseur.
Nota
Si votre appareil n’est plus couvert par la garantie, notre
fournisseur de services d’entretien peut vous facturer
cette visite.
Si vous devez faire appel à un technicien d’entretien et
si le défaut n’est pas la responsabilité du fabricant, notre
fournisseur de services d’entretien se réserve le droit de
facturer son intervention.
Les rendez-vous non respectés par le client peuvent
être facturés.
Après la période de garantie
Nous recommandons un entretien périodique de nos
appareils pendant toute leur vie utile afi n de garantir des
performances et une effi cacité optimales.
Les travaux d’entretien doivent être effectués
uniquement par des personnes techniquement
compétentes et qualifi ées.
Pièces de rechange
Pour garantir une performance optimale et sûre, nous
recommandons l’utilisation exclusive de pièces d’origine.
N’utilisez pas de commandes de gaz remises à neuf ou
non autorisées. Contactez votre fournisseur.
Installation
Cette cuisinière est conçue uniquement pour un usage
domestique. Toute autre utilisation n’engage ni la
responsabilité, ni la garantie du fabricant.
Avant l’installation, vérifi ez que la cuisinière convient
au type de gaz et à la tension d’alimentation électrique.
Reportez-vous au badge technique de l’appareil.
Vérifi ez le type de gaz prévu pour votre cuisinière sur le
badge technique.
Modification
Cet appareil est de catégorie: -
G 20 20millibars
CAT II
2H3+
Un kit de modifi cation permettant l’utilisation d’autres
gaz est fourni avec la cuisinière.Si la cuisinière doit
être modifi ée pour fonctionner avec un autre gaz, nous
recommandons d’effectuer cette modifi cation avant
l’installation. Pour plus de détails, reportez-vous à la
section Modifi cation des présentes instructions.
Page 42

42
Français
Mesures/Règlements de sécurité
Cet appareil doit être installé par une personne
compétente. L’installation doit être conforme aux
réglementations applicables, ainsi qu’aux prescriptions
de la compagnie d’électricité locale. Lisez les
instructions avant d’installer ou d’utiliser cet appareil.
Dans votre intérêt et par souci de sécurité, légalement,
tous les appareils à gaz doivent être installés par des
personnes compétentes. Une installation incorrecte
n’engage ni la responsabilité, ni la garantie du fabricant,
et peut donner lieu à des poursuites.
Installez la cuisinière dans un endroit bien ventilé.
Ventilation
Cet appareil n’est pas raccordé à un dispositif
d’évacuation des produits de combustion. Il doit être
installé et raccordé conformément à la réglementation
en vigueur concernant l’installation. Prêtez
particulièrement attention à la réglementation en vigueur
concernant la ventilation.
Respectez la réglementation locale sur la ventilation,
mais au minimum :
Toutes les pièces nécessitent une fenêtre ouvrable ou
un dispositif équivalent, et certaines pièces nécessitent
une mise à l’air libre permanente en plus de la fenêtre
ouvrable. La cuisinière ne doit pas être installée dans
une chambre-salon de volume inférieur à 20 m3. En
cas d’installation dans une pièce de volume inférieur à
5 m3, une mise à l’air libre de surface utile de 100 cm2
est nécessaire; en cas d’installation dans une pièce de
volume entre 5 m3 et 10 m3, une mise à l’air libre de
surface utile de 50 cm2 est nécessaire; si le volume est
supérieur à 11 m3, aucune mise à l’air permanente n’est
nécessaire. Cependant, si la pièce a une porte ouvrant
directement sur l’extérieur, aucune mise à l’air libre
permanente n’est nécessaire, même pour une pièce de
volume entre 5 m3 et 10 m3. Si la pièce contient d’autres
appareils à combustible, une ventilation supplémentaire
peut être nécessaire.
Emplacement de la cuisinière
La cuisinière peut être installée dans une cuisine/un
salon-cuisine, mais PAS dans une pièce contenant une
baignoire ou une douche.
Positionnement de la cuisinière
Les schémas indiquent les cotes minimales
recommandées entre la cuisinière et les surfaces
adjacentes.
Les espaces de 3 mm de chaque côté permettent le
déplacement de la cuisinière
Le pourtour de la table de cuisson doit être au niveau ou
au-dessus de tout plan de travail adjacent. Au-dessus
du niveau de la table de cuisson, laissez un espace
de 75 mm entre chaque côté de la cuisinière et toute
surface verticale adjacente.
Pour les surfaces non-combustibles (telles que le métal
non peint ou les carrelages) cette cote peut être de
25 mm.
Laissez un espace de 800 mm au minimum entre la
partie supérieure de la table de cuisson et une surface
horizontale combustible.
Toute hotte de cuisinière doit être installée
conformément aux instructions du fabricant de hotte.
Les surfaces des meubles et des murs de chaque côté
et à l’arrière de l’appareil doivent être résistantes à la
chaleur, aux éclaboussures et à la vapeur. Certains
types de meubles de cuisine en vinyle ou en stratifi é
sont particulièrement susceptibles aux risques de
dommages thermiques et de décoloration. Nous
déclinons toute responsabilité pour des dommages
résultant d’une utilisation normale de la cuisinière
et subis par des matériaux qui se décollent ou se
décolorent à des températures de moins de 65°C audessus de la température ambiante.
Par mesure de sécurité, ne placez pas de rideaux
directement derrière la cuisinière.
Nous recommandons de laisser un espace de 1006mm
entre les unités pour permettre le déplacement de la
cuisinière. Si la cuisinière doit être encastrée, placez-la
à niveau avec l’élément d’un côté, puis montez l’élément
de l’autre côté.
Déballage de la cuisinière
N’enlevez aucun emballage de la cuisinière tant que
celle-ci n’est pas directement en face de l’emplacement
où elle sera installée (sauf si, dans son emballage
externe, la cuisinière ne peut pas passer par une porte).
Page 43

43
Français
Déplacement de la cuisinière
La cuisinière est très lourde. Prenez garde lorsque vous
la déplacez.
Nous recommandons de faire appel à deux personnes
pour déplacer la cuisinière. Déposez toutes les portes
: ouvrez complètement la porte, puis faites pivoter
le disque de blocage de la charnière de 90° en sens
horaire sur les deux charnières pour bloquer la porte en
position ouverte.
Fermez la porte avec précaution et, approximativement
à la position semi-fermée, les charnières se détacheront
du châssis de la cuisinière.
quadrant de charnière
position
d’origine
position de
blocage
disque à
encoche
encoche de
positionnement
de charnière
Rangez les portes, en lieu sûr.
Assurez-vous que le revêtement du sol est solidement
fi xé en place ou retirez-le afi n de ne pas l’abîmer en
déplaçant la cuisinière. Vous devrez utiliser l’outil de
mise à niveau.
Depuis l’avant, inclinez la cuisinière vers l’arrière
et retirez la partie avant du socle d’emballage en
polystyrène.
Répétez cette procédure à l’arrière et retirez la partie
arrière du socle.
La cuisinière est équipée de trois galets inférieurs. Les
dispositifs de réglage hexagonaux sont situés comme
illustré ci-dessous.
Insérez l’outil de mise à niveau dans le dispositif de
réglage hexagonal comme illustré ci-dessous.
Vissez pour abaisser le galet jusqu’à ce qu’il touche
le fond, puis donnez 10 tours complets (360°) en sens
horaire.
Veillez à abaisser les trois galets. Déroulez le
bord arrière du plateau d’emballage. Inclinez avec
précaution la cuisinière vers l’arrière et retirez le plateau
d’emballage. Poussez la cuisinière près de sa position
fi nale, en laissant juste assez de place pour pouvoir
avoir accès à l’arrière.
Mise à niveau
Nous vous recommandons d’utiliser un niveau à bulle
placé sur une des grilles de four pour vérifi er le niveau.
Placez la cuisinière à l’emplacement prévu pour son
installation, en veillant à ne pas exercer de force de
torsion lorsque vous l’insérez entre les éléments de
cuisine, pour ne pas l’endommager ou endommager les
éléments.
Les galets réglables permettent la mise à niveau de
la cuisinière. Pour régler la hauteur de l’arrière de la
cuisinière, utilisez l’outil de mise à niveau fourni pour
tourner les écrous de réglage aux coins avant inférieurs
de l’appareil.
Page 44

44
Français
Réglez la hauteur du galet avant pour mettre la
cuisinière à niveau. Tournez en sens horaire pour lever
la cuisinière et en sens anti-horaire pour l’abaisser.
Lorsque la hauteur et le niveau sont corrects, levez
l’avant de la cuisinière d’un tour du dispositif de réglage
du galet avant. Dévissez les supports avant jusqu’à
ce qu’ils touchent le sol. Vissez le dispositif de réglage
du galet avant en sens anti-horaire pour remonter le
galet avant, de sorte que l’avant de la cuisinière repose
sur les supports, et non pas sur le galet avant, afi n de
prévenir tout mouvement accidentel de la cuisinière.
Raccordement de gaz
Dispositif stabilisateur
Un dispositif stabilisateur doit être monté sur la
cuisinière si celle-ci est alimentée en gaz par le biais
d’un tuyau fl exible. Tout dispositif stabilisateur doit être
attaché à la structure de la pièce et doit pouvoir être
défait pour permettre le déplacement de la cuisinière à
des fi ns de nettoyage ou d’entretien.
Raccordement de gaz
Un robinet d’isolement de gaz doit être monté
entre l’alimentation en gaz et le tuyau fl exible de
raccordement. Le tuyau fl exible (non fourni avec la
cuisinière) doit être conforme aux normes appropriées.
En cas de doute, contactez votre fournisseur.
Les boîtiers arrière de la cuisinière limitent la position du
point d’alimentation. L’alimentation en gaz domestique
doit être terminée par un raccord orienté vers le bas.
Le raccord de l’appareil est situé juste au-dessous du
niveau de la table de cuisson, à l’arrière de la cuisinière.
Le raccord d’admission de la cuisinière est de type ISO
7-1 interne. Si vous devez utiliser un raccord ISO 2281, trouvez le raccord ISO 7-1/ISO 228-1 dans le kit de
conversion. Enduisez l’extrémité du raccord ISO 7-1 de
mastic d’étanchéité pour fi lets.
Vissez le raccord sur l’admission de la cuisinière,
en serrant uniquement à la main. Placez deux outils
appropriés - un sur l’admission pour prévenir tout
mouvement et un autre sur le raccord - et serrez le
raccord sur l’admission de la cuisinière.
Page 45

45
Français
Couple minimum 15 Nm.
Couple maximum 20 Nm
Raccordez le tuyau fl exible au raccord.
Montez le tuyau de façon à ce que les raccords
d’admission et de sortie soient verticaux et que le tuyau
pende en forme de «U».
Il est diffi cile de donner des cotes précises, étant
donné que la hauteur de la cuisinière est réglable et
que chaque raccordement est différent. Idéalement,
le raccord d’alimentation domestique doit être dans la
partie ombrée indiquée sur le schéma représentant
l’arrière de l’appareil.
Lorsque le raccordement est terminé, effectuez un essai
de pression pour contrôler l’étanchéité de la cuisinière.
Lors du contrôle de l’étanchéité, n’utilisez pas de liquide
détergent pour vaisselle, qui risque d’endommager le
matériel. Utilisez un produit conçu spécifi quement pour
la détection des fuites.
Essai de pression
La pression de gaz peut être mesurée au niveau du
point d’essai de pression qui se trouve sur le bloc de
raccordement du gaz. Allumez l’un des brûleurs de la
table de cuisson.
Si l’appareil est alimenté en gaz naturel, la pression doit
être de 20 millibars.
Remettez en place le chapeau du brûleur, en veillant à
le remonter correctement sur le corps du brûleur.
Raccordement électrique
Cette cuisinière doit être installée par un électricien
qualifi é, conformément à la réglementation appropriée et
aux prescriptions de la compagnie d’électricité locale.
MISE EN GARDE : CET APPAREIL DOIT ETRE MIS A
LA TERRE
Nota
La cuisinière doit être raccordée à l’alimentation
électrique correcte, indiquée sur l’étiquette de tension
sur l’appareil, par le biais d’une unité de commande de
cuisinière appropriée à interrupteur bipolaire (avec une
séparation de contact de 3 mm au minimum entre les
pôles). Cette cuisinière ne doit pas être raccordée à une
prise d’alimentation domestique ordinaire.
La charge électrique totale de cet appareil est de 7,2 kW
environ. Le câble utilisé doit avoir un calibre adapté à
la charge et être conforme à toutes les prescriptions
locales.
Pour accéder au bornier d’alimentation secteur, retirez le
boîtier électrique sur le panneau arrière.
Raccordez les câbles d’alimentation secteur aux bornes
correctes pour votre type d’alimentation électrique.
Vérifi ez que les connecteurs sont montés correctement
et que les vis des bornes sont bien serrées. Fixez le
câble d’alimentation secteur à l’aide du serre-câble.
Disjoncteurs-détecteurs de fuites de terre
commandés par injection de courant
Lorsque l’installation de la cuisinière est protégée
par un dispositif pour courant résiduel (DCR) d’une
sensibilité de 30 milliampères, l’utilisation combinée
de votre cuisinière et d’autres appareils domestiques
peut occasionnellement causer des disjonctions
fortuites. Dans ce cas, il est utile de protéger le circuit
de la cuisinière avec un dispositif de 100 mA. Cette
intervention doit être effectuée par un électricien qualifi é.
Table de cuisson
Contrôlez le fonctionnement de chaque brûleur. Un
dispositif de sécurité coupe l’alimentation en gaz du
brûleur en cas d’extinction de la fl amme. En appuyant
sur le bouton, le brûleur est mis en marche par le biais
d’un système d’allumage par étincelle.
Pour chaque brûleur, appuyez sur le bouton et mettez-le
sur le symbole grande fl amme (
).
Page 46

46
Français
Le système d’allumage produit une étincelle et allume le
gaz. Continuez d’appuyer sur le bouton pour permettre
l’arrivée du gaz dans le brûleur pendant quelques
secondes.
Si le brûleur s’éteint lorsque vous relâchez le bouton
de commande, le dispositif de sécurité n’a pas été
enclenché. Mettez le bouton de commande sur la
position Arrêt [Off] et attendez une minute avant
d’essayer de nouveau, en appuyant sur le bouton
pendant un peu plus longtemps.
Gril
Ouvrez la porte de l’enceinte du gril. Tournez le bouton
de commande du gril et vérifi ez que le gril commence à
chauffer.
Four Cuisson lente
Mettez le four en marche et vérifi ez qu’il commence à
chauffer.
Contrôle du four ventilé
Mettez le four en marche et vérifi ez que le ventilateur
du four se met en marche et que le four commence à
chauffer. Eteignez le four.
Montage de la plinthe
Montez la plinthe à l’aide des 3 vis le long du bord
inférieur avant de la cuisinière. Serrez les vis de fi xation.
Conseils à la clientele
Veuillez indiquer au client comment faire fonctionner la
cuisinière et lui remettre les présentes instructions.
Merci.
Page 47

47
ENTRETIEN – AVERTISSEMENT
Avant toute intervention d’entretien, débranchez les alimentations de gaz et d’électricité.
Lorsque le travail est terminé, effectuez les contrôles de sécurité nécessaires..
Entretien
Avant de commencer toute intervention d’entretien ou de
remplacement de pièces assurant l’acheminement du gaz,
débranchez l’alimentation en gaz.
Contrôlez l’étanchéité de l’appareil une fois l’intervention
d’entretien terminée. Lors du contrôle de l’étanchéité,
n’utilisez pas de liquide détergent pour vaisselle, qui
risque d’endommager le matériel. Utilisez un produit conçu
spécifi quement pour la détection des fuites.
ATTENTION : N’UTILISEZ PAS DE FLAMME POUR
DETECTER LES FUITES DE GAZ.
N’utilisez pas de commandes de gaz remises à neuf ou
non autorisées.
Débranchez l’alimentation d’électricité avant toute
intervention d’entretien, notamment si vous devez retirer
l’un des éléments suivants : panneau de commande,
panneau latéral, plaque de cuisson ou tout composant
électrique ou boîtier.
Avant de rebrancher l’alimentation électrique, effectuez les
contrôles de sécurité nécessaires.
Nota – Les références au four gauche et droit s’appliquent
lorsque l’on regarde le four depuis l’avant.
AVANT TOUTE INTERVENTION D’ENTRETIEN SUR UN
COMPOSANT ACHEMINANT DU GAZ, COUPEZ LE GAZ.
1 Dépose de la table de cuisson
Débranchez l’appareil de l’alimentation d’électricité.
Avancez la cuisinière afi n de pouvoir y accéder.
a) Retirez les grilles/les accessoires de table de cuisson
et les chapeaux de brûleur.
b) Retirez le venturi en cuivre situé au centre de chaque
encadrement de brûleur de la table de cuisson.
c) Retirez l’encadrement de la table de cuisson et
débranchez le câble d’allumage de l’électrode
d’allumage d’étincelle.
d) Levez la table de cuisson à l’avant et débranchez le
câble de terre de la table de cuisson. Dégagez la table
de cuisson de l’appareil.
e) Remontez en procédant dans l’ordre inverse.
2 Dépose du panneau de commande
Débranchez l’appareil de l’alimentation d’électricité.
a) Retirez les grilles/les accessoires de table de cuisson
et les chapeaux de brûleur.
b) Desserrez le venturi en cuivre situé au centre de
chaque brûleur.
c) Retirez les boutons de commande de tous les
robinets.
d) Ouvrez le gril et les portes de four droit. Déposez 3
fi xations de la partie supérieure avant et 3 fi xations du
dessous du panneau de commande.
e) Tirez le panneau de commande vers l’avant. Retirez
les raccords de l’arrière des trois néons. Débranchez
le câble de terre et soulevez le panneau de l’appareil
pour le dégager.
f) Remontez en procédant dans l’ordre inverse.
g) Pour remettre les raccords électriques en place,
reportez-vous au schéma de câblage.
3 Dépose d’un panneau latéral extérieur
Débranchez l’appareil de l’alimentation d’électricité.
a) Retirez les 3 vis latérales du bord avant et les 3 vis à
l’arrière de la cuisinière.
b) Retirez le panneau en tirant pour le détacher de
l’appareil.
c) Remontez en procédant dans l’ordre inverse.
4 Dépose d’un néon de four ou de gril
Débranchez l’appareil de l’alimentation d’électricité.
a) Retirez le panneau de commande comme indiqué à la
Section 2.
b) Retirez le raccord de néon approprié et défaites
l’écrou retenant le néon au panneau de commande.
c) Remontez en procédant dans l’ordre inverse. Vérifi ez
que le néon de rechange fonctionne correctement.
5 Dépose d’un thermostat
Débranchez l’appareil de l’alimentation d’électricité.
a) Retirez la table de cuisson, comme indiqué à la
Section 1.
b) Retirez le panneau de commande comme indiqué à la
Section 2.
c) Ouvrez la porte de four appropriée et retirez les grilles
de four.
d) Retirez les vis fi xant le tube en verre du thermostat au
côté supérieur droit du four.
e) Tirez la cuisinière vers l’avant pour pouvoir accéder à
la partie arrière. Retirez les vis de fi xation du panneau
arrière.
f) Retirez le tube en verre du thermostat et le tube
capillaire par l’arrière de la cuisinière; prenez note de
l’acheminement du tube capillaire.
g) Débranchez le câblage du thermostat. Défaites les
fi xations qui attachent le dispositif à la plaque de
montage.
e) Placez la pièce de rechange et remontez en
procédant dans l’ordre inverse. Vérifi ez que le tube
en verre est attaché sur l’une des parois intérieures
latérales du four et qu’il est centré entre les clips
de fi xation. Vérifi ez que le thermostat fonctionne
correctement.
6 Remplacement d’un contrôleur de gril
Débranchez l’appareil de l’alimentation d’électricité.
a) Retirez la table de cuisson, comme indiqué à la
Section 2.
b) Retirez le panneau de commande comme indiqué à la
Section 2.
c) Débranchez le câblage du contrôleur. Défaites les
fi xations qui retiennent l’appareil à la plaque de
montage.
d) Posez la pièce de rechange et remontez les pièces en
procédant dans l’ordre inverse. Vérifi ez que la pièce
de rechange fonctionne correctement.
Page 48

ENTRETIEN – AVERTISSEMENT
Avant toute intervention d’entretien, débranchez les alimentations de gaz et d’électricité.
Lorsque le travail est terminé, effectuez les contrôles de sécurité nécessaires.
48
7 Dépose du thermostat d’arrêt automatique
de four
Débranchez l’appareil de l’alimentation d’électricité.
a) Avancez la cuisinière afi n de pouvoir accéder au
boîtier du couvercle. Dévissez les vis du couvercle et
le retirer.
b) La commande se trouve sur la plaque de terre, à côté
des raccords d’éléments du four.
c) Débranchez le câblage du thermostat. Défaites les
fi xations qui retiennent le thermostat à la plaque de
terre et le retirer.
d) Posez la commande de rechange et remontez les
pièces en procédant dans l’ordre inverse.
8 Dépose d’un robinet de table de cuisson
a) Retirez la table de cuisson, comme indiqué à la
Section 1.
b) Retirez le panneau de commande comme indiqué à la
Section 2.
c) Débranchez le câble FSD de l’arrière du robinet.
Défaites le raccord de compression situé à l’arrière
du robinet. Retirez les fi xations retenant le robinet
à la conduite de gaz. Débranchez le câblage du
contacteur d’allumage.
d) Retirez le robinet. Retirez et mettez le joint au rebut.
Posez le nouveau joint sur le robinet de rechange.
e) Remontez en procédant dans l’ordre inverse.
Contrôlez l’étanchéité de l’appareil. Contrôlez
l’allumage de la table de cuisson.
9 Changement de contacteur d’allumage
Changez le robinet de gaz comme indiqué à la Section 8.
10 Dépose d’un injecteur de brûleur de table de
cuisson
a) Retirez la table de cuisson, comme indiqué à la
Section 1.
b) Retirez l’injecteur directement depuis le corps du
brûleur.
c) Posez l’injecteur correct.
d) Remontez en procédant dans l’ordre inverse.
Contrôlez l’étanchéité de l’appareil.
11 Dépose de l’électrode d’allumage d’étincelle
d’un brûleur de table de cuisson
a) Retirez les grilles, les accessoires de table de cuisson
et les chapeaux de brûleur.
b) Défaites le venturi et retirez l’encadrement de la table
de cuisson. Tirez le fi l d’allumage de l’étincelle par
l’orifi ce de dégagement de l’électrode.
c) Débranchez l’électrode d’allumage d’étincelle du fi l
d’allumage.
Nota
Veillez à empêcher le fi l d’allumage de retomber dans
l’orifi ce de dégagement.
d) Défaites l’électrode d’allumage d’étincelle de
l’encadrement en déposant le clip de ressort et le
ressort.
e) Posez l’électrode de rechange sur l’encadrement du
brûleur. Assurez-vous que le ressort et le clip sont
positionnés correctement.
f) Remontez en procédant dans l’ordre inverse et
vérifi ez si l’allumage du brûleur est correct.
12 Dépose d’un brûleur de la table de cuisson
a) Retirez les grilles, les accessoires de table de cuisson
et les chapeaux de brûleur.
b) Retirez la table de cuisson, comme indiqué à la
Section 1.
c) Retirez l’écrou qui retient le corps du brûleur au canal
de support.
d) Retirez les fi xations retenant le canal de support au
châssis. Dégagez le canal de l’appareil.
e) Défaites le raccord de compression raccordant le
corps du brûleur au tuyau de gaz. Retirez le corps du
brûleur de l’appareil.
f) Remontez en procédant dans l’ordre inverse.
Contrôlez l’étanchéité de l’appareil et vérifi ez si le
brûleur fonctionne de façon satisfaisante.
13 Dépose de la porte du four
a) Ouvrez la porte du four.
b) Faites pivoter le disque de blocage de la charnière de
90° en sens horaire pour les deux charnières de porte
pour bloquer la porte en position ouverte.
c) Fermez la porte avec précaution et,
approximativement à la position semi-fermée, les
charnières se détacheront du châssis de la cuisinière.
d) Remontez en procédant dans l’ordre inverse.
14 Dépose du panneau de porte extérieur du
four
a) Déposez la porte de la cuisinière (voir section
13).
b) Retirez les vis fi xant le panneau extérieur à la
porte.
c) Retirez le panneau de porte extérieur.
d) Défaites les écrous fi xant la poignée au panneau de
porte. Montez la poignée sur le nouveau panneau de
porte.
e) Montez le panneau isolant de rechange sur la porte
interne du four, en vérifi ant que l’isolation du four est
montée correctement.
f) Remontez en procédant dans l’ordre inverse.
15 Dépose du joint de la porte du four
Page 49

49
ENTRETIEN – AVERTISSEMENT
Avant toute intervention d’entretien, débranchez les alimentations de gaz et d’électricité.
Lorsque le travail est terminé, effectuez les contrôles de sécurité nécessaires..
a) Ouvrez la porte du four. Le joint est maintenu en place
par des petits crochets placés sur la face arrière.
Depuis le coin, tirez sur le joint dans le sens de la
diagonale, en l’éloignant du centre de la porte, jusqu’à
ce que ce crochet se défasse.
b) Passez au crochet suivant et défaites-le, ainsi que les
suivants, de la même façon. Vous pouvez forcer si les
crochets résistent car le joint usagé sera mis au rebut.
c) Accrochez le joint neuf dans l’un des orifi ces de coin
de la porte et procédez ainsi sur tout le pourtour de
l’ouverture de la porte pour tous les crochets.
16 Dépose des fi ls d’électrode de table de
cuisson
Débranchez l’alimentation électrique.
Tirez la cuisinière vers l’avant pour pouvoir accéder à la
partie arrière.
a) Retirez les grilles, les accessoires de la table de
cuisson et les chapeaux des brûleurs.
b) Déposez la table de cuisson, comme indiqué à la
Section 1.
c) Retirez le boîtier de protection et débranchez tous les
fi ls HT au niveau du générateur d’étincelle.
d) Tirez le faisceau gainé de fi ls HT et faites-le sortir par
la colonne arrière.
e) Retirez le fi l à remplacer de la gaine et insérez le fi l de
rechange.
f) Ré-insérez le faisceau dans la colonne arrière.
g) Rebranchez les fi ls au niveau du générateur
d’étincelle.
h) Remontez en procédant dans l’ordre inverse et
vérifi ez le fonctionnement de l’allumage.
17 Dépose du générateur d’étincelle
a) Mettez l’appareil hors tension.
b) Abaissez les roulettes de déplacement avant (voir
la section « ROULETTES DE DEPLACEMENT » du
Guide de l’utilisateur) et tirez la cuisinière vers l’avant
afi n de pouvoir accéder à la partie arrière.
ATTENTION : VEILLEZ A NE PAS TROP TIRER SUR
LE TUYAU DE GAZ. Au besoin, débranchez-le.
c) Retirez le couvercle d’admission du câble
d’alimentation, 8 vis.
d) Débranchez les câbles électriques du générateur
d’étincelle.
e) Retirez les deux vis fi xant le support du générateur au
châssis de la cuisinière et, avec précaution, dégagez
suffi samment le générateur pour pouvoir débrancher
les fi ls de l’électrode.
f) Remontez en procédant dans l’ordre inverse.
18. Dépose de l’élément du gril
a) Mettez l’appareil hors tension.
b) Retirez les deux vis de fi xation du bandeau du gril et
déposez le bandeau.
c) Retirez les deux vis fi xant le support d’élément du
gril au compartiment du gril et laissez l’élément et le
support pivoter vers le bas à l’arrière.
d) Débranchez les bornes de l’élément (des pinces
seront peut-être nécessaires). Prenez note de la
position des bornes et de l’acheminement en vue du
remontage des câbles.
d) Retirez le support et l’élément du compartiment du
gril. Retirez les deux vis à l’arrière fi xant l’élément au
support. Vous pouvez à présent extraire l’élément du
support.
f) Remontez en procédant dans l’ordre inverse.
19. Dépose des panneaux du four supérieur /gril
a) Déposez la porte – voir section 13.
b) Détachez le joint de la porte (four supérieur
seulement) en le décrochant des quatre coins du
châssis avant.
c) Retirez les glissières gauches et droites (2 vis par
glissière). Vous pouvez à présent retirer les panneaux.
Retirez également 4 vis de fi xation supérieures.
Page 50

ENTRETIEN – AVERTISSEMENT
Avant toute intervention d’entretien, débranchez les alimentations de gaz et d’électricité.
Lorsque le travail est terminé, effectuez les contrôles de sécurité nécessaires.
50
20. Dépose des panneaux du four inférieur
a) Déposez la porte du four – voir section 13.
b) Détachez le joint de la porte en le décrochant des
quatre coins.
c) Tirez pour extraire le panneau de voûte.
d) Retirez les grilles du four et les vis de fi xation des
glissières de grilles (4 de chaque côté).
d) Retirez les 4 vis du panneau arrière.
e) Retirez les panneaux latéraux. Faites glisser le
panneau latéral droit vers le bas pour qu’il ne soit
pas bloqué par les fi xations du tube en verre du
thermostat, en prenant soin de ne pas toucher le tube.
f) Remontez en procédant dans l’ordre inverse.
21. Dépose des éléments du four Cuisson lente
(four supérieur)
a) Mettez l’appareil hors tension.
b) Procédez comme pour « Dépose des panneaux du
four supérieur ».
c) Soulevez et retirez la sole du four pour avoir accès à
l’élément du four.
d) Retirez la vis fi xant l’élément au châssis.
e) Dégagez l’élément du châssis, avec précaution, pour
pouvoir débrancher les bornes électriques; veillez à
ne pas laisser tomber les câbles derrière l’appareil.
22 Dépose de l’élément du four ventilé
a) Mettez l’appareil hors tension.
b) Procédez comme pour « Dépose des panneaux du
four ».
c) Retirez les 3 vis fi xant l’élément au châssis et
dégagez l’élément, avec précaution, pour pouvoir
avoir accès aux bornes électriques.
d) Débranchez les bornes, en veillant à ne pas laisser
tomber le câble derrière l’appareil.
e) Remontez en procédant dans l’ordre inverse.
23 Dépose du ventilateur du four
a) Mettez l’appareil hors tension.
b) Procédez comme pour « Dépose de l’élément du four
».
c) Retirez les 4 vis fi xant le ventilateur au châssis.
d) Dégagez suffi samment le ventilateur pour pouvoir
avoir accès aux bornes du moteur électrique et
débranchez les câbles.
e) Retirez la pale du ventilateur.
NOTA : Les écrous de fi xation de la pale ont un
fi letage gauche.
f) Dévissez le moteur de la plaque de montage.
g) Remontez en procédant dans l’ordre inverse.
24 Dépose d’un élément du gril
Débranchez l’appareil de l’alimentation d’électricité.
a) Avancez la cuisinière afi n de pouvoir accéder aux
boîtiers situés à l’arrière de l’appareil. Retirez les
fi xations retenant le couvercle et soulevez pour le
retirer.
b) Défaites les branchements de borne en veillant à
prendre note de leurs emplacements.
c) Déposez la lèchefrite.
d) Retirez les fi xations retenant le support avant
d’élément de l’intérieur de l’enceinte.
e) Retirez une fi xation de chacun des éléments et
enlevez les éléments de l’enceinte.
f) Posez le(s) élément(s) de rechange et remontez
en procédant dans l’ordre inverse. Vérifi ez le
fonctionnement du gril.
Page 51

51
ENTRETIEN – AVERTISSEMENT
Avant toute intervention d’entretien, débranchez les alimentations de gaz et d’électricité.
Lorsque le travail est terminé, effectuez les contrôles de sécurité nécessaires..
Fiche technique
La cuisinière est de catégorie II2E+3+
NOTICE A L’INSTALLATEUR :
Veuillez remettre les présentes instructions à l’utilisateur.
EMPLACEMENT DU BADGE TECHNIQUE :
Arrière de la cuisinière, badge de répétition du numéro de
série sous l’ouverture de la porte du four.
Pays de destination :
FR
Electricité 230V 50Hz
Reportez-vous au badge technique de l’appareil pour les pressions de contrôle
Dimensions
Hauteur totale minimum 915 mm maximum 940 mm
Largeur totale 1000 mm*
Profondeur totale 660 mm
Profondeur sans les poignées 600 mm
Emplacement prévu pour fi xation Reportez-vous à la section « Positionnement de la cuisinière »
Espace minimum au-dessus de la table de cuisson 800 mm
Branchements
Gaz :Rp
1
/2 au niveau du côté arrière droit
Electricité
230V 50Hz
Capacités
Gaz naturel
GPL
Table de cuisson
Injector Bypass Injector Bypass
Brûleur central
5kW 165 96 5kW (357g/h) 107 57
Grands brûleurs
3kW 120 54 3kW (214g/h) 82 40
Brûleur avant droit
1.7kW 95 39 1.7kW (121g/h) 64 32
Les valeurs correspondant aux brûleurs de gaz sont basées sur la valeur calorifi que brute
Charge électrique totale maximum à 230V 8.7 kW (valeur totale approximative comprenant l’éclairage de four, le
ventilateur de four, etc.)
Fours
Convection forcée
2.5kW
Classement selon son effi cacité énergétique
sur une échelle allant de A (économe) à G (peu économe)
C
Consommation d’énergie Calculée en charge normalisée 1.05kWh
Volume utile (litres) 49
Type
Volume moyen
Temps de cuisson en charge normale (minutes) 46 minutes
Surface de cuisson 720cm
2
Page 52

ENTRETIEN – AVERTISSEMENT
Avant toute intervention d’entretien, débranchez les alimentations de gaz et d’électricité.
Lorsque le travail est terminé, effectuez les contrôles de sécurité nécessaires.
52
Retirez les 3 vis de fi xation à la partie supérieure du
panneau de commande.
Tirez le panneau de commande vers l’avant. Appuyez-le
sur la porte ouverte du gril et sur la porte ouverte du four
droit.
Modification des robinets de commande
Dévissez la vis de dérivation du robinet.
A l’aide d’une pince à bec long, retirez la vis de dérivation
avec précaution et montez la vis de rechange correcte.
Serrez la vis.
Voir le tableau pour la taille correcte.
Remontez le panneau de commande.
Remontage
Trouvez le gros anneau dans le kit de conversion.
Modification en vue de l’utilisation
d’un autre gaz
Entretien – mise en garde
Cette modifi cation doit être effectuée par une personne
compétente. Après modifi cation, l’installation doit être
conforme aux réglementations applicables, ainsi qu’aux
prescriptions de la compagnie d’électricité locale. Lisez
les instructions avant d’effectuer une modifi cation sur cet
appareil.
Une modifi cation incorrecte n’engage ni la responsabilité,
ni la garantie du fabricant, et peut donner lieu à des
poursuites.
Les présentes instructions doivent être utilisées en
conjonction avec les autres instructions relatives à cet
appareil, en particulier en ce qui concerne les informations
sur les normes, le positionnement de la cuisinière, le choix
des tuyaux de raccordement appropriés, etc.
Lors de l’entretien ou du remplacement de composants
d’alimentation de gaz, débranchez le gaz avant le début
de l’intervention et, au terme de celle-ci, effectuez les
contrôles de sécurité nécessaires pour les appareils à gaz.
N’utilisez pas de commandes de gaz remises à neuf ou
non autorisées.
Modification
Avant toute intervention d’entretien, débranchez les
alimentations de gaz et d’électricité. Lorsque le travail est
terminé, effectuez les contrôles de sécurité nécessaires.
Cet appareil est de catégorie CAT II2E+3+. A la livraison, il
est réglé sur gaz naturel G20 à 20 millibars
Un kit de modifi cation permettant l’utilisation de gaz de
pétrole liquéfi é est fourni avec la cuisinière.
Injecteurs
Retirez la grille, les têtes et les chapeaux des brûleurs pour
avoir accès à l’injecteur.
Défaites les gros écrous en laiton et retirez les venturis
en laiton. Soulevez l’avant de la table de cuisson et
débranchez les fi ls d’allumage des électrodes. Retirez la
table de cuisson.
Retirez les gicleurs usagés. Montez les nouveaux gicleurs
(voir le tableau pour les gicleurs corrects).
Réglage du robinet de commande
Tirez pour enlever tous les boutons de commande.
Ouvrez la porte du four et du gril et retirez les vis de fi xation
sous le panneau de commande.
Page 53

53
ENTRETIEN – AVERTISSEMENT
Avant toute intervention d’entretien, débranchez les alimentations de gaz et d’électricité.
Lorsque le travail est terminé, effectuez les contrôles de sécurité nécessaires..
Placez cet anneau sur le brûleur central et montez le socle
du brûleur à l’aide du venturi de grand diamètre intérieur
(10,5 mm
venturi 10,5 mm venturi 7mm
Brûleur central
Table de cuisson
Gaz naturel GPL
Gicleur Dérivation Gicleur Dérivation
Brûleur central 165 96 107 57
Grands brûleurs 120 54 82 40
Brûleur avant droit 95 39 64 32
Placez les petits anneaux sur les brûleurs externes.
Montez les venturis de plus grand diamètre intérieur (10,5
mm) sur tous les brûleurs. Serrez les gros écrous en laiton.
Brûleur externe
Remontez les chapeaux des brûleurs, en veillant à les
remonter correctement sur les corps des brûleurs.
Remontez en procédant dans l’ordre inverse.
Etiquette autocollante
Apposez l’étiquette appropriée sur le badge technique pour
indiquer le gaz à utiliser avec la cuisinière.
Essai de pression
Raccordez la cuisinière à l’alimentation de gaz. Contrôlez
l’étanchéité de l’appareil.
Les pressions d’essai sont indiquées sur la Fiche
technique, au verso de la présente brochure.
La pression de gaz peut être mesurée au niveau du
point d’essai de pression qui se trouve sur le bloc de
raccordement du gaz. Allumez un des brûleurs de la table
de cuisson.
Contrôlez l’étanchéité de l’appareil.
Contrôlez le fonctionnement de tous les
brûleurs.
Page 54

ENTRETIEN – AVERTISSEMENT
Avant toute intervention d’entretien, débranchez les alimentations de gaz et d’électricité.
Lorsque le travail est terminé, effectuez les contrôles de sécurité nécessaires.
54
Schéma de câblage
Page 55

55
ENTRETIEN – AVERTISSEMENT
Avant toute intervention d’entretien, débranchez les alimentations de gaz et d’électricité.
Lorsque le travail est terminé, effectuez les contrôles de sécurité nécessaires..
Légende du schéma de câblage
A Boutons du robinet
B Générateur d’étincelle
C Régulateur du gril
D Gril interne
F Gril externe
G Néon
H Protecteur thermique
I Thermostat du four droit
J Elément du four ventilé
K Ventilateur du four
M Thermostat du four gauche
O Thermostat du four Cuisson lente
P Elément de sole
Q Terre sur le bornier principal
Code couleur
b Bleu
bl Noir
br Brun
r Rouge
v Violet
w Blanc
y Jaune
Page 56

Falcon is a business name of AGA Consumer Products
 Loading...