

Page 1

User manual for roller shutter ARZ Z-Wave
Contents
1. Safety standards .................................................................................................................................2
2. Description ........................................................................................................................................3
3. Programming the appliance................................................................................................................4
4. Association Groups............................................................................................................................5
5. Compatibility of other producers’ appliances in Z-Wave. ................................................................5
6. Z-Wave configuration parameters.....................................................................................................5
7. Alarms and Notifications...................................................................................................................5
8. Technical parameters..........................................................................................................................6
9. Command classes...............................................................................................................................6
10. Manufacturer Specific Report..........................................................................................................6
11. Description of signals - light-emitting diode (LED)........................................................................6
12. Warranty...........................................................................................................................................8
FAKRO Sp. z o.o.
ul. Węgierska 144A
33-300 Nowy Sącz
Polska
www.fakro.com
tel. +48 18 444 0 444
fax. +48 18 444 0 333
02.03.18 NC849-GB 1/7 ©2018, FAKRO
GB
Page 2

1. Safety standards
Please carefully read the instructions below before installing the awning to avoid electric
shocks, laceration, etc.
While installing the electric roller shutter it is essential to comply with the following
rules:
Firstly, after unpacking, check that the roller shutter does not show any signs of
mechanical damage.
Installation should be performed by a qualified person according to the producer’s user
manual.
Before connecting the roller shutter, make sure that the supporting voltage is compatible
with the voltage of the roller shutter mentioned on the rated plate.
Connect the roller shutter and launch one cycle of work to verify whether it works
correctly (dual-core wire - 15V DC).
Plastic containers used for packing should be kept out of children’s reach as they pose a
potential threat.
The roller shutter should be used only for its purpose. FAKRO is not responsible for any
damage of the roller shutter resulting from improper use.
Any actions related to cleaning, adjusting or disassembling of the electric awning should
be preceded by disconnecting the power supply.
Do not use any solvent-like agents, or a water jet (do not dip in water).
All repairs should be made by a service authorized by the producer.
The roller shutter is for external use only.
02.03.18 NC817-GB 2/7 ©2018, FAKRO
Page 3
2. Description
ARZ Z-Wave roller shutters are only for external installation with Fakro roof windows. They are compatible
with Fakro wireless remote controls or other remote controls marked with the Z-Wave logo produced by other companies.
roller shutters are equipped with a two-way module of radio communication. Z-Wave uses 869 MHz radio waves.
The ARZ Z-Wave roller shutter has three extremes:
– maximum extension (encoder maximum position)
– completely rolled up (encoder minimum position)
– current limiting protecting roller shutter against damage and user against accidental injury resulting from the
contact with moving elements of roller shutter.
In order to use the appliance, it is essential to install it in accordance with the figure manual attached to its package.
Programming should be done with any of the remote controls available from Fakro or any remote controls equipped with
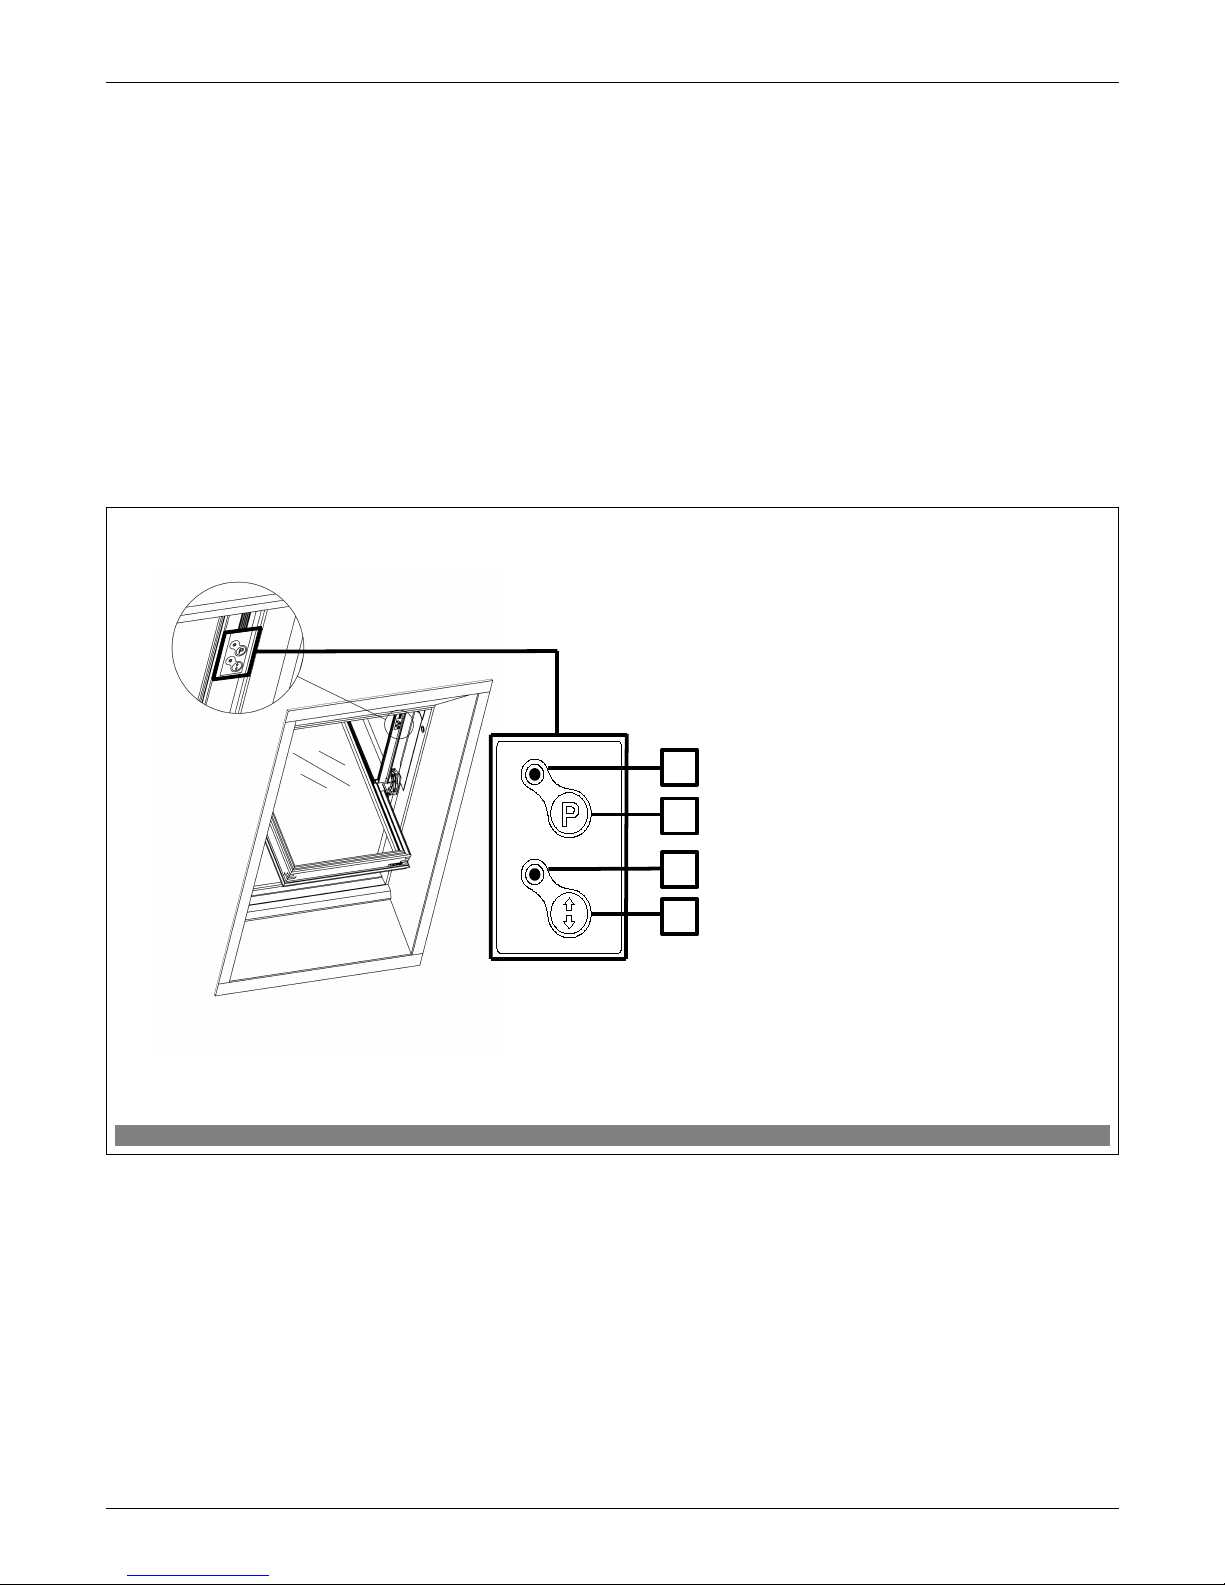
the Z-Wave logo produced by other companies. Figure 1 shows a general view of the ARZ Z-Wave roller shutter with a
description of the buttons and indicators. In the ARZ Z-Wave roller shutter the controlling module is located under the
right-side body cover - see Figure 1.
02.03.18 NC817-GB 3/7 ©2018, FAKRO
Figure 1: ARZ Z-Wave roller shutter button description.
1. Led network status
2. Programming button P
3. LED motor status
4. Manual control button
2
1
3
4
Page 4

3. Programming the appliance.
In order for the appliance to communicate with the Z-Wave network, it is essential to connect to the network and give
the appliance a special number (Node ID). The appliance can be added to a network, as long as it does not belong to another one. In
order to add the appliance to a network, it should firstly be deleted from any network it belongs to, or restored to factory settings. This
can be done with the use of any primary controller. The network status diode indicates when the appliance is ready to be linked to the
network. This diode does not belong to any network.
In some cases (changing the location of an installation, or changing a damaged appliance), it is necessary to delete the
appliance from the controllers’ memory, as well as from the network in order to avoid errors and save the batteries of portable
controllers.
Do not physically remove the appliance until it has been deleted from the controller’s memory. Improper usage can cause
delays when trying to use the appliance and will cause the batteries of portable controllers to run out quickly.
Function Description
Led indication
Motor operating status
Z-Wave operating status
Autoinclusion & Include
(Add a new node)
Autoinclusion - This feature allow you to add hard to reach devices to Z-
Wave network. 3-times ON and OFF the power roller shutter (OFF-ONOFF-ON-OFF-ON) causes the introduction of roller shutter to
Autoinclusion mode. Please note that the procedure has been started the
time between on and off can not exceed 20s. Autoinclusion mode is
activated for a maximum of 10 minutes. During this time, we can add an
awning to any Z-Wave controller running in the Include procedure.
-
flashing for up to 10 minutes
Include - This function allow you to add roller shutter to the network ZWave. Follow the procedur adding device to the network Z-Wave according
to user manual supplied with the product. Then, press the programming
button P on the roller shutter for 1 second.
-
Before: Light ON
After: Light OFF
Association
(Add node to group)
Associate – function allow you to add roller shutter to the group of
controller. Follow the procedur adding device to the selected group
according to user manual supplied with the product. Then, press the
programming button P on the roller shutter for the 1 second.
- -
Exclude (Remove an
existed node)
Exclude - This function allow you to remove roller shutter from the network
Z-Wave. Follow the procedur removing device from the network Z-Wave
according to user manual supplied with the product. Then, press the
programming button P on the roller shutter for 1 second. Function removes
information only about newtork Z-Wave.
-
light
Delete
(Remove node from
group)
Delete – function allow you to remove roller shutter from the group of
controller. Follow the procedur removing device from the selected group
according to user manual supplied with the product. Then, press the
programming button P on the roller shutter for the 1 second.
- -
Factory Default Reset
Device Reset Locally – This function allows you to reset the Z-Wave
network without the use of Z-Wave controller. Press 5 times the
programming button P fast, the roller shutter was removed from the Z-Wave
network, restore the default parameters, name and locations.
Please use this procedure only when the network primary controller is
missing or otherwise inoperable.
-
light
Parameter Reset Locally – Press fast 3 times P button on the roller shutter.
Function removes information about parameters.
-
Flashing 5 times
Calibration
Manual - Factory end positions
roller shutter are calibrated.
Calibration possible without
necessity for prior recalibration of
the device. It is performed using
buttons available on the control
panel of the ARZ Z-Wave roller
shutter. Warning!!! For the proper
calibration of the device requires two
end positions set correctly.
1. Press P button and manual control
button in the same time on the
control panel.
Flashing...
-
2. Press and hold manual control
button until reach first end position.
Flashing...
-
3. Press P button to confirm first end
position.
Stop flashing and lit
cointinously within 2 sec.
-
4. Led motor status blinking again.
Press and hold manual control button
until reach second end position.
Flashing...
-
5. Press P button to confirm second
end position.
Stop blinking and lit
cointinously within 2 sec.
-
Remote – calibration possible after
prior recalibration of the device. It is
1. Discalibrate device from
controller – set parameter 12, value 2
Light
-
02.03.18 NC817-GB 4/7 ©2018, FAKRO
Page 5

possible via gate (Gateway Z-Wave),
remote control with a display, e.g.
ZRS24 remote control (FAKRO).
2. Calibrate device from controller –
set parameter 12, value 1
Flashing...
-
3. Press UP button and hold it till
reach first end position.
Flashing...
-
4. Press STOP button to confirm first
end position.
Stop flashing and lit
cointinously within 2 sec.
-
5. Press DOWN button and hold it
till reach second end position.
Flashing...
-
6. Press STOP button to confirm
second end position.
Stop blinking and lit
cointinously within 2 sec.
-
4. Association Groups.
There are three association groups in roller shutter ARZ Z-Wave:
1. Life Line – group for position reporting roller shutter after each a stoppage and alarm reporting (overcurrent, damage
encoders). This group can be a maximum 1 device.
2. Basic Repeat – group used to transfer the received basic commands to the devices included in this group. This group can be a
maximum 5 devices.
3. Multilevel Repeat – group used to transfer the received multilevel commands to the devices included in this group. This
group can be a maximum 5 devices.
5. Compatibility of other producers’ appliances in Z-Wave.
Z-Wave allows for the integration of other producers’ appliances for lighting, heating, domestic automatic appliances, etc. The ZWave works in the network as a “repeater”, which enlarges the range of radio communication. The more appliances in the network,
the more resistant to disordered activities in the network.
Launch the “INCLUDE” procedure with a controller of the existing network, and then press the “Programming button” located on the
roller shutter which you want to link to the network.
Attention: All information concerning “Include” and “Associate” options in other producers’ controllers can be found in their
user manuals.
6. Z-Wave configuration parameters.
No. Value Default Value Size Description
12 1
2
1 1 Value 1 – calibrated
Value 2 – discalibrated – to enter the calibration mode must first time discalibrate and then
calibrate.
13 1
2
1 1 1 – FF go to Max
2 – FF go to previous position
7. Alarms and Notifications.
Notyfication type Event
Power Management Over-load detected
System System hardware failure (encoders damaged)
02.03.18 NC817-GB 5/7 ©2018, FAKRO
Page 6
8. Technical parameters
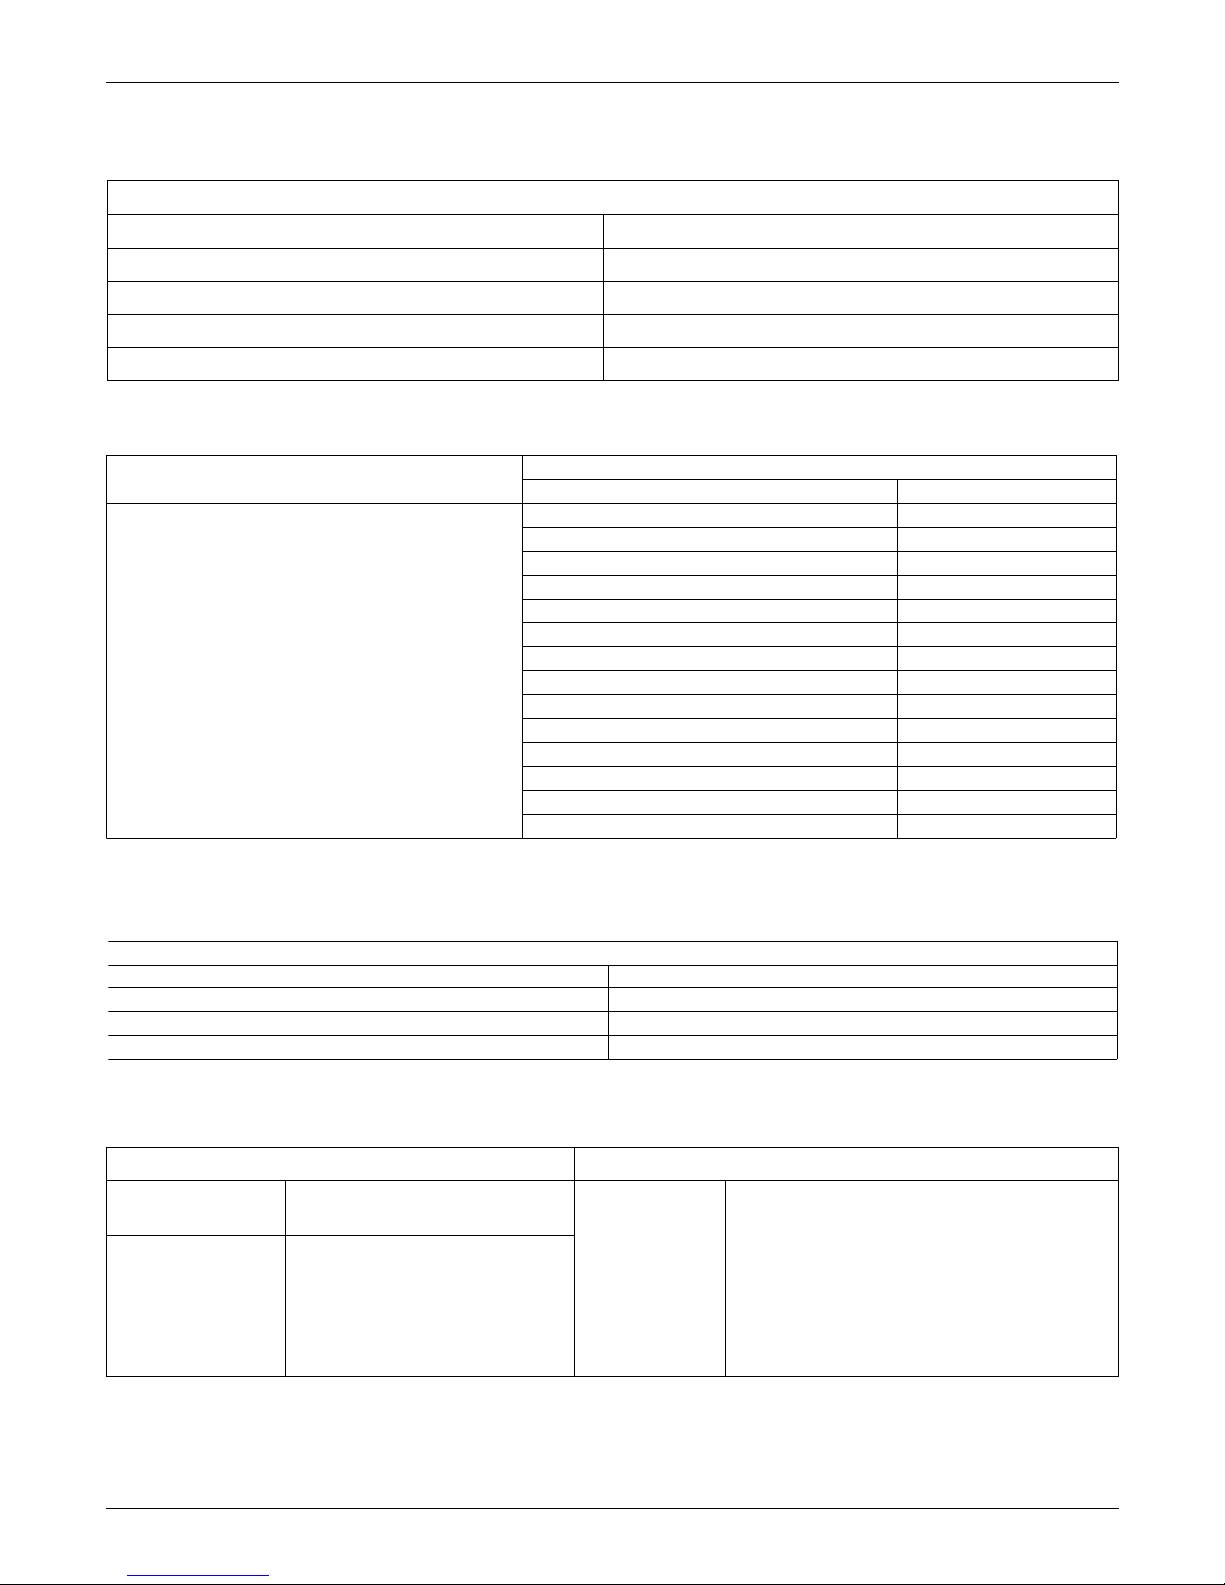
Technical parameters
Power voltage 15V DC
Rated current 1,4 A
Speed 23 r.p.m
Temperature of usage (-10oC) do (65oC)
Supplying cable 2 x 0,75 mm
2
9. Command classes.
10. Manufacturer Specific Report.
11. Description of signals - light-emitting diode (LED)
Motor operating status (see figure no.1) Z-Wave operating status (see figure no.1)
Singular blink of the
diode
The current received from the motor
is too low.
Continuous
lighting of the
diode
The appliance does not belong to any network remove control is impossible. This diode always
appears when the appliance is connecting to a new
motor. It disappears when the appliance is linked
to any network using “INCLUDE” function.
Triple blink of the
diode
The current received from the motor
is too intensive. A calibration of the
roller shutter motor should be
checked. A description of outskirts
regulation is described in point A of
the roller shutter installation.
02.03.18 NC817-GB 6/7 ©2018, FAKRO
0x0085
0x0003
0x0011
Manufacturer Specific Report
Parameter Value
Manufacturer ID
Product Type ID
Product ID
Command Classes
Role
Support Control
Command Class Z-Wave+ Info v2 ok
Command Class Basic v1 ok ok
Command Class Version v2 ok
Command Class Manufacturer Specific v2 ok
Command Class Device Reset Locally v1 ok
Command Class Ass ociation v2 ok
Command Class Ass ociation Group Info v1 ok
Command Class Powerlevel v1 ok
Command Class Switch Binary v1 ok
Command Class Switch Multilevel v3 ok ok
Command Class Switch All v1 ok
Commad Class Configuration v1 ok
Command Class Notification v3 ok
Command Class Node Naming v1 ok
Page 7

12. Warranty
The producer guaranties a high quality of the appliance. It pledges to repair or replace damage
element, if the damage is caused by defective materials or construction. The warranty is valid within 24 months
from the date of selling due to the following conditions:
The installation process was proceeded by qualified and authorized person according to the producer
requirements.
The seals were not affected and there were not introduced any changes in construction.
The appliance was used according to its purpose and in comply with user manual.
Damage is not an effect of improper power supply installation or an atmospheric conditions.
The producer is not responsible for any damages arising of improper using and for mechanic damages.
In case of a damage the appliance should be delivered along with the Warranty Card. During the warranty
period all damages and defections are recovered for free within 15 labour-days. Warranty and after-warranty
repairs are made by the producer FAKRO Ltd.
Quality certificate:
Appliance
Model..............................................................................................................................................
Serial Number.................................................................................................................................
Saleperson.......................................................................................................................................
Address............................................................................................................................................
Date of purchase..............................................................................................................................
..............................................................................................................
Signature (stamp) of installing person
02.03.18 NC817-GB 7/7 ©2018, FAKRO
 Loading...