

Page 1
STIMA
Buharlı ütü
Steam Iron
Steam Iron – Instruction Manual
Buharl› Ütü – Kullanma Kılavuzu
Instruction Manual
Kullan›m K›lavuzu
Page 2

Page 3

Girifl
Uzun y›llar sorunsuz çal›flmas› için
tasarlanan ve üretilen Fakir Stima Buharl›
Ütüyü sat›n alm›fl oldu¤unuz için teflekkür
ederiz.
Benzer ürünleri kullanmaya al›fl›k
olabilirsiniz, ancak kullanma k›lavuzunu
okumak için lütfen zaman ay›r›n›z. Bu k›lavuz
sat›n alm›fl oldu¤unuz üründen en iyi
performans› alman›z için haz›rlanm›flt›r.
Güvenlik Önemlidir
Kendi güvenli¤iniz ve di¤erlerinin güvenli¤i
için ürünü çal›flt›rmadan önce kullanma
k›lavuzunu okuyunuz. Bu k›lavuzu ilerideki
kullan›mlar için güvenli bir yerde saklay›n›z.
Cihaz yaln›zca ev kullan›m› içindir ve cihaz›
sadece kullanma k›lavuzunda belirtilen
talimatlara uygun flekilde kullan›n›z.
Cihaz yüksek derecede s›cak buhar
üretmektedir. Cihaz› büyük bir dikkatle
kullan›n›z ve di¤erlerini potensiyel tehlikeler
için uyar›n›z.
Güvenlik Uyar›lar›
Elektrikli bir cihaz kullan›l›rken, afla¤›daki
önlemler her zaman al›nmal›d›r. Yang›n,
elektrik çarpmas› ve kiflisel yaralanmalar›
engellemek için;
1. Cihaz›n üzerinde yazan voltaj ile flebeke
voltaj›n›n uyumlu oldu¤undan emin olunuz.
2. Kullanmadan önce elektrik kablosunu tam
olarak aç›n›z ve düzlefltiriniz.
3. Cihaz› sert ve düz bir zemine yerlefltiriniz.
4. Kablonun ütünün s›cak taban›na
de¤memesine özen gösteriniz.
5. Cihaz›n fifli, cihaza su eklenirken prizden
çekilmelidir.
6. Cihaz fiflten çekilmeden ya da fifle
tak›lmadan önce mutlaka kapal› konuma
getirilmelidir.
7. Elektrikli cihazlar› çocuklar›n kullanmas›na
izin vermeyiniz. Çocuklar›n yan›nda cihaz›
kullan›rken, hiçbir zaman cihaz› bofl
b›rakmay›n›z.
8. E¤er cihaz›n kablosu hasar görmüfl ise,
lütfen Fakir Yetkili Servisi’ne baflvurunuz.
9. Su tank›n› kullan›mdan sonra boflalt›n›z.
10. Cihaz çocuklar dahil olmak üzere fiziksel,
duyusal ya da zihinsel problemleri olan
kifliler taraf›ndan, deneyimi ya da bilgisi
olmayan kifliler taraf›ndan, cihaz› güvenli
bir flekilde kullanacak kiflilerin gözetimi
olmadan kullan›lmamal›d›r.
11. Cihaz› kullan›rken çocuklar›n cihaza
dokunmamas›na dikkat ediniz.
12. Cihaz prize tak›l› oldu¤unda kesinlikle
gözetimsiz b›rakmay›n›z.
13. Cihaz için uygun olmayan uzatma kablolar›n›
kullanmay›n›z.
14. Cihazda kulland›¤›n›z suyun içine parfüm,
sirke veya baflka kimyasallar›, cihaza zarar
verdikleri için kesinlikle eklemeyeniz.
15. Cihaz› su ya da baflka bir s›v›ya kesinlikle
dald›rmay›n›z.
16. Cihaz hasar görmüfl ise ya da anormal
olarak çal›fl›yorsa kullanmay›n›z.
17. Cihaz düflürülmüfl veya gözle görünür
herhangi bir ar›zas› var ise, su s›zd›r›yorsa
veya anormal olarak çal›fl›yorsa kesinlikle
kullan›lmamal›d›r.
18. Cihaza ütüleme esnas›nda ya da
ütülemeden hemen sonra dokunmay›n›z.
19. Cihaz› kumafllara ya da yanabilecek
yüzeylere temas halinde b›rakmay›n›z.
20. Cihaza kesinlikle ›slak ya da nemli ellerle
dokunmay›n›z.
21. Cihaz› aç›k havada b›rakmay›n›z.
22. Cihaz tam olarak so¤umadan, kablosunu
ütünün etraf›na sarmay›n›z. Cihaz tamamen
so¤udu¤unda kablosunu hafifçe etraf›nda
sar›n›z.
23. Cihaz üzerinde kullan›c›n›n yapabilece¤i
herhangi bir bak›m yoktur. Bu yüzden
cihaz›n herhangi bir parças›n› sökmeye
çal›flmay›n›z. Herhangi bir ar›za durumunda
tamir için Fakir Yetkili Servisi’ne gönderiniz.
24. Cihaz› sadece kullan›m k›lavuzunda
belirtildi¤i gibi kullan›n›z.
ÜRÜN ÖZELL‹KLER‹
1. Sprey
2. Su Doldurma Kapa¤›
3. Buhar Dü¤mesi
4. Sprey Tuflu
01
Page 4
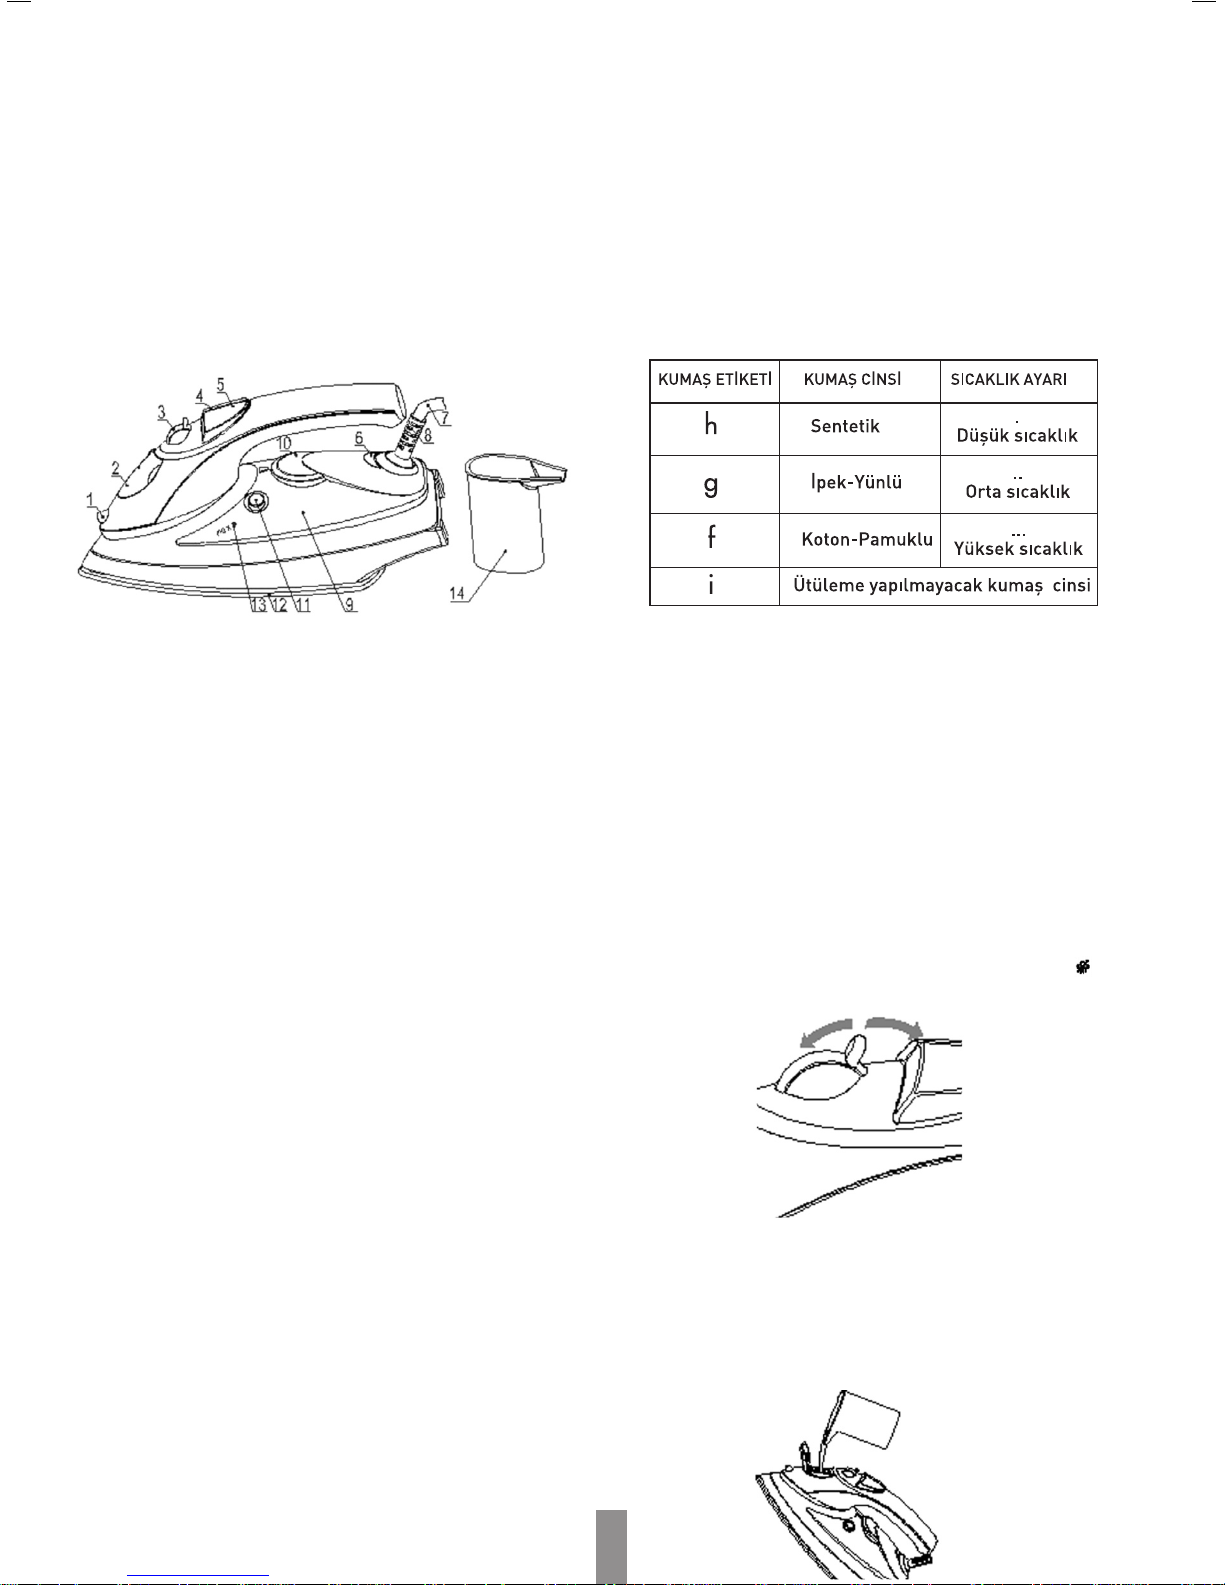
5. Yo¤un Buhar Ç›k›fl Dü¤mesi
6. Güç gösterge ›fl›¤›
7. Elektrik Kablosu
8. Elektrik kablosu koruyucusu
9. fieffaf su tankı
10. S›cakl›k ayar dü¤mesi
11. Kendi kendini temizleme dü¤mesi
12. Buhar delikli seramik taban
13. Max. su doldurma seviyesi
14. Su kab›
bir süre sonra sona erecektir. Ayr›ca, cihaz›
ilk kulland›¤›n›zda s›radan bir kumafl
üzerinde ilk denemeyi yapman›z› tavsiye
ederiz.
SINIFLANDIRMA
Ütülemek istedi¤iniz ürün üzerinde bulunan
etiketlerdeki sembollere ya da kumafl›n
cinsine göre ütülemeyi yap›n›z.
K‹RECE KARfiI KORUMA S‹STEM‹
Su tank›n›n içinde bulunan özel filtresi suyun
daha yumuflak olmas›n› sa¤lar ve cihazda
kireç oluflmas›n› engeller. Bu filtre cihaz›n
içinde kal›c›d›r ve de¤ifltirmeye gerek yoktur.
Not: Sadece çeflme suyu kullan›n›z. Ar›t›lm›fl
su kirece karfl› koruma sistemini etkisiz hale
getirmektedir. Kimyasal katk› maddelerini
kullanmay›n›z.
SU DAMLATMAMA S‹STEM‹
Su damlatmama sitemi ile, en nazik
kumafllar› bile mükemmel bir flekilde
ütüleyebilirisiniz. Bu tür kumafllar› her zaman
düflük s›cakl›k seviyesinde ütüleyiniz. Taban
buhar›n gelmedi¤i s›cakl›k seviyesinde
so¤uyabilir, ancak küçük su damlalar› bile
kumafl›n›z› lekeleyebilir. Bu tür durumlarda,
su damlatmama sistemi otomatik olarak
buharlaflmay› önlemek için harekete geçer,
böylece en hassas kumafllar› bile bozma
ya da lekeleme riski olmadan
ütüleyebilirsiniz.
‹LK KULLANIM
Cihaz› ilk kullanaca¤›n›z zaman hafif bir
buhar fark edebilirsiniz ya da plastiklerin
genifllemesinden kaynaklanan ses
duyabilirsiniz. Bu son derece normaldir ve
Öncellikle ütüleme ifllemine düflük s›cakl›k
gerektiren kumafllarla bafllay›n›z. Böylece
ütünün ›s›nmas› ya da so¤umas› için
beklemeniz gereken zaman› ve kumafla
zarar verme riskini en aza indirmifl
olursunuz.
BUHARLI ÜTÜLEME
Su Haznesinin Doldurulmas›
- Cihaz prizinin tak›l› olmad›¤›ndan emin
olunuz.
- Buhar dü¤mesini flekil-1 deki gibi “ ”
pozisyonuna getiriniz.
• Su haznesinin kapa¤›n› aç›n›z.
• Suyun rahatça doldurulabilmesi ve taflma
yaflanmamas› için ütüyü dik bir flekilde
tutarak su ile doldurunuz.
• Su haznesine suyu MAX seviyesini
geçmeyecek flekilde (300ml) yavaflça
doldurunuz.
02
Page 5
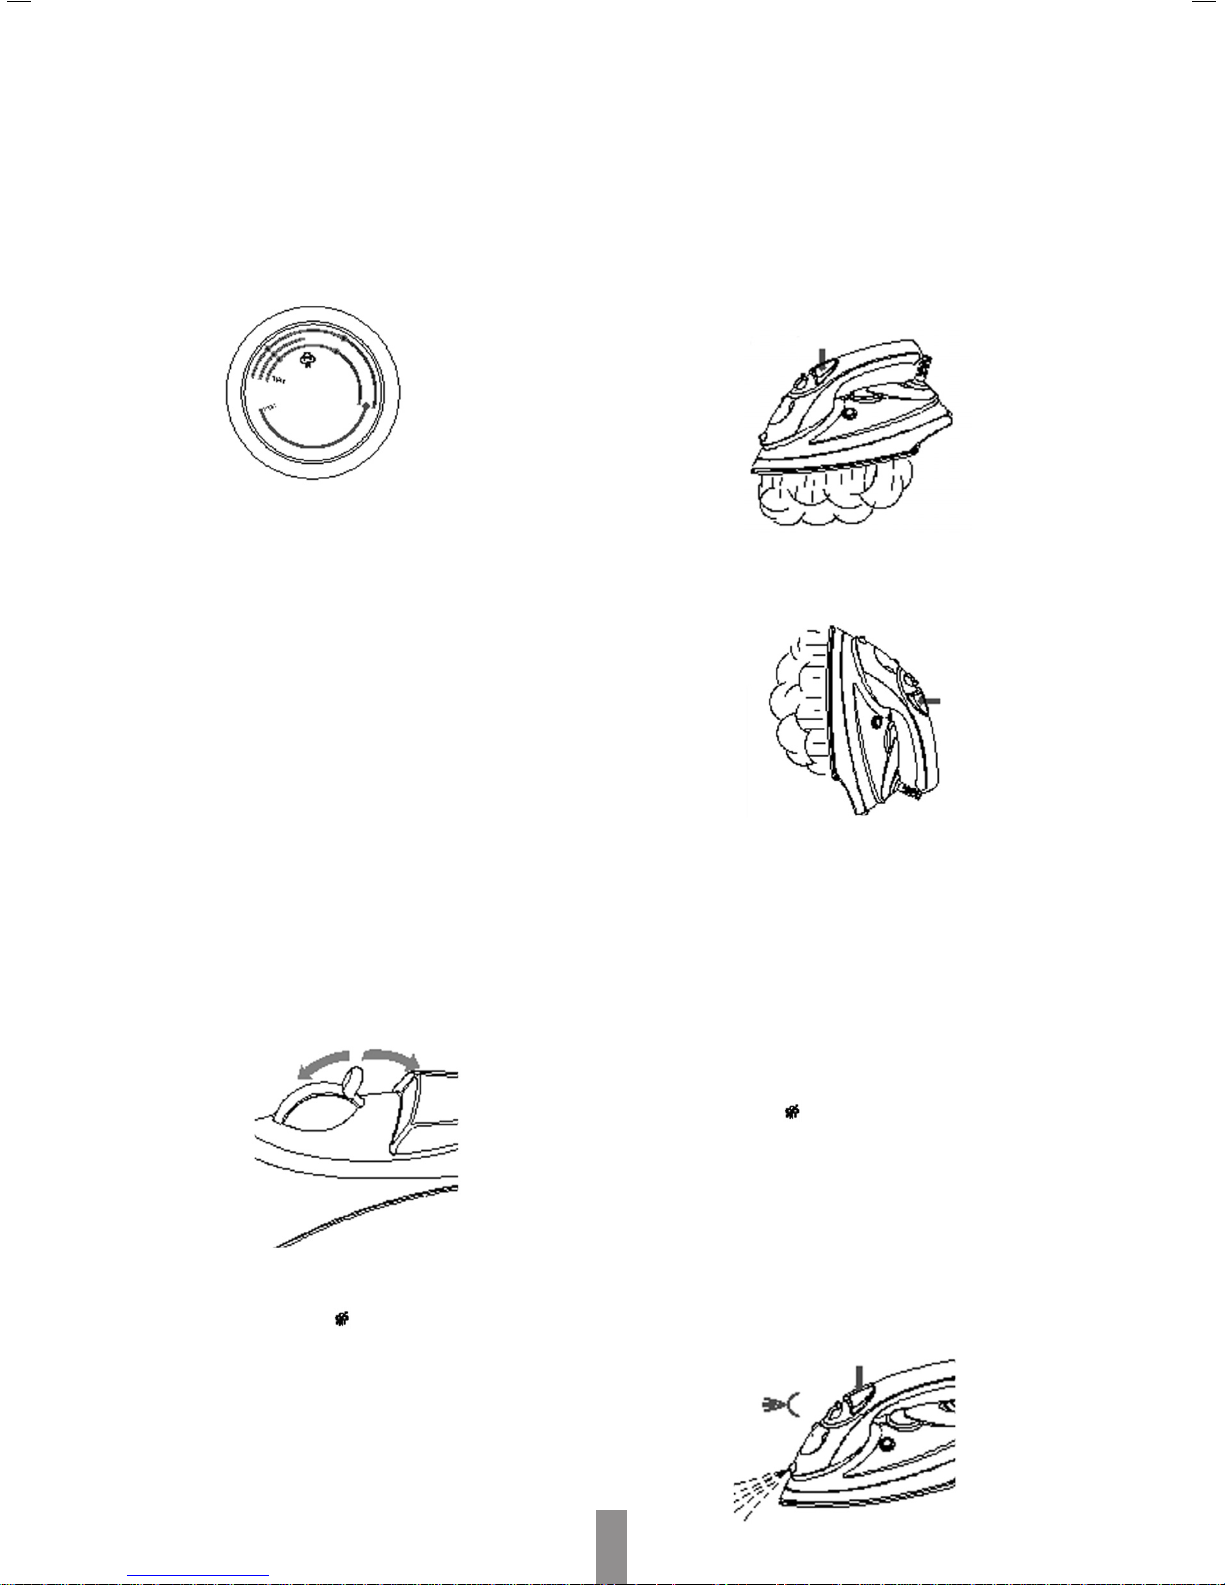
• Kapa¤› kapat›n›z.
S›cakl›¤›n Ayarlanmas›
• Cihaz› dik bir flekilde yerlefltiriniz.
• Cihaz›n fiflini prize tak›n›z.
• S›cakl›k ayar dü¤mesini kumafl›n üzerinde
bulunan, kumafl cinsi etiketine göre
ayarlay›n›z.
Cihaz›n ›s›nd›¤›n› gösteren güç gösterge
ıflı¤ı yanacaktır. Ütüleme ifllemine
bafllamadan önce, güç gösterge ›fl›¤›n›n
sönmesini bekleyiniz.
Uyar›: Ütüleme ifllemi s›ras›nda güç
gösterge ıflı¤ı, seçilen ›s›n›n korundu¤una
dair belirli aral›klarla yanacakt›r. Yüksek
s›cakl›kta bir ütüleme iflleminden sonra
s›cakl›k ayar dü¤mesini düflük bir s›cakl›k
seviyesine getirdi¤inizde, güç gösterge
›fl›¤› tekrar yan›ncaya kadar ütüleme
ifllemine bafllamay›n›z.
Buhar›n Ayarlanmas›
Buhar miktar› buhar dü¤mesi ile
ayarlanmaktad›r.
Buhar dü¤mesini ihtiyaç duyulan buhar
miktar› ve seçilen s›cakl›k seviyesine göre
maximum ve minimum derecesi aras›nda
ayarlay›n›z.
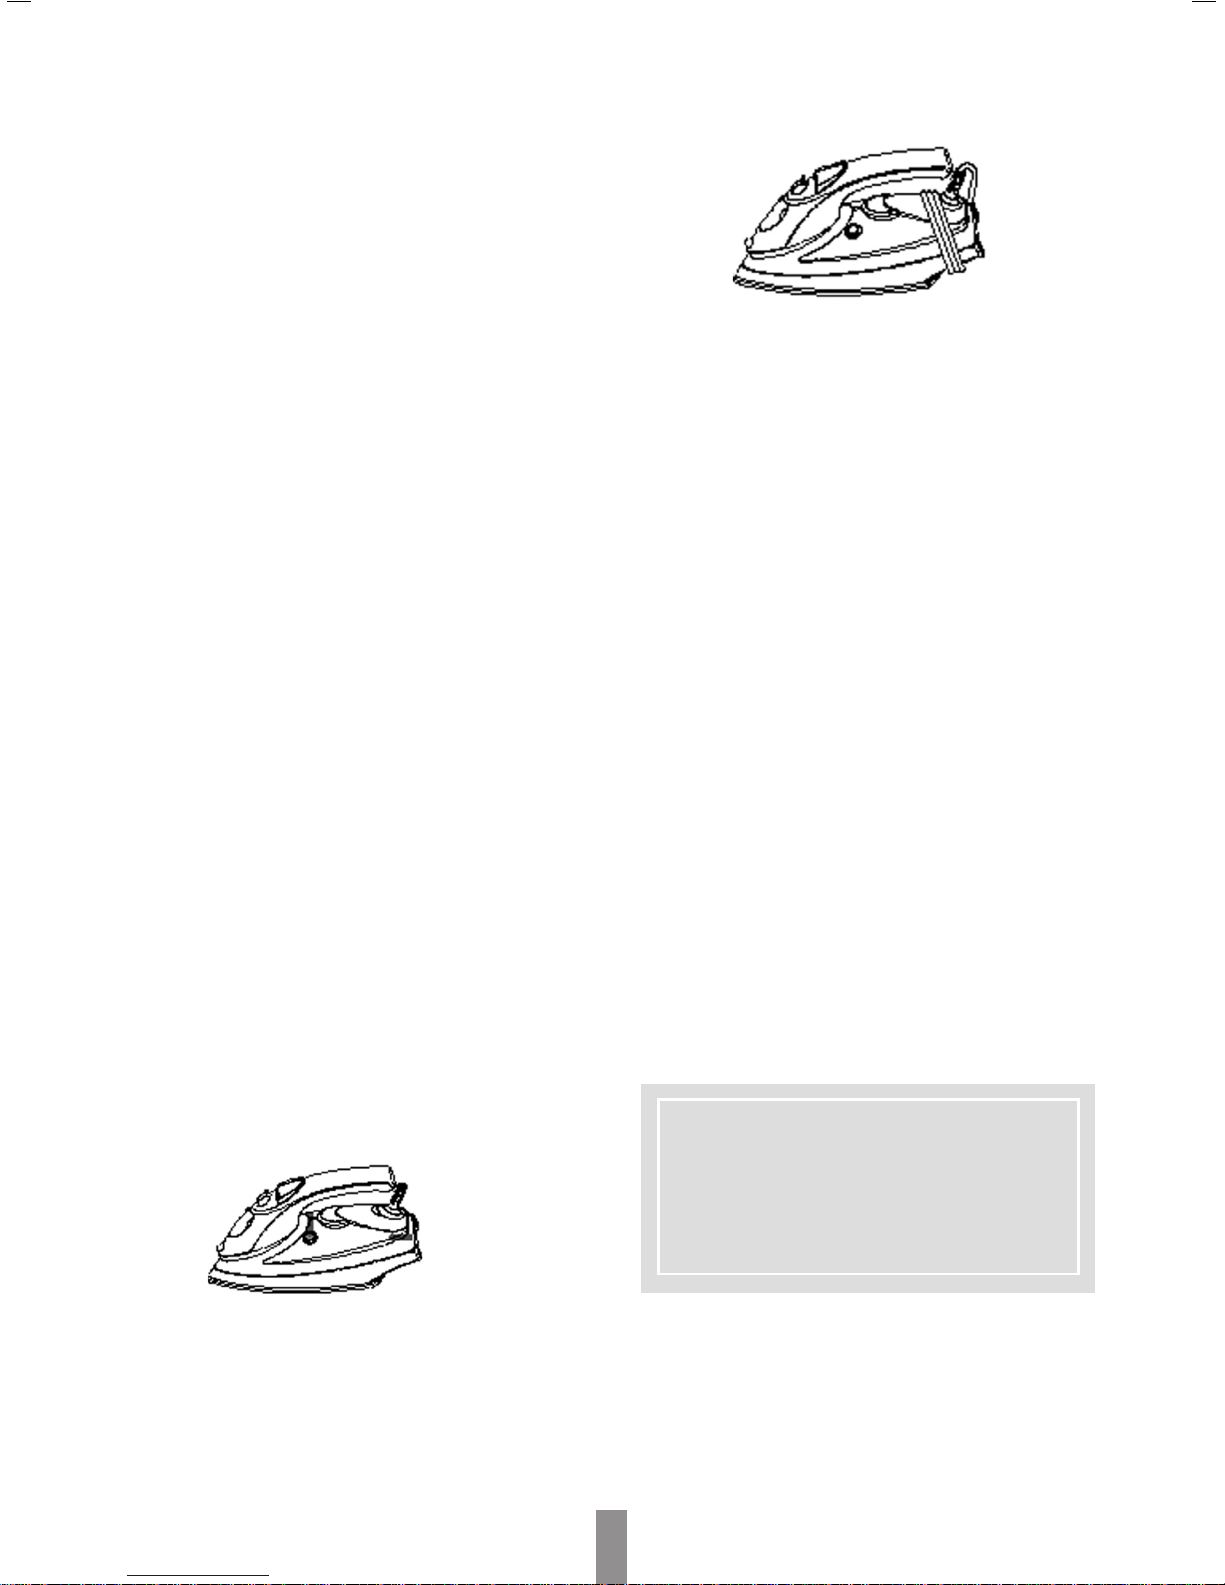
Dikey Ütüleme S›ras›nda Yo¤un Buhar›n
Ayarlanmas›:
Yo¤un buhar ç›k›fl dü¤mesine basarak,
kumafla nüfuz eden güçlü buhar kullanabilir
ve en zor ve dayan›kl› k›r›fl›kl›klar›
giderebilirsiniz. Tekrar yo¤un buhar
dü¤mesine basmadan önce birkaç saniye
bekleyiniz.
Yo¤un buhar dü¤mesine belirli aral›klarla
basarak, dikey ütüleme de yapabilirsiniz.
Uyar›: Yo¤un buhar özelli¤i yaln›zca yüksek
s›cakl›kta kullan›labilir. Bu özelli¤i, güç
gösterge ›fl›¤› yand›¤›nda kullanmay›n›z,
›fl›k söndü¤ünde yo¤un buhar özelli¤ini
kullanmaya devam edebilirsiniz.
BUHARSIZ ÜTÜLEME
Buhars›z ütüleme için, “buharl› ütüleme”
bölümünde bulunan aflamalar› buhar
dü¤mesini “ ” noktas›na getirerek takip
ediniz.
Uyar›: Cihaz yatay olarak tutuldu¤unda
düzenli ve sürekli olarak buhar vermektedir.
Buhar dü¤mesini “ ” noktas›na getirerek
ya da cihaz› dik olarak yerlefltirerek düzenli
buhar› durdurabilirsiniz. Termostat
dü¤mesinde ve bafllang›ç tablosunda
gösterildi¤i gibi, buhar› yaln›zca yüksek
s›cakl›klarda kullanabilirsiniz. Seçilen s›cakl›k
düflük ise, tabandan su damlayabilir.
Sprey Özelli¤i
Su haznesinde yeterli su bulundu¤undan
emin olunuz. Yo¤un sprey için yavaflça,
buharl› sprey için h›zl› bir flekilde sprey
dü¤mesine bas›n›z.
03
Page 6
Uyar›: Hassas kumafllar için sprey özelli¤ini
kullanmadan önce kumafl› nemlendirmenizi
ya da ütü ve kumafl aras›na nemli bir bez
koyman›z› tavsiye ederiz. Lekelerden
kaç›nmak için, ipek ve sentetik kumafllarda
sprey özelli¤ini kullanmay›n›z.
TEM‹ZLEME
Not: Cihaz› temizlemeden önce mutlaka
fiflin prize tak›l› olmad›¤›ndan emin olunuz.
• Cihaz tamamen so¤uyana kadar bekleyiniz.
• Cihaz›n kablosunuz sar›n›z.
• Cihaz› her zaman dik bir flekilde muhafaza
ediniz.
Cihaz›n taban›nda oluflan herhangi tortu,
kal›nt› nemli bir bez ya da afl›nd›r›c› olmayan
s›v› deterjanlar ile giderilebilir.
Cihaz›n taban›n› bulafl›k teli ya da metal
nesneler ile çizmemeye gayret ediniz.
Plastik parçalar nemli bir bezle temizlenip,
daha sonra kuru bir bezle silinebilir.
KEND‹ KEND‹NE TEM‹ZLEME ÖZELL‹⁄‹
Kendi kendini temizleme özelli¤i sayesinde
taban içinde oluflan kal›nt›lar temizlenebilir.
Cihaz›n bu özelli¤ini 10-15 gün ara ile
kullanman›z› öneririz.
Talimatlar:
• Su haznesini MAX seviyesine kadar
doldurunuz ve buhar dü¤mesini ayarlay›n›z.
• S›cakl›k ayar dü¤mesini maximum
pozisyonuna getiriniz ve ›fl›k sönene kadar
bekleyiniz.
• Cihaz›n fiflini prizden çekiniz ve ütüyü dik
olarak lavaboya do¤ru tutunuz.
• Tüm kaynayan su, buhar, kal›nt›lar ç›kana
kadar “Self - Clean” tufluna bas›n›z.
‹Y‹ B‹R ÜTÜLEME ‹Ç‹N TAVS‹YELER
Farkl› ve az görülen kumafllar için düflük
s›cakl›k seviyelerini kullanman›z› tavsiye
ederiz. E¤er kumafl›n cinsini bilmiyorsan›z,
uygun bir s›cakl›kla öncelikle kumafl›n bir
köflesini ütüleyiniz. Düflük s›cakl›k seviyesi
ile ütüleme ifllemine bafllay›n›z ve düzenli
olarak artt›r›n›z.
‹pek, yünlü, ve sentetik kumafllar›n
parlamamas› için, bu kumafllar› içten
ütüleyiniz.
Kadife kumafllar üzerinde parlakl›k
oluflmas›n› önlemek için, kumafl› ayn› yönde
ve ütüyü kumafl›n üzerine bast›rmadan
ütüleyiniz.
Birçok kumafl›n ütülenmesi nemli iken daha
kolay olur. Örne¤in, ipek kumafllar her
zaman nemli olarak ütülenmelidir.
Ürün bilgileri
Güç : 2200 Watt
Voltaj : 230V~50 Hz
Motor : AC
Koruma s›n›f› : II
Kulanım ömrü : 7 yıl
• Cihaz›n taban› so¤udu¤unda, nemli bir
bezle temizleyebilirsiniz.
MUHAFAZA
• Cihaz›n fiflini prizden çekiniz.
• Su tank›nda bulunan suyu ütüyü ters
çevirerek boflalt›n›z.
Cihazın su haznesinde ve ya etraf›nda su
olabilir. Bunun sebebi cihazlar›m›z› üretim
sonras› siz sat›nalmadan %100 çal›fl›rl›¤›na
dair denememizden kaynaklan›yor.
Böylelikle kaliteli bir Stima Buharlı Ütü
sahibi oluyorsunuz.
04
Page 7

05
Page 8

Introduction
Thank you for purchasing Fakir Stima Steam
Iron which has been designed and
manufactured to give you many years of
trouble-free service.
You may already be familiar with using a
similar product, but do please take time to
read these instructions – they have been
written to ensure you get the very best from
your purchase.
Safety is Important
To ensure your safety and the safety of
others, please ensure you read the Safety
Instructions before you operate this product.
Keep this information in a safe place for
future reference.
Important Safeguards
When using an electric appliance, basic
precautions should always be followed,
including the following:
1. Check the mains voltage stated on the
rating plate corresponds to the local
electricity supply.
2. Unwind and straighten the power
cord/supply cord before use.
3. Place the appliance on a firm and steady
surface.
4. Avoid power cord or supply cord touches
the soleplate.
5. The plug of the supply cord must be
removed from the socket-outlet before the
water reservoir is filled with water.
6. Keep electrical appliances out of reach
from Children or infirm persons. Do not let
them use the appliances without supervision
7. When placing the iron on its stand, ensure
that the surface on which the stand is placed
is stable.
8. If the power cord or supply cord is
damaged, the manufacturer or its service
agent or similarly qualified person must
replace it in order to avoid a hazard
9. Empty the water tank after use.
10. This appliance is not intended for use by
persons (including children) with reduced
physical, sensor yor mental capabilities, or
lack of experience and knowledge, unless
they have been given supervision or
instruction concerning use of the appliance
by a person responsible for their safety.
11. Children should be supervised to ensure
that they do not play with the appliance.
12. Do not allow children touch the appliance
when ironing.
13. Do not leave the appliance unattended
when it is connected to a mains supply
outlet.
14. Do not use an extension power cord set
unless competent authority has approved
it.
15. Do not add perfumed, vinegar or other
chemical liquids into the water tank; they
can damage the appliance seriously.
16. Do not immerse the appliance in water or
any other liquid.
17. Do not use the appliance when it is
damaged or performs abnormally.
18. The iron is not to be used if it has been
dropped, if there are visible signs of
damage or if it is leaking.
19. Do not touch the iron rest during or just
after ironing. It is hot!
20. Do not leave the hot iron touching fabrics
or very inflammable surfaces.
21. Do not touch the appliance with wet or
damp hands.
22. Do not leave appliance exposed to the
weather (rain, sun, etc.)
23. Do not roll the power cord or supply cord
around the iron unit or base console for
storage until it has cooled down completely.
24. Do not attempt to open the cabinet or
dismantle any parts from the appliance,
there is no serviceable part inside.
25. Use iron only for its intended use.
UNIT SPECIFICATIONS
1. Spray organ
2. Filler door
3. Steam dial
4. Spray button
5. Shot-steam button
6. Power indication light
7. Supply cord
8. Cord bushin
06
Page 9
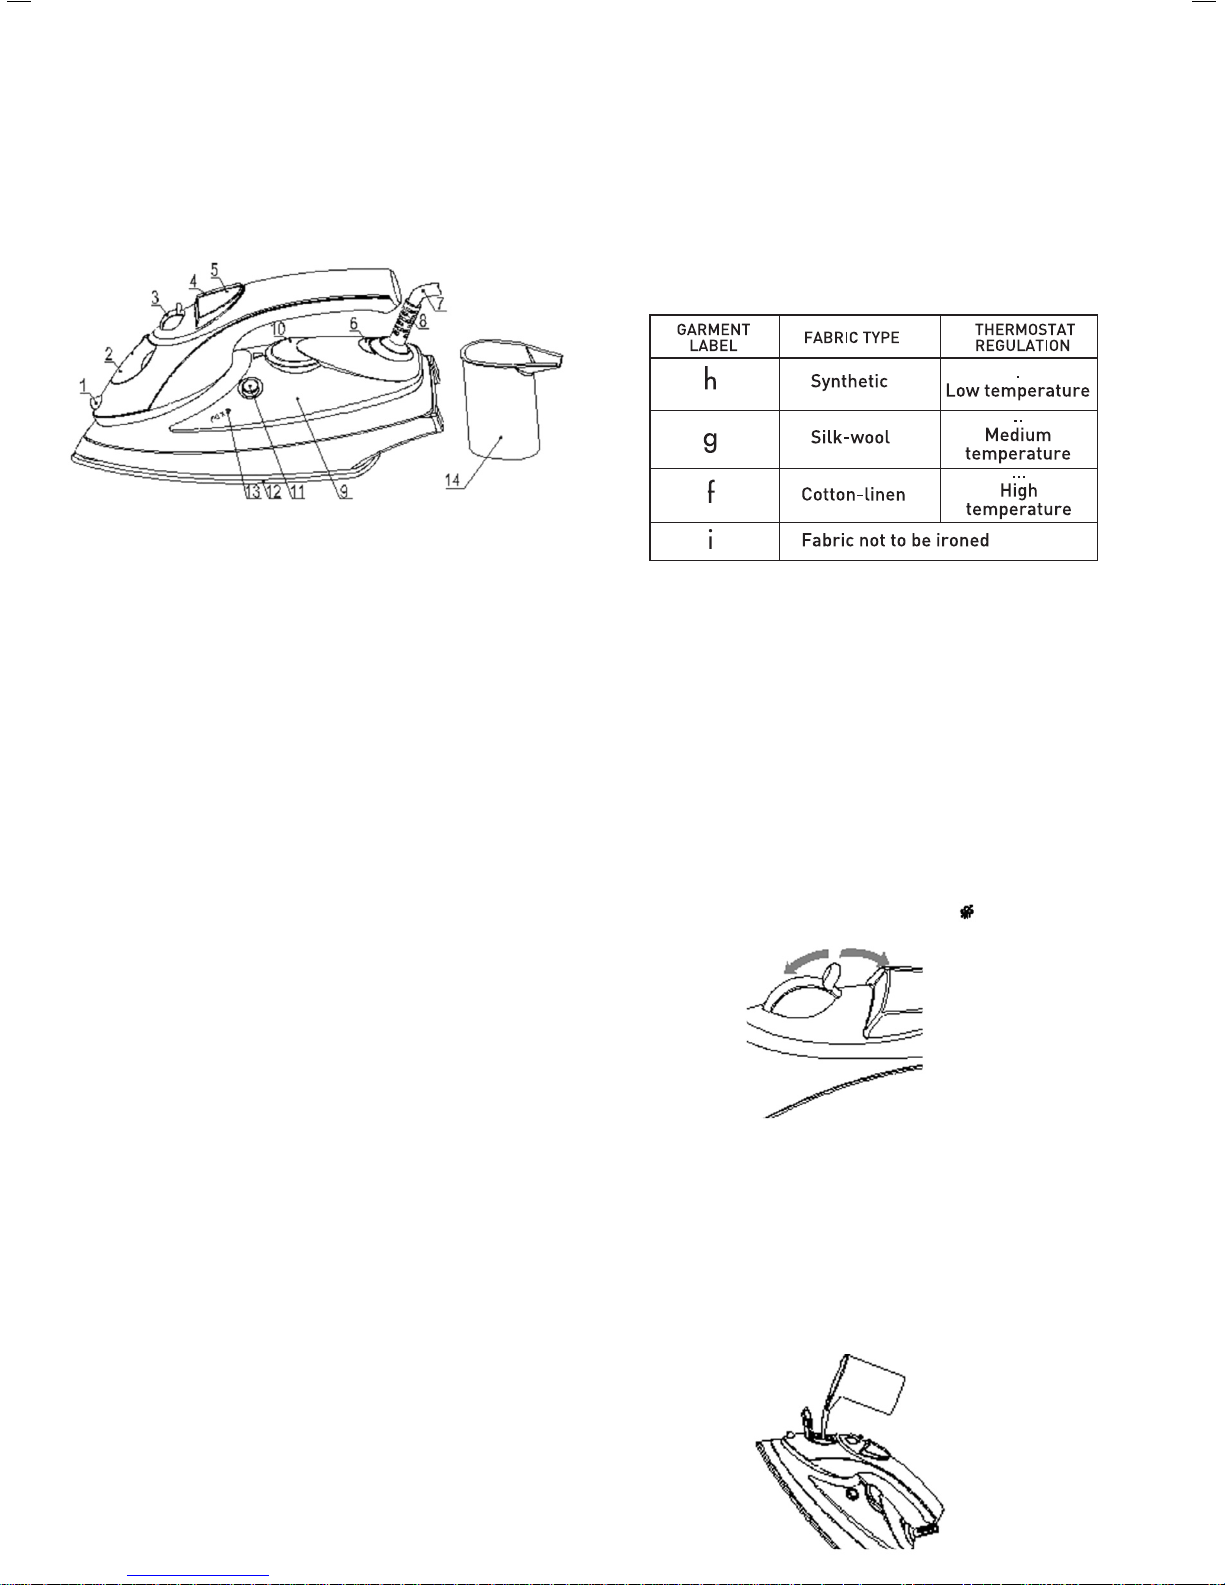
9. Transparent water tank
10. Thermostat knob for temperature regulation
11. Self-cleaning button
12. Plate with steam vents
13. Maximum filling level
14. Water measure
ANTI-CALC SYSTEM
A special resin filter inside the water
reservoir softens the water and prevents
scale build-up in the plate. The resin filter
is permanent and does not need replacing.
Note: Use tap water only. Distilled
and/demineralised water makes the anticalc system ineffective by altering its
physicochemical characteristics.
Do not use chemical additives, scented
substances or decalcifiers. Failure to comply
with the above-mentioned regulations leads
to the loss of guarantee.
passing the iron over an ordinary cloth
before using it for the first time.
PREPARATIONS
Soft the laundry to be ironed according to
the international symbols on the garment
label, or if this is missing, according to the
type of fabric.
Start ironing the garments requiring a low
temperature.
This reduces the waiting times (the iron
takes less time to heat up than to cool down)
and eliminates the risk of scorching the
fabric.
STEAM IRONING
Filling the reservoir
• Check that the plug is disconnected from
the socket.
• Move the steam selector to “ ”
ANTI-DRIP SYSTEM
With the anti-drip system, you can perfectly
iron even the most delicate fabrics.
Always iron these fabrics at low
temperatures. The plate may cool down to
the point where no more steam comes out,
but rather drops of boiling water that can
leave marks or stains. In these cases, the
Anti-drip system automatically activates to
prevent vaporization, so that you can iron
the most delicate fabrics without risk of
spoiling or staining them.
GENERAL INSTRUCTIONS
When using the iron for the first time, you
may notice a slight emission of smoke and
hear some sounds made by the expanding
plastics. This is quite normal and it stops
after a short time. We also recommend
• Open the lid.
• Raise the tip of the iron to help the water
enter the opening without overflowing.
• Slowly pour the water into the reservoir
using the special measure and taking care
not to go over the maximum level (about
300ml) indicated by “MAX” on the reservoir
• Close the lid.
Page 10
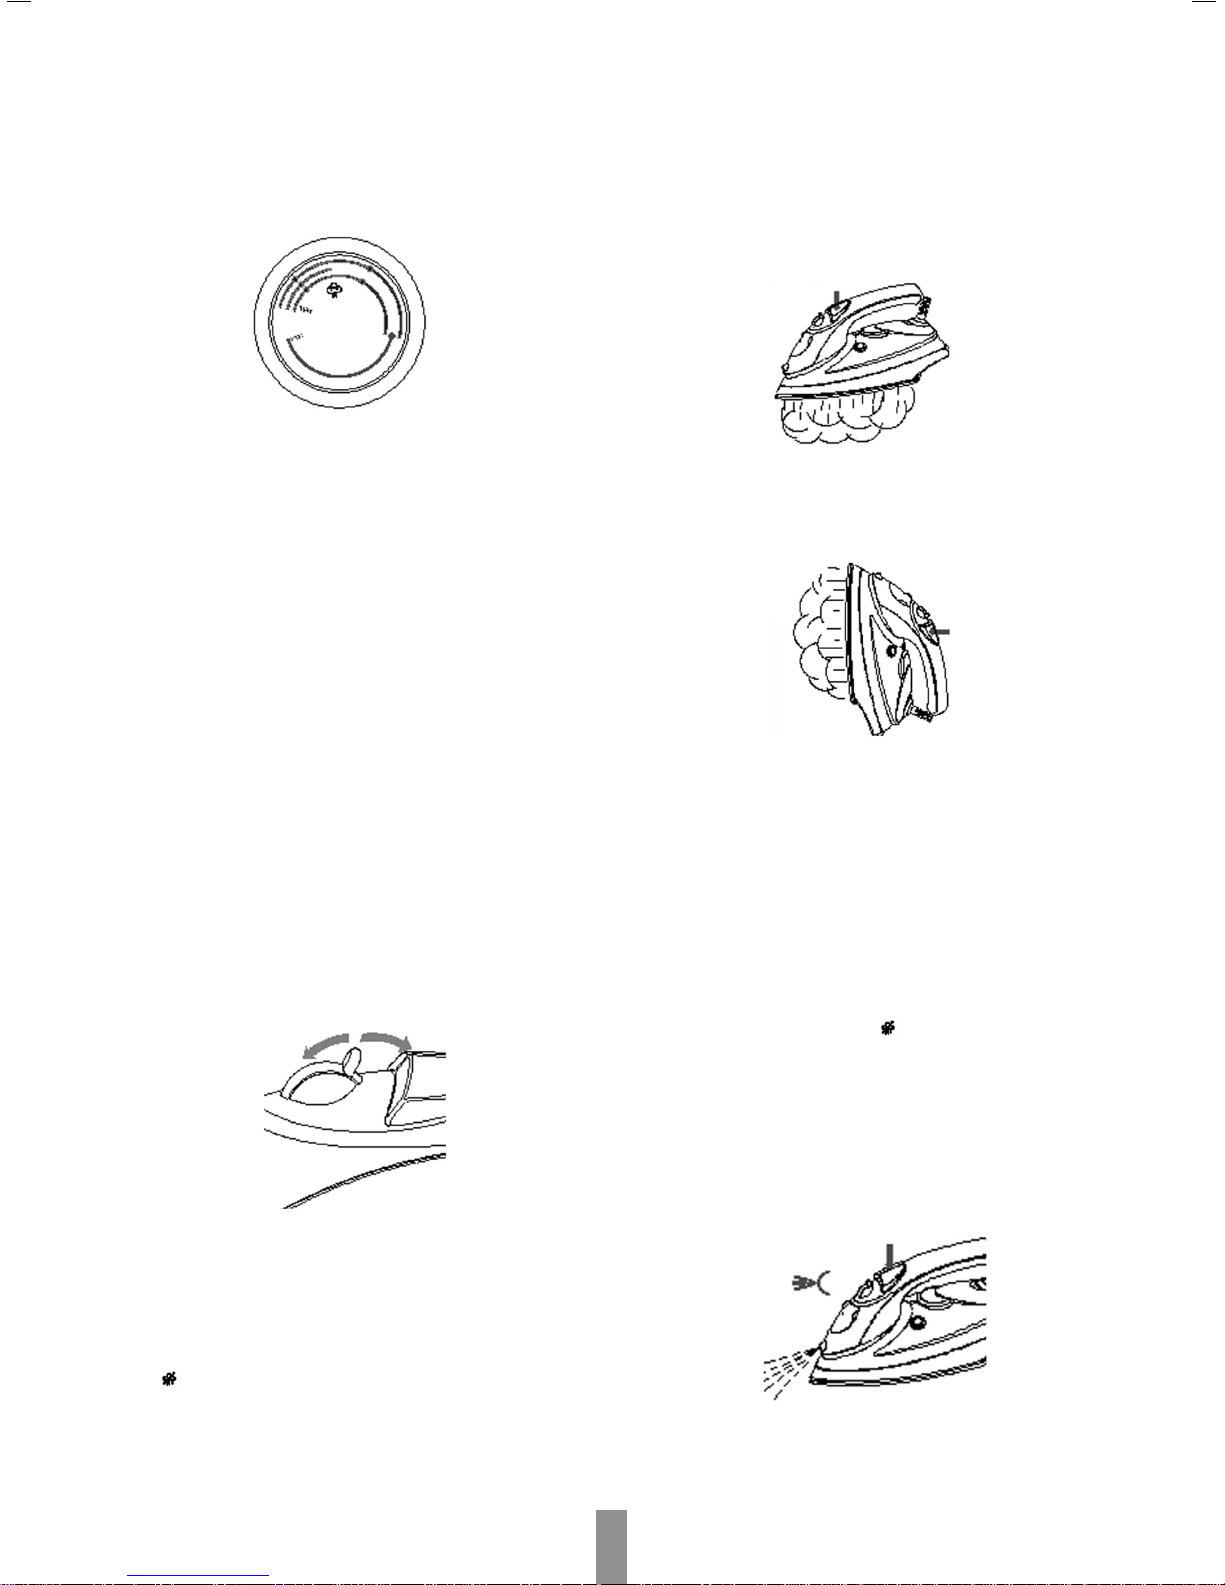
Selecting the temperature.
• Put the iron in a vertical position.
• Put the plug in the socket.
• Adjust the thermostat knob according to
the international symbol on the garment
label.
The power indication light indicates that
the iron is heating up. Wait until the power
indication light goes off before ironing.
Warning: During ironing, the power
indication light comes on at intervals,
indicating that the selected temperature is
maintained. If you lower the thermostat
temperature after ironing at a high
temperature, do not start ironing until the
power indication light comes on again.
Selecting the steam
The quantity of steam is regulated by the
steam selector.
• Move the steam selector to a position
between minimum and maximum
depending on the quantity of steam required
and the temperature selected.
Selecting Shot-steam and steam when
ironing vertically.
Press the shot-steam button to generate a
powerful burst of steam that can penetrate
the fabrics and smooth the most difficult
and tough creases. Wait for a few seconds
before pressing again.
By pressing the shot-steam button at
intervals you can also iron vertically
(curtains, hung garments, etc.)
Warning: The shot-steam function can only
be used at high temperatures. Stop the
emission when the power indication light
comes on, than start ironing again only after
the light has gone off.
DRY IRONING
To iron without steam, follow the instructions
in section “steam ironing”, leaving the steam
selector on position “ ”.
Warning: The iron gives off steam
continuously only if you hold the iron
horizontally. You can stop the continuous
steam by placing the iron in a vertical
position or by moving the steam selector
to “ ”. As indicated on the thermostat knob
and in the initial table, you can only use
steam at the highest temperatures. If the
selected temperature is too low, water may
drip onto the plate.
Spray Function
Make sure that there is water in the reservoir.
Press the spray button slowly (for a dense
spray) or quickly (for a vaporized spray)
Warning: For delicate fabrics, we
recommend moistening the fabric
beforehand using the spray function, or
07
Page 11
putting a damp cloth between the iron and
the fabric. To avoid staining, do not use the
spray on silk or synthetic fabrics.
CLEANING
Note: Before cleaning the iron in any way,
make sure that the appliance plug is not
connected to the socket.
Any deposits, starch residue or size left on
the plate can be removed using a damp
cloth or an unabrasive liquid detergent.
Avoid scratching the plate with steel wool
or metallic objects.
The plastic parts can be cleaned with a
damp cloth then wiped over with a dry cloth.
SELF-CLEANING
The self-cleaning feature cleans inside the
plate, removing impurities. We recommend
using it every 10-15days. Directions:
• Fill the reservoir up to the maximum level
indicated and set the steam selector
• Set the thermostat knob to the maximum
temperature and wait for the light to turn
off.
• Pull the plug out of the socket and hold the
iron horizontally over the sink.
• Hold the self-clean button setting until all
the boiling water, steam, impurities come
out.
• Always put the iron away in a vertical
position.
ADVICE FOR GOOD IRONING
We recommend using the lowest
temperatures with fabrics that have unusual
finishes (sequins, embroidery, flush, etc.).
If you don’t know the composition of the
fabric, determine the suitable temperature
by testing on a hidden corner of the
garment. Start with a low temperature and
increase it gradually until it reaches the
ideal temperature.
To avoid marking silk, woolen or synthetic
garments shiny, iron them inside out.
To avoid marking velvet garments shiny,
iron in one direction (following the fibre)
and do not press down on the iron.
Many fabrics are easier to iron if they are
not completely dry.
For example, silk should always be ironed
damp.
Specifications:
Power consumption : 2200 Watt
Voltage : 230V~50 Hz
Motor : AC
Protection class : II
Usage life : 7 years
• When the soleplate has cooled down, you
can clean it with a damp cloth.
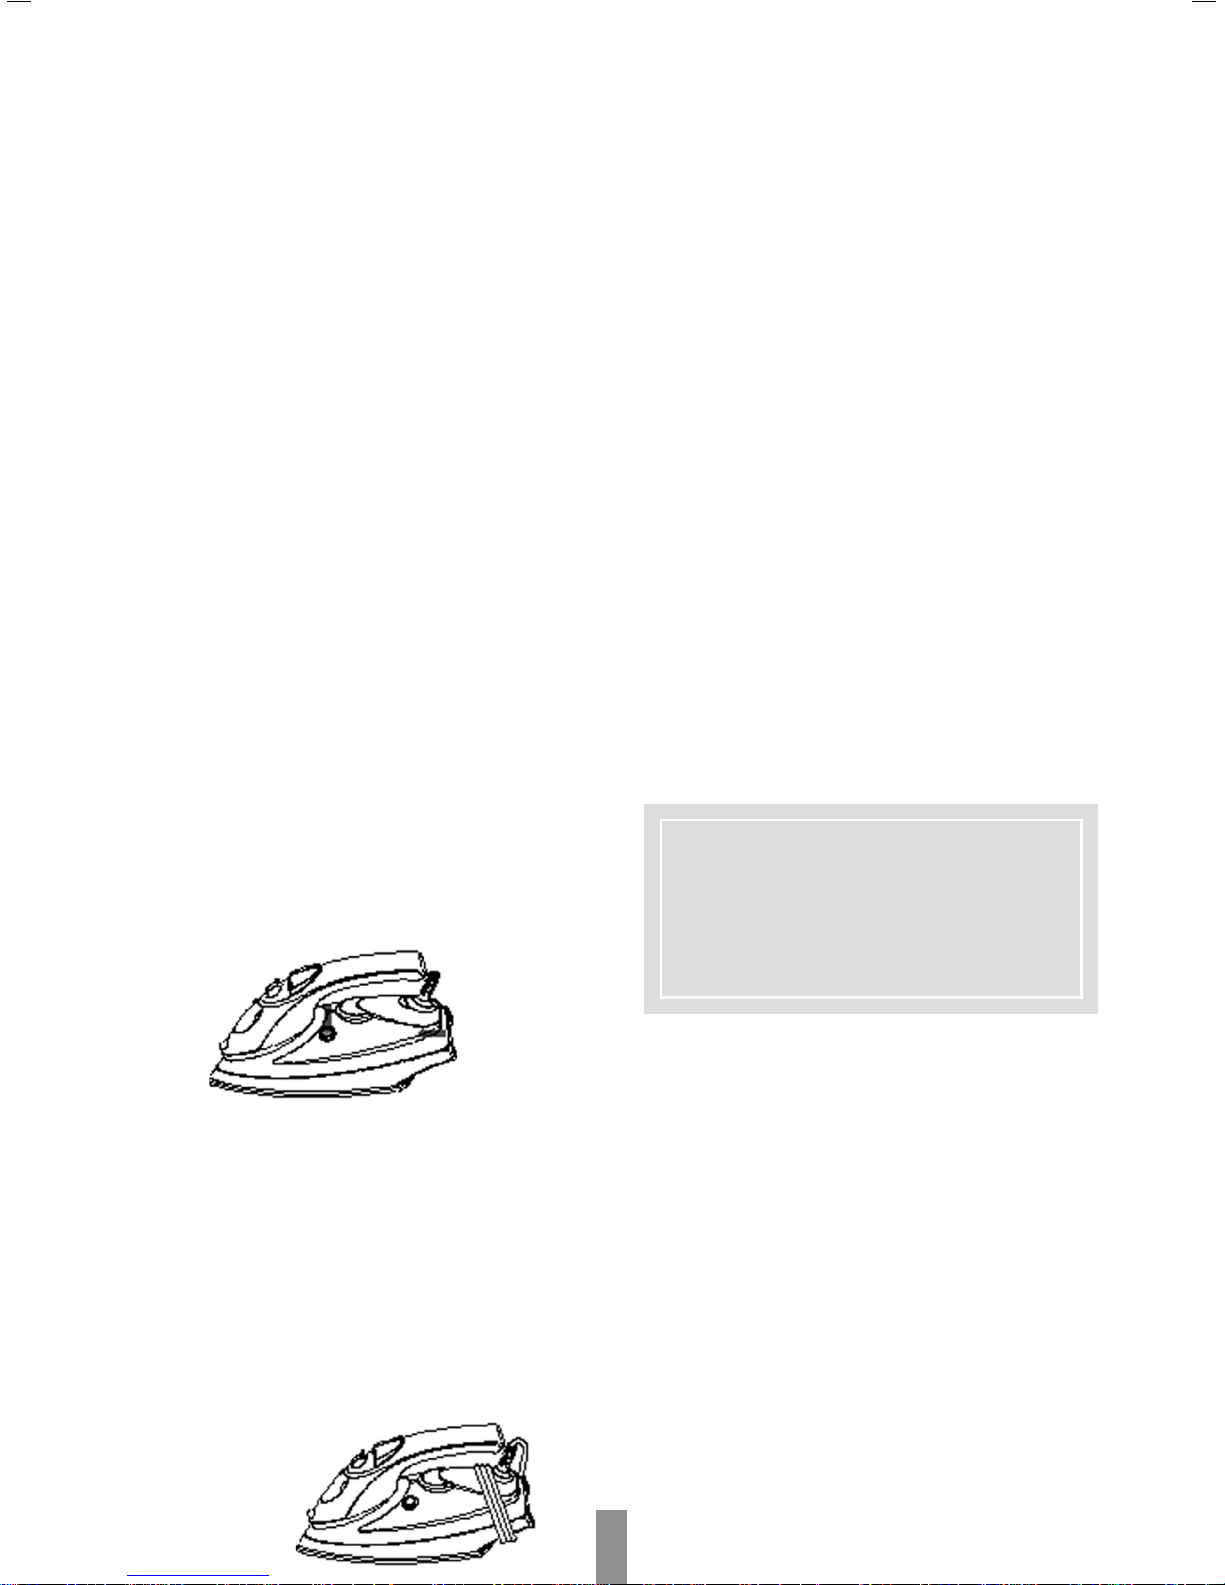
HOW TO PUT IT AWAY
• Disconnect the plug of the iron from the
socket.
• Empty the reservoir by turning the iron
upside down and gently shaking it.
• Leave the iron to cool down completely.
• Roll up the power cord with the rewinder.
There may be a little water in the water
tank. This is because we test all our Stima
Steam Iron 100% before you buy them, so
you get a quality product.
06
Page 12

Zhejiang Cuori Electrical Appliances (Group) Co., Ltd.
No:48 Developing Road, Zhouxiang, Town, Cixi City
Zhejiang, China
 Loading...