

Page 1

User Manual
Kullan›m K›lavuzu
2300 Watt
Steam-Vacuum Cleaner
Buharl› Süpürge
Page 2
Page 3
01
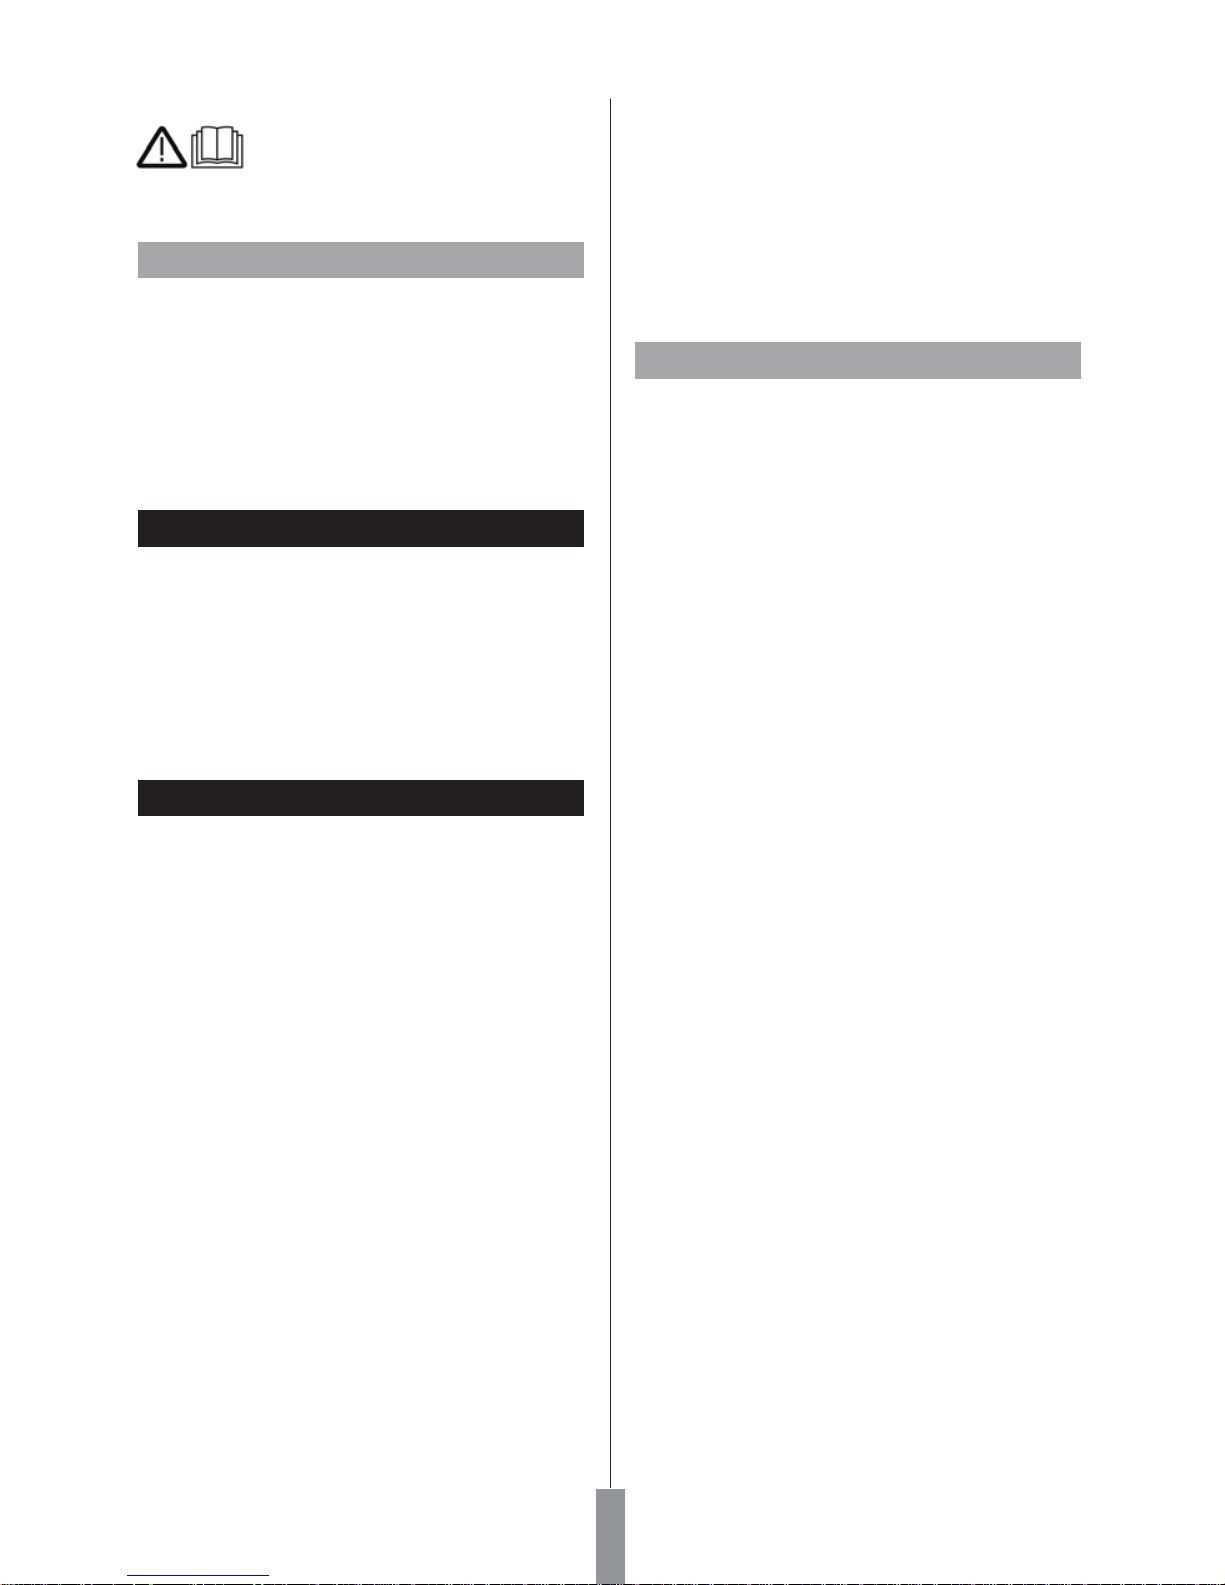
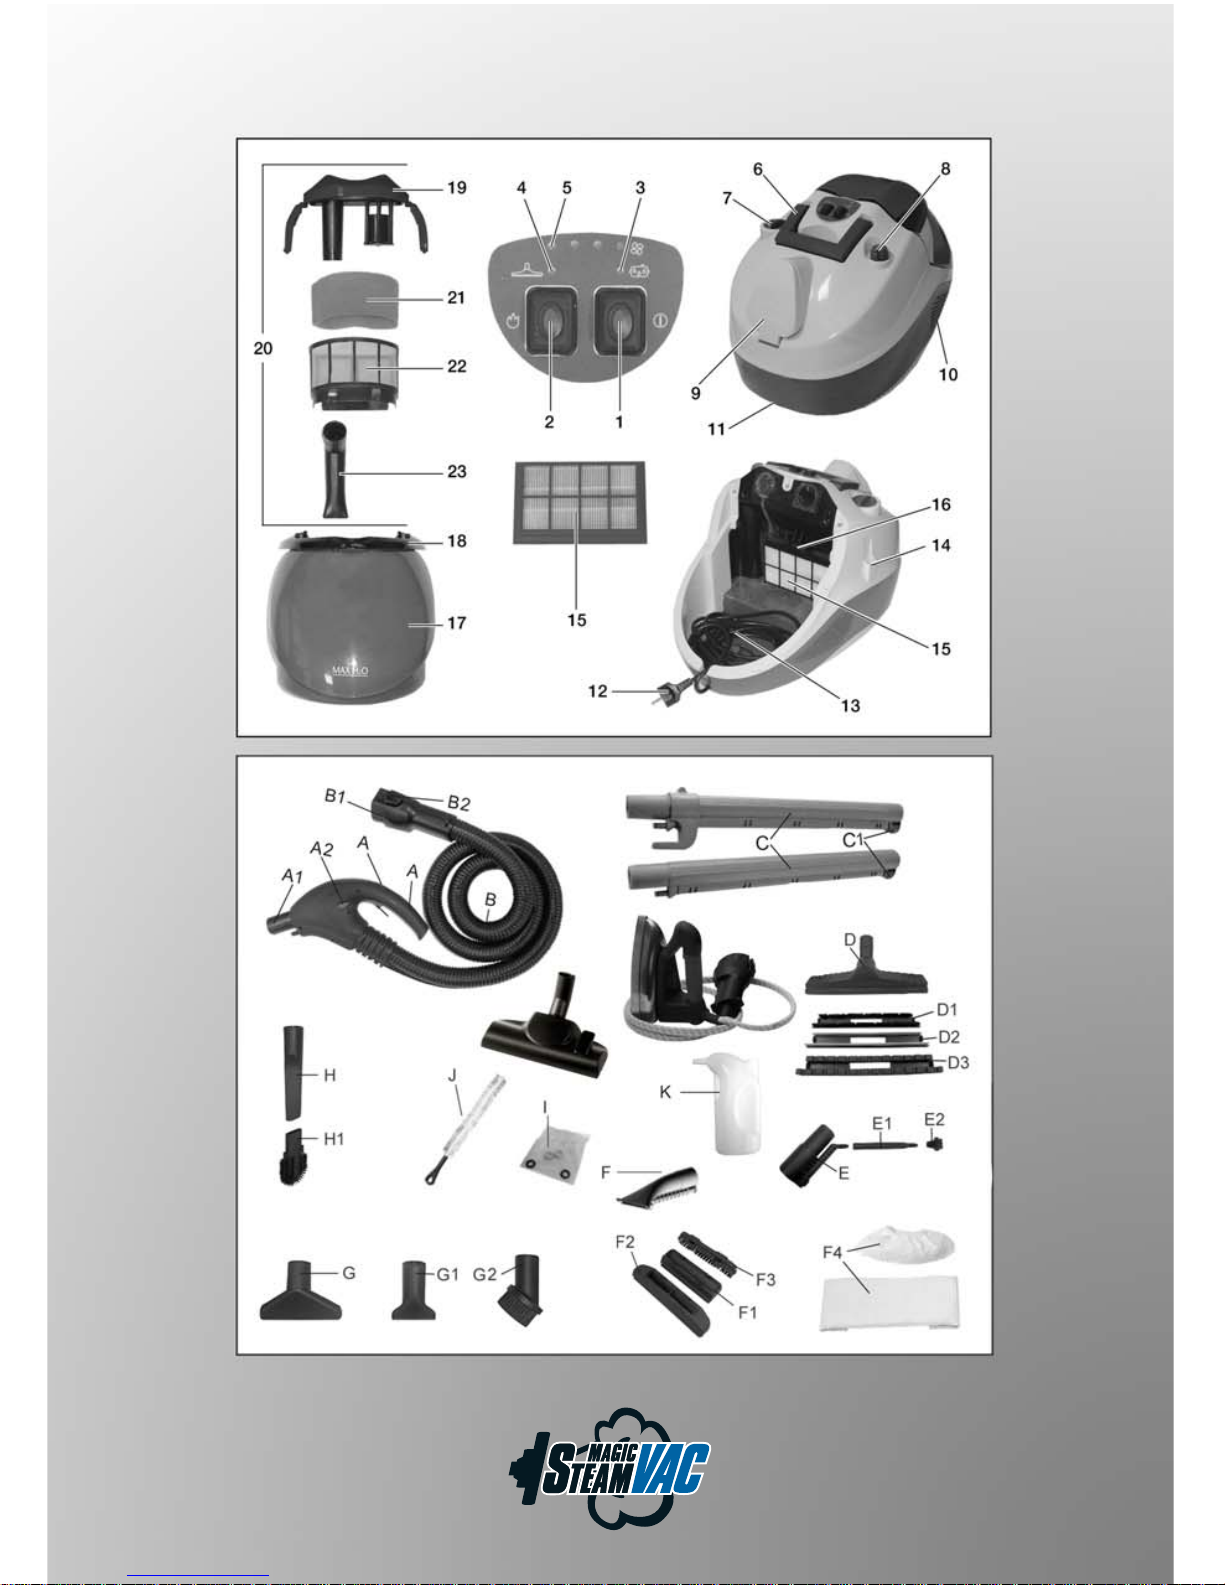
15 H.E.P.A. filter
16 Lever for unhooking the HEPA filter
17 Water filter container
18 Handle for Water filter container
19 Water filter inlay
20 Water filter lid
21 Formed foam filter
22 Filter with micro-perforations
23 Pipe bender
Dear Customer,
Please read and comply with these
instructions prior to the initial operation
of your appliance. Retain these operating instructions for
future reference or for subsequent possessors.
Proper Use
Description of the Appliance 01
Safety instructions 04
Preparing the Appliance 05
Operation 06
How to Use the Accessories 08
Maintenance and Care 09
Troubleshooting 10
Specifications 10
This appliance is designed for domestic use only.
The machine is designed for generating steam and
vacuum cleaning liquids and solid substances according
to the description in this Operating Instructions Manual.
The manufacturer is not responsible for any damages
that may occur on account of improper use or wrong
operations.
Contents
1 Main switch
2 Steam boiler switch
3 ”Low water” - indicator lamp
4 Indicator lamp - Pressure level
5 Indicator lamps - vacuum performance
6 Transport handle, retractable
7 Filling nozzles for water tank
8 Steam regulation
9 Machine socket with flap
10 Air exit grid
11 Rollers
12 Power cord
13 Power cord casing
14 Parking holder
Description of the Appliance
Accessories
A Handle
A1 - inlay bushing for accessories
A2 - Child safety
A3 - Vacuum switch
A4 - Steaming switch
B Steam suction hose
B1 - Steam plug
B2 - Steam plug lock
C Steam suction pipe
C1 - accessories lock
D Multi floor nozzle
D1 - brush lamellas
D2 - hard rubber lamellas
D3 - rubber lamellas
E Steam suction - detail nozzle
E1 - extension
E2 - round brush
F Steam suction - hand nozzle
F1 - small detachable flap (130 mm)
F2 - large detachable flap (200 mm)
F3 - brush crown
F4 - terry towelling cover
G Upholstery nozzle
G1- small upholstery nozzle
G2- furniture brush
H Crevice nozzle
H1- crevice nozzle brush
I Spare washers (O-ring set)
J Suction brush
K Steam Iron, optional
L Cleaning brush for water tank and pipes
M Measuring cup
Page 4
02
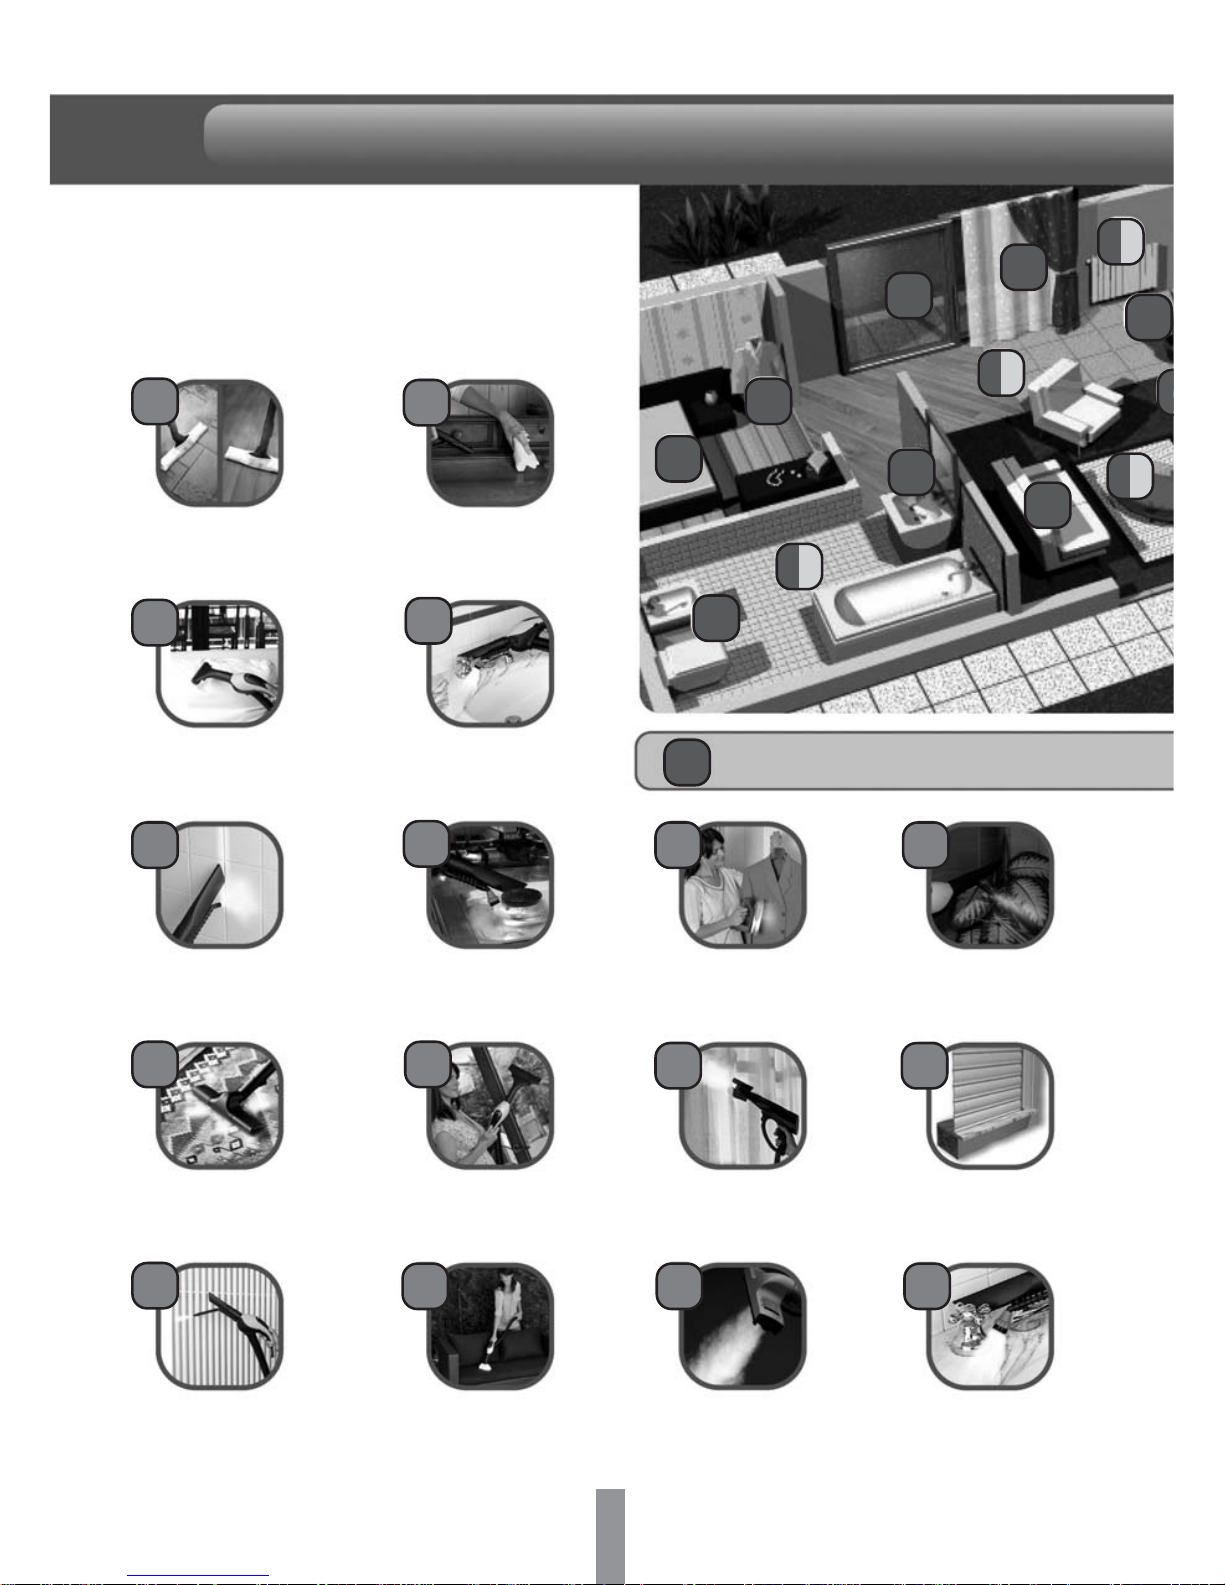
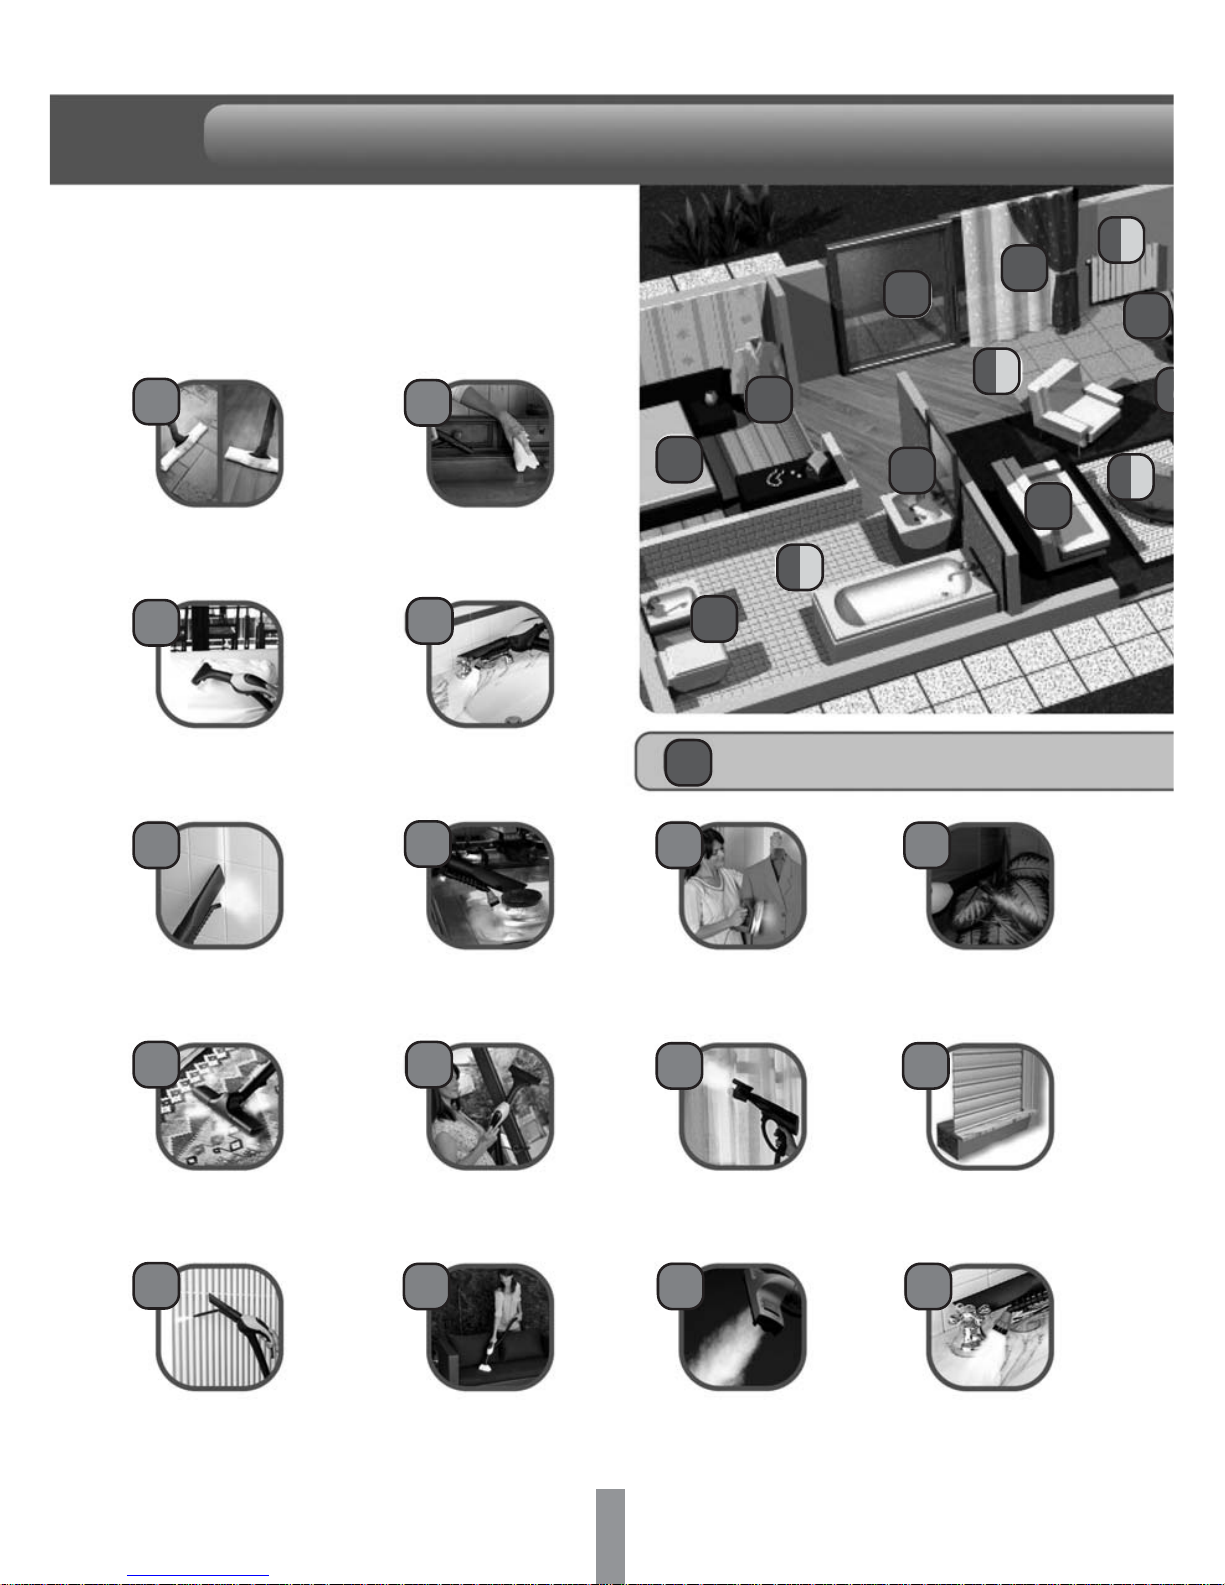
Cleaning terra cotta
and parquet floors
Cleaning sofas
and mattresses
Cleaning floors
and tiles
Cleaning carpets
and moquette
Ceaning radlators
Cleaning furniture
Clening bathroom
Cleaning the
kitchen
Cleaning glass
and mirrors
Cleaning garden
furniture
Ironing
Spraying curtains with
steam to freshen them up
Purlflying the air
Cleaning plants
Cleaning roller
shutters
Cleaning chrome
fixtures and taps
= Steam cleaning
5
1
2
3
4
6
7
8
9
10
11
12
13
14
15
16
11
2
7
3
9
16
2
1
12
14
6
4
5
Page 5
03
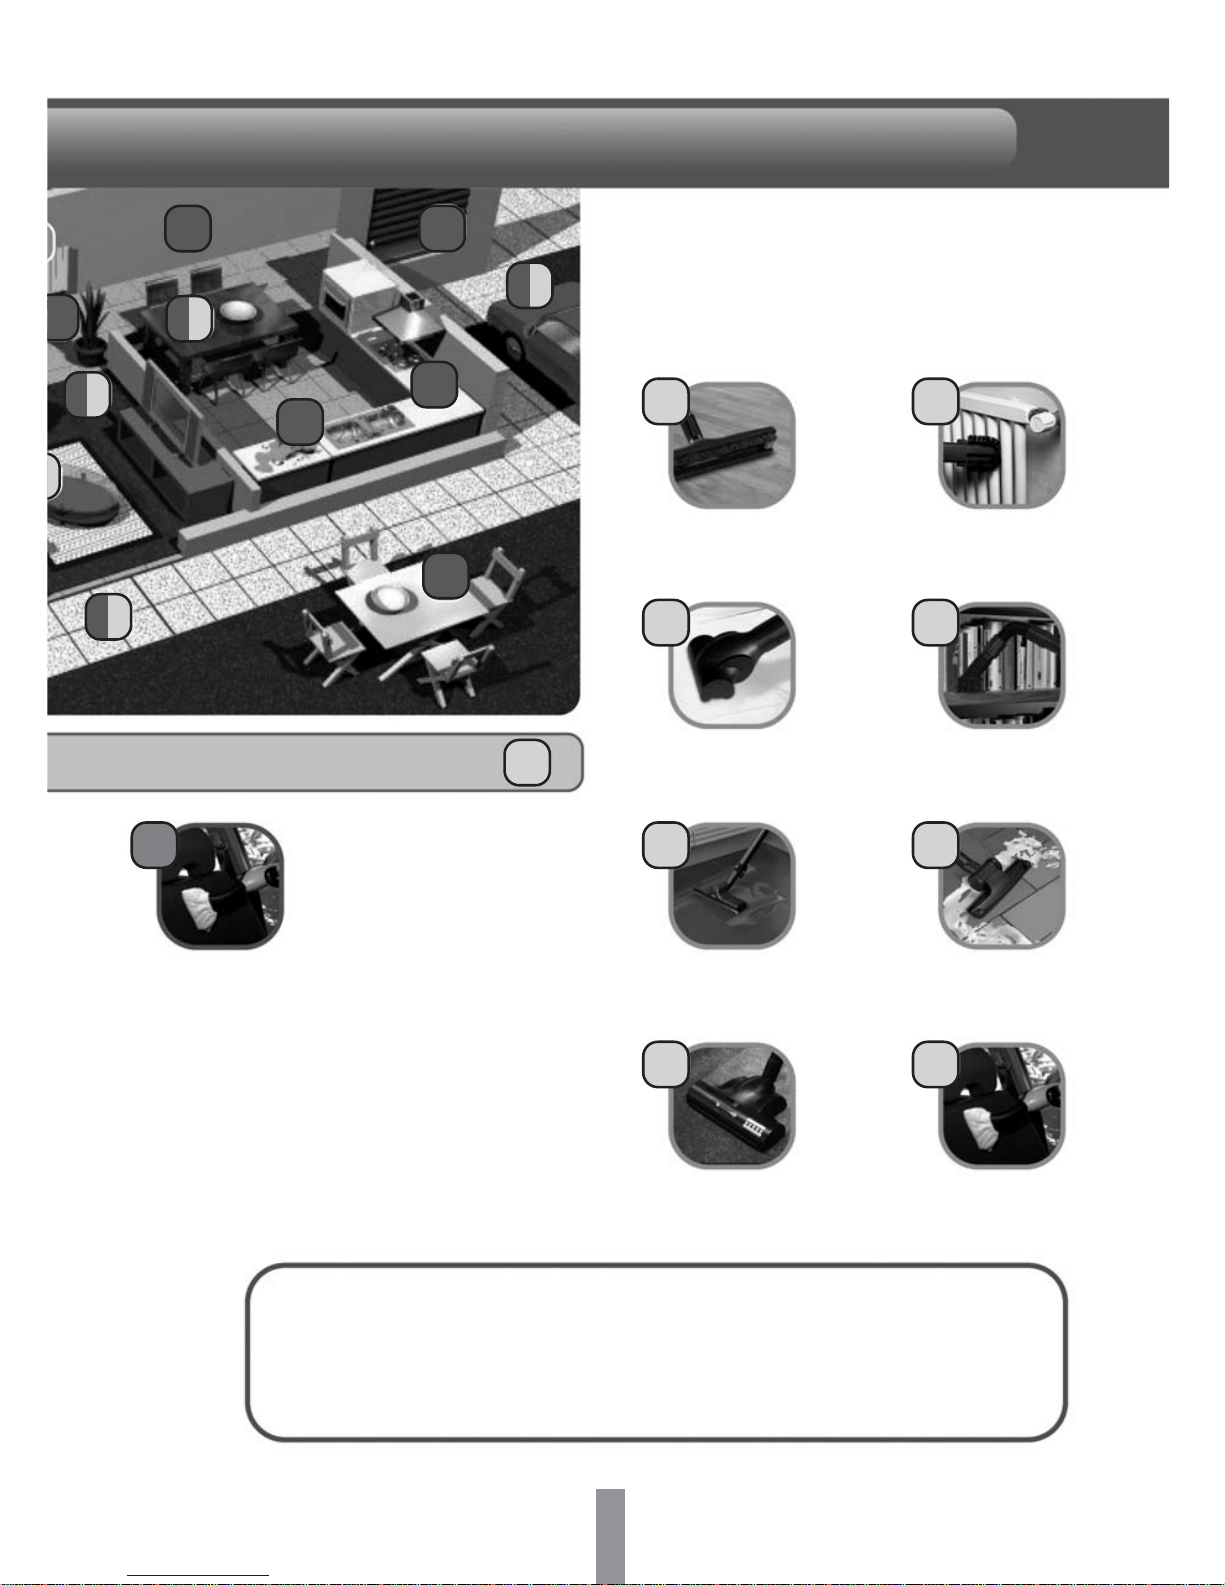
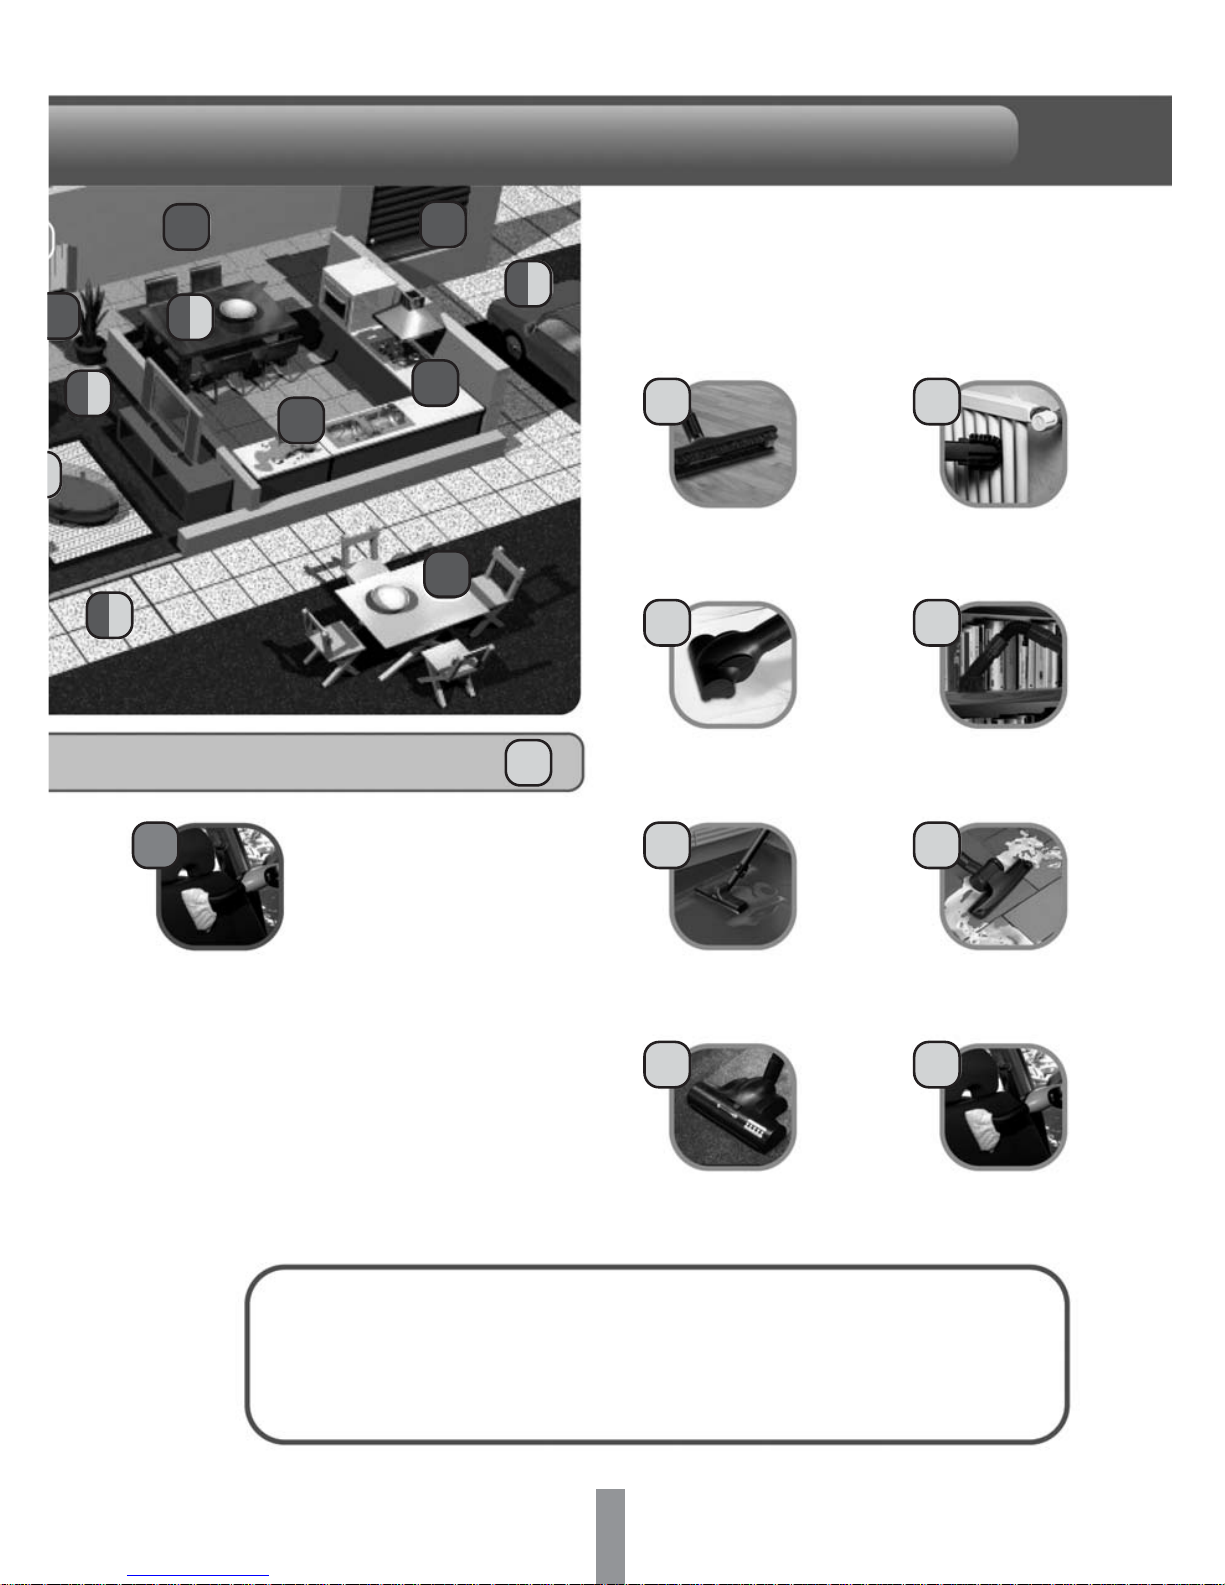
Cleaning the car
Suction =
Fakir Magic Steam Vac is the only appliance you can use for
all these functions for cleaning, vacuuming and sanitising your home.
Vacuuming wooden
floors
Vacuuming sofas
and mattresses
Vacuuming floors
Vacuuming carpets and
wall-to-wall carpeting
Vacuuming radlators
Dusting furniture
Suction of solids
and liquids
Vacuuming the car
3
6
17
8
10
13
15
18
4
4
1
2
3
4
5
6
17
18
18
Page 6

04
• Never operate the machine bare-foot.
• Do not touch the machine with wet hands or feet when
the mains plug is inserted in the socket.
• Never use the machine in direct vicinity of bath-tubs,
showers and containers filled with water.
• Never dip the machine, the cable or the plugs in water
or other liquids.
• It is not allowed to use the appliance in hazardous
locations. If the appliance is used in hazardous areas
the corresponding safety provisions must be observed.
• Do not use the machine in the presence of toxic
substances.
• Do not place the machine on heat-sensitive surfaces.
• Do not place the machine in the vicinity of swtich-on
stoves, electrical ovens or other sources of heat.
• Protect the appliance against external weather, humidity
and heat sources.
• Protect the unit from rain. Do not store outside.
• The appliance must not be operated by children, young
persons or persons who have not been instructed
accordingly.
• Press the switches lightly and avoid using sharp objects
such as pins, pens/pencils and similar objects.
• The appliance must provide of a stable ground.
• If the machine falls down, first get it checked by an
authorised FAKIR Service agent because there can be
internal damages that hamper the safety of the product.
• Never wind the main cable around the machine,
definitely not till the machine is still hot.
• Do not use the machine to vacuum clean acids or other
solutions as they can damage the machine. Also do not
suck in explosive powders or liquids as this can lead to
explosion when these substances come in contact with
the internal parts of the machine.
• Do not suck in toxic substances.
• Do not suck in burning or glowing objects such as
cigarette buds, ash or other burning or glowing materials.
• Do not use the machine to vacuum clean plaster of
Paris, cement, etc. that can harden on coming into contact
with water and can thus hamper the functioning of
the machine.
• Always switch off the machine and remove the plug
while filling the machine with water.
• Always place the machine in a horizontal position
during operation.
• Do not direct the steam jet on household appliances
that contain electrical parts.
• Never touch the steam jet from a short distance with
your hands and never direct the steam jet to persons or
animals (risk of scalds).
• Never use the appliance to clean objects containing
hazardous substances (e.g. asbestos).
Safety instructions
Apart from the notes contained herein the general safety
provisions and rules for the prevention of accidents of
the legislator must be observed.
Any use of the machine in contravention with the following
instructions will lead to warranty claims being rendered
void.
• Only connect the appliance to properly earthed sockets.
• The voltage indicated on the type plate must correspond
to the voltage of the socket.
• In wet rooms, e.g. bathrooms, connect the appliance
to sockets with a series connected RCD adapter. If you
are not sure, please contact an electrician.
•Never touch the mains plug and the socket with wet
hands.
• Only use a splashproof extension cable with a minimum
section of 3x1 mm2.
• Never use a damaged power cord or extension cable!
If the power cord is damaged it must be replaced with
a special power cord available from the manufacturer
or his customer service.
• Make sure that the power cord or extension cables
are not damaged by running over, pinching, dragging
or similar. Protect the power cord from heat, oil, and
sharp edges.
• If couplings of the power cord or extension cable are
replace the splash protection and the mechanical tightness
must be ensured.
• Please switch off the machine first using the main switch
before disconnecting the machine from the mains.
• To separate the machine from the mains, pull the plug
and not the power cord.
Application
• The operator must use the appliance properly. He must
consider the local conditions and must pay attention to
third parties, in particular children, when working with
the appliance.
• Check the faultless condition of the appliance and the
accessories before using it. Otherwise, the appliance
must not be used. Please check in particular the power
cord, the steam boiler seal, and the steam hose.
• The steam hose must not be damaged (risk of scalds).
A damaged steam hose must be replaced immediately.
You may only use a steam hose that is recommended
by the manufacturer (see spare parts list for the order
number).
Electrical connection
Page 7

05
• Never fill solvents, solvent-containing liquids or undiluted
acids (e.g. detergents, benzene, paint thinner, and
acetone)
into the water reservoir or the water filter container as
these substances affect the materials used on the appliance.
• Ensure that the machine has cooled down completely
before stowing it away or cleaning it.
• Never leave the appliance unattended as long as it is
in operation.
• Turn off the appliance and remove the mains plug
prior to any care and maintenance works.
• To avoid risks, all repairs and replacement of spare
parts in the machine may only be carried out by the
authorised FAKIR service personnel.
• Always use original spare parts and accessories
permitted by the manufacturer so that the safety of the
machine remains intact.
• Caution: Never operate or store the
appliance in a horizontal position!
• Protect the unit from rain. Do not store
outside.
Steam
CAUTION - Danger of scalding
Symbols on the machine
When you unpack the system, check that everything is
complete (see page 3). If there are any missing parts or
you detect any transport damage when unpacking,
please inform your dealer immediately.
Unpacking the appliance
The terms of the guarantee applicable in each country
have been published by our respective national
distributors. We will repair possible faults on your unit
free of charge within the warranty period, insofar as the
faults are caused by material defects or defective
workmanship. Guarantee claims should be addressed
to your dealer or the nearest FAKIR customer service
centre, and supported by documentary evidence of
purchase.
Warranty
Preparing the appliance
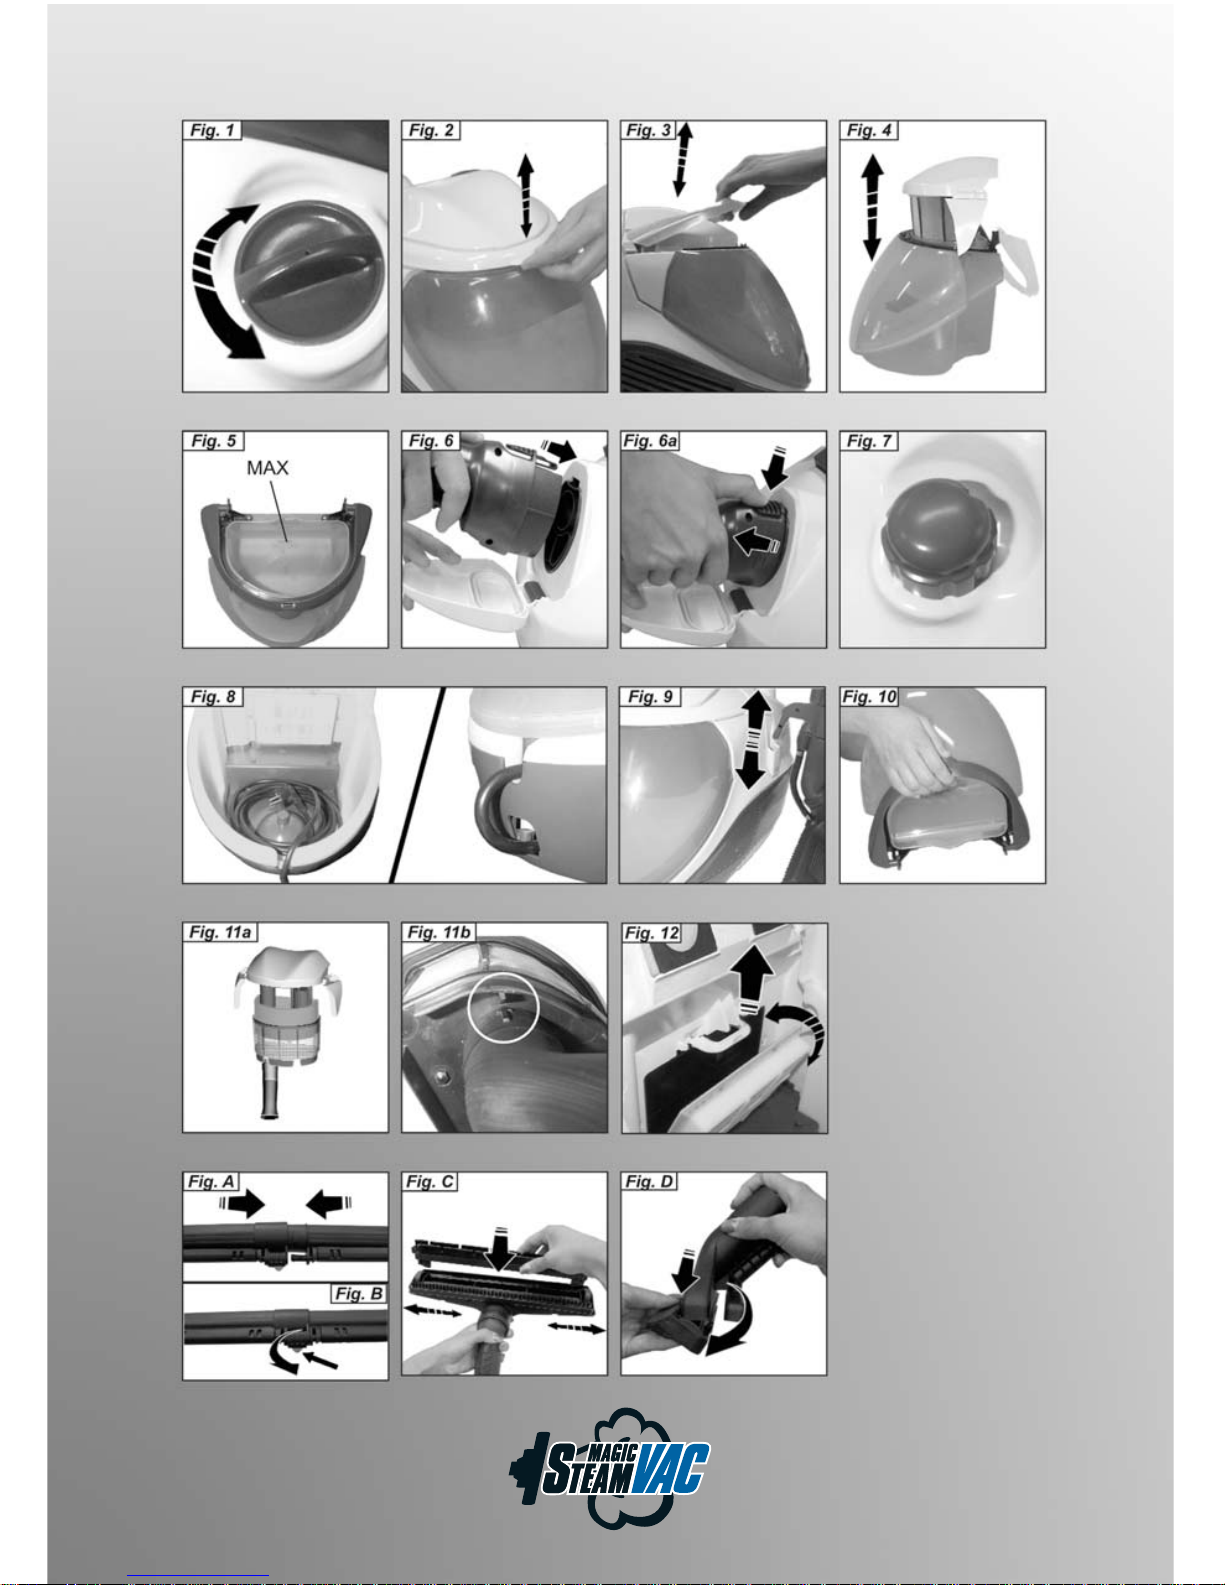
• Open the filling nozzle (7) of the water tank (Fig. 1).
• Fill approx. 0.5 litre water into the water tank. You
can use the measuring cup (Fig. K).
Note: You can use normal tap water. As water
naturally contains calcium that can lead to the formation
of deposits in the boiler, we recommend the use of a
mixture consisting of 50% tap water and 50% distilled
water.
• Close the filling nozzle of the water reservoir (7).
Note: Water is automatically supplied from the water
reservoir to the steam boiler. The water reservoir must
be filled up twice before commissioning the machine for
the first time.
Filling the water reservoir
Filling the water filter container
• Lift the handle (18) of the water filter container (Fig.
2) and remove the water filter container (17) (Fig. 3).
• Turn the handle (18) of the water filter container and
remove the water filter inlay (19) (Fig. 4).
• Fill the water filter container (17) with tap water till the
water level marking MAX H2O is covered (Fig. 5).
• Add a cap full of foam stop to the water filter container.
Note: The functioning of the vacuum cleaner is based
on the whirling of the suction air in the water filter. In the
process, sucked-in materials and deposits of cleaning
agents from floors get collected in the water bath. This
can sometimes lead to the formation of foam. It is
necessary to add the foam stop liquid to the water filter
bath to avoid this situation. The foam stop liquid is
environment friendly and fully bio-degradable. Slight
foam formation is normal and does not hamper the
functioning of the machine.
• Insert the water filter inlay (19) back into the water
container (17).
The packaging material can be recycled.
Please do not place the packaging into the
ordinary refuse for disposal, but arrange
for the proper recycling.
Old appliances contain valuable materials
that can be recycled. Please arrange for the
proper recycling of old appliances. Please
dispose of your old appliances using
appropriate collection systems.
Environmental protection
Maintenance
Storage
Usage life: 10 years
Page 8

06
• Lift the handle (18) of the water filter container and
insert the water filter container (17) back into the machine.
• Bring the handle (18) back to its initial position on the
water filter container.
The water filter container must always be
filled up when the machine is running.
• Open the flap of the machine socket (9); insert the
steam plug (B1) into the socket till you hear it lock. (Fig.6).
• Connect the mains plug to a suitable socket.
Please activate the child safety lock (A2) to avoid
accidental exit of steam.
• Press the main switch (1).
The first stage of the indicator lamps Vacuum cleaning
(5) starts to blink.
• Briefly press the Vacuum cleaning (A3) switch on the
main handle (A). Vacuum cleaning starts at the minimum
performance level. The first stage of the indicator lamps
Vacuum cleaning (5) glows continuously.
• To stop vacuum cleaning operation, press the Vacuum
cleaning switch (A3) again.
Note! When you restart vacuum cleaning function,
the machine starts at the previous vacuum cleaning
setting.
Setting the vacuum cleaning performance
You can set the vacuum cleaning performance based
on the surface to be cleaned.
• Press the vacuum cleaning switch (A3) and keep it
depressed.
The vacuum cleaning performance first increases
gradually and decreases gradually on reaching the
maximum performance level. This is displayed on the
indicator lamps vacuum cleaning (5).
– Level 1: For curtains
– Level 2: For upholstered furniture and cushions
– Level 3: For carpets
– Level 4: For hard floors and sucking in liquids
Note: The numbers indicating the levels correspond
to the display of the indicator lamps for vacuum
cleaning. If the dirt water level in the water filter
container (17) has reached the maximum level, then
the vacuum cleaning function is automatically blocked
(you can then hear a higher speed of the motor).
Operation
Connecting the accessories
All accessories can be installed directly at the handle (A)
or at the steam suction tubes (c) in the following manner.
Note:Handle (A) has a child safety lock (A2) that prevents
accidental steam release. It is recommended that you
activate the child safety lock (press it towards the left)
while leaving the steam suction hose unattended for a
short time during operation. Deactivate the child safety
lock (turn it to the right) to restart steam release.
Accessories for steam and vacuum cleaning
(D, E, F):
• Connect the handle or the extension pipe to the desired
accessory till the accessory lock snaps (Fig. A).
• Check that the accessory if properly connected before
starting to use it.
• To remove the accessory: Keep the switch (C1)
depressed and remove the accessory parts (Fig. B).
Accessories for vacuum cleaning (G, H, J):
• Connect the handle or the extension pipe to the desired
accessory without locking the accessory lock.
Vacuum cleaning operation
You can use this machine to vacuum clean dust as well
as liquids.
Switch off the machine. The air exit filter can get
damaged if you immediately restart the machine.
• To resume cleaning operations, follow the procedure
described in the chapter "Emptying and cleaning the
water filter container"; then refill water till the required
water level is reached.
Caution:
Caution!
Caution!
Page 9
07
• Press the main switch (1).
The first stage of the indicator lamps Vacuum cleaning
(5) starts to blink.
• Press the steam boiler switch (2); it then glows.
• Wait till the indicator lamp Pressure level (4) glows.
The machine is now ready for steam operations.
• Press the Steam switch (A4) on the handle.
Steam will be let out so long as you press they switch
(A4).
• Press the steam boiler switch (2) to stop steam operations.
Setting the steam outflow
You can optimize the steam outflow by pressing the
steam switch for steam regulation (8) (Fig. 7).
• To increase the steam outflow: Turn the rotary knob
clockwise.
• To decrease the steam outflow: Turn the rotary knob
anti-clockwise.
– Mild steam: (Setting 1-2)
To sprinkle water on plants, clean fabrics, tapestries,
uphostered furniture, etc.
– Normal steam: (Setting 3)
For carpeted floors, carpets, window panes, floors.
– Heavy steam: (Setting 4-5)
To remove hard dirt, stains and grease.
Filling the water reservoir
The water reservoir may be refilled at any time.
Note: If there is not enough water in the steam boiler
the pump automatically supplies water from the water
reservoir into the steam boiler. If the water reservoir is
empty, the pump is not able to fill the steam boiler
and the steam tapping is blocked.
• When there is water deficit in the water reservoir, the
indicator lamp water deficit (3) glows and is indicated
through a sound.
• To continue, follow the description in section "Filling
the water reservoir".
Steam operations
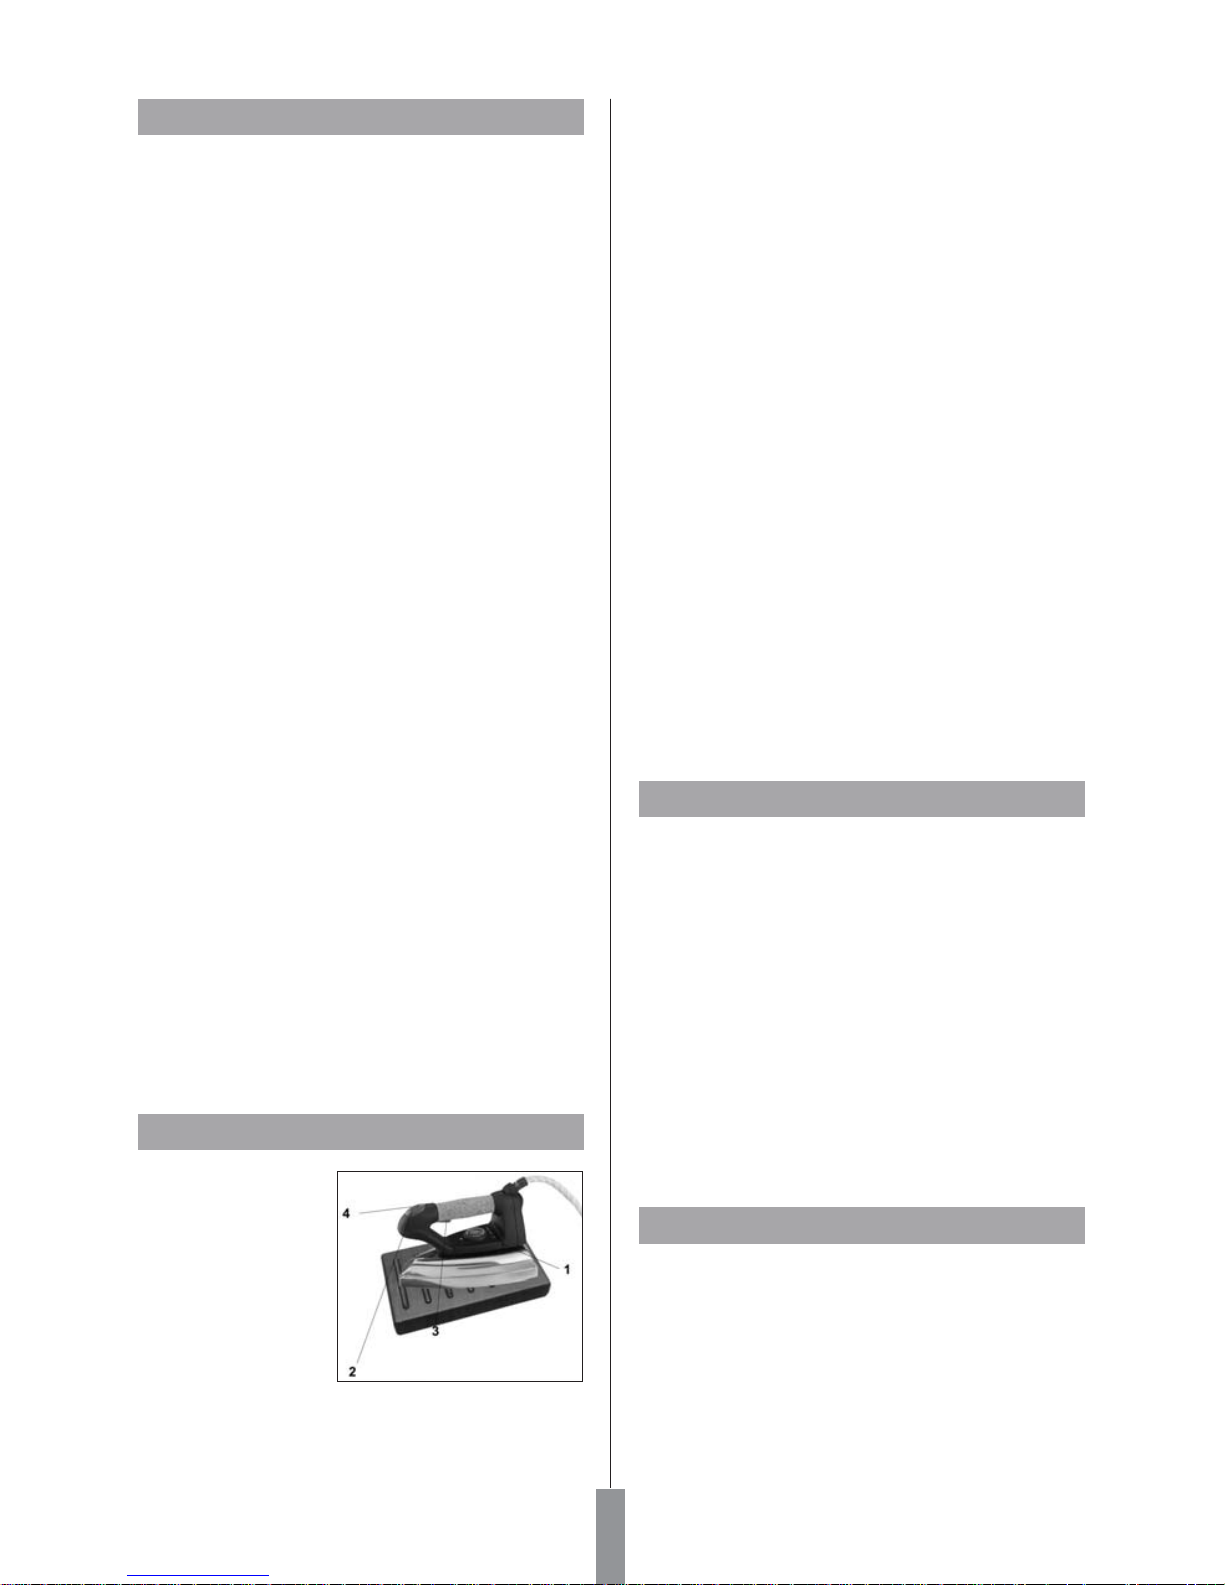
1) Temperature
regulation control
2) "Iron heating"
indicator light
3) Steam request
button
4) Continuous steam
jet button
*Using the iron, optional
When steam ironing, ALWAYS have the iron
temperature set to the “COTTON-LINEN” position,
by turning the knob (1). When DRY ironing (without
steam) set the knob to the required temperature
for the fabric. When dry ironing be careful NOT
TO PRESS THE STEAM RELEASE BUTTON on
top of the iron, otherwise water may leak from the
soleplate of the iron.
Always wait for the heat indicator light (2) to go
out, before starting to iron.
Press the steam request button on the iron (3) to
allow the steam to exit. Releasing this button stops
the steam flow. At first you may find that the steam
contains some water globules and we recommend
that the first jet of steam is therefore played onto
an old cloth, and is not directed onto the garment
to be ironed. For dry ironing do not press the
steam request button (3).
To obtain a continuous steam burst (in Pro. model
only) move the button forward (4). The steam jet
will continue even if you release the button. To
STOP the steam burst just move the button
backwards (4).
The iron can also be used in a vertical position
e.g. for removing creases from curtain, clothing
etc.
Steam and vacuum cleaning operation
• Press the main switch (1).
The first stage of the indicator lamps Vacuum cleaning
(5) starts to blink.
• Press the steam boiler switch (2); it then glows.
• Wait till the indicator lamp Pressure level (4) glows.
The machine is now ready for steam operations.
• Press the switches Steam (A4) and the Vacuum cleaning
switch (A3) briefly at the same time on the handle (A).
The vacuum cleaning operation starts at minimum
performance level and steam is let out simultaneously.
For proper use of steam and vacuum cleaning function
refer chapter Steam operations“ and „Vacuum cleaning
operation“.
Putting down the accessories
During short breaks in work, the steam suction pipe can
be parked in the parking holder (14) (Fig. 9).
1-
2-
3-
4-
5-
6-
Page 10
08
Please read the cleaning instructions of the
manufacturer before treating leather, special fabrics
and wooden surfaces and always do a trial on a
sample or some hidden part.
Let the steam-treated surface dry and then check
whether there are any changes to the colour or form
on account as reaction to the steam.
How to use the accessories
Multi Floor nozzle (D)
We recommend that you use the multi floor nozzle on
large surfaces, ceramic floors, marble floors, parquet
(only at maximum vacuum cleaning level and minimum
steam level), carpets, etc. by using the following
attachments.
• Bursh lamellas (D1) for dry vacuum cleaning.
By using the cloth on the multi floor nozzle you could
clean the surfaces with steam.
• Hard rubber lamellas (D2) for cleaning and brushing
carpeted floors.
• Rubber lamellas (D3) for sucking in liquids on smooth
surfaces.
• Remove existing attachments from the side.
• Insert the desired attachments from the side (Fig. C).
Note: Push the brush lamella with crevices in the front,
the second one at the rear of the nozzle.
While inserting rubber lamella (D3) make sure that the
smooth surface is on the inner side.
Steam suction - detail nozzle (E)
We recommend the use of detail nozzle to access difficultto reach areas.
The detail nozzle can be used for the following:
• Treating stains on carpeted floors or car pets before
using the brush.
• Cleaning steel surfaces, window panes, mirrors and
enamelled surfaces.
• Cleaning corners on staircases, window frames,
doorposts and aluminium profiles.
• Cleaning fixtures.
• Cleaning window shutters, room heaters, interiors of
vehicles.
We recommend that you be very careful while
cleaning wooden surfaces (furniture, doors, etc.)
because long exposure to steam can damage the
wax coating, the finish or the surface colours.
Hence we recommend that you use steam only for
short intervals or first clean the surface with a cloth
that has been steam-moistened.
For highly sensitive surfaces (for e.g. synthetic materials,
painted surfaces, etc.) we recommend that you use
the steam function at the minimum performance level.
Finish operation
• Press the main switch (1).
• Disconnect the mains plug from the socket.
• Remove the steam plug (B1) from the machine. Keep
the steam lock (B2) depressed and pull out the steam
plug from the machine socket (Fig. 6a).
Storing the appliance
Note: Always clean all the accessories that you use and
the water filter container (17) before you put the machine
away.
• Remove all accessories.
• Rinse all the accessories with clean water and then let
them dry.
Emptying and cleaning the water filter
container
• Lift the water filter container (19) and pull it out of its
seat at the handle (Fig. 3).
• Turn the handle as shown in Fig. 4 and remove the
water filter unit (21).
• Empty the water filter container by tilting it in the
direction of the pouring device (Fig. 10).
• Remove the pipe benders (25) from the filter casing
with the micro-perforation grid (24) till it is fully detached
(Fig. 11a).
• Remove all components and wash them under flowing
water. (Replace the filter if it is damaged. Please contact
an FAKIR Service Agent to procure a new filter).
• Insert the water filter inlay (21) back into the water
container (19).
Ensure that the arrow on the pipe bender (25) matches
the marking on the filter with microperforation (24)
(Fig.11b).
• Roll the mains cable carefully and place it in the cable
casing (13) (Fig. 8).
• Place the water filter container (17) back into its position
and ensure that it is positioned correctly.
1-
2-
3-
4-
Caution!
Caution!
Page 11
09
Maintenance
• Check the washers in the steam plug (B1) at regular
intervals. Replace them if necessary. Carry out the
same checks for the connecting washers of the steam
suction pipe (C) and the handle (A).
H.E.P.A. filter
The machine is equipped with a HEPA filter (15) that you
can clean under flowing water. Proceed as follows to
clean the filter.
• Remove the water filter container (17) according to
the instructions in the chapter "Filling the water filter
container".
• Lift the unhooking lever (16) of the H.E.P.A. filter and
remove the filter from its position (Fig. 12).
• Rinse the H.E.P.A. filter under cold flowing water.
Shake the H.E.P.A. filter carefully after cleaning so that
any residual dirt or excess water is removed.
Note! Let the HEPA filter dry but keep it away from any
sources of light or heat. Insert only the dry H.E.P.A. filter
back into the machine.
• Replace the H.E.P.A. filter if found to be damaged.
• Clean the H.E.P.A. filter regularly at intervals of 4
months.
• Ensure that the H.E.P.A. filter (15) is positioned correctly
in the holders. Then block the lever (16). (Fig. 12).
Care
Allow the accessory parts to dry completely before storing
them.
• Do not place the brushes onto the bristles during the
cooling and drying process to avoid a deformation of
the bristles.
• Only use a moist cloth for externally cleaning the
casing. Avoid using any solutions or cleaning agents as
they can damage the plastic surface.
• For cleaning the water filter casing and for cleaning
or replacing the foam filter, follow the procedure in the
section "Storing the Appliance".
• Sprinkling indoor plants from a distance. The detail
nozzle can be combined with the following accessories:
• Round brush (E2) suitable for hardened dirt on very
small surfaces such as cooking ranges, rolling shutter,
tile joints, sanitary units, etc..
• Extension (E1): This is an accessory that can be used
for optimal cleaning of areas that are very difficult to
access. Ideal for cleaning room heaters, doorposts,
windows, rolling shutter, sanitary units.
Steam suction - hand nozzle (F)
The use of hand-suction nozzle is used for glass and
mirror surfaces, smooth surfaces in general or for cleaning
fabric areas such as sofas, mattresses, etc.
The hand nozzle can be combined with the following
accessories. As shown in Figure D, the accessories are
attached to the hand nozzle. The upper sides of the
detachable lips are marked as "Upper Part".
• Small detachable lip (F1): For smaller surfaces
such as muntin windows and mirrors.
• Large detachable lip (F2): For window panes
and larger surfaces such as wall tiles.
• Crown brush (F3): For carpets, staircases, car
interiors, fabric surfaces in general (after carrying out
a test a a hidden area).
A terry towel cover (F4) can also be put on the brush.
Cleaning windows
Use the following procedure to use the machine properly
for cleaning windows:
• To loosen the dirt, apply steam uniformly on the surface
to be treated.
• Press the detachable lip against the surface to be
cleaned and move it from the top to the bottom and
keep the vacuum cleaning function on.
In seasons when the temperatures are particularly low,
pre-heat the window panes by letting out steam from a
distance of approx. 50 cm from the surface to be cleaned.
• Do not clean the H.E.P.A. filter using a brush as it can
get damaged and its filtering capacity can get reduced.
• Do not use any cleaning agents, do not rub the H.E.P.A.
filter and do not clean it in the dishwasher.
• H.E.P.A. filters are available with the FAKIR Service
agents.
Caution!
Always disconnect the mains plug and allow the machine
to cool down before performing any maintenance work.
Maintenance and care
Caution!
Danger
Page 12
Specifications
Voltage 220-240V
Current type 1~ 50Hz
Life time 10 years
Boiler capacity 1250W
Rated power turbine 1050W
Max. steam pressure 5bar
Heating time per litre of water 10min
Max. steam quantity 110g/min
Power connection
Performance data
Filling quantity
Steam boiler 1,2l
Water reservoir 0,5l
Water filter container 1,2l
Water volume 0,6l
Dimensions
Width 330mm
Length 500mm
Height 330mm
Weight 10,5kg
(without accessories)
10
Troubleshooting
Often, failures have simple causes and you can do the
troubleshooting yourself using the following overview. If
you are in doubt or if the failure is not listed here please
contact the FAKIR customer service.
Vacuum cleaner does not start
There is no mains supply.
Check the mains plug and mains socket.
Poor vacuum cleaning
Nozzle, suction hose or suction pipe may be
blocked.
• Clean the water filter inlay. Remove blocks, if any,
from the tubes and accessories.
• Change the water in the water filter container.
H.E.P.A. filter worn out.
• Replace the H.E.P.A. filter.
Poor cleaning performance
Water in the water filter container is very
dirty
• Change the water in the water filter container.
Water leaks out while sucking in fluids
The float switch is blocked.
• Clean the lid of the water filter container.
The vacuum cleaner does not suck
Float switch is blocking.
• Switch off the vacuum cleaner, ensure that the water
level in the reservoir is correct and switch on the
machine again.
Dispatch
Send the appliance in the original package or a similar,
well-padded package to prevent damage to the appliance.
If the service life of the device has ended, in particular
if functional disturbances occur, make the worn-out device
unusable by cutting through the power cable.
Dispose of the device according to the
environmental regulations applicable
in your country.
Electrical waste must not be disposed
of together with household waste. Bring
the worn-out device to a collection
center. The packaging of the device
consists of recycling-capable materials.
Place these, sorted out according to
material, in the collectors provided, so
that recycling can be carried out on
them.
For advice on recycling, refer to your
local authority or your dealer.
Disposal
This appliance is compatible with 2002/96/EC WEEE
directive.
This product is produced by Polti SpA Via Ferloni 83,
22070 Bulgarograsso (Como), Italy on behalf of Fakir
Elektrikli Ev Aletleri D›fl Ticaret A.fi.
Page 13
11
15 H.E.P.A. filtre
16 H.E.P.A. filtreyi açma kolu
17 Su filtresi deposu
18 Su filtresi deposunun tutama¤ı
19 Su filtresi soketi
20 Su filtresinin kapa¤ı
21 fiekil verilmifl sünger filtre
22 Mikro gözenekli filtre
23 Boru dirse¤i
Sayın müflterimiz,
Cihazınızı ilk defa kullanmadan önce bu
kullanım kılavuzunu okuyup buna göre
davranınız. Bu kullanım kılavuzunu, daha sonra tekrar
kullanmak ya da cihazın sonraki kullanıcılarına iletmek
üzere saklayın.
Kurallara uygun kullan›m
Cihaz tanımı 11
Güvenlik uyarıları 14
Hazırlık 15
Çalıfltırma 16
Aksesuarların kullanımı 18
Temizlik, Bakım 19
Arızalarda yardım 19
Teknik bilgiler 20
Cihaz, bu kullanım kılavuzunda tarif edildi¤i gibi buhar
üretme ve sıvı ve katı partiküllerin emilmesi için üretilmifltir.
Üretici, amacına uygun olmayan ya da hatalı kullanım
sonucu oluflan hasarlar için sorumluluk üstlenmez.
‹çindekiler
1 Ana flalter
2 Buhar kazanı flalteri
3 Kontrol lambası - Su eksikli¤i
4 Kontrol lambası - Basınç göstergesi
5 Kontrol lambaları - Vakum gücü
6 Taflıma kolu, katlanır
7 Su deposu dolum a¤zı
8 Buhar ayarı
9 Kapaklı cihaz prizi
10 Hava çıkıfl ızgarası
11 Makaralar
12 Elektrik kablosu
13 fiebeke kablosu bölümü
14 Park tutucusu
Cihaz Tan›m›
Aksesuarlar
A Tutamak
A1 - Aksesuara ait soket fifli
A2 - Çocuk emniyeti
A3 - Vakumlama tuflu
A4 - Buhar püskürtme tuflu
B Buhar vakumlama hortumu
B1 - Buhar soketi
B2 - Buhar soketinin kilidi
C Buhar vakumlama boruları
C1 - Aksesuar kilidi
D Çok yönlü zemin aparat›
D1 - Fırçalı lameller
D2 - Sert kauçuk lameller
D3 - Kauçuk lameller
E Buhar vakumlama-nokta püskürtme memesi
E1 - Uzatma
E2 - Yuvarlak fırça
F Cam silme aparat›
F1 - Küçük cam silme aparat› (130 mm)
F2 - Büyük cam silme aparat› (200 mm)
F3 - Fırça halkası
F4 - Havlu kılıf
G Koltuk kanepe aparat›
G1- Küçük koltuk kanepe aparat›
G2- Mobilya f›rças›
H Kenar köfle aparat›
H1- Kenar köfle aparat› f›rças›
I Yedek contalar (O-ring seti)
J Yer aparat›
K Buharl› ütü ( ‹ste¤e ba¤l› aksesuar )
L Su deposu ve borular için temizleme fırçası
M Ölçü kab›
Page 14
0212
Parke ve tafl
zeminler
Koltuk ve yatak
temizli¤i
Zemin ve döfleme
temizli¤i
Hal› ve kilim
temizli¤i
Radyotör temizli¤i
Mobilya temizli¤i
Banyo temizli¤i
Mutfak temizli¤i
Cam ve ayna
temizli¤i
Bahçe mobilyas›
temizli¤i
Ütüleme
Buhar ile perde
k›r›fl›klar› giderme
Hava temizleme
Bitki temizli¤i
Stor temzli¤i
Demirbafl temizli¤i
= Buharl› Temizleme
5
1
2
3
4
6
7
8
9
10
11
12
13
14
15
16
11
2
7
3
9
16
2
1
12
14
6
4
5
Page 15
Araba temizli¤i
Süpürme =
Fakir Magic Steam Vac cihaz› ile evinizde her türlü temizleme,
süpürme ve buharl› temizli¤i gerçeklefltirebilirsiniz.
Ahflap zemin
temizli¤i
Koltuk ve yatak
süpürme
Zemin süpürme
Perde temizleme
Radyatör süpürme
Mobilya tozu alma
Su vakumlama
Araba süpürme
1
2
3
4
5
6
17
18
13
3
6
17
8
10
13
15
18
4
4
18
Page 16

14
• Cihazı kesinlikle banyo küvetleri, dufllar ve su dolu
depoların yakınında kullanmayın.
• Cihaz, kablo ya da soketleri kesinlikle su ya da di¤er
sıvılara batırmayın.
• Patlama tehlikesi olan odalarda cihazın çalıfltırılması
yasaktır. Tehlikeli alanlarda cihazın kullanılması
durumunda gerekli emniyet tedbirlerinin dikkate alınması
gerekir.
• Zehirli maddeler mevcutken cihazı kullanmayın.
• Sıcak cihazı ısıya duyarlı yüzeylere yerlefltirmeyin.
• Cihazı çalıflır durumdaki fırınlar, elektrikli ocaklar ya
da di¤er ısı kaynaklarının yakınına yerlefltirmeyin.
• Cihazı harici hava etkileri, nem ve ısı kaynaklarına
karflı koruyun.
• Cihazı ya¤murdan koruyun. Açık alanda saklamayın.
• Cihaz çocuklar, gençler veya e¤itimsiz kifliler tarafından
kullanılmamalıdır.
• Tufllara çok kuvvetli basılmamalı ve pim ya da benzeri
sivri cisimlerin kullanılması önlenmelidir.
• Cihaz sa¤lam bir zemin üzerinde bulunmalı.
• Cihazın düflmesi durumunda, ürünün güvenli¤ini
kısıtlayabilecek dahili arızalar olabilece¤i için cihaz,
yetkili bir FAK‹R servisi tarafından kontrol edilmelidir.
• fiebeke kablosunu, özellikle cihaz sıcak oldu¤u sürece
kesinlikle cihazın etrafına sarmayın.
• Cihaza zarar verebilecekleri için asit ya da çözeltileri
emmeyin. Cihazın içindeki bileflenlerle temas etmeleri
durumunda patlamalara neden olabilecekleri için
patlayıcı toz ya da sıvıları vakumlamay›n.
• Hiçbir zehirli maddeyi vakumlamay›n.
• Sigara izmariti, kül gibi ateflli cisimler ya da benzeri
di¤er yanıcı ya da ateflli maddeleri vakumlamay›n.
• Suyla temas etmeleri durumunda sertleflebilecekleri ve
cihazın çalıflmasına zarar verebilecekleri için
alçı, çimento, vb gibi maddeleri vakumlamay›n.
• Su doldururken cihazı kapatın ve elektrik prizini çekin.
• Çalıflma sırasında cihazın yatay konuma getirilmesi
gereklidir.
• Buharı, kesinlikle elektrikli parçalar içeren ev cihazlarına
yöneltmeyin.
• Buhar jetine kısa mesafelerden elinizi tutmayın veya
insanlar, hayvanlar üzerine do¤rultmayın (Yanma
tehlikesi).
• Sa¤lı¤a zarar verebilecek maddelere (örn. asbest)
buhar püskürtmeyin.
• Cihazda kullanılan malzemeleri olumsuz yönde
etkileyecekleri için, kesinlikle çözücü maddeler, çözücü
madde içeren sıvılar ya da inceltilmemifl asitleri (Örn;
temizlik maddesi, benzin, tiner ve aseton) su deposu ya
da su filtresi deposuna doldurmayın.
• Cihazı kenara koyma ya da temizlemeden önce,
cihazın komple so¤umufl olmasına dikkat edin.
• Cihaz çalıflır durumdayken baflından asla ayrılmayınız.
Güvenlik uyar›lar›
Bu kullanım kılavuzundaki uyarılara ek olarak, yasa
koyucunun genel güvenlik ve kaza önleme talimatları
dikkate alınmalıdır.
Mevcut talimatlara uymayan her türlü kullanım garantinin
geçersiz olmasına neden olur.
• Cihazı sadece kurallara uygun topraklaması bulunan
prizlere ba¤layın.
• Tip etiketinde belirtilen voltaj ile prizinizdeki voltaj
örtüflmelidir.
• Nemli odalarda, örn. banyo, cihazı FI-Koruma flalterli
prizlere takın.
• fiüpheleriniz varsa elektrik konusunda e¤itimli bir
uzmana danıflın.
• Fifli ve prizi kesinlikle ıslak veya nemli elle temas
etmeyin.
• Sadece, su geçirmez ve kablo kesiti 3x1 mm2 olan
uzatma kablosu kullanın.
• Kesinlikle arızalı elektrik fifli veya uzatma kablosu
kullanmayın. Elektrik kablosu zarar görürse, kablo, üretici
veya müflteri hizmetlerinden temin edilebilen bir
elektrik kablosuyla de¤ifltirilmelidir.
• Elektrik ya da uzatma kablosunun ezilme, sıkıflma,
kopmaya ya da benzer flekilde zarar görmeye karflı
korunmasına dikkat edin. Elektrik fiflini ısıdan, ya¤ ve
keskin kenarlardan koruyun.
• Elektrik veya uzatma kablosu kavramalarının
de¤fltirilmesinde su geçirmezli¤i ve mekanik sa¤lamlılı¤ı
garanti edilmelidir.
• Cihaz elektrik flebekesinden ayrılmadan önce, cihaz,
her zaman ilk önce ana flalterle kapatılmalıdır.
• Cihazı flebekeden ayırmak için ba¤lantı kablosu yerine
soketi çekin.
• Kullanıcı cihazı talimatlara uygun olarak kullanmak
zorundadır. Yerel kuralları dikkate almalı ve çalıflma
esnasında 3'üncü flahıslara özellikle çocuklara
dikkat etmelidir.
• Cihazı ve aksesuarları kullanmadan önce kontrol edin.
E¤er hasar veya eksik var ise kullanılmamalıdır. Lütfen
özellikle elektrik kablosu, buhar deposu kilidi ve
buhar hortumunu kontrol edin.
• Buhar hortumu hasarlı olmamalı (yanma tehlikesi).
Hasarlı bir buhar hortumu derhal de¤ifltirilmelidir. Sadece
üretici tarafından tavsiye edilen buhar hortumu
kullanılabilir.
• Cihazı kesinlikle çıplak ayakla kullanmayın.
• fiebeke soketi prizdeyken cihaza kesinlikle ıslak eller
ya da ayaklarla dokunmayın.
Elektrik ba¤lant›s›
Kullan›m
Page 17
15
• Bütün bakım ve temizlik çalıflmalarında cihaz kapatılmalı
flebeke kablosu prizden çıkartılmalıdır.
• Tehlikeleri önlemek için, cihazdaki onarımlar ve yedek
parça de¤iflimleri sadece yetkili FAK‹R servisi
tarafından yapılmalıdır.
• Cihazın güvenli¤ini olumsuz yönde etkilememek için,
sadece üreticinin onayladı¤ı orijinal yedek parça ve
aksesuarlar kullanın.
Buhar
D‹KKAT - Yanma Tehlikesi
Cihazdaki Semboller
Ambalajı açarken eksik parça olup olmadı¤ını kontrol
edin. Herhangi bir parçanın eksik veya ambalajından
çıkarırken hasarlı oldu¤unu fark etti¤inizde, hemen
satıcınıza baflvurun.
Cihaz›n ambalaj›ndan ç›kar›lmas›
Haz›rl›k
• Su deposunun dolum a¤zını (fiekil 1) açın.
• Su deposuna yaklaflık o,5 litre su doldurun. Ölçü kab›n›
kullanabilirsiniz.
Uyarı: Normal musluk suyu kullanılabilir. Su, do¤ası
gere¤i zamanla kazanda birikintilere neden olabilecek
kireç içerdi¤i için, % 50 musluk suyu ve % 50 saf sudan
oluflan bir karıflımın kullanılması önerilmektedir.
• Su deposunun dolum a¤zını (7) tekrar kapatın.
Uyarı: Buhar kazanı, su deposundan otomatik olarak
suyla beslenir. ‹lk iflletime almadan önce su deposu iki
kez doldurulmal›d›r.
Su haznesinin doldurulmas›
Su filtresi deposunun doldurulmas›
• Su filtresi deposunun tutama¤ını (18) kaldırın (fiekil 2)
ve su filtresi deposunu (17) dıfları çekin (fiekil 3).
• Tutma¤ı, flekil 4'te gösterildi¤i gibi döndürün ve su
filtresi soketini (19) dıfları çekin.
• Su seviyesi göstergesi MAX H2O kapanana kadar su
filtresi deposuna (17) musluk suyu doldurun (fiekil 5).
• Köpük önleme sıvısı (Foam Stop) dolu bir kilit kapa¤ını
su filtresi deposuna doldurun.
Uyarı: Vakumlay›c›n›n çalıflma flekli, vakumlanan
havanın su filtresine santrifüjü esasına dayanır. Bu sırada,
vakumlanan malzeme ve temizlik maddesi artıkları zemin
kaplamalarından su havuzuna toplanır. Belirli koflullar
altında bu durum köpük oluflmasına neden olabilir. Bu
oluflumu önlemek için, köpük önleme sıvısı su filtresi
havuzuna doldurulmalıdır. Köpük önleme sıvısı, çevre
dostudur ve biyolojik olarak tümüyle yok edilebilir.
Çalıflma sırasında hafif bir köpük oluflumu normaldir ve
çalıflmanın kısıtlanmasına neden olmaz.
• Su filtresi soketini (19) tekrar su filtresi deposuna (17)
yerlefltirin.
• Su filtresi deposunun tutama¤ını (18) kaldırın ve su
filtresi deposunu (17) tekrar cihaza yerlefltirin.
• Tutama¤ı (18), kilitlenene kadar su filtresi deposundaki
bafllangıç pozisyonuna geri çekin.
Dikkat: Cihazı kesinlikle yatay flekilde çalıfltırmayın ya
da depolamayın!
• Cihazı ya¤murdan koruyun. Açık alanda saklamayın.
Garanti belgesinde yay›nlaflm›fl olan garanti koflullar›
geçerlidir. Garanti süresi dahilinde cihazda, malzeme
ve üretim hatasından oluflabilecek arızaların giderilmesi
tarafımızdan ücretsiz olarak yapılır. Garanti kapsamındaki
arızaların oluflması halinde, lütfen cihazı tüm aksesuarları
ve satıfl belgesi ile (fifl, fatura) satın aldı¤ınız yere ya da
en yakındaki FAK‹R yetkili servisine götürünüz.
Cihazın kullanım ömrü 10 yıldır.
Ambalaj malzemeleri geri dönüfltürülebilir.
Ambalaj malzemelerini evinizin çöpüne
atmak yerine lütfen tekrar kullanılabilecekleri
yerlere gönderin.
Eski cihazlarda, yeniden de¤erlendirme
ifllemine tabi tutulması gereken de¤erli geri
dönüflüm malzemeleri bulunmaktadır. Bu
nedenle eski cihazları lütfen öngörülen
toplama sistemleri aracılı¤ıyla imha edin.
Çevre Bilgisi
Garanti
Bak›m
Saklama
Page 18

16
Su filtresi deposu, çalıflma sırasında her
zaman dolu olmalıdır.
• Cihaz prizinin kapa¤ını (9) açın; buhar soketini (B1)
kilitlenene kadar cihaz prizine bastırın. (fiekil 6).
• Elektrik fiflini uygun bir prize takın.
Vakumlama gücünün ayarlanmas›
Vakumlama gücünü, temizlenecek yüzeye ba¤lı olarak
ayarlayabilirsiniz.
• Vakum tufluna (A3) basın ve tuflu basılı tutun.
Vakumlama gücü, ilk önce sürekli olarak artar ve
maksimum güce ulafltıktan sonra tekrar sürekli olarak
düfler. Bu durum, vakum gücü kontrol lambaları (5) ile
gösterilir.
1. kademe: Perdeler için
2. kademe: Dolgulu mobilyalar ve minderler için
3. kademe: Halılar için
4. kademe: Sert zeminler ve sıvıların vakumlanmas› için
Uyarı: Kademe sayıları, vakum gücü kontrol lambaları
göstergesine eflittir.
Su filtresi
• Su filtresi deposundaki (17) pis su seviyesi maksimum
seviyeye ulaflmıflsa, vakum fonksiyonu otomatik olarak
bloke edilir (bu durumda daha yüksek bir motor
devri duyulabilir).
Çal›flt›rma
Aksesuar parçalar›n›n ba¤lanmas›
Tüm aksesuar parçaları, afla¤ıdaki flekilde direkt olarak
tutamak (A) ya da buhar vakumlama borularına (C)
sabitlenebilir.
Uyarı: Tutamak (A), farkında olmayan buhar çıkıflını
önleyen bir çocuk kilidine sahiptir. Buhar vakumlama
hortumu çalıflma sırasında kısa süreli olarak denetim dıflı
kalacaksa, çocuk kilidini (A2) etkinlefltirmenizi öneriyoruz.
Buhar çıkıflını tekrar devreye sokmak için çocuk kilidini
devre dıflı bırakın.
Buhar püskürtme ve vakumlama aksesuar parçaları
(D, E, F):
• Tutamak ya da uzatma borusunu, aksesuar kilidi
kilitlenene kadar istedi¤iniz aksesuar parçasına ba¤layın
(fiekil A).
• Aksesuar parçalarını kullanmadan önce, ba¤lantının
güvenli olup olmadı¤ını kontrol edin.
• Aksesuar parçalarını ayırmak için: Tuflu (A5; C1) basılı
tutun ve aksesuar parçalarını dıfları do¤ru çekin (fiekil B).
Sadece vakumlama aksesuar parçaları (G,
H, J):
• Tutamak ya da uzatma borusunu, aksesuar kilidi
kilitlenmeden istedi¤iniz aksesuar parçasına ba¤layın (fiekil
A).
Vakumlama modu
Bu cihaz ile hem toz hem de sıvılar vakumlanabilir.
Cihazı kapatın. Çok kısa süre sonra tekrar çalıfltırmak,
hava çıkıfl filtresine zarar verebilir.
• Temizlik çalıflmalarına devam edebilmek için, "Su
filtresi deposunun boflaltılması" bölümünde tarif edilen
yöntem
uygulanmalıdır; daha sonra, gerekli su seviyesine ulaflana
kadar su eklenmelidir.
Buharın tesadüfen dıfları çıkmasını önlemek için, çocuk
kilidi (A2) etkinlefltirilmelidir.
• Ana flaltere (1) basın.
Vakumlama gücü kontrol lambalarının birinci kademesi
(5) yanıp sönmeye bafllar.
• Tutamaktaki vakum tufluna (A3) kısa süreli basın.
Vakum modu, en düflük güçle bafllar.
Vakum gücü kontrol lambalarının birinci kademesi (5)
sürekli yanar.
• Vakum modundan çıkmak için, emme tufluna (A3)
kısa süreli olarak tekrar basın.
Not! Vakumlama fonksiyonunun tekrar devreye
sokulması durumunda, cihaz daha önce ayarlanan
vakumlama gücüyle çalıflmaya bafllar.
Dikkat:
Dikkat!
Dikkat:
Page 19
17
• Ana flaltere (1) basın.
Vakum gücü kontrol lambalarının birinci kademesi (5)
yanıp sönmeye bafllar.
• Buhar kazanı flalterine (2) basın; daha sonra flalterdeki
ıflık yanar.
• Basınç göstergesi kontrol lambası (4) yanana kadar
bekleyin. Cihaz, buhar püskürtme modu için flimdi
hazırdır.
• Tutamaktaki buhar püskürtme tufluna (A4) basın.
Tuflu (A4) basılı tuttu¤unuz sürece buhar püskürtülür.
• Buhar püskürtme modundan çıkmak için, buhar kazanı
flalterine (2) basın.
Buhar ç›k›fl›n›n ayarlanmas›
Buhar ayar anahtarına (8) (fiekil 7) basarak buhar çıkıflını
optimum düzeye getirebilirsiniz.
• Buhar çıkıflını güçlendirmek için: Ayar anahtarını saat
yönünde döndürün.
• Buhar çıkıflını azaltmak için: Ayar anahtarını saat
yönünün tersine do¤ru döndürün.
– Hafif buhar: (Konum 1-2)
Bitkileri nemlendirmek, kumafl, duvar ka¤ıdı, dolgulu
mobilyaları, vb temizlemek için.
– Normal buhar: (Konum 3)
Halı döflemeler, halılar, pencere camları, zeminler için.
– Güçlü buhar: (Konum 4-5)
‹natçı kirler, lekeler ve ya¤ların temizlenmesi için.
Su deposuna su eklenmesi
Su deposuna her zaman su eklenebilir.
Uyarı: Buhar kazanında az su kalmıflsa veya hiç su
kalmamıflsa, pompa, otomatik olarak su deposundan
buhar kazanına su gönderir. Su deposu boflsa, pompa
buhar kazanını dolduramaz ve buhar alıflı bloke
edilir.
• Su deposundaki suyun eksik oldu¤u, su kesikli¤i kontrol
lambası (3) ve akustik bir sinyalle gösterilir.
• Çalıflmaya devam etmek için, "Su deposunun
doldurulması" bölümündeki yöntem uygulanmalıdır.
Ütü kullan›m› (‹ste¤e ba¤l›)
Buhar püskürtme ve vakumlama modu
• Ana flaltere (1) basın.
Vakum gücü kontrol lambalarının birinci kademesi (5)
yanıp sönmeye bafllar.
• Buhar kazanı flalterine (2) basın; daha sonra flalterdeki
ıflık yanar.
• Basınç göstergesi kontrol lambası (4) yanana kadar
bekleyin. Cihaz, buhar püskürtme modu için flimdi
hazırdır.
• Tutamakta (A), aynı anda buhar püskürtme (A4) ve
kısa süreli olarak vakumlama tufluna (A3) basın.
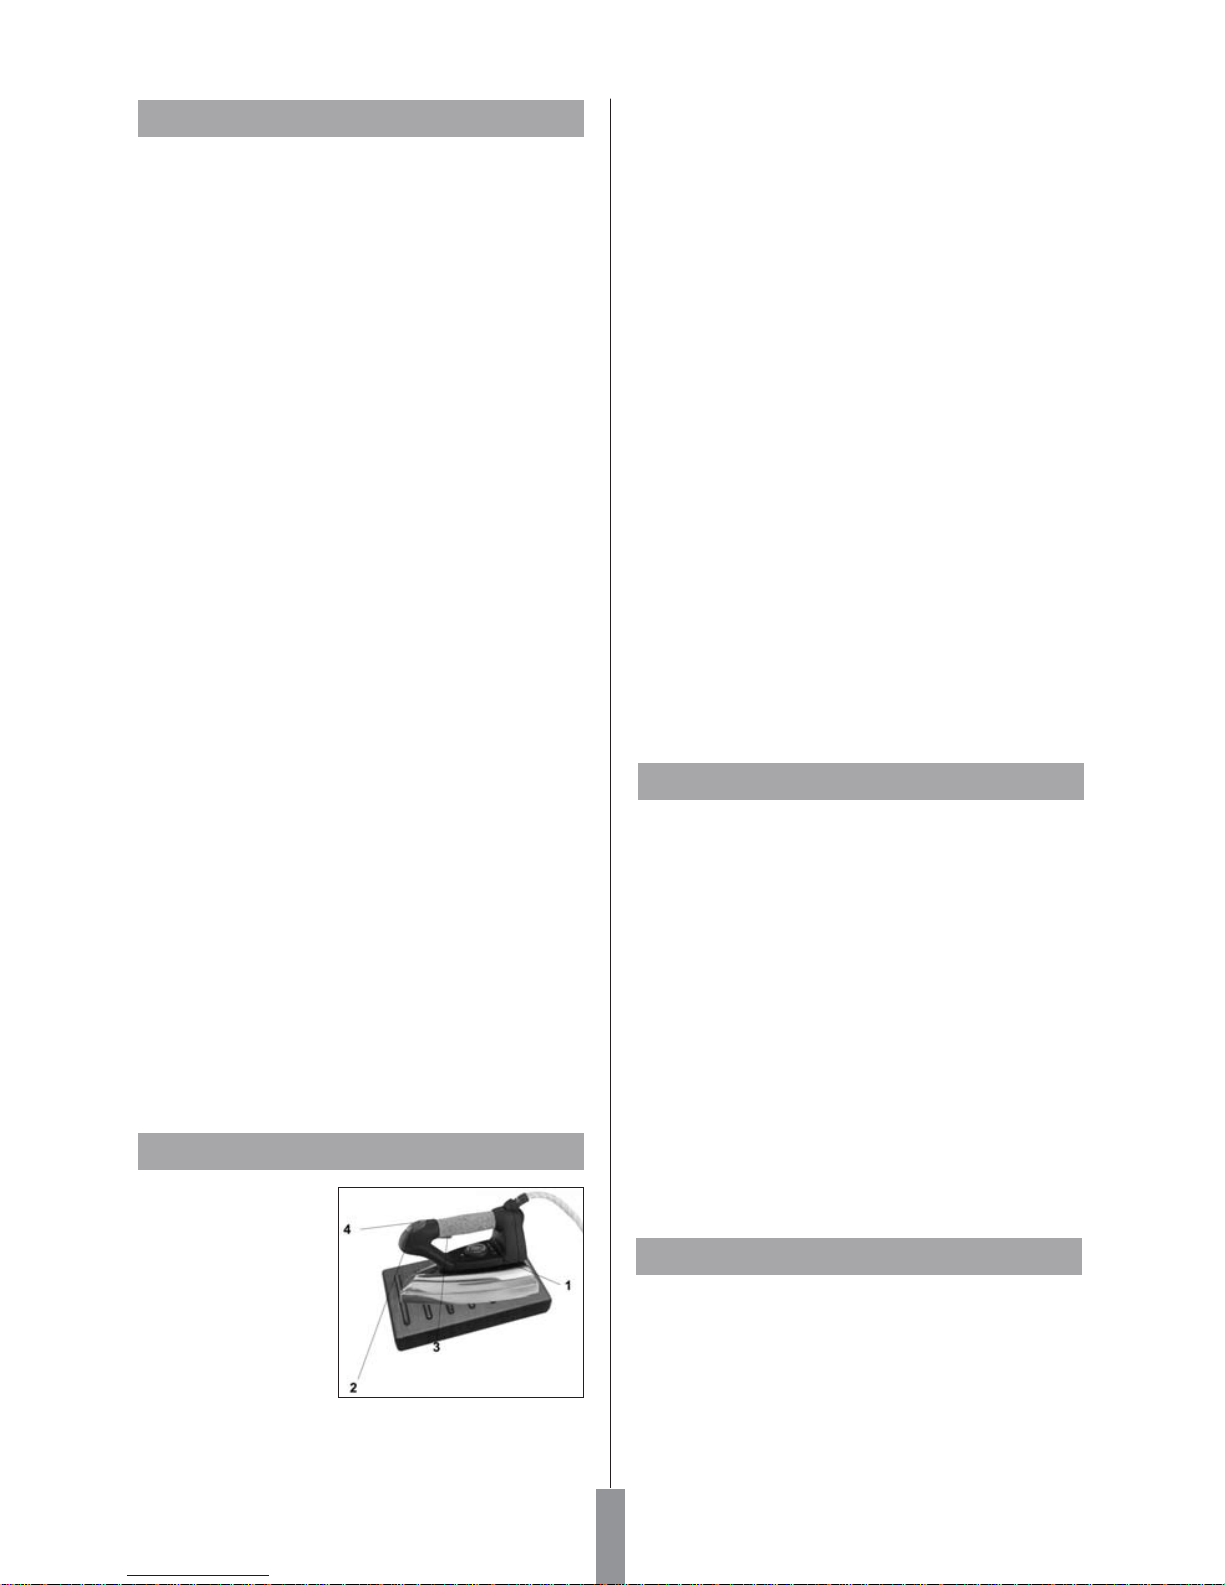
1) S›cakl›k ayar›
dü¤mesi
2) Ütü ›s›nma ›fl›¤›
3) Buhar dü¤mesi
4) Sürekle buhar
dü¤mesi (mod. PRO)
Ütünün elektrikli buhar soketini Magic Steam Vac
üzerinde bulunan prizine tak›n›z ve kilitledi¤inden
emin olunuz.
Buhar ile ütülemek için ütünün s›cakl›k ayar dü¤mesini
(1) YÜN-KETEN konuma getiriniz. Buhars›z ütülemek
için ütünün s›ckal›k ayar dü¤mesini ütülenecek kumafla
göre ayarlay›n›z.
Ütüleme ifllemine bafllamadan önce birkaç dakika
bekleyin, ütünün s›cakl›k göstergesi (2) söndükten
sonra ütülemeye bafllay›n.
Buhar dü¤mesine (3) basarak buharl› ütülemeye
bafllayabilirsiniz, buhar dü¤mesini (3) b›rakt›¤›n›zda
buhar c›k›fl› engellenecektir. Ütünün ilk kullan›m›nda
buhar dü¤mesine (3) bast›¤›n›zda, buhar ile kar›fl›k
su ç›kacakt›r.
Bu sebepten dolay› ilk ütülemede buhar dü¤mesine
basmadan, cihaz› ütülenecek kumafl›n üstünde
olmad›¤›ndan emin olunuz.
Sürekli buhar için ütünün üzerinde bulunan sürekli
buhar dü¤mesini (4) öne do¤ru itmelisiniz. Böylelikle
buhar dü¤mesine (3) basmad›¤›n›z halde sürekli
buhar c›kacakt›r. Buhar› kesmek için sürekli buhar
dü¤mesini (4) tekrar geriye dogru çekmelisiniz.
Perde, giysi vb. eflyalar› buharla k›r›fl›k gidermek için
ütüyü dikey olarakta kullanabilirsiniz.
Buhar püskürtme modu
Vakumlama modu, en düflük güçle bafllar ve aynı anda
buhar püskürtülür.
Buhar püskürtme ve vakumlama fonksiyonunun kurallara
uygun bir flekilde kullanılması için, "Buhar püskürtme
modu" ve "Vakumlama modu" bölümünü okuyun.
Aksesuar› kald›rmak
Çalıflmaya kısa süreli ara verilmesi durumunda, buhar
vakumlama borusu park konumuna (14) getirilebilir (fiekil 9).
1-
2-
3-
4-
5-
6-
Page 20
18
Çok yönlü zemin aparat› (D)
Çok yönlü zemin aparat›n›n afla¤ıdaki adaptörler takılarak
büyük yüzeyler, seramik, parke zeminler (sadece en
yüksek vakumlama gücü ve minimum buhar gücünde),
halılarda, vb kullanılması önerilmektedir.
• Fırçalı lameller (D1): Sert zeminlerde kuru vakumlama
için. Bu aparat› bez ile birlikte kullanarak parkelerin
düflük buharl› temizli¤inde de kullanabilirsiniz.
• Sert kauçuk lameller (D2): Halı kaplamaların
temizlenmesi ve yenilenmesi için.
• Kauçuk lameller (D3): Kaygan yüzeylerdeki sıvıların
vakumlanmas› için.
Adaptörlerin tak›lmas›
• Mevcut adaptörleri yana do¤ru dıfları çekin.
• ‹stedi¤iniz adaptörleri yandan içeri itin (fiekil C).
Uyarı: Fırçalı lameli, girintileri önde olacak flekilde ve
ikinci fırçalı lamelde arkada olacak flekilde aparata itin.
Kauçuk lameli (D3) içeri iterken, kaygan tarafının içeri
gelmesine dikkat edin.
Buhar vakum. notka püskürtme aparat›
Nokta püskürtme aparat›n›n zor ulaflılabilen noktalarda
kullanılması önerilmektedir. Nokta püskürtme aparat›
afla¤ıdaki amaçlarla kullanılabilir:
• Fırça kullanılmadan önce, halı döflemeler ya da
halılardaki lekelerin ifllenmesi için.
• Paslanmaz çelik, pencere camları, aynalar ve emaye
zeminlerin temizlenmesi için.
• Merdivenler, pencere çerçeveleri, kapı direkleri,
alüminyum profillerin temizlenmesi için.
• Armatürlerin temizlenmesi için.
• Panjurlar, kalorifer peteklerinin temizlenmesi,
araçlardaki iç temizlik.
• Oda bitkilerinin uzaktan nemlendirilmesi.
Nokta püskürtme aparat›, afla¤ıdaki aksesuarlarla
kombine edilebilir:
• Yuvarlak fırça (2), ocak tablaları, storlar, soba ekleri,
sıhhi tesisat sistemleri gibi özellikle küçük yüzeylerdeki
inatçı kirler için uygundur.
Deri, özellikle kumafllar ve ahflap yüzeylerin
ifllenmesinden önce, üreticinin talimatlarını okumalı
ve gizli bir nokta ya da ayrı bir numunede bir deneme
yapmalısınız.
Renk ya da flekil de¤ifliklikleri oluflup oluflmadı¤ını
kontrol etmek için, buharla ifllenmifl yüzeyi kurutun.
Aksesuarlar›n Kullan›m›
Uzun süreli bir buhar püskürtme ifllemi yüzeyin yıkama
kaplamaları, parlaklı¤ı ya da rengine zarar
verebilece¤i için, ahflap yüzeylerin (mobilya, kapılar,
vb) temizlenmesi için özellikle dikkatli olunmalıdır;
Bu nedenle, bu yüzeyler için buharın sadece kısa
aralıklarla kullanılması
ya da temizli¤in daha önce buhar püskürtülmüfl bir
bezle yapılması önerilmektedir.
Özel olarak duyarlı yüzeyler (Örn; sentetik malzemeler,
boyalı yüzeyler, vb) için, buhar fonksiyonunun
minimum güçte kullanılması önerilmektedir.
Çal›flman›n tamamlanmas›
• Ana flaltere (1) basın.
• Elektrik kablosunu prizden çekin.
• Buhar soketini (B1) cihazdan ayırın. Bu amaçla buhar
soketi kilidini (B2) basılı tutun ve buhar soketini cihazın
prizinden çekin (fiekil 6a).
Cihaz›n kald›r›lmas›
Uyarı: Cihazı ambalajına kaldırmadan önce, kullanılmıfl
aksesuar parçaları ve su filtresi deposunu (17) temizleyin.
• Tüm aksesuar parçalarını ayırın.
• Aksesuar parçalarını temiz suyla yıkayın ve daha
sonra kurutun.
Su filtresi deposunun boflalt›lmas› ve
temizlenmesi
• Su filtresi deposunun tutama¤ını (18) kaldırın (fiekil 2)
ve su filtresi deposunu (17) dıfları çekin (fiekil 3).
• Tutma¤ı, flekil 4'te gösterildi¤i gibi döndürün ve su
filtresi soketini (19) dıfları çekin.
• Dökme tertibatı yönünde e¤erek su filtresi deposunu
boflaltın (fiekil 10).
• Boru dirse¤ini (23), tam olarak dıfları çıkana kadar
mikro gözenekli ızgarayla (22) birlikte filtre muhafazasından çekin (fiekil 11a).
• Tüm bileflenleri çıkartın ve akar su altında yıkayın.
(Filtrede hasar görülürse, filtreyi de¤ifltirin. Yeni bir
filtre temin etmek için lütfen yetkili FAK‹R servis
hizmetlerine baflvurun).
• Su filtresi soketini (19) tekrar su filtresi deposuna (17)
yerlefltirin.
Boru dirse¤indeki okun (23) mikro gözenekli filtredeki
iflaretle (22) (fiekil 11b) çakıflmasına dikkat edin.
• Elektrik kablosunu eflit oranlı bir flekilde sarın ve elektrik
kablosu bölümüne (13) yerlefltirin (fiekil 8).
• Su filtresi deposunu (17) tekrar kendi pozisyonuna
yerlefltirin ve deponun do¤ru flekilde yerleflmifl olmasına
dikkat edin.
Dikkat!
Dikkat!
1-
2-
3-
4-
Page 21
19
• Uzatma parçası (E1) Bu aksesuarlar, özellikle eriflim
sa¤lanamayan noktalarda optimum bir temizlik
mümkündür. Kaloriferler, kapı direkleri, pencereler,
storlar, sıhhi tesisat sistemlerinin temizlenmesi için
idealdir.
Temizlik
Aksesuarları kaldırmadan önce tamamen kurumalarını
bekleyin.
• So¤utma ve temizleme sırasında, deforme olmamaları
için fırçaları sert kılların üzerine koymayın.
• Muhafazanın dıfl temizli¤i için sadece nemli bir bez
kullanın. Plastik yüzeye zarar verebilecekleri için,
çözücü maddeler ya da temizlik maddelerinin
kullanılmasını önleyin.
Bak›m
• Buhar soketindeki (B1) contaların durumunu sürekli
olarak kontrol edin. Gerekli olması durumunda contaları
de¤ifltirin. Aynı kontrolü, buhar vakumlama boruları
(C) ve tutama¤ın (A) bafllantı contalarında da yapın.
H.E.P.A. filtre
Cihaz, akar su altında temizleyebilece¤iniz bir H.E.P.A.
filtreyle (15) donatılmıfltır.
• Su filtresi deposunu (17), "Su filtresi deposunun
doldurulması" bölümündeki talimatlara uygun olarak
çıkartın.
• H.E.P.A. filtrenin çıkartma kolunu (16) kaldırın ve filtreyi
yuvasından (fiekil 12) çekin.
• H.E.P.A. filtreyi, so¤uk ve akar su altında yıkayın.
Temizlik iflleminden sonra, olası kir artıkları ve aflırı
suyun giderilmesi için filtreyi dikkatlice sallayın.
Not! H.E.P.A. filtreyi, ıflık ve ısı kaynaklarından uzak
bir flekilde açık havada kurutun. H.E.P.A. filtreyi, sadece
kuru olarak tekrar cihaza yerlefltirin.
• H.E.P.A. filtrede hasar görülürse, filtre de¤ifltirilmelidir.
• H.E.P.A. filtre, 4 aylık aralıklarla temizlenmelidir.
• H.E.P.A. filtrenin tutuculara do¤ru flekilde yerlefltirilmifl
oldu¤undan emin olun.
Daha sonra, kol (16) bloke edilmelidir. (fiekil 12).
•Su filtresi deposunun temizlenmesi ve köpük filtresinin
(21) temizlenmesi ya da de¤ifltirilmesi için, "Cihazın
kaldırılması" bölümünde tarif edilen yöntemi izleyin.
Vakum fonksiyonu devreye girmiyor
fiebeke gerilimi eksik.
Elektrik soketi ve elektrik fiflini kontrol edin.
Ar›zalarda yard›m
Arızalar, takip eden genel bakıfl sayesinde çözebilece¤iniz,
genellikle basit nedenlerden dolayı oluflur. fiüphe
duydu¤unuzda veya burada tarif edilmeyen bir arıza
ile karflılafltı¤ınızda lütfen FAK‹R servisine danıflın.
Cam silme aparat› (F)
Cam silme aparat›, büyük cam ve ayna yüzeyler, genel
anlamda kaygan yüzeylerde ya da koltuk, döflemeler,
vb gibi kumafl yüzeylerin temizlenmesi için önerilir.
Cam silme aparat›, afla¤ıdaki aksesuarlarla kombine
edilebilir. Aksesuar, flekil D'de gösterildi¤i gibi aparata
itilir.
Çekme dudaklarının üst tarafları, "Üst taraf - Upper Part"
ile iflaretlenmifltir.
• Küçük cam silme aparat› (F1): Örn; basamaklı
pencereler ve aynalar gibi daha küçük yüzeyler için.
• Büyük cam silme aparat› (F2): Pencere camları ve Örn;
duvar fayansları gibi daha büyük yüzeyler için.
• Fırça halkası (F3): Halılar, merdivenler, oto iç
donanımları, genel anlamda kumafl yüzeyler için (gizli
bir noktada yapılacak bir testten sonra). Fırçaya, aynı
flekilde bir havlu kılıfı (F4) yerlefltirilebilir.
Pencere temizli¤i
Pencere temizli¤i sırasında do¤ru bir uygulama için
afla¤ıdaki yöntemi izleyin:
• Kiri çözmek için, ifllenecek yüzeye eflit oranlı bir flekilde
buhar püskürtün.
• Çekme duda¤ını, temizlenecek yüzeye do¤ru bastırın
ve vakumlama fonksiyonu açıkken dikey olarak
yukarıdan afla¤ıya do¤ru hareket ettirin.
Özellikle sıcaklı¤ın düflük oldu¤u mevsimlerde, ifllenecek
yüzeyden yaklaflık 50 cm mesafede buhar püskürterek
camları önceden ısıtın.
Temizlik ve bakım çalıflmalarını yalnızca elektrik fifli
çekilmiflken ve cihaz so¤ukken yapın.
Temizlik ve Bak›m
• Hasar görebilece¤i ve filtreleme özelli¤i olumsuz yönde
etkilenebilece¤i için H.E.P.A. filtreyi bir fırçayla
temizlemeyin.
• Temizlik maddesi kullanmayın, H.E.P.A. filtreyi ovmayın
ve bulaflık makinesinde yıkamayın.
• H.E.P.A. filtreler, FAK‹R yetkili sat›c›lar›ndan temin
edilebilir.
Dikkat!
Tehlike
Caution!
Page 22
Teknik Bilgiler
Gerilim 220-240V
Elektrik türü 1~ 50Hz
Kullanım ömrü 10 yıl
Kazan çekifl gücü 1250W
Türbinin nominal gücü 1050W
Maksimum buhar bas›nc› 5bar
Suyun litre bafl›na ›s›t›lma süresi 10min
Maksimum buhar miktar› 110g/min
Güç Kayna¤›
Performans Bilgisi
Dolum Bilgisi
Buhar kazan› 1,2l
Su deposu 0,5l
Su filtresi deposu 1,2l
Su al›fl› 0,6l
Ebatlar
Genifllik 330mm
Uzunluk 500mm
Yükseklik 330mm
A¤›rl›k 10,5kg
(aksesuars›z)
20
Vakum performans› azal›yor
Meme, emme hortumu ya da emme borusu
t›kanm›fl.
• Su filtresi soketini temizleyin. Borular ve aksesuarlardaki
olası tıkanmaları giderin.
• Su filtresi deposundaki suyu de¤ifltirin.
H.E.P.A. filtrenin kullan›m süresi doldu.
• H.E.P.A. filtreyi de¤ifltirin.
Temizleme performans› azal›yor
Su filtresi deposundaki su çok kirlenmifl.
• Su filtresi deposundaki suyu de¤ifltirin.
S›v›lar›n emilmesi s›ras›nda su ç›k›fl›
fiamand›ra flalteri bloke olmufl.
• Su filtresi deposunun kapa¤›n› temizleyin.
Toz emici emmiyor
fiamand›ra flalterinin müdahalesi.
• Toz emiciyi kapatın, depodaki su seviyesini tekrar
do¤ru duruma getirin ve cihazı yeniden çalıfltırın.
Sevk
Cihaz›n, orijinal ambalaj›nda veya zarar görmesini
önlemek için, iyi ve yumuflak pakette tafl›nmas›
gerekmektedir.
Cihaz›n kullan›m ömrünün bitmesi halinde, elektrik
kablosunu
keserek kullan›lamayacak hale getiriniz.
Ülkenizde mevcut bulunan yasalara
göre, bu tür cihazlar için
özel olarak belirlenmifl çöp kutular›na
cihaz› b›rak›n›z.
Elektriksel at›klar, normal çöplerle birlikte
at›lmamal›d›r.
Cihaz›n paketleme elemanlar› geri
dönüflüme uygun maddelerden
üretilmifltir. Bunlar› geri dönüflüm çöp
kutular›na
at›n›z.
Cihaz 2002/96/EC say›l› WEEE direktiflerine uygundur.
Geri Dönüflüm
Bu ürün Fakir Elektrikli Ev Aletleri D›fl Ticaret A.fi ad›na
Polti SpA Via Ferloni 83, 22070 Bulgarograsso (Como),
Italy taraf›ndan üretilmifltir.
Page 23
Page 24
2300 Watt
Steam-Vacuum Cleaner
Buharl› Süpürge
‹malatç› / ‹thalatç› Firma: Fakir Elektrikli Ev Aletleri D›fl Tic. A.fi.
Meflrutiyet Cad. No:43 Tepebafl›-‹stanbul TÜRK‹YE
Tel:(212) 249 70 69 (pbx) Fax:(212) 251 51 42
 Loading...