

Page 1
MULTIPLEX
ROBOT M‹KSER
BENCH MIXER
Instruction Manual
Kullan›m K›lavuzu
Page 2

Page 3
Girifl
Uzun y›llar sorunsuz çal›flmas› için tasarlanan ve üretilen
Fakir Multiplex Robot Mikser’ i sat›n alm›fl oldu¤unuz
için teflekkür ederiz.
Benzer ürünleri kullanmaya al›fl›k olabilirsiniz, ancak
kullanma k›lavuzunu okumak için lütfen zaman ay›r›n›z.
Bu k›lavuz sat›n alm›fl oldu¤unuz üründen en iyi
performans› alman›z için haz›rlanm›flt›r.
Güvenlik önemlidir
Kendi güvenli¤iniz ve di¤erlerinin güvenli¤i için ürünü
çal›flt›rmadan önce kullanma k›lavuzunu okuyunuz. Bu
k›lavuzu ilerideki kullan›mlar için güvenli bir yerde
saklay›n›z. E¤er cihaz›n›z› birisine veriyorsan›z, kullanma
k›lavuzunu da veriniz. Bütün paketleri sökünüz, fakat
cihaz›n›z›n çal›flt›¤›ndan emin olana kadar da paketleri
saklay›n›z.
‹çinde metal bulunan hiçbir aksesuar› mikrodalga f›r›n
•
içinde kullanmay›n›z.
Cihaz aksesuarlar›n› tak›p sökmeden önce, cihaz›
•
kapat›p fiflini prizden çekiniz.
Cihaz çal›fl›r vaziyetteyken ç›rpma, kar›flt›rma veya
•
yo¤urma aparatlar›na dokunmay›n›z.
•
Her kullan›mda yaln›zca tek bir aparat kullan›n›z.
•
Cihaz› 10 dakikadan fazla bir süre boyunca
kullanmay›n›z. Bir sonraki kullan›ma geçmeden önce
30 dakika kadar bekleyiniz.
•
Bu cihaz küçük çocuklar›n veya fiziksel, ruhsal, beyinsel
yetenekleri düflük veya deneyimi ve bilgi düzeyi eksik
kiflilerin kendi güvenliklerinden sorumlu olan bir kifli
taraf›ndan gözetilmedikçe kullanmas› için yap›lmad›.
Küçük çocuklar›n cihaza ulaflmalar›na engel olunuz.
•
Çocuklar›n cihaz ile oynamamalar›na dikkat edilmelidir.
Güvenlik uyar›lar›
Cihaz› kullanma k›lavuzunda belirtildi¤i flekilde
•
kullan›n›z.
Cihaz› çal›flt›rmadan önce flebeke voltaj›n›n cihaz›n›z›n
•
tip etiketinde gösterilenle ayn› oldu¤unu kontrol ediniz
Cihaz aksesuarlar› tak›p sökmeden önce, kapal›
•
oldu¤undan emin olunuz.
Cihaz aksesuarlar›n›n aç›k k›s›mlar›ndan ve cihaz›n
•
hareket eden k›s›mlar›ndan ellerinizi uzak tutunuz.Bu
cihaz› yaln›zca kendi kullan›m alan› içinde kullan›n›z.
•
Cihaz› asla gözetimsiz b›rakmay›n›z.
Cihaz›n fiflini topraklanm›fl prize tak›n›z.
•
Cihaz› uzatma kablosu ile kullanacaksan›z, takaca¤›n›z
•
prizin topraklanm›fl olmas›na dikkat ediniz.
Cihaz›n kullan›m› biter bitmez veya cihaz› temizledi¤iniz
•
zaman fiflini prizden çekiniz.
E¤er cihaz›n›z veya aksesuarlar› ar›zal› ise kesinlikle
•
kullanmay›p, yetkili bir Fakir servisine dan›fl›n›z.
Temizlik ve cihaz›n genel bak›m› d›fl›ndaki tüm tamir
•
ifllemleri yetkili bir Fakir servisi taraf›ndan yap›lmal›d›r.
Cihaz›, cihaz kablosunu ve fiflini suya veya herhangi
•
bir s›v›ya temas ettirmeyiniz.
Cihaz kablosuna çocuklar›n ulaflmas›na engel olunuz.
•
Cihaz kablosunun, cihaz›n ›s›nm›fl k›s›mlar›na veya
•
f›r›n, ocak v.b s›cak yüzeylere temas etmemesine ve
mutfak tezgâh› köflesinden kablosunun sarkmamas›na
dikkat ediniz.
Cihaz›n›z› e¤er kablosu, fifli veya herhangi bir
•
parças› ar›zal› ise kesinlikle kullanmay›n›z. ∑
Cihaz›n›z› e¤er kablosu, fifli veya herhangi bir
•
parças› ar›zal› ise kesinlikle kullanmay›n›z.
Cihaz›n›z›n kablosu, fifli veya parçalar› hasarl›
ise, herhangi bir zarar›n önlenmesi için yetkili bir
Fakir servisi taraf›ndan yerine yenisi ile
•
de¤ifltirilmelidir.
D‹KKAT!
Kullanma k›lavuzunuzda yaz›l› olan güvenlik
kurallar›n› ve kullanma talimatlar›n› dikkatlice
okuyunuz. Bu kullanma k›lavuzunu ilerideki
kullan›mlar için saklay›n›z.
Ürün bilgileri
Güç :1200 Watt
Voltaj : 230V~50/60 Hz
Koruma s›n›f› : l
Kullan›m Ömrü : 7 Y›l
01
Page 4
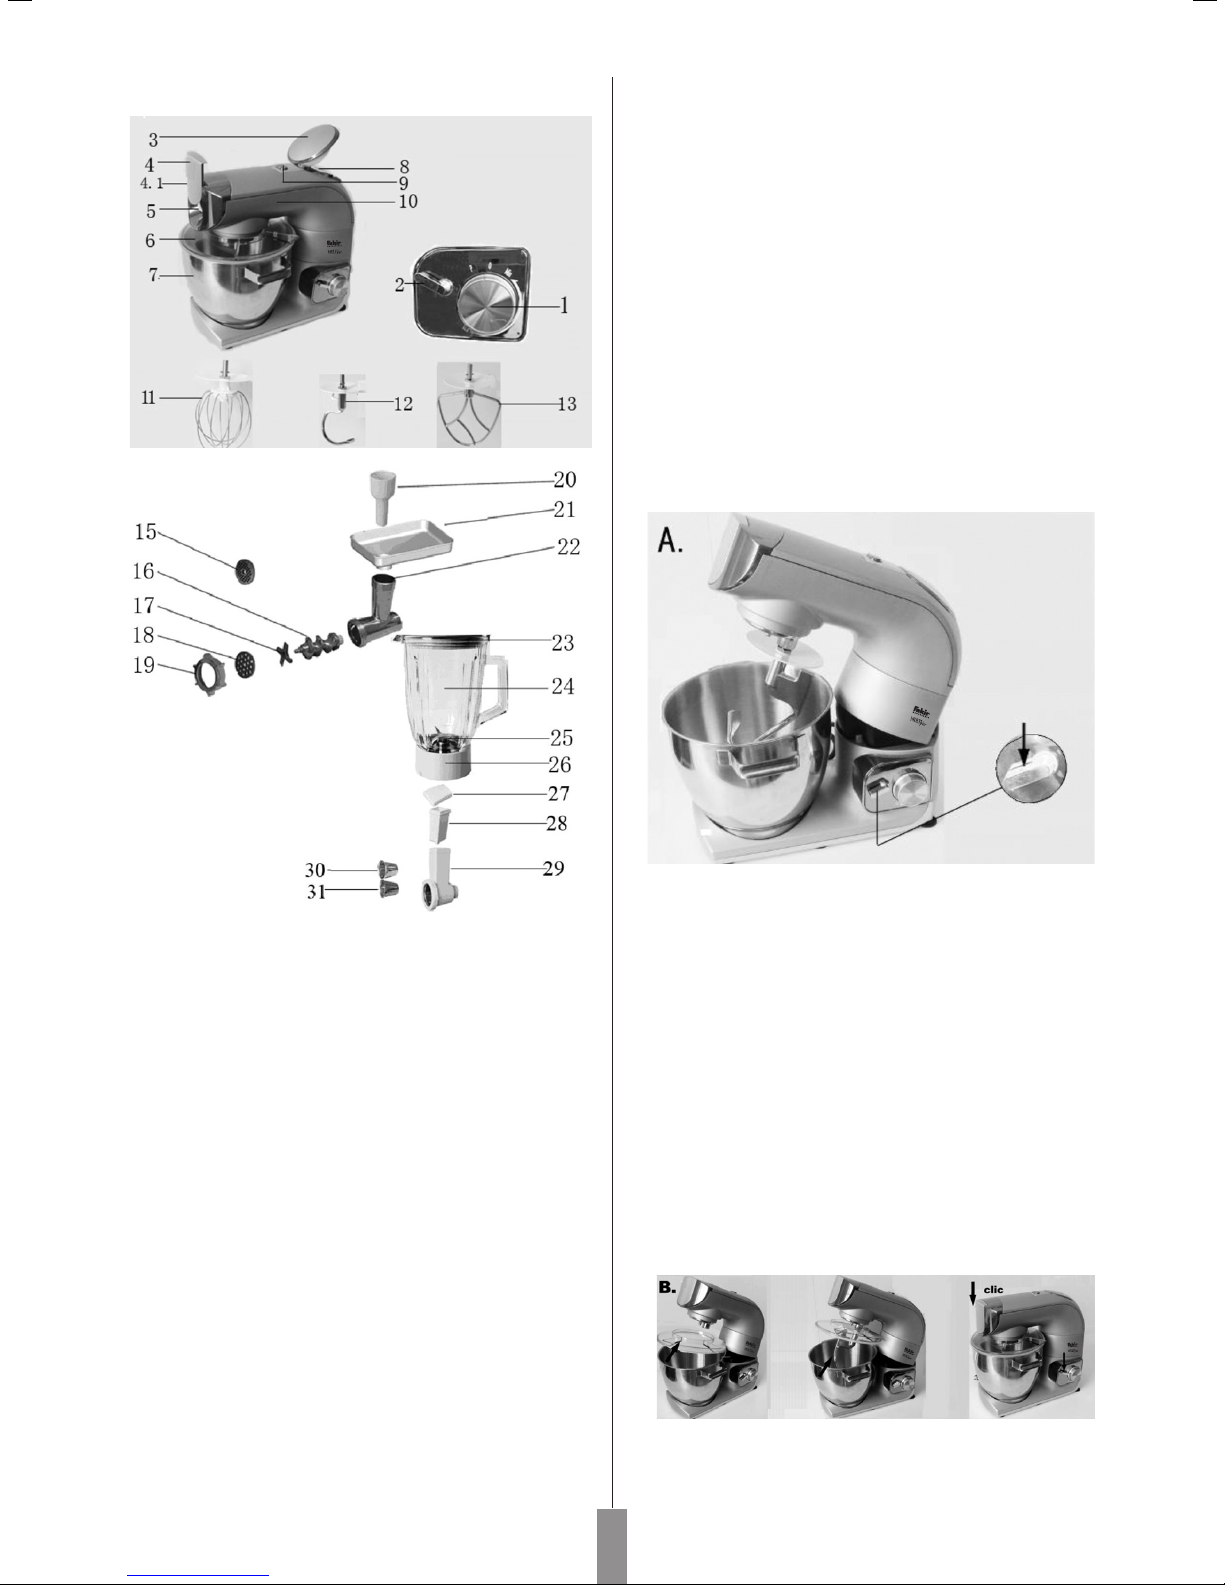
Ürün Parçalar›n›n Tan›t›m›
22. Et k›yma kesici bölmesi
23. Blender kapa¤›
24. Blender cam hazne
25. Blender b›ça¤›
26. Blender b›çak bölmesi
27. Sebze rendeleme / dilimleme aparat› itme
sap› kapa¤›
28. Sebze rendeleme / dilimleme aparat› itme
sap›
29. Sebze rendeleme / dilimleme aparat› kesici
bölmesi
30. Sebze rendeleme b›ça¤›
31. Sebze dilimleme b›ça¤›
Cihaz›n kullan›m›:
Aparatlar›n cihaza montaj›:
1. H›z ayar tuflu
2. Mikser kafas› gevfletme tuflu
3. Kapak
4. Et k›yma ve sebze rendeleme / dilimleme
aparat› takma kapa¤›
4.1.Aparat kilitleme- gevfletme tuflu
5. Et k›yma ve sebze rendeleme dilimleme aparat›
güç ç›k›fl noktas›
6. Mikser kap kapa¤›
7. Paslanmaz çelik mikser kab›
8. Blender aparat› güç ç›k›fl noktas›
9. Kapak açma tuflu
10.Mikser kafas›
11.Ç›rp›c›
12.Yo¤urma aparat›
13.Mikser b›ça¤›
15. ‹nce paslanmaz çelik k›yma diski
16. Et k›yma aparat› flaft›
17. Et k›yma b›ça¤›
18. Orta paslanmaz çelik k›yma diski
19. Et k›yma somunu
20. Et k›yma itme sap›
21. Et k›yma yiyecek koyma tepsisi
02
•
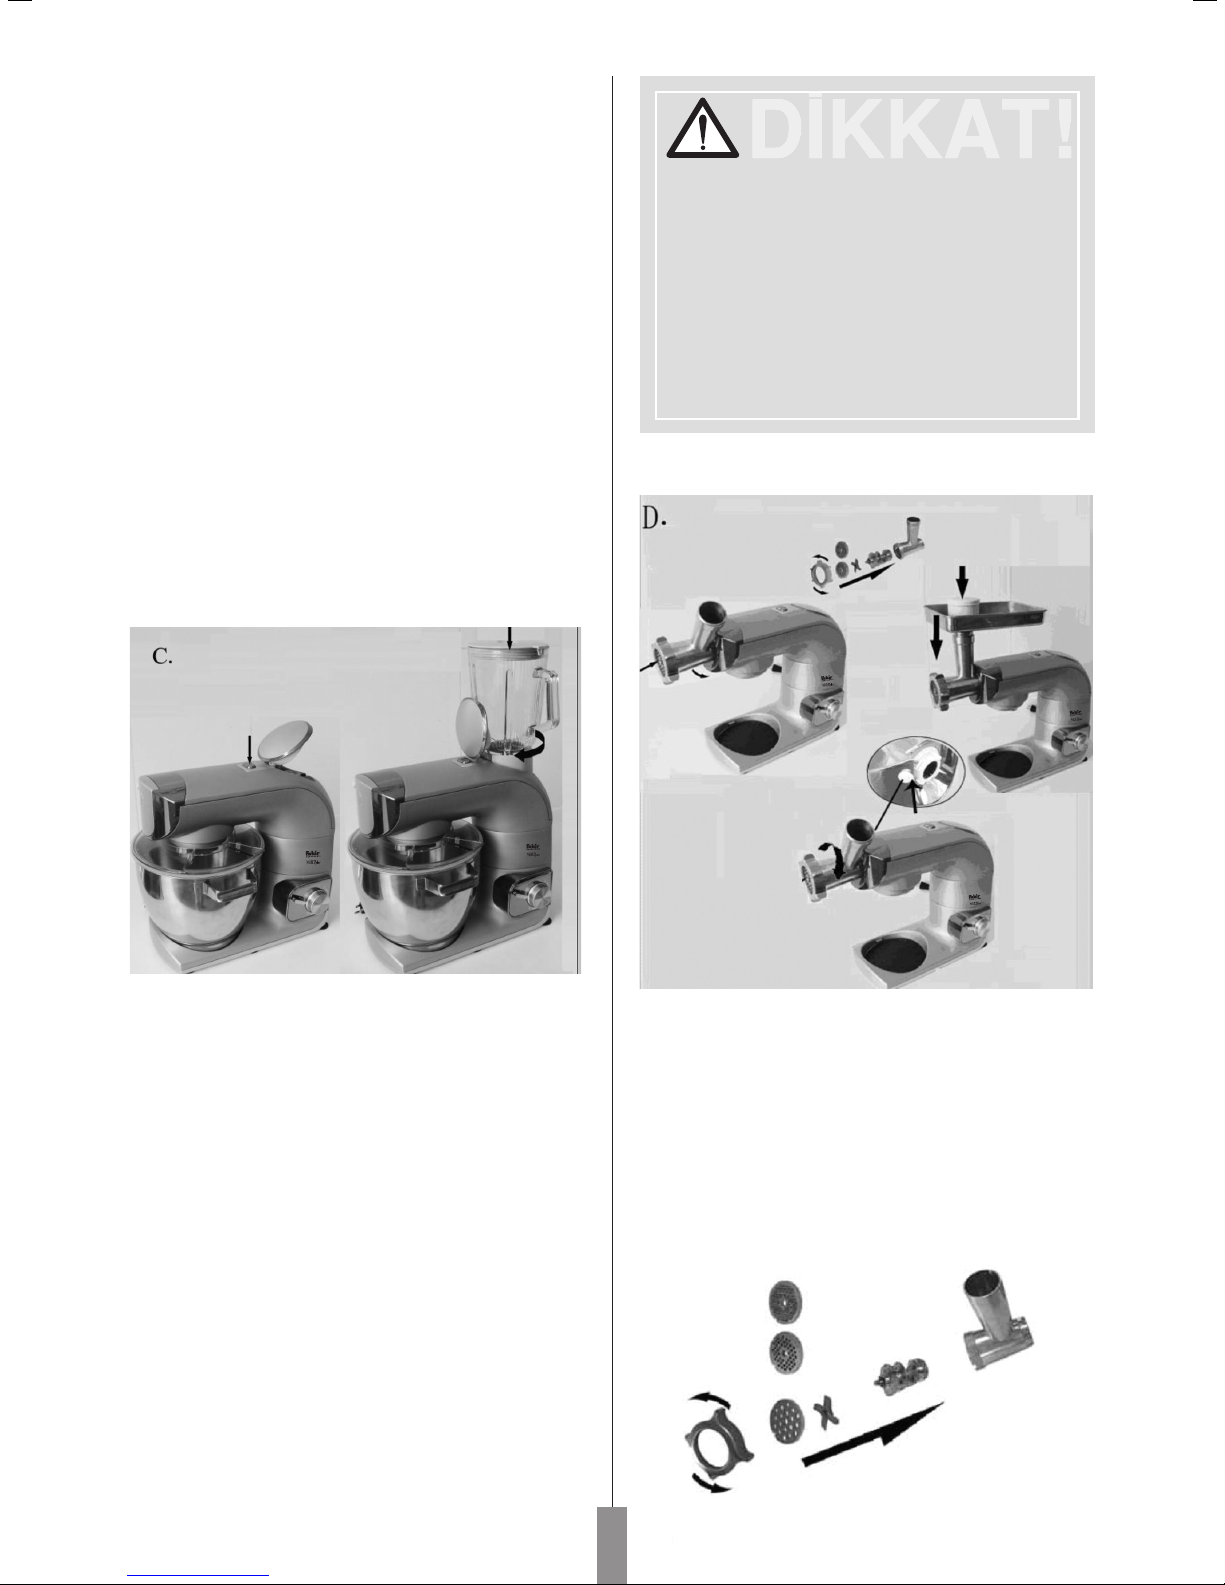
Mikser kafas› gevfletme tufluna bas›p, mikser
kafas›n› yukar›ya kald›r›n›z ve ç›rp›c› aparat›,
yo¤urma aparat› veya mikser b›ça¤›
aparatlar›ndan bir tanesini tak›n›z.
•
Mikser kafas›n› mikser kafas› gevfletme tufluna
basarak yerine kilitleninceye kadar afla¤›ya do¤ru
indiriniz.
•
Mikser kafas›n› yukar›ya do¤ru kayd›r›n›z, mikser
b›ça¤›, ç›rp›c› ve yo¤urma aparat›n› tutunuz.
•
Cihaz› ilk kullan›mdan önce, cihaz aksesuarlar›n›
sabunlu su ile y›kay›p, durulay›p, kurulay›n›z.
•
Cihaz›n›z› düz, sa¤lam bir zemin üzerine
yerlefltirdikten sonra fiflini prize tak›n›z.
Kar›flt›rma, yo¤urma, ç›rpma:
Kulland›¤›n›z malzemelerin içeri¤ine ba¤l› olarak,
•
fleffaf kapa¤› ile beraber mikser kab›, 2.3 kg’ a
kadar hamur haz›rlayabilmektedir.
Page 5
•
Mikser kafas› gevfletme tufluna bas›n›z ve mikser
kafas›n› dik pozisyona gelene kadar yukar›ya
kald›r›n›z.
•
Mikser kab›n› cihaza yerlefltirip, kilitleninceye
kadar çevirerek cihaza oturtunuz. Ard›ndan
haz›rlad›¤›n›z kar›fl›m› kap içine koyunuz.
Kab›n fleffaf kapa¤›n› cihaz›n önünde bulunan
•
k›sma yerlefltiriniz.
•
Mikser b›ça¤›, yo¤urma aparat› veya ç›rp›c›
aparatlar›ndan bir tanesini seçiniz ve aparat›
çeyrek tur döndürerek kilitleninceye kadar cihaz
a¤›z k›sm›na yerlefltiriniz.
•
Mikser kafas› gevfletme tufluna basarak mikser
kafas›n› tekrar afla¤›ya do¤ru “klik” sesi gelene
kadar indiriniz.
•
Cihaz operasyonu boyunca, aç›labilir minik
kapaktan kar›fl›mlar› kaba koyabilirsiniz.
•
Cihaz› durdurmak için tuflu I ‘ den 0’ a getiriniz.
‹ste¤e ba¤lı aparatlar:
a-Blender Aparat› ‹le Kullanma:
D‹KKAT!
• Blender aparat› içi bofl iken 1 dakikadan daha
uzun bir süre boyunca çal›flt›rmay›n›z.
• Blender› kesinlikle kaynam›fl kar›fl›mlar için
kullanmay›n›z. S›cak kar›fl›mlar›n so¤umas› için
bekleyiniz. Aksi taktirde, cihaz bu kar›fl›mlar› daha
fazla ›s›tabilir, blender cam kasesi de çatlayabilir.
Blender ile buz parçalayacaksan›z, her kullan›mda
boyutlar› 40mmx40mmx20mm olacak flekilde
max. 9 buz parças› parçalayabilirsiniz.
b-Et K›yma Aparat› ‹le Kullanma:
Kulland›¤›n›z malzemelerin içeri¤ine ba¤l› olarak,
•
blender aparat› ile 1.4 litreye kadar olan
kar›fl›mlar› haz›rlayabilirsiniz.
Aparat›n cihaza montaj›;
Blender b›ça¤›n› blender cam haznesinde bulunan
•
conta üzerine yerlefltiriniz ve saat yönünde çeyrek
tur çevirerek kilitleninceye cam hazne içine
yerlefltiriniz.
Mikser kafas›n›, mikser kafas› gevfletme tufluna
•
basarak yatay flekilde afla¤›ya do¤ru kilitleninceye
kadar kayd›r›n›z.
Kapak açma tufluna bas›n›z, kapak aç›lacakt›r.
•
Blender b›çak bölmesini blender aparat› güç ç›k›fl
•
bölmesine yerlefltiriniz ve saat yönünün tersine
döndürerek cihaza kilitleyiniz (blender aparat›
dik konumda olmal›d›r).
Kar›fl›mlar› blender cam hazne içine boflalt›n›z.
•
Aparat›n cihaza montaj›
Viday› plastik bölümü kesici k›sma gelecek flekilde
•
kesici k›sma yerlefltiriniz. Kesici b›ça¤› vidan›n
üstüne yerlefltiriniz. ( kesici b›çaklar ön k›sma
yerlefltirilmelidir). Kendi tercihinize göre seçmifl
oldu¤unuz k›yma disklerinden birini yerlefltiriniz.
( k›yma diski ortas›ndaki deli¤in vida ç›k›nt›s›na
oturmufl oldu¤undan emin olunuz). Somunu kesici
k›sma yerine tam olarak yerleflinceye kadar
çevirerek oturtunuz.
0503
Page 6
Et k›yma aparat› takma kapa¤›n› cihazdan
•
sökünüz.
Et k›yma kesici bölmesini et k›yma aparat› güç
•
ç›k›fl bölmesine yerlefltiriniz.
Aparat kilitleme / gevfletme tuflunu kullanarak,
•
kesici bölmeyi sola do¤ru çevirerek cihaza
kilitleyiniz.
Son olarak yiyecek koyma tepsisi ve itme sap›n›
•
yerlefltiriniz.
D‹KKAT!
• Et k›yma aparat› kesici bölmesini cihazdan
sökerken, et k›yma aparat› gevfletme tufluna bas›n›z.
• Eti parçalar halinde kesiniz ve tutma sap›
yard›m›yla et k›yma kesici bölmesine aktar›n›z.
Yiyecekleri kesici bölmeye aktar›rken kesinlikle
elinizi kullanmay›n›z.
c-Kar›flt›rma, yo¤urma, ç›rpma:
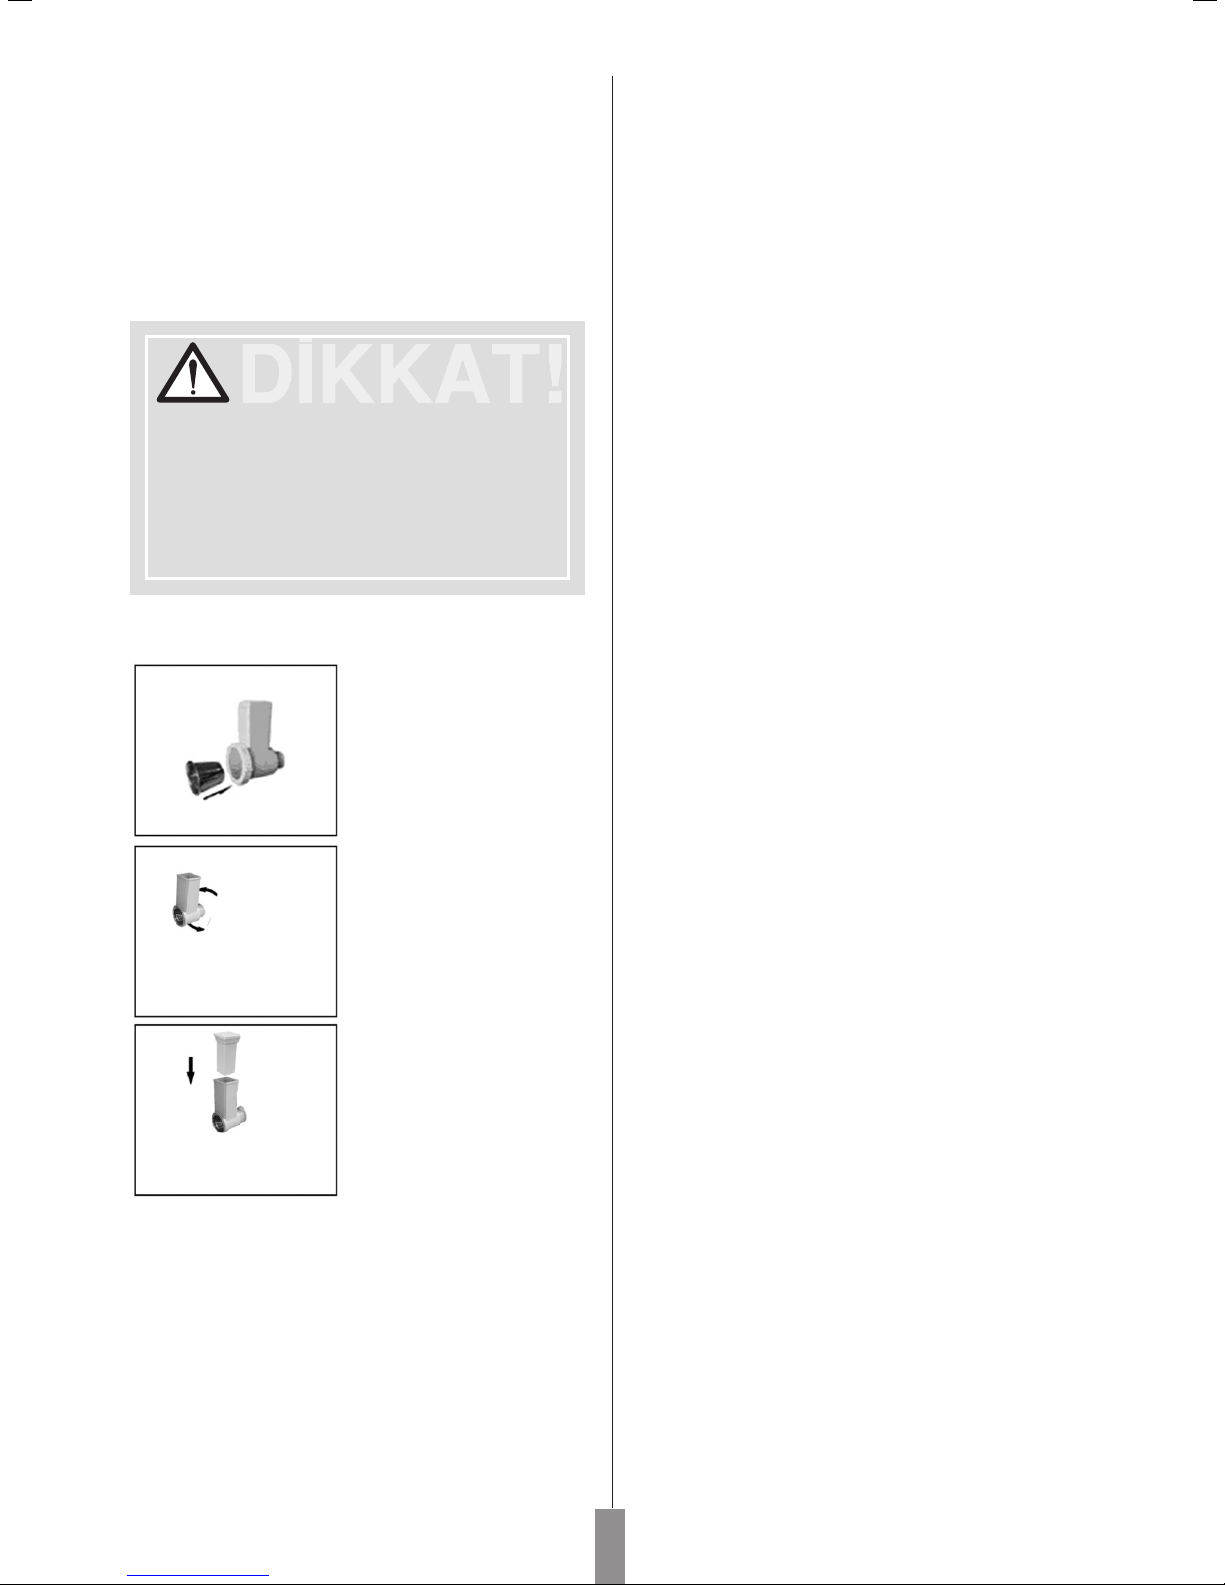
• Sebze rendeleme veya
dilimleme b›ça¤›n› kesici
bölme içine yerlefltiriniz.
Ard›ndan kesici bölmeyi
flekilde görüldü¤ü gibi
ok yönünde çevirerek
sebze rendeleme /
dilimleme aparat› güç
ç›k›fl noktas›na tak›n›z.
• Kullanaca¤›n›z
patates, havuç v.b.
sebzeyi kesici bölmeye
s›¤acak flekilde parçalar
halinde kesiniz.
Parçalad›¤›n›z sebzeleri,
kesici bölme içine
koyunuz ve sebze dilimle
/ rendeleme aparat›n›n
itme sap› yard›m›yla
iflleme bafllay›n›z.
Cihazla sebzeleri
rendelemek veya dilimlemek için kesinlikle elinizle
kesici bölme içine koymaya çal›flmay›n›z.
Cihazın temizlenmesi
Cihaz fiflini prizden çekiniz.
•
Cihaz motor k›sm›n› kesinlikle suya veya herhangi
•
bir nesneye temas ettirmeyiniz. Cihaz› akan su
alt›nda y›kamaya çal›flmay›n›z. Cihaz› temizlemek
için hafif nemli yumuflak bir bez kullanabilirsiniz.
Cihaz› h›zl› bir flekilde temizlemek için cihaz
•
aksesuarlar›n› suda çözünmeleri için bekletiniz.
Metal aksesuarlar d›fl›nda (et k›yma aparat›n›n
•
paslanmaz çelik k›yma diskleri, et k›yma aparat›
flaft›, et k›yma b›ça¤› ve et k›yma somunu), tüm
aksesuarlar› bulafl›k makinesinde y›kayabilirsiniz.
Et k›yma aparat› k›yma disklerini ve b›ça¤›n›
•
zaman zaman ya¤laman›z tavsiye edilmektedir.
Her kullan›mdan sonra piflirirken kulland›¤›n›z
herhangi bir ya¤ ile aparatlar› silebilirsiniz.
Cihaz aksesuarlar haz›rlad›¤›n›z yiyeceklerden
•
(havuç, portakal, v.b) ötürü boyanmaya bafllarsa,
üzeri zeytinya¤› bir peçete yard›m›yla ç›karabilir
ve ard›ndan aksesuarlar› temizleyebilirsiniz.
•
Blender cam haznesi içine bulafl›k deterjanl› s›cak
su ile doldurunuz. Kapa¤›n› kapat›n›z. Cihaz
üzerine yerlefltiriniz ve birkaç kez çal›flt›r›p
kapat›n›z. Blender› cihazdan ç›kart›n›z, cam
hazneyi akan su alt›nda çalkalay›n›z ve kurumas›
için ters bir flekilde tutunuz.
04
Page 7
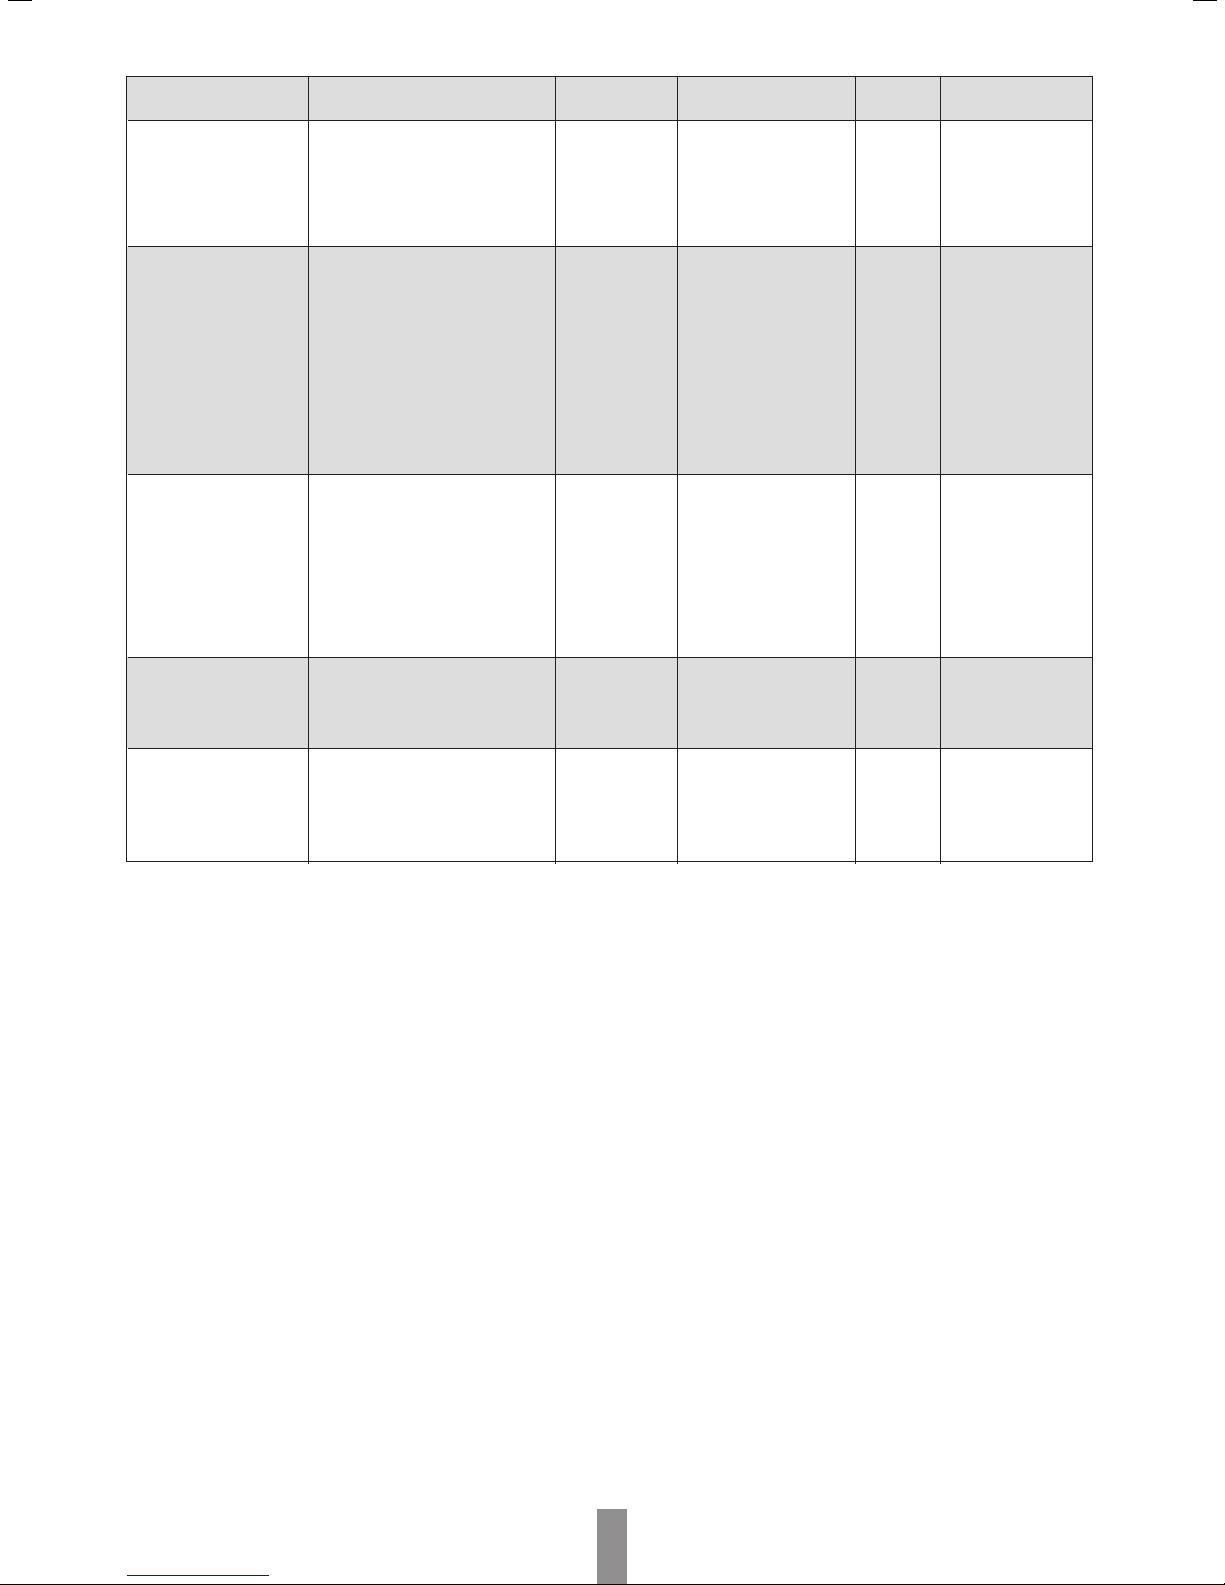
Aksesuar
Yiyecek
Maximum
Kullan›m süresi
Hız ayrı
Hazırlama
Ç›rp›c›
Yo¤urma aparat›
Mikser b›ça¤›
Blender
Krema (38%ya¤ içerikli)
Yumurta beyaz›
Un
Tuz
Maya
fieker
Su
Ya¤
Un
Pudra flekeri
Margarin
Yumurta
Havuç
Su
250ml
12adet
1700g
20g
10g
10g
1100g
20g
100g
100g
100g
2adet
560g
840g
10 dakika
3 dakika
10 dakika
5 dakika
3 dakika
3 dakika
5-6
5-6
5-6
1-4
P/6
-
-
-
-
15x15x5mm
-
Et kıyma aparatı
Et
Tavuk
2000g
2000g
3dakika
3dakika
P/6
20x20x60 mm
0505
Page 8

Page 9

Introduction
Thank you for purchasing Fakir Multiplex Bench Mixer
which has been designed and manufactured to give you
many years of trouble-free service.
You may already be familiar with using a similar product,
but do please take time to read these instructions - they
have been written to ensure you get the very best from
your purchase.
Safety is important
For yours and others safety please read the instructions
before using the appliance. Please keep this instruction
in a safe place for the further use. If you pass the appliance
on, pass on the instructions too. Remove all packaging,
but keep it until you are satisfied that the appliance is
working.
Security Cautions
When use electrical appliances, basic safety precautions
should always be followed, including the following
Carefully read the instructions before using your
•
appliance.
Before plugging into a socket, check whether your
•
voltage corresponds to the rating label of the appliance.
Switch off the appliance before fitting and removing
•
the attachment.
Keep your fingers away from moving parts and the
•
opening on the attachment.
Only use the appliance for its intended domestic use.
•
Never leave the appliance to run unsupervised,
•
especially when young children or handicapped
persons are present.
The appliance must be plugged into an earthed
•
electrical socket.
If you have to use an electrical extension lead, it must
•
be earthed and you should make sure that no-one
can trip over it.
Unplug the appliance as soon as you have finished
•
using it and when you clean it.
Don’t use your attachment and/or appliance if it has
•
been damaged. You should contact an approved
Fakir service centre.Unplug the appliance as
•
soon as you have finished using it and when you
•
clean it.
Don’t use your attachment and/or appliance it has
•
been damaged. You should contact an approved
Fakir service centre.
•
Any work on the appliance other than normal care
•
and cleaning by the customer must be carried out by
an approved service centre.
,,,Do not immerse the appliance, the power cord
or the plug in water or in any other liquid.
Do not allow the power cord to hang within the reach
•
of children, to come close to or into contact with the
hot parts of your appliance, any other source of heat
or any sharp edge.
Do not operate any appliance with a damaged cord
•
or plug or after the appliance malfunctions, or has
been damaged in any manner. Return appliance to
an authorized Fakir Service facility for examination,
repair or adjustment
Do not put any accessories containing metal in a
•
microwave oven.
Switch off the appliance and disconnected from supply
•
before changing accessories or approaching parts
which move in use.
Do not touch the whisk, mixer blade or kneading
•
hook while the appliance is in operation.
Only ues one attachment at a time.
•
Do not operate the appliance for more than 10 minutes
•
at one time. Allow 30 minutes rest before next use.
This appliance is not intended for use by persons
•
(including children) with reduced physical, sensory or
mental capabilities, or lack of experience and
knowledge, unless they have been given supervision
or instruction concerning use of the appliance by a
person responsible for their safety.
Children should be supervised to ensure that they do
•
not play with the appliance.
Please read all instructions and safety guards
carefull. Please keep this instruction manual for
further usage.
Specifications:
Power consumption: 1200 Watt
Voltage: 230V~50/60 Hz
Protection class: I
Usage Life: 7 years
07
NOTE!
Page 10
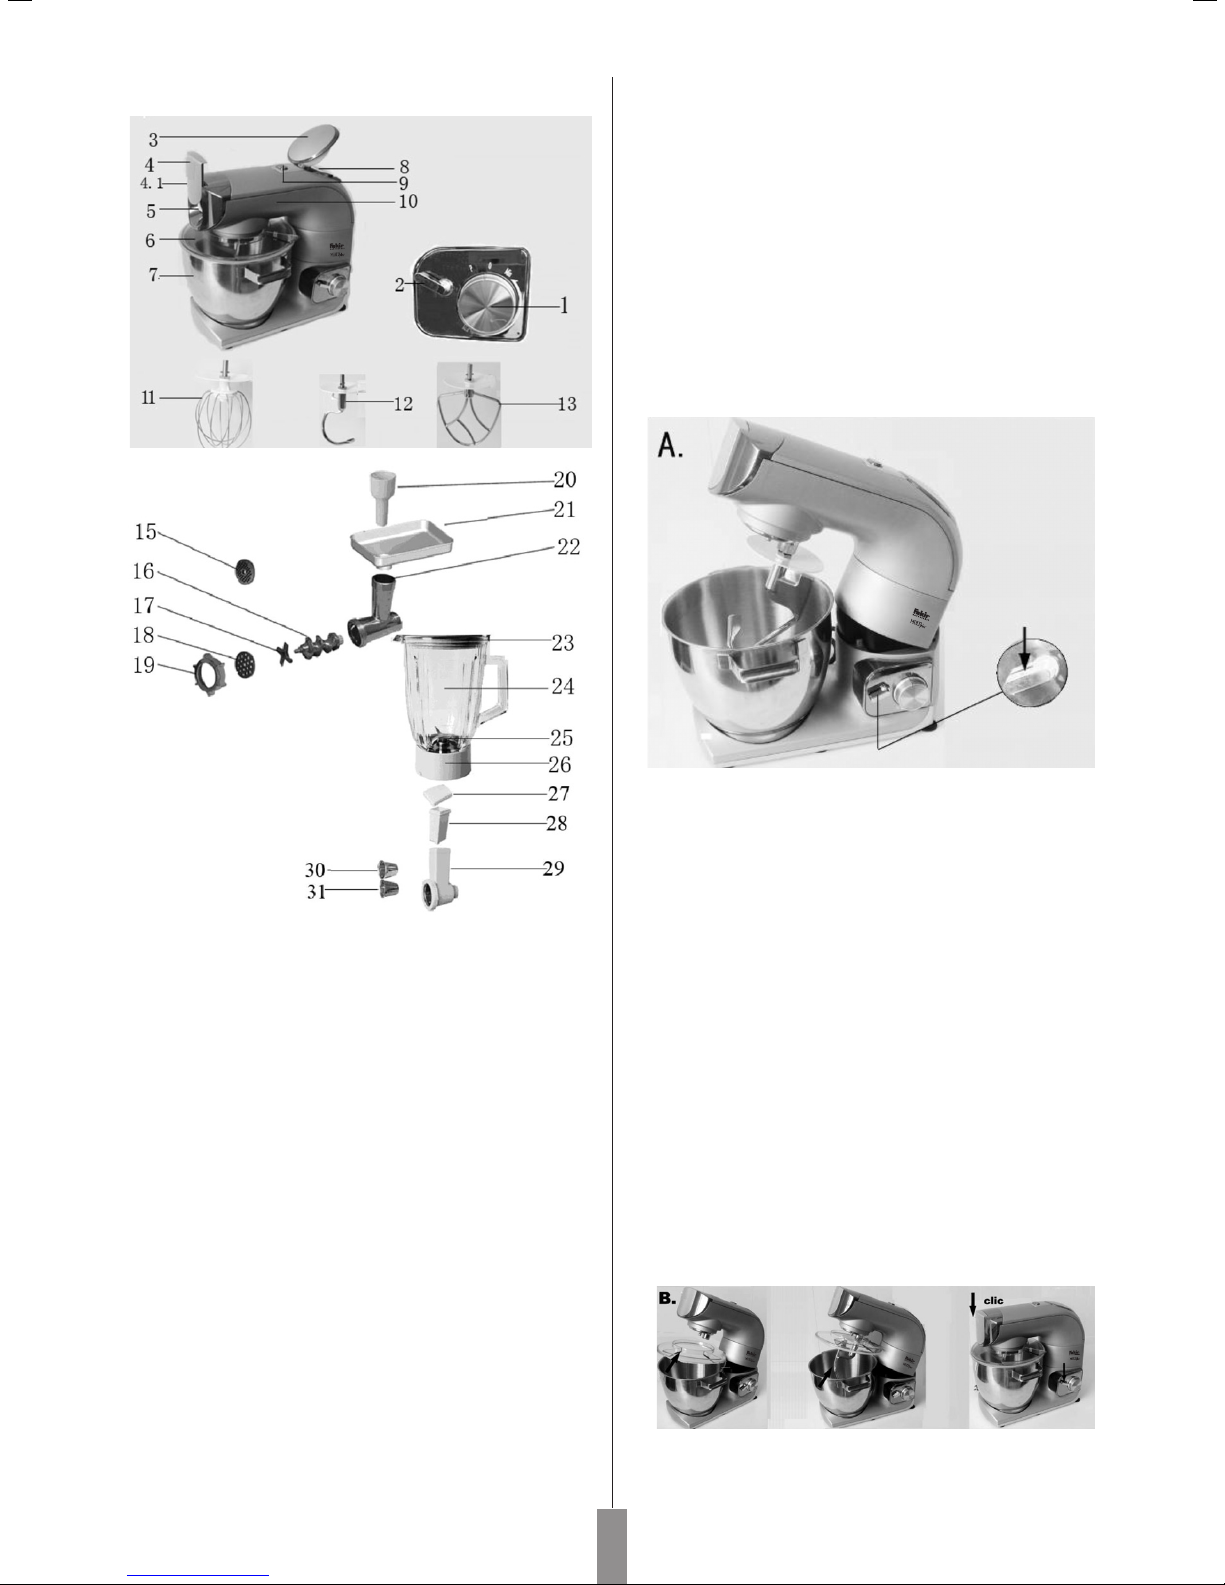
Product Parts Description
22 Cutter housing
23 Cover for jug
24 Glass jug
25 Blade
26 Blade seat
27 Cover
28 Big pusher
29 Big cutter housing
30 Slice cutter
31 Fine bar cutter
Usage:
Adjusting the healtof the attachmets
1. Speed control switch
2. Release button for multifunction head
3. Cover
4. Removable cover for meat grinder & vegetable
slicer power outlet
4.1. Release button for Cutter housing
5. Power outlet for meat grinder & vegetable slicer
attachments
6. Bowl cover
7. Stainless steel bowl
8. Power outlet for blender attachment
9. Release button for Cover 3
10. Multifunction head
11. Whisk
12. Dough hook
13. Mixer blade
15 Fine grinding disc
16 Worm shaft
17 Cutter blade
18 Medium grinding disc
19 Screw ring
20 Pusher
21 Tray
Your attachments are equipped with a system for
adjusting the height above the bottom of the bowl
for optimum results.
Press the release button to lift the multifunction
•
head and insert the mixer blade, dough hook or
whisk.
Hold it in position.
•
Lower the head of the appliance with the release
•
button and press until a click is heard.
Adjust the height by turning the shaft: adjust the
•
accessories to the ideal position.
Lift the head of the appliance again, hold the
•
Mixer blade, Hook or whisk in position.
Before using for the first time, clean all parts of
•
the accessories with soapy water .rinse and dry.
Place the appliance on a flat, clean and dry
•
surface and then plug in your appliance.
Mixing/Kneading/Beating/Elulsifying/
Whisking
Depending on the nature of the ingredients, the
•
bowl with its cover can be used to prepare up to
2.3 kg of dough.
08
Page 11
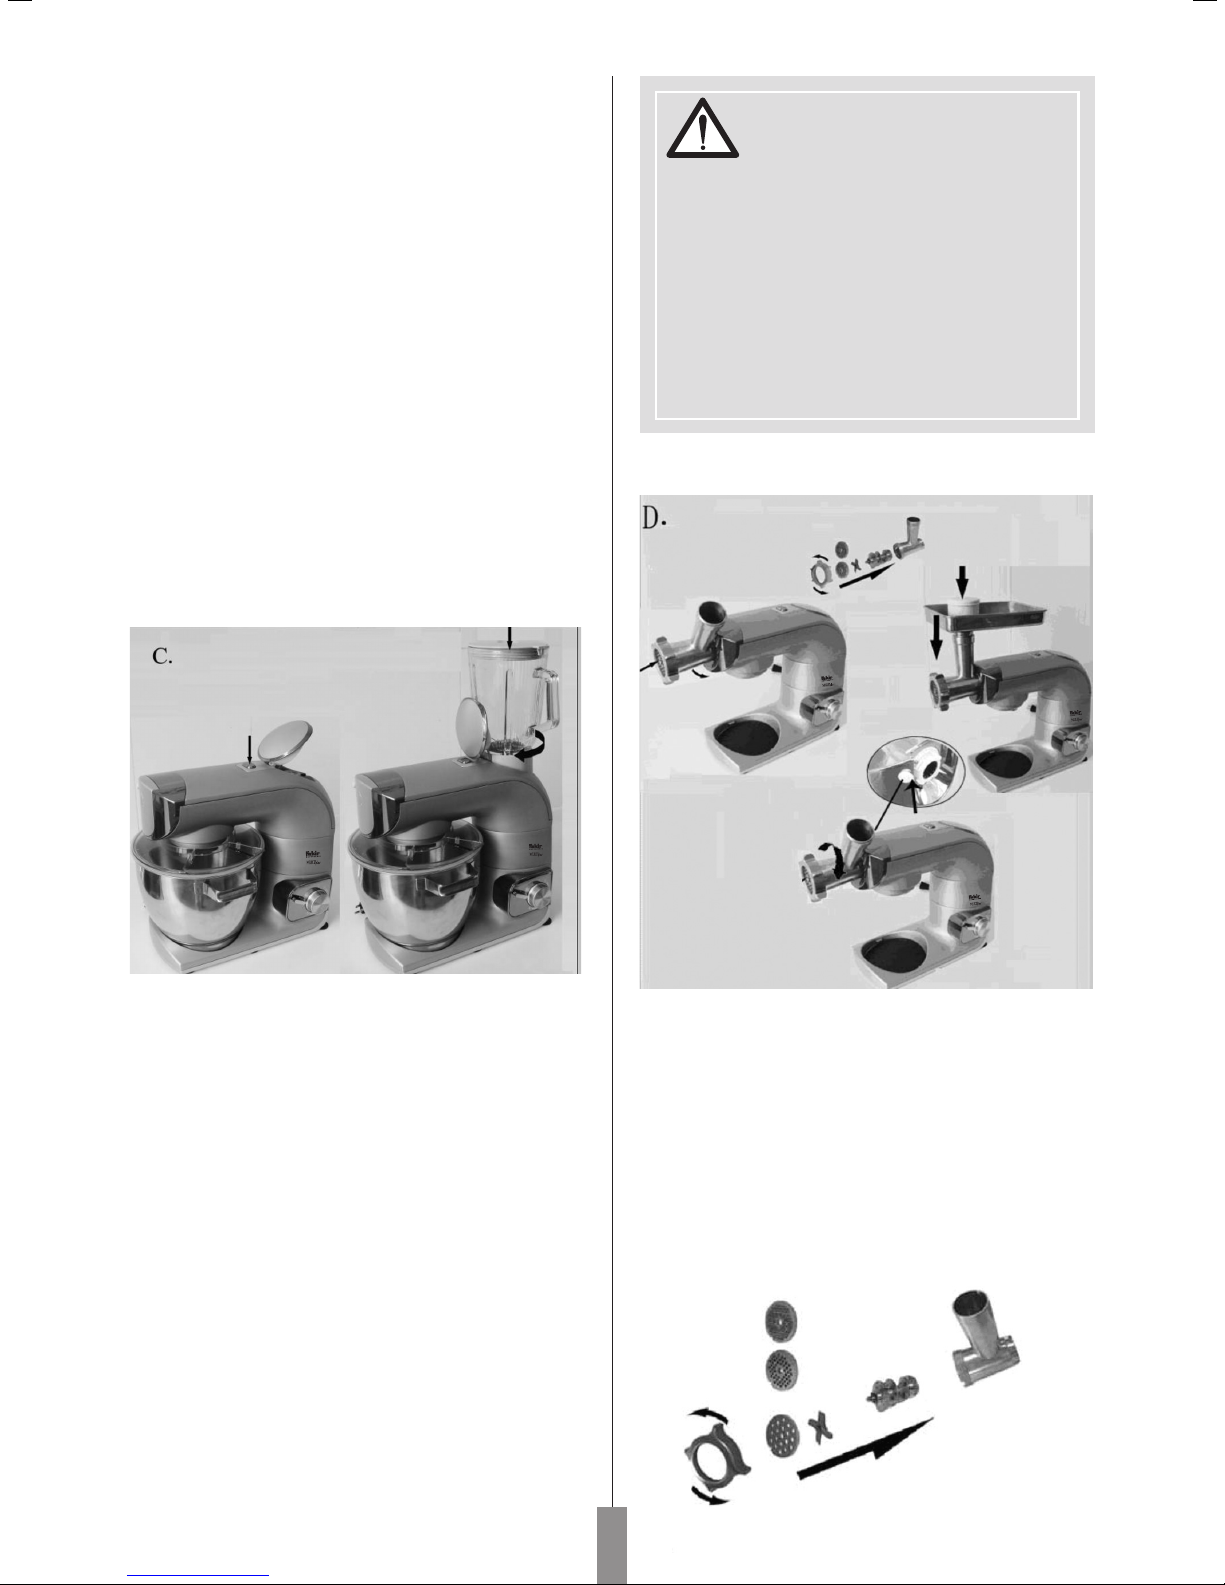
•
Press button to the release the multifunction head
and raise it to a vertical position.
•
Fit the bowl onto the appliance by turning untit
locks in position and place the ingredients in it,
weighting them as indicated under the weighing
•
function.
Position the cover on the head with the filling
•
opening at the front of the appliance.
Fit the desired accessory in the power outlet,
pushing the shaft of the accessory home and turn
it a quarter turn towards you to lock it in position.
•
Lower the multifunction head of the appliance to
horizontal position and press button again (a click
should be heard).
•
During preparation, you can add ingredients
through the opening the cover.
•
To stop the appliance, turn the knob back to “0”
position.
Optional accessories:
a-Using with the blender attachment:
CAUTION
CAUTION
• Do not run the blender empty for more than 1
minute.
• Never fill the mixing jug with boiling fluids, you
could allow these to cool down to a room
temperature. Otherwise, the appliance could
overheat and the glass of the mixing jug could
crack. • When you use the jug operate ice, you
could select nine ices each time and the every ice
size is 40MM * 40MM * 20MM.
b-Using with the meat grinder attachment:
Depending on the nature of the ingredients, the
•
blender can be used to prepare up to 1.4L of
mixture.
Assembling and fitting the attachment.
Assemble the blade assembly to the seal and lock
•
it with a quarter turn clockwise into the bottom of
the jug (the jug must be upright).
Lower the multifunction heard of the appliance to
•
a horizontal position and press release button
again (a click should be heard).
Press release button for cover to open the cover.
•
Ensure that the appliance is at a standstill before
•
latching on the assembled blender.
Fit the assembled blender and lock it in position
•
by turning it anticlockwise.
Place the ingredients in the blender jug, weighing
them as indicated under the weighing function
and then fit the cover with the measuring plug.
Assembling and fitting the attachment;
• Insert the worm shaft into the cutter housing, the
plastic end first. Place the cutter unit onto the worm
shaft. (The cutting edges should be at the front.)
Place the fine grinding disc or coarse grinding disc
(depending on the consistency you prefer) onto the
warm shaft. (Make sure the notch of the grinding
disc fit onto the projections of the mincer head.) Turn
the screw ring in the direction of the arrow on the
cutter hosing until it is properly fastened.
0509
Page 12
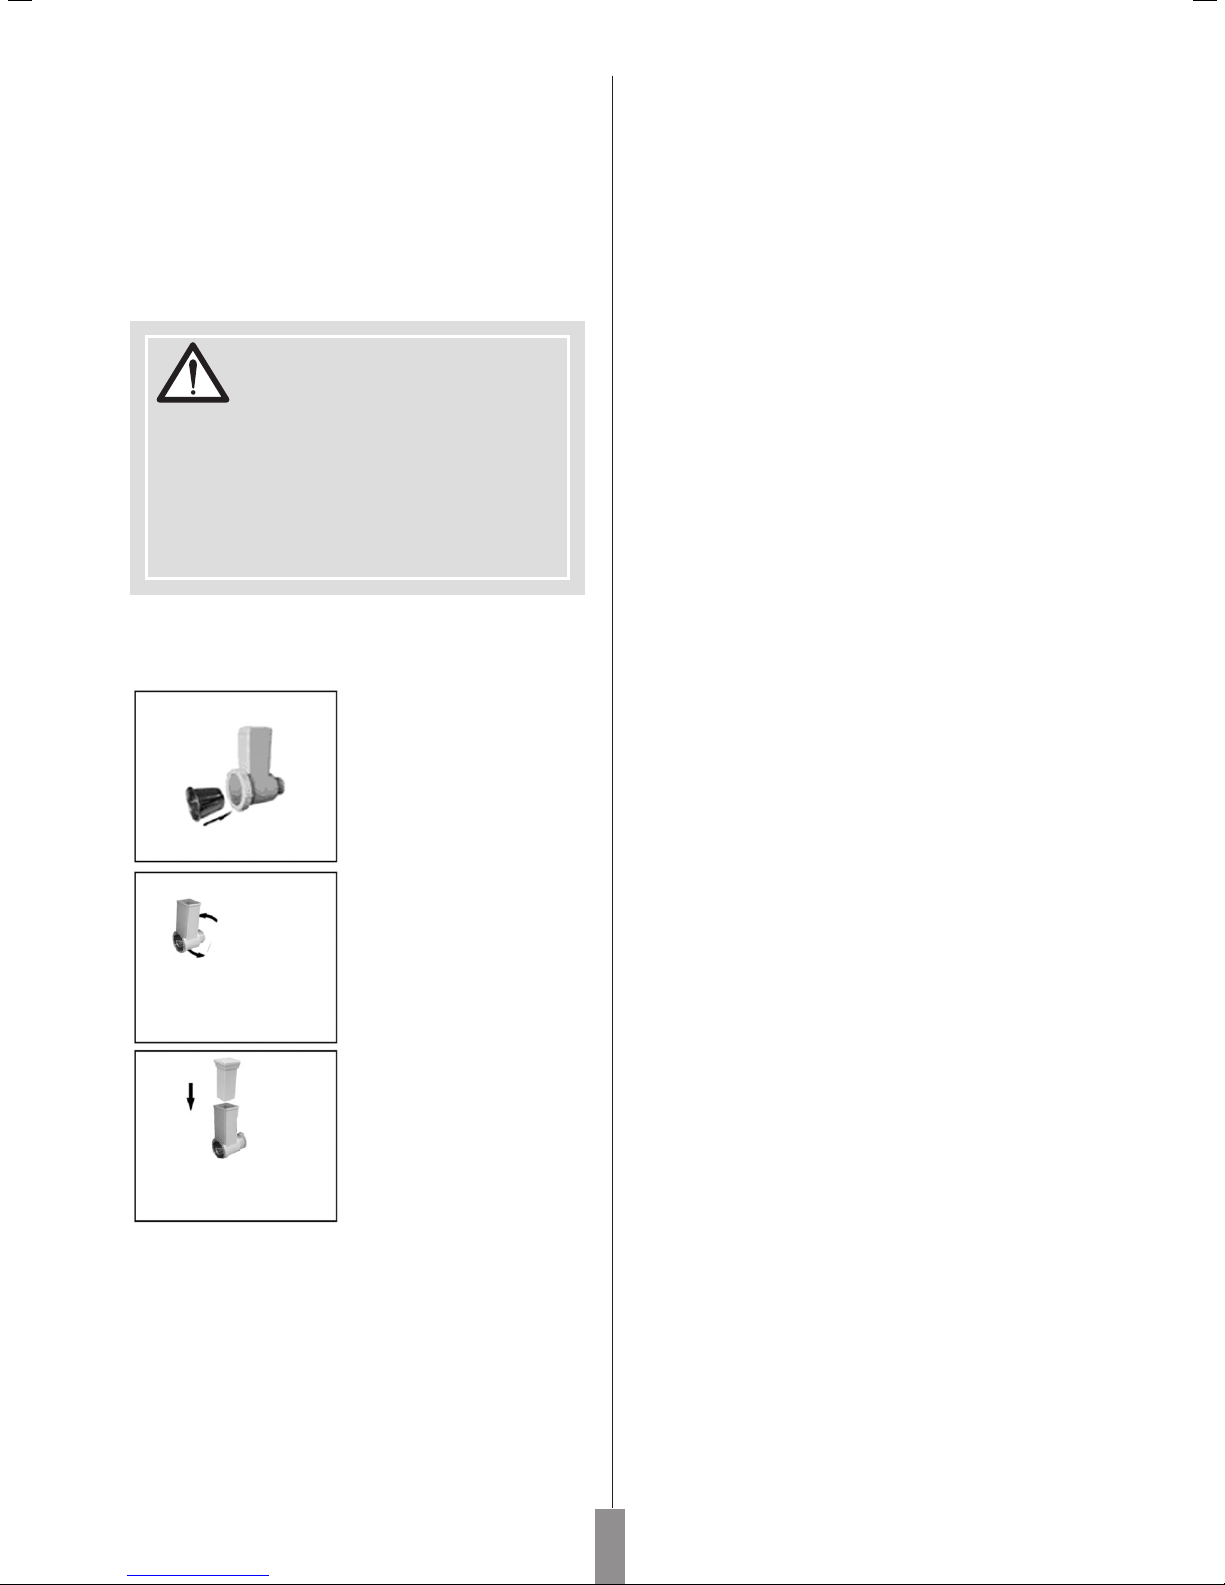
Take off the removable cover for meat grinder
•
from the appliance.
Place the meat grinder cutter housing to the power
•
outlet for the meat grinder.
By using the release button for cutter housing,
•
turn the cutter housing of the meat grinder and
lock it to the appliance.
And finally, place the food tray and pusher.
•
CAUTION!
CAUTION!
• When you dissembled the meat grinder cutter
housing, you must press the release button for
cutter housing.
• Insert the pieces of meat in the feed tube piece
by piece using the pusher; never push the meat
with the finger or any other utensil.
c-Using with the vegetable slicer
attachment:
Insert the slice cutter or
the fine bar cutter into
the cutter housing.
Attach the cutter housing
to the motor unit.
Now the appliance is
ready for slicing
Cleaning of the Appliance;
Unplug the appliance.
•
Never immerse the motor until in water or put it
•
under running water wipe it with a soft dry or
slight damp cloth.
For easier cleaning, quickly rinse the accessories
•
after use. Completely dismantle the mixer
attachment. Handle the blades with care, as some
have sharp cutting edges.
Wash , rinse and wipe the accessories or the can
•
be put in the dishwasher, except for the metal
components of the meat grinder attachment body
fine grinding disc, medium grinding disc, worm
shaft, cutter blade, coarse grinding disc and screw
ring.
The grinding disc and the blade must be kept
•
lubricated. Wipe them over with cooking oil after
each use.
If your accessories are discolored by food (carrots,
•
oranges etc), rub them gently with kitchen towel
dipped in cooking oil and then clean in the usual
way.
Blender assembly: pour hot water with a few
•
drops of washing up liquid into the blender jug.
Close the cover. Fit it on the appliance and give
a few pulses. Remove the blender, rinse the jug
under running water and leave it upside down to
dry .for cleaning more difficult residues, especially
with thicker preparations. The blade nut assembly
can be detached from the bottom of the jug, to
do this, place the empty blender upside down on
a flat surface, release the blade /nut assembly
with a quarter turn and lift out the seal with care.
Cut the potato or other
vegetable for processing
it to pieces, which size
is suitable for cutter
housing.
Choose the different kind
of cutter as requested.
Put the pieces into cutter
housing and press
slightly by pusher of the
vegetable slicer.
(Note: Never press by finger.)
10
Page 13
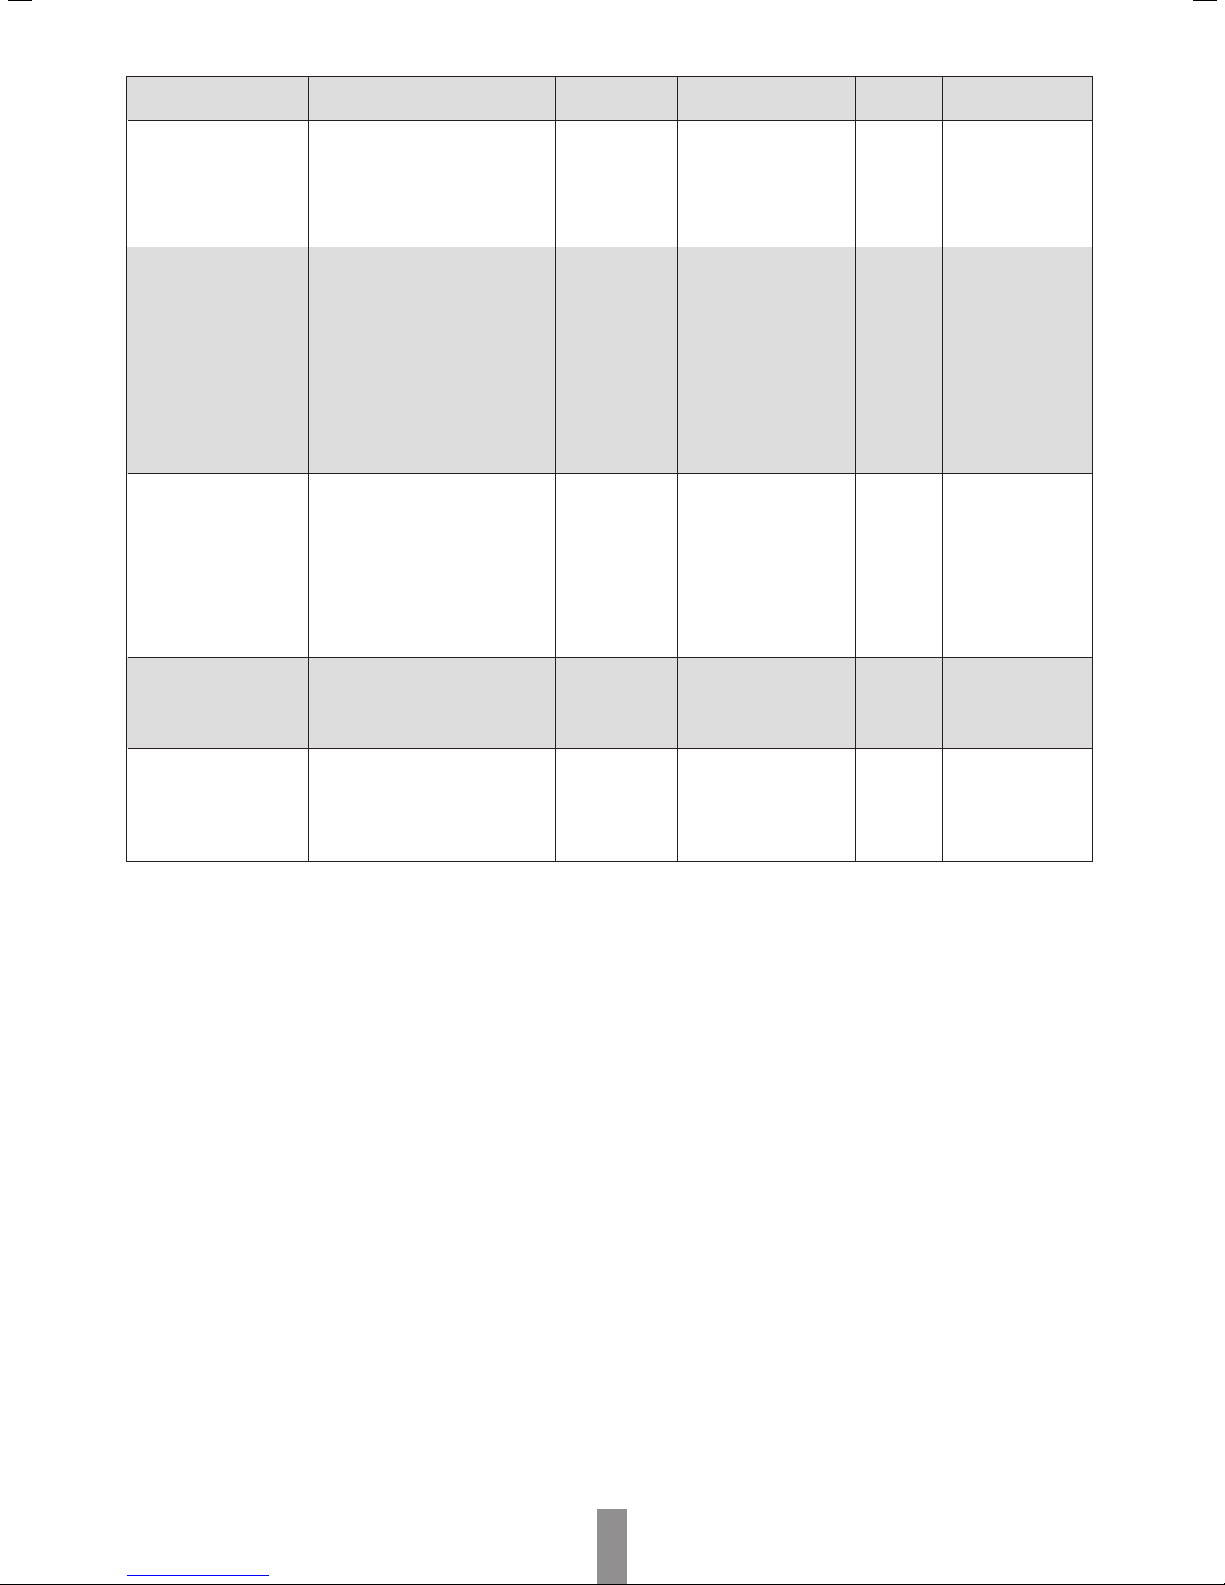
Accessory
Food
Maximum
Operation time
Speeds
Preparation
Whisk
Dough hook
Mixer blade
Blender
Cream(include 38%fat)
Egg white
Flour
Salt
Yeast
Sugar
Water
Lard
Flour
Castor sugar
Margarine
Egg
Carrot
Water
250ml
12pcs
1700g
20g
10g
10g
1100g
20g
100g
100g
100g
2adet
560g
840g
10 minutes
3 minutes
10 minutes
5 minutes
3 minutes
3 minutes
5-6
5-6
5-6
1-4
P/6
-
-
-
-
15x15x5mm
-
Meat Grinder
Beef
Chicken
2000g
2000g
3 minutes
3 minutes
20x20x60 mm
3-6
0511
Page 14

NOT / NOTES
12
Page 15

0513
Page 16

DONGLIAN ELECTRIC APPLIANCES CO., LTD.
North B, 1/F, NO.304 BUILDINGS, SHANGBU
INDUSTRY ZONE, HONGLI ROAD, FUTIAN DISTRICT,
SHENZHEN, P.R. CHINA
 Loading...