

Page 1
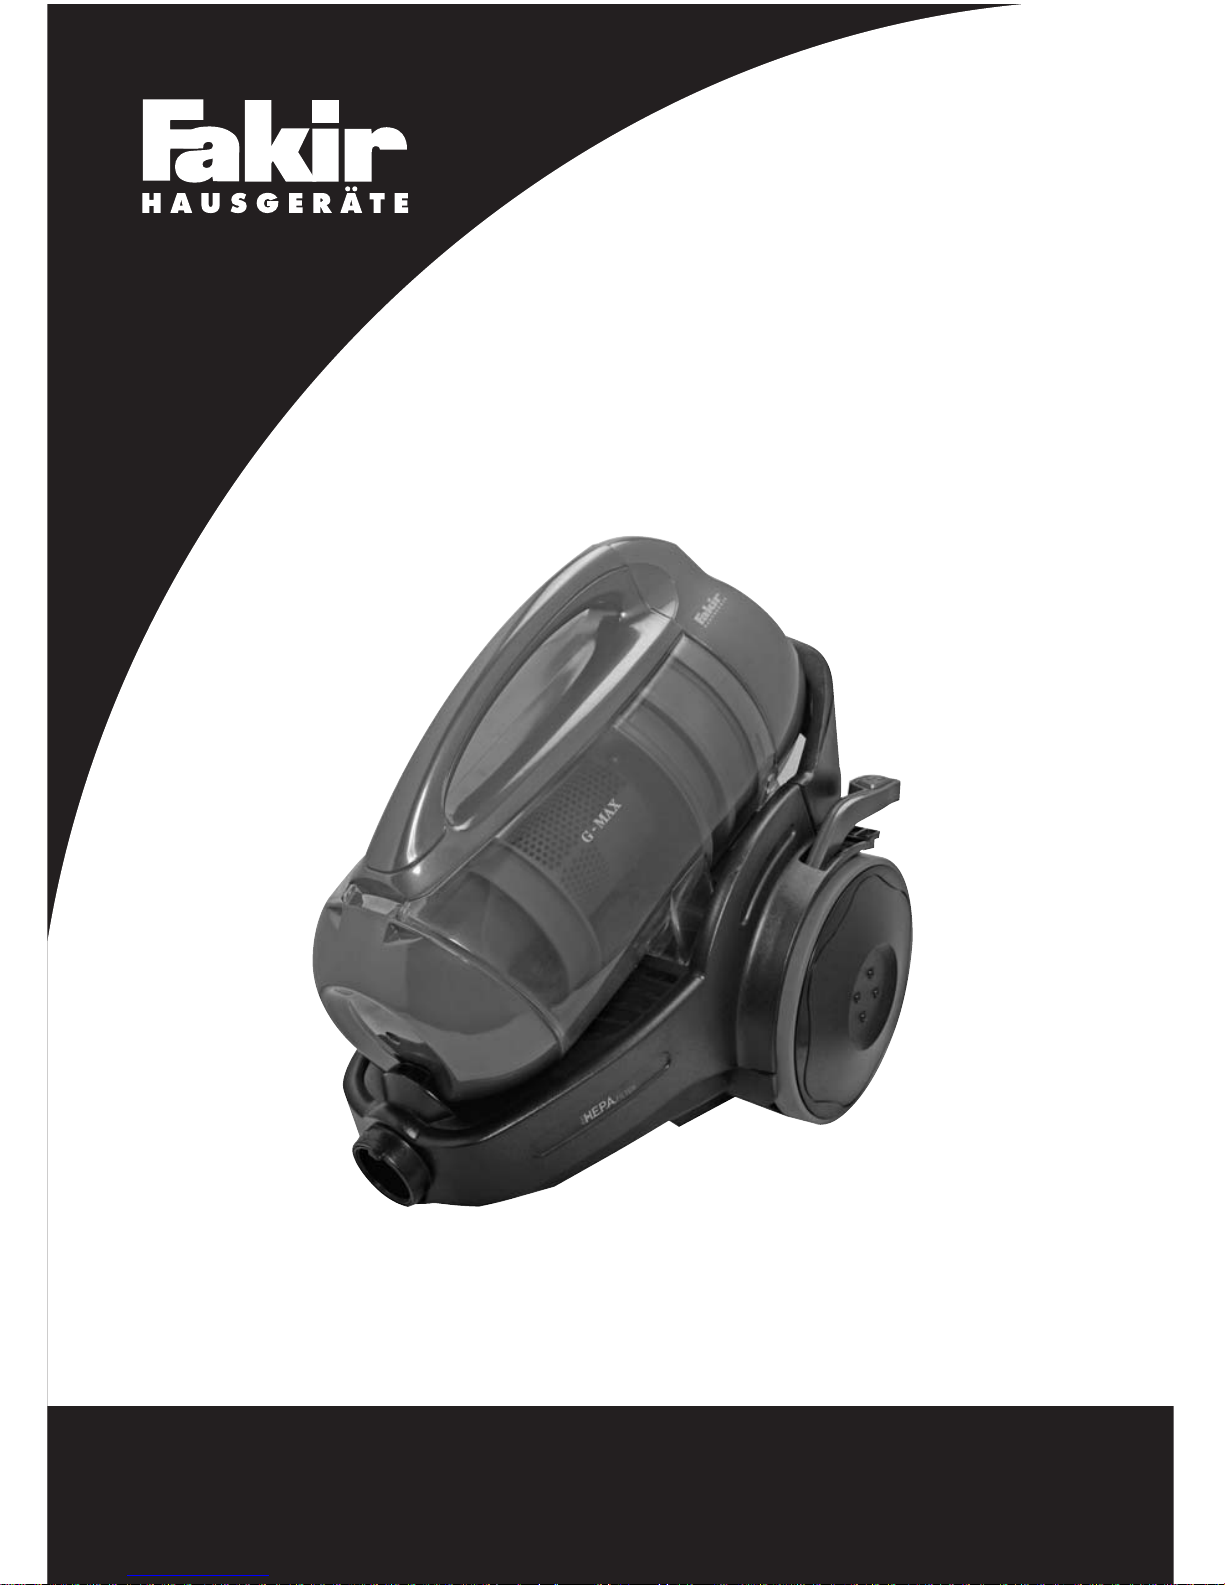
G-MAX
Cyclonic Dry Vacuum Cleaner - Instruction Manual
Cyclonic Kuru Elektrikli Süpürge - Kullanma K›lavuzu
Page 2

Girifl
Uzun y›llar sorunsuz çal›flmas› için tasarlanan ve üretilen Fakir G-MAX kuru elektrik
süpürgesini sat›n ald›¤›n›z için teflekkür ederiz.
Benzer ürünleri kullanmaya al›fl›k olabilirsiniz, ancak kullanma k›lavuzunu okumak
için lütfen zaman ay›r›n›z. Bu k›lavuz sat›n alm›fl oldu¤unuz üründen en iyi performans›
alman›z için haz›rlanm›flt›r.
Güvenlik Önemlidir
Sizin ve yak›nlar›n›z›n güvenli¤ini sa¤lamak için ürünü çal›flt›rmadan önce lütfen
güvenlik uyar›lar›n› okuyunuz. Bu K›lavuzu gelecek kullan›mlar için saklay›n›z.
2
Page 3

3
Güvenlik Uyar›lar›
Elektrikli bir cihaz kullan›l›rken,
afla¤›daki önlemler her zaman
al›nmal›d›r. Yang›n, elektrik çarpmas›
ve kiflisel yaralanmalar› engellemek
için;
• Kullanma k›lavuzunda size verilen
bilgileri dikkatlice okuyunuz. Lütfen
kullanma k›lavuzunu saklay›n›z.Cihaz›
üçüncü bir kifliye verecekseniz mutlaka
k›lavuzu da birlikte veriniz.
• Ürünü kolisinden ilk ç›kard›¤›n›zda
aksesuarlar›n ve aparatlar›n tam
oldu¤undan emin olunuz. Kutuda eksik
var ise, en yak›n Fakir Yetkili Servisi’ne
baflvurunuz.
• Aksesuarlar›n ve aparatlar›n koruma
pofletlerini bo¤ulma riskini engellemek
için çocuklardan ve bebeklerden uzak
tutunuz.
• E¤er cihaz›n üzerinde, kasas›nda,
kablosunda, fiflinde herhangi bir
problem oldu¤unu düflünüyorsan›z,
cihaz› çal›flt›rmay›n›z. Size en yak›n
Fakir Servisine baflvurunuz.
• Ürünü ›slak zeminleri, henüz
so¤umam›fl külleri, sivri metal ya da
cam parçalar›, yan›c› maddeleri,
üzerinizdeki giysileri süpürmek için
kullanmay›n›z. Cihaz sa¤l›¤a zararl›
maddelerin süpürülmesinde
kullan›lmamal›d›r.
• E¤er cihaz ar›zalanm›fl ise yetkili Fakir
Servisi taraf›ndan tamir edilmelidir. Asla
kendiniz tamir etmeyiniz.
• Cihaz› plastik, çimento, tafl tozu ve un
kapl› yüzeyleri süpürmek için
kullanmay›n›z.
• Cihaz elektrik gücüyle çal›flt›¤›ndan
elektrik floku tehlikesi vard›r, bu nedenle
fifle kesinlikle ›slak ellerle dokunmay›n›z.
• Fifli prizden çekmek istedi¤inizde
mutlaka fiflten tutarak çekiniz. Elektrik
kordonundan tutarak çekmeye
çal›flmay›n›z. Kabloya zarar verebilir.
• Elektrik kablosunun zedelenmemesine,
›s› kayna¤› ya da sivri uçlarla temas
etmemesine özen gösteriniz.
• Makine çal›fl›r haldeyken aç›k
k›s›mlar›na herhangi bir objenin
s›k›flmamas›na özen gösterin. Hava
deliklerinin kapanmas› makinenin fazla
›s›nmas›na yol açar.
• Aç›k havada kullanmay›n›z. Makineniz
kir ya da ya¤murdan olumsuz
etkilenebilir.
• Makinenizi kesinlikle suya dald›rmay›n›z
ve ya¤mur ya da rutubetten koruyunuz.
• Makinenizi mutlaka cihaz›n üzerinde
yazan voltaj aral›¤›nda kullan›n›z.
• Makinenizi asla fifle tak›l› iken
gözetiminiz d›fl›nda b›rakmay›n›z.
Gözetiminiz d›fl›nda çocuklar›n cihazla
oynamas›na izin vermeyiniz.
• Aksesuarlar› takarken, ç›kart›rken ya
da cihaz› temizlerken ve bak›m
yaparken, fiflin prizde olmad›¤›ndan
emin olunuz.
• Çal›flt›rmadan önce filtrelerin yerlerinde
oldu¤undan, elektrik süpürgesinin aç›k
k›s›mlar›na herhangi bir objenin
s›k›flmam›fl oldu¤undan emin olun.
Filtreler bozulmam›fl ve kuru olmal›d›r.
Aksi taktirde silindir elektrik süpürgesine
zarar verebilir.
• Cihaz›n elektrik kablosu veya fiflinde
bir ar›za ya da hasar var ise, cihaz›
kullanmay›n›z ve en yak›n Fakir Yetkili
Servisi’ne baflvurunuz.
BU KULLANMA KILAVUZUNU
‹LER‹DEK‹ KULLANIMLAR ‹Ç‹N
SAKLAYINIZ.
Page 4
4
1
11
8
7
6
10
5
4
3
2
9
2
3
12
14
15
13
16
17
fiekil 1/1
fiekil 2/1
fiekil 2/2
fiekil 2/3
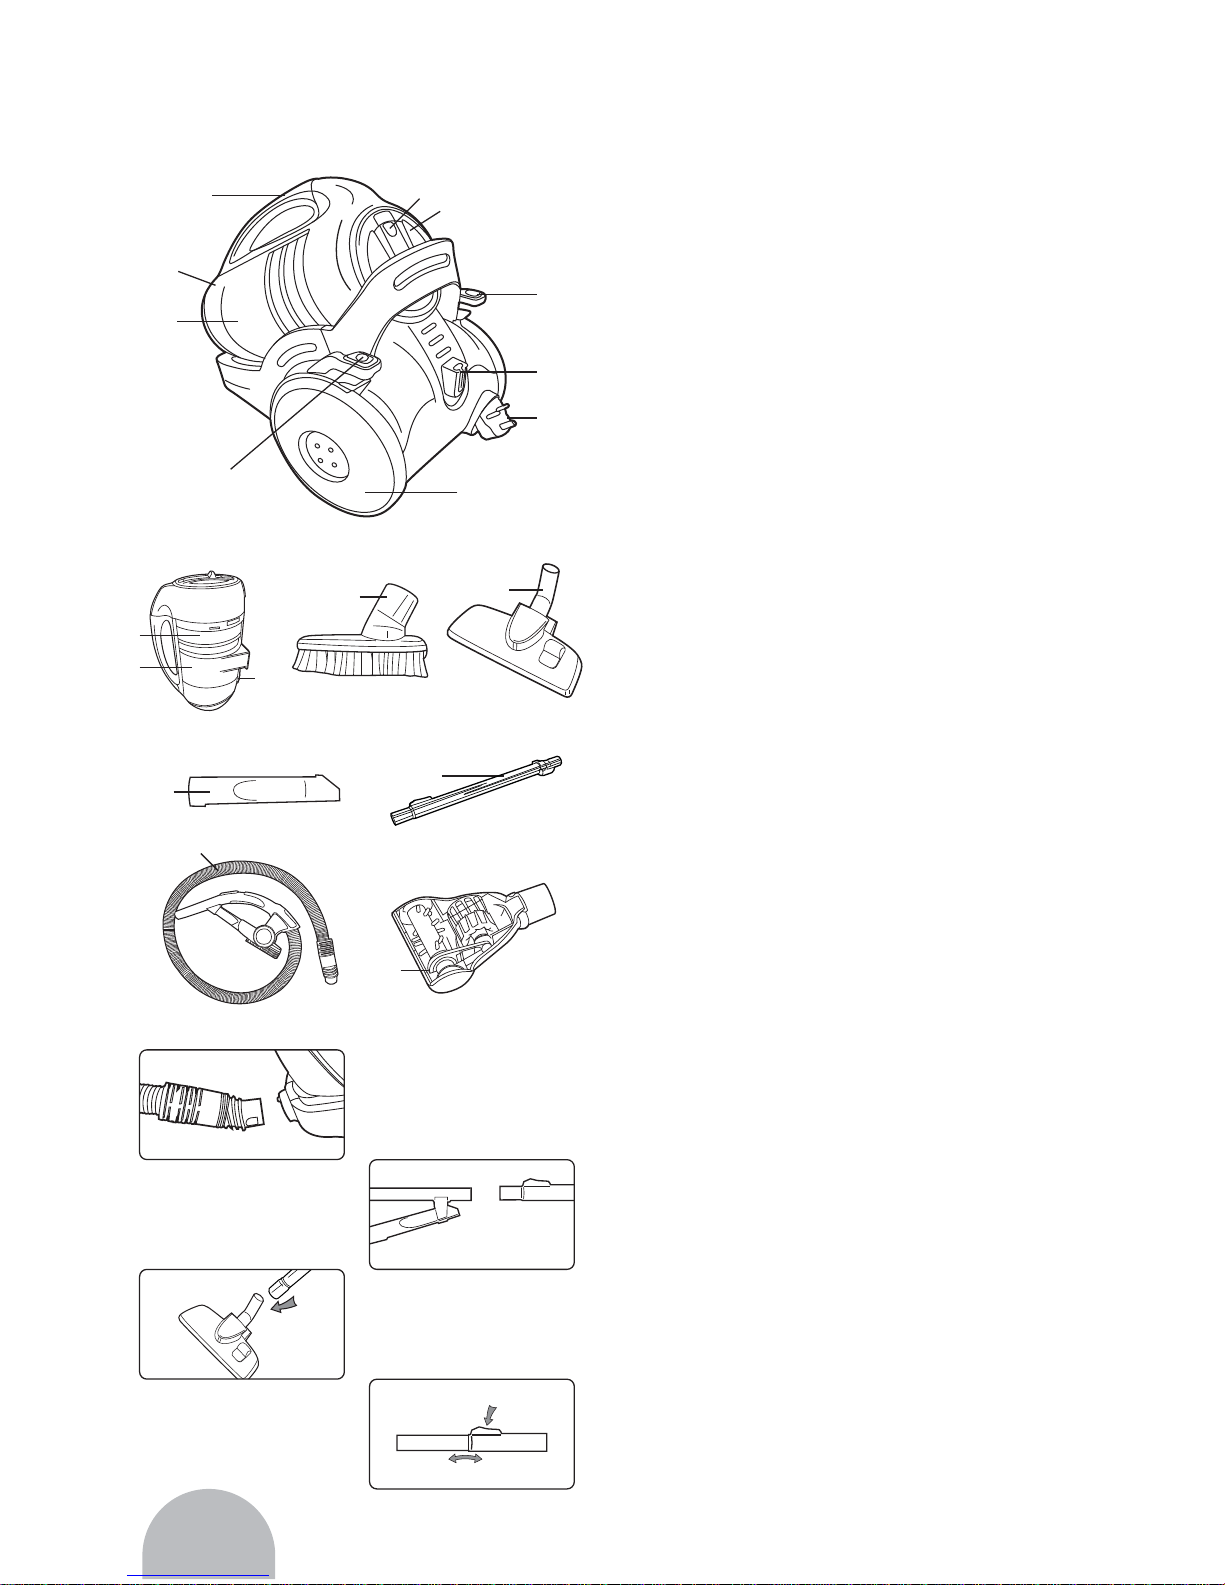
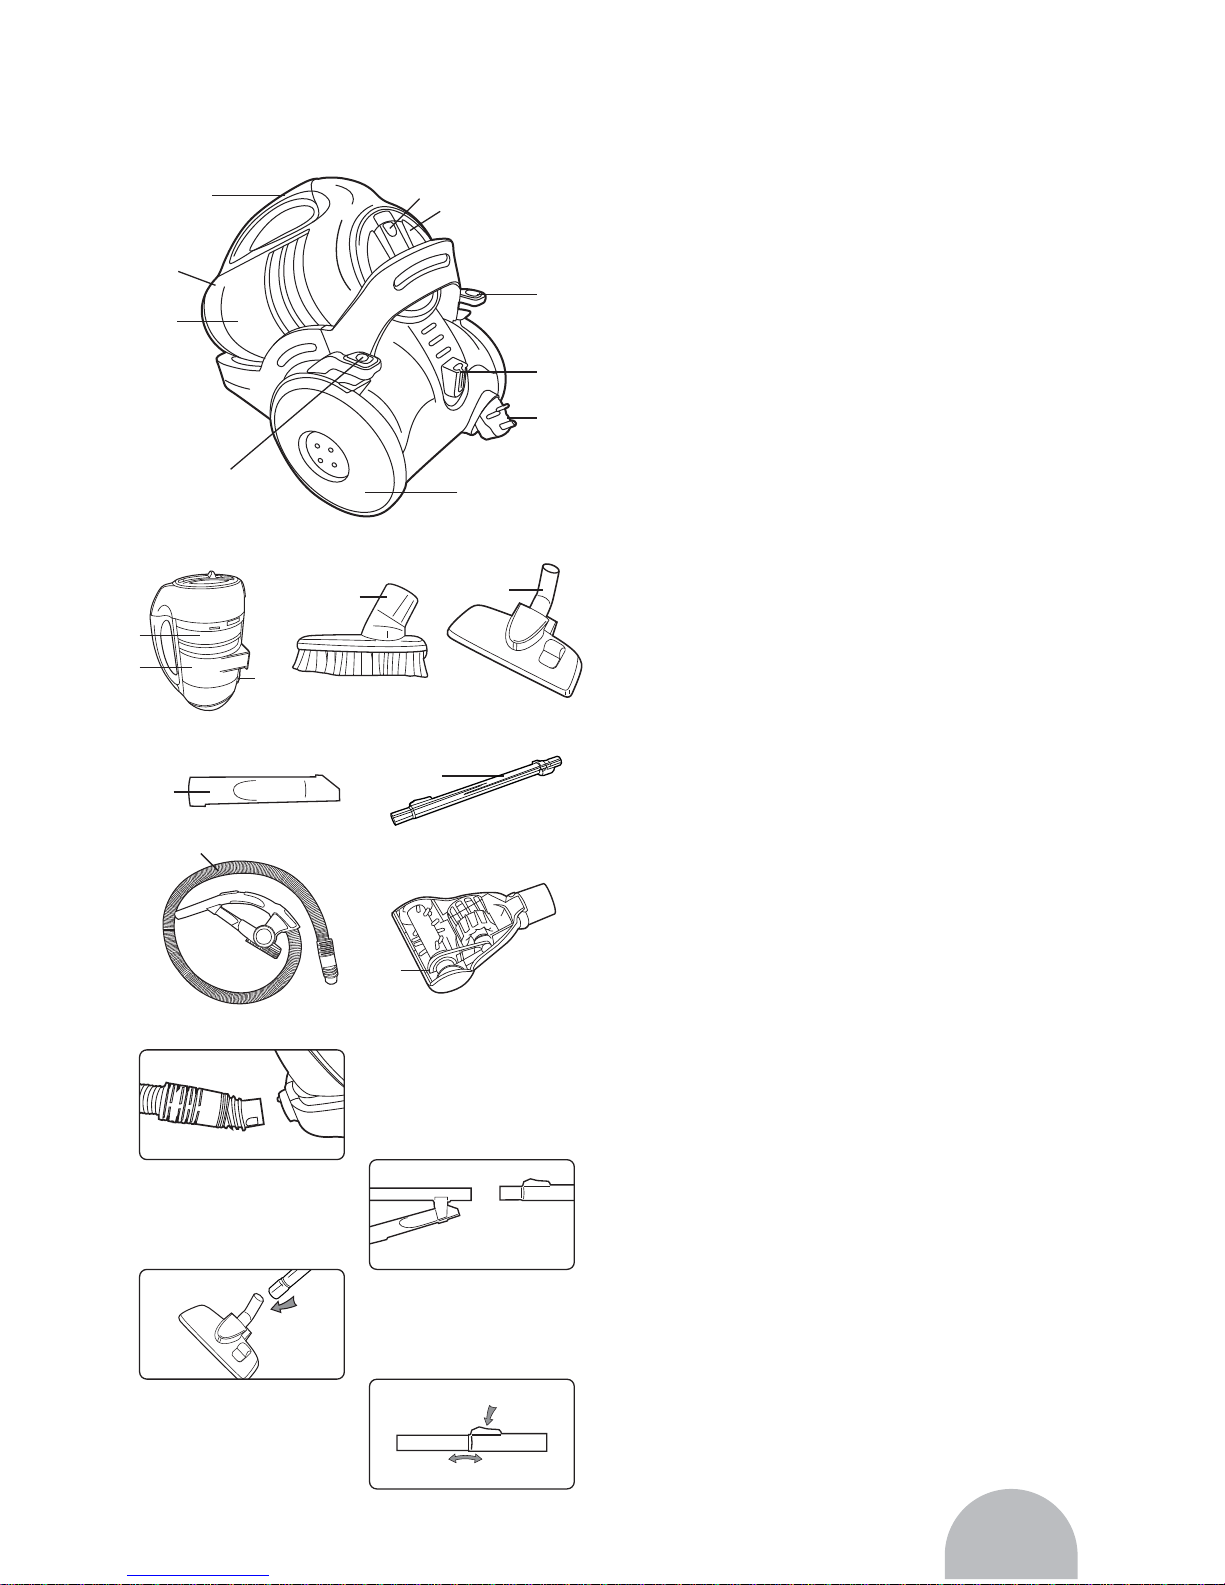
Ürün Bilgileri 1) Açma/Kapama dü¤mesi
2) Toz haznesi
3) Cyclonic separatör
4) Toz haznesi tutma sap›
5) Toz haznesi mandal›
6) Otomatik kablo sar›c› dü¤mesi
7) Park pozisyonu
8) Fiflli kablo
9) Toz haznesi boflaltma dü¤mesi
10) Motor koruma filtresi kapa¤›
11) Teker
12) Birleflik aparat
13) Kenar köfle aparat›
14) Pedall› yer aparat›
15) Teleskopik boru
16) Turbo aparat
17) Vakum hortumu
Teknik Bilgi
Ürün : Cyclonic Elektrik Süpürgesi (toz
torbas›z)
Model : G-MAX
Voltaj : 220 V - 240 V ~50/60 Hz
Güç : 1400 W nom. - 1600 W max.
Toz haznesi : 2.0 litre, y›kanabilir
Filtreler: Motor koruma filtresi, H.E.P.A.
filtre
Kablo uzunlu¤u: yaklafl›k 5.0 m
A¤›rl›k : yaklafl›k 6.0 kg
5.Kullanma Talimatlar›
Vakum borusunun tak›lmas›
1. fiekil 1/1’de belirtildi¤i gibi vakum
hortumunu vakum ç›k›fl›na yerlefltiriniz
ve adaptörü sa¤ yöne çevirerek
kilitleyiniz.
2. Tutma sap›n› (flekil 2/1) teleskopik
vakum borusunun içine do¤ru itiniz.
3. Vakum borusunun (flekil 2/2) di¤er
ucuna f›rçay› yerlefltiriniz.
Page 5
5
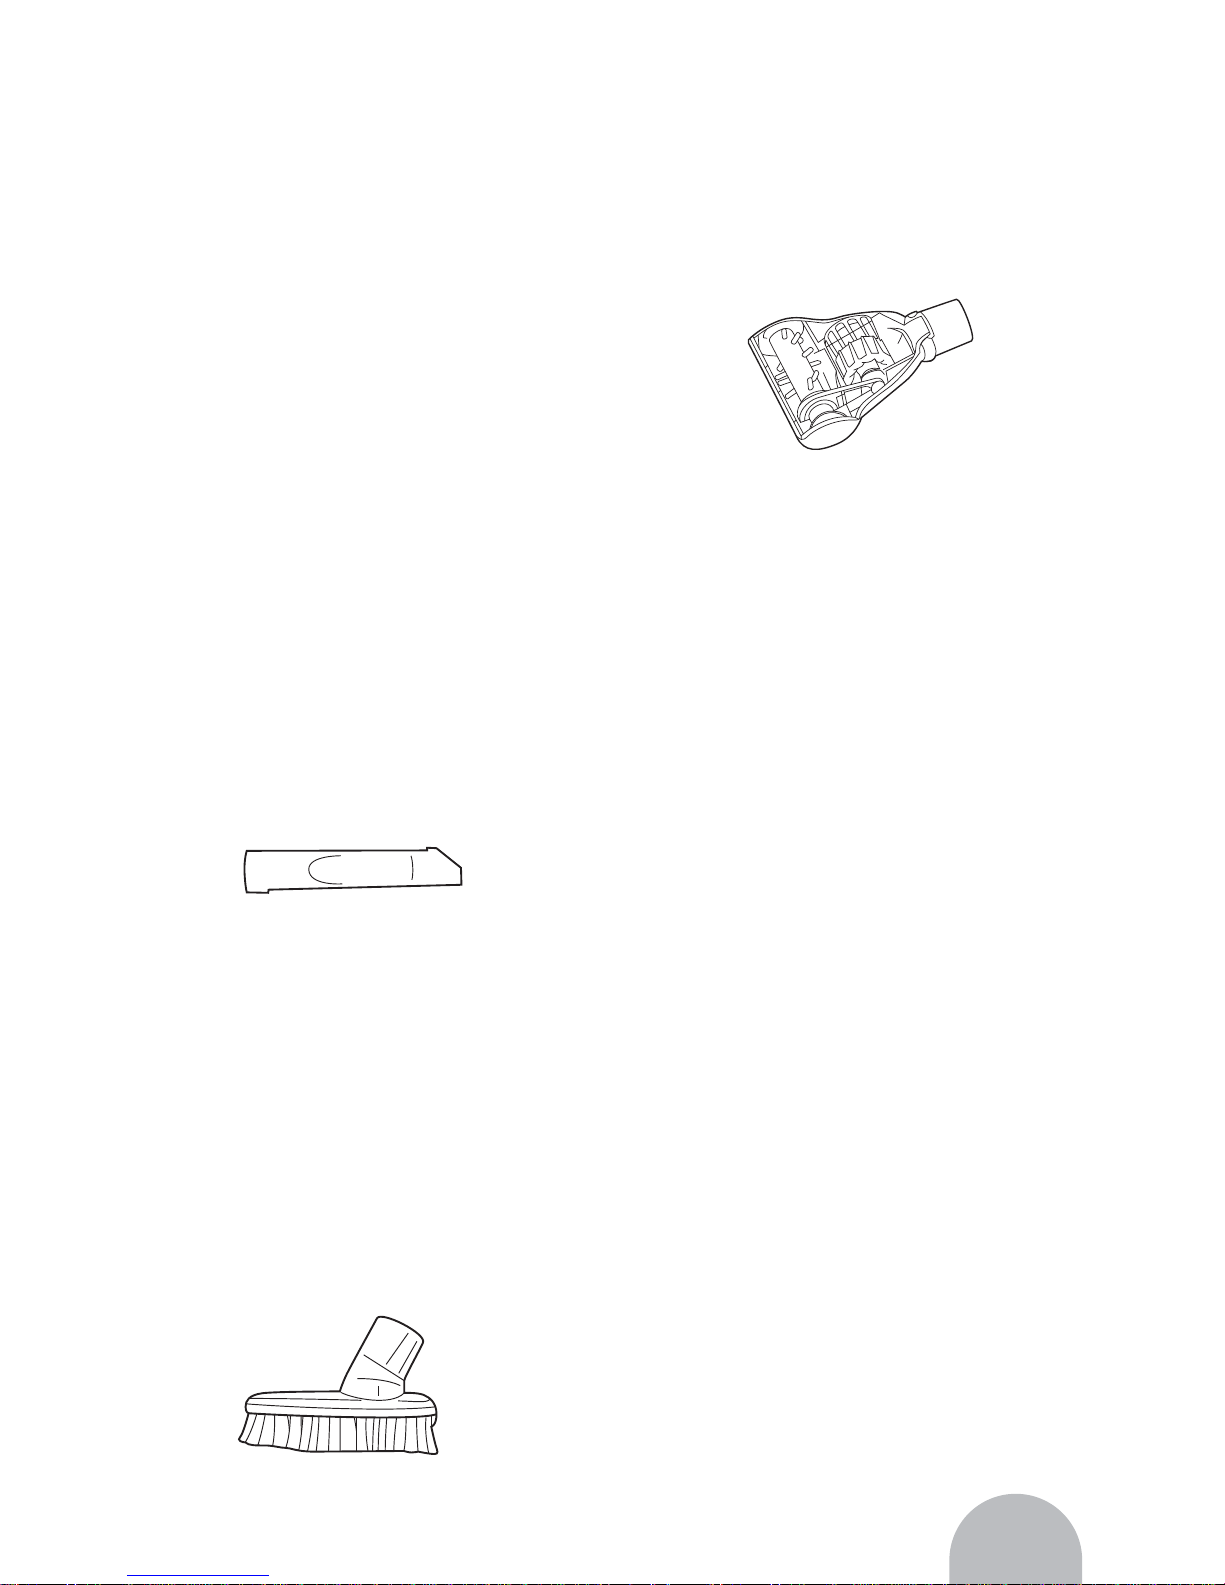
4. Vakum borusunun boyunu ayarlay›n›z,
bunu yapmak için borunun üzerindeki
tuflu (flekil 2 / 3) ileri do¤ru itiniz.
Ard›ndan vakum borusunu istenilen
uzunlu¤a gelinceye kadar çekiniz.
Kilitlemek için vakum borusunu serbest
duruma getiriniz.Bir klik sesi
duyacaks›n›z.
Aksesuarlar›n tak›lmas›:
Yer aparat›n›n yan›nda di¤er
aksesuarlar› da kullanarak elektrik
süpürgenizin kullan›m alan›n›
geniflletebilirsiniz.
Turbo aparat, kenar köfle aparat› ve
birleflik aparat teslimatta aksesuar
olarak da¤›t›lmaktad›r. Aksesuar a¤z›na
tak›labilirler.
• Kenar köfle aparat› ulafl›lmas› zor
yerler için kullan›l›r.
• Birleflik f›rça mobilya f›rças› gibi
kullan›labilir. Koltuklar›n ve hassas
zeminleri (masa üstü, dolap)olan
objeleri temizlemekte kullan›labilir.
• Mobilya f›rças› birleflik aparat› da bu
amaçla kullanabildi¤ini gibi koltuklar›
temizlemekte kullan›labilir.Temiz
yumuflak, çizilmez yüzeylerde (döfleme
mobilyalara) kullan›n›z.
• Turbo f›rça Bu f›rçan›n dönebilen bir
bafll›¤› vard›r ve bu yüzden hal›n›n
derinlemesine temizli¤inde kullan›l›r.
F›rças› hal›n›n k›llar›n›n canl› durmas›n›
sa¤lar.
Not: Turbo f›rça kullan›l›rken gücü
yüksek oldu¤undan yüksek bir ses
ç›kar. Bu normal durumdur.
F›rçan›n monte edilmesi
1. Öncelikle makineyi kapat›n›z ve fifli
prizden çekiniz.
2. Aparat› yerinden ç›kar›n›z.
3. ‹htiyaca göre tutma sap›n›n ya da
teleskopik borunun ucuna istedi¤iniz
f›rça ya da aparat› tak›n›z.
D‹KKAT:
Elektrik süpürgesini f›rça olmadan
kullan›rsan›z, eflyalar›n süpürülmesinde
daha büyük kaza riskleri oluflur.
4. Gösterildi¤i gibi, f›rçan›n aksesuar
girifline istenilenden daha uzun
olmayacak flekilde monte edildi¤inden
emin olunuz.
• Birleflik f›rçay› aksesuar girifline do¤ru
itiniz.
• Kenar köfle aparat›n› aksesuar girifline
do¤ru itiniz ve tutturunuz.
5. Di¤er f›rçalar› güvenli ve çocuklar›n
ulaflamayaca¤› bir yerde muhafaza
ediniz.
Page 6

6
Kullan›m
UYARI:
Elektrik süpürgesinin ve güç kablosunu
her kullan›m öncesi kontrol ediniz.
Hasarl› ürün asla kullan›lmamal›d›r.
D‹KKAT:
Tüm filtrelerin do¤ru tak›lm›fl
oldu¤undan emin oldu¤unuzda elektrik
süpürgesini kullan›n›z. Filtreler hasars›z
ve kuru olmal›d›r. Uyumsuzluk elektrik
süpürgenize zarar verebilir.
1. ‹stedi¤iniz f›rça ya da aparat› tak›n›z.
2. Kabloyu, fifli tutarak, sar› uyar› çizgisi
ç›kana dek çekebilirsiniz.
Uyar›: E¤er k›rm›z› uyar› çizgisi ç›kar
ise kablo geri sar›m dü¤mesini
kullanarak kabloyu tekrar sar› çizgiye
kadar geri sar›n›z. Kablonun k›rm›z›
çizgisinin ç›kmas› elektrik çarpma
tehlikesi oluflturaca¤›ndan zararl›d›r.
3. Elektrik süpürgesini açma/kapama
dü¤mesine basarak aç›n›z.
4. Yer aparat›n›n üzerinde bulunan pedal
sayesinde, aparat› döflemenin cinsine
göre ayarlay›n›z.
• Sert Yüzey laminat yüzeyler, fayanslar,
PVC yüzeyler vb.
• Hal› uzun ve k›sa tüy hal›lar, yol hal›lar›
vb.
5. Süpürmek için,elektrik süpürgesini
arkan›zda olacak flekilde çekiniz.
Döfleme üreticisinin tavsiyelerini dikkate
al›n›z.
NOT:
Perde, vb’in s›k›flmas› halinde vakum
hortumu dirse¤inin üzerinde bulunan
ikinci hava kontrolü sayesinde vakum
gücünü hemen düflürebilirsiniz.
NOT:
Elektrik süpürgesi fazla ›s›nmaya karfl›
korumal›d›r. Fazla ›s›nd›¤›nda
kendili¤inden duracakt›r. (çok ›s›nmas›
ya da toz torbas›n›n dolu olmas›
durumunda) Bu durumda makineyi
kapat›n›z ve fifli prizden çekiniz.
Is›nmaya yol açan etkeni ortadan
kald›r›n›z ve çal›flt›rmadan önce 45
dakika so¤umas› için bekleyiniz.
Makinenin kapat›lmas› ve kablonun
toplanmas›:
1. Açma kapama dü¤mesini kullanarak
elektrik süpürgesini kapat›n›z ve fifli
prizden çekiniz.
2. Fifli elinizde s›k›ca tutunuz
Uyar›: Kablo makinenin içine sar›l›rken
sizi yan›lt›p etrafa zarar verebilir. Bu
nedenle kablo sar›l›rken fifli elinizde
s›k›ca tutunuz.
3. Makinenin üzerindeki fifl toplama
dü¤mesine basarak kabloyu sar›n.
Kablo sar›l›rken fifli tuttu¤unuz elinizle
de kabloya rehberlik edin.
Saklama s›ras›nda ya da çal›flma
aras›nda yer aparat›n› sabitlemek için
asma kancas›n› kullan›n›z. Yer
aparat›n›n üzerindeki kancay› park
kancas›na asarak sabit durmas›n›
sa¤lay›n›z.
UYARI:
Çal›flma alan›n› terk edecekseniz,
makineyi kapat›n›z.
Page 7
7
D‹KKAT
Makineyi do¤rudan ›s› kaynaklar›n›n
önüne koymay›n›z. Is› kaynaklar› ve
direk günefl ›fl›¤›na maruz kalmas›
makinenize zarar verebilir. Makinenizi
uzun süre kullanmayacaksan›z filtrenin
ve gerekiyorsa toz torbas›n›n temizli¤ini
yaparak çocuklar›n ulaflamayacaklar›
bir yere kald›r›n›z.
Toz Haznesinin Boflalt›lmas›
D‹KKAT: Toz haznesini boflaltmadan
önce, cihaz› kapat›n›z. Bu flekilde
tozlar›n cihaz›n›z› bozmas›n›
önleyebilirsiniz. Toz haznesini
doldu¤unda ya da çekme gücü
azald›¤›nda temizleyiniz.
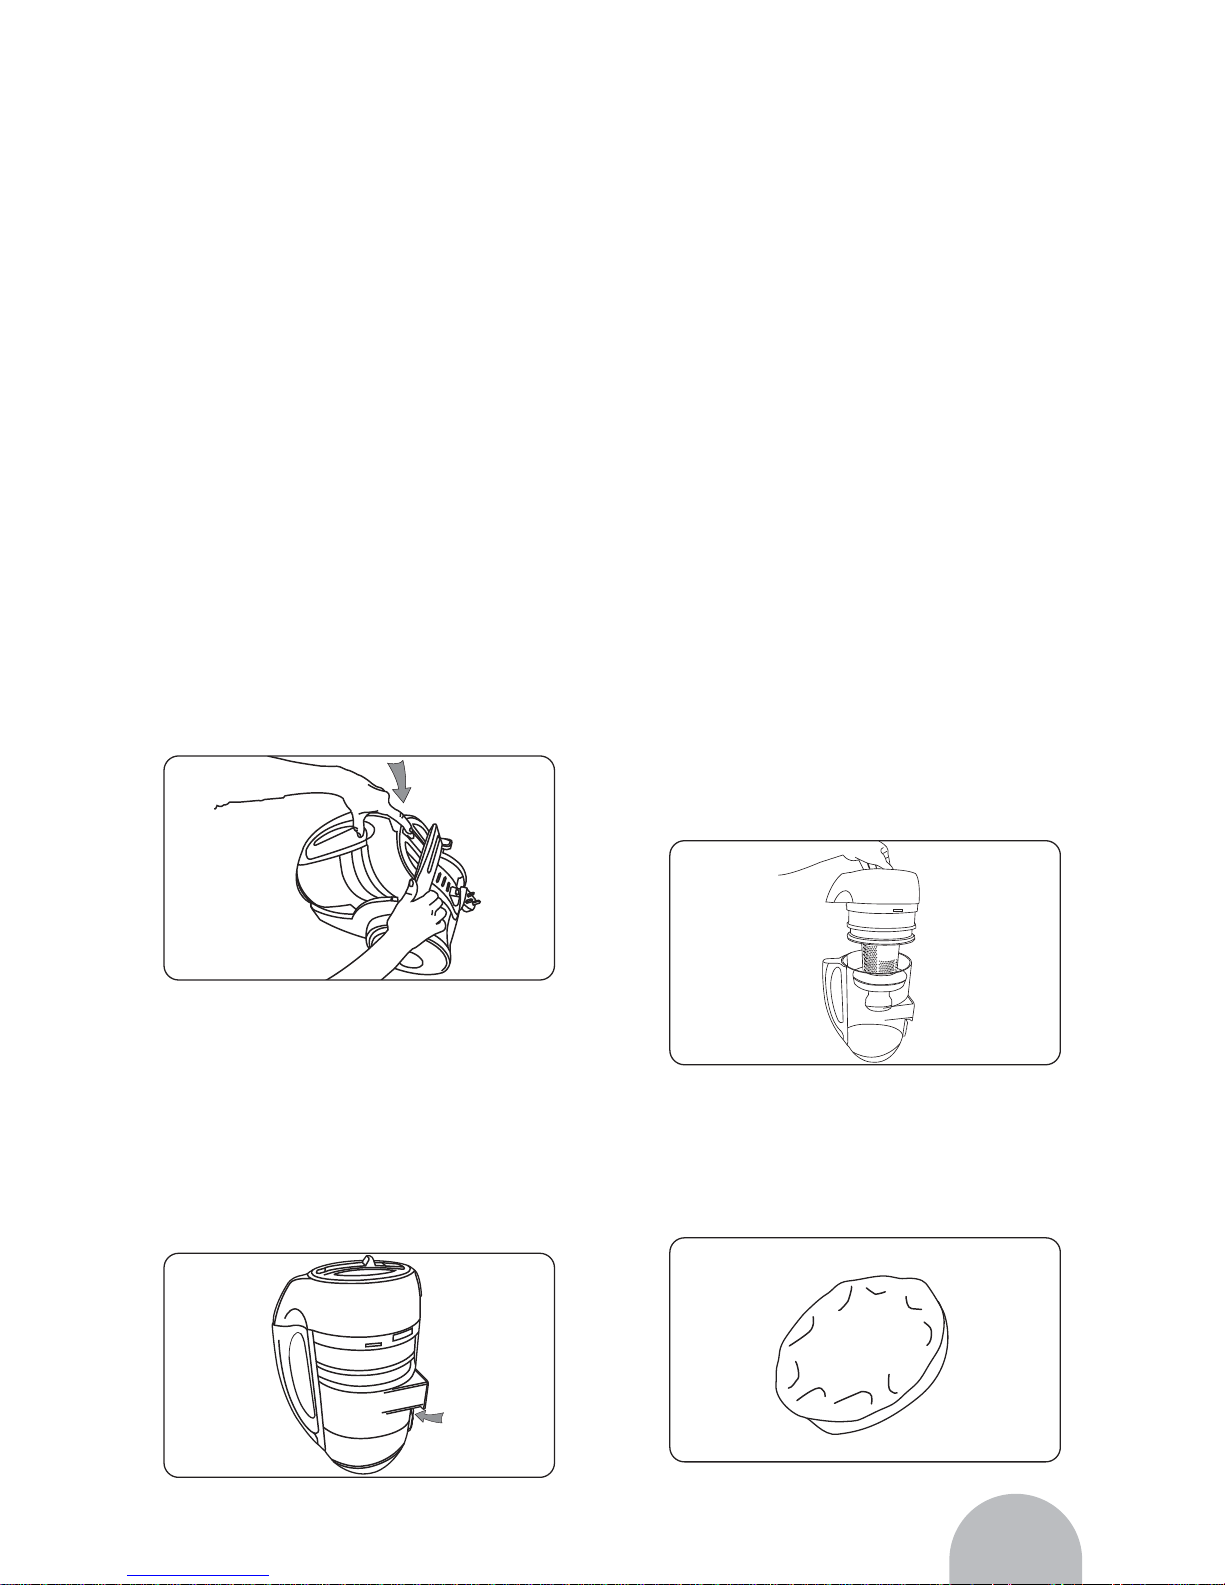
1. Toz haznesini dü¤mesine basarak
serbest b›rak›n›z. (flekil 3/1)
2. Haznesini elektrik süpürgesinden
ç›kar›n›z.
3. Tozu çöpe boflaltmak için hazneyi çöpe
yak›n tutunuz.
4. Açma dü¤mesine (flekil 3/2) bas›n›z.
Ünite aç›l›r ve çöpler çöp kutusuna
geçer.
5. Kalan toz için hazneyi sarsarak
boflalt›n›z.
6. Tozu boflaltt›ktan sonra üniteyi kapat›n›z.
7.Hazneyi elektrik süpürgesine
yerlefltiriniz. Geçme a¤z›ndaki
dü¤meye do¤ru duyulabilir bir ses
gelene kadar bast›r›n›z.
NOT:
Hazneyi kolay yerlefltirmek için
dü¤meye bas›l› flekilde tutabilirsiniz.
Yerine yerlefltirmek için sert bast›rman›z
gerekebilir.
8. Haznenin tam olarak yerleflti¤inden
emin olunuz.
Filtreler
Elektrik süpürgesinde bulunan filtreler
flunlard›r:
• Ay›rma ünitesinin temizleme ekran› (flekil
3/3): Toz haznesindeki havay› temizler.
• Koruyucu motor filtresi (flekil 3/4): Toz
partiküllerinin motora ulaflmas›n›
engeller.
fiekil 3/1
fiekil 3/3
fiekil 3/2
fiekil 3/4
Page 8

8
• H.E.P.A. filtre (flekil 3/5): Havadaki toz
partiküllerini temizler. (en geç 6 ayda
bir de¤ifltirilir.)
• Filtreler bir süre sonra bloke olabilir ve
bu yüzden vakum gücü düflürülebilir.
• Filtrelerinizin zarar görmesi halinde
hemen de¤ifltiriniz.
Filtrelerin Temizlenmesi
• Makineyi kapat›n›z.
• Toz haznesini kald›r›n›z ve temizleyiniz.
• Ay›rma ünitesini saat yönünün tersine
çevirerek ç›kar›n›z. (flekil 4/1)
• Çöpe hafifçe sallayarak boflalt›n›z.
Hafif ›slak bir bez ile hazneyi ve filtreyi
siliniz ve kurutunuz. Daha sonra ay›rma
ünitesini saat yönününde çevirerek
hazneyle birlefltiriniz. (flekil 4/2)
Motor Koruma Filtresinin
Temizlenmesi
1. Cihaz› kapat›n›z.
2. Toz haznesini ç›kart›n›z.
3. Filtreyi kapa¤›ndan tutarak gevfletiniz
(flekil 4/3) ve yerinden ç›kar›n›z.
4. Motor filtresi kapa¤›n› tutma sap› ile
birlikte tutarak ç›kar›n›z.
5. Motor koruma filtresini tutaca¤› ile birlikte
çöp kutusunun üzerine geldikten sonra
ikiye ay›r›n›z ve sallayarak temizleyiniz.
Derin temizleme için çöp kutusunun
üzerinde silkeleyiniz.
D‹KKAT:
Motor koruma filtresi bulafl›k
makinesinde y›kanmaya uygun de¤ildir.
NOT:
Filtre çok kirliyse dufl bafll›¤›n›n alt›na
tutarak suyla y›kayabilirsiniz. Bu ifllem
için kesinlikle f›rça kullanmay›n›z.
Daha sonra filtreyi korumaya b›rak›n›z.
(oda s›cakl›¤›nda yaklafl›k 24 saat).
Tamamen kurudu¤unda tekrar
kullan›n›z. Kir ç›kmad›ysa, yeni bir motor
koruma filtresi yerlefltiriniz.
6. Kuru motor koruma filtresini yerine
yerlefltiriniz.
7. Motor koruma filtresini yuvas›na
yerlefltiriniz.
8. Filtre kapa¤›n› asarak yerine tam olarak
fiekil 4/1
fiekil 3/5
fiekil 4/2
fiekil 4/3
Page 9

9
oturtunuz. Daha sonra yerine
oturdu¤una dair klik sesi duyacaks›n›z.
NOT:
Toz haznesinin yerine yerleflmesi için
filtre kapa¤› tam olarak yerleflmelidir.
E¤er kapak tam olarak yerleflmezse
bast›rmak yeterli olmayacakt›r.
9. Toz haznesini elektrik süpürgesine
yerlefltiriniz.Yerleflti¤ine dair klik sesi
gelinceye dek toz haznesine bast›r›n›z.
10.Toz haznesinin tamamen yerleflti¤inden
emin olunuz.
NOT:
Biraz kuvvetli itmek gerekebilir. Toz
haznesini yerlefltirirken ifllemi
kolaylaflt›rmak için boflaltma dü¤mesini
bas›l› tutunuz.
H.E.P.A Filtrenin Temizlenmesi
1. Cihaz› açma/kapama dü¤mesine
basarak kapat›n›z.
2. Cihaz›n bütün aksesuarlar›n› ç›kart›n›z.
3. Cihaz› ters çeviriniz.
4. Cihaz›n alt gövdesinde bulunan
H.E.P.A. filtre kapa¤›n› üzerinde
bulunan mandala basarak kendinize
do¤ru çekiniz.
5. Hijyenik filtreyi ç›kar›n›z. (flekil 4/4)
6. H.E.P.A. filtreyi çok kirli ise çöp
tenekesinin üzerinde silkeleyiniz,
gerekirse akan suyun alt›na tutarak
y›kayabilirsiniz. Bu durumda filtreyi en
az 24 saat kurutman›z gerekiyor.
7. Kuru filtreyi yerine yerlefltiriniz ve filtre
kapa¤›n› kapat›n›z.
NOT:
H.E.P.A filtreyi sadece bir kez y›kayarak
temizlemenizi tavsiye ediyoruz. Fieltreyi
en geç 6 ay sonra de¤ifltirmenizi tavsiye
ediyoruz.
NOT:
Yerine yerlefltirmek biraz zor olabilir.
bast›rarak yerlefltiriniz. Yerine tam
oturdu¤undan emin olunuz. Aksi
takdirde filtre kolayl›kla yerinden
ç›kabilir.
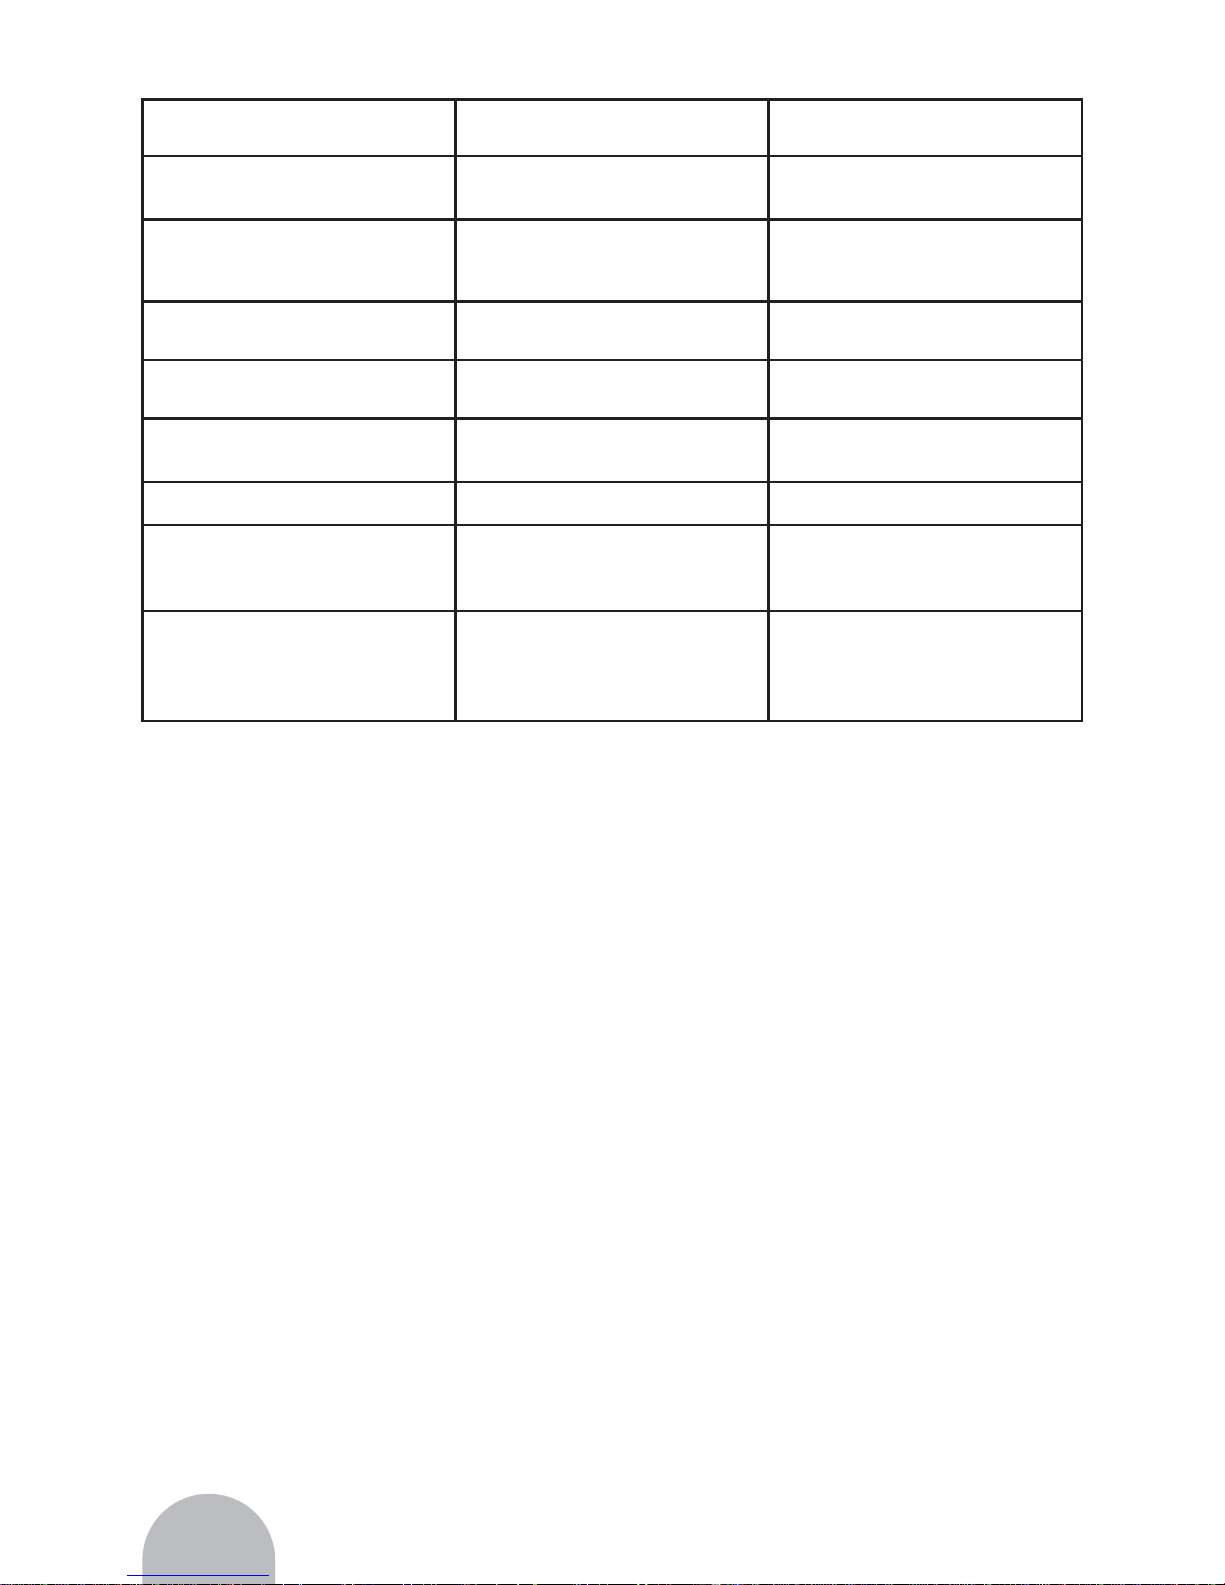
Muhtemel Sorunlar›n Giderilmesi
Ürünü Fakir Yetkili Servisine
göndermeden önce, sorunlar›
çözebilmek için, afla¤›daki tabloyu
kullanabilirsiniz.
UYARI
Sorunu çözmeye bafllamadan önce,
cihaz› kapat›n›z ve ana fiflini çekiniz.
Kesinlikle hatal› ürünü kullanmay›n›z.
fiekil 4/4
Page 10
10
Objeleri yerinden alarak
t›kanmay› gideriniz. Gerekirse
bunun için uzun bir tahta
kullanabilirsiniz.
ÇÖZÜMSORUN MUHTEMEL NEDEN
Makine çal›flmad›¤›nda
Fifli tak›lmam›flt›r ya da makine
çal›flt›r›lmam›flt›r.
Fifli tak›n›z ya da makineyi
çal›flt›r›n›z.
Soketten geçen ak›m
bulunmamaktad›r.
Elektrik süpürgesini ak›m
geçti¤inden emin oldu¤unuz
baflka bir sokete ba¤lay›n›z.
Kablo zarar görmüfltür. Fakir Yetkili Servisinden
kabloyu de¤ifltiriniz.
Makine tozlar› çekmedi¤inde
Toz haznesi doludur ya da
bloke olmufltur.
Toz haznesini boflalt›n›z/
temizleyiniz.
Seçilen f›rça yüzeye uygun
de¤ildir.
F›rçan›z› yüzeye uygun olan
ile de¤ifltiriniz.
Filtre kirlenmifltir.
‹lgili filtreyi temizleyiniz.
Hortum, vakum borusu ya da
aparat t›kanm›flt›r.
T›kanmay› gideriniz. Gerekirse
bunun için uzun bir tahta
kullanabilirsiniz.
Makine çal›flma esnas›nda
fazla ses yap›yorsa
Çekilen objeler hava yolunu
t›k›yor olabilir.
Temizleme
Uyar›:Elektrik süpürgesini
temizlemeden önce, cihaz› kapat›n›z
ve ana fiflini çekiniz
Gövdenin Temizlenmesi: Temizlemek
için yaln›zca hafif nemli yumuflak bir
bez kullan›n›z.
Dikkat:
Gövdeye zarar verebilecek herhangi
bir temizleme arac›, alkol gibi temizleme
maddesi kullanmay›n›z.
Filtrelerin Temizlenmesi
Filtreleri temizlemek için “Filtreler”
bölümüne bakabilirsiniz.
At›klar›n At›lmas›
Ürün için kullan›lan filtreler çevreyle
uyumlu maddelerden yap›lm›flt›r ve eve
ait çöplerle at›labilir.
Çal›flamaz durumdaki ürünlerinizin
garanti süresi geçmifl ise, elektrik ile
ba¤lant›s›n› kesiniz. Cihaz›n imha
edilmesi çevresel hükümlere göre
ülkenizde uygulanabilir.Elektrikli alet
at›klar› ev çöpünde imha edilemez,
imha için ulusal kanunun belirledi¤i
kurallar› uygulay›n›z.
Page 11

11
Introduction
Thank you for purchasing Fakir Kastell dry vacuum cleaner which has been designed
and manufactured to give you many years of trouble-free service.
You may already be familiar with using a similar product, but do please take time
to read these instructions - they have been written to ensure you get the very best
from your purchase.
Safety is Important
To ensure your safety and the safety of others, please ensure you read the Safety
Instructions before you operate this product. Keep this information in a safe place
for future reference.
Page 12

12
Important Safeguards
When using an electric appliance, basic
precautions should always be followed,
including the following:
To reduce the risk of fire, electric shock,
or injury:
• Read this operating manual through
completely before working with the
appliance. Keep the operating manual
safe. If you pass the appliance on to a
third party, give them the operating
manual as well.
• Ensure that, the apparatus and the
accessories of the vacuum cleaner are
complete when you first open the
giftbox. If there are defective parts,
apply to an authorized Fakir Service.
• Keep the packaging away from babies
and children in order to avoid the risk
of suffocation.
• If there is any damage on the vacuum
cleaner or power cord or the plug, do
not use the vacuum cleaner. Apply to
an authorized Fakir Service.
• Don’t use the vacuum cleaner to suck
up inflammables and glass or metal
splinters or the clothes. This appliance
is not suitable to be used to pick up
substances constituting a health
hazard.
• If the appliance has breakdown, it may
only be repaired by the maintenance
center. Never dismantle it by yourself
blindly.
• Don’t suck up surface covered with
plastic, cement, stone dust or flour.
• The appliance is operated with
electrical power which means there is
in principle a risk of electric shock so
that do not touch the plug with wet
hands.
• If you want to pull the plug out of the
socket then always pull directly on the
plug. Never pull on the cable as this
could damage it.
• Make sure that the power cable is not
bent, caught or run over, and that it
does not come into contact with heat
sources or sharp edges.
• Do not push objects into the openings
of the appliance while it is running. The
appliance could overheat.
• Do not use in the open-air. There is a
risk of the appliance being destroyed
by rain and dirt.
• Never immerse the appliance in water
or other fluids and keep it away from
rain and moisture.
• Only use an extension cable that is
designed for the power requirement of
the appliance.
• Never leave the appliance unattended,
and use it with the greatest of care if
children or persons who cannot assess
the risks are nearby.
• Unplug the unit, during connecting
accessories, cleaning, repairing or
servicing the unit.
• Only use the vacuum cleaner if all filters
are correctly in place and once you
have ensured that no openings are
blocked The filters must be intact and
dry. Non-compliance can damage the
cylinder vacuum cleaner.
• If the power cord or the plug of the
appliance is broken or damaged, do
not use the appliance. Apply to nearest
authorized Fakir Service.
KEEP THIS MANUAL FOR FUTURE
REFERENCES.
Page 13
13
1
11
8
7
6
10
5
4
3
2
9
2
3
12
14
15
13
16
17
Fig. 1/1
Fig. 2/1
Fig. 2/2
Fig. 2/3
Product Specification 1 On/off button
2 Dirt container
3 Cyclone separator
4 Dirt container & carry handle
5 Dirt bin release button
6 Auto cord rewind
7 Floor tool parking slot
8 Plug
9 Dirt bin quick release button
10 Pre-motor filter cover
11 Wheel
Accessories:
12 2-in-1 tool
13 Crevice tool
14 Combination floor head
15 Telescopic tube
16 TurboTool
17 Hose
Technical Specifications
Type of appliance : Cyclonic vacuum
cleaner (bagless)
Model : G-MAX
Voltage : 220 V - 240 V ~ 50/60 Hz
Output : 1400 W nom. - 1600 W max.
Dust container : 2.0 litre, washable
Filters: Protective motor filter, H.E.P.A
filter
Mains cable length : approx. 5.0 m
Weight : approx. 6.0 kg
Operating Instructions
Mounting suction hose
1. Plug the suction hose adapter (Fig. 1/1)
into the suction hose receiver and lock
the adapter by turning it clockwise to
the stop point.
2. Push the handle (Fig. 2/1) into the upper
end of the telescopic tube.
3. Push the floor nozzle (Fig. 2/2) onto the
lower end of the telescopic tube.
Page 14
14
4. Adjust the length of the telescopic tube.
To do this, press the telescopic
tubelock forwards (Fig. 2/3). Then pull
the telescopic tube by the handle to
the desired length. To lock it, release
the telescopic tube lock while you pull.
You will hear an audible click.
Mounting the accessories
Alongside the floor nozzle just installed,
you can expand the range of functions
of your cylinder vacuum cleaner with
other nozzles.
The turbo brush, crevice nozzle and
the 2-in-1
combi-nozzle are included as
accessories in the scope of delivery.
They can be secured to the accessories
Mount.
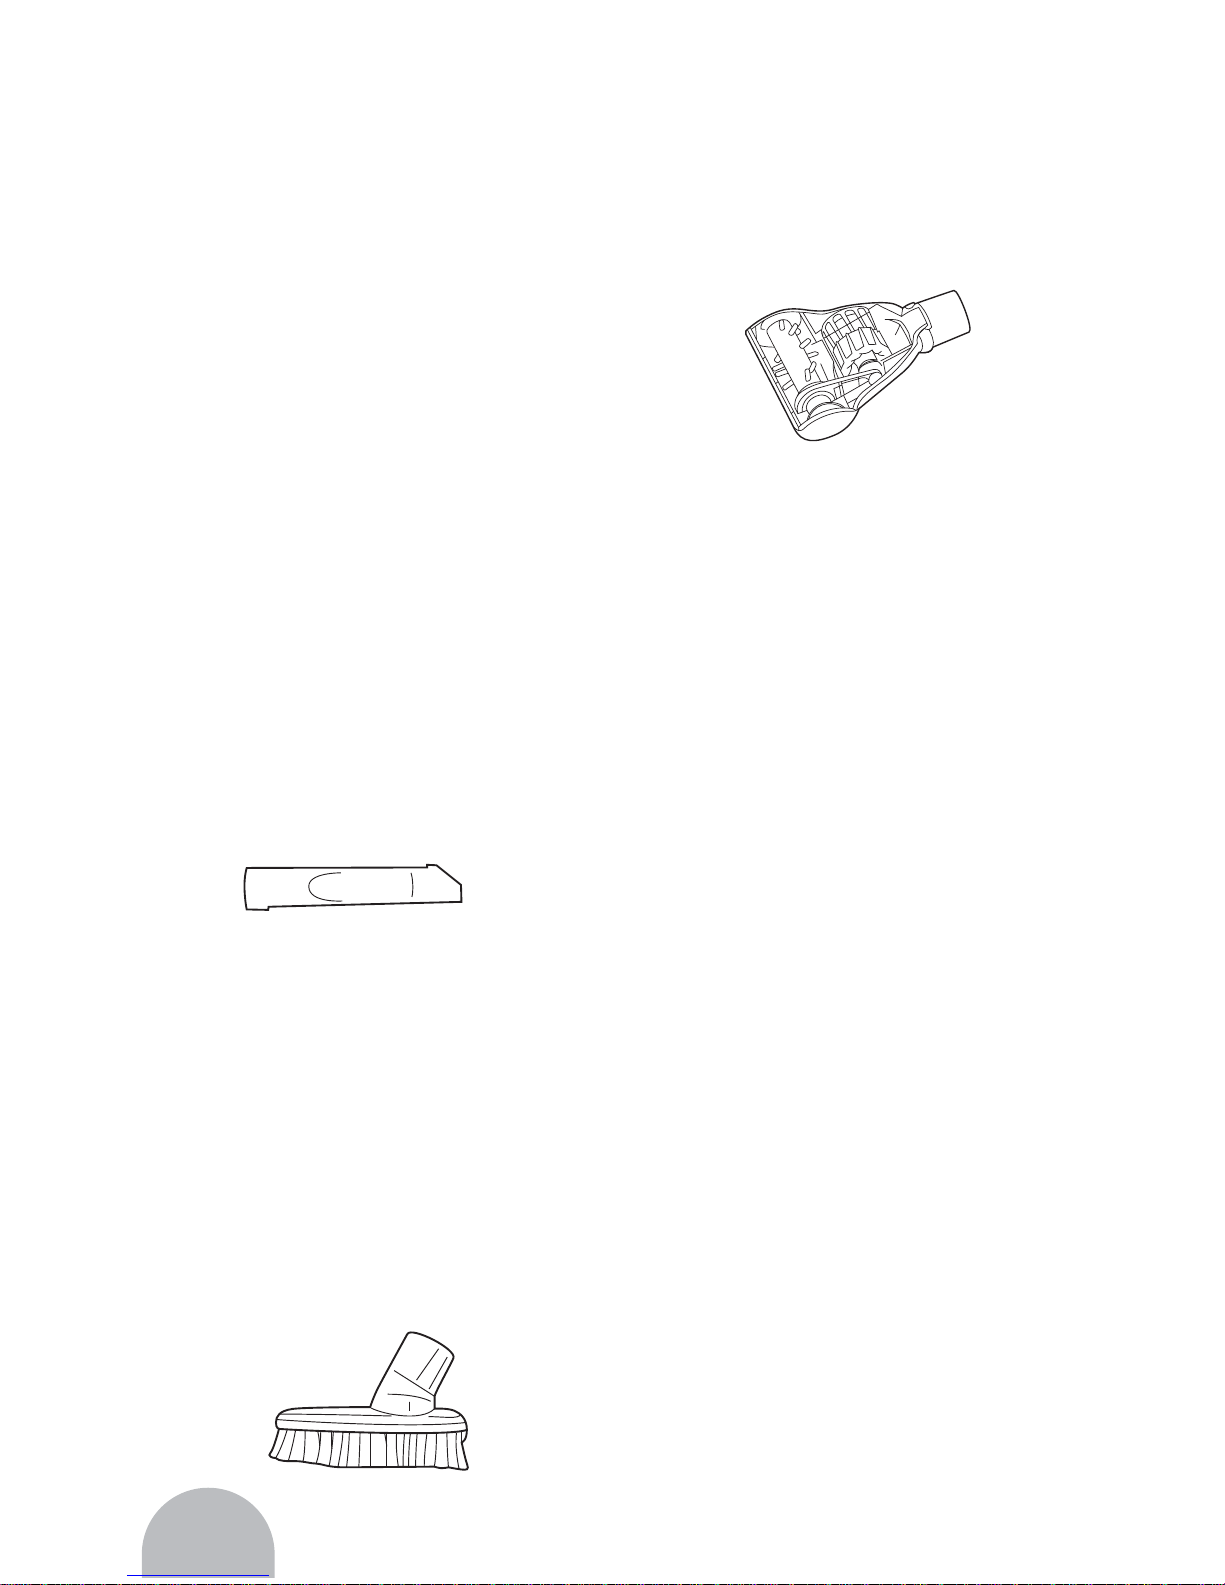
• Crevice nozzle Use this to vacuum
dust from hard to reach places.
• 2-in-1 combi-nozzle to be used as:
Furniture brush Use this to vacuum
dust off objects that have sensitive
surfaces (e. g. cupboards, tables).
• Upholstery nozzle By simply pushing
off the brush attachment you can make
an upholstery brush from the 2-in-1
combi-nozzle.Use this to clean soft,
scratchresistantsurfaces (e.g.
upholstered furniture).
• Turbo brush This has a rotating brush
head and is therefore best suited for
deep-cleaning carpets. Brushing also
causes the carpet pile to straighten up.
NOTE: When using the turbo brush, a
loud noise can occur as a result of the
high speed of the brush. This is normal.
Mounting the nozzle
1. Switch the appliance off and pull the
plug out of the socket.
2. Remove the nozzle from the telescopic
tube.
3. When required, push the desired nozzle
onto the lower end of the telescopic
tube or the handle.
ATTENTION:
If you use the cylinder vacuum cleaner
without an attached nozzle, there is a
greater risk of accidently vacuuming
up objects.
4. As illustrated, secure the nozzles no
longer required onto the accessories
mount, as far as this is possible.
• Push the 2-in-1 combi-nozzle into the
accessories mount .
• Push the crevice nozzle onto the
accessories mount and attach it so it
clicks audibly and noticeably into
place.
5. Keep the other nozzles safe and
inaccessible to children.
Page 15

15
Operating the Unit
WARNING:
Check the cylinder vacuum cleaner
and the power cable before each use.
A damaged appliance must never be
used.
ATTENTION:
Only use the cylinder vacuum cleaner
if all filters are correctly in place and
once you have ensured that no
openings are blocked The filters must
be intact and dry. Non-compliance can
damage the cylinder vacuum cleaner.
1. Push on the desired nozzle
2. Remove the cable, by holding the plug,
until the yellow mark is reached.
Warning: If the red mark is visible, use
the cable retract button to draw in the
cable again up to the yellow mark.
Otherwise the cable can break off.
There is a risk of electric shock.
3. Switch on the cylinder vacuum cleaner
using the on/off switch.
4. Adjust the carpet/hard floor switch
depending on the type of flooring:
• Hard floor Laminate flooring, tiles, PVC
flooring, etc.
• Carpet Long and short pile carpets,
runners, etc.
5. To vacuum, pull the cylinder vacuum
cleaner behind you like a sledge.
Observe the recommendations of the
flooring manufacturer.
NOTE:
You can quickly reduce the suction
power with the secondary air controller,
e. g. to release curtains that have been
sucked in.
NOTE:
The cylinder vacuum cleaner has an
overheating protection device. It will
switch off automatically if overheated
(e. g. due to blocked nozzles or overfull
dust container). If this happens, then
turn off the appliance and remove the
plug. Remove the cause of overheating.
Wait approx. 45 min. You can use the
cylinder vacuum cleaner again once it
has cooled down.
Switching off the unit and retracting
the power cable
1. Switch off the cylinder vacuum cleaner
using the on/off switch and pull the
plug out of the socket.
2. Take the plug in your hand and hold it
firmly.
Warning: The power cable can whip
around when being pulled in, it can
also trip you or somebody else up or
knock down objects.
3. Press the cable retract button to pull
in the power cable. Guide the last part
with the plug by hand. For storage or
during work breaks, you can use the
parking hook mount to hook the parking
hook onto the floor nozzle.
WARNING:
If you leave your work area, switch off
the appliance.
Page 16
16
ATTENTION:
Never position the appliance directly
against heat sources (e. g. heating,
oven). Avoid direct sunlight. Heat can
damage the appliance. If you want to
store the appliance for a longer period
of time, empty the dustcontainer and
clean it as well as the filters. Store the
appliance in a cool, dry room,
inaccessible to children.
Emptying the dust container
ATTENTION: Before you empty the
dust container, switch off the appliance.
This is how you will prevent dust from
destroying the appliance. Empty the
dust container at the latest when the
sucked in quantity of dirt in the dust
container is full or the suction power
has dropped.
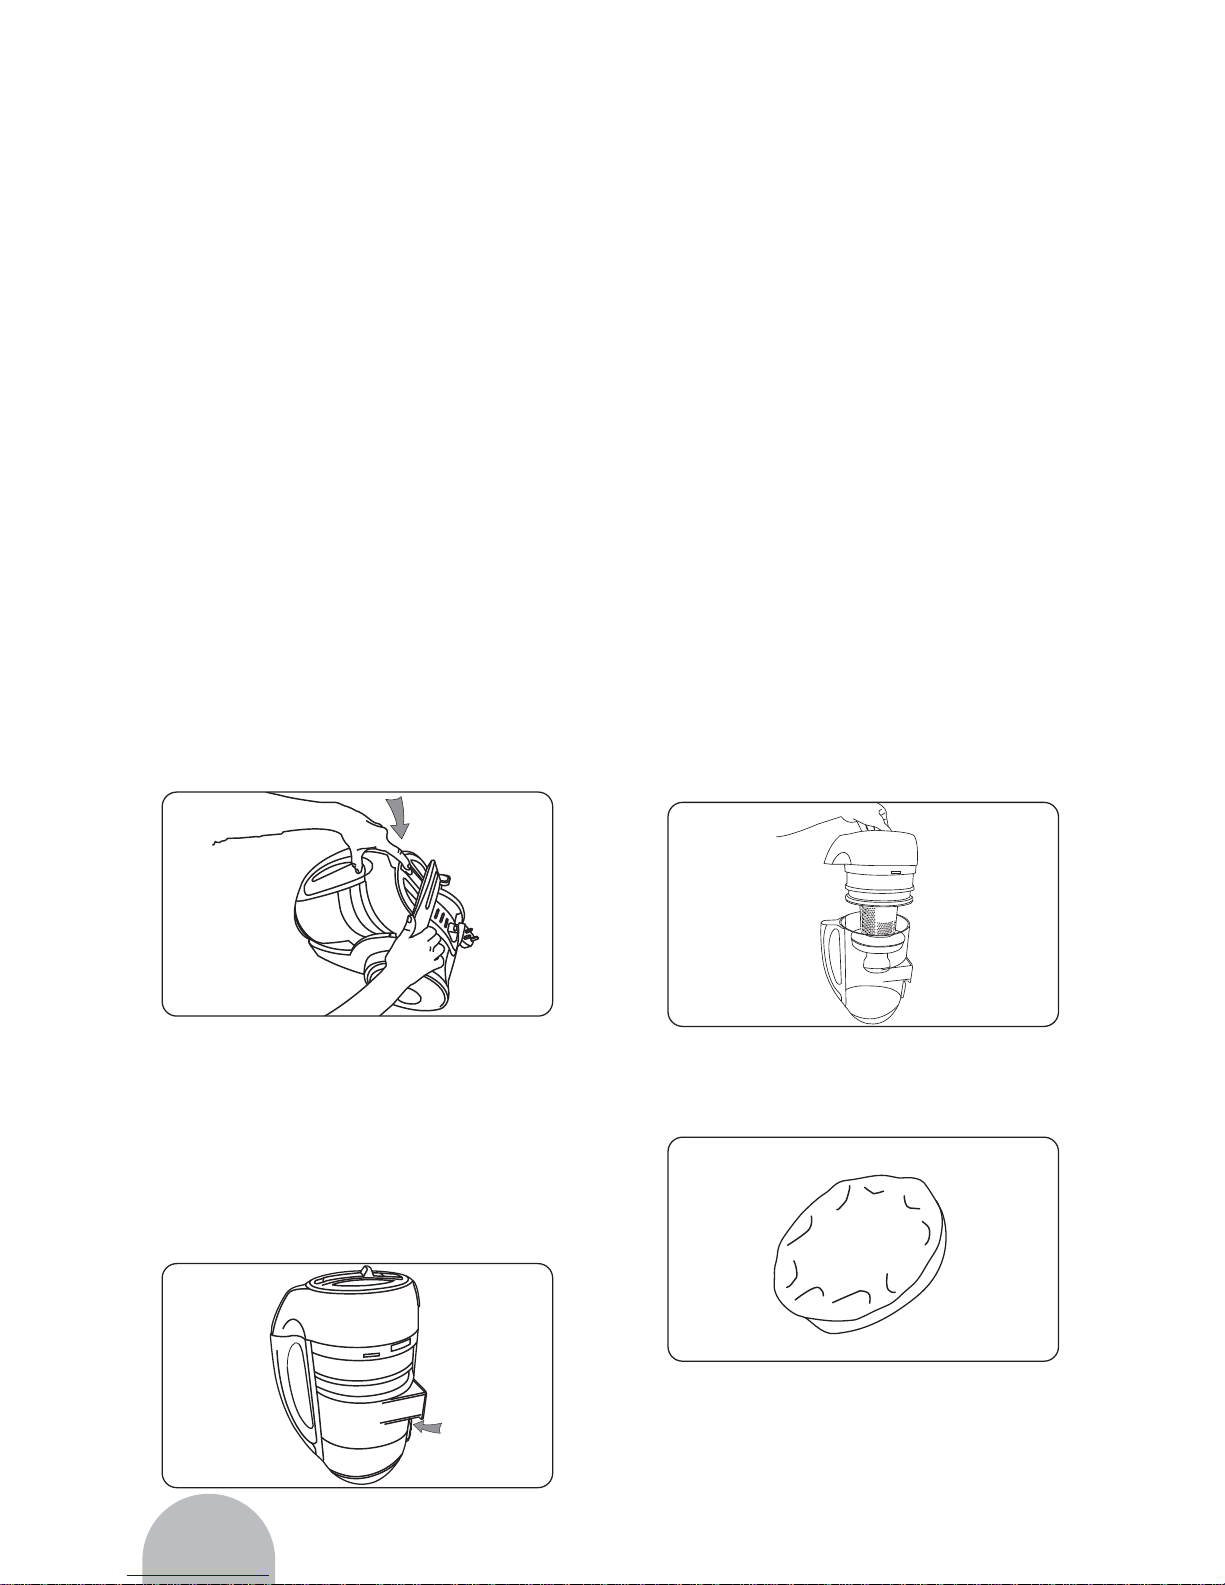
1. Release the dust container by pressing
down the release button as shown (Fig.
3/1).
2. Lift the dust container forwards out of
the cylinder vacuum cleaner.
3. When emptying the dust container,
hold it low over a dustbin.
4. Press the open button (Fig. 3/2). The
base opens and the dust runs into the
dustbin.
5. Carefully knock the remaining dust
loose.
6. Close the base.
7. Place the dust container onto the
cylinder vacuum cleaner. Press the
dust container firmly into its mounting
bracket until it audibly clicks into place.
NOTE:
It may be necessary to push a bit
harder. To make it easier, you can hold
the release button pressed when
inserting the dust container.
8. Check whether the dust container is
securely seated.
Filters
The cylinder vacuum cleaner has the
following filters:
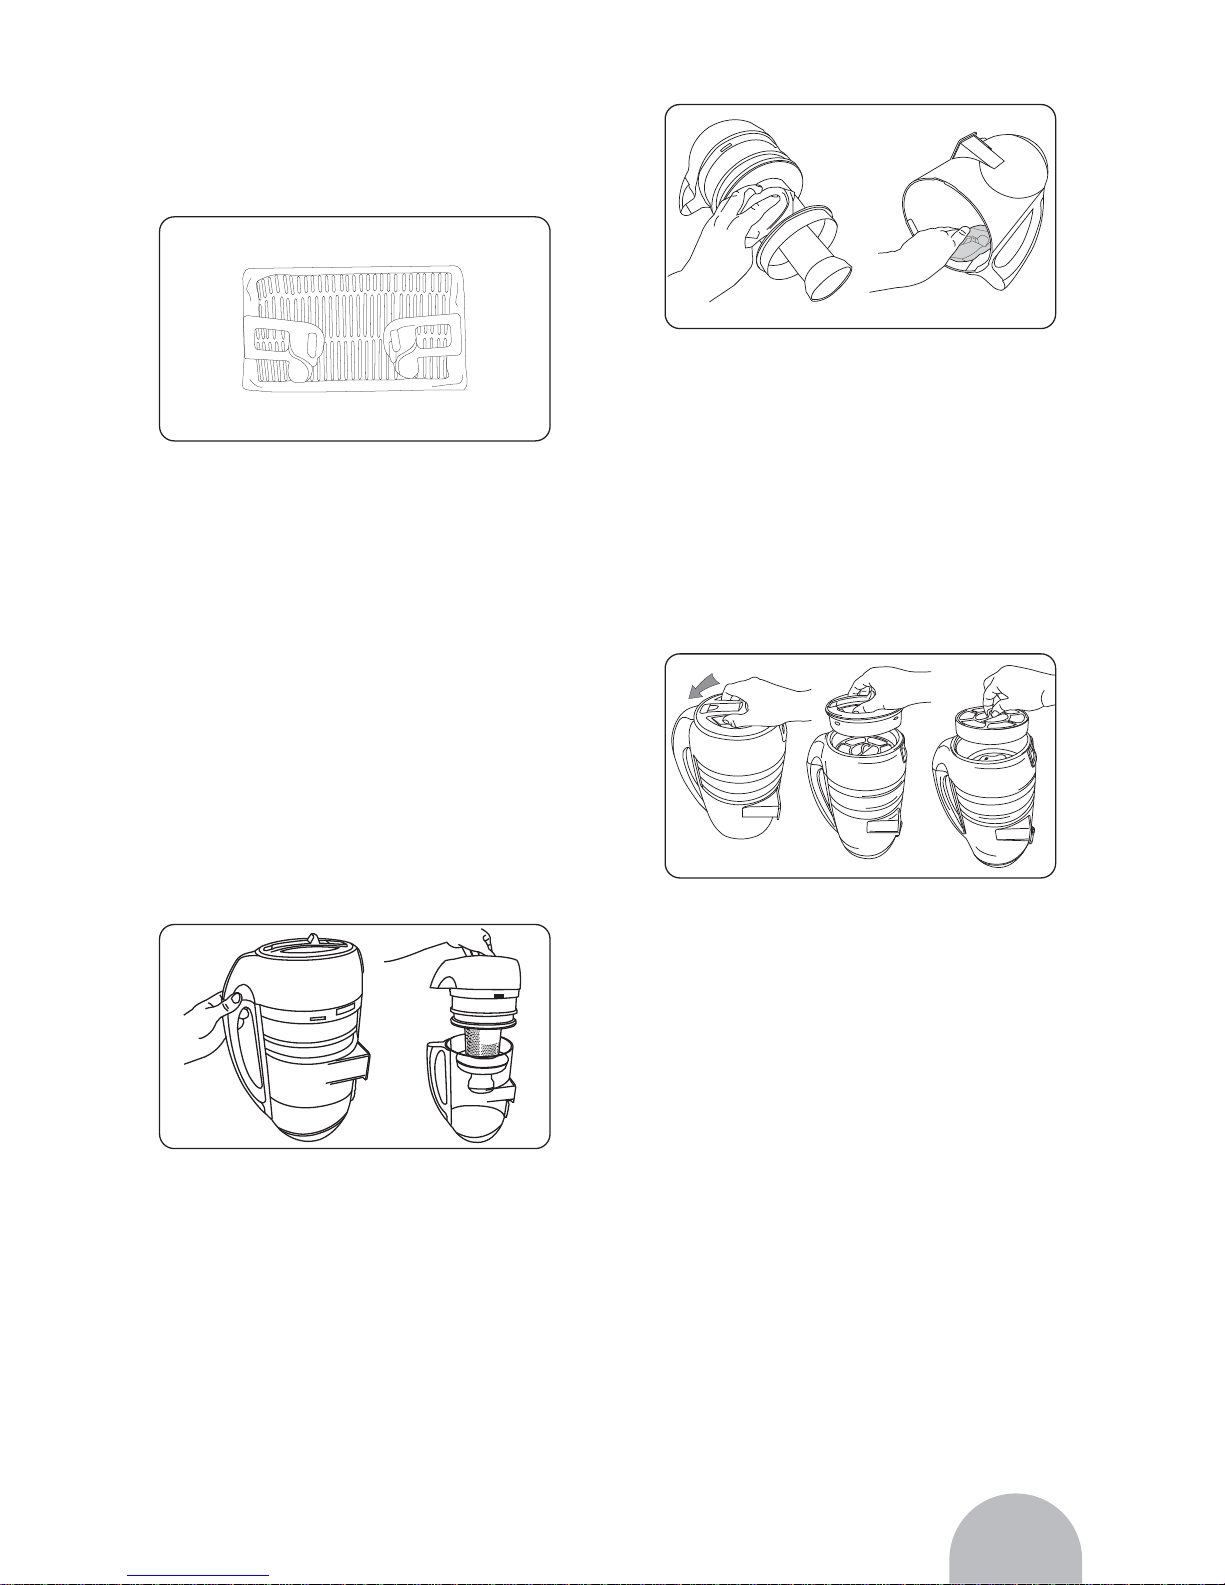
• Filter screen of separation unit (Fig.
3/3) Thoroughly pre-cleans the air in
the dust container.
• Protective motor filter (Fig. 3/4) is used
to filter out the fine dust particles.
Fig. 3/1
Fig. 3/3
Fig. 3/2
Fig. 3/4
Page 17
17
• H.E.P.A. filter (Fig. 3/5) Filters out the
fine particles from the blownout air.
Replace: every 6 months
• The filters can become blocked after
some time and can thereby reduce the
suction power. It is therefore important
that the abovementioned intervals are
adhered to.
• If you determine that a filter is damaged
then replace it immediately.
Cleaning the Filters
• Switch the appliance off
• Remove and empty the dust container,
• Turn the separation unit anticlockwise
off the dust container (Fig. 4/1).
• For a rough clean, hold the filter screen
over a dustbin. Then knock it gently.
If the filter screen is extremely dirty,
rinse it thoroughly with a shower head
Fig. 4/2 Then leave it to dry completely.
Only re-insert it once it is completely
dry.
Cleaning the protective motor filter
1. Switch the appliance off
2. Remove the dust container
3. Release the filter cover (Fig. 4/3) and
remove it.
4. Remove the protective motor filter
together with the holder at the lip
provided for this purpose below right.
5. Hold the protective motor filter together
with the holder over a dustbin. Only
then should you separate both parts
from each other. For a rough clean,
Gently knock both parts over a dustbin.
ATTENTION:
The protective motor filter is not suitable
for the dishwasher.
NOTE:
If the protective motor filter is very dirty,
rinse it thoroughly with a shower head.
Do not use any brushes for this. Then
leave the filter to dry (approx. 24 hours
at room temperature). Only use it again
when it is completely dry. If the dirt
Fig. 4/1
Fig. 3/5
Fig. 4/2
Fig. 4/3
Page 18

18
cannot be removed, insert a new
protective motor filter
6. Insert the dry protective motor filter
back into its holder.
7. Place protective motor filter into its
receptacle.
8. Replace the filter cover by hooking it
precisely from above first .Then engage
the lock by pressing it until it audibly
clicks into place.
NOTE:
The filter cover must be inserted
correctly for the dust container to fit
into its mounting bracket. Pressing
firmly will not help if the cover has not
been positioned precisely.
9. Place the dust container onto the
cylinder vacuum cleaner. Press the
dust container firmly into its mounting
bracket until it audibly clicks into place.
10. Check whether the dust container is
securely seated.
NOTE:
It may be necessary to push a bit
harder. To make it easier, you can hold
the release button pressed when
inserting the dust container.
Replacing the H.E.P.A. filter
1. Switch the appliance off with on/off
switch.
2. Remove every accessorie of the
appliance.
3. Reverse the appliance.
4. Release the H.E.P.A. filter cover on
the recessed handle provided for this
purpose and remove it.
5. Remove the H.E.P.A. filter (Fig. 4/4)
6. Clean the H.E.P.A. filter or if it is very
dirty replace it with a new one.
7. Place the clean/new H.E.P.A. filter
back into its receptacle. Then insert
the H.E.P.A. filter cover by hooking it
in from above first. Lock the cover by
pressing firmly until it audibly and
noticeably clicks into place.
NOTE:
Please wash the H.E.P.A. filter only
one time. Replace the H.E.P.A. filter
at latest every 6 months.
NOTE:
It may be necessary to push a bit
harder. Make sure when doing this that
the cover clicks fully into place behind
both projections provided for this
purpose. Otherwise the cover and
possibly even the exhaust filter will fall
out easily.
Fig. 4/4
Page 19
19
Cleaning:
Warning: Before you clean the
appliance, switch off the appliance and
remove the mains plug.
Cleaning the housing
Only clean the housing with a slightly
damp cloth.
Attention:
Do not use any cleaning agent,
scouring agent or alcohol as these can
damage the housing.
Cleaning the filters
To clean the filters, see "Filters" chapter.
Waste disposal
The filters used for the appliance are
made from environmentally compatible
materials and can be
disposed of with the domestic waste.
When the service life of the appliance
has expired, in particular if malfunctions
occur, make the finished appliance
unusable by removing the mains plug
from the socket and disconnecting the
power cable. Dispose of the appliance
according to the environmental
provisions applicable in your country.
Electrical waste must not be disposed
of with domestic waste. Contact your
municipal authority or your dealer for
any advice regarding recycling.
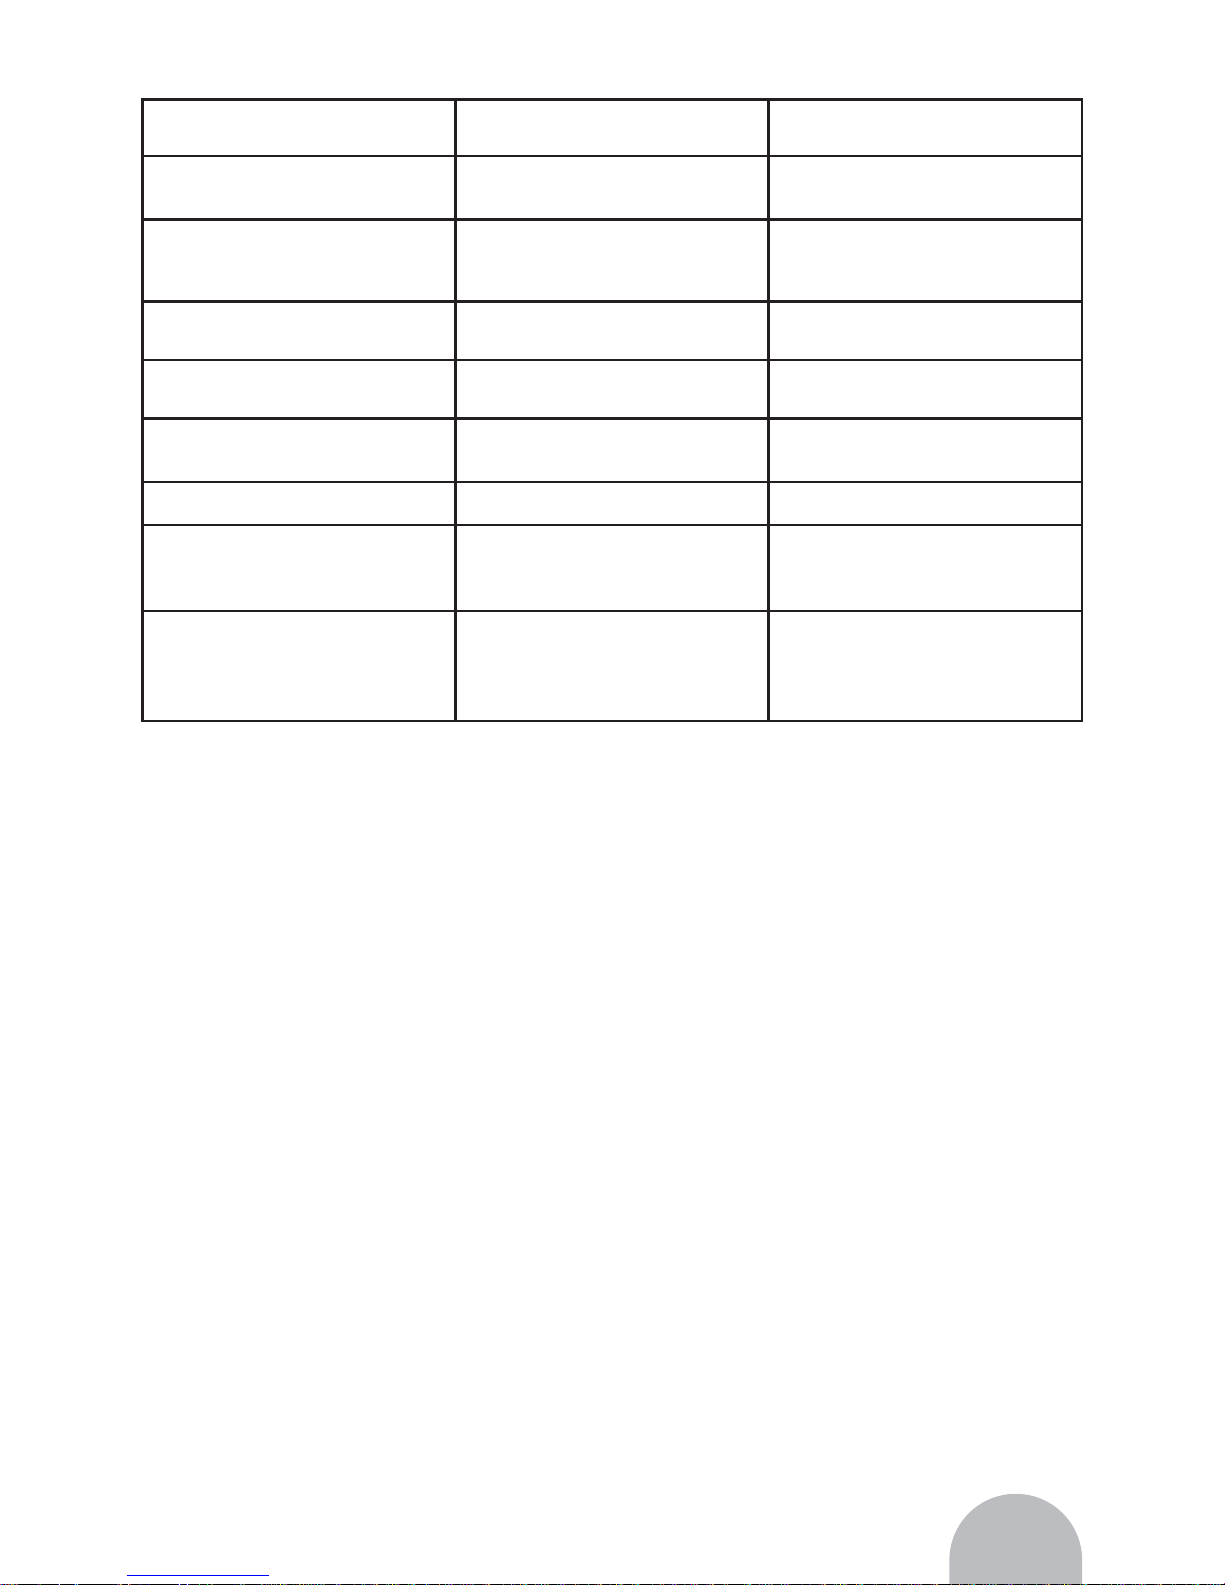
Remove the particles. If
necessary, use a long wooden
rod for this (e. g. a broom
handle).
SOLUTIONMALFUNCTION POSSIBLE CAUSE
Appliance does not work
Plug is not plugged in or the
appliance is not switched on.
Plug in the plug or switch the
appliance on
Socket does not carry any
current.
Test the cylinder vacuum
cleaner at another socket which
you are sure carries curreent
Power cable is damaged. Have the cable replaced by
authorized Fakir services
Appliance does not suck up
any dirt
Dust container is full or blocked. Empty/clean dust container.
Selected brush/nozzle are
incorrect for the type of flooring.
Adjust your brush/nozzle
selection to the type of flooring.
Filter is dirty.
Clean the corresponding filter.
Nozzle, telescopic tube or
suction hose are blocked.
Remove the blockage. If
necessary, use along wooden
rod for this (e.g.a broom handle).
Appliance is making unusually
loud noises while running
Sucked-in particles are
blocking the air-way.
Page 20

TEK Electrical (SuZhou) Co., Ltd
108 ShiHu West Road, Wuzhong District, SuZhou, China
 Loading...