

Page 1
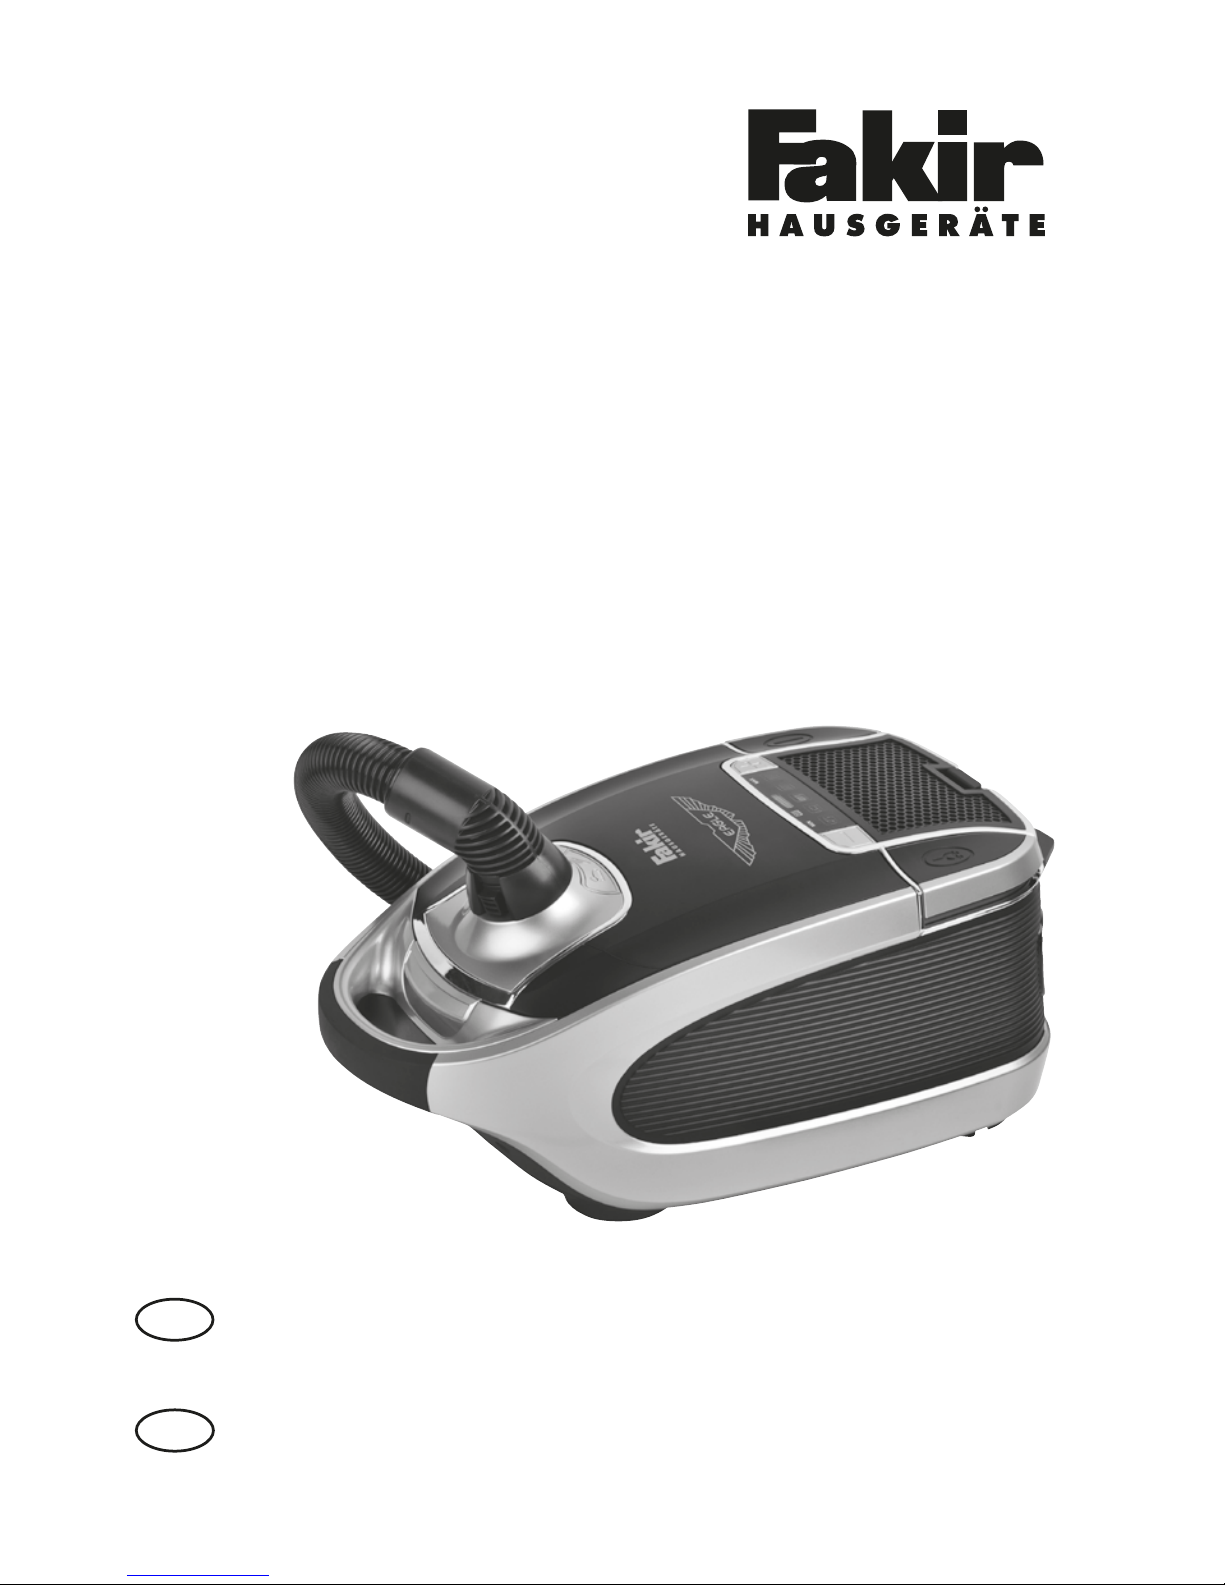
EAGLE
Kullanma Kılavuzu
Kuru Vakum Süpürgesi
TR
Instructions manuel
Dry Vacuum Cleaner
GB
Page 2

İÇİNDEKİLER
2
TR
1 Güvenlik 3
1.1 Kullanım Talimatları 3
1.2 Uyarı İfadeleri 3
1.3 Çocuklar 3
1.4 Uygun Kullanım 4
1.5 Elektrik Bağlantısı 5
1.6 Ürün Hasarlıysa 5
2 Kurulum 6
2.1 Kutudan Çıkartma 6
2.2 Diğer Aparatları Kullanmak 7
3 Kullanım 8
3.1 Süpürmek 8
3.2 Emiş Gücünü Ayarlamak 9
3.3 Cihazı Kapatmak ve Güç Kablosunu Sarmak 10
3.4 Nakil ve Saklama 10
4 Bakım 11
4.1 Toz Torbalarını Değiştirmek 11
4.2 Filtreleri Değiştirmek 12
4.3 Hijyenik Hava Çıkış Filtresinin Değiştirilmesi 12
4.4 Motor Koruma Filtresinin Değiştirilmesi 13
4.5 Gövdenin Temizlenmesi 13
5 Sorun Giderme 14
6 Kullanım Sonrası 15
6.1 Temizlik 15
6.2 Sorumluluk 15
6.3 Yetkisiz Kullanım 15
6.4 Kullanım Alanı 15
6.5 CE Uygunluk Deklarasyonu 16
6.6 Geri Dönüşüm 16
6.7 Sevk 16
Page 3
3
GÜVENLİK
TR
1.1 Kullanım Talimatları
1.Güvenlik Notları
Kullanmadan önce kullanma kılavuzunu dikkatlice
okuyunuz.
Bu kılavuzu ilerideki kullanımlar için güvenli bir yerde
saklayınız.
Kullanma klavuzu önerilerine uymamak şiddetli
yaralanmalara neden olabilir.
Kullanma klavuzuna uyulmamasından kaynaklanan
yaralanmalar için firmamız sorumluluk kabul etmemektedir.
Tercihinizi Fakir EAGLE Kuru Vakum Süpürgesi’nden yana
kullandığınız için teşekkür ederiz. Ürünümüz size uzun
süre sorunsuz hizmet vermek için tasarlanıp üretilmiştir.
1.2 Uyarı İfadeleri Güvenliğiniz için uyarılar işaretlenmiştir. Kazalardan ve
yaralanmalardan korunmak için lütfen bu uyarıları dikkate
alınız.
1.3 Çocuklar Cihazı asla yalnız bırakmayınız . Cihazı çocukların ve
oluşabilecek tehlikeleri farkedemeyecek insanların
yakınında kullanmayınız.
Cihazın, çocuklar, fiziksel durumu cihazı kullanmaya
müsait olmayan kişilerce, akli dengesi bozuk yada bilgi ve
deneyimden yoksun kişilerce başlarında güvenliklerinden
sorumlu biri olmadıkça kullanılmaması gerekmektedir.
Çocukların cihazla oynamadıklarından emin olmak için
gözlenmeleri gerekmektedir. Ambalaj filmleri boğulma
tehlikesine neden olabilir. Oyun oynamak için kullanılamaz.
UYARI!
Sağlık tehlikesini ve olası yaralanmaları belirtir.
DİKKAT!
Kullanıcı ve diğer objeler için olası tehlikeleri belirtir.
NOT!
Vurgular, ipuçları ve bilgileri belirtir.
Page 4

4
GÜVENLİK
TR
1.4 Uygun Kullanım • Cihazı sadece kirlenmiş zemin, halı ve perde üzerinde
kullanınız.
• Bu cihaz sadece hafif ev kullanımı icin tasarlanmıştır.
Endustriyel ve ticari kullanım icin uygun değildir.
• Diğer kullanımlar uygun değildir ve yasaklanmıştır.
• Saçları, parmakları ve vücudun diğer parçalarını vakumla
temizlemek yaralanmaya sebep olabilir.
• Giyecek parçaları (ayakkabı bağcıkları); emilebilir ve
yaralanmalara sebep olabilir.
• Su ve diğer akışkanlar; özellikle halı temizleme
ürünlerinden oluşabilecek nem kısa devreye neden olabilir.
• Toner tozu (lazer yazıcılar, fotokopi makinları vs.); yangın
ve patlamaya neden olabilir.
• Kızgın kül, yanan sigara ve kibritler; yangına neden olabilir.
• Keskin nesneler; özellikle kırık cam parçaları ve tırnaklar
filtrenin zarar görmesine neden olabilir.
• Yara bandı, çimento ve çöp; filtreler tıkanabilir ve cihaz
zarar görebilir.
• Dışarıda kullanım; yağmur ve kir riski vardır. Cihaza zarar
verebilir.
• Yapışkan maddeler; cihazın açık yerlerine yapışabilir ve
aşırı ısınmaya neden olabilir.
Page 5

5
GÜVENLİK
TR
1.5 Elektrik Bağlantısı • Cihaz elektrik kullandığından her zaman elektrik çarpması
riski vardır. Bu yüzden cihazı kullanırken lütfen bunlara
dikkat ediniz;
- Fişe asla ıslak ellerle dokunmayınız.
- Eğer cihazı prizden çekmek istiyorsanız, fişten tutarak
çekiniz. Kablodan tutup çekmek, kablonun kırılmasına
neden olabilir.
- Elektrik kablosunun kıvrılmadığından, bir yere
kıstırılmadığından, bir yere sarılmadığından ve ısıtma
cihazlarından uzak olduğundan emin olunuz.
- Sadece uyumlu uzatıcı kabloları kullanınız.
- Cihazı kesinlikle suya ya da sıvıya daldırmayınız.
- Cihazı kullanacağınız yerin voltajı, tip etiketinde belirtilen
voltaj ile aynıysa kullanınız. Yanlış voltaj cihazı bozabilir.
- Cihazın elektrik kablosu veya fişinde bir arıza ya da hasar
var ise, cihazı kullanmayınız ve en yakın Fakir Yetkili
Servisi’ne başvurunuz.
1.6 Ürün Hasarlıysa • Kesinlikle bozulmuş ya da elektrik kablosu hasarlı ürünü
kullanmayınız. Ciddi yaralanmalara yol açabilir.
• Herhangi bir arıza halinde, en yakın Fakir Yetkili Servisi’ne
haber veriniz.
Page 6
6
KURULUM
TR
2. Kurulum
2.1 Kutudan çıkartma
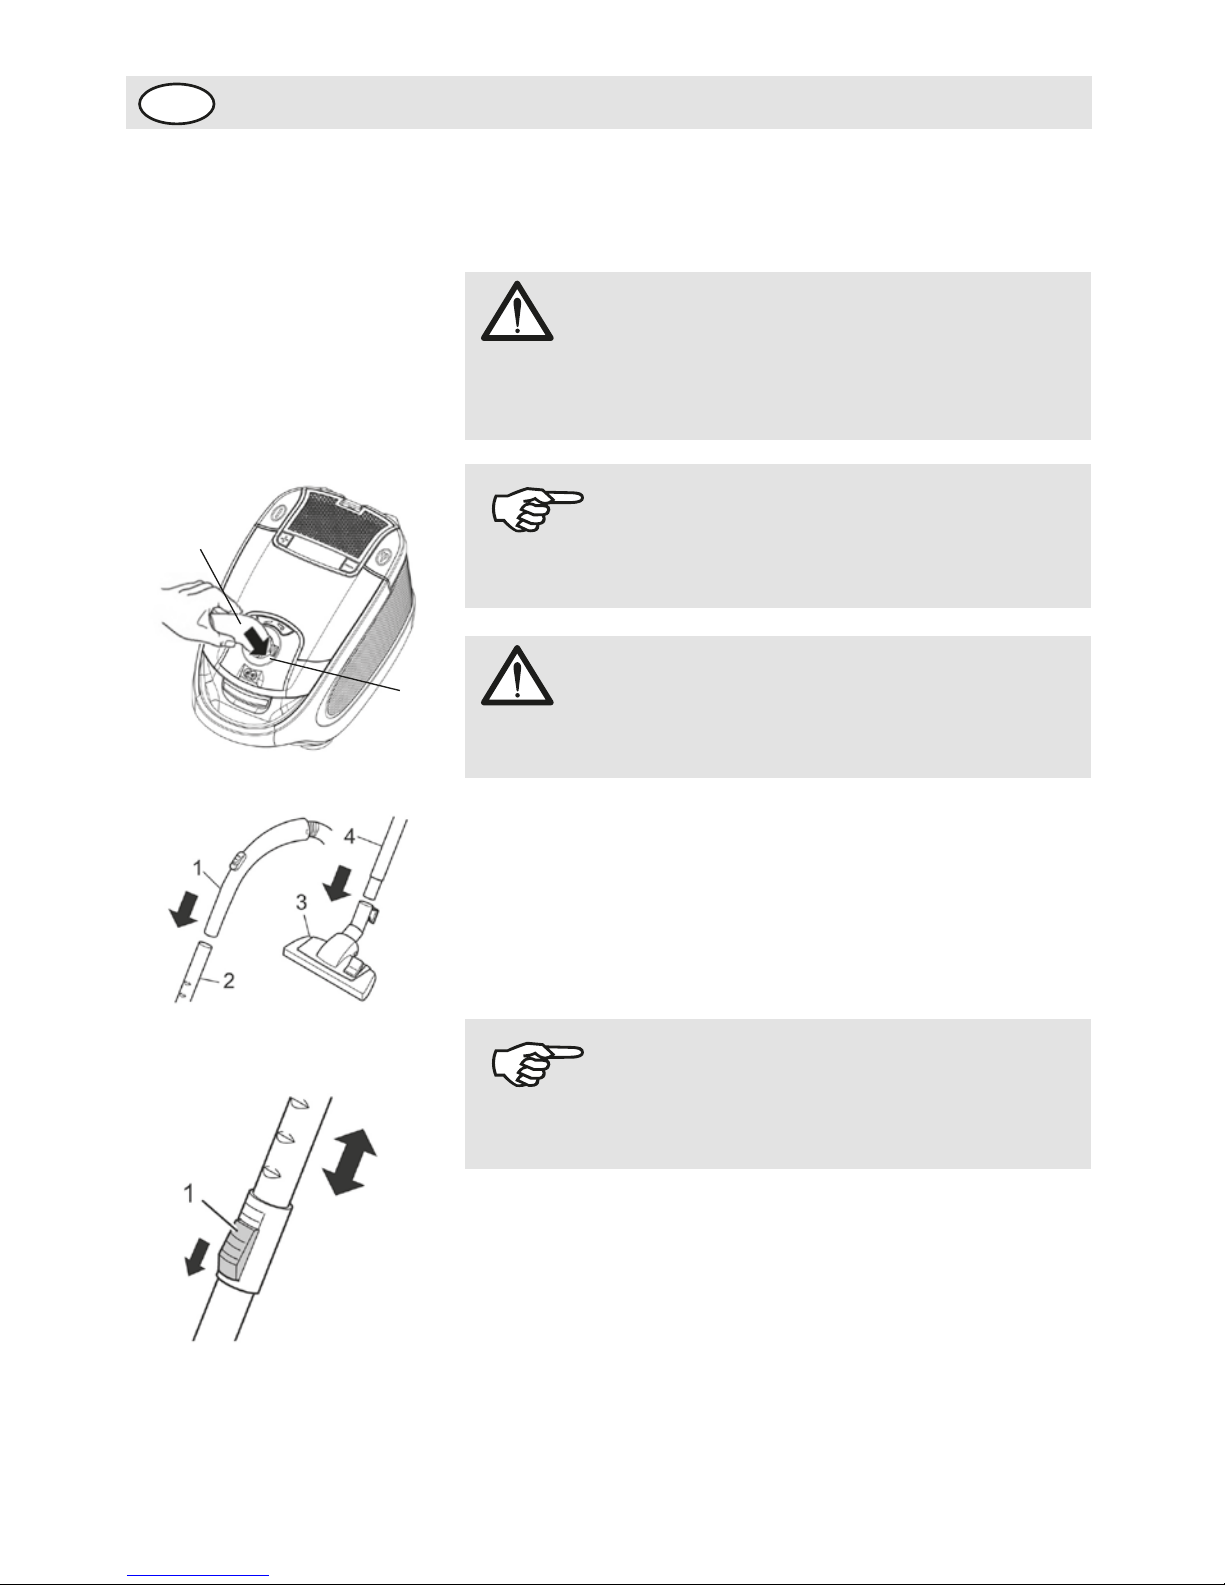
1.Hortumun arka ucunu (resim 2-1) cihazın giriş kısmına
(resim 2-2) takınız. Kilik sesinin duyduğunuzdan ve
kilitlendiğinden emin olunuz.
2-Tutma kolunu (resim 3-1) teleskobik borunun üst
boşluğuna (resim 3-2) yerleştiriniz.
3.Yer aparatını (resim 3-3) teleskobik borunun alt
boşluğuna (resim 3-4) yerleştiriniz.
4.Teleskobik borunun boyunu ayarlayınız. Bunu
yapabilmek için borunun üzerinde yer alan serbest
bırakma mandalına (resim 4-1) basınız ve sonra da
teleskobik boru sapını istediğiniz boyuta gelene kadar
çekiniz. İstediğiniz boyutta ayarlamak için serbest
bırakma mandalı bırakınız. Kilik sesi duyduğunuzdan ve
borunun kilitlendiğinden emin olunuz.
UYARI!
Cihaz kurulumunu fiş prize takılı değilken yapınız. Aksi
taktirde cihaz yanlışlıkla çalışabilir.
Cihazı ve parçalarını ambalajından çıkartınız.
DİKKAT!
Cihazı olası hasarlardan korumak için orijinal
ambalajıyla naklediniz. Bu yüzden orijinal ambalajları
saklayınız.
NOT!
Nakil işlemi sırasında bir hasar oluştuysa derhal
satıcınıza başvurun.
NOTE!
Yerleştirme esnasında güçlü bir şekilde ittirmeniz
gerekebilir.
(Res.2)
(Res.3)
(Res.4)
2
1
Page 7
7
KURULUM
TR
2.2 Diğer Aparatları
Kullanmak
Taktığınız yer aparatı haricinde diğer aparatları kullanarak
cihazın fonksiyonlarını çeşitlendirebilirsiniz.
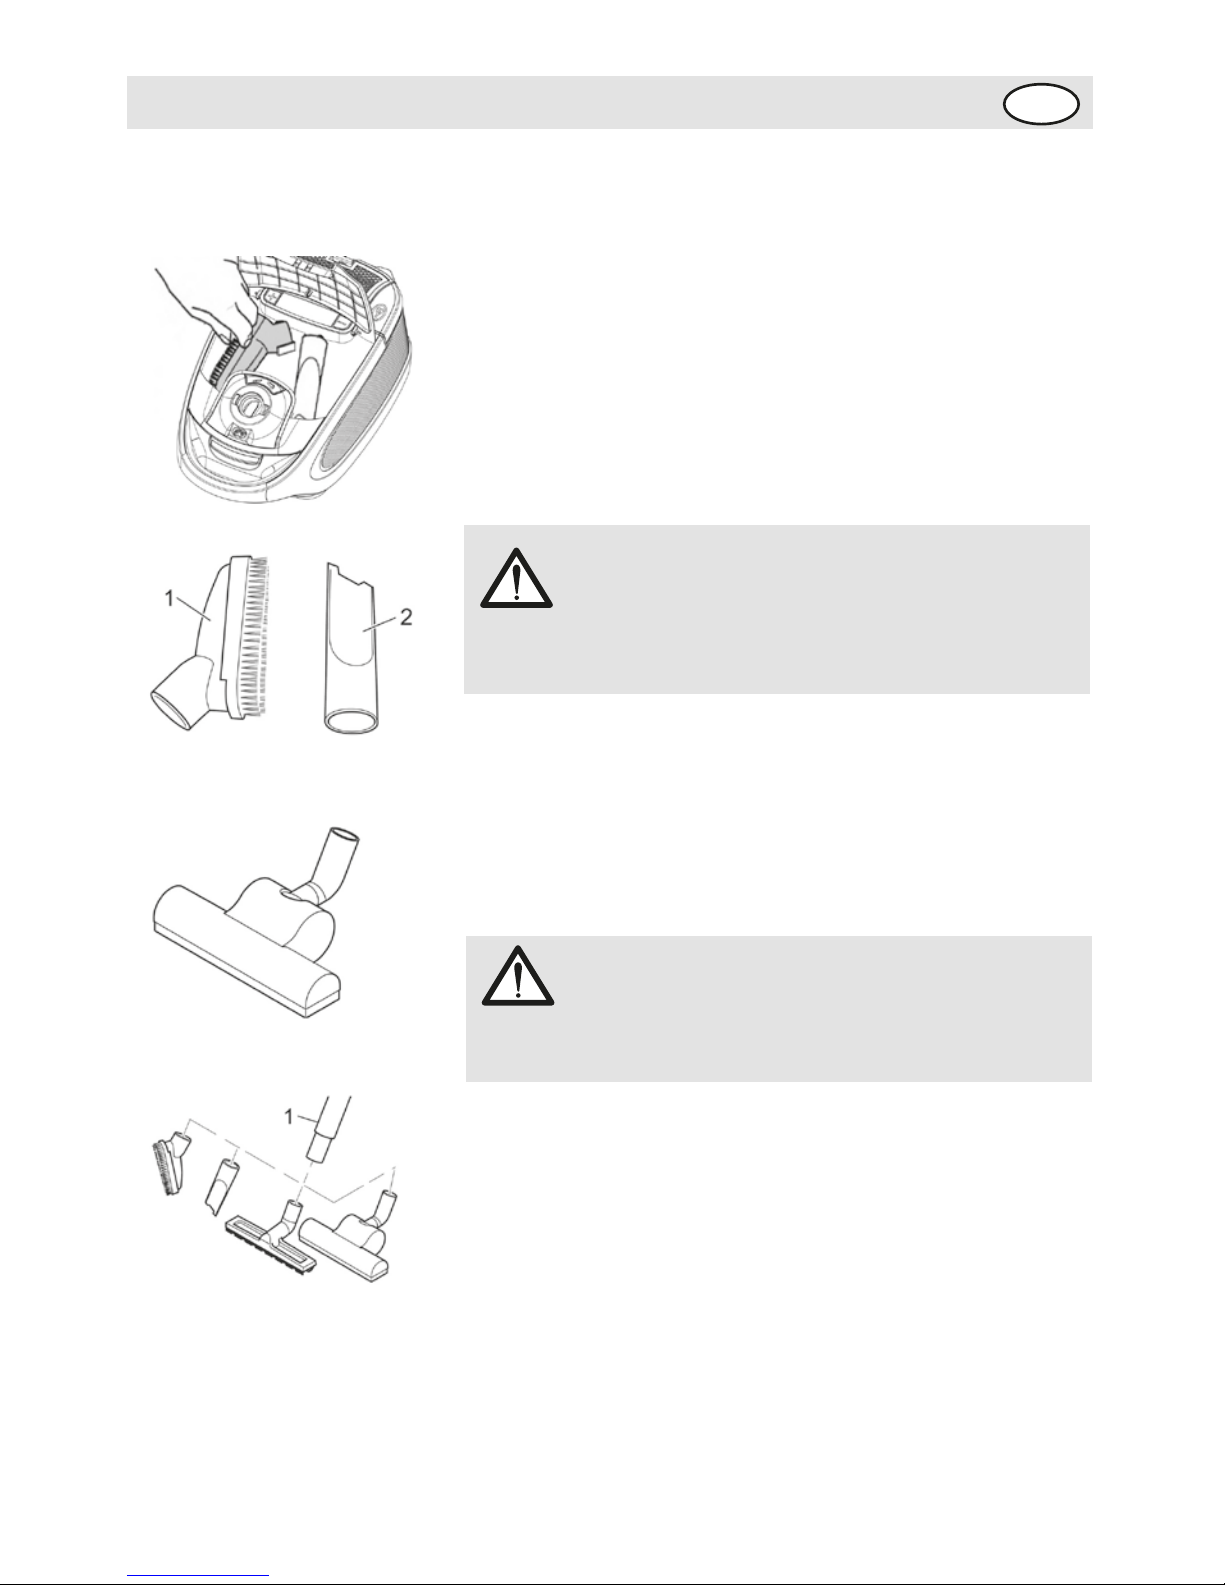
• Döşeme aparatı ve kenar-köşe aparatı aksesuarlar olarak
ürünle birlikte temin edilir. Aparatları kullanmadığınız
zamanlar aparat gözünde (resim 5) saklayabilirsiniz.
- Döşeme Aparatı (resim 6-1)
Hassas yüzeyleri temizlemek için döşeme aparatını
kullanabilirsiniz.
- Kenar – Köşe Aparatı (resim 6-2)
Ulaşılması zor yerleri kenar – köşe aparatıyla
temizleyebilirsiniz.
Aparatları Monte Etmek
1.Cihazı kapatın ve fişini prizden çekiniz.
2.Takılı olan aparatı çekerek teleskobik borudan çıkarınız.
3. Gerekli aparatı teleskobik borunun alt boşluğuna veya
gerekirse direk tutma koluna takınız.
4.Kullanılmayan aparatları mümkünse aparat gözünde
saklayınız.
DİKKAT!
Aparatları fiş prize takılı değilken takınız. Aksi taktirde
cihaz yanlışlıkla çalışabilir.
UYARI!
Cihazı aparatsız bir şekilde kullanmak, nesnelerin
yanlışlıkla yutulma oranını arttırır.
(Res.5)
(Res.6)
(Res.8)
(Res.7)
Page 8
KULLANIM
TR
8
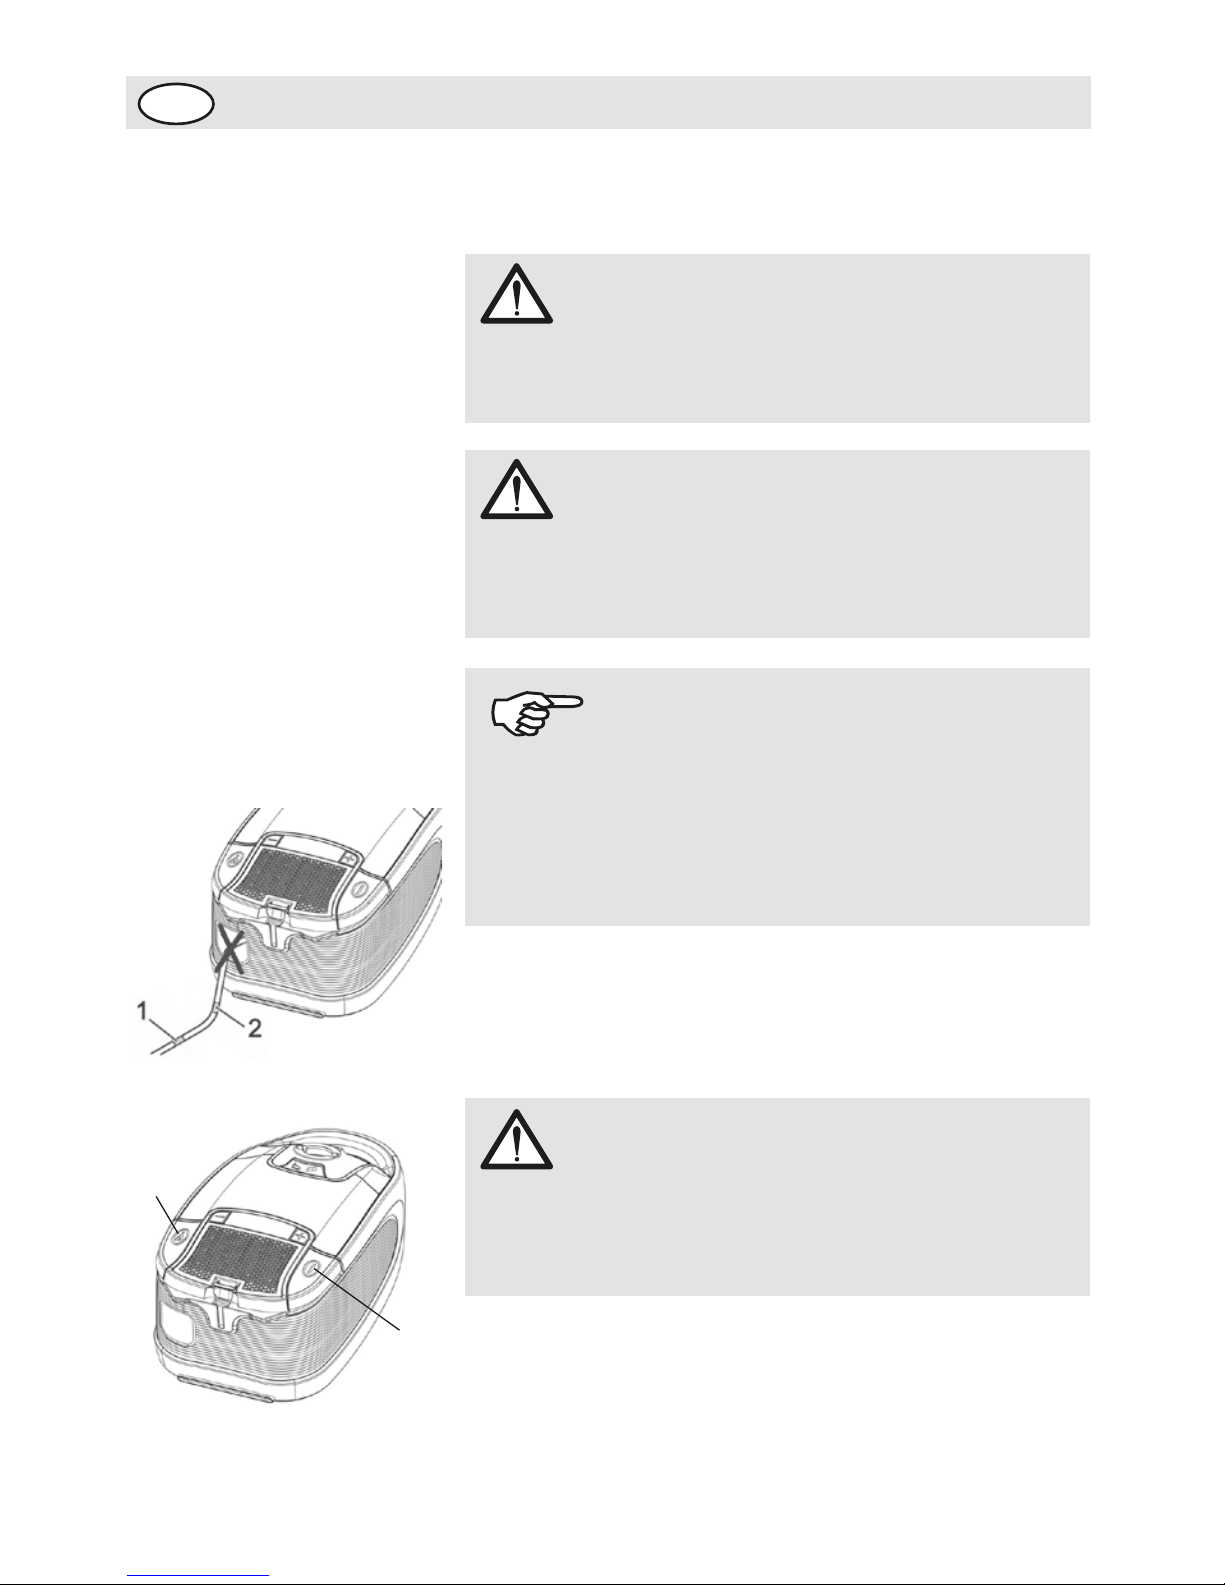
1. Gerekli olan aparatı takınız.
2. Güç kablosunu sarı işareti görünceye kadar
çekiniz.(resim 9-1)
3.On/Off tuşuna basarak cihazı çalıştırınız. (resim 10-1)
3.1 Süpürmek
3 Kullanım
DİKKAT!
Her kullanımdan önce cihazı ve güç kablosunu kontrol
ediniz. Hasarlı ürünler kesinlikle kullanılmamalıdır.
Yaralanma riski vardır.
DİKKAT!
Güç kablosunda kırmızı işareti(resim 9-2) görürseniz, sarı
renk gelene kadar geri sarma butonuna (10-2) basınız.
Aksi taktirde kablo hasar görebilir. Ayrıca elektrik çarpma
riski de vardır.
UYARI!
Cihazı; bütün filtereler takılı, kuru ve düzgün
yerleştirilmiş iken kullanınınız. Cihazın açık bölgelerinin
kapalı veya tıkalı olmadığından emin olunuz. Aksi
taktirde cihazınız zarar görebilir.
NOT!
Cihaz aşırı ısınmaya karşı güvenlik kilidiyle
donatılmıştır. Motor aşırı ısındığında cihaz kendini
otomatik olarak kapatır. Böyle bir durumda cihazı
kapatınız ve fişini prizden çekiniz. Aşırı ısınmaya
neden olan problemi çözünüz ve 45 dakika bekleyiniz.
Soğuduktan sonra cihazınızı tekrar kullanabilirsiniz.
(Res.9)
(Res.10)
1
2
Page 9
KULLANIM
TR
9
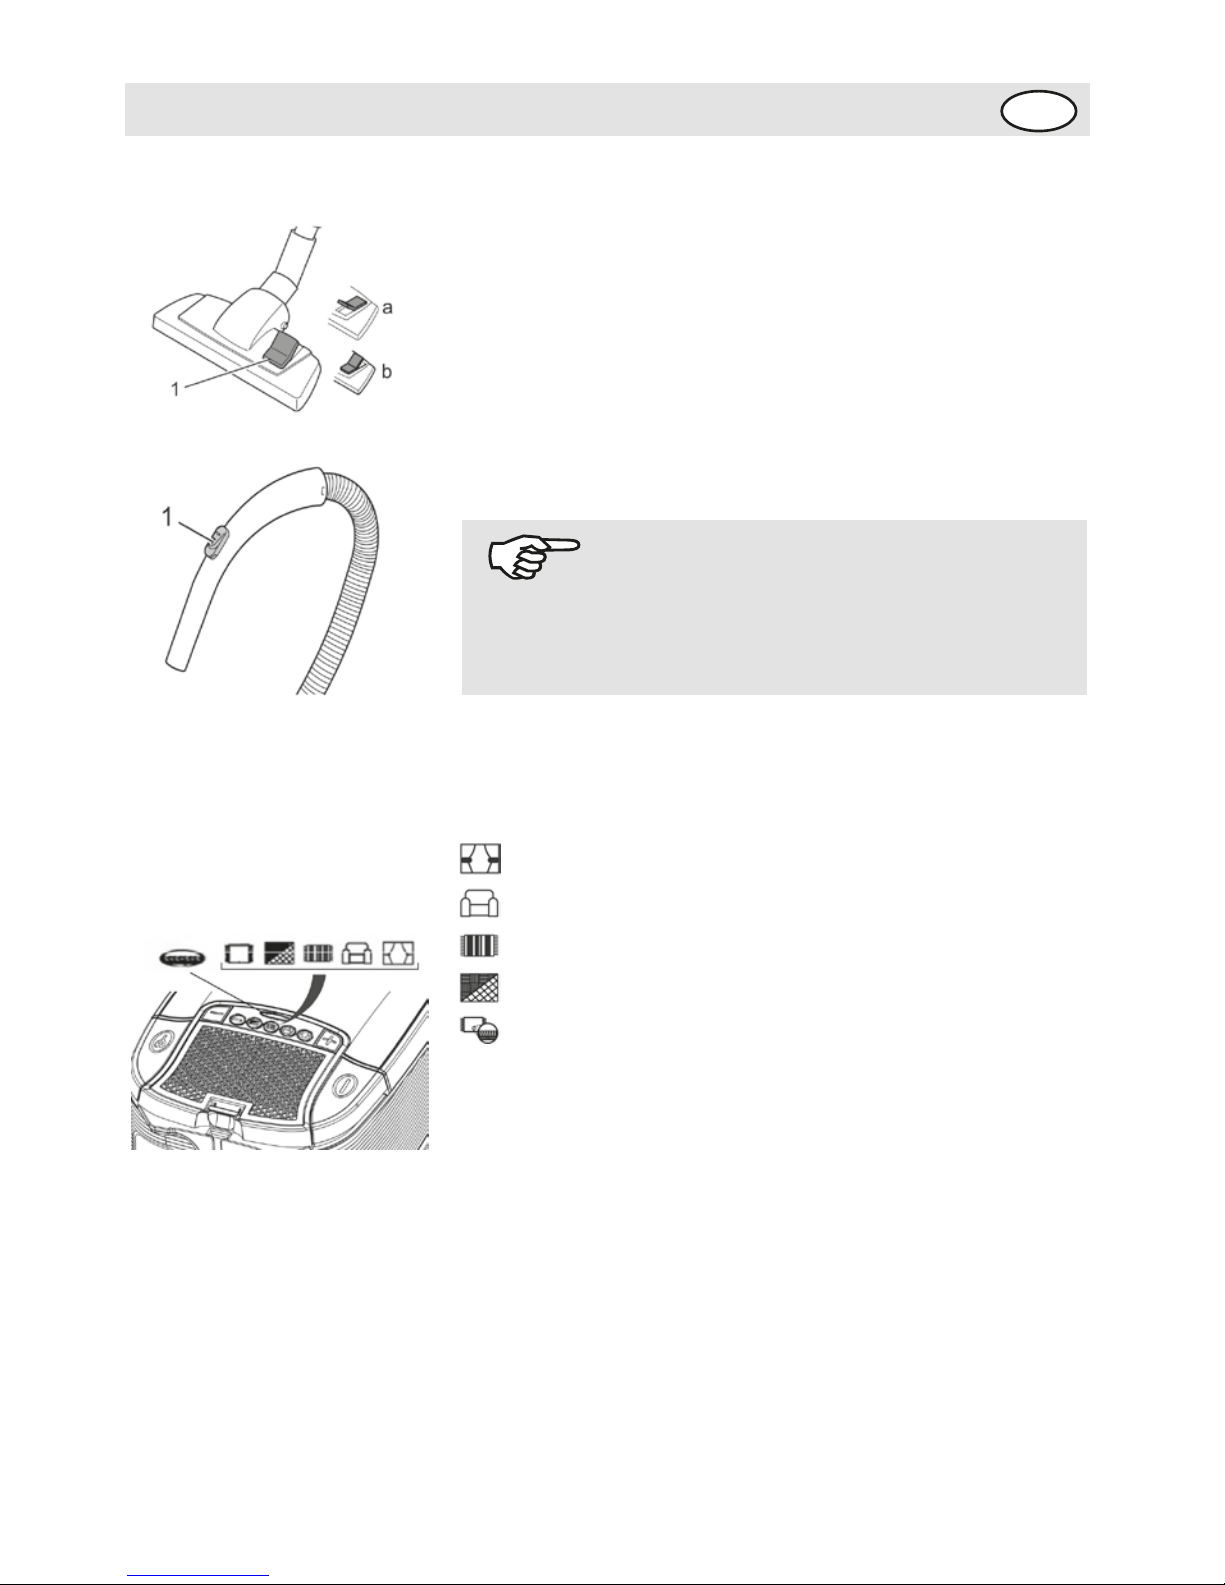
4.Temizlik yapılacak alana yer aparatını; halı veya sert
zemin ayarına getiriniz. (resim 11-A)
- Sert Zemin (resim 11-A): laminant, PVC vs.
- Halı (resim 11-B): uzun ve kısa kıllı halılar, kilimler vs.
5.Cihazla temizlik yaparken, cihazı arkanızdan kızak gibi
çekiniz. Zeminler için, üreticilerin tavsiyelerini dikkate
alınız.
1. Arzulanan emiş gücüne ayarlayabilmek için (+) veya (-)
tuşlarına, istenilen seviyeye gelene kadar basınız.
2. + tuşu (resim 13-2) emiş gücünü arttırır.
- Tuşu (resim 13-3) emiş gücünü azaltır.
Emiş gücünü temizlediğin zemine göre ayarlayabilirsiniz.
Emiş gücü ekranını bir rehber olarak kullanabilirsiniz.
(resim 13-1)
Perdeler, tekstil ürünleri (en düşük seviye)
Döşemeler, yastıklar
Üst segment halılar, kilimler ve yol halıları
Hafif kirlenmiş halılar ve sert zeminler
Ağır kirlenmiş halılar ve adi kirlenmiş sert zeminler
(en yüksek seviye)
Bypass menfezi (resim 12-1) sayesinde emiş
gücünü hızlı bir biçimde azaltabilir ya da yanlışlıkla
emilen bir maddeyi serbest bırakabilirsiniz.
NOT!
3.2 Emiş gücünü
ayarlamak
(Res.11)
(Res.12)
(Res.13)
Page 10
10
TR
KULLANIM
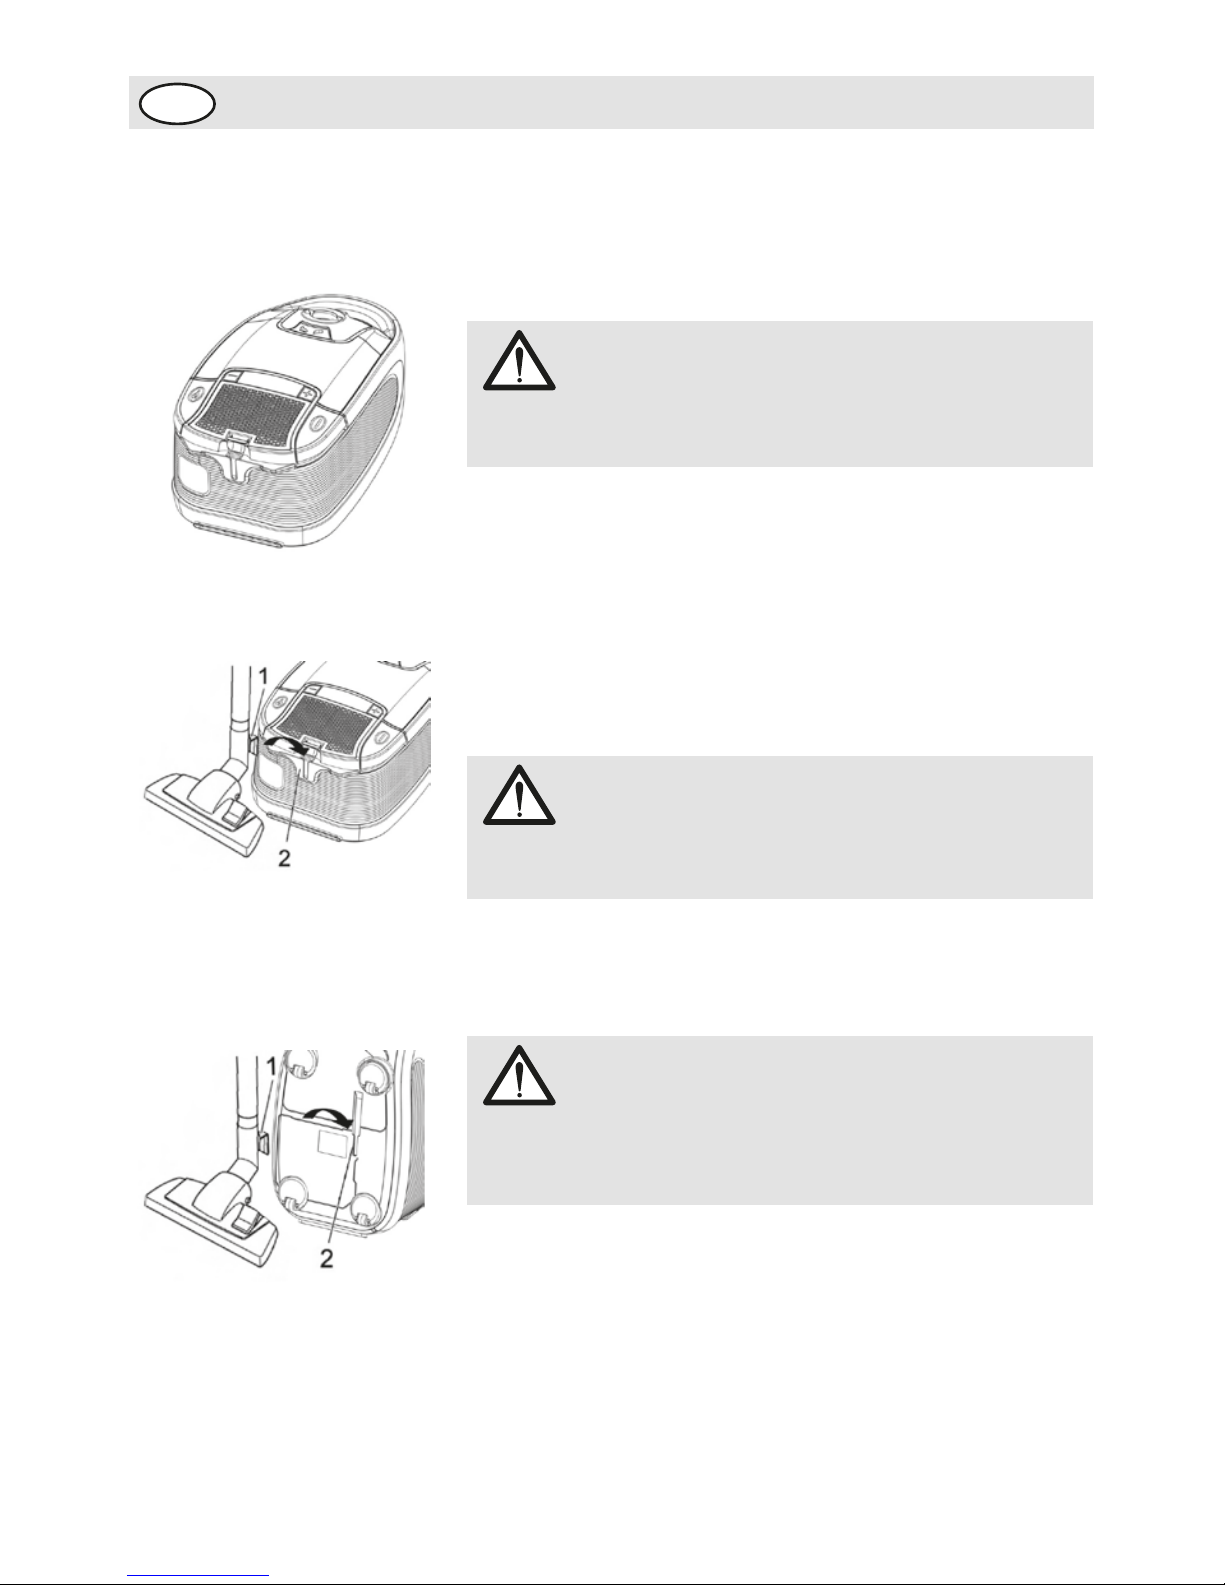
1. On/Off tuşunu (resim 14-1) kullanarak cihazı kapatınız ve
fişi prizden çekiniz.
2. Fişi elinizde tutunuz.
3.Kabloyu geri sarmak için kablo geri sarma tuşuna
basınız.
DİKKAT!
Güç kablosunu geri sarma işlemi sırasında kablo
fırlayabilir, nesneler engel olabilir ya da nesneleri yıkabilir.
DİKKAT!
Temizlik yaptığınız alanı terk ederken cihazı kapatmayı
ve güç kablosunu geri sarmayı unutmayınız.
UYARI!
Cihazı kesinlikle ısı kaynaklarının yakınında ve direk
güneş ışığı alacak şekilde saklamayınız. Isı cihaza zarar
verebilir.
• Cihazın bir yerden başka bir yere naklini elinizde
taşıyarak gerçekleştirebilirsiniz.
• Cihazı saklamak veya temizliğe ara vermek için park
posizyon askısını (resim 15-1) park pozisyon
dirseğine(resim 15-2) asabilirsiniz.
• Cihazı saklamak için park pozisyonu askısını(resim 16-1)
cihazın altında bulunan saklama dirseğine (resim 16-2)
asabilirsiniz.
• Eğer cihazı uzun bir süre saklayacaksınız, önceden toz
torbasını çıkartınız ve filtreleri temizleyiniz.
• Cihazı her zaman kuru ve soğuk ortamda saklayınız.
3.3 Cihazı kapatmak ve
güç kablosunu sarmak
3.4 Nakil ve Saklama
(Res.14)
(Res.15)
(Res.16)
Page 11
11
TR
BAKIM
UYARI!
Temizlik yaptığınız alanı terk edeceğiniz zaman, cihazın
zarar görmesini engellemek için cihazı kapatınız ve güç
kablosunu toplayınız.
Toz torbasını çıkarırken tozların dağılmaması için
dikkatli olunuz.
NOT!
Toz torbasının içinde yasaklı bir atık yoksa normal bir
çöp konteynırına atabilirsiniz.
NOT!
Toz torba hazne kapağı sadece içeride toz torbası
varsa kapanır.
NOT!
• Toz torbalarını; toz torba doluluk ikazı (resim 13-1)
kırmızı yandığı zaman veya emiş gücü azaldığı zaman
değiştiriniz.
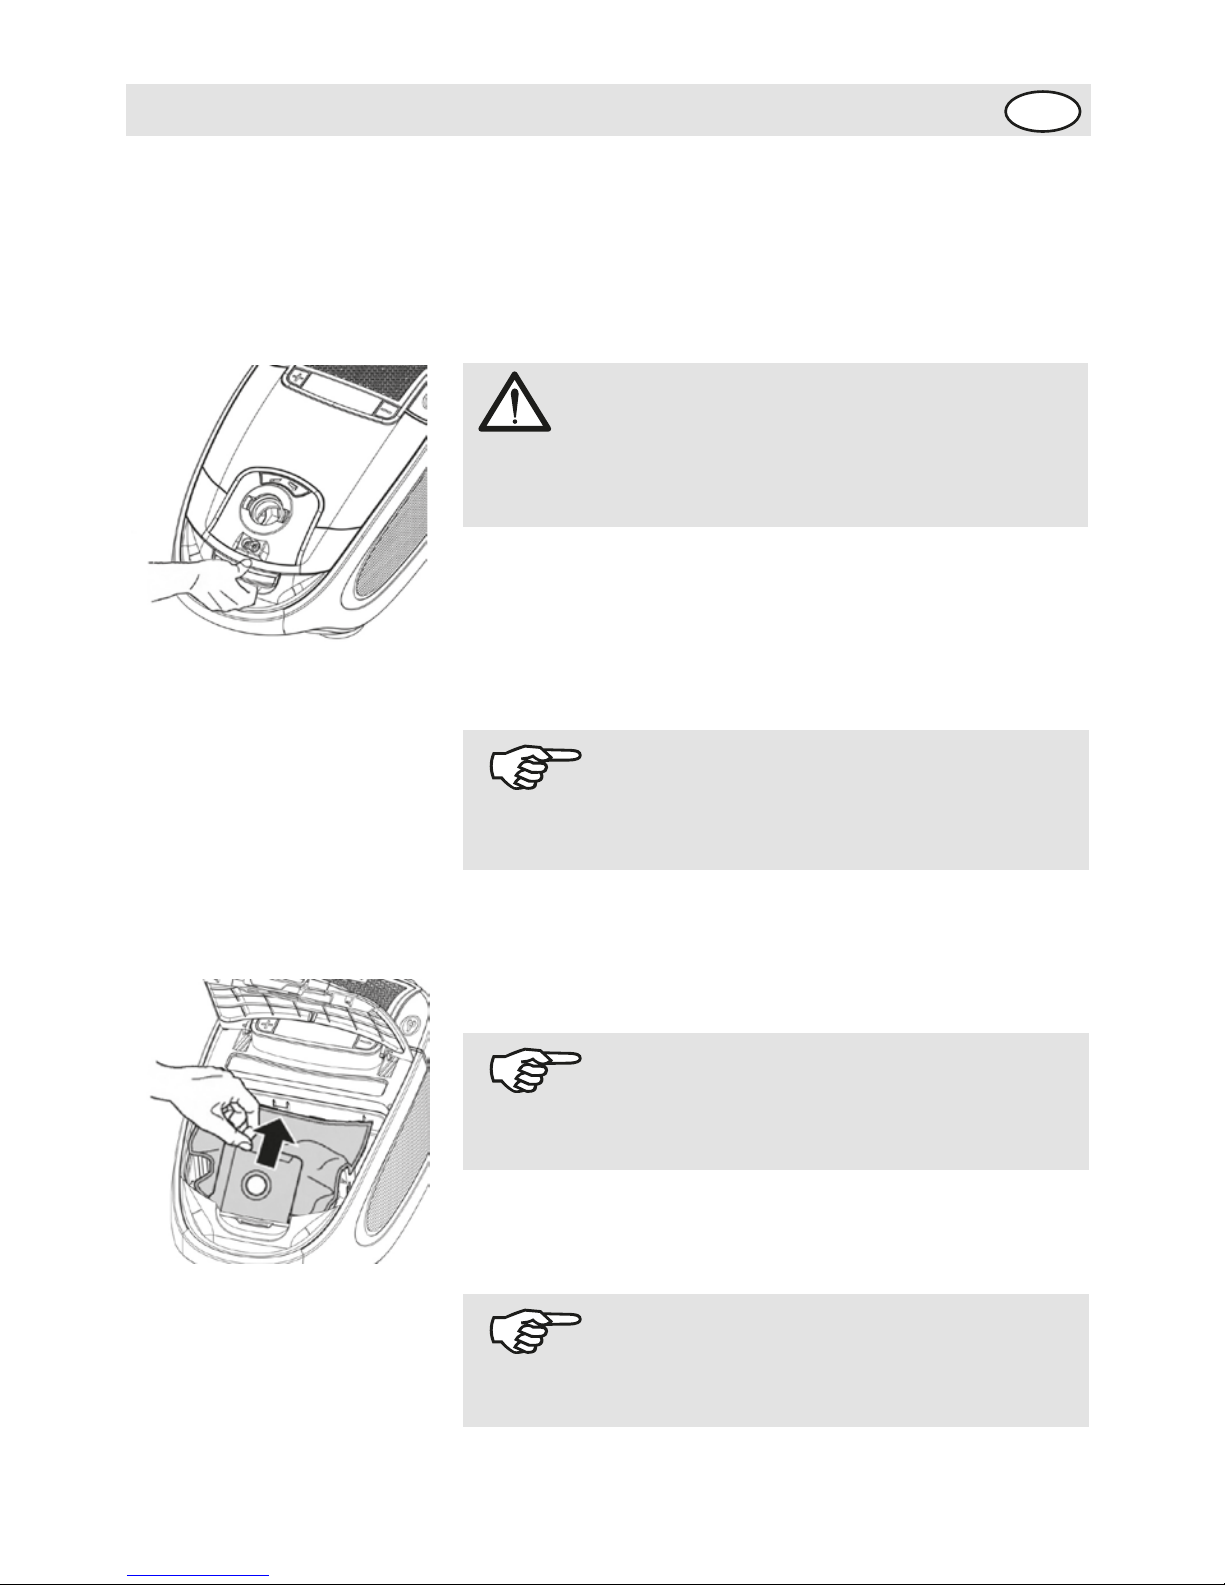
1-Toz torbası hazne kapağını mandallarını serbest
bırakarak açınız ve yavaşça yukarı doğru
kaldırınız.(resim 17)
2-Toz torbası hazne kapağını en yüksek seviyede
kilitlenene kadar kaldırınız ve kendi kendine açık halde
kalana kadar bekleyiniz.
3-Toz torbasını; toz torba tutucusundan çıkarmak için
çekiniz.
4-Toz torba haznesinde toplanmış olabilecek bütün tozları
temizleyiniz.
5-Yeni toz torbasını; toz torba tutucusuna takınız.
6-Toz torba hazne kapağını kapatınız. Kapatma sorunsuz
ise bir klik sesi duyacaksınız.
4.1 Toz torbalarını
değiştirmek
4 Bakım
(Res.17)
(Res.18)
Page 12
TR
12
BAKIM
Eğer motor koruma filtresi hafif kirli ise, filtrenin
üzerindeki kirler bir kaba boşaltılarak temizlenebilir.
Fakat Fakir Elektrikli Ev Aletleri olarak her 6 ayda bir
filtrenin değiştirilmesini öneriyoruz.
NOT!
Hava çıkış filtresinin yerine iyice oturduğundan emin
olunuz, aksi taktirde hava çıkış bölmesi düzgün bir
şekilde filtrelenemez.
NOT!
DİKKAT!
Filtreler yıkanabilir değildir. Hava çıkış filtresi tekrar
kullanılamaz.
Süpürgeniz aşağıdaki filtrelerle donatılmıştır;
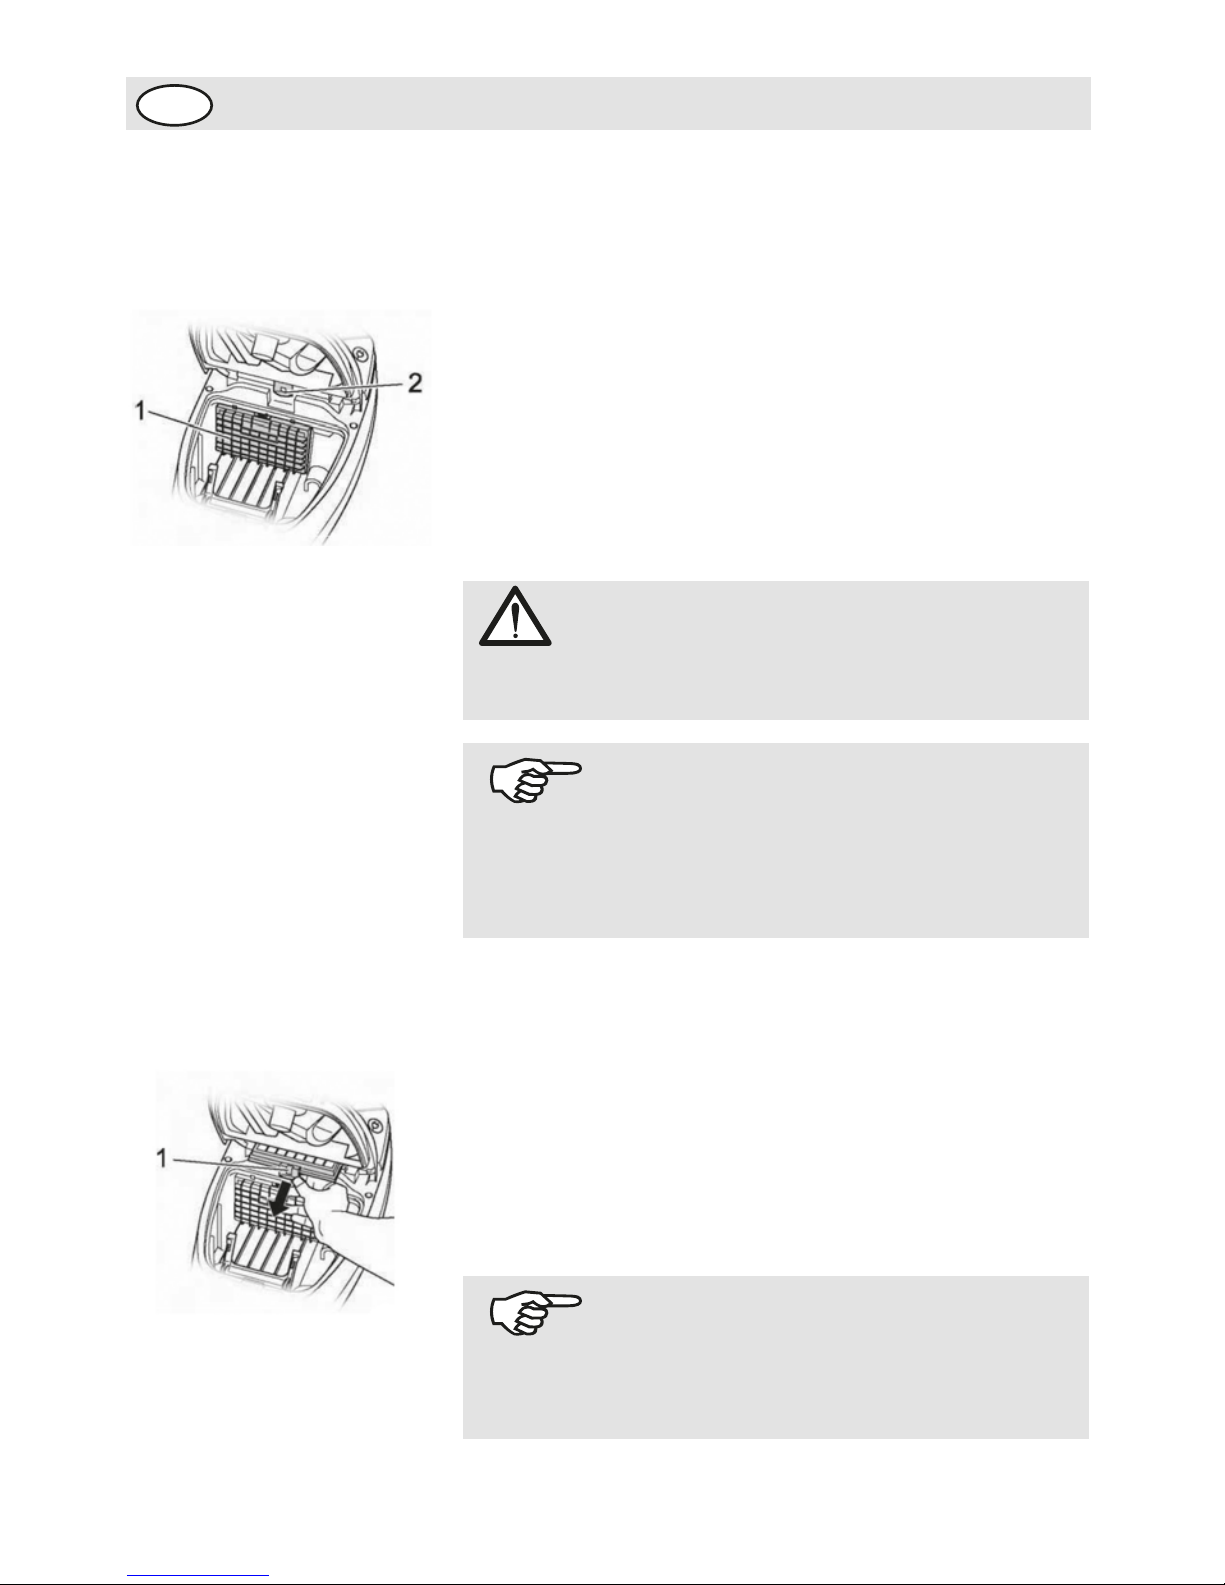
Motor koruma filtresi (resim 19-1): toz torbası zarar
görmüş ise, büyük parçaların motora zarar vermesini
engeller.
Değiştirme: En azından 6 ayda bir değiştirilmesi
gerekmektedir.
Hijyenik Hava Çıkış Filtresi (resim 19-2): Hava çıkış
bölümündeki mikroskobik parçaları engeller.
Değiştirme: En azından 6 ayda bir değiştirilmesi
gerekmektedir.
Filtreler zamanla tıkanabilir ve cihazın performansını
düşürebilir. Bu yüzden filtrelerin değişim zamanlarına
uymak cihazın çalışması için yararlıdır.
Zarar görmüş filtreler derhal değiştirilmelidir.
4.2 Filtreleri Değiştirmek
1-Cihazı kapatınız ve toz torbasını çıkartınız.
2-Hava çıkış filtresini çıkartınız. (resim 20-1)
Kilidi açınız ve filtreyi yavaşça kaldırınız. Şimdi filtreyi ön
tarafından çekerek çıkartabilirsiniz.
3-Yeni filtreyi takınız ve kilitlenene kadar aşağıya doğru
ittiriniz.
4-Toz torbasını takınız ve hazneyi kapatınız. Kapak
kapandığında klik sesini duyacaksınız.
4.3 Hijyenik Hava Çıkış
Filtresinin Değiştirilmesi
(Res.19)
(Res.20)
Page 13
13
TR
BAKIM
DİKKAT!
Her temizlik ve bakım öncesinde cihazı kapatınız ve
fişini prizden çekiniz.
UYARI!
Cihazı temizlerken temizleyici kimyasalları ve ya
alkolü, zarar verebileceğinden dolayı kullanmayınız.
1-Cihazı kapatınız ve toz torbasını çıkartınız.
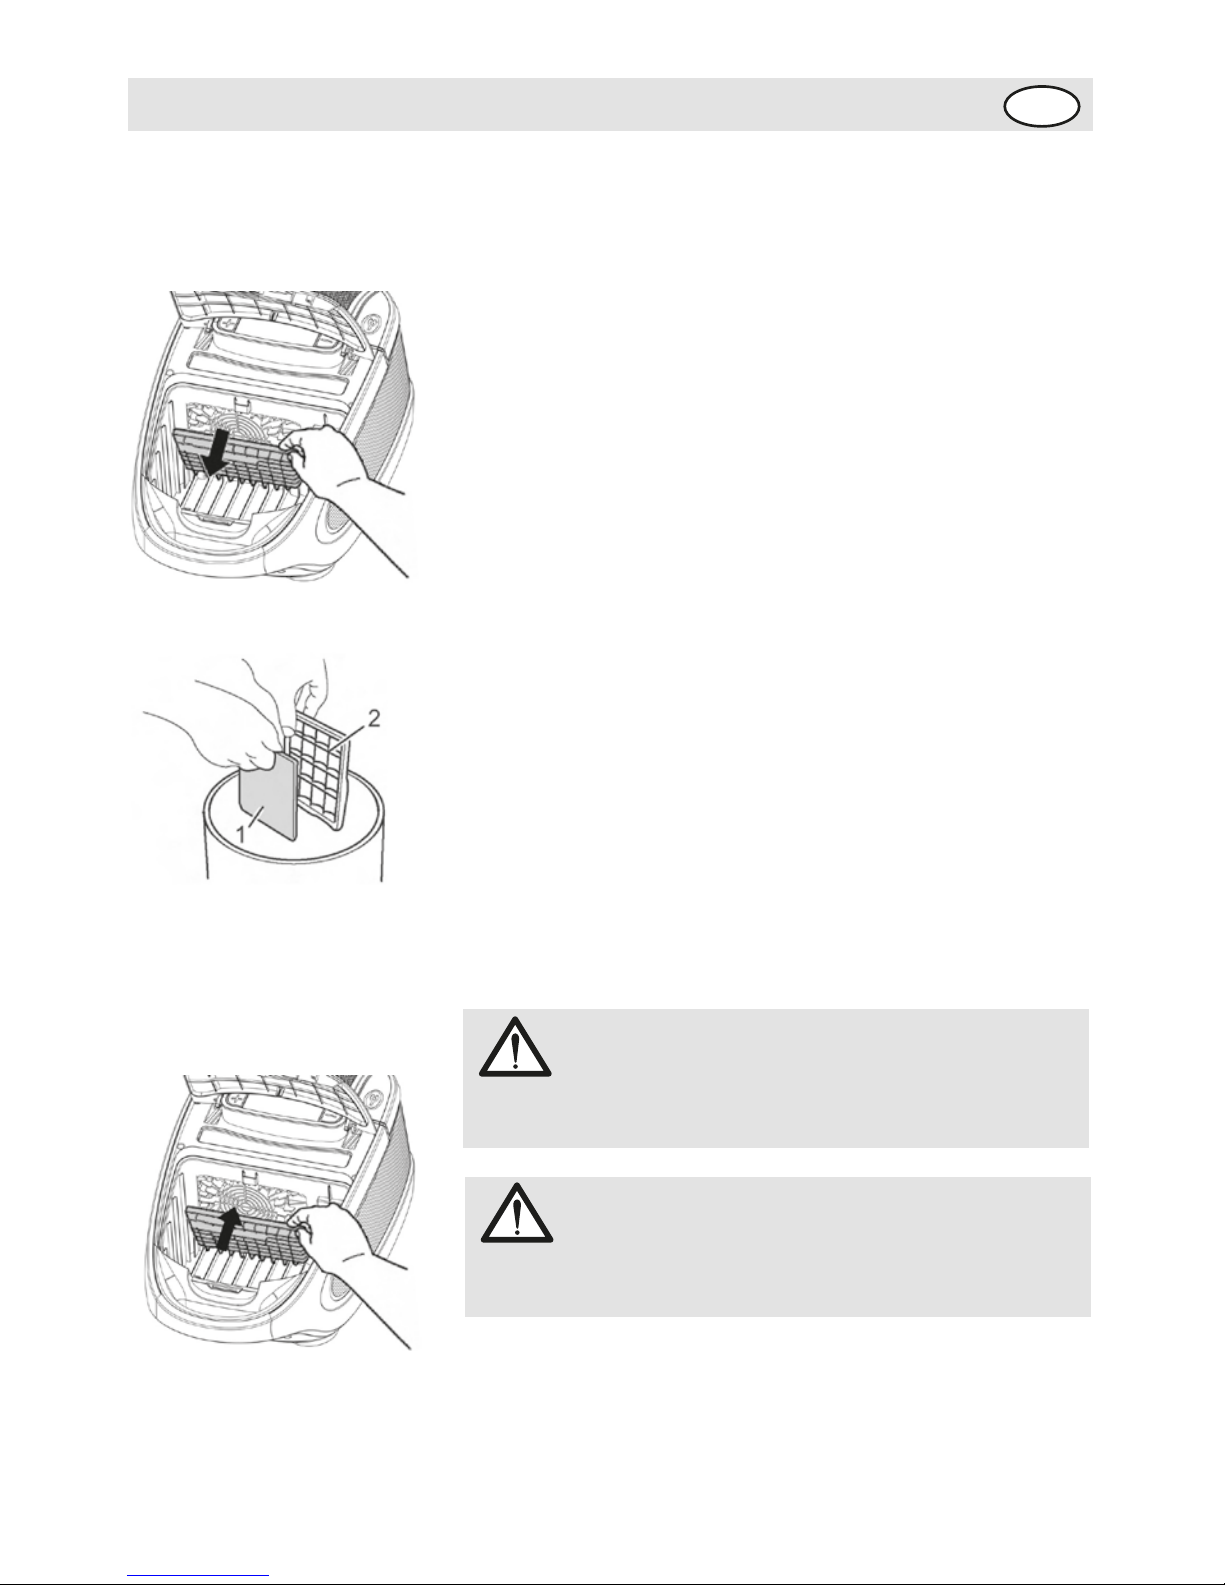
2-Filtre tutucusunu, motor koruma filtresiyle beraber
çıkarıtınız. (resim 21).
3-Motor koruma filtresini(resim 22-1) filtre
tutucusundan(resim 22-2) bir kabın üzerinde ayırınız.
4-Filtre tutucusunu temizleyiniz.
5-Eğer yeni filtre eskisine göre büyükse; eski filtreyi yeni
filtrenin üzerine koyunuz ve eski filtreye göre yeni filtreyi
makas yardımıyla keserek boyutlarını ayarlayınız.
6-Yeni motor koruma filtresini, filtre tutucusuna yerleştiriniz.
7-Yeni filtrenin takıldığı filtre tutucusunu yerine kilitlenene
kadar ittirerek takınız.
8-Toz torbasını takınız ve hazne kapağını takınız.
• Cihazın dışını kuru ve yumuşak bir bezle siliniz.
4.4 Motor Koruma
Filtresinin Değiştirilmesi
4.5 Gövdenin
Temizlenmesi
(Res.21)
(Res.22)
(Res.23)
Page 14

14
TR
SORUN GİDERME
UYARI:
Hasarlı ürünü kullanmayınız. Sorun gidermeye başlamadan önce cihazı kapatınız ve fişini
prizden çekiniz.
5 Sorun Giderme
Hata
Cihaz
Çalışmıyor
Temizleme
sonucu istenilen
gibi değil
Cihaz anormal
sesler çıkarıyor.
Muhtemel Neden
Fiş prize takılmamış olabilir ya da
cihaz çalıştırılmamış olabilir.
Prize elektrik gelmiyor olabilir.
Güç kablosu hasar görmüş olabilir.
Toz torbası dolu veya tıkalı olabilir
Yer aparatı, teleskobik boru veya
hortum tıkalı olabilir.
Güç ayarı temizlik yapılan yere
uygun değil.
Yer aparatındaki halı/sert zemin
ayarı zemin tipine göre yanlış
ayarlanmış olabilir.
Takılan aparat zemine uygun
olmayabilir.
Filtreler kirlenmiş olabilir.
Emilen obje hava sirkülasyonunu
engelliyor olabilir.
Çözüm
Fişi prize takınız ve cihazı çalıştırınız
Cihazın fişini elektrik olduğunu bildiğiniz
başka bir prize takarak tekrar deneyiniz.
En yakın Fakir Yetkili Servisine
başvurunuz.
Toz torbasını boşaltın veya değiştirin
Tıkanan maddeyi çıkartın. Bunun için uzun
bir tahta sopa kullanabilirsiniz.
Yer tipine uygun olan ayarı seçin.
Halı/sert zemin ayarını zemine göre doğru
pozisyona getirin.
Doğru aparatı takınız.
Filtreyi değiştirin veya temizleyin.
Engelleme yapan maddeyi çıkartınız.
Bunun için uzun bir tahta sopa
kullanabilirsiniz.
Page 15
15
UYARI!
Süpürgenizi temizlemeden ya da bakım yapmadan
önce mutlaka kapatınız ve fişini prizden çekiniz.
DİKKAT!
Kesinlikle alkol ve solvent bazlı temizleyiciler kullanmayınız. Aksi takdirde cihazınıza zarar verebilirsiniz.
Cihazınızı yumuşak ve hafif bir nemli bezle
temizleyiniz. Aynı şekilde gerektiğinde toz torbası
haznesini de temizleyebilirsiniz.
Hortum, fırça vb. aksesuarlar belirli aralıklarda
tıkanıklığa karşı kontrol edilip temizlenmelidir.
Temizlik
Sorumluluk
Bu kullanım kılavuzundaki talimatlara uygun olmayacak
şekilde kullanım sonucunca ortaya çıkabilecek bir hasar
oluşması durumunda Fakir Elektrikli Ev Aletleri Dış. Tic.
A.Ş., sorumluluk kabul etmez.
Cihazın, kendi alanı dışında bir yerde kullanılması, Fakir
yetkili servislerinden başka bir yerde tamir ettirilmesi
durumunda Fakir Elektrikli Ev Aletleri Dış. Tic. A.Ş.,
sorumluluk kabul etmez.
Kullanım Alanı
Cihazı ev tipi kullanıma uygundur, kendi kullanım alanı
dışında ve dış ortamlarda kullanmayınız.
Yetkisiz Kullanım
Aşağıda belirtilen yetkisiz kullanım durumlarında, cihaz
zarar görebilir ya da yaralanmaya yol açabilir;
Bu cihaz akli dengesi yerinde olmayan kişilerin ya da bu tip
cihazları kullanmak için yeterli bilgisi olmayan kişilerin
kullanması için uygun değildir. Bu tip kişilerin cihazı
kullanmasına kesinlikle izin vermeyiniz.
Cihaz bir oyuncak değildir. Bundan dolayı çocukların bu
cihazı kullanmalarına izin vermeyiniz ve cihazı çocukların
yanında kullanırken daha dikkatli olunuz.
Paketin içinden çıkan, poşet ve karton gibi maddeleri
çocuklardan uzak tutunuz. Aksi takdirde çocuklar bu
maddeleri yutmak suretiyle kendilerine zarar verebilirler!
TR
KULLANIM SONRASI
Page 16

16
TR
KULLANIM SONRASI
Cihazın geri dönüşüm
noktalarına bırakılması
Cihazın kullanım ömrünün bitmesi halinde, elektrik
kablosunu keserek kullanılamayacak hale getiriniz.
Ülkenizde mevcut bulunan yasalara göre, bu tür cihazlar
için özel olarak belirlenmiş çöp kutularına cihazı bırakınız.
Elektriksel atıklar, normal çöplerle birlikte atılmamalıdır.
Cihazı elektriksel atıklar için belirlenmiş çöp kutularına
atınız.
Cihazın paketleme elemanları geri dönüşüme uygun
maddelerden üretilmiştir. Bunları geri dönüşüm çöp
kutularına atınız.
Kullanılmış toz torbası ve filtreleri genel çöp kutularına
atabilirsiniz.
CE Uygunluk
Deklerasyonu Bu cihaz Avrupa Birliği’nin 2004/108/EC Elektromanyetik
Uyumluluk ve 2006/95/EC Gerilim Direktifleri’ne tamamen
uygundur. Bu ürün cihaz tip etiketinde CE işaretine
sahiptir.
Cihazın, orijinal ambalajında veya zarar görmesini önlemek
için, iyi ve yumuşak pakette taşınması gerekmektedir.
❑ Ürünümüz Fakir Elektrikli Ev Aletleri Dış Ticaret A.Ş
adına SUZHOU EUP ELECTRIC CO LTD, 90 JIN SHAN
ROAD, NEW DISTRICT, SUZHOU 215011, P.R.CHINA
TEL.: 0086-512-68091780 tarafından üretilmiştir.
Teknik Özellikler:
Sevk:
Max. 2400W
220/240V
50/60 Hz
10 Yıl Kullanım Ömrü
Page 17

17
TABLE OF CONTENTS
GB
1 Safety 18
1.1 Operating Manual 18
1.2 The Notices Given 18
1.3 Children 18
1.4 Appropriate Use 19
1.5 Mains connection 20
1.6 If the appliance is defective 20
2 Unpacking and assembling 21
2.1 Unpacking 21
2.2 Using further nozzles (accessories) 22
3 Operation 23
3.1 Vacuum cleaning 23
3.2 Setting the suction power 24
3.3 Switching off and retracting power cord 25
3.4 Transport and storage 25
4 Maintenance 26
4.1 Changing the dust filter bag 26
4.2 Changing filters 27
4.3 Changing the hygienic exhaust filter 27
4.4 Changing the motor protection filter 28
4.5 Cleaning the housing 28
5 Troubleshooting 29
6 After Use 30
6.1 Cleaning 30
6.2 Liability 30
6.3 Unauthorized Use 30
6.4 Usage Area 31
6.5 CE Declaration of Conformity 31
6.6 Disposal 31
6.7 Dispatch 31
Page 18
18
SAFETY
GB
1.1 Operating Manual
1 Safety notes
Read this operating manual carefully before using the
appliance.
Keep the operating manual for reference. Include the
operating manual if you pass the appliance to third parties.
Violations of the operating instructions can lead to severe
injuries as well as damages to the appliance.
We take no responsibility for damages due to violations of
these operating instructions.
Thank you for purchasing the Fakir EAGLE Dry Vacuum
Cleaner. It was developed and manufactured to work
reliably for many years.
1.2 The Notices Given Notices for your safety are especially marked. Always
observe these notices to avoid accidents and damages to
the appliance.
1.3 Children • Never leave the appliance unattended and use it with
special precaution if children or persons who cannot judge
dangers are nearby.
• People (including children) who are unable to safely
operate the appliance on account of their physical, sensory
or mental abilities or their lack of experience or knowledge
should only use this appliance under surveillance or
instruction of a responsible person. Keep the appliance out
of reach of people of these groups.
• Packing-materials are not toys. There is danger of
suffocation.
WARNING!
Warning concerning health hazards describing possible
risks of injury.
ATTENTION!
Warning concerning possible dangers to the appliance
or other objects.
NOTE!
Highlights tips and information for you.
Page 19

19
SAFETY
GB
1.4 Appropriate Use • Use the cylinder vacuum cleaner only for cleaning normally
soiled floors, rugs and curtains.
• The appliance Is Intended for home use only. It may not be
used commercially.
Any other use Is considered Inappropriate and Is
prohibited.
It is especially forbidden:
• To vacuum-clean:
- Hair, fingers and other parts of the body. They could be
sucked in and injured.
- Pieces of clothing (e. g. shoe laces, scarves, etc.). They
could be sucked in and cause injuries.
- Water and other liquids, especially moisture from
carpet-cleaning agents. Moisture inside the appliance can
lead to short-circuiting.
- Toner dust (for laser printers, copying-machines, etc.)
There is danger of fire or explosion.
- hot ash, burning cigarettes or matches. This could cause a
fire.
- pointed objects such as glass shards, nails, etc. Such
objects destroy the filters.
- Plaster, cement, finest drilling-dust, makeup, etc. The
filters may clog, causing damage to the appliance.
• The use of the appliance near inflammable or explosive
materials. There is danger of fire or explosion.
• Outdoor use There is danger of rain and dirt destroying the
appliance.
• Sticking objects into the appliance's openings. It could
overheat.
Page 20

20
SAFETY
GB
1.5 Mains connection • The appliance runs on electricity, that means there Is
always danger of electric shock. So please especially
observe the following:
- Never touch the plug with wet hands.
- Always pull directly at the plug If you want to disconnect
the appliance from the mains. Never pull the mains lead, It
might break.
- Take care that the power cord is not bent, pinched, rolled
over or gets in contact with heat sources.
- Use only extension cords suited to the power requirements
of the appliance.
- Never immerse the appliance in water or other liquids.
- Only operate the appliance if your mains voltage is the
same as that indicated on the appliance's nameplate.
Wrong voltage can destroy the appliance.
- If the power cord of this appliance is damaged it must be
replaced by the manufacturers, their authorised service
representative or a similarly qualified person to avoid
danger to the user.
1.6 If the appliance is
defective
• Never use a defective appliance or operate an appliance
with a defective power cord. There is a major risk of injury.
• Refer a defective appliance to an authorised dealer or the
Fakir Home Appliances service for repair.
Page 21
21
ASSEMBLY
GB
2.1 Unpacking
2 Unpacking and assembling
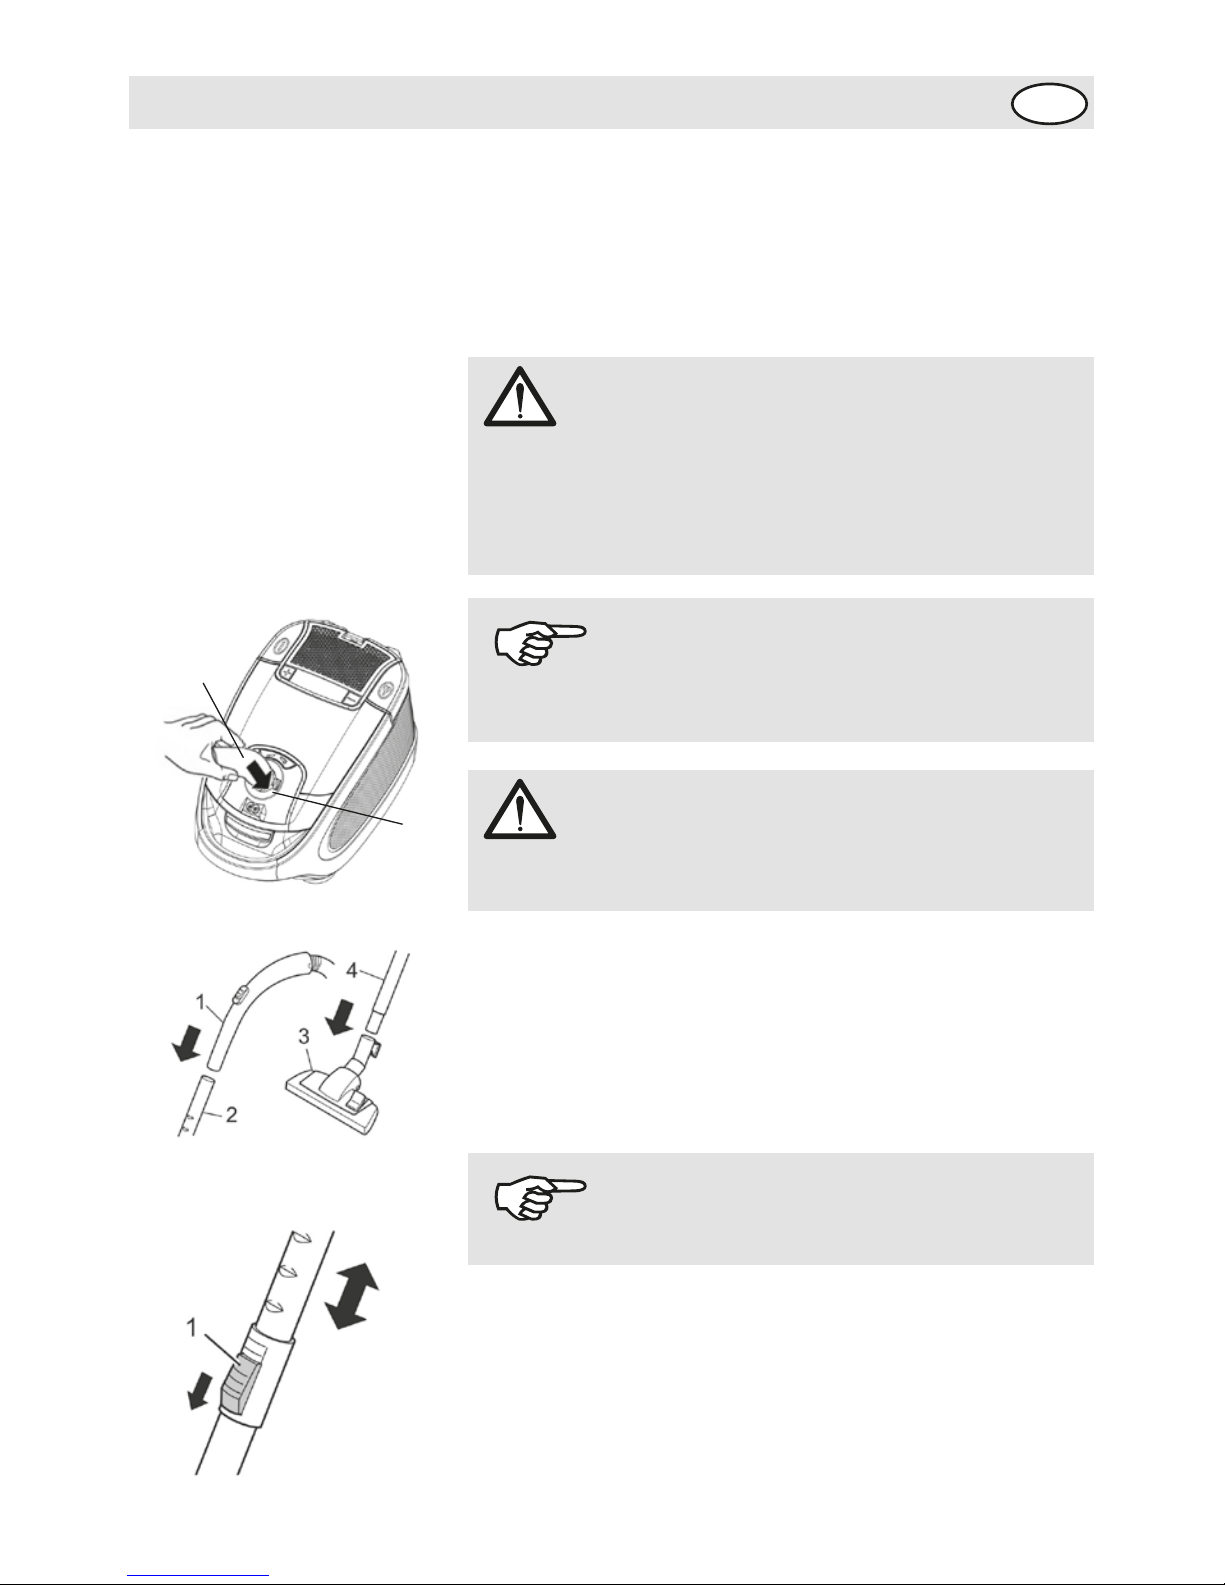
1. Unpack the appliance and all its accessories.
2. Check that the contents are complete Information
regarding scope of delivery
1. Insert the end of the suction hose (Fig. 2/1) in the intake
opening (Fig. 2/2) into the intake opening of the vacuum
cleaner, until it locks with an audible click.
2. Insert the handle (Fig. 3/1) into the upper end of the
telescopic tube (Fig. 3/2).
3. Attach the floor nozzle (Fig. 3/3) to the bottom end of the
telescopic tube (Fig. 3/4).
4. Adjust the length of the telescopic tube. Press down the
release latch on the tube to (Fig. 4/1) do this. Then pull
the handle of the telescopic tube to extend (Fig. 3/1) it to
your desired length. Let go of the release catch while
pulling until it locks in place. You will hear a distinct click.
Your vacuum cleaner is now ready for use.
WARNING!
Only assemble the appliance if it is not connected to the
mains. The appliance could be switched on by accident.
ATTENTION!
Always transport or ship the appliance in its original
packaging to avoid damage. Keep the packaging for
such an event.
Dispose of no longer needed packaging material
according to the applicable regulations of your country.
NOTE!
Immediately contact your dealer if you damage
resulting from transportation.
NOTE!
It might be necessary to push a bit harder.
(Fig.2)
(Fig.3)
(Fig.4)
2
1
Page 22
22
UNPACKING AND ASSEMBLING
GB
2.2 Using Further Nozzles Besides the floor nozzle you just attached, you may extend
the functions of your vacuum cleaner with other nozzles.
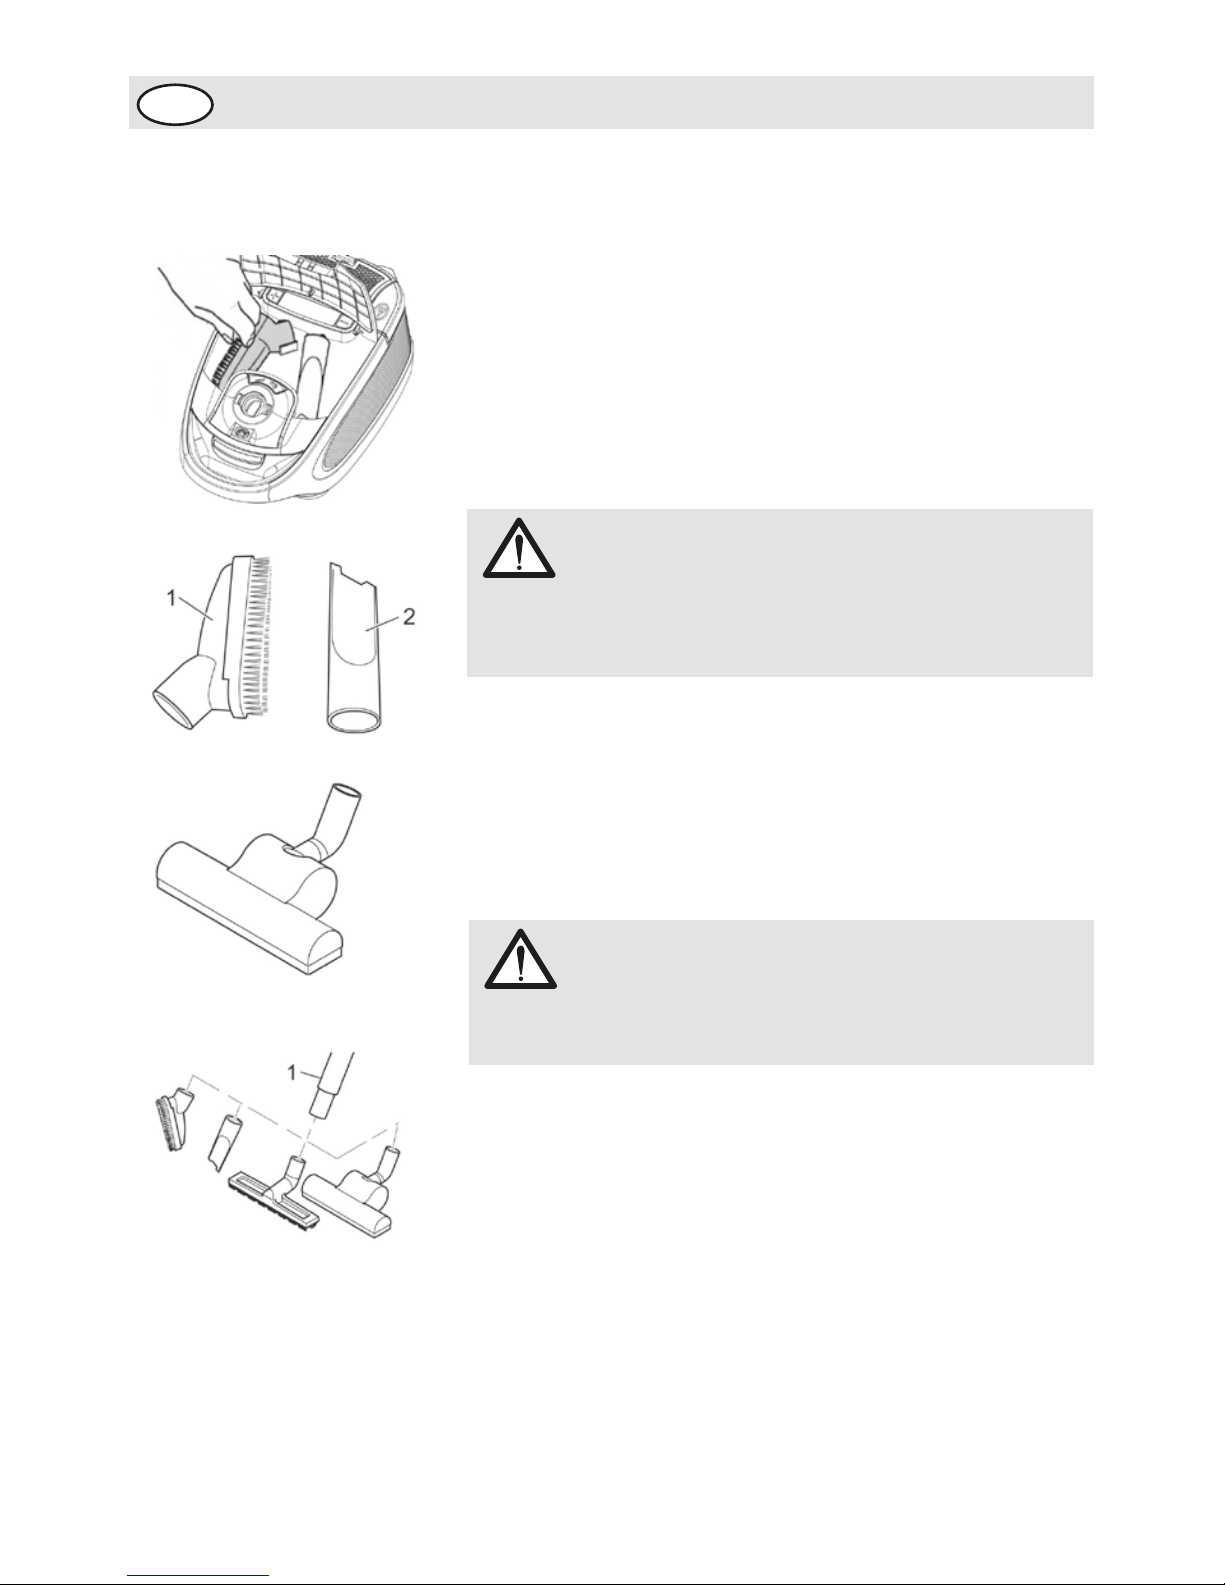
• The combi brush and the crevice nozzle are included in
the package as accessories. You can store them in the
accessory compartment when not in use. (Fig.5)
- Combi Brush (Fig.6/1)
Use this to remove dust from objects with delicate surfaces
(e.g. cupboards and tables)
- Crevice Nozzle (Fig.6/2)
Use this to suck dust out of hard to reach places.
This is how you attach the nozzles:
1.Switch off the vacuum cleaner and pull the plug from the
mains socket.
2.Pull the attached nozzle off of the telescobic tube.
3.Attach the required nozzle to the bottom end of the
telescobic tube (Fig.9/1) or if necessary directly to the
handle.
4.If possible, store nozzles no longer in use on the
accessory bracket.
WARNING!
Only attach nozzles when the vacuum cleaner is not
connected to the mains. The appliance could be
switched on by accident.
ATTENTION!
Using the vacuum cleaner without a nozzle attached
increases the danger of accidentally sucking in objects.
(Fig.5)
(Fig.6)
(Fig.7)
(Fig.8)
Page 23
OPERATION
23
GB
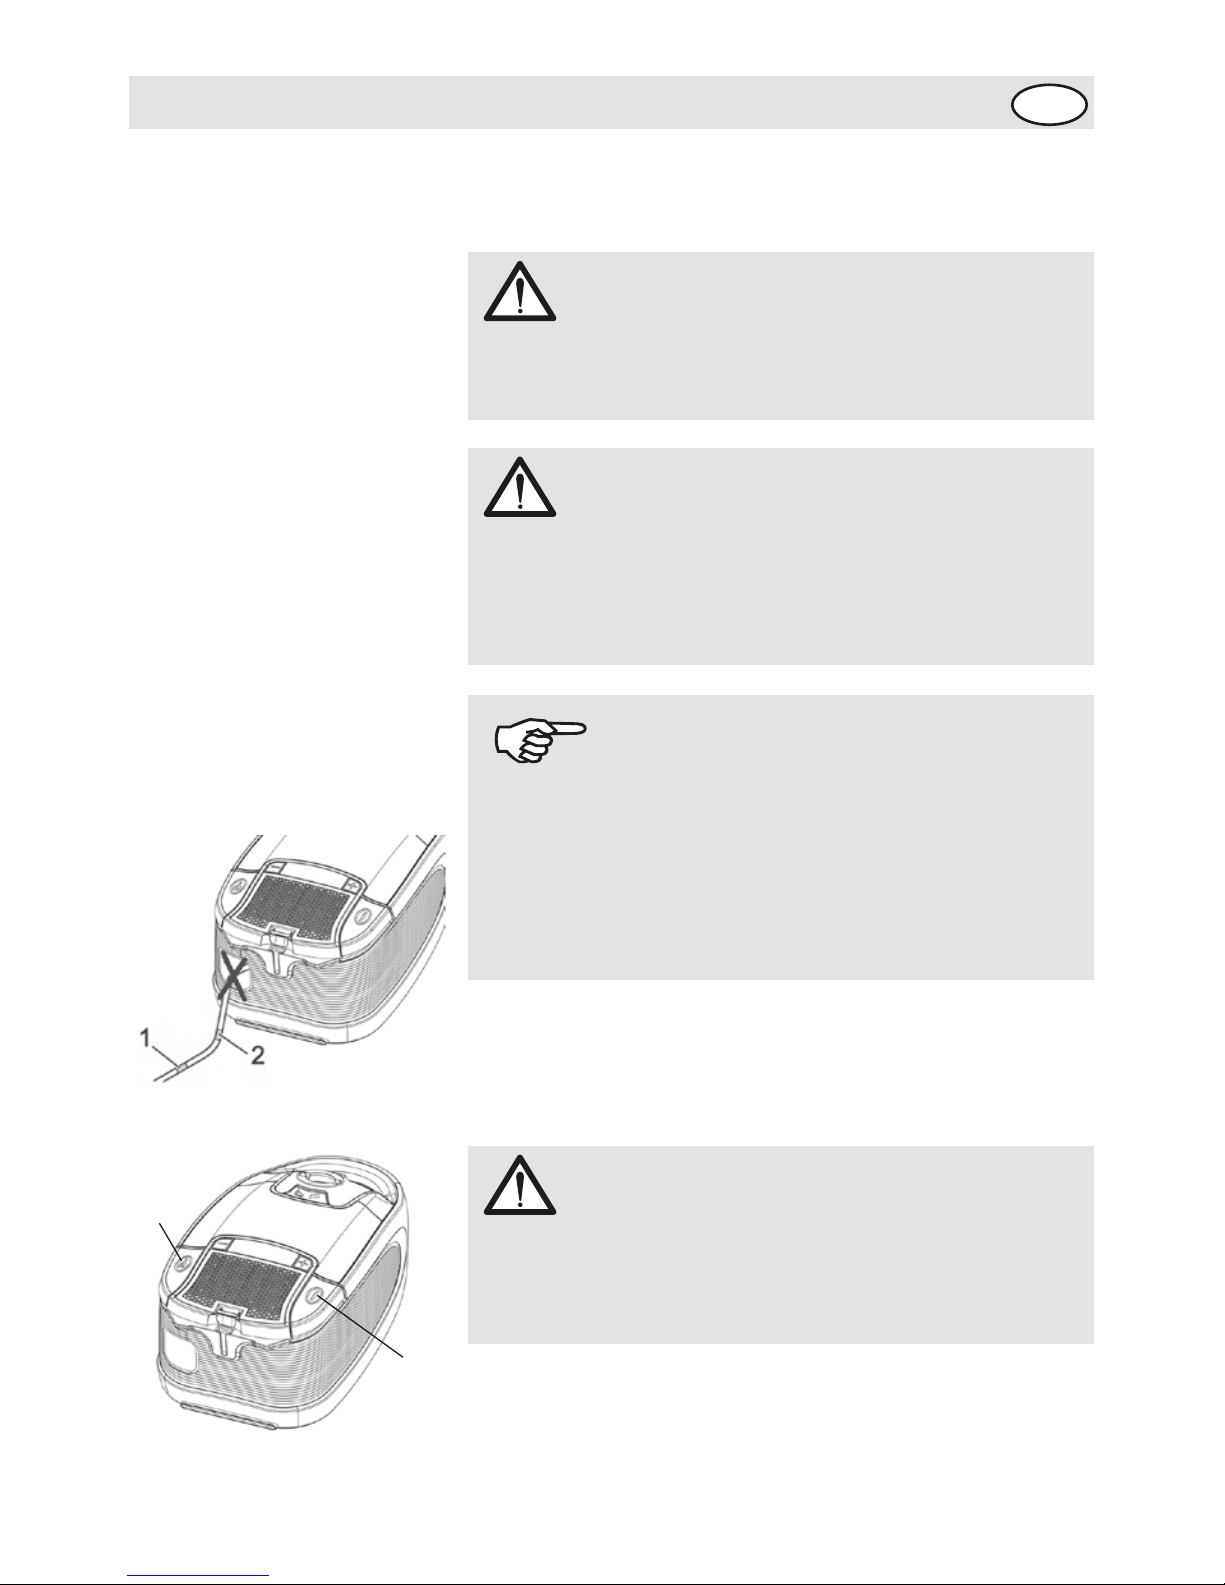
1. Attach the desired nozzle
2. cord until the yellow marking is visible (Fig. 9/1)
3. Switch on the vacuum cleaner with the on/off switch
(Fig. 10/1).
3.1 Vacuum cleaning
3 Operation
WARNING!
Check the vacuum cleaner and the power cord each time
before using It. A damaged appliance must not be used.
There is danger of injury.
WARNING!
If the red marking shows (Fig. 9/2) retract the cord by
pressing the retract buttonto pull in the cable (Fig. 10/2)
up to the yellow mark again. Otherwise the cord might
break. There is danger of an electric shock.
ATTENTION!
Only use the vacuum cleaner with all filters intact, in dry
condition and correctly placed. Make sure that the
openings of the vacuum cleaner are not clogged.or
obstructed. Otherwise the vacuum cleaner might be
damaged.
NOTE!
Your vacuum cleaner is equipped with a safety switch
to prevent overheating. It automatically cuts off the
power supply if the motor is overheated. In this case
switch off the vacuumcleaner and disconnect it from
the mains. Remove the cause of the overheating. Wait
for about 45 minutes. After it has cooled off, you may
use the vacuum cleaner again.
(Fig.9)
(Fig.10)
1
2
Page 24
24
OPERATION
GB
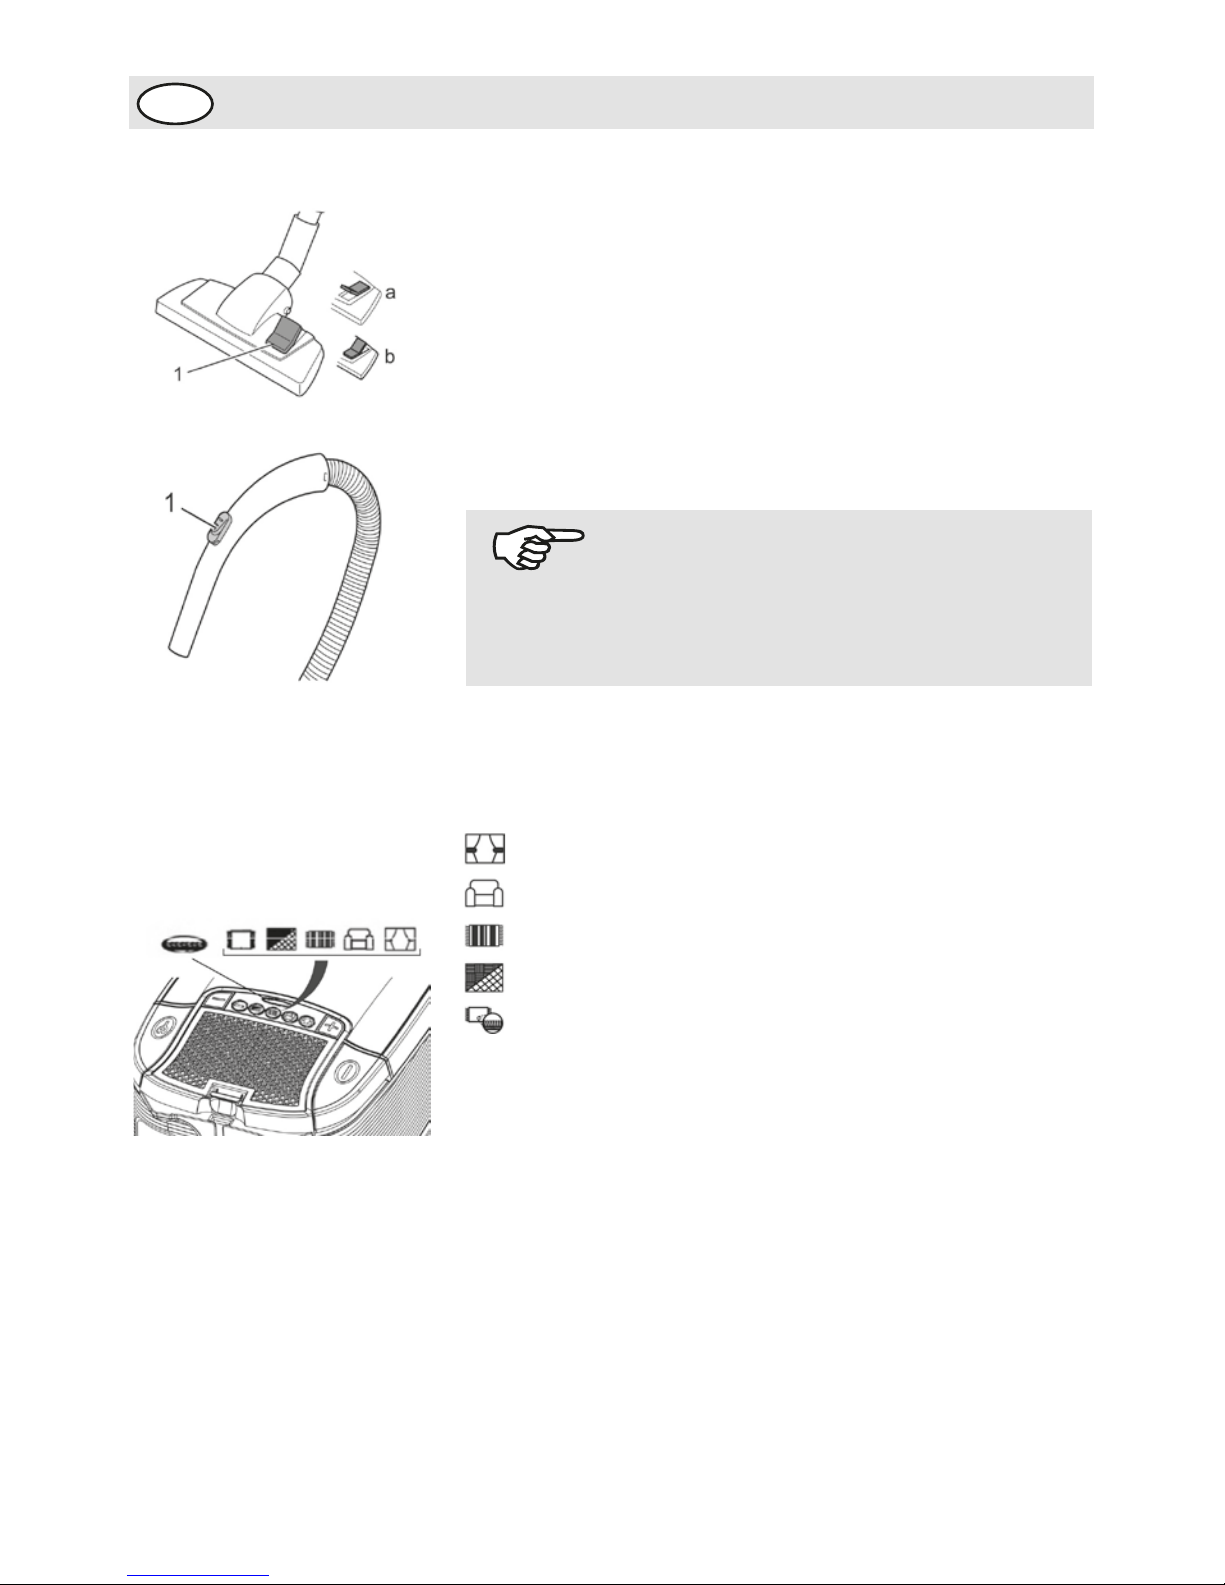
4. Set the nozzle switch to "carpet" or "hard floor"
according to the floor (Fig. 11) to be cleaned:
- Hard floor (Fig. 11/A)
Laminate, tiles, PVC, etc.
- Carpet (Fig. 11/B)
Short- and deep-pile carpets, rugs, etc.
5. When working with the vacuum cleaner, pull if after you
like a sleigh. Follow the respective recommendations of
the flooring manufacturers.
1. To set the desired power setting, press the + button or
the - button several times until the desired setting lights
up on the suction power display.
- + button (Fig. 13/2) increases suction power
- - button (Fig. 13/3) reduces suction power
You can adjust the suction power to suit the type of floor
being cleaned. Use the symbols on the suction power
display as a guideline (Fig. 13/1):
Curtains, textiles (lowest setting)
Upholstery, cushions
High-class carpets, rugs and runners
slightly soiled carpets and hard floors
Heavily soiled carpets and hard floors with coarse dirt
(highest setting)
3.2 Setting the suction
power
With the bypass vent (Fig. 12/1) you can quickly
reduce the suction power if less power is needed,
or to release objects accidentally sucked in.
NOTICE!
(Fig.11)
(Fig.12)
(Fig.13)
Page 25
25
OPERATION
GB
1. Switch off the vacuum cleaner with the on/off switch (Fig.
14/1) and pull the plug from the mains socket.
2. Keep the plug In your hand.
3. To retract the power cord, push the cord retracting
button (Fig. 14/2).
WARNING!
During retraction the power cord can whip around,
become an obstacle or overthrow objects.
WARNING!
During retraction the power cord can whip around,
become an When leaving your working-area, switch off
the appliance and mind the notices at \>Chapter 3.3,
"Switching off and retracting power cord".or overthrow
objects.
ATTENTION
Never store the appliance next to heat sources (e.g.
stoves or radiators). Avoid exposing it to direct sunlight.
The heat might damage the appliance.
3.3 Switching off and
retracting power cord
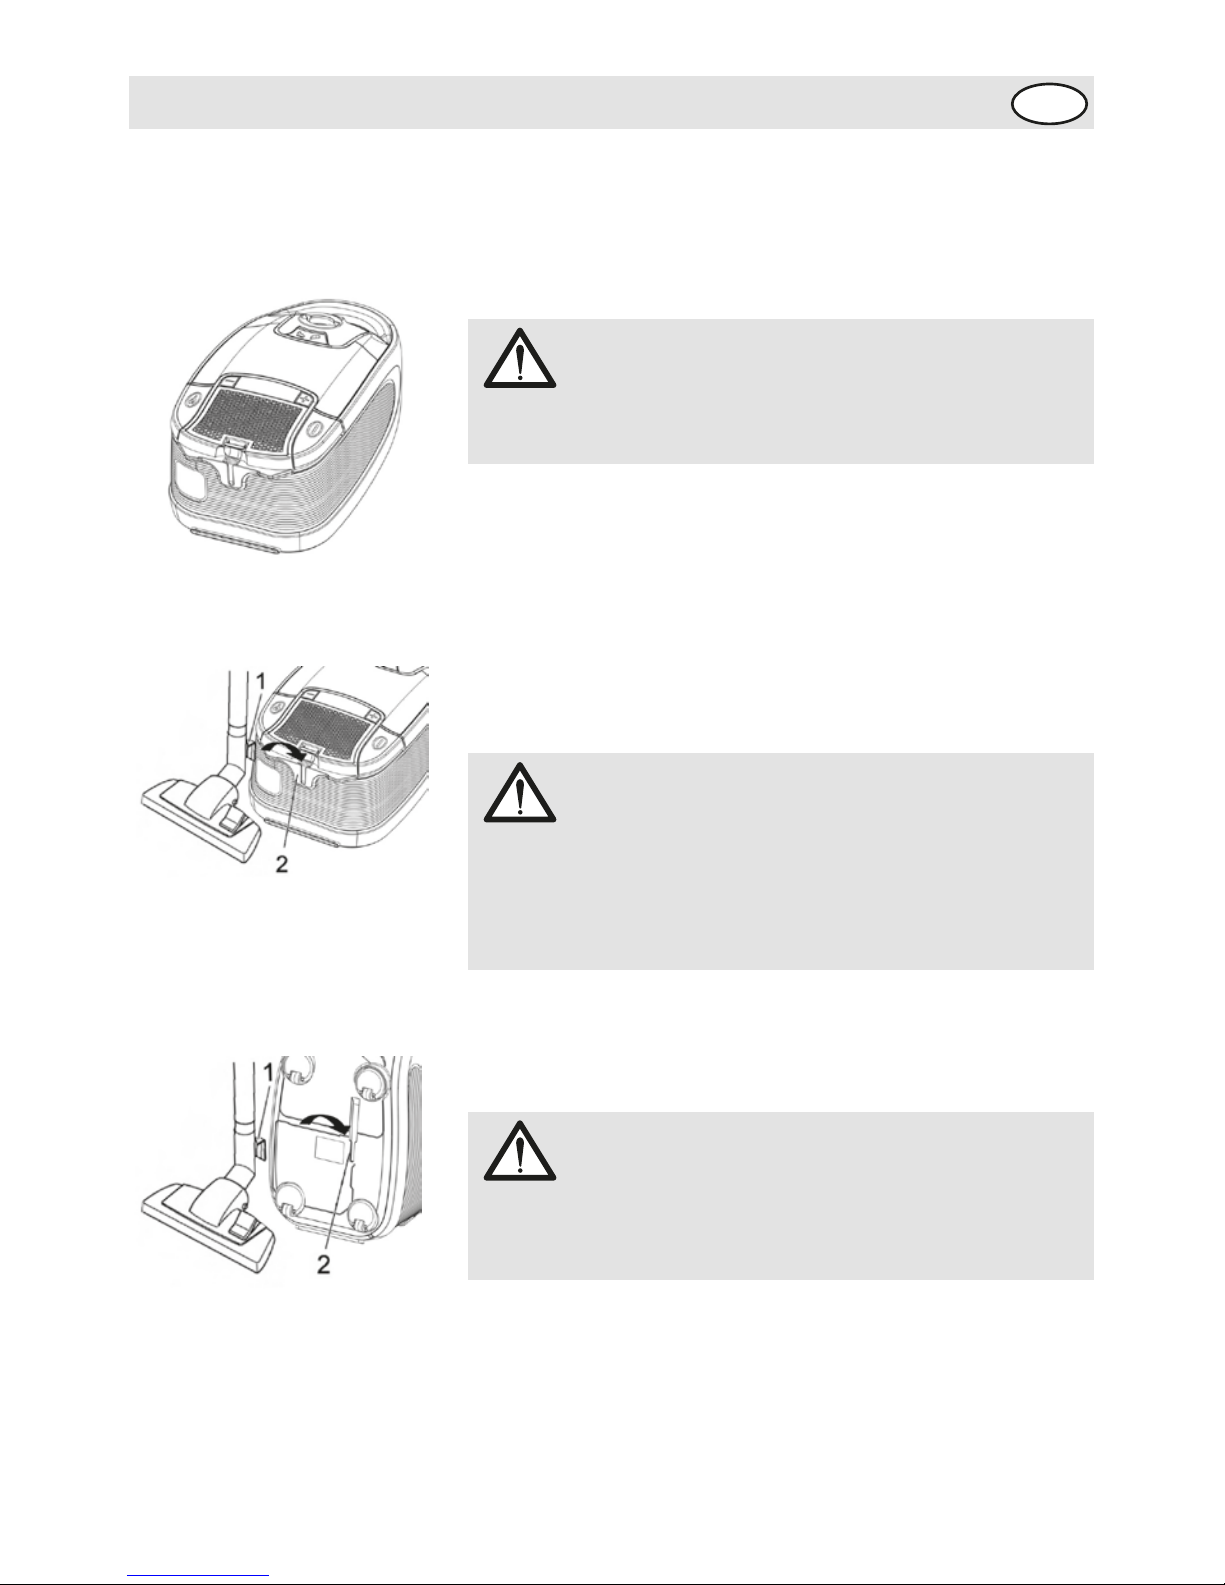
• To transport the vacuum cleaner you can cany it by the
handle.
• To store it or when interrupting your work, you can hook
the park/storage hook (Fig. 15/1) into the parking (Fig.
15/2) bracket.
• To store the vacuum cleaner you can hook the
park/storage hook (Fig. 16/1) into the storage (Fig. 16/2)
bracket on the bottom of the appliance.
• If you want to store the appliance for a prolonged period,
remove the dust filter bag and dispose of it properly. Also
clean the filters.
• Always store the appliance in a cool, dry place.
3.4 Transport and storage
(Fig.14)
(Fig.15)
(Fig.16)
Page 26
26
MAINTENANCE
GB
ATTENTION
When leaving your working-area, switch off the appliance
and mind the notices at \>Chapter 3.3, "Switching off and
retracting power cord". In this way you avoid dust
destroying the appliance.
Be careful when removing the dust filter bag so that
no dust escapes.
NOTICE!
You can dispose of the dust filter bag with your regular
domestic trash if it contains no prohibited waste
materials.
NOTICE!
The dust compartment cover can only be closed with a
dust filter bag in place.
NOTICE!
• Change the dust filter bag at the latest when the
electronic dust filter bag change indicator (Fig. 13/1)
shows "red" or the suction power has decreased.
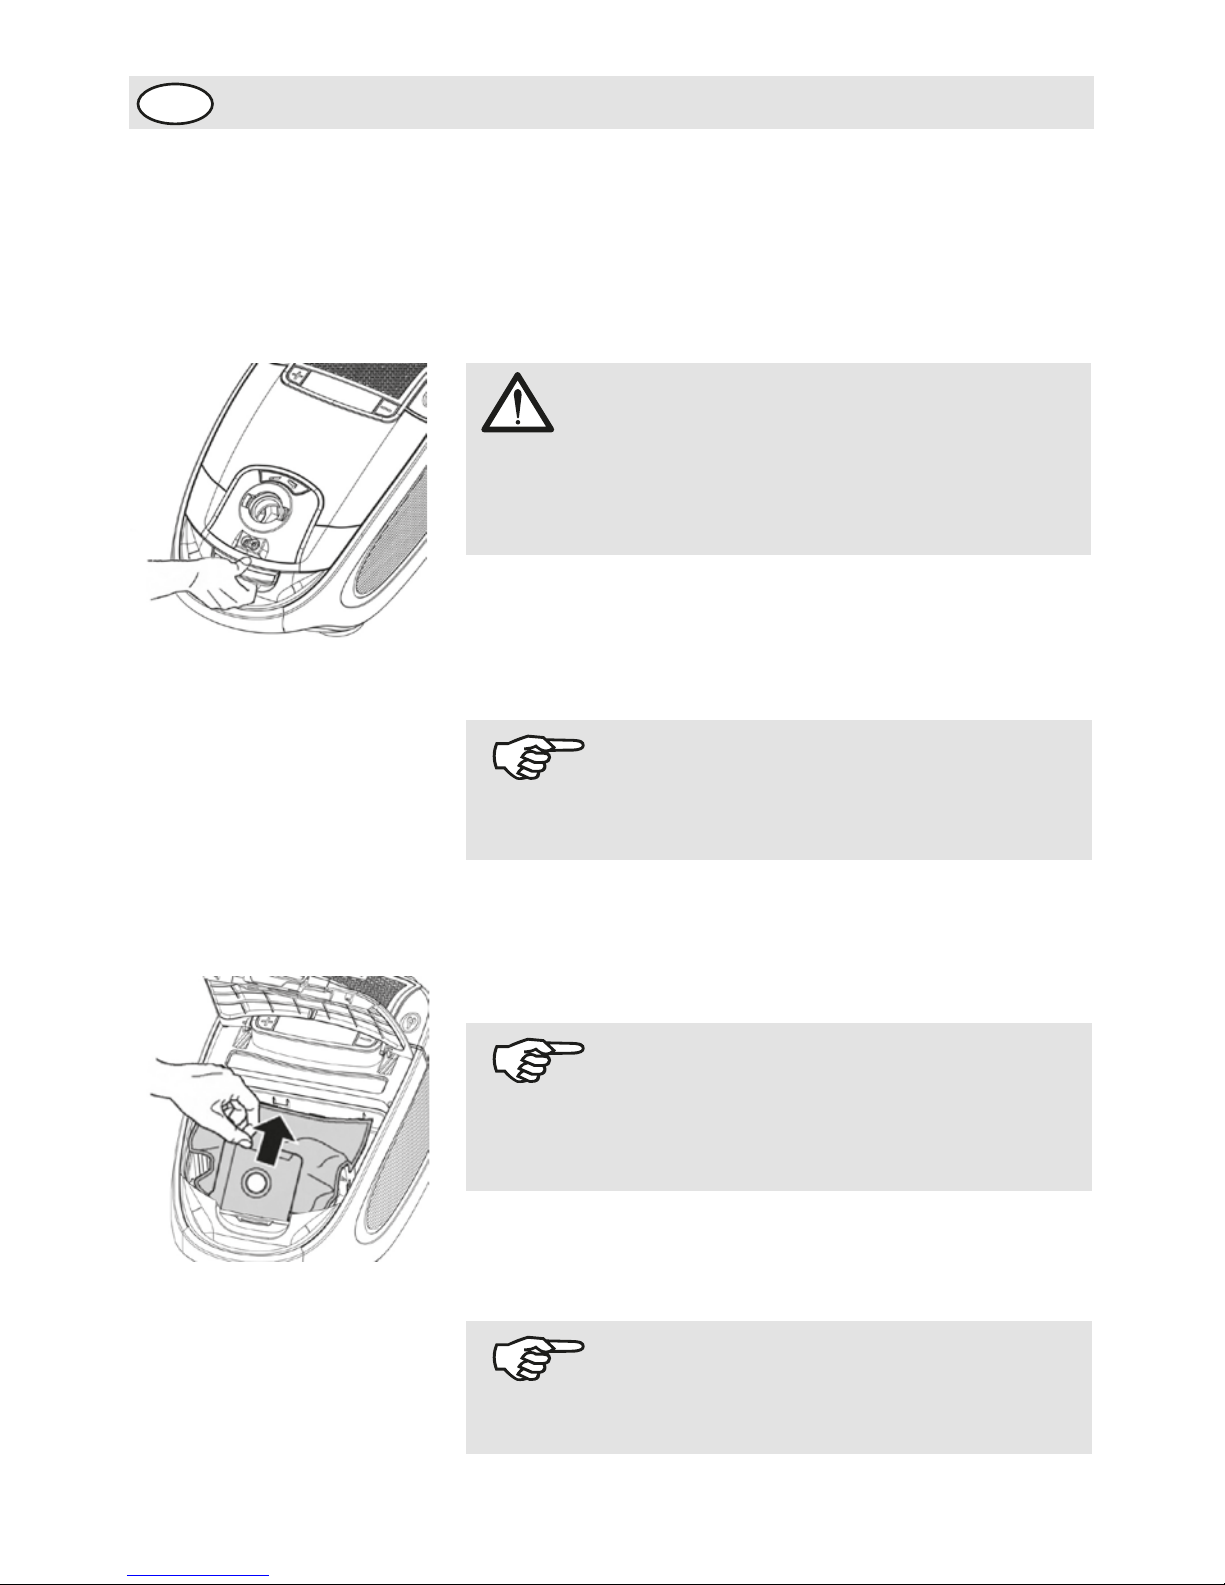
1. Open the dust compartment cover by unlatching and
subsequently raising it (Fig. 17).
2. Raise the dust compartment cover until it locks in the
highest position and remains open by itself.
3. Pull the dust filter bag up and out of the dust filter holder
(Fig. 18).
4. Remove any dust that may have collected in the dust
compartment.
5. Push the new dust filter bag in the filter bag holder.
6. Close the dust compartment cover. It clicks into place
audibly.
4.1 Changing the dust
filter bag
4 Maintenance
(Fig.17)
(Fig.18)
Page 27
27
MAINTENANCE
GB
If the motor protection filter is only slightly dirty, it can
help to beat out the dust over a dustbin. However, we
recommend to change the motor protection filter each
time you open a new box of dust \>Chapter 6, "Spare
parts and disposal") filter bags.
NOTICE!
Make sure that that the exhaust filter is always properly
locked into position, otherwise the exhaust air will not
be properly filtered.
NOTICE!
ATTENTION
These filters are not washable. The exhaust filter may
not be re-used.
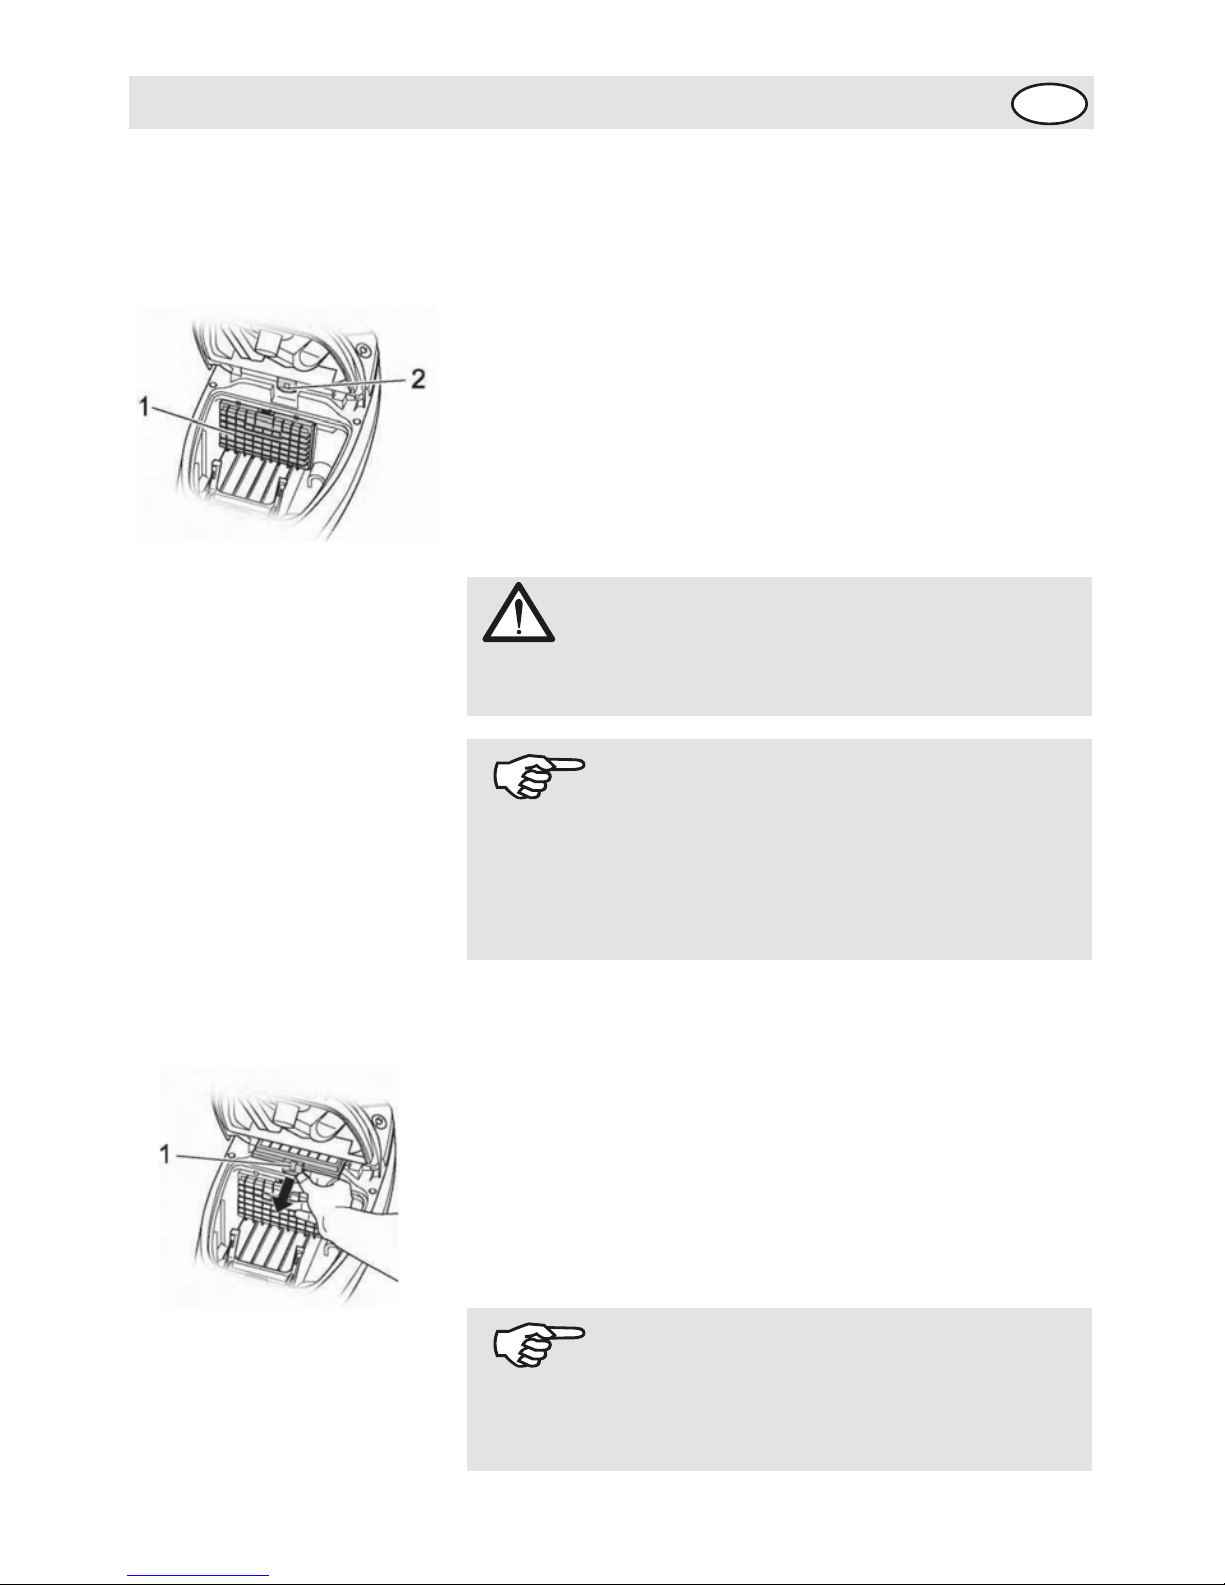
Your vacuum cleaner is equipped with the following filters:
• Motor protection filter (Fig. 19/1) prevents larger
particles from destroying the motor in case the dust filter
bag is defective.
Changing: Every time you open a new box of dust filter
bags, as they always contain a new motor protection
filter, but at least every 6 months.
• Hygienic exhaust filter (Fig. 19/2) removes
microscopic particles from the exhaust air stream.
Changing: every 6 months
The filters can become clogged with time and reduce the
appliance's performance. That's why it is important to
adhere to the above changing intervals.
Damaged filters must be removed immediately.
4.2 Changing filters
1. Switch offthe vacuum cleaner and remove the dust filter
bag as described in \>Chapter4.1, "Changing the dust
filter bag", steps 1 thru 4.
2. Remove the exhaust filter (Fig. 20/1).
Unlatch the lock and slightly lift the filter. Now you can pull
out the filter towards the front.
3. Insert a new exhaust filter (\>Chapter 6, "Spare parts and
disposal") and push it down slightly until it locks into the
holder.
4. Replace the dust filter bag and close the dust
compartment cover. The cover clicks into place audibly.
4.3 Changing the
hygienic exhaust filter
(Fig.19)
(Fig.20)
Page 28
28
MAINTENANCE
GB
WARNING!
Always switch off the appliance and disconnect it from the
mains before cleaning it t>Chapter3.3, "Switching off and
retracting power cord".
ATTENTION
Do not use cleaning or scouring agents or alcohol, as
these might damage the appliance.
1. Switch off the vacuum cleaner and remove the dust filter
bag as described in > Chapter 4.1, "Changing the dust
filter bag", steps 1 thru 4.
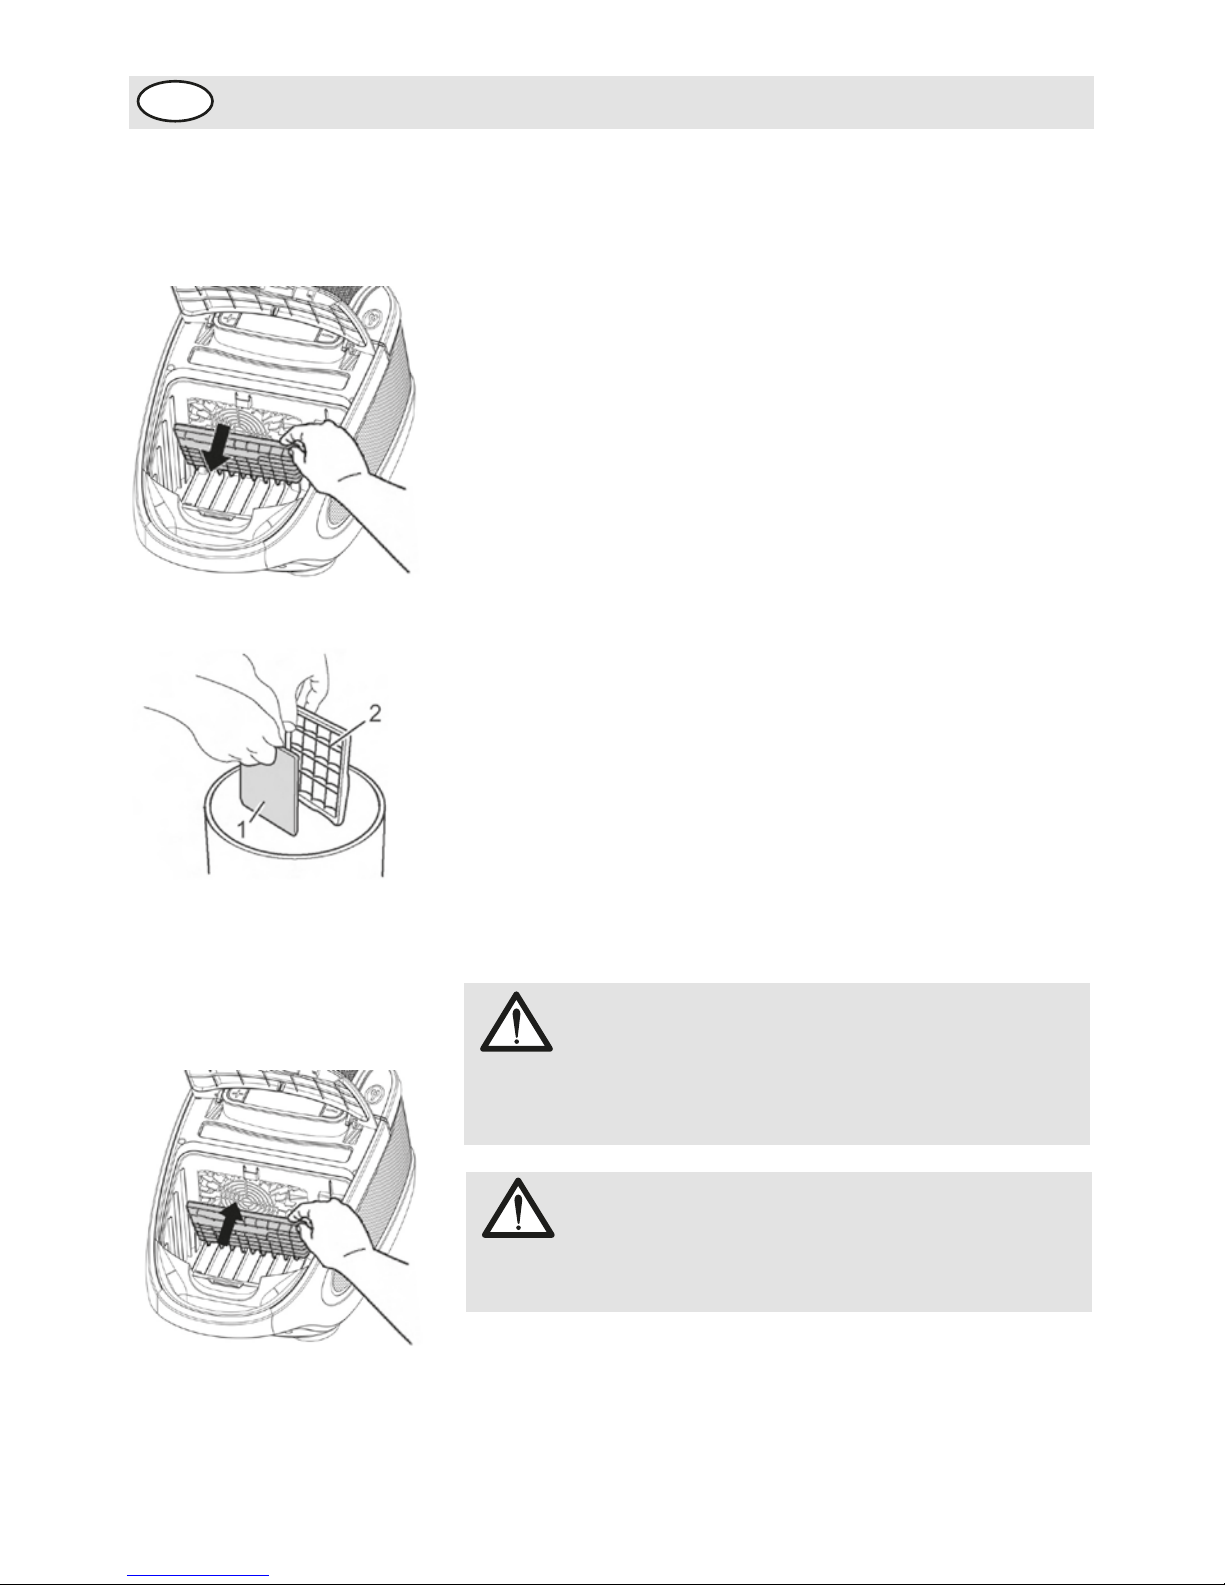
2. Remove the filter holder with motor protection filter (Fig.
21/1). Your first flip the filter holder forwards and then
pull the filter up and out.
3. Remove the motor protection filter (Fig. 22/1) from the
filter holder (Fig. 22/2) over a dustbin.
4. Clean the filter holder.
5. If the new motor protection filter is too large, lay the the
old filter onto the new filter mat. Mark the contours and
cut the new filter down to size with a pair of scissors.
6. Insert the new motor protection filter into the filter holder.
7. Insert the filter holder with the new filter into its bracket
from above and push it down until it audibly locks into
place.
8. Replace the dust filter bag and close the dust
compartment cover. The cover clicks into place audibly.
• Clean the outside of the housing using a slightly damp
cloth only.
4.4 Changing the motor
protection filter
4.5 Cleaning the
housing
(Fig.21)
(Fig.22)
(Fig.23)
Page 29
29
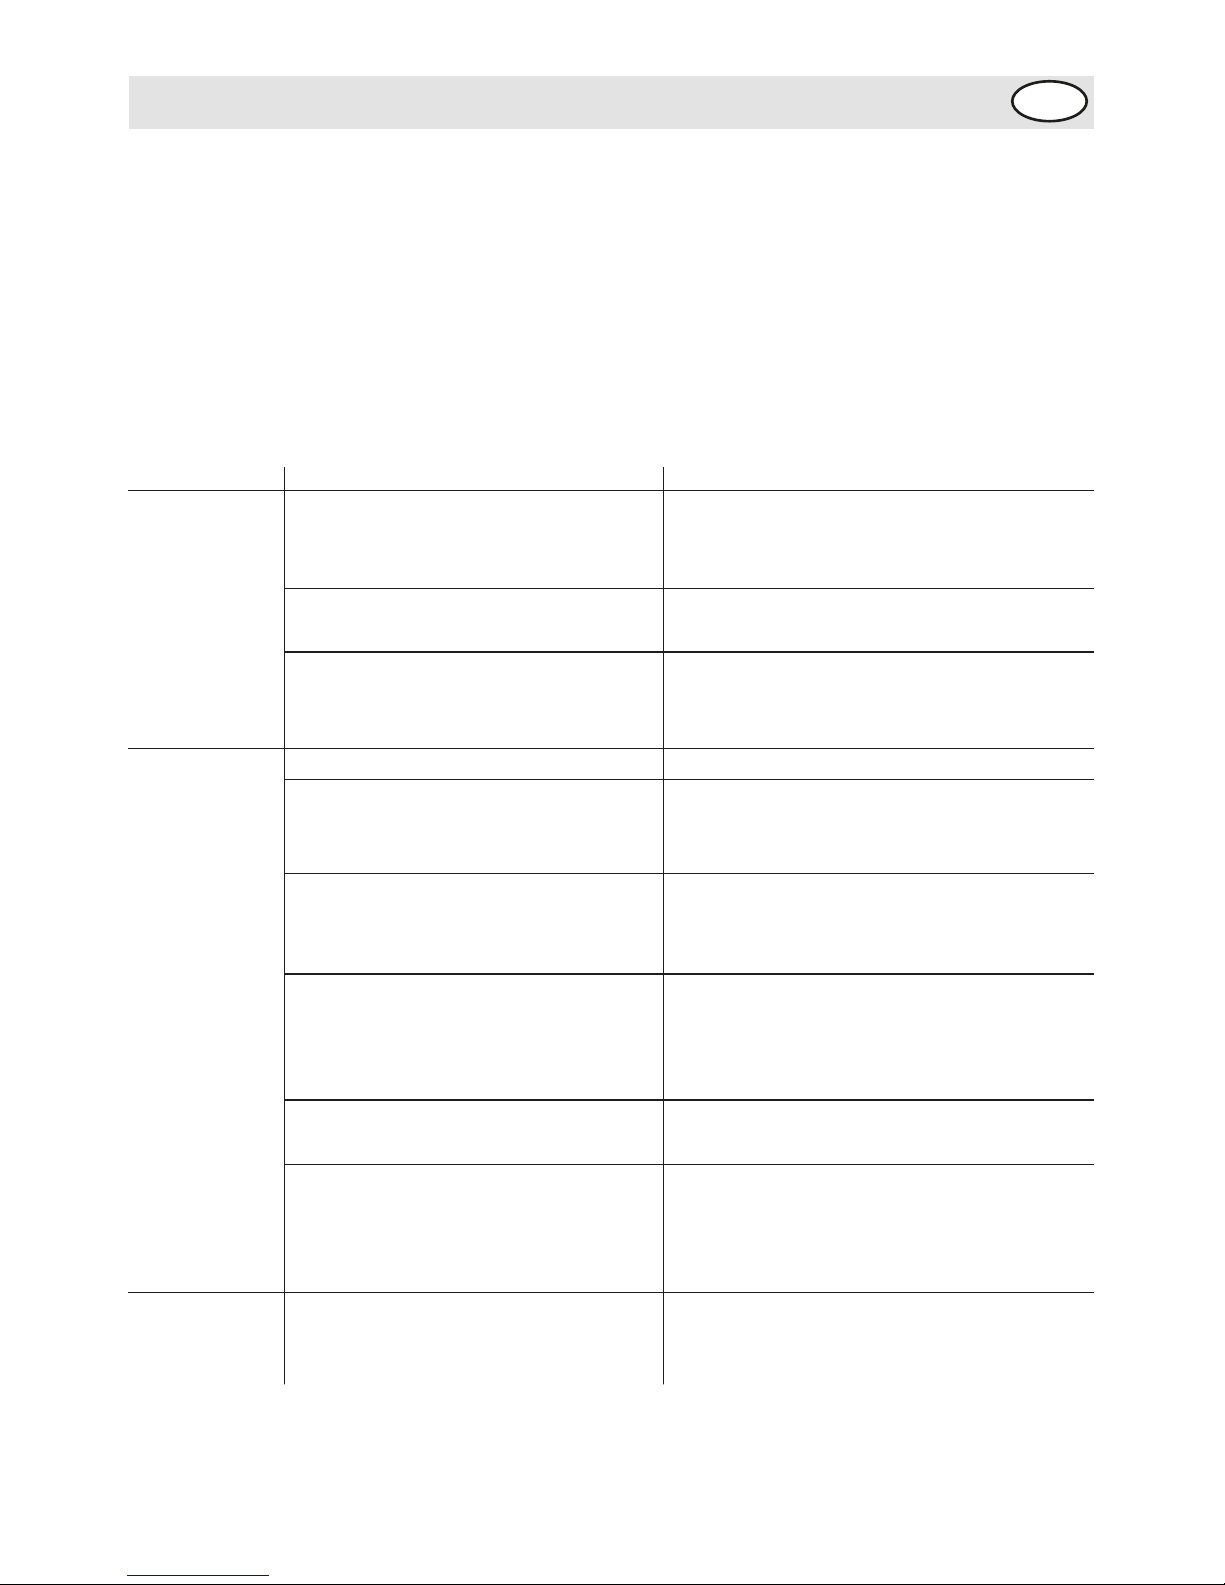
TROUBLESHOOTING
GB
WARNING:
Never use a defective appliance. Always switch off the appliance and disconnect it from the
mains before starting troubleshooting \>Chapter 3.3, "Switching off and retracting power
cord".
5 Troubleshooting
Fault
The appliance
doesn't run.
The cleaning
result is
unsatisfactory.
The appliance
makes unusual
noises.
Possible cause
The plug is not connected to the
mains or the appliance is not
switched on.
Socket does not carry current.
The power cord is damaged.
The dust filter bag is full or clogged.
Nozzle, telescopic tube or suction
hose are clogged.
The power setting does not fit the
flooring.
The "carpet/hard floor" switch (Fig.
1/10) is in the wrong position for the
particular type of floor.
The attached nozzle does not fit the
flooring.
The filter is dirty.
Sucked-in objects are obstructing
the air stream.
Solution
Insert the plug into a mains socket and
switch on the appliance \>Chapter 3.1,
"Vacuum cleaning".
Test the vacuum cleaner on another socket
that you are sure is carrying current.
Have the cord replaced by the Royal®
Appliance Customer Service, address
\>Page 35, "Warranty".
Empty/clean the dust filter bag.
Remove the obstacle. If necessary,
use a long wooden stick (e.g. a broomstick)
to do this.
Set the power to the setting suggested for
the flooring, \>Chapter3.1, "Vacuum
cleaning", step 4.
Set the "carpet/hard floor" switch to the
correct position for the (Fig. 1/10) particular
type of floor, \>Chapter3.1, "Vacuum
cleaning", step 5.
Attach the correct nozzle >Chapter 2.3,
"Using further nozzles (accessories)".
Change/clean the respective filter
\>Chapter 4.4, "Changing the motor
protection filter"or \> Chapter 4.3,
"Changing the hygienic exhaust filter".
Remove the objects. If necessary, use a
long wooden stick (e.g. a broomstick)
to do this.
Page 30
30
AFTER USE
GB
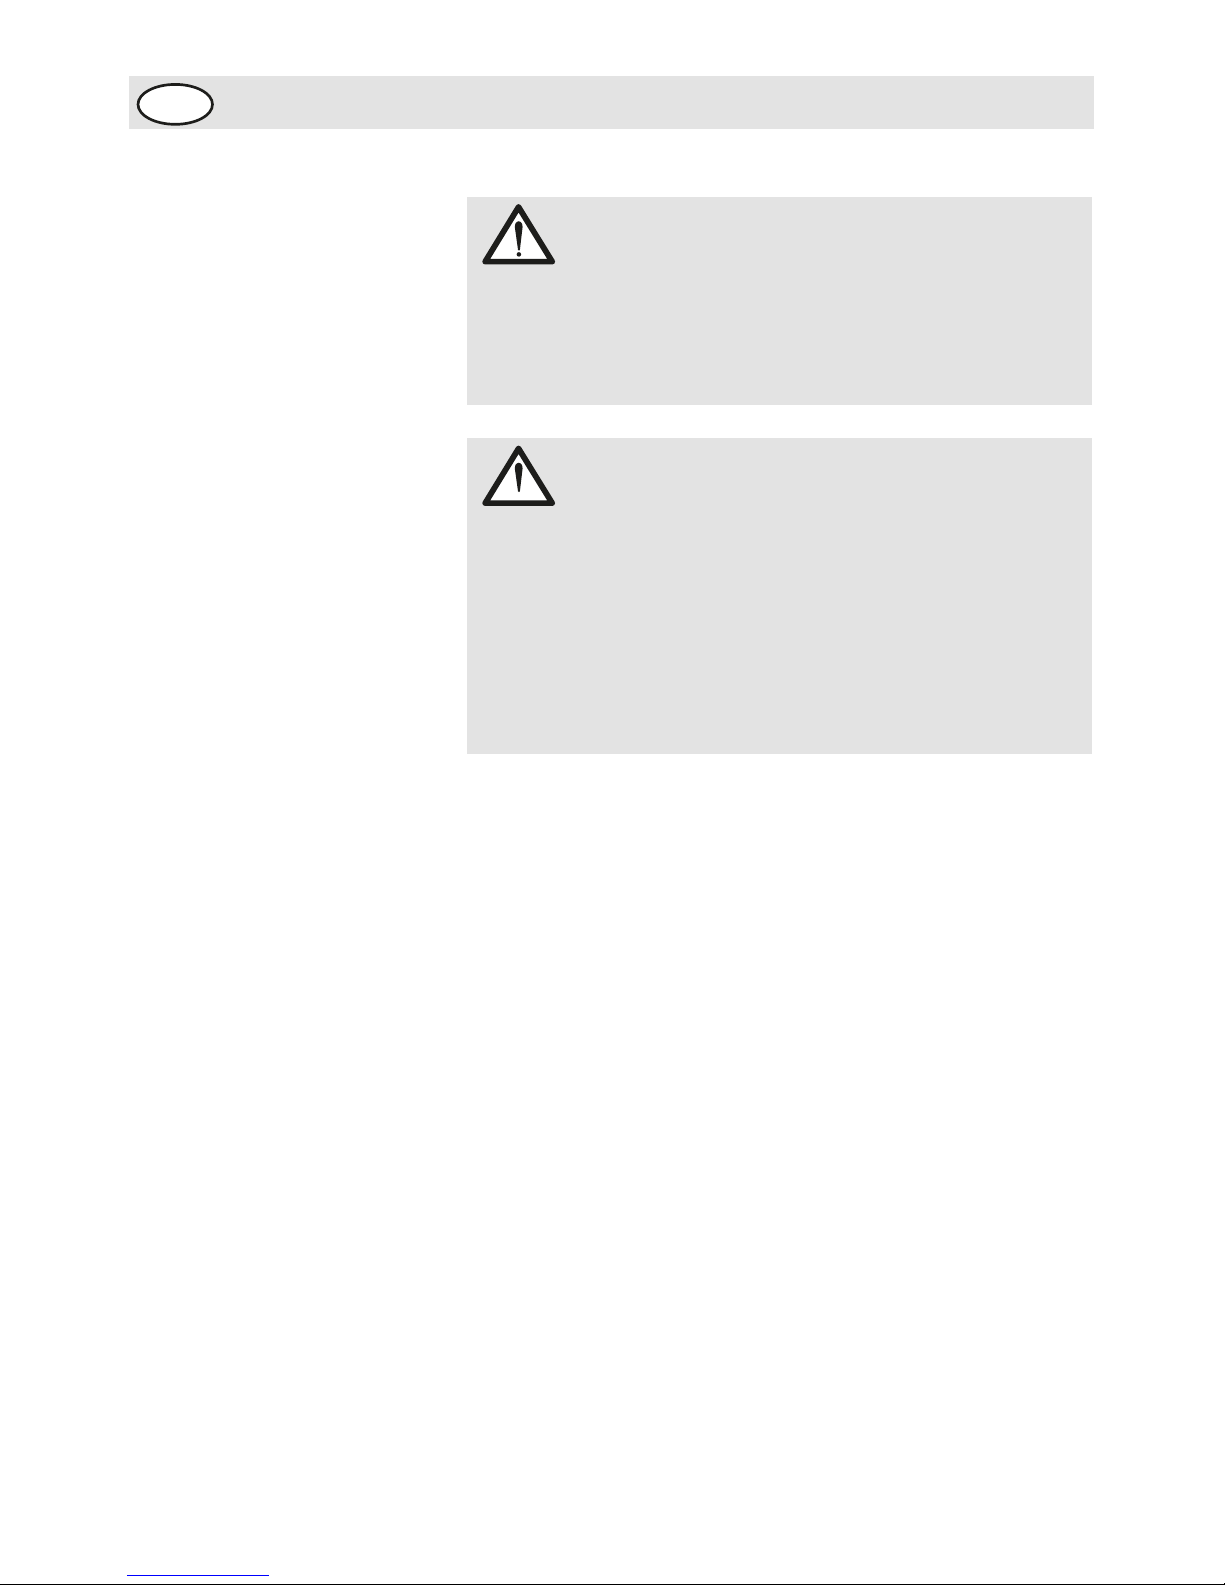
WARNING!
Switch off the vacuum cleaner and disconnect the plug
from the mains socket before cleaning the appliance.
This ensures that the appliance is not switched on
unintentionally.
CAUTION!
Do not use cleaning detergents, abrasive agents or
alcohol as these will damage the casing.
Only dry-wipe the appliance or clean with a damp
cloth. You can also clean the filter chamber with a
damp cloth if necessary.
Suction accessories such as the hose, pipes or
nozzles should be regularly checked for blockages,
cleaned and, washed and dried.
Cleaning
Liability Fakir Elektrikli Ev Aletleri
Dış. Tic. A.Ş.
will accept no
liability for damages resulting from failure to comply with the
operating instructions. Fakir Elektrikli Ev Aletleri
Dış. Tic.
A.Ş.
cannot assume any liability in case the appliance is
used for other purposes than its intended use or handled,
repaired or serviced improperly.
Unauthorized use The examples of unauthorized use listed here can result in
malfunctions, damage to the appliance or personal injury:
This appliance is not designed to be used by persons
(including children) with limited physical, sensory or mental
capacities or by persons lacking in experience and/or
knowledge, unless they are supervised by someone who is
responsible for their safety or have received instructions on
how to use the appliance. Children should be supervised to
ensure that they do not play with the appliance.
Childrenshould be supervised to ensure that they do not
play with the appliance. Electric appliances are not toys for
children! Therefore, use and store the appliance away from
the reach of children. Children do not recognize the danger
involved with handling an electric appliance. Do not let the
power cord dangle from the appliance.
Keep packaging films away from children - danger of
suffocation!
Page 31
31
AFTER USE
GB
Waste disposal If the service life of the device has ended, in particular if
functional disturbances occur, make the worn-out device
unusable by cutting through the power cable.
Dispose of the device according to the environmental regulations applicable in your country.
Electrical waste must not be disposed of together with
household waste. Bring the worn-out device to a collection
center. The packaging of the device consists of
recycling-capable materials. Place these, sorted out
according to material, in the collectors provided, so that
recycling can be carried out on them.
For advice on recycling, refer to your local authority or your
dealer.
Dispose of used dust bag and filters in domestic waste.
Usage Area
This appliance is suitable for places; home. Do not use
appliance for other than intended use and never use this
appliance outdoors.
CE Declaration of
Conformity
This appliance fulfills the requirements of the Appliance and
Product Safety Law (GPSG) and the EU Directives
2004/108/EC “Electromagnetic Compatibility” and
2006/95/EC “Low-Voltage Directive.” The appliance bears
the CE mark on the rating plate.
Dispatch: Carry the appliance in the original package or a similar,
wellpadded package to prevent damage to the appliance.
❑ This product is produced on behalf of Fakir Elektrikli Ev
Aletleri Dış Ticaret A.Ş by SUZHOU EUP ELECTRIC CO
LTD, 90 JIN SHAN ROAD, NEW DISTRICT, SUZHOU
215011, P.R.CHINA TEL.: 0086-512-68091780.
Technical Specs: Max. 2400W
220/240V
50/60 Hz
10 Years Usage Life
Page 32

İmalatçı / İthalatçı Firma:
Fakir Elektrikli Ev Aletleri Dış. Tic. A.Ş.
Meşrutiyet Cad. No:43 Tepebaşı-İstanbul TÜRKİYE
Tel:(212) 249 70 69 (pbx) Fax:(212) 251 51 42
 Loading...