

Fakir Deluxe 9800 S ÖKO Power User Manual
Deluxe 9800 S
ÖKO Power
2200 Watt
Vacuum Cleaner
Elektrikli Süpürge
User Manual
Kullan›m K›lavuzu
2200 Watt
Vacuum Cleaner
Elektrikli Süpürge

Deluxe 9800 S
ÖKO Power
1600 Watt
Spray Extraction Cleaner
Hal› Y›kama Makinesi
User Manual
Kullan›m K›lavuzu
1600 Watt
Spray Extraction Cleaner
Hal› Y›kama Makinesi
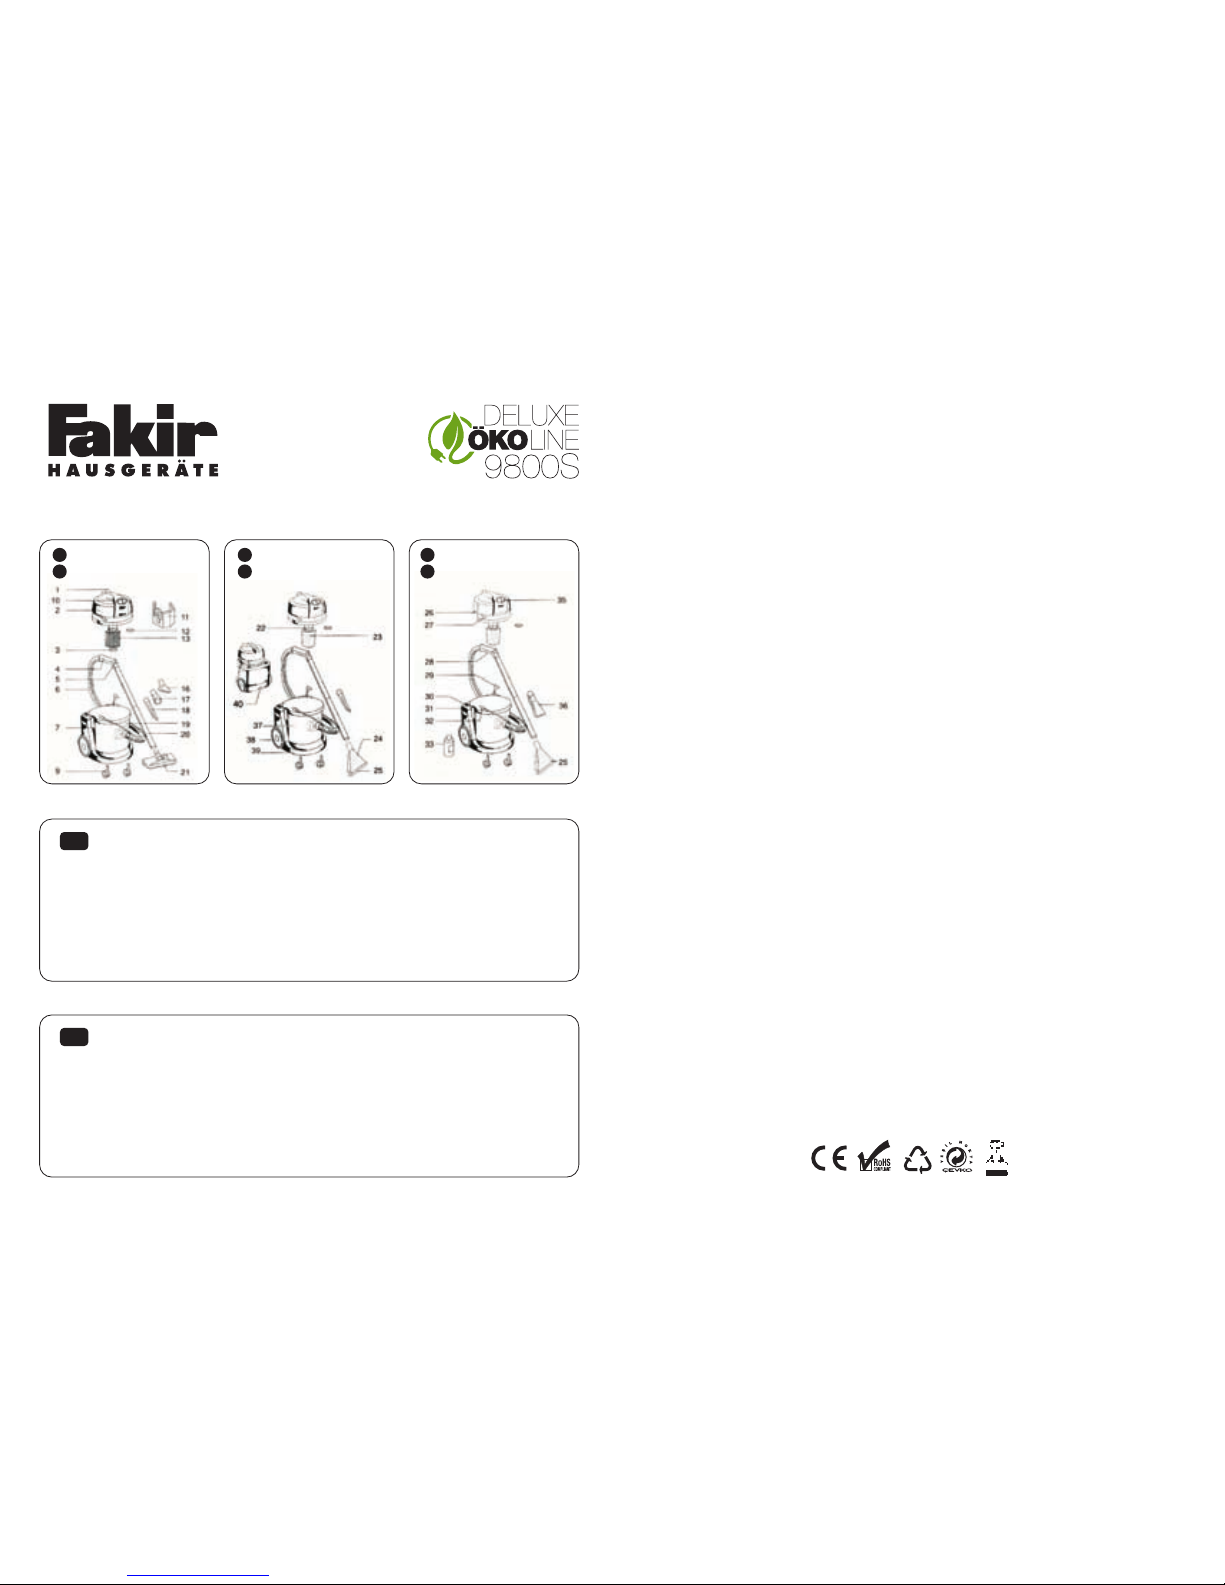
Introduction of Parts / Parçalar›n Tan›t›m›
GB Extraction Cleaning
TR Püskürtme Ekstraksiyonlu Temizlik
GB Wet Vacuum Cleaning
TR Islak Vakumlama
GB Dry Vacuum Cleaning
TR Kuru Vakumlama
1 Carrying Handle
2 Hood
3 Filter Retaining Clip
4 Handle
5 Suction Power Control
6 Integrated Suction Hose
7 Canister Clamps
9 Castors
10 ON/OFF Switch (Motor)
11 Paper Filter
12 Motor Protection Filter
13 Cartridge Filter
16 Upholstery Nozzle
17 Brush for Sensitive
Surfaces
18 Crevice Nozzle
19 Intake Socket with Hose
Release Button
20 Integrated Suction Tube
21 Swiveling Floor Nozzle
22 Float Switch
23 Foam Plastic Filter
24 Carpet Spray Exctraction
Nozzle
25 Carpet Spray Exctraction
Nozzle for tiled floor
26 Hose Connection Socket
27 Pressure Hose
28 Metering Button
29 Connection Hose
30 Cleaning Liquid Tank Cap
31 Cleaning Liquid Tank
32 Pressure Hose
33 Concentrated Cleaning
Agent
35 ON/OFF Switch (Pump)
36 Upholstery Spray
Cleaning Nozzle
37 Inox Canister
38 Rear Big Wheel
39 Plastic Under-Inkstand
40 Water Discharge
GB
1 Tafl›ma Kolu
2 Motor Kafas›
3 Y›ld›z Filitre Kilidi
4 Vakum Dirse¤i
5 Vakum Ayar Sürgüsü
6 Vakum Hortumu
7 Kazan Mandallar›
9 Tekerlekler
10 ON/OFF fialteri (Motor)
11 Ka¤›t Toz Torbas›
12 Motor Koruma Filitresi
13 Y›ld›z Filitre
16 Döfleme Aparat›
17 Mobilya ve Hassas Yüzey
Aparat›
18 Kenar-Köfle Aparat›
19 Hortum Soketi ve
Hortum Ǜkarma Pimi
20 Vakum Borusu
21 Hal› / Sert Zemin Aparat›
22 fiamand›ra
23 Köpük Filitre
24 Üçgen Hal› Y›kama
Aparat›
25 Sert Zemin Y›kama K›za¤›
26 Temiz Su Tank› Pompa
Ba¤lama Soketi
27 Temiz Su Hortumu
28 Tetik Mandal›
29 Ba¤lant› Hortumu
30 Temiz Su Tank› Kilidi
31 Temiz Su Tank›
32 Temiz Su Ba¤lant› Yeri
33 Konsantre Temizlik
Deterjan›
35 ON/OFF fialteri (Pompa)
36 Koltuk Y›kama Aparat›
37 Paslanmaz Çelik Gövde
38 Büyük Tekerlekler
39 Plastik Alt Çember
40 Kirli Su Tahliye T›pas›
TR
Life time: 10 years
Kullan›m ömrü: 10 y›l

Important Safety Instructions
Dear Customers!
GB
Please read this instruction manual carefully. Pay special
attention to important safety instructions. Keep this instruction
manual for future reference.
Please read through the information given below with
care. This provides important guidance on the use, safety
and maintenance/care of the appliance. Keep these
instructions for use carefully and pass them on to any
subsequent owners.
• FAKIR appliance comply with recognized technology
standards and current official safety regulations for
domestic appliances.
• FAKIR appliances are provided with radio interference
suppression in accordance with EC guideline 89/336.
GENERAL INSTRUCTIONS
• Before plugging in the appliance, check to ensure that
the voltage shown on the rating plate is the same as the
mains electricity supply voltage.
• The power point must be provided with a 16A automatic
circuit breaker fuse.
• Do not switch on the appliance if:
The housing exhibits any evidence of damage
(cracks/fractures)
The connection lead is defective
It is suspected that an internal defect is present (after
being dropped)
• Before use check to ensure that all the filters are correctly
installed. The appliance must not be used without a filter
under any circumstances.
• Use only genuine FAKIR filters and accessories.
• Use only non-polluting, environment-friendly cleaning
agents.
• Repairs must only be carried out by qualified technicians
(e.g. FAKIR after sales service engineers). Only genuine
FAKIR spare parts must be used. Inexpertly repaired
appliances could endanger the user.
• Do not allow children to use the appliance. Cleaning
agents should be kept out of the reach of children.
• This appliance is not intended for use by people (including
children) with reduced physical, sensor or mental
capabilities, or lack of experience and knowledge, unless
they have been given supervision or instruction concerning
use of the appliance by a person responsible for their
safety.
• This appliance is not suitable for use on substances
constituting a health hazard.
• If the appliance is misused, incorrectly operated of
inexpertly repaired no liability will be accepted for any
damage which may occur.
General Directions of Use
SAFETY PRECAUTIONS
• Never withdraw the plug from the socket by puling on
the connection lead.
• Do not pull the connection lead over sharp edges or
allow it to get jammed.
• Do not use damaged extension leads.
• Before carrying out any maintenance operations or
replacing a filter switch off the appliance and withdraw
the mains plug. This also applies after you have finished
using the appliance.
• Never place the nozzles or tube ands near the eyes or
ears.
• Do not use the the appliance to pick up:
Hot or glowing ashes etc.
Coarse fragments of glass
Solvents
Explosive gases or liquids
• Do not store the appliance in the open air.
• When cleaning the appliance use only a dry or slightly
moistened cloth. Take care to prevent any live components
(switch, plug, motor etc.) from coming in to contact with
water.
DISPOSAL INSTRUCTIONS
When disposing of the packaging materials and eventually
the appliance itself please observe any official regulations
applicable to the disposal of waste materials.
• The packaging materials should be disposed of in
accordance with recycling provisions.
• Before disposing of the appliance at the end of its life,
take appropriate steps to render it unusable.
• Please consult your local authority for information on
appliance waste disposal regulations.
ATTENTION!!! When the machine is not used for washing
surfaces check the red light of the pump is off.
If the machine pump's wanted to be long lasted and
healthy working please use it's own original detergent.
01
Cartridge Filter - As supplied the appliance is fitted with
a cartridge filter which cleaned when it becomes
contaminated. This cartridge filter can be used for all dry
vacuum cleaners tasks.
Paper Filter - This filter should be used to remove fine
dry dust (ashes, remnants of cement powder etc.) or in
case where special hygiene standards must be met. The
paper filter is used in addition to the filter cartridge.
is provided for the cleaning of furniture,
pictures etc.
Textile Filter - The textile filter is a long-life filter which
like the paper filter serves as an additional filter for the
removal of fine dry dust or similar.
Foam Plastic Filter - The foam plastic filter should be
installed when the appliance is used for extraction cleaning
or a mixture of liquid and dirt or waste matter is to be
picked up.
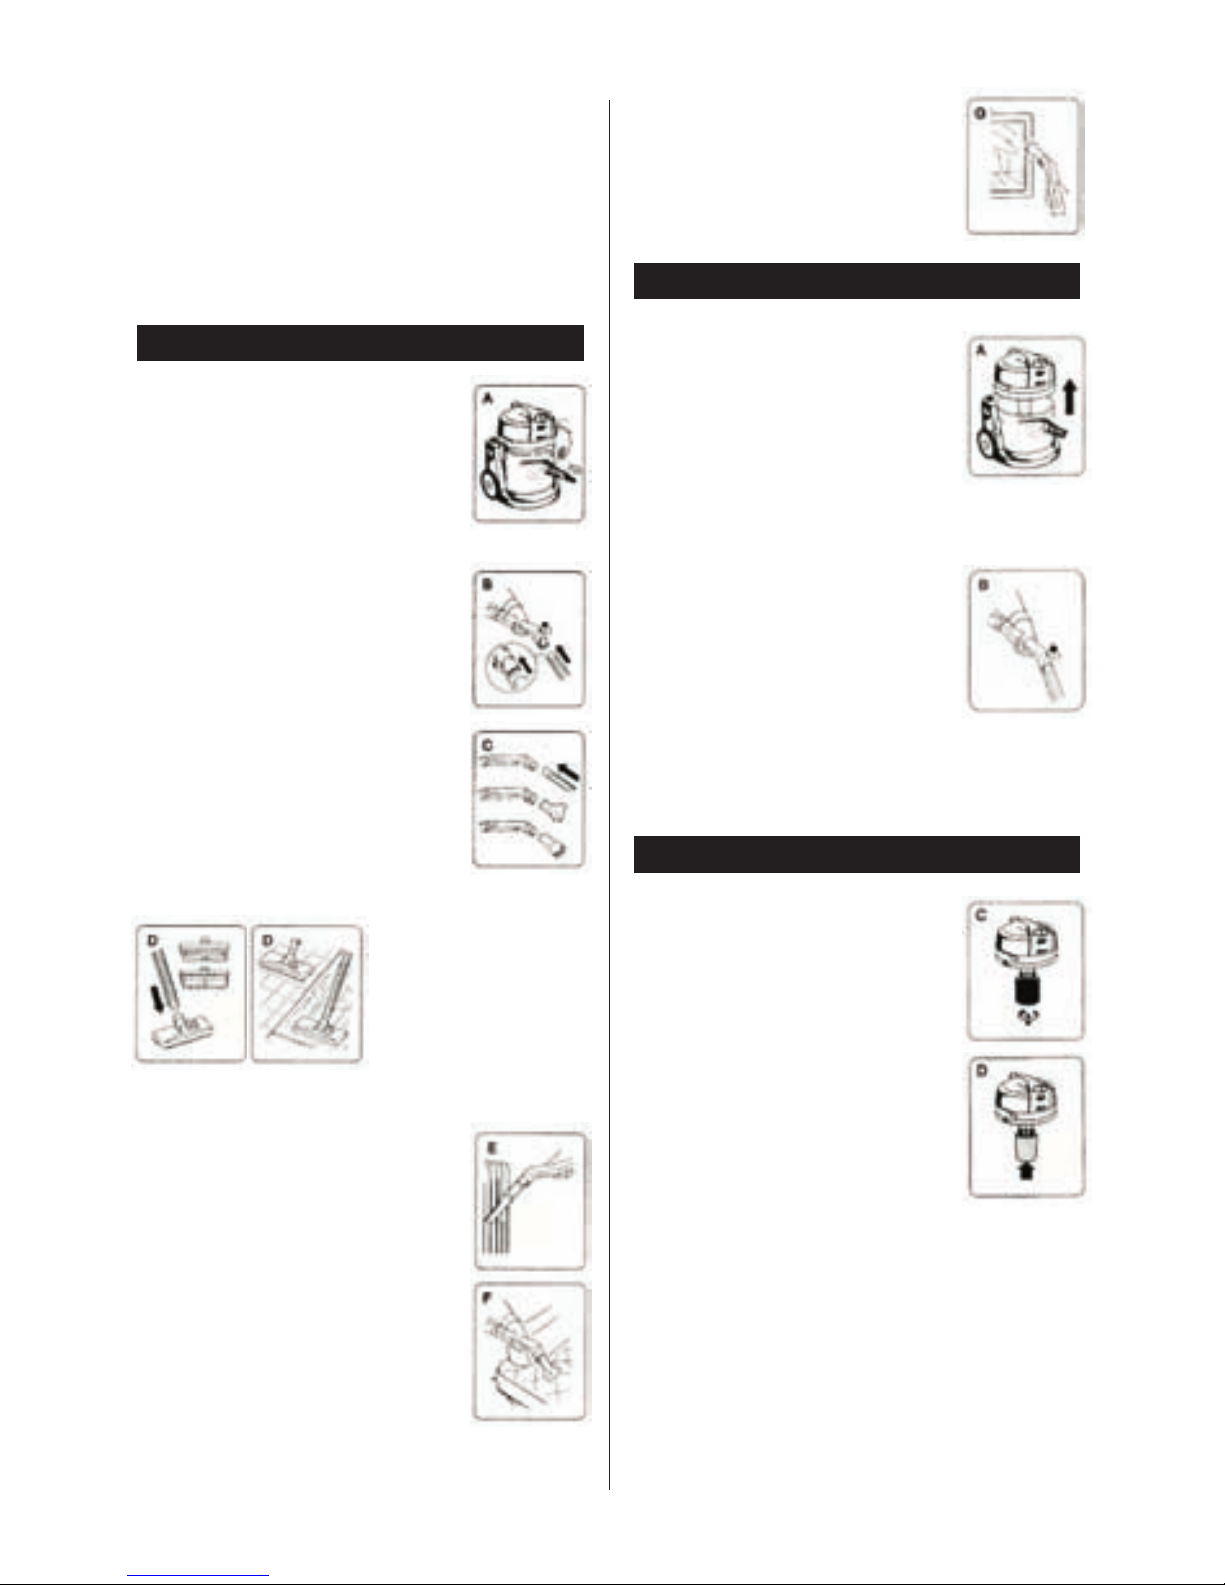
Assembling the Appliance
A- Suction Hose - Fuse the rotary sleeve
of the suction hose into the intake socket
in the canister until it locks home. Pull the
release button on the intake socket and
pull out the suction hose.
B- Suction Tubes - Insert the pin in the
housing of extension tubes to connect
them. After having connected the two
parts of the tubes turn the lever of the
pin on the position "closed". Carry out the
same operation to connect the extension
tubes to the handle and to the integrated
connection piece.
C- Nozzles - All the accessories can be
connected to the handle and to the
extension tubes.
D- Swiveling Floor Nozzle - The swiveling floor nozzle
provides for the vacuum
cleaning of carpeted floors
of all kinds also smooth
floors with no change of
nozzle. Adjustment to the
respective type of floor is
effected by operating the
foot switch on the nozzle: Carpeted floors bristles retracted.
Smooth floor bristles extended.
E- Crevice Nozzle - The crevice nozzle
permits the efficient cleaning of cracks
folds, recesses and other awkward places.
F- Upholstery Nozzle - The use of the
upholstery nozzle is recommended for the
cleaning of upholstery, mattresses, car
seats etc. It is also suitable for the removal
of small spills of water.
Dry Vacuum Cleaning
Having selected and installed the desired
accessory, check to ensure that the interior
of the appliance (A) and all the accessory
compenents are dry.
• Unwind the mains lead and install the
plug into the power socket.
• Switch on the appliance by lightly pressing the ON/OFF
switch.
B- Suction Power Control - An air intake
control is located in the handle of the
suction hose with which you can reduce
the suction power if e.g. the carpet or
mat lifts from the floor under excessive
suction power. For Max. Suction Power
- Push control slide forward (aperture in handle closed).
For Min. Suction Power - Push the control slide to the rear
(aperture in handle open).
Wet Vacuum Cleaning
C- Release the canister clamps, remove
hood, filter cartridge and paper filter if
fitted. To remove the filter, turn the filter
retaining clip anticlockwise and pull off
the filter cartridge togeher with the base
plate.
D- Foam Plastic Filter - Install the foam
plastic filter if it is intended to remove a
mixture of liquid and dirt or waste matter.
To do this, push the filter on to the float
valve retainer as far as it will go. Slightly
contaminated water can be removed without installing
the foam plastic filter. Place the hood an the canister,
fasten the canister clamp and install the desired cleaning
accessory.
• Unwind the mains lead and install the plug into the
power socket.
• Switch on the appliance by light pressure on the On/OFF
switch.
02
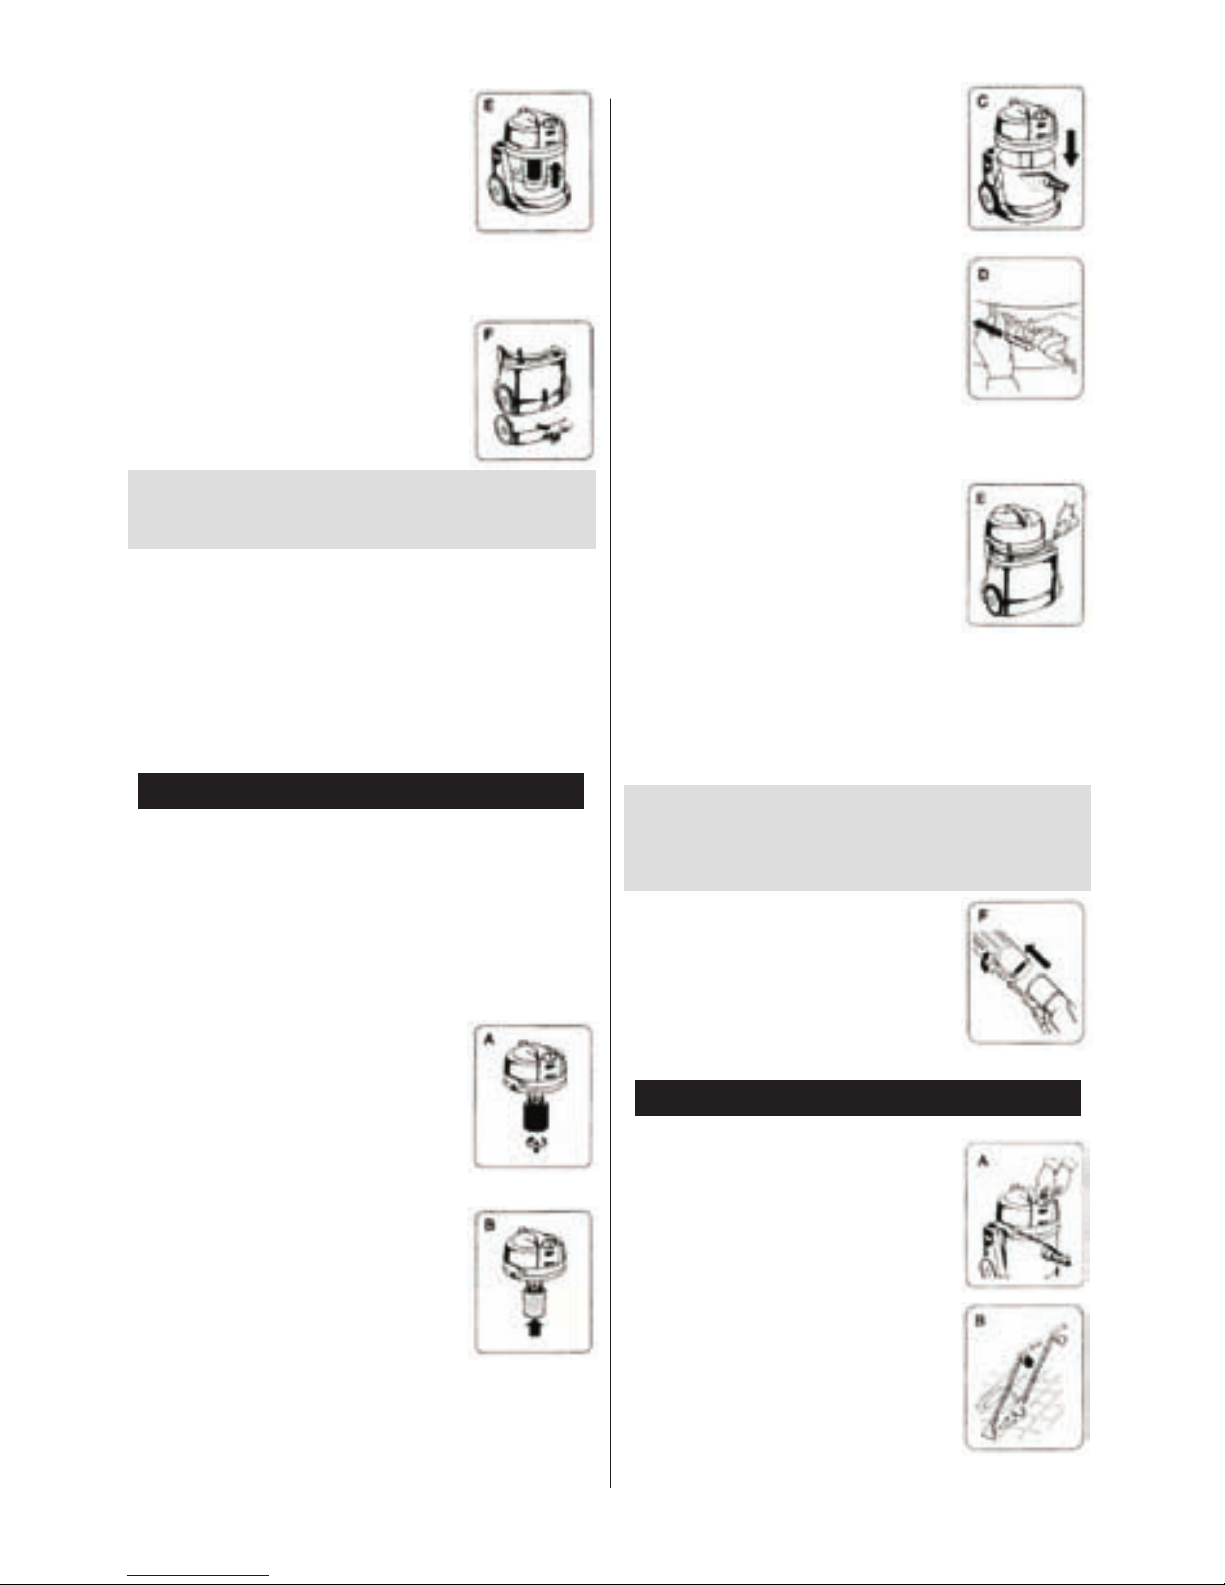
C- Pressure Hose
D- Insert the pressure hose in to the
corresponding aperture of the adapter
supplied and secure to the suction hose
or suction tube at regular intervals. Insert
the quick release coupling at the end of
the hose into the mating socket in to the
hood and push it home so that it locks.
The pressure hose connection can be
straightforwardly released. To do this
push the corrugated sleeve of the quick
release coupling back so that the coupling
is automatically forced out under spring pressure.
E- Spray Extraction Liquid Tank
Connection Hose - Push the plug
connector on the connection hose in to
the corresponding aperture in the hood
as far as it will go. Take care to ensure
that the hose is not kinked and that the
end of the hose with the strainer is positioned at the
bottom of the tank. Spray extraction liquid.
Remove the screw plug from the tank and pour in the
mixture of water and concentrated cleaning agent with
the aid of the funnel. The capacity of the tank is 4.5 liters.
CAUTION!!! Use only non-polluting, environmentfriendly cleaning agents. Please observe the mixture
ratio specified by the manufacturer.
F- Accessories - Insert the floor nozzle
(or the sofa nozzle) on the extension
tubes. Connect the sprayer tube to the
pin of the extension tubes (push and turn
anti-clockwise).
E- Float Valve - When the maximum liquid
level in the canister is reached, the float
valve will automatically close the intake
aperture in the hood, interrupting the
intake process. Switch off the appliance
immediately and withdraw the mains plug.
Carry or pull the complete appliance to the disposal point
and empty the canister.
F- Water Discharge - To empty the liquid
from the tank, turn off the motor switch
and open the water discharge. Before
switching it on again verify the water
discharge is closed.
ATTENTION!!! When the machine is working never
open the water discharge (F).
Note: If foam or liquid escapes from the ventilation
apertures during cleaning operations, switch the
appliance off immediately and withdraw the mains
plug. Empty the canister and if necessary add some
anti-foaming agent. Carry out a function check on
the float valve before switching on the appliance
again.
Preparation for Spray Extraction
Before extraction cleaning of carpeted floors or upholstery
check the color-fastness of the material. To do this apply
some of the concentrated cleaning agent to an in
conspicuous area with a cloth allow it to dry, then carry
out a color comparison. The floor covering or upholstery
should only be cleaned if no change of color is evident.
A- Tank - Release the canister clamps,
remove the hood, cartridge filter and
paper filter if fitted. To remove the filter
turn the filter retaining clip anti-clockwise
and pull off the filter cartridge including
the base plate.
B- Foam Plastic Filter - Install the foam
plastic filter by pushing the filter completely
onto the float valve retainer as far as it
will go. Now reinstall the hood on the
canister, fasten the canister clamps and
install the extraction cleaning accessories.
Spray Extraction of Carpeted Floors
A- After desired accessory has been
selected and installed, proceed as follows:
• Unwind the mains lead and insert the
plug into the power point.
• Set the control switch to maximum
suction power.
• Switch on the appliance by lightly
pressing the ON/OFF switch.
• Start the pump by the applying light
pressure to the switch.
B- Method of Operation
03
 Loading...