

Page 1
5. After you have fi nished sharpening all of the
teeth on the chain, turn off the machine by
pushing the red button on the Switch Plate (5)
and unplug the unit.
NO VOLT RELEASE SWITCH For your safety
this machine is fi tted with a no volt release
switch and will not restart automatically if the
power supply is interrupted. After a power
failure the green button must be pressed to
resume operation of the motor.
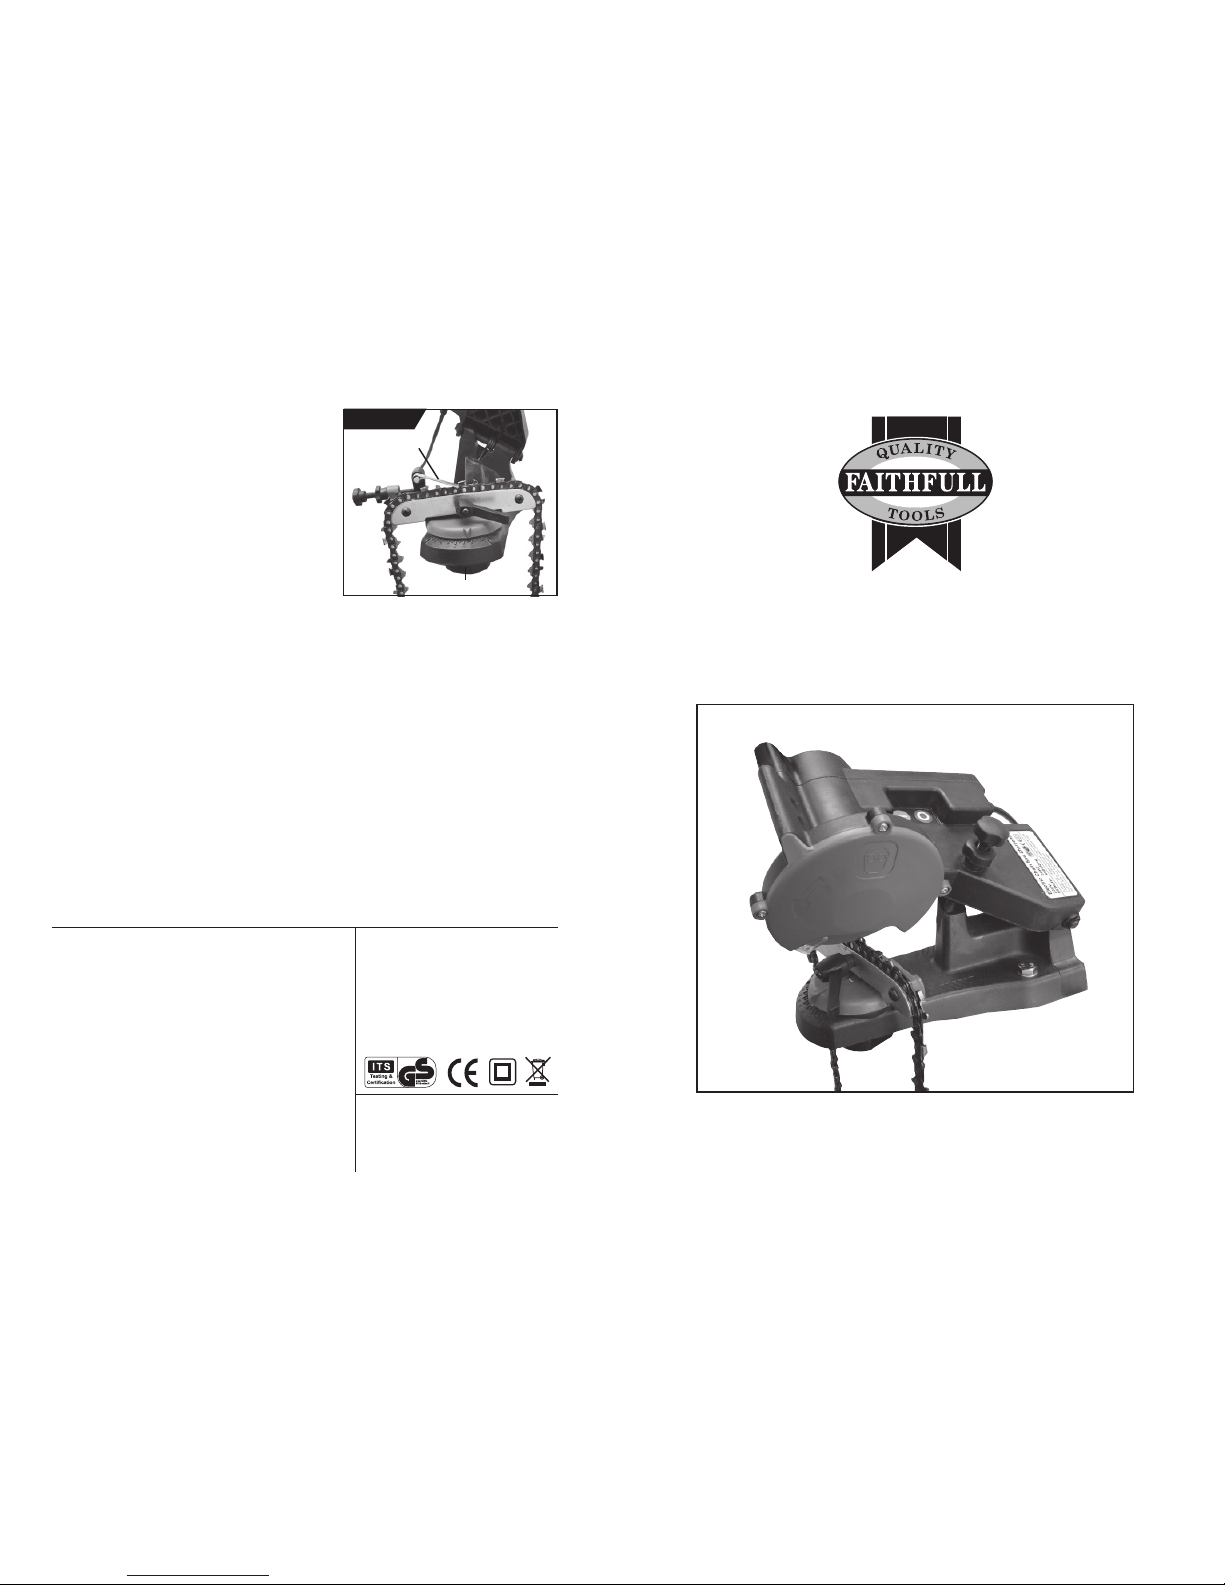
6. Loosen the Lock Wheel (18) and reset the
angle so that the fi rst tooth that hasn’t been sharpened is positioned against the
Chain Stop (23) and locked in as explained on page 6. See FIGURE 11.
7. As you did with the fi rst half of the chain, be sure to lower the Top Housing (4) so that
the Grinding Wheel (8) skims the chain tooth, and lock it in place. See page 5. Follow
all of the steps on page 5 double checking everything before you plug in the machine
and turn it on again.
Remember to turn the machine off and unplug it if you need to make any adjustments.
8. After you repeat all of the steps under sharpening on page 6, your chain is ready to be
mounted on your saw.
Maintenance
1. Keep the Sharpener clean and free of dust, metal debris and dirt.
2. Check the grinding wheel before each use to make sure it isn’t damaged. Do not use a
grinding wheel if it is chipped, cracked, or worn. You can check if the wheel has cracks
not visible to the human eye by hanging it up by the central hole and tapping it with a
non-metal object (ie: screwdriver handle). If it is in good condition it will produce a
metallic ringing sound. A dull sound indicates a crack or break.
3. Replace the grinding wheel when it grinds down to a diameter of 75mm (3 inches).
FIGURE 11
Lock Wheel (18)
Chain Stop (23)
FAITHFULL TOOLS
Long Reach, Galleon Boulevard,
Crossways Business Park, Dartford,
Kent, DA2 6QE, United Kingdom
E-mail: [email protected]
www.faithfulltools.com
Guarantee
The Faithfull electric chainsaw sharpener carries a full one year
warranty. If this product becomes defective due to faulty materials
or workmanship within 12 months from the date of purchase, we
shall at our discretion replace all defective parts without charge,
or replace the product free of charge provided that:
The product has not been used in a trade application or for hire purposes.
The product has not been subjected to misuse, neglect or used
for a purpose that it is not intended for.
The product has not sustained damage to any part, caused by
other objects, substances or by accident.
Repairs have not been carried out by unauthorised Faithfull repair
agents.
This guarantee is offered as an extra benefi t and is additional to
consumers statutory rights.
In all instances proof of purchase will be required before any repair
or replacement of this product can be provided.
EC Declaration of Conformity
This product is inconformity with the following
standards or standardised documents.
EN 55014-1: 2006
EN 55014-2: 1997/+A1: 2001
EN 61000-3-2: 2006
EN 61000-3-3: 1995/+A1: 2001/+A2: 2005
EMC directive (2004/108/EC)
Replacement Grinding Wheel: Product Code FPP CHAINSSW
ELECTRIC CHAINSAW
SHARPENER
Assembly and Operating Instructions
FPP CHAINSS
Page 2
Specifi cations
Motor 230V, 50Hz, 85 Watts
Rpm 4,800
Vice Capacity 0.80" to 0.50"
Table Vice Angles 35 Degrees Right to Left
Arbor Diameter 22mm (7/8")
Wheel Dimensions 115 Dia. x 3mm Thick (4
1
/4" x 1/8")
Overall Dimensions W 230 x L 250 x H 308mm ( 9" x 10" x 121/8")
Weight 2kg (4.85lbs)
Save this manual
You will need the manual for the safety warnings and precautions, assembly instructions,
operating and maintenance procedures, parts list and diagram. Keep the manual in a safe
and dry place for future reference.
Safety Warnings and Precautions
WARNING: When using tools, basic safety precautions should always be followed to
reduce the risk of personal injury and damage to equipment.
READ ALL THE INSTRUCTIONS BEFORE USING THIS TOOL
1. Keep the work area clean. Cluttered areas invite injuries.
2. Observe work area conditions. Do not use machines or power tools in damp or
wet locations. Don't expose to rain. Keep the work area well lit. Do not use electrically
powered tools in the presence of fl ammable gasses or liquids.
3. Keep children away. Children must never be allowed in the work area. Do not let them
handle machines, tools, or extension cords.
4. Store idle equipment. When not in use, tools must be stored in a dry location to inhibit
rust. Always lock up tools and keep out of reach of children.
5. Use the right tool for the job. Do not attempt to force a small tool or attachment to do
the work of a larger industrial tool. There are certain applications for which this tool was
designed. It will do the job better and more safely at the rate for which it was intended.
Do not modify this tool and do not use this tool for a purpose for which it was not intended.
6. Dress properly. Do not wear loose clothing or jewellery as they can be caught in
moving parts. Protective, electrically non-conductive clothes and non-slip footwear are
recommended when working. Wear restrictive hair covering to contain long hair
7. Use eye and ear protection. Always wear approved impact safety goggles. Wear a full
face shield if you are producing metal fi lings or wood chips. Always use a BS or EN
approved safety products, we recommend Scan Safety Products, information available
at www.scan-safety.com.
8. Do not overreach. Keep proper footing and balance at all times. Do not reach over or
across running machines.
Page 2
8. Lock the chain in the Sliding Guides(31)
by turning the Handle (34).
See FIGURE 8.The Handle (34) should
be situated so that you can easily release
and tighten it. You will need to release
it each time you move to the next link,
and tighten it to sharpen each link.
9. If the chain has been repeatedly
sharpened, the chain depth limiting
gauges may need to be taken down with
a fl at fi le (not included).
See FIGURES 8 & 9. File down each
gauge so that they are at a lower level
than cutting teeth.
Sharpening
1. Always wear appropriate clothing and suitable eye protection and make sure the
immediate area is clear of bystanders.
2. Plug in the Power Cord (3) and press the green button on the Switch Plate (5) to
turn on the machine.
3. Slowly lower the grinding wheel as shown in FIGURE 10. If you notice slight errors in
your settings, turn off the unit and unplug it before you make your adjustments.
Note: A good grind occurs when the
contact between the wheel and the teeth
are gradual and smooth. Do not stop too
long on each tooth.
4. After sharpening one tooth, turn off the
machine. Lift the Top Housing (4),
release the Handle (34), and move the
chain so that the next link is positioned in
the Chain Stop (23). Tighten the Handle
(34). Turn the machine back on and
continue sharpening the next tooth. Repeat
this process until you have sharpened all
of the links set up for this angle.
Page 7
FIGURE 8
FIGURE 9
FIGURE 10
Handle
(34)
Limiting
Gauge
Operation (continued)
Chain Stop (23)
Page 3
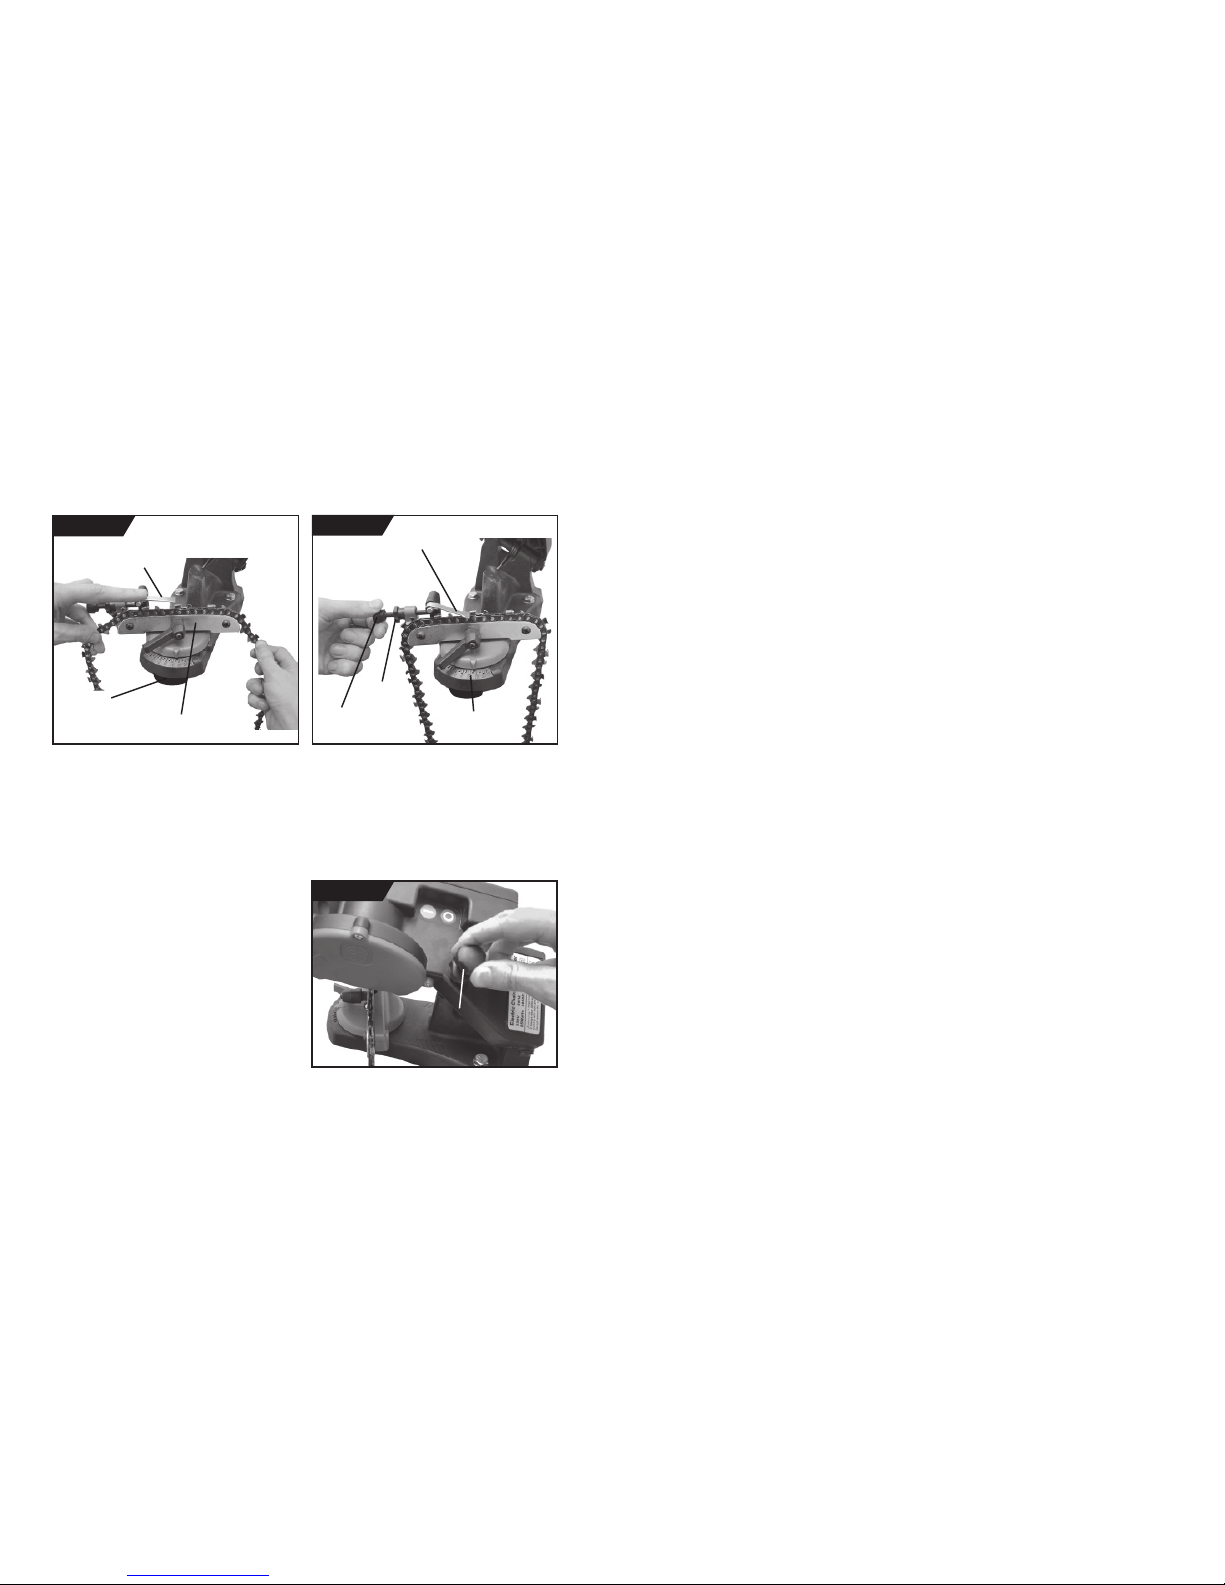
2. Lift up the Chain Stop (23) and secure the chain in the sliding Guides (31).
See FIGURE 5.
3. Lower the Chain Stop (23) so that it is positioned on the tooth (blade) you want to start
with. See FIGURE 6.
4. See FIGURES 5 & 6. Loosen the Lock Wheel (18) to allow entire housing to turn.
Rotate the housing to match the degree of angle you need on the Angle Gauge.
Chains come in various sizes with varying degrees of sharpening angles: Check with
your chain manufacturer’s manual to determine what degree you need to sharpen at.
Once the degree is set, tighten the Lock Wheel (18).
5. Lower the Top Housing (4) so that the Grinding Wheel (8) skims the chain tooth.
6. Hold it at that position while you tighten
the Lock Stop (6) so that the Wheel will
only go down to that point See FIGURE 7.
7. Depending on the amount of material
you wish to remove, tighten or loosen the
Lower Knob (26) and set the Lock Nut.
See FIGURE 6. The Lower Knob (26) has
a Lock Nut, which will determine how much
material is removed. Once you set the Lock
Nut, fully tighten the Lower Knob (26).
Operation (continued)
Page 6
FIGURE 5
FIGURE 7
Lock Stop
(6)
Chain Stop (23)
Angle Gauge
Lower Knob (26)
Lock Nut
Tip of Chain Stop
positioned against tooth
Chain Stop (23)
FIGURE 6
Lock Wheel (18)
Sliding Guides (31)
9. Maintain tools with care. Keep tools sharp and clean for better and safer performance.
Follow instructions for lubricating and changing accessories. Inspect tool cords
periodically and if damaged, have them repaired by an authorised technician.
The handles must be kept clean, dry and free from oil and grease at all times.
10. Avoid unintentional starting. Be sure the switch is in the Off position when not in use
and before plugging in. NO VOLT RELEASE SWITCH For your safety this machine is
fi tted with a no volt release switch and will not restart automatically if the power supply
is interrupted. After a power failure the green button must be pressed to resume
operation of the motor.
11. Stay alert. Watch what you are doing, use common sense. Do not operate any tool
when you are tired.
12. Check for damaged parts. Before using any tool it should be checked for damaged or
worn parts. Any part that is damaged should be properly repaired or replaced by a
qualifi ed technician. Do not use the tool if any switch does not turn On and Off properly.
13. Guard against electric shock. Prevent body contact with grounded surfaces such as
pipes, radiators, ranges, and refrigerator enclosures. We always recommend the use of
a RCD Residual-Current Device to provide full protection against electric shock when
using power tools.
14. Replacement parts and accessories. When servicing, use only genuine replacement
parts. Use of any other parts will void the product warranty. Only use accessories
intended for use with tool.
15. Do not operate tool if under the infl uence of alcohol or drugs. Read warning labels
on prescriptions to determine if your judgment or refl exes are impaired while taking
drugs. If there is any doubt, do not operate the tool.
16. Use proper size and type extension cord. If an extension cord is required, it must
be of the proper size and type to supply the correct current to the tool without over
heating. This tool requires use of an extension cord of 10 amps minimum capacity.
17. Maintenance. For your safety, maintenance should be performed regularly by a
qualifi ed technician.
18. Never use the Electric Chainsaw Sharpener around fl ammable materials.
Warning: The warnings, cautions and instructions in this manual cannot cover all
the possible conditions and situations that may occur. It must be understood by the
operator that common sense and caution are factors which cannot be built into this
product, but must be supplied by the operator of the tool.
Page 3
Page 4
Additional Safety Warnings
Grinding Wheel Warnings
1. Do not use a grinding wheel if it is chipped, cracked, or worn. Y ou can check if the wheel
has cracks not visible to the human eye by hanging it up by the central hole and tapping
it with a non-metal object (ie: screwdriver handle). If it is in good condition it will produce a
metallic ringing sound. A dull sound indicates a crack or break.
2. Only use grinding wheels that fi t the arbor 22mm (7/8”). Do not try to change or modify the
mounting hole on a grinding wheel to make it fi t.
3. Do not over-tighten the Grinder Lock Cap (9). Hand tighten it only. Over-tightening may
cause the wheel to break or disintegrate.
4. Never use the chain saw sharpener without the Grinding Wheel Cover (11) in place.
5. Always test the Grinding Wheel (8) by running it for a minute prior to contact with a chain.
6. Keep away from the wheel when it is turning, and make sure no one is standing close, in
the line of the wheel rotation trajectory.
7. If the grinding wheel vibrates, turn off the machine immediately and check that it is
mounted securely and that is not damaged.
8. Never try to stop the grinding wheel with your hands, even if you are wearing safety gloves.
The wheel will cut through gloves and your hand, causing serious injury.
9. Never operate tool without the Grinding Wheel Cover in place.
10. Replacement grinding wheel listed speed must meet or exceed RPM rating of the tool.
Warning! This machine is designed to sharpen chain saw chains. Do not attempt to sharpen
any other tools and do not attempt to grind any other objects.
Assembly
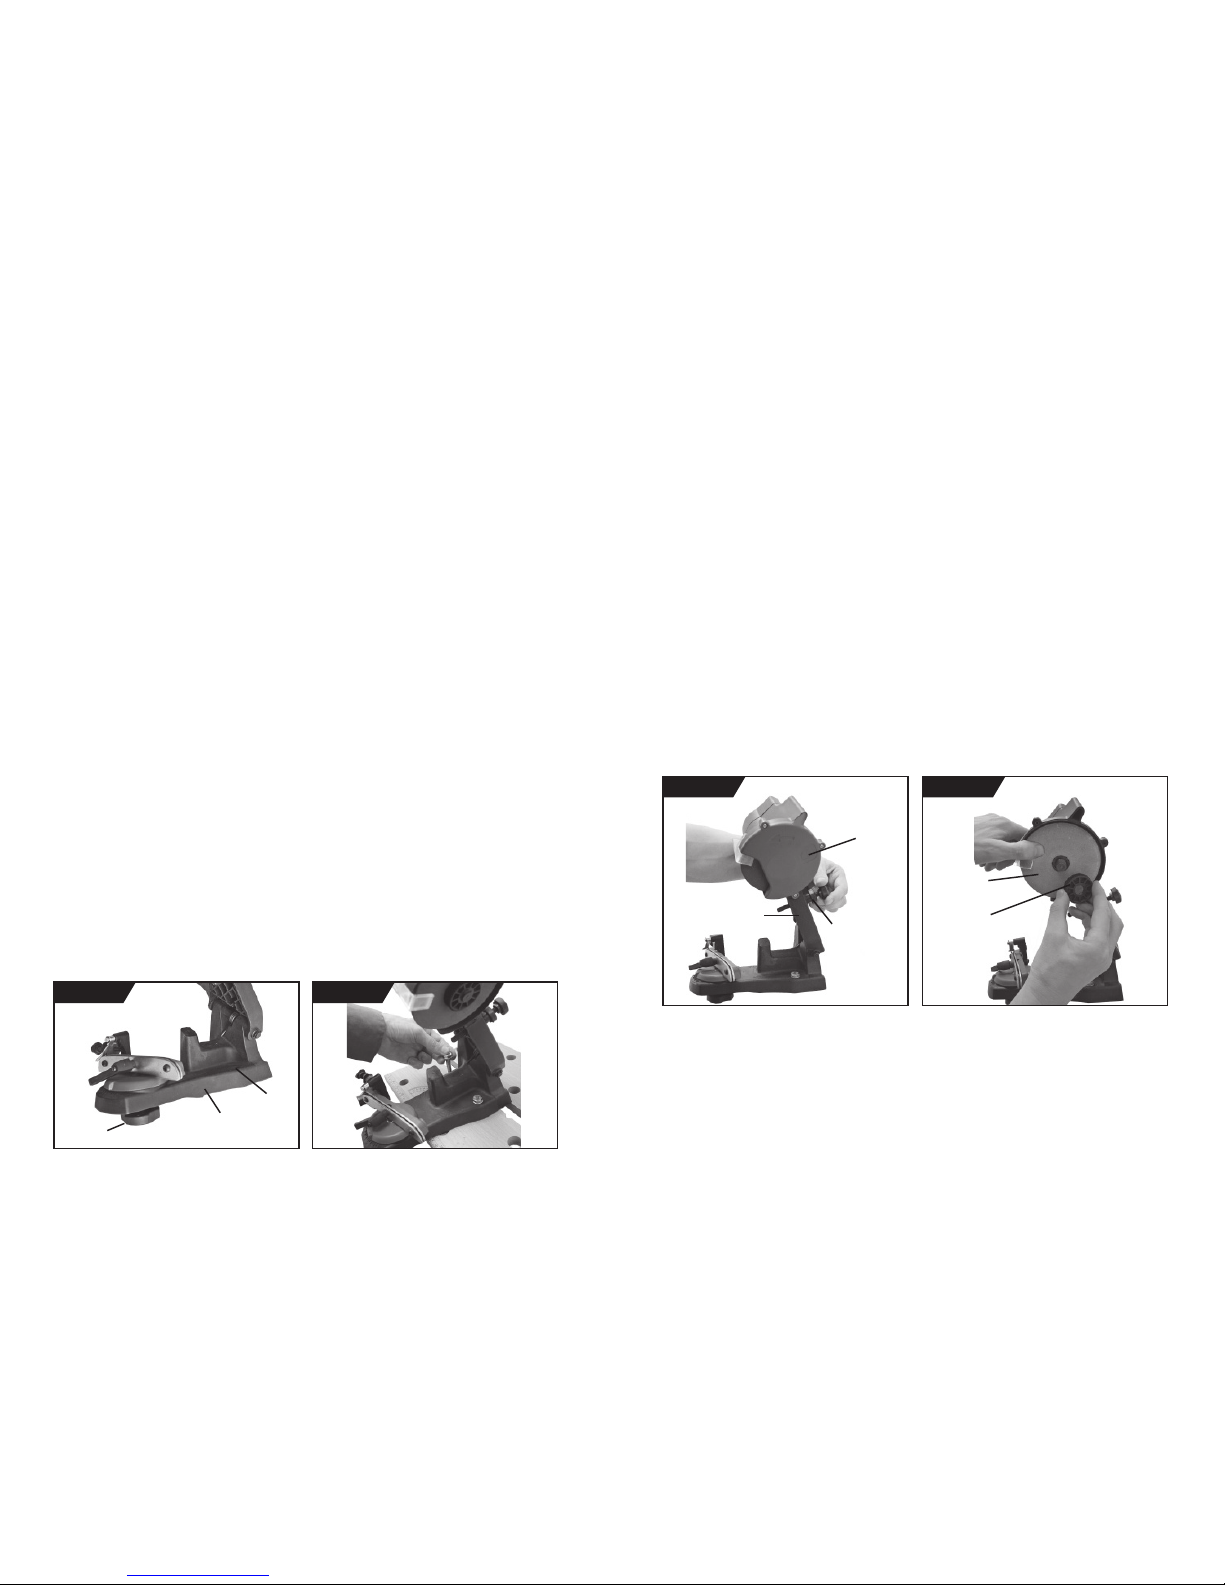
1. When installing the sharpener on a workbench, make sure that the Lock Wheel (18) is
accessible as shown in the mounting picture in FIGURE 1.
2. Bolt (bolts not included) the unit directly to the workbench through the two 10mm holes
on the Base (17). The workbench must have a solid surface capable of supporting the
weight of this sharpener, the work-piece and assorted tools. See FIGURE 2.
Page 4
FIGURE 1
FIGURE 2
Lock Wheel (18)
Base (17)
Bolt Hole
Warning! Always unplug the unit before changing grinding wheels, or when making any
adjustments to the Sharpener.
Mounting a Grinding Wheel
Refer to FIGURE 3 and FIGURE 4 below.
1. Raise the Top Housing (4) and lock it in the up position by tightening the Lock Stop (6)
2. Remove the three screws holding the Grinding Wheel Cover (11), Set the cover aside.
3. Unscrew the Grinder Lock Cap (9) that holds the Grinding Wheel (8) in place.
4. Install the new wheel on the Grinding Wheel Base (7), making sure it fi ts properly.
Note: Do not use a grinding wheel if it chipped, cracked, or worn. You can check if the
wheel has cracks not visible to the human eye by hanging it up by the central hole and
tapping it with a non-metal object (i.e. screwdriver handle). If it is in good condition it will
produce a metallic ringing sound. A dull sound indicates a crack or break.
5. Replace the Grinder Lock Cap (9).
6. Replace the Grinding Wheel Cover (11).
7. Release the Lock Stop (6) and lower the Top Housing (4).
8. Never operate tool without the Grinding Wheel Cover in place.
Operation
Warning! Always unplug the unit while adjusting the chain to be sharpened.
Note: Raise the Top Housing (4) while adjusting the chain.
1. Clean the chain with a NON-FLAMMABLE solvent before sharpening. Do not use petrol,
methylated sprits or similar products to clean the chain.
Page 5
FIGURE 3
Top Housing (4)
FIGURE 4
Grinding
Wheel
Cover (11)
Lock Stop
(6)
Grinding
Wheel (8)
Grinder Lock
Cap (9)
 Loading...