

Page 1
Professional
8 Litres
FAI SPRAY8HD
Fitted with Viton™ seals to allow the spraying of both
water based and most solvent based chemicals.
Please read these instructions carefully and retain for future reference.
Page 2
Introduction
The FAISPRAY8HD Professional Sprayer
is tted with VITON™ seals which are
resistant to most acids and solvents,
enabling this sprayer to be used with
more aggressive chemicals widely used in
automotive and professional cleaning and
some agricultural applications.
It is always advisable where possible to
use water-based product as these are less
damaging to the environment.
Use of aggressive chemicals will inevitably
shorten the working life of these seals.
General Safety Rules
■ When using garden pesticides, herbicides,
insecticides, fungicides or any other form
of garden chemical always obey the
manufacturer’s instructions fully.
■ Do not use petroleum based products in
this sprayer.
■ Do not spray toxic or harmful liquids on
persons, animals or foodstuffs.
■ For certain weed killers and pesticides,
trace elements may always remain.
Consult the product manufacturer’s
instructions, but in such cases, it is
recommended that once such products are
introduced, then the sprayer should only be
used for that specic application thereafter.
■ Consult the products manufacturer’s
instructions about safe and lawful disposal
of excess product when emptying unused
product from the tank and during the
cleaning process. (Many products cannot be
disposed of in drains and sewers).
■ Strain any mixtures that contain sediments
before introducing product to the tank. Strain
through a ne sieve or cloth.
Specications
Working capacity: 8 Litres
Working pressure: 2.5 bar
Net weight: 1.760kg
2
Area coverage: 40M
ALWAYS WEAR
SUITABLE PROTECTION
■ Wear the appropriate protective equipment
coverall, gloves, goggles and suitable
respiratory mask. For details of a complete
range of protective equipment, visit the
SCAN Safety Website at www.scan-safety.com
■ Avoid contact with the skin and eyes, do not
eat, drink or smoke when using the sprayer.
■ Wash hands and face after use.
■ Do not leave the sprayer within the reach of
children.
■ Keep bystanders away whilst using the sprayer.
■ Always direct the spray downwind as
spraying into the wind will result in operator
contamination.
■ Do not leave the sprayer exposed to heat
sources or intense cold.
■ Release pressure after each use, even if you
are going to recommence spraying in a few
minutes.
■ Ensure pressure is released before attempting
to remove the pump assembly mechanism.
■ Do not pressurize by any means other than
pumping.
- 100M
2
Page 3
Parts Identication
7
6
2
5
4
1
8
3
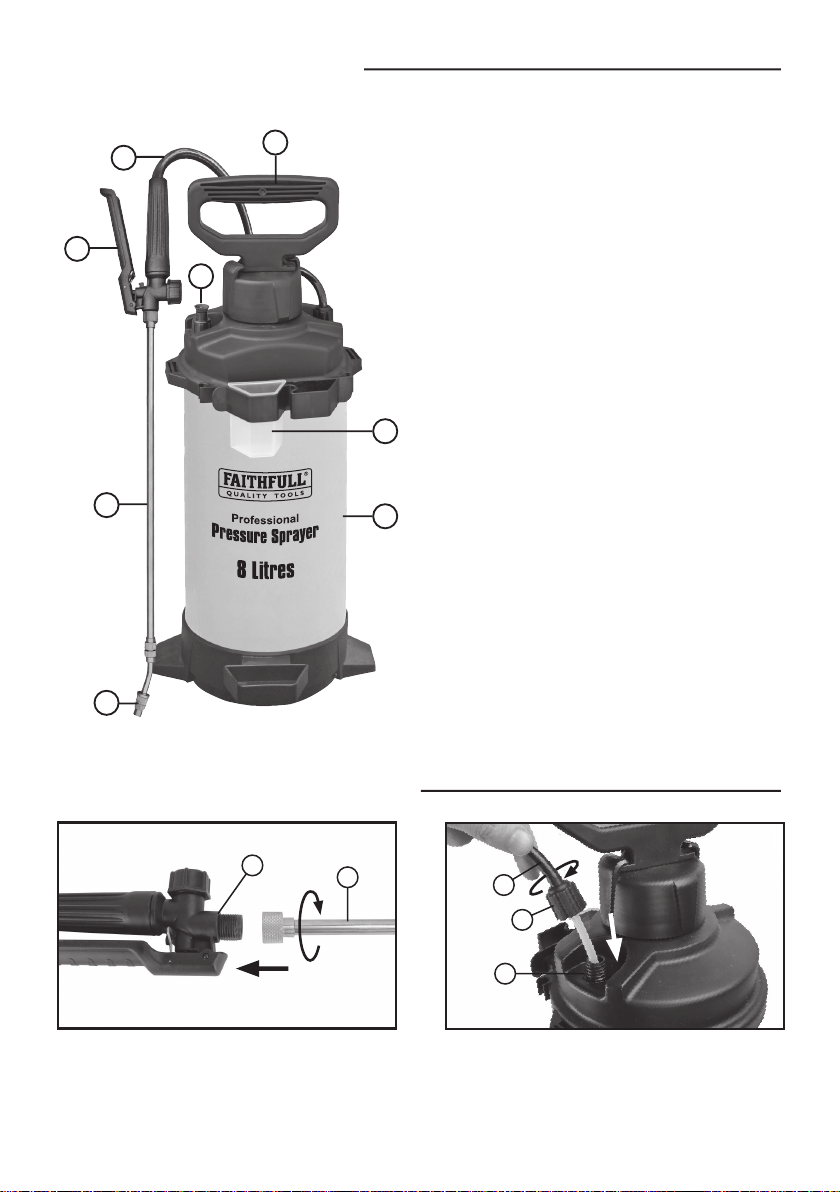
1. Pump handle
2. Safety pressure valve
3. Tank
4. Nozzle
5. Lance
6. Trigger assembly
7. Hose
8. Measuring cup
Assembly Instructions
6
Fig.1
Screw the lance (5) onto the trigger
assembly (6).
5
7
G
5.2
Fig.2
Insert the suction tubing of the hose (7) into
the tank through the hose inlet (5.2).
Screw the compression tting (G) to secure
the hose in place.
Page 4
Operating Instructions
Fig.3
Fig.4
Fig.5
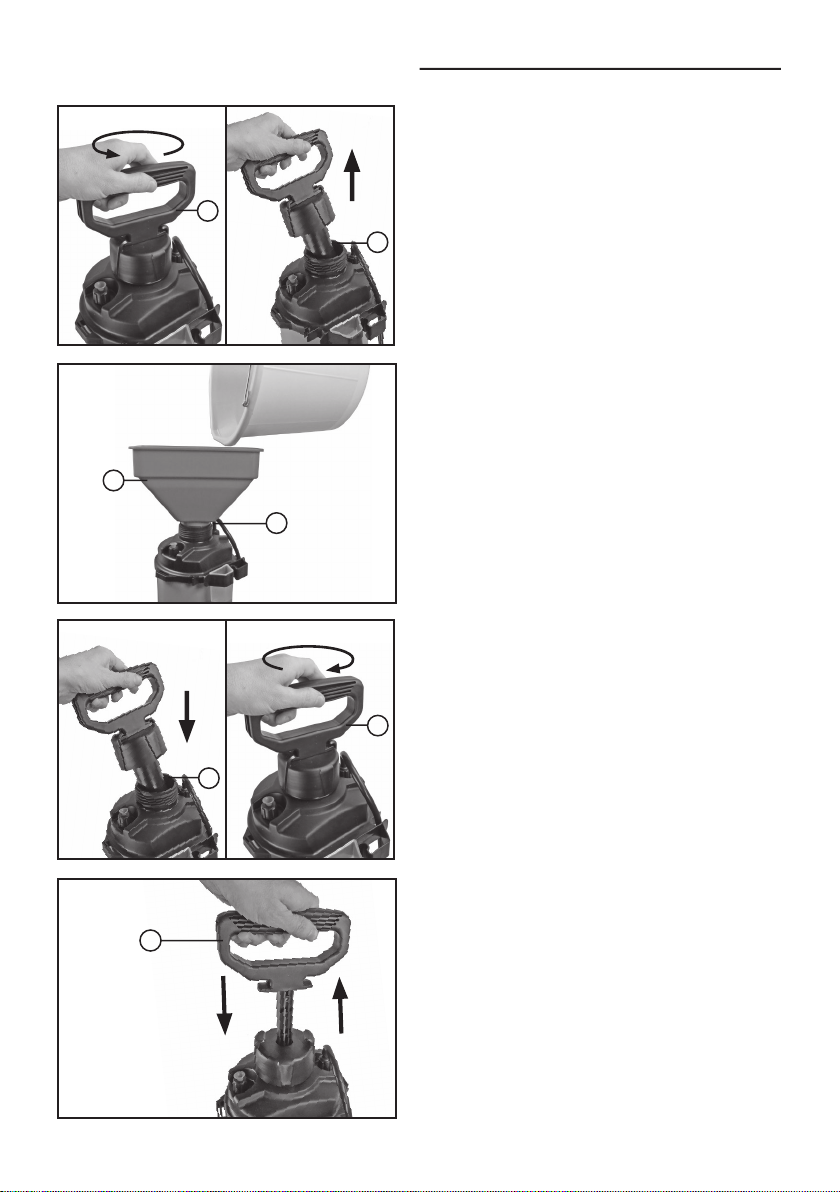
Filling the spray bottle (Fig.3)
Unscrew the pump handle (1) anti-clockwise
to loosen and remove the pump handle
1
H
8
assembly from the ll inlet (8).
8
Fill the spray bottle with your chosen liquid
to the desired level through the ll inlet (8).
(Fig.4)
Note: whilst the ll inlet incorporates a
anged rim to help avoid spillages, the
additional use of a large funnel (H) may be
advisable, especially when using potentially
hazardous liquids.
Replace the pump handle assembly and
screw clockwise to close.
(Fig.5)
Fig.6
x30
1
8
Pressurisation (Fig.6)
1
Working spraying pressure is acheived by
pumping the handle (1) approximately
30 times.
Note: Try to avoid overll with either air or
liquid. Air will bleed from the safety pressure
valve if the pressure exceeds 2.5bar. (see
the following section for more information).
Page 5
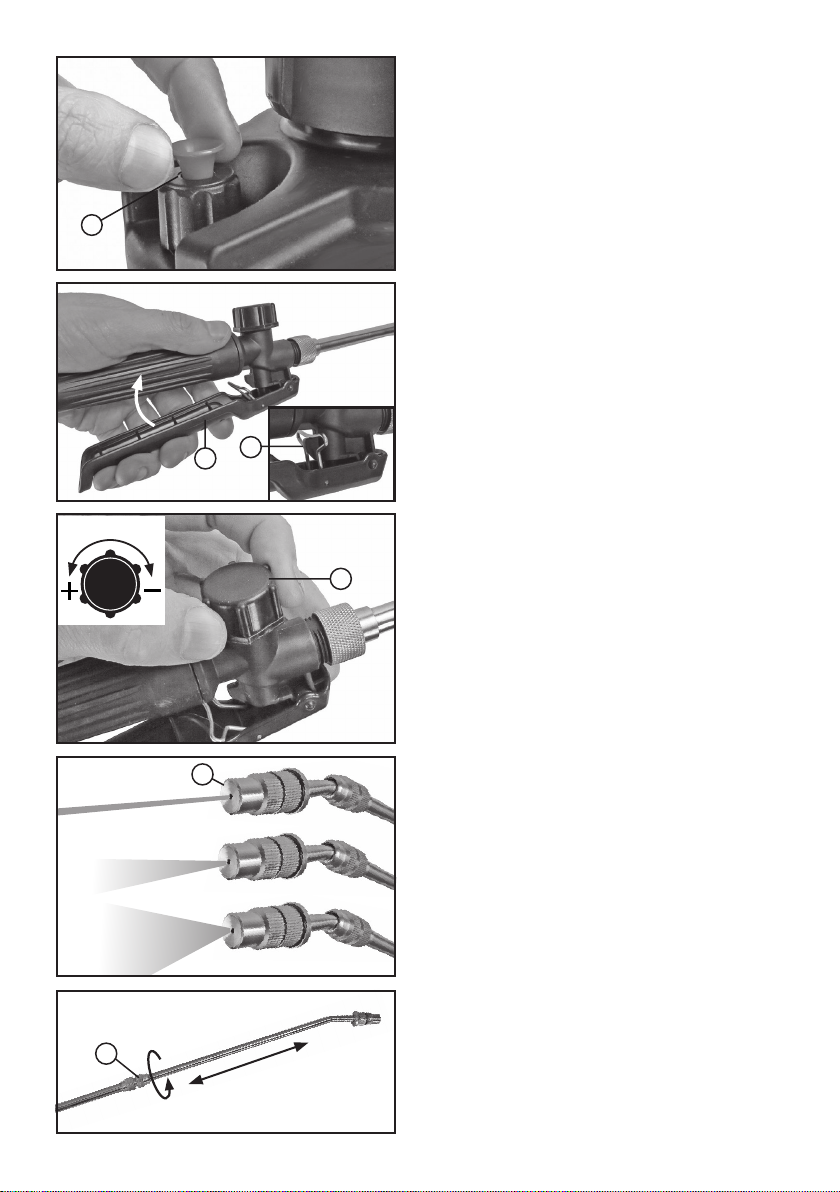
Fig.7
2
Fig.8
Fig.9
Safety pressure valve (Fig.7)
The safety pressure valve (2) will open when
the pressure exceeds 2.5bar. It can also be
opened manually to vent remaining pressure
prior to opening.
To open the valve manually, pull up on the
valve to release pressure.
Spray operation (Fig.8)
The sprayer is operated by depressing the
trigger (6).
For continuous spraying, pull the metal locking
catch (6.1) forward and locate onto the plastic
lug, locking the trigger in the open position.
6.1
6
Flow rate (Fig.9)
The force of the spray can be regulated using
the ow adjustment dial (6.2) located on the
trigger assembly.
6.2
Turn the dial anti-clockise for increased ow
rate and clockwise to decrease the ow rate.
Fig.10
Fig.11
5.1
Variable spray pattern (Fig.10)
The spray pattern can be varied from a ne jet
through to a wide fan by rotating the nozzle (4).
4
Note: Do not undo the nozzle too far as this
will cause liquid to leak from the rear.
Note: If the nozzle continues to drip after
the trigger handle has been shut off, there is
probably air in the discharge system (nozzle,
handle, tap and hose). Purge the system by
turning the nozzle to jet and operating the
trigger on and off in short bursts, until the
liquid shuts off cleanly. Collect any liquid in a
separate container to use later.
Telescopic lance (Fig.11)
Unscrew nut (5.1), pull lance out to desired
length from 520 to 1150mm and retighten nut.
Page 6

Looking After Your Sprayer
Blocked Nozzles
If a nozzle becomes blocked or fails to spray the correct pattern, unscrew the nozzle
tip and clean the components under running water or a water jet. Do not use a metallic
instrument to unblock a nozzle as this may alter the nozzle aperture making the nozzle
ineffective.
Cleaning
Add a little detergent and some warm water (not hot) to the sprayer and spray through the
system. Repeat the above operation with clean cold water. Finally check that the nozzle
is free from any residue. Your sprayer will now be perfectly clean and ready for its next
use. Always dispose of any unused garden chemicals safely and in accordance with the
manufactures instructions.
After Use
Always release the pressure from the tank before storage. Hold or lock the sprayers trigger
in the on position until the pressure in the tank has been released or pull up on the safety
valve to release the pressure.
Storage
Store the sprayer under cover and avoid freezing temperatures. For winter storage ensure
that all uid is removed from the tank, hose and lance before storing. Do not store in direct
sunlight, in a greenhouse or any areas where extremes of heat may occur.
Troubleshooting
Fault Problem Solution
Weak or no spray. Non-pressuration. Check and tighten
Loss of pressure Check gaskets are lubricated
Obstruction. Check for possible blockage in
Distorted spray. Obstruction. Check for possible debris
Leakage. Possible sediment
accumulation on sealing
surfaces.
connections, if necessary.
and show no signs of wear -
replace if necessary.
nozzle, trigger or outlet hose.
partially obstructing nozzle.
Check sealing rings are free
from debris and sedimant -
clean or replace if necessary.
Page 7

.
Page 8

FAITHFULL TOOLS
Phoenix House,
3 White Lodge Business Estate,
Hall Road, Norwich, Norfolk, NR4 6DG
E-mail: [email protected]
www.faithfulltools.com
 Loading...